

Page 1
BOOKLET MAKER BM 61
Operating Instruction
Booklet Maker Reference
Part no: 61229
Doc no: T10165
Rev. date: 28 September 2006
Page 2

Page 3

T10165 OPERATOR MANUAL BM 61
TABLE OF CONTENTS
1. Introduction
1.1 Safety notices ..................................................................................................................... 5
1.1.1 Notation conventions ..................................................................................................................5
1.1.2 General safety ............................................................................................................................ 6
1.1.3 Operational safety ......................................................................................................................7
1.1.4 Safety notes ...............................................................................................................................8
1.1.5 Safety measures when using the belt stacker ............................................................................9
2. Installation
2.1 Installation ......................................................................................................................... 10
3. Getting to know the Booklet Maker
3.1 Main components ..............................................................................................................11
3.2 Infeed section, upper ........................................................................................................
3.3 Infeed section, collator side .............................................................................................. 13
3.4 The control panel .............................................................................................................. 14
3.5 Accessories (optional) ....................................................................................................... 15
12
4. Operator instructions
4.1 Settings ............................................................................................................................. 16
4.1.1 Stapling and folding ..................................................................................................................16
4.1.2 Folding only .............................................................................................................................. 16
4.1.3 Stapling and folding - OFF-line.................................................................................................17
4.1.4 Folding - OFF-line ....................................................................................................................17
4.1.5 Block stapling - OFF-line option 1 ............................................................................................18
4.1.6 Block stapling - OFF-line option 2 ............................................................................................19
4.2 Operation .......................................................................................................................... 20
4.2.1 Operating the Booklet Maker ON-line ......................................................................................20
4.2.2 Operating the Booklet Maker OFF-line.....................................................................................20
4.3 Paper settings ................................................................................................................... 21
4.3.1 Set up for non-standard paper sizes ........................................................................................21
4.3.2 Reset to standard paper sizes..................................................................................................21
5. Maintenance
5.1 Cleaning of rollers ............................................................................................................. 22
6. Problem solving
6.1 Problem solving ................................................................................................................ 23
7. Specications
7.1 Specication table ............................................................................................................. 24
3
Page 4

OPERATOR MANUAL BM 61 T10165
4
Page 5

T10165 OPERATOR MANUAL BM 61
1. Introduction
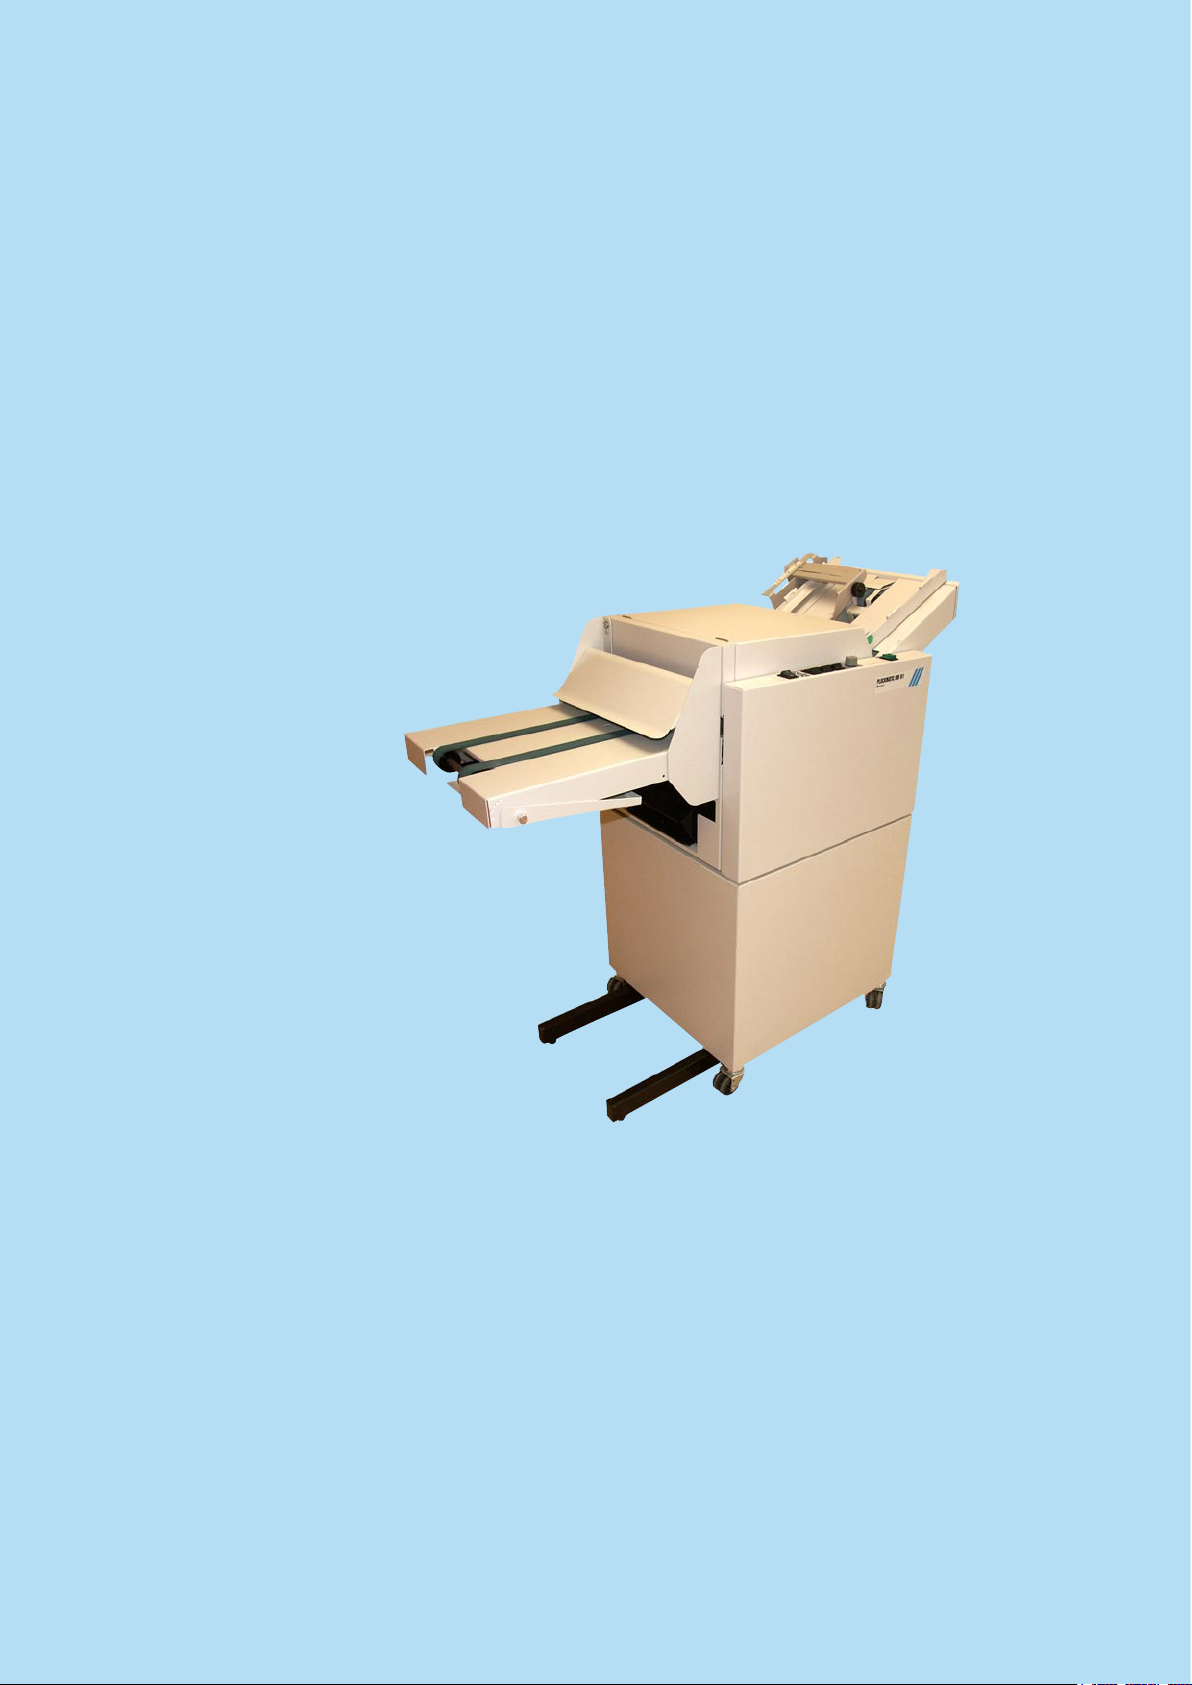
The Plockmatic BM 61 automatic Booklet Maker combines features from large and
advanced systems into one compact unit designed to meet the highest demands for
productivity, safety and ease of operation.
1.1 Safety notices
Prior to start up – read the Operator Manual and observe the safety notes!
Please forward all safety instructions to other users of this machine.
1.1.1 Notation conventions
Whenever necessary, the following points for attention are indicated in this manual.
WARNING:
This remark in the text means a potential danger of injuries to the operator.
CAUTION:
This remark in the text means a potential risk of machine damage.
NOTE:
This sign refers to remarks for making the operation much easier. You get practical hints to
assist you in the machine operation.
5
Page 6

OPERATOR MANUAL BM 61 T10165
1.1.2 General safety
The following points are brought to the attention of the user of this unit:
This machine was manufactured according to the latest technical development and
1.
the recognized safety regulations. Nevertheless, the usage of this system could pose
dangers to the operator‘s life and limb or impair the machine functions.
This machine is destined for specic purpose only. Any use going beyond this specic
2.
purpose is regarded as beyond the determination. The manufacturer will not be liable
for damages resulting from any use beyond the determination, unallowed operation,
respectively. The user alone bears the risk.
For your own safety please observe the information labels on your machine and the
3.
hints given in the text.
The manufacturer will not be liable for modications made at the machine on your own
4.
and damages resulting thereof.
EC declaration of conformity and the mark CE will be invalidated, if you make changes
at the machine or at the individual components.
For all questions concerning service and repair contact your sales representative in
5.
charge.
The machine is to be used only by authorized and instructed persons. The responsibili
6.
ties on operating the machine have to be strictly laid down and observed so that there
are no unclear competences regarding safety aspects.
The operator‘s manual always has to be available at the PLACE OF USE
7.
machine.
In the interest of technical development the company reserves the right to make altera
8.
tions to specications without prior notice!
WARNING: It is the duty of the service staff to correctly instruct the operator and to point
out specic dangers and possible operating errors.
NOTE: The indications like front and rear, left and right refer to the paper transport
direction.
of the
-
-
6
Page 7

T10165 OPERATOR MANUAL BM 61
1.1.3 Operational safety
Attention to the following notes ensures the continued safe operation of your equipment.
Always connect the equipment to a properly grounded power source receptacle. In doubt,
have the receptacle checked by a qualied electrician.
WARNING: Improper connection of the equipment grounding conductor can result in
electrical shock.
Always follow all warnings marked on, or supplied with, the equipment.
Always locate the equipment on a solid support surface with adequate strength for the
weight of the machine.
Always exercise care in moving or relocating the equipment.
Always keep magnets and all devices with strong magnetic eld away from the machine.
Never use a ground adapter plug to connect the equipment to a power source receptacle
that lacks a ground connection terminal.
Never attempt any maintenance function that is not specically described in this
documentation.
Never remove the covers or guards that are fastened with screws.
Never install the unit near a radiator or any other heat source.
Never override or “cheat” electrical or mechanical interlock devices.
Never operate the equipment if you notice unusual noises or odours. Disconnect the
power cord from the power source receptacle and call your customer service engineer to
correct the problem.
7
Page 8

OPERATOR MANUAL BM 61 T10165
1.1.4 Safety notes
Preserve this operator manual carefully for later use.
•
Lay the power cord in a way that nobody will stumble over it. Do not place things on the
•
cord.
The machine should be protected against humidity.
•
The vent holes serve for air circulation to protect the machine from overheating. Make
•
sure that the holes are not covered.
WARNING: Objects or liquids must never penetrate the machine Danger of life!
WARNING: Pull mains plug before cleaning and care!
WARNING: Observe the legal regulations of the local institutions concerning protective
clothing and preventive measures.
Keep your hands off moving, rotating or cutting assemblies.
Wear proper protection for the head (e.g. hairnet) to prevent dangers caused
by loosely hanging hair.
Pieces of jewellery, wristwatches or other comparable objects must not be
worn during operation due to possible dangers.
NOTE: If the machine is not used over an extended period it should be unplugged to
prevent damage in the case of overload.
Do not use any uid or aerosol purier.
•
The best suitable for cleaning is a slightly moistened cloth.
In the case of the following conditions the machine must be unplugged and checked by
•
a qualied service technician:
a) Power cord or plug damaged.
b
c) The machine has been exposed to moisture.
d) The machine is not working according to the operator’s manual and no
improvement has been brought about with the help of the manual.
e) The machine has been dropped and/or the housing damaged.
f) The machine is showing clear signs of defects.
For repair use only the original spare parts or those spare parts that correspond to the
•
original parts.
For all questions concerning service and repair contact your SALES representative in
•
charge. In this way the operating safety of the machine is ensured.
Liquid has penetrated the machine.
)
8
Page 9
T10165 OPERATOR MANUAL BM 61
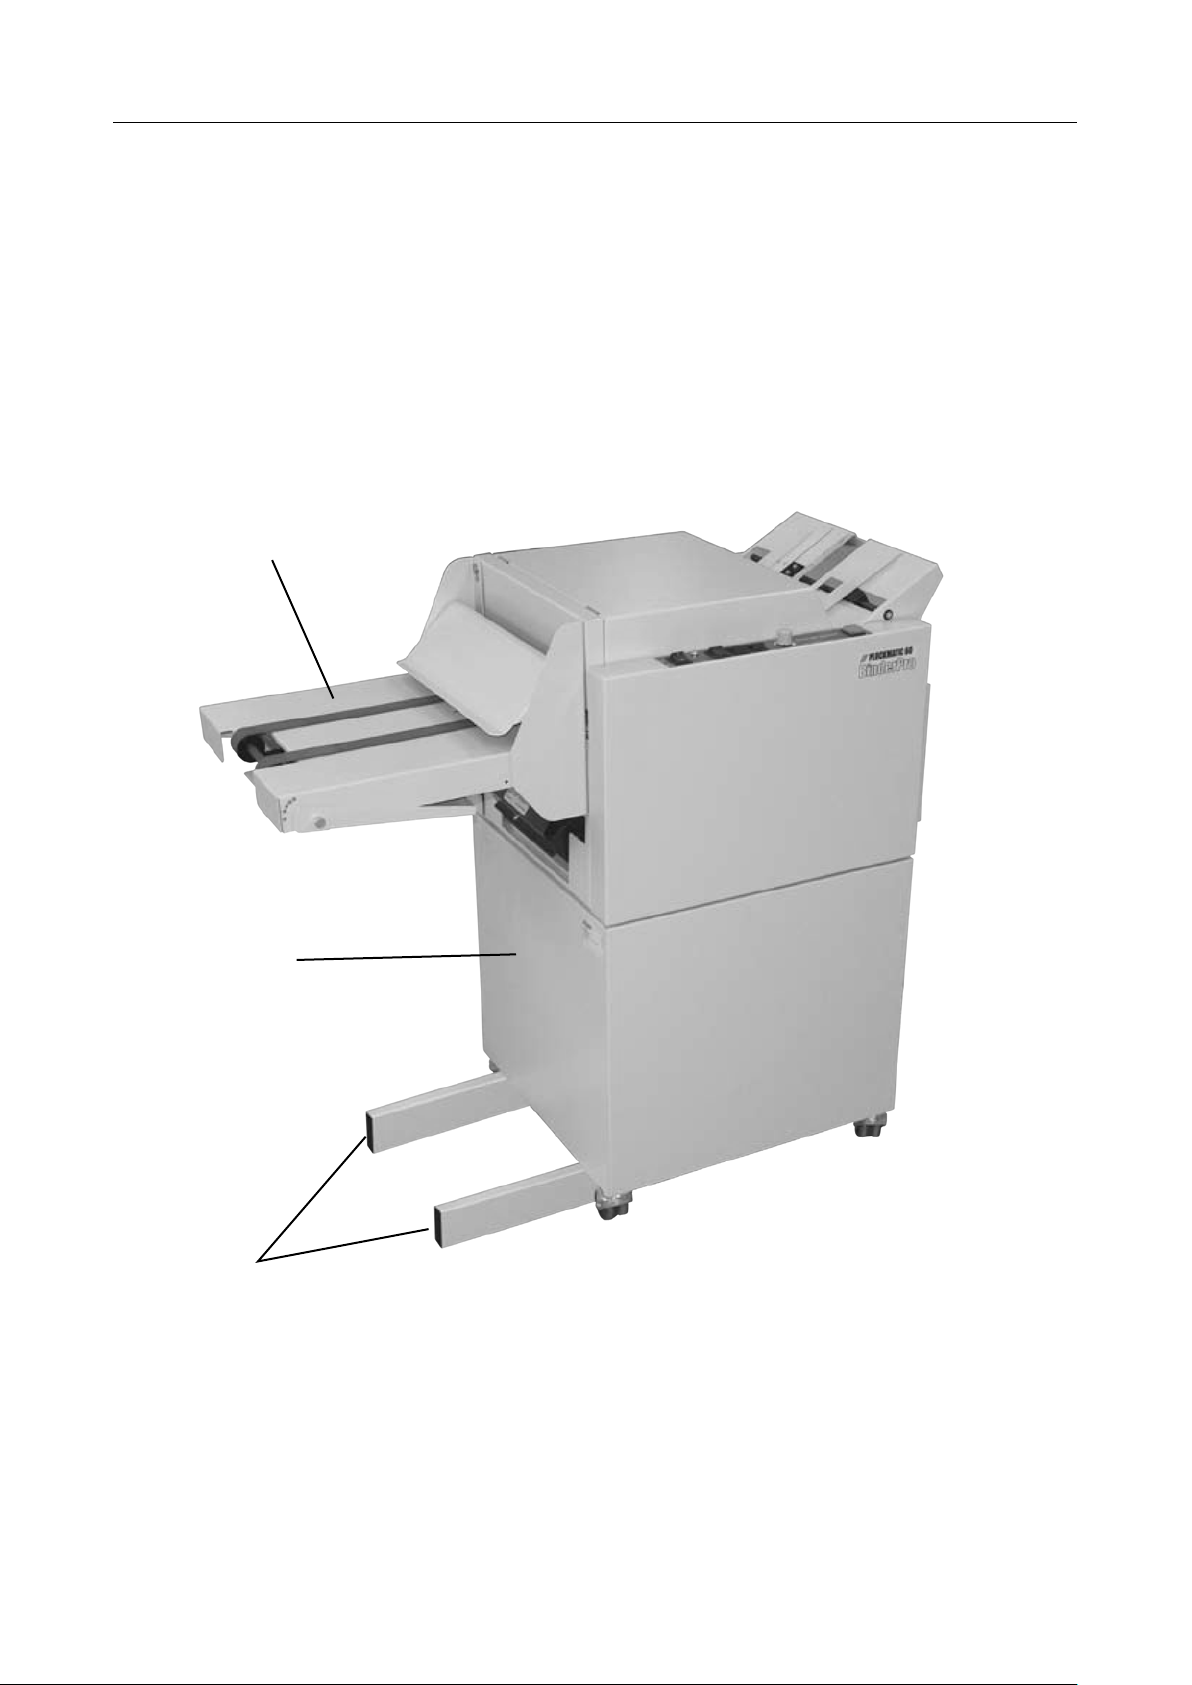
1.1.5 Safety measures when using the belt stacker
WARNING: If the Belt Stacker is used and the machine is placed on a Base, the Tip
Protection bars must be installed. They are indicated in the picture below.
Belt Stacker
Base
Tip Protection bars
9
Page 10

OPERATOR MANUAL BM 61 T10165
2. Installation
2.1 Installation
Attach the power cord to the Booklet Maker.
1.
Attach the connection cable between the Booklet Maker and the Collator.
2.
Roll the Booklet Maker up against the Collator make sure that the Collator studs enter
3.
the Docking Bracket on the Booklet Maker for the correct paper size.
10
Page 11

T10165 OPERATOR MANUAL BM 61
3. Getting to know the Booklet Maker
Take a few minutes to become familiar with the main components of the Booklet Maker.
3.1 Main components
1 2
3
4
5
6
Top cover
1.
Upper pressure roller assembly (Only used for ON-line operation to Collator)
2.
Press area, machine release (Press here and the Booklet Maker will be
3.
released from the Collator and can be rolled
away)
Control panel
4.
Fold stop assembly
5.
Belt Stacker (Optional accessory)
6.
11
Page 12
OPERATOR MANUAL BM 61 T10165
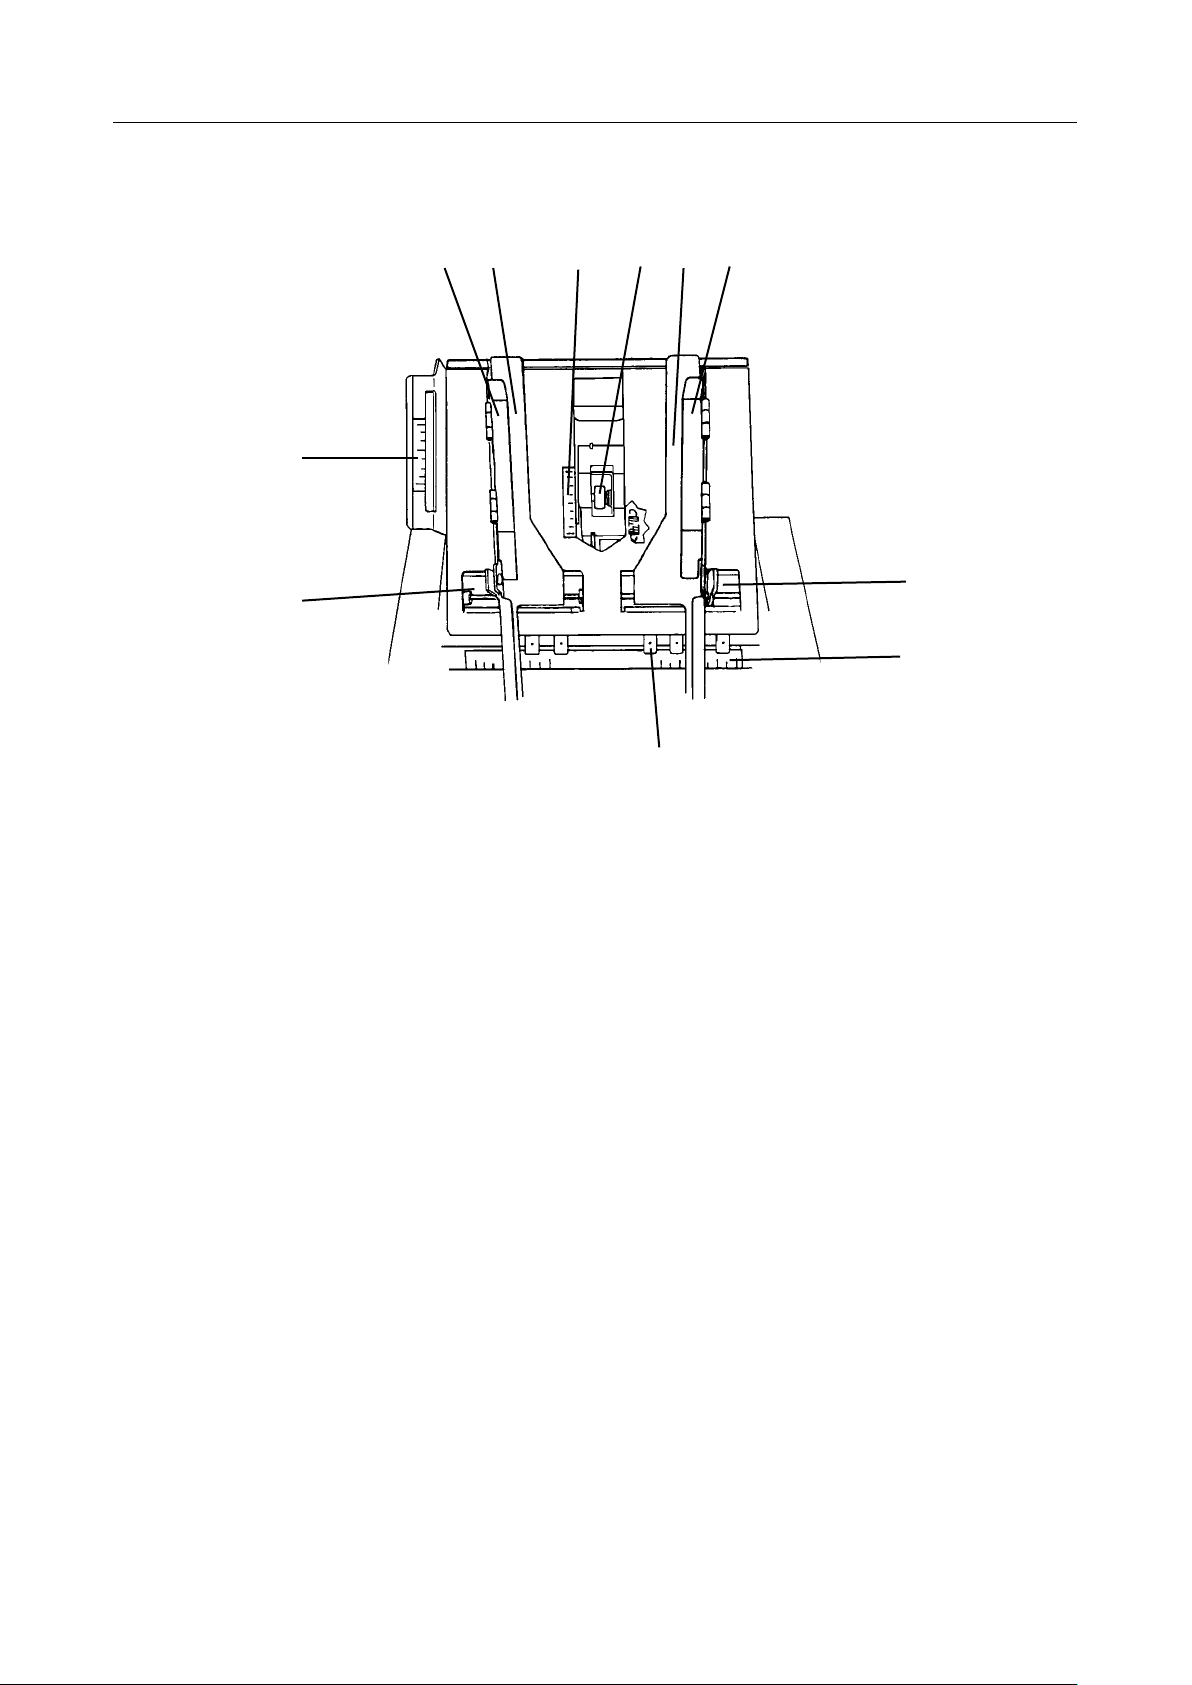
3.2 Infeed section, upper
1 42 3 5 6
11
7
10
8
Upper guide, side jogger
1.
Side jogger, rear
2.
Scale, paper length
3.
Rear jogger roller
4.
Side jogger, front
5.
Upper guide, side jogger
6.
Release handle, side jogger
7.
Scale, paper width
8.
Anvil
9.
Release handle, side jogger
10.
Scale upper pressure roller assembly
11.
9
12
Page 13

T10165 OPERATOR MANUAL BM 61
3.3 Infeed section, collator side
1 2 3
9
8
4567
Positioning holes, small paper width (Used for A4/8”1/2 paper widths or sizes
1.
nearby)
Positioning holes, large paper width (Used for A3/11” paper widths or sizes nearby)
2.
Positioning mark (green) (Shall correspond to the green mark on the
3.
Collator)
Paper stop crank (Used for adjustment to correct paper length)
4.
Rear jogger latch (Used to lower the rear jogger and enable
5.
OFF-line operation)
Rear jogger adjustment latch (Used to position the rear jogger to the paper
6.
length)
Receptacle, connection cable (The connection cable from the Collator
7.
connects here)
Knob, adjustment for odd paper size (By loosening the knob the Docking Bracket
8.
can be individually positioned for odd paper
sizes)
Docking Bracket
9.
13
Page 14
OPERATOR MANUAL BM 61 T10165
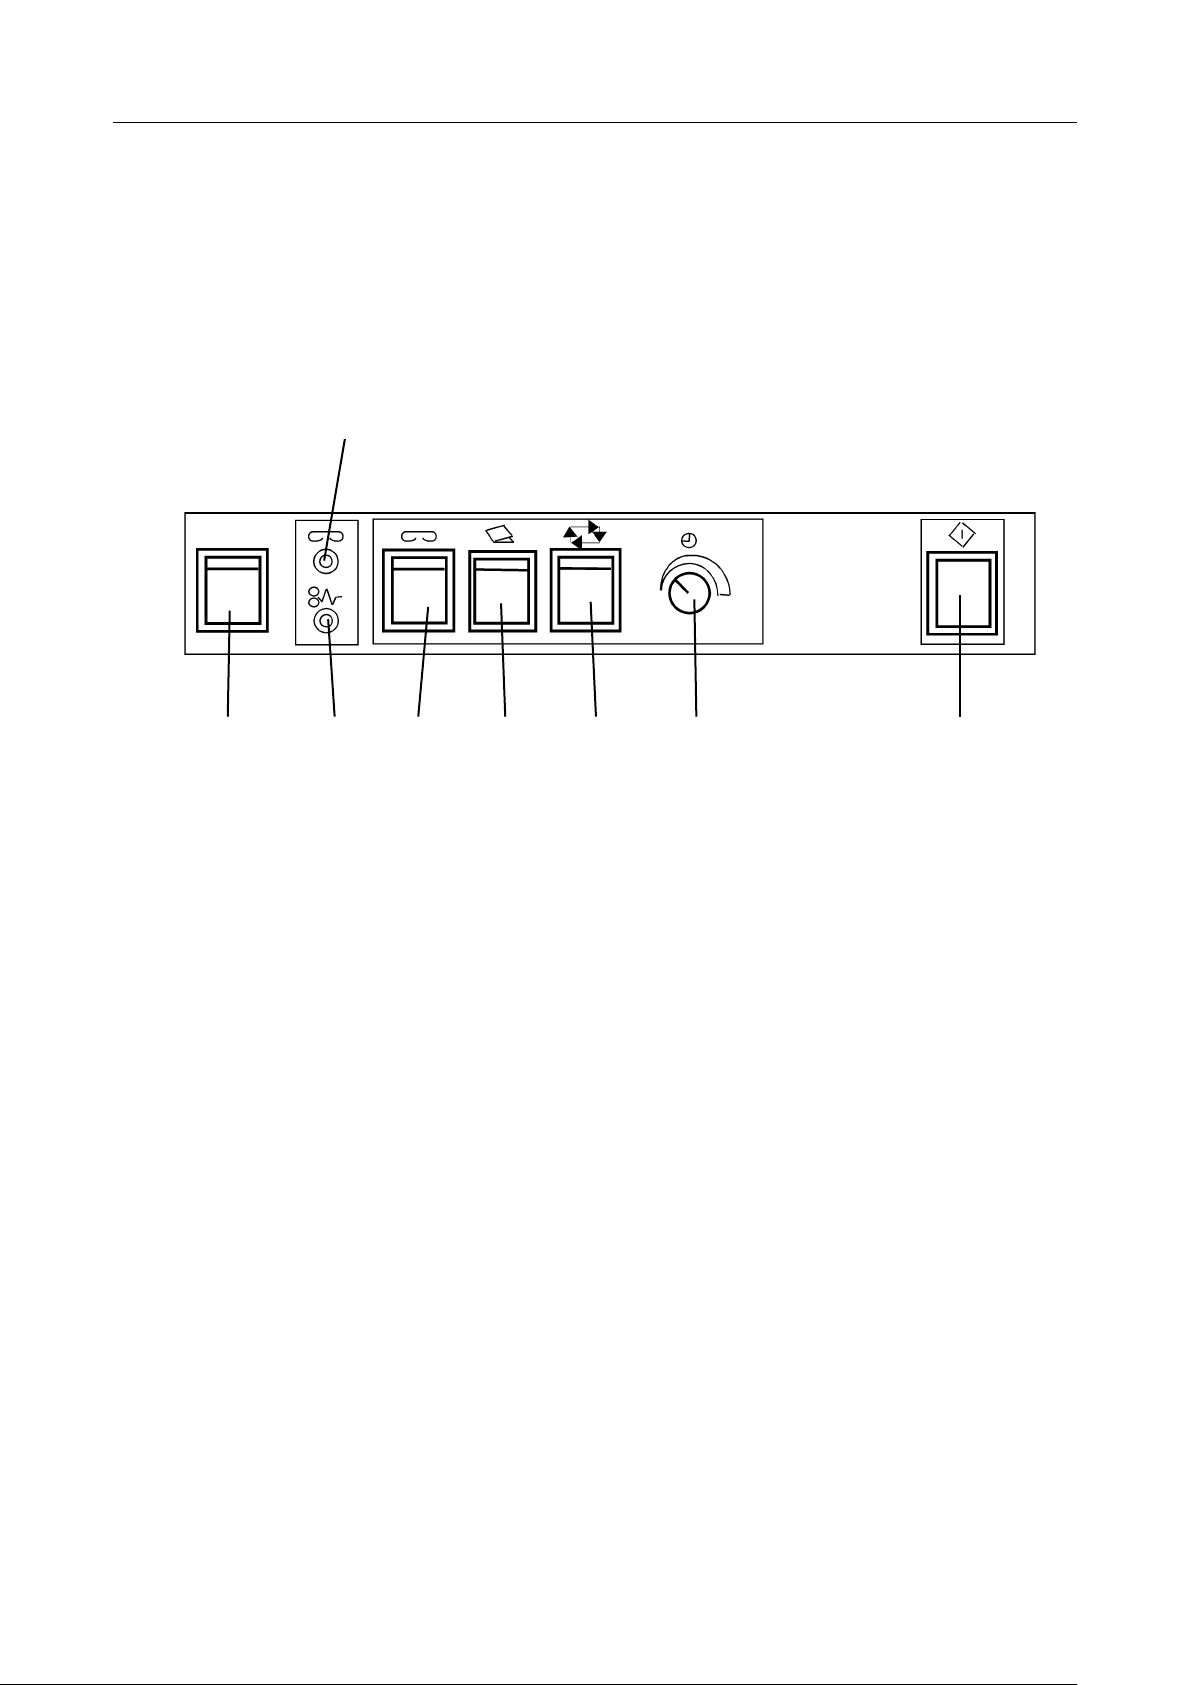
3.4 The control panel
2
I
0
1 3 4 5 6 7 8
1.
Power switch
Low staples indicator
2.
Jam indicator *
3.
Stapling ON / OFF
4.
Folding ON / OFF
5.
Automatic start ON / OFF (Can only be used OFF-line)
6.
Time delay (Can only be used OFF-line)
7.
Manual start button (Can only be used OFF-line)
8.
14
Page 15

T10165 OPERATOR MANUAL BM 61
3.5 Accessories (optional)
21
3 4
Belt Stacker
1.
Adapter
2.
Delivery Tray
3.
Knob, Delivery Tray (By loosening the knob the Delivery Tray can be
4.
adjusted for correct paper size)
15
Page 16

OPERATOR MANUAL BM 61 T10165
16
Page 17

T10165 OPERATOR MANUAL BM 61
4. Operator instructions
4.1 Settings
4.1.1 Stapling and folding
Open the top cover.
1.
Set the two side joggers to the correct paper size according to the scale.
2.
Insert a set to the stapling area.
3.
Move the rear side jogger up against the paper to verify that the side jogger aligns the
4.
sheets.
NOTE: When checking the alignment, do not squeeze the release handle, only push
on top of the side jogger at the green label, to simulate the jogging action that the
BM 61 does during run.
Turn the paper stop crank until the trail edge of the set is in line with the scale for paper
5.
length.
Move the rear jogger up against the trail edge of the set.
6.
Remove the set.
7.
Position the upper pressure roller according to the scale.
8.
Position the stapler heads over the anvils to be used.
9.
Attach the Booklet Maker to the Collator and make sure that the green mark on the
10.
Docking Bracket aligns with the green mark on the Collator.
Set the stapling switch to ON position.
11.
Set the folding switch to ON position.
12.
Close the top cover.
13.
Set the power switch to ON position.
14.
4.1.2 Folding only
1. Same procedure as above with the exception that on point 11 the switch is set to OFF
position and point 9 is not performed.
17
Page 18

OPERATOR MANUAL BM 61 T10165
4.1.3 Stapling and folding - OFF-line
Remove the upper pressure roller assembly.
1.
Flip over the side jogger upper guides (both side joggers).
2.
Lower the rear jogger unit by pressing the rear jogger unit forward and downwards
3.
(green marked).
Open the top cover.
4.
Set the side jogger to the correct paper size according to the scale.
5.
Insert a set into the stapling area.
6.
Move the rear side jogger up against the paper to verify that the side jogger aligns the
7.
sheets.
NOTE: When checking the alignment, do not squeeze the release handle, only push
on top of the side jogger at the green label, to simulate the jogging action that the
BM 61 does during run.
Turn the paper stop crank until the trail edge of the set is in line with the scale for paper
8.
length.
Remove the set.
9.
Position the stapler heads over the correct anvils.
10.
Set the stapling switch to ON position.
11.
Set the folding switch to ON position.
12.
Close the top cover.
13.
Set the power switch to ON position.
14.
4.1.4 Folding - OFF-line
Same procedure as above with the exception that on point 11 the switch is set to OFF
1.
position and point 10 is not performed.
18
Page 19

T10165 OPERATOR MANUAL BM 61
4.1.5 Block stapling - OFF-line option 1
Lower the rear jogger by pressing the rear jogger unit forward (green marked).
1.
Remove the upper pressure roller assembly.
2.
Flip over the side jogger upper guides (both side joggers).
3.
Open the top cover.
4.
Set the side jogger to the correct paper size according to the scale.
5.
Insert a set into the stapling area.
6.
Move the rear side jogger up against the paper to verify that the side jogger aligns the
7.
sheets.
NOTE: When checking the alignment, do not squeeze the release handle, only push
on top of the side jogger at the green label, to simulate the jogging action that the
BM 61 does during run.
Turn the paper stop crank to position the set to the stapler.
8.
Remove the set.
9.
Position the stapler heads over the correct anvils.
10.
Close the top cover.
11.
Set the stapling switch to ON position.
12.
Set the folding switch to OFF position.
13.
Select manual or automatic start.
14.
Flip down the fold stop to enable the sets to pass through the machine.
15.
Set the power switch to ON position.
16.
NOTE: By using the adapter (optional) either the Belt Stacker or the Delivery Tray can be
used for stacking of stapled sets.
19
Page 20

OPERATOR MANUAL BM 61 T10165
4.1.6 Block stapling - OFF-line option 2
Lower the rear jogger by pressing the rear jogger unit forward (green marked).
1.
Remove the upper pressure roller.
2.
Flip over the side jogger upper guides (both side joggers).
3.
Open the top cover.
4.
Set the side jogger to the correct paper size according to the scale.
5.
Insert the two red pins in the holes in the side joggers. (The pins are stored inside the
6.
machine over the fold rolls). These will stop the set in the correct position (in this mode
the set will not be transported through the machine).
Insert set into the stapling area.
7.
Move the rear side jogger up against the paper to verify that the side jogger aligns the
8.
sheets.
NOTE: When checking the alignment, do not squeeze the release handle, only push
on top of the side jogger at the green label, to simulate the jogging action that the
BM 61 does during run.
Remove the set.
9.
Position the stapler heads over the correct anvils.
10.
Set the stapling switch to ON position.
11.
Set the folding switch to OFF position.
12.
Select manual start.
13.
Close the top cover.
14.
Set the power switch to ON position.
15.
To operate insert one set and press the manual start button. When stapled, remove set
16.
and insert the next one.
20
Page 21

T10165 OPERATOR MANUAL BM 61
4.2 Operation
4.2.1 Operating the Booklet Maker ON-line
Verify that the set up of the Booklet Maker is completed.
1.
Select “third party output” on the Collator.
2.
Press “calibration” on the Collator.
3.
The set will enter the Booklet Maker and remain in the stapling section unstapled.
4.
Verify that the set is completed/correct press the Collator start button.
5.
4.2.2 Operating the Booklet Maker OFF-line
1.
Select manual or automatic start.
Manual start: Make sure that the time delay is set to minimum. Press the manual start
button for each operation.
Automatic start: The set will automatically be stapled as it is inserted in the Booklet
Maker.
When operating, insert one set at a time. Align the set with your ngertip. When auto-
2.
matic mode is selected, set time delay to allow careful alignment.
NOTE: The manual start button will light up when the next set may be inserted.
21
Page 22

OPERATOR MANUAL BM 61 T10165
4.3 Paper settings
4.3.1 Set up for non-standard paper sizes
This procedure is to enable ON-line operation with paper sizes that deviate from the
standard A4/A3 and 8
Perform the setup of the Booklet Maker for the paper size.
1.
Attach the Booklet Maker to the Collator, using the positioning holes on the Booklet
2.
Maker that best matches the paper size. (Green mark on rear side jogger as close as
possible to the Docking Bracket).
Loosen the knob for adjustment to odd paper sizes on the Docking Bracket.
3.
Move the Booklet Maker sidewise until the green mark on the rear side jogger is
4.
aligned with the green mark on the Collator.
Tighten the knob.
5.
1
/2“x11”/11”x17” sizes.
4.3.2 Reset to standard paper sizes
Disconnect the Booklet Maker from the Collator by pressing the Docking Bracket
1.
(green marked side).
Loosen the knob for adjustment to odd paper sizes.
2.
Slide the Docking Bracket back to align it with the chassis in the Booklet Maker, it will
3.
lock into place.
22
Page 23

T10165 OPERATOR MANUAL BM 61
5. Maintenance
5.1 Cleaning of rollers
Grease and oil on rollers will badly affect operation. On a regular basis, clean with a rubber
reactivator uid or similar cleaner intended for rubber.
23
Page 24

OPERATOR MANUAL BM 61 T10165
6. Problem solving
6.1 Problem solving
PROBLEM POSSIBLE CAUSES ACTION
Paper jam in fold roller
section
Stapler jam Stapler not aligned with anvils Align staplers with anvil
Bad sheet alignment
side
Bad sheet alignment
front to back
Not possible to select
third party eject on
Collator
Paper jam into side
guides
Paper jam in infeed
area
Set remaining in
stapling section
Folding not selected
Side joggers set too tight
Side joggers incorrectly adjusted Adjust side joggers to the paper
Rear jogger incorrectly adjusted
Upper pressure roller missing
Upper pressure roller incorrectly
positioned
Connection cable not attached
Top cover open
Power switch set to OFF position
Booklet Maker in jam condition
Booklet Maker incorrectly
positioned to Collator
Paper size setting incorrect
Upper guides on side jogger
unfolded
Upper pressure roller incorrectly
positioned
Rear jogger unit lowered in ONline mode
Lower stapler
Misfeed in Collator
Paper jam in Booklet Maker
Side jogger set too tight
Select folding on control panel
Adjust side joggers correctly
size
Adjust rear jogger
Mount upper pressure roller
Position the upper pressure roller to
correct paper size
Attach connection cable
Close top cover
Set power switch to ON position
Clear jam in Booklet Maker
Reposition the Booklet Maker for
the correct paper size
Adjust side joggers to the correct
paper size
Fold down upper guides
Reposition the pressure roller
Raise the rear jogger
Load stapler
Correct problem in Collator and
restart
Clear paper jam
Adjust the side joggers to the correct paper size
24
Page 25

T10165 OPERATOR MANUAL BM 61
7. Specications
7.1 Specication table
BM 61 (ON-line) BM 61 (OFF-line)
Capacity
Speed
10 sheets 80 gsm (incl. cover)
10 sheets 20 lb bond (incl. cover)
1800 A5 sized booklets/hour
1400 A4 sized booklets/hour
22 sheets 80 gsm
22 sheets 20 lb bond
Adjustable up to 1800 A5 or
1400 A4 sized booklets/hour
Paper size
Min
Max
Stapler head
Low stapler detection
Jam detection
Jogging
Height
Width
Depth
Weight
Voltage
200 x 270 mm, 7 7/8” x 10 5/8”
305 x 440 mm, 12” x 17 1/4”
210 Plockmatic chisel point
Yes
Yes
Side and back
550 mm (880 mm incl. base)
21 5/8” (34 5/8” incl. base)
780 mm (1420 mm incl. Belt Stacker)
11
30
/16 “ (55 7/8 “ incl Belt Stacker)
500 mm
19 5/16“
58 kg
128 lb
115 V 60 Hz
230/240 V 50 Hz
25
Page 26

Page 27

Page 28

 Loading...