

Page 1
Bedienungsanleitung
GASTROBACK
DESIGN ESPRESSO PLUS
®
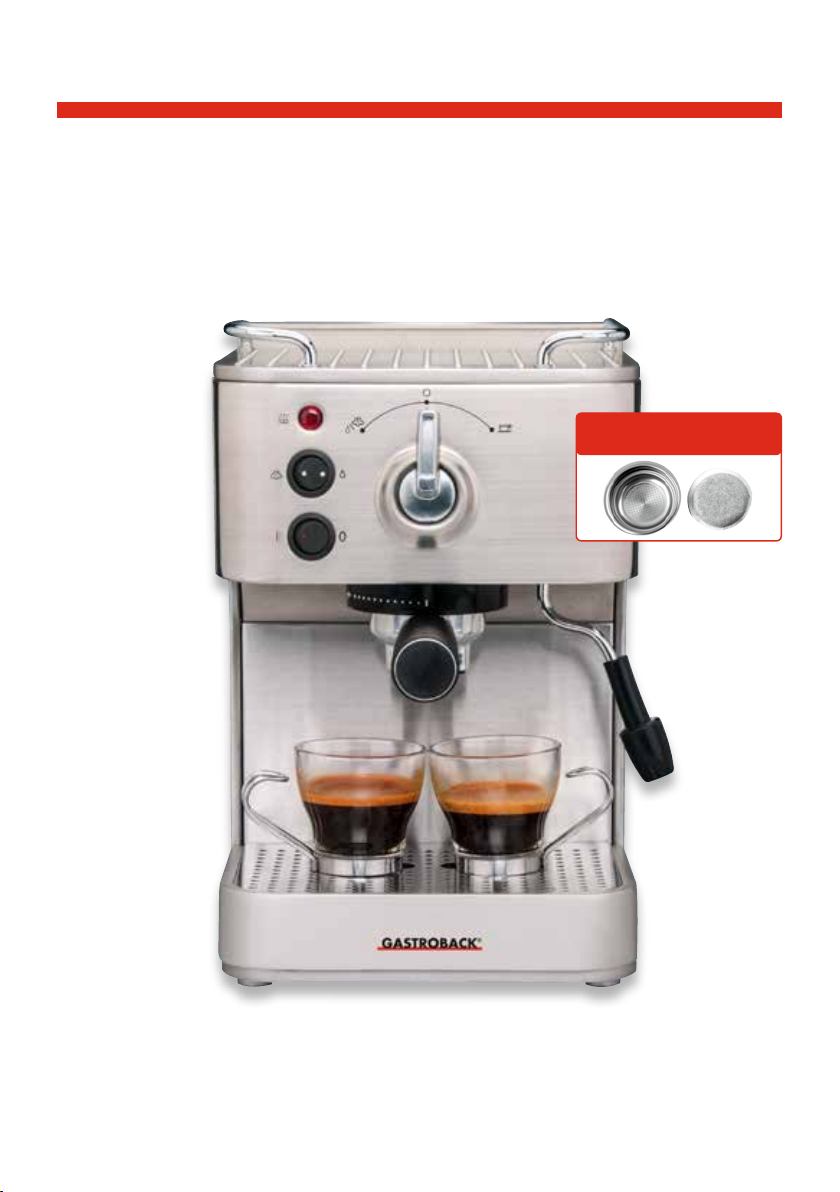
E.S.E.-PAD-SYSTEM
Auch für Espresso-Pads geeignet
Art.-Nr. 42606 »Design Espresso Plus«
Bedienungsanleitung vor Gebrauch unbedingt lesen!
Modell- und Zubehöränderungen vorbehalten!
Nur für den Hausgebrauch!
Page 2

Lesen Sie bitte alle Hinweise und Anleitungen, die mit dem Gerät
geliefert werden, sorgfältig und vollständig durch, bevor Sie das
Gerät in Betrieb nehmen und beachten Sie bitte alle Warnhin-
weise, die in der Bedienungsanleitung aufgeführt sind.
Inhaltsverzeichnis
Wichtige Warnhinweise .......................................................................................................... 4
Ihre Design Espresso Plus kennenlernen ..................................................................................... 5
Wichtige Sicherheitshinweise ................................................................................................... 6
Allgemeine Hinweise zur Sicherheit ...................................................................................... 6
Wichtige Sicherheitshinweise für alle Elektrogeräte ................................................................ 9
Hohe Temperaturen – Verbrennungsgefahr ......................................................................... 10
Bedienung ............................................................................................................................ 11
Das Gerät zusammensetzen .............................................................................................. 11
Das Gerät betriebsbereit machen ....................................................................................... 12
Den Wassertank auffüllen ................................................................................................. 13
Den Espresso vorbereiten .................................................................................................. 14
Das Espressopulver andrücken ........................................................................................... 14
Espresso Pad verwenden ................................................................................................... 14
Den Brühkopf spülen ........................................................................................................ 15
Die Tassen vorwärmen ...................................................................................................... 15
Den Siebträger einsetzen .................................................................................................. 15
Den Espresso aufbrühen .................................................................................................... 15
Die Vorbrühfunktion .......................................................................................................... 16
Den Siebträger ausleeren .................................................................................................. 17
Milch aufschäumen .......................................................................................................... 17
Den Aufsatz abnehmen ................................................................................................ 17
Den Aufsatz wieder aufsetzen....................................................................................... 17
Die Dampffunktion verwenden ...................................................................................... 18
Milch schäumen .......................................................................................................... 18
Empfehlung Mischungsverhältnisse ................................................................................ 20
Heißes Wasser ................................................................................................................ 20
Nützliche Tipps ..................................................................................................................... 22
Die Kaffeesorte ................................................................................................................ 22
Das Wasser .................................................................................................................... 22
Energiesparfunktion .......................................................................................................... 23
Hinweise zum Kaffeepulver ............................................................................................... 23
Den Kaffee andrücken ...................................................................................................... 23
Pflege und Reinigung ............................................................................................................. 24
Die Dampfdüse reinigen ................................................................................................... 24
Filter, Siebträger und Brühkopf reinigen .............................................................................. 26
Das Gehäuse und die Wärmeplatte reinigen ....................................................................... 26
Tropfschale reinigen ......................................................................................................... 26
Das Gerät zusammensetzen .............................................................................................. 27
Den Wassertank entkalken ................................................................................................ 27
Technische Daten .................................................................................................................. 29
Störungen beseitigen ............................................................................................................. 29
Aufbewahrung ...................................................................................................................... 31
Entsorgungshinweis ............................................................................................................... 32
Information und Service ......................................................................................................... 33
Gewährleistung/Garantie ...................................................................................................... 33
Rezepte ............................................................................................................................... 34
Page 3

SEHR GEEHRTE KUNDIN, SEHR GEEHRTER KUNDE!
Herzlichen Glückwunsch zu Ihrer neuen Design Espresso Plus von Gastroback.
Mit dem strapazierfähigen Gehäuse, der handlichen Größe und der professionellen
Funktionalität sowie der hervorragenden Leistung und einfachen Bedienung ist die
Design Espresso Plus bestens geeignet für den Einstieg in die Welt des Espresso.
Auch andere Kaffeespezialitäten wie z.B. Latte Macchiato, Cappuccino und Milchkaffee lassen sich problemlos zubereiten. Den erforderlichen Milchschaum liefert die
integrierte Milchschaumdüse in wenigen Sekunden. Die professionelle Ulka-Espressopumpe mit 15 Bar Druck zaubert dabei immer eine perfekte Crema in die Tasse.
Durch das Thermoblock-Heizsystem ist die Design Espresso Plus schnell auf Betriebstemperatur und dank der digitalen Temperaturkontrolle wird die Brühtemperatur konstant gehalten. Die Vorbrühfunktion ist ein weiterer Garant für ein tolles
Geschmackserlebnis. Für den schnellen Genuss können mit dem zusätzlichen »Easy
Serving Espresso-Einsatz« auch Espresso Pads verwendet werden.
Eine perfekte Kombination aus edlem Design und optimaler Funktionalität. Die
Design Espresso Plus ist mit umfangreichem Zubehör ausgestattet. So sind Doppelwandfilter für ein und zwei Tassen, Milchschaumkännchen, E.S.E.-Einsätze für
Espressopads und ein Reinigungsset im Lieferumfang enthalten.
Die Informationen in dieser Anleitung werden Ihnen die Vielseitigkeit des Gerätes
rasch vermitteln.
Entdecken Sie mit der Design Espresso Plus die Welt des Kaffees.
Ihre Gastroback GmbH
3
Page 4

WICHTIGE WARNHINWEISE
• Niemals kleine Kinder mit dem Gerät oder den Bauteilen des Gerätes unbeaufsichtigt lassen! Vergewissern Sie sich immer, dass das Gerät richtig und vollständig zusammengesetzt ist, bevor Sie den Netzstecker in die Steckdose stecken und
das Gerät einschalten.
• Nehmen Sie die Milchschaumdüse nicht aus der Milch heraus, solange noch
Dampf austritt. Andernfalls kann heiße Milch aus dem Kännchen spritzen. Schalten Sie den Dampfwählschalter immer zuerst in die Ausgangsposition (Standby
(O)-Position) zurück, bevor Sie das Milchaufschäumkännchen von der Milchschaumdüse entfernen. Einige Sekunden nach dem Ausschalten der Dampffunktion tritt ein kurzer Dampfstoß aus der Milchschaumdüse. Achten Sie darauf, sich
nicht am heißen Dampf zu verbrühen.
• Die Metallteile des Siebeinsatzes und des Siebträgers sind nach dem Gebrauch
noch einige Zeit sehr heiß. Fassen Sie den heißen Siebträger nur am schwarzen
Griff an. Kühlen Sie den Siebträger und den Siebeinsatz zuerst in kaltem Wasser,
bevor Sie die Metallteile anfassen.
• Die Milchschaumdüse ist nach dem Gebrauch noch einige Zeit sehr heiß. Vergewissern Sie sich immer zuerst, dass dieses Bauteil abgekühlt ist, bevor Sie die
Milchschaumdüse anfassen.
• Aus der Milchschaumdüse tritt heißer Dampf aus. Halten Sie niemals Ihre Hände oder andere Körperteile an die Milchschaumdüse oder darunter, wenn der
Dampfwählschalter auf der Dampf-Position steht. Halten Sie das Milchaufschäumkännchen unter die Milchschaumdüse, bevor Sie den Auswahlschalter in die
Dampf-Position drehen.
• Aus der Milchschaumdüse tritt heißer Dampf aus. Dieses Bauteil wird sehr heiß.
Achten Sie stets darauf, sich nicht am heißen Dampf zu verbrühen. Fassen Sie
während der Dampferzeugung niemals auf die Milchschaumdüse. Fassen Sie die
Milchschaumdüse während des Betriebes nur an dem dunklen Kunststoffgriff an.
• Vor der Reinigung das Gerät immer ausschalten, den Stecker aus der Steckdose
ziehen und das Gerät abkühlen lassen.
• Der Wassertank sollte während des Entkalkens nicht entfernt werden.
4
Page 5
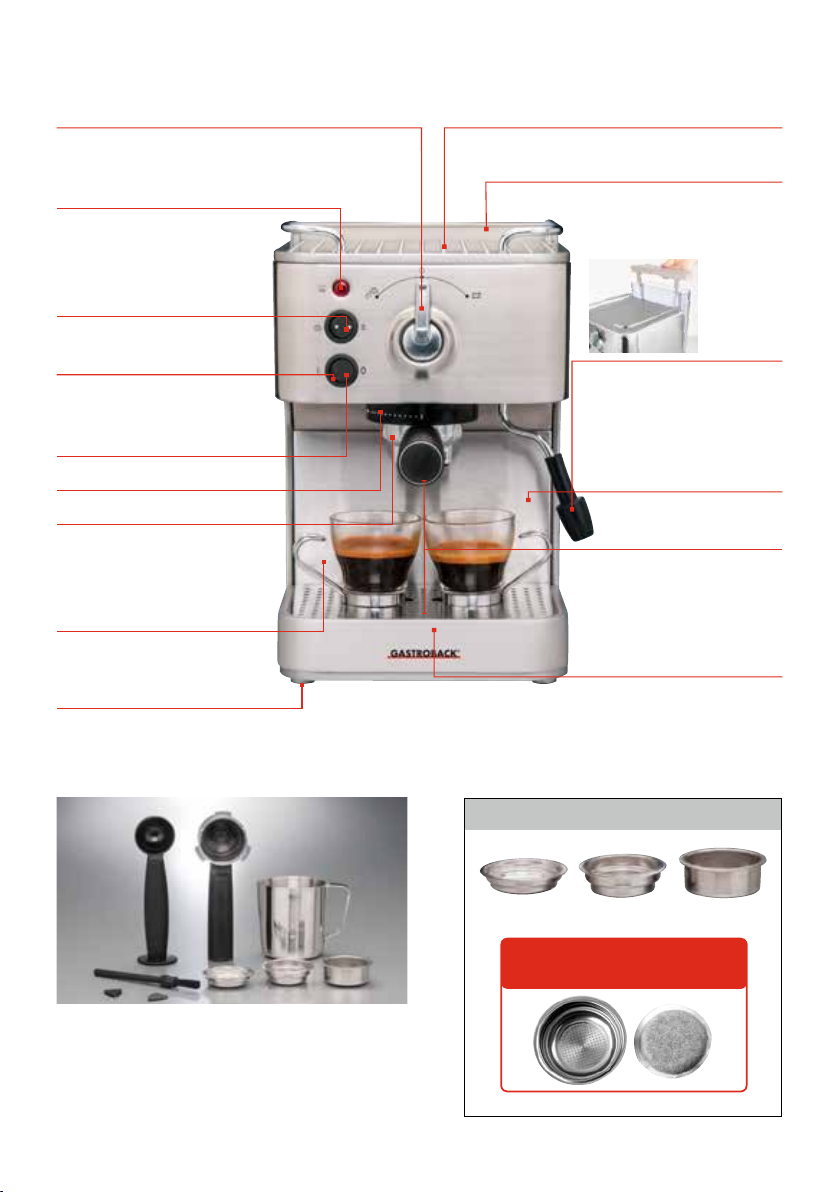
IHRE DESIGN ESPRESSO PLUS KENNENLERNEN
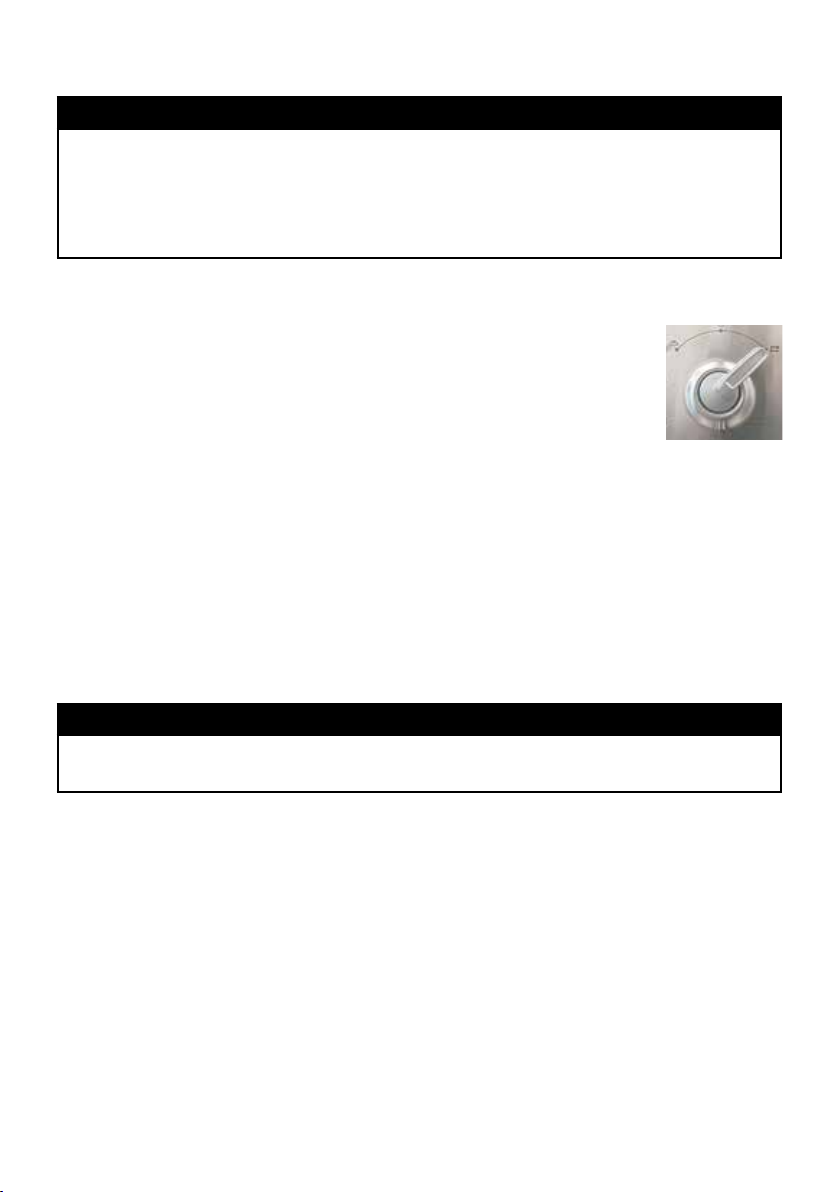
Auswahlschalter
für Espresso (rechts), Dampf & Heißwasser (links),
Standby (mitte)
Heizkontrolllampe (HEATING)
leuchtet rot beim Vorheizen und
erlischt wenn das Gerät
betriebsbereit ist
Auswahlschalter
Dampf oder heißes Wasser
Powerlampe (POWER)
leuchtet rot beim Einschalten des
Gerätes
Ein-/Ausschalter
Brühkopf
schwerer Siebträger aus Edelstahl
lässt sich mit einem Handgriff
ansetzen; besonders gute Crema
durch Edelstahl-Doppelwandfilter
Leistung 1.250 Watt
mit Thermo-Block-Heizsystem für
den sofortigen Gebrauch
rutschfeste Gummifüße
verhindert das Verrutschen und Kratzer auf dem
Tisch
Tassenvorwärm-Funktion
Wärmeplatte für Tassen
Wassertank
herausnehmbarer 1,5 Liter Wassertank, einfach zu befüllen
360° schwenkbare Milchschaumdüse
mit Aufsatz; lässt sich zum Aufschäumen von Milch leicht in
die richtige Position schwenken
automatisches Druckablass-System
große Tassen
extra viel Platz für große Tassen
durch zusätzlichen Freiraum
zwischen dem Siebträger und
der Tropfschale
abnehmbare Tropfschale
Grill und Tropfschale abnehmbar
für eine leichte Reinigung
Umfangreiches Zubehör inklusive:
3 Filtereinsätze aus Edelstahl: Doppelwandfilter für 1 und 2
Tassen sowie ein E.S.E-Pad-Einsatz für Espresso-Pads, 1 Edelstahl-Milchkännchen zum Aufschäumen von Milch, 1 Messlöffel
mit Tamper, Reinigungsset.
Siebeinsätze
Pad-Filter Einfach-Filter Doppel-Filter
E.S.E.-PAD-SYSTEM
Auch für Espresso-Pads geeignet
5
Page 6

WICHTIGE SICHERHEITSHINWEISE
Lesen Sie bitte vor dem Gebrauch des Gerätes alle Hinweise und Anleitungen, die
mit dem Gerät geliefert werden, sorgfältig und vollständig durch und bewahren Sie
die Anleitungen gut auf. Verwenden Sie das Gerät ausschließlich in der darin angegebenen Weise, zu dem beschriebenen Zweck (bestimmungsgemäßer Gebrauch).
Ein bestimmungswidriger Gebrauch und besonders Missbrauch können zu Sachschäden sowie zu schweren Personenschäden durch gefährliche elektrische Spannung, Feuer und bewegliche Bauteile führen. Jegliche Benutzung für andere Zwecke
ist seitens des Herstellers untersagt und zu unterlassen. Für Schäden, die auf nicht
sachgemäßen Gebrauch zurückzuführen sind, übernehmen wir keinerlei Haftung
und sind auch nicht regresspflichtig. Führen Sie ausschließlich diejenigen Arbeiten
am Gerät durch, die in dieser Anleitung beschrieben sind. Lassen Sie das Gerät im
Betriebszustand nicht unbeaufsichtigt. Das Gerät entspricht den Richtlinien, die für
die CE-Kennzeichnung verbindlich sind.
Diese Anleitung ist ein wichtiger Bestandteil des Gerätes. Geben Sie das Gerät nicht
ohne diese Anleitung an Dritte weiter. Bestehen Unklarheiten oder sollten weitere
Informationen erforderlich sein, bitten wir Sie, sich vor Inbetriebnahme der Maschine mit Ihrem autorisierten Fachhändler oder unserem Kundendienst in Verbindung
zu setzen.
Reparaturen und technische Wartung am Gerät dürfen nur von dafür autorisierten
Fachwerkstätten durchgeführt werden. Wenden Sie sich gegebenenfalls bitte an
Ihren Händler. Fragen zum Gerät beantwortet: Gastroback GmbH, Gewerbestr. 20,
21279 Hollenstedt, Telefon: (04165) 22250.
ALLGEMEINE HINWEISE ZUR SICHERHEIT
• Verwenden und lagern Sie das Gerät an einem sauberen, frostfreien Ort, an dem
es vor Feuchtigkeit, Nässe und übermäßiger Belastung geschützt ist. Das Gerät
nicht im Freien verwenden oder lagern. Das Gerät ist nicht für die Verwendung
in fahrenden Fahrzeugen oder auf Booten geeignet. Bewahren Sie das Gerät und
alle Bauteile stets an einem für kleine Kinder unzugänglichen Ort auf. Nur für den
Betrieb in Innenräumen und für den Hausgebrauch geeignet.
• Prüfen Sie das Gerät und das Netzkabel regelmäßig auf Beschädigungen. Niemals das Gerät verwenden, wenn das Gerät oder Teile davon beschädigt oder
undicht sind, übermäßigen Belastungen ausgesetzt waren (z.B. Sturz, Schlag,
Überhitzung oder eingedrungene Feuchtigkeit) oder nicht mehr erwartungsgemäß
arbeiten. Verwenden Sie das Gerät nicht mehr, wenn sich während des Betriebes
Wasser unter dem Gerät sammelt. Ziehen Sie sofort den Netzstecker aus der
Steckdose und lassen Sie das Gerät in einer Fachwerkstatt überprüfen.
• Verwenden Sie nur Bauteile, Werkzeuge, Ersatzteile und Zubehör für das Gerät,
die vom Hersteller für diesen Zweck vorgesehen und empfohlen sind. Beschädigte
oder ungeeignete Bauteile können während des Betriebes brechen, das Gerät
beschädigen und/oder zu schweren Verletzungen oder Sachschäden führen.
6
Page 7

• Vergewissern Sie sich, dass das Gerät richtig und vollständig zusammengesetzt
ist, bevor Sie den Netzstecker in die Steckdose stecken und das Gerät einschalten.
Vergewissern Sie sich vor jeder Verwendung, dass der Filter richtig am Brühkopf
eingesetzt und gesichert ist, sowie der Auswahlschalter auf Bereitschaft (mittig)
gestellt ist. Wenn der Auswahlschalter rechts (in Brühposition) steht, kommt nach
dem Vorheizen heißes Wasser aus dem Brühkopf und wenn der Auswahlschalter links (Dampfposition/Heißwasserposition) steht, kommt heißer Dampf oder je
nach Einstellung heißes Wasser aus der Dampfdüse. Achten Sie darauf, dass der
schwarze Klappschalter auf der richtigen Position steht: Dampf oder Heißwasser.
Das Gerät steht während des Betriebs unter Überdruck! Schalten Sie
•
das Gerät immer zuerst in die Bereitschaftsposition, bevor Sie den Filter abnehmen.
• Stellen Sie das Gerät auf einer gut zugänglichen, ebenen, trockenen und ausreichend stabilen sowie wärme- und feuchtigkeitsbeständigen Arbeitsfläche auf.
Stellen Sie das Gerät zum Betrieb niemals auf eine Metallfläche (z.B. Geschirrabtropffläche). Verwenden Sie das Gerät nicht in feuchten oder nassen Bereichen.
Stellen Sie das Gerät nicht an den Rand oder die Kante der Arbeitsfläche. Achten
Sie darauf, dass das Netzkabel nicht von der Tischkante herunterhängt und, dass
niemand das Gerät am Kabel vom Tisch ziehen kann.
• Legen Sie keine Tücher, Servietten oder ähnliche Materialien unter oder auf das
Gerät, um eine Überhitzung und eine Gefährdung durch Feuer und elektrischen
Schlag zu vermeiden. Legen Sie niemals harte, scharfkantige oder schwere
Gegenstände auf das Gerät, um die Wärmeplatte oder das Rost nicht zu beschädigen.
• Niemals das Gerät oder Teile des Gerätes in die Nähe von starken Wärmequellen und heißen Oberflächen (z.B. Heizung, Ofen, Grill) stellen oder legen. Achten
Sie darauf, dass sich während des Betriebes keine wertvollen oder feuchtigkeitsoder hitzeempfindlichen Gegenstände in der Nähe des Gerätes befinden, um
Schäden durch heißen Dampf und Wasser zu vermeiden. Das Gerät muss von
vorn frei zugänglich sein. An den Seiten müssen mindestens 15 cm Platz frei sein.
• Das Gerät ist nicht dafür geeignet mit externen Zeitschaltuhren oder Fernbedienungen bedient zu werden.
• Lassen Sie besonders kleine Kinder niemals unbeaufsichtigt, wenn das Gerät
oder Geräteteile für sie zugänglich sind. Lassen Sie kleine Kinder niemals mit
dem Gerät, den Bauteilen oder dem Reinigungswerkzeug spielen. Kinder und
gebrechliche Personen müssen Sie bei der Handhabung von Elektrogeräten stets
besonders beaufsichtigen.
• Dieses Gerät kann von Kindern ab 8 Jahren und älter, Personen mit eingeschränkten physischen, sensorischen oder geistigen Fähigkeiten oder mangelnder Erfahrung und Wissen, nur verwendet werden, wenn sie dabei beaufsichtigt werden
7
Page 8

oder eine ausführliche Anleitung zur Benutzung des Geräts in einer sicheren Weise erhalten haben und die damit verbundenen Gefahren verstehen. Halten Sie
das Gerät und seine Kabel außerhalb der Reichweite von Kindern unter 8 Jahren.
• Kinder dürfen nicht mit dem Gerät spielen.
• Schalten Sie das Gerät immer aus und ziehen Sie den Netzstecker, wenn Sie das
Gerät bewegen, zusammen- oder auseinanderbauen wollen oder Sie das Gerät
längere Zeit unbeaufsichtigt stehen lassen.
• Füllen Sie zum Betrieb immer nur kaltes, sauberes Leitungswasser in den Wassertank. Verwenden Sie niemals andere Flüssigkeiten. Verwenden Sie zum Entkalken
keine scharfen Chemikalien und Entkalker (siehe ›Pflege und Reinigung‹).
• Niemals das Gerät einschalten, wenn der Wassertank leer ist. Achten Sie beim
Einsetzen des gefüllten Wassertanks und beim Herausnehmen der vollen Tropfschale darauf, das enthaltene Wasser nicht zu verschütten.
Hinweis:
Achten Sie beim Einsetzen des Wassertanks darauf, dass die Führungsrillen auf
der Rückseite des Wassertanks richtig an den Aussparungen der Geräterückseite einrasten. Drücken Sie den Tank soweit nach unten, dass sich das Wasserventil im Boden des Wassertanks öffnet.
• Niemals das Gerät unbeaufsichtigt lassen, wenn der Netzstecker eingesteckt ist.
Schalten Sie das Gerät immer zuerst aus (POWER-Taste), ziehen Sie den Netzstecker aus der Steckdose und lassen Sie das Gerät abkühlen, wenn Sie das Gerät
nicht verwenden, bewegen oder reinigen.
• Lassen Sie keine Nahrungsmittelreste auf dem Gerät oder den Bauteilen eintrocknen. Reinigen Sie das Gerät nach jeder Verwendung (siehe ›Pflege und Reinigung‹).
• Niemals das Gerät oder die Bauteile mit Scheuermitteln, harten Scheuerhilfen
(z.B. Topf-reiniger) scharfen Putzmitteln oder ätzenden Chemikalien (Desinfektionsmittel, Entkalker) reinigen. Niemals harte oder scharfkantige Gegenstände für
die Arbeit mit dem Gerät oder zum Reinigen verwenden.
• Wenden Sie bei der Arbeit mit dem Gerät keine Gewalt an, um die Bauteile nicht
zu beschädigen.
• Die Design Espresso Plus dient zum Aufbrühen von Kaffee. Daher werden einige
Bauteile, wie z. B. der Brühkopf, der Siebträger und die Milchschaumdüse beim
Betrieb sehr heiß und heißes Wasser oder Dampf treten aus.
• Niemals das Gerät oder die Bauteile des Gerätes in der Spülmaschine reinigen.
Das Gerät und das Netzkabel niemals mit Flüssigkeiten übergießen oder in Flüssigkeiten stellen oder tauchen.
8
Page 9

• Nachdem Sie die richtige Menge Kaffeepulver in den Siebträger gefüllt haben,
müssen Sie das Kaffeepulver möglichst gleichmäßig andrücken. Verwenden Sie
dazu den integrierten Tamper. Das Kaffeepulver darf nicht zu fest angedrückt
werden.
• Wischen Sie eventuell auf dem Rand des Siebeinsatzes verschüttetes Kaffeepulver
sorgfältig ab. Der Rand sollte unbedingt ganz sauber sein, damit der Siebeinsatz
am Brühkopf druckdicht abschließt.
• Die Restfeuchtigkeit des Kaffeesatzes im Siebträger, die sich auf Grund der speziellen Brühtechnik der Maschine ergibt, stellt keinesfalls eine Fehlfunktion der
Maschine dar.
• Achten Sie darauf, dass der Siebträger vor der Benutzung fest im Brühkopf eingesetzt ist. Niemals den Siebträger während des Betriebes entfernen.
• Das Gerät nicht mit kohlensäurehaltigem Wasser, sondern nur mit möglichst weichem Trinkwasser betreiben.
• Das Gerät nicht ohne Wasser betreiben.
• Dieses Gerät ist für die Verwendung im Haushalt und in folgenden Bereichen vorgesehen:
– Küchen in Geschäften, Büros oder anderen Arbeitsumgebungen;
– Landwirtschaftlichen Betrieben;
– Hotels, Motels oder anderen Unterkünften;
– Unterkünften mit Frühstücksangebot.
• Verpackungsmaterial außerhalb der Reichweite von Kindern aufbewahren.
• Verpackungsmaterial für eventuellen Transport unbedingt aufbewahren.
WICHTIGE SICHERHEITSHINWEISE FÜR ALLE ELEKTROGERÄTE
• Stellen Sie das Gerät in der Nähe einer passenden Wandsteckdose auf und
schließen Sie das Gerät dort direkt an. Das Gerät darf nur an die ordnungsgemäß
abgesicherte Schukosteckdose einer geeigneten Stromversorgung (Wechselstrom;
230/240 V, 50/60 Hz) mit Schutzleiter angeschlossen werden. Die Steckdose
muss für 16 A einzeln abgesichert sein. Verwenden Sie keine Verlängerungskabel oder Tischsteckdosen, um eine Gefährdung durch Feuer und Elektrizität zu
vermeiden. Außerdem sollte die Steckdose über einen Fehlerstromschutzschalter
abgesichert sein, dessen Auslösestrom nicht über 30 mA liegen sollte. Wenden
Sie sich im Zweifelsfall an Ihren Elektriker.
• Niemals Wasser oder andere Flüssigkeiten über oder unter das Gehäuse laufen
lassen. Niemals das Netzkabel oder das Gehäuse in Wasser oder andere Flüssig-
9
Page 10

keiten tauchen oder stellen. Sollte während der Arbeit Wasser oder eine andere
Flüssigkeit über das Gehäuse gelaufen sein, dann schalten Sie das Gerät sofort
aus, ziehen Sie den Netzstecker und trocknen das Gerät mit einem sauberen
Tuch ab. Ziehen Sie sofort den Netzstecker aus der Steckdose, wenn Bauteile des
Gerätes undicht sind und/oder sich während des Betriebes Wasser unter dem
Gerät sammelt.
• Wickeln Sie das Kabel vor der Verwendung des Gerätes immer vollständig ab.
Niemals am Kabel ziehen, reißen oder das Kabel knicken, einklemmen, quetschen oder verknoten. Achten Sie darauf, dass das Netzkabel nicht von der Tischkante herunterhängt. Achten Sie darauf, dass niemand in Kabelschlaufen hängen
bleiben oder das Gerät am Kabel von der Arbeitsfläche reißen kann. Fassen Sie
immer am Gehäuse des Steckers an, wenn Sie den Stecker ziehen.
HOHE TEMPERATUREN – VERBRENNUNGSGEFAHR
• Die Design Espresso Plus dient zum Aufbrühen von Kaffee. Daher
werden einige Bauteile, wie z.B. der Brühkopf, der Siebträger und die Milchschaumdüse beim Betrieb sehr heiß und heißes Wasser oder Dampf treten aus.
• Fassen Sie während des Betriebes und kurz danach niemals heiße Bauteile (z.B.
Brühkopf, Siebträger, Milchschaumdüse, Aufsatz) an. Auch nach dem Ausschalten sind das Gerät und die entsprechenden Bauteile noch einige Zeit sehr heiß.
• Achten Sie vor jedem Gebrauch darauf, dass der Auswahlschalter auf Bereitschaft
(mittig) steht. Wenn der Auswahlschalter rechts (in Brühposition) steht, kommt nach
dem Vorheizen heißes Wasser aus dem Brühkopf und wenn der Auswahlschalter links (Dampfposition/Heißwasserposition) steht, kommt heißer Dampf oder je
nach Einstellung heißes Wasser aus der Dampfdüse. Achten Sie darauf, dass der
schwarze Klappschalter auf der richtigen Position steht: Dampf oder Heißwasser.
• Aus dem Brühkopf und der Milchschaumdüse kann heißer Dampf austreten oder
heißes Wasser tropfen. Achten Sie aus diesem Grund immer darauf, dass die
Milchschaumdüse in Richtung Tropfschale weist, wenn sie nicht benutzt wird.
Halten Sie niemals Ihre Hände, andere Körperteile oder feuchtigkeits- und/oder
hitzeempfindliche Gegenstände an Siebträger, Brühkopf, Milchschaumdüse oder
Aufsatz oder darunter, wenn das Gerät eingeschaltet ist.
• Achten Sie darauf, dass beim Milchaufschäumen keine Flüssigkeit von oben in
den schwarzen Aufsatz der Dampfdüse laufen kann. Die Milch lässt sich so nicht
aufschäumen.
• Die Maschine entlüftet sich nach der Dampferzeugung automatisch, drehen Sie
hierzu den Auswahlschalter auf die Position Standby (Mitte).
• Vergewissern Sie sich immer, dass der Siebträger im Brühkopf korrekt eingesetzt
ist bevor Sie das Gerät einschalten. Beim Brühen des Espressos entsteht Druck —
Verbrennungsgefahr!
10
Page 11

• Entfernen Sie niemals den Siebträger während eines Brühvorgangs.
• Warten Sie immer, bis das Gerät auf Raumtemperatur abgekühlt ist und leeren
Sie den Wassertank und die Tropfschale aus, bevor Sie das Gerät bewegen oder
reinigen. Fassen Sie das Gerät immer auf beiden Seiten unten am Gerätesockel
(nicht an der Tropfschale!) an, wenn Sie das Gerät bewegen wollen.
BEDIENUNG
DAS GERÄT ZUSAMMENSETZEN
Vor der ersten Verwendung: Entfernen Sie alle Verpackungs- und Werbematerialien.
Wenn Sie das Gerät auspacken, dann sind Tropfschale und Wassertank bereits richtig eingebaut. Die Tropfschale steckt im Gerätesockel und wird nach vorn herausgezogen. Der Wassertank sitzt hinten am Gerät und kann durch Anheben herausgenommen werden. Entfernen Sie das Verpackungsmaterial unter dem Wassertank.
Vergewissern Sie sich, dass die Bauteile und das Zubehör vollständig und unbeschädigt sind, bevor Sie die Verpackung entsorgen. Zum Zubehör gehört: Edelstahldoppelwandfilter (Einfach-Filter, Doppel-Filter und Pad-Filter), Reinigungswerkzeug,
Siebträger, Milchkännchen und Messlöffel mit Tamper.
1. Heben Sie den Deckel des Wassertanks nach oben ab. Sie können den Tank am
geöffneten Deckel herausheben (siehe Abb.). Spülen Sie den Wassertank dann
sorgfältig aus. Spülen Sie vor der ersten Verwendung auch
Filtereinsätze, Siebträger, Messlöffel und Milchkännchen in
etwas warmer Spülmittellösung. Arbeiten Sie dabei nach
der Anleitung im Kapitel ›Pflege und Reinigung‹.
2. Nach dem Reinigen setzen Sie den Wassertank wieder ein.
Achten Sie darauf, dass die Führungsrillen auf der Rückseite
des Wassertanks richtig an den Aussparungen der Geräterückseite einrasten. Drücken Sie den Tank soweit nach
unten, dass sich das Wasserventil im Boden des Wassertanks öffnet.
Hinweis:
Beim Herunterdrücken des Tanks sehen Sie, dass sich der Ventildeckel nach oben
öffnet.
Vor der ersten Verwendung sollten Sie das Gerät einmal ohne Kaffeepulver arbeiten
lassen. Dadurch werden die inneren Bauteile des Geräts aufgeheizt und gespült.
Arbeiten Sie dazu nach der Anleitung im folgenden Absatz ›Einen Kaffee zubereiten‹.
11
Page 12
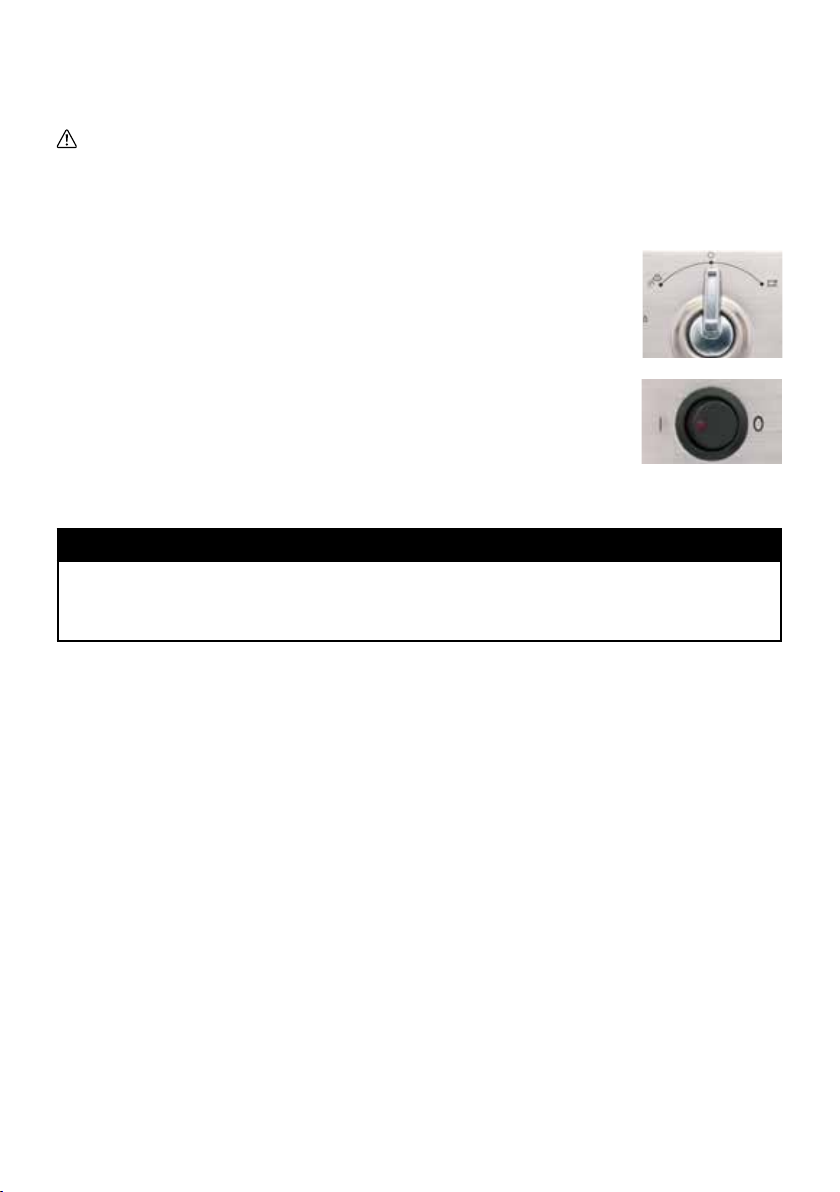
DAS GERÄT BETRIEBSBEREIT MACHEN
WARNUNG: Niemals kleine Kinder mit dem Gerät oder den Bauteilen des
Geräts unbeaufsichtigt lassen! Vergewissern Sie sich immer, dass das Gerät richtig
und vollständig zusammengesetzt ist und der Auswahlschalter mittig auf Standby
steht, bevor Sie den Netzstecker in die Steckdose stecken und das Gerät einschalten.
ACHTUNG: Wenn der Auswahlschalter rechts (in Brühposition)
steht, kommt heißes Wasser aus dem Brühkopf und wenn der
Auswahlschalter links (auf Dampf- oder Heißwasserposition) steht,
kommt heißer Dampf oder heißes Wasser aus der Dampfdüse.
Achten Sie darauf, dass der schwarze Klappschalter auf der richtigen Position steht: Dampf oder Heißwasser.
Stellen Sie das Gerät immer zuerst in die Position ›Standby‹ (Aus-
EIN AUS
wahlschalter mittig). Drücken Sie den Ein-/Aus-Schalter und schalten Sie das Gerät ein. Die Powerlampe leuchtet rot. Während des
Vorheizens leuchtet auch die Heizkontrolllampe rot. Sobald das
Gerät betriebsbereit ist erlischt die Heizkontrolllampe.
Hinweis:
Schalten Sie das Gerät an dem Ein-/Aus-Schalter aus, ziehen Sie den Netzstecker
und warten Sie, bis das Gerät abgekühlt ist, bevor Sie Wassertank oder Tropfschale herausnehmen/einsetzen oder das Gerät reinigen.
Halten Sie den Arbeitsplatz sauber und trocken. Lassen Sie keine Flüssigkeiten über
oder unter das Gerät laufen und legen Sie keine Tücher, Servietten oder ähnliche
Materialien unter oder auf das Gerät. Sollte während der Arbeit Flüssigkeit über
das Gerät gelaufen sein, dann schalten Sie das Gerät sofort aus und ziehen Sie
den Netzstecker. Trocknen Sie das Gerät nach der Anleitung im Kapitel ›Pflege und
Reinigung‹.
Um sicher zu gehen, dass das Thermosystem und alle sich im Gerät befindenen Leitungen vorgewärmt sind und die benötigte Betriebstemperatur haben, müssen Sie
das Gerät entsprechend vorbereiten.
1. Füllen Sie den Wassertank bis zur MAX-Markierung (1500 ml).
2. Schalten Sie das Gerät an der Ein-/Aus-Taste ein und richten Sie dabei die
Dampfdüse auf die Tropfschale. Die Powerlampe leuchtet rot. Während des
Vorheizens leuchtet auch die Heizkontrolllampe rot. Sobald das Gerät betriebsbereit ist, erlischt die Heizkontrolllampe.
12
Page 13
Hinweis:
Das Pumpgeräusch könnte beim ersten Einschalten des Geräts etwas lauter sein,
weil sich das Thermosystem und alle Leitungen im Gerät beim ersten Einschalten
zunächst mit Wasser füllen müssen. Sobald das Gerät betriebsbereit und die Systeme mit Wasser gefüllt sind, arbeitet das Gerät leiser.
ACHTUNG: Achten Sie beim Betrieb des Geräts immer darauf, dass der Wassertank gefüllt ist.
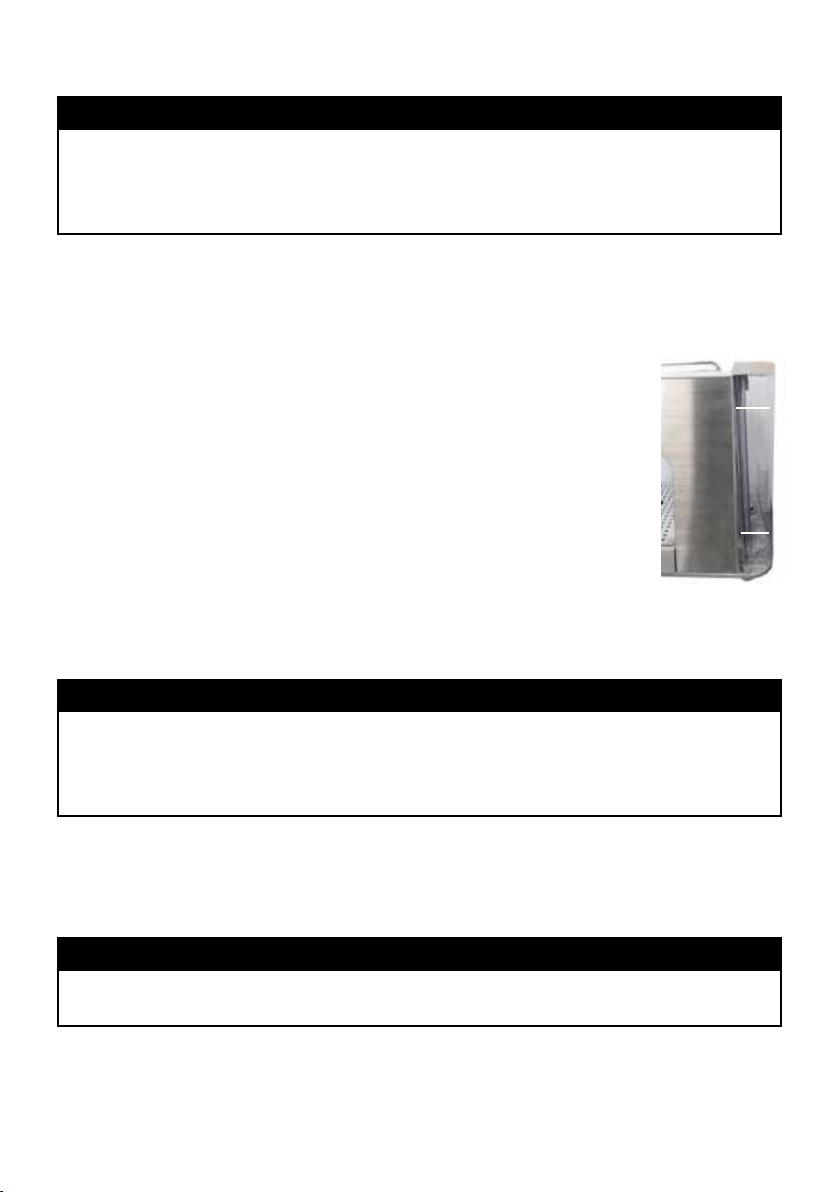
DEN WASSERTANK AUFFÜLLEN
1. Heben Sie den Deckel des Wassertanks nach oben ab. Sie kön-
nen den Tank am geöffneten Deckel herausheben. Füllen Sie den
MAX
Wassertank mit klarem kaltem Leitungswasser.
ACHTUNG: Achten Sie beim Betrieb des Geräts immer darauf, dass
der Füllstand im Wassertank zwischen den Füllmarken MIN (100
ml) und MAX (1500 ml) liegt. Überprüfen Sie den Wasserstand vor
jedem Einschalten und füllen Sie rechtzeitig frisches Wasser ein.
MIN
Niemals das Gerät einschalten, wenn zu wenig Wasser im Wassertank ist (unter der Füllmarke 100 ml). Verwenden Sie immer nur
Leitungswasser für das Gerät. Füllen Sie weder Mineralwasser noch
destilliertes (demineralisiertes) Wasser ein. Überfüllen Sie nicht den Wassertank. Der
Inhalt darf höchstens die Füllmarke 1500 ml erreichen.
Hinweis:
Nach dem Gebrauch der Dampfdüse oder wenn das Gerät mit leerem Wassertank im Betrieb ist kann es sein, dass kein Wasser durch den Brühkopf kommt. In
diesem Fall gehen Sie alle Punkte durch die unter dem Punkt ›Das Gerät betriebsbereit machen‹ stehen.
2. Setzen Sie den gefüllten Wassertank wieder ein. Achten Sie darauf, dass die
Führungsrillen auf der Rückseite des Wassertanks richtig an den Aussparungen
der Geräterückseite einrasten. Drücken Sie den Tank soweit nach unten, dass
sich das Wasserventil im Boden des Wassertanks öffnet.
Hinweis:
Beim Herunterdrücken des Tanks sehen Sie, dass sich der Ventildeckel nach oben
öffnet. Richten Sie die Dampfdüse auf die Tropfschale.
WICHTIG: Achten Sie beim Einsetzen des Wassertanks darauf, das Wasser nicht
zu verschütten.
13
Page 14

DEN ESPRESSO VORBEREITEN
1. Legen Sie den Einfach-Filter, Doppel-Filter oder Pad-Filter (für Espresso Pads) in
den Siebträger ein und drücken Sie den Filter fest. Die Filter sind auf der Rückseite entsprechend gekennzeichnet (Einfachfilter ; Doppelfilter ; Pad ).
Der Filter muss fest im Siebträger sitzen. Der Rand des Filters muss auf dem Rand
des Siebträgers fest aufliegen.
Der flachere Einfach-Filter ist für 1 Tasse (1 Messlöffel Espressopulver), der etwas
tiefere Doppel-Filter (2 Messlöffel Espressopulver) ist für 2 Tassen Espresso gedacht.
Wenn Sie etwas mehr Espresso aufbrühen wollen (Beispiel: Für einen Becher), dann
verwenden Sie immer den Doppel-Filter.
Filtern Sie mit dem Doppel-Filter höchstens 60 ml Kaffee. Wenn Sie größere Mengen
wünschen, dann füllen Sie zuerst heißes Wasser in die Tasse und filtern Sie dann
den Kaffee dazu.
Wenn Sie nur eine Tasse Espresso brühen wollen, dann verwenden Sie den EinfachFilter, um das optimale Aroma zu erhalten. Filtern Sie damit nur etwa 30 ml.
2. Füllen Sie den Messlöffel gestrichen mit Espressopulver auf. Für den Einfach-Filter
nehmen Sie nur 1-2 Messlöffel Pulver – für den Doppel-Filter verwenden Sie 2-3
Messlöffel Pulver. Verwenden Sie immer nur die richtige Menge Pulver für die
beiden Filter, da die Poren der Filter genau die richtige Größe haben, um bei
der vorbestimmten Pulvermenge den richtigen Druck zu erreichen (siehe: ›Hinweise zum Kaffeepulver‹).
DAS ESPRESSOPULVER ANDRÜCKEN
1. Verteilen Sie das Espressopulver gleichmäßig im Filter und drücken Sie
das Espressopulver mit dem flachen Boden des Messlöffels (Tamper)
gleichmäßig aber nicht zu fest an (siehe: ›Einige nützliche Tipps‹).
2. Wischen Sie eventuell auf dem Rand des Filters verschüttetes Espresso-
pulver sorgfältig ab. Der Rand muss unbedingt ganz sauber sein, damit
der Filter am Brühkopf druckdicht abschließt.
ESPRESSO PAD VERWENDEN
Wenn Sie Espresso Pads verwenden wollen, legen Sie einen
entsprechenden Espresso Pad in den dafür vorgesehenen Filter.
Der Filter für die Pads ist auf der unteren Seite mit pod gekennzeichnet. Verwenden Sie immer nur einen Pad für die Zubereitung ihres Kaffees.
Wichtig: Verwenden Sie immer nur Espresso Pads, die handelsüblichen Kaffee-Pads
14
Page 15
sind zu groß und dadurch nicht geeignet für den Filtereinsatz.
DEN BRÜHKOPF SPÜLEN
WARNUNG: Aus dem Brühkopf treten heißes Wasser und Dampf aus. Niemals
die Hand oder andere Körperteile an den Brühkopf oder darunter halten, wenn das
Gerät eingeschaltet ist.
Bevor Sie den Filter am Brühkopf einsetzen, sollten Sie etwas Wasser durch den
Brühkopf leiten, um den Brühkopf zu spülen.
1. Stecken Sie den Netzstecker in die Steckdose und drücken Sie den Ein-/Aus-
Schalter um das Gerät einzuschalten. Die Powerlampe leuchtet rot. Während
des Vorheizens leuchtet auch die Heizkontrolllampe rot. Sobald das Gerät
betriebsbereit ist, erlischt die Heizkontrolllampe.
2. Stellen Sie eine leere Tasse oder einen Becher unter den Brühkopf auf die Tropf-
schale.
3. Drehen Sie den Auswahlschalter kurz nach rechts auf die Espresso-Position (ohne
den Siebträger). Das Gerät erzeugt ein Pumpgeräusch. Zunächst tritt Dampf und
dann heißes Wasser aus dem Brühkopf. Spülen Sie den Brühkopf kurz durch.
Um den Spülvorgang zu beenden drehen Sie den Auswahlschalter wieder auf
die Position ›Standby‹ (Mitte).
DIE TASSEN VORWÄRMEN
Sobald das Gerät eingeschaltet ist, wird auch die Wärmplatte oben auf dem Gerätedach beheizt. Stellen Sie Ihre Tassen auf die Wärmplatte, um die Tassen vorzuheizen. Dadurch kühlt der Kaffee nicht aus, wenn er in die Tasse läuft.
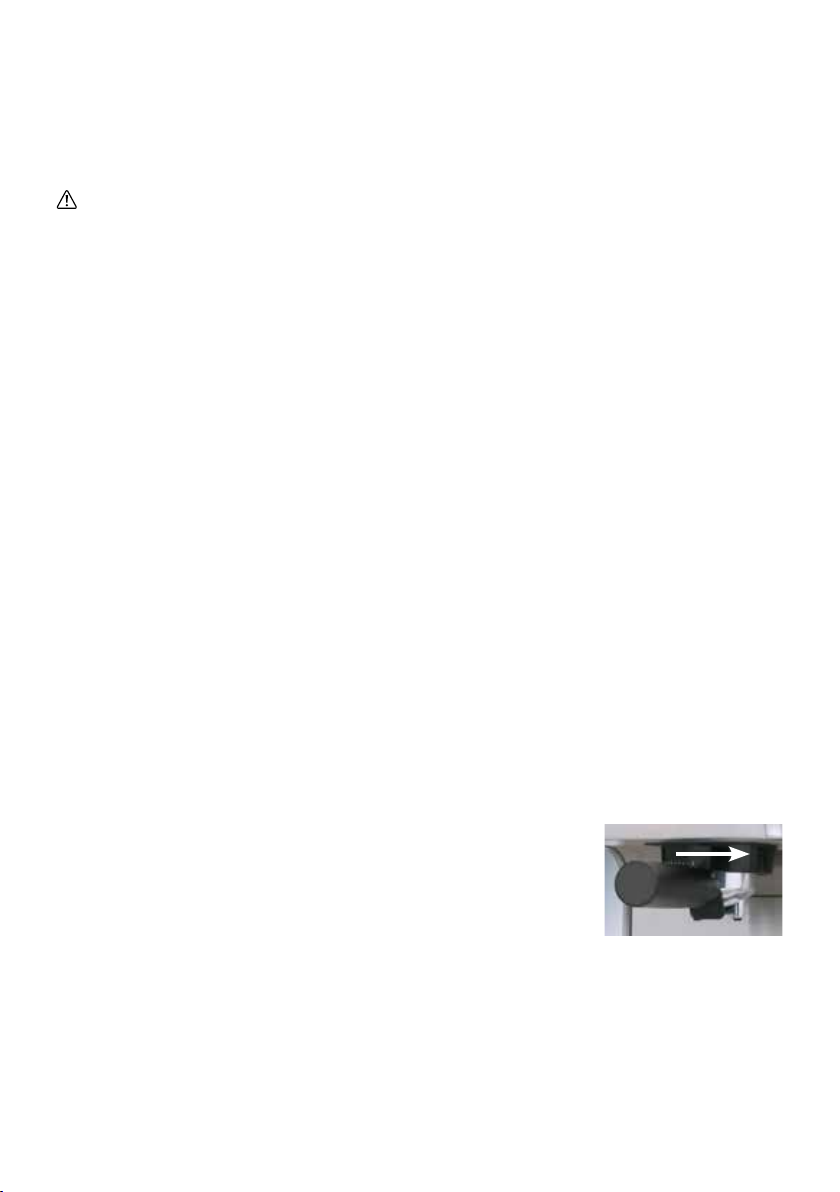
DEN SIEBTRÄGER EINSETZEN
1. Fassen Sie den Siebträger mit dem gefüllten Filter am
schwarzen Griff und halten Sie den Siebträger unter
den Brühkopf. Der Griff muss dabei etwa im 45° Winkel
schräg nach links vorn zeigen.
2. Drehen Sie den Siebträger so weit nach rechts wie mög-
lich (am Brühkopf mit Lock beschriftet). Der Filterhalter wird dadurch druckdicht
am Gerät verriegelt.
DEN ESPRESSO AUFBRÜHEN
Sobald das Gerät die richtige Temperatur erreicht hat, erlischt die Heizkontrolllampe.
15
Page 16
Hinweis:
Wenn das Gerät längere Zeit in Betriebsposition steht, fängt die Heizkontrolllampe zwischendurch an zu leuchten. Nimmt die Temperatur im Brühkopf ab, schaltet
sich die Heizung automatisch wieder ein um eine konstante Betriebstemperatur zu
halten. Sobald die Betriebstemperatur erreicht ist, hört die Heizkontrolllampe auf
zu leuchten. Das Gerät ist wieder in Betriebsposition.
1. Vergewissern Sie sich, dass die Tropfschale und das Rost richtig eingelegt sind
und der Wassertank gefüllt ist.
2. Setzen Sie den Siebträger mit Filter und Espressopulver- oder Pad
in das Gerät ein.
3. Stellen Sie eine oder zwei vorgewärmte Tassen unter den Siebträ-
ger.
4. Drehen Sie den Auswahlschalter nach rechts auf die Espresso-Position. Nach ein
paar Sekunden läuft der Espresso automatisch aus dem Siebträger. Ein Pumpgeräusch ist dabei zu hören.
5. Sobald die gewünschte Menge Espresso in die Tasse/Tassen gelaufen ist, dre-
hen Sie den Auswahlschalter wieder zurück in die Mitte (Position ›Standby‹).
Dadurch wird der Brühvorgang beendet.
Solange das Gerät eingeschaltet ist, bleibt das Gerät betriebsbereit und hält eine
konstante Temperatur im Brühkopf. Sobald die Temperatur im Brühkopf abnimmt,
schaltet sich die Heizung automatisch wieder ein und die Heizkontrolllampe leuchtet.
Hinweis:
Warten Sie nach Beendung des Brühvorganges einen Moment bevor Sie die Tasse
von dem Rost nehmen, da der Kaffee nach dem Ausschalten ein wenig nachläuft.
6. Wenn Sie keinen weiteren Espresso brühen wollen, dann drücken Sie auf den
Ein-/Aus-Schalter, um das Gerät auszuschalten und ziehen Sie den Netzstecker.
Warten Sie, bis das Gerät abgekühlt ist, bevor Sie das Gerät nach der Anleitung im
Kapitel ›Pflege und Reinigung‹ reinigen.
DIE VORBRÜHFUNKTION
Nach der Aktivierung des Espressoprogramms (Auswahlschalter rechts), befördert
die 15-bar-Pumpe zunächst etwas Wasser, macht dann eine kurze Pause und pumpt
danach weiteres Wasser durch den gemahlenen Kaffee im Siebträger. Das Espressopulver wird durch dieses Verfahren zuerst mit etwas Wasser angefeuchtet, bevor
der eigentliche Brühvorgang beginnt. Dadurch quillt das Espressopulver und im Brühkopf kann ein größerer Druck aufgebaut werden. Auf diese Weise werden die Öle
und Aromastoffe des Kaffees besser an das Wasser abgegeben.
16
Page 17
DEN SIEBTRÄGER AUSLEEREN
WARNUNG: Die Metallteile des Filters und Siebträgers
sind nach dem Gebrauch noch einige Zeit sehr heiß. Fassen
Sie den heißen Siebträger nur am schwarzen Griff an. Kühlen
Sie den Siebträger und den Filter zuerst in kaltem Wasser,
bevor Sie die Metallteile anfassen.
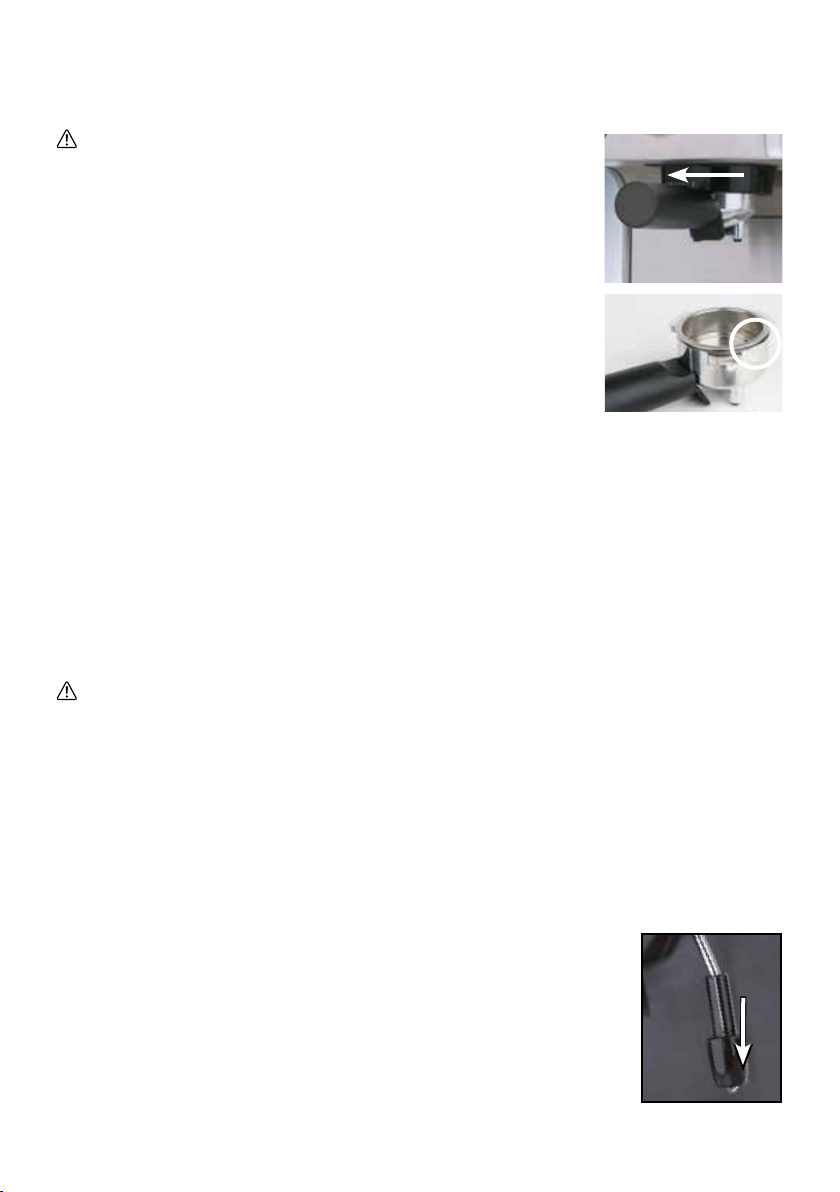
1. Nehmen Sie den Siebträger vom Brühkopf ab. Fassen Sie
den Siebträger dazu am schwarzen Griff und drehen Sie
den Siebträger nach links (im Uhrzeigersinn) bis die Verriegelung gelöst ist.
2. Leeren Sie den Siebträger dann über einer Schüssel oder
Spüle aus. Das gebrauchte Espressopulver geben Sie am
besten in den Hausmüll oder zu den kompostierbaren Küchenabfällen. Spülen
Sie das Espressopulver nicht in den Ausguss, da andernfalls der Abfluss verstopft
werden könnte.
3. Die Filter sitzen fest im Siebträger. Heben Sie den Filter an den Aussparungen
an den Seiten des Siebträgers an, um ihn aus dem Siebträger zu nehmen.
4. Spülen Sie den Filter und Siebträger mit klarem Wasser aus und lassen Sie diese
Bauteile danach trocknen.
MILCH AUFSCHÄUMEN
WARNUNG: Die Dampfdüse und der Aufsatz sind nach dem Gebrauch noch
einige Zeit sehr heiß. Vergewissern Sie sich immer zuerst, dass diese Bauteile abgekühlt sind, bevor Sie die Dampfdüse anfassen.
Die Espresso-Maschine ist mit einer schwenkbaren Dampfdüse und einem schwarzen Aufsatz zum Aufschäumen von Milch ausgerüstet. Damit können Sie schnell und
problemlos Milchschaum herstellen. Wenn Sie nur wenig Milchschaum brauchen,
dann nehmen Sie den Aufsatz von der Dampfdüse ab und schäumen die Milch nur
mit der Düse auf.
Den Aufsatz abnehmen
Vergewissern Sie sich unbedingt zuerst, dass der Aufsatz abgekühlt ist. Ziehen Sie den Aufsatz dann vorsichtig nach unten von
der Dampfdüse ab. Drehen Sie den Aufsatz dabei eventuell etwas
hin und her.
Den Aufsatz wieder aufsetzen
Stecken Sie den Aufsatz mit dem schmalen Ende über die Dampf-
17
Page 18

düse und schieben Sie den Aufsatz soweit nach oben bis er einrastet. Der Aufsatz
darf nicht wackeln oder herunterfallen. Drehen Sie den Aufsatz dabei eventuell
etwas hin und her.
Hinweis:
Der Aufsatz hat innen zwei Widerstände und sitzt korrekt, wenn Sie ihn zum Einrasten bis über den ersten Widerstand auf die Düse geschoben haben. Die Düse
sollte sich nur im schmalen Teil des Aufsatzes befindet und darf nicht unten aus
dem Aufsatz ragen.
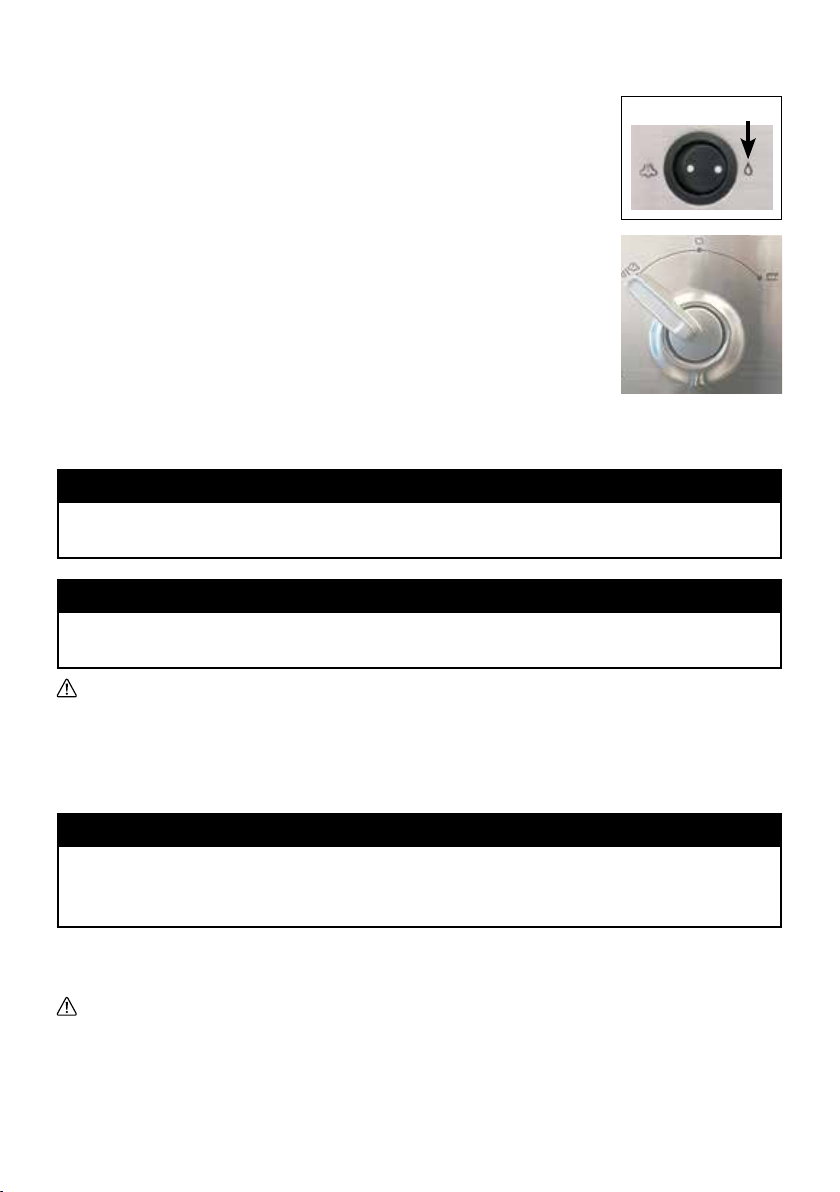
Die Dampffunktion verwenden
Die Heizkontrolllampe leuchtet auf, wenn Sie den Auswahlschalter
auf die Dampf-Position gestellt haben.
Hinweis:
Dampfdüse
Achten Sie vor jedem Gebrauch darauf, dass der Auswahlschalter auf ›Standby‹ (mittig) steht. Wenn der Auswahlschalter rechts
Aufsatz
(in Brühposition) steht, kommt heißes Wasser aus dem Brühkopf
und wenn der Auswahlschalter links (auf Dampf- oder Heißwasserposition) steht, kommt heißer Dampf oder heißes Wasser aus
der Dampfdüse.
WICHTIG: Achten Sie darauf, dass der schwarze Klappschalter
Dampf heißes Wasser
auf der richtigen Position steht: Dampf oder Heißwasser.
Milch schäumen
WARNUNG: Aus der Dampfdüse tritt heißer Dampf oder
heißes Wasser aus. Halten Sie niemals Ihre Hände oder andere Körperteile an die
Dampfdüse oder darunter, wenn der Auswahlschalter auf der Dampf- oder Heißwasserposition steht. Halten Sie ein geeignetes Gefäß unter die Dampfdüse, bevor Sie
den Auswahlschalter in die Dampf- oder Heißwasserposition drehen.
1. Vergewissern Sie sich, dass ausreichend Wasser im Wassertank ist (zwischen
den MIN- und MAX-Marken).
2. Drücken Sie die Ein-/Aus-Schalter und schalten Sie das Gerät ein.
3. Stellen Sie an dem schwarzen Klappschalter die Dampfposi-
Dampfposition
tion ein.
4. Füllen Sie das mitgelieferte Milchaufschäumkännchen aus
Edelstahl etwa zu 1/3 mit frischer kalter Milch auf.
Hinweis:
Die besten Ergebnisse erhalten Sie mit fettreduzierter frischer Milch.
18
Page 19

5. Drehen Sie den Auswahlschalter nach links in die Dampf-
Position; die Heizkontrolllampe fängt an zu leuchten. Der
Thermoblock wird zur Dampferzeugung beheizt. Der Vorgang
dauert ca. 30 Sekunden. Schwenken Sie die Spitze der Dampfdüse über die Tropfschale.
Sobald nur noch Dampf und keine Wassertropfen mehr aus der
Dampfdüse kommt, drehen Sie den Auswahlschalter in die Mitte in die StandbyPosition.
Hinweis:
Es könnten anfangs eventuell ein paar Tropfen Wasser aus der Dampfdüse austreten. Aus diesem Grund sollte die Dampfdüse zu Beginn auf die Tropfschale gerichtet sein. Das restliche Wasser, das sich im Leitsystem befindet wird somit aus der
Dampfdüse gespült.
6. Halten Sie jetzt das Milchaufschäumkännchen unter die Dampfdüse und tauchen
Sie die Spitze der Dampfdüse etwa 10 mm in die Milch ein. Drehen Sie jetzt
den Auswahlschalter wieder gegen den Uhrzeigersinn auf die Dampfposition.
Wasserdampf tritt aus der Düse aus und der Aufschäumvorgang beginnt.
Hinweis:
Wenn bereits Dampf aus der Dampfdüse austritt und die Düse noch nicht in die
Milch eintaucht, dann könnte der entweichende Dampf die Milch aus dem Becher
spritzen.
7. Halten Sie den Aufsatz zum Aufschäumen an den Rand des Milchaufschäum-
kännchens. Durch den austretenden Dampf bewegt sich die Milch im Kreis durch
den Becher.
Hinweis:
Während des Dampfvorgangs leuchtet die Heizkontrolllampe. Der Thermoblock
wird beheizt, um eine konstante Temperatur zu behalten und um die Dampfproduktion fortzusetzen.
WARNUNG: Aus der Dampfdüse und dem Aufsatz tritt heißer Dampf aus, und
diese Bauteile werden sehr heiß. Achten Sie stets darauf, sich nicht am heißen
Dampf zu verbrühen. Fassen Sie niemals während der Dampferzeugung auf die
Dampfdüse. Fassen Sie die Dampfdüse während des Betriebs nur vorsichtig am Aufsatz an. Achten Sie darauf sich nicht zu verbrühen.
Hinweis:
Sie können die Dampfdüse nach Wunsch schwenken, um bequem arbeiten zu
können. Fassen Sie die Dampfdüse dazu ausschließlich am dunklen Aufsatz an.
19
Page 20
8. Wenn das Volumen der Milch im Becher zunimmt, halten Sie den Aufsatz etwas
tiefer in die Milch, um die Milch gut durchzuheizen. Halten Sie das Milchaufschäumkännchen dabei mit einer Hand am Griff fest.
ACHTUNG: Der Becherboden und das Gefäß können durch den Dampf sehr heiß
werden.
WICHTIG: Achten Sie darauf, dass die Milch nicht über den oberen Rand des Auf-
satzes läuft. Andernfalls arbeitet das Gerät nicht richtig.
WARNUNG: Nehmen Sie niemals die Dampfdüse aus der Milch heraus, so lan-
ge noch Dampf austritt. Andernfalls kann heiße Milch aus dem Becher spritzen. Drehen Sie den Auswahlschalter immer zuerst mittig in die Standby-Position bevor Sie
das Milchaufschäumkännchen von der Dampfdüse weg nehmen. Nur dadurch wird
die Dampferzeugung umgehend beendet.
9. Sobald die Milch die gewünschte Beschaffenheit hat und ausreichend erwärmt
ist (zur Kontrolle können Sie vorsichtig den Boden des Milchaufschäumkännchens berühren – aber verbrühen Sie sich nicht), drehen Sie den Auswahlschalter mittig in die Standby-Position und schalten Sie das Gerät
aus. Nehmen Sie erst danach den Becher nach unten von der
Dampfdüse
Dampfdüse.
WICHTIG: Reinigen Sie den Aufsatz nach jeder Verwendung,
damit die Milch nicht am Aufsatz antrocknet (siehe: ›Pflege und
Reinigung‹).
Aufsatz
10. Gießen Sie die heiße Milch in Ihren vorbereiteten Espresso und
geben Sie den Milchschaum mit dem Löffel darüber.
Hinweis:
Drehen Sie nach jedem Dampfvorgang den Auswahlschalter auf die Standby-Position (Mitte), damit sich das Gerät entlüften kann.
Empfehlung Mischungsverhältnisse
• Cappuccino: 1/3 Espresso, 1/3 heiße Milch, 1/3 Milchschaum
• Latté wird traditionell in einem Glas serviert: 1/3 Espresso, überschichtet mit 1/3
heißer Milch und einer etwa 1 cm dicken Schicht Milchschaum.
HEISSES WASSER
WARNUNG:
Aus der Dampfdüse tritt heißer Dampf oder heißes Wasser aus. Halten Sie niemals Ihre Hände oder andere Körperteile an die Dampfdüse oder darunter, wenn der Auswahlschalter auf der Dampf- oder Heißwasserposition steht. Halten
Sie ein geeignetes Gefäß unter die Dampfdüse, bevor Sie den Auswahlschalter in
die Dampf- oder Heißwasserposition drehen.
20
Page 21
1. Vergewissern Sie sich, dass ausreichend Wasser im Was-
Heißwasserposition
sertank ist (zwischen den MIN- und MAX-Marken).
2. Drücken Sie die Ein-/Aus-Schalter und schalten Sie das
Gerät ein.
3. Stellen Sie an dem schwarzen Klappschalter die Heißwas-
serposition ein.
4. Halten Sie jetzt Ihren Becher unter die Dampf- und Heißwas-
serdüse. Drehen Sie jetzt den Auswahlschalter gegen den
Uhrzeigersinn auf die Dampf- und Heißwasserposition. Die
Heizkontrolllampe fängt an zu leuchten. Der Thermoblock
wird beheizt. Heißes Wasser tritt nun aus der Düse aus.
5. Sobald ausreichend heißes Wasser in Ihrem Becher ist, drehen Sie den Auswahl-
schalter in die Mitte zurück – in die Standby-Position.
Hinweis:
Halten Sie die Dampf- und Heißwasserdüse immer auf die Tropfschale gerichtet,
wenn sich kein Gefäß darunter befindet, da noch Restwasser nachtropfen kann.
Hinweis:
Während des Heißwasservorgangs leuchtet die Heizkontrolllampe. Der
Thermoblock wird beheizt, um eine konstante Temperatur zu behalten.
WARNUNG: Aus der Dampf- und Heißwasserdüse treten heißer Dampf aus, und
diese Bauteile werden sehr heiß. Achten Sie stets darauf, sich nicht am heißen
Dampf oder Wasser zu verbrühen. Fassen Sie niemals während der Dampf- oder
Heißwassererzeugung auf die Düse. Fassen Sie die Düse während des Betriebs nur
vorsichtig am Aufsatz an. Achten Sie darauf sich nicht zu verbrühen.
Hinweis:
Sie können die Dampf- und Heißwasserdüse nach Wunsch schwenken, um bequem
arbeiten zu können. Fassen Sie die Düse dazu ausschließlich am dunklen Aufsatz
an.
ACHTUNG: Der Becherboden und das Gefäß können durch das heiße Wasser sehr
heiß werden.
WARNUNG: Nehmen Sie niemals die Dampf- und Heißwasserdüse aus dem
Becher heraus, so lange noch heißes Wasser austritt. Andernfalls kann heißes Wasser aus dem Becher spritzen. Drehen Sie den Auswahlschalter immer zuerst mittig in
die Standby-Position bevor Sie den Becher von der Dampf- und Heißwasserdüse
wegnehmen. Nur dadurch wird die Heißwassererzeugung umgehend beendet.
21
Page 22

NÜTZLICHE TIPPS
Einen guten Kaffee zuzubereiten ist eine Kunst, die leicht zu erlernen ist. In diesem
Kapitel finden Sie einige Tipps für Ihren perfekten Kaffee.
Hinweis:
Um einen wirklich aromatischen Espresso zu genießen, sollten Sie nicht mehr als
30 ml (mit dem Einfach-Filter) oder – für einen doppelten Espresso – nicht mehr als
60 ml (mit dem Doppel-Filter) zubereiten.
Hinweis:
Den Geschmack Ihres Espressos sollten Sie nach Ihren eigenen Vorlieben wählen. Hier spielt die Kaffeesorte eine große Rolle sowie die Art, in der der Kaffee
gemahlen wird (fein oder grob). Außerdem können Sie den Geschmack durch das
Andrücken im Filter beeinflussen. Experimentieren Sie am besten, um Ihre persönliche Note zu finden.
DIE KAFFEESORTE
Bewahren Sie den Kaffee (Pulver, ganze Bohnen oder Espresso Pads) in einem luftdicht schließenden Behälter an einem kühlen, trockenen Ort auf. Sie sollten den Kaffee allerdings nicht in den Kühlschrank oder das Tiefkühlfach stellen.
Sie können fertig gemahlenen Kaffee verwenden. In diesem Fall sollten Sie das Kaffeepulver im Laufe einer Woche verbrauchen, da sich das Aroma mit der Zeit verflüchtigt.
Wir empfehlen ganze Kaffeebohnen zu kaufen und direkt vor der Zubereitung zu
mahlen. Kaffeebohnen sollten nicht länger als 1 Monat gelagert werden.
DAS WASSER
Beim Aufbrühen des Kaffees sollten Sie darauf achten, dass das Wasser mit der richtigen Geschwindigkeit durch das Pulver gepresst wird.
• Wenn das Wasser zu langsam fließt, dann wird der Kaffee sehr dunkel und bitter.
Die Crema auf dem Kaffee wird fleckig.
• Wenn das Wasser zu schnell fließt, dann bleibt ein großer Teil der Aromastoffe
im Kaffeepulver zurück und der Kaffee wird wässrig, fade und ohne Crema.
Sie können die Wasserströmung beeinflussen, in dem Sie das Kaffeepulver beim
Einfüllen mehr oder weniger fest andrücken. Eventuell können Sie den Kaffee auch
grober oder feiner mahlen.
22
Page 23

ENERGIESPARFUNKTION
Die »Design Espresso Advanced Plus« verfügt über eine Energiesparfunktion. Im
Energiesparmodus verbraucht das Gerät 50% weniger Strom als im betriebsbereiten
Modus. Wird das Gerät 30 Minuten nicht benutzt, schaltet es automatisch in den
Energiesparmodus.
HINWEISE ZUM KAFFEEPULVER
Wenn Sie fertig gemahlenen Kaffee verwenden, dann vergewissern Sie sich, dass
das Kaffeepulver für Espresso/Cappuccino-Maschinen geeignet ist. Wenn Sie den
Kaffee selbst mahlen, dann sollte das Pulver nicht zu grob und nicht zu fein sein.
Dadurch beeinflussen Sie die Geschwindigkeit, mit der das Wasser durch das Pulver
gepresst wird und bestimmen letztendlich die Qualität Ihres Kaffees.
• Wenn der Kaffee zu fein gemahlen ist (das Kaffeepulver gleicht Puderzucker und
fühlt sich zwischen den Fingern an wie Mehl) dann kann das Wasser auch unter
Druck nicht durch das Pulver fließen. Der Kaffee wird dadurch dunkel und bitter
und der Schaum wird fleckig.
• Wenn der Kaffee zu grob gemahlen ist, dann fließt das Wasser zu schnell durch
und die Aromastoffe bleiben im Kaffeepulver zurück. Der Kaffee wird wässrig
und fade.
DEN KAFFEE ANDRÜCKEN
Nachdem Sie die richtige Menge Kaffeepulver in den Filter gefüllt haben, müssen
Sie das Kaffeepulver möglichst gleichmäßig andrücken. Verwenden Sie dazu den
flachen Boden des Messlöffels. Das Kaffeepulver muss ziemlich fest angedrückt werden.
• Wenn Sie das Kaffeepulver zu fest andrücken, dann fließt das Wasser zu lang-
sam durch das Pulver. Der Kaffee wird dunkel und bitter.
• Wenn Sie das Kaffeepulver zu wenig andrücken, dann fließt das Wasser zu
schnell durch und die Aromastoffe bleiben im Kaffeepulver zurück. Der Kaffee
wird wässrig und fade.
23
Page 24

PFLEGE UND REINIGUNG
Eine regelmäßige und sorgfältige Pflege ist für die Leistung, Lebensdauer und
Betriebssicherheit Ihrer Maschine sehr wichtig.
Niemals das Gerät, Bauteile des Geräts und das Zubehör in der Spülmaschine reinigen.
Tägliche Reinigung:
Reinigen Sie Siebträger, Siebe, Wasserbehälter, Wasserauffangschale, Tropfblech der Wasserauffangschale, Messlöffel und Tamper mit
warmem Wasser und/oder einem lebensmittelechten Spülmittel. Säubern Sie die
Brühgruppe und die Gruppendichtung im unteren Bereich der Kaffeebrühgruppe von
sichtbarer Verschmutzung ohne diese Teile zu entnehmen.
Reinigung je nach Erfordernis: Reinigen Sie Dampf- und Warmwasserventil nach
jedem Gebrauch. Säubern Sie das Gehäuse bei abgeschalteter und abgekühlter
Maschine. Zur Reinigung ein weiches angefeuchtetes Tuch verwenden. Auf keinen
Fall Scheuermittel oder chlorhaltiges Reinigungsmittel einsetzen!
Entleeren Sie die Wasserauffangschale rechtzeitig. Warten Sie nicht bis
diese randvoll ist.
• WARNUNG: Brühkopf, Siebträger, Filter, Aufsatz und Dampfdüse werden
beim Betrieb sehr heiß. Außerdem kann bei eingeschaltetem Gerät heißes Wasser oder Dampf austreten. Schalten Sie das Gerät immer zuerst aus (Ein-/AusSchalter drücken), ziehen Sie den Netzstecker aus der Steckdose, warten Sie bis
das Gerät abgekühlt ist und leeren Sie den Wassertank und die Tropfschale aus,
wenn Sie das Gerät nicht benutzen, das Gerät bewegen, oder reinigen wollen.
• Niemals das Gerät oder das Netzkabel mit Flüssigkeiten übergießen oder in
Flüssigkeiten stellen oder tauchen.
• Niemals das Gerät oder die Bauteile des Geräts mit scharfen Reinigern oder
irgendwelchen Chemikalien (Bleiche, Desinfektionsmittel, Entkalker) reinigen. Niemals das Gerät oder die Bauteile mit Scheuermitteln oder harten Scheuerhilfen
(Beispiel: Topfreiniger) reinigen. Niemals harte oder scharfkantige Gegenstände
für die Arbeit mit dem Gerät oder zum Reinigen verwenden. Wenden Sie bei der
Arbeit mit dem Gerät keine Gewalt an, um die Bauteile nicht zu beschädigen.
• Das Reinigungswerkzeug enthält eine spitze Nadel. Achten Sie darauf, sich nicht
an der Nadel zu stechen. Lassen Sie kleine Kinder niemals mit den Bauteilen und
Zubehör des Geräts oder dem Reinigungswerkzeug spielen.
DIE DAMPFDÜSE REINIGEN
Reinigen Sie die Dampfdüse jedes Mal, nachdem Sie Milch aufgeschäumt haben,
da Eiweiß und Fett in der Milch sonst eine feste Kruste bilden, durch die die Düse
und die Öffnungen im Aufsatz verstopft werden.
24
Page 25

1. Vergewissern Sie sich unbedingt zuerst, dass das Gerät in der Standby-Position
steht (der Auswahlschalter steht mittig) und der Aufsatz und die Dampfdüse nicht
mehr heiß sind.
2. Ziehen Sie den Aufsatz nach unten von der Dampfdüse ab und spülen Sie den
Aufsatz in warmen Wasser.
3. Wischen Sie die Dampfdüse mit einem feuchten Tuch ab. Schwenken Sie
danach die Dampfdüse über die Tropfschale und nehmen Sie die Hand von der
Düse.
4. Drehen Sie den Auswahlschalter gegen den Uhrzeigersinn auf die Dampfpositi-
on. Dadurch werden Rückstände der Milch aus der Düse gespült.
5. Drehen Sie den Auswahlschalter im Uhrzeigersinn zurück in die Standby-Positi-
on. Drücken Sie den Ein-/Aus-Schalter und schalten Sie das Gerät aus. Ziehen
Sie den Netzstecker und lassen Sie das Gerät abkühlen.
6. Wenn die Dampfdüse durch Ablagerungen verstopft ist, dann stechen Sie die
Düse mit der Nadel im Reinigungswerkzeug frei.
7. Wenn die Dampfdüse auch dadurch nicht durchgängig wird, dann schrauben
Sie die Spitze der Dampfdüse ab.
8. Weichen Sie die Düsenspitze etwa 10 Minuten in warmer Spülmittellösung ein
und öffnen Sie dann die Bohrung in der Düsenspitze mit der Nadel im Reinigungswerkzeug. Achten Sie dabei darauf, sich nicht mit der Nadel zu stechen.
9. Schrauben Sie die Düsenspitze wieder auf die Dampfdüse.
ACHTUNG: Wenden Sie beim Festschrauben der Düsenspitze keine Gewalt an,
um das Gewinde nicht zu überdrehen. Die Düsenspitze muss nur leicht angezogen
werden, so dass keine Lücke zwischen dem Düsenrohr und der Düsenspitze bleibt.
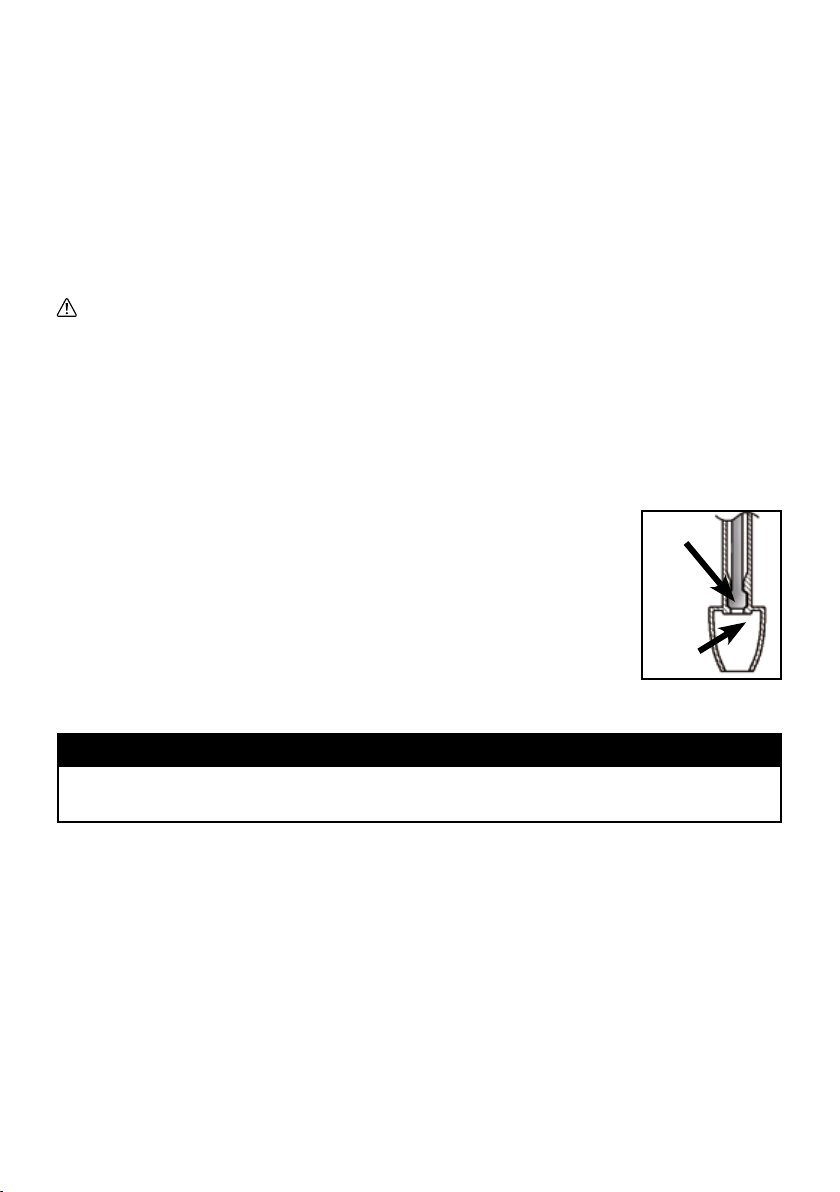
10. Stecken Sie den Aufsatz mit dem schmalen Ende über die Dampfdüse und schie-
ben Sie den Aufsatz soweit nach oben bis er einrastet. Der Aufsatz darf nicht
wackeln oder herunterfallen. Drehen Sie den Aufsatz dabei eventuell etwas hin
und her.
Hinweis:
Der Aufsatz hat innen zwei Widerstände und sitzt korrekt, wenn Sie ihn zum Einrasten bis über den ersten Widerstand auf die Düse geschoben haben. Die Düse
sollte sich nur im schmalen Teil des Aufsatzes befinden und darf nicht unten aus
dem Aufsatz ragen.
25
Page 26

FILTER, SIEBTRÄGER UND BRÜHKOPF REINIGEN
1. Spülen Sie den verwendeten Filter und den Siebträger direkt nach jeder Verwen-
dung mit klarem Wasser aus. Entfernen Sie dabei alle Reste des Kaffeepulvers.
Wenn die Poren im Filter verstopft sind, dann können Sie die Nadel im Reinigungswerkzeug verwenden, um die Poren zu öffnen.
2. Die Innenseite des Brühkopfs wischen Sie am besten mit einem feuchten Tuch
aus, um die Reste des Kaffeepulvers zu entfernen.
3. Spülen Sie den Siebträger und den Brühkopf regelmäßig durch. Setzen Sie dazu
den Siebträger mit einem der Filter (ohne Kaffeepulver!) am Gerät ein und lassen Sie etwas Wasser durchlaufen, um Reste des Kaffeepulvers aus den Poren
zu spülen.
DAS GEHÄUSE UND DIE WÄRMPLATTE REINIGEN
Das Gehäuse des Geräts und die Wärmplatte wischen Sie am besten mit einem
weichen, feuchten Tuch ab. Trocknen Sie das Gerät danach sorgfältig mit einem
sauberen Tuch ab.
ACHTUNG: Verwenden Sie niemals Scheuermittel oder harte Scheuerhilfen (Bei-
spiel: Topfreiniger) zur Reinigung des Geräts oder der Bauteile.
TROPFSCHALE REINIGEN
1. Ziehen Sie die Tropfschale nach vorn aus dem Gerät heraus und leeren Sie sie
aus (spätestens nach einem Tag oder wenn Sie sehen, dass die Tropfschale voll
ist). Besonders wenn die Tropfschale sehr voll ist, müssen Sie darauf achten, den
Inhalt beim Herausziehen nicht zu verschütten.
WARNUNG: Wenn Flüssigkeiten über oder unter das Gerät gelaufen sind, dann
ziehen Sie sofort den Netzstecker und trocknen die Flüssigkeit mit einem sauberen
Handtuch ab, bevor Sie das Gerät wieder in Betrieb nehmen.
2. Nehmen Sie das Rost aus der Tropfschale heraus.
3. Reinigen Sie Tropfschale und Rost mit einem weichen feuchten Tuch und etwas
warmer Spülmittellösung. Trocknen Sie die Bauteile danach gut ab.
26
Page 27

DAS GERÄT ZUSAMMENSETZEN
Arbeiten Sie nach folgender Anleitung, um alle Bauteile nach der Reinigung wieder
richtig am Gerät einzusetzen.
1. Legen Sie das Edelstahlrost auf die Tropfschale. Fassen Sie die Tropfschale an
den Seiten und schieben Sie die Tropfschale an der Vorderseite des Geräts in
den Gerätesockel.
2. Setzen Sie den Wassertank ein. Sie können den Tank am geöffneten Deckel
anheben. Achten Sie darauf, dass die Führungsrillen auf der Rückseite des Wassertanks richtig an den Aussparungen der Geräterückseite einrasten. Drücken
Sie den Tank soweit nach unten, dass sich das Wasserventil im Boden des Wassertanks öffnet.
Hinweis:
Beim Herunterdrücken des Tanks sehen Sie, dass sich der Ventildeckel nach oben
öffnet.
DEN WASSERTANK ENTKALKEN
Beim normalen Gebrauch des Geräts können sich Kalkablagerungen im Wassertank und in der Maschine sammeln und die Wasserströmung behindern. Außerdem
steigt durch Kalkablagerungen der Energieverbrauch und die Qualität des Kaffees
wird beeinträchtigt.
Zur Vorbeugung einer starken Verkalkung empfehlen wir Ihnen, die Maschine regelmäßig unter Berücksichtigung des Härtegrades Ihres Wassers zu entkalken. Hierbei
ist die Verwendung schonender Entkalkungsmittel wichtig, die kein Metall angreifen.
Bitte verwenden Sie zum Entkalken ausschließlich den Gastroback Premium Entkalker (Art-Nr.: 98175). Dieser Entkalker enthält spezielle metallschonende Additive
und ist auf die in unseren Maschinen verwendeten Bauteile abgestimmt. Bei dem
Gastroback Premium Entkalker verwenden Sie eine Mischung aus 50 ml Entkalker
und max. 750 ml Wasser. Aufgrund der unterschiedlichen Wasserhärten und Benutzungen können wir hier keine genauen Vorgaben über die Häufigkeit machen. Die
folgende Tabelle ist eine unverbindliche Empfehlung und dient nur zur Orientierung.
Härtebereich Empfohlene Häufigkeit Liter oder Wochen
weich alle 150 Liter alle 16 bis 20 Wochen
mittel alle 90 Liter alle 4 bis 8 Wochen
hart alle 60 Liter alle 2 bis 4 Wochen
27
Page 28

ACHTUNG: Betreiben Sie das Gerät nicht mit völlig entleertem Wassertank. Schal-
ten Sie das Gerät immer zuerst aus, bevor Sie den Wassertank aus dem Gerät nehmen.
1. Drücken Sie auf die Ein/Aus-Taste, um das Gerät auszuschalten, und ziehen Sie
den Netzstecker. Lassen Sie das Gerät abkühlen.
2. Nehmen Sie den Siebträger vom Brühkopf und den Aufsatz von der Dampfdüse.
Gießen Sie dann die Mischung 750 ml Wasser und 50 ml Gastroback Premium
Entkalker in den Wassertank.
3. Stecken Sie den Netzstecker in die Steckdose und schalten Sie das Gerät an der
Ein-/Aus -Taste ein. Stellen Sie einen Krug oder eine passende Schüssel unter
den Brühkopf und die Dampfdüse. Sobald das Gerät die richtige Temperatur
erreicht hat, hört die Heizkontrolllampe auf zu leuchten.
4. Drehen Sie den Auswahlschalter rechts auf die Espressoposition und lassen Sie
etwa die Hälfte der Mischung aus Wasser und Entkalker durch den Brühkopf
laufen.
5. Schalten Sie den schwarzen Kippschalter auf die Heißwasserposition
6. Drehen Sie den Auswahlschalter gegen den Uhrzeigersinn in die Dampf- und
Heißwasserposition und lassen Sie die andere Hälfte der Mischung aus Wasser
und Entkalker durch die Dampfdüse laufen.
7. Sobald der Wasserstand bis unter die MIN-Marke abgesunken ist, drehen Sie
die Auswahlschalter im Uhrzeigersinn mittig auf die Bereitschaftsposition.
8. Drücken Sie auf die Ein/Aus-Taste, um das Gerät auszuschalten und ziehen
Sie den Netzstecker aus der Steckdose. Nehmen Sie den Wassertank aus dem
Gerät und spülen Sie den Wassertank sorgfältig mit klarem Wasser aus. Füllen
Sie den Wassertank dann mit klarem Wasser wieder auf.
9. Setzen Sie den Wassertank wieder am Gerät ein und spülen Sie den Brühkopf
und die Dampfdüse nach der Anleitung in den Punkten 3 bis 8 mit dem klaren
Wasser durch. Danach ist das Gerät wieder für die Verwendung bereit.
Hinweis:
Geräteschäden, die durch Kalkablagerungen in und am Gerät verursacht werden,
sind nicht Teil der Gewährleistung. Falls Sie Ihr Gerät zu einer technischen Überprüfung einsenden möchten, legen Sie bitte keine Anbauteile wie z. B. Siebträger
und Wasserauffangschale bei.
WARNUNG: Der Wassertank sollte während des Entkalkens nicht entfernt wer-
den.
28
Page 29

TECHNISCHE DATEN
Modell:
Stromversorgung:
Leistungsaufnahme:
Länge des Netzkabels:
Gewicht:
Abmessungen:
Fassungsvermögen des
Wassertanks:
Prüfzeichen:
Art.-Nr.: 42606 Design Espresso Pro
230 - 240 V Wechselstrom, 50 - 60 Hz
1.250 Watt
ca. 100 cm
ca. 5,64 kg
ca. 206 mm x 270 mm x 325 mm (Breite x Tiefe x Höhe)
1,7 Liter
STÖRUNGEN BESEITIGEN
Problem Mögliche Ursache Die Lösung des Problems
Der Kaffee läuft nicht
durch.
Der Kaffee läuft zu
schnell durch.
Das Gerät ist nicht eingeschaltet oder hat keinen Strom.
Der Wassertank ist leer. Füllen Sie ausreichend Wasser ein.
Der Auswahlschalter steht nicht
auf Espresso-Position.
Der Kaffee ist zu fein gemah-
len.
Der Kaffee ist zu fest ange-
drückt.
Der Filter ist verstopft. Reinigen Sie den Filter. Sie können die Poren des Filters mit
Der Kaffee ist zu grob gemahlen.
Sie haben zu wenig Kaffee eingefüllt.
Der Kaffee ist nicht fest genug
angedrückt.
Prüfen Sie: Ist der Netzstecker eingesteckt und das Gerät
eingeschaltet (Powerlampe leuchtet)?
Drehen Sie den Auswahlschalter auf Espresso-Position.
Verwenden Sie ein Kaffeepulver, das für Espresso-Maschinen
geeignet ist; siehe ›Nützliche Tipps‹.
Drücken Sie das Kaffeepulver nicht zu fest in den Filter; siehe
›Nützliche Tipps‹.
dem Reinigungswerkzeug durchgängig machen; siehe ›Pflege und
Reinigung‹.
Verwenden Sie ein Kaffeepulver, das für Espresso-Maschinen
geeignet ist; siehe ›Nützliche Tipps‹.
Messen Sie mit dem Messlöffel eine ausreichende Menge Kaffeepulver; siehe ›Einen Kaffee zubereiten‹.
Drücken Sie das Kaffeepulver fester in den Filter; siehe ›Nützliche Tipps‹.
29
Page 30

Problem Mögliche Ursache Die Lösung des Problems
Der Kaffee läuft an der
Außenseite des Siebträgers herunter.
Der Siebträger ist nicht richtig
am Brühkopf eingesetzt.
Auf dem Filterrand ist Kaffeepulver verschüttet.
Setzen Sie den Siebträger richtig ein. Siehe: ‚Den Siebträger
einsetzen’.
Wischen Sie verschüttetes Kaffeepulver sorgfältig vom Rand
des Filters ab, bevor Sie den Siebträger am Gerät einsetzen.
Zu viel Kaffeepulver im Filter. Verwenden Sie die richtige Menge Kaffee für den richtigen
Filter.
Das Kaffeepulver ist zu fest
Drücken Sie das Kaffeepulver nicht so fest an.
angedrückt.
Der Kaffee tropft nur
spärlich aus dem Filter.
Falscher Filter für die verwendete Kaffeemenge.
Zu wenig Wasser im Wassertank.
Das Kaffeepulver ist zu fein
gemahlen.
Verwenden Sie die richtige Menge Kaffee für den richtigen
Filter.
Füllen Sie den Wassertank auf.
Verwenden Sie Kaffeepulver, das für die Espresso-Maschine
geeignet ist. Fertig gemahlenes Kaffeepulver ist entsprechend
gekennzeichnet.
Die Wasserkanäle im Gerät
und/oder die Filterporen sind
Entkalken Sie das Gerät und öffnen Sie die Poren des Filters
mit der Nadel des Reinigungswerkzeugs.
verstopft.
Das Gerät macht ein
ungewöhnliches Sauggeräusch.
Der Wassertank ist leer. Füllen Sie ausreichend Wasser in den Tank.
Der Wassertank ist nicht richtig
eingesetzt.
Setzen Sie den Wassertank richtig am Gerät ein. Die Führungsrillen auf der Rückseite des Wassertanks müssen richtig
an den Aussparungen der Geräterückseite einrasten. Drücken
Sie den Tank soweit nach unten, dass sich das Wasserventil
im Boden des Wassertanks öffnet.
Der Kaffee ist zu
schwach oder wässrig.
Das Kaffeepulver ist zu grob
gemahlen.
Verwenden Sie Kaffeepulver, das für die Espresso-Maschine
geeignet ist. Fertig gemahlenes Kaffeepulver ist entsprechend
gekennzeichnet.
Der Kaffee ist zu kalt. Das Gerät wurde nicht vorge-
heizt.
Warten Sie vor dem Aufbrühen des Kaffees immer, das das
Gerät betriebsbereit ist und die Heizkontrolllampe aufgehört hat
zu leuchten. Erst dann hat das Gerät die richtige Temperatur
erreicht.
Die Tassen wurden nicht vorgewärmt.
Die Wärmplatte (auf dem Gerätedach) wird beheizt, sobald
Sie das Gerät einschalten. Stellen Sie Ihre Tassen einige Zeit
dort ab, bevor Sie den Kaffee aufbrühen.
Die Milch ist nicht heiß genug
(für Cappuccino oder Latté).
Verwenden Sie das Milchaufschäumkännchen zur Zubereitung des Milchschaums und halten Sie die Hand dabei unter
den Boden des Krugs. Wenn der Boden des Krugs zu heiß
zum Anfassen wird, hat die Milch die richtige Temperatur.
30
Page 31

Problem Mögliche Ursache Die Lösung des Problems
Keine Kaffeecrema Der Kaffee ist nicht fest genug
angedrückt.
Das Kaffeepulver ist zu grob
gemahlen.
Das gemahlene Kaffeepulver
ist nicht mehr frisch.
Drücken Sie das Kaffeepulver etwas fester an; siehe ›Das
Kaffeepulver andrücken‹.
Verwenden Sie Kaffeepulver, das für Espresso-Maschinen
geeignet ist. Siehe: ›Hinweise zum Kaffeepulver‹.
Bewahren Sie gemahlenen Kaffee nicht länger als 1 Woche
in einem luftdicht schließenden Gefäß auf.
Die Filterporen sind verstopft. Durchstoßen Sie die Filterporen mit der Nadel am Reinigungs-
werkzeug. Siehe ›Filter, Siebträger und Brühkopf reinigen‹.
Das Gerät macht pulsierende, pumpende
Dies sind die normalen Arbeitsgeräusche des Geräts.
-/-
Geräusche während
des Brühvorgangs oder
beim Aufschäumen der
Milch.
Das Gerät erzeugt keinen Dampf
Das Gerät ist nicht eingeschaltet.
Vergewissern Sie sich, dass das Gerät Strom hat und einge-
schaltet ist (Powerlampe leuchtet).
Der Wassertank ist leer. Füllen Sie den Wassertank auf.
Die Dampfposition wurde noch
nicht ausgewählt.
Drehen Sie den Dampfkontroll-Schalter in die Dampfposi-
tion;
Die Dampfdüse ist verstopft. Lassen Sie die Dampfdüse abkühlen, nehmen Sie den
Aufsatz ab und versuchen Sie die Dampfdüse mit dem
Reinigungswerkzeug zu öffnen. Wenn dies nicht gelingt,
dann nehmen Sie die Dampfdüse ab und reinigen Sie die
Dampfdüse nach der Anleitung im Abschnitt ›Die Dampfdüse
reinigen‹.
Die Milch lässt sich
nicht aufschäumen.
Das Gerät entwickelt nicht
genug Dampf.
Die Milch ist nicht frisch oder
nicht kalt genug.
Die Dampfdüse könnte verstopft sein. Siehe: ›Die Dampfdü-
se reinigen‹.
Die Milch muss frisch und kalt sein. Siehe: ›Milch schäu-
men‹.
AUFBEWAHRUNG
Schalten Sie das Gerät immer ganz aus (POWER-Taste), ziehen Sie den Netzstecker
aus der Steckdose und reinigen Sie das Gerät und alle Bauteile und Werkzeuge,
wenn Sie das Gerät längere Zeit nicht benutzen wollen (siehe: ›Pflege und Reinigung‹).
Entleeren Sie den Wassertank und die Tropfschale.
Gehen Sie sicher, dass die Maschine abgekühlt, sauber und trocken ist.
Bewahren Sie die Maschine geradestehend auf. Stellen Sie keine anderen Gegen-
31
Page 32

stände auf die Maschine.
Wenn das Gerät über einen längeren Zeitraum nicht benutzt wird, empfehlen wir
eine Gruppenreinigung durchzuführen. Den Siebträger danach nicht mehr in die
Gruppe einspannen.
Bewahren Sie das Gerät stets an einem sauberen, trockenen und frostfreien Ort
auf, an dem es gegen übermäßige Belastungen (Herunterfallen, Stöße, Feuchtigkeit,
Frost, direktes Sonnenlicht) geschützt und für kleine Kinder unzugänglich ist. Legen
Sie keine schweren oder harten Gegenstände auf das Gerät oder seine Bauteile.
Behandeln Sie das Netzkabel mit Vorsicht. Niemals das Netzkabel knicken, quetschen oder verknoten. Niemals am Netzkabel ziehen oder reißen.
Niemals die Bauteile oder Werkzeuge des Gerätes für andere Zwecke verwenden als zur Arbeit mit dem Gerät. Bewahren Sie die Bauteile und Werkzeuge des
Gerätes am besten immer zusammen mit dem Gerät auf.
Lagerung
Setzen Sie das Gerät nach der Reinigung wieder zusammen. Das Zubehör des
Gerätes bewahren Sie am besten zusammen mit dem Gerät auf. Bewahren Sie das
Gerät an einem für kleine Kinder unzugänglichen Ort auf, an dem es vor übermäßigen Belastungen geschützt ist. Legen Sie niemals harte, scharfkantige oder schwere
Gegenstände auf das Gerät um die Wärmeplatte oder das Rost nicht zu beschädigen.
ENTSORGUNGSHINWEISE
Gerät und Verpackung müssen entsprechend den örtlichen Bestimmungen zur
Entsorgung von Elektroschrott und Verpackungsmaterial entsorgt werden.
Informieren Sie sich gegebenenfalls bei Ihrem örtlichen Entsorgungsunternehmen.
Entsorgen Sie elektrische Geräte nicht im Hausmüll, nutzen Sie die Sammelstellen
der Gemeinde. Fragen Sie ihre Gemeindeverwaltung nach den Standorten der Sammelstellen. Wenn elektrische Geräte unkontrolliert entsorgt werden, können während
der Verwitterung gefährliche Stoffe ins Grundwasser und damit in die Nahrungskette
gelangen, oder die Flora und Fauna auf Jahre vergiftet werden. Wenn Sie das Gerät
durch ein neues ersetzen, ist der Verkäufer gesetzlich verpflichtet, das alte mindestens kostenlos zur Entsorgung entgegenzunehmen.
32
Page 33

INFORMATION UND SERVICE
Weitere Informationen erhalten Sie im Internet unter www.gastroback.de. Wenden
Sie sich mit Problemen, Fragen und Wünschen gegebenenfalls an: Gastroback
Kundenservice,Tel.: 04165/2225-0 oder per E-Mail: info@gastroback.de
GEWÄHRLEISTUNG/GARANTIE
Wir gewährleisten für alle Gastroback-Elektrogeräte, dass sie zum Zeitpunkt des
Kaufes mangelfrei sind. Nachweisliche Fabrikations- oder Materialfehler werden
unter Ausschluss weitergehender Ansprüche und innerhalb der gesetzlichen Frist
kostenlos ersetzt oder behoben. Ein Gewährleistungsanspruch des Käufers besteht
nicht, wenn der Schaden an dem Gerät auf unsachgemäße Behandlung, Überlastung und/oder Installationsfehler zurückgeführt werden kann. Ohne unsere schriftliche Einwilligung erfolgte, technische Eingriffe von Dritten, führen zum sofortigen
Erlöschen des Gewährleistungsanspruchs. Der Käufer muss zur Geltendmachung
des Anspruchs den Original-Kaufbeleg vorlegen und trägt im Gewährleistungsfall
die Kosten und das Risiko des Transportes.
Hinweis:
Kunden aus Deutschland und Österreich: Für die Reparatur- und Serviceabwicklung möchten wir Sie bitten, Gastroback Produkte an folgende Anschrift zu senden: Gastroback GmbH, Gewerbestr. 20, 21279 Hollenstedt.
Kunden anderer Länder: Bitte kontaktieren Sie Ihren Händler
Bitte haben Sie dafür Verständnis, dass unfreie Sendungen nicht angenommen werden können. Einsendung von Geräten: Bitte verpacken Sie das Gerät transportsicher, ohne Zubehör und legen Sie den Garantiebeleg sowie eine kurze Fehlerbeschreibung bei. Die Bearbeitungszeit nach Wareneingang des defekten Gerätes
beträgt ca. 2 Wochen; wir informieren Sie automatisch. Bei defekten Geräten außerhalb der Garantie senden Sie uns das Gerät bitte an die angegebene Adresse. Sie
erhalten dann einen kostenlosen Kostenvoranschlag und können dann entscheiden,
ob das Gerät zu den ggf. anfallenden Kosten repariert, unrepariert und kostenlos an
Sie zurück gesendet oder vor Ort kostenlos entsorgt werden soll.
Das Gerät ist ausschließlich für den Privatgebrauch bestimmt und ist nicht
für den gewerblichen Betrieb ausgelegt. Verwenden Sie das Gerät nur
wie in dieser Gebrauchsanleitung beschrieben. Jede andere Verwendung
gilt als nicht bestimmungsgemäß und kann zu Sachschäden oder sogar
zu Personenschäden führen. Der Hersteller übernimmt keine Haftung für
Schäden, die durch nicht bestimmungsgemäßen Gebrauch entstanden
sind.
33
Page 34

Kaffee-Rezepte
Espresso
Intensiv und aromatisch.
Für einen Espres-
so (oder kleinen
Schwarzen) brauchen Sie 7g Kaffeepulver. Brühen
Sie etwa 30 ml auf
und servieren Sie in
einem kleinen Glas oder einer Tasse.
Großer Schwarzer
Ein großer Schwarzer wird für gewöhnlich zunächst als
Standard- Espresso hergestellt.
Danach wird nach
Geschmack heißes
Wasser zugegeben.
Flacher Weißer
Ein einfacher
Espresso wird in
einer Tasse oder
einem Glas mit
heißer Milch überschichtet. Mengenverhältnis: ½ Kaffee, ½ heiße Milch.
Klassischer Kaffee Latte Macchiato
Dies ist der traditionelle Morgenkaffee
in Italien und Frankreich. Der Kaffee
wird typischerweise in einem Glas
serviert. Dazu wird
ein Täfelchen Schokolade oder süßes
Gebäck gereicht.
Zubereitung: Zunächst wird ein einfacher Espresso aufgebrüht. Dann wird
dieselbe Menge heiße Milch langsam
am Innenrand der Tasse hinunter gegossen, um eine cremige Beschaffenheit
und eine schöne Schaumschicht zu erreichen.
Cappuccino
Der echte Cappuccino wird sehr
leicht und lauwarm
serviert. Dazu werden 1/3 einfacher
Espresso mit 1/3
heißer Milch aufgefüllt und mit 1/3 Milchschaum überschichtet.
Für die perfekte Optik halten Sie ein
Blatt Papier über eine Hälfte der Tasse
während Sie etwas geraspelte Schokolade über die andere Hälfte streuen.
34
Page 35

Macchiato
Con Pannia
Ein kleiner Espresso wird in eine
70-ml-Tasse gefüllt
und mit einem Löffel feinem Milchschaum garniert.
Mocca Frappe
(zwei Portionen)
Diese herrliche
Erfrischung ist im
Handumdrehen fertig und wird die
Genießer von Kaffee und Schokoladen-Drinks gleichermaßen begeistern. Schmelzen Sie zwei
gehäufte Teelöffel einer geraspelten
Qualitätsschokolade in zwei doppelt
starken kleinen Espressos. Geben Sie
eine halbe Tasse kalte Milch dazu und
9 Eiswürfel. Mixen Sie das Ganze in
einem Mixer bei langsamer Geschwindigkeit durch, bis die Mischung eine
glatte, samtige Beschaffenheit hat. Verteilen Sie die Mischung auf 2 Gläser
und servieren Sie sofort.
Espresso Affogato
Diese süße Versuchung ist einfach
unwiderstehlich
und besteht aus
einer Kugel Premium-Vanilleeis in Espresso. Eventuell können Sie auch einen Schuss von Ihrem
Lieblings-Likör dazu geben. Für die
Optik servieren Sie diese Köstlichkeit in
einem Martini-Glas mit zwei MürbeteigKeksen.
Con Pannia bedeutet mit Sahne. Dies
ist eine schicke
Variante des althergebrachten Wiener
Kaffees. In einer
Tasse für 90 bis
120 ml wird ein
doppelter Espresso gefüllt und mit einem
Schlag frischer cremig geschlagener
Sahne garniert. Mit Zimt bestäuben und
sofort servieren.
Tiramisu (für 4 Personen)
Zutaten:
1 ½ Tassen Mascarpone oder Doppelrahmfrischkäse
1 ¼ Tassen Sahne
2 ½ Esslöffel Puderzucker
½ Tasse starker Espresso, abgekühlt
½ Tasse Tia Maria oder Amaretto
16 Biskuitstäbchen
Kakaopulver zum Bestäuben
Zubereitung:
1. Mischen Sie Mascarpone, Sahne
und Puderzucker in einer großen Schüssel. Schlagen Sie die Mischung mit dem
Schneebesen auf, bis sie eine cremige
Beschaffenheit erreicht. Stellen Sie die
Mischung dann kalt.
2. Mischen Sie den Kaffee und den
Likör in einer Schüssel. Tauchen Sie die
Biskuitstäbchen kurz in die Kaffee/LikörMischung. Legen Sie die Hälfte der Biskuitstäbchen in einer Schale aus. Der
Boden der Schale muss vollständig mit
Biskuitstäbchen bedeckt werden.
3. Schichten Sie die Hälfte der Mascarpone-Creme über die Biskuitstäbchen.
Legen Sie dann die restlichen Biskuitstäb-
35
Page 36

chen über der Creme-Schicht aus.
Kaffee-Zimt-Walnuss-Muffins
4. Schichten Sie danach die restliche
Mascarpone-Creme darüber.
5. Stäuben Sie Kakao darüber und stellen Sie das Dessert bis zum Servieren
mindestens ½ Stunde kalt.
6. Servieren Sie mit frischen Früchten
(Beispiel: Himbeeren) und frischem Kaffee.
Gehaltvoller Kaffee-Aufstrich
Zutaten:
2 Tassen gesiebter Puderzucker
1 Esslöffel schaumig geschlagene Butter
¼ Tasse starker, heißer Espresso
Zubereitung:
Mischen Sie die Hälfte des Kaffees,
Puderzucker und Butter in einer Schüssel. Rühren Sie gut durch und geben Sie
den restlichen Kaffee nach und nach
dazu bis Sie eine streichfähige Masse
erhalten.
(für 12 Personen)
Zutaten:
2 ½ Tassen Mehl
2 Teelöffel Backpulver
1 Teelöffel gemahlener Zimt
¾ Tassen feiner Kandis
1 Tasse saure Sahne
2 Eier
1 Teelöffel fein geriebene Schale einer
ungespritzten Zitrone
1/3 Tasse Olivenöl
¾ Tassen starker, abgekühlter Espresso
1 Tasse grob gehackte Walnüsse
Zubereitung:
1. Sieben Sie Mehl, Backpulver und
Zimt zusammen in eine Schüssel und
mischen Sie den Zucker unter.
2. Mischen Sie saure Sahne, Eier,
Zitronenschale, Olivenöl und Espresso
in einer mittelgroßen Schüssel gut durch.
3. Kneten Sie diese Mischung unter die
Mehlmischung. Rühren Sie dabei nicht
zu stark durch.
36
4. Geben Sie den Teig in 12 leicht
gefettete und am Boden mit Backpapier
ausgelegte Muffin-Förmchen. Die Förmchen sollten bis zu 2/3 gefüllt sein.
5. Stellen Sie die Muffins in den auf
180° C vorgeheizten Ofen und backen
Sie die Muffins etwa 12 bis 15 Minuten
bis die Muffins innen gar sind.
6. Servieren Sie die noch warmen Muffins mit etwas Puderzucker überstreut.
Reichen Sie dazu einen Cappuccino
oder Café Latté.
Page 37

Operating Instructions
GASTROBACK
DESIGN ESPRESSO PLUS
®
E.S.E.-PAD-SYSTEM
suitable for espresso pads
Art.-No. 42606 »Design Espresso Plus«
Model and attachments are subject to change!
Read all provided instructions before first use!
For household use only!
Page 38

Carefully read all provided instructions before you start running the
appliance and pay attention to the warnings mentioned in these
instructions.
Table of Contents
Important Warning Notes ...................................................................................................40
Knowing Your Design Espresso Plus .....................................................................................41
Important Safeguards .........................................................................................................42
General Safety Instructions.............................................................................................42
Important Safeguards for all Electrical Appliances ............................................................46
High Temperatures—Risk of Burns ...................................................................................47
Technical Specifications .....................................................................................................48
Operation ........................................................................................................................48
Assembling the Appliance .............................................................................................48
Preparing the Appliance for Operation ...........................................................................49
Filling the Water Tank ...................................................................................................50
Preparing Coffee .........................................................................................................51
Tamping the Espresso ...................................................................................................51
Using Espresso Pads .....................................................................................................51
Flushing the Grouphead ................................................................................................52
Pre-Heating the Cups ....................................................................................................52
Inserting the Portafilter ...................................................................................................52
Brewing the Espresso ....................................................................................................52
The Pre-Brew-Function ....................................................................................................53
Emptying the Portafilter ..................................................................................................53
Frothing Milk ...............................................................................................................54
Removing the Attachment ........................................................................................54
Using the Steam Function ........................................................................................54
Frothing Milk .........................................................................................................54
Hot Water ..................................................................................................................57
Useful Tips........................................................................................................................58
The Coffee ...................................................................................................................58
The Water ...................................................................................................................58
Information about Ground Coffee ...................................................................................59
Tamping the Coffee ......................................................................................................59
Energy Saving Features .................................................................................................. 59
Care and Cleaning ...........................................................................................................59
Cleaning the Steam Wand ............................................................................................60
Cleaning the Filters, the Portafilter and the Grouphead ......................................................61
Cleaning the Housing and the Warming Plate ..................................................................61
Cleaning the Drip Tray ..................................................................................................62
Assembling the Appliance .............................................................................................62
Descaling the Water Tank .............................................................................................62
Trouble Shooting ...............................................................................................................64
Storage ............................................................................................................................66
Notes for Disposal .............................................................................................................67
Information and Service .....................................................................................................67
Warranty .........................................................................................................................67
Coffee-Recipes ..................................................................................................................69
Page 39

DEAR CUSTOMER!
Congratulations on the purchase of your new Gastroback Design Espresso Plus.
The durable housing, the handy size and professional functionality, as well as an
outstanding performance and easy handling of the Design Espresso Plus is ideal for
getting started in the world of espresso.
A variety of specialty coffees such as latte macchiato, cappuccino and latte can be
prepared easily. The required milk foam is provided through the integrated steam
wand in a few seconds. The professional Ulka Espresso pump with 15 bar pressure
always creates a perfect crema in the cup.
With its thermo-block heating system your Design Espresso Plus heats up to operating
temperature quickly. The digital temperature control keeps the brewing temperature
constant. The pre-brew function is a further guarantee of a great taste experience.
For quick coffee indulgence the additional »Easy Serving Espresso-filter« can be also
used with espresso pads.
A perfect combination of classy design and optimum functionality. The Design
Espresso Plus is equipped with extensive accessories. Stainless steel doublefilter for
one and two cups, ESE pad system filter, stainless steel milk jug, measuring spoon
with tamper and cleaning set are included in delivery.
These instructions for use will inform you about the various functions and features,
which make it easy to take pleasure in your new Gastroback Design Espresso Plus.
We hope that you will enjoy your new Gastroback Design Espresso Plus.
Your Gastroback GmbH
39
Page 40

IMPORTANT WARNING NOTES
• Never leave small children unsupervised with the appliance or the parts of the
appliance! Always make sure that the appliance is properly and fully assembled
before you plug the power cord into the outlet and turn on the appliance.
• Do not remove the steam wand out of the milk, as long as steam escapes. Otherwise hot milk may splash out of the frothing jug. Turn the steam dial always back
to the starting position (standby(O) position) before you remove the frothing jug
from the steam wand. Several seconds after turning off the steam function a short
burst of steam from the steam wand occurs. Be careful not to scald yourself on
the hot steam.
• The metal parts of the portafilter will be very hot during and after operation.
Grasp the hot portafilter only on the black handle. Cool the portafilter and the
filter insert in cold water, before you touch the metal parts.
• The steam wand is very hot after use for some time. Always check first that the
component has cooled down before touching the steam wand .
• Hot steam escapes from the steam wand. Never place your hands or other body
parts onto or under the steam wand if the selection switch is in the steam position.
Hold the frothing jug under the steam wand before you turn the selection switch
to the steam position.
• Hot steam escapes from the steam wand. This component is very hot. Always be
sure not to scald on the hot steam. During steam generation never grasp the steam
wand. Touch the steam wand during operation only by the dark plastic handle.
• Never remove the steam wand from the milk, as long as steam escapes. Otherwise, hot milk may splash out of the frothing jug. Always turn the selection switch
to the standby (O) position back, before removing the frothing jug from the steam
wand.
• Always switch off before cleaning the the ppliance, disconnect the plug from the
wall outlet and let the appliance cool down.
• The water tank should not be removed during descaling.
40
Page 41

KNOWING YOUR DESIGN ESPRESSO PLUS
Selection Switch
for espresso (right), steam & hot water (left),
standby (middle/O)
Heating Indicator (HEATING)
lights red during preheating
and turns off when the appliance
is ready for operation
Selection Switch
steam or hot water
Power Indicator (POWER)
lights up red when the appliance is
switched on
On-/Off Switch
Grouphead
Heavy Stainless Steel
Portafilter
can be inserted with a single
movement; especially well crema
by stainless steel double wall filters
Performance 1.250 W
with thermo-block heating system for immediate
use
Non-Slip Rubber Feet
prevents slippage and scratches on the table
Cup-Preheating-Function
warming plate for cups
Water Tank
removable 1.5 litre water tank,
easy to fill
360° Swivel Steam
Wand
with attachment; can be easily
moved for frothing milk swirl
into the right position
Automatic Depressurization System
Large Cups
extra space for large cups by
additional clearance between
the filter holder and drip tray
Extensive Range of Accessories Included:
stainless steel double-wall filter for one and two cups, ESE pad
system, stainless steel milk jug, measuring spoon with tamper,
cleaning set
Siebeinsätze
Pad Filter One Cup Filter Two Cup Filter
E.S.E.-PAD-SYSTEM
suitable for espresso pads
41
Page 42

IMPORTANT SAFEGUARDS
Carefully read all instructions before operating this appliance and save for further
reference. Do not attempt to use this appliance for any other than the intended use
described in these instructions. Any other use, especially misuse, can cause severe
injuries or damage by electric shock, heat or fire, and moving parts. Any use for
other purposes is prohibited by the manufacturer and must be avoided. For damages
due to improper use, we assume no liability and are not responsible for recourse.
Perform only operations with this appliance described in this manual. Do not leave
the appliance unattended while in operation. The appliance meets guidelines that
are mandatory for the CE marking.
These instructions are an essential part of the appliance. Do not pass the appliance
without this booklet to third parties.
Any operation, repair and technical maintenance of the appliance or any part of it,
other than described in these instructions may only be performed at an authorised
service centre. Please contact your vendor.
GENERAL SAFETY INSTRUCTIONS
• Use and store the appliance in a clean, frost-free place where it is protected from
moisture, dampness and excessive strain. This appliance is for household use only
and not intended for use in moving vehicles. Do not operate or store the appliance
in humid or wet areas or outdoors. Any use of accessories, attachments or spare
parts not recommended by the manufacturer may result in damage and/or injuries to persons. Keep the appliance and all parts always in an inaccessible place
for small children. Only suitable for indoor and domestic use.
• Check the entire appliance regularly for proper operation—especially the power
cord. Do not use the appliance if the non-stick coating is damaged in any way
(e.g. scratched, or peeling off). Do not operate the appliance, when liquids are
in the housing of the appliance or accumulate under the appliance or overflow.
Do not operate the appliance, when the appliance or any part of it is likely to
be damaged, to avoid risk of fire, electric shock or any other damage and/or
injuries to persons. The appliance is likely to be damaged if the appliance was
subject to inadmissible strain (e.g. overheating, mechanical or electric shock), or
if there are any cracks, excessively frayed or melted parts, or distortions, or if the
appliance is leaking or not working properly. In this case, immediately unplug the
appliance and return the entire appliance (including all parts and accessories) to
an authorised service centre for examination and repair.
• Use only components, tools, spare parts and accessories for the appliance provided and recommended by the manufacturer for this purpose. Damaged or unsuitable components may break during operation, damage the appliance and/or
cause serious injury or property damage.
• Always ensure the appliance is properly assembled before connecting to power
42
Page 43

outlet and operating. Follow the instructions provided in this book. Before each
use, ensure that the filter is properly and securely inserted in the grouphead, and
the selection switch is positioned to standby (center). If the selector switch is positioned to the right (in brewing position), after preheating hot water emerges from
the group head. If the selector switch is positioned to the left (steam/hot water),
hot steam or hot water (depending on the setting) emerges from the steam wand.
Make sure that the black folding switch is in the correct position: steam or hot
water.
• During operation the appliance is under overpressure! Switch the appliance
always first to the standby position before removing the filter.
• During operation keep the appliance in an appropriate distance of at least 15
cm on each side and 1 m above to furniture, walls, boards, curtains, and other
objects. Do not operate the appliance beneath or below any heat-sensitive or
moisture-sensitive materials, boards, or drop-lights to avoid damage caused by
steam, heat, or condensate. Operate the appliance on a well accessible, stable,
level, dry, heat-resistant, water-resistant and suitable large table or counter. Do
not place the appliance over a power cord, or near the edge of the table or counter, or on wet or inclined surfaces, or where it can fall. Always keep the appliance
and the table or counter clean and dry, and wipe off spilled liquids immediately.
• Do not place any clothes or tissue or other objects under or on the appliance
during operation, to avoid risk of fire, electric shock and overheating. Before
operation, always ensure that there are no foreign objects in or under the pot,
and the appliance is assembled properly and not leaking with the lid and upper
cover firmly in place. Solely use the appliance for processing edible food. Immediately unplug the appliance, if there is any kind of malfunction or problem (e.g.
leaking, overheating).
• This appliance is not intended for use by persons (including children) with reduced
physical, sensory or mental capabilities, or lack of experience and knowledge,
unless they have been given supervision or instruction concerning use of the
appliance by a person responsible for their safety. Children must be supervised
to ensure that they do not play with the appliance or any parts of the appliance
or the packaging. Do not leave the appliance unattended, when it is in reach of
young children. Always keep the appliance where it is dry and clean and where
young children cannot reach it. Do not place any hard and/or heavy objects on
the appliance or any part of it. Take care that no one will pull the appliance by
the power cord.
• Remove and safely discard any packaging material and promotional labels or
stickers before using Design Espresso Plus for the first time.
• Do not place the appliance near the edge of a bench or table during operation.
Ensure the surface is level, clean and free of water and other substances. Do not
43
Page 44

use the appliance on a sink drain board. Do not place the appliance on or near
a hot gas or electric burner, or where it could touch a heated oven.
• The appliance is not intended to be operated by means of an external timer or
separate remote control system.
• Do not use attachments other than those provided with the appliance. The use of
accessory attachments not recommended by Gastroback may result in fire, electric shock or injury to persons.
• Do not attempt to operate the appliance by any method other than those described in this book.
• Use only cold, tap water in the water tank. Do no use any other liquid. Do not
use any harsh chemicals and descalers for descaling (see ›Care and Cleaning‹).
• Never use the appliance without water in the water tank. When inserting the filled
water tank and when removing the drip tray full care not to spill the water contained. NOTE: Make sure when inserting the water tank, that the guide grooves
on the back of the water tank are engaged in the recesses in the rear of the
appliance. Press the water tank down so that the water valve opens in the bottom
of the water tank.
• Ensure the portafilter is firmly inserted and secured into the grouphead before
using the machine.
• Never remove the portafilter during the brewing operation as the machine is
under pressure.
• Do not move the appliance whilst in operation.
• Do not leave any food dry on the appliance. Always clean the appliance after
each use to prevent a build up of baked-on foods (See: ›Care and Cleaning‹).
Always keep the appliance and the accessories clean.
• Do not use abrasive cleaners or cleaning pads (e.g. metal scouring pads) for
cleaning. Do not clean the appliance with any corrosive chemicals (e.g. bleach).
Do not immerse the appliance or power cord in water or any other liquid. Do not
spill or drip any liquids on the appliance or on the power cord to avoid risk of fire
and electric shock. When liquids are spilled in the appliance, immediately switch
off, unplug the power cord and wait for the appliance to cool down. Thereafter,
clean and dry the appliance thoroughly (See: ›Care and Cleaning‹).
• Do not leave the appliance unattended when in use.
• Do not touch hot surfaces. Use handles or knobs. Allow the appliance to cool
down before moving or cleaning any parts.
• Do not place anything, other than cups for warming, on top of the the appliance.
44
Page 45

• Always switch off the appliance and unplug if appliance is to be left unattended,
if not in use, before cleaning, before attempting to move the appliance, disassembling, assembling and when storing the appliance.
• Keep the appliance and accessories clean. Follow the cleaning instructions provided in this book.
• The appliance is heated by built-in electric heating elements. The appliance or
power cord may never touch hot surfaces. Do not place the appliance or any part
of it on or near hot surfaces (e.g. burner, heater or oven). Do not use any part of
the appliance (e.g. pot, steamer) with any other device.
• The appliance is designed for brewing espresso and coffee. Therefore, some components, such as the grouphead, the portafilter and the steam wand become very
hot during operation and hot water or steam escape.
• Do not operate the appliance with a damaged cord or plug or after the appliance malfunctions, or has been damaged in any manner. Immediately cease use
and contact an authorised service center for examination, repair or adjustment.
• Do not apply any force during operation to prevent damage to the components.
• Do not place the appliance or power cord in an automatic dishwasher.
• After you have filled the correct quantity of ground coffee into the portafilter, you
should press the ground coffee as evenly as possible. To do this, use the integrated tamper. The ground coffee should not be pressed too hard.
• Wipe carefully the rim of the portafilter of any spilled coffee. The rim should be
completely clean so that the portafilter can seal at the brew head pressure-tight.
• The moisture content of the coffee grounds in the portafilter, which is due to the
special brewing technology of the machine, represents not a malfunction of the
appliance.
• Store packaging materials out of reach of children.
• This appliance can be used by children aged from 8 years and above and persons with reduced physical, sensory or mental capabilities or lack of experience
and knowledge if they have been given supervision or instruction concerning use
of the appliance in a safe way and understand the hazards involved.
• Children shall not play with the appliance.
• Cleaning and user maintenance shall not be made by children without supervision. This appliance can be used by children aged from 8 years and above if they
have been given supervision or instruction concerning use of the appliance in a
safe way and if they understand the hazards involved. Cleaning and user maintenance shall not be made by children unless they are older than 8 and supervised.
Keep the appliance and its cord out of reach of children aged less than 8 years
45
Page 46

• Do not operate with carbonated water, but only in soft water
• This appliance is intended to be used in household and similar applications such
as:
– staff kitchen areas in shops, offices and other working environments;
– farm houses;
– by clients in hotels, motels and other residential type environments;
– bed and breakfast type environments.
IMPORTANT SAFEGUARDS FOR ALL ELECTRICAL APPLIANCES
The appliance is heated electrically. Place the appliance near a suitable wall power
socket to connect the appliance directly to a protected mains power supply with protective conductor (earth/ground) connected properly. Ensure that the voltage rating
of your mains power supply corresponds to the voltage requirements of the appliance (220 - 240 V, 50 Hz, AC, rated for at least 8 A).
The installation of a residual current operated circuit breaker (r.c.c.b.) with a maximum rated residual operating current of 30 mA in the supplying electrical circuit is
strongly recommended. If in doubt, contact your electrician for further information. In
various foreign countries, the specifications for power supplies are subject to incompatible norms. Therefore it is possible that power supplies in foreign countries do not
meet the requirements for safe operation of the appliance. Thus, before operating
the appliance abroad, ensure that safe operation is possible.
• Do not to use any extension cords or multisocket outlets.
• Always handle the power cord with care. Always completely unwind the power
cord before use. Do not place the appliance on a power cord. Power cords may
never be knotted, twisted, pulled, strained or squeezed. Do not let the plug or
power cord hang over the edge of the table or counter. The power cord may not
touch hot surfaces. Ensure that no one will pull the appliance by the power cord.
Take care not to entangle in the power cord. Always grasp the plug to disconnect
the power cord. Do not touch the power plug with wet hands when the appliance
is connected to the power supply.
• Unwind the power cord fully before use.
• To protect against electric shock do not immerse power cord, power plug or appliance in water or any other substance.
• This appliance is not intended for use by persons (including children) with reduced physical, sensory or mental capabilities, or lack of experience or knowledge,
unless they have been given supervision or instruction concerning use of the appliance by a person responsible for their safety.
46
Page 47

• Children should be supervised to ensure they do not play with the appliance.
• The appliance has a short cord as a safety precaution to prevent personal injury
or property damage resulting from pulling, tripping or becoming entangled with
the cord. Do not allow children to be near or use this appliance without close
adult supervision. If you must use a longer cord or an extension cord when using
the appliance, the cord must include a 3-prong grounding plug. It must be arranged so it will not drape or hang over the edge of a countertop, tabletop or surface
area where it can be pulled on by young children or tripped over. To prevent
electric shock, personal injury or fire, the electrical rating of the extension cord
you use must be the same or more than the wattage of the appliance (wattage is
marked on the underside of the appliance).
• This appliance is recommended for household use only. Do not use this appliance
for anything other than its intended use. Do not use in moving vehicles or boats.
Do not use outdoors. Misuse may cause injury.
CAUTION: To ensure continued protection against risk of electric shock, connect to
properly earthed outlets only.
HIGH TEMPERATURES – RISK OF BURNS
• The Design Espresso Plus is designed for brewing espresso and cof-
fee. Therefore, some components, such as the grouphead, the portafilter and the steam wand become very hot during operation and hot
water or steam escape.
• Do not touch during operation and shortly thereafter hot parts (eg. grouphead,
portafilter, swivel steam wand with frothing attachment). Even after switching off
the appliance and the corresponding parts are very hot for some time.
• Before each use, ensure that the filter is properly and securely inserted in the
grouphead, and the selection switch is positioned to standby (center). If the selector switch is positioned to the right (in brewing position), after preheating, hot
water emerges from the group head. If the selector switch is positioned to the left
(steam/hot water), hot steam or hot water (depending on the setting) emerges
from the steam wand. Make sure that the black folding switch is in the correct
position: steam or hot water.
• Hot steam may escape or hot water may drip from the grouphead and the swivel
steam wand. Therefore always ensure that the swivel steam wand points towards
the drip tray when not in use. Never hold your hands or other body parts or
moisture and heat-sensitive items onto or below the portafilter, grouphead, swivel
steam wand with frothing attachment when the appliance is turned on.
• Make sure that during frothing milk no liquid can run from the top into the black
attachment of the steam wand. This way you will not be able to froth the milk.
47
Page 48

• The machine is purged automatically after generating steam, to do this, turn the
selector switch to the standby position (center).
• Always make sure that the portafilter inserted correctly into the grouphead before
operating the appliance. When brewing the espresso high pressure is produced
- risk of burns!
• Never remove the portafilter during brewing.
• Always wait until the appliance is cooled down to room temperature and empty
the water tank and the drip tray before moving or cleaning the appliance. Grasp
the appliance on both sides of the bottom of the appliance base (not the drip
tray!) If you want to move the appliance.
TECHNICAL SPECIFICATIONS
Model:
Power supply:
Power consumption:
Length of power cord:
Weight:
Dimensions:
Capacity of water tank:
Art. No. 42606 Design Espresso Pro
230 - 240 V, 50 - 60 Hz
1,250 W
ca. 100 cm
ca. 5.64 kg
ca. 206 x 270 x 325 mm (width x depth x height)
1.7 Litre
Certification:
OPERATION
ASSEMBLING THE APPLIANCE
Before first use: remove all packaging and promotional materials. When you unpack
the appliance, the drip tray and water tank are already properly installed. The drip
tray is in the base of the appliance and can be pulled forward. The water tank is
in the back of the appliance and can be removed by lifting. Remove the packaging
material under the water tank.
Make sure that all parts and accessories are complete and undamaged before disposing of the packaging. Accessories include: stainless steel double wall filter (single filters, double filters and ESE filter pad), cleaning tool, filter holder, milk jug and
measuring spoon with tamper.
48
Page 49

1. Lift the lid of the water tank upwards. You can lift the water
tank by the open lid (see picture). Rinse the water tank carefully. Before first use rinse also filters, portafilter, measuring
spoon and milk jug with warm detergent solution. Follow
the instructions in the section ›Care and Cleaning‹.
2. After cleaning, place the water tank back into the appli-
ance. Make sure that the guide grooves on the back of the
water tank are engaged the cutouts in the back of the appliance. Press the tank down so that the water valve opens in
the bottom of the water tank.
Note:
When pushing down the tank you will see that the valve cover opens upwards.
Before the first use, you should operate the appliance without coffee. The internal
components of the appliance will be heated and purged. Follow the instructions
according to the section ›Preparing a Coffee‹.
PREPARING THE APPLIANCE FOR OPERATION
WARNING: Never leave small children unsupervised with the appliance or the
parts of the appliance! Always make sure that the appliance is properly and fully
assembled and the selector switch is positioned on standby (centre) before plugging
the power cord into the outlet and turning on the appliance.
ATTENTION: If the selector switch is positioned to the right (in
brewing position), after preheating, hot water emerges from the
group head. If the selector switch is positioned to the left (steam/
hot water), hot steam or hot water (depending on the setting)
emerges from the steam wand. Make sure that the black folding
switch is in the correct position: steam or hot water.
ON OFF
Make sure to position the selector switch to the ›Standby‹-postition
(middle) first. Press the ›on/off‹-switch and turn on the appliance.
The power indicator lights red. During preheating the heating indicator lights red. Once the appliance is ready for operation the heating indicator
turns off.
Note:
Always turn the appliance off with the ›on/off‹-switch, unplug the power cord and
wait until the appliance has cooled down before removing/replacing or cleaning
the appliance water tank or drip tray.
Keep the workstation clean and dry. Do not let any liquids run above or below the
49
Page 50

appliance or place towels, napkins, or similar materials under or on the appliance.
If during operation liquids have run on the appliance, turn off the power immediately and unplug the power cord. Dry the appliance according to the instructions in
section ›Care and Cleaning‹.
To ensure that the thermal system and all inside pipes of the appliance are pre-heated and have the required operating temperature,
the appliance shoud be prepared accordingly.
MAX
1. Fill the water tank (as described) up to the MAX-mark (1500 ml).
2. Turn the appliance on by pressing the ›on/off‹-switch and posi-
tion the steam wand towards the drip tray. The power indicator
lights red. During preheating the heating indicator lights red.
MIN
Once the appliance is ready for use, the heating indicator turns
off.
Note:
The pumping noise could be a little louder when the appliance is turned on for the
first time, because the thermal system and all inside pipes in the appliance have
to be filled with water. Once the appliance is ready for operation and the systems
are filled with water, the appliance operates quieter.
ATTENTION: When operating the appliance, always ensure that the water tank is
filled.
FILLING THE WATER TANK
1. Lift the cover of the water tank upwards. You can lift the water tank by the open
lid. Fill the water tank with clean, running cold water.
ATTENTION: When operating the appliance, always ensure that the water level in
the water tank is between the filling marks MIN (100 ml) and MAX (1500 ml). Check
the water level every time before turning the appliance on and fill with fresh water if
nessecary. Do not turn the appliance on when too little water in the tank (below the
fill mark 100 ml). Always use tap water for the appliance. Never fill the appliance
with any mineral water or distilled (demineralized) water. Do not overfill the water
tank. The content must not exceed the fill line 1500 ml.
Note:
After using the steam wand or if the appliance was in operation without any water
in the water tank, it may be that no water comes through the grouphead. In this
case, follow the steps in section ›Preparing the Appliance for Operation‹.
2. Place the filled water tank again into the appliance. Make sure that the guide
grooves on the back of the water tank are engaged the cutouts in the back of
the appliance. Press the tank down so that the water valve opens in the bottom
of the water tank.
50
Page 51

Note:
When pushing down the tank you will see that the valve cover opens upwards.
Position the steam wand towards the drip tray.
Important: Take care not to spill any water when inserting the water tank.
PREPARING COFFEE
1. Place the single filter, double filter or pad filter (for espresso pads) in the portafil-
ter and press firmly. The filters are marked on the back (single filter , double
filter , pad ).
The filter must be firmly set in the portafilter. The edge of the filter must rest firmly on
the rim of the portafilter.
The flatter single filter is for 1 cup (1 spoon of espresso powder), the slightly deeper
double-filter (2 spoons of espresso powder) is for 2 cups of espresso. If you want to
brew some more espresso (example: for a mug), than always use the double-filter.
Filter with the double-filter maximum of 60 ml espresso. If you want larger quantities,
then fill hot water into the cup and then filter the espresso into it.
If you want to brew a single cup of espresso, then use the single filter to get the best
flavor. Filter only about 30 ml.
2. Fill the measuring spoon level with espresso powder. For the single filter use 1-2
spoons of coffee powder - for the double-filter use 2-3 spoons of coffee powder.
Always use the right amount of powder for the two filters, since the pores of the
filter have exactly the right size to reach the correct pressure with the predetermined amount of powder (see: ›Information on coffee powder‹).
TAMPING THE ESPRESSO
1. Distribute the ground coffee evenly in the filter and press the espresso powder
with the flat bottom of the spoon (tamper) evenly but not too tightly
(see: ›Useful tips‹).
2. Clean off thoroughly any spilled espresso powder on the edge of the
filter. The edge must be very clean so that the filter can be closed pressure-tight to the grouphead.
USING ESPRESSO PADS
If you want to use espresso pads, insert an appropriate espresso pad into the provided filter. The filter for the pads is marked on the bottom with
pod. Always use only one pad for the preparation of espresso.
Important: Use only espresso pads for brewing espresso, offthe-shelf coffee pads are too large, and thus not suitable for the filter insert.
51
Page 52

FLUSHING THE GROUPHEAD
WARNING: Hot water and steam escape from the grouphead. Do not hold your
hands or other body parts under the grouphead, when the appliance is turned on.
Before inserting the portafilters at the grouphead, you should pipe some water
through the grouphead to rinse the grouphead.
1. Insert the power plug into the outlet and press the ›on/off‹-switch to turn on the
aapliance. The power indicator lights red. During preheating the heating indicator lights red. Once the appliance is ready for use, the heating indicator turns
off.
2. Place an empty cup or a mug under the grouphead on the drip tray.
3. Turn the selector switch to the right onto the espresso position (without the porta-
filter). The appliance produces a pumping sound. First steam and then hot water
escape from the grouphead. Rinse the goup head. To stop the purging, turn the
selector switch back to the ›standby‹-position (center).
PRE-HEATING THE CUPS
Once the appliance is turned on, the heating plate on the top of the appliance is
heated. Place your cups onto the heating plate to preheat your cups. Thus coffee
does not cool off when running into the cup.
INSERTING THE PORTAFILTER
1. Grasp the portafilter with the filter filled at the black
handle and hold the portafilter under the grouphead. The
handle has to point obliquely to the left front at about a
45 ° angle.
2. Turn the portafilter so far to the right as possible (Lock
labeled with at the grouphead). The portafilter is thereby locked into the appliance.
BREWING THE ESPRESSO
Once the appliance has reached the operating temperature, the heating indicator
turns off.
Note:
If the appliance is an extended time in standby position the heating indicator
begins to light up in between. If the temperature decreases in the grouphead, the
heater will automatically switch on again to maintain a constant operating temperature. Once the operating temperature is reached, the heating indicator turns off.
The appliance is back in standby position.
52
Page 53

1. Make sure that the drip tray and the grate are inserted correctly and the water
tank is filled.
2. Insert the portafilter filter with filter and espresso powder or pad into the appli-
ance.
3. Place one or two warmed cups under the portafilter.
4. Turn the selector switch to the right into the espresso position. After a few
seconds the espresso runs automatically from the portafilter. A pump noise can
be heard.
5. Once the desired amount of espresso has run into the cup/cups, turn the selec-
tor switch back to the center position (›standby‹). Thus, the brewing process is
terminated.
As long as the appliance is switched on, the appliance remains in operational mode
and maintains a constant temperature in the grouphead. As soon as the temperature
decreases in the grouphead, the heater will automatically switch on again and the
heating indicator light up.
Note:
After completion of the brewing process, wait for a moment before removing the
cup off the rust, because the coffee keeps runing on after turnig the switch off.
5. If you do not want to brew any more espresso, press the ›on/
off‹-switch to turn off the appliance and unplug the power cord.
Wait until the appliance has cooled down before cleaning the
appliance according to the instructions in the section ›Care and
Cleaning‹.
THE PRE-BREW-FUNCTION
Upon activation of the Espresso program (selection switch on the right), the 15-bar
pump initially transportes some water, then pauses for a moment and then pumpes
more water through the ground coffee in the portafilter. The espresso powder is
moistened by this method with some water before the actual brewing process starts.
This swells the espresso powder in the grouphead, so a greater pressure can be built
up. In this way, the oils and flavors of the coffee are better delivered to the water.
EMPTYING THE PORTAFILTER
WARNING: The metal parts of the filter and the portafilter are very hot after use
for some time. Grasp the hot portafilter only by the black handle. Cool down the
portafilter and the filter first with cold water before you touch the metal parts.
53
Page 54

1. Remove the portafilter from the grouphead. Grasp the portafilter by the black
handle and rotate the portafilter to the left (clockwise) until
the lock is released.
2. Empty the portafilter over a bowl or sink. Dispose of the
used espresso powder in the household waste or compostable kitchen waste. Do not dispose of the espresso powder in the sink, otherwise the drain could be clogged.
3. The filters sit firmly in the portafilter. Lift the filter by the recesses on the sides of
the portafilter to remove it from the portafilter.
4. Rinse the filter and portafilter with clear water and allow
these components to dry.
FROTHING MILK
WARNING: The steam wand and the attachment are very hot after use for some
time. Always check first that these components have cooled down before you touch
these.
This espresso machine is equipped with a swiveling steam wand and a black attachment for frothing milk. This allows you to quickly and easily produce milk foam. If you need only a little milk foam, than remove
the attachment and use only the steam wand for frothing the milk.
Removing the Attachment
Make sure first, that this part has cooled down. Then pull the
attachment gently downward from the steam wand. Rotate the
attachment during process slightly back and forth.
Replacing the Attachment
Steam
wand
Insert the attachment with the narrow end onto the steam wand
and push upwards to the top until it clicks into place. The attachment should not wobble or fall off. Rotate the attachment during
Attachment
the process might slightly back and forth.
Note:
The attachment has two resistors inside and is placed properly, when you have
pushed the attachment for snapping up over the first resistance onto the steam
wand. The steam wand should be located only in the narrow part of the attachment and must not protrude from the top down.
54
Page 55

Using the Steam Function
The heating indicator lights up when you set the selector switch to the steam position.
Note: Make sure before each use that the selection switch is positioned to ›standby‹position (middle). If the selector switch is positioned to the right (in brewing position),
after preheating, hot water emerges from the group head. If the
selector switch is positioned to the left (steam/hot water), hot
Steam Hot Water
steam or hot water (depending on the setting) emerges from the
steam wand. Important: Make sure that the black folding switch
is in the correct position: steam or hot water.
Frothing Milk
WARNING: Hot steam or hot water escape from the steam
wand. Never place your hands or other body parts under the steam wand, or less
if the selector switch is on the steam or hot water position. Place a suitable container
under the steam wand before you turn the selector switch into the steam or hot water
position.
1. Make sure that there is sufficient water in the water tank (bet-
Steam
ween the MIN and MAX marks).
2. Press the ›on/off‹-switch and turn on the appliance.
3. Turn the black folding switch to the steam position.
4. Fill the stainless steel frothing jug about 1/3 with fresh cold
milk.
Note:
The best results are obtained with reduced-fat fresh milk.
5. Turn the selector switch to the left into the ›steam‹-position. The
heating indicator lights up. The thermoblock is heated to produce steam. The process takes about 30 seconds. Swirl the tip
of the steam wand over the drip tray. When only steam and
no water droplets are coming out of the steam wand, turn the
selector switch to the middle into the standby position.
Note:
Initially a few drops of water may emerge from the steam wand. For this reason,
the steam wand should be directed initially to the drip tray. The remaining water
that is in the system is thus flushed out of the steam wand.
6. Now hold the milk frothing jug under the steam wand and immerse the tip of the
steam wand approximately 10 mm into the milk. Now turn the selector switch
back counterclockwise to the ›steam‹-position. Water steam escapes from the
steam waned and the frothingstarts.
55
Page 56

Note:
If steam is already leaking from the steam wand and the steam wand is not
immersed into the milk, then the escaping steam could spray the milk from the
frothing jug.
7. Hold the attachment for frothing to the edge of the frothing jug. Through the
escaping steam, the milk moves in a circle through the cup.
Note:
During the steaming process, the steam indicatior lights up. The thermoblock is
heated to maintain a constant temperature and continue to steam production.
WARNING: From the steam wand and the attachment hot steam escapes, and
these components are very hot. Always be sure not to scald at the hot steam. Never
touch the steam wand during steam generation. Hold the steam wand during operation cautiously by the attachment. Be careful not to scald yourself.
Note:
You can swivel the steam wand as desired in order to work comfortably. Hold the
steam wand only by the dark attachment.
8. If the volume of the milk increases in the frothing jug, hold the attachment a little
deeper into the milk to heat the milk well. Hold the frothing jug with one hand
on the handle.
ATTENTION: The frothing jug bottom and the frothing jug can be very hot due to
the steam.
Important: Make sure that the milk does not run over the top of the attachment.
Otherwise, the appliance will not work properly.
WARNING: Never remove the steam wand from the milk, as long as steam is
escaping. Otherwise, hot milk splash out of the frothing jug. Turn the selector switch
always first to center into the ›standby‹-position before you remove the frothing jug
from the steam wand. Only thereby the steam generation is terminated immediately.
9. Once the milk has the desired texture and is sufficiently heated (to control you
can gently touch the bottom of the frothing jug - but you do not scald yourself),
turn the selector switch in the middle into the standby position, and turn the appliance off. Only then remove the frothing jug down from the steam wand.
Important: Clean the attachment after each use so that the milk does not dry on
top (see: ›Care and Cleaning‹).
10. Pour the hot milk into your prepared espresso and add the milk froth with a
spoon on top.
56
Page 57

Note:
Turn after each steam operation the selector switch to the standby position (center),
so that the appliance can vent.
Recommendation mixing ratios
• Cappuccino: 1/3 Espresso, 1/3 hot milk, 1/3 milk froth
• Latté is traditionally served in a glass: 1/3 espresso, layered with 1/3 steamed
milk and about 1 cm thick layer of milk foam.
HOT WATER
WARNING: Hot steam or hot water escape from the steam wand. Never put
your hands or other body parts on or under the steam wand, when the selector
switch is on the steam or hot water position. Place a suitable container under the
steam wand before you turn the selector switch to the steam or hot water position.
1. Make sure that there is sufficient water in the water tank (between the MIN and
MAX marks).
Hot Water
2. Press the ›on/off‹-switch and turn on the appliance.
3. Turn the black folding switch to the hot water position.
4. Now place your cup under the steam and hot water wand.
Now turn the selector switch counterclockwise to the steam
and hot water position. The heating indicator lights up. The
thermoblock is heated. Hot water now escapes out of the
steam wand.
5. As soon as there is enough hot water in your cup, turn the
selector switch into the middle – in the standby position.
Note:
Keep the steam and hot water wand always directed to the drip tray if there is no
container underneath it, because residual water may drip out.
Note:
During the hot water process, the heating indicator lights up. The thermoblock is
heated to maintain a constant temperature.
WARNING: Hot steam or hot water escape from the steam wand. These parts
are very hot. Always ensure not to scald on hot water or steam. Never touch the
steam wand during the steam or hot water production. Hold the steam wand during
operation cautiously by the attachment. Be careful not to scald yourself.
57
Page 58

Note:
You can swivel the steam wand as desired in order to work comfortably. Hold the
steam wand only by the dark attachment.
ATTENTION: The cup bottom and the vessel can be very hot because of the hot
water.
WARNING: Do not remove the steam and hot water wand from the cup, as long
as hot water is still leaking. Hot water may splash out of the cup. Turn the selector
switch always first to center into the standby position before removing the cup from
the steam and hot water wand. Only thereby the water generation is terminated
immediately.
USEFUL TIPS
Preparing a good coffee is an art that is easily learned. In this chapter you will find
some tips for your perfect coffee.
Note:
To enjoy a truly aromatic espresso, you should extract not more than 30 ml (with
the single filter) or - for a double espresso - not more than 60 ml.
Choose your coffee according to your own preferences. Here the type of coffee
plays a major role and the way in which the coffee is ground (fine or coarse). You
can also influence the flavor by tamping the coffee. Experiment to find your personal touch.
THE COFFEE
Keep the coffee (powder, whole beans or espresso pads) in an airtight container in
a cool, dry place. However you should not place coffee in the fridge or the freezer.
You can use ready ground coffee. In this case, you should consume the coffee powder in the course of a week, since the flavor dissipates with time.
We recommend buying whole coffee beans and grinding just before extraction. Coffee beans should be stored not longer than 1 month.
THE WATER
When brewing coffee, you should make sure that the water is pressed with the right
speed through the powder.
• If the water flows too slowly, the coffee is very dark and bitter. The crema on the
coffee is stained.
• If the water flows too fast, then a large part of the flavoring substances remains in
58
Page 59

the coffee powder and the coffee is watery, bland and without crema.
You can control the water flow, by pressing the coffee powder when filling more or
less firmly. You may be able to grind the coffee too coarse or fine.
INFORMATION ABOUT GROUND COFFEE
If you are using ready ground coffee, then make sure that the ground coffee is suitable for espresso/cappuccino machines. If you grind the coffee, then the powder
should not be too coarse and not too fine. This will affect the speed with which the
water is forced through the powder and ultimately determine the quality of your coffee.
• If the coffee is ground too fine (the coffee is like icing sugar and feels like flour
between your fingers) then the water can not flow through the powder under pressure. The coffee is characterized dark and bitter and the crema is stained.
• If the coffee is ground too coarse, the water flows through too quickly and the flavors remain in the coffee powder. The coffee is watery and bland.
TAMPING THE COFFEE
Once you have filled the right amount of coffee powder into the filter, you must press
the ground coffee evenly as possible. To do this, use the flat bottom of the spoon.
The coffee must be very firmly pressed.
• If you press the coffee too hard, the water flows too slowly through the powder.
The coffee is dark and bitter.
• If you press the ground coffee too little, then the water flows through too quickly
and the flavors remain in the coffee powder. The coffee is watery and bland.
ENERGY SAVING FEATURES
The appliance will enter the ›Power Save Mode‹, if not used for 30 minutes.
CARE AND CLEANING
Regular and careful maintenance is very important for the performance, life and reliability of your appliance.
• Never clean the appliance, the appliance parts and accessories in the dishwasher.
Daily cleaning: Clean portafilter, filters, water tank, drip tray, measuring spoon
and tamper with warm water and/or a food-safe detergent. Clean the grouphead
and the group gasket at the bottom of the grouphead of visible pollution without
removeing these parts.
Cleaning as required: Clean steam and hot water wand after each use. Clean
59
Page 60

the exterior of the appliance with the appliance switched off and cooled down. For
cleaning, use soft damp cloth. Do not use abrasives or chlorine-containing cleaning
agent in any case!
Empty the drip tray in time. Do not wait until it is full to the brim.
WARNING: Grouphead, poratfilter, filter, steam wand and its attachment will be
very hot during operation. In addition when the appliance is in operation hot water
or steam can escape. Turn off the appliance first (press ›on/off‹-switch), unplug the
power cord from the outlet, wait until the appliance has cooled down and empty
the water tank and drip tray when not using the appliance, moving the appliance,
or cleaning the appliance.
• Never pour liquids over the appliance or power cord or immerse these into
liquids.
• Do not use abrasive cleaners or cleaning pads (e.g. metal scouring pads) for
cleaning. Do not clean the appliance with any corrosive chemicals (e.g. bleach).
Do not immerse the appliance or power cord in water or any other liquid. Do
not spill or drip any liquids on the appliance or on the power cord to avoid risk
of fire and electric shock. When liquids are spilled in the appliance, immediately
switch off, unplug the power cord and wait for the appliance to cool down. Never
use any hard or sharp objects for working with the appliance or for cleaning the
appliance. Do not apply any violence to prevent damage to the components when
operating the appliance.
• The cleaning tool contains a sharp needle. Be careful not to pierce yourself with
the needle. Never allow small children to play with the components and accessories of the appliance or the cleaning tool.
CLEANING THE STEAM WAND
Clean the steam wand each time after you have frothed milk, otherwise protein and
fat in the milk will form a solid crust, through which the steam wand and the openings in the attachment are clogged.
1. Make sure first that the appliance is in the standby position (the selector switch
is in the middle) and the steam wand and the attachment are no longer hot.
2. Remove the attachment from the steam wand and rinse the attachment in warm
water.
3. Wipe the steam wand with a damp cloth. Swing then the steam wand over the
drip tray and remove your hand from the steam wand.
4. Rotate the selector switch counterclockwise to the steam position. The milk resi-
dues will be rinsed from the inside of the steam wand.
5. Turn the selector switch clockwise back to the standby position. Press the ›on/
60
Page 61

off‹-switch and turn the appliance off. Unplug the power cord and allow the
appliance to cool.
6. If the steam wand is clogged with deposits, then pierce the
steam wand with the needle in the cleaning tool.
Steam
wand
7. If the the clogging will not dissolve, then unscrew the tip of the
steam wand.
Attach-
8. Soak the steam wand tip for about 10 minutes in a hot deter-
ment
gent solution and then open the hole in the steam wand tip
with the needle in the cleaning tool. Be careful not to pierce yourself with the
needle.
9. Screw the steam wand tip back onto the steam wand.
ATTENTION: Do not apply any violence when screwing the steam wand tip on, so
as not to strip the threads. The steam wand tip must be tightened only slightly, so that
no gap between the steam wand tube and the steam wand tip remains.
10. Insert the attachment with the narrow end onto the steam wand and push up
until it clicks into place. The attachment should not wobble or fall off. Rotate the
attachment during the process slightly back and forth.
Note:
The attachment has two resistors inside and is placed properly, when you have
pushed the attachment for snapping up over the first resistance onto the steam
wand. The steam wand should be located only in the narrow part of the attachment and must not protrude from the top down.
CLEANING THE FILTERS, THE PORTAFILTER AND THE GOUPHEAD
1. Rinse the used filters and the portafilter immediately after each use with cle-
an water. Remove all remains of coffee powder. If the pores in the filter are
clogged, use the needle in the cleaning tool to open the pores.
2. Wipe the inside of the grouphead with a damp cloth to remove the remains of
the coffee powder.
3. Rinse the portafilter and the grouphead by regularly. To do this, insert the porta-
filter with one of the filters (without coffee!) into the appliance and let some water
to flush through and remove all remnants of the coffee powder from the pores.
CLEANING THE HOUSING AND THE WARMING PLATE
Wipe the housing of the appliance and the warming plate with a soft, damp cloth.
Wipe dry afterwards with a clean cloth.
ATTENTION: Never use abrasives cleaners or harsh abrasive tools (example: pot
cleaner) to clean the appliance or its parts.
61
Page 62

CLEANING THE DRIP TRAY
1. Pull the drip tray forward, out of the appliance and empty it (at the latest after a
day or when you see that the drip tray is full). Especially when the drip tray is
full, be careful not to spill the contents while pulling out.
WARNING: If liquids have run over or under the appliance, then pull the power
cord immediately and dry the liquid with a clean towel before putting the appliance
into operation again.
2. Remove the rust from the drip tray.
3. Clean drip tray and rack with a soft damp cloth and warm soapy water. Dry the
parts thoroughly thereafter.
ASSEMBLING THE APPLIANCE
Follow the following instructions to insert all parts after cleaning the appliance.
1. Place the stainless steel rack onto the drip tray. Grasp the drip tray on both sides
and slide the drip tray in the front of the appliance into the appliance base.
2. Insert the water tank. You can lift the tank by the open lid. Make sure that the
guide grooves on the back of the water tank are engageed in the cutouts in the
rear. Press the tank down so that the water valve opens in the bottom of the
water tank.
Note:
While pressing down the water tank you will see that the valve cover opens
upwards.
DESCALING THE WATER TANK
During regular use of the appliance calcium deposits can build up in the water tank
and in the engine, and restrain water flow. Besides, due to calcification the consumption of the energy increases and quality of the coffee is impaired.For prevention of
severe calcification, we recommend that you descale the machine regularly, taking
into account the degree of hardness of your water. Here, the use of gentle descaler,
that does not affect any metal, is important. Please use for decalcifying only the Gastroback Premium Descaler (Art. No.: 98175). This Descaler contains special metal
gentle additives and is matched to the components used in our machines. Using
the Gastroback Premium Descaler a mixture of 50 ml descaler and max. 750 ml of
water is recommended. Due to the differences of water hardness and we can not
make any precise specifications on the frequency on the decalcifying. The following
table is a non-binding recommendation and is for guidance only.
62
Page 63

hardness range Recommended Frequency Litre or Weeks
mild every 150 Litre every 16 to 20 weeks
medium every 90 Litre every 4 to 8 weeks
hard every 60 Litre every 2 to 4 weeks or when ›Clean
Me‹ lights up
ATTENTION: Do not operate the appliance with completely empty water tank. Turn
off the appliance before you remove the water tank from the appliance.
1. Press the ›on/off‹-button to turn the power off and unplug the power cord. Let the
appliance cool down.
2. Remove the portafilter from the grouphead and the attachment of the steam
wand. Then pour the mixture of 750 ml water and 50 ml Gastroback Premium
Descaler into the water tank.
3. Plug the power cord into the outlet and turn the appliance on by pressing the
›on/off‹-switch. Place a pitcher or a suitable container under the grouphead and
the steam wand. Once the appliance has reached the operating temperature,
the heating indicator turns off.
4. Turn the selector switch to the right onto the espresso position and let about half
of the mixture of water and descaler run through the grouphead.
5. Switch the black selector switch onto the hot water position.
6. Turn the selector switch counterclockwise into the steam and hot-water position
and let the other half of the mixture of water and descaler run through the steam
wand.
7. As soon as the water level falls below the MIN mark, turn the selector switch
clockwise to center onto the standby position.
8. Press the ›on/off‹-button to turn the aplliance off and unplug the power cord from
the outlet. Remove the water tank from the aplliance and rinse the water tank
thoroughly with clean water. Then fill the water tank with clean water again.
9. Replace the water tank back on the aplliance and rinse the grouphead and the
steam wand following the instructions in steps 3 - 8 with clear water. Thereafter
the appliance is ready for operation.
Note:
Damage caused by calcium deposits in the appliance are not part of the warranty.
If you want to send your appliance for a technical review, please do not enclose
any attachments such as portafilter and drip tray.
WARNING: The water tank should not be removed during descaling.
63
Page 64

TROUBLE SHOOTING
Problem Possible Cause The Simple Solution to the Problem
Espresso does not run
through.
Espresso runs out too
quickly.
Espresso runs out
around the edge of
the filter holder.
Espresso extracts as
drops from the portafilter.
Appliance is not turned on or
plugged in.
Ensure the machine is plugged in and the POWER button is
pressed to on.
Water tank is empty. Fill fresh cold water into the water tank.
The selector switch is not on
Turn the selector switch to espresso position.
espresso position.
Espresso grind is too fine. Use a ground coffee suitable for espresso machines; see:
›Useful Tips‹.
Espresso grind tamped too
firmly.
Do not tamp the ground coffee too tight in the filter; see:
›Useful Tips‹.
The filter is blocked. Clean the filter. You can clear the pores of the filter with
the cleaning tool; see ›Care and Cleaning‹.
The espresso grind is too
coarse.
Not enough ground espresso
in the filter
Ground espresso not tamped
firmly enough
Portafilter is not inserted in the
grouphead properly
There are espresso grounds
around the filter rim.
Too much ground espresso in
the filter
Ground espresso has been
tamped too firmly.
Incorrect filter for amount of
ground coffee used.
The water tank is empty or
Use a ground coffee suitable for espresso machines; see:
›Useful Tips‹.
Measure with the measurring spoon a sufficient amount of
coffee powder; see ›Preparing the Espresso‹.
Tamp the ground espresso more firmly in the filter; see:
›Useful Tips‹.
Insert the portafilter correctly. Refer to ›Inserting The Por-
tafilter‹
Clean any excess ground espresso from the rim of the por-
tafilter to ensure a proper fit into the grouphead.
Measure with the measurring spoon a sufficient amount of
coffee powder; see ›Preparing the Espresso‹.
Tamp the ground espresso less firmly in the filter; see:
›Useful Tips‹.
Ensure you use the small filter for 1 cup of espresso and
the larger filter for 2 cups of espresso.
Fill fresh cold water into the water tank.
low.
Espresso grind is too fine Ensure you use a suitable espresso grind. Ground coffee is
marked accordingly.
Machine is blocked by mineral
deposits.
Descale the appliance and unclog the pores of the filter with
the needle of the cleaning tool.
64
Page 65

Problem Possible Cause The Simple Solution to the Problem
The appliance makes
an unusual sucking
sound.
The water tank is empty. Fill fresh cold water into the water tank.
The water tank is not installed
properly.
Install the water tank correctly on the appliance. The guide
grooves on the back of the water tank must properly enga-
ge in the recesses on the back of the appliance. Press the
tank down low so that the water valve opens in the bottom
of the water tank.
The coffee is too
weak or watery.
The coffee is too cold. The appliance was not pre-
The coffee is ground too coarsely.
heated.
Ensure you use a suitable espresso grind. Ground coffee is
marked accordingly.
Always wait before brewing the espresso for the appliance
to reach operating temperature and the heating indicator
to turn off.
The cups were not preheated. The warming plate (ontop of the appliance) is heated as
soon as you turn on the appliance. Place your coffee mugs
there for some time before brewing espresso.
The milk is not hot enough
(for Cappuccino or Latté).
Use the milk frothing hug for the preparation of milk froth
and hold the hand during operation at the bottom of the
jug. If the bottom of the jug is too hot to touch, the milk is
at the right temperature.
No crema The coffee is not pressed firm-
ly enough.
The espresso grind is too
coarse.
The ground coffee is no longer
fresh.
Tamp the ground espresso more firmly in the filter; see:
›Useful Tips‹.
Ensure you use a suitable espresso grind. Ground coffee is
marked accordingly.
Keep ground coffee no longer than 1 week in an airtight
vessel.
The filter pores are clogged. Clean the filter. You can clear the pores of the filter with
the cleaning tool; see ›Care and Cleaning‹.
The appliance makes
pulsating, pumping
These are the normal operating noise of the appliance.
-/-
noises during brewing
or when frothing the
milk.
65
Page 66

Problem Possible Cause The Simple Solution to the Problem
The appliance does
not generate steam.
The appliance is not turned on. Make sure that the appliance is plugged in and turned on
(power indicator is illuminated).
The water tank is empty. Fill fresh cold water into the water tank.
The steam position has not yet
Turn the steam control switch to the steam position;
been selected.
The steam wand is clogged. Allow the steam wand to cool, remove the attachment and
try to open the steam wand with the cleaning tool. Remove
the steam wand and clean the steam wand according to
the instructions in the section ›Care and Cleaning‹.
The milk does not
froth up.
The appliance does not develop enough steam.
The milk is not fresh or not
The steam wand may be clogged. See: ›Care and Clea-
ning‹.
The milk must be fresh and cold. See: ›Frothing milk‹.
cold enough.
STORAGE
Always turn the appliance off (power button), remove the power cord from the outlet
and clean the appliance and all parts and tools if you do not want to use the appliance for a long time (see: ›Care and Cleaning‹).
Empty the water tank and drip tray.
Make sure that the appliance has cooled down, is clean and dry. Stow all accesso-
ries with the appliance.
Store the appliance standing upwards. Place no other objects on the appliance.
If the appliance is not used for a longer period, we recommend a cleaning the grou-
phead. Do not insert portafilter afterwards into the grouphead.
Store the appliance only in a clean, dry and frost-free place, where it is protected
from excessive strain (fall, shock, moisture, frost, direct sunlight) and out of reach
of small children. Do not place heavy or hard objects on the appliance or its components.
Handle the power cable with care. Do not bend the power cord, squeeze or tie.
Never pull or tear the power cord.
Never use any parts or tools of the appliance for other purposes than to work with
the appliance. Keep parts and tools of the appliance always with the appliance.
Storage
Assemble the appliance after cleaning. Keep parts and tools of the appliance always
with the appliance. Store the appliance out of the reach of small children and where
66
Page 67

it is protected from excessive strain. Never any place hard, sharp or heavy objects
on the appliance or the warming plate or grate, not to damage the appliance.
NOTES FOR DISPOSAL
Dispose of the appliance and packaging must be effected in accordance with
the corresponding local regulations and requirements for electrical appliances and packaging. Please contact your local disposal company.
Do not dispose of electrical appliances as unsorted municipal waste, use separate
collection facilities. Contact your local government for information regarding the
collection systems available. If electrical appliances are disposed of in landfills or
dumps, hazardous substances can leak into the groundwater and get into the food
chain, damaging your health and well-being. When replacing old appliances with
new ones, the retailer is legally obligated to take back your old appliance for disposal at least for free of charge.
INFORMATION AND SERVICE
Please check www.gastroback.de for further information. For technical support, please
contact Gastroback Customer Care Center by phone: +49 (0)4165/22 25-0 or e-mail:
info@gastroback.de.
WARRANTY
We guarantee that all our products are free of defects at the time of purchase. Any
demonstrable manufacturing or material defects will be to the exclusion of any further claim and within 2 years after purchasing the appliance free of charge repaired
or substituted. There is no Warranty claim of the purchaser if the damage or defect
of the appliance is caused by inappropriate treatment, over loading or installation mistakes. The Warranty claim expires if there is any technical interference of a
third party without a written agreement. The purchaser has to present the sales slip
in assertion-of-claim and has to bear all charges of costs and risk of the transport.
Note:
Customers from Germany and Austria: For repair and service, please send Gastroback products to the following address: Gastroback GmbH, Gewerbestr. 20,
D-21279 Hollenstedt, Germany.
Customers from other countries: Please contact your dealer.
Please agree that we cannot bear the charge of receipt. Submission of appliances:
Please ensure packing the appliance ready for shipment without accessories. Add
67
Page 68

the sales slip and a short fault description. The processing time after receipt of the
defective appliance will be approx. 2 weeks; we will inform you automatically. After
the warranty period, please send defective appliances to the given address. You
will get a free quotation and, thereafter, can decide, whether we shall repair the
appliance to the costs possibly accrued, send back the defective appliance for free
of charge, or dispose of the appliance for free of charge.
The appliance is intended for household use only and NOT suited for
commercial usage. Do not attempt to use this appliance in any other
way or for any other purpose than the intended use, described in these instructions. Any other use is regarded as unintended use or misuse,
and can cause severe injuries or damage. There is no warranty claim of
the purchaser if any injuries or damages are caused by unintended use.
68
Page 69

Coffee-Recipes
Espresso
Intense and aromatic, an espresso or short black
as it’s also known
uses about ¼ oz of
ground espresso. It
is served in a small
cup or glass to a
level of approximately 1 oz.
Americano
A long black is
generally a single
or double shot of
espresso with hot
water added to
taste.
Flat White
A single shot of
espresso in a cup
filled with steamed
milk and topped
with a skin of silky
smooth foam.
Classic Café Latté
Traditionally the
morning coffee of
Italy and France,
taken with pain au
chocolate or sweet
biscotti. This blend
of 1/3 espresso to
2/3 milk is made
with a single shot of espresso. Top with
steamed milk, poured down the inside
rim of the glass to give a creamy consistency and perfect layer of froth.
Cappuccino
The real thing is served very light and
luke warm with 1/3 espresso to 1/3
steamed milk and a
generous final 1/3
of creamy froth.
For added finesse, hold a piece of
card over one half
of the cappuccino
before dusting with chocolate.
Macchiato
A shot of espresso
served short in a
2½ oz demitasse
and stained with a
dash of finely textured milk.
69
Page 70

Café Mocha
A glass of textured
milk laced with melted cocoa or chocolate syrup and an
espresso shot. Top
sprinkled with dark
chocolate shavings.
Espresso Affogato
Totally irresistible,
this sweet temptation is simply a single scoop of premium vanilla bean ice
cream, drenched
in espresso and if
desired, your favorite liqueur. To create a sense of occasion, serve ice cream in a martini glass
with shots on the side.
Baked Custards with Fresh Raspberry and Coffee Float
Serves 6
25 oz (750ml) cream
¾ cup finely granulated sugar
2 vanilla beans, cut lengthways
1 tablespoon gelatine
1 basket of fresh raspberries
1 tablespoon finely granulated
sugar, extra
¾ cup strong espresso coffee, cooled
1. Combine the cream, finely granulated sugar and vanilla beans in a
saucepan. Stir over medium heat
until just boiling. Remove the vanilla
beans.
2. Add the gelatine and stir constantly
with a wooden spoon until dissolved. Remove from heat. Allow the
custard to cool.
Con Panna
Meaning ›with
cream‹ this heart
warmer is a chic
variation on oldfashioned Vienna
Coffee. In a 3-4 oz
cup, dress a double
shot of espresso with a dollop of fresh
cream, whipped until lossy. Dust with
cinnamon and serve immediately.
70
3. Pour custard evenly into 5 oz
glasses. Refrigerate for a minimum
of 3 hours or until set.
4. Place the raspberries into a medium
sized bowl, sprinkle with sugar and
crush lightly with a fork.
5. Fold the cooled espresso coffee
through the crushed raspberries.
Cover and chill in the refrigerator.
6. To serve, top the custards, when set,
with the raspberries and espresso
coffee mixture.
7. Serve immediately with freshly brewed espresso coffee.Tiramisu
Page 71

Makes 4
1½ cups mascarpone
1¼ cups cream
2½ tablespoons powdered sugar
½ cup strong espresso coffee, cooled
½ cup coffee liqueur
16 sponge fingers
Cocoa powder, for dusting
1. Combine mascarpone, cream and
powdered sugar in a large bowl. Whisk
lightly until soft peaks form. Set aside.
2. Combine espresso coffee and liqueur
in bowl. Dip the sponge fingers into the
espresso coffee mixture a few at a time.
Ensure all the espresso coffee mixture is
absorbed evenly by the sponge fingers.
3. Layer half the sponge fingers even-
ly into the base of 4 dessert bowls or
glasses. Spread the layered sponge
fingers with half of the cream mixture.
Repeat the layers with remaining sponge
fingers and cream mixture.
4. Dust evenly with cocoa powder and
refrigerate until required.
5. Serve with fresh fruits and freshly
brewed espresso.
71
Page 72

GASTROBACK GmbH
Gewerbestraße 20 . 21279 Hollenstedt / Germany
Telefon +49 (0)41 65/22 25-0 . Telefax +49 (0)41 65/22 25-29
info@gastroback.de . www.gastroback.de
20151216
 Loading...