

Page 1
®
GASTROBACK
Instructions for use
Food Slicer/Shredder Attachment
Accessory Design Stand Mixer Advanced
Art.-Nr. 98102
Read all provided instructions before first usage!
Model and attachments are subject to change
Page 2

Carefully read all provided instructions before you start running the
appliance and pay regard to the warnings mentioned in these
!
instructions.
Important Instructions
• The appliance is designed for normal household quantities. Do not operate or store
the appliance outdoors or in damp or wet areas.
• WARNING: The blades are very sharp. Pay attention when handling the slice
or shredder applications. Only touch the slice or shredder applications on the margin
when handling them.
• Before use, always make sure that the appliance and accessory is properly and
completely assembled. Always IMMEDIATELY unplug the appliance after each operation
and before assembling or disassembling accessories. Always ensure, that the slice or
shredder applications and accessories are engaged firmly before connecting the appliance
to the mains power supply (see ´Operation`). Always handle the entire appliance
and the tools with care and without violence.
• Do not grab into the assembled attachment with your hands or any other objects
when the appliance is connected to the poweroutlet.
• CAUTION: Do not block the ventilation slits on the back of the appliance and do
not use the appliance in continuous operation for more than 10 minutes to avoid overheating.
If processing large quantities of food, regularly interrupt operation and unplug the
appliance for a few minutes, to let the motor cool down.
• ATTENTION: Avoid contact the moving parts. Keep hands, hair, clothing,
as well as spatula and other utensils, away from accessory during
operation to prevent injury and/or damage to the mixer or the attachment.
• IMPORTANT: Speed setting 4 is the highest speed setting recommended, when
using the Food Slicer/Shredder Attachment.
• DO NOT immerse the motor housing or power cord in any liquids or spill any
liquids on it.
• Never leave the appliance unattended when in operational mode.
Do not leave the appliance unattended while connected to the power supply.
Page 3
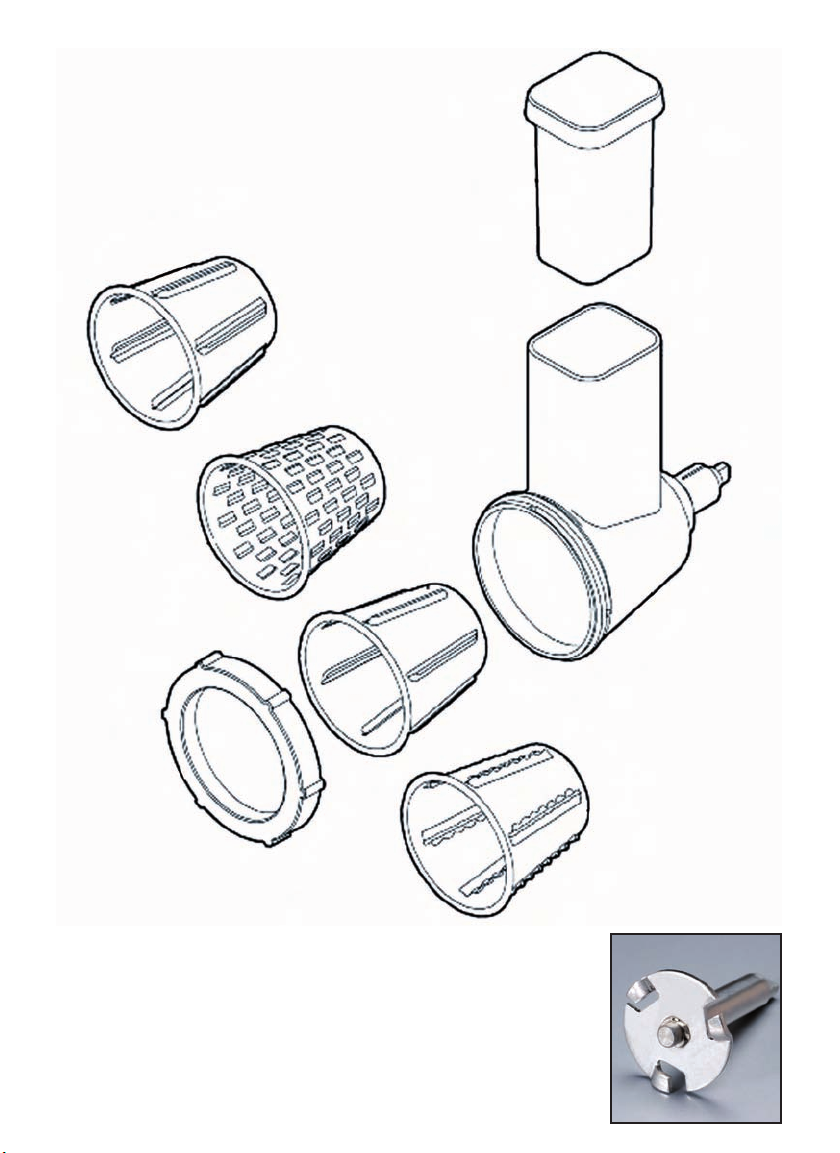
The Food Slicer/Shredder Attachment
1
6
7
2
5
1. thick slicer application
2. fine shredder application
3. thin slicer application
4. coarse shredder application
8
3
4
5. ring nut
6. food pusher
7. feed chute
8. housing
driveshaft
Page 4
Food Slicer/Shredder Attachment
Operating
Before first use of the Food Slicer/Shredder Attachment
Remove all promotional materials and packing as well as any foreign objects, but do
not remove the model label. Before first use and after a long period of storage, clean
the processing tools in warm soapy water (see ´Care and Cleaning`).
Using the Food Slicer/Shredder Attachment
WARNING: Always switch ´Off` the appliance, wait until the motor stops completely
and unplug the appliance before assembling/disassembling the attachment. To turn the
appliance ´Off` you have to turn the speed control anticlockwise into the ´Off`-position.
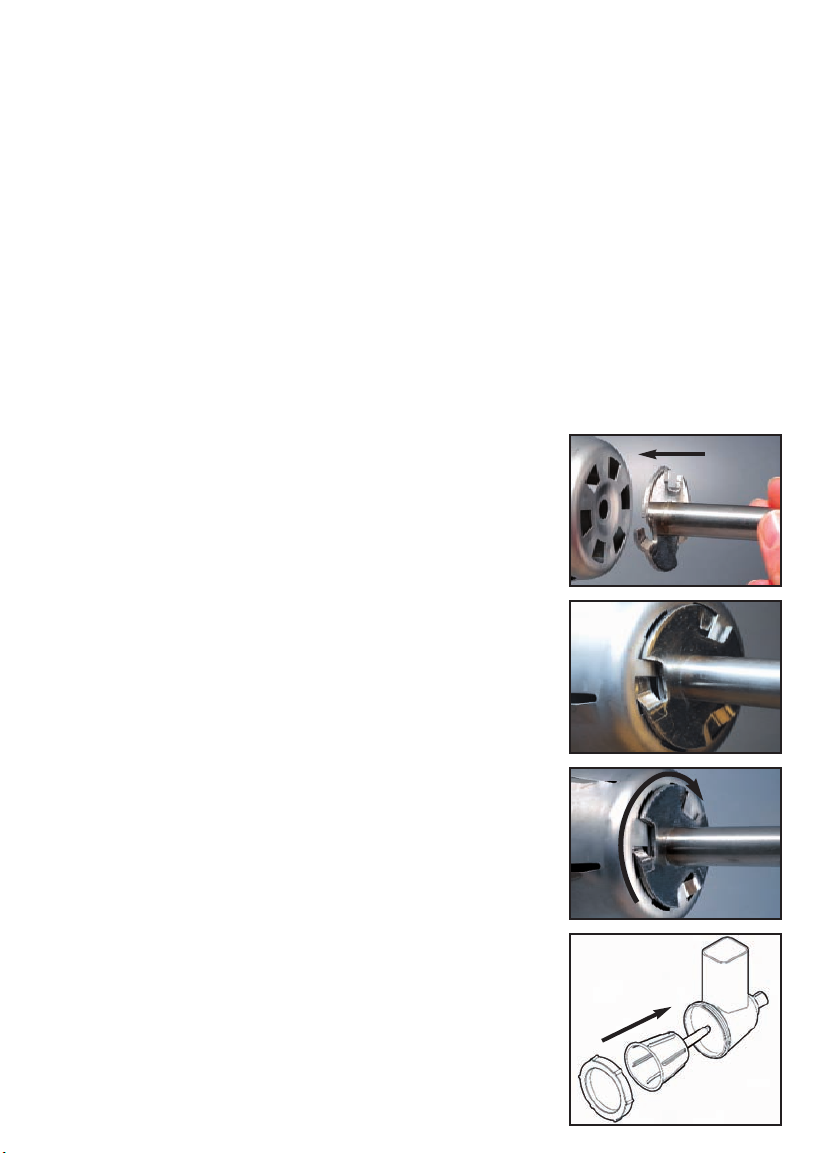
Assemble the Food Slicer/Shredder Attachment
1. Take the driveshaft into your right hand. The wider part
with the guiding pins has to face the front and the shaft
has to face backwards (picture A).
2. Take the application needed into your left hand.
WARNING: The blades are very sharp. Pay attention
when handling the slice or shredder applications. Only
touch the applications on the margin when handling them.
A
B
Place the guiding pins of the driveshaft into the matching holes
in the bottom of the application (picture B).
3. Lock the driveshaft in position turning the driveshaft
clockwise (picture C).
4. Place the application together with the driveshaft into the
housing. The shaft has to face the housing when sliding the
application into the housing (picture D).
NOTE: The application is correctly located when it is
pushed up all the way inside the housing and the end of
the shaft of the driveshaft pokes out of the back end of the
housing.
5. Take the ring nut and screw it onto the thread of the
housing turning it clockwise (picture D).
NOTE: Do not tighten the ring nut too much to avoid
overwinding the thread.
C
D
Page 5

The Food Slicer/Shredder Attachment is now assembled and
can be attached to the Design Standmixer Advanced.
6. Prop up the attachment access (picture E).
7. Press down the attachment ejector (picture F) and slide the
Food Slicer/Shredder Attachment into the opening. Release the
attachment ejector and turn the Food Slicer/Shredder Attachment
slightly so that the shaft engages in the socket with pin of the
access opening located in the hole of the attachment.
The Food Slicer/Shredder Attachment is now ready for use
(picture G).
Example for uses of the applications:
Fine Shredder: Finely shreds hard and crisp vegetables, such as carrots, beets,
turnip, potatoes, celery or nuts, firm and cold cheese, coconut and dry bread.
Coarse Shredder: Coarsly shreds carrots, celery, onions, fruit, nuts or chocolat.
Potato can be shredded for hush browns.
E
F
G
Thick Slicer: Gives a thick slice for firm foods. Perfect for vegetables that are to
be steamed, fried or scalloped.
Thin Slicer: Thinly slices vegetables for cole slaw, potato chips, sauerkraut, sliced
cucumber, radishes, celery and nuts.
To operate the Food Slicer/Shredder Attachment
WARNING: For the case that liquid runs over the appliance while operating turn
the appliance ´Off` immediately and pull the plug. Clean and dry the appliance
according to the instructions ´Care and cleaning`.
1. Prepare the vegetables (peel, wash, get seeds out and cut of the stem).
2. Assemble the Food Slicer/Shredder Attachment as described, attach it to the
Design Standmixer Advanced and place a plate or dish in front of the outlet.
WARNING: Always make sure that the appliance is turned ´Off` before plugging
in the power supply.
3. Plug the power supply cable into a mains socket.
Page 6

WARNING: Never hold your face or other body parts over the feed chute when the
motor is running because little pieces of food could be thrown out of the feed chute.
Never push the food through the feed chute.
ATTENTION: Avoid contact the moving parts. Keep hands, hair, clothing,
as well as spatula and other utensils, away from feed chute during
operation to prevent injury and/or damage to the appliance.
4. Place the vegetables little by little in the feed chute and put the food pusher into
the feed chute. Switch ´On` the appliance using speed setting 4.
IMPORTANT: Speed setting 4 is the highest speed setting recommended, when
using the Food Slicer/Shredder Attachment.
To ensure that the vegetables are evenly shaped, feed the vegetables through the
feed chute at a constant rate.
5. Slowly feed the vegetables through the feed chute and guide down with the food
pusher. Do not apply excessive force when pushing down the food pusher. Use only
the food pusher to guide down the vegetables. Never use the fingers!
IMPORTANT: Operate in a slow and constant pace. Do not try to rush the procedure
by pushing down the food with force.
NOTE: Whenever you wish to change applications, the appliance must be turned
´Off` and disconnected from the power outlet. Take off the attachment and remove
the ring nut turning it anticlockwise. In order to avoid injury, use a towel or something protective to grip the ring nut. Turn the housing around and the application
will slide out off the housing. Loosen the driveshaft from the application and
change the applications (refer to the instructions ´Dissemble the shredder attachment`). Assemble the attachment referring to the instructions ´Assemble the shredder
attachment` and continue your work.
6. Switch ´Off` the appliance after use and disconnect the power supply cable
from the mains socket.
7. Clean and disassemble the appliance right after use and make sure that no
leftover food desiccate on the appliance. Work according to the instructions ´Care
and cleaning`.
Dissemble the Food Slicer/Shredder Attachment
1. Switch ´Off` the appliance after use and disconnect
the power supply cable from the mains socket.
2. Press down the attachment ejector (picture A) and pull the
Food Slicer/Shredder Attachment out off the access opening.
A
Page 7

3. Take off the ring nut by turning it anticlockwise.
NOTE: In order to avoid injury, use a towel or something
protective to grip the ring nut.
4. Turn the housing around and the application will slide
out off the housing (picture B). Ensure the application will
not fall on the floor when sliding it out.
B
5. Loosen the driveshaft from the application turning the
driveshaft anticlockwise. Pull the driveshaft out of the
application (picture C/D).
C
Care and Cleaning
Clean the appliance directly after use and do not leave any
food dry on the surfaces of the appliance.
WARNING: To avoid injuries to persons and damage,
always switch ´Off` the appliance, wait for the motor to stop
completely and unplug the appliance immediately after
operation and before disassembling or cleaning the appliance.
With the appliance connected to the power supply, keep
hands, hair, clothing, as well as spatula and other utensils, away from feed chute
and the blades of the applications to prevent injury and/or damage to the appliance.
DO NOT place the appliance or power cord in an automatic dishwasher. Do not
immerse the motor housing or power cord in any liquids or spill any liquids on it.
Always wipe off spilled liquids immediately.
CAUTION: Do not use abrasive cleaners, cleaning pads, corrosive chemicals (disinfectants,
bleach) or any sharp or hard objects (i.e. metal scouring pads) for cleaning, for this
could damage the surfaces. Carefully clean the appliance with a damped sponge or
cloth and warm soapy water.
D
1. Switch ´Off` (speed control into ‘Off’-position), wait for the motor to stop completely
and unplug the appliance from the power outlet.
2. Disassemble the attachment regarding the instructions ´Disassemble the Food
Slicer/Shredder Attachment` and remove food residues on the scroll and the feed chute.
Use the handle of the provided spanner for emptying the feed chute.
Follow the cleaning instructions step by step
3. Wash all parts thoroughly in hot soapy water. Do not use aggressive detergents.
The applications and the housing are suitable for dishwasher. Soak parts with desiccated
food leftovers a few minutes in warm soapy water and use a nylon cleaning brush
Page 8

or cleaning sponge for cleaning. Rinse all parts with running water and dry them
accurately.
NOTE: Some foods such as carrots may stain the housing. These stains may be
removed by placing the housing in the dishwasher or rub a small amount of of or
shortening over the stains, wash in warm sudsy water and rinse.
4. Wipe the appliance and power cord with a damp soft cloth. Take care not to spill
or drip water or any other liquids on the appliance.
5. Thoroughly dry the appliance and all parts of the appliance and attachment after each
cleaning. Leave all parts dry naturally where they are out of reach of young children.
Storage
Always clean the appliance and attachment before storing (see ´Care and Cleaning`).
Ensure to store the appliance and attachment where it is clean, dry and safe from frost,
direct sunlight and inadmissible strain (mechanical or electric shock, heat, moisture) and
where it is out of reach of young children.
Place the appliance and attachment on a clean and stable surface, where it can not
fall. Do not place any hard or heavy objects on the appliance or the attachment.
Notes for disposal
Dispose of the appliance must be effected in accordance with the corresponding
local regulations and requirements for electrical appliances. Please contact your local
disposal company.
Warranty
We guarantee that all our products are free of defects at the time of purchase. Any
demonstrable manufacturing or material defects will be to the exclusion of any further
claim and within 2 years after purchasing the appliance free of charge repaired or
substituted. There is no Warranty claim of the purchaser if the damage or defect of
the appliance is caused by inappropriate treatment, over loading or installation mistakes.
The Warranty claim expires if there is any technical interference of a third party
without an written agreement. The purchaser has to present the sales slip in
assertion-of-claims and has to bear all charges of costs and risk of the transport.
Page 9

Recipes
Teriyaki Vegetable Sauté
for 4-6 persons
4 medium carrots, peeled and cut into thirds
1 medium red or green bell pepper, cut in fourth
1 medium onions, cut in fourth
1 teaspoon oil
1/4 teaspoon red pepper flakes
1 teaspoon sugar
1 teaspoon starch
1/4 teaspoon ginger
1/2 cup chicken or vegetable broth
1 tablespoon soy sauce
Assemble the application, using the thick slicer and attach to mixer. Turn to speed
4 and slice carrots into large bowl placed under the outlet. Repeat with bell pepper
and onion. Heat oil in large skillet over medium-high heat until oil sizzles.
Add vegetables and red pepper flakes. Cook and stir 4-5 minutes, or until vegetables
are crisp-tender.
Combine all remaining ingredients in a small bowl. Add to mixture in skillet all at
once. Cook and stir until mixture is thickened and vegetables are coated with sauce.
Carrot-Coconut Cake
for 12-16 persons
4 medium carrots, peeled and cut into thirds
11/4 cups flour
1 cup whole meal flour
11/2 cups sugar
2 teaspoons baking soda
1/2 teaspoon salt
1/4 teaspoon nutmeg
1/2 cup oil
1 can pineapple (approx. 227 gr), crushed in juice, undrained
3 eggs
1 package vanilla sugar
3/4 cup flaked coconut
Orange Cream Cheese Frosting
Page 10

Assemble the application, using the fine shredding application and attach to mixer.
Turn to speed 4 and shred carrots into large bowl placed under outlet. Set aside.
Combine flour, whole meal flour, sugar, baking soda, salt, and nutmeg in mixer
bowl. Add oil, pineapple, eggs and vanilla sugar. Attach bowl and flat beater to
mixer. Turn to speed 2 and mix about 1 minute. Stop and scrape bowl. Turn to
speed 4 and beat about 30 seconds. Turn to speed 1 and add coconut and carrots.
mixing just until blended.
Pour batter into greased and floured baking pan 35 x 22 x 5 cm. Bake at 175
degrees for 30 to 35 minutes, or until toothpick inserted in center comes out clean.
Cool completely on wire rack. Frost with Orange Cream Cheese Frosting, if desired.
Orangen-Frischkäse Tortenguss
4 cups powdered sugar
1 Paket light cream cheese (ca. 227 gr.)
1 teaspoon orange juice
1/2 teaspoon grated orange peel, untreated
Place all ingredients in mixer bowl. Attach bowl and flat beater to mixer.
Turn to speed 1 and mix about 30 seconds, or until blended. Turn to speed 4 and
beat about 2 minutes, or until smooth and creamy.
Page 11

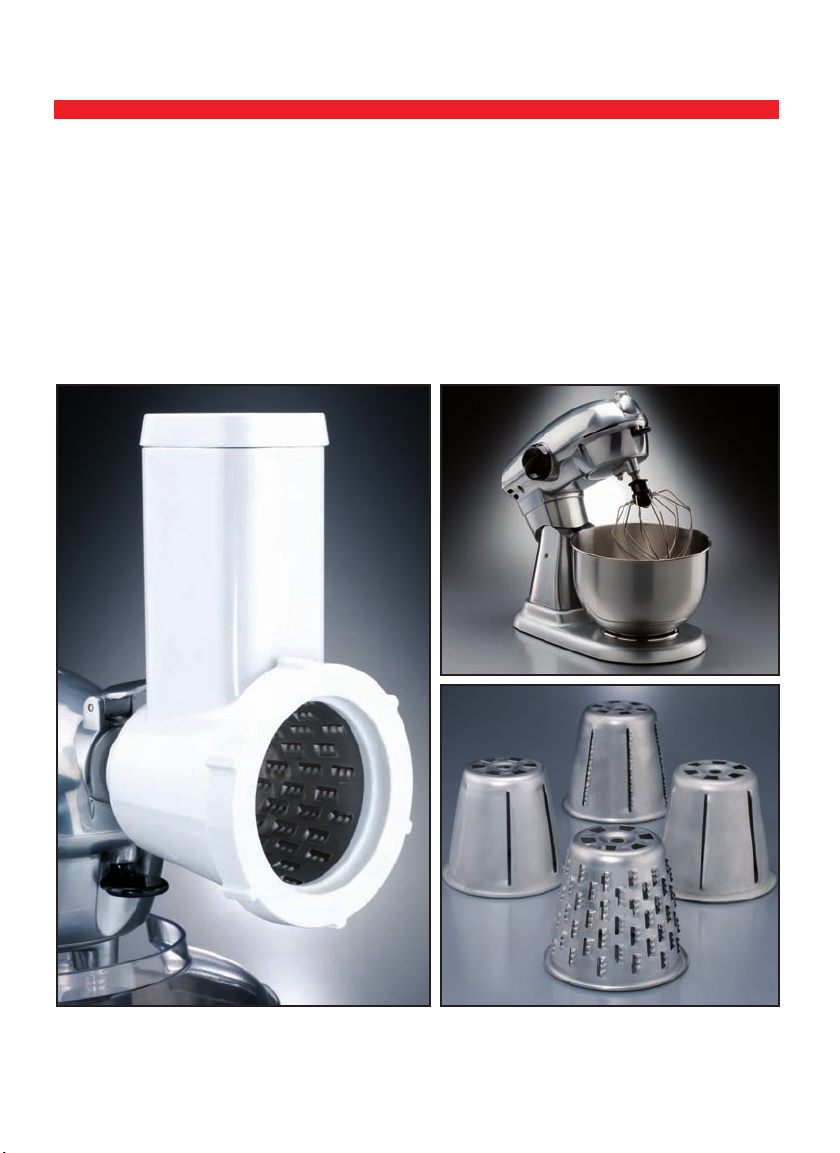
Accessories for the Design Stand Mixer Advanced
You will get the accessories from your specialty retailer.
Pasta Maker Attachment
Art.-Nr.: 98100
Meat Grinder / Cookie
Attachment
Art.-Nr.: 98101
Food Slicer/
Shredder Attachment
Art.-Nr.: 98102
Additional stainless steel bowl
Art.-Nr.: 98103
Page 12

GASTROBACK GmbH
Gewerbestraße 20 • D-21279 Hollenstedt/Germany
http://www.gastroback.de • E-Mail: info@gastroback.de
 Loading...