

Page 1
Operating Instructions
Health Smart Grill Pro
Art.-Nr. 42514 Health Smart Grill Pro
Read all provided instructions before first usage!
Model and attachments are subject to change!
For household use only!
Page 2

Carefully read all provided instructions before you start running
the appliance and pay attention to the warnings mentioned in
these instructions.
TABLE OF CONTENTS
Knowing Your Health Smart Grill Pro ..................................................................... 26
Important Safeguards .......................................................................................... 28
General Safety Instructions ................................................................................ 28
Important Safeguards for Electrical Appliances .................................................... 29
High Temperatures – Risk of Burns ...................................................................... 30
Non-Stick Coating ............................................................................................ 31
Technical Specifications ....................................................................................... 31
Properties of Your New Grill ................................................................................. 32
Height Control Feature ...................................................................................... 32
Angle Adjust Non-Slip Feet ................................................................................ 32
Tips for Best Results ............................................................................................. 33
Grilling Guide ................................................................................................. 33
Tipps for Toasting Sandwiches ........................................................................... 34
How to Judge a Steaks Doneness ....................................................................... 35
Before First Use ................................................................................................... 35
Operation .......................................................................................................... 36
Cooking Your Food .......................................................................................... 36
Care and Cleaning ............................................................................................. 38
Cleaning the Appliance .................................................................................... 38
Storage .............................................................................................................. 39
Notes for Disposal .............................................................................................. 40
Information and Service ....................................................................................... 40
Warranty ........................................................................................................... 40
Index .............................................................................................................. 41
Page 3
DEAR CUSTOMER!
Congratulations! Your new Health Smart Grill Pro comes with some remarkable features for preparing your dishes.
The heated lid is mounted on a floating hinge. Thus, your food is cooked especially
quickly and evenly without the need of extremely high temperature settings. Not only
steaks and sausages can be grilled perfectly, but even open sandwiches and thickly
filled Burgers and baguettes are simply prepared. For always getting the best results,
the cooking temperature can be selected accordingly.
As you can prepare your food without any additional fat, this way of cooking complies
with the criteria of modern diet.
These instructions for use will inform you about the various functions and features,
which make it easy to take pleasure in your new Grill.
We hope that you will enjoy your new Grill.
Your Gastroback GmbH
25
Page 4
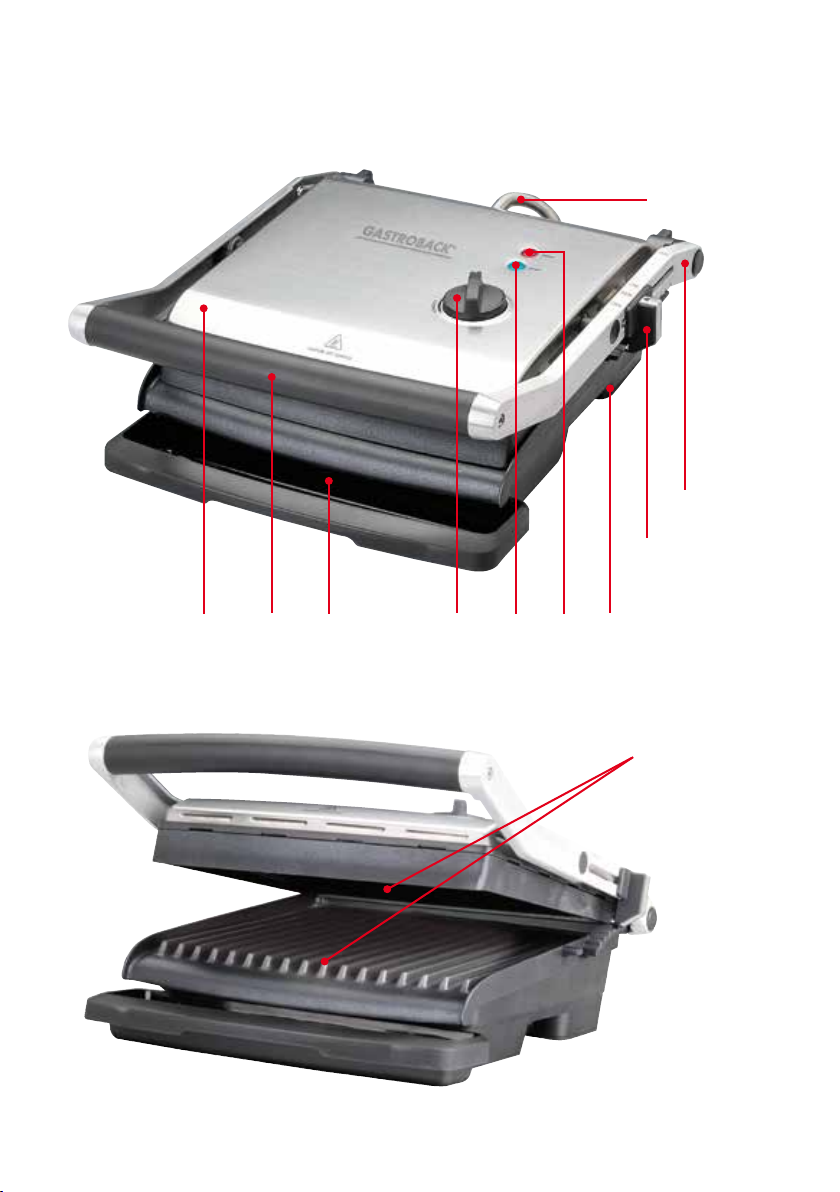
KNOWING YOUR HEALTH SMART GRILL PRO
B
E
D
A
F GHI J
K
26
C
Page 5

A Housing in stylish brushed stainless steel design.
B Power cord
C Grilling surfaces on base and lid – with durable Quantanium non-stick coating.
D Height control feature – adjustable to accommodate thick or thin foodstuffs.
E Unique floating hinge – due to this feature, the lid presses evenly down on the food.
F Heavy-duty insulated metal handle – for lifting the lid.
G Red POWER indicator – illuminates, when the appliance is life.
H Green READY indicator – illuminates as soon as the set temperature is reached.
I Continuously variable temperature dial –
for selecting the desired grilling temperature.
J Angle adjust non-slip feet – for reducing the slope of the lower grilling surface.
K Removable drip tray – simply pull out for easy cleaning.
L Cord storage – wrap the power cord around the retainer when storing the appliance.
27
Page 6

IMPORTANT SAFEGUARDS
Carefully read all instructions before operating this appliance and save for further reference.
Do not attempt to use this appliance for any other than the intended use, described in these
instructions. Any other use, especially misuse, can cause severe injuries or damage by electric
shock, heat, or fire.
These instructions are an essential part of the appliance. Do not pass the appliance without
this booklet to third parties.
Any operation, repair and technical maintenance of the appliance or any part of it other than
described in these instructions may only be performed at an authorised service centre. Please
contact your vendor.
General Safety Instructions
• This appliance is for household use only and NOT intended for use in moving vehicles. Do
not operate or store the appliance in humid or wet areas or outdoors. Any use of accessories,
attachments or spare parts that are not recommended by the manufacturer or damaged in any
way may result in injuries to persons and/or damage.
• Check the entire appliance regularly for proper operation – especially the power cord (e.g.
check for distortion, discolouration, cracks, corroded pins of the power plug). Do not operate
the appliance, when the appliance or any part of it is likely to be damaged, to avoid risk
of fire, electric shock or any other injuries to persons and/or damage. The appliance or its
parts are likely to be damaged, if the appliance has been subject to inadmissible strain (e.g.
overheating, mechanical or electric shock), or if there are any cracks, excessively frayed or
melted parts, or distortions, or if the appliance is not working properly. In one of these cases
occur during operation, immediately unplug the appliance. Get in contact with an authorized
service centre for examination and/or repair.
• Operate the appliance on a well accessible, stable, level, dry, and suitable large table or
counter that is resistant against water, fat, and heat. Do not place the appliance on plastic surfaces or surfaces with plastic coatings (e.g. painted surfaces), and do not place any delicate
objects near the appliance during operation, to avoid damage.
• Always keep the appliance and the table or counter clean and dry, and wipe off spilled
liquids immediately. Do not place any clothes or tissue or other foreign objects under or on the
appliance during operation, to avoid risk of fire, electric shock and overheating. Do not place
the appliance over a power cord or on any surfaces sensitive to heat, fat, or moisture, or near
the edge of the table or counter, or on wet or inclined surfaces.
• During operation keep the appliance in an appropriate distance of at least 50 cm on each
side to the edge of the working space and furniture, walls, boards, curtains to avoid damage
due to heat and splashes. Leave at least 1 m of free space above the appliance. Do not operate the appliance under over hanging boards or drop lights.
• Exclusively use the appliance for domestic use and for processing food that is fit for consumption. Immediately unplug the appliance, if there is any kind of malfunction or problem
(e.g. overheating).
• This appliance can be used by children aged from 8 years and above and persons with
reduced physical, sensory or mental capabilities, or lack of experience and knowledge, if
they have been given supervision or instruction concerning the use of the appliance in a
safe way and understand the hazards involved. Do not let children play with the appliance.
Cleaning and user maintenance must not be carried out by children without supervision.
28
Page 7

• Always keep the appliance where it is dry, frost-free, and clean, and where young children
cannot reach it. Do not leave the appliance or any part of it unattended, when in reach of
young children.
• Do not place the appliance or any part of it in a range, or on or near hot surfaces (e.g.
burner, heater or oven). Do not use any parts of the appliance with any other device or for any
other purpose. Before operation, always ensure that the appliance is assembled
and connected completely and correctly according to the instructions in this
booklet. Do not handle the appliance or any part of it with violence.
• Do not hold your hands or any foreign objects (e.g. clothes, cooking utensils) on the grilling
surfaces, with the appliance connected to the power supply. For example, use barbecue tongs
made of plastic to take your food.
• Fresh moistened food will splash, when placed on the hot grilling area, and hot steam will
escape. During operation, do not hold any part of your body or delicate objects over the
grilling plate. Always ensure that persons (including you) keep sufficient distance to the appliance during operation. Always expect that splashes of hot fat and juices will escape form the
grilling area.
• Do not move or tilt the appliance or place it in the upright position, when the appliance is
still hot. Also, ensure that the appliance will not fall over, when opening the lid. Always leave
the appliance cool down before removing the drip tray. Otherwise, hot liquids (fat, juices)
could be spilled, causing severe injuries and serious damage. Always ensure to LOCK the
height control, before lifting the appliance by the handle. (See: »Height Control Feature«). Do
not hold the appliance at the power cord for moving the appliance. Always slide the height
control clip to the OPEN position, before operating the appliance. Open and close the lid
carefully without violence.
• Do not leave the appliance unattended, when it is connected to the power supply. Always
unplug the appliance, and leave the appliance cool down, before moving, or cleaning the
appliance, or assembling or disassembling any parts, or when the appliance is not in use. Do
not place any hard and/or heavy objects on the appliance or any part of it.
• Do not use any abrasive cleaners, cleaning pads (e.g. metal scouring pads), or any corrosive
chemicals (e.g. bleach) for cleaning.
• Do not place the housing or the power cord in an automatic dishwasher.
• Do not leave any food dry on the appliance. Always clean the appliance after each use
to prevent an accumulation of baked-on foods (see: »Care and Cleaning«). Always keep the
appliance and its parts, where it is clean.
Important Safeguards for Electrical Appliances
The appliance is heated electrically. Place the appliance near a suitable wall power socket to
connect the appliance directly to a protected mains power supply with protective conductor
(earth/ground) connected properly. Ensure that the voltage rating of your mains power supply
corresponds to the voltage requirements of the appliance (220-240 V, 50 Hz, AC, rated for
at least 16 A). The power outlet socket must be installed separately from other power outlet
sockets to avoid interference with other appliances.
The installation of a residual current operated circuit breaker (r.c.c.b.) with a maximum rated
residual operating current of 30 mA in the supplying electrical circuit is strongly recommended. If in doubt, contact your electrician for further information.
29
Page 8

In various foreign countries, the specifications for power supplies are subject to incompatible
norms. Therefore it is possible that power supplies in foreign countries do not meet the requirements for safe operation of the appliance. Thus, before operating the appliance abroad,
ensure that safe operation is possible.
• Do not use any desk top multi socket outlet, external timer, or remote control systems. It is
best to avoid using an extension cord, but if you wish to use one, only use an extension cord
rated for a maximum continuous current of at least 16 A with safety plug and safety coupler
plug and protective conductor (earth/ground) connected properly. Additionally, the extension
cord must be of sufficient length.
When laying power cords, always ensure that no one will step on the power cord or get entangled or trip over the power cords. Also, ensure that no tension is applied to any part of the power
cords. Tie the extension cord loosely onto the leg of the table using a separate cord, to ensure
that no one will pull the power cord. To connect: always connect the appliance to the extension
cord first. To disconnect: Always unplug the extension cord from the power supply first.
• Always handle power cords with care. The pins of the power plug must be smooth and
clean. Always completely unwind the power cord before use. Do not place the appliance on
a power cord. Power cords may never be knotted, twisted, pulled, strained or squeezed. Do
not let the plug or power cord hang over the edge of the table or counter. The power cord may
not touch hot surfaces or sharp edges. Ensure that no one will pull the appliance by the power
cord. Take care not to entangle in the power cord. Always grasp the plug to disconnect the
power cord. Do not touch the appliance or power plug with wet hands when the appliance is
connected to the power supply.
• DO NOT drip or spill any liquids on the housing or power cord. Do not immerse the appliance or power cord in water or other liquids. Do not pour or spill any liquids on the housing
or power cord. Do not place the appliance on wet surfaces. When liquids overflowed or are
spilled on the housing or power cord, immediately unplug the appliance. Thereafter, clean
the appliance and let it dry for at least 1 day. (See: »Care and Cleaning«) Do not clean the
appliance in an automatic dishwasher.
• Do not operate the appliance without the drip tray to avoid risk of overheating, fire and
electric shock!
• The heater starts to work as soon as you insert the plug into the outlet. The unit can be turned
off just by pulling the power plug.
High Temperatures – Risk of Burns
The Health Smart Grill Pro is designed for cooking food. For this purpose, the
grilling surfaces are heated electrically. The heating elements start heating as
soon as you connect the appliance to the power supply. Thus, improper handling could cause severe injuries and damage. Please keep this in mind to avoid
burns and damage.
• The grilling surfaces, the drip tray, frame of the grilling surfaces, lid and housing of the appliance can be very hot during operation and shortly thereafter. Additionally, during preparation
of your food, hot steam and splashes could escape. Do not touch the hot surfaces with any
parts or your body or any heat-sensitive or moisture-sensitive objects during operation or while
the appliance is still hot. Only touch the appliance and its parts at the handles and operating
elements during operation and shortly thereafter. Beware of hot steam and condensate, when
placing food on the grilling surfaces. Protect your hands and arms with oven gloves. Do not
leave any foreign objects on the hot grilling area (e.g. grilling shovels, barbecue utensils).
30
Page 9

• Do not move the appliance when still hot. Always leave the appliance and all its parts cool
down before moving the appliance, emptying the drip tray or cleaning the appliance. Do not
place the appliance on heat-sensitive surfaces, for operation or when hot.
• Do not operate the appliance close to inflammable, volatile materials (e.g. alcohol, spirit, or
benzine), or high-proof alcoholic beverages. Alcohol will quickly evaporate due to the heat,
thus building up an inflammable mixture that could be ignited by any source of ignition (e.g.
candles, cigarettes, and heating elements of the appliance), causing severe injuries to persons
and serious damage. DO NOT cook any high-proof alcoholic liquid or alcoholic
foodstuffs (e.g. mulled wine, grog) on the appliance. Do not pour any alcoholic liquid on the appliance to avoid risk of explosion and fire. The appliance is
not suited for flambéing.
Non-Stick Coating
The grilling surfaces of your Health Smart Grill Pro are provided with Quantanium non-stick coatings. Even without using additional oil, food will not stick to the coated surfaces. Due to the cooked
food, some discolouration may occur. However, this will not affect the cooking performance.
Please adhere to the following precautions:
• Before first use, wipe the non-stick coatings of the grilling surfaces with a little cooking
oil. Thereafter, there is no need to add any further oil for cooking.
• Do not use the appliance, if the non-stick coating is scratched, cracked or detached due to
overheating.
• Only use wooden or heat-resistant plastic cooking utensils with the appliance. Do not use
hard or sharp objects for scratching, stirring, or cutting on the coatings. We will not be liable
for damage to the non-stick coating, if metal utensils or similar objects have been used. Do not
use any spray-on non-stick coatings.
• The non-stick coatings minimise the effort of cleaning. Do not use abrasive scourers or abrasive cleaners for cleaning. Even stubborn residues can be removed via a soft sponge or soft
nylon brush and warm dishwater.
TECHNICAL SPECIFICATIONS
Model:
Power supply:
Maximum power consumption:
Length of power cord:
Weight:
Dimensions:
Size of grilling areas:
Certification:
Art. No. 42514 Health Smart Grill Pro
220-240 V AC, 50 Hz
2.200 W
approx. 95
approx. 5.15 kg
approx. 33.0 cm x 38.0 cm x 14.5 / 46.0 cm
(width x depth x height)
Base: 28.0 cm x 28.0 cm
Lid: 27.0 x 26.5 cm
31
Page 10

PROPERTIES OF YOUR NEW GRILL
WARNING: Your new Health Smart Grill Pro is intended for cooking edible food and is hea-
ted electrically. Do not place any inflammable objects on the grilling areas. Do not leave any
food bake on the grilling areas. Do not place the appliance on heat-sensitive surfaces during
operation, to avoid risk of overheating and fire.
Height Control Feature
The lid of the Health Smart Grill Pro can be adjusted to the thickness of your food, using the
height control feature. This way, even delicate and tender ingredients (e.g. fish, Burger, or tomatoes) will not be crushed, when lowering the lid for cooking. With the height control feature
adjusted, the lid will be locked in the selected distance to the lower grilling surface: from 1 cm
(LOW) to approx. 5.5 cm (HIGH).
The Health Smart Grill Pro can be used in open or closed operation. When grilling with the
lid closed, your food will be cooked at both sides simultaneously, thus being cooked in a time
and energy saving way.
IMPORTANT: You cannot open the lid of the Health Smart Grill Pro with the height control
clip in LOCK position. The LOCK position is only intended for moving and storing the appliance. Before use, always slide the height control clip to the OPEN position first. Do not attempt
to open the lid violently.
The height control clip is located at the right side of the housing on the metal hinge of the lid.
See: Knowing Your Health Smart Grill Pro
1. First slide the height control clip to the OPEN position.
WARNING – RISK OF BURNS
Only touch the appliance at the operating elements (handle, temperature dial, height control
clip). The exterior of the appliance can get hot during operation, causing risk of burns.
2. Grasp the lid at the handle and hold it in the desired position.
3. Slide the height control clip backwards (to the hinge of the lid) until it stops.
Tip: If you wish to lower the lid: first hold the lid at the handle. Then pull the height control clip
a little more to the front of the Grill.
4. Slowly release the handle; the lid will stay in the selected position.
Angle Adjust Non-Slip Feet
The Health Smart Grill Pro provides extendable feet, which are designed to level the base
grilling surface, when cooking foods such as sausages. This ensures the sausages to not roll
off the grilling surface. However, the maximum amount of surplus fat will still be drained during
cooking.
WARNING – RISK OF BURNS
Always adjust the angle adjust non-slip feet of the appliance before connecting the appliance
to the power supply. Do not tilt the appliance during operation. Otherwise, hot fat and juices
could run out, causing severe injuries and damage.
1. With the lid completely closed, slide the height control clip to the LOCK position to lock the
lid. (See: »Storage«)
32
Page 11

2. Lift the Grill by the handle. The Angle Adjust non-slip feet are folded into sockets at the
bottom of the base. Just, as required, fold out or fold in both feet until they snap into position.
Thereafter, ensure that both feet are in the same position. Otherwise, the appliance will not
stand stable.
3. Place the appliance on the desired working surface and unlock the lid (height control clip
to the OPEN position). Thereafter, you can use the Grill.
TIPS FOR BEST RESULTS
For best grilling results, use cuts which are thick enough to touch the grilling surfaces at the lid
and bottom, when closing the lid (approx. 1 to 5.5 cm).
Recommended Cuts:
Beef Sirloin (New York), Rump, Rib Eye (Scotch Filet), Filet
Lamb Trim Lamb Leg Steaks, Filet, Eye of Loin, Cutlets, Diced Lamb
Pork Butterfly Loin Steaks, Spare Ribs, Leg Steaks, Filet, Diced Pork
• Tougher cuts such as beef blade, topside steak, lamb forequarter or neck chops can be used.
To tenderize these cuts, marinate them for a few hours or overnight in a marinade with wine
or vinegar to help break down the connective tissue.
• Add salt after cooking. Otherwise, the salt would dehydrate the meat, making it tough and dry.
• If using a marinade recipe or pre-marinated meats from your meat retailer, drain excess marinade off and dab with kitchen paper before placing on the grilling surface. Some marinades
contain high sugar levels, which can scorch on the grilling surface when cooked.
• Do not overcook meat. Even pork is better served pink and juicy.
• Do not pierce meat with a fork or cut meat while cooking. This will let the juices escape,
resulting in a tougher and dry steak.
• When cooking fish, use a flat heat-resistant plastic spatula to support the food.
• Parboiling sausages can alleviate the need to pierce sausages before cooking.
• It is recommended not to cook cuts with thick bones such as T-bone steaks. You should remove
the bone before cooking.
Grilling Guide
Cooking temperatures and cooking times depend on your individual liking, as well as on thickness, type and consistency of your food. The following table holds some recommendations. If
required, check your food for the desired consistency during cooking.
• Select a low temperature (SANDWICH) for heating up food and cooking sandwiches.
• Select medium temperatures for seafood and scallops.
• Select high temperatures (SEAR) for meat and poultry.
33
Page 12

Type of Food Cooking Time Temperature
Beef, Sirloin 1-2 min. (rare)
3-4 min. (medium rare)
5-6 min. (well done)
Beef, minute steak 1-2 min. high
Beef, Hamburger patties 4-6 min. low
Pork, various cuts 4-6 min. high
Lamb, loin 3-4 min. high
Lamb, cutlets, leg steaks 4 min. high
Chicken breast 6 min., cooked through high
Chicken thigh filets 4-5 min. high
high
Sausage 3-7 min.
depending on thickness
Sandwich or Foccacia 3-5 min. until golden brown low
Vegetable, 1 cm thick (e.g. eggplant,
zucchini, sweet potatoe)
Fish filet 2-4 min. medium
Fish cutlets 3-5 min. medium
Octopus 3 min. medium
Prawns 2 min. medium
Scallops 1 min. medium
3-5 min. medium
high
Tipps for Toasting Sandwiches
• Bread: Most types of bread can be used (white, wholemeal, wholegrain, raisin loaf, etc.).
The sandwich press is ideal for toasting foccacia, Turkish bread baguettes as well as bread
rolls. Raisin bread, brioche or other sweet breads, which contain high sugar content, will tend
to brown quicker.
• Fillings: Prefer canned or pre-cooked fruit, as fresh fruit may give off excessive juices when
heated. Be careful when biting into sandwiches containing fillings such as cheese and tomato
or jam as they retain heat and can burn if eaten too quickly.
• Toasting Bread: The unique flat design makes the sandwich press ideal for toasting plain
breads without any fillings or spreads. Try toasting Turkish bread with jams for a great alternative to standard breads at breakfast.
• Fat Free Snacks: Due to the non-stick flat plate design, it is not necessary to use any butter
or margarine on the outside of your toasted snacks.
34
Page 13

How to Judge a Steaks Doneness
There is an art to determining when your steak, lamb chop, or cutlet is cooked to the correct
degree of doneness – rare, medium rare, medium, medium well, or well done. However, it is
easily mastered, using this handy hints and tips.
Rare: Cook for a few minutes per side, depending on thickness. Turn once only. Cook until
steak feels very soft with back of tongs. A meat thermometer will show the internal temperature
of a rare steak as 55-60°C.
Medium rare: Cook one side until moisture is just visible on top surface. Turn once only.
Cook on the other side until surface moisture is visible. Steak will be cooked to medium rare,
when it feels soft with back of tongs. A meat thermometer will show the internal temperature
of a medium rare steak as 60-65°C.
Medium: Cook one side until moisture is pooling on top surface. Turn once only. Cook second side until moisture is visible. Steak will be cooked to medium when it feels springy with
back of tongs. A meat thermometer will show the internal temperature of a medium steak as
65-70°C.
Medium Well: Cook one side until moisture is pooling on top surface. Turn and cook second
side until moisture is pooling on top. Reduce heat slightly and continue to cook until steak feels
firm with back of tongs. A meat thermometer will show the internal temperature of a medium
well steak as 70-75°C.
Well Done: Cook one side until moisture is pooling on top surface. Turn and cook second
side until moisture is pooling on top. Reduce heat slightly and continue to cook until steak feels
very firm with back of tongs. A meat thermometer will show the internal temperature of a well
done steak as 75-85°C.
BEFORE FIRST USE
WARNING: DO NOT let young children play with the appliance, or any part
of it, or the packaging!
1. Unpack the appliance and all accessories carefully.
2. Check that no parts are damaged or missing. See: Knowing Your Health Smart Grill Pro
3. Carefully remove all shipping materials and promotional materials, but DO NOT remove
the model label. Slide the height control clip to the OPEN position. Then grasp the lid of the
Grill by the handle and fold the lid completely open. Especially ensure that there are no foreign objects (e.g. packaging material) on the grilling surfaces
WARNING – RISK OF ELECTRIC SHOCK
Always unplug, and leave the appliance cool down, before cleaning. Do not immerse the
housing or power cord in water or other liquids or spill any liquids on the housing or power
cord. Do not place the housing or power cord in an automatic dishwasher.
4. Before first use and after a longer period of storage, clean the appliance and its parts. See:
Care and Cleaning
5. Drip some cooking oil on a kitchen cloth and wipe the non-stick coatings to prepare the
non-stick coatings for use.
35
Page 14

Note: When using the Grill for the very first time, you may notice a fine smoke haze.
This is caused by heating some of the components of the appliance. There is no need for
concern. To avoid any influence on the taste of your food, you should heat-up the appliance
to maximum temperature for 15 minutes. If the smoke haze persists on further use, unplug the
appliance and leave it cool down to room temperature. Then clean the appliance thoroughly.
If the smoke haze still persists, send the appliance to an authorized service centre for examination and repair.
6. Turn the temperature dial to the highest temperature setting (SEAR) and wait for approx.
15 minutes. Thereafter turn the temperature dial to the desired setting and wait some minutes
with the lid open until the READY indicator goes out. Now the appliance is ready for cooking
your food.
OPERATION
WARNING: Always ensure that the appliance and all its parts and accessories are out of
reach of young children. The appliance is intended for cooking food, thus the surfaces
will become very hot. During operation, only touch the appliance at the operating elements
to avoid scalds.
Only place the appliance on a stable, dry, heat-resistant, and level surface. (See: »General
Safety Instructions«) Do not place any clothes or tissue or other foreign objects on or under the
appliance during operation, to avoid risk of fire, overheating, or electric shock. Do not block
the ventilation slots at the bottom of the housing. During operation, the operating elements must
be accessible all the time. (See: »Knowing Your Health Smart Grill Pro«)
Ensure to keep the appliance in an appropriate distance of at least 50 cm on each side to the
edge of the working space and any other objects. During operation leave at least 1 m of free
space above the appliance for free access.
Before assembling the appliance, always ensure that all parts are in proper working order and
completely dry. (See: »General Safety Instructions«) Do not use any damaged or unsuitable
parts to avoid risk of injuries and damage. Do not operate the appliance without the drip tray
in place, to avoid risk of fire, electric shock and scalds.
Please keep in mind that fresh food will splash and hot steam will escape, when coming in
contact with the hot grilling surfaces. Do not hold any part of your body or any delicate objects
over the appliance. Protect your hands and arms with oven gloves. During operation, ensure
that all persons (including you) stay in sufficient distance. Expect splashes of hot fat and juices
in the surroundings of the appliance.
CAUTION: Do not scratch or cut on the grilling areas. Do not use any hard or edged objects
(e.g. knives, metal scrapers) on the grilling areas to avoid damage to the non-stick coating.
Only use cooking utensils made of wood or plastics.
CAUTION: The heater starts to work as soon as you insert the plug into the outlet. The unit
can be turned off just by pulling the power plug.
Cooking Your Food
1. Place the appliance on a suitable surface (see: »General Safety Instructions«), if possible,
near a suitable wall power outlet. See: Important Safeguards for Electrical Appliances Completely unwind the power cord.
36
Page 15

WARNING: Always completely unwind the power cord before connecting the appliance to
the power supply. Do not operate the appliance with the power cord wrapped around the cord
storage to avoid damage and injuries due to overheating and electric shock.
2. If required, fold out the non-slip feet if you wish to cook sausages or Burger, for which you
need a level grilling surface (see: »Angle Adjust Non-Slip Feet«).
3. Slide the height control clip on the metal hinge of the lid to the OPEN position. (See: »Height
Control Feature«). Open the lid and ensure that the grilling surfaces are clean and there are
no foreign objects on it. Then close the lid. With the lid closed, the Grill will reach the desired
cooking temperature more quickly, thus saving energy.
4. Ensure that the drip tray is assembled correctly. (See: »Care and Cleaning«)
WARNING – RISK OF BURNS
Only touch the hot Grill at the handles and operating elements. The appliance starts heating
IMMEDIATELY, when connected to the power supply. Do not touch the grilling surfaces or other
hot components of the appliance, during operation or shortly thereafter.
Do not operate the appliance without the drip tray. Otherwise hot fat and juices could run out,
causing severe burns and damage.
5. Insert the power plug in a suitable wall power outlet (220-240 V, 50 Hz, AC; (see: »Important Safeguards for Electrical Appliances«). The red POWER indicator illuminates and the
appliance starts heating immediately.
Note: When using the Grill for the very first time, you may notice a fine smoke haze. However, there is no need for concern.
6. Only before the very first use of the new appliance: Turn the temperature dial to
the highest temperature setting (SEAR). Then wait for about 15 minutes. This way, the components of the appliance will be prepared for use. However, this procedure is not necessary on
further use. Later on, you can immediately start cooking your food.
7. Turn the temperature dial to the desired temperature setting. Then wait, until the grilling
surfaces reach the set temperature, and the green READY indicator illuminates. This will last for
approx. 5 to 10 minutes, depending on the set temperature. See: Tips for Best Results
8. It is a good idea to use this time for preparing your food. Remove all inedible parts and cut
your food in pieces of sufficient size. Leave frozen food thaw, before cooking. Dab dry humid
pieces of food, using a kitchen cloth.
Note: The Grill can be used with open or closed lid. However, when closing the lid, the cooking time will be shorter and you can save energy.
WARNING – RISK OF BURNS!
Only touch the Grill at the operating elements (handle, temperature dial, height control clip).
DO NOT touch hot parts of the appliance with your body or heat-sensitive objects. Open the
lid carefully to avoid that the appliance will tilt backwards. When placing your food on the
hot grilling surface, water and fat could splash. Ensure that persons (including you) stay in
sufficient distance to the appliance.
9. Place your food as far as possible at the rear of the grilling surface. The required temperature setting and cooking time depend on size, thickness, type and desired consistency of your
food. (See: »Grilling Guide«)
37
Page 16

Use barbecue utensils of wood or heat-resistant plastic. Do not use any metal utensils.
The green READY indicator may turn on and out during operation. This simply indicates that
the appliance is holding the set temperature.
10. It is best to close the lid whenever possible. The lid is assembled to floating hinges and can
be adjusted to the thickness of your food: approx. from 1 cm to 5.5 cm.
Hold the lid by the handle in the desired height, while sliding the height control clip towards
the hinge of the lid to the stop. See: Height Control Feature.
Tip: Especially with soft food (Burger, fish, delicate vegetables) the lid should only touch the
food slightly without pressure. The lid is assembled using a floating hinge, thus lying evenly
on the food.
CAUTION
Do not cut or scratch on the grilling surfaces. Otherwise, the non-stick coating could be damaged. Ensure that you do not tip over the appliance, when opening the lid.
11. Cook your food to the desired consistency. Possibly, you should check the cooking process
after some minutes.
12. As soon as your food is done, fold the lid open to the stable upper position.
Take your food from the grilling surface using, for example, plastic or wooden barbecue utensils. Thereafter, you can immediately place fresh food on the grilling surface.
13. When you finished your work, turn the temperature dial to the lowest temperature setting
(SANDWICH) and unplug the appliance.
14. Leave the appliance cool down for at least 40 minutes, ensuring that the appliance is
always out of reach of young children.
15. Clean the appliance after each use to avoid the accumulation of baked-on food. (See:
»Care and Cleaning«)
CARE AND CLEANING
WARNING – RISK OF BURNS
Always ensure that the appliance is out of reach of young children.
Always switch the temperature dial to the lowest temperature setting (SANDWICH), then unplug the appliance, and wait until the grilling surfaces cooled down (at least 40 minutes),
before moving, disassembling, or cleaning the appliance. Do not attempt to move the
appliance with fat and juices in the drip tray still hot! Otherwise, hot fat could be
spilled, causing severe injuries and damage.
CAUTION: Keep in mind that fat and juices could drip especially from the grilling surfaces
and drip tray, when removing the drip tray. Keep delicate objects in sufficient distance. Do not
place the appliance or any parts of it on surfaces that are sensitive to heat, fat or moisture.
Do not use any abrasive cleaners or corrosive chemicals (e.g. bleach) for cleaning the appliance or any parts of it, to avoid damage to the surfaces. Do not use any hard or sharp-edged
objects for cleaning any surface of the appliance. Do not immerse the housing, or power cord
in water or any other liquid. Do not spill or drip any liquids on or in these parts to avoid risk
of fire and electric shock. Do not clean the housing or power cord in an automatic
dishwasher. Do not use violence!
Tip: Always clean the appliance after each use to prevent accumulation of baked-on foods.
38
Page 17

Cleaning the Appliance
1.Turn the temperature dial to SANDWICH, and unplug the appliance.
2. Grasp the lid at the handle. Push the height control clip to the OPEN position and fold the
lid completely open. Ensure that young children cannot reach the appliance, and leave the
appliance cool down to room temperature (at least 40 minutes with the lid open).
3. It is best to remove remaining juices from the grilling surfaces, using a wooden spoon. Push
the remainder into the drip tray.
4. Pull the drip tray out from under the base of the appliance. Doing so, ensure not to spill the
juices.
Note: Pour fat and juices into a vessel that can be closed tightly. Then dispose the vessel in
domestic waste. Do not dispose fat and juices in the sink!
5. Pour out fat and juices from the drip tray. Then clean the drip tray in warm dishwater, using
a soft cloth or nylon brush. Alternatively, you can clean the drip tray in the top rack of an
automatic dishwasher.
IMPORTANT: Grasp the lid by the handle, while cleaning the grilling surfaces. This way, you
avoid inadmissible strain to the hinges of the lid, and the appliance cannot fall over.
6. Moisten a cloth or soft sponge with warm dishwater for cleaning. Grasp the appliance
by the handle and wipe the grilling surfaces. If required, you may use a nylon brush for the
grilling surfaces. Wipe the exterior of the appliance using a damp cloth. Always ensure not to
drip water into the interior of the appliance.
7. Moisten a clean cloth with clear tap water and wipe the surfaces again.
8. Thoroughly dry all parts of the appliance (including the drip tray) after cleaning.
9. Grasp the drip tray at its handle and insert the drip tray in the base of the appliance. Push
the drip tray into position until it settles tangibly.
STORAGE
WARNING: Young children must be supervised that they do not play with the appliance or
any part of it. When the appliance is not in use, always turn the temperature dial to the lowest
temperature setting (SANDWICH). Thereafter, unplug the appliance. Do not leave the appliance unattended while connected to the power supply to avoid risk of electric shock or fire.
Always clean the appliance and all its parts before storing to avoid accumulation of dried-on
food. (See: »Care and Cleaning«)
Ensure to store the appliance where it is clean, dry and safe from frost, direct sunlight and
inadmissible strain (mechanical or electric shock, heat, moisture) and where it is out of reach
of young children. Place the appliance on a clean and stable surface, where it cannot fall.
Do not place any hard or heavy objects on the appliance or any part of it.
Always handle power cords with special care. Electric cables may never be knotted, twisted,
pulled, strained, or squeezed.
Do not use any parts or accessories of the appliance for any other purpose than operating
the appliance. It is good advice to store the parts and accessories of the appliance with the
appliance.
39
Page 18

CAUTION: Do not hold the appliance by the power cord for moving the appliance. To move
the appliance, always grasp the appliance at the handle or at both sides of the base, to avoid
damage. Before moving the appliance by the handle, always ensure that the height control
clip is in the LOCK position and the lid is securely locked to the base.
1. If you do not wish to use the appliance for a longer period of time, turn the temperature
dial to the lowest temperature setting (SANDWICH); then unplug the appliance. Leave the
appliance cool down. Then clean the appliance. (See: »Care and Cleaning«)
2. Grasp the handle of the lid, and push the height control clip to the OPEN position. Then
completely close the lid, and slide the height control clip to the LOCK position.
Ensure that the lid is locked firmly to the base.
3. Lift the appliance by the handle and wrap the power cord loosely around the cord storage
at the bottom of the base. Doing so, avoid pulling, straining or squeezing the power cord.
4. Thereafter you may carry the appliance by the handle and store it in the upright position.
Store the appliance on a level, stable and dry surface, where it cannot fall down or fall over,
and where it is out of reach of young children.
NOTES FOR DISPOSAL
Dispose of the appliance and packaging must be effected in accordance with the
corresponding local regulations and requirements for electrical appliances and packaging. Please contact your local disposal company.
Do not dispose of electrical appliances as unsorted municipal waste, use separate
collection facilities. Contact your local government for information regarding the collection
systems available.If electrical appliances are disposed of in landfills or dumps, hazardous
substances can leak into the groundwater and get into the food chain, damaging your health
and well-being.When replacing old appliances with new once, the retailer is legally obligated
to take back your old appliance for disposal at least for free of charge.
INFORMATION AND SERVICE
Please check www.gastroback.de for further information.
For technical support, please contact Gastroback Customer Care Center
by phone: +49 (0)4165/22 25-0 or e-mail info@gastroback.de.
WARRANTY
We guarantee that all our products are free of defects at the time of purchase. Any demonstrable manufacturing or material defects will be to the exclusion of any further claim and
within warranty limits of the law free of charge repaired or substituted. There is no warranty
claim of the purchaser if the damage or defect of the appliance is caused by inappropriate
treatment, over loading or installation mistakes. The warranty claim expires if there is any
technical interference of a third party without an written agreement.
The purchaser has to present the sales slip in assertion-of-claim and has to bear all charges
of costs and risk of the transport.
40
Page 19

Index
A
abroad operation.............................. 30
accessories ....................................... 28
B
bread .............................................. 34
C
capacity ........................................... 31
care and cleaning ............................. 38
condensate ....................................... 30
cooking time .................................... 33
D
disposal ..................................... 39, 40
drip tray .......................................... 39
E
electricity ......................................... 29
extension cord .................................. 30
F
feet ................................................. 32
first use ............................................ 35
functions .......................................... 32
G
guidelines ........................................ 33
M
model .............................................. 31
N
non-stick coating ......................... 31, 35
O
operation ......................................... 36
P
power consumption ........................... 31
power cord .......................... 30, 31, 40
power supply ............................. 29, 31
preparing food ................................. 36
properties ........................................ 32
S
safety instructions .............................. 28
sandwich ......................................... 34
saving energy ................................... 37
service ............................................. 40
slope of grilling plate ........................ 32
spare parts ....................................... 28
steak ............................................... 34
steam .............................................. 30
storage ............................................ 39
H
height control ............................. 32, 40
I
ingredients ....................................... 33
inteded use ...................................... 28
L
lid .................................................. 32
LOCK ............................................. 40
T
technical specifications ...................... 31
temperature ................................ 30, 33
test for proper operation .................... 28
thickness of food ............................... 32
tips and tricks ................................... 33
W
warranty .......................................... 40
workspace ....................................... 28
41
Page 20

GASTROBACK GmbH
Gewerbestraße 20 . 21279 Hollenstedt / Germany
Telefon +49 (0)41 65/22 25-0 . Telefax +49 (0)41 65/22 25-29
info@gastroback.de . www.gastroback.de
20140619
 Loading...