

Page 1

CFN Series
CFN III Manager’s Manual
for Windows NT
®
Version 3.4
MDE-4315
(formerly C36143)
Page 2

Computer Programs and Documentation
FCC Warning
All Gasboy International Inc. computer programs (including software on diskettes and within memory chips) and documentation are copyrighted by, and shall remain the property
of, Gasboy International Inc. Such computer programs and documents may also contain trade secret information. The duplication, disclosure, modification, or unauthorized use of
computer programs or documentation is strictly prohibited, unless otherwise licensed by Gasboy International Inc.
This equipment has been tested and found to comply with the limits for a Class A digital device pursuant to Part 15 of the FCC Rules. These limits a r e designed to provide
reasonable protection against harmful interference when the equipment is operated in a commercial environment. This equipment generates, uses, and can radiate radio frequency
energy, and if not installed and used in accordance with the instruction manual, may cause harmful interference to radio communic ations. Operation of this equipment in a
residential area is likely to cause harmful interference in which case the user will be required to correct the interference at his own expense. Changes or modifications not expressly
approved by the manufacturer could void the user’s authority to operate this equipment.
Approvals
Gilbarco is an ISO 9001:200 0 regi stered comp an y.
Underwriters Laboratories:
U. L. File# Products li st ed wi th U. L.
MH4314
MH6418
MH7404
MH10581 Key con t ro l u n it , M od e l G K E- B S e ri e s
All dispensers and self-contained pumping
units
Power operated Transfer Pump Models 25,
25C, 26, 27, 28, 72, 72S, 72SP, 72X, 73 and
1820
Hand operated Transfer Pump Models 1230
Series, 1243 Series, 1520 and 1720 Series
Card reader terminals, Models 1000, 1000P
Site controller, Model 2000S CFN Series
Data entry terminals, Model TPK-900 Series
Fuel Point Reader System
New York City:
NYFD C of A # Produc t
4823 9100A, 9140A, 9152A, 9153A,
4997 9822A, 9823A
5046 pending 9100Q, 9140Q, 9152Q, 9153Q,
9800A, 9840A, 9850A, 9852A,
9853A, 9140
9800Q, 9840Q, 9852Q, 9853Q
NCWM - Certificate of Compliance:
Gasboy pumps and dispensers are evaluated by the National Conference of Weights and Measures (NCWM) under the National Type Evaluation Program (NTEP).
NCWM has issued the following Certificates of Compliance (COC):
COC# Product Model # COC# Product Model # COC# Product Model #
95-179A2 Dispenser
95-136A5 Dispenser 9800 Series 91-057A3 Controller
9100 Retail Series, 8700
Series, 9700 Series
91-019A2 Dispenser
9100 Commercial
Series
1000 Series FMS,
2000S-CFN Series
California Air Resources Board (CARB):
Executive Order # Product
G-70-52-AM Balance Vapor Recovery
G-70-150-AE VaporVac
Patents
Gasboy products are manufactured or sold under one or more of the following U.S. patents.:
Dispensers
5,257,720
Point of Sale/Back Office Equipment
D335,673
Trademarks
Non-registered trademarks
Consola™
Infinity™
Registered trademarks
ASTRA
Fuel Point
®
Gasboy
®
Keytrol
Slimline
®
®
®
Additional U.S. and foreign trademarks
pending.
Other brand or product names shown may be
trademarks or registered trademarks of their
respective holders.
Additional U.S. and foreign patents pending.
This document is subject to change without notice. · For information regarding Gasboy Literature, call (336) 547-5661
E-mail: literature@gilbarco.com · Internet: http://www.gasboy.com and http://www.gilbarco.com
2004 Gasboy International Inc. and Gilbarco Inc. · All Rights Reser v ed
Page 3

Table of Contents
Table of Contents
List of Figures xiv
1 – Introduction 1
Your Operating System 1
Starting your CFN3 . . . . . . . . . . . . . . . . . . . . . . . . . . . . . . . . . . . . . . . . . .1
Quitting Your CFN3 Application . . . . . . . . . . . . . . . . . . . . . . . . . . . . . . . . .2
Minimizing the Command Window. . . . . . . . . . . . . . . . . . . . . . . . . . . . . . .2
Levels of Operation . . . . . . . . . . . . . . . . . . . . . . . . . . . . . . . . . . . . . . . . . .2
Logging onto NT as Administrator 4
Miscellaneous NT Information 4
Profit Point . . . . . . . . . . . . . . . . . . . . . . . . . . . . . . . . . . . . . . . . . . . . . . . . .5
On-line Documentation . . . . . . . . . . . . . . . . . . . . . . . . . . . . . . . . . . . . . . .5
Related Documentation . . . . . . . . . . . . . . . . . . . . . . . . . . . . . . . . . . . . . . .5
Cabling and Wirin g 7
2 – CFN3 9
System Overview 9
CFN3 Command Window . . . . . . . . . . . . . . . . . . . . . . . . . . . . . . . . . . . . .9
Consoles 9
Readers 10
The Log Printer 10
Command Terminals 11
Commands 11
Command keys . . . . . . . . . . . . . . . . . . . . . . . . . . . . . . . . . . . . . . . . . . . .12
System-response Problems 12
CFN3 Command Sessions 12
How to Sign On . . . . . . . . . . . . . . . . . . . . . . . . . . . . . . . . . . . . . . . . . . . .12
How to Sign Off . . . . . . . . . . . . . . . . . . . . . . . . . . . . . . . . . . . . . . . . . . . .13
Automatic Sign Off . . . . . . . . . . . . . . . . . . . . . . . . . . . . . . . . . . . . . . . . . .13
How to Change Your Sign-on Code. . . . . . . . . . . . . . . . . . . . . . . . . . . . .13
How to Enter Commands and Data . . . . . . . . . . . . . . . . . . . . . . . . . . . . .13
How to Use Options with Commands . . . . . . . . . . . . . . . . . . . . . . . . . . .15
How to Enter Multiple Blocks of Information . . . . . . . . . . . . . . . . . . . . . .16
How to Verify Commands . . . . . . . . . . . . . . . . . . . . . . . . . . . . . . . . . . . .17
How to Use Ranges with Commands . . . . . . . . . . . . . . . . . . . . . . . . . . .17
A Shortcut for Entering Data . . . . . . . . . . . . . . . . . . . . . . . . . . . . . . . . . .18
How to Use Disk-based Commands . . . . . . . . . . . . . . . . . . . . . . . . . . . .18
Redirecting Command Input and Output 19
How to Redirect Input for a Command. . . . . . . . . . . . . . . . . . . . . . . . . . .19
How to Redirect Output from a Command. . . . . . . . . . . . . . . . . . . . . . . .19
The Log Printer 20
How to Print a File on a Log Printer . . . . . . . . . . . . . . . . . . . . . . . . . . . . .20
How to Print a Message on a Log Printer . . . . . . . . . . . . . . . . . . . . . . . .20
MDE-4315 CFN Series CFN III Manager’s Manual for Windows NT · August 2004 Page i
Page 4

Table of Contents
Keyboard Control Characters 20
The CONTROL Key . . . . . . . . . . . . . . . . . . . . . . . . . . . . . . . . . . . . . . . . .21
How to Terminate a Command . . . . . . . . . . . . . . . . . . . . . . . . . . . . . . . .21
How to Delete Characters . . . . . . . . . . . . . . . . . . . . . . . . . . . . . . . . . . . .21
How to Delete a Line . . . . . . . . . . . . . . . . . . . . . . . . . . . . . . . . . . . . . . . .21
How to Pause Printout . . . . . . . . . . . . . . . . . . . . . . . . . . . . . . . . . . . . . . .22
How to Pause Printout with the L Option . . . . . . . . . . . . . . . . . . . . . . . . .22
Permission Levels 22
Remote Access Command 23
Optional Commands 23
The HELP Command 23
3 – Users 25
User ID Numbers 25
Special User Numbers . . . . . . . . . . . . . . . . . . . . . . . . . . . . . . . . . . . . . . .25
How to Add a User. . . . . . . . . . . . . . . . . . . . . . . . . . . . . . . . . . . . . . . . . .26
How to Remove a User . . . . . . . . . . . . . . . . . . . . . . . . . . . . . . . . . . . . . .27
How to Print a List of User Numbers . . . . . . . . . . . . . . . . . . . . . . . . . . . .27
Permission Levels 27
How to Use Permission Levels . . . . . . . . . . . . . . . . . . . . . . . . . . . . . . . .28
4 – Receipts, Messages, and Date 31
Date and Time 31
Receipt Heading and Footi ng 31
How to Enter Receipt Heading and Footing. . . . . . . . . . . . . . . . . . . . . . .31
Special Printer Functions . . . . . . . . . . . . . . . . . . . . . . . . . . . . . . . . . . . . .32
How to Print Receipt Heading and Footing . . . . . . . . . . . . . . . . . . . . . . .33
How to Change Heading and Footing Lines . . . . . . . . . . . . . . . . . . . . . .34
How to Delete Heading or Footing Lines . . . . . . . . . . . . . . . . . . . . . . . . .34
Island Card Reader Messages 34
How to Enter Messages. . . . . . . . . . . . . . . . . . . . . . . . . . . . . . . . . . . . . .34
How to Print Messages . . . . . . . . . . . . . . . . . . . . . . . . . . . . . . . . . . . . . .35
How to Change Messages . . . . . . . . . . . . . . . . . . . . . . . . . . . . . . . . . . . .35
How to Load Messages . . . . . . . . . . . . . . . . . . . . . . . . . . . . . . . . . . . . . .36
How to Delete Messages . . . . . . . . . . . . . . . . . . . . . . . . . . . . . . . . . . . . .36
5 – Fuel Products 37
How to Add or Change Fuel Products 37
How to Initialize Fuel-product Information 38
How to Create a New Fuel Product 38
How to Change Fuel-product Infor m ation 39
How to Print Fuel-product Information 39
How to Remove a Fuel-product 40
Fuel Product Inventory 40
How to Enter Fuel-product Inventory 41
MDE-4315 CFN Series CFN III Manager’s Manual for Windows NT · August 2004 Page ii
Page 5

Table of Contents
6 – Tank and Pump Commands 43
Tank Commands 43
How to View Current Tank Inventory . . . . . . . . . . . . . . . . . . . . . . . . . . . .43
How to Add to and Subtract from Tank Inventory Counters. . . . . . . . . . .43
How to Set Tank Inventory Counters . . . . . . . . . . . . . . . . . . . . . . . . . . . .44
Method-of-payment Pricing 45
Price Code Levels . . . . . . . . . . . . . . . . . . . . . . . . . . . . . . . . . . . . . . . . . .46
How to View Current Price Code Levels and Prices . . . . . . . . . . . . . . . .46
How to Enter Price Code Levels and Prices . . . . . . . . . . . . . . . . . . . . . .47
How to Change Price-code Prices . . . . . . . . . . . . . . . . . . . . . . . . . . . . . .47
How to Delete a Price Code or Price Level . . . . . . . . . . . . . . . . . . . . . . .48
How to Set Up Day-Night Pricing. . . . . . . . . . . . . . . . . . . . . . . . . . . . . . .49
Pump Commands 49
How to Assign Products, Prices, and Tanks to Hoses . . . . . . . . . . . . . . .49
How to View Pump Information . . . . . . . . . . . . . . . . . . . . . . . . . . . . . . . .50
How to Set Pump Totalizers. . . . . . . . . . . . . . . . . . . . . . . . . . . . . . . . . . .52
How to Reset Pump Totalizers. . . . . . . . . . . . . . . . . . . . . . . . . . . . . . . . .52
How to Enter Pump-Fill-Limit and Slow-to-Cutoff. . . . . . . . . . . . . . . . . . .53
7 – Merchandise Products 55
How to Add or Change Merchandise Products 55
How to Create a New Merchan dise Product 55
How to Create Special Merchandise Products 56
How to Print Merchandise Product Information 57
How to Change Merchan di se Pr od uct Info rm ation 58
Change Price Lookup 58
How to Print Merchandise Product Information 58
How to Remove a Merchandise Product 59
How to Enter Merchandise Product Price Lookups 60
Merchandise Product Inventory 60
How to Enter Merchandise Product Inventory . . . . . . . . . . . . . . . . . . . . .60
How to Add to Merchandise Product Inventory . . . . . . . . . . . . . . . . . . . .61
How to Subtract from Merchandise Product Inventory. . . . . . . . . . . . . . .61
How to Enable Merchandise Dollar Inventory . . . . . . . . . . . . . . . . . . . . .61
How to Disable Merchandise Inventory Tracking. . . . . . . . . . . . . . . . . . .62
8 – Setting Up Tax Tables 63
The Three Tax Types 63
Tax Accumulators 63
How to Enter Tax Accumulator Names . . . . . . . . . . . . . . . . . . . . . . . . . .63
How to Print Tax Accumulators . . . . . . . . . . . . . . . . . . . . . . . . . . . . . . . .64
How to Reset Cumulative Tax Totals. . . . . . . . . . . . . . . . . . . . . . . . . . . .64
Tax as Percentage 64
When to Use Tax Tables 65
How to Set Up a Tax Table 66
1. Prepare a Compressed Description of Tax Data . . . . . . . . . . . . . . . . .66
2. Allot Storage Space for Your Tax Information . . . . . . . . . . . . . . . . . . .69
3. Assign a Tax Number and Name to Each Table . . . . . . . . . . . . . . . . .70
MDE-4315 CFN Series CFN III Manager’s Manual for Windows NT · August 2004 Page iii
Page 6

Table of Contents
4. Build a Tax Table . . . . . . . . . . . . . . . . . . . . . . . . . . . . . . . . . . . . . . . . .70
5. Back Up Your Tax Data . . . . . . . . . . . . . . . . . . . . . . . . . . . . . . . . . . . .73
9 – Reports, Cash Drawer and Shifts 75
Reports 75
How to Print Sales Reports . . . . . . . . . . . . . . . . . . . . . . . . . . . . . . . . . . .76
How to Print Quantity Reports . . . . . . . . . . . . . . . . . . . . . . . . . . . . . . . . .79
How to Print Quantity and Dollar Totals. . . . . . . . . . . . . . . . . . . . . . . . . .81
How to Print a Sales Summary Report . . . . . . . . . . . . . . . . . . . . . . . . . .83
How to Reset Sales Totals. . . . . . . . . . . . . . . . . . . . . . . . . . . . . . . . . . . .84
Cash Drawer Commands 85
How to Enter Cash Drawer Amount. . . . . . . . . . . . . . . . . . . . . . . . . . . . .85
How to Add To or Subtract From Cash Drawer . . . . . . . . . . . . . . . . . . . .85
How to Print Cash Drawer Totals. . . . . . . . . . . . . . . . . . . . . . . . . . . . . . .86
Shift Change 86
The NEXT SHIFT Command . . . . . . . . . . . . . . . . . . . . . . . . . . . . . . . . . .86
Other Shift-change Commands . . . . . . . . . . . . . . . . . . . . . . . . . . . . . . . .87
The NEXT DAY Command . . . . . . . . . . . . . . . . . . . . . . . . . . . . . . . . . . .87
10 – Transactions 89
Printing Transactions 89
How to Print Transactions . . . . . . . . . . . . . . . . . . . . . . . . . . . . . . . . . . . .90
How to Sort a Transaction Printout . . . . . . . . . . . . . . . . . . . . . . . . . . . . .90
How to Print Specified Types of Transactions . . . . . . . . . . . . . . . . . . . . .91
How to Print a Range of Transactions . . . . . . . . . . . . . . . . . . . . . . . . . . .92
How to Print Transactions in Progress. . . . . . . . . . . . . . . . . . . . . . . . . . .92
How to Print Receipts from the Transaction File . . . . . . . . . . . . . . . . . . .93
The Transaction File 93
How to Reset the Transaction-begin Pointer . . . . . . . . . . . . . . . . . . . . . .94
How to Automatically Reset the Transaction Pointer . . . . . . . . . . . . . . . .95
A More Detailed Report . . . . . . . . . . . . . . . . . . . . . . . . . . . . . . . . . . . . . .96
11 – Proprietary Cards 99
Proprietary Card Format 99
How to Restrict Purchases 99
Lockouts 100
Bit-mapped Lockout 100
How to Use Card Ranges . . . . . . . . . . . . . . . . . . . . . . . . . . . . . . . . . . .101
Limited Lockou t 101
How to Use Wildcards . . . . . . . . . . . . . . . . . . . . . . . . . . . . . . . . . . . . . .101
Positive and Negative Lockout Options 102
How to Select Negative Lockout . . . . . . . . . . . . . . . . . . . . . . . . . . . . . .102
How to Select Positive Lockout . . . . . . . . . . . . . . . . . . . . . . . . . . . . . . .103
Disk-based Bit-mapp ed Lockou t 103
How to Check a Card’s Lockout Status 103
How to Lock Out and Unlock Cards 104
How to Print a Lockout List 105
Authorization Codes 105
How to Assign Product Codes to Authorization Codes . . . . . . . . . . . . .106
MDE-4315 CFN Series CFN III Manager’s Manual for Windows NT · August 2004 Page iv
Page 7

Table of Contents
How to Print Authorization Code Definitions . . . . . . . . . . . . . . . . . . . . .107
How to Remove Product Codes. . . . . . . . . . . . . . . . . . . . . . . . . . . . . . .107
Fuel Limitation Codes 108
How to Assign Fuel Limits to Fuel Limitation Codes . . . . . . . . . . . . . . .108
How to Print Fuel Limitation Codes . . . . . . . . . . . . . . . . . . . . . . . . . . . .109
How to Remove a Fuel Limitation Code. . . . . . . . . . . . . . . . . . . . . . . . .109
Patron/Loyalty Cards 109
Example of the Patron.ini file . . . . . . . . . . . . . . . . . . . . . . . . . . . . . . . . .109
Price Levels, Authorization Codes and Limitation Codes . . . . . . . . . . .110
Using the Patron Card as Payment . . . . . . . . . . . . . . . . . . . . . . . . . . . .110
Attendant Cards 111
Procedure. . . . . . . . . . . . . . . . . . . . . . . . . . . . . . . . . . . . . . . . . . . . . . . .111
Reports. . . . . . . . . . . . . . . . . . . . . . . . . . . . . . . . . . . . . . . . . . . . . . . . . .111
Key Option 112
Communicating with the Site Controller. . . . . . . . . . . . . . . . . . . . . . . . .112
Restrictions Using the CFN with Key Option System. . . . . . . . . . . . . . .112
Fueler ID - Fleet Packages Only 114
Assigning a Fueler ID to a Cluster . . . . . . . . . . . . . . . . . . . . . . . . . . . . .114
12 – Lookup Program 115
Definitions 115
Records . . . . . . . . . . . . . . . . . . . . . . . . . . . . . . . . . . . . . . . . . . . . . . . . .119
The Menus 120
Short and Long Menus. . . . . . . . . . . . . . . . . . . . . . . . . . . . . . . . . . . . . .120
Default Actions in Fields. . . . . . . . . . . . . . . . . . . . . . . . . . . . . . . . . . . . .120
Main Menu 120
Update from Keyboard 121
Add New Records . . . . . . . . . . . . . . . . . . . . . . . . . . . . . . . . . . . . . . . . .121
Delete Records . . . . . . . . . . . . . . . . . . . . . . . . . . . . . . . . . . . . . . . . . . .122
Edit Existing Records. . . . . . . . . . . . . . . . . . . . . . . . . . . . . . . . . . . . . . .124
Search and Replace. . . . . . . . . . . . . . . . . . . . . . . . . . . . . . . . . . . . . . . .125
Merge Updates to/from File 126
Copying from a Source File . . . . . . . . . . . . . . . . . . . . . . . . . . . . . . . . . .126
Copying to a Target File. . . . . . . . . . . . . . . . . . . . . . . . . . . . . . . . . . . . .128
List Records 130
List Records to a Text File . . . . . . . . . . . . . . . . . . . . . . . . . . . . . . . . . . .130
Display a Text File . . . . . . . . . . . . . . . . . . . . . . . . . . . . . . . . . . . . . . . . .132
Unsorted List of Records . . . . . . . . . . . . . . . . . . . . . . . . . . . . . . . . . . . .132
Sorted List of Records . . . . . . . . . . . . . . . . . . . . . . . . . . . . . . . . . . . . . .133
Configuration 133
Optimize 134
13 – Fuel Allocation and Miles-Per-Gallon 135
Fuel Allocation 135
How to Set Up an Allocation System . . . . . . . . . . . . . . . . . . . . . . . . . . .135
How to Initialize the Allocation File. . . . . . . . . . . . . . . . . . . . . . . . . . . . .136
How to Set Up Allocation Numbers . . . . . . . . . . . . . . . . . . . . . . . . . . . .136
How to Change Allocated Amounts . . . . . . . . . . . . . . . . . . . . . . . . . . . .137
How to Print Currently Allocated Amounts. . . . . . . . . . . . . . . . . . . . . . .139
How to Remove an Allocation Number . . . . . . . . . . . . . . . . . . . . . . . . .139
MDE-4315 CFN Series CFN III Manager’s Manual for Windows NT · August 2004 Page v
Page 8

Table of Contents
Miles Per Gallon System 140
How to Set Up an MPG System. . . . . . . . . . . . . . . . . . . . . . . . . . . . . . .140
How MPG Information Is Calculated . . . . . . . . . . . . . . . . . . . . . . . . . . .141
How to Set Up Vehicle Numbers . . . . . . . . . . . . . . . . . . . . . . . . . . . . . .141
How to Reset MPG Period for All Vehicles . . . . . . . . . . . . . . . . . . . . . .142
How to Print MPG Report. . . . . . . . . . . . . . . . . . . . . . . . . . . . . . . . . . . .142
How to Remove a Vehicle Number . . . . . . . . . . . . . . . . . . . . . . . . . . . .142
14 – Backup System Data and Disk Files 143
Why Make Backups? 143
Floppy Diskettes. . . . . . . . . . . . . . . . . . . . . . . . . . . . . . . . . . . . . . . . . . .144
The Back-up Files 144
How to Back Up System Data 145
Backing Up CFN3 Files with BACKUP. . . . . . . . . . . . . . . . . . . . . . . . . .145
How to Do a Custom System Backup . . . . . . . . . . . . . . . . . . . . . . . . . .145
How to Back Up Transactions 146
TRANBACK . . . . . . . . . . . . . . . . . . . . . . . . . . . . . . . . . . . . . . . . . . . . . .146
BACKTRAN . . . . . . . . . . . . . . . . . . . . . . . . . . . . . . . . . . . . . . . . . . . . . .147
How to Restore Your Backup Data 147
How to Write-protect Backup Diskettes 147
How to Restore System or Transaction Data 148
15 – CFN3 File System 151
What Is a CFN3 File 151
Filename Restrictions. . . . . . . . . . . . . . . . . . . . . . . . . . . . . . . . . . . . . . .151
Filename Extensions . . . . . . . . . . . . . . . . . . . . . . . . . . . . . . . . . . . . . . .152
Wildcards in Filenames . . . . . . . . . . . . . . . . . . . . . . . . . . . . . . . . . . . . .152
The File System 152
Disk Drive Names . . . . . . . . . . . . . . . . . . . . . . . . . . . . . . . . . . . . . . . . .154
How to Specify Files on Other Drives . . . . . . . . . . . . . . . . . . . . . . . . . .154
Site Controller Files 154
How to Create Site Controller Files . . . . . . . . . . . . . . . . . . . . . . . . . . . .154
How to Print the Contents of Files . . . . . . . . . . . . . . . . . . . . . . . . . . . . .155
How to Remove User Files . . . . . . . . . . . . . . . . . . . . . . . . . . . . . . . . . .156
How to Copy Files . . . . . . . . . . . . . . . . . . . . . . . . . . . . . . . . . . . . . . . . .156
How to Rename Files. . . . . . . . . . . . . . . . . . . . . . . . . . . . . . . . . . . . . . .157
How to Move Files Between Directories of the RAM Drive . . . . . . . . . .157
How to Set Permissions of Files . . . . . . . . . . . . . . . . . . . . . . . . . . . . . .158
Directory Commands 159
How to List Files in a Directory. . . . . . . . . . . . . . . . . . . . . . . . . . . . . . . .159
How to Print a Short File List . . . . . . . . . . . . . . . . . . . . . . . . . . . . . . . . .159
How to List All Files Below a Directory. . . . . . . . . . . . . . . . . . . . . . . . . .159
How to Create Directories . . . . . . . . . . . . . . . . . . . . . . . . . . . . . . . . . . .160
How to Change to a Different Directory . . . . . . . . . . . . . . . . . . . . . . . . .160
How to Change to a Different Disk Drive from a Remote Site . . . . . . . .160
How to Print the Current Directory Name. . . . . . . . . . . . . . . . . . . . . . . .160
How to Copy a Directory . . . . . . . . . . . . . . . . . . . . . . . . . . . . . . . . . . . .161
How to Remove a Directory . . . . . . . . . . . . . . . . . . . . . . . . . . . . . . . . . .161
MDE-4315 CFN Series CFN III Manager’s Manual for Windows NT · August 2004 Page vi
Page 9

Table of Contents
Disk Commands 161
How to Format the RAM Drive . . . . . . . . . . . . . . . . . . . . . . . . . . . . . . . .161
How to Check a Disk for Errors . . . . . . . . . . . . . . . . . . . . . . . . . . . . . . .162
16 – Using Text Editors 163
®
Windows NT
Text Editors 163
FRED 164
The Editor’s Modes 164
How to Change Editor Modes . . . . . . . . . . . . . . . . . . . . . . . . . . . . . . . .164
Command Mode. . . . . . . . . . . . . . . . . . . . . . . . . . . . . . . . . . . . . . . . . . .164
Using the Editor: the Basics 165
How to Enter Text . . . . . . . . . . . . . . . . . . . . . . . . . . . . . . . . . . . . . . . . .166
How to Correct Text as You Type It. . . . . . . . . . . . . . . . . . . . . . . . . . . .166
Command Case . . . . . . . . . . . . . . . . . . . . . . . . . . . . . . . . . . . . . . . . . . .166
The Work Buffer. . . . . . . . . . . . . . . . . . . . . . . . . . . . . . . . . . . . . . . . . . .166
How to Name Files. . . . . . . . . . . . . . . . . . . . . . . . . . . . . . . . . . . . . . . . .166
How to Save New Files . . . . . . . . . . . . . . . . . . . . . . . . . . . . . . . . . . . . .167
How to Resave Files . . . . . . . . . . . . . . . . . . . . . . . . . . . . . . . . . . . . . . .167
How to Exit the Editor. . . . . . . . . . . . . . . . . . . . . . . . . . . . . . . . . . . . . . .167
How to Exit the Editor without Saving . . . . . . . . . . . . . . . . . . . . . . . . . .167
How to Move the Cursor . . . . . . . . . . . . . . . . . . . . . . . . . . . . . . . . . . . .168
How to Insert Text . . . . . . . . . . . . . . . . . . . . . . . . . . . . . . . . . . . . . . . . .169
How to Delete Text. . . . . . . . . . . . . . . . . . . . . . . . . . . . . . . . . . . . . . . . .169
How to Open a Line . . . . . . . . . . . . . . . . . . . . . . . . . . . . . . . . . . . . . . . .169
How to Undo Changes to a Line . . . . . . . . . . . . . . . . . . . . . . . . . . . . . .169
How to Join Two Lines. . . . . . . . . . . . . . . . . . . . . . . . . . . . . . . . . . . . . .169
How to Split Two Lines. . . . . . . . . . . . . . . . . . . . . . . . . . . . . . . . . . . . . .169
How to Copy a Line . . . . . . . . . . . . . . . . . . . . . . . . . . . . . . . . . . . . . . . .170
How to Replace One Character . . . . . . . . . . . . . . . . . . . . . . . . . . . . . . .170
Advanced Editing 170
How to Move the Cursor to a Specified Character. . . . . . . . . . . . . . . . .170
How to Move the Cursor to Specified Line. . . . . . . . . . . . . . . . . . . . . . .171
How to Search for a Specified String . . . . . . . . . . . . . . . . . . . . . . . . . . .171
How to Search for and Print a String . . . . . . . . . . . . . . . . . . . . . . . . . . .172
How to Execute a Global Search and Replace . . . . . . . . . . . . . . . . . . .172
How to Erase the Entire Work Buffer . . . . . . . . . . . . . . . . . . . . . . . . . . .172
How to Delete Specified Lines . . . . . . . . . . . . . . . . . . . . . . . . . . . . . . . .173
How to Delete Up to a Specified Character . . . . . . . . . . . . . . . . . . . . . .173
How to Append a File to the Current File. . . . . . . . . . . . . . . . . . . . . . . .173
How to Set Tab Stops . . . . . . . . . . . . . . . . . . . . . . . . . . . . . . . . . . . . . .174
How to Edit a New File without Leaving FRED . . . . . . . . . . . . . . . . . . .174
Editor Command Summary 175
17 – Making Your Own Commands 177
Restrictions on Command File Names 177
Program Space 177
Search Path for Commands 178
How to Execute User Command Files 178
Comments in Command Files 179
How to Use Terminal Input with Command Files 180
MDE-4315 CFN Series CFN III Manager’s Manual for Windows NT · August 2004 Page vii
Page 10

Table of Contents
Command File Commands 180
How to Print a Line with ECHO . . . . . . . . . . . . . . . . . . . . . . . . . . . . . . .180
How to Wait with SLEEP . . . . . . . . . . . . . . . . . . . . . . . . . . . . . . . . . . . .181
From Command File to Command File . . . . . . . . . . . . . . . . . . . . . . . . .181
Wait for User Input . . . . . . . . . . . . . . . . . . . . . . . . . . . . . . . . . . . . . . . . .181
Line Length Limitations 182
The ~0A Control Code . . . . . . . . . . . . . . . . . . . . . . . . . . . . . . . . . . . . . .182
The @C and @P Console Destinations. . . . . . . . . . . . . . . . . . . . . . . . .182
Command Files Execut ed from a Console 182
Command Files at Sign On 183
How to Save Output from a Command File 183
Output of a Single Command. . . . . . . . . . . . . . . . . . . . . . . . . . . . . . . . .183
Output of Several Commands . . . . . . . . . . . . . . . . . . . . . . . . . . . . . . . .183
How to Output to Log Printer 184
How to Output to a Receipt Printer 184
How to Add an Event to the Disk Journal 185
Variables for Use in Command Files 186
System Variables . . . . . . . . . . . . . . . . . . . . . . . . . . . . . . . . . . . . . . . . . .186
Command-line-argument Variables . . . . . . . . . . . . . . . . . . . . . . . . . . . .188
User Variables . . . . . . . . . . . . . . . . . . . . . . . . . . . . . . . . . . . . . . . . . . . .189
The EXECUTE Command . . . . . . . . . . . . . . . . . . . . . . . . . . . . . . . . . . .189
How to Exit from Command Files 190
18 – Advanced Command Files 191
How to Use the IF Command 191
How to Use Loops in Command Files . . . . . . . . . . . . . . . . . . . . . . . . . .194
How to Use Case Statements in Command Files . . . . . . . . . . . . . . . . .196
Prompt String . . . . . . . . . . . . . . . . . . . . . . . . . . . . . . . . . . . . . . . . . . . . .197
How to Set User Variables in Command Files. . . . . . . . . . . . . . . . . . . .197
ECHO with the p1 Option. . . . . . . . . . . . . . . . . . . . . . . . . . . . . . . . . . . .200
How to Use Branching and Subroutines . . . . . . . . . . . . . . . . . . . . . . . .200
How to Search for a String in a File . . . . . . . . . . . . . . . . . . . . . . . . . . . .202
Advanced Commands 203
The NEXT CLERK Command . . . . . . . . . . . . . . . . . . . . . . . . . . . . . . . .203
The CLOSE Command . . . . . . . . . . . . . . . . . . . . . . . . . . . . . . . . . . . . .203
The SCREEN Command . . . . . . . . . . . . . . . . . . . . . . . . . . . . . . . . . . . .203
19 – Automatic Cron Commands 205
What Conditions Can Be Specified for cro n 205
Timed cron Entry . . . . . . . . . . . . . . . . . . . . . . . . . . . . . . . . . . . . . . . . . .206
Restart cron Entry . . . . . . . . . . . . . . . . . . . . . . . . . . . . . . . . . . . . . . . . .207
Reboot cron Entry . . . . . . . . . . . . . . . . . . . . . . . . . . . . . . . . . . . . . . . . .208
Transaction-memory cron Entry. . . . . . . . . . . . . . . . . . . . . . . . . . . . . . .209
Where To Put Command Files for cron 209
How To Enter cron Commands 210
How To Keep cron Command Output from the Log. . . . . . . . . . . . . . . .210
How To Print a Listing of cron Entries 210
How to Remove cron Commands 211
MDE-4315 CFN Series CFN III Manager’s Manual for Windows NT · August 2004 Page viii
Page 11

Table of Contents
20 – Communications 213
Remote Authorizat io ns 213
Dial-out Phone Numbers . . . . . . . . . . . . . . . . . . . . . . . . . . . . . . . . . . . .213
How to Initiate a Call . . . . . . . . . . . . . . . . . . . . . . . . . . . . . . . . . . . . . . .214
Kermit 214
21 – Configuration Command Summary 217
Disk-based Configuration Commands . . . . . . . . . . . . . . . . . . . . . . . . . .217
22 – Preventive Maintenance 219
How to Clean the Diskette Drive . . . . . . . . . . . . . . . . . . . . . . . . . . . . . .219
When Batteries Fail . . . . . . . . . . . . . . . . . . . . . . . . . . . . . . . . . . . . . . . .219
Island Card Reader 220
How to Clean the Magnetic Strip Reader. . . . . . . . . . . . . . . . . . . . . . . .220
How to Clean the Optical Card Reader . . . . . . . . . . . . . . . . . . . . . . . . .220
Console 221
Magnetic Card Reader . . . . . . . . . . . . . . . . . . . . . . . . . . . . . . . . . . . . . .221
Keyboard . . . . . . . . . . . . . . . . . . . . . . . . . . . . . . . . . . . . . . . . . . . . . . . .221
23 – Diagnostic Commands 223
System Diagnostics 223
How To Print System Diagnostics . . . . . . . . . . . . . . . . . . . . . . . . . . . . .223
How to Reset System Diagnostics. . . . . . . . . . . . . . . . . . . . . . . . . . . . .224
How to Reset System Diagnostics after Reconfiguration. . . . . . . . . . . .225
Diagnostic Error Codes . . . . . . . . . . . . . . . . . . . . . . . . . . . . . . . . . . . . .225
Event History 226
How to Enable and Disable Event History . . . . . . . . . . . . . . . . . . . . . . .227
How to Print the Event History List. . . . . . . . . . . . . . . . . . . . . . . . . . . . .227
System Status 228
How To Print System Monitor Messages. . . . . . . . . . . . . . . . . . . . . . . .228
How To Display Current System State. . . . . . . . . . . . . . . . . . . . . . . . . .229
How To Display Buffers in Use . . . . . . . . . . . . . . . . . . . . . . . . . . . . . . .229
How To Examine Contents of Memory . . . . . . . . . . . . . . . . . . . . . . . . .232
How To Display Site Controller Status. . . . . . . . . . . . . . . . . . . . . . . . . .233
How To Test a Pump Control Unit’s Memory 233
How To Test a Receipt Printer 234
The SHOW Command . . . . . . . . . . . . . . . . . . . . . . . . . . . . . . . . . . . . . .234
24 – Enabling and Disabling Devices 235
Shut Down and Restart a Site 235
How To Shut Down a Site . . . . . . . . . . . . . . . . . . . . . . . . . . . . . . . . . . .235
Disable Pumps. . . . . . . . . . . . . . . . . . . . . . . . . . . . . . . . . . . . . . . . . . . .235
How To Do an Emergency Stop from the Terminal . . . . . . . . . . . . . . . .236
How To Do and Emergency Stop from the Console . . . . . . . . . . . . . . .236
How To Restart a Site . . . . . . . . . . . . . . . . . . . . . . . . . . . . . . . . . . . . . .236
How To Restart from a Console Emergency Stop . . . . . . . . . . . . . . . . .236
How To Restart a Site from a Serious Crash. . . . . . . . . . . . . . . . . . . . .237
How To Reboot the Site Controller . . . . . . . . . . . . . . . . . . . . . . . . . . . .237
MDE-4315 CFN Series CFN III Manager’s Manual for Windows NT · August 2004 Page ix
Page 12

Table of Contents
Site Devices 238
How To Disable and Enable a Pump . . . . . . . . . . . . . . . . . . . . . . . . . . .238
How To Disable and Enable a Pump Control Unit . . . . . . . . . . . . . . . . .239
How To Disable and Enable a Reader Terminal . . . . . . . . . . . . . . . . . .239
How To Disable and Enable a Console . . . . . . . . . . . . . . . . . . . . . . . . .239
How to Disable and Enable a Tank Monitor™ System . . . . . . . . . . . . .240
How to Disable and Enable a Gate Reader . . . . . . . . . . . . . . . . . . . . . .240
How to Disable and Enable a Fuel Point
How to Disable, Enable, and Download SDIs . . . . . . . . . . . . . . . . . . . .241
®
Reader . . . . . . . . . . . . . . . . .241
Operating Pumps Ma nu al ly 242
How To Activate a Pump from the Command Window . . . . . . . . . . . . .242
How To Deactivate a Pump from the Command Window . . . . . . . . . . .242
How To Put a Pump into Full-service Mode. . . . . . . . . . . . . . . . . . . . . .242
How To Bypass the Pump Control Unit . . . . . . . . . . . . . . . . . . . . . . . . .243
25 – Invoice Printing 245
Requirements and Restrictions 245
Invoice Setup 245
Printing an Invoice 246
Sample Invoice 247
Duplicates 247
26 – CFN III Optional packages 249
27 – Appendix A: CFN3 Ports and Switches A-1
Front Panel Components A-1
Serial/Parallel Ports A- 1
DIP Switch Settings A-2
Memory Board DIP Switch SC-Memory I/O - S1 . . . . . . . . . . . . . . . . . . A-2
Memory Board DIP Switch SC-Memory I/O - S2 . . . . . . . . . . . . . . . . . . A-2
PC IRQ Switch, SC-COMM CPU - S1 . . . . . . . . . . . . . . . . . . . . . . . . . . A-2
PC Address Switch, SC-COMM CPU - S2. . . . . . . . . . . . . . . . . . . . . . . A-3
SC3 Comm Board DIP Switch CPU - S3 . . . . . . . . . . . . . . . . . . . . . . . . A-3
Jumper Settings A-4
SC-Comm CPU Board Settings . . . . . . . . . . . . . . . . . . . . . . . . . . . . . . . A-4
SC-Comm Memory I/O Board Settings . . . . . . . . . . . . . . . . . . . . . . . . . A-4
28 – Appendix B: Modem Settings and Cables B-1
Hayes® 1200 Modem Switch Settings B-1
Hayes Modem DIN Cabling B-2
Null Modem Cross Cable B- 3
29 – Appendix C: Printed Receipt Regulations C-1
EFT Regulation E C-1
Section 205.9(a)—Documentation of Transfers. . . . . . . . . . . . . . . . . . .C-1
Section 205.9(b)(1)(iv) . . . . . . . . . . . . . . . . . . . . . . . . . . . . . . . . . . . . . .C-2
Gasboy Receipt C-3
MDE-4315 CFN Series CFN III Manager’s Manual for Windows NT · August 2004 Page x
Page 13

Table of Contents
30 – Appendix D: Status and Error Messages D-1
Messages on the Log Printer D-1
Name Table Reconstructed . . . . . . . . . . . . . . . . . . . . . . . . . . . . . . . . . .D-1
[Pump #] Card #XXXXXXXXXXXX denial_reason WED 11/29/97
12:34 PM. . . . . . . . . . . . . . . . . . . . . . . . . . . . . . . . . . . . . . . . . .D-2
Bank Verification Came Up . . . . . . . . . . . . . . . . . . . . . . . . . . . . . . . . . . D-3
Battery FAILED . . . . . . . . . . . . . . . . . . . . . . . . . . . . . . . . . . . . . . . . . . .D-3
Battery OK . . . . . . . . . . . . . . . . . . . . . . . . . . . . . . . . . . . . . . . . . . . . . . . D-3
Card Reader Terminal #X Came Up . . . . . . . . . . . . . . . . . . . . . . . . . . .D-3
Card Reader Terminal #X Disabled . . . . . . . . . . . . . . . . . . . . . . . . . . . .D-4
Card Reader Terminal #X Paper Low . . . . . . . . . . . . . . . . . . . . . . . . . .D-4
Card Reader Terminal #X Out of Paper. . . . . . . . . . . . . . . . . . . . . . . . .D-4
Card Reader Terminal #X Paper Refilled. . . . . . . . . . . . . . . . . . . . . . . .D-4
Card Reader Terminal #X Printer Down . . . . . . . . . . . . . . . . . . . . . . . .D-4
Card Reader Terminal #X Printer Jammed . . . . . . . . . . . . . . . . . . . . . .D-4
Card Reader Terminal #X Printer Unjammed . . . . . . . . . . . . . . . . . . . .D-4
Card Reader Terminal #X Printer Up. . . . . . . . . . . . . . . . . . . . . . . . . . .D-4
Card Reader Terminal #X Reader Jammed. . . . . . . . . . . . . . . . . . . . . .D-5
Card Reader Terminal #X Reader Unjammed. . . . . . . . . . . . . . . . . . . .D-5
Card Reader Terminal #X Went Down. . . . . . . . . . . . . . . . . . . . . . . . . .D-5
CFN Verification Came Up. . . . . . . . . . . . . . . . . . . . . . . . . . . . . . . . . . .D-5
CFN Verification Did Not Respond. . . . . . . . . . . . . . . . . . . . . . . . . . . . .D-5
Check PT/Profit PT #X Came Up. . . . . . . . . . . . . . . . . . . . . . . . . . . . . .D-5
Check PT/Profit Pt #X Disabled . . . . . . . . . . . . . . . . . . . . . . . . . . . . . . .D-6
Check PT/Profit Pt #X Went Down. . . . . . . . . . . . . . . . . . . . . . . . . . . . .D-6
Data Corrupted in Table. . . . . . . . . . . . . . . . . . . . . . . . . . . . . . . . . . . . .D-6
CARD: XXXXXXXXXX DES Not Ready. . . . . . . . . . . . . . . . . . . . . . . . .D-6
Diagnostics Table Too Small . . . . . . . . . . . . . . . . . . . . . . . . . . . . . . . . .D-6
Disk Full . . . . . . . . . . . . . . . . . . . . . . . . . . . . . . . . . . . . . . . . . . . . . . . . .D-6
EMERGENCY STOP . . . . . . . . . . . . . . . . . . . . . . . . . . . . . . . . . . . . . . .D-7
End EMERGENCY STOP . . . . . . . . . . . . . . . . . . . . . . . . . . . . . . . . . . .D-7
Fuel Point Reader # on Loop # Went Down. . . . . . . . . . . . . . . . . . . . . .D-7
Fuel Point Reader # Came Up . . . . . . . . . . . . . . . . . . . . . . . . . . . . . . . .D-7
Gate # on Loop # Went Down . . . . . . . . . . . . . . . . . . . . . . . . . . . . . . . .D-7
Gate # Came Up . . . . . . . . . . . . . . . . . . . . . . . . . . . . . . . . . . . . . . . . . .D-7
Island EMERGENCY STOP. . . . . . . . . . . . . . . . . . . . . . . . . . . . . . . . . .D-7
Island Reader Only . . . . . . . . . . . . . . . . . . . . . . . . . . . . . . . . . . . . . . . .D-8
Loop Table Overflow . . . . . . . . . . . . . . . . . . . . . . . . . . . . . . . . . . . . . . .D-8
Master Key Loaded . . . . . . . . . . . . . . . . . . . . . . . . . . . . . . . . . . . . . . . . D-8
Memory Available. . . . . . . . . . . . . . . . . . . . . . . . . . . . . . . . . . . . . . . . . . D-8
Memory Full . . . . . . . . . . . . . . . . . . . . . . . . . . . . . . . . . . . . . . . . . . . . . .D-8
No Tokheim
No Wayne
NT PC-SCIII Interface V#.# Started . . . . . . . . . . . . . . . . . . . . . . . . . . . .D-9
PC Not Responding . . . . . . . . . . . . . . . . . . . . . . . . . . . . . . . . . . . . . . . .D-9
PC Responding . . . . . . . . . . . . . . . . . . . . . . . . . . . . . . . . . . . . . . . . . . .D-9
Product #XX Name Below Reorder Level . . . . . . . . . . . . . . . . . . . . . . . D-9
Pump #X Disabled . . . . . . . . . . . . . . . . . . . . . . . . . . . . . . . . . . . . . . . . .D-9
Pump #X Disabled, No Quantity . . . . . . . . . . . . . . . . . . . . . . . . . . . . . .D-9
Pump #X Disabled, No Price . . . . . . . . . . . . . . . . . . . . . . . . . . . . . . . . D-10
Pump #X Enabled . . . . . . . . . . . . . . . . . . . . . . . . . . . . . . . . . . . . . . . .D-10
Pump Control Unit #X Came Up . . . . . . . . . . . . . . . . . . . . . . . . . . . . .D-10
Pump Control Unit #X Disabled . . . . . . . . . . . . . . . . . . . . . . . . . . . . . .D-10
®
Handler. . . . . . . . . . . . . . . . . . . . . . . . . . . . . . . . . . . . . . .D-9
®
Handler . . . . . . . . . . . . . . . . . . . . . . . . . . . . . . . . . . . . . . . .D-9
MDE-4315 CFN Series CFN III Manager’s Manual for Windows NT · August 2004 Page xi
Page 14

Table of Contents
Pump Control Unit #X Down, Bad Memory . . . . . . . . . . . . . . . . . . . . .D-11
Pump Control Unit #X Found Unassigned Transaction . . . . . . . . . . . .D-11
Pump Control Unit #X Went Down. . . . . . . . . . . . . . . . . . . . . . . . . . . .D-11
Remote Command: command . . . . . . . . . . . . . . . . . . . . . . . . . . . . . . .D-11
Remote Verification Did Not Respond . . . . . . . . . . . . . . . . . . . . . . . . .D-12
SC III Vx (HHMM/MMDDYY) Router:r_name, Handler:h_name
Day MM/DD/YY HH:MM AM/PM. . . . . . . . . . . . . . . . . . . . . . . D-12
Tank #X Below Reorder Level . . . . . . . . . . . . . . . . . . . . . . . . . . . . . . .D-12
Tank #X Fuel Leak. . . . . . . . . . . . . . . . . . . . . . . . . . . . . . . . . . . . . . . .D-12
Tank #X Probe Error . . . . . . . . . . . . . . . . . . . . . . . . . . . . . . . . . . . . . .D-13
Tank #X Excess Water. . . . . . . . . . . . . . . . . . . . . . . . . . . . . . . . . . . . .D-13
Tank #X YYY Gal Delivery . . . . . . . . . . . . . . . . . . . . . . . . . . . . . . . . . .D-13
Warm Boot . . . . . . . . . . . . . . . . . . . . . . . . . . . . . . . . . . . . . . . . . . . . . .D-13
Messages in the Transaction Printout D-14
error #. . . . . . . . . . . . . . . . . . . . . . . . . . . . . . . . . . . . . . . . . . . . . . . . . .D-14
Aborted. . . . . . . . . . . . . . . . . . . . . . . . . . . . . . . . . . . . . . . . . . . . . . . . . D-14
Limit . . . . . . . . . . . . . . . . . . . . . . . . . . . . . . . . . . . . . . . . . . . . . . . . . . . D-14
Mem Lost . . . . . . . . . . . . . . . . . . . . . . . . . . . . . . . . . . . . . . . . . . . . . . .D-14
Pwr Fail . . . . . . . . . . . . . . . . . . . . . . . . . . . . . . . . . . . . . . . . . . . . . . . .D-14
Payout . . . . . . . . . . . . . . . . . . . . . . . . . . . . . . . . . . . . . . . . . . . . . . . . .D-14
Prod Out. . . . . . . . . . . . . . . . . . . . . . . . . . . . . . . . . . . . . . . . . . . . . . . .D-14
Pump Down . . . . . . . . . . . . . . . . . . . . . . . . . . . . . . . . . . . . . . . . . . . . .D-14
Refund . . . . . . . . . . . . . . . . . . . . . . . . . . . . . . . . . . . . . . . . . . . . . . . . .D-14
Return . . . . . . . . . . . . . . . . . . . . . . . . . . . . . . . . . . . . . . . . . . . . . . . . .D-14
Reversal. . . . . . . . . . . . . . . . . . . . . . . . . . . . . . . . . . . . . . . . . . . . . . . .D-15
Timed Out . . . . . . . . . . . . . . . . . . . . . . . . . . . . . . . . . . . . . . . . . . . . . .D-15
Unassigned . . . . . . . . . . . . . . . . . . . . . . . . . . . . . . . . . . . . . . . . . . . . .D-15
Withdrawal . . . . . . . . . . . . . . . . . . . . . . . . . . . . . . . . . . . . . . . . . . . . . .D-15
Messages in Command Mode D-15
Already exists. . . . . . . . . . . . . . . . . . . . . . . . . . . . . . . . . . . . . . . . . . . .D-15
Bad Data Input . . . . . . . . . . . . . . . . . . . . . . . . . . . . . . . . . . . . . . . . . . .D-15
BAD MESS. . . . . . . . . . . . . . . . . . . . . . . . . . . . . . . . . . . . . . . . . . . . . .D-15
Can’t activate . . . . . . . . . . . . . . . . . . . . . . . . . . . . . . . . . . . . . . . . . . . .D-15
Can’t open file . . . . . . . . . . . . . . . . . . . . . . . . . . . . . . . . . . . . . . . . . . .D-16
Cannot run program. . . . . . . . . . . . . . . . . . . . . . . . . . . . . . . . . . . . . . .D-16
Card is not valid . . . . . . . . . . . . . . . . . . . . . . . . . . . . . . . . . . . . . . . . . .D-16
Card is valid . . . . . . . . . . . . . . . . . . . . . . . . . . . . . . . . . . . . . . . . . . . . .D-16
Command failed. . . . . . . . . . . . . . . . . . . . . . . . . . . . . . . . . . . . . . . . . .D-16
Device out of service . . . . . . . . . . . . . . . . . . . . . . . . . . . . . . . . . . . . . .D-16
Does not exist . . . . . . . . . . . . . . . . . . . . . . . . . . . . . . . . . . . . . . . . . . .D-16
Error loading program . . . . . . . . . . . . . . . . . . . . . . . . . . . . . . . . . . . . .D-17
Invalid option . . . . . . . . . . . . . . . . . . . . . . . . . . . . . . . . . . . . . . . . . . . .D-17
Manager key required . . . . . . . . . . . . . . . . . . . . . . . . . . . . . . . . . . . . . D-17
No more file space . . . . . . . . . . . . . . . . . . . . . . . . . . . . . . . . . . . . . . . .D-17
Permission denied . . . . . . . . . . . . . . . . . . . . . . . . . . . . . . . . . . . . . . . .D-17
Program checksum error . . . . . . . . . . . . . . . . . . . . . . . . . . . . . . . . . . . D-17
Pump deactivated . . . . . . . . . . . . . . . . . . . . . . . . . . . . . . . . . . . . . . . .D-17
Pump is not on . . . . . . . . . . . . . . . . . . . . . . . . . . . . . . . . . . . . . . . . . . .D-17
Pump is ready . . . . . . . . . . . . . . . . . . . . . . . . . . . . . . . . . . . . . . . . . . .D-17
Site is stopped . . . . . . . . . . . . . . . . . . . . . . . . . . . . . . . . . . . . . . . . . . . D-18
Some valid, some not. . . . . . . . . . . . . . . . . . . . . . . . . . . . . . . . . . . . . . D-18
String too long . . . . . . . . . . . . . . . . . . . . . . . . . . . . . . . . . . . . . . . . . . .D-18
MDE-4315 CFN Series CFN III Manager’s Manual for Windows NT · August 2004 Page xii
Page 15

Table of Contents
Transactions in progress . . . . . . . . . . . . . . . . . . . . . . . . . . . . . . . . . . .D-18
Unknown command . . . . . . . . . . . . . . . . . . . . . . . . . . . . . . . . . . . . . . .D-18
31 – Appendix E: Files on the Hard Disk E-1
System Diskette E-1
Root Directory: Operating System . . . . . . . . . . . . . . . . . . . . . . . . . . . . . E-1
BIN Directory: Disk-based Commands And Command Files. . . . . . . . . E-1
Applications Diskette E-2
Root Directory . . . . . . . . . . . . . . . . . . . . . . . . . . . . . . . . . . . . . . . . . . . . E-2
BIN Directory . . . . . . . . . . . . . . . . . . . . . . . . . . . . . . . . . . . . . . . . . . . . . E-2
32 – Appendix F: Dialout Communications F-1
Types of Cards F-1
Credit Card Numbering F-2
Handling Transactions F-2
Authorization (verification) . . . . . . . . . . . . . . . . . . . . . . . . . . . . . . . . . . . F-2
Data Capture . . . . . . . . . . . . . . . . . . . . . . . . . . . . . . . . . . . . . . . . . . . . . F-3
Settlement . . . . . . . . . . . . . . . . . . . . . . . . . . . . . . . . . . . . . . . . . . . . . . . F-3
Card Networks Certifying CFN F-4
Uppercase Error Messages . . . . . . . . . . . . . . . . . . . . . . . . . . . . . . . . . . F-6
Modems F-6
Troubleshooting - Quick Diagnostic Checks . . . . . . . . . . . . . . . . . . . . . F-8
33 – Appendix G: Trademark Information G-1
34 – Glossary Glossary-1
Index Index-1
MDE-4315 CFN Series CFN III Manager’s Manual for Windows NT · August 2004 Page xiii
Page 16

List of Figures
List of Figures
Figure 1-1: Gasboy - CFN3 Desktop. . . . . . . . . . . . . . . . . . . . . . . . . . . . . . . . . . . . . 3
Figure 1-2: CFN3 Connections . . . . . . . . . . . . . . . . . . . . . . . . . . . . . . . . . . . . . . . . . 7
Figure 2-1: LOAD HEADING Command with C Option. . . . . . . . . . . . . . . . . . . . . . 16
Figure 8-1: Sample Tax Table. . . . . . . . . . . . . . . . . . . . . . . . . . . . . . . . . . . . . . . . . 67
Figure 9-1: Relationship Between Various Types of Totals. . . . . . . . . . . . . . . . . . . 76
Figure 10-1: The Transaction Pointers . . . . . . . . . . . . . . . . . . . . . . . . . . . . . . . . . . 94
Figure 10-2: Format of Compressed Output . . . . . . . . . . . . . . . . . . . . . . . . . . . . . . 98
Figure 10-3: Format of Expanded Output . . . . . . . . . . . . . . . . . . . . . . . . . . . . . . . . 98
Figure 14-1: Floppy Diskette . . . . . . . . . . . . . . . . . . . . . . . . . . . . . . . . . . . . . . . . . 148
Figure 15-1: Sample Directory Tree Structure. . . . . . . . . . . . . . . . . . . . . . . . . . . . 153
Figure 16-1: Opening Notepad . . . . . . . . . . . . . . . . . . . . . . . . . . . . . . . . . . . . . . . 163
Figure 32-1: Indicator Lights on Hayes 2400 Smartmodem . . . . . . . . . . . . . . . . . F-6
Figure 32-2: Indicator Lights on Modem - aa, tr, mr On. . . . . . . . . . . . . . . . . . . . . F-7
Figure 32-3: Indicator Lights on Modem - hs, tr, mr On. . . . . . . . . . . . . . . . . . . . . F-7
Figure 32-4: Indicator Lights on Modem - hs, oh, tr, mr On. . . . . . . . . . . . . . . . . . F-7
Figure 32-5: Indicator Lights on Modem - hs, cd, oh, tr, mr On. . . . . . . . . . . . . . . F-8
Page xiv MDE-4315 CFN Series CFN III Manager’s Manual for Windows NT · August 2004
Page 17

1 – Introduction
This reference manual explains com mands that a re used to setup, maintain,
produce reports on, and diagnose problems for a CFN III system.
Your service technician will set up your CFN III and introduce you to some of
its features. This manual can help you avoid many unnecessary service calls,
and help assure that your CFN III works the way you want it to.
This manual is for anyone who needs to know how to issue commands to the
CFN III, or interpret the log printout and other reports. Generally the site
manager or person in charge of operations at the site should be familiar with
this manual and its contents so you can operate and maintain the CFN III
information. Attendants do not need to read this manual in order to operate the
Check Point or Profit Point consoles, which are covered in other manuals.
Introduction
This manual is not intended to be read cover to cover, but you should become
familiar with its contents so you can look up information when you need it.
Your Operating System
Your Site Controller III (SC III) comes with a PC operating system called
Windows NT
access the command window and/or applications you must use your mouse.
You must move t he mouse (which moves t he arrow on the scree n) ove r the icon
that you want to open and double click, using the left mouse button. Your
technician will instruct you on the basics of this system and accessing your
CFN3 command window . The CFN3 command window mus t remain running at
all times. It can be minimized, more about that later, but once closed, you will
lose contact with the site controller.
When the CFN3 software was installed, your technician or system
administrator configured it with your particular devices and the procedures
your company follows. Fo r e xampl e, if your site accepts cash for fuel, the CFN
III has been told whether the customer is required to pay before pumping (a
prepay system) or is allowed to pay after pumping (a postpay system).
®
from Microsoft. This new system is icon based, meaning that to
Starting your SC III
The computer is turned on (booted) by pressing the button on the front of the
computer. Make sure that the monitor is turned on and there are no diskettes in
the A: drive. It will take a few moments t o start. You do not need to double click
the CFN3 icon to start operations, the operating system has been programmed
MDE-4315 CFN Series CFN III Manager’s Manual for Windows NT · August 2004 Page 1
Page 18

Introduction
to do this for you. The CFN3 command window automatically opens. Press the
return key if your signon prompt does not display immediately.
Quitting Your CFN3 Application
The preferred way to quit the CFN3 application is to press the ALT key and
while continuing to press the ALT key , press the X key. This will terminate your
site operations. Should you forget this, this method is mentioned when you log
on at the top of the screen as illustrated in Figure 1-1.
Minimizing the Command Window
The site controller runs with either the command window open or minimized.
Minimizing the CFN3 command window collapses th e window on your desktop
into the taskbar at the bottom of the screen, running it in the background. To
place the window in the background, click the small box in the upper right
corner of the command window that has an underline. Notice the box with the
“X”. Clicking once on the X will quit the application and terminate site
operations; this is not the r ecommended wa y of qui ttin g th e site operat ions. You
need to log on again by double clicking on the CFN3 icon. Remember that the
CFN3 command window must remain either open or minimized to
communicate with the SC III. If your window is not open, or has been
“minimized”, click once, using the left mouse button, on the CFN3 box in the
taskbar to open the window onto the desktop.
Should you accidently quit the CFN3 program by clicking in the “X” in the
upper right corner, double click on the CFN3 icon using the left mouse button
and log in again.
Levels of Operation
The SC III has 2 user levels of operation: Gasboy, which is the daily CFN3
operation (and Integral Profit Point if you have it) and Administrator which
allows you to add software updates, create/delete users, add passwords, change
your PC settings , etc. You can run your site from t he Administ rator level b ut it is
not recommended.
Page 2 MDE-4315 CFN Series CFN III Manager’s Manual for Windows NT · August 2004
Page 19
Gasboy Level
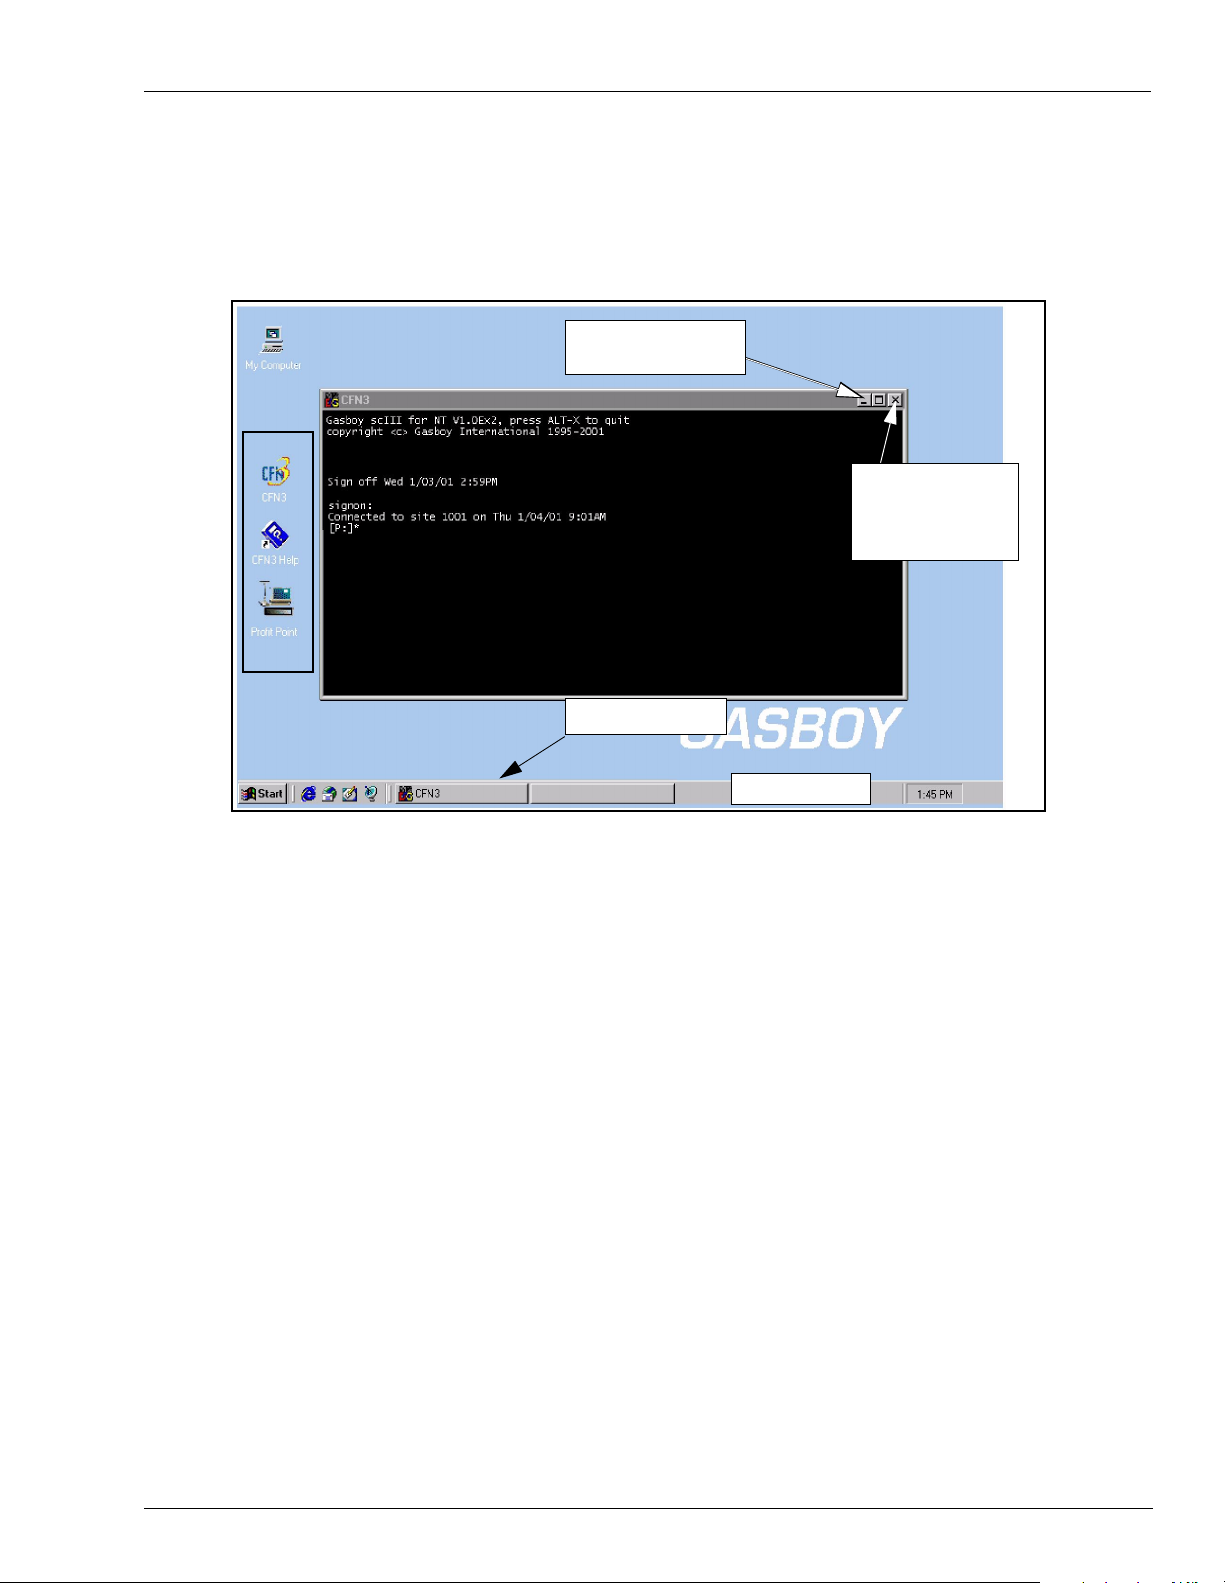
Figure 1-1: Gasboy - CFN3 Desktop
Minimize option
Introduction
Quits CFN3
application
and terminates
site operations
Icons
CFN3 window
Taskbar
Gasboy is the default login (user) and is the working level of operation. All
CFN3 operations occur at this login level. When you turn on the computer the
user is Gasboy with GASBOY as the password. The desktop will contain very
few icons; CFN3, CFN3 Help, My Computer, and Integral Profit Point
(optional). Your day to day site operations use this login.
Figure 1-1 shows a typical CFN3 desktop with the various icons available and
the CFN3 command window open. Notice in Figure 1-1 that the CFN3 icons
(CFN3, the Integral Profit Point and the CFN3 HELP) are located in the lower
left of this desktop. Icons are your li nk to starting your software programs. Th e
icons can be placed anywhere on the desktop but must always be available
should you need to open the program.
At the bottom of the scree n is a taskba r. Whe never an appl icati on is open it wil l
be represented at the bottom of the screen in this taskbar. If you minimize the
CFN3 command window it will be represented in this taskbar. This is your
identification that the CFN3 command window is still running. The command
window must remain open, or run in the background (minimized), to
communicate with the site control ler.
Clicking on the box representing the program will open or minimize the
program’s window on the desktop.
MDE-4315 CFN Series CFN III Manager’s Manual for Windows NT · August 2004 Page 3
Page 20

Introduction
Administrator Level
Administrator is where users are added or deleted, your hardware settings
changed, passwords changed, etc. You can also add software updates. The
Administrator requires a separate login, has a different password, and has
additional features/options. There are more icons displayed on the desktop.
The RUN command, used to install software from the Start button, is only
available from the Administrator level. This command is an NT operating
system command and is separate from the CFN3 RUN command.
Logging onto NT as Administrator
When the computer boots the default login is Gasboy. To make any changes to
your CFN3 setup you must log in as Administrator. To log in as Administrator:
1 Select Start->Shutdown.
2 Select Close All Programs by clicking once in the radio button.
3 Click Yes and hold down the Shift key until the login window appears.
4 Enter Administrator with your pa ssword (the default pass word is blank).
5 The deskt op will appea r si mila r to the Gas boy il lu strat ion. T here a re more icons
on the desktop and if you press the Start button in the taskbar, more options are
available to add software updates, etc.
6 When you have finished making your additions or changes, relogin as Gasboy
by selecting Start-> Shut down.
Miscellaneous NT Information
If you do not like the arrangement of the icons on the desktop, you can change
the arrangement by clicking once with the right mouse button anywhere on the
open desktop. Select an option from the list that appears.
To refresh your desktop, press F5. If using the Profit Point keyboard, F5 is All
Stop.
Page 4 MDE-4315 CFN Series CFN III Manager’s Manual for Windows NT · August 2004
Page 21
Profit Point
If you have a Profit Point, start the Profit Point by double clicking on the Profit Point icon
using the left most mouse button. For the Profit Point to operate, the SC III must be running
with the CFN3 window on the desktop either open or minimized.
On-line Document a t ion
On-line documentation is available on the SC III. The on-line system is viewed using your
browser that comes wit h your P C system. Us e th e on-li ne docu mentati on for a quick refer ence
when you do not want to pull the manual off the shelf.
To open the on-line system, double click the CFN3 HELP icon. The browser will open
displaying the on-line library available. Click once on the manual you would like to review.
Introduction
Related Documentation
CFN III - Verison 3.4 and above
Document
Number Document Title GOLD
C09204 Check Point Reference Manual Gasboy Fuel Management Products
C35745 Profit Point Clerk’s Manual Gasboy Fuel Management Products
C35746 Profit Point Reference Manual Gasboy Fuel Management Products
C35923 Point of Sale and Shift Change Gasboy Fuel Management Products
C36145 CFN III Quick Reference Version 3.4 Gasboy Fuel Management Products
MDE-4316 CFN III Configuration Manual for Windows NT
C36144)
Credit and Debit Card Network
Document
Number Title GOLD Library
C35901 Buypass Credit and Debit Card Networks Gasboy Fuel Management Products
C35902 ADS-Citgo Credit and Debit Card Networks Gasboy Fuel Management Products
C35903 Comdata Credit and Debit Card Networks Gasboy Fuel Management Products
C35904 EDS-CCIS Credit and Debit Card Networks Gasboy Fuel Management Products
C35905 FDR Credit and Debit Card Networks Gasboy Fuel Management Products
C35906 FINA 009 Credit and Debit Card Networks Gasboy Fuel Management Products
C35907 Gascard Credit and Debit Card Networks Gasboy Fuel Management Products
®
(formerly
®
Library
Gasboy Fuel Management Products
MDE-4315 CFN Series CFN III Manager’s Manual for Windows NT · August 2004 Page 5
Page 22

Introduction
Document
Number Title GOLD Library
C35908 PaymenT ech 005 Credit and Debit Card Networks Gasboy Fuel Management Products
C35909 Generic Dial Credit and Debit Card Networks Gasboy Fuel Management Products
C35910 NaBANCO 004 Credit and Debit Card Networks Gasboy Fuel Management Products
C35911 NDC Credit and Debit Card Networks Gasboy Fuel Management Products
C35913 Sinclair 015 Credit and Debit Card Networks Gasboy Fuel Management Products
C35914 SPS/Phillips Credit and Debit Card Networks Gasboy Fuel Management Products
C35915 T-CHEK Credit and Debit Card Networks Gasboy Fuel Management Products
C35916 UFDA Credit and Debit Card Networks Gasboy Fuel Management Products
C35917 VDOT Credit and Debit Card Networks N/A
C35918 VisaNet Credit and Debit Card Networks Gasboy Fuel Management Products
C35930 Gasboy Dial Credit and Debit Card Networks Gasboy Fuel Management Products
C35931 Amoco/DataCard Credit and Debit Card Networks Gasboy Fuel Management Products
Pump Interface
Document
Number Title GOLD Library
C01745 Gilbarco Interface Unit Installation Manual Gasboy Fuel Management Products
C09146 Site Controller Pump Interface Manual Gasboy Fuel Management Products
®
C35849 SD Interface Wayne
®
C35924 SDI/Unitec
C35933 Insight Interface Gasboy Fuel Management Products
Interface Gasboy Fuel Management Products
CAT Gasboy Fuel Management Products
Card Encoding and Miscellaneous
Document
Number Title GOLD Library
C01687 CFN Series Card Encoding Manual Gasboy Fuel Management Products
C09136 CFN Series Clubcard Format N/A
Remote Communications
Document
Number Title GOLD Library
C09137 Site Controller Host Communications Gasboy Fuel Management Products
C09138 Site Controller Raw Mode Communications Gasboy Fuel Management Products
C09140 Applications Guide for Host-SC Communications N/A
C09141 PC/Site Control User’s Manual N/A
Page 6 MDE-4315 CFN Series CFN III Manager’s Manual for Windows NT · August 2004
Page 23
Technical Publications
Document
Number Title GOLD Library
C01759 CFN Diagnostic Manual Gasboy Fuel Management Products
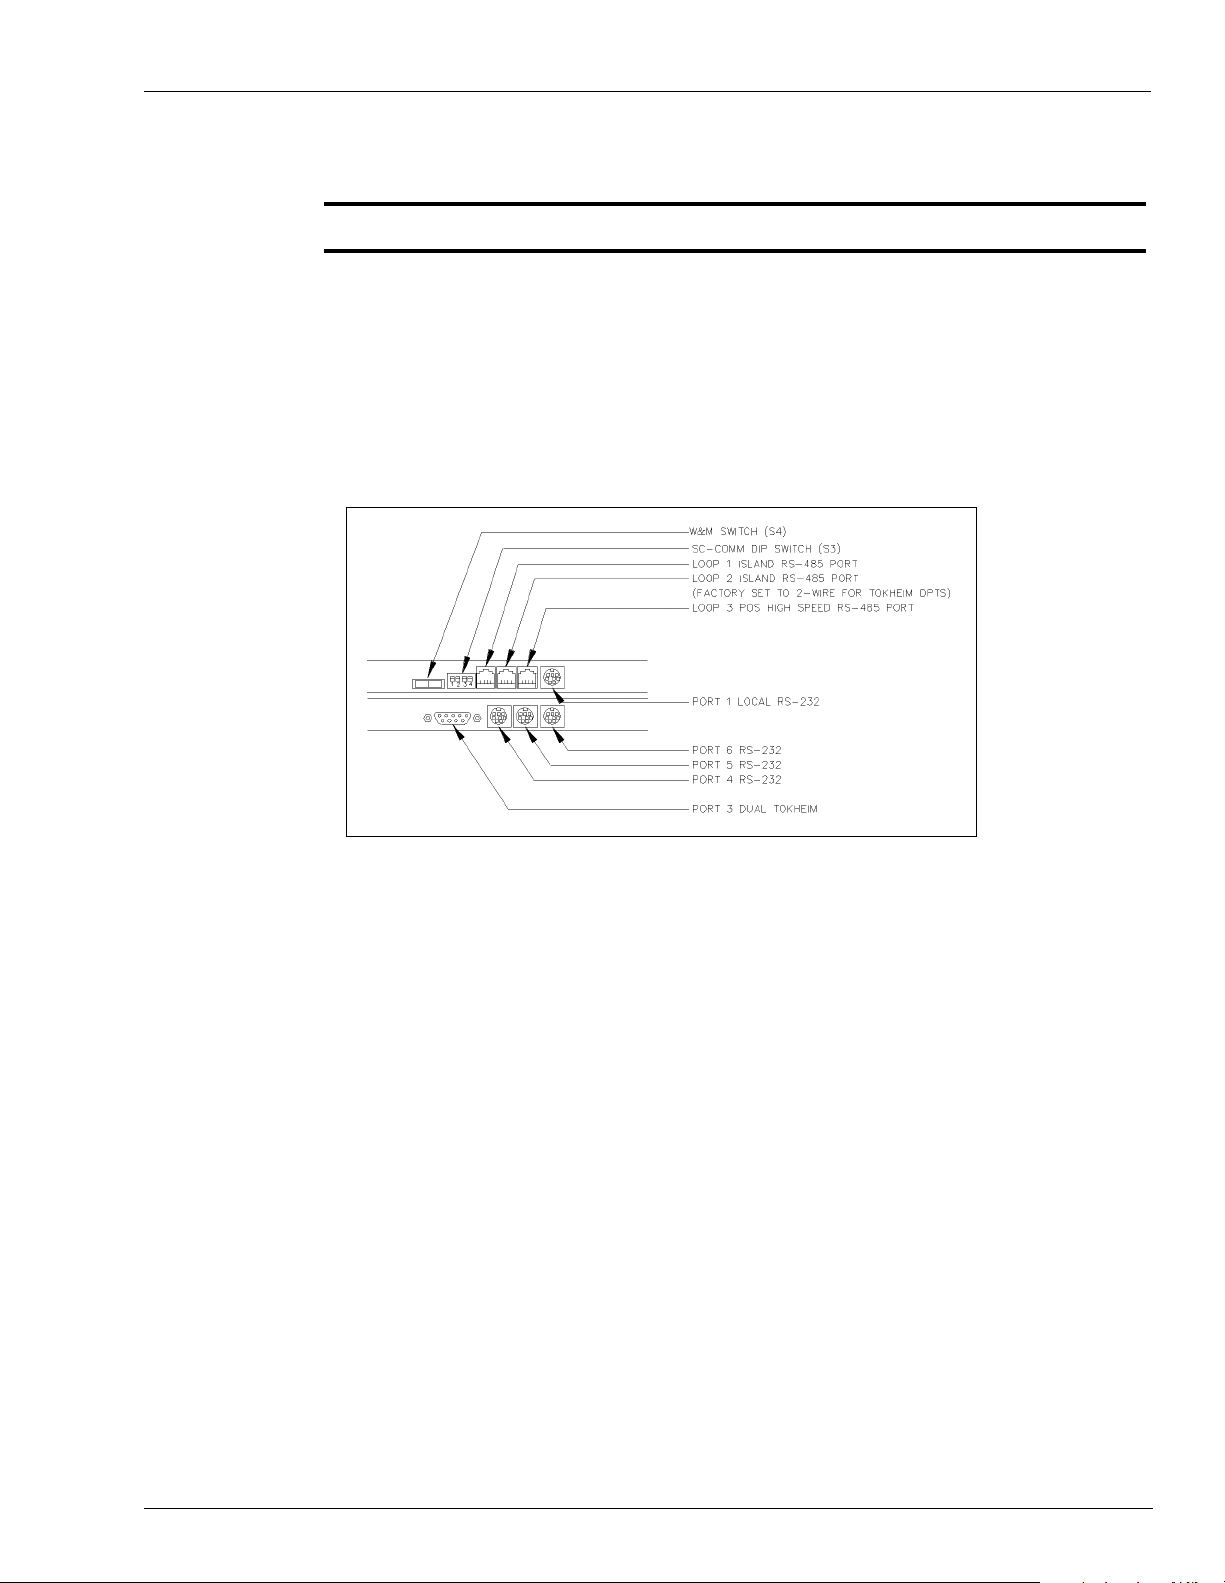
Cabling and Wiring
Use the following illustration to correctly connect your SC III to the various pieces of
equipment.
Figure 1-2: SC III Connections
Introduction
• Port 1, Local RS232 - use cable number C05994, SC III terminal cable assembly.
• Port 2, Ribbon Cable to RS232 - use ribbon cable C05554 (not currently used).
• Port 3, RS232 - use cable number C05996, SC III to Tokheim
®
cable assembly.
• Port 4, RS232 use cable number C05995, SC III modem cable assembly.
• Port 5, RS232 use cable number C06006, SC III Wayne
®
cable assembly.
• Port 6 is extra and can be used as either a modem or Wayne.
Note: Ports 1, 4, 5 and 6 are interchangeable.
Loops 1, 2, and 3 - use cable number C05670, cable assembly 4 position 1:1 HS/Line - 8ft.
modular cable.
More complete i nformat ion on p orts and switch es can be found i n “Appendi x A: CFN III Ports
and Switches” on page A-1.
MDE-4315 CFN Series CFN III Manager’s Manual for Windows NT · August 2004 Page 7
Page 24

Introduction
Page 8 MDE-4315 CFN Series CFN III Manager’s Manual for Windows NT · August 2004
Page 25

2 – Site Controller III
System Overview
The Site Con troller III (SC III) is the brain of the CFN III Syst em. Its job is to
keep you informed of what is goi ng on at your site and to enable you to c ont rol
the various pieces of equipment involved in a fueling operation, such as fuel
pumps or dispensers, automatic gates, and tank gauges.
The SC III collects infor mation abou t what each de vice is doi ng and ma kes that
information available to you in a convenient format. When you issue
commands to the Site Controller-for example, to tell it to authorize a sale on a
fuel pump-it forwards the request to the pump hardware, then monitors the sale
in case something goes wrong. It puts control of all the connected devices at
your fingertips.
Site Controller III
When the SC II I was installed, your technician or system administrator
configured it with the PC operating system, along with your particular devices
and the procedures your company follows. For example, if your site accepts
cash for fuel, the SC III has been told whether the customer is required to pay
before pumping (a prepay system) or is allowed to pay after pumping (a
postpay system).
CFN3 Command Window
New for version 3.4: there is no longer the separation of the PC drives and the
SC3 root directory. The P: drive is your CFN3 prompt and the location of the
SC3 root directory.
The command window has an P[drive: /direct ory]* prompt wher e you will enter
your commands to the SC III. If you do not see this prompt you will need to
press the ENTER key to bring up the signon prompt. Sign on as instructed and
press ENTER. The P* prompt will display. The command window must be
“active” to communicate with the SC III. Active means that the window
appears on the desktop with a colored band at the top displaying the words
CFN3. If the band is gray then the window is not active. To activate the
window, move the desktop arrow over the window (using the mouse) and cli ck
once using the left mouse button. For more information about your command
window and the desktop see “Introduction” on page 1.
Consoles
In order to use the SC III fully, you must kno w how to give it co mmands and to
understand its repli es. The two point of sale devices tha t communicate with the
MDE-4315 CFN Series CFN III Manager’s Manual for Windows NT · August 2004 Page 9
Page 26

Site Controller III
Readers
SC III are the Check Point and/or Profit Point consoles.
The consoles combine pump control and ca sh-register functions . They allow
you to turn on pumps and accept cash or other payment. They are used at sites
that do retail business, accept cash or credit cards in the store. The Check Point
and Profit Point manuals describe console operations.
Readers are devices that communicate with the CFN system and allow input
from the end user. They can activate pumps, display messages, and print
receipts. Readers can con sis t of any combinat ion of a cu stomer di splay, keypad,
card reader, and receipt printer. Some readers are “in dispenser” and are
specifically assigned to a single pump. Stand-alone readers can represent
multiple pumps and require a pump selection from the user. To obtain a receipt
from these reader s, the us er must r eturn t o the re ader a fter comp leting a fuel sa le
and re-swipe the card or enter the pump number that was used.
The Log Printer
Another device, the log printer prints a continuous record of transactions and
may also be used to print reports. Every site needs some type of printer. It is
important to know how to read the information that comes out of the printer,
since it includes data about completed sales and messages about any errors that
have occurred.
The log printer generates an on- going recor d on paper of import ant even ts at the
site. These include sales transactions and system messages generated when
certain commands are run or when errors are detected during operation.
The log printer, such as an Okidata
site personnel can read its output. The output of the log printer serves both as a
maintenance log and an audit trail. For example, the log printer records an entry
as each sale is concluded and also any time a problem is detected in an attached
pump, island card reader, or other device. Since the printed log is an important
business record, it is important not to let the log prin ter jam or run out of
paper.
In order to print, the log pri nter must be in th e state called on-line or ready. This
is usually indicated by a light on the front panel of the printer. The log printer
normally goes off- line automatically when it jams or runs out of paper. You can
take the log printer off-line to load paper. Most printers have a switch labeled
on-line or select for taking them on- and off-line.
®
184 plain printer, should be located where
A properly connected a nd config ured l og printer will not ify the SC III whene ver
it goes off-line, so that no data will be sent to it until it is ag ain ready to print.
Page 10 MDE-4315 CFN Series CFN III Manager’s Manual for Windows NT · August 2004
Page 27

However, the space available for storing such output is limited, so the log
printer should not be left off-line for long periods while the site is operating.
It is possible to print a file on a log printer. This is usually done at shift change
or by a local au tomatic command file. When a file is printed on the log this
way, the terminal beeps and prints the header -Printing: filename date time
where filename is the name of the file being print ed.
Command Terminals
Site commands can be entered through local or remote terminals. The local
terminal is the command window on your SC III PC. A remote terminal is
connected to the site through one of the SC III’s RS232 ports. It can be any
dumb terminal such as the LINK or another PC running terminal emulator
software capable of sup port i ng VT10 0 or VT52 (such as Procomm Plus
remote terminal can also be a modem connection.
Site Controller III
®
). The
Commands
Commands are instructions you type in the CFN3 Command window. CFN3
commands must be typed in exactly the format shown in this manual. Most
commands are words or abbreviations for the action to be performed. For
example, typing PRINT DATE and then pressing the ENTER key causes the
SC III to print the curren t date and time according to its internal clock.
Some commands, as explained in this manual, have short forms that you can
use instead of typing the whole command in order to save time. In the above
example, PRINT DATE could have been typed P DA.
Besides command words, other special symbols, such as < and >, provide
flexibility in redirecting the input to or output from commands.
MDE-4315 CFN Series CFN III Manager’s Manual for Windows NT · August 2004 Page 11
Page 28

Site Controller III
Command keys
The keyboards on all types of PCs have much in common. The SC III uses
several specific keys for specific functions. These keys may be located in
different positions on different keyboards.
Locate the DELETE, CONTROL, ENTER, and ESCAPE keys on your
keyboard. Note that:
• the DELETE key may be marked DEL
• the CONTROL key may be marked CTRL or CTL
• the ENTER key may be marked RETURN, RTN or
• the ESCAPE key may be marked ESC
System-response Problems
When you open the CFN3 command window, it should display a P* at the top
left of the screen. If not, press the ENTER or RETURN key on your local
terminal, the system should respond with a signon prompt. Should the system
not respond, close the window by pressing the ALT key, hold it down, and then
press the X key. Release both keys. Open the CFN3 window again by double
clicking on the CFN3 icon. Press ENTER to get the signon prompt.
↵
CFN3 Command Sessions
After signing on, you may enter data and commands until you either sign off or
are signed off automatically. The time during which you are signed on is
referred to as a command session.
How to Sign On
T o si gn on to t he Site Control ler, you enter a user numbe r and si gn-on code. Se e
below for how to add new users and change sign-on codes.
To sign on:
1 Press ENTER.
The terminal will print the message signon:.
2 Type your user number, a comma, and your sign-on code, and press ENTER.
For example, if your user number is 3, and your sign-on code is hawk, type
3,hawk. If your sign-on code has any uppercase letters, make sure you enter
them in uppercase. The terminal will not echo the password you type for
security reasons. If you do not enter a user number, user number 0 will be
assumed.
Page 12 MDE-4315 CFN Series CFN III Manager’s Manual for Windows NT · August 2004
Page 29

When you are properly signed on, the terminal prints a message such as
Connected to site 1010 on Tue 7/27/04 1:12PM to show that the command
session has begun and it is ready to accept commands. The next line displays
the command prompt (P*).
How to Sign Off
To end a command session, press ESCAPE or type EXIT or QUIT and press
ENTER.
The terminal will accept no further commands until you or someone else signs
on again. When you sign off, the terminal prints Sign off Tue 10/ 26/04
1:25PM. Do not click the “X” in the upper right corner of the window.
Automatic Sign Off
If you do not type anyth ing on the terminal for 5 minutes, th e te rminal ends the
command se ssion automatically. This protects the system if you forget to sign
off.
Site Controller III
How to Change Your Sign-on Code
Use the command LOAD SIGNON or LO SIG to change your sign-on code. A
sign-on code can be up to 16 characters long, and does not have to be a word.
You can use any comb ination of characte rs. When you load a new sign -on co de,
your previous sign-on cod e is era se d. In orde r to maint ain se curit y, do not write
down your sign-on code.
1 Type LOAD SIGNON.
LOAD SIGNON (LO SIG)
P* LOAD SIGNON
Sign on code? ******** ↵
P*
2 Enter your new code.
↵
Note: In the boxed examples shown in this manual user entries are bold
typeface and terminal responses are in regular typeface. A ↵ shows that
the user pressed ENTER.
How to Enter Commands and Data
Note: Any time you enter a command, y ou can type th e full command or use the
short form, such as LO SIG for LOAD SIGNON in the section
immediately above. You can use either UPPERCASE or lower case letters
when typing commands.
MDE-4315 CFN Series CFN III Manager’s Manual for Windows NT · August 2004 Page 13
Page 30
Site Controller III
Commands tell the site controller to perform particular actions, such as printing reports or
changing prices.
To enter a command, type the command on the terminal keyboard and press ENTER.
After the site controller finishes performing the action requested by a command, it will
respond with the current drive letter followed by an asterisk (P*) to show that it is ready to
accept another command. This lett er-asterisk combination is called the command prompt,
since it prompts you to enter a command. Anytime you see the command prompt, the site
controller is ready to accept a command.
For example, if you type the PRINT DATE command and press ENTER, the terminal prints
the date and time, followed by the command prompt to indicate that the command has been
executed and the terminal is ready to accept another command.
If a command requires that you enter data, the terminal will ask a question—which is called a
data entry prompt—indicating what type of data you should enter. If the terminal displays a
data entry prompt:
• Type the data and press ENTER.
• If the command has several prompts, type the reque st ed dat a and pr ess ENTER after each
one.
• After the last prompt in the series, the terminal will print the command prompt to indicate
the command has been executed and the terminal is ready to accept another command.
To print the date, type PRINT DATE and press ENTER.
P* PRINT DATE ↵
Tue 10/26/04 11:40AM,Trans=57, Seq=624 SCIIIv3.x
P*
CFN3 will display the date.
Command prompt will be displayed.
To load the date:
1 Type LOAD DATE.
P* LOAD DATE ↵
MONTH? 10 ↵
DAY OF MONTH? 26 ↵
YEAR? 04 ↵
HOUR? 13 ↵
MINUTE? 31 ↵
Tue 10/26/04 1:31PM, Trans=154, Seq=332 SCIIIv3.x
P*
2 Enter the month (mm format).
3 Enter the day (dd format).
4 Enter the year (yy format).
Page 14 MDE-4315 CFN Series CFN III Manager’s Manual for Windows NT · August 2004
Page 31

5 Enter the hour (military time format).
P* RESET DIAGNOSTICS ↵
P*
6 Enter the minute.
CFN3 will display the date and time
If a command does not print data or require data to be entered, the terminal prints just a
command prompt to indicate the command has been executed and the terminal is ready to
accept another command as illustrated.
How to Use Options with Commands
Many commands take options that modify how the command works. These options are
additional letters or symbols typed on the command line after the command.
A semicolon (;) separates the command and the option(s). Do not put a space between the
command and the option(s); if you insert a space, the option will be interpreted as an
argument.
Site Controller III
If both options and arguments (data) are used on a command line, the options come first, then
a space, th en the arguments:
command;options arguments
When more than one option is used with a command, the options may be listed in any order.
Complex options (P1=, P2=, >, >>, <) are separated by commas.
The common options are:
A All. Usually expands the effect of a command.
I Initialize. Usually initializes data affected b y the command.
C C hain. Allo ws you to enter multiple sets (a cha in) of data to commands requ iring dat a.
See below.
P1=,P2=Parameter. Allows you to specify fields for sorting. Field name is given as data
immediately following parameter; for exampl e, PRINT TRANSACTION;P1=AUTH
would print a list of transactions sorted by authorization codes.
> Redirect output to a new file. Saves output of a command in a file you specify. If the
file already exists, that file is overwritten. Requires destination (file name or LOG) as
argument.
>> Redirect out put to an existing file. Output is appended to th e end of the specified f ile.
Requires destination (file name) as argument. If a file does not exist, it will be create d.
< Redirect input. Allows you to use a fi le as t he sour ce of in put to a command. Requi res
source (file name) as argument.
L Lines. Used with any command to page output for CRT screen. May also be used to
set number of lines per screen (for example, L=20). Stays in effect for all subsequent
commands until the user signs off or the L option is redefined by using it on another
command.
T T ext . Used in co mmand fil es inten ded to be r un from th e conso le so tha t single lines of
text can be displayed on the console.
H Home. Used with any command, clears from the current cursor position to the end of
the screen and puts the cursor in the home position on a CRT.
MDE-4315 CFN Series CFN III Manager’s Manual for Windows NT · August 2004 Page 15
Page 32

Site Controller III
Disk-based commands use different options than those given here for systemresident commands. However, almost all the commands needed for everyday
operation are system resident, and so they have the options and form described
in this section.
How to Enter Multiple Blocks of Information
For the commands that enter data, the LOAD commands, for example, you can
use the C option to enter multiple blocks of data with one command. Without
the C option, only a single block can be entered with each command.
To use the C option:
• Type semicolon C (;C) after the command.
• The terminal will print a prompt each time you press ENTER. The amount
of data you can enter for each command is determined by the CFN3
configuration.
• When you have entered all the data, press ENTER once after the next
prompt without entering any data.
To use the C option with the command LOAD HEADING, type: LOAD
HEADING;C.
Figure 2-1: LOAD HEADING Command with C Option
P* LOAD HEADING;C ↵
Line number? 1 ↵
Heading line? SMITTY’S STATION ↵
Line number? 2 ↵
Heading line? 10 MAIN STREET ↵
Line number? 3 ↵
Heading line? SMITH,, WA 98000 ↵
Line number? 11 ↵
Footing line? THANK YOU ↵
Line number? 12 ↵
Footing line? PLEASE COME AGAIN ↵
Line number? 0 ↵
Form feed length? 5
Line number? ↵
P*
↵
two commas typed
no data entered
The terminal continues to print prompts each time ENTER is pressed.
To enter a comma, type two commas on the third heading line (see Figure 2-1).
One comma will be printed on the receipt.
End the sequence by pressing ENTER, without entering any data, after the last
“Line number ?” prompt of the series (see Figure 2-1).
Page 16 MDE-4315 CFN Series CFN III Manager’s Manual for Windows NT · August 2004
Page 33

How to Verify Commands
Some commands require verification before they are executed. These
commands give you a chance to term inate the ac tion if you entered the
command inadvertently.
If a command requires verification, the terminal will print the prompt Verify (y/
n)?. Type a Y to continue exec ution , or an N t o termi nate t he command. Do not
type a Y unless you are sure the command does what you want to do.
Try not to get in the bad habit of typing Y automatically when prompted with
Verify (y/ n) ? . Look at the command line you typed and think first.
Note that verification is not required when one of these commands is included
in a command file.
How to Use Ranges with Commands
Most PRINT commands allow you to act on specified ranges of data.
• A range has the form N-M, which means numbers N through M. (In
entering the command, actual numbers are substituted for N and M.)
• A -N means numbers from the beginning of the file through N.
• An N- means number N through the end of the file.
• An N means print only number N.
Site Controller III
If the starting number specifie d is not in the fi le, no data is printed. The pr intou t
stops after the last number specified or at the end of the file if the ending
number is not in the file.
You can specify more than one range for a command:
• PRINT TRANSACTION 23-150 prints transactions 23 through 150.
• PRINT TRANSACTION 23-150 200-250 prints transactions 23 through
150 and 200 through 250.
• PRINT TRANSACTION 23- prints transaction number 23 thr ough the end
of the transaction file.
• PRINT TRANSACTION -5 prints transactions from the beginning of the
file through transaction 5.
• PRINT TRANSACTION 34 prints only transaction number 34.
• PRINT TRANSACTION;P2=ACC=54, 1-10 prints transactions whose
account number starts with 54, in the transaction range 1 through 10.
The only PRINT commands that do not allow ranges are PRINT CARD,
PRINT CONSOLE, PRINT DATE, PRINT PHONE, PRINT RECEIPT, and
PRINT TIP. PRINT LOCKOUT does not allow ranges in syst ems wi th li mit ed
lockout.
MDE-4315 CFN Series CFN III Manager’s Manual for Windows NT · August 2004 Page 17
Page 34

Site Controller III
A Shortcut for Entering Data
Once you have become familiar with some of the commands, you may no
longer need the prompts to remind you how to enter data. You can type the
command and all the data you want to enter on one line before you press
ENTER.
Separate i t ems with a co mma. To enter a comma as part of the text, type tw o
commas. Remember that if you use the C option, you must press ENTER twice
to enter and terminate the command.
The command and the data required for the command, with commas between
items are typed, then ENTER is pressed twice.
P* LOAD HEADING;C 1,SMITTY’S STATION,10 MAIN STREET ↵
Line number? ↵
P*
How to Use Disk-based Commands
Disk-based commands are programs that are stored on a disk. These commands
are actually names of executable disk files. Therefore, if the file is stored on a
removable (or floppy) disk, the disk must be present in the drive for the
command to be run.
There are two types of disk-based commands: command files that contain a list
of CFN3 commands and have the extension .CMD, and executables that have
the extension .BIN. To execute either of these, a disk containing the
corresponding CMD or BI N file mus t be in the SC III di sk drive , or the file must
be present on the hard disk drive.
The SC III w i ll first look for the command in different places in the following
order (known as the search path):
R: RAM drive
. current directory
P:BIN the .BIN directory on the hard disk
You must type the enti re command name, including the path, if the command is
not in the RAM drive, the curren t directory, or P:BIN. Do not type the extension
.BIN or .CMD. If the SC III cannot find a .BIN or . CMD file corresponding to
what you typed, it will reply with the message unknown command. The site
looks for .BIN first, then .CMD.
Page 18 MDE-4315 CFN Series CFN III Manager’s Manual for Windows NT · August 2004
Page 35

Redirecting Command Input and Output Site Controller III
Redirecting Command Input and Output
Normally commands take their input from th e keyboard and send their outp ut to
the command terminal. You can use input and output redirection to cause
commands to take their input from a file and put their output in a file.
You can use input and output redirection together. When you combine the
redirection options with other options on the same command line, if the other
options follow the redirection options, put a comma after the filename.
For example,
PRINT PUMP;>filename,A
may also be written as
PRINT PUMP;A>filename
In any case, a blank space should always separate the command options from
the arguments or data.
How to Redirect Input for a Command
The option for input redirection is <. You can create a file with data for a
command, then execute the command with that file as input. For example, the
file MESSAGES shown below contains data for the command LOAD
MESSAGE. This example results in a moving message on the island card
reader’s disp lay. The second column is the l engt h of time each line is displayed.
The command LOAD MESSAGE;<MESSAGES,IC executes the command
LOAD MESSAGE with input from the file MESSAGES.
P* LOAD MESSAGES ↵
1 3.00 Welcome to
2 3.00 Will’s Fast Fuel
3 3.00 Walla Walla,, WA
4 3.00 <---Slide Card <--5 0.20 <--6 0.20 <--7 0.20 <--8 0.20 <--9 2.00 Need Oil?
10 3.00 Oil is on sale!
P*
How to Redirect Output from a Command
The options for output redirection are > and >>. These options differ in their
effect on an existing file that is to receive output. The > option overwrites the
contents of an existing file. The >> option appends data to the end of an
existing file. For example, the command PRINT TRANSACTIONS;>TRANS
puts the output of PRINT TRANSACTIONS in the file TRANS, deleting
whatever was in the TRANS file.
The command PRINT TRANSACTIONS;>>TRANS appends the outp ut of the
command PRINT TRANSACTIONS to the file TRANS.
MDE-4315 CFN Series CFN III Manager’s Manual for Windows NT · August 2004 Page 19
Page 36

Site Controller III Redirecting Command Input and Output
The Log Printer
Do not use the option ;>LOG with a command file or an executable on an SC
III.
How to Print a File on a Log Printer
Use the command LOG FILE or LOG FI to print a file on the log printer.
LOG FILE (LOG FI)
P* LOG FILE
File name? SAL-RPT ↵
P*
1 Type: LOG FILE
2 Enter the filename
↵
The A option, when added to LOG FILE, deletes the designated file after it has
been printed on the log printer.
How to Print a Message on a Log Printer
Use LOG MESSAGE or LOG ME to pr int a message on the lo g printe r . You can
use the C option to log messag es requiri ng more than one lin e, but each li ne will
have the date and time appended to it.
LOG MESSAGE (LOG ME)
P* LOG MESSAGE Bob, Call office
P*
↵
The message that pri nts in cludes th e date and time: Bo b, Call branch of fic e T ue
10/26/04 5:51 PM.
Keyboard Control Characters
Keyboard control characters are used to edit the command line and to modify
the effect of commands. They allow you to terminate commands, delete
characters you have typed, and temporarily stop printout.
The following key combinations are described in this section:
CTRL-C
CTRL-S
CTRL-Q
Page 20 MDE-4315 CFN Series CFN III Manager’s Manual for Windows NT · August 2004
Terminate a command.
Pause display.
Unpause display.
Page 37

Redirecting Command Input and Output Site Controller III
CTRL-X
DELETE
BACKSPACE
Delete current line.
Delete previous character(s) - printer terminal.
Delete previous character - CRT or PC CFN3 terminal.
The L command option and the HELP command are also discussed next.
The CONTROL Key
As shown above, some functions are executed by using a combination of the CONTROL key
(designated by CTRL or CTL on the key) and a specified character. To execute one of these
functions, hold down CONTROL while you type the specified character.
Note: The use of the CONTROL key is indicated by a caret (^) before the character to be typed
while CONTROL is held down. For example, to enter a ^C, hold down CONTROL and
type a C.
How to Terminate a Command
After you have typed a command and pressed ENTER, you can terminate the command in
most cases by typing a ^C. (Remember, C for cease.) When you type a ^C with a print
command the printout will stop at the point where the ^C was typed.
How to Delete Characters
Press the BACKSPACE key (or type a ^H) to delete the previous character. Press
BACKSPACE as many times as necessary to delete the mistake, then type the correct
characters. You must make the corrections before you press ENTER.
The user typed PRNT.
The user pressed BACKSPACE twice.
The terminal deleted th e NT.
The user typed INT DATE.
P* PRNT
P* PR
P* PRINT DATE
How to Delete a Line
Use a ^X to de lete an enti re line. You must make the correction before you press ENTER.
The user typed PRUNT DATE and noticed the error.
The user entered a ^X.
The terminal printed a backslash after the deleted line and moved down one line.
P* PRUNT DATE
P* PRUNT DATE\
MDE-4315 CFN Series CFN III Manager’s Manual for Windows NT · August 2004 Page 21
Page 38

Site Controller III Redirecting Command Input and Output
How to Pause Printout
A pause in printing is useful for viewing a printout on a CRT.
To temporarily pause pri nt in g wit hou t t er mi na ti ng a command , enter a ^S (S for stop) or pr es s
the PAUSE key if you have a printer terminal. This will keep new lines from being printed.
To continue printing, enter a ^Q, or press ENTER, or press the PAUSE key again.
How to Pause Printout with the L Option
Use the L option to automatically pause printing after a specified number of lines have been
printed. Press ENTER to print t he nex t group of lin es. If you do not speci fy a number, 24 lines
will be printed.
T o use the L opt ion to spec ify page len gth, type a semi colon L (;L), followed by an eq uals sign
and the desired number, after the command. For example, ;L=20 sets the screen length to 20
lines.
The L option will affect all subsequent print commands until you sign off. To remove the L
option, type semicolon L=0 (;L=0) or semicolon minus L (;-L) after a command.
• Type: PRINT DIAGNOSTICS;L
P* PRINT DIAGNOSTICS;L
The terminal will print 24 line s each time the user press es ENTER, until all the dia gnostics
have been printed
• Type: PRINT DIAGNOSTICS;L=20
P* PRINT DIAGNOSTICS;L=20
The terminal will print 20 line s each time the user press es ENTER, until all the dia gnostics
have been printed
Permission Levels
Permission leve ls a re used for security a nd saf et y. By assigning appropriate permiss ion levels
to users and to commands, you can make sure that users have access to only the commands
they need to use.
In the default configuration, users with permission level 2 are allowed to activate only basic
CFN3 commands. Users with permis sion l evel 1 0 are a llowed to act ivate al l CFN3 command s.
Page 22 MDE-4315 CFN Series CFN III Manager’s Manual for Windows NT · August 2004
Page 39

Remote Access Command Site Controller III
Remote Access Command
SYStem. Typing SYStem will take you to the NT operating system from the CFN3
application. Typing SYS does not change drives, it only allows you to see different drives on
the PC. To return to CFN3 from NT, type EXIT. Do not add any additional extensions or
commands such as SYS PJ or SYS TYPE. It is NOT advised to use this command whil e using
the PC. When you need to execute NT commands on your PC, use a DOS window with a C:
prompt or use Windows NT Explorer.
This command is designed for use from a remote signon when the PC cannot be accessed
directly.
Optional Commands
Several of the commands shown on the help list, such as DISABLE FPR and ENABLE FPR,
work only with the optional programs you may not have installed. If you try to run these
commands without having installed the program, an error message appears.
The HELP Command
Type HELP to list all valid commands and options for the permission level you are signed on
at. (The short form of the commands are shown in uppercase letters.)
The following illustration shows a printout for a user who has access to all commands. The
number before each command is the number that runs that command from a console.
If you specify the first word of a command with the HELP command, only the commands th at
start with that word will be printed. For example, HELP LOAD prints all the commands that
start with LOAD.
If you type HELP * and the second part of a command, you will see all the commands whose
second word starts wi th what you spe cified. For example , HELP * VEHI CLE (n ote th e blan k
space before and after the *) prints all the commands whose second word is VEHICLE.
The A option with the HELP command shows each command prefaced with its command
number.
MDE-4315 CFN Series CFN III Manager’s Manual for Windows NT · August 2004 Page 23
Page 40

Site Controller III Remote Access Command
P* HELP;A ø
Terminal Commands SCIII v3.4
94:ACtivate GAte;c 10:ACtivate PUmp;cap1 77:ADd ALlocation;c
11:ADd DRawer;c 100:ADd INventory;c 101:ADd SIGnon
12:ADd TAnk;c 102:CALL 103:CHDir
13:Check CArd;c 154:CLOSE 105:COPy;ia
105:CP;I 14:DEactivate PUmp;ca 6:DELete;a
4:DIRectory;ia 19:DIsable COnsole;c 106:DIsable DUmp
162:DIsable FPR;c 88:DIsable GAte;c 107:DIsable HIstory
20:DIsable PCu;c 108:DIsable PROduct;c 21:DIsable PUmp;ca
109:DIsable RAW 22:DIsable REader;c 163:DIsable SDI;c
86:DIsable TMS;c 100:DOwnload SDI 144:ECho;ap1
23:Enable COnsole;ci 112:Enable DUmp;a 87:Enable GAte;ci
113:Enable HIstory;i 24:Enable PCu;ci 114:Enable PROduct;c
25:Enable PUmp;cia 8:Enable RAW;a 161:Enable FPR;ci
26:Enable REader;ci 164:Enable SDI;ci 85:Enable TMS;ci
27:EXit 28:Fix TRansaction;ia 116:FORMAT
117:Get TRansaction;a 29:Help;a 78:LOad ALlocation;c
30:LOad Authorization;ci 146:LOad CArd;c 76:LOad CRon;ci
40:LOad CUtoff;c 31:LOad DAte 32:LOad DRawer;c
33:LOad Fuel;c 34:LOad Heading;ci 118:LOad INventory;c
35:LOad LImitation;ci 36:LOad MEssage;ci 46:LOad PHone;ci
119:LOad PLU;c 37:LOad PRice;ci 38:LOad PROduct;ca
39:LOad PUmp;c 41:LOad SHift 42:LOad SIGnon
45:LOad TAnk;ci 142:LOad TAX;ci 47:LOad TRansaction
82:LOad Vehicle;cia 48:LOCk CArd;ca 158:LOG EVent
121:LOG FIle;a 93:LOG MEssage;c 122:MKdir
159:NExt CLerk 151:NExt DAY;ia 152:NExt SHift;a
149:PAUse;iap1 155:PORT 79:Print ALloction
49:Print Authorization 95:Print CArd 150:Print COnsole
15:Print CRon 50:Print DAte 51:Print DIagnostics;a
52:Print DRawer 53:Print Heading 123:Print HIstory;a
54:Print LImitation 55:Print LOckout 56:Print MEssage
89:Print MOnitor;a 16:Print PHone 57:Print PRice
58:Print PROduct;ia 59:Print PUmp;a 145:Print QUantity;ia
124:Print RECeipt;cap1 126:Print SAles;ia 125:Print SIGnon
18:Print SUmmary;ia 60:Print TAnk 129:Print TIp;a
61:Print TOtals;ia 62:Print TRansaction;ap1p2 83:Print Vehicle
130:PUrge SITe 131:REBOOT;iap1 7:RECord;i
80:REMove ALlocation;ca 63:REMove Authorization;c 132:REMove CRon;cia
133:REMove Heading;c 64:REMove LImitation;c 134:REMove MEssage;c
17:REMove PRice;c 135:REMove PROduct;ca 136:REMove SIGnon
84:REMove Vehicle;c 138:REName;a 65:REset DIagnostics;i
66:REset PUmp 67:REset TOtals;ia 68:REset TRansaction;ia
140:RMdir 69:RUN;ia 167:SCReen
156:SEND COMmand;a 157:SEND FIle;a 166:SHow
153:SET_var;i 70:STOP;ia 81:SUbtract ALlocation;c
71:SUbtract DRawer;c 141:SUbtract INventory;c 72:SUbtract TAnk;c
160:SYStem;a 73:TEst PCu 5:TYpe;a
74:Unlock CArd;ca
P*
Page 24 MDE-4315 CFN Series CFN III Manager’s Manual for Windows NT · August 2004
Page 41

3 – Users
Users
The system administrator is usually responsible for assigning a useridentification number and a sign-on code to each person who will need to use
the SC III data terminal. Some systems also require users to sign on to the
Check Point or Profit Point. For these, the system administrator is also
responsible for assigning sign-on codes to people who use the console.
In its normal confi gur ation the SC III allows up t o 99 users; the default nu mb er
is 5. Each user has three attributes, a user number (0 through 99), a sign-on
code (a password) of up to 16 characters, and a permission level (0-10):
• User numbers identify users. They are also used in the output of PRINT
HISTORY command to show which user executed which commands.
• Sign-on codes are used for sec uri ty. By controlling who knows the sign-on
code, you can control who has access to your system. Several users can
have the same sign-on code, or each user can have a different one.
• Permission levels a re used for secu rity and safe ty. By assig ning a ppropriat e
permission levels to users and to commands, you can make sure that users
have access to only the commands they need to use. In the default
configuration, users with permission level 2 are allowed to activate only
basic SC III commands. Users with permission level 10 are allowed to
activate all SC III com mands.
User ID Numbers
There are two general systems of using user numbers. If there are fewer than 99
employees at a site, each employee can have his or her own user number. The
drawback to this arrang ement, however, is that if there is a large turnove r in
employees, keeping track of numbers through numerous rounds of adding and
deleting users can be confusing.
A second system invol ves assigning numbers by user ca te gories, rather than by
individua l users. Under this system, for exa mple, the sy stem administrator an d
the site manager might have user number 3, with a permission level of 9; all
other users are 2, with a permission level of, say, 1 or 2; and user number 1 is
reserved for remote computers in host mode, as explained below.
Special User Numbers
There are two special user numbers: a default user number and a remote host
user number. At the signon: prompt, each user will enter:
#, password
where # is the user’s number (0-99) and password is his or her password.
MDE-4315 CFN Series CFN III Manager’s Manual for Windows NT · August 2004 Page 25
Page 42

Users
How to Add a User
User number 0 is the default user. When you sign on, you are required to enter
both a password and a user number. The only exception is if you sign on with
the password for user 0. With user 0’s password, you do not have to al so en ter 0
as your user number. User number 0 will automatically be assigned to you by
the Site Controller. This is the most common way of signing onto the data
terminal.
User number 1 is the default remote-host user number. By default, remote
computers using CFN host-mode communications si gn on as user 1. If your si te
will be connected to a remote CFN host we strongly recommend that you
reserve user number 1 for use only by the remote host. You can set the
permission level for user number 1 to whatever is appropriate. If you reset
transactions from the remote host, or download prices or lockouts, or do
maintenance, you probabl y need to give the remo te host a high permi ssion level,
perhaps level 9.
Use the command ADD SIGNON or AD SIG to add a new user to the system.
You also use ADD SIGNON to change a user’s permission level or sign-on
code. You specify the user number, permission level, and sign-on code.
Asterisks (*) are printed for each character of the sign-on code as you enter it.
For security, pick a sign-on code that is hard to guess. Do not use the site’s
name, the user’s name, or any other obvious sign-on code. Sign-on codes may
be up to 16 characters long and may include alphabetic, numeric, and special
characters. Remember , the
↵ sign indicates t hat you a re to pr ess the ENTER key.
What you type in is shown in bold. Asterisks are echoed by the Site Controller
in place of your password for security purposes.
1 Type: ADD SIGNON
ADD SIGNON (AD SIG)
P* ADD SIGNON
User number? 2 ↵
Permission level? 1 ↵
Sign on code? ******* ↵
P*
2 Enter the user number.
3 Enter the permission level.
4 Enter the signon code for this user.
↵
User IDs that will be used to sign on to the Check Point console should have
numeric sign-on codes, since the Check Point console does not have a
convenient way to enter alphabetic characters.
Page 26 MDE-4315 CFN Series CFN III Manager’s Manual for Windows NT · August 2004
Page 43

How to Remove a User
1 Type: REMOVE SIGNON.
REMOVE SIGNON (REM SIG)
P* REMOVE SIGNON
User number? 3 ↵
P*
↵
2 Enter the User Number.
How to Print a List of User Numbers
Type: PRINT SIGNON (or P SIG).
PRINT SIGNON (P SIG)
P* PRINT SIGNON
User Level
02
19
25
39
P*
↵
Users
For security, the sign-on codes are not printed.
Permission Levels
Every command is associated with a certain permission level. For commands
that have the A or I options, the command used with the option may have a
different permission level than the plain command. (See the chart in the
Command permission levels chapter in MDE-4316 CFN III Configuration
Manual for details.)
Command permission levels may be changed by using the disk-based
configuration program PERM. Disk-based commands are assigned permission
levels by the disk-based command SET_PERM.
Permission levels are usually assigned during the initial configuration of the
system, but you should verify that the permission levels in use are appropriate
for your system. See How to use permissi on level s be lo w for mor e infor mat ion.
See the MDE-4316 CFN III Configuration Manual if you need more
information about assigning permission levels to commands.
MDE-4315 CFN Series CFN III Manager’s Manual for Windows NT · August 2004 Page 27
Page 44

Users
Four things determine whether a user has access to a command. They are: the
user’s permission level, the command’s permission level, the position of the Site
Controller manager keyswitch (not available at this time), and the position of
the console keyswitch (if entering commands from a console).
• If a user has a permi ssion l evel th at is equal t o or gr eater t han the permissi on
level required for a command, that user may execute that command.
• The manager keyswitch (not available at this time) is a way to temporarily
increase the users’ permission level. The key, when inserted and turned
clockwise until it stops, has a permission level associated with it. The
manager key permission level is assigned by the disk-based configuration
program SYS_PAR, and is usually assigned during the initial configuration
of the system.
When the manager key is inserted and fully turned, the permission level
associated with the key is in effect for all users, except those users who
already have a higher permission level.
• If a user is signed on to a console, the console keyswitch may also raise the
user’s effective permission level. The permission level associated with each
key, when inserted, will be in effect if it is higher than the user’s permission
level. The key position permission levels are as follows:
Key Position Permission Level
Check Point:
OFF 0
ON 1
SUPERVISOR 4
MANAGER 8
Profit Point, 5-p o s ition:
5 (automatically signs on user 2) user 1’s
4 (automatically signs on user 1) user 2’s
3 ON 1
2 SUPERVISOR 4
1 MANAGER 8
Profit Point, 3-p o s ition:
1 ON 1
2 OFF 0
3 MANAGER 8
How to Use Permission Levels
Permission levels can ensure Site Controller security.
Although we refer to user numbers and user permission levels, most sites will
not have a separate u ser ID and sign-o n code for each pers on. Inste ad, most sites
will probably rely on the console or manager’s keyswitch to set pe rmission
levels for site personnel.
Page 28 MDE-4315 CFN Series CFN III Manager’s Manual for Windows NT · August 2004
Page 45

Users
It is probably more appropriate to think of Site Controller users as job functions rather than as
individuals. For example, a typical attended site might have separate user IDs for cashier,
supervisor, manager, and system configuration and maintenance. The permission levels for
each might be as follows:
User Job User Permission Level
Cashier/Attendant 1
Supervisor 4
Manager 8
Maintenance/Programmer 9
Note that permission levels 1, 4, and 8 are the permission levels assigned by default to the
console keyswitch positions.
Ideally, each user should have access to only the commands required for that user’s job. This
requires careful plannin g. You must decide what commands ea ch level of user will n eed to u se,
and assign permission levels to commands accordingly.
MDE-4315 CFN Series CFN III Manager’s Manual for Windows NT · August 2004 Page 29
Page 46

Users
Page 30 MDE-4315 CFN Series CFN III Manager’s Manual for Windows NT · August 2004
Page 47

Receipts, Messages, and Date
4 – Receipts, Messages, and Date
Date and Time
The system has a battery-back-up clock, and even after a power failure the
clock maintains the correct date and time, so you normally will not have to
enter the date. The Site Controller does not automatically adjust for daylightsavings time, so you will have to adjust the Site Controller’s clock manually if
daylight-savings time is observed in your area.
Also, the Si te Controller’s clock can gain or lose time over a period, just as a
watch can. You may need to adjust it periodically. For information on how to
enter the date and time or display the date, refer to “How to Enter Commands
and Data” on page 13.
Receipt Heading and Footing
The receipt head ing is pr inted ab ove and the rec eipt foo ting is printed below th e
body of each printed r eceipt. The informa tion in t he recei pt headin g and foot ing
usually includes the name of the store or gas station, and may also include the
address and some other m essages, such as Thank You and Please Come Again.
Note: If your site is connected to a financial network and allows debit
transactions, Federal regulations for receipts for electronic funds
transfers apply. (These regulations are included in an appendix to this
manual.)
Characters @C, @N, and @O
Note: The card reader device must support track 1 to make use of this feature.
The charac ters @C are used to cen ter text.
If the characters @N are found, the y will be rep laced by the customer’s name if
known. The line will print regardless of whether or not the name has been
found.
If the characters @O are found with the @N, the line will not be displayed
unless the customer’s name is known.
How to Enter Receipt Heading and Footing
Use the command LOAD HEADING or LO H to ent er the hea din g and footing
to be printed on the receipt and to enter the form fe ed length. The heading an d
footing you load will print on all printers at the site.
MDE-4315 CFN Series CFN III Manager’s Manual for Windows NT · August 2004 Page 31
Page 48

Receipts, Messages, and Date
The number of receipt heading and footing lines allowed is determined by the
Site Controller configuration. Each heading and footing line can have up to 24
characters. The form feed length is the number of blank lines between the last
line of the receipt and the first line of the next receipt.
For a blank line, press the space bar and then ENTER after HEADING LINE?
One blank line is automatically printed after the heading and one blank line is
automatically printed before the footing.
LOAD HEADING;C (LO H;C)
P* LOAD HEADING;C
Line number? 1 ↵
Heading line? SMITTY’S STATION ↵
Line number? 2 ↵
Heading line? 10 MAIN STREET ↵
Line number? 3 ↵
Heading line? SMITH,, WA 98000 ↵
Line number? 11 ↵
Footing line? THANK YOU ↵
Line number? 12 ↵
Footing line? PLEASE COME AGAIN ↵
Line number? 0 ↵
Form feed length? 5 ↵
Line number? ↵
P*
• Use line number 0 for the form feed length.
• Use 1 through 9 for the heading line numbers; line number 1 is the first
heading line, line number 2 is the second heading line, and so on.
• Use the line number plus ten for the footing line number; line number 11 is
the first footing line, line number 12 is the second footing line, an d so on.
• For credit-card receipts printed by a console, use lines 20-29 to provide
space for the customer’s signature.
↵
A single comma terminates an item, so to use a comma in your heading or
footing, you must type two commas. You can use the C option with the
command LOAD HEADING.
Form feed length is in lines. The user typed two commas on the third heading
line. One comma will be printed on the receipt.
Special Printer Functions
If your site has island card readers equipped with the Novatronics or the Star®
printers, you can create special effects on your receipts. Use the following
special ch aracters to perform the special pri nter functi ons. Be awar e that other
printers, including some stand-alone printers, ignore these characters.
Console and Island Card Reader
\nn Set left margin to nn spaces.
^ Cut paper here.
Page 32 MDE-4315 CFN Series CFN III Manager’s Manual for Windows NT · August 2004
Page 49

Receipts, Messages, and Date
Console Only
&&B Use bold print
&&C Use condensed print (15 chars. per inch).
&&N Use normal print (12 chars. per inch).
&&E Use expanded print (7.5 or 6 chars per inch, depending if condensed or normal in
&&U Use expanded print (return to condensed/normal).
&&Lnn Set margin to nn (nn is one or two digits).
&&V;text Wait for insert, print text on inserted slip (check validation)
effect).
The C and N options may be followed by any combination of B or E. B causes
the text to be struck twice, giving a bold effect. E puts the print into expanded
mode. The second footing line is the same as the first, so it will overstrike the
same characters, causing a bold print effect.
LOAD HEADING;C (LO H;C)
P* LOAD HEADING;C
Line number? 1 ↵
Heading line? {SMITTY’S STATION} ↵
Line number? 11 ↵
Footing line? THANK YOU ~ ↵
Line number? 12 ↵
Footing line? THANK YOU ↵
Line number? ↵
P*
↵
If you have other types of printers in addition to the Star printer, they will
ignore the special characters. That means the first heading line will print
normally, and the first t wo footing lines will be printed on differ ent lines ins tead
of one on top of the other.
How to Print Receipt Heading and Footing
Type: PRINT HEADING (or P H).
PRINT HEADING (P H)
P* PRINT HEADING
N. Heading
0 5 BLANK LINES AT END
1 SMITTY’S STATION
2 10 MAIN STREET
3 SMITH, WA 98000
11 THANK YOU
12 PLEASE COME AGAIN
P*
The terminal will display the line number and the text for each heading and
footing line. For mor e information, refer to “Printing an Invoice” on page 246.
• Line numbers 1 through 9 are heading lines.
• Line numbers 11 through 19 are footing lines.
• Line numbers 20 - 29 are for credit-card receipts.
• Line numbers 30 - 39 are the invoice header.
• Line numbers 40 - 49 are the invoice footer.
• Line 0 is the form feed length.
↵
MDE-4315 CFN Series CFN III Manager’s Manual for Windows NT · August 2004 Page 33
Page 50

Receipts, Messages, and Date
How to Change Heading and Footing Lines
T o change one head ing or footing lin e, just use the LOAD HEADING command
to enter new text for that line.
To erase all receipt heading and footing lines and reenter new ones, use the
command LOAD HEADING;IC. The I option erases all current heading and
footing lines and the blank form feed lines at the end. The C option allows you
to enter new heading and footing lines.
How to Delete Heading or Footing Lines
1 Type: REMOVE HEADING.
2 Enter Line number.
REMOVE HEADING (REM H)
P* REMOVE HEADING
Line number? 2 ↵
P*
↵
You can use the C option.
Island Card Reader Messages
The island card reader messages appear on the reader display while it is
inactive. You can use these as promotional messages, or as instructional
messages that tell your customers how to begin a transaction.
How to Enter Messages
Use the command LOAD MESSAGE or LO ME to enter the messages. The
number of messages allowed i s determin ed by the Site Controll er confi guration ;
20 is the default number all owed. Each messa ge can be up t o 20 chara cter s long.
For a blank display, press the space bar and ENTER after Message to display?.
A single comma terminates an item, so to use a comma in your message, you
must type two commas. At this time, curly braces are reserved characters and
are not to be used in messages. They are no lon ger used t o allow text to flash or
blink on the reader.
Display Multiple Lines
To display multiple lines, use the C option with the command LOAD
MESSAGE. Enter each line separatel y and specify the display time.
Page 34 MDE-4315 CFN Series CFN III Manager’s Manual for Windows NT · August 2004
Page 51

Receipts, Messages, and Date
LOAD MESSAGES (LO ME)
P* LOAD MESSAGE;C
Message number? 1 ↵
Display in sec? 2 ↵
Message? TRY A HOT SANDWICH ↵
Message number? 2 ↵
Display in sec? 2 ↵
Message? FROM OUR DELI ↵
Message number? 3 ↵
Display in sec? .5 ↵
Message? (space) ↵
Message number? ↵
P*
↵
For example, you might want to display the promotional lines “Try a hot sandwich from our
deli” and have e ach l ine b e displ ayed f or 2 seco nds. The illus trat ion d emonstr ates how t o ent er
this information.
Note that message 3 is a blank displayed for half a second.
Multiple Line Display
If the ICRs at your site have multiple line displays, use ~# at the beginning of the message
display, where # is the line number. A message that starts ~1 will display on the first line of a
multiple line display. Code ~0 will cle ar the whole screen.
How to Print Messages
Type: PRINT MESSAGE.
PRINT MESSAGES (P ME)
P* PRINT MESSAGE
N. Sec Message
1 2.00 TRY A HOT SANDWICH
2 2.00 FROM OUR DELI
3 0.50
P*
The terminal will display the current message numbers (N.), display times (Sec), and
messages.
How to Change Messages
To change one message line, just use the LOAD MESSAGE command to enter new text for
that message.
Use the command LOAD MESSAGE;IC or LO ME;IC to erase all messages and enter new
messages. The I option erases all current messages. The C option allows you to reenter more
than one message at a time.
↵
MDE-4315 CFN Series CFN III Manager’s Manual for Windows NT · August 2004 Page 35
Page 52

Receipts, Messages, and Date
How to Load Messages
Use the LOad MEssage (LO ME) command in the site controller to load the DPT messages. To
access the 4 lines of the Premier display (or 2 lines for a TCS display), use the tilde character
(~) and the line #1 (1 to 4) befo re the message. The display times for messag es 1 to 3 should be
loaded as 0 seconds; messag e #4 display time shoul d be greater tha n 0 seconds. This will allo w
the messages on all 4 lines to display at the same time instead of one line at a time.
Note: If more than 4 messages are loaded (5-10), omit the tilde preceding the text for line 4
and the messages will be scrolled in line 4 of the disp lay.
P* LO ME;C ↵
Message number? 1 ↵
Display in sec? 0 ↵
Message? ~1WELCOME TO JOE’S ↵
Message number? 2 ↵
Display in sec? 0 ↵
Message? ~2TODAY’S SPECIAL IS ↵
Message number 3: 3 ↵
Display in sec? 0 ↵
Message: ~310W30 OIL ↵
Message number? 4 ↵
Display in sec? 9 ↵
Message? ~4HAVE A NICE DAY!↵
Message number? ↵
P*
If GASBOY ICRs are on a site along with DPTs, the DPT messages are usually loaded as
described in the previous example. If the GASBOY ICRs will be communicating on the
console loop, the broadca st messa ges will not be di sp layed on them. The GASBOY ICRs will
display the message that is on the reader program under step-type 1, which is usually Slide
card or Insert card.
How to Delete Messages
1 Type: REMOVE MESSAGE.
2 Enter message line number.
REMOVE MESSAGES;C (REM ME;C)
P* REMOVE MESSAGE;C
Message number? 1 ↵
Message number? 5
Message number? ↵
P*
You can use the C option with REMOVE MESSAGE.
↵
↵
Page 36 MDE-4315 CFN Series CFN III Manager’s Manual for Windows NT · August 2004
Page 53

5 – Fuel Products
When you are creating products, you must make several choices about how you will set up
your products, tanks, and price codes. Things to remember include:
• Fuel products are usually in category 1 or categories 1 and 2.
• The command LOAD FUEL lets you assign the product code, price code, and tank
number that will be used for a tra nsa ction. The command does this by letting you as si gn a
product code, price code, and tank number to a hose.
• When fuel is pumped, the price charged is determined by the price code assigned to the
hose by LOAD FUEL. You do not need to assign a price to the product itself.
• A product is also assigned to a tank by LOAD TANK. The product you assign this way is
used only for the PRINT TANK report; it is not used for tra n sa ct ion s. To avoid confusion,
you should usually assign the same product to a tank with LOAD TANK that is assigned
with LOAD FUEL.
• If you charge different prices for the same type of fuel, you may want to create different
products in the system with the LOAD PRODUCT command. For example, if you have a
bulk diesel pump that has a different price from diesel at the other pumps, you may want
to set up a separ ate bulk di esel produ ct. Or, if you have so me pu mps on t he syst em that are
full serve, you may want to set up separate full-serve and self-serve products.
(Creating different products from the same fuel allows you to separate the products in
reports. If you do not want to separate them in reports, you can use the LOAD PRICE
command to create different price codes for the same fuel.)
• You normally do not need to use inventory tracking for fuel products. Use Tank inventory.
Fuel Products
How to Add or Change Fuel Products
Use the following procedure to add a new product:
• Make sure the produ ct information has been in it ia li zed with REMOVE PRODUCT ; A . Do
not use this command if you have already loaded product information into the system; it
will clear all product information.
• Create a new product with LOAD PRODUCT;A. The product codes are used to assign
products to tanks and for f uel authorizat ions for propri etary cards. They are included in the
transaction data, and in the product, sales, and totals reports. Each product is assigned a
product code, product name, category.
• The low price and high price are not used fo r fu el produ cts. The ta x code for fuel pro ducts
is currently ignored (no tax), as taxes are included in the price.
• Assign products to pumps or hoses with LOAD FUEL. Price codes are also assigned to
pumps or hoses with this command.
MDE-4315 CFN Series CFN III Manager’s Manual for Windows NT · August 2004 Page 37
Page 54

Fuel Products
How to Initialize Fuel-product Information
Before you enter products for your system, you must initialize the product information.
CAUTION
This procedure removes all product information for fuel and merchandise products..
Type: REMOVE PRODUCT;A
(or REM PRO;A)
REMOVE PRODUCT;A (REM PRO;A)
P* REMOVE PRODUCT;A
P*
The A option erases all current product codes, names, and inventory and price information.
↵
How to Create a New Fuel Product
Use the command LOAD PRODUCT;A or LO PRO;A to create a new product. The command
without the A option changes an existing product. If you use the command without the A
option and name a pr oduc t that does not already exist, the terminal will pri nt an error message.
1 Type LOAD PRODUCT .
2 Enter Product Code.
3 Enter Category.
4 Enter Product Name.
5 Enter Minimum Price.
6 Enter Maximum Price.
7 Enter Taxes.
LOAD PRODUCT;A (LO PRO;A)
P* LOAD PRODUCT;AC
Product code? 1 ↵
Category? 1 ↵
Product name? REGULAR ↵
Minimum price? 0 ↵
Maximum price? 0 ↵
Taxes? 0 ↵
Product code?
P*
↵
↵
You may use the C option with the command LOAD PRODUCT;A.
Page 38 MDE-4315 CFN Series CFN III Manager’s Manual for Windows NT · August 2004
Page 55

Fuel Products
• The product code is used in transaction and pump printouts, and can be
used for sorting printouts. Up to 99 products or departments are allowed.
Fuel products are usuall y 1-10 or 20-29, wit h 30 and above for me rchandise
products. If you are using a Profit Point POS, the department # is used as a
base for the PLU file.
• The category is used for grouping products. For example, you could have
fuel and merchandise categories. Category 1 is usually used for fuel
products. You can print out spe cified categories with PRINT TOTALS,
PRINT SALES, and PRINT PRODUCT.
• The product name is displayed on consoles and optionally, island card
readers, and is printed on receipts and sales and product reports. It can be
up to 12 characters long. Not all characters may print, so do not make the
first digits of any two names the same or you will not be able to
differentiat e b et ween the m on repor ts .
• The minimum price and maximum price are used for products that allow
price override. For fuel products, they should both be 0.
• The tax code specifies which tax table to use for calculating taxes for a
product. Taxes for fuel products are included in the price. If no taxes are to
be added to the product, specify tax code 0.
How to Change Fuel-product Information
Type: LOAD PRODUCT.
LOAD PRODUCT (LO PRO)
P* LOAD PRODUCT
Product code? 1 ↵
Category? 1 ↵
Product name? DIESEL ↵
Minimum price? 0 ↵
Maximum price? 0 ↵
Taxes? 0 ↵
P*
↵
Note: Do not use the A option.
How to Print Fuel-product Information
Use the command PRINT PRODUCT or P PRO to print the current product
data. You can specify a range of products to print or, with the I option, you can
specify a category to print.
The example below shows all products in category 1, which is the category usually used for fuel
products. No high price has been entered, as is usual for fuel products, so the printout shows —No
Override—. The 0.00 under Price means the pump price comes from the pri ce ta ble and is assigned
with the LOAD FUEL command.
MDE-4315 CFN Series CFN III Manager’s Manual for Windows NT · August 2004 Page 39
Page 56

Fuel Products
PRINT PRODUCT (P PRO)
P* PRINT PRODUCT;I 1ø
Pr Cat Product Inventory Reorder Low price High price Price Taxes
1 1 Regular 0 0 -No Override- 0.00 None
2 1 Unleaded 0 0 -No Override- 0.00 None
3 1 Premium 0 0 -No Override- 0.00 None
4 1 Diesel 0 0 -No Override- 0.00 None
P*
You can also use product ranges with PRINT PRODUCT to print specified
product numbers. For exampl e, t he command PRINT PRODUCT 1-4 prints the
information for products 1 through 4.
How to Remove a Fuel- pr oduct
Type: REMOVE PRODUCT.
REMOVE PRODUCT (REM PRO)
P* REMOVE PRODUCT
Product code? 1 ↵
P*
↵
You may use the C option with REMOVE PRODUCT.
Fuel Product Inventory
Product inventory is ini tially d isabled. You may want to keep it disabled for fuel
products, and just use the tank inventory, or you may want to enable product
inventory so that invent ory information for fuel pro duct s a ppea rs in t he product
information printout.
If you have the same product assigned to more than one tank, the inventory
information in the pr oduct printout can be the tota l for all the tanks. If you have
more than one product assi gne d to on e tank (such as diesel sold at two different
prices), the inventory information in the product printout will not be very
meaningful, so you should probably not enable inventory in this case.
When you use the commands ADD TANK and SUBTRACT TANK, the
inventory for the corresponding products is also adju st ed if inventory recording
is enabled. However, the ADD INVENTORY and SUBTRACT INVENTORY
commands do not adjust the tank inventory, since more than one tank could be
assigned the same product. This means that it is better to use the TANK
commands to adjust inventory for fuel products.
The LOAD TANK command does not adjust the inventory for products, so
enter 0 for the inve ntory when you do the L OAD TANK and use ADD TANK to
enter the inventory amount when inventory is enabled.
Page 40 MDE-4315 CFN Series CFN III Manager’s Manual for Windows NT · August 2004
Page 57

When the commands ADD or SUBTRACT TANK or INVENTORY are executed , the amoun t
added or subtracted is logged.
If the site has tank gauges, the gauges can be set up to adjust product inventory, but such an
arrangement is not required by the Site Controller.
How to Enter Fuel-product Inventory
Type: LOAD INVENTORY.
LOAD INVENTORY (LO IN)
P* LOAD INVENTORY;C
Product? 1 ↵
Quantity? 4300 ↵
Reorder level? 1000 ↵
Product? 3 ↵
Quantity? 2900 ↵
Reorder level? 800 ↵
Product? ↵
P*
When inventory goes below the reorder level a message is printed on the log printer.
↵
Fuel Products
When the product inventory and tank figures do not match, one use of the LOAD
INVENTORY command is to set the book inventory to equal the physical inventory.
MDE-4315 CFN Series CFN III Manager’s Manual for Windows NT · August 2004 Page 41
Page 58

Fuel Products
Page 42 MDE-4315 CFN Series CFN III Manager’s Manual for Windows NT · August 2004
Page 59

6 – Tank and Pump Commands
Tank Commands
How to View Current Tank Inventory
To display the tank inventory for all tanks, use the command PRINT TANK or
P TA. The terminal will display the tank number (T#), total quantity (Totals),
and reorder level.
Tank and Pump Commands
In addition, if a CFN-compatible Tank Monitor
®
System (electronic t ank gauge)
is installed on the tank and connected to the Site Controller, then the measured
tank quantities and tank ullage will be displayed. Ullage is the amount of
remaining space or unused capacity in the tank.
PRINT TANK (P TA)
P* PRINT TANK
T# Product Total Reorder Gauge Diff % Temp Ullage
1 Regular 5000.000 5000.000 4995 5 0.1 65.2 5005
2 Unleaded 6240.000 5000.000 6240 0 0.0 65.2 3760
3 Diesel 19840.000 8000.000 19844 4 0.1 65.2 156
4 Premium 10000.000 5000.000 9999 1 0.1 65.2 1
P*
↵
T# Tank number of tank.
Product N ame of product stored in tank.
Total Inventory quantity in tank.
Reorder Reorder level at which a warning message will be logged.
Gauge Measured quantity in tank according to Tank Monitor System (TMS).
Diff Difference between inventory and measured quantities.
% Difference expressed as a percentage over or short.
Temp Measured temperature as reported by the TMS. Used by the TMS to
compute temperature-corrected gallons.
Ullage The amount of usable empty space remaining in the tank.
How to Add to and Subtract from Tank Inventory Counters
If a Tank Monitor System (TMS) is present, the site can be configured to
automatically add deliveries that are detected by the TMS to the inventory
totals. If your site has this capability, you will not need to add deliveries to
inventory manually and to do so will produce an error in the totals.
You might wish to make this adjustment if a physical measurement of the fuel
MDE-4315 CFN Series CFN III Manager’s Manual for Windows NT · August 2004 Page 43
Page 60

Tank and Pump Commands
Add Tank
1 Type: ADD TANK.
2 Enter Tank Number.
3 Enter Quantity.
gives a result more or less than the amount indicated by the counter, in order to
bring the perpetual inventory amount back into line with the physical inventory
amount.
If product inventory is enabled (see set tank inventory counter), ADD or
SUBTRACT TANK will adjust the inventory for the corresponding product.
The C option is available for both commands.
ADD TANK (AD TA)
P* ADD TANK
Tank number? 14 ↵
Quantity? 5000 ↵
P*
↵
The amount added is logged.
Subtract Tank
1 Type: SUBTRACT TANK
2 Enter Tank Number.
3 Enter Quantity.
SUBTRACT TANK (SUB TA)
P* SUBTRACT TANK
Tank number? 2 ↵
Quantity? 100 ↵
P*
↵
The amount subtracted is logged.
How to Set Tank Inventory Counters
Use the command LOAD TANK or LO TA to set the Site Controller tank
inventory counters e qua l t o t he amoun t of fuel in the tanks. The qua nti ty should
be in the same units (gallons or litres) that the pumps use. The Site Controller
tank inventory counters decrement each time fuel is pumped.
The product code entered with the LOAD TANK command associates the tank
with a product so inventory updates for that product can be done when the
commands ADD TANK and SUBTRACT TANK are used. Inventory updates
Page 44 MDE-4315 CFN Series CFN III Manager’s Manual for Windows NT · August 2004
Page 61

Tank and Pump Commands
for products are done only if inventory keeping is enabled for the products, but inventory is
always kept for tanks.
You can specify a product and reorder level with the LOAD TANK command. When the tank
inventory level dips below the specified reorder level, the message Tank #xx Below reorder
level is prin ted on the log prin ter. An aste ri sk (* ) next to the t ota ls i n the print out o f the PRI NT
TANK command shows that the tank is below the reorder level.
The command LOAD TANK does not update the inventory for products, because there could
be more than one tank with the same product. If you want to keep track of inventory for
products, use the LOAD TANK command to enter the tank information, but enter 0 for the
inventory level. Then use ADD TANK to enter the current inventory level.
When the ADD or SUBTRACT TANK commands are executed, the amount added or
subtracted is logged.
The product codes e ntere d wi th the LOAD TANK command affect inventory, but do not a f fect
transactions. The product codes and tank numbers entered with the LOAD FUEL command
are the ones that are used for transactions.
1 Type: LOAD TANK.
2 Enter Tank number.
3 Enter Quantity.
4 Enter Product code.
5 Enter Reorder level.
LOAD TANK (LO TA)
P* LOAD TANK
Tank number? 1 ↵
Quantity? 30000 ↵
Product code? 1 ↵
Reorder level? 5000 ↵
Tank number? ↵
P*
↵
Use the C option to load more than one tank.
Method-of-payment Pricing
Some sites want to char ge di ff erent pr ices f or fuel products depe nding on what sort of pay ment
is offered. For example, the cash price for unleaded gasoline might be lower than the credit
price.
The Site Controller stores these multi-level prices in a special table in its memory called the
price table. Price codes are arbitrary numbers assigned to fuel products or hoses to link those
fuels or pump table entries to entries in the price table.
The command PRINT PRICE (see below) allows you to see th e prices that have been assigned
to existing price codes. Then the command LOAD PRICE can be used to change them.
MDE-4315 CFN Series CFN III Manager’s Manual for Windows NT · August 2004 Page 45
Page 62

Tank and Pump Commands
When pumps and fuel products are first set up on the system, price codes can be assigned
directly to pumps and hoses using LOAD FUEL (the standard method for fuels).
Price codes assigned with LOAD FUEL appear in the PRINT PUMP report, not in PRINT
PRODUCT.
After prices have been initially set up, in almost all cases prices for fuel products will be
changed with the LOAD PRICE command, rather than with the LOAD PLU or LOAD
PRODUCT commands that are normally used with merchandise.
Price Code Levels
If the pump used for a transaction has a price code assigned to it, then that price code is used,
even if another price look up happens to be assigned to the product. The price charged is
determined at the time of the transaction by the customer’s method of payment. Each price
code can have multiple levels of prices, one for each method of payment that is accepted.
The Site Controller uses a number to refer to each price level. These numbers are fixed and
cannot be changed. Values for particular price levels, such as debit and proprietary card, need
to be loaded for particular price codes only if that method of payment is accepted for the
product or pump assigned to that price code.
Level 0 Price level 0 is the default fallback price (though the Site Controller can be configured for a different
Level 1 Price level 1 is the cash price. It is charged when the CASH key on the console is pressed.
Level 2 Price level 2 is the credit price. It is charged when the CREDIT key on the console is pressed or a
Level 3 Price level 3 is the debit price. It is charged when the DEBIT key on the console is pressed or when a
fallback price level). This is the price that is displayed on the pump. If no price is loaded for one of the
other price levels, transactions that would normally be charged at that level will be charged at the
fallback price.
If you use only one price level, load only price level 0. Price level 0 must be loaded for every price
code that is used.
credit card is run through the console card reader or an island card reader.
debit (automated teller) card is run through the console card reader or an island card reader.
Additional price leve ls, referred to as club prices, are a vailable for use with proprietary cards.
If a price level is encoded on a proprietary card, that price will be charged. If no price level is
encoded on proprietary cards, the credit price will be charged.
Note: You must always load a p rice f or at l east l evel 0 for ev ery pri ce code you use . The p ump
will be disabled if you do not load a fallback (level 0) price.
How to View Current Price Code Levels and Prices
Use the command PRINT PRICE or P PR. The terminal will display the price levels (Pl) and
prices for each price code (Pc). Price codes are rows and price levels are columns.
Page 46 MDE-4315 CFN Series CFN III Manager’s Manual for Windows NT · August 2004
Page 63

Type: PRINT PRICE.
PRINT PRICE (P PR)
P* PRINT PRICE
Pc Pl Price
1 0 1.169 1 1.169 2 1.199
2 0 1.229 1 1.229 2 1.299
3 0 1.299 1 1.299 2 1.306
P*
↵
To specify price codes to display, enter the code number at the command.
P* PRINT PRICE 1 ↵
Pc Pl Price
1 0 1.169 1 1.169 2 1.199
P*
How to Enter Price Code Levels and Prices
Use the command LOAD PRICE or LO PR to enter price levels and prices for
price codes. The number of price leve ls and pric es allowed i s determine d by the
Site Controller configuration.
Tank and Pump Commands
If you are changing prices while the site is open for business, first shut down
the site wit h the command STOP. This will allo w transactions in progress to
finish, but prevent new transactions from starting while you are changing
prices. When you have finished changing prices, use the command RUN to
restart the site.
LOAD PRICE (LO PR)
P* LOAD PRICE
Price code? 2 ↵
Price level? 1 ↵
Price? 1.119 ↵
Price level? ↵
P*
↵
How to Change Price-code Prices
It is a good idea to write down or print existing prices before making changes,
and again after making changes to check your work.
To change prices for a price code, use LOAD PRICE or LO PR to enter new
prices for the price levels for that price code.
There are two methods for changing prices for price codes.
The first method is to enter the new price for each price code and price level
that you wish to change. This method uses LOAD PRICE;C command.
MDE-4315 CFN Series CFN III Manager’s Manual for Windows NT · August 2004 Page 47
Page 64

Tank and Pump Commands
P* LOAD PRICE;C ↵
Price code? 1 ↵
Price level? 0 ↵
Price? 1.149 ↵
Price level? 1
Price? 1.169 ↵
Price level? 2 ↵
Price? 1.199 ↵
Price level? ↵
Price code? ↵
P*
.
↵
The other method is to enter the amount of the price change as a quantity to be
added to or subtracted from the old price. This method can be used to raise or
lower either all price levels of one price code or all price codes by a specified
amount.
The form for the second command is LOAD PRICE code level change where:
• code is replaced by the pric e code(s ) to be changed ( either a numbe r or * for
all price codes),
• level is replaced by the level(s) to be affected (either a number or * for all
levels),
• change is replaced by a + or - sign and the amount of the change in dollars
and cents.
This example raises all prices for all codes (i ndicated by the first ast erisk after
LOAD PRICE) and all levels (the second asterisk) by five cents.
All Codes All levels
P* LOAD PRICE * * +.05 ↵
P*
This next example subtracts two cents from all levels in price code 3.
P* LOAD PRICE 3 * -.02 ↵
Price level ? ↵
P*
Note: LOAD PRICE;I erases all price levels and price code prices for all
pumps that have been assigned price codes. This will disable all pumps.
You must re-enter new prices for all price codes and re-enable all pumps
with ENABLE PUMP after you use this command.
How to Delete a Price Code or Price Level
Use the command REMOVE PRICE or REM PR to delete one or more price
levels for a given price code.
Page 48 MDE-4315 CFN Series CFN III Manager’s Manual for Windows NT · August 2004
Page 65

REMOVE PRICE (REM PR)
P* REMOVE PRICE
Price code? 4 ↵
Price level? 3 ↵
Price level? ↵
P*
↵
To delete an entire price code, delete all the price levels under that price code.
Use the C option to remove more than one price code.
How to Set Up Day-Night Pricing
You can have day-night pricing by using the RECORD command or one of the editors to
create command files that contain the LOAD PRICE commands for the day and night prices.
Then the command files can be exe cuted au tomati cally at the appro priat e time s by loadi ng the
proper cron (user-defined commands execut ed at spe ci fi ed t imes ) en tr ie s wit h LOAD CRON.
(See “Automatic Cron Commands” on page 201.)
P* TYPE PRC1.CMD ↵
stop
lo pri;c
1 0 .799 1 .759 2 .799
2 0 .859 1 .819 2 .859
3 0 .919 1 .879 2 .919
4 0 1.069 1 1.029 2 1.069
run
P* TYPE PRC2.CMD
stop
lo pri;c
1 0 1.279 1 1.239 2 1.279
2 0 1.339 1 1.299 2 1.339
3 0 1.459 1 1.419 2 1.459
4 0 1.179 1 1.139 2 1.179
run
P*
↵
Tank and Pump Commands
The example above shows two command files used for changing the pricing for day-night
pricing.
Pump Commands
How to Assign Products, Prices, and Tanks to Hoses
Use the command LOAD FUEL or LO FU to enter the product code, price code, and tank
number to be assigned to each pump, or to each hose for multi-product dispensers (MPD
Pumps that dispense the same product may be assigned different price codes. For example, a
full-service pump that dispenses unleaded regular fuel may be assigned a different price code
than a self-service pump that dispenses the same fuel. Price levels and prices are assigned to
price codes with LOAD PRICE.
The LOAD FUEL command allows you to specify different products, prices, and tanks for
each hose on a pump. If the system uses MPDs, a pump is one side of the MPD. That is, each
dollar and gallon display corresponds t o o ne pump. For regular dispenser s a nd pumps, there is
one hose per pump. The pump, not the hose, is authorized for transactions.
MDE-4315 CFN Series CFN III Manager’s Manual for Windows NT · August 2004 Page 49
®
).
Page 66

Tank and Pump Commands
P* LOAD FUEL ↵
Pump number? * ↵
Hose number? 1 ↵
The number of pumps and associated hoses in the system is determined by the
Site Controller configuration.
You may use the C option with the command LOAD FUEL.
LOAD FUEL (LO FU)
P* LOAD FUEL
Pump number? 13 ↵
Hose number? 1 ↵
Product code? 1 ↵
Price code? 1 ↵
Tank number? 1 ↵
Hose number? 2 ↵
Product code? 2 ↵
Price code? 2 ↵
Tank number? 2 ↵
Hose number? ↵
P*
↵
C
To set all pumps to be the same, enter an asterisk when prompted for the pump
number in LOAD FUEL. This will affect all pumps with the same hose number.
How to View Pump Information
The PRINT PUMP or P PU command displays information for each pump. If
MPDs are used, PRINT PUMP displays the information for each hose under
each pump. Hose numbers are not displayed, but the information under each
pump is in order by hose number.
P* PRINT PUMP
P# T# Pr Pc Price Totals $Total Rate Limit Slow
1 1 1 1 0.799 178.770 181.10 100/$ $30 0.500
2 2 2 0.859 360.716 322.74 Pumping
3 3 3 0.919 740.360 741.94
2 1 1 1 0.799 84.110 66.44 100/$ $30 0.500 Down
2 2 2 0.859 2.140 1.83
3 3 3 0.919 462.540 494.42
3 3 3 3 0.919 353.044 357.14 100/$ $30 0.500
4 4 4 4 1.069 336.634 349.97 100/$ $30 0.500 Pumping
5 1 1 1 0.799 7019.954 6722.35 100/G $500 0.500
6 2 2 2 0.859 503.411 548.22 100/G $30 0.500 Pumping
7 3 3 3 0.919 464.840 578.71 100/G $30 0.500
8 4 4 4 1.069 778.470 804.44 100/G $30 0.500
P*
↵
========= =========
11284.99 11169.30
Number of pump, dispenser or MPD
Number of MPD hose; all others enter 1
Code created with LOAD PRODUCT
Price code created with LOAD PRICE
Number of fuel tank used by LOAD TANK
PRINT PUMP (P PU)
P# The pump number is the number of the pump, dispenser, or MPD (in the above example, pumps 1
and 2 are MPDs).
— The hose number is not displayed, but is used to determine the order in which hose information for
an MPD is displayed (pumps 1 and 2 have three hoses). For other pumps and dispensers, the hose
number is 1.
Page 50 MDE-4315 CFN Series CFN III Manager’s Manual for Windows NT · August 2004
Page 67

Tank and Pump Commands
T# The tank number is the number of the fuel storage tank drawn upon by that hose.
Pr The product code is the number of the product assigned to the hose with LOAD FUEL. Use PRINT
Pc The price code controls what prices will be charged for each method of payment such as cash or
Price The price is the current fallback value assigned to the price code with LOAD PRICE. (The fallback
Totals The quantity totalizer is the cumulative quantity pumped for the hose. These totalizers will roll over
$Totals The dollar totalizer is the cumulative dollar sales for the hose. Dollar totalizers will also roll over
Rate The pulser rate is the number of pulses produced per unit of measure, such as gallons. It applies
Limit The fill limit is the amount automatically requested, unless overridden, when a customer asks for a
Slow The slow flow cutoff point determines how soon before reaching a limit or preset amount the slow
PRODUCT to view the product names that correspond to the numbers.
credit. It is the code entered with LOAD FUEL.
price is defined in this chapter under Price codes.)
periodically when all 9s are displayed.
periodically.
only to fuel products, and is an accurate way of measuring flow. $ means that dollars are being
counted, L means that liters are being counted, and G means that gallons are being counted.
fill. (The limit assigned to privately issued cards can be different than the hose fill limit.)
pump mode is activated. The purpose of slow flow cutoff is to prevent the pump from coasting past
the preset amount or limit. Slow flow cutoff point is always specified in gallons or liters.
The last column, pump status, which has no heading, shows the current status of the hose.
Down The pump is out of service. The commands PRINT DIAGNOSTICS 2 and PRINT DIAGNOSTICS 8
give more diagnostic information about pump control units and pumps, respectively.
Pumping The pump is currently activated. The command PRINT TIP gives more information on transactions
Reader If this appears for any length of time, the pump is stuck. Type ENABLE PUMP;A followed by the
Console If this appears for any length of time the pump is stuck. Type ENABLE PUMP;A followed by the
Disabled You have run the DISABLE PUMP command, no price has been entered in the Site Controller, or
Ful Srv The pump is in full-serve mode. It will pump any time the hose is taken off-hook. To get a pump out
— The pump is idle.
in progress.
pump number.
pump number.
the pulser has developed a problem.
of full-serve mode, type DEACTIVATE PUMP;A followed by the pump number.
The A option with PRINT PUMP displays the values of the pump totalizers, as of the end of
the previous shift. (These values are updated whenever the commands LOAD SHIFT, NEXT
SHIFT, RESET TOTALS, and NEXT DAY are run.)
The first seven columns with the A option are identical to the PRINT PUMP display. The two
columns on the right di splay each pump’s quantity and dollar totals at the time the shift change
occurred; these two columns are not totaled.
MDE-4315 CFN Series CFN III Manager’s Manual for Windows NT · August 2004 Page 51
Page 68

Tank and Pump Commands
P* PRINT PUMP;A ↵
P# T# Pr Pc Price Totals $Total Q Previous $ Previous
1 1 1 1 0.799 178.770 181.10 29.700 23.73
2 2 2 0.859 360.716 322.74 22.600 19.41
3 3 3 0.919 740.360 741.94 45.500 41.81
2 1 1 1 0.799 84.110 66.44 0.000 0.00
2 2 2 0.859 2.140 1.83 0.000 0.00
3 3 3 0.919 462.540 494.42 10.000 9.19
3 3 3 3 0.919 353.044 357.14 20.000 18.38
4 4 4 4 1.069 336.634 349.97 0.000 0.00
5 1 1 1 0.799 7019.954 6722.35 55.900 44.66
6 2 2 2 0.859 503.411 548.22 33.700 28.95
7 3 3 3 0.919 464.840 578.71 15.500 14.24
8 4 4 4 1.069 778.470 804.44 44.000 47.03
======== ========
P*
How to Set Pump Totalizers
1 Type: LOAD PUMP.
LOAD PUMP (LO PU)
P* LOAD PUMP
Pump number? 1 ↵
Hose number? 1 ↵
Quantity? 5624.8 ↵
$ amount? 3217.95 ↵
Hose number? ↵
P*
↵
11284.99 11169.30
2 Enter Pump number.
3 Enter Hose number.
4 Enter Quantity.
5 Enter the dollar amount.
How to Reset Pump Totalizers
1 Type: RESET PUMP.
RESET PUMP (RE PU)
P* RESET PUMP
Verify (y/n)? y ↵
P*
2 Verify? Enter yes or no.
↵
Page 52 MDE-4315 CFN Series CFN III Manager’s Manual for Windows NT · August 2004
Page 69

How to Enter Pump-Fill-Limit and Slow-to-Cutoff
The pump limit is the amount the Site Controller will authorize, or request authorization for, if
a customer requests a FI LL by pressi ng that key on the card r eader. (If you use privatel y issued
cards, the limit assigned to the cards will be us ed instead.)
The pump limit can be in (units/liters) or dollars. Use a dollar sign ($) before the pump-limit
amount to specify a dollar limit.
The slow-to-cutoff point determines how soon before rea chi ng a li mit the sl ow-pump mode is
activated. The slow-to-cutoff point is in gallons prior to the limit.
A default cutoff point and p ump limit for all pumps is determined by the Site Controlle r
configuration. LOAD CUTOFF overrides the default limit. If the default limit is okay for a
pump, you do not need to enter a new limit.
1 Type: LOAD CUTOFF.
LOAD CUTOFF (LO CU)
P* LOAD CUTOFF
Pump number? 1 ↵
Pump limit? $50 ↵
Slow cutoff? .25 ↵
P*
↵
Tank and Pump Commands
2 Enter Pump number.
3 Enter Pump limit.
4 Enter Slow cutoff.
There is also a maximum limit that is set in the Site Controller configuration. You cannot
exceed the Site Controller’s maximum limit with LOAD CUTOFF. You may use the C option
with the command LOAD CUTOFF.
Configure all pumps at once by entering an asterisk for the pump number.
MDE-4315 CFN Series CFN III Manager’s Manual for Windows NT · August 2004 Page 53
Page 70

Tank and Pump Commands
Page 54 MDE-4315 CFN Series CFN III Manager’s Manual for Windows NT · August 2004
Page 71

Merchandise Products
7 – Merchandise Products
When you are creating product s, you must make several choices abo ut how you
will organize your system and how you will handle pricing. Things to consider
include:
• Do you want inventory levels shown in the product printout?
• Do merchandise products repr ese nt indi vid ual it ems, dep art ment s, or some
of each?
• Will the system use fixed prices or manually entered prices, or some of
each? Will user override be allowed for fixed prices?
How to Add or Change Merchandise Products
Use the following procedure to add a new product.
• Make sure the p roduct information has been initialized with RE MOVE
PRODUCT;A. Do not use this command if you have already loaded
product information into the syste m; it will clear all product information.
• Create a new product with LOAD PRODUCT;A. Each product is assigned
a product code, product name, category. If price override is allowed, or if
prices are to be entere d at the time of the sale, products are assigned a low
and high price.
• Use LOAD PLU to enter price look ups for products that have default or
non-overridable pri ces .
• Use LOAD INVENTORY to enter the initial number of items or dollar
inventory amount for products that will use inventory tracking. For dollar
inventory, use ENABLE PRODUCT and specify type 4.
How to Create a New Merchandise Product
Use the command LOAD PRODUCT;A or LO PRO;A to create a new pr oduct .
The command without the A option changes an existing product. If you use the
command without the A option and name a product that does not already exist,
the terminal will print an error message.
MDE-4315 CFN Series CFN III Manager’s Manual for Windows NT · August 2004 Page 55
Page 72

Merchandise Products
You may use the C option with the command LOAD PRODUCT;A.
LOAD PRODUCT;A (LO PRO;A)
P* LOAD PRODUCT;AC
Product code? 10 ↵
Category? 2 ↵
Product name? MILK ↵
Minimum price? .45 ↵
Maximum price? 3.00 ↵
Taxes? 0 ↵
Product code? 11 ↵
Category? 3 ↵
Product name? SODA ↵
Minimum price? .30 ↵
Maximum price? 2.00 ↵
Taxes? 1 ↵
Product code? ↵
P*
↵
• The product code is used to add merchandise products to a sale when the
product does not have its own key on the console. It can also be used for
sorting printouts. Up to 99 products are allowed, including fuel and
merchandise products.
• The category is used for grouping products. For example, you could have
fuel and merchandi se c ategorie s. You can print out specified categor ies with
PRINT TOTALS, PRINT SALES, and PRINT PRODUCT.
• The product name is displayed on consoles and is printed on receipts and
sales and product reports. It can be up to 12 characters long. Visually only
the first 5 digits are displayed in printouts, so do not make the first 5 digits
of any two names the same or you will not be able to differentiate between
them on reports.
• The minimum price and maximum price are used for products that allow
price over ride. If override is not allowed, enter 0 for the maximum pr ice.
• The tax code specifies which tax table to use for calculating taxes for a
product. Tax tables are loaded in the Site Controller configuration or by
TAX.BIN. (The actual tax names are loaded with LOAD TAX.)
How to Create Special Merchandise Products
You can create special products for keeping track of cash withdrawals, refunds,
bottle deposit refun ds, a nd such. T hese ar e not r eal pr oducts, but the y al low you
to have information about cash withdrawals and refunds included in your
product and sales reports.
Page 56 MDE-4315 CFN Series CFN III Manager’s Manual for Windows NT · August 2004
Page 73

Merchandise Products
To create a cash withdrawal or refund product:
ENABLE PRODUCT (E PRO)
P* LOAD PRODUCT;A
Product code? 20 ↵
Category? 9 ↵
Product name? Refund ↵
Minimum price? .01 ↵
Maximum price? 150.00 ↵
Taxes? 0 ↵
P* ENABLE PRODUCT ↵
Product code? 20 ↵
Type ? 1 ↵
P* LOAD PRODUCT;A ↵
Product code? 21 ↵
Category? 9 ↵
Product name? Withdr ↵
Minimum price? .01 ↵
Maximum price? 150.00 ↵
Taxes? 0 ↵
P* ENABLE PRODUCT ↵
Product code? 21 ↵
Type ? 3 ↵
P*
↵
• Use LOAD PRODUCT;A t o cre at e a ne w product. Special products should
be in their own category so they can be printed out separately.
• Give the product a descriptive name, such as WITHDR or REFUND.
• For cash-withdrawal special products, the minimum and maximum prices
are the minimum and maximum amounts that can be withdrawn in one
transaction.
• For refund special products, the minimum and maximum prices are the
minimum and maximum amounts for a refund.
• Special products do not normally have taxes.
• You do not need to enter inventory or prices for special products.
• Use ENABLE PRODUCT to make the product a special product. Specify
type 3 for a cash withdrawal produc t, t ype 2 for a payou t product, or type 1
for a refund product (see the Product attributes table on the next page).
How to Print Merchandise Product Information
Use PRINT PRODUCT;A or P PRO;A to print a list of product attributes for
each product. You may specify a range of products to print. You can use the I
option to specify categories rather than products.
P* PRINT PRODUCT;AI 37↵
Pr Cat Name Enabled
24 37 Chips 5
25 37 Candy 5
26 37 Snakes 5
P*
Whenever a LOAD FUEL command is executed, a bit is set t o indic ate th at this
is a fuel product. The bi t is displ ayed a s type 8 in PRINT PRODUCT;A. The bit
is not unset if a subsequent LOAD FUEL changes the product.
MDE-4315 CFN Series CFN III Manager’s Manual for Windows NT · August 2004 Page 57
Page 74

Merchandise Products
Table 1 shows the product attributes that may be enabled.
Table 1: Product Attributes
Number Meaning
9 Use category number as the department number in the journal. This is useful in putting several products
into the same department for disk-journal reports.
8 This is the fuel product.
7 Low inventory is indicated by an asterisk in PRINT PRODUCT.
5 Inventory tracking was enabled with ADD INVENTORY or ENABLE PRODUCT.
4 Inventory is in dollars, not units (enabled with ENABLE PRODUCT).
3 Product is a special cash-withdrawal product (enabled with ENABLE PRODUCT).
2 Product is a special payout product (enabled with ENABLE PRODUCT). Note: Payout products
assigned to type 2 will subtract from the sales total.
1 Product is a special refund product; cash flow direction is reversed (enabled with ENABLE PRODUCT).
0 Console prompts Amount? rather than Price?; used for payout special products (enabled with ENABLE
PRODUCT).
15 Enables pat ronage (Buyp ass only).
10 Product is tax exempt. For example, if you have a tax exempt key assigned on the Profit Point, and the
clerk presses that key during a sale, any items with an attribute of 10 have the tax removed.
How to Change Merchandise Product Information
To change the category, name, maximum or minimum price, or tax codes for a product.
Type: LOAD PRODUCT.
LOAD PRODUCT (LO PRO)
P* LOAD PRODUCT
Product code? 10 ↵
Category? 2 ↵
Product name? DELI ↵
Minimum price? .5 ↵
Maximum price? 5.00 ↵
Taxes? 1 ↵
P*
↵
Do not use A option.
Change Price Lookup
Type: LOAD PLU.
You may use the C option with LOAD PRODUCT.
How to Print Merchandise Product Information
Use the command PRINT PRODUCT or P PRO to print the current product data. PRINT
PRODUCT prints product codes, names, and inventory and price information entered with
LOAD PRODUCT, LOAD PLU, and LOAD INVENTORY.
Page 58 MDE-4315 CFN Series CFN III Manager’s Manual for Windows NT · August 2004
Page 75

PRINT PRODUCT (P PRO)
P* PRINT PRODUCT
Pr Cat Product Inventory Reorder Low price High price Price Taxes
1 1 Regular 0 0 -No Override- 0.00 None
2 1 Unleaded 0 0 -No Override- 0.00 None
3 1 Premium 0 0 -No Override- 0.00 None
4 1 Diesel 0 0 -No Override- 0.00 None
Pr Cat Product Inventory Reorder Low price High price Price Taxes
5 2 Cigs $321.05 100 0.75 1.50 1.20 5
6 2 Tires $400.00 150 35.00 125.00 98.00 5
7 2 Bread $21.12 10 0.69 1.10 0.98 None
8 2 Soda $250.25 110 0.25 0.75 0.45 2
P*
↵
You can use ra nge s wi th P R INT PRODUCT t o pr int sp ecified product numbers. For example,
the command PRINT PRODUCT 5-8 prints the information for products 5 through 8.
P* PRINT PRODUCT 5-8 ↵
Pr Cat Product Inventory Reorder Low price High price Price Taxes
5 2 Cigs $321.05 100 0.75 1.50 1.20 5
6 2 Tires $400.00 150 35.00 125.00 98.00 5
7 2 Bread $21.12 10 0.69 1.10 0.98 None
8 2 Soda $250.25 110 0.25 0.75 0.45 2
P*
Merchandise Products
When you specify ranges with PRINT PRODUCTS with the I option, the ranges refer to the
category number rather than the product number. This allows you to print only specified
categories of products.
P* PRINT PRODUCT;I 2 ↵
Pr Cat Product Inventory Reorder Low price High price Price Taxes
5 2 Oil 321 100 0.75 1.50 1.20 5
6 2 Tires 400 150 35.00 125.00 98.00 5
7 2 Bread 20 10 0.69 1.10 0.98 None
8 2 Soda 250 110 0.25 0.75 0.45 2
P*
How to Remove a Merchandise Product
Type: REMOVE PRODUCT.
REMOVE PRODUCT (REM PRO)
P* REMOVE PRODUCT
Product code? 10 ↵
P*
You may use the C option with REMOVE PRODUCT.
↵
MDE-4315 CFN Series CFN III Manager’s Manual for Windows NT · August 2004 Page 59
Page 76

Merchandise Products How to Enter Merchandise Product Price Lookups
How to Enter Merchandise Product Price Lookups
Use LOAD PLU or LO PLU to assign prices to products. (PLU stands for price lookup.)
Prices assigned with LOAD PLU appear in the PRINT PRODUCT printout. Prices for
merchandise products can be overridable or non-overridable. If you have a Profit Point POS,
use the PLU price book residen t on the Profi t Point for P LU pricing. You may use the C option
with LOAD PLU.
LOAD PLU (LO PLU)
P* LOAD PLU;C
Product? 11 ↵
Price? $1.05 ↵
Product? 12 ↵
Price? $0.98 ↵
Product? 13 ↵
Price? $4 ↵
P*
• Default Price. You can specify a default price for the product with the LOAD PLU
command. The price can be preceded by a dollar sign but it is not needed.
If you enter a High price with the LOAD PRODUCT command, the user can override the
default price within the range of the low and high price fields.
If you enter 0 as the high price, the conso le user cannot override the price and the product
printout will show -No Override- in the price range fields.
• Manually Entered Price. If you do not enter a price for a product, or enter a price of $0,
the user must always enter the price within the range of the high and low price fields. If
you have a price of $0, you must specify a high price.
↵
Merchandise Product Inventory
Inventory for products is initially disabled. The commands LOAD INVENTORY and ADD
INVENTORY enable inventory recording. You may also use ENABLE PRODUCT to
explicitly enable inventory recording.
Inventory is normally ke pt by it em. You may specify that inventory be kept as a dolla r amount
instead. This is also done with ENABLE PRODUCT.
Inventory amounts appear in the PRINT PRODUCT printout. You can use PRINT
PRODUCT;A to see if inventory is enabled for product.
How to Enter Merchandise Product Inventory
Use the command LOAD INVENTORY or LO IN to load the initial inventory amounts and
the reorder levels for products. Once you have loaded the initial inventory amount, use ADD
INVENTORY or SUBTRACT INVENTORY to adjust the inventory. The amount added or
subtracted will be logged.
LOAD INVENTORY (LO IN)
P* LOAD INVENTORY
Product? 1 ↵
Quantity? 400 ↵
Reorder level? 100 ↵
P*
↵
Page 60 MDE-4315 CFN Series CFN III Manager’s Manual for Windows NT · August 2004
Page 77

How to Enter Merchandise Product Price Lookups Merchandise Products
The quantity will normally be interpr eted as number of items. If typ e 4 has been speci fied with
ENABLE PRODUCT, the quantity will be interpreted as a dollar amount. You may use the C
option with LOAD INVENTORY.
How to Add to Merchandise Product Inventory
Use the command ADD INVENTORY or AD IN to add to the inventory amount for a product .
ADD INVENTORY (AD IN)
P* ADD INVENTORY;C
Product? 2 ↵
Quantity? 500 ↵
Product? 3 ↵
Quantity? 230 ↵
Product? ↵
P*
The quantity will normally be interpr eted as number of items. If typ e 4 has been speci fied with
ENABLE PRODUCT, the quantity will be interpreted as a dollar amount. You may use the C
option with ADD INVENTORY.
↵
How to Subtract from Merchandise Product Inventory
Use the command SUBTRACT INVENTORY or SU IN to subtract from the inventory
amount for a product.
SUBTRACT INVENTORY (SU IN)
P* SUBTRACT INVENTORY;C
Product? 2 ↵
Quantity? 300 ↵
Product? 4 ↵
Quantity? 65 ↵
Product? ↵
P*
↵
The quantity will normally be interpr eted as number of items. If typ e 4 has been speci fied with
ENABLE PRODUCT, the quantity will be interpreted as a dollar amount. You may use the C
option with SUBTRACT INVENTORY.
How to Enable Merchandise Dollar Inventory
To enable inventory recording for a product with dollar inventory rather than item inventory,
use ENABLE PRODUCT and specify type 4 (type 4 tracks inventory in dollars, not units).
There will be a dollar sign before the inventory amount in the PRINT PRODUCT printout.
ENABLE PRODUCT (E PRO)
P* ENABLE PRODUCT
Product Code? 11 ↵
Type? 4 ↵
P*
↵
MDE-4315 CFN Series CFN III Manager’s Manual for Windows NT · August 2004 Page 61
Page 78

Merchandise Products How to Enter Merchandise Product Price Lookups
How to Disable Merchandise Inventory Tracking
Inventory tracking is initially disabled. It is disabled automatically when LOAD
INVENTORY, ENABLE PRODUCT type 5, or ADD INVENTORY is executed.
DISABLE PRODUCT (DI PRO)
P* DISABLE PRODUCT
Product Code? 10 ↵
Type? 5 ↵
P*
T o disabl e inventory tra cking once it has been enable d, use DISABLE PRODUCT and specify
type 5.
↵
Page 62 MDE-4315 CFN Series CFN III Manager’s Manual for Windows NT · August 2004
Page 79

8 – Setting Up Tax Tables
The Three Tax Types
There are three tax types on the Site Controller:
• Each sales tax in most areas can be calculated as a percentage of the price of the items to
which the tax applies. For all or mo st tax perce ntage rates , you are able to simply specify
the tax rate and the rounding rule. Thes e t axe s a re called type 0 on the Site Controller, and
they are the default type.
• Taxes that the law requires to be calculated according to a tax table are type 1.
• Type 2 taxes use a combination of percentage and tax table. The tax on the whole-dollar
amount of the price is calculated by multiplying by the tax’s percentage rate, and then a
table is use d to calcula te the tax on any remaining fraction of a dollar ($.01-.99) of the
price. For example, if the price of an i te m i s $10.4 5, the tax on $10 would be c al cul at ed as
a percentage of $10, and the tax on the 45 cents would be looked up on a tax table by the
Site Controller.
Setting Up Tax Tables
You can conf igure the CFN3 applic ation to r ecog nize u p to e ight d if fer ent t axes, d ependi ng on
what the law in your area requires.
Tax Accumulators
The Site Controller can have up to eight tax accumul at ors , whi ch keep a running total of t axes
collected in up to eight categories. Most sites will probably use only one or two. The tax
percentages are specified in the Site Controller configuration. Taxes are assigned to products
with LOAD PRODUCT. Each time a taxable product is sold, the tax is calculated, charged to
the sale, and credited to the correct tax accumulator.
Cumulative tax totals a re also maintained. The cumulative tax accumulators are reset by
RESET TOTALS;A or RESET TOTALS;I.
How to Enter Tax Accumulator Names
1 Type: LOAD TAX.
LOAD TAX (LO TAX)
P* LOAD TAX
Tax #? 3 ↵
Name? Alc.Tx ↵
P*
↵
2 Enter Tax.
3 Enter Name (limited to seven characters).
The command LOAD TAX with the I option initializes all tax accumulators. All tax names
and amounts are cleared.
MDE-4315 CFN Series CFN III Manager’s Manual for Windows NT · August 2004 Page 63
Page 80

Setting Up Tax Tables
How to Print Tax Accumulators
Use the command PRINT SALES;I 0 or P SA;I 0 to print the tax accumulators.
This will print the amou nt in each tax accumula tor for each shift or day.
P* PRINT SALES;I 0
- Shift 1 from Thu 08/19/04 8:00 AM to Thu 08/19/04 4:00 PM Pr Cat Name Club Debit Credit Cash Total
T1 0 Sale Tx 0.00 0.00 51.31 49.39 100.70
T2 0 Tob. Tx 0.00 0.00 22.97 31.18 54.15
T3 0 Alc. Tx 0.00 0.00 13.33 16.88 30.21
- Totals from Sun 08/22/04 8:00 AM to Thu 08/26/04 4:00 PM Pr Cat Name Club Debit Credit Cash Total
T1 0 Sale Tx 26.00 10.50 251.31 489.39 777.20
T2 0 Tob. Tx 10.88 3.55 112.97 231.18 358.58
T3 0 Alc. Tx 4.20 2.77 113.33 116.84 237.14
P*
PRINT SALES;I 0 (P SA;I 0)
↵
==== ==== ===== ===== ======
0.00 0.00 87.61 97.45 185.06
===== ===== ====== ====== =======
41.08 16.82 477.61 837.41 1372.92
The product number for taxes is shown as the tax number preceded by a T.
How to Reset Cumulative Tax Totals
Cumulative tax totals are automatically reset with other totalizers when the
RESET TOTALS;A or RESET TOTALS;I command is run.
Tax as Percentage
If the tax laws in your area allow type-0 tax calculations for all items-and most
areas do allow this, you do not need to use this chap ter. Inst ea d, refer to the Tax
Rate and Tax Rounding Boundaries parameters on menu 3 of the CONSOLE
configuration program (which is discussed in MDE-4316 CFN III
Configuration Manual) for instructions on setting up a type 0 tax.
For each product you define th rough the LOAD PRODUCT command , you will
use CONSOLE to specify the tax that applies. Tax rates are specified in
hundredths of a percent. For example, a 7.8 percent tax is specified as 780,
though it displays as 7.80.
You can also sp ecify the upwa rd roun din g breakp oint, i n tent hs of a cen t (whic h
is hundredths of a dollar). For example, if taxes are to be rounded up at $.005
and down below $.005, you will use CONSOLE to enter a 5 for the tax round ing
boundary.
Note that tax rates and tax rounding boundaries are ignored if the tax tables are
loaded using the TAX program.
Page 64 MDE-4315 CFN Series CFN III Manager’s Manual for Windows NT · August 2004
Page 81

When to Use Tax Tables Setting Up Tax Tables
When to Use Tax Tables
Setting up tax tables is a complicated procedure, so use tax tables only if the law in your area
requires them. If you are required by your local or state tax laws to use a tax table instead of
tax percentages , read th rough t his ent ire chap ter car efully b efore starti ng to con struct the tabl e;
then come back to the beginning of the chapter and start to work.
For each different tax lookup table the law requires you to use, use the TAX program
explained in this chapter to build a tax table. The table you build through the TAX program is
similar to the kind traditionally used in many point-of-sale (POS) termina ls and cash registers.
You may set up 1-8 different taxes using these tables. Determine how many tax lookup tables
you need to build. Then for each one, follow the instructions in the remainder of this chapter.
MDE-4315 CFN Series CFN III Manager’s Manual for Windows NT · August 2004 Page 65
Page 82

Setting Up Tax Tables How to Set Up a Tax Table
How to Set Up a Tax Table
There are five major steps involved in setting up a tax table:
“1. Prepare a Compressed Description of Tax Data” on page 66
“2. Allot Stora ge Space for Your Tax Information” on page 69
“3. Assign a Tax Number and Name to Each Table” on page 70
“4. Build a Tax Table” on page 70
“5. Back Up Your Tax Data” on page 73
This chapter explains how to complete all those steps. It also explains how to
use TAX to print your tax information and how to update a tax table when tax
rates change.
1. Prepare a Compressed Description of Tax Data
If your local taxing authorities require a tax lookup table, Gasboy or your local
distributor may alre ady have a compressed (short a nd concise) description of it .
Otherwise, use the ins t ructions in this section to compose a compres sed
description of each tax table you will use. (An example of a compressed
description follows item 7 in the list immediately below.)
1 Obtain a complete tax lookup table from the taxing authorities. Using the
instructions in this section, you will examine your tax table and prepare a
compressed description of it. Then you will enter the compressed description
into the CFN3 software.
2 You will need to determine what type of tax table you are using, type 1 or type
2.
• Type 1 taxes are determined from a lookup table only.
• Type 2 breaks the taxable amount into two parts. The first part is a whole
dollar amount, with its tax calcul ated at a percentage, poss ibly rounded. The
second part of the taxable amount is the remainder after the whole dollar
amount is taken out. Its tax is calculated by the table lookup (similar to the
type 1 lookup table). The total tax is the sum of the tax on the two parts.
3 Construct a worksheet fo r the tax table. Include the following columns (refer to
the sample graphic that follows):
From In this column, write the low amount in each range of taxable amounts
Page 66 MDE-4315 CFN Series CFN III Manager’s Manual for Windows NT · August 2004
for which a constant tax amount applies. For example, a customer may
pay a tax of $0.03 on any sales amounts from $0.46 to $0.63. You will
place $0.46 in the From column for that range.
Page 83

How to Set Up a Tax Table Setting Up Tax Tables
To In this column, write the high amount in the range, for example, $0.63 in
the example immediately above.
Tax For each range, write the tax charged on the amounts in the range.
Amt Diff Subtract the From amount of the preceding range from the From amount
of the current range, and write the result in this column.
Tax Diff Subtract the Tax amount on the preceding row from the Tax amount on
the current row, and write the result in this column.
The sample graphic below shows information from a typical tax table. The
columns labeled From, To, and Tax correspond to the columns on a tax table
like those issued by taxing authorities. The columns labeled Amt Diff and Tax
Diff have been calculated from the tax table information. The Tax Diff is
usually a constant. Note that in the sample tab le, it is always $0.01.
Figure 8-1: Sample Tax Table
From To Tax diff diff From To Tax Diff Diff
0.00 0.09 0.00 - - 8.10 8.27 0.45 0.19 0.01
0.10 0.27 0.01 - - 8.28 8.45 0.46 0.18 0.01
0.28 0.45 0.02 0.18 0.01 8.46 8.63 0.47 0.18 0.01
0.46 0.63 0.03 0.18 0.01 8.64 8.81 0.48 0.18 0.01
0.64 0.81 0.04 0.18 0.01 8.82 8.99 0.49 0.18 0.01
0.82 0.99 0.05 0.18 0.01 9.00 9.18 0.50 0.18 0.01
1.00 1.18 0.06 0.18 0.01 9.19 9.36 0.51 0.19 0.01
1.19 1.36 0.07 0.19 0.01 9.37 9.54 0.52 0.18 0.01
1.37 1.54 0.08 0.18 0.01 9.55 9.72 0.53 0.18 0.01
1.55 1.72 0.09 0.18 0.01 9.73 9.90 0.54 0.18 0.01
1.73 1.90 0.10 0.18 0.01 9.91 10.09 0.55 0.18 0.01
1.91 2.09 0.11 0.18 0.01 10.10 10.27 0.56 0.19 0.01
2.10 2.27 0.12 0.19 0.01 10.28 10.45 0.57 0.18 0.01
2.28 2.45 0.13 0.18 0.01 10.46 10.63 0.58 0.18 0.01
2.46 2.63 0.14 0.18 0.01 10.64 10.81 0.59 0.18 0.01
2.64 2.81 0.15 0.18 0.01 10.82 10.99 0.60 0.18 0.01
2.82 2.99 0.16 0.18 0.01 11.00 11.18 0.61 0.18 0.01
3.00 3.18 0.17 0.18 0.01 11.19 11.36 0.62 0.19 0.01
3.19 3.36 0.18 0.19 0.01 11.37 11.54 0.63 0.18 0.01
3.37 3.54 0.19 0.18 0.01 11.55 11.72 0.64 0.18 0.01
3.55 3.72 0.20 0.18 0.01 11.73 11.90 0.65 0.18 0.01
3.73 3.90 0.21 0.18 0.01 11.91 12.09 0.66 0.18 0.01
3.91 4.09 0.22 0.18 0.01 12.10 12.27 0.67 0.19 0.01
4.10 4.27 0.23 0.19 0.01 12.28 12.45 0.68 0.18 0.01
4.28 4.45 0.24 0.18 0.01 12.46 12.63 0.69 0.18 0.01
4.46 4.63 0.25 0.18 0.01 12.64 12.81 0.71 0.18 0.01
4.64 4.81 0.27 0.18 0.01 12.82 12.99 0.72 0.18 0.01
4.82 4.99 0.27 0.18 0.01 13.00 13.18 0.72 0.18 0.01
5.00 5.18 0.28 0.18 0.01 13.19 13.36 0.73 0.19 0.01
5.19 5.36 0.29 0.19 0.01 13.37 13.54 0.74 0.18 0.01
5.37 5.54 0.30 0.18 0.01 13.55 13.72 0.75 0.18 0.01
5.55 5.72 0.31 0.18 0.01 13.73 13.90 0.76 0.18 0.01
5.73 5.90 0.32 0.18 0.01 13.91 14.09 0.77 0.18 0.01
5.91 6.09 0.33 0.18 0.01 14.10 14.27 0.78 0.19 0.01
6.10 6.27 0.34 0.19 0.01 14.28 14.45 0.79 0.18 0.01
6.28 6.45 0.35 0.18 0.01 14.46 14.63 0.80 0.18 0.01
6.46 6.63 0.36 0.18 0.01 14.64 14.81 0.81 0.18 0.01
6.64 6.81 0.37 0.18 0.01 14.82 14.99 0.82 0.18 0.01
6.82 6.99 0.38 0.18 0.01 15.00 15.18 0.83 0.18 0.01
7.00 7.18 0.39 0.18 0.01 15.19 15.36 0.84 0.19 0.01
7.19 7.36 0.40 0.19 0.01 15.37 15.54 0.85 0.18 0.01
7.37 7.54 0.41 0.18 0.01 15.55 15.72 0.86 0.18 0.01
7.55 7.72 0.42 0.18 0.01 15.73 15.90 0.87 0.18 0.01
7.73 7.90 0.43 0.18 0.01 15.91 16.09 0.88 0.18 0.01
7.91 8.09 0.44 0.18 0.01 16.10 16.27 0.89 0.19 0.01
Amt Tax Amt Tax
MDE-4315 CFN Series CFN III Manager’s Manual for Windows NT · August 2004 Page 67
Page 84

Setting Up Tax Tables How to Set Up a Tax Table
4 Complete your worksheet, indicating the amount differences and the tax
differences for each range of taxable amounts.
5 Examine the Amt Diff column on the sample worksheet. Note that there is a
regular pattern. Five $0.18 taxable amount increments are followed by one
$0.19 increment, the n there are four $0.18 inc rements, an d one $0.19 increm ent.
This pattern repeats-or loops-itself eight times. Now examine the Amt Diff
column of your worksheet. Try to find a repeating pattern in the tax amount
increments.
6 Fi nd a repeatin g pattern to the incre ments in th e Tax Diff column (it may be that
they are alw ays the same, as in the sample).
7 Then find a single repeating pattern that accounts for the increments in both Diff
columns. If the in cre ments in the Tax Diff column are not all the same, this may
be more difficult, and the pattern will almost certainly repeat itself less often.
You will use the repeating patterns you find to build the tax table through the
TAX program.
To compose your compressed description, write down:
• The tax number (1-8: defined in configuration).
• The tax type. For tax tables, it is type 1 or 2.
• The method for figuring taxes on amounts that exceed the largest amount in
the table: you can us e a f ixed r ate wi th a r ounding ru le, or you can app ly the
table to the excess amounts.
• The tax inc r ement; almost always 1 cent.
• The smallest taxable amount.
• The formula for determining the individual entries in the table. You do this
by means of three TAX program commands: increment, loop, and end loop.
An increment tells the TAX program an Amt Diff and a Tax Diff and the number
of consecutive times to apply those differences. For example, in the sample
worksheet, the firs t Amt Dif f is 0.18 , and that dif feren ce occurs f ive consecu tive
times. For the sample t abl e, and for mos t ta x ta bles, the tax increment is always
$0.01.
A loop tells the TAX program to repeat the commands within the loop the
number of times you specify. You start a loop with a loop command and end it
with an end loop command. So, when two or more increments occur in a
repeating pattern, you can describe the repeating pattern in terms of a loop.
Loops may be nested-that is, the steps repeated by a loop may include other
loops.
An end loop terminates the last l oop that wa s start ed. Thus, if ther e are two loo p
commands and then an end loop, the end loop will terminate the second loop.
Another end loop is required to terminate the first loop.
Page 68 MDE-4315 CFN Series CFN III Manager’s Manual for Windows NT · August 2004
Page 85

How to Set Up a Tax Table Setting Up Tax Tables
A compressed description of the sample table follows:
• Tax number: 1
• Tax type: 1
• Tax increment: 1 cent
• Smallest taxable amount: $0.10
• Loop 8 times
Increment taxable amount by $0.18 and tax by $0.01 five times
Increment taxable amount by $0.19 and tax by $0.01 one time
Increment taxable amount by $0.18 and tax by $0.01 four times
Increment taxable amount by $0.19 and tax by $0.01 one time
End loop
The sample table is a simple example. In your table, you may have a nonrepeated sequence of increment commands before the first loop. Or, you may
have many loops, or loops within loops. Or, you may have a non-repeated
sequence of increment commands at the end of the table, after all loops are
ended.
Most tax tables should reduce to a compressed description. However, if you
encounter some difficulty, consult your salesman or distributor for help.
2. Allot Storage Space for Your Tax Information
The CFN3 software already ha s ei ght rec o r ds i n it s s tor age space for its 1-8 tax
rates, and it must create additional records for the informat ion in your ta x
tables.
When you have a compressed table description, count the additional records it
will require. Allow one additional record for each of the following:
• The table beginning.
• Each increment command.
• Each loop command.
• Each end-loop command.
• The end of the table.
After you have prepared a compressed description of all your tax tables,
determine the total number of additional records you will need for all of them.
Then add eight to your total. This gives the total number of records you need
for your tax.
You may use up to 200 records for tax. If your total is larger than 200, consult
your ASR or distributor to help you reduce the commands in your compressed
descriptions.
When you have determined the number of records you need, use the TABLE
program to define the n umber of re cords i n tabl e numb er 27, t he tax table (ref er
to MDE-4316 CFN III Configuration Manual for instructions). Be sure your
total includes the orig inal eight r ecords required by the CFN3 software and all
the additional records required for your tax tables.
MDE-4315 CFN Series CFN III Manager’s Manual for Windows NT · August 2004 Page 69
Page 86

Setting Up Tax Tables How to Set Up a Tax Table
3. Assign a Tax Number and Name to Each Table
Use the LOAD TAX command to assign a tax number (1-8) and name for each
table you will use. Be sure you also assign a number and name to each of the
taxes you want the CFN3 software to calculate as percentages with a rounding
factor-that is, those taxes for which you do not need to build a table.
4. Build a Tax Table
The example that follows shows the prompts and user responses to enter the
sample table into the CFN3 software. After entering the compressed
description, the user requests a printed summary of the table, then quits and
saves the table.
Study the sample and compare it with the compressed description to help you
see how to use the TAX program.
If you respond with n at the All tax increments one cent prompt, you will
subsequently be prompted for the tax increment amount after each Increment
how many times? prompt. Otherwise, the command assumes that one cent
applies to all increments.
Note that the printed summary is a representation of the commands (increment,
loop, and end loop) that defined the table.
The Loop Level column shows each loop. A plus sign (+) marks the beginning
and end of the loop, and a dashed vertical line extends over the interior of the
loop. If there were loops nested within loops, other pairs of plus signs and
dashed lines would be printed, indented so they would not overlap.
The Rec Nbr column shows the number of each record in the table.
The Record Type column lists each command in the table.
The Apply Times column shows the number of times the command is to be
applied. For increment com mands, this m eans the numb er of rows for whic h the
specified increments apply. For loops, this means the number of times the
commands inside the loop are to be repeated.
The Amount Increment column sho ws the smallest taxable amount, and for the
increment commands, it shows the increment from the Amt Diff column of the
worksheet.
The Tax Increment column shows the increment from the Tax Diff column of
the worksheet.
Page 70 MDE-4315 CFN Series CFN III Manager’s Manual for Windows NT · August 2004
Page 87

How to Set Up a Tax Table Setting Up Tax Tables
↵
P* TAX
TAX program.
Enter ? for help.
Table status: size = 20 records, used = 8, available = 12
Tax number, P, P#, T, T#, or Q to quit? 1
Tax type, Q to quit, RETURN for same? 1 ↵
New calculation number entered.
Initializing new tax calculation table.
Smallest taxable amount (cents)? 10
Enter command (I, L, E, Q, D, P, M, or S)? L ↵
Loop how many times (0 = until done)? 8 ↵
Enter command (I, L, E, Q, D, P, M, or S)? i ↵
Increment how many times (0 = until done)? 5 ↵
Taxable amount increment (cents)? 18 ↵
All tax increments one cent (Y/N)? y ↵
Enter command (I, L, E, Q, D, P, M, or S)? i ↵
Increment how many times (0 = until done)? 1 ↵
Taxable amount increment (cents)? 19 ↵
Enter command (I, L, E, Q, D, P, M, or S)? i ↵
Increment how many times (0 = until done)? 4 ↵
Taxable amount increment (cents)? 18 ↵
Enter command (I, L, E, Q, D, P, M, or S)? i ↵
Increment how many times (0 = until done)? 1 ↵
Taxable amount increment (cents)? 19 ↵
Enter command (I, L, E, Q, D, P, M, or S)? e ↵
End loop
Enter command (I, L, E, Q, D, P, M, or S)? p
Tax number 1: SALES T
Type 1: table lookup
Loop Rec Record Apply Amount Tax
Level Nbr Type Times Increment Increment
---- --- ----- ----- --------- -------- 1 Initial - $0.10 -+ 2 Loop 8 --- -| 3 Increment 5 $0.18 $0.01
| 4 Increment 1 $0.19 $0.01
| 5 Increment 4 $0.18 $0.01
| 6 Increment 1 $0.19 $0.01
+ 7 End loop - ----- -----
Enter command (I, L, E, Q, D, P, M, or S)? q
End table
Table status: size = 20 records, used = 17, available = 3
Save the updated tax table (Y, N, or P)? y
Tax table saved
Table status: size = 20 records, used = 17, available = 3
Tax number, P, P#, T, T#, or Q to quit? q
P*
TAX
↵
↵
↵
↵
↵
↵
TAX Program: Options and Arguments
You can use several options and ar guments with TAX when you initially run the
program. The table below shows the options preceded by a semicolon and the
arguments preceded by a dash.
To enter an option, type a semicolon, then the option letter. To enter an
argument, type a space, then a dash, then the argument character. Options and
arguments for TAX are not case sensitive. That means you may type them in
uppercase or lowercase. They are shown below in uppercase.
MDE-4315 CFN Series CFN III Manager’s Manual for Windows NT · August 2004 Page 71
Page 88

Setting Up Tax Tables How to Set Up a Tax Table
Option Effect
;I CAUTION: Do not use this option after you have entered tax information you want to save. It initializes
-P Used with this argument, TAX prints a summary of all taxes whose names have been loaded with LOAD
-R Used with this argument, TAX prints all information from the tax rate table in a raw form suitable for the
-? Used with this argument, TAX runs in tutorial mode. When any prompt is displayed for the first time, it is
the tax tables-that is, it erases all the tax information. All taxes become type 0 (rate tables rather than
lookup tables), but tax numbers and names remain unchanged. The program prompts you to confirm
that you want to initialize, then it erases the tax information and quits.
TAX.
RESTORE command to use in restoring the tax table. The standard command file SYSBACK calls TAX
with this argument. Normally, you will not use this argument.
preceded by its help message. You can print the help message again by entering a question mark (?) in
response to the prompt when it appears again. This mode is useful if you have not run TAX many times.
If you specify an option not on thi s li st , TAX will print Invalid option and quit. If you specify
an argument not on this list, it will print a list of valid options and arguments, then quit.
When you are ready to build your tax table, use the TAX program. The following paragraphs
list the prompts that TAX displays and explains how to respond to them.
Tax number, P, P#, T, T#, or Q to quit?
• Enter a tax number to create or edit a table for that tax code number. (Remember that you
must already have assigned, with the LOAD TAX command, the number you enter to
create a new table.) If you enter a tax number, the next prompt appears.
• Enter P to print a summary of all taxes whose names have been loaded with LOAD TAX.
The summa ry is the same report tha t prints if yo u use the -P argument with the TAX
program.
• Enter P# to print a summary of the specified tax (specify the tax’s number in place of the #
sign).
• Enter T to print a tax table. Then, in response to the next prompt, enter the number of the
table you want to print. You can compare this printout with the tax ta ble you o btained from
the taxing authorities or a bank to verify that the tax has been entered correctly.
• Enter T# to prin t a table of the specified tax (specify the table’s number in place of th e #
sign).
• To exit the program, enter Q or press RETURN.
Tax type, Q to quit, RETURN for same?
• Enter 0, 1, or 2 to specify the tax type for the tax number you entered. The default is zero.
• 0 (zero) indicates a tax rate with rounding. If the tax number you specified had been
defined as a type 1 or 2, entering a zero here redefines it as a type 0. For taxes of type 0,
TAX does not do anything other than set tax type and table maximum.
• 1 (one) indicates a table created through a compressed description (as explained in this
chapter). The program continues the prompts through Smallest taxable amount (cents)?
Then it begins at the point where it was when you last entered data for the table. You can
add commands to the end of the table or delete commands from the end of the table.
• 2 (two) indicates a tax that is calculated as a percentage of the whole dollar amount, and
then uses a lookup table for any remaining cents
Press RETURN to use the same type-that is, to indica te you are not changing the t ax t ype .
If the tax number is type 0, the program returns to the first prompt. Zero is the default type,
so if you have not defined the tax number as a type 1 or 2, it is a type 0.
• To exit the program, enter Q.
Page 72 MDE-4315 CFN Series CFN III Manager’s Manual for Windows NT · August 2004
Page 89

How to Set Up a Tax Table Setting Up Tax Tables
Enter command (I, L, E, Q, D, P, M, or S)?
This prompt will be repeated until you enter Q to quit. Enter the commands, in order, that
define the compressed description of your tax table. Each command you enter causes the
program to ask for other information:
• Enter I to give an increment command. You will be prompted for the number of times the
increment applies and the taxable amount increment (Amt Diff on your worksheet).
• Enter L to start a loop. You will be prompted for the number of times to repeat the
commands that occur before the end loop command. (The program will not allow you to
quit until you end all the loops you start.)
• Enter E to end the last loop that was started.
• Enter Q to quit the program. You will be asked whether or not you want to save the
changes you have made to the table . You may respond with Y to save the changes, N not to
save the changes, or P to print t he curre nt table definit ion so y ou can decide whe ther or not
to save it. (Remember, you cannot quit if there are loops that have been started but not
ended.)
• Enter D to delete the last command you e ntered, in cludin g your respon ses to the c ommand
prompts. If you enter D again, the previous command is deleted. You can continue
entering D until you delete as many entries as you wish, back to the Smallest taxable
amount prompt.
• Enter P to print the curren t tabl e defini tion so you can revie w it. Ref er back t o the exampl e
for a sample printout of the table definition.
• Enter M to modify a record. You will be asked for the number of the record t o be
modified, then you can change that record’s smallest taxable amount.
• Enter S to see a display of the table ’s status showing the record size and the number of
records used and available.
If you want to quit the program without saving any changes or ending your loops, use ^C
(press and hold the CTRL key, then press C).
5. Back Up Your Tax Data
After you have used the TAX program to enter a tax table, run SYSBACK to back up the data.
MDE-4315 CFN Series CFN III Manager’s Manual for Windows NT · August 2004 Page 73
Page 90

Setting Up Tax Tables How to Set Up a Tax Table
Page 74 MDE-4315 CFN Series CFN III Manager’s Manual for Windows NT · August 2004
Page 91

Reports, Cash Drawer and Shifts
9 – Reports, Cash Drawer and Shifts
Note: The material covered in this chapter is not the same as the material in
the Point of Sale and Shift Change manual. For example, the reports
discussed in this chap ter conta in dollar and quantity amoun ts of fuel and
merchandise; the Point of Sale and Shift Change reports include
everything that occurred at a site during a shift or day.
Note: The following similar commands are not identical in their functions:
NEXT SHIFT and NEXTSHFT, NEXT DAY and NEXTDAY, LOAD
DRAWER and LDDRAWER, ADD DRAWER and ADDDRAWER.
Reports
The Site Con troller maintains sales totals for the last three shifts, the current
shift, dail y totals for t he current and previous days, and cumulative totals.
The shift totals are changed when a shift change is entered with the LOAD
SHIFT, NEXT SHIFT, and NEXT DAY commands. Up to a total of nine shifts
can be loaded.
The daily totals are reset with the RESET TOTALS command. This command
moves the cu rrent daily totals to the previous day’s totals.
The daily, cumulative, and shift totals are reset to zero with the A option
(RESET TOTALS;A). The I option (RESET TOTALS;I) resets only the
cumulative totals to zer o.
Each transaction is entered in three places: daily totals, c urrent shift totals, and
cumulative totals. See the chart below.
The cumula tive, current day, and current shift to tals are running totals, and
they are added to whenever a sale takes place. All other totals are buffered
totals. The RESET TOTALS command resets the buffered totals to zero.
Cash drawer totals are also kept for one day’s worth of shifts plus the current
shift. Sales totals and cash drawer totals are usually pri nted at shif t-change
time, but they can be printed at any time, since the totals are available until the
next day’s shifts.
Figure 9-1 shows the relationships between the various types of totals.
MDE-4315 CFN Series CFN III Manager’s Manual for Windows NT · August 2004 Page 75
Page 92

Reports, Cash Drawer and Shifts
Figure 9-1: Relationship Between Various Types of Totals
Transactions
Daily
Day
RE TO;A
RE TO;A
RE TO
NE DAY
Previous
How to Print Sales Reports
Use the command PRINT SALES or P SA to print the total cash, debit, club, and credit sales
in dollars from the time the total was last reset. The shift, daily, and cumulative totals can be
printed with the command PRINT SALES.
The default printout format includ es the current-shift totals and the cumulative totals, which
are the totals since you last used the RESET TOTALS;A or RESET TOTALS;I command.
(The examples in this chapter assume that the RESET TOTALS;A command is used every 24
hours or so.)
RE TO;A
RE TO;A
RE TO;A
RE TO;A
Current
Shift
LO SH
Previous
Shift 1
Previous
Shift 2
Previous
Shift 3
NE SH
*RE TO
Cumulative
* if configured
RE TO;A
RE TO;I
Products that have zero amounts all the way across are not displayed. Also, totals are not
shown for subcategories that have only one entry.
Note: In the printouts, the product names in the PRODUCT column are the names assigned
the product codes with the command LOAD PRODUCT. Product codes are assigned to
tanks with the command LOAD TANK. Product codes are assigned to pumps or hoses
with the command LOAD FUEL. Product names and tank assignments in the examples
may be different from those in your system
Page 76 MDE-4315 CFN Series CFN III Manager’s Manual for Windows NT · August 2004
Page 93

Reports, Cash Drawer and Shifts
PRINT SALES (P SA)
P* PRINT SALES
----- Shift 1 from Sun 8/15/04 7:51 AM to Sun 8/22/04 6:34 PM ----Pr Cat Name Club Debit Credit Cash Total
1 1 Regular 87.89 56.45 89.12 99.25 332.71
2 1 Unleaded 151.77 96.34 111.56 120.32 479.99
3 1 Premium 138.36 83.68 108.95 119.59 450.58
4 1 Diesel 160.16 112.26 180.24 207.69 660.35
5 2 Candy 22.43 12.18 18.97 19.67 73.25
6 2 Dairy 21.18 14.97 19.40 20.43 75.98
7 2 Bread 14.21 12.33 9.78 10.14 46.46
8 2 Soda 25.18 23.26 28.99 21.87 99.30
----- Totals from Sat 8/21/04 6:59 PM to Sun 8/22/04 6:35 PM -----
Pr Cat Name Club Debit Credit Cash Total
1 1 Regular 240.03 114.21 183.94 168.34 706.52
2 1 Unleaded 305.75 182.14 211.00 243.46 942.35
3 1 Premium 242.54 161.23 221.32 209.59 834.68
4 1 Diesel 326.87 224.98 362.65 402.69 1317.19
5 2 Candy 44.16 25.99 36.14 38.89 145.18
6 2 Dairy 41.35 28.75 37.76 42.38 150.24
7 2 Bread 29.56 25.87 36.90 22.18 114.51
8 2 Soda 51.12 26.52 57.31 42.19 177.14
P*
↵
------ ------ ------ ------ ------
538.18 348.73 489.87 546.85 1923.63
----- ----- ----- ----- ------
83.00 62.74 77.14 72.11 294.99
====== ====== ====== ====== =======
621.18 411.47 567.01 618.96 2218.62
------ ------ ------ ------ -------
1115.19 682.56 978.91 1024.08 3800.74
------ ------ ------ ------ ------
166.19 107.13 168.11 145.64 587.07
1281.38 789.69 1147.02 1169.72 4387.81
======= ====== ======= ======= =======
The command PRINT SALES with the A option prints dollar totals for the
period you request. The periods are (use the letters and numbers shown in
parentheses to specify the period):
• Current shift (C)
• Previous shifts (123)
• Today’s daily totals (totals since last reset with RESET TOTALS or
NEXT DAY) (D)
• Yesterday’s daily totals (Y)
• Cumulative totals (totals since last reset with RESET TOTALS;A or
RESET TOTALS;I) (T)
• Cumulative totals at last day-change (totals at last RESET TOTALS or
NEXT DAY) (P, if configured). This function is useful at day changes so
you do not have to stop the site to obtain cumulative totals.
You can request to tals for any co mbination of up t o seven periods . If you do not
specify a period on the command line, the prompt Which totals? will be
printed. Enter the per iods you want in respo nse to the prompt. Totals for periods
will be printed in the order they were requested:
MDE-4315 CFN Series CFN III Manager’s Manual for Windows NT · August 2004 Page 77
Page 94

Reports, Cash Drawer and Shifts
PRINT SALES;A 1D prints the totals for the previous shift 1 and the current
daily totals.
PRINT SALES;A 123C prints the totals for the previous shifts 1, 2, and 3, and
the current shift.
You can use ranges with the PRINT SALES command to print information for
specified products for the current shift and the cumulative total since you last
RESET TOTALS;A or RESET TOTALS;I.
P* PRINT SALES 1-4 ↵
----- Shift 1 from Sun 7/18/99 7:51 AM to Sun 7/18/99 6:34 PM ----Pr Cat Name Club Debit Credit Cash Total
1 1 Regular 17.00 0.00 0.00 18.25 35.25
2 1 Unleaded 0.00 0.00 0.00 18.55 18.55
3 1 Premium 38.36 0.00 0.00 9.59 47.95
4 1 Diesel 19.22 0.00 0.00 7.69 26.91
---- Totals from Sat 7/17/99 12:59 PM to Sun 7/18/99 6:35 PM ----Pr Cat Name Club Debit Credit Cash Total
1 1 Regular 118.03 4.21 13.94 68.34 204.52
2 1 Unleaded 5.75 2.14 1.00 43.46 52.35
3 1 Premium 42.54 0.00 0.00 9.59 52.13
4 1 Diesel 26.87 0.00 0.00 7.69 34.56
====== ==== ===== ====== =======
P*
====== ===== ===== ===== =======
74.58 0.00 0.00 54.08 128.66
193.19 6.35 14.94 129.08 343.56
You can use the I option and ran ges with PRINT SALES to print info rmation for
specified categories instead of for products.
P* PRINT SALES;I 2 ↵
----- Shift 1 from Sun 7/18/99 7:51 AM to Sun 7/18/99 6:34 PM ----Pr Cat Name Club Debit Credit Cash Total
5 2 Candy 22.43 12.18 18.97 19.67 73.25
6 2 Dairy 21.18 14.97 19.40 20.43 75.98
7 2 Bread 14.21 12.33 9.78 10.14 46.46
8 2 Soda 25.18 23.26 28.99 21.87 99.30
----- Totals from Sat 7/17/99 12:59 PM to Sun 7/18/99 6:35 PM ----Pr Cat Name Club Debit Credit Cash Total
5 2 Candy 44.16 25.99 36.14 38.89 145.18
6 2 Dairy 41.35 28.75 37.76 42.38 150.24
7 2 Bread 29.56 25.87 36.90 22.18 114.51
8 2 Soda 51.12 26.52 57.31 42.19 177.14
P*
====== ===== ===== ===== =======
83.00 62.74 77.14 72.11 249.99
====== ====== ====== ====== =======
166.19 107.13 168.11 145.64 587.07
You can use PRINT SALES with any combination of the A option and the I
option and ranges, to print sales totals for specified periods and products or
categories. Separate the periods and the ranges of products or categories with a
comma. For example:
Page 78 MDE-4315 CFN Series CFN III Manager’s Manual for Windows NT · August 2004
Page 95

PRINT SALES;AI 3,2 prints sales totals for previous shift 3, category 2;
PRINT SALES;AI YD,1-5 prints yesterday’s and today’s daily sales totals for categories 1
through 5; and
PRINT SALES;A 123,1-5 prints sales totals for the previous shifts 1, 2, and 3 for products 1
through 5.
How to Print Quantity Reports
Use the command PRINT QUANTITY or P QU to display sales in terms of quantity sold.
Quantities sold are catego ri zed by method of payment and kept by shift, current day, previous
day, and cumulative. Quantities are printed in hundredths of a unit.
PRINT QUANTITY can be used with the same opti ons and ar guments a s PRINT SALES. The
default printout format includes the current shift totals and the cumulative totals.
PRINT QUANTITY (P QU)
P* PRINT QUANTITY
----- Shift 1 from Sun 7/18/99 7:51 AM to Sun 7/18/99 6:34 PM ----Pr Cat Name Club Debit Credit Cash Total
1 1 Regular 87.89 56.45 89.12 99.25 332.71
2 1 Unleaded 151.77 96.34 111.56 120.32 479.99
3 1 Premium 138.36 83.68 108.95 119.59 450.58
4 1 Diesel 160.16 112.26 180.24 207.69 660.35
5 2 Candy 22.00 12.00 18.00 19.00 71.00
6 2 Dairy 21.00 14.00 19.00 20.00 74.00
7 2 Bread 14.00 12.00 9.00 10.00 46.00
8 2 Soda 25.00 23.00 28.00 21.00 97.00
----- Totals from Sat 7/17/99 6:59 PM to Sun 7/18/99 6:35 PM -----
Pr Cat Name Club Debit Credit Cash Total
1 1 Regular 240.03 114.21 183.94 168.34 706.52
2 1 Unleaded 305.75 182.14 211.00 243.46 942.35
3 1 Premium 242.54 161.23 221.32 209.59 834.68
4 1 Diesel 326.87 224.98 362.65 402.69 1317.19
5 2 Candy 44.00 25.00 36.00 38.00 143.00
6 2 Dairy 41.00 28.00 37.00 42.00 148.00
7 2 Bread 29.00 25.00 36.00 22.00 112.00
8 2 Soda 51.00 26.00 57.00 42.00 176.00
P*
↵
------ ------ ------ ------ ------
538.18 348.73 489.87 546.85 1923.63
621.18 409.73 563.87 618.85 2211.63
1280.19 786.56 1144.91 1168.08 4379.74
====== ====== ====== ====== ======
------ ------ ------ ------ ------
1115.19 682.56 978.91 1024.08 3800.74
------ ------ ------ ------ ------
165.00 104.00 166.00 144.00 579.00
======= ====== ====== ====== ======
Reports, Cash Drawer and Shifts
----- ----- ----- ----- ------
83.00 61.00 74.00 70.00 288.00
The command PRINT QUANTITY with the A option prints quanti ty to tals for the period you
request. The periods are (use the letters and numbers shown in parentheses to specify the
period):
• Current shift (C).
• Previous shifts (123).
• Today’s daily totals (totals since last reset with RESET TOTALS or NEXT DAY) (D).
• Yesterday’s daily totals (Y).
• Cumulative totals (totals since last reset with RESET TOTALS;A or RESET TOTALS;I)
(T).
MDE-4315 CFN Series CFN III Manager’s Manual for Windows NT · August 2004 Page 79
Page 96

Reports, Cash Drawer and Shifts
• Cumulative totals at last day-change (total s at la st RESET TOTALS or NEXT DAY) (P, if
configured). This function is useful at day changes so you do not have to stop the site to
obtain cumulative totals.
You can request totals for any combination of up to seven periods. If you do not specify a
period on the command line, the prompt Which totals? will be printed. Enter the periods you
want in response to the prompt. Totals for periods will be printed in the order they were
requested:
PRINT QUANTITY;A 1D prints the totals for the previous shift 1 and the current daily totals.
PRINT QUANTITY;A 123C prints the totals for the previous shifts 1, 2, and 3, and the current
shift.
You can use ranges with the PRINT QUANTITY command to print information for specified
products.
P* PRINT QUANTITY 1-4 ↵
----- Shift 1 from Sun 7/18/99 7:51 AM to Sun 7/18/99 6:34 PM ----Pr Cat Name Club Debit Credit Cash Total
1 1 Regular 17.00 0.00 0.00 18.25 35.25
2 1 Unleaded 0.00 0.00 0.00 18.55 18.55
3 1 Premium 38.36 0.00 0.00 9.59 47.95
4 1 Diesel 19.22 0.00 0.00 7.69 26.91
---- Totals from Sat 7/17/99 12:59 PM to Sun 7/18/99 6:35 PM ----Pr Cat Name Club Debit Credit Cash Total
1 1 Regular 118.03 4.21 13.94 68.34 204.52
2 1 Unleaded 5.75 2.14 1.00 43.46 52.35
3 1 Premium 42.54 0.00 0.00 9.59 52.13
4 1 Diesel 26.87 0.00 0.00 7.69 34.56
====== ==== ===== ====== =======
P*
====== ===== ===== ===== =======
74.58 0.00 0.00 54.08 128.66
193.19 6.35 14.94 129.08 343.56
You can use the I option and ranges with PRINT QUANTITY to print information for
specified categories instead of for products.
P* PRINT QUANTITY;I 2 ↵
----- Shift 1 from Sun 7/18/99 7:51 AM to Sun 7/18/99 6:34 PM ----Pr Cat Name Club Debit Credit Cash Total
5 2 Candy 22.43 12.00 18.00 19.00 71.00
6 2 Dairy 21.18 14.00 19.00 20.00 74.00
7 2 Bread 14.21 12.00 9.00 10.00 46.00
8 2 Soda 25.18 23.00 28.00 21.00 97.00
----- Totals from Sat 7/17/99 12:59 PM to Sun 7/18/99 6:35 PM ----Pr Cat Name Club Debit Credit Cash Total
5 2 Candy 44.00 25.0 36.00 38.00 143.00
6 2 Dairy 41.00 28.00 37.00 42.00 148.00
7 2 Bread 29.00 25.00 36.0 22.00 112.00
8 2 Soda 51.00 26.00 57.00 42.00 176.00
P*
====== ===== ===== ===== =======
83.00 61.00 74.00 70.00 288.00
====== ====== ====== ====== =======
165.00 104.00 166.00 144.00 587.00
You can use PRINT QUANTITY with any combination of the A option and the I option and
ranges, to print quantity totals for specified periods and products or categories. Separate the
Page 80 MDE-4315 CFN Series CFN III Manager’s Manual for Windows NT · August 2004
Page 97

periods and the ranges of products or categories with a comma. For example:
PRINT QUANTITY;AI 3,2 prints quantity totals for previous shift 3, category
2;
PRINT QUANTITY;AI YD,1-5 prints yesterday’s and today’s dai ly quan ti ty
totals for categories 1 through 5; and
PRINT QUANTITY;A 123,1-5 print s quantity tota ls for the prev ious shifts 1, 2,
and 3 for products 1 through 5.
PRINT QUANTITY does not display products that have zero amounts all the
way across, or show totals for subcategories that have only one entry shown.
How to Print Quantity and Dollar Totals
Use the command PRINT TOTALS or P TO to print quantity and dollar totals
by product. The plain command prints the current shift and cumulative totals.
PRINT TOTALS (P TO)
P* PRINT TOTALS
----- Shift 1 from Sun 7/18/99 7:51 AM to Sun 7/18/99 6:34 PM ----Pr Cat Name Quantity $ Total
1 1 Regular 38 35.25
2 1 Unleaded 21 18.55
3 1 Premium 47 47.95
4 1 Diesel 38 26.91
5 2 Cigs 0 0.00
6 2 Tires 0 0.00
7 2 Bread 0 0.00
8 2 Soda 0 0.00
==== =====
----- Totals from Sat 7/17/99 12:59 PM to Sun 7/18/99 6:35 PM ----Pr Cat Name Quantity $ Total
1 1 Regular 224 204.52
2 1 Unleaded 57 52.35
3 1 Premium 52 52.13
4 1 Diesel 43 34.56
---- -----
5 2 Cigs 0 0.00
6 2 Tires 0 0.00
7 2 Bread 0 0.00
8 2 Soda 0 0.00
P*
↵
--- ----144 128.66
--- --- 0 0.00
144 128.66
376 343.56
---- ---- 0 0.00
==== ======
376 343.56
Reports, Cash Drawer and Shifts
The command PRINT TOTALS with the A option prints quantity and dollar
totals for the period you request. The periods are (use the letters and numbers
shown in parentheses to specify the period):
• Current shift (C).
• Previous shifts (123).
• Today’s dail y totals (totals since last r ese t with RESET TOTALS or NEXT
DAY) (D).
• Yesterday’s daily totals (Y).
MDE-4315 CFN Series CFN III Manager’s Manual for Windows NT · August 2004 Page 81
Page 98

Reports, Cash Drawer and Shifts
• Cumulative totals (totals since last reset with RESET TOTALS;A or
• Cumulative totals at last day-change (totals at last RESET TOTALS or
You can request total s for any combi natio n of up to seven per iods. If you do not
specify a period on the command line, the prompt Which totals? will be printed.
Enter the periods you want in response to the prompt. Totals for periods will be
printed in the order they were requested. Fo r example:
PRINT TOTALS;A 1D prints the totals for the previous shift 1 and the current
daily totals.
PRINT TOTALS;A 123C prints the total s for the previ ous shifts 1, 2, and 3, and
the current shift.
You can use ranges with the PRINT TOTALS command to print specific
product information.
RESET TOTALS;I) (T).
NEXT DAY) (P, if configured). This function is useful at day changes so
you do not have to stop the site to obtain cumulative totals.
P* PRINT TOTALS 1-4 ↵
----- Shift 1 from Sun 8/15/04 7:51 AM to Sun 8/15/04 6:34 PM ----Pr Cat Name Quantity $ Total
1 1 Regular 38 35.25
2 1 Unleaded 21 18.55
3 1 Premium 47 47.95
4 1 Diesel 38 26.91
----- Totals from Sat 8/14/04 12:59 PM to Sun 8/15/04 6:35 PM ----Pr Cat Name Quantity $ Total
1 1 Regular 224 204.52
2 1 Unleaded 57 52.35
3 1 Premium 52 52.13
4 1 Diesel 43 34.56
---- -----
P*
--- ----144 128.66
376 343.56
You can use the I option and ranges with PRINT TOTALS to print information
for specified categories instead of for products.
Page 82 MDE-4315 CFN Series CFN III Manager’s Manual for Windows NT · August 2004
Page 99

Reports, Cash Drawer and Shifts
P* PRINT TOTALS;I 2 ↵
----- Shift 1 from Sun 8/15/04 7:51 AM to Sun 8/15/04 6:34 PM ----Pr Cat Name Quantity $ Total
5 2 Cigs 0 0.00
6 2 Tires 0 0.00
7 2 Bread 0 0.00
8 2 Soda 0 0.00
==== =====
----- Totals from Sat 8/14/04 12:59 PM to Sun 8/15/04 6:35 PM ----Pr Cat Name Quantity $ Total
5 2 Cigs 0 0.00
6 2 Tires 0 0.00
7 2 Bread 0 0.00
8 2 Soda 0 0.00
P*
00.00
==== ======
00.00
You can use PRINT TOTALS with any combinations of the A option and the I
option and ranges, to print quantity and dollar totals for specified periods and
products or categories. Separate the periods and the ranges of products or
categories with a comma. For example:
PRINT TOTALS;AI 3,2 prints q uantity and dollar totals for previous shift 3,
category 2;
PRINT TOTALS;AI YD,1-5 prints yesterday’s and today’s daily quantity and
dollar totals for categories 1 through 5; and
PRINT TOTALS;A 123,1-5 prints quantity and dollar totals for the previous
shifts 1, 2, and 3 for products 1 through 5.
How to Print a Sales Summary Report
The PRINT SUMMARY or P SU command pr ints a short ened form of the sales
report. This format includes only dollar totals by type of payment.
This repor t is generated from the same inform ation used i n the PRINT SALES
and PRINT TOTALS commands and is also affected by the RESET TOTALS
and LOAD SHIFT commands.
The command PRINT SUMMARY with no options prints the current shift and
cumulative totals.
MDE-4315 CFN Series CFN III Manager’s Manual for Windows NT · August 2004 Page 83
Page 100

Reports, Cash Drawer and Shifts
P* PRINT SUMMARY
- Shift 1 from Sun 8/15/04 5:51 PM to Sun 8/15/04 6:35 PM Club Debit Credit Cash Total
74.58 0.00 0.00 54.08 128.66
- Totals from Sat 8/14/04 12:59 PM to Sun 8/15/04 6:35 PM Club Debit Credit Cash Total
193.19 6.35 14.94 129.08 343.56
P*
You can use the A option with the PRINT SUMMARY command to specify the
periods to summarize. You can also specify products—or categories, with the I
option—to summarize. These options work like they do with the PRINT
SALES and PRINT TOTALS commands:
PRINT SUMMARY;A 1D prints a totals summary for the previous shift 1 and
the current daily totals.
PRINT SUMMAR Y;A 123C prints a totals summary fo r the pr evious s hifts 1 , 2,
and 3, and the current shift.
PRINT SUM MARY;A DT prints a totals summary f or the current daily totals
and the cumulative totals.
PRINT SUMMARY 1-4 prints a totals summary for the current shift and the
cumulative totals for products 1 through 4.
PRINT SUMMARY;AI D,2 prints a tota ls summary for the daily totals for
category 2.
PRINT SUMMARY (P SU)
↵
How to Reset Sales Totals
The command RESET TOTALS or RE TO resets the daily totals. It moves
today’s totals to yesterday, clears today’s totals, and marks the begin time for
each product and payment type. If so configured, the command also moves the
running cum ulative to tals to the previous shift 3, where the totals are buffered.
RESET TOTALS affects the daily totals printed by PRINT SALES, PRINT
TOTALS, PRINT SUMMARY, PRINT QUANTITY, and PRINT DRAWER.
Execute this command daily, at the beginning of the daily accounting period.
RESET TOTALS (RE TO)
P* RESET TOTALS
Verify (y/n)? Y ↵
P*
Use the command RESET TOTALS;A or RE TO;A to reset the daily, previous
shift, and cumulative sales totals (including tax totals) to zero. It also sets the
shift to one and clears totals.
Y ou mig ht use this co mmand to reset the cumul ative total at the beginning of the
fiscal year, for example. (The maximum total the Site Controller can
accommodate is $999,999.99, then it starts at zer o agai n.)
↵
Page 84 MDE-4315 CFN Series CFN III Manager’s Manual for Windows NT · August 2004
 Loading...