

Page 1

Reltima
Driver/Dispatch
User Guide
The Garmin PND Interface
Page 2
Garmin & The Driver/Dispatch System
The Driver/Dispatch system gives a Teluware user the ability to
communicate with a Garmin Personal Navigation Device (PND). This
communication occurs by sending a route of stops to the device from the
Teluware routing module or sending messages to the PND from either the
routing or messaging modules in our application. This extremely user-
friendly process is detailed in the ‘Help” section of the Teluware GPS fleet
management application. The purpose of this guide is to detail what it all
looks like from the driver end – while actually viewing the PND. We will
also cover the mechanics of entering & sending a message and using the
Garmin PND to get directions to self-entered stops as well. Please read on
to review the process by which we use this very useful dispatch tool.
Page 3
Receiving Routes & Messages
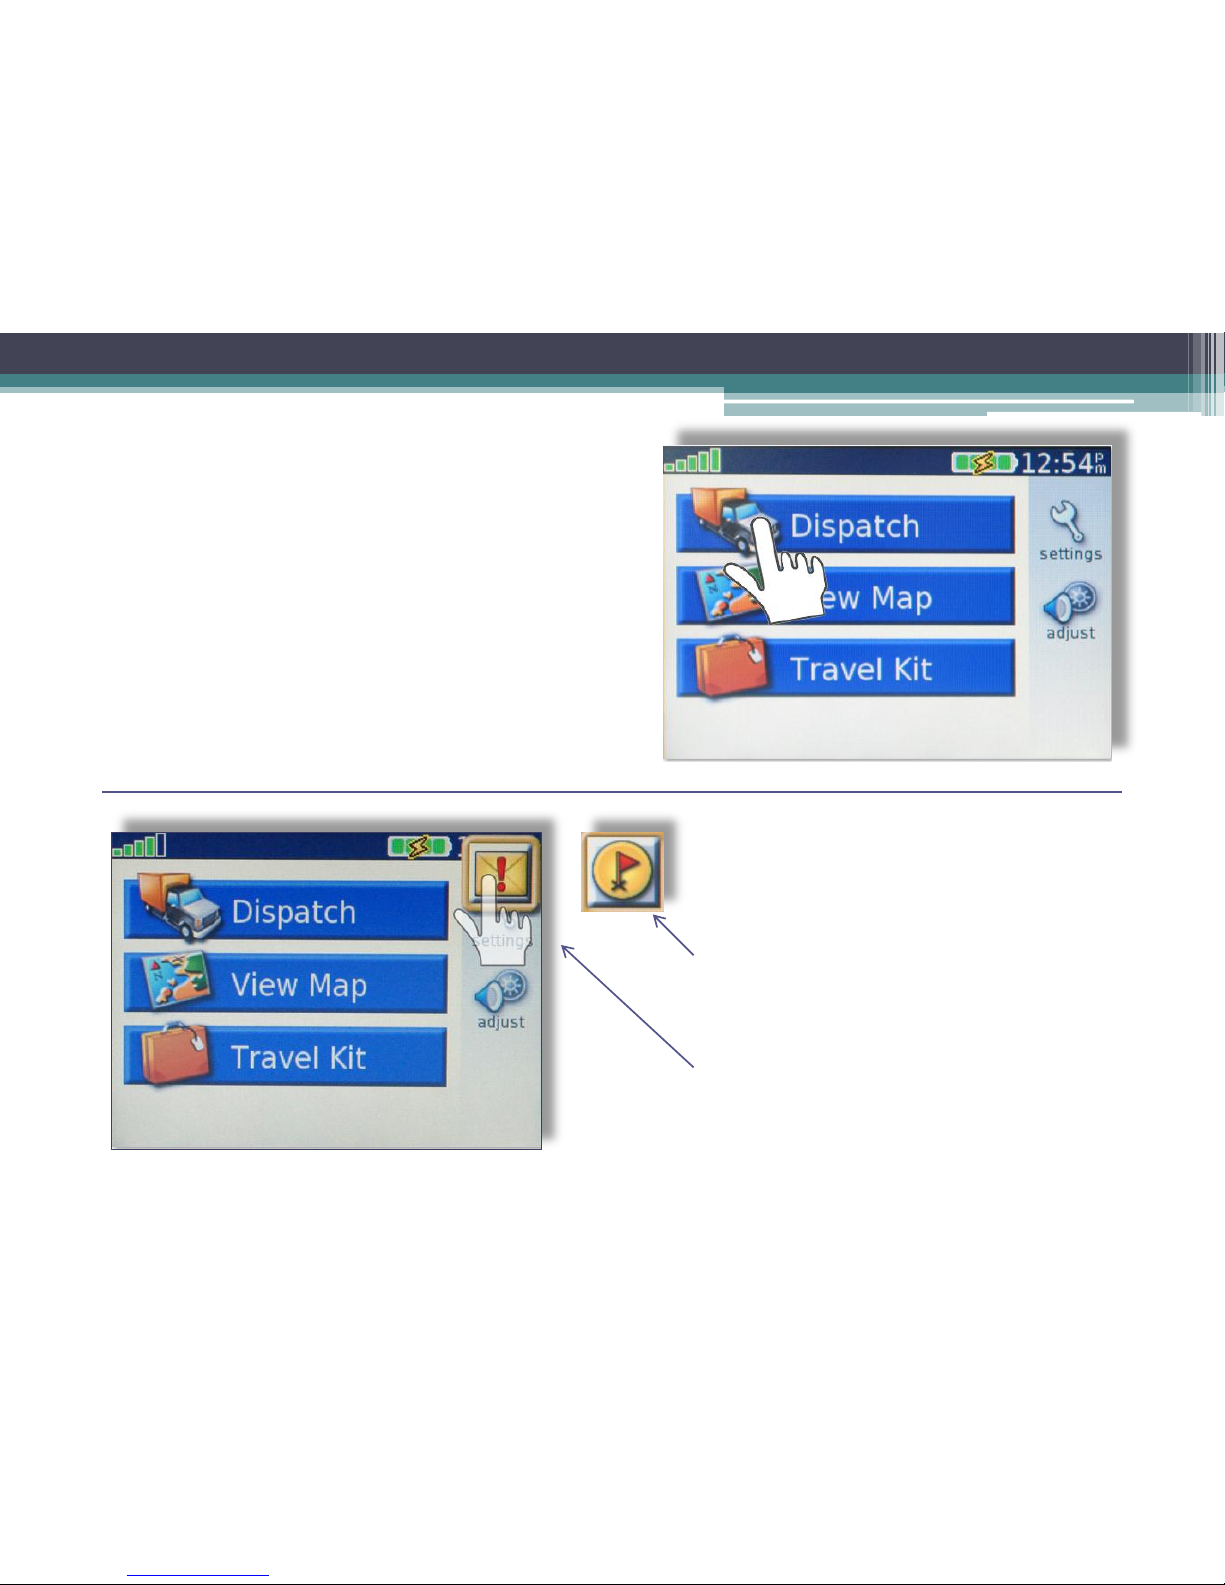
Shown to the right is the default screen
seen when using the PND if no route or
message has been sent. Simply press the
dispatch button to enter an address or
location to get directions to.
If a route or message is dispatched to
the PND you will see the appearance
of the following icons. You will hear the
chime when the icon appears.
• The appearance of a flag signifies
that a route has been sent to the
device. Simply tap the flag and the
route will load.
• The appearance of letter with an
exclamation point signifies that a
message is to be read. Tap the icon to
see the message.
Page 4
Routing & Messaging – Accepting dispatched route
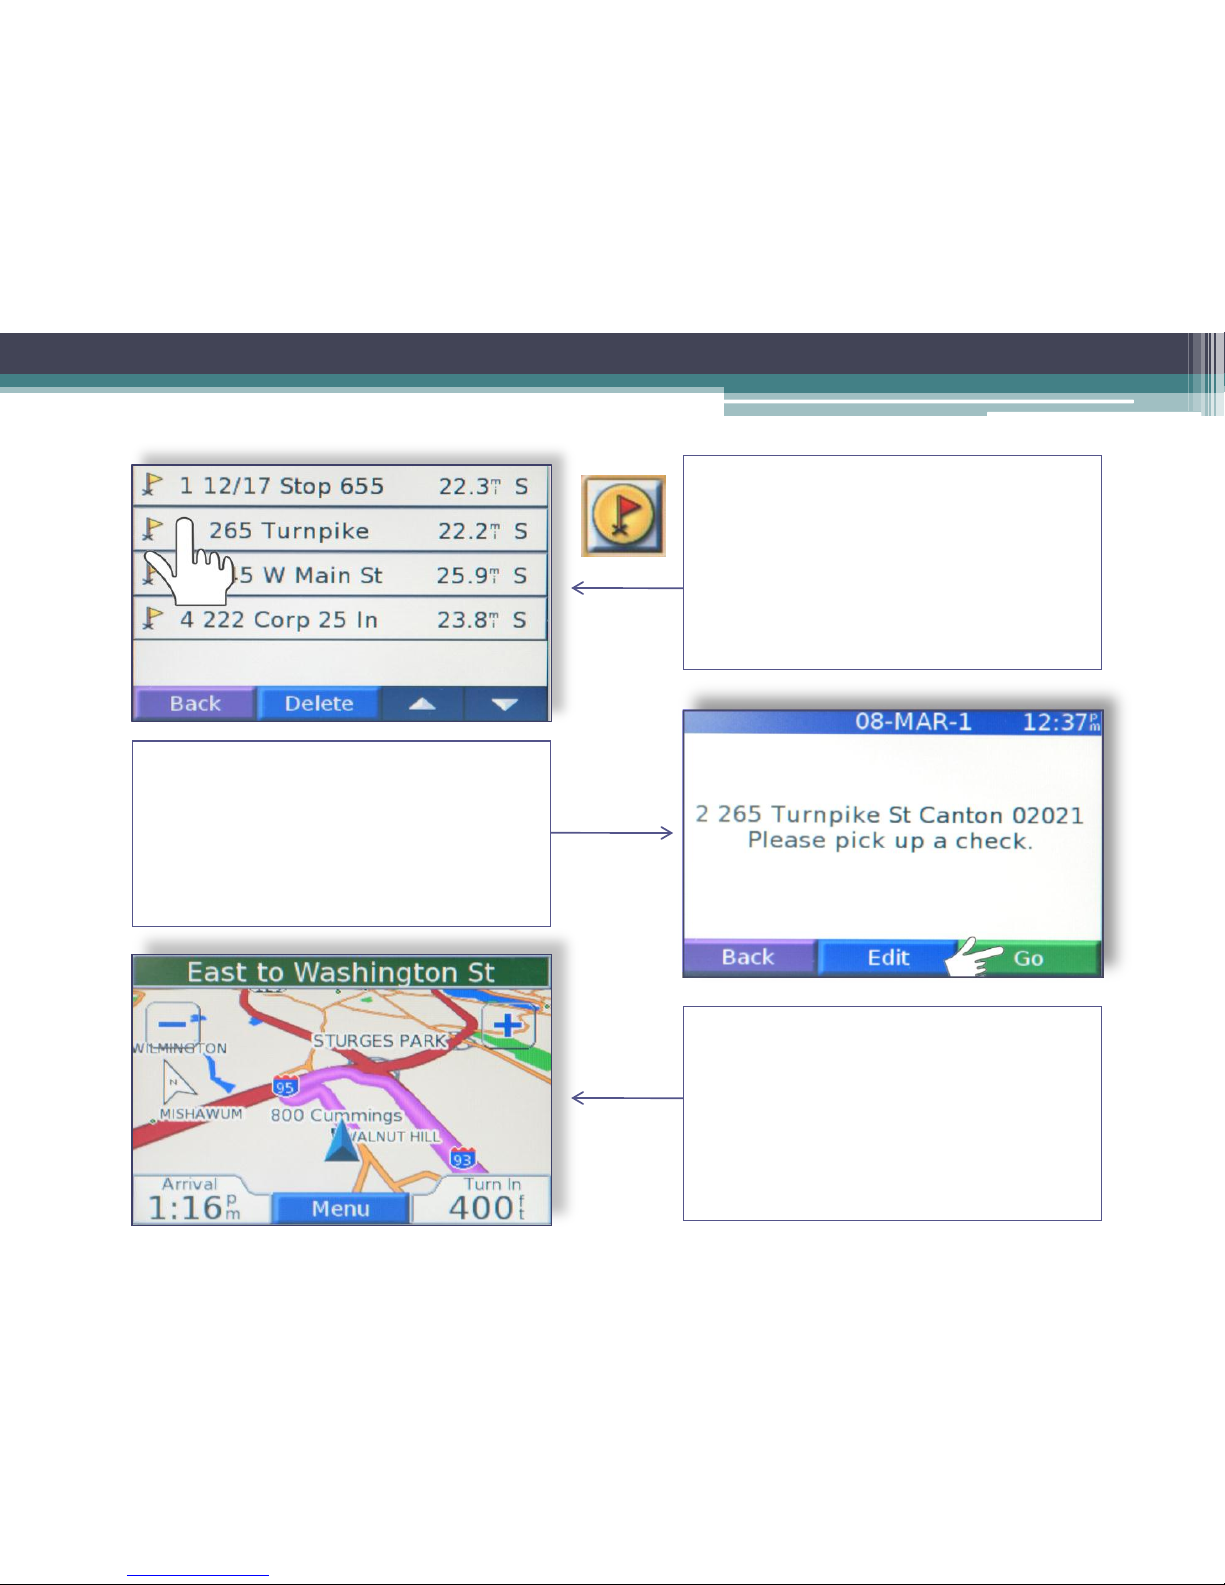
When the flag icon is tapped the
route stops will appear in this
manner. The stops will be numbered
to the left by the order of their entry.
Tap the selected address to receive
directions to that stop. To delete the
stops tap “Delete”.
After you have tapped the selected
stop it will appear on the next page
with the address as shown here. Any
messages sent with the selected
stop will appear here also. To get
directions to the stop press “Go”.
After you have pressed “Go”
turn-by-turn directions to the selected
stop will appear on your Garmin PND
as shown here. You will now be
placed in “Enroute” status in the
Dispatch module.
Page 5
Routing & Messaging – Accepting dispatched route (Continued)
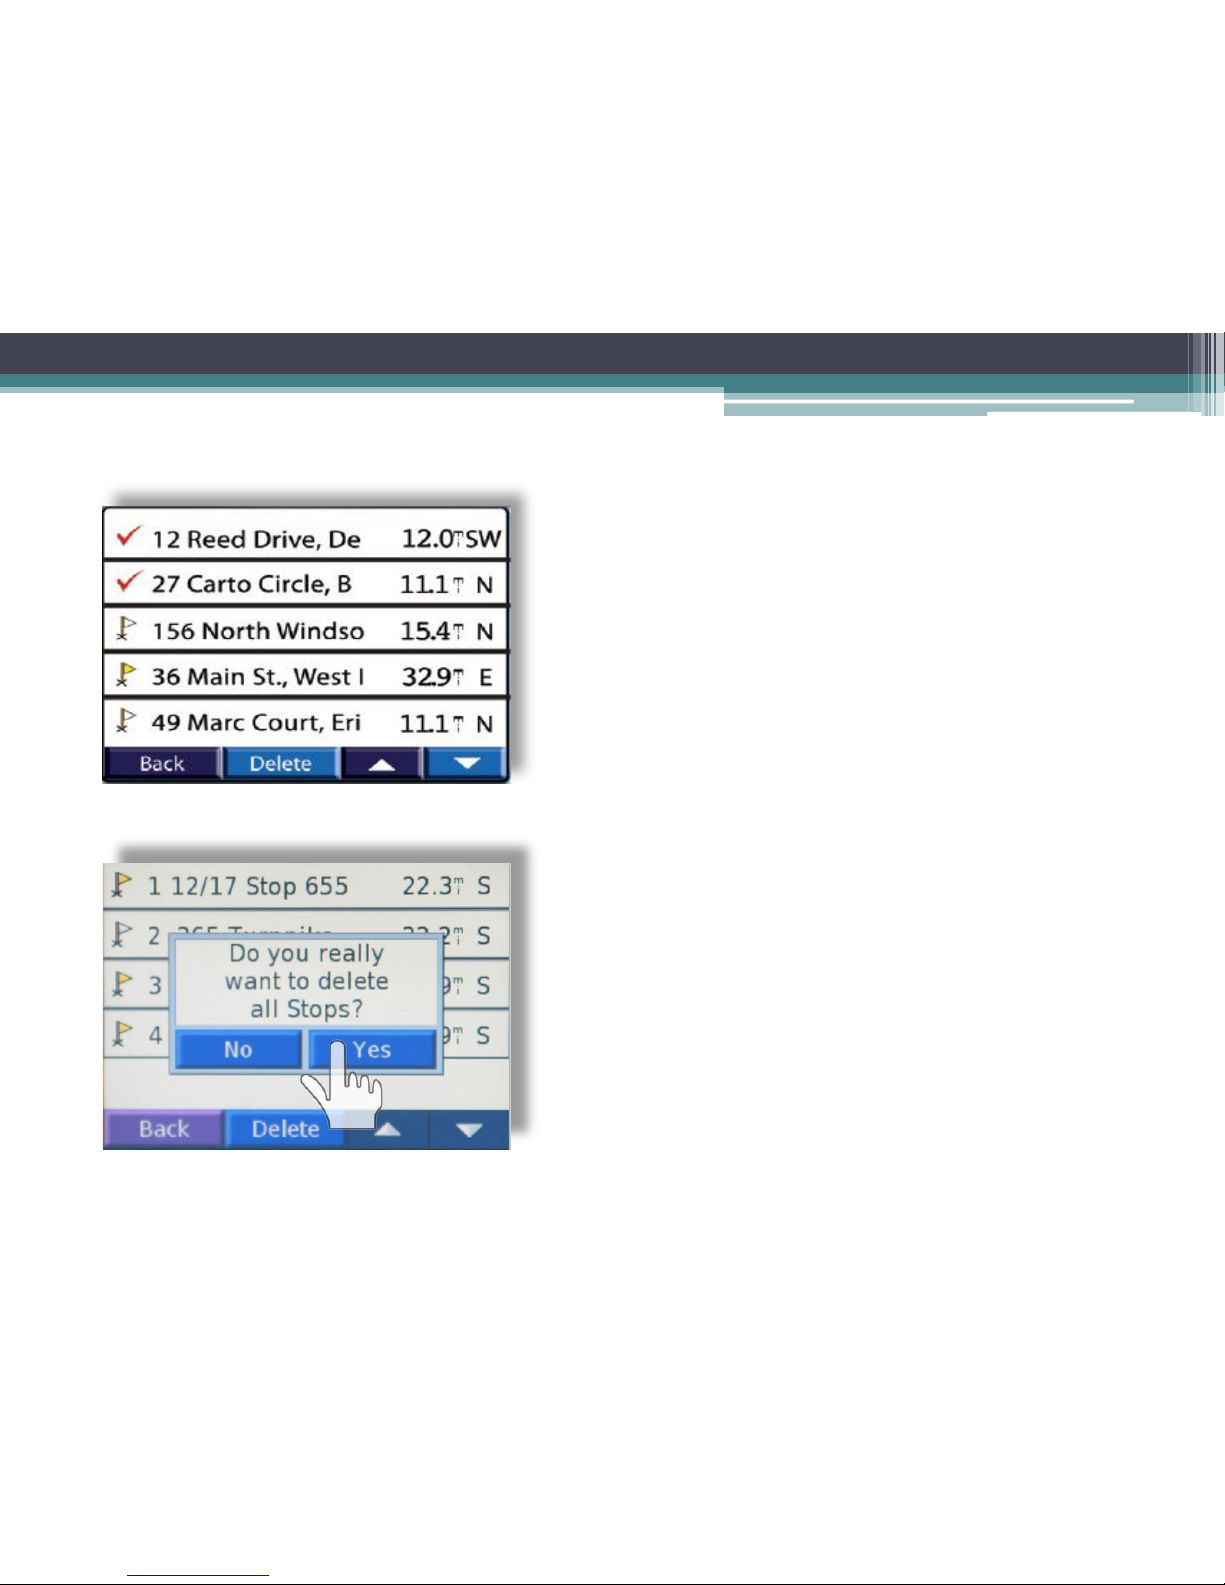
As a driver completes the stops on a route they will
be marked with a check mark to list each stop as
being completed. The Teluware “Dispatch” module
will display time stamps defining when the driver
started the trip (Enroute), when the driver arrived
(Arrived), when the driver exited the stop
(Departed) and when the driver completed the job
(Completed).
A driver may delete all the stops from the
route on the PND by pressing the “Delete”
button then the “Yes” button. This will
result in a “Rejection” status being sent to
the Teluware “Dispatch” module for all the
stops in the route
Page 6
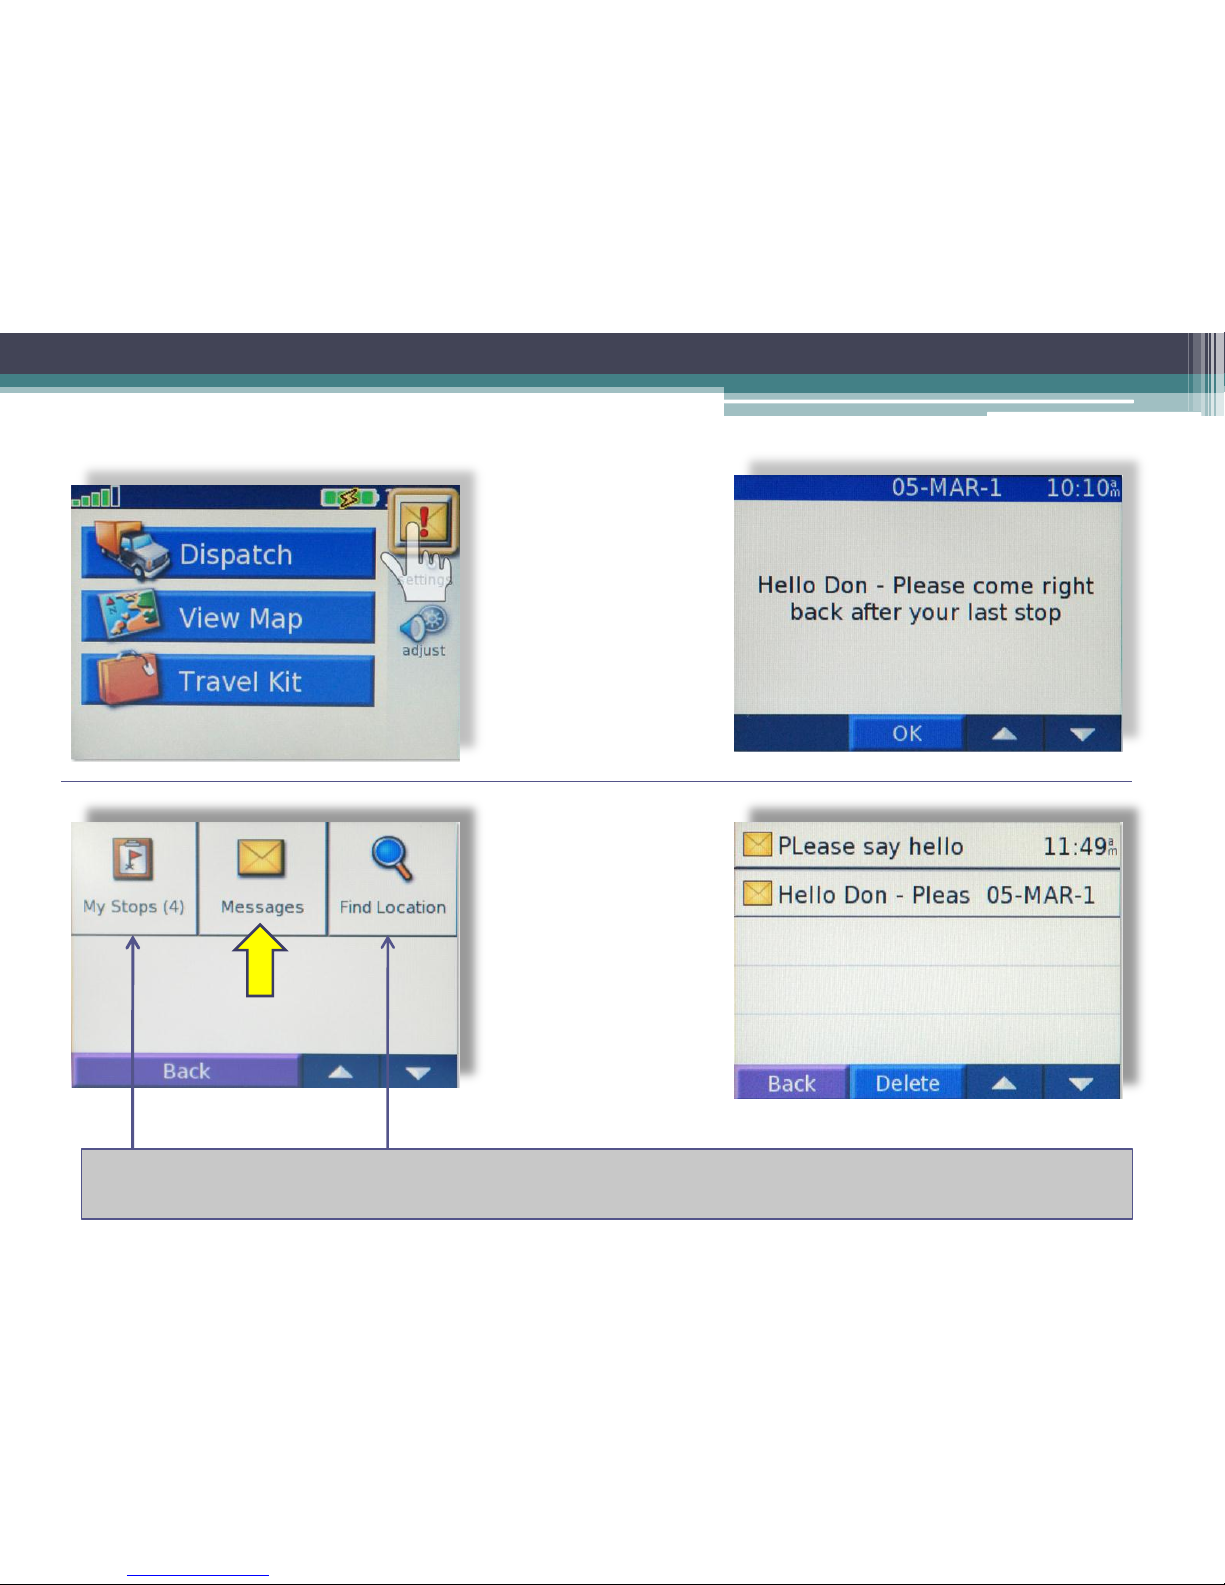
Routing & Messaging – Accepting a dispatched message
When the message
icon is tapped as
shown here to the
left the message
will be displayed as
shown here to the
right
If the message icon
from the menu is
tapped any
messages in the
“In-Box” will be
displayed as shown
here on the right.
After tapping a
specific message it
will then be
displayed as shown
to the upper right,
At any timer a driver may tap “My Stops” to see the route or stored routes on the PND. The
driver may also tap “Find Location” to use the PND to find a driver entered location.
Page 7
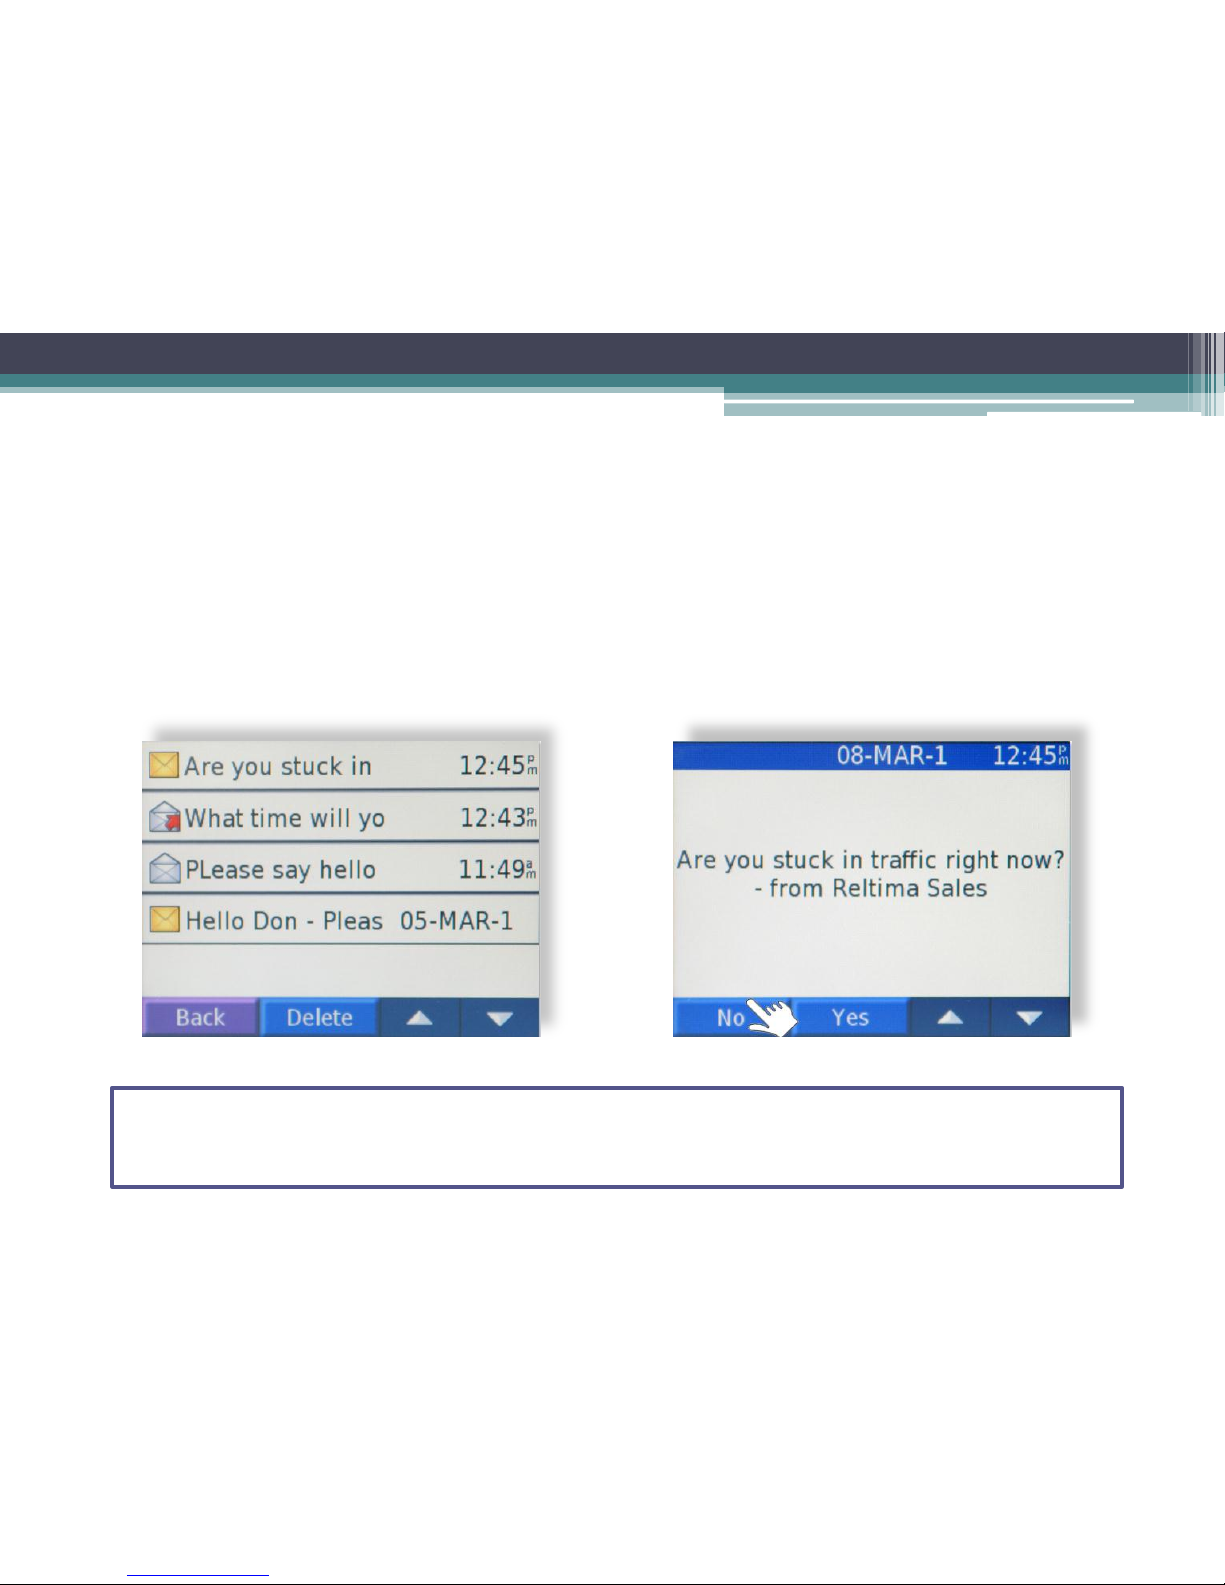
Routing & Messaging – Accepting a dispatched message
A Teluware user may send a “Yes/No”
question from the messaging or routing
modules to the Garmin PND. The
driver will have the option of answering
yes or no to the question as shown
below.
After tapping the “Messages” icon in
the menu the list of messages and
their status will be displayed as shown
below. Unopened envelopes signify
messages that have that have not
been read
A driver may also receive a message with a “Read Receipt” requested. The driver will
simply have the option of tapping “OK” at the bottom of the PND screen to confirm that
the message has been read.
Page 8
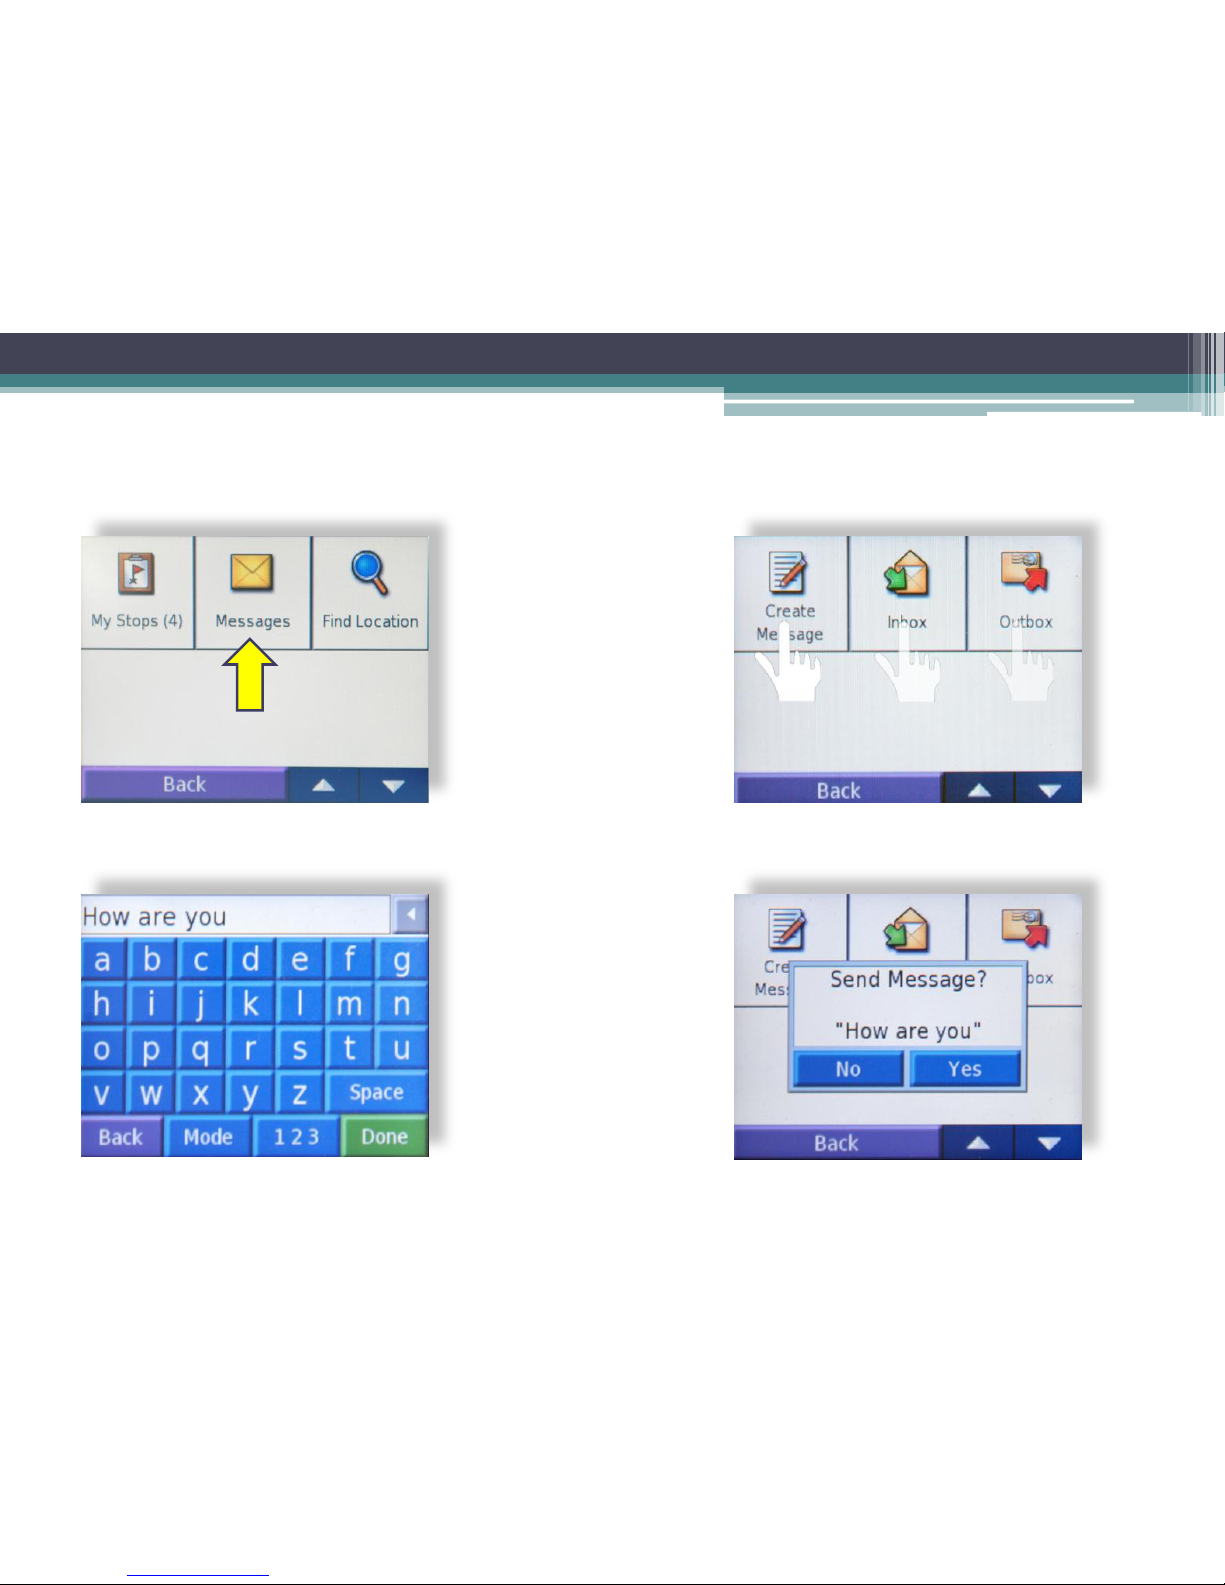
Routing & Messaging - Sending a message from the PND to the Teluware Application
Creating a Message -
To create & send a
message from the PND
simply tap the
“Messages” icon as
shown to the left
(accessed by tapping
the “Dispatch” bar) then
tap “Create Message”
as shown to the right.
This action will make
the keyboard
appear. You may
then type the
message, tap
“Done” as shown to
the left and then
answer “Yes” to the
“Send Message?”
icon shown to the
right. To start over
simply tap “No”.
Page 9
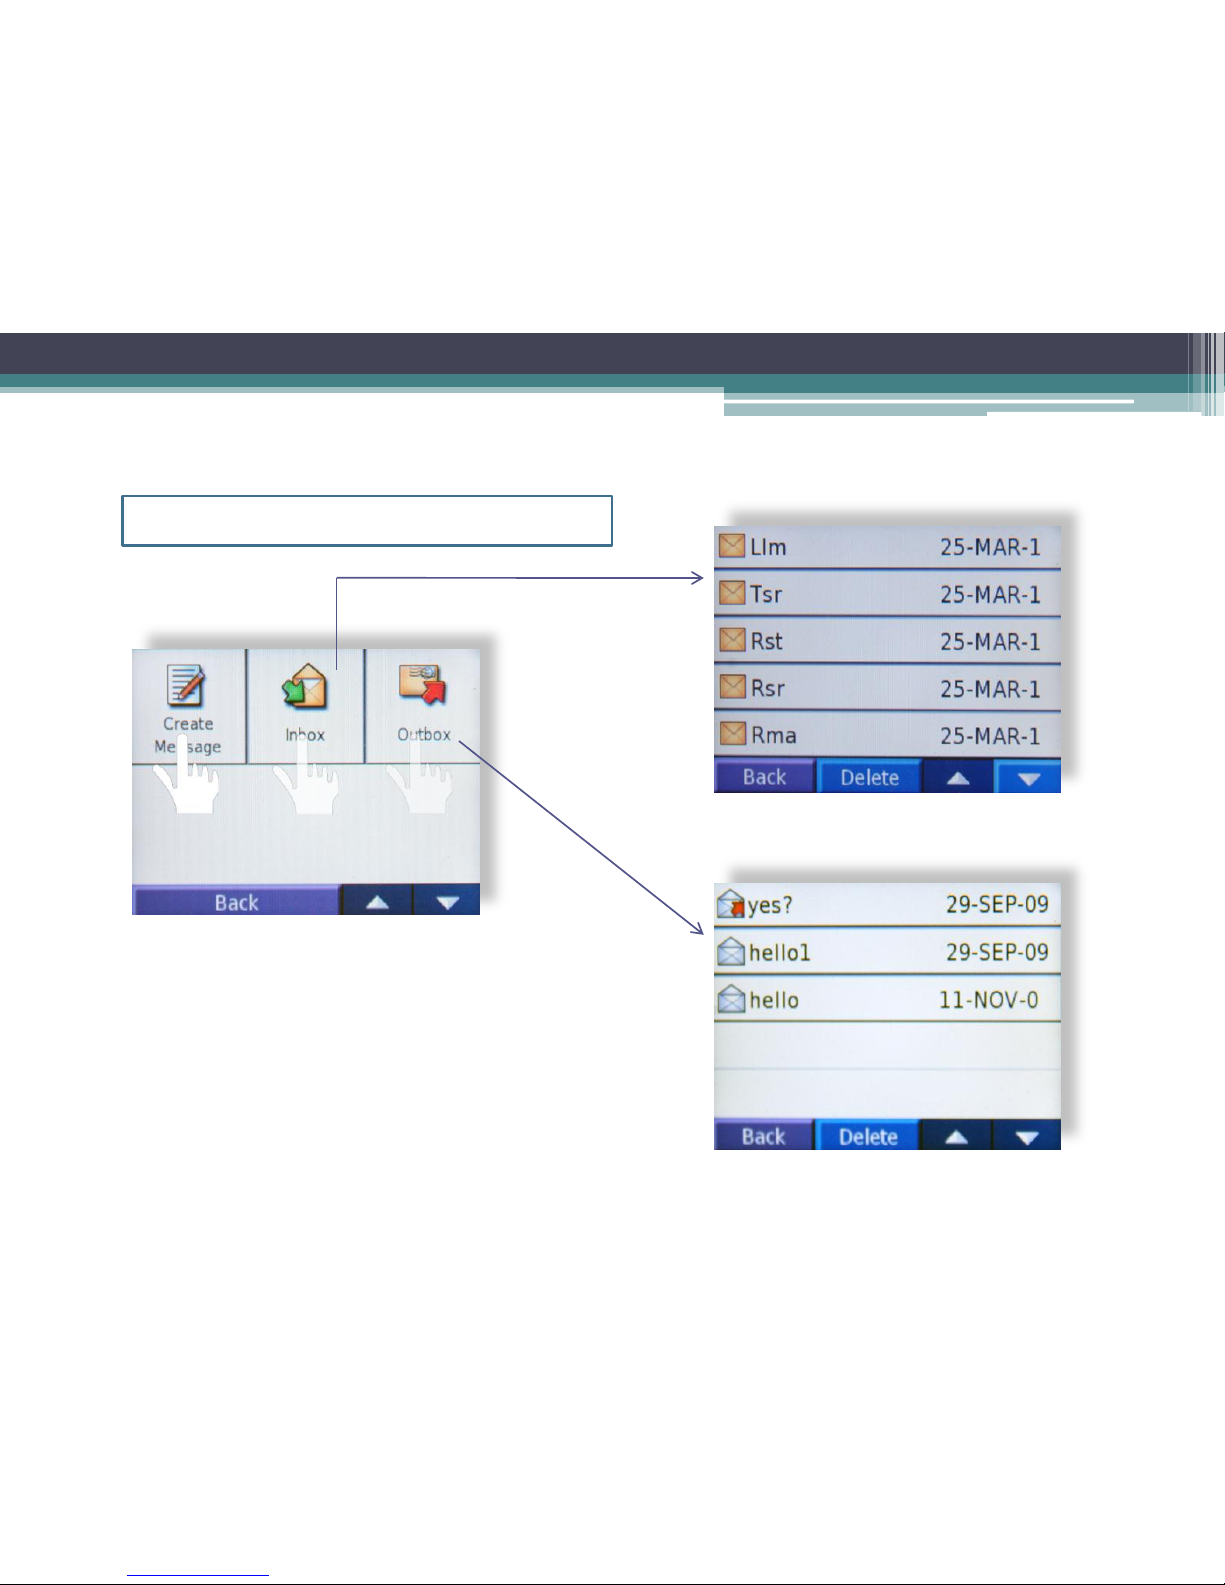
Inbox & Outbox – Reviewing your messages (both received and sent)
To see messages stored in the In or Out
boxes simply tap the icon to see the list.
Messages marked by a closed envelope
have not yet been read. Messages with an
open envelope have been read. Messages
in the “Outbox” marked with a red arrow
have been sent to a recipient in the
Teluware application.
Easily check your Inbox & Outbox
Page 10
Things You Should Know About the Garmin PND & The Teluware Driver
Dispatch System
The Garmin PND always works best when “hardwired” in the vehicle.
The Driver/Dispatch application will not work on the Garmin PND if the device is in in
battery mode. The PND needs a source of constant power to operate correctly with
our application and the SmartAntenna. While the PND will work with a temporary
auxiliary power adapter our tests have shown that this power method may yield
inconsistent results due to minor power interruptions from poor connectivity.
The length of a message (sent without a route stop) may not exceed 110 characters.
Messages sent with a route stop (from the “comment” section of the address line in
the routing application) will have their content size reduced by the amount of
characters in the location address. If there are 35 characters in the address then the
message size will be limited to 75 characters.
A driver may use the PND as a normal location device at any time by simply tapping
the “Find Location” icon located on the “Dispatch” menu.
All Garmin PNDs working as part of the Driver/Dispatch application must use an
approved cable for connection to the SmartAntenna RS 232 serial interface cable.
There are several cables that may be used based on the model type of the Garmin
PND. To find the part number of the correct cable required please go to this link
http://www8.garmin.com/solutions/pnd/supportedproducts.jsp
 Loading...