

Garmin Descent Mk2i Owner's Manual
Descent™ Mk2i
Owner’s Manual

© 2020 Garmin Ltd. or its subsidiaries
All rights reserved. Under the copyright laws, this manual may not be copied, in whole or in part, without the written consent of Garmin. Garmin reserves the right to change or improve its
products and to make changes in the content of this manual without obligation to notify any person or organization of such changes or improvements. Go to www.garmin.com for current updates
and supplemental information concerning the use of this product.
Garmin®, the Garmin logo, ANT®, ANT+®, Approach®, Auto Lap®, Auto Pause®, Edge®, inReach®, QuickFit®, TracBack®, VIRB®, Virtual Partner®, and Xero® are trademarks of Garmin Ltd. or its
subsidiaries, registered in the USA and other countries. Body Battery™, Connect IQ™, Descent™, Garmin Connect™, Garmin Dive™, Garmin Explore™, Garmin Express™, Garmin Golf™, Garmin
Move IQ™, Garmin Pay™, HRM-Run™, HRM-Swim™, HRM-Tri™, Subwave™, tempe™, TruSwing™, TrueUp™, Varia™, Varia Vision™, and Vector™ are trademarks of Garmin Ltd. or its subsidiaries.
These trademarks may not be used without the express permission of Garmin.
Android™ is a trademark of Google Inc. Apple®, iPhone®, iTunes®, and Mac® are trademarks of Apple Inc., registered in the U.S. and other countries. The BLUETOOTH® word mark and logos are
owned by the Bluetooth SIG, Inc. and any use of such marks by Garmin is under license. The Cooper Institute®, as well as any related trademarks, are the property of The Cooper Institute. Di2
is a trademark of Shimano, Inc. Shimano® is a registered trademark of Shimano, Inc. iOS® is a registered trademark of Cisco Systems, Inc. used under license by Apple Inc. The Spotify® software
is subject to third-party licenses found here: https://developer.spotify.com/legal/third-party-licenses. STRAVA and Strava™ are trademarks of Strava, Inc. Advanced heartbeat analytics by
Firstbeat. Training Stress Score™ (TSS), Intensity Factor™ (IF), and Normalized Power™ (NP) are trademarks of Peaksware, LLC. Wi‑Fi® is a registered mark of Wi-Fi Alliance Corporation.
Windows® is a registered trademark of Microsoft Corporation in the United States and other countries. Zwift™ is a trademark of Zwift, Inc. Other trademarks and trade names are those of their
respective owners.
This product is ANT+® certified. Visit www.thisisant.com/directory for a list of compatible products and apps.
™

Table of Contents
Introduction.....................................................................1
Getting Started............................................................................1
Buttons................................................................................... 1
Using the Watch.....................................................................1
Viewing the Controls Menu............................................... 1
Viewing Widgets................................................................1
Customizing the Watch.......................................................... 2
Default Watch Face............................................................... 2
Pairing Your Smartphone........................................................... 2
Charging the Device................................................................... 2
Product Updates......................................................................... 2
Setting Up Garmin Express................................................... 2
Diving.............................................................................. 2
Dive Warnings............................................................................ 2
Dive Modes................................................................................. 3
Using the Pool Dive Mode..................................................... 3
Dive Setup.................................................................................. 3
Setting Up Your Breathing Gases.......................................... 3
Setting PO2 Thresholds......................................................... 4
Setting CCR Setpoints........................................................... 4
Air Integration............................................................................. 4
Installation and Setup............................................................ 4
Transmitter Position Tips.................................................. 4
Installing the Transmitter on Your Tank Regulator........... 5
Installing the Transmitter on a High Pressure Hose
Extension.......................................................................... 5
Pairing the Transmitter with a Descent Mk2i Dive
Computer............................................................................... 6
Selecting Paired Transmitters to View on Your Dive Data
Screens............................................................................. 6
Transmitter Settings............................................................... 6
Selecting the Gas Consumption Rate Metric......................... 7
Including Transmitters in Gas Consumption Calculations..... 7
Dive Data Screens...................................................................... 7
Single-Gas and Multi-Gas Data Screens............................... 7
CCR Data Screens................................................................ 7
Gauge Data Screens............................................................. 8
Apnea and Apnea Hunt Data Screens................................... 8
Starting a Dive............................................................................ 8
Navigating with the Dive Compass........................................ 8
Using the Dive Stopwatch...................................................... 8
Viewing the Transmitter Data Screens.................................. 9
Switching Gases During a Dive............................................. 9
Switching Between CC and OC Diving for a Bailout
Procedure.............................................................................. 9
Performing a Safety Stop....................................................... 9
Performing a Decompression Stop........................................ 9
Diving with the Map..............................................................10
Viewing the Surface Interval Widget......................................... 10
Viewing the Dive Log Widget.................................................... 10
Dive Planning............................................................................10
Calculating NDL Time.......................................................... 10
Creating a Decompression Plan.......................................... 10
Viewing and Applying a Decompression Plan..................... 11
Editing a Decompression Plan............................................. 11
Deleting a Decompression Plan...........................................11
No-Fly Time.............................................................................. 11
Altitude Diving........................................................................... 11
Tips for Wearing the Device with an Exposure Suit................. 11
Dive Alerts................................................................................ 11
Transmitter Alerts..................................................................... 12
Enabling Lost Transmitter Alerts.......................................... 12
Dive Terminology...................................................................... 12
Activities and Apps...................................................... 12
Starting an Activity.................................................................... 12
Tips for Recording Activities................................................ 13
Changing the Power Mode.................................................. 13
Stopping an Activity.................................................................. 13
Adding or Removing a Favorite Activity.................................... 13
Creating a Custom Activity....................................................... 13
Indoor Activities........................................................................ 13
Going for a Virtual Run........................................................ 13
Calibrating the Treadmill Distance....................................... 13
Recording a Strength Training Activity.................................13
Outdoor Activities......................................................................14
Viewing Tide Information..................................................... 14
Viewing Your Ski Runs........................................................ 14
Recording a Backcountry Skiing Activity..............................14
Using the Metronome...........................................................14
Playing Audio Prompts During an Activity............................15
Jumpmaster......................................................................... 15
Multisport.................................................................................. 15
Triathlon Training................................................................. 15
Creating a Multisport Activity............................................... 15
Swimming................................................................................. 15
Swim Terminology............................................................... 15
Stroke Types........................................................................ 15
Tips for Swimming Activities................................................ 15
Resting During Pool Swimming........................................... 16
Auto Rest............................................................................. 16
Training with the Drill Log.................................................... 16
Turning Off Wrist-based Heart Rate While Swimming......... 16
Golfing...................................................................................... 16
Playing Golf..........................................................................16
Hole Information...................................................................16
Big Numbers Mode......................................................... 16
Measuring Distance with Button Targeting.......................... 16
Changing Holes................................................................... 16
Moving the Flag................................................................... 17
Viewing Measured Shots..................................................... 17
Viewing Layup and Dogleg Distances................................. 17
Saving Custom Targets...................................................17
Keeping Score..................................................................... 17
Updating a Score............................................................ 17
Setting the Scoring Method............................................. 17
Setting Your Handicap.................................................... 17
Enabling Statistics Tracking............................................ 17
TruSwing™.......................................................................... 17
Using the Golf Odometer..................................................... 18
Viewing PlaysLike Distance................................................. 18
Viewing the Direction to the Pin........................................... 18
Starting an Expedition.............................................................. 18
Changing the Track Point Recording Interval...................... 18
Recording a Track Point Manually....................................... 18
Viewing Track Points........................................................... 18
Connected Features..................................................... 18
Enabling Bluetooth Notifications............................................... 18
Viewing Notifications............................................................ 19
Receiving an Incoming Phone Call...................................... 19
Replying to a Text Message................................................ 19
Managing Notifications.........................................................19
Turning Off the Bluetooth Smartphone Connection.................. 19
Turning On and Off Smartphone Connection Alerts................. 19
Locating a Lost Mobile Device.................................................. 19
Garmin Dive App...................................................................... 19
Garmin Connect........................................................................19
Updating the Software Using the Smartphone Apps........... 20
Updating the Software Using Garmin Express.................... 20
Using Garmin Connect on Your Computer..................... 20
Table of Contents i

Manually Syncing Data with Garmin Connect..................... 20
Garmin Explore™..................................................................... 20
Garmin Golf™ App................................................................... 20
Safety and Tracking Features..................................... 20
Adding Emergency Contacts.................................................... 20
Adding Contacts....................................................................... 21
Turning Incident Detection On and Off..................................... 21
Requesting Assistance............................................................. 21
Starting a GroupTrack Session.................................................21
Tips for GroupTrack Sessions............................................. 21
GroupTrack Settings............................................................ 21
Wi‑Fi® Connected Features........................................ 21
Connecting to a Wi‑Fi Network................................................. 21
Connect IQ Features.................................................... 21
Downloading Connect IQ Features.......................................... 22
Downloading Connect IQ Features Using Your Computer....... 22
Garmin Pay................................................................... 22
Setting Up Your Garmin Pay Wallet......................................... 22
Paying for a Purchase Using Your Watch................................ 22
Adding a Card to Your Garmin Pay Wallet............................... 22
Managing Your Garmin Pay Cards...................................... 22
Changing Your Garmin Pay Passcode..................................... 22
Music............................................................................. 22
Connecting to a Third-Party Provider....................................... 22
Downloading Audio Content from a Third-Party Provider.... 23
Downloading Audio Content from Spotify®......................... 23
Changing the Music Provider............................................... 23
Disconnecting from a Third-Party Provider.......................... 23
Downloading Personal Audio Content...................................... 23
Listening to Music..................................................................... 23
Music Playback Controls.......................................................... 23
Connecting Bluetooth Headphones.......................................... 23
Changing the Audio Mode........................................................ 23
Heart Rate Features..................................................... 23
Wrist-based Heart Rate............................................................ 23
Wearing the Device..............................................................23
Tips for Erratic Heart Rate Data...........................................24
Viewing the Heart Rate Widget............................................ 24
Broadcasting Heart Rate Data to Garmin Devices.............. 24
Broadcasting Heart Rate Data During an Activity........... 24
Setting an Abnormal Heart Rate Alert................................. 24
Turning Off the Wrist-based Heart Rate Monitor................. 24
Running Dynamics....................................................................24
Training with Running Dynamics......................................... 25
Color Gauges and Running Dynamics Data........................ 25
Ground Contact Time Balance Data............................... 25
Vertical Oscillation and Vertical Ratio Data.....................25
Tips for Missing Running Dynamics Data............................ 26
Performance Measurements.................................................... 26
Turning Off Performance Notifications................................. 26
Detecting Performance Measurements Automatically......... 26
Syncing Activities and Performance Measurements........... 26
About VO2 Max. Estimates.................................................. 26
Getting Your VO2 Max. Estimate for Running................ 26
Getting Your VO2 Max. Estimate for Cycling.................. 27
Viewing Your Predicted Race Times................................... 27
About Training Effect........................................................... 27
Heart Rate Variability and Stress Level............................... 27
Viewing Your Heart Rate Variability and Stress Level.... 27
Performance Condition........................................................ 27
Viewing Your Performance Condition............................. 28
Lactate Threshold................................................................ 28
Performing a Guided Test to Determine Your Lactate
Threshold........................................................................ 28
Getting Your FTP Estimate
Conducting an FTP Test................................................. 28
Training Status..........................................................................28
Training Status Levels......................................................... 29
Tips for Getting Your Training Status.............................. 29
Heat and Altitude Performance Acclimation........................ 29
Training Load....................................................................... 29
Training Load Focus............................................................ 29
Recovery Time..................................................................... 30
Viewing Your Recovery Time.......................................... 30
Recovery Heart Rate.......................................................30
Body Battery™..........................................................................30
Viewing the Body Battery Widget.........................................30
Tips for Improved Body Battery Data................................... 30
.................................................. 28
Pulse Oximeter............................................................. 30
Getting Pulse Oximeter Readings............................................ 30
Turning On All-Day Pulse Oximeter Readings......................... 31
Turning Off Automatic Pulse Oximeter Readings..................... 31
Turning On Pulse Oximeter Sleep Tracking............................. 31
Tips for Erratic Pulse Oximeter Data........................................ 31
Training......................................................................... 31
Setting Up Your User Profile.....................................................31
Fitness Goals....................................................................... 31
About Heart Rate Zones...................................................... 31
Setting Your Heart Rate Zones....................................... 31
Letting the Device Set Your Heart Rate Zones............... 32
Heart Rate Zone Calculations......................................... 32
Setting Your Power Zones................................................... 32
Activity Tracking........................................................................32
Auto Goal............................................................................. 32
Using the Move Alert............................................................32
Sleep Tracking..................................................................... 32
Using Automated Sleep Tracking....................................32
Using Do Not Disturb Mode............................................ 32
Intensity Minutes.................................................................. 32
Earning Intensity Minutes................................................ 33
Garmin Move IQ™............................................................... 33
Activity Tracking Settings..................................................... 33
Turning Off Activity Tracking........................................... 33
Workouts...................................................................................33
Following a Workout From Garmin Connect........................ 33
Starting a Workout............................................................... 33
About the Training Calendar................................................ 33
Using Garmin Connect Training Plans............................ 33
Adaptive Training Plans.................................................. 33
Interval Workouts...................................................................... 34
Creating an Interval Workout............................................... 34
Starting an Interval Workout................................................ 34
Stopping an Interval Workout...............................................34
PacePro Training...................................................................... 34
Downloading a PacePro Plan from Garmin Connect........... 34
Starting a PacePro Plan.......................................................34
Stopping a PacePro Plan................................................ 34
Creating a PacePro Plan on Your Watch............................ 34
Segments..................................................................................35
Strava™ Segments.............................................................. 35
Viewing Segment Details..................................................... 35
Racing a Segment............................................................... 35
Setting a Segment to Adjust Automatically.......................... 35
Using Virtual Partner®.............................................................. 35
Setting a Training Target.......................................................... 35
Cancelling a Training Target................................................ 35
Racing a Previous Activity........................................................ 35
Personal Records..................................................................... 36
Viewing Your Personal Records.......................................... 36
Restoring a Personal Record............................................... 36
ii Table of Contents

Clearing a Personal Record................................................. 36
Clearing All Personal Records............................................. 36
Clocks............................................................................ 36
Setting an Alarm....................................................................... 36
Editing an Alarm...................................................................36
Starting the Countdown Timer.................................................. 36
Deleting a Timer...................................................................36
Using the Stopwatch................................................................. 36
Adding Alternate Time Zones................................................... 37
Editing an Alternate Time Zone........................................... 37
Navigation..................................................................... 37
Saving Your Location............................................................... 37
Editing Your Saved Locations.............................................. 37
Projecting a Waypoint............................................................... 37
Navigating to a Destination....................................................... 37
Navigating to a Point of Interest............................................... 37
Points of Interest.................................................................. 37
Creating and Following a Course on Your Device.................... 37
Creating a Round-Trip Course..................................................37
Viewing or Editing Course Details............................................ 38
Using ClimbPro......................................................................... 38
Marking and Starting Navigation to a Man Overboard
Location.................................................................................... 38
Navigating with Sight 'N Go...................................................... 38
Navigating to Your Starting Point During an Activity................ 38
Viewing Route Directions..................................................... 38
Navigating to the Starting Point of a Saved Activity................. 38
Stopping Navigation................................................................. 39
Map........................................................................................... 39
Viewing the Map.................................................................. 39
Saving or Navigating to a Location on the Map................... 39
Navigating with the Around Me Feature.............................. 39
Changing the Map Theme................................................... 39
Compass...................................................................................39
Setting the Compass Heading............................................. 39
Altimeter and Barometer........................................................... 39
History........................................................................... 40
Using History............................................................................ 40
Multisport History................................................................. 40
Viewing Your Time in Each Heart Rate Zone...................... 40
Viewing Data Totals.................................................................. 40
Using the Odometer..................................................................40
Deleting History........................................................................ 40
Customizing Your Device............................................ 40
Activities and App Settings....................................................... 40
Customizing the Data Screens............................................ 41
Adding a Map to an Activity................................................. 41
Alerts.................................................................................... 41
Setting an Alert................................................................42
Activity Map Settings............................................................42
Routing Settings...................................................................42
Auto Lap...............................................................................42
Marking Laps by Distance............................................... 42
Enabling Auto Pause........................................................... 42
Enabling Auto Climb............................................................ 43
3D Speed and Distance....................................................... 43
Turning On and Off the Lap Key.......................................... 43
Using Auto Scroll................................................................. 43
Changing the GPS Setting................................................... 43
GPS and Other Satellite Systems................................... 43
UltraTrac......................................................................... 43
Power Save Timeout Settings..............................................43
Changing the Order of an Activity in the Apps List................... 43
Widgets..................................................................................... 44
Customizing the Widget Loop.............................................. 44
inReach Remote
Using the inReach Remote............................................. 44
VIRB Remote....................................................................... 45
Controlling a VIRB Action Camera.................................. 45
Controlling a VIRB Action Camera During an Activity..... 45
Using the Stress Level Widget............................................. 45
Customizing the My Day Widget.......................................... 45
Customizing the Controls Menu................................................45
Watch Face Settings.................................................................45
Customizing the Watch Face............................................... 45
Sensors Settings.......................................................................46
Compass Settings................................................................ 46
Calibrating the Compass Manually................................. 46
Setting the North Reference............................................46
Altimeter Settings................................................................. 46
Calibrating the Barometric Altimeter............................... 46
Barometer Settings.............................................................. 46
Calibrating the Barometer............................................... 46
Xero Laser Location Settings............................................... 46
Map Settings............................................................................. 47
Map Themes........................................................................ 47
Marine Map Settings............................................................ 47
Showing and Hiding Map Data............................................ 47
Navigation Settings................................................................... 47
Customizing Map Features.................................................. 47
Setting Up a Heading Bug................................................... 47
Setting Navigation Alerts......................................................47
Power Manager Settings.......................................................... 47
Customizing the Battery Saver Feature............................... 47
Customizing Power Modes.................................................. 48
Restoring a Power Mode..................................................... 48
System Settings........................................................................ 48
Time Settings....................................................................... 48
Setting Time Alerts.......................................................... 48
Syncing the Time............................................................ 48
Changing the Backlight Settings.......................................... 49
Customizing the Hot Keys....................................................49
Changing the Units of Measure........................................... 49
Viewing Device Information...................................................... 49
Viewing E-label Regulatory and Compliance Information.... 49
.................................................................. 44
Wireless Sensors......................................................... 49
Pairing Your Wireless Sensors................................................. 49
Extended Display Mode............................................................ 49
Using an Optional Bike Speed or Cadence Sensor.................. 49
Training with Power Meters...................................................... 49
Using Electronic Shifters...........................................................49
Situational Awareness.............................................................. 49
Foot Pod................................................................................... 49
Improving Foot Pod Calibration........................................... 50
Calibrating Your Foot Pod Manually.................................... 50
Setting Foot Pod Speed and Distance................................. 50
tempe™.................................................................................... 50
Club Sensors............................................................................ 50
Device Information....................................................... 50
Descent Mk2i Specifications..................................................... 50
Battery Information...............................................................50
Descent T1 Specifications........................................................ 50
Data Management.................................................................... 51
Deleting Files....................................................................... 51
Device Maintenance..................................................... 51
Device Care.............................................................................. 51
Cleaning the Device............................................................. 51
Changing the QuickFit® Bands................................................ 51
Extra Long Diving Band............................................................ 51
Metal Watch Band Adjustment................................................. 51
Table of Contents iii

Descent T1 Device Care...........................................................51
Cleaning the Transmitter......................................................51
User Replaceable Batteries...................................................... 51
Replacing the Descent T1 Battery....................................... 52
Troubleshooting........................................................... 52
My device is in the wrong language......................................... 52
Is my smartphone compatible with my device?........................ 52
My phone will not connect to the device................................... 52
Can I use my Bluetooth sensor with my watch?....................... 52
My headphones will not connect to the device......................... 52
My music cuts out or my headphones do not stay connected.. 52
Restarting Your Device............................................................. 52
Resetting All Default Settings................................................... 53
Diving........................................................................................ 53
Resetting Your Tissue Load.................................................53
Resetting the Surface Pressure........................................... 53
Updating the Transmitter Software Using Your Descent Dive
Computer............................................................................. 53
My transmitter and watch lose connection underwater........ 53
Adjusting the Transmitter Power Setting......................... 53
My transmitter battery is draining rapidly............................. 53
Acquiring Satellite Signals........................................................ 53
Improving GPS Satellite Reception......................................53
The temperature reading is not accurate.................................. 54
Maximizing the Battery Life.......................................................54
Activity Tracking........................................................................54
My daily step count does not appear................................... 54
My step count does not seem accurate............................... 54
The step counts on my device and my Garmin Connect
account don't match............................................................. 54
The floors climbed amount does not seem accurate........... 54
Getting More Information.......................................................... 54
Appendix....................................................................... 54
Data Fields................................................................................54
VO2 Max. Standard Ratings..................................................... 58
FTP Ratings.............................................................................. 59
Wheel Size and Circumference................................................ 59
Symbol Definitions.................................................................... 59
Index.............................................................................. 61
iv Table of Contents
Introduction
WARNING
See the Important Safety and Product Information guide in the
product box for product warnings and other important
information.
Always consult your physician before you begin or modify any
exercise program.
Getting Started
When using your watch the first time, you should complete these
tasks to set it up and get to know the basic features.
Press LIGHT to turn on the watch (Buttons, page 1).
1
Follow the on-screen instructions to complete the initial
2
setup.
During the initial setup, you can pair your smartphone with
your watch to receive notifications, sync your activities, and
more (Pairing Your Smartphone, page 2).
Charge the device (Charging the Device, page 2).
3
Start an activity (Starting an Activity, page 12).
4
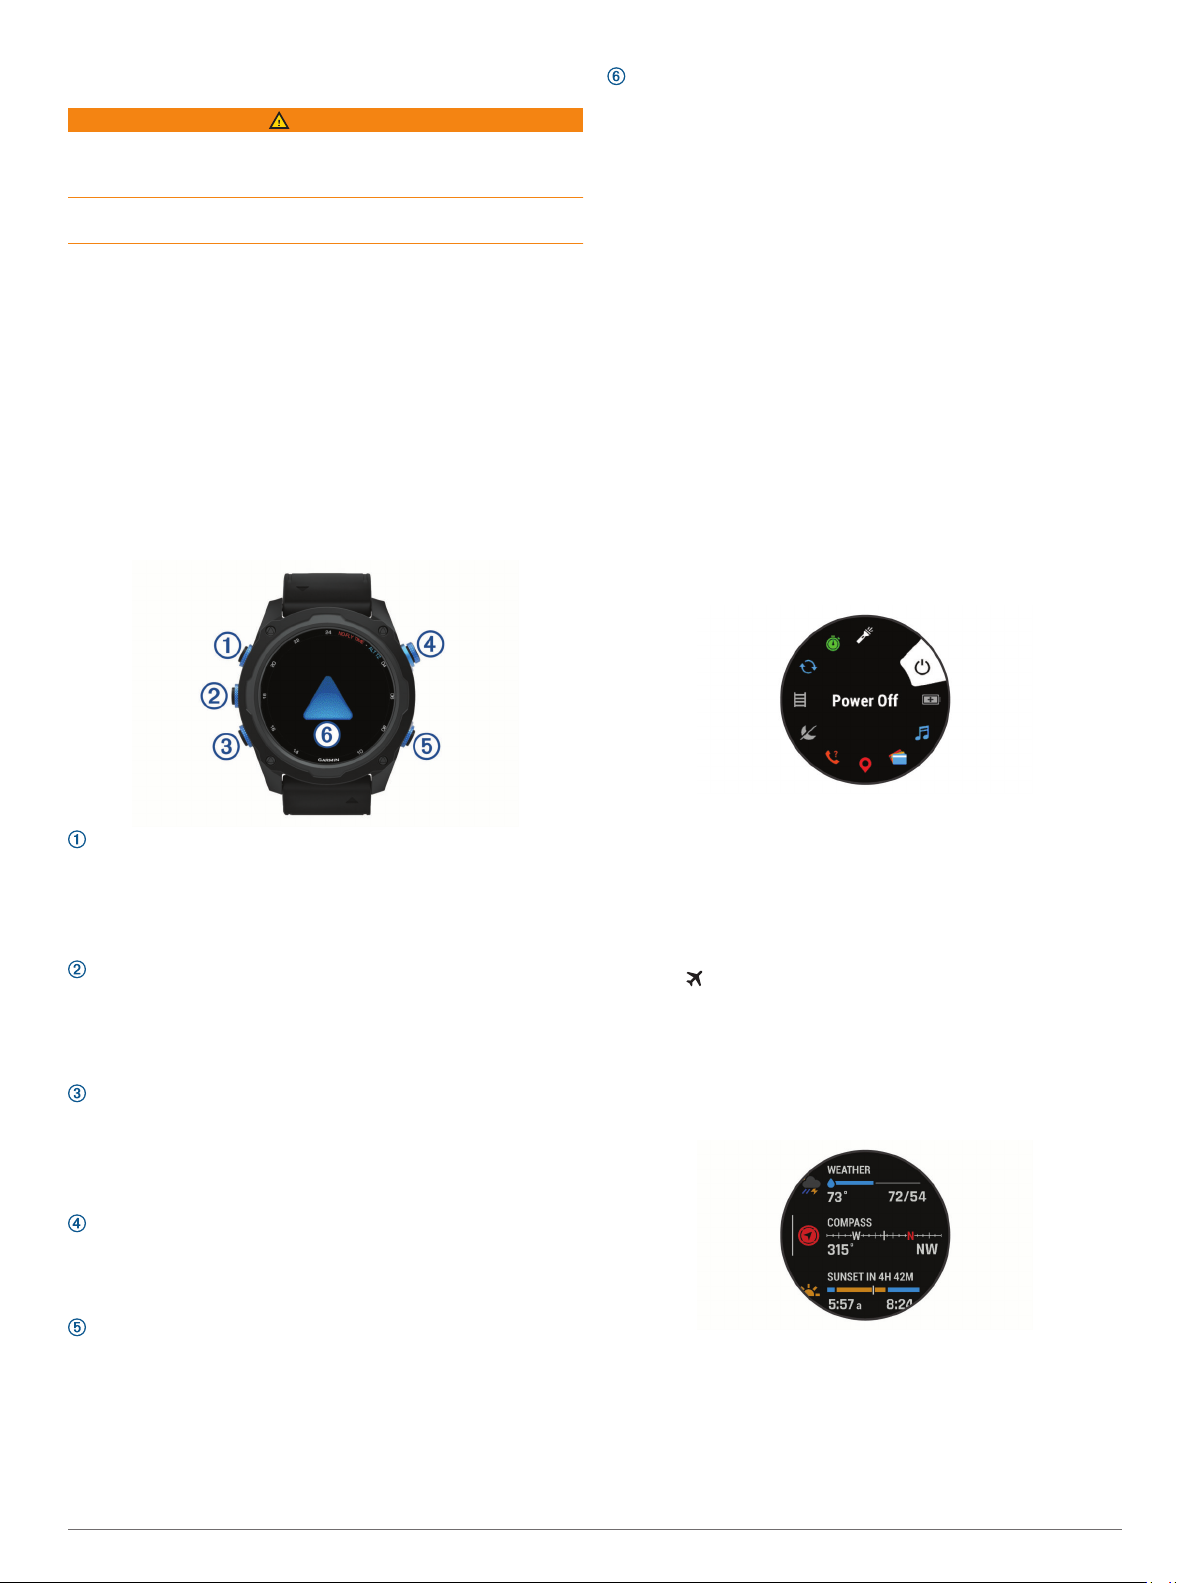
Buttons
: Double tap the device to scroll through the data screens
during a dive.
Using the Watch
• Hold LIGHT to view the controls menu.
The controls menu provides quick access to frequently used
functions, such as turning on do not disturb mode, saving a
location, and turning the watch off.
• From the watch face, press UP or DOWN to scroll through
the widget loop.
Your watch comes preloaded with widgets that provide at-a-
glance information. More widgets are available when you pair
your watch with a smartphone.
• From the watch face, press START to start an activity or
open an app (Activities and Apps, page 12).
• Hold MENU to customize the watch face, adjust settings, and
pair wireless sensors.
Viewing the Controls Menu
The controls menu contains options, such as turning on do not
disturb mode, locking the keys, and turning the device off. You
can also open the Garmin Pay™ wallet.
NOTE: You can add, reorder, and remove the options in the
controls menu (Customizing the Controls Menu, page 45).
From any screen, hold LIGHT.
1
LIGHT
• Press to turn the backlight on and off.
• Press to turn the device on.
• Hold to view the controls menu.
NOTE: While diving, hold functions are disabled.
MENU·UP
• Press to scroll through the widget loop and menus.
• Hold to view the menu.
NOTE: You can enable or disable this button for dive
activities (Dive Setup, page 3).
DOWN
• Press to scroll through the widget loop and menus.
• Press to scroll through the data screens during a dive.
• Hold to view the music controls from any screen.
NOTE: While diving, hold functions are disabled.
START·STOP
• Press to view the activity list and start or stop an activity.
• Press to choose an option in a menu.
• Press to view the menu during a dive.
BACK·LAP
• Press to return to the previous screen.
• Press to exit a menu during a dive.
• Press to record a lap, rest, or transition during a multisport
activity.
• Hold to view the watch face from any screen.
• Hold to return to the primary data screen during a dive.
Press UP or DOWN to scroll through the options.
2
Enabling Airplane Mode
You can enable airplane mode to disable all wireless
communications.
NOTE: You can add options to the controls menu (Customizing
the Controls Menu, page 45).
Hold LIGHT.
1
Select .
2
Viewing Widgets
Your device comes preloaded with several widgets, and more
are available when you pair your device with a smartphone.
• Press UP or DOWN.
The device scrolls through the widget loop and displays
summary data for each widget.
• Press START to view widget details.
TIP: You can press DOWN to view additional screens for a
widget, or press START to view additional options and
functions for a widget.
• From any screen, hold BACK to return to the watch face.
• If you are recording an activity, press BACK to return to the
activity data pages.
Introduction 1
Customizing the Watch
• From the watch face, hold MENU to change the watch face.
• From the widget screens, hold MENU to customize the
widget options.
• From the controls menu, hold MENU to add, remove, and
reorder the controls.
• From any screen, hold MENU to change additional settings.
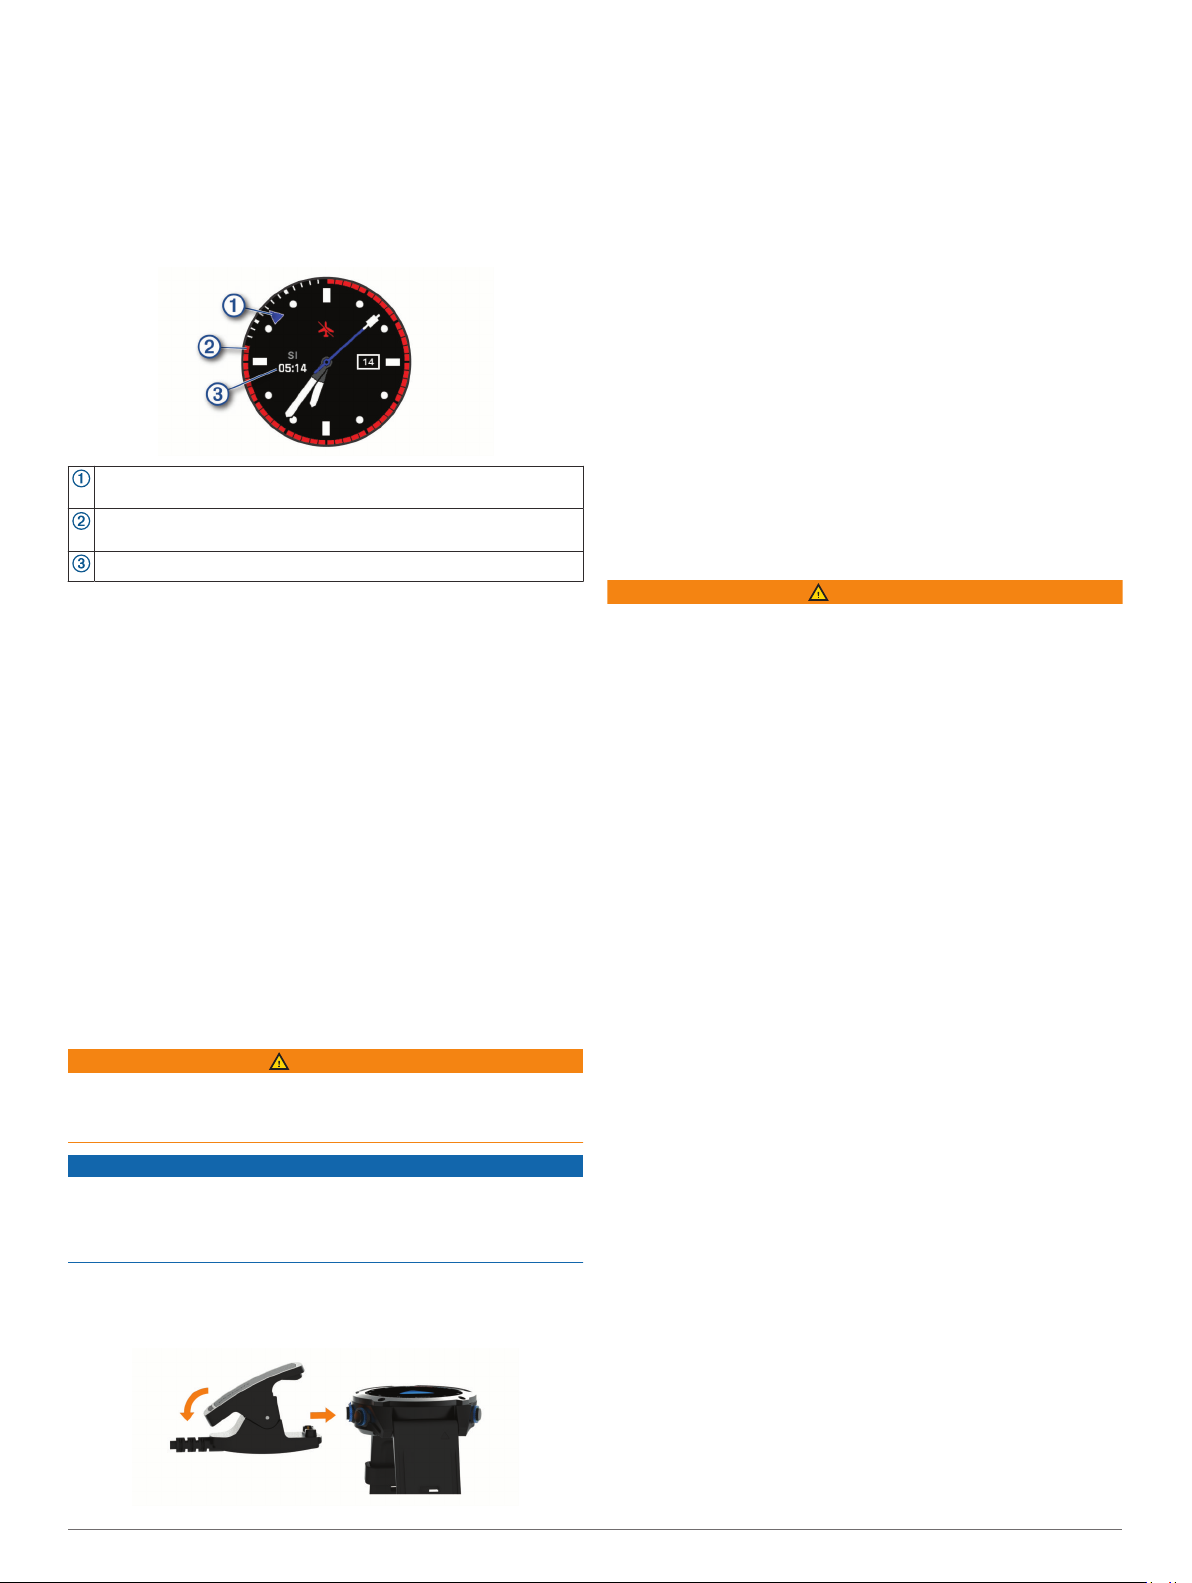
Default Watch Face
Alternate time zone pointer. References the 24-hour time markings
on the watch (Adding Alternate Time Zones, page 37).
No-fly time remaining. References the 24-hour time markings on
the watch (No-Fly Time, page 11).
Surface interval (SI) time after a dive.
Pairing Your Smartphone
To use the connected features on your watch, you must pair it
directly through the Garmin Dive™ app, instead of from the
Bluetooth® settings on your smartphone.
From the app store on your smartphone, install and open the
1
Garmin Dive app.
Select an option to enable pairing mode on your watch:
2
• During the initial setup, select Yes when you are prompted
to pair with your smartphone.
• If you previously skipped the pairing process, hold MENU,
and select Pair Phone.
Select an option to add your watch to your account:
3
• If this is the first time you are pairing a device with the
Garmin Dive app, follow the on-screen instructions.
• If you already paired another device with the Garmin Dive
app, select Add > Devices, and follow the on-screen
instructions.
Charging the Device
WARNING
This device contains a lithium-ion battery. See the Important
Safety and Product Information guide in the product box for
product warnings and other important information.
NOTICE
To prevent corrosion, thoroughly clean and dry the contacts and
the surrounding area before charging or connecting to a
computer. Refer to the cleaning instructions (Device Care,
page 51).
Pinch the sides of the charging clip.
1
Align the clip with the contacts on the back of the device, and
2
release the clip.
Plug the USB cable into a USB charging port.
3
Product Updates
On your computer, install Garmin Express™ (www.garmin.com
/express). On your smartphone, install the Garmin Dive app.
This provides easy access to these services for Garmin
devices:
• Software updates
• Map updates
• Course updates
• Data uploads to Garmin Dive
• Product registration
®
Setting Up Garmin Express
Connect the device to your computer using a USB cable.
1
Go to www.garmin.com/express.
2
Follow the on-screen instructions.
3
Diving
Dive Warnings
WARNING
• The diving features of this device are for use by certified
divers only. This device should not be used as a sole dive
computer. Failure to input the appropriate dive-related
information into the device can lead to serious personal injury
or death.
• Make sure that you fully understand the use, displays, and
limitations of your device. If you have questions about this
manual or the device, always resolve any discrepancies or
confusion before diving with the device. Always remember
that you are responsible for your own safety.
• There is always a risk of decompression sickness (DCS) for
any dive profile even if you follow the dive plan provided by
the dive tables or a diving device. No procedure, diving
device, or dive table will eliminate the possibility of DCS or
oxygen toxicity. An individual's physiological make up can
vary from day to day. This device cannot account for these
variations. You are strongly advised to remain well within the
limits provided by this device to minimize the risk of DCS.
You should consult a physician regarding your fitness before
diving.
• The dive computer can calculate your surface air
consumption rate (SAC) and air time remaining (ATR). These
calculations are an estimate and should not be relied on as
the only source of information.
• Always use backup instruments, including a depth gauge,
submersible pressure gauge, and timer or watch. You should
have access to decompression tables when diving with this
device.
• Perform pre-dive safety checks, such as checking proper
device function and settings, display function, battery level,
tank pressure, and bubble checks to check hoses for leaks.
• If a tank pressure warning or battery warning appears on the
dive computer, terminate the dive immediately and safely
return to the surface. Disregarding the alarm may result in
serious injury or death.
• This device should not be shared between multiple users for
diving purposes. Diver profiles are user specific, and using
another diver's profile can result in misleading information
that could lead to injury or death.
• For safety reasons, you should never dive alone. Dive with a
designated buddy. You should also stay with others for an
extended time after a dive, because the potential onset of
2 Diving

decompression sickness (DCS) may be delayed or triggered
by surface activities.
• This device is not intended for commercial or professional
dive activities. It is for recreational purposes only.
Commercial or professional dive activities can expose the
user to extreme depths or conditions that increase the risk of
DCS.
• Do not dive with a gas if you have not personally verified its
contents and input the analyzed value to the device. Failure
to verify tank contents and input the appropriate gas values
to the device will result in incorrect dive planning information
and could result in serious injury or death.
• Diving with more than one gas mixture presents a much
greater risk than diving with a single gas mixture. Mistakes
related to the use of multiple gas mixtures may lead to
serious injury or death.
• The transmitter is not an oxygen cleaned product. Do not use
the transmitter with anything greater than 40% oxygen.
• Always ensure a safe ascent. A rapid ascent increases the
risk of DCS.
• Disabling the deco lockout feature on the device can result in
an increased risk of DCS, which can result in personal injury
or death. Disable this feature at your own risk.
• Violating a required decompression stop may result in
serious injury or death. Never ascend above the displayed
decompression stop depth.
• Always perform a safety stop between 3 and 5 meters (9.8
and 16.4 feet) for 3 minutes, even if no decompression stop
is required.
Dive Modes
The Descent Mk2i device supports six dive modes. Each dive
mode has four phases: dive pre-check, surface display, in-dive,
and post-dive.
Single-Gas: This mode allows you to dive with a single gas
blend. You can set up to 11 additional gases as backup
gases.
Multi-Gas: This mode allows you to configure multiple gas
blends and switch gases during your dive. You can set the
oxygen content from 5–100%. This mode supports one
bottom gas, and up to 11 additional gases as decompression
or backup gases.
NOTE: Backup gases are not used in no-decompression limit
(NDL) and time to surface (TTS) decompression calculations
until you activate them during a dive.
CCR: This mode for closed-circuit rebreather (CCR) diving
allows you to configure two partial pressure of oxygen (PO2)
setpoints, closed-circuit (CC) diluent gases, and open-circuit
(OC) decompression and backup gases.
Gauge: This mode allows you to dive with basic bottom timer
features.
NOTE: After diving in gauge mode, the device can only be
used in gauge or apnea mode for 24 hours.
Apnea: This mode allows you to free dive with apnea-specific
dive data. This mode has a higher data refresh rate.
Apnea Hunt: This mode is similar to the Apnea dive mode, but
tuned specifically for spearfishers. This mode displays
simplified in-dive data, and disables start and stop tones.
Using the Pool Dive Mode
When the device is in pool dive mode, the tissue load and
decompression lockout features function normally, but dives are
not saved to the dive log.
Hold LIGHT to view the controls menu.
1
Select .
2
The pool dive mode turns off automatically at midnight.
Dive Setup
You can customize the dive settings based on your needs. Not
all settings are applicable for all dive modes. You can also edit
the settings before you start a dive.
Hold MENU, and select Dive Setup.
Gases: Sets the gas blends used in the gas dive modes (Setting
Up Your Breathing Gases, page 3). You can have up to
twelve gases for each gas dive mode.
Conservatism: Sets the level of conservatism for
decompression calculations. Higher conservatism provides a
shorter bottom time and a longer ascent time. The Custom
option allows you to set a custom gradient factor.
NOTE: Make sure you understand gradient factors before
entering a custom level of conservatism.
Air Integration: Allows you to pair Descent T1 devices and
configure the data screens (Air Integration, page 4).
Water Type: Allows you to select the water type.
PO2: Sets the partial pressure of oxygen (PO2) thresholds, in
bar, for decompression, warnings, and critical alerts (Setting
PO2 Thresholds, page 4).
Alerts: Allows you to set tone, vibration, or silent alerts for depth
and time. You can enable different alerts for different dive
modes.
Apnea Surf. Alert: Allows you to set alerts for apnea surface
intervals.
Safety Stop: Allows you to change the safety stop duration.
End Dive Delay: Allows you to set the length of time before the
device ends and saves a dive after surfacing.
CCR Setpoints: Allows you to set high and low PO2 setpoints
for closed-circuit rebreather (CCR) dives (Setting CCR
Setpoints, page 4).
Backlight: Allows you to adjust the backlight settings for dive
activities. You can enable the backlight throughout the dive or
only when you are at depth.
Heart Rate: Allows you to enable or disable a heart rate monitor
for dives. The Stored Strap Data option allows you enable a
chest heart rate monitor, such as the HRM-Swim™ or
HRM-Tri™ device, that stores heart rate data with the dive.
You can view chest heart rate monitor data in the Garmin
Dive app after you complete the dive.
Double Tap to Scroll: Allows you to double tap the device to
scroll through the dive data screens. If you notice accidental
scrolling, you can use the Sensitivity option to adjust the
responsiveness.
UP Key: Allows you to disable the UP button during dive
activities to prevent inadvertent button presses.
NOTE: This setting is disabled by default.
Deco Lockout: Allows you to disable the decompression
lockout feature. This feature prevents single-gas and multigas dives for 24 hours if you violate a decompression ceiling
for more than three minutes.
NOTE: You can still disable the decompression lockout
feature after violating a decompression ceiling.
Setting Up Your Breathing Gases
You can enter up to twelve gases for each gas dive mode.
Decompression calculations include your decompression gases,
but do not include your backup gases.
Hold MENU.
1
Select Dive Setup > Gases.
2
Select a dive mode.
3
Select the first gas in the list.
4
Diving 3
For single-gas or multi-gas dive modes, this is the bottom
gas. For the closed-circuit rebreather (CCR) dive mode, this
is the diluent gas.
Select Oxygen, and enter the oxygen percentage of the gas
5
blend.
Select Helium, and enter the helium percentage of the gas
6
blend.
The device calculates the remaining percentage as the
nitrogen content.
Press BACK.
7
Select an option:
8
NOTE: Not all options are available for all dive modes.
• Select Add Backup, and enter the oxygen and helium
percentage for your backup gas.
• Select Add New, enter the oxygen and helium
percentage, and select Mode to set the intended use for
the gas, such as decompression or backup.
NOTE: For the multi-gas dive mode, you can select Set as
Travel Gas to set a decompression gas as your intended
gas for descending.
Setting PO2 Thresholds
You can configure the partial pressure of oxygen (PO2)
thresholds, in bars, for decompression, warning, and critical
alerts.
Hold MENU.
1
Select Dive Setup > PO2.
2
Select an option:
3
• Select Deco PO2 to set the threshold that you can reach
before you should begin your ascent and switch to the
decompression gas with the highest percentage of
oxygen.
NOTE: The device does not switch gases for you
automatically. You must select the gas.
• Select PO2 Warning to set the threshold for the highest
oxygen concentration level that you are comfortable
reaching.
• Select PO2 Critical to set the threshold for the maximum
oxygen concentration level that you should reach.
Enter a value.
4
If you reach a threshold value during a dive, the device displays
an alert message.
Setting CCR Setpoints
You can configure the high and low partial pressure of oxygen
(PO2) setpoints for closed-circuit rebreather (CCR) dives.
Hold MENU.
1
Select Dive Setup > CCR Setpoints.
2
Select an option:
3
• To configure the lower PO2 setpoint, select Low Setpoint.
• To configure the upper PO2 setpoint, select High
Setpoint.
Select Mode.
4
Select an option:
5
• To automatically change the setpoint based on your
current depth, select Auto.
NOTE: For example, if you descend through the high
setpoint depth or ascend through the low setpoint depth,
the PO2 threshold switches to the high or low setpoint,
respectively. Automatic setpoint depths must be at least
6.1 m (20 ft.) apart.
• To manually change setpoints during a dive, select
Manual.
NOTE: If you manually change setpoints within 1.8 m (6
ft.) of an automatic switch depth, then automatic setpoint
switching is disabled until you are more than 1.8 m (6 ft.)
above or below the automatic switch depth. This prevents
unintended setpoint switching.
Select PO2, and enter a value.
6
Air Integration
The Descent Mk2i dive computer can be used with a paired
Descent T1 transmitter to view tank pressure, estimated air time
remaining, and estimated gas consumption. You can also view
the tank pressure and battery status for up to four other divers in
your group.
Installation and Setup
CAUTION
To ensure proper setup and best performance, it is strongly
recommended that you complete the first time installation and
setup at a dive shop. You should fully test the transmitter
installation above and below water before using it during a dive.
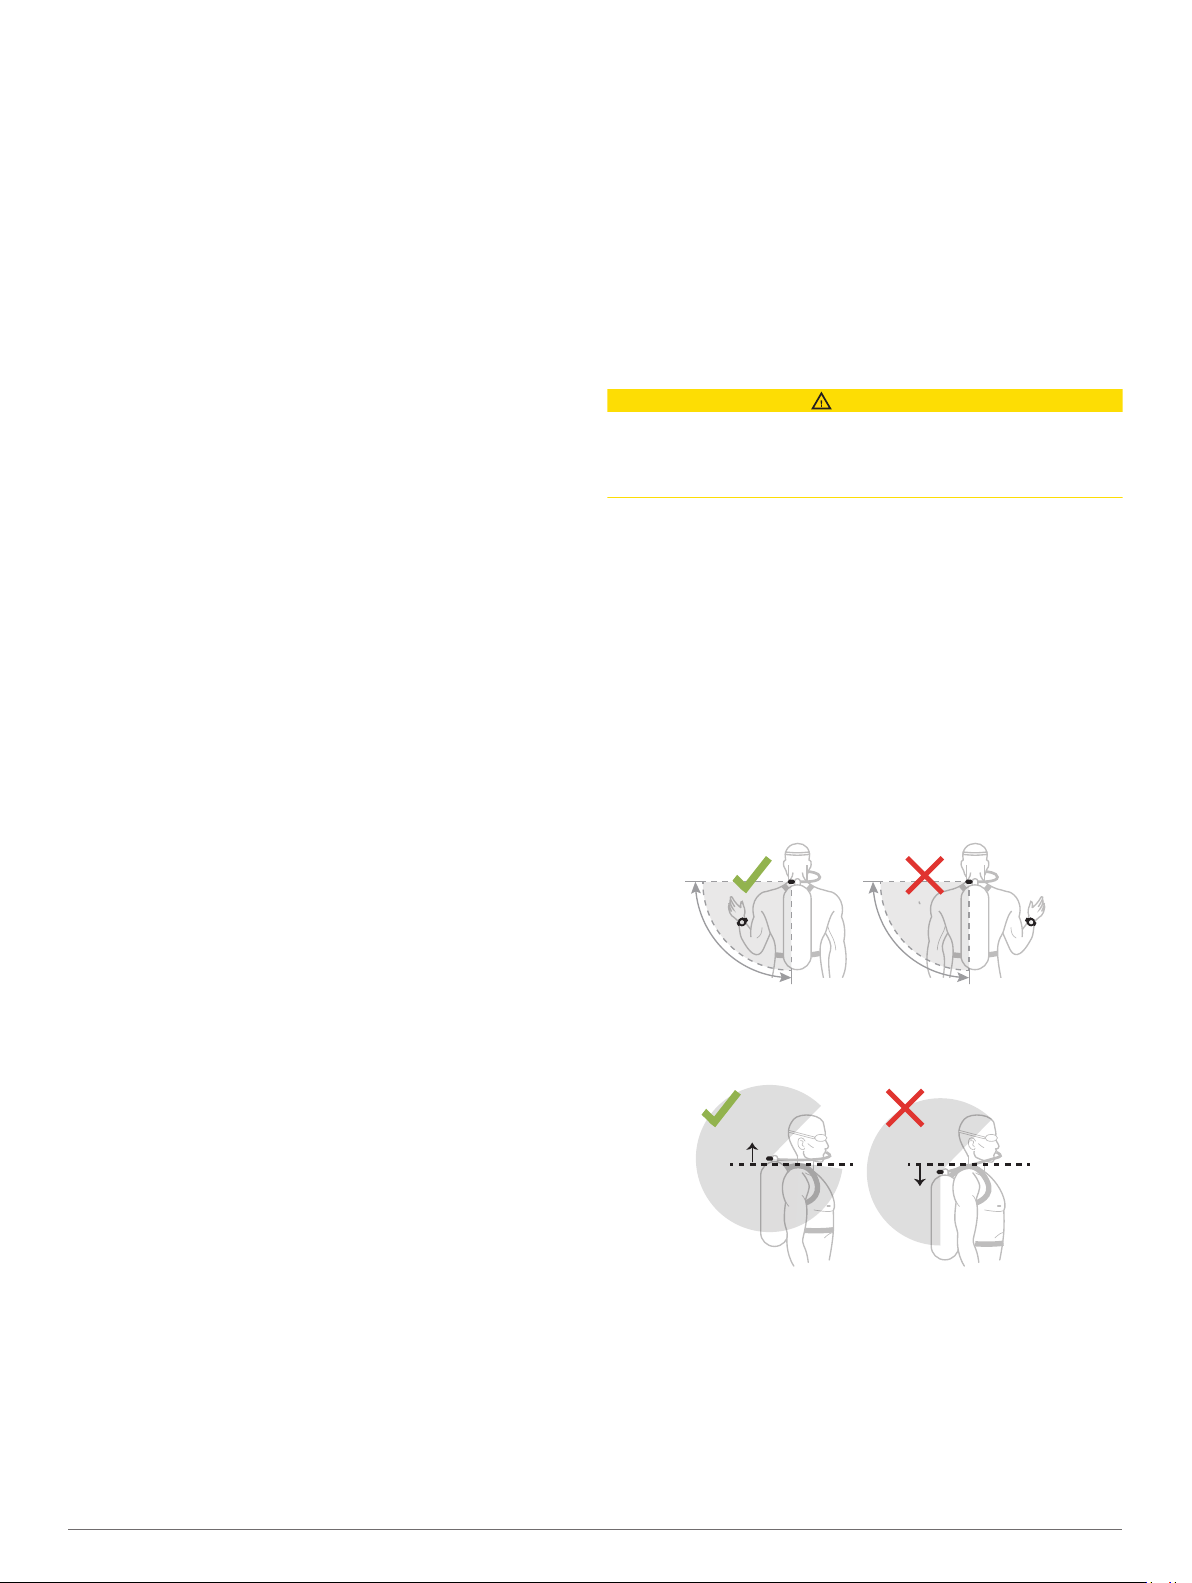
Transmitter Position Tips
The transmitter communicates wirelessly with your compatible
dive computer. On the surface, it uses ANT® technology.
Underwater, it uses a sonar signal. Your body, drysuit, and dive
equipment can obstruct the signal, particularly while underwater.
For the best reception, all transmitters in your group should have
clear lines of sight to the dive computer. To help prevent
blocking the signal with your body or equipment, you should
follow these tips.
• You should install the transmitter at least 7 cm (3 in.) from
your body.
• You should install the transmitter on the same side of the
tank as the wrist wearing your dive computer. For example, if
you wear your dive computer on your left wrist, you should
install the transmitter on the left side of the tank regulator.
• For the best reception, you should wear the tank high on your
back. This allows the transmitter to have a clear line of sight
over your shoulders.
• If you wear your tank inverted with the regulator at the
bottom, you can use a high-pressure hose to relocate the
transmitter to have a clear line of sight over your shoulders.
• If you lose the signal from your transmitter, you should move
your arm until the signal is restored.
• If you lose the signal from another diver, you should change
your body position until the signal is restored. If your body is
between the dive computer and another diver, it may obstruct
the signal from that diver's transmitter.
4 Diving
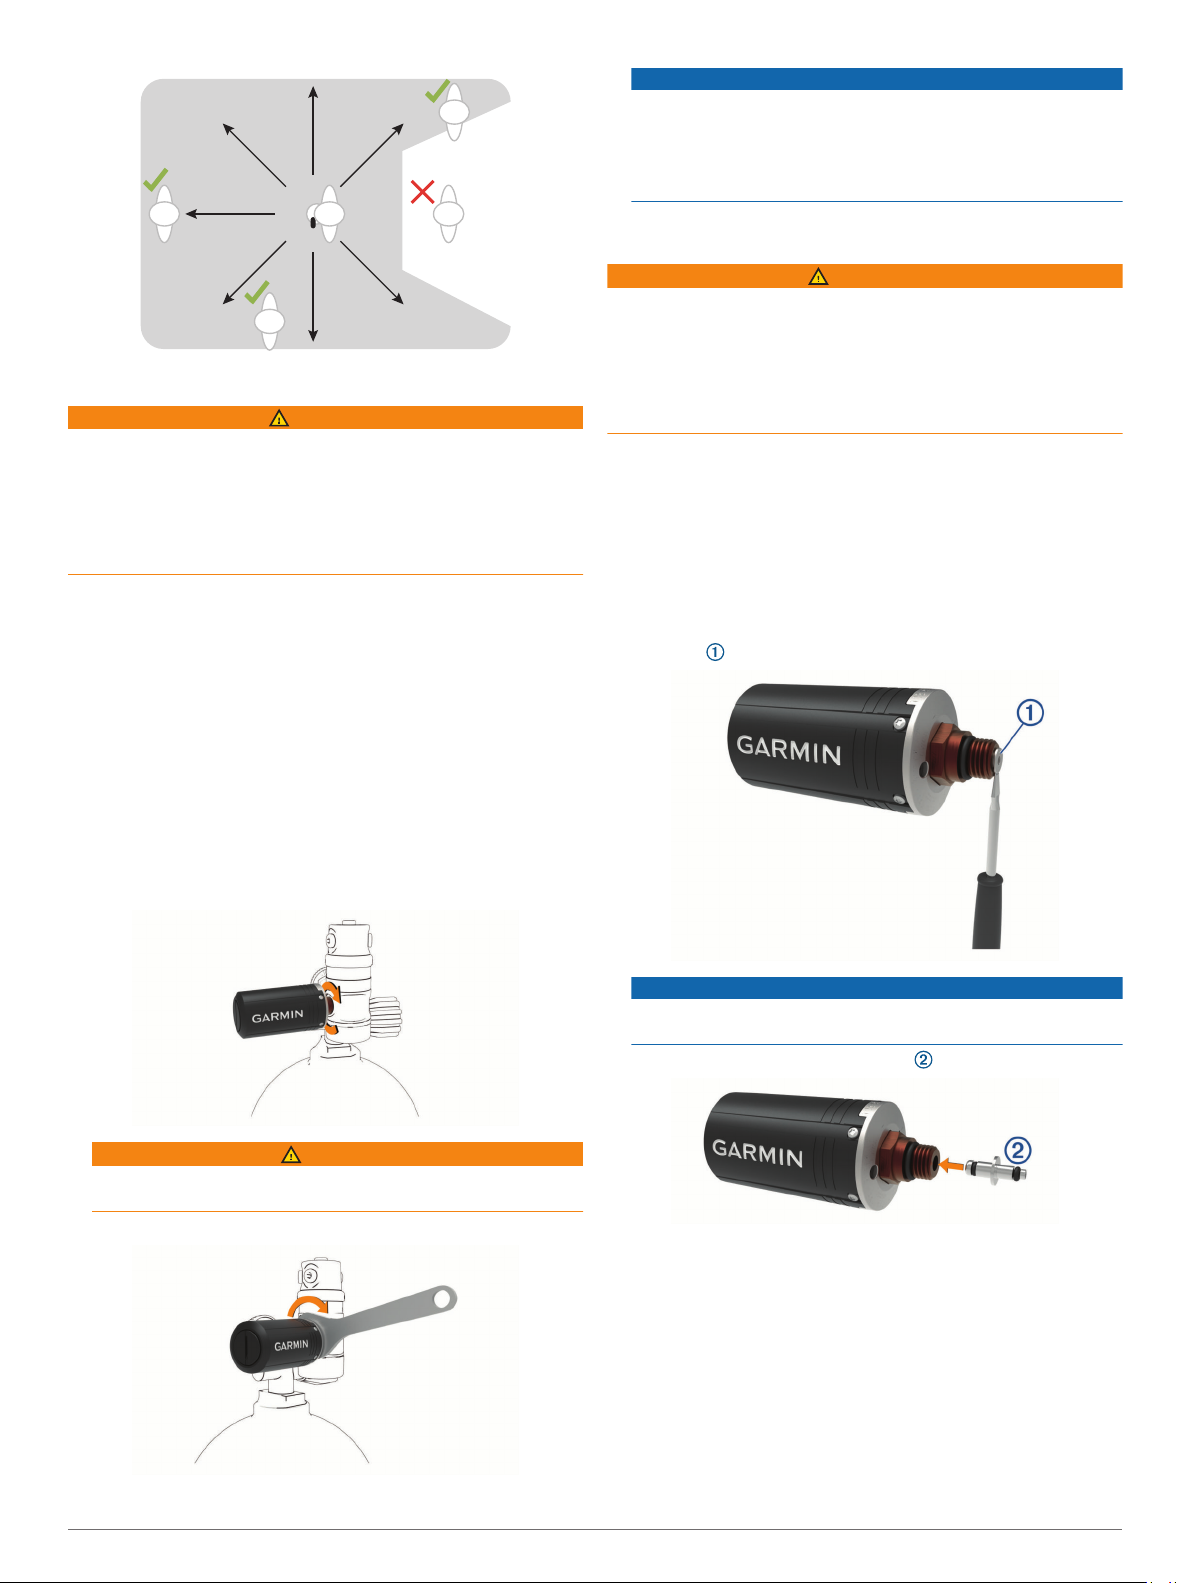
Installing the Transmitter on Your Tank Regulator
WARNING
Always use the pre-installed flow restrictor when using the
transmitter directly attached to your regulator. Always use the
included air spool when connecting the transmitter to a high
pressure hose extension (Installing the Transmitter on a High
Pressure Hose Extension, page 5). Using the transmitter
without either the flow restrictor or air spool could result in
serious injury or death from an air pressurization failure.
Before you install the transmitter on your tank regulator, you
should read the transmitter position tips and choose the port
position that provides the best line of sight to the dive computer.
To install the transmitter, you need a 5/8 in. (16 mm) open-ended
wrench.
The transmitter connects to a high pressure output port of the
first-stage regulator.
Confirm the regulator is depressurized and detached from a
1
scuba cylinder.
Remove the port plug from the high pressure output port of
2
the first-stage regulator.
Confirm the flow restrictor is installed in the transmitter.
3
Screw the transmitter onto the high pressure output port until
4
you feel resistance.
NOTICE
To prevent damage to the transmitter and possible loss of
function, do not overtighten. Do not use the transmitter
housing to tighten or loosen the transmitter.
Do not grip the regulator or the transmitter to move, carry, or
adjust the tank.
Installing the Transmitter on a High Pressure Hose Extension
WARNING
Always use the pre-installed flow restrictor when using the
transmitter directly attached to your regulator (Installing the
Transmitter on Your Tank Regulator, page 5). Always use the
included air spool when connecting the transmitter to a high
pressure hose extension. Using the transmitter without either the
flow restrictor or air spool could result in serious injury or death
from an air pressurization failure.
Before you install the transmitter on a high pressure hose
extension certified to the EN 250:2014 standard, you should
read the transmitter position tips and choose a position that
provides the best line of sight to the dive computer.
To install the transmitter, you need two 5/8 in. (16 mm) openended wrenches and a small flat screwdriver or flat-nose pliers.
The transmitter can connect to a high pressure hose extension
from the high pressure output port of the first-stage regulator.
Use a screwdriver or pliers to carefully remove the flow
1
restrictor from the transmitter.
NOTICE
Use care when removing the flow restrictor to avoid
damaging the device.
Insert the large end of the air spool into the transmitter.
2
WARNING
Verify the installed transmitter does not physically interfere
with any hoses or other tank assemblies.
Use a 5/8 in. (16 mm) wrench to tighten the transmitter.
5
Diving 5
Confirm the regulator is depressurized and detached from a
3
scuba cylinder.
Remove the port plug from the high pressure output port of
4
the first-stage regulator.
Connect a high pressure hose extension to the high pressure
5
output port of the first-stage regulator.
Screw the transmitter onto the high pressure hose extension
6
until you feel resistance.
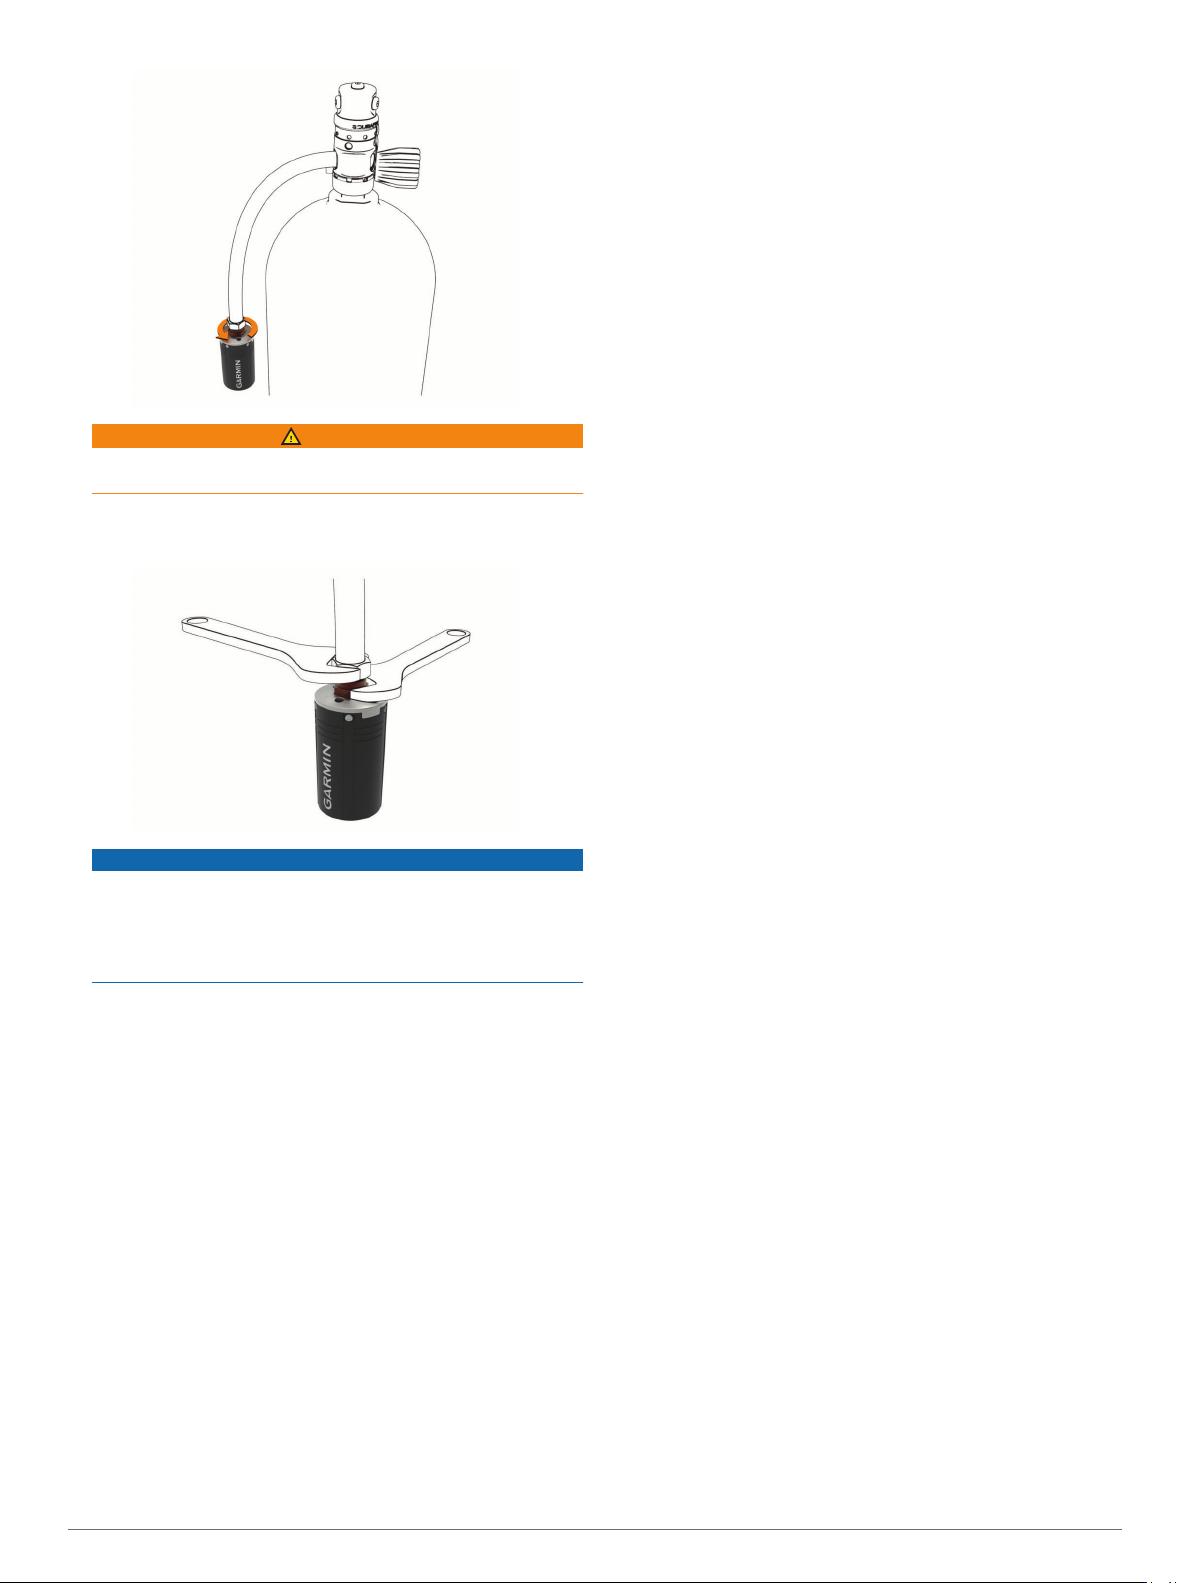
WARNING
Verify the installed transmitter does not physically interfere
with any hoses or other tank assemblies.
Use two 5/8 in. (16 mm) wrenches to tighten the transmitter,
7
placing one wrench on the transmitter and one wrench on the
hose fitting.
NOTICE
To prevent damage to the transmitter and possible loss of
function, do not overtighten. Do not use the transmitter
housing to tighten or loosen the transmitter.
Do not grip the regulator or the transmitter to move, carry, or
adjust the tank.
Ensure the connection between the transmitter and hose
8
fitting is secure before using the device.
You must remove the air spool and reinstall the flow restrictor
before installing the transmitter on your tank regulator.
Pairing the Transmitter with a Descent Mk2i Dive Computer
To pair the transmitter, you must have a pressurized tank and
regulator.
The Descent T1 can transmit air pressure data to a Descent
Mk2i dive computer.
Before you use the transmitter for the first time, you must pair it
with the dive computer. Out of the box, the transmitter is in low
power mode. You must wake the device from low power mode
to complete the pairing process.
NOTE: If a transmitter was packaged with your dive computer,
they are already paired.
Install the transmitter on the first-stage regulator (Installing
1
the Transmitter on Your Tank Regulator, page 5).
Gradually open the tank valve to pressurize the first-stage
2
regulator.
When the transmitter detects pressure, it wakes from low
power mode. The transmitter plays a tone when it wakes
from low power mode and is ready to pair.
On the Descent Mk2i dive computer, hold MENU, and select
3
Dive Setup > Air Integration > Transmitters > Add New.
The dive computer starts searching and displays a list of
nearby transmitters.
From the list of transmitters, select the transmitter ID you
4
want to pair.
The transmitter ID is printed on the housing.
When the pairing process is complete, Connected appears on
the dive computer screen. The transmitter begins sending tank
pressure data, and it is ready to use on a dive. The next time the
transmitter and dive computer are turned on and within wireless
range, they connect automatically when you start a dive.
If you are diving with a group, you can pair up to 5 Descent T1
transmitters with the dive computer.
Selecting Paired Transmitters to View on Your Dive Data Screens
You can view two paired transmitters at-a-glance on the primary
dive data screen. You can customize which paired transmitters
appear on the screen. By default, the first and second
transmitters that you pair appear.
Hold MENU.
1
Select Dive Setup > Air Integration > Display Setup.
2
Select a field to customize.
3
Select a paired transmitter.
4
Transmitter Settings
You can customize the settings for paired transmitters prior to a
dive.
On the paired Descent dive computer, hold MENU, select Dive
Setup > Air Integration > Transmitters, and select a
transmitter.
Status: Enables a connection to the transmitter, and shows
current connection status.
Identify: Plays a tone on the selected paired transmitter. This
helps you to identify the transmitter without needing to look at
the transmitter ID printed on the transmitter housing.
Units: Sets the pressure units for your tank. The device defaults
to psi if your depth setting is in feet, and bar if your depth
setting is in meters.
Working Pressure: Sets how much pressure the tank has when
full. This value is used to determine the upper end of the
pressure gauge, and to calculate respiratory minute volume
(RMV) for tanks using psi units.
Reserve Pressure: Sets the threshold values for reserve
pressure and critical pressure alerts to appear on the dive
computer.
Volume: Allows you to enter the air volume of the tank. You can
use the Reset Volume option if you move the transmitter to a
different size tank.
NOTE: This value is required to calculate volumetric surface
air consumption (SAC) and respiratory minute volume (RMV)
(Selecting the Gas Consumption Rate Metric, page 7).
SAC/RMV/ATR: Enables the transmitter to be included in
volumetric surface air consumption (SAC), respiratory minute
volume (RMV), and air time remaining (ATR) estimates
(Including Transmitters in Gas Consumption Calculations,
page 7).
Set Transmit Power: Allows you to adjust the power setting if
your transmitter is losing connection with the paired dive
computer underwater.
About: Displays the transmitter ID, software version, and battery
status.
Name: Allows you to enter an easily identifiable name for the
transmitter.
Remove: Allows you to remove a paired transmitter.
6 Diving
Selecting the Gas Consumption Rate Metric
Hold MENU.
1
Select Dive Setup > Air Integration > Display Setup > Gas
2
Consumption Rate.
Select an option.
3
NOTE: The dive computer can estimate volumetric surface
air consumption (SAC) or respiratory minute volume (RMV)
only if the air volume of the tank is entered in the dive
computer (Transmitter Settings, page 6). The dive computer
can estimate pressure-based surface air consumption
(PSAC) with or without the air volume of the tank.
Including Transmitters in Gas Consumption Calculations
Gas consumption and air time remaining estimates are
calculated using the tank pressure from the included
transmitters. By default, the first transmitter that you pair with
your compatible dive computer is included. You can include
additional paired transmitters in gas consumption calculations.
Hold MENU.
1
Select Dive Setup > Air Integration > Transmitters.
2
Select a paired transmitter.
3
Select the SAC/RMV/ATR toggle switch to include the
4
transmitter in gas consumption calculations.
If necessary, repeat steps 2 through 4 to include additional
5
paired transmitters in gas consumption calculations.
Dive compass: Allows you to view the compass and set a
directional heading to aid with underwater navigation
(Navigating with the Dive Compass, page 8).
Customizable data screen: Displays additional dive data and
physiological information, including the time of day, battery
level, and your heart rate. You can edit the gauges and the
first five data fields (Customizing the Data Screens,
page 41).
The time to surface (TTS) decompression calculation.
Transmitters data screen: Displays information about paired
Descent T1 transmitters (Viewing the Transmitter Data
Screens, page 9).
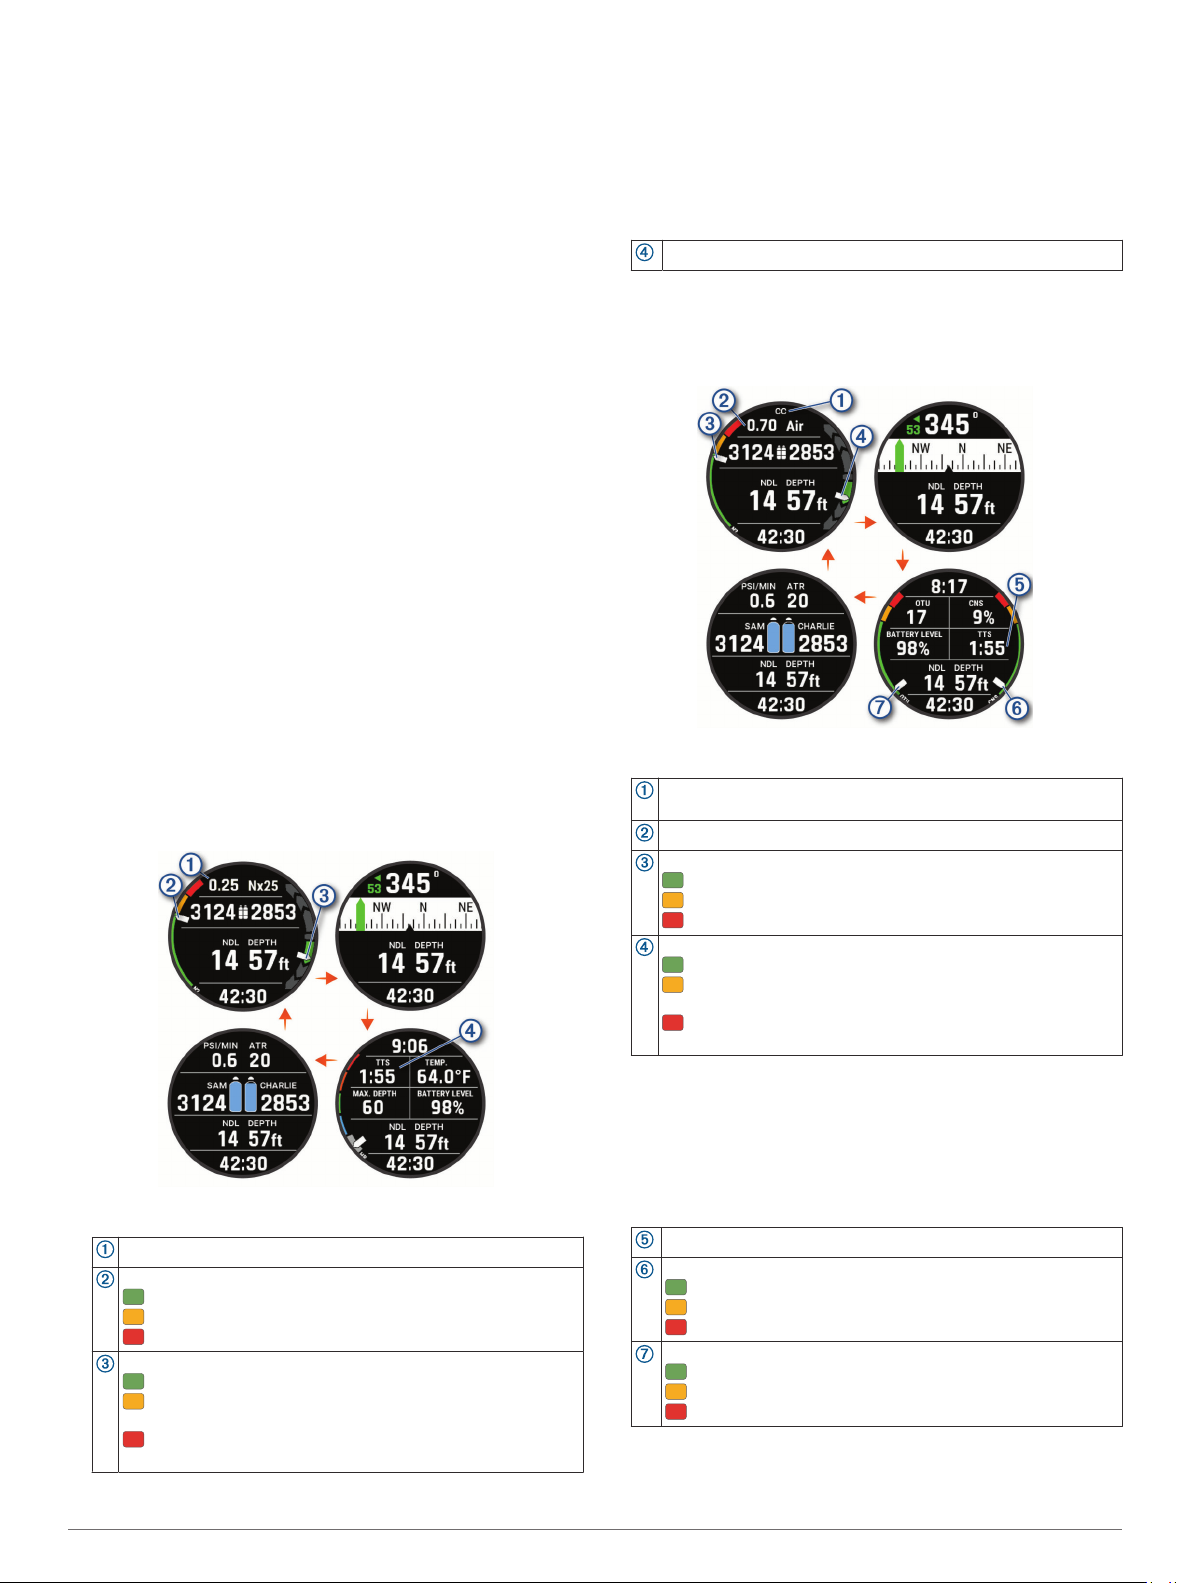
CCR Data Screens
Dive Data Screens
You can press DOWN or double-tap the device to scroll through
the data screens.
In the activity settings, you can reorder the default data screens,
add a dive stopwatch, and add custom data screens
(Customizing the Data Screens, page 41). You can customize
the data fields on some of the data screens.
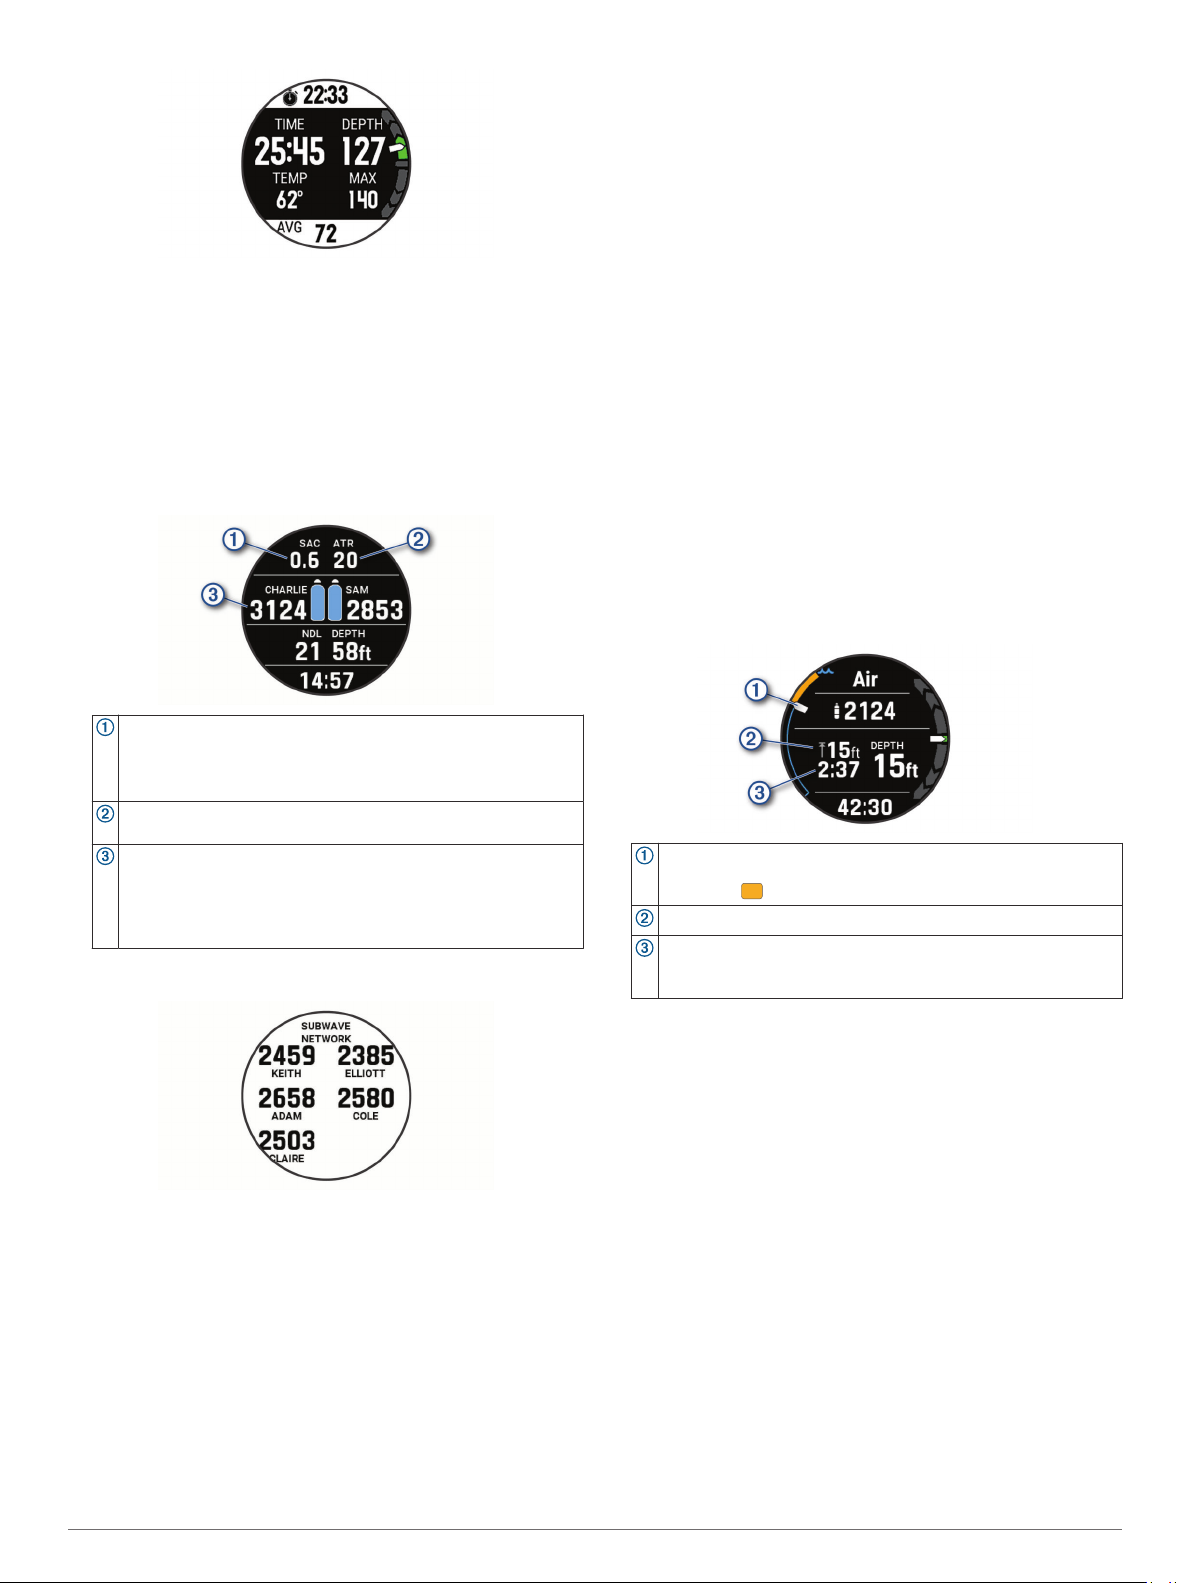
Single-Gas and Multi-Gas Data Screens
Primary data screen: Displays the main dive data, including
your breathing gas and rate of ascent or decent.
Your partial pressure of oxygen (PO2) level.
Your nitrogen (N2) and helium (He) tissue load level.
Green: 0 to 79% tissue load.
Yellow: 80 to 99% tissue load.
Red: 100% or greater tissue load.
Your rate of descent or ascent.
Green: Good. Ascent is less than 7.9 m (26 ft.) per min.
Yellow: Moderately high. Ascent is between 7.9 and 10.1 m
(26 and 33 ft.) per min.
Red: Too high. Ascent is greater than 10.1 m (33 ft.) per
min.
Primary data screen: Displays the main dive data, including
your breathing gas and rate of ascent or decent.
Indicates whether closed-circuit (CC) or open-circuit (OC) diving
is active.
Your partial pressure of oxygen (PO2) level.
Your nitrogen (N2) and helium (He) tissue load level.
Green: 0 to 79% tissue load.
Yellow: 80 to 99% tissue load.
Red: 100% or greater tissue load.
Your rate of descent or ascent.
Green: Good. Ascent is less than 7.9 m (26 ft.) per min.
Yellow: Moderately high. Ascent is between 7.9 and 10.1 m
(26 and 33 ft.) per min.
Red: Too high. Ascent is greater than 10.1 m (33 ft.) per
min.
Dive compass: Allows you to view the compass and set a
directional heading to aid with underwater navigation
(Navigating with the Dive Compass, page 8).
Customizable data screen: Displays additional dive data and
physiological information, including the time of day and
battery level. You can edit the gauges and the first five data
fields (Customizing the Data Screens, page 41).
The time to surface (TTS) decompression calculation.
Your central nervous system (CNS) oxygen toxicity level.
Green: 0 to 79% CNS oxygen toxicity.
Yellow: 80 to 99% CNS oxygen toxicity.
Red: 100% or greater CNS oxygen toxicity.
Your current oxygen toxicity units (OTU).
Green: 0 to 249 OTU.
Yellow: 250 to 299 OTU.
Red: 300 or greater OTU.
Transmitters data screen: Displays information about paired
Descent T1 transmitters (Viewing the Transmitter Data
Screens, page 9).
Diving 7
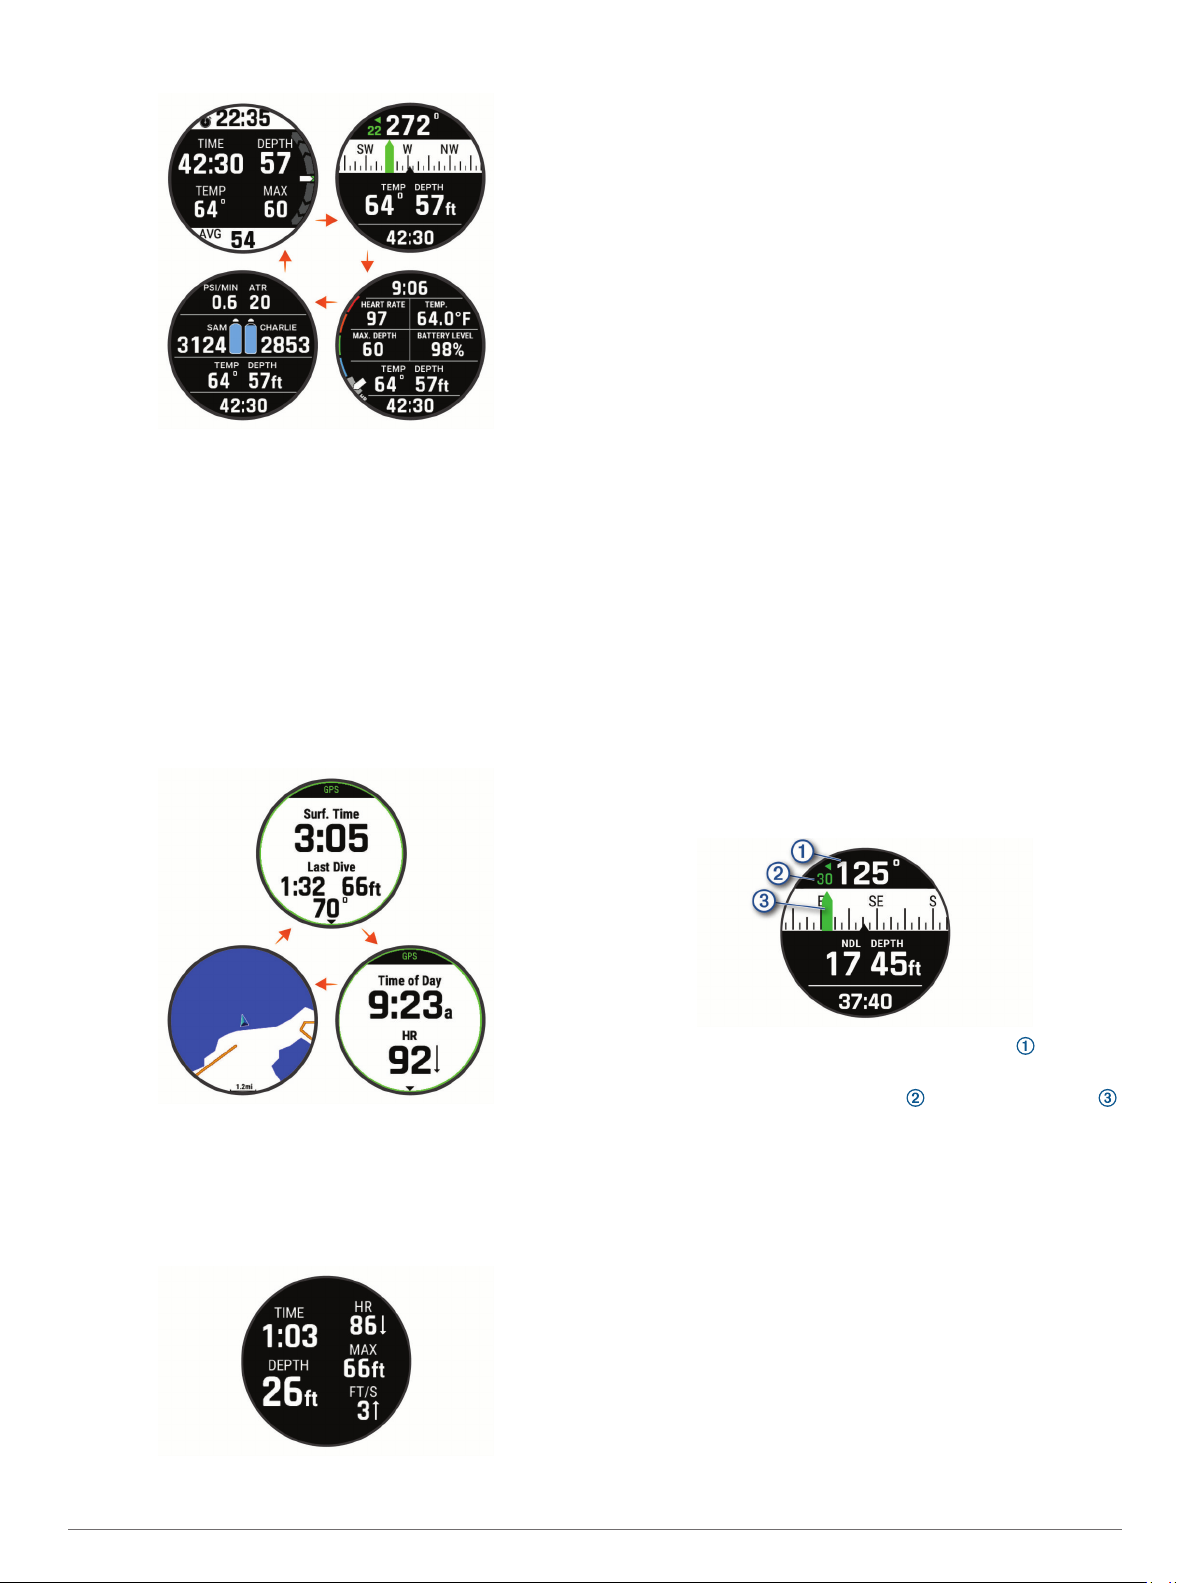
Gauge Data Screens
Dive stopwatch: Displays the bottom time stopwatch; current,
maximum, and average depth; and rate of ascent or decent
(Using the Dive Stopwatch, page 8).
Dive compass: Allows you to view the compass and set a
directional heading to aid with underwater navigation
(Navigating with the Dive Compass, page 8).
Customizable data screen: Displays additional dive data and
physiological information, including the time of day, battery
level, and your heart rate. You can edit the gauges and the
first five data fields (Customizing the Data Screens,
page 41).
Transmitters data screen: Displays information about paired
Descent T1 transmitters (Viewing the Transmitter Data
Screens, page 9).
Apnea and Apnea Hunt Data Screens
In-dive screen: Displays the information about the current dive,
including the elapsed time, current and maximum depth,
heart rate data, and rate ascent or descent.
Starting a Dive
From the watch face, press START.
1
Select a dive mode (Dive Modes, page 3).
2
If necessary, press DOWN to edit the dive settings, such as
3
the gases, water type, and alerts (Dive Setup, page 3).
Wait with your wrist out of the water until the device acquires
4
GPS signals and the status bar turns green (optional).
The device requires GPS signals to save your dive entry
location.
Press START until the primary dive data screen appears.
5
Descend to start your dive.
6
The activity timer starts automatically when you reach a
depth of 1.2 m (4 ft.).
NOTE: If you start a dive without selecting a dive mode, the
device uses the most recently used dive mode and settings.
Select an option:
7
• Press DOWN to scroll through the data screens and dive
compass.
TIP: You can also double tap the device to scroll through
the screens.
• Press START to view the in-dive menu.
When you ascend to 1 m (3.3 ft.), the End Dive Delay timer
begins counting down (Dive Setup, page 3). When the timer
elapses, the device automatically ends and saves the dive. You
should keep your wrist out of the water while the device saves
your dive exit location.
Navigating with the Dive Compass
During a single-gas, multi-gas, closed-circuit rebreather, or
1
gauge dive, scroll to the dive compass.
The compass indicates your directional heading .
Press START to set the heading.
2
Surface interval screen: Displays the current surface interval
time, as well as the elapsed time, maximum depth, and
temperature for your last apnea dive.
Time of day screen: Displays the time of day and your heart
rate data.
Map: Displays your current location on the map (Diving with the
Map, page 10).
The compass indicates deviations from the set heading .
Press START, and select an option:
3
• To reset the heading, select Reset Heading.
• To change the heading by 180 degrees, select Set to
Recip..
NOTE: The compass indicates the reciprocal heading with
a red mark.
• To set to a 90-degree heading left or right, select Set to
90L or Set to 90R.
• To clear the heading, select Clear Heading.
Using the Dive Stopwatch
TIP: You can add a simplified stopwatch screen to any of the
gas dive modes (Customizing the Data Screens, page 41).
Start a Gauge dive.
1
Scroll to the stopwatch screen.
2
8 Diving
Press START, and select Reset Avg. Depth to set the
3
average depth to your current depth.
Press START, and select Start Stopwatch.
4
Select an option:
5
• To stop using the stopwatch, press START, and select
Stop Stopwatch.
• To restart the stopwatch, press START, and select Reset
Stopwatch.
Viewing the Transmitter Data Screens
Press DOWN to view the transmitter data screen.
1
NOTE: The device does not switch gases for you
automatically. You must select the gas.
Switching Between CC and OC Diving for a Bailout Procedure
During a closed-circuit rebreather (CCR) dive, you can switch
between closed-circuit (CC) and open-circuit (OC) diving while
you perform a bailout procedure.
Start a CCR dive.
1
Press START.
2
Select Switch to OC.
3
The dividing lines on the data screens turn red, and the
device switches the active breathing gas to your OC
decompression gas.
NOTE: If you have not set up an OC decompression gas, the
device switches to your diluent gas.
If necessary, press START, and select Gas to manually
4
switch to a backup gas.
Press START, and select Switch to CC to switch back to CC
5
diving.
Performing a Safety Stop
You should perform a safety stop during every dive to help
reduce the risk of decompression sickness.
After a dive of at least 11 m (35 ft.), ascend to 5 m (15 ft.).
1
Safety stop information appears on the data screens.
The gas consumption estimate for the selected transmitters.
NOTE: You can customize the transmitters used for gas
calculations (Including Transmitters in Gas Consumption
Calculations, page 7).
The air time remaining (ATR) estimate for the selected
transmitters.
Your primary and secondary transmitters and their tank
pressure values.
NOTE: You can customize which transmitters are displayed
(Selecting Paired Transmitters to View on Your Dive Data
Screens, page 6).
From the transmitter data screen, press START to view
2
additional paired transmitters in the network.
Switching Gases During a Dive
Start a single-gas, multi-gas, or closed-circuit rebreather
1
(CCR) dive.
Select an option:
2
• Press START, select Gas, and select a backup or
decompression gas.
NOTE: If necessary, you can select Add New and enter a
new gas.
• Dive until you reach the Deco PO2 threshold (Setting PO2
Thresholds, page 4).
The device prompts you to switch to the gas with the
highest percentage of oxygen.
Your depth relative to the surface.
As you ascend, your position moves upward toward the safety
stop depth .
The safety stop ceiling depth.
The safety stop timer.
When you are within 1 m (5 ft.) of the ceiling depth, the timer
starts counting down.
Stay within 2 m (8 ft.) of the safety stop ceiling depth until the
2
safety stop timer reaches zero.
NOTE: If you ascend more than 3 m (8 ft.) above the safety
stop ceiling depth, the safety stop timer pauses, and the
device alerts you to descend below the ceiling depth. If you
descend below 11 m (35 ft.), the safety stop timer resets.
Continue ascending to the surface.
3
Performing a Decompression Stop
You should always perform all the required decompression
stops during a dive to help reduce the risk of decompression
sickness. Missing a decompression stop adds significant risk.
When you exceed the no-decompression limit (NDL) time,
1
begin your ascent.
Decompression stop information appears on the data
screens.
Diving 9
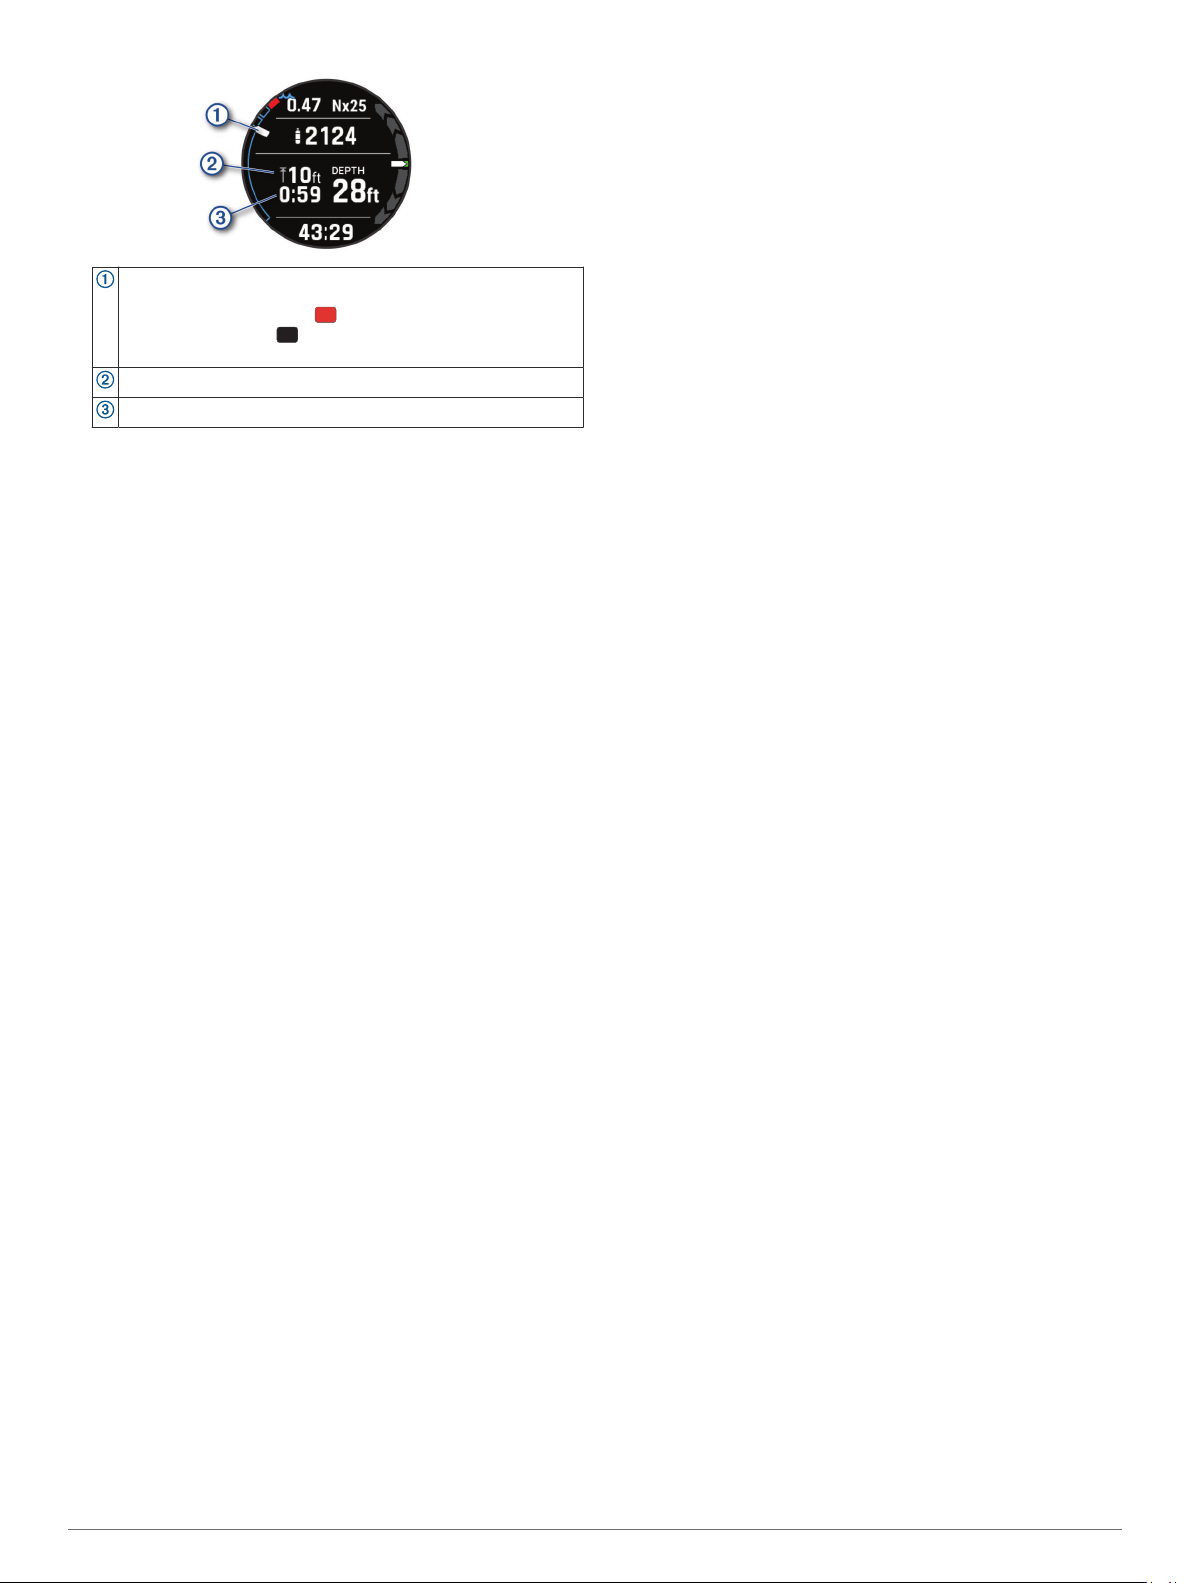
Your depth relative to the surface.
As you ascend, your position moves upward toward the required
decompression stop depth .
The empty segments represent cleared stops. You may
clear a stop before ascending to it.
The decompression stop ceiling depth.
The decompression stop timer.
Stay within 0.6 m (2 ft.) of the decompression stop ceiling
2
depth until the decompression stop timer reaches zero.
NOTE: If you ascend more than 0.6 m (2 ft.) above the
decompression stop ceiling depth, the decompression stop
timer pauses, and the device alerts you to descend below the
ceiling depth. The depth and ceiling depth flash red until you
are within the safe margin.
Continue ascending to the surface.
3
Diving with the Map
You can view your dive entry and exit locations on the map
during apnea surface intervals.
TIP: You can view map data for all dive modes in the dive log
widget and in the Garmin Dive app.
During an apnea dive activity, scroll to the map.
1
Press START, and select an option:
2
• To pan or zoom the map, select Pan/Zoom.
TIP: You can press START to toggle between panning up
and down, panning left and right, or zooming. You can
hold START to select the point indicated by the
crosshairs.
• To mark your location, select Save Location.
TIP: You can press DOWN to change the icon.
Viewing the Surface Interval Widget
The widget displays your surface interval time, tissue load, and
central nervous system (CNS) oxygen toxicity percentage.
From the watch face, press UP or DOWN to view the surface
1
interval widget.
Press START to view your oxygen toxicity units (OTU) and
2
CNS percentage.
NOTE: The OTU accumulated during a dive expire after 24
hours.
Press DOWN to view your tissue load details.
3
Viewing the Dive Log Widget
The widget displays summaries of your recently recorded dives.
From the watch face, press UP or DOWN to view the dive log
1
widget.
Press START to view your most recent dive.
2
Select an option:
3
• Press START to view more details.
• Press DOWN > START to view a different dive.
Press DOWN.
4
Select an option:
5
• To view additional information about the activity, select All
Stats.
• To view additional information about one of multiple apnea
dives in the activity, select Dives, and select a dive.
• To view the activity on a map, select Map.
NOTE: The device shows your entry and exit locations if
you waited for GPS signals before and after the dive.
• To save a dive entry or exit location, select Save
Location.
• To view the depth profile of the activity, select Depth
Profile.
• To view the temperature profile of the activity, select
Temperature Profile.
• To view the gases you used, select Gas Switches.
Dive Planning
You can plan for future dives using your device. The device can
calculate no-decompression limit (NDL) times or create
decompression plans. When planning a dive, the device uses
your residual tissue load from recent dives in the calculations.
Calculating NDL Time
You can calculate the no-decompression limit (NDL) time or
maximum depth for a future dive. These calculations are not
saved or applied to your next dive.
Press START.
1
Select Plan Dive > Compute NDL.
2
Select an option:
3
• To calculate NDL based on your current tissue load, select
Diving Now.
• To calculate NDL based on your tissue load at a future
time, select Enter Surf. Interval, and enter your surface
interval time.
Enter an oxygen percentage.
4
Select an option:
5
• To calculate the NDL time, select Enter Depth, and enter
the planned depth for your dive.
• To calculate the maximum depth, select Enter Time, and
enter your planned dive time.
The NDL countdown clock, depth, and maximum operating
depth (MOD) appear.
Press DOWN.
6
Select an option:
7
• To exit, select Done.
• To add intervals to your dive, select Add Repeat Dive,
and follow the on-screen instructions.
Creating a Decompression Plan
You can create open-circuit decompression plans and save
them for future dives.
Press START.
1
Select Plan Dive > Deco Plans > Add New.
2
Enter a name for the decompression plan.
3
Select an option:
4
• To enter the maximum partial pressure of oxygen in bars,
select PO2.
NOTE: The device uses the PO2 value for gas switching.
• To enter your level of conservatism for decompression
calculations, select Conservatism.
• To enter your gas blends, select Gases.
• To enter the maximum dive depth, select Bottom Depth.
• To enter the time at the bottom depth, select Bottom
Time.
Select Save.
5
10 Diving

Viewing and Applying a Decompression Plan
You can replace the current single-gas or multi-gas dive settings
with the settings from a decompression plan.
Press START.
1
Select Plan Dive > Deco Plans.
2
Select a decompression plan.
3
If necessary, select View to view the decompression plan,
4
then press BACK.
Select Apply to use the decompression plan settings for the
5
single-gas or multi-gas dive mode.
Editing a Decompression Plan
Press START.
1
Select Plan Dive > Deco Plans.
2
Select a decompression plan.
3
Select an option:
4
• To change the decompression plan details, select Edit.
• To edit the name of the decompression plan, select
Rename.
Edit the information.
5
Deleting a Decompression Plan
Press START.
1
Select Plan Dive > Deco Plans.
2
Select a decompression plan.
3
Select Delete > Yes.
4
No-Fly Time
After a dive, appears on the default watch face, along with a
no-fly time estimate in hours (Default Watch Face, page 2). You
should not fly in an airplane during this time. The default no-fly
time after a dive is 24 hours. After a gauge dive or a dive that
violated the decompression plan, the no-fly time is set to 48
hours.
TIP: You can add the no-fly indicator to a custom watch face
(Customizing the Watch Face, page 45).
Altitude Diving
At higher altitudes, the atmospheric pressure is lower, and your
body contains a larger amount of nitrogen than it would at the
start of a dive at sea level. The device accounts for altitude
changes automatically using the barometric pressure sensor.
The absolute pressure value used by the decompression model
is not affected by the altitude or the gauge pressure displayed
on the watch.
Tips for Wearing the Device with an Exposure Suit
• Use the extra long silicone diving band to wear the device
over a thick exposure suit.
• Use the extension on the titanium watch band to increase
the length of the band.
• For accurate heart rate measurements, make sure that the
device stays in contact with your skin and does not bump into
other wrist-worn devices (Wearing the Device, page 23).
• If you are wearing the device over an exposure suit, turn off
the wrist-based heart rate monitor to increase battery life
(Turning Off the Wrist-based Heart Rate Monitor, page 24).
Dive Alerts
Alert Message Cause Device Action
None You completed the
None Your partial pressure of
%1 OTU
accumulated. End
your dive now.
250 OTU
accumulated.
Approaching Deco
Stop
Approaching NDL You are at 80% of your
Ascending too fast.
Slow your ascent.
Battery critically
low. End your dive
now.
Battery is low. Less than 20% battery
CNS toxicity at
%1%. End your
dive now.
CNS toxicity at
80%.
Decompression
Cleared
Descend below
deco ceiling.
Descend to
complete safety
stop.
decompression stop.
oxygen (PO2) value is
above the specified
warning value.
Your oxygen toxicity
units are above the
safe limit. During a
dive, "%1" is replaced
with the number of
units accumulated.
Your oxygen toxicity
units (OTU) are at 80%
of the safe limit (250
units).
You are within one stop
interval (3 m or 9.8 ft.)
of the decompression
stop depth.
tissue load.
You are ascending
faster than 9.1 m/min.
(30 ft./min.) for more
than 5 seconds.
Less than 10% battery
power remains.
power remains.
Your CNS oxygen
toxicity is too high.
During a dive, "%1" is
replaced with your
current CNS
percentage.
Your central nervous
system (CNS) oxygen
toxicity is at 80% of the
safe limit.
You completed all
decompression stops.
You are more than
0.6 m (2 ft.) above the
decompression ceiling.
You are more than 2 m
(8 ft.) above the safety
stop ceiling.
The decompression stop
depth and time flash
blue for five seconds.
Your PO2 value flashes
yellow.
The alert appears every
two minutes, up to three
times.
None
None
None
None
The alert appears when
the device is below 10%
battery power and on the
dive pre-check screen
for your next dive.
The alert appears when
the device is below 20%
battery power and on the
dive pre-check screen
for your next dive.
The alert appears every
two minutes, up to three
times.
The alert appears during
a dive and on the dive
pre-check screen for
your next dive.
None
The current depth and
stop depth flash red.
If you remain above the
decompression ceiling
for more than three
minutes, the
decompression lockout
feature goes into effect.
The current depth and
stop depth flash yellow.
Diving 11

Alert Message Cause Device Action
Failed to read depth
sensor. End your
dive now.
NDL exceeded.
Decompression
now required.
PO2 is high.
Ascend or switch to
lower O2 gas.
PO2 is low.
Descend or switch
to higher O2 gas.
Safe to switch to
%1. Switch now?
Safety Stop
Cleared
This pool dive will
not be saved to the
dive log.
The device has no
depth sensor data.
You have exceeded
your no decompression
limit (NDL) time.
Your PO2 value is
above the specified
critical value.
Your PO2 value is
below 0.18 bar.
In a multi-gas dive, a
gas with a higher
oxygen content is now
safe to breathe.
You completed the
safety stop.
The device is in pool
dive mode.
Use a backup dive
computer or dive plan
and end your dive. Call
Garmin Product Support.
None
Your PO2 value flashes
red.
The alert appears every
30 seconds, up to three
times, until you ascend
to a safe level or switch
gases.
If you are within the first
two minutes of your dive,
your PO2 value flashes
yellow. Otherwise, your
PO2 value flashes red.
The alert appears every
30 seconds, up to three
times, until you descend
to a safe level or switch
gases.
You can switch gases
now, or wait to switch
gases later in the dive.
None
The device will not save
the current dive to the
dive log.
Transmitter Alerts
Alert
Message
None Your paired dive computer
%1 is below
reserve
pressure.
%1 pressure
is critically
low.
%1 has a
low battery.
NO COMMS Your paired dive computer
Enabling Lost Transmitter Alerts
Your paired dive computer can lose communication with the
transmitter when the transmitter is out of range, when the
transmitter signal is blocked by your body or that of another
Cause Device Action
has lost communication
with the transmitter for 30
seconds.
Your tank pressure is below
the reserve pressure level.
"%1" is replaced with the
transmitter name.
Your tank pressure is below
the critical pressure level.
"%1" is replaced with the
transmitter name.
Fewer than 20 hours of dive
time remain. "%1" is
replaced with the
transmitter name.
has lost communication
with the transmitter for 60
seconds.
The tank pressure value
flashes yellow.
The tank pressure value
turns yellow.
The paired dive computer
vibrates and plays a
warning tone.
The tank pressure value
flashes red.
The paired dive computer
vibrates and plays a
warning tone.
The transmitter name
flashes BATT. LOW when
the battery is critically low.
The paired dive computer
vibrates and plays a
warning tone.
The transmitter name
flashes NO COMMS,
dashed lines replace the
tank pressure value, and
the tank pressure value
flashes red.
The paired dive computer
vibrates and plays a
warning tone if connection
alerts are enabled.
diver, and when the transmitter loses battery power. You can
enable an alert that notifies you when your paired dive computer
has lost communication with the transmitter for 60 seconds.
On the paired dive computer, hold MENU.
1
Select Dive Setup > Air Integration > Connection Alert.
2
Dive Terminology
Air time remaining (ATR): The time you may remain at the
current depth until an ascent at 9 m/min. (30 ft./min.) would
result in surfacing with the reserve pressure.
Central nervous system (CNS): A measure of central nervous
system oxygen toxicity caused by exposure to increased
partial pressure of oxygen (PO2) while diving.
Closed-circuit rebreather (CCR): A diving mode used for dives
performed with a rebreather that recirculates exhaled gas
and removes carbon dioxide.
Maximum operating depth (MOD): The greatest depth at which
a breathing gas can be used before the partial pressure of
oxygen (PO2) exceeds the safe limit.
No decompression limit (NDL): A dive that does not require
decompression time while ascending to the surface.
Oxygen toxicity units (OTU): A measure of pulmonary oxygen
toxicity caused by exposure to increased partial pressure of
oxygen (PO2) while diving. One OTU is equivalent to
breathing 100% oxygen at 1 ATM for 1 minute.
Partial pressure of oxygen (PO2): The pressure of the oxygen
in the breathing gas, based on depth and oxygen percentage.
Pressure-based surface air consumption (PSAC): The
change in pressure over time, normalized to 1 ATM.
Respiratory minute volume (RMV): The change in gas volume
at ambient pressure over time.
Surface interval (SI): The amount of time that has elapsed
since the completion of the last dive.
Time to surface (TTS): The estimated amount of time it will take
to ascend to the surface, including decompression and safety
stops.
Volumetric surface air consumption (SAC): The change in
gas volume over time, normalized to 1 ATM.
Activities and Apps
Your device can be used for indoor, outdoor, athletic, and fitness
activities. When you start an activity, the device displays and
records sensor data. You can save activities and share them
with the Garmin Connect™ community.
You can also add Connect IQ™ activities and apps to your
device using the Connect IQ app (Connect IQ Features,
page 21).
For more information about activity tracking and fitness metric
accuracy, go to garmin.com/ataccuracy.
Starting an Activity
When you start an activity, GPS turns on automatically (if
required).
From the watch face, press START.
1
Select an option:
2
• Select an activity from your favorites.
• Select , and select an activity from the extended activity
list.
If the activity requires GPS signals, go outside to an area with
3
a clear view of the sky, and wait until the device is ready.
The device is ready after it establishes your heart rate,
acquires GPS signals (if required), and connects to your
wireless sensors (if required).
12 Activities and Apps

Press START to start the activity timer.
4
The device records activity data only while the activity timer is
running.
Tips for Recording Activities
• Charge the device before starting an activity (Charging the
Device, page 2).
• Press LAP to record laps, start a new set or pose, or
advance to the next workout step.
• Press UP or DOWN to view additional data pages.
Changing the Power Mode
You can change the power mode to extend battery life during an
activity.
During an activity, hold MENU.
1
Select Power Mode.
2
Select an option.
3
The watch displays the hours of battery life gained with the
selected power mode.
Stopping an Activity
Press STOP.
1
Select an option:
2
• To resume your activity, select Resume.
• To save the activity and return to watch mode, select
Save > Done.
• To suspend your activity and resume it at a later time,
select Resume Later.
• To mark a lap, select Lap.
• To navigate back to the starting point of your activity along
the path you traveled, select Back to Start > TracBack.
NOTE: This feature is available only for activities that use
GPS.
• To navigate back to the starting point of your activity by
the most direct path, select Back to Start > Route.
NOTE: This feature is available only for activities that use
GPS.
• To discard the activity and return to watch mode, select
Discard > Yes.
NOTE: After stopping the activity, the device saves it
automatically after 30 minutes.
Adding or Removing a Favorite Activity
The list of your favorite activities appears when you press
START from the watch face, and it provides quick access to the
activities you use most. You can add or remove favorite
activities at any time.
Hold MENU.
1
Select Activities & Apps.
2
Your favorite activities appear at the top of the list.
Select an option:
3
• To add a favorite activity, select the activity, and select
Set as Favorite.
• To remove a favorite activity, select the activity, and select
Remove from Favorites.
Creating a Custom Activity
From the watch face, press START.
1
Select Add.
2
Select an option:
3
• Select Copy Activity to create your custom activity
starting from one of your saved activities.
• Select Other to create a new custom activity.
If necessary, select an activity type.
4
Select a name or enter a custom name.
5
Duplicate activity names include a number, for example:
Bike(2).
Select an option:
6
• Select an option to customize specific activity settings. For
example, you can customize the data screens or auto
features.
• Select Done to save and use the custom activity.
Select Yes to add the activity to your list of favorites.
7
Indoor Activities
The Descent device can be used for training indoors, such as
running on an indoor track or using a stationary bike. GPS is
turned off for indoor activities.
When running or walking with GPS turned off, speed, distance,
and cadence are calculated using the accelerometer in the
device. The accelerometer is self-calibrating. The accuracy of
the speed, distance, and cadence data improves after a few
outdoor runs or walks using GPS.
TIP: Holding the handrails of the treadmill reduces accuracy.
You can use an optional foot pod to record pace, distance, and
cadence.
When cycling with GPS turned off, speed and distance are not
available unless you have an optional sensor that sends speed
and distance data to the device (such as a speed or cadence
sensor).
Going for a Virtual Run
You can pair your Descent Mk2i device with a compatible thirdparty app to transmit pace, heart rate, or cadence data.
From the watch face, press START.
1
Select Virtual Run.
2
On your tablet, laptop, or smartphone, open the Zwift™ app or
3
another virtual training app.
Follow the on-screen instructions to start a running activity
4
and pair the devices.
Press START to start the activity timer.
5
After you complete your run, press STOP to stop the activity
6
timer.
Calibrating the Treadmill Distance
To record more accurate distances for your treadmill runs, you
can calibrate the treadmill distance after you run at least 1.5 km
(1 mi.) on a treadmill. If you use different treadmills, you can
manually calibrate the treadmill distance on each treadmill or
after each run.
Start a treadmill activity (Starting an Activity, page 12).
1
Run on the treadmill until your Descent Mk2i device records
2
at least 1.5 km (1 mi.).
After you complete your run, press STOP.
3
Select an option:
4
• To calibrate the treadmill distance the first time, select
Save.
The device prompts you to complete the treadmill
calibration.
• To manually calibrate the treadmill distance after the firsttime calibration, select Calibrate & Save > Yes.
Check the treadmill display for the distance traveled, and
5
enter the distance on your device.
Recording a Strength Training Activity
You can record sets during a strength training activity. A set is
multiple repetitions (reps) of a single move.
Activities and Apps 13

From the watch face, press START.
1
Select Strength.
2
Select a workout.
3
The first time you record a strength training activity, you must
select which wrist your watch is on.
Select View to view a list of workout steps (optional).
4
TIP: While viewing workout steps, you can press START to
view an animation of the selected exercise, if available.
Select Do Workout.
5
Press START to start the set timer.
6
Start your first set.
7
The device counts your reps. Your rep count appears when
you complete at least four reps.
TIP: The device can only count reps of a single move for
each set. When you want to change moves, you should finish
the set and start a new one.
Press LAP to finish the set and move to the next exercise, if
8
available.
The watch displays the total reps for the set. After several
seconds, the rest timer appears.
If necessary, press DOWN, and edit the number of reps.
9
TIP: You can also add the weight used for the set.
When you are done resting, press LAP to start your next set.
10
Repeat for each strength training set until your activity is
11
complete.
After your last set, press START to stop the set timer.
12
Select Save.
13
Outdoor Activities
The Descent device comes preloaded with outdoor activities,
such as running and cycling. GPS is turned on for outdoor
activities. You can add new activities based on default activities,
such as walking or rowing. You can also add custom activities to
your device (Creating a Custom Activity, page 13).
Viewing Tide Information
WARNING
Tide information is for information purposes only. It is your
responsibility to heed all posted water-related guidance, to
remain aware of your surroundings, and to use safe judgment in,
on, and around the water at all times. Failure to heed this
warning could result in serious personal injury or death.
You can view information about a tide station, including the tide
height and when the next high and low tides will occur.
From the watch face, press START.
1
Select Tides.
2
Select an option:
3
• To use your current location when you are near a tide
station, select Search > Current Location.
• To select a location on the map, select Search > Use
Map.
• To enter the name of a city, select Search > City Search.
• To select a saved location, select Search > Saved
Locations.
• To enter coordinates for a location, select Search >
Coordinates.
A 24-hour tide chart appears for the current date with the
current tide height and information about the next tide .
Press DOWN to see tide information for upcoming days.
4
Press START, and select Star Location to save the tide
5
station (optional).
Viewing Your Ski Runs
Your device records the details of each downhill skiing or
snowboarding run using the auto run feature. This feature is
turned on by default for downhill skiing and snowboarding. It
automatically records new ski runs based on your movement.
The timer pauses when you stop moving downhill and when you
are on a chairlift. The timer remains paused during the chairlift
ride. You can start moving downhill to restart the timer. You can
view run details from the paused screen or while the timer is
running.
Start a skiing or snowboarding activity.
1
Hold MENU.
2
Select View Runs.
3
Press UP and DOWN to view details of your last run, your
4
current run, and your total runs.
The run screens include time, distance traveled, maximum
speed, average speed, and total descent.
Recording a Backcountry Skiing Activity
The backcountry skiing activity lets you manually switch
between climbing and descending tracking modes so you can
accurately track your statistics.
From the watch face, press START.
1
Select Backcountry Ski.
2
Select an option:
3
• If you are starting your activity on a climb, select
Climbing.
• If you are starting your activity moving downhill, select
Descending.
Press START to start the activity timer.
4
Press LAP to switch between climbing and descending
5
tracking modes.
After your activity is finished, press START to stop the timer.
6
Select Save.
7
Using the Metronome
The metronome feature plays tones at a steady rhythm to help
you improve your performance by training at a faster, slower, or
more consistent cadence.
NOTE: This feature is not available for all activities.
From the watch face, press START.
1
Select an activity.
2
Hold MENU.
3
Select the activity settings.
4
Select Metronome > Status > On.
5
Select an option:
6
• Select Beats / Minute to enter a value based on the
cadence you want to maintain.
• Select Alert Frequency to customize the frequency of the
beats.
14 Activities and Apps

• Select Sounds to customize the metronome tone and
vibration.
If necessary, select Preview to listen to the metronome
7
feature before you run.
Go for a run (Starting an Activity, page 12).
8
The metronome starts automatically.
During your run, press UP or DOWN to view the metronome
9
screen.
If necessary, hold MENU to change the metronome settings.
10
Playing Audio Prompts During an Activity
You can enable your Descent Mk2i device to play motivational
status announcements during a run or other activity. Audio
prompts play on your connected headphones using Bluetooth
technology, if available. Otherwise, audio prompts play on your
smartphone paired through the Garmin Connect app. During an
audio prompt, the device or smartphone mutes the primary
audio to play the announcement.
NOTE: This feature is not available for all activities.
Hold MENU.
1
Select Audio Prompts.
2
Select an option:
3
• To hear a prompt for each lap, select Lap Alert.
NOTE: The Lap Alert audio prompt is enabled by default.
• To customize prompts with your pace and speed
information, select Pace/Speed Alert.
• To customize prompts with your heart rate information,
select Heart Rate Alert.
• To customize prompts with power data, select Power
Alert.
• To hear prompts when you start and stop the timer,
including the Auto Pause® feature, select Timer Events.
• To hear activity alerts play as an audio prompt, select
Activity Alerts.
• To change the language or the dialect of the voice
prompts, select Dialect.
Jumpmaster
WARNING
The jumpmaster feature is for use by experienced skydivers
only. The jumpmaster feature should not be used as a primary
skydiving altimeter. Failure to input the appropriate jump related
information can lead to serious personal injury or death.
The jumpmaster feature follows military guidelines for
calculating the high altitude release point (HARP). The device
detects automatically when you have jumped to begin navigating
toward the desired impact point (DIP) using the barometer and
electronic compass.
Multisport
Triathletes, duathletes, and other multisport competitors can
take advantage of the multisport activities, such as Triathlon or
Swimrun. During a multisport activity, you can transition
between activities and continue to view your total time and
distance. For example, you can switch from biking to running
and view your total time and distance for biking and running
throughout the multisport activity.
You can customize a multisport activity, or you can use the
default triathlon activity set up for a standard triathlon.
Triathlon Training
When you participate in a triathlon, you can use the triathlon
activity to quickly transition to each sport segment, to time each
segment, and to save the activity.
From the watch face, press START.
1
Select Triathlon.
2
Press START to start the activity timer.
3
Press LAP at the beginning and end of each transition.
4
The transition feature can be turned on or off for the triathlon
activity settings.
After you complete your activity, press STOP, and select
5
Save.
Creating a Multisport Activity
From the watch face, press START.
1
Select Add > Multisport.
2
Select a multisport activity type, or enter a custom name.
3
Duplicate activity names include a number. For example,
Triathlon(2).
Select two or more activities.
4
Select an option:
5
• Select an option to customize specific activity settings. For
example, you can select whether to include transitions.
• Select Done to save and use the multisport activity.
Select Yes to add the activity to your list of favorites.
6
Swimming
Swim Terminology
Length: One trip down the pool.
Interval: One or more consecutive lengths. A new interval starts
after a rest.
Stroke: A stroke is counted every time your arm wearing the
device completes a full cycle.
Swolf: Your swolf score is the sum of the time for one pool
length and the number of strokes for that length. For
example, 30 seconds plus 15 strokes equals a swolf score of
45. For open water swimming, swolf is calculated over 25
meters. Swolf is a measurement of swimming efficiency and,
like golf, a lower score is better.
Critical swim speed (CSS): Your CSS is the theoretical speed
that you can maintain continuously without exhaustion. You
can use your CSS to guide your training pace and monitor
your improvement.
Stroke Types
Stroke type identification is available only for pool swimming.
Your stroke type is identified at the end of a length. Stroke types
appear in your swimming history and in your Garmin Connect
account. You can also select stroke type as a custom data field
(Customizing the Data Screens, page 41).
Free Freestyle
Back Backstroke
Breast Breaststroke
Fly Butterfly
Mixed More than one stroke type in an interval
Drill Used with drill logging (Training with the Drill Log, page 16)
Tips for Swimming Activities
• Before starting a pool swimming activity, follow the on-screen
instructions to select your pool size or enter a custom size.
The next time you start a pool swimming activity, the device
uses this pool size. You can hold MENU, select the activity
settings, and select Pool Size to change the size.
• Press LAP to record a rest during pool swimming.
The device automatically records swim intervals and lengths
for pool swimming.
• Press LAP to record an interval during open water swimming.
Activities and Apps 15
 Loading...