

Page 1
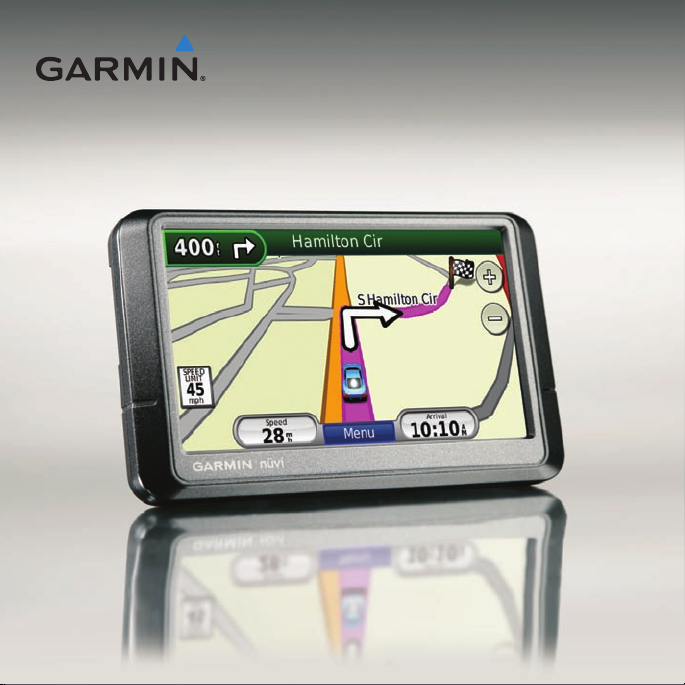
nüvi
®
205 and 205W series
owner’s manual
205, 205W, 215, 215W, 255, 255W, 265, 265W, 275, and 285W
for use with these nüvi models:
Page 2
© 2008–2009 Garmin Ltd. or its subsidiaries
Garmin International, Inc.
1200 East 151st Street,
Olathe, Kansas 66062,
USA
Tel. (913) 397.8200 or
(800) 800.1020
Fax (913) 397.8282
All rights reserved. Except as expressly provided herein, no part of this manual may be reproduced,
copied, transmitted, disseminated, downloaded or stored in any storage medium, for any purpose without
the express prior written consent of Garmin. Garmin hereby grants permission to download a single copy
of this manual onto a hard drive or other electronic storage medium to be viewed and to print one copy of
this manual or of any revision hereto, provided that such electronic or printed copy of this manual must
contain the complete text of this copyright notice and provided further that any unauthorized commercial
distribution of this manual or any revision hereto is strictly prohibited.
Information in this document is subject to change without notice. Garmin reserves the right to change
or improve its products and to make changes in the content without obligation to notify any person
or organization of such changes or improvements. Go to the Garmin Web site (www.garmin.com) for
current updates and supplemental information concerning the use and operation of this and other Garmin
products.
Garmin®, the Garmin logo, nüvi®, and MapSource® are trademarks of Garmin Ltd. or its subsidiaries,
registered in the USA and other countries. Garmin Lock™, myGarmin™, ecoRoute™ and nüMaps
Guarantee™ are trademarks of Garmin Ltd. or its subsidiaries. These trademarks may not be used without
the express permission of Garmin.
The Bluetooth® word mark and logos are owned by the Bluetooth SIG, Inc., and any use of such
name by Garmin is under license. Windows® is a registered trademark of Microsoft Corporation in the
United States and/or other countries. Mac® is a registered trademark of Apple Computer, Inc. SD™ and
microSD™ are trademarks of the SD Card Association. Panoramio is a trademark of Google Inc.
January 2009 Part Number 190-00973-00 Rev. C Printed in Taiwan
Garmin (Europe) Ltd.
Liberty House
Hounsdown Business Park,
Southampton, Hampshire, SO40 9RB UK
Tel. +44 (0) 870.8501241 (outside the UK)
0808 2380000 (within the UK)
Fax +44 (0) 870.8501251
Garmin Corporation
No. 68
Jangshu 2nd Road,
Shijr, Taipei County,
Taiwan
Tel. 886/2.2642.9199
Fax 886/2.2642.9099
Page 3
Introduction
Introduction
myGarmin™
Go to http://my.garmin.com to access
Manual Conventions
When you are instructed to “touch”
something, use your nger to touch
an item on the screen.
The small arrows (>) used in the
text indicate that you should touch a
series of items. For example, if you
the latest services for your Garmin
products:
Register your Garmin unit.
•
Subscribe to online services for
•
safety camera information (see
pages 46–47).
Unlock optional maps.
•
see “touch Where to? > Favorites”
you should touch Where to?, and
then touch Favorites.
nüvi® Tips and Shortcuts
To quickly return to the Menu
•
page, touch and hold Back.
Touch and to see
•
more choices. Touch and hold
these buttons to scroll faster.
Screenshots in this manual are
•
taken from a widescreen unit and
may look different than your unit.
nüvi 205 and 205W series owner’s manual i
Contact Garmin
Contact Garmin Product Support if you
have any questions while using your nüvi.
In the USA, go to www.garmin
.com/support, or contact Garmin USA
by phone at (913) 397-8200 or (800)
800-1020.
In the UK, contact Garmin (Europe) Ltd.
by phone at 0808 2380000.
In Europe, go to www.garmin
.com/support and click Contact Support
for in-country support information, or
contact Garmin (Europe) Ltd. by phone at
+44 (0) 870.8501241.
Page 4

Introduction
Table of Contents
Introduction .......................... i
Manual Conventions .............. i
nüvi® Tips and Shortcuts........i
myGarmin™ ........................... i
Contact Garmin ..................... i
Getting Started .................... 1
Step 1: Mount Your nüvi .......2
Step 2: Congure Your nüvi .. 3
Step 3: Acquire Satellites .....3
Step 4: Use Your nüvi ...........3
Finding Your Destination ......4
Adding a Stop .......................5
Taking a Detour ....................5
Stopping the Route ............... 5
Adjusting the Volume ............5
Locking the Screen ............... 5
Where to? ............................ 6
Finding an Address ...............6
Setting a Home Location ......6
Go! Page Options .................7
ii nüvi 205 and 205W series owner’s manual
Finding a Place by Spelling
the Name .............................8
Searching Near Another
Location ................................8
Finding Recently Found
Places ................................... 9
Favorites ............................... 9
Finding a Place Using the
Map ....................................10
Entering Coordinates .......... 11
Using Photo Navigation ...... 11
Navigating Off Road ........... 11
Walking to a Destination ..... 11
Using the Map ................... 12
Trip Computer .....................13
Turn List ..............................13
Next Turn ............................ 13
Making Hands-Free Phone
Calls ................................... 14
Pairing Your Phone ............. 14
Receiving a Call ................15
In a Call .............................16
Page 5

Introduction
Phone Menu .......................16
Managing Files .................. 19
Supported File Types..........19
Loading Files ......................19
Loading Pictures for Photo
Navigation ..........................20
Deleting Files ..................... 20
Using the Tools ................. 21
Settings ..............................21
Where Am I? .......................21
Help ....................................21
MSN® Direct ........................ 21
ecoRoute™ .......................... 22
Picture Viewer ....................25
My Data ..............................26
World Clock .......................26
Calculator ..........................26
Unit Converter ...................27
Viewing Advertisements .....27
Using FM Trafc ................29
Trafc in Your Area .............30
nüvi 205 and 205W series owner’s manual iii
Severity Color Code ...........30
Trafc on Your Route .......... 30
Viewing the Trafc Map ......31
Viewing Trafc Delays ........31
Trafc Subscriptions ...........32
Customizing the nüvi ....... 33
Changing the System
Settings ..............................33
Changing the Navigation
Settings ..............................33
Adjusting the Display
Settings ..............................34
Updating the Time
Settings ..............................34
Setting the Languages .......35
Changing the Map
Settings ..............................35
Changing Security
Settings ..............................36
Setting the Bluetooth
Technology Options ............36
Page 6

Introduction
Changing the Proximity
Points Settings ...................37
Viewing Trafc Subscription
Information .........................37
Restoring All Settings .........39
Appendix ...........................40
Caring for Your nüvi ...........40
Locking Your nüvi ...............41
Calibrating the Screen ........41
Resetting Your nüvi ............42
Updating the Software ........42
Clearing User Data .............42
Battery Information ............43
Charging Your nüvi ............. 43
Changing the Fuse .............43
Removing the nüvi and
Mount .................................44
Mounting on Your
Dashboard ..........................44
nüMaps Guarantee™ ........... 45
Additional Maps ..................45
iv nüvi 205 and 205W series owner’s manual
About GPS Satellite
Signals ................................ 45
Extras and Optional
Accessories ........................46
Garmin Travel Guide ..........47
Specications .....................48
Declaration of Conformity ...50
Software License
Agreement ..........................50
Troubleshooting ................. 51
Index ..................................53
Page 7
Getting Started
Getting Started
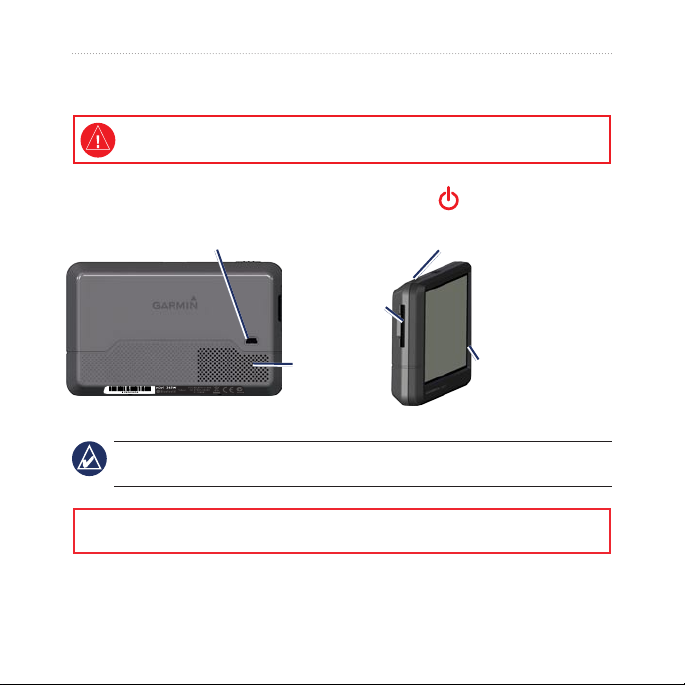
See the Important Safety and Product Information guide in the product box for product
warnings and other important information.
Power key:
Slide to the left to turn the nüvi on/off;
Mini-USB connector
slide to the right to lock the screen.
Memory
card
slot
Speaker
NOTE: Memory card slots on units may be equipped for an SD™ card or a microSD™
card.
WARNING: This product contains a lithium-ion battery. To prevent damage, remove the unit
from the vehicle when exiting or store it out of direct sunlight.
nüvi 205 and 205W series owner’s manual 1
Microphone
Page 8
Getting Started
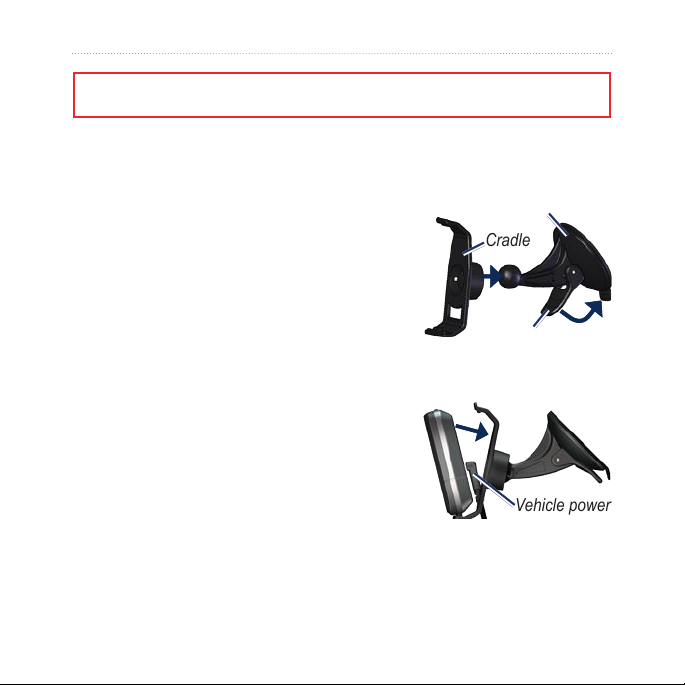
Suction cup mount
Cradle
Suction cup mount
Cradle
Vehicle power
cable
Vehicle power
cable
Before mounting the nüvi, see the Important Safety and Product Information guide for
information about laws pertaining to windshield mounting.
Step 1: Mount Your nüvi
1. Plug the vehicle power cable into the back of your nüvi.
2. Snap the cradle onto the suction cup arm.
3. Remove the clear plastic from the suction cup.
Clean and dry your windshield and the suction
cup with a lint-free cloth. Press the suction cup
rmly on the windshield.
4. Flip the lever back toward the windshield.
5. Fit the bottom of your nüvi into the cradle.
6. Tilt your nüvi back until it snaps into place.
7. Plug the other end of the vehicle power cable
into a power outlet in your vehicle. Your unit
should turn on automatically if it is plugged in
and the vehicle is running.
8. If you are using a trafc receiver in Europe,
connect the external antenna to the trafc
receiver and secure the external antenna to
the windshield using the suction cups. (Trafc
receivers are included in some nüvi 205 and
205W series packages.)
2 nüvi 205 and 205W series owner’s manual
Page 9
Getting Started
Step 2: Congure Your
nüvi
To turn your nüvi on, slide the
Power key to the left. Follow the
on-screen instructions. To turn your
nüvi off, slide the Power key to
the left.
Step 3: Acquire Satellites
1. Go outdoors to an open area,
away from tall buildings and trees.
2. Turn on your nüvi.
Acquiring satellite signals can take a
few minutes. The bars indicate
satellite strength. When at least one
of the bars is green, your nüvi has
acquired satellite signals. Now you
can select a destination and navigate
to it.
nüvi 205 and 205W series owner’s manual 3
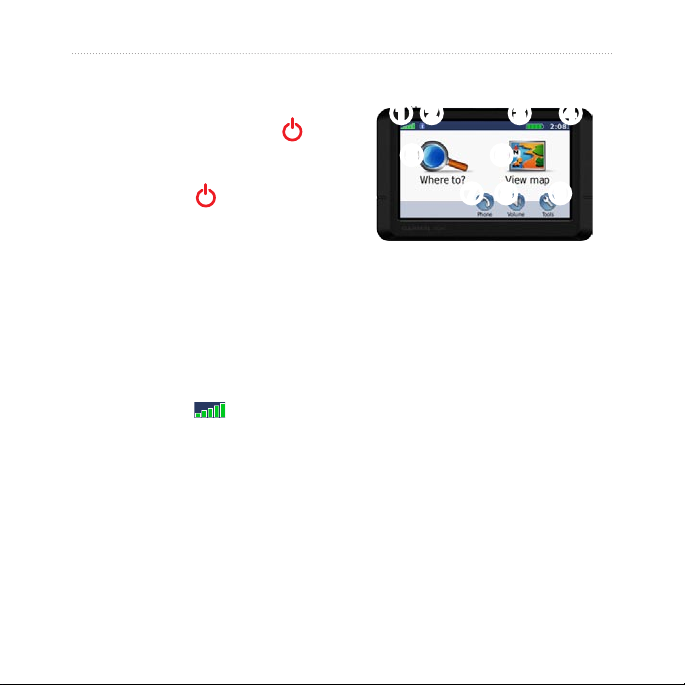
Step 4: Use Your nüvi
➊ ➋ ➌ ➍
➎ ➏
➐ ➑ ➒
➊
GPS satellite strength
➋
Bluetooth® technology status
(Available on the nüvi 215,
215W, 265, 265W, 275, and
285W.)
➌
Battery status
➍
Current time. Touch to change
time settings.
➎
Touch to nd a destination.
➏
Touch to view the map.
➐
Touch to make a call when
connected to a compatible
mobile phone.
➑
Touch to adjust the volume.
➒
Touch to use the tools such as
settings and Help.
Page 10
Getting Started
Finding YourYour Destination
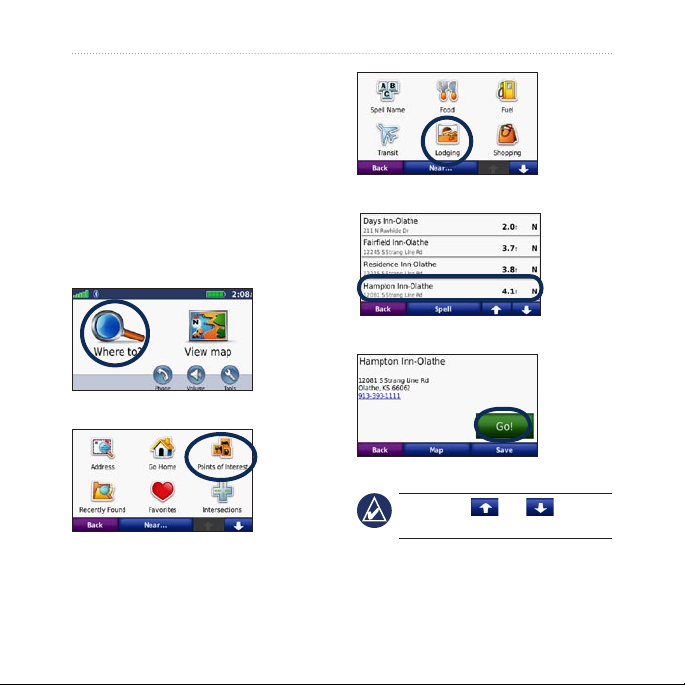
The Where to? menu provides
several different categories for you
to use when searching for addresses,
cities, and other locations. The
detailed maps loaded in your nüvi
contain millions of points of interest,
such as restaurants, hotels, and auto
services.
1. Touch Where to?.
2. Select a category.
3. Select a subcategory.
4. Select a destination.
5. Touch Go!.
TIP: Touch and to see
more choices.
4 nüvi 205 and 205W series owner’s manual
Page 11
Getting Started
Adding a Stop
You can add a stop (called a Via
Point) to your route. The nüvi gives
Stopping the Route
1. With a route active, touch Menu.
2. Touch
Stop.
you directions to the Via Point and
then to your nal destination.
1. With a route active, touch Menu >
Where to?.
2. Search for the extra stop.
3. Touch
4. Touch
Go!.
Add as Via Point to add
this stop before your destination.
Touch Set as new Destination to
make this your nal destination.
Adjusting the Volume
From the Menu page, touch Volume.
Touch and to adjust the
volume. Touch the box next to Mute
to mute all audio.
Locking the Screen
To prevent accidental screen touches,
slide the Power key to the right
( ). To unlock the screen, slide the
Taking a Detour
1. With a route active, touch Menu.
2. Touch
Detour.
Power key to the center position.
The nüvi attempts to get you
back on your original route as
quickly as possible. If the route
you are currently taking is the only
reasonable option, the nüvi might not
calculate a detour.
nüvi 205 and 205W series owner’s manual 5
Page 12
Where to?
Where to?
The Where to? menu provides
several different categories you can
use to search for locations. To learn
how to perform a simple search, see
page 4.
Finding an Address
NOTE: Depending on the version
of the maps loaded on your nüvi, the
button names can change and some
steps could be ordered differently.
1. Touch Where to? > Address.
2. Change the state, country, or
province, if necessary.
3. Touch
Spell City, enter the
city/postal code, and touch Done.
Select the city/postal code in the
list. (Not all map data provides
postal code searching.) If you are
unsure of the city, touch Search
All.
4. Enter the number of the address,
and touch Done.
5. Enter the street name, and touch
Done.
6. Select the correct street in the list,
if necessary.
7. Touch the address, if necessary.
Setting a Home Location
Set your home location for the place
you return to most often.
1. To set your home location, touch
Where to? > Go Home.
2. Select an option:
Enter your address.
•
Use your current location.
•
Choose from a list of recently
•
found locations.
Going Home
To navigate home after you have set
your home location, touch Where
to? > Go Home.
6 nüvi 205 and 205W series owner’s manual
Page 13
Where to?
Changing Your Home
Go! Page Options
Location
To set a different home location:
1. Touch Tools > My Data > Set
Home Location.
2. Select an option:
Enter your address.
•
Use your current location.
•
Choose from a list of recently
•
found locations.
To edit your home location:
1. Touch Where to? > Favorites >
All Favorites > Home.
2. Touch
If you delete your home location,
you can reset it by following the
steps on page 6.
nüvi 205 and 205W series owner’s manual 7
Edit, enter your changes,
and touch Done.
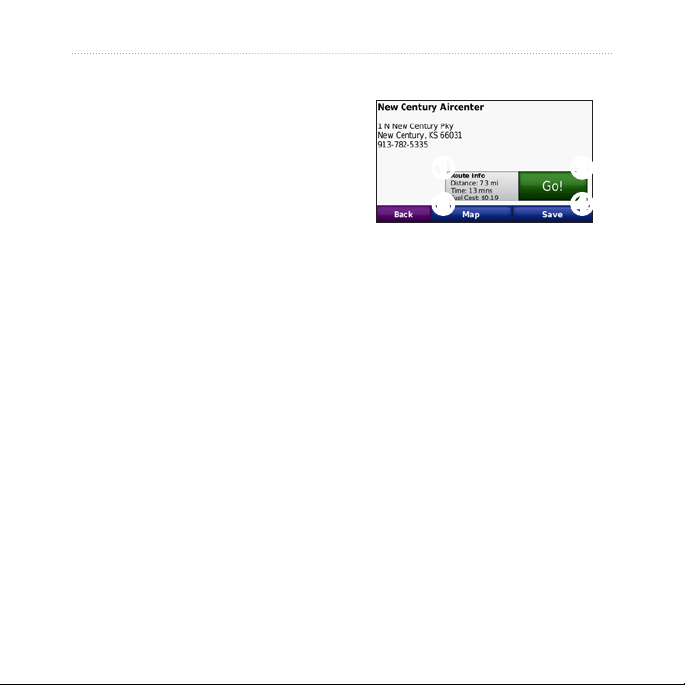
➊
➋
➌
➍
If a mobile phone with Bluetooth
wireless technology is connected,
touch the phone number to call this
location.
➊ ➋
➌ ➍
Touch to view the route on the
map.
Touch Go! to create a turn-by-
turn route to this location.
Touch Map to view this
location on the map.
Touch Save to save this
location to your Favorites.
Page 14
Where to?
Finding a Place by Spelling the Name
If you know the name of the
destination you are looking for,
you can spell it using the on-screen
keyboard. You can also enter letters
contained in the name to narrow the
search.
1. Touch Where to? > Points of
Interest > Spell Name.
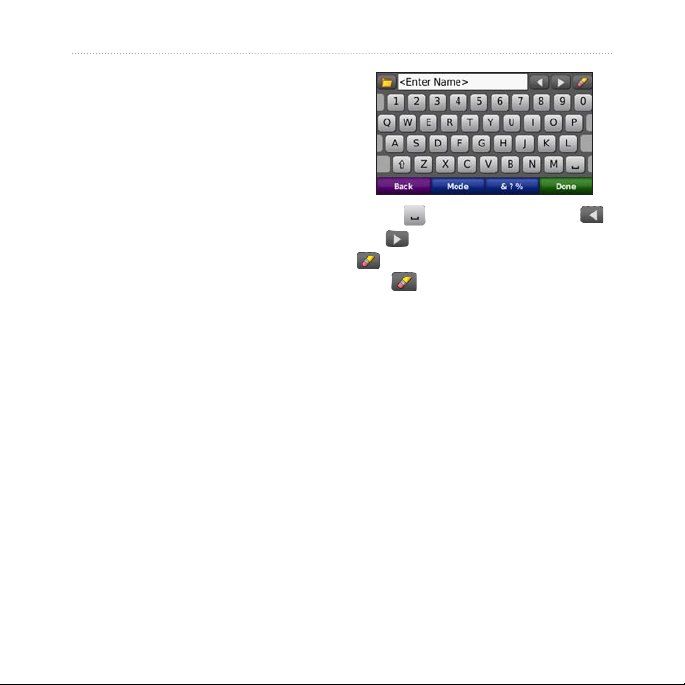
2. Using the on-screen keyboard,
enter letters of the name of your
destination. Touch Done.
Using the On-Screen
Keyboard
When an on-screen keyboard
appears, touch a letter or number to
enter it.
8 nüvi 205 and 205W series owner’s manual
Touch to add a space. Touch
and to move the cursor. Touch
to delete a character. Touch and
hold to erase the entire entry.
Touch Mode to select the keyboard
language mode. Touch &?% to
enter special characters, such as
punctuation marks.
Searching Near AnotherNear Another
Location
1. Touch Where to? > Near….
2. Select an option:
Where I Am Now—search
•
near your current location.
A Different City—search near
•
the city you enter.
Page 15
My Current Route—search
•
along your active route.
My Destination—search near
•
your current destination.
Finding Recently Found Places
Your nüvi stores the last 50 of your
recent nds in the Recently Found
list. The most-recently viewed places
appear at the top of the list. Touch
Where to? > Recently Found to
view your recently found items.
Deleting Recently Found
Places
To remove all places from the
Recently Found list, touch Clear >
Yes.
NOTE: When you touch Clear, all
items in the list are removed. This
process does not delete the actual
place from your nüvi.
Where to?
Favoritesvorites
You can save places in your
Favorites so you can quickly nd
them and create routes to them.
Your home location is also stored in
Favorites.
Saving Your Current
Location
From the Map page, touch .
Touch Save Location to save your
current location.
Saving Places You Find
1. From the Go! page, touch Save.
2. Touch
Finding Saved Places
1. Touch Where to?.
2. Touch
OK. The place is saved in
Favorites.
Favorites. Your saved
locations are listed.
nüvi 205 and 205W series owner’s manual 9
Page 16

Where to?
Editing Saved Places
1. Touch Where to? > Favorites.
2. Select the category and the
location you want to edit.
3. Touch
4. Touch an item to edit:
10 nüvi 205 and 205W series owner’s manual
Edit.
Change Name—enter a new
•
name, and touch Done.
Attach Photo—select a
•
picture that you have loaded
on your nüvi or on a memory
card to assign to the location.
Change Map Symbol—touch
•
a new symbol used to mark
this location on the map.
Change Phone Number—
•
enter a phone number, and
touch Done.
Change Categories—select
•
another category for the
location.
Delete—touch Yes to remove
•
this item from the Favorites
list.
Finding a Place Using the Map
Use the Browse Map page to view
different parts of the map. Touch
Where to? > Browse Map.
Tips for Browsing the Map
Touch the map, and drag to view
•
different parts of the map.
Touch and to zoom in and
•
out.
Touch any object on the map.
•
An arrow appears pointing at the
object.
Touch Save to save this location.
•
Touch Go! to navigate to the
•
location.
If the GPS mode is off, touch Set
•
Loc to set your location to the
selected location. (See page 33.)
Page 17

Where to?
Entering Coordinates
If you know the geographic
coordinates of your destination, you
can use your nüvi to navigate to your
destination using the latitude and
longitude coordinates. This can be
especially helpful when geocaching.
1. Touch Where to? > Coordinates.
2. Touch a box to enter a coordinate.
3. Touch
4. Enter the coordinates, and touch
Format to change the type
of coordinates. Because different
maps and charts use different
coordinate formats, the nüvi
allows you to select the correct
coordinate format for the type of
map you are using.
Next.
routes to them. Go to http://connect
.garmin.com/photos to download
pictures with location information.
See page 20 for more information.
1. Touch Where to? > Favorites >
Panoramio Photos. Pictures you
have saved on the nüvi drive or
on the memory card are listed.
2. Touch a picture.
Navigating Off Road
If you are not following roadways
as you navigate, use Off Road
mode. Touch Tools > Settings >
Navigation > Route Preference >
Off Road > OK.
Walking to a Destination
If you are walking to your
Using Photo Navigation
Panoramio™ provides pictures that
include location information. You
can load these pictures on your nüvi
destination, use Pedestrian mode
to optimize your route for walking.
Touch Tools > Settings > System >
Usage Mode > Pedestrian > OK.
or on a memory card and create
nüvi 205 and 205W series owner’s manual 11
Page 18
Using the Map
Using the Map
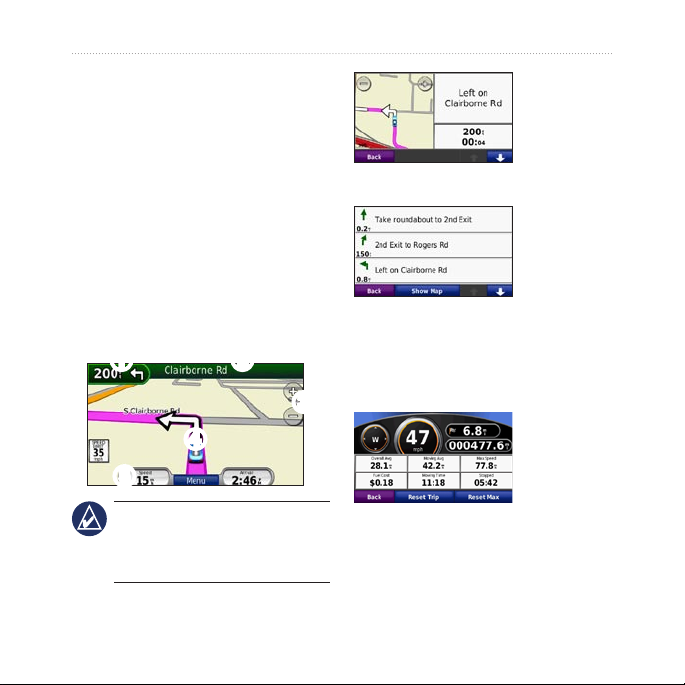
Your route is marked with a
magenta line. As you travel, your
nüvi guides you to your destination
with voice prompts, arrows on the
map, and directions at the top of
the map. A checkered ag marks
your destination. If you depart
from the original route, your nüvi
recalculates the route and provides
new directions.
➊ ➋
➌
➍
➎
➊
Touch to view the next turn.
➋
Touch to view the turn list.
➌
Touch to zoom in and zoom out.
➍
Touch to view the Where Am I?
page.
TIP: A speed limit icon could appear
as you travel on major roadways.
This icon displays the current speed
limit of the roadway.
12 nüvi 205 and 205W series owner’s manual
➎
Touch to view the trip computer.
Page 19

Using the Map
Trip Computer
The trip computer displays your
current speed and provides helpful
statistics about your trip.
To view the trip computer, touch the
Speed eld on the map.
If you make frequent stops, leave the
nüvi turned on so it can accurately
measure elapsed time during the trip.
Resetting the Trip
Turn List
When you are navigating a route,
the turn list displays turn-by-turn
instructions for your entire route and
the distance between turns.
Touch the text bar on the top of the
map to open the turn list. Touch a
turn on the list to view the next turn
for that turn. Touch Show Map to
view the entire route on the browse
map page.
Computer
Reset the trip computer before
beginning a trip. From the map,
touch the Speed eld. Touch Reset
Trip to reset the information on the
trip computer. Touch Reset Max to
reset the maximum speed.
nüvi 205 and 205W series owner’s manual 13
Next Turn
When you are navigating a route, the
next turn shows the turn on the map
and the distance and time left before
you reach the turn.
To view an upcoming turn on the
map, touch the turn indicator on the
map, or touch any turn from the turn
list.
Page 20
Making Hands-Free Phone Calls
Making Hands-Free
connect automatically each time you
turn them on.
Phone Calls
Bluetooth wireless technology is
available on the nüvi 215, 215W,
265, 265W, 275, and 285W.
Using Bluetooth wireless technology,
your nüvi can connect to your
mobile phone to become a handsfree device. To determine whether
your mobile phone with Bluetooth
technology is compatible with the
nüvi, go to www.garmin.com
/bluetooth.
Bluetooth wireless technology
establishes a wireless link between
devices, such as a mobile phone and
the nüvi. The rst time you use two
devices together you must “pair”
them by establishing a relationship
using a PIN or passkey. After the
initial pairing, the two devices can
14 nüvi 205 and 205W series owner’s manual
NOTE: You might have to set your
mobile phone to connect to the nüvi
automatically when it is turned on.
Pairing Your Phone
To pair and connect, your phone and
the nüvi must be turned on and be
within 10 meters of each other.
Initiate pairing from your nüvi or
from your phone. Refer to your
phone instructions.
To pair using your phone
settings:
1. Enable the Bluetooth setting
on your nüvi. Touch Tools >
Settings > Bluetooth.
2. Select
3. Enable the Bluetooth component
Enabled.
on your phone. This might be in a
menu called Settings, Bluetooth,
Connections, or Hands-free.
Page 21
Making Hands-Free Phone Calls
4. Initiate a search for Bluetooth
devices.
5. Select the nüvi from the list of
devices.
6. Enter the nüvi Bluetooth
(1234) into your phone.
To pair using the nüvi settings:
1. From the Menu page, touch
Tools > Settings > Bluetooth >
Add.
2. Enable the Bluetooth component
on your phone, and enable
Find Me/Discoverable/Visible
mode. These settings might be
in a Bluetooth, Connections, or
Hands-free menu.
3. Touch
4. Select your phone, and touch
5. Enter the nüvi Bluetooth PIN
OK on the nüvi.
(1234) in your phone.
PIN
When you turn on the nüvi, it tries to
connect to the last phone to which it
was connected.
NOTE: Not all phones support all
features of the nüvi Phone menu.
Receiving a Call
When you get a call, the Incoming
Call window opens. Touch Answer
to answer the call. Touch Ignore to
ignore the call and stop your phone
from ringing.
The internal microphone is in the
front of the nüvi; speak normally.
OK.
When your phone is connected to
your nüvi, you are ready to make
phone calls. Touch Phone to access
the Phone menu.
nüvi 205 and 205W series owner’s manual 15
Page 22
Making Hands-Free Phone Calls
In a Call
During a call, the In Call icon
appears. Touch > End Call to
hang up. Touch > Call Options
for the following options:
Touch Tones—displays a
•
keypad page so that you can use
automated systems, such as voice
mail.
Transfer Audio To Phone—this
•
is helpful if you want to turn off
Using Call Waiting
When you are on a call and you
receive a second call (call waiting),
the Incoming Call window appears.
Touch Answer to answer the call.
The rst call is placed on hold.
To switch between calls:
1. Touch > Switch To.
2. Touch
End Call to hang up. This
does not disconnect the call on
hold.
the nüvi but remain on the call,
or if you need privacy. To switch
back, touch Transfer Audio To
Device.
Mute Microphone.
•
NOTE: Depending on the screen
that appears on your nüvi, the In
Call icon could look different.
16 nüvi 205 and 205W series owner’s manual
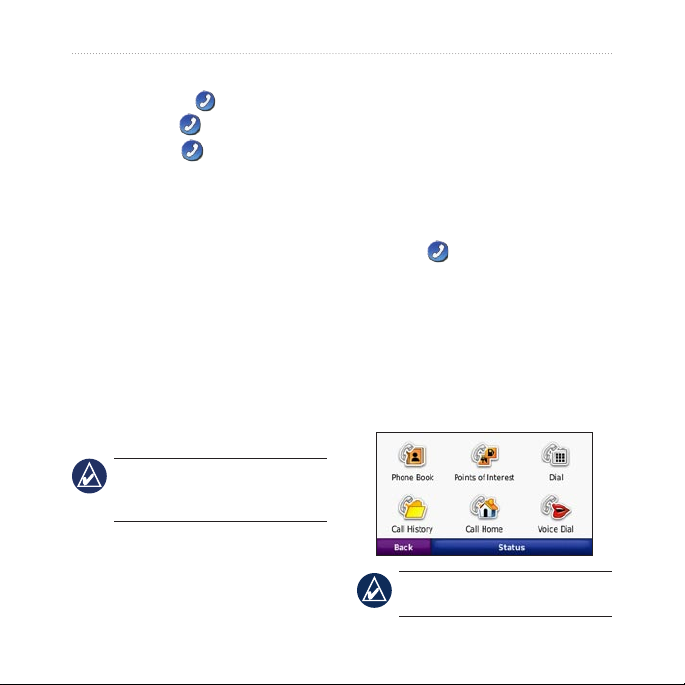
Phone Menu
From the Menu page, touch Phone
to open the Phone menu.
NOTE: Not all phones support all
features of the nüvi Phone menu.
Page 23

Making Hands-Free Phone Calls
Using Your Phone Book
Each time your phone connects
with the nüvi, the phone book is
automatically loaded into the nüvi.
It can take a few minutes for the
phone book to be available. Phone
book transfer is not available on all
phones.
1. Touch Phone > Phone Book.
2. Touch the phone book entry
(contact) you want to call.
3. Touch
Dial to call the contact.
Viewing Your Call History
Each time your phone connects
to the nüvi, your call history is
automatically transferred to the nüvi.
It can take a few minutes to transfer
this data to the nüvi.
1. Touch Phone > Call History.
2. Touch a category to view those
calls. The calls are listed in
chronological order. The most-
recent calls are at the top of the
list.
3. Touch an entry, and touch
Dial.
Dialing a Point of Interest
1. Touch Phone > Points of
Interest.
2. Search for the point of interest
you want to call.
3. Touch
Dial or touch the phone
number.
Calling Home
Enter a phone number for your home
location so you can quickly call
home.
Dialing a Number
1. Touch Phone > Dial.
2. Enter the number, and touch
nüvi 205 and 205W series owner’s manual 17
Dial.
Page 24
Making Hands-Free Phone Calls
To enter your phone number:
1. Touch Phone > Call Home.
2. Touch
3. Touch
Enter Phone Number to
use the keypad page or Select
From Phonebook (only available
if your phone supports phone
book transfer).
Done > Yes. The nüvi dials
your home phone number.
NOTE: To edit your home location
or phone number, touch Where to?
> Favorites > Home > Edit.
Placing Calls Using Voice
Dial
You can place calls by speaking the
contact’s name.
1. Touch Phone > Voice Dial.
2. Speak the contact name.
NOTE: You might need to “train”
your phone to recognize your voice
dial commands. Refer to your phone
instructions.
Phone Status
To call home:
1. Touch Phone > Call Home.
2. The nüvi dials your home phone
number.
18 nüvi 205 and 205W series owner’s manual
Check the battery level and signal
strength for your phone by touching
Phone > Status.
Page 25

Managing Files
Managing Files
You can store les, such as JPEG
image les, in the internal memory
on the nüvi or on a memory card.
Loading Files
Step 1: Insert a Memory
Card (Optional)
To insert or remove the memory
card, press it in until it clicks.
NOTE: The nüvi is not compatible
with Windows® 95, 98, Me, or
Windows NT®. It is also not
compatible with Mac® OS 10.3 and
earlier. This is a common limitation
of most USB mass storage devices.
Step 2: Connect the USB
Cable
Connect the mini-USB connector
to the back of the nüvi. Connect the
larger end of the cable to an available
Supported File Types
JPEG and JPG image les: see
•
pages 25–26
Maps and GPX waypoint les
•
from MapSource®: see page 45
GPI custom POI les from
•
Garmin’s POI Loader: see page
46
nüvi 205 and 205W series owner’s manual 19
USB port on your computer.
Your nüvi and memory card
appear as removable drives in My
Computer on Windows computers
and as mounted volumes on Mac
computers.
NOTE: Some operating systems or
computers with multiple network
drives can not display the nüvi
drives. See your operating system
Help le to learn how to map the
drives.
Page 26
Managing Files
Step 3: Transfer Files to
Your nüvi
Copy and paste les from your
computer into the nüvi drives/
volumes.
1. Browse your computer for the le
you want to copy.
2. Highlight the le, and click
Copy.
3. Open the “Garmin” or memory
card drive/volume.
4. Click
Edit > Paste. The le
appears in the list of les in the
nüvi memory or on the memory
card.
Edit >
Step 4: Eject and Unplug
the USB Cable
When you are nished transferring
les, click in your toolbar
(system tray), or drag the volume
icon to the Trash on Mac
computers. Unplug your nüvi from
your computer.
20 nüvi 205 and 205W series owner’s manual
Loading Pictures for Photo Navigation
1. Connect your nüvi to your
computer.
2. Go to
3. Select a photo.
4. Follow the on-screen instructions.
http://connect.garmin.com
/photos, and sign in.
See page 11 and go to
http://connect.garmin.com/photos for
more information.
Deleting Files
Connect the nüvi to your computer,
and open the nüvi or memory card
drive/volume. Highlight the le you
want to delete, and press the Delete
key on the computer keyboard.
CAUTION: If you do not know
the purpose of a le, do not delete
it. Your nüvi memory contains
important system les that should
not be deleted.
Page 27
Using the Tools
Using the Tools
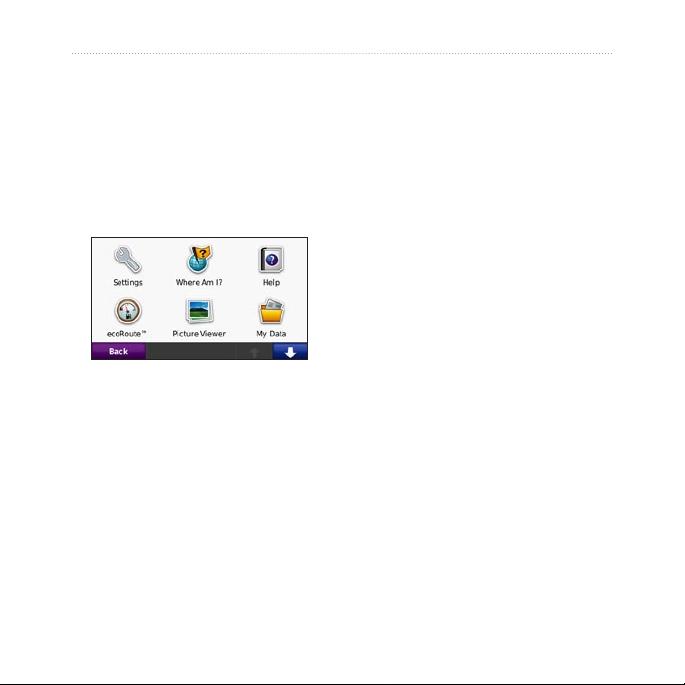
The Tools menu provides many
features that are helpful when you
are traveling. From the Menu page,
touch Tools to access the Tools
menu.
location. Touch Save Location to
save your current location.
Help
Touch Help to get information about
using your nüvi.
MSN® Direct
You can only access MSN Direct
content with an optional MSN Direct
receiver.
For more information, visit
http://garmin.msndirect.com
Settings
For information about the settings,
see pages 33–39.
or www.garmin.com/trafc. To
purchase an accessory, visit
http://buy.garmin.com.
Where Am I?
Touch Where Am I? to view current
location information, including
hospitals, police stations, and fuel.
This feature is helpful if you need
to tell emergency personnel your
nüvi 205 and 205W series owner’s manual 21
Page 28
Using the Tools
ecoRoute
™
The ecoRoute feature calculates
your vehicle’s fuel economy,
carbon footprint, and fuel price of
navigating to a destination and offers
tools for improving fuel efciency.
The data provided by the ecoRoute
feature are estimates only. The
data is not actually read from your
vehicle. To receive more accurate
fuel reports for your specic vehicle
and driving habits, calibrate the fuel
economy. See page 23.
Touch Tools > ecoRoute. The
rst time you access the ecoRoute
features you will be asked to enter
fuel and mileage information about
your vehicle.
View the Fuel Report
If you have entered your vehicle
prole and the current fuel price,
your nüvi calculates your vehicle’s
average fuel economy, your carbon
footprint, and the cost of the fuel
consumed.
To view the fuel report, touch Tools
> ecoRoute > Fuel Report. The
fuel consumption data is based on
estimates for speed and acceleration
for an average vehicle.
TIP: To ensure fuel data is always
recorded, keep your nüvi turned on
while driving.
Touch Reset to reset the data.
22 nüvi 205 and 205W series owner’s manual
Page 29

Using the Tools
Calibrate the Fuel
Economy
Calibrate the fuel economy to receive
more accurate fuel reports for your
specic vehicle and driving habits.
Calibrate when you ll up your fuel
Adjust the Fuel Price
Touch Tools > ecoRoute > Fuel
Price and enter the current fuel price.
This information is used to calculate
the fuel cost of routes and used to
calculate the fuel reports.
tank.
1. Calculate your miles per gallon or
liters per 100 kilometers.
2. Touch
3. Touch
4. Touch
Calibrate.
+ and - to enter the result
from step 1.
OK.
Take the Driving Challenge
The Driving Challenge tool helps
you maximize your fuel economy
by scoring your driving habits.
The higher your overall score for a
Driving Challenge, the more fuel you
could save.
To take a Driving Challenge, touch
Tools > ecoRoute > Driving
Challenge, then touch Start.
Your overall score is the average of
three scores:
nüvi 205 and 205W series owner’s manual 23
Page 30
Using the Tools
Acceleration score—gain points for
gradual acceleration; lose points for
rapid acceleration.
Deceleration score—gain points for
gradual braking; lose points for hard
braking.
Speed score—gain points for driving
at the best speed for conserving
fuel, which is 45–60 mph for most
vehicles.
Touch on the map page to view
details about your current challenge.
The leaf color on the driving
challenge icon changes depending on
your performance in the challenge.
When viewing the details, touch
Stop > Yes to stop the current
challenge.
Adjust Your Vehicle Prole
You will create a vehicle prole
the rst time you touch Tools >
ecoRoute. To adjust the vehicle
prole, touch Tools > ecoRoute >
Vehicle Prole.
City Fuel Economy—enter your
vehicle’s average city fuel economy.
Highway Fuel Economy—enter
your vehicle’s average highway fuel
economy.
TIP: For best results, calibrate your
fuel economy instead of adjusting
the city and highway fuel economy
here.
Fuel Type—select a fuel type.
To reset your vehicle prole data,
touch Reset.
To reset your best scores, touch
Reset.
24 nüvi 205 and 205W series owner’s manual
Page 31

Using the Tools
View Driving Tips
Your nüvi provides driving tips to
help you save fuel. Touch Tools >
ecoRoute > Tips.
View the Mileage Report
Mileage reports provide the distance,
the time, the average fuel economy,
and the fuel cost of navigating to a
destination.
A mileage report is created for
every route that you drive. If you
stop a route on your nüvi, a mileage
report is created for the distance you
traveled.
To access a mileage report, touch
Tools > ecoRoute > Mileage
Report, and select a report. You
can view up to 20 mileage reports
on your nüvi. You can also access
mileage reports in the Reports folder
Picture Viewer
Use the picture viewer to view
pictures that you have stored in your
nüvi or on a memory card.
1. Touch Tools > Picture Viewer.
2. Touch a picture to view a larger
image of it.
3. Touch the arrows to view all the
images.
Viewing a Slide Show
Touch Slide Show to start a slide
show, which displays each image for
a few moments and then displays the
next image.
Touch anywhere on the screen to
stop the slide show. Touch Stop to
return to the list of pictures. Touch
Resume to resume the slide show.
Touch and to zoom out and
to zoom in.
on your nüvi drive/volume.
To reset the data, touch Reset.
nüvi 205 and 205W series owner’s manual 25
Page 32

Using the Tools
Navigating to a Picture
If a picture contains location
information, touch Info, and then
touch Go! to create a route to it.
See page 20 for more information
6. Touch
7. Touch
World Map to view a map.
Nighttime hours are shown in the
shaded area.
World Clock to view the
clocks again, or touch Back to
exit.
about loading pictures to your nüvi.
Calculator
My Data
Use this tool to manage and delete
your saved data, such as your
Favorites.
World Clock
1. Touch Tools > World Clock.
2. To change a listed city, touch the
city.
3. Enter a city name, and touch
Done.
4. Select the correct city, if
necessary.
5. Touch
26 nüvi 205 and 205W series owner’s manual
Save.
1. Touch Tools > Calculator.
2. Enter the rst number of your
calculation.
3. Touch an operator (
4. Enter the second number of your
calculation.
Touch . to add a decimal.
•
Touch ± to make the number
•
negative or positive.
Touch % to add or subtract
•
percentages of a number.
Touch C to clear the entry.
•
5. Touch
6. Touch
=.
C to perform a new
calculation.
÷, ×, -, or +).
Page 33

Using the Tools
Unit Converter
1. Touch Tools > Unit Converter.
2. Touch
3. Touch a unit of measure that you
4. Select a unit of measure, and
5. Touch the blank rectangle to enter
6. Enter a value, and touch
7. Touch
Updating Conversion
Rates
You can update the currency
conversion rates manually so that
you are always using the most
current rates.
Conversion, select a type
of measurement, and touch OK.
want to change.
touch OK. Repeat if necessary.
a value.
Done.
The unit is converted.
Clear to perform another
conversion.
1. Touch Tools > Unit Converter >
Conversion. Select Currency.
2. Touch the currency buttons and
select the currencies you want to
update.
3. Touch
4. Touch the boxes next to the
5. Touch
Update.
currencies to enter new rates.
Save to save the new
rates. Touch Restore to use the
original rates.
Viewing Advertisements
If your nüvi package includes a
trafc receiver, you will receive
location-relevant advertisements
and coupons. Ad-based trafc
information is only available in
North America.
The trafc receiver must be
connected to external power and
you must be in a coverage area to
receive ad-based trafc information.
When an advertisement appears on
nüvi 205 and 205W series owner’s manual 27
Page 34

Using the Tools
the screen, touch the advertisement
to search for the nearest location
related to that advertisement. If the
advertisement includes a coupon
icon, touch the coupon icon on the
Go! page to receive a coupon code.
Write down this code and present it
when you arrive at the location.
CAUTION: Do not attempt to
write down the coupon codes while
driving.
To view a list of the advertisements
you have received, touch Tools >
Advertisements.
To disable advertisements, you
must disable trafc. Touch Tools
> Settings > Trafc, and clear the
Enable Trafc check box.
28 nüvi 205 and 205W series owner’s manual
Page 35
Using FM Trafc
Using FM Trafc
The trafc receiver is included
in some nüvi 205 and 205W
series packages and is an optional
accessory for all nüvi 205 and 205W
series models.
Use an FM Trafc Message Channel
(TMC) trafc receiver to receive
trafc information broadcast over the
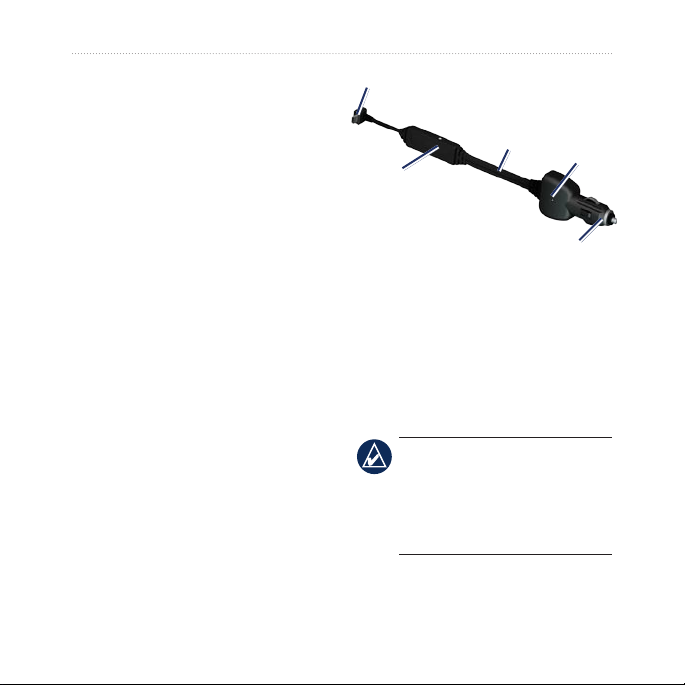
FM Radio Data System. The trafc
receiver is integrated in the vehicle
power cable.
In North America, trafc receivers
that are included in your nüvi
Mini-USB
connector
Internal
antenna
External
antenna
connector
Power
LED
Vehicle power
adapter
If the nüvi is connected to the trafc
receiver, connected to vehicle power,
and in a coverage area, the nüvi can
receive trafc delay information. For
more information, go to
www.garmin.com/trafc.
package provide you with free,
ad-based trafc information that
does not require a subscription.
Trafc information is not available
in all markets. See page 27 for more
information.
nüvi 205 and 205W series owner’s manual 29
NOTE: Garmin is not responsible
for the accuracy of the trafc
information. The FM trafc receiver
receives signals from the trafc
service provider and displays that
information on your nüvi.
Page 36
Using FM Trafc
Trafc in Your Area
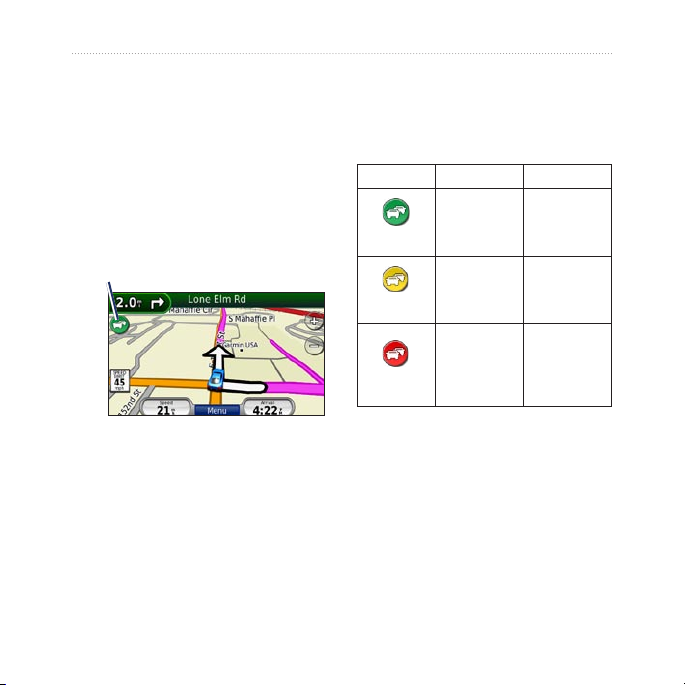
When you are receiving trafc
information, a trafc icon appears
Severity Color Code
The color of the trafc icon indicates
the severity of the trafc delay.
in the upper-left corner of the Map
page. The trafc icon changes color
to indicate the severity of trafc
conditions on your route or the road
you are currently driving on.
Trafc icon
Color Description Meaning
Trafc is
owing
normally.
Trafc is
slightly
congested.
Trafc is
heavily
congested or
stopped.
Green
Yellow
Red
Low severity
Medium
severity
High severity
Trafc on Your Route
When calculating your route, the
nüvi examines the current trafc and
automatically optimizes the route
for the shortest time. If a severe
trafc delay occurs on your route
while you are navigating, the nüvi
automatically recalculates the route.
30 nüvi 205 and 205W series owner’s manual
Page 37

Using FM Trafc
You might still be routed through
trafc if no better alternative routes
exist.
If a non-severe trafc delay occurs
on your route, touch the trafc icon
to display a tab that shows how much
time the delay has added to your
route. This time is already included
in your estimated arrival time.
To manually avoid trafc on your
route:
1. On the Map page, touch the trafc
icon.
2. Touch
3. Touch the arrows to view other
4. Touch
nüvi 205 and 205W series owner’s manual 31
Trafc On Route.
trafc delays on your route, if
necessary.
Avoid to avoid the trafc
delay.
Viewing the Trafc Map
The trafc map shows color-coded
trafc ow and delays on nearby
roads.
1. On the Map page, touch the trafc
icon.
2. Touch
Show Trafc Map to view
the trafc incidents on a map.
To return to the normal map from
the trafc map, touch the trafc icon,
and then touch Show Normal Map.
Viewing Trafc Delays
1. On the Map page, touch the trafc
icon.
2. Touch
3.
Trafc Search to view a
list of trafc delays.
To view details, touch an item in
the list. If there is more than one
delay, touch the arrows to view
additional delays.
Page 38
Using FM Trafc
Trafc Subscriptions
To add or renew a trafc
subscription, touch Tools > Settings
> Trafc. For more information, see
page 37 and go to www.garmin
.com/fmtrafc.
NOTE: You do not need to activate
the subscription included with
your FM trafc receiver (if it
came with one). The subscription
activates automatically after your
nüvi acquires satellite signals while
receiving trafc signals from the pay
service provider.
32 nüvi 205 and 205W series owner’s manual
Page 39
Customizing the nüvi
Customizing the nüvi
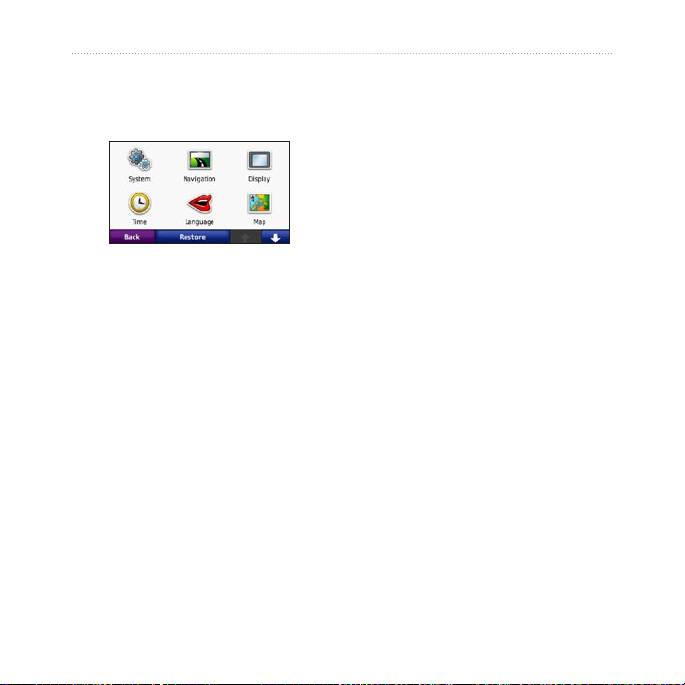
1. Touch Tools > Settings.
2. Touch the setting you want to
change.
3. Touch the button under the setting
name to change it.
Changing the System Settings
Touch Tools > Settings > System.
GPS Simulator—turn on the
simulator to turn off the GPS mode
and simulate navigation and to save
battery power.
Usage Mode—specify how you will
be navigating to optimize routes:
Automobile, Bicycle, or Pedestrian.
nüvi 205 and 205W series owner’s manual 33
Units—change units of measure to
Kilometers or Miles.
Keyboard—touch QWERTY
for a layout similar to a computer
keyboard, or touch ABC for an
alphabetical layout. This option is
only available on widescreen models.
About—display the nüvi software
version number, the unit ID number,
and the audio version number.
You need this information when
you update the system software or
purchase additional map data (see
page 45).
Restore—restore the system settings.
Changing the Navigation Settings
Touch Tools > Settings >
Navigation.
Route Preference—select a
preference for calculating your route:
Page 40

Customizing the nüvi
Faster Time—to calculate routes
•
that are faster to drive but can be
longer in distance.
Shorter Distance—to calculate
•
routes that are shorter in distance
but can take more time to drive.
Less Fuel— to calculate routes
•
that could use less fuel than other
routes. The route calculation is
based on road speeds and vehicle
acceleration data for a given
route.
Off Road—to calculate point-to-
•
point routes (without roads).
Avoidances—select the road types
you want to avoid on your routes.
Restore—restore the original
navigation settings.
Color Mode—select Daytime for
a light background, Nighttime
for a dark background, or Auto to
automatically switch between the
two.
Screen Shot—turn on Screen Shot
mode. Touch to take a screen
shot. The picture bitmap le is saved
in the screenshots folder on the nüvi
drive.
Brightness—adjust the backlight
brightness level. Reducing the
backlight brightness increases your
battery life.
Restore—restore the original display
settings.
Updating the Time Settings
Adjusting the Display Settings
Touch Tools > Settings > Display.
34 nüvi 205 and 205W series owner’s manual
Touch Tools > Settings > Time.
Time Format—select a 12-hour,
24-hour, or UTC time format.
Page 41

Customizing the nüvi
Current Time—manually set the
time on your nüvi. Select Automatic
to have the nüvi set the time based
on your location.
Restore—restore the original time
settings.
Setting the Languages
Touch Tools > Settings > Language.
Voice—change the language for
voice prompts.
Text—change all on-screen text to
the selected language. Changing the
text language does not change the
language of user-entered data or map
data, such as street names.
Keyboard—select the keyboard for
your language. You can also change
the keyboard language mode from
any keyboard by touching the Mode
button.
nüvi 205 and 205W series owner’s manual 35
Restore—restore the original
language settings.
Changing the Map Settings
Touch Tools > Settings > Map.
Map Detail—adjust the amount of
detail shown on the map. Showing
more detail can cause the map to
redraw slower.
Map View—select a map
perspective.
Track Up—display the map in
•
two dimensions (2D) with your
direction of travel at the top.
North Up—display the map in
•
2D with North at the top.
3D—display the map in three
•
dimensions (3D) in Track Up.
Page 42

Customizing the nüvi
Vehicle—touch Change to change
the icon used to display your position
on the map. Touch the icon you
want to use, and then touch OK.
Download additional vehicle icons at
www.garmingarage.com.
Trip Log—show or hide the log of
your travels. To clear your trip log,
touch Tools > My Data > Clear
Trip Log.
Map Info—view the maps and the
version of each map loaded on your
nüvi. Touch a map to enable (check
mark) or disable (no check mark)
that map.
Restore—restore the original map
settings.
Garmin Lock—turn on Garmin
Lock™ to lock your nüvi. Enter a
4-digit PIN, and set a security
location. For more information, see
page 41.
Safe Mode—turn on or off safe
mode. When your vehicle is moving,
Safe mode disables all functions that
require signicant operator attention
and could become a distraction while
driving.
Restore—restore the original
security settings. Note that restoring
the security settings will not clear
your Garmin Lock PIN or security
location.
Setting the Bluetooth
Changing Security Settings
Touch Tools > Settings > Security.
36 nüvi 205 and 205W series owner’s manual
Technology Options
Touch Tools > Settings > Bluetooth.
Connections—touch Add > OK to
pair with a phone that has Bluetooth
Page 43

Customizing the nüvi
wireless technology. See pages
14–18. Touch Change to connect
with a different phone.
Drop—select the phone you want
•
to disconnect, and touch Yes.
Remove—select the phone you
•
want to delete from the nüvi
memory, and touch Yes.
Bluetooth—turn on and off the
Bluetooth component. The
Bluetooth icon appears on the Menu
page if the Bluetooth component is
turned on. To prevent a phone from
automatically connecting, touch
Disabled.
Friendly Name—enter a friendly
name that identies your nüvi on
devices with Bluetooth technology.
Touch Done.
Restore—restore the original
Bluetooth settings. This does not
clear the pairing information.
nüvi 205 and 205W series owner’s manual 37
Changing the Proximity Points Settings
You must have proximity points
(such as custom POIs or a safety
camera database) loaded to adjust
the proximity points settings. See
page 46. Touch Tools > Settings >
Proximity Points.
Proximity Alerts—turn on or off
the alerts when you approach custom
POIs or safety cameras.
Restore—restore the proximity
points settings.
Viewing Trafc
Subscription
Information
The trafc receiver is included in
some nüvi 205 and 205W series
packages. Touch Tools > Settings >
Trafc.
Page 44

Customizing the nüvi
North American Options
Your FM trafc subscriptions and
expiration dates are listed. Touch
Add to add a subscription.
Adding a Subscription
You can purchase additional
subscriptions or a renewal if your
subscription expires. Go to
www.garmin.com/fmtrafc.
European Options
Current—select which provider
to use. Touch Auto to use the best
provider for the area, or select a
specic provider to use.
Find More—search for additional
TMC trafc providers. To increase
the search time, touch Yes to clear
the provider table.
Subscriptions—view your FM
trafc subscriptions and expiration
dates. Touch Add to add a
subscription.
38 nüvi 205 and 205W series owner’s manual
NOTE: You do not need to activate
the subscription included with
your FM trafc receiver (if it
came with one). The subscription
activates automatically after your
nüvi acquires satellite signals while
receiving trafc signals from the
service provider.
1. From the Menu page, touch
Tools > Settings > Trafc.
2. For non-North American units,
touch Subscriptions > Add. For
North American units, touch Add.
3. Write down the FM trafc receiver
unit ID.
4. Go to
www.garmin.com/fmtrafc
to purchase a subscription and
get a 25-character code.
Page 45

5. Touch Next on the nüvi, enter the
code, and touch Done.
The trafc subscription code cannot
be reused. You must obtain a new
code each time you renew your
service. If you own multiple FM
trafc receivers, you must obtain a
new code for each receiver.
Restoring All Settings
1. Touch Tools > Settings.
2. Touch
3. Touch
Restore.
Yes.
Customizing the nüvi
nüvi 205 and 205W series owner’s manual 39
Page 46

Appendix
Appendix
Caring for Your nüvi
Your nüvi contains sensitive
electronic components that can be
permanently damaged if exposed
to excessive shock or vibration. To
minimize the risk of damage to your
nüvi, avoid dropping your unit and
operating it in high-shock and highvibration environments.
Cleaning the Unit
The nüvi is constructed of highquality materials and does not
require user maintenance other than
cleaning. Clean the outer casing
of the unit (not the touch screen)
using a cloth dampened with a mild
detergent solution, and then wipe
it dry. Avoid chemical cleaners and
solvents that can damage plastic
components.
40 nüvi 205 and 205W series owner’s manual
Cleaning the Touch Screen
Clean the touch screen with a soft,
clean, lint-free cloth. Use water,
isopropyl alcohol, or eyeglass
cleaner, if needed. Apply the liquid
to the cloth, and then gently wipe the
touch screen.
Protecting Your nüvi
Do not store the nüvi where
•
prolonged exposure to extreme
temperatures can occur, because
it can cause permanent damage.
Do not expose the nüvi to water.
•
Contact with water can cause this
unit to malfunction.
Although a PDA stylus can
•
be used to operate the touch
screen, never attempt this while
operating a vehicle. Never use a
hard or sharp object to operate
the touch screen because damage
might result.
Page 47
Appendix
Avoiding Theft
To avoid theft, remove the unit
•
and mount from sight when not
in use. Remove the residue left
on the windshield by the suction
cup.
Do not keep your unit in the
•
glove compartment.
Register your product at
•
http://my.garmin.com.
Use the Garmin Lock feature. See
•
below for more information.
Locking Your nüvi
Garmin Lock is a theft-deterrent
system that locks your nüvi. Each
3. Enter a 4-digit PIN and drive to a
security location.
What is a Security
Location?
Your security location should be a
location you return to often, such as
your home. If the nüvi has satellite
signals and you are at the security
location, you do not need to enter
the PIN.
NOTE: If you forget your PIN and
your security location, you must
send your nüvi to Garmin to get
it unlocked. You must also send a
valid product registration or proof of
purchase.
time you turn on the nüvi, enter the
PIN or drive to the security location.
1. Touch Tools > Settings >
Security.
2. Touch the button below
Lock.
nüvi 205 and 205W series owner’s manual 41
Garmin
Calibrating the Screen
If the touch screen is not responding
properly, calibrate the touch screen.
1. Turn off the nüvi.
Page 48
Appendix
2. Turn on the nüvi and hold the
Power key to the left for about
30 seconds until the calibration
screen appears (white screen
with “Press dot”).
Resetting Your nüvi
Depending on your nüvi model, you
can reset your nüvi by pushing the
RESET button on the bottom of the
2. Connect the nüvi to your
computer using the mini-USB
cable.
3. Run WebUpdater, and follow the
on-screen instructions.
After conrming that you want to
perform an update, WebUpdater
automatically downloads the update
and installs it on your nüvi.
unit.
Clearing User Data
CAUTION: Do not reset your nüvi
with a ballpoint pen or other sharp
object, which can damage the unit or
the battery.
If your nüvi does not have a RESET
button, slide the Power key to
the on/off position and hold it for 8
seconds.
Updating the Software
1. Go to www.garmin.com/products
/webupdater, and download
WebUpdater to your computer.
42 nüvi 205 and 205W series owner’s manual
CAUTION: This deletes all userentered information.
1. Hold your nger on the lower-right
corner of the nüvi screen while
turning on the nüvi.
2. Keep your nger pressed until the
pop-up window appears.
3. Touch
Yes to clear all user data.
All original settings are restored.
Any items that you have saved are
erased.
Page 49
Appendix
End
piece
Silver tip
Fuse
End
piece
Silver tip
Fuse
Connect your nüvi to a computer
Battery Information
To maximize the lifetime of the
battery, do not leave your nüvi in
direct sunlight, and avoid prolonged
exposure to excessive heat.
The battery icon in the corner
of the Menu page indicates the status
of the nüvi battery. To increase the
accuracy of the battery gauge, fully
discharge the battery and then fully
charge it. Do not unplug the nüvi
until it is totally charged.
Charging Your nüvi
Connect the vehicle power cable
•
to the mini-USB connector on
your nüvi and to a power outlet
in your vehicle. The vehicle key
may need to be turned to ON/
ACC for the nüvi to charge.
Connect an AC adapter (optional
•
accessory) to the nüvi and a wall
outlet.
nüvi 205 and 205W series owner’s manual 43
•
using a USB cable. The USB
cable is included with some nüvi
205 and 205W packages. The
computer must be on for the nüvi
to charge.
Changing the Fuse
CAUTION: When replacing the
fuse, do not lose any of the small
pieces and make sure they are put
back in the proper place.
If your unit will not charge in your
vehicle, you might need to replace
the fuse located at the tip of the
vehicle adapter.
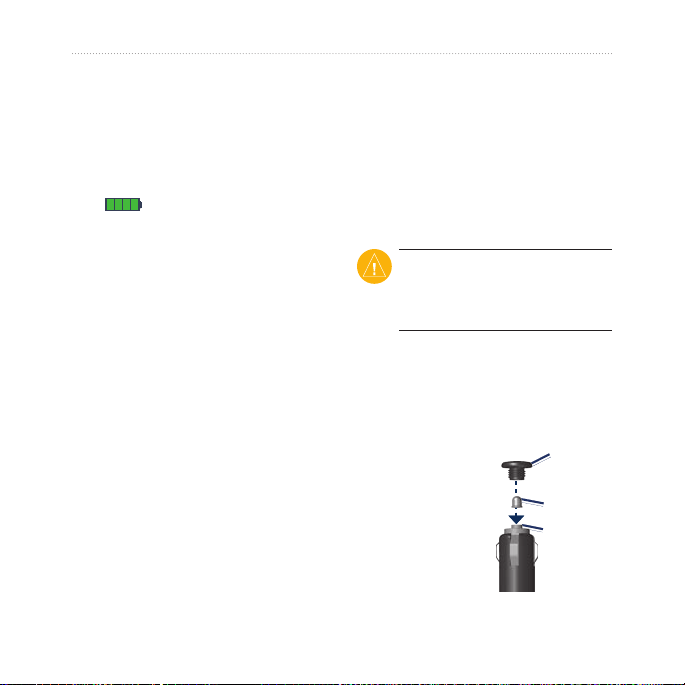
1. Unscrew the
black, round
end piece, and
remove it.
Page 50
Appendix
2. Remove the fuse (glass and silver
cylinder), and replace it with a 3 A
fast-blow fuse.
3. Ensure that the silver tip is placed
in the black end piece. Screw on
the black end piece.
Removing the nüvi and Mount
To remove the nüvi from the cradle,
hold onto the cradle and tilt the nüvi
forward.
To remove the cradle from the
mount, turn the cradle to the right or
left. Apply pressure in that direction
until the cradle snaps off the mount.
To remove the suction cup mount
from the windshield, ip the lever
toward you. Pull the tab on the
suction cup toward you.
44 nüvi 205 and 205W series owner’s manual
Mounting on Your Dashboard
Use the enclosed mounting disk to
mount your unit to the dashboard and
comply with certain state regulations.
CAUTION: The permanent
mounting adhesive is extremely
difcult to remove after it is
installed.
1. Clean and dry the dashboard
where you are placing the disk.
2. Remove the backing from the
adhesive on the bottom of the
disk.
3. Place the disk on the dashboard.
4. Remove the clear plastic cover
from the top of the disk.
5. Place the suction cup mount
on top of the disk. Flip the lever
down (toward the disk).
Page 51
nüMaps Guarantee
To receive one free map update
(if available), register your nüvi
at http://my.garmin.com within
60 days of acquiring satellites and
driving with your nüvi. You are not
eligible for the free map update if
you register by phone or wait longer
than 60 days after the rst time
you drive with your nüvi. For more
information, go to www.garmin
.com/numaps.
™
Additional Maps
You can purchase additional maps
for your nüvi. To see a list of maps
that are compatible with your nüvi,
go to your nüvi product page on the
Garmin Web site (www.garmin
.com), and click the Maps tab.
Appendix
About GPS Satellite Signals
Your nüvi must acquire GPS
(Global Positioning System) satellite
signals in order to navigate. If you
are indoors, near tall buildings or
trees, or in a parking garage, your
nüvi may not acquire satellites. Go
outside to an area free from tall
obstructions to use your nüvi.
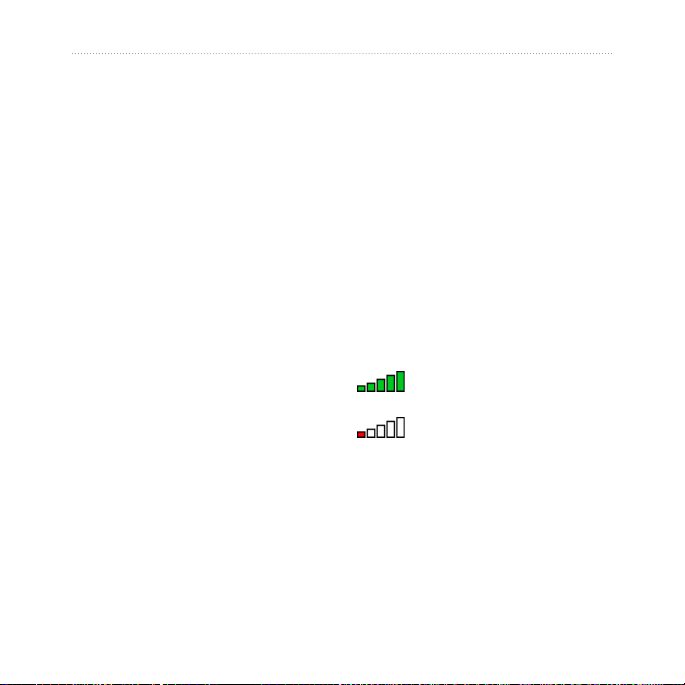
When your nüvi has acquired
satellite signals, the signal strength
bars on the Menu page are green
. When it loses satellite
signals, the bars turn red or clear
.
For more information about GPS, go
to www.garmin.com/aboutGPS.
nüvi 205 and 205W series owner’s manual 45
Page 52

Appendix
Extras and Optional Accessories
For more information about optional
accessories, go to http://buy.garmin
.com or www.garmin.com/extras, or
contact your Garmin dealer.
Custom Points of Interest
Use the POI Loader to load custom
points of interest (POIs) onto your
nüvi. POI databases are available
from various companies on the
Internet. Some custom databases
contain alert information for points,
such as safety cameras and school
zones.
Go to www.garmin.com/extras, and
click POI Loader to install the POI
Loader onto your computer. For
more information, refer to the POI
Loader Help le. Press F1 to open
the Help le.
46 nüvi 205 and 205W series owner’s manual
To view your Custom POIs, touch
Where to? > Extras > Custom
POIs.
To change the proximity alert
settings, touch Tools > Settings
> Proximity Points > Proximity
Alerts.
To delete the Custom POIs from
your nüvi, connect your nüvi to
your computer. Open the Garmin\
poi folder in the nüvi drive or the
memory card drive. Delete the le
titled poi.gpi.
Safety Cameras
Safety camera information is
available in some locations. Check
http://my.garmin.com for availability.
For these locations, the nüvi includes
the locations of hundreds of safety
cameras. Your nüvi alerts you when
you are approaching a safety camera
and can warn you if you are driving
Page 53
Appendix
too fast. The data is updated at least
weekly, so you always have access to
the most up-to-date information.
You can purchase a new region
To use the travel guide, insert the
memory card into your nüvi. Touch
Where to? > Extras. Touch the
name of your travel guide to open it.
or extend an existing subscription
at any time. Each region that you
purchase has its own expiration date.
CAUTION: Garmin is not
responsible for the accuracy of, or
the consequences of using, a custom
POI or safety camera database.
Garmin Travel Guide
Much like a paper travel guide,
the Garmin Travel Guide provides
detailed information about places,
such as restaurants and hotels. To
purchase an accessory, go to
http://buy.garmin.com or contact
your Garmin dealer.
nüvi 205 and 205W series owner’s manual 47
Page 54

Appendix
Specications
nüvi 205 Series
Physical size: W × H ×D: 3.86 ×
2.93 × .768 in. (98 × 74.4 ×
19.5 mm)
Weight: 5.01 oz. (141.6 g)
Display: 3.5" diagonal, 320 × 240
pixels; 64K colors; bright
QVGA TFT landscape display;
white backlight; touch screen
Case: Not waterproof (IPXO)
Operating temperature range:
32°F–140°F (0°C–60°C)
Charging temperature range:
32°F–113°F (0°C–45°C)
Data storage: Internal memory and
optional removable microSD
card. Data stored indenitely.
Computer interface: USB 2.0 full
speed mass storage
Operating system: Garmin
48 nüvi 205 and 205W series owner’s manual
Charge time: Approximately 4
hours
Power input: Vehicle power using
included vehicle power cable
or AC power using an optional
accessory
Usage: 5 W max.
Battery life: Up to 4 hours
Battery type: Non-user-replaceable
rechargeable lithium-ion battery
GPS receiver: High-sensitivity with
HotFix
Acquisition times*:
Warm: <1 sec
Cold: <38 sec
Factory Reset: <45 sec
*Average acquisition times for a
stationary receiver with a clear view
of the sky.
Page 55

Appendix
nüvi 205W Series
Physical size: W × H × D: 4.76 ×
2.93 × .768 in. (120.9 × 74.4 ×
19.5 mm)
Weight: 5.93 oz. (168.3 g)
Display: 4.3" diagonal, 480 × 272
pixels; 64K colors; bright
WQVGA TFT landscape
display; white backlight; touch
screen
Case: Not waterproof (IPXO)
Operating temperature range:
32°F–140°F (0°C–60°C)
Charging temperature range:
32°F–113°F (0°C–45°C)
Data storage: Internal memory and
included vehicle power cable
or AC power using an optional
accessory
Usage: 5 W max.
Battery life: Up to 4 hours
Battery type: Non-user-replaceable
rechargeable lithium-ion battery
GPS receiver: High-sensitivity with
HotFix
Acquisition times*:
Warm: <1 sec
Cold: <38 sec
Factory Reset: <45 sec
*Average acquisition times for a
stationary receiver with a clear view
of the sky.
optional removable SD card.
Data stored indenitely.
Computer interface: USB 2.0 full
speed mass storage
Operating system: Garmin
Charge time: Approximately 4
hours
Power input: Vehicle power using
nüvi 205 and 205W series owner’s manual 49
Page 56

Appendix
Declaration of Conformity
Hereby, Garmin declares that this nüvi
product is in compliance with the essential
requirements and other relevant provisions
of Directive 1999/5/EC. To view the full
Declaration of Conformity, go to the Web site
for your Garmin product at
www.garmin.com.
Software License Agreement
BY USING THE nüvi, YOU AGREE
TO BE BOUND BY THE TERMS AND
CONDITIONS OF THE FOLLOWING
SOFTWARE LICENSE AGREEMENT.
PLEASE READ THIS AGREEMENT
CAREFULLY.
Garmin grants you a limited license to use
the software embedded in this device (the
“Software”) in binary executable form in
the normal operation of the product. Title,
ownership rights, and intellectual property
rights in and to the Software remain in
Garmin.
You acknowledge that the Software is the
property of Garmin and is protected under the
United States of America copyright laws and
international copyright treaties. You further
acknowledge that the structure, organization,
and code of the Software are valuable trade
secrets of Garmin and that the Software in
source code form remains a valuable trade
secret of Garmin. You agree not to decompile,
disassemble, modify, reverse assemble,
reverse engineer, or reduce to human readable
form the Software or any part thereof or create
any derivative works based on the Software.
You agree not to export or re-export the
Software to any country in violation of the
export control laws of the United States of
America.
50 nüvi 205 and 205W series owner’s manual
Page 57
Troubleshooting
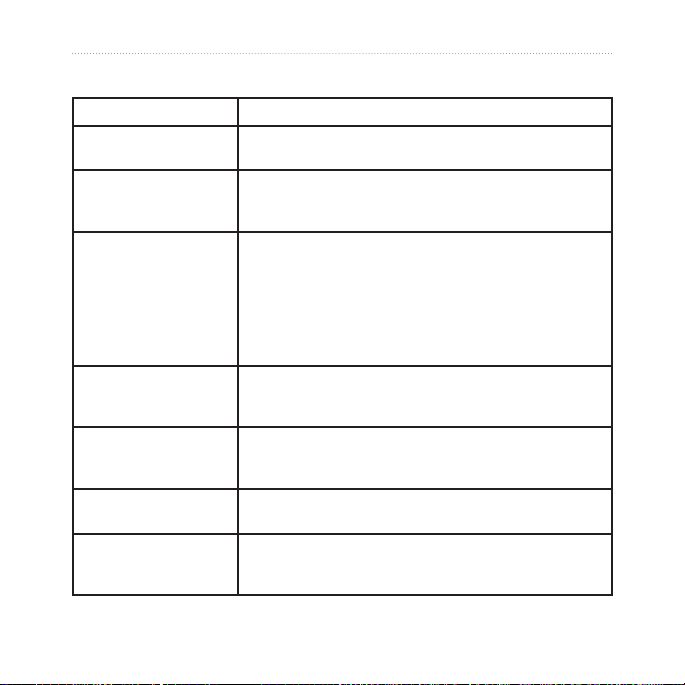
Problem/Question Solution/Answer
My nüvi never gets
satellite signals.
The suction cup will not
stay on my windshield.
My nüvi does not charge
in my vehicle.
My battery does not stay
charged for very long.
How do I clear all my
user data?
My battery gauge does
not seem accurate.
The touch screen is
not responding to my
touches.
Take your nüvi out of parking garages and away from tall
buildings and trees. Remain stationary for several minutes.
Clean the suction cup and windshield with rubbing alcohol.
Dry with a clean, dry cloth. Mount the suction cup as
described on page 2.
Check the fuse in the vehicle power cable (see pages
43–44).
Ensure the vehicle is turned on and is supplying power to
the power outlet.
Your nüvi can only charge between 32°F and 140°F (0°C
and 60°C). If the nüvi is placed in direct sunlight or in a hot
environment, it cannot charge.
To maximize the time between charges, turn down
the backlight. Touch Tools > Settings > Display >
Brightness.
Hold your nger on the lower-right corner of the nüvi screen
while it is turning on. Keep your nger pressed until the
message appears. Touch Yes to clear all user data.
Allow the unit to fully discharge, and fully charge it (without
interrupting the charge cycle).
Calibrate the touch screen as described on pages 41–42.
Appendix
nüvi 205 and 205W series owner’s manual 51
Page 58
Appendix
Problem/Question Solution/Answer
How do I know my nüvi
is in USB mass storage
mode?
My computer never
senses that the nüvi is
connected.
I cannot see any new
removable drives in my
list of drives.
How can I nd
restaurants near the
hotel I will be staying at
in the future?
My phone will not
connect to the nüvi.
When your nüvi is in USB mass storage mode, a picture of
a nüvi connected to a computer is shown. Also, you should
see two new removable disk drives listed in My Computer.
1. Unplug the USB cable from your computer.
2. Turn off the nüvi.
3. Plug the USB cable into a USB port on your computer
and into your nüvi. The nüvi automatically turns on and
goes into USB mass storage mode. Ensure your nüvi is
connected to a USB port and not a USB hub.
If you have several network drives mapped on your
computer, Windows can have trouble assigning drive letters
to your nüvi drives. See your operating system Help le to
learn how to map or assign drive letters.
1. Touch
2. Find the hotel, and touch
3. Touch
4. Search for a restaurant. Restaurants nearest your hotel
Ensure you have a nüvi 215, 215W, 265, 265W, 275, or
285W.
Touch Tools > Settings > Bluetooth. Verify that the
Bluetooth eld is set to Enabled.
Ensure your phone is turned on and is less than 10 meters
(about 33 feet) away from your nüvi.
See www.garmin.com/bluetooth for more help.
Where To? > Near > A Different City (and
enter your vacation destination).
Menu > Where To? > Near > My Destination.
are listed rst.
Go!.
52 nüvi 205 and 205W series owner’s manual
Page 59

Index
Index
Symbols
2-D, 3-D map view 35
A
acceleration score 24
accessories 46
additional maps 45
addresses 6
advertisements
disabling 28
viewing 27
alarm clock 47
alerts
safety camera 46
anti-theft feature 36, 41
attaching a photo to a
location 10
audio version 33
avoiding
road types 34
theft 41
nüvi 205 and 205W series owner’s manual 53
B
background color 34
battery 43, 51
status 3
battery information 43
bicycle navigation 33
Bluetooth technology
14–18
deleting a phone 37
pairing with phone 14
settings 36
brightness 34
browsing the map 10
C
calculator 26
calibrate fuel economy 23
call
answering 15
call waiting 16
hanging up 16
history 17
home 17
muting 16
caring for your nüvi 40
charging your nüvi 43, 51
computer connection 19
conguring 3
converting
currency 27
units 27
coordinates 11
current location, save 9
customizing the nüvi
33–38
custom POIs 46
D
dashboard disk 44
deceleration score 24
Declaration of Conformity
50
deleting
all user data 42
character 8
custom POIs 46
Favorites 10
les 20
recent nds list 9
detail maps 36
Page 60

Index
detour 5
diacritical characters 8
display settings 34
Driving Challenge 23
driving directions 13
E
ecoRoute™ 22
calibrate 25
Driving Challenge 23
fuel report 22
mileage report 25
tips 25
vehicle prole 22
extras 46–47
F
Favorites 9
les 19–20
deleting 20
supported types 19
transferring 20
nding places 4
by address 6
by coordinates 11
54 nüvi 205 and 205W series owner’s manual
by name 8
by postal code 6
near another location
8
recent selections 9
saved places
(Favorites) 9
using photos 11–12
FM trafc receiver 29
free map update 45
fuel cost, entering 23
fuel report 22
fuse, changing 43
G
Garmin Lock 36, 41
Garmin Travel Guide 47
geocaching 11
Go! page options 7
go home 6
GPS
about GPS 3, 45
off/on 33
H
hands-free phone features
14–18
Help 21
home
phone number 17
setting a location 6
I
incoming call 15
J
JPEG image les 19
K
keyboard 8
language mode 8, 35
layout 33
kilometers 33
L
language settings 35
lithium-ion battery 43,
48, 49
locking
screen 5
Page 61

Index
the nüvi 41
M
map
adding 45
browsing 10
detail level 35
enabling detail maps
36
Map Info button 36
settings 35
version 36
viewing 35
zooming 10
MapSource 19, 45
max speed, reset 13
measurements, converting
27
memory card 19
Menu page 3
microSD card 1
mileage report 25
miles 33
mounting
on dashboard 44
nüvi 205 and 205W series owner’s manual 55
on windshield 51
removing from mount
44
MSN Direct 21
mute
audio 5
phone call 16
My Data 26
myGarmin i
N
navigation 12
mode 33
settings 33
next turn 13
nüMaps Guarantee 45
nüvi
case 1
charging 43
cleaning 40
mounting 2, 44
protecting 40
resetting 42
O
off road, routing 11, 34
on-screen keyboard 8
on-unit Help 21
output, audio 5
P
pairing a mobile phone
14, 15
Panoramio pictures 11
pedestrian navigation
mode 11, 33
phone book 17
photo navigation 11–12
loading pictures 20
PIN
Bluetooth 15
Garmin Lock 41
points of interest 8
custom 46
POI loader 19
position icon 36
proximity alerts 37
proximity points
alerts 37
Page 62

Index
settings 37
Q
QWERTY keyboard 33
R
recently found locations 9
registering 41
removing the mount 44
resetting
the max speed 13
the trip data 13
your nüvi 42
routes
adding a stop 5
mode 33
off road 34
preferences 33
simulating 33
stopping 5
S
safe mode 36
safety camera database 46
satellite signals 45
saving
56 nüvi 205 and 205W series owner’s manual
places you nd 9
your current location
9, 10, 21
school zone database 46
screen
brightness 34
lock 5
screen shots 34
SD card 1
search area 8
security
location 41
settings 36
settings 33–38
restoring 39
setting your location 10
simulating a route 33
software
license agreement 50
updating 42
version 33
specications
205 series 48
205W series 49
speed limit icon 12
speed score 24
storing the nüvi 40
supported le types 19
system settings 33
T
text language 35
time settings 34
time zone 34
tools 21–28
touch screen
calibrating 41, 51
cleaning 40
settings 34
Track Up 35
trafc 29
adding trafc
subscriptions 37
advertisements 29
incidents 30
transferring les 20
trip computer 13
trip data, reset 13
trip log 36
troubleshooting 51
Page 63

Index
turn-by-turn directions 13
turn list 13
U
unit converter 27
unit ID 33
updating
maps 45
software 41
usage mode 33
USB 52
eject 20
mass-storage mode
19
user data, delete 42
WebUpdater 42
Where Am I? 21
Where to? 6
world clock 26
Z
zoom 10
V
vehicle icon 36
vehicle prole 24
via point, adding 5
voice dial 18
voice language 35
voice mail 16
W
walking route 11, 33
nüvi 205 and 205W series owner’s manual 57
Page 64
For the latest free software updates (excluding map data) throughout the life of
your Garmin products, go to the Garmin Web site at www.garmin.com.
© 2008–2009 Garmin Ltd. or its subsidiaries
1200 East 151st Street, Olathe, Kansas 66062, USA
Liberty House, Hounsdown Business Park, Southampton, Hampshire, SO40 9RB UK
No. 68, Jangshu 2nd Road, Shijr, Taipei County, Taiwan
Garmin International, Inc.
Garmin (Europe) Ltd.
Garmin Corporation
www.garmin.com
Part Number 190-00973-00 Rev. C
 Loading...