

Page 1
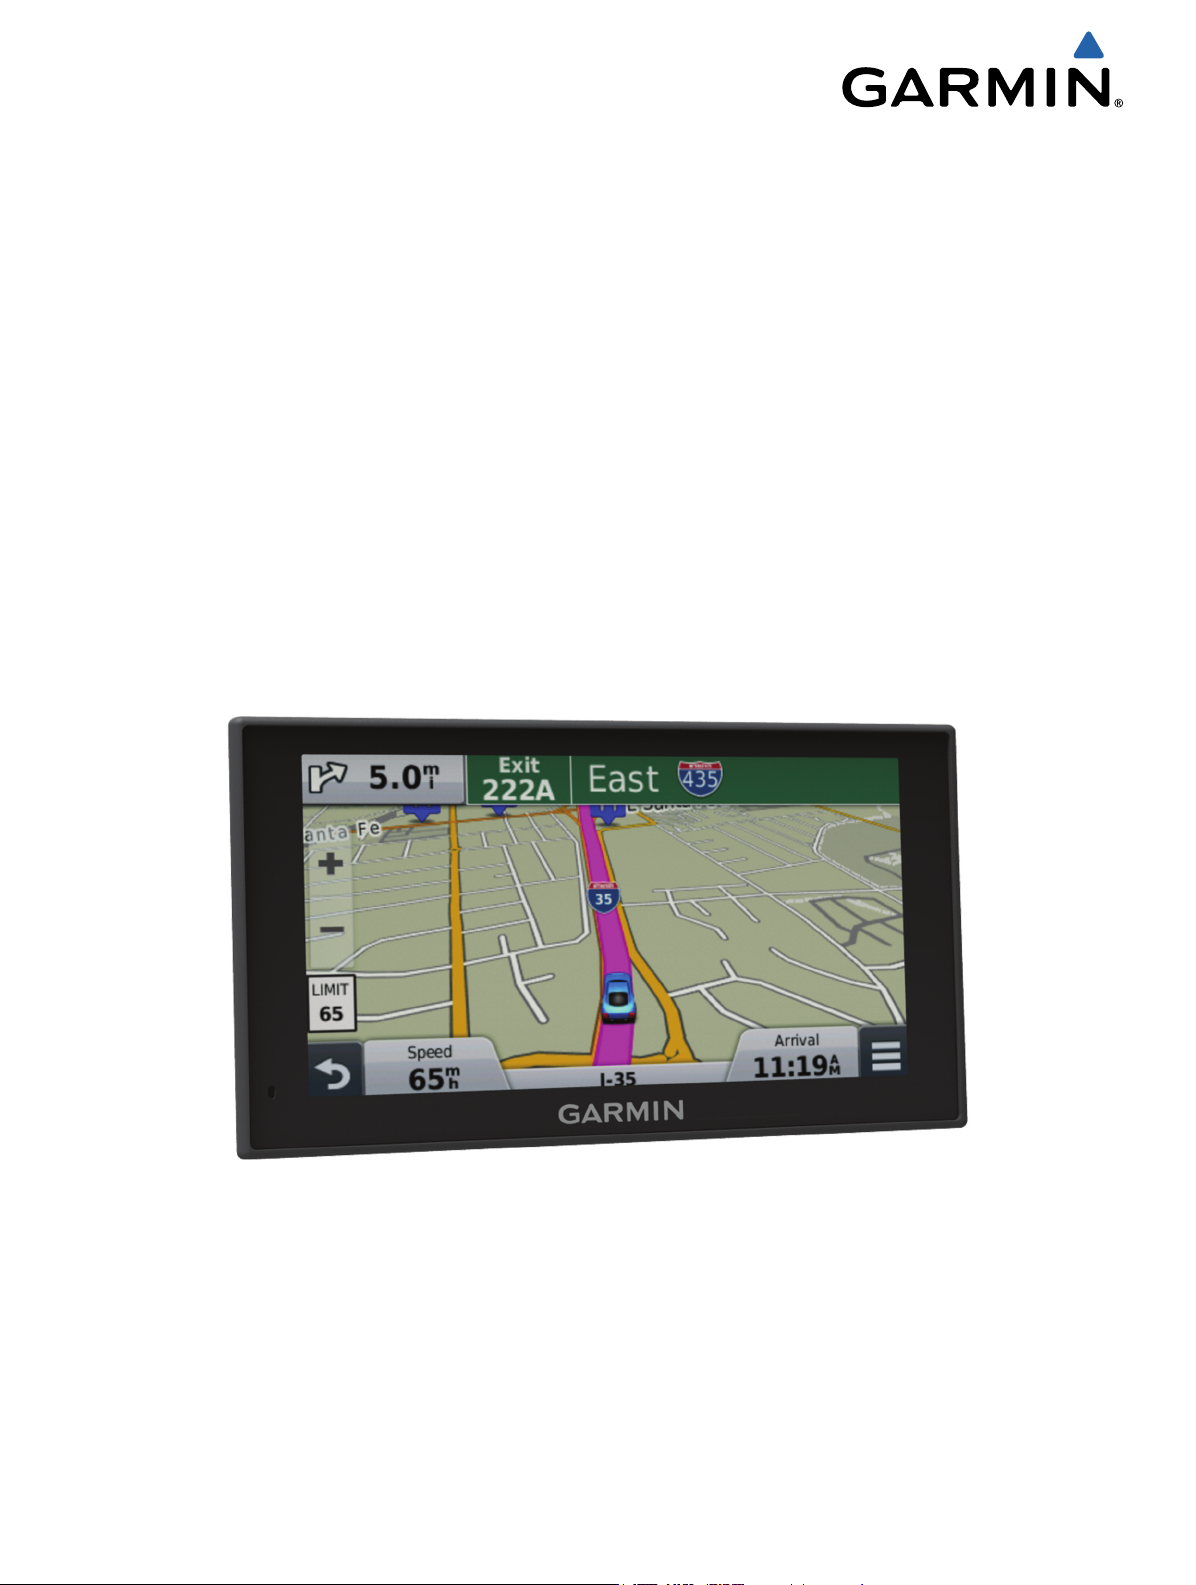
nüvi® 2509/2609 Series
Owner’s Manual
July 2014 Printed in Taiwan 190-01707-00_0B
Page 2

All rights reserved. Under the copyright laws, this manual may not be copied, in whole or in part, without the written consent of Garmin. Garmin reserves the
right to change or improve its products and to make changes in the content of this manual without obligation to notify any person or organization of such
changes or improvements. Go to www.garmin.com for current updates and supplemental information concerning the use of this product.
Garmin®, nüvi®, and the Garmin logo are trademarks of Garmin Ltd. or its subsidiaries, registered in the USA and other countries. These trademarks may not
be used without the express permission of Garmin.
BaseCamp™, Garmin Express™, HomePort™, MapSource®, myGarmin™, ecoRoute™, myTrends™, trafficTrends™, nüMaps Guarantee™, and nüMaps
Lifetime™ are trademarks of Garmin Ltd. or its subsidiaries. These trademarks may not be used without the express permission of Garmin.
The Bluetooth® word mark and logos are owned by the Bluetooth SIG, Inc., and any use of such word mark or logo by Garmin is under license. Foursquare
is a trademark of Foursquare Labs, Inc. in the U.S. and in other countries. microSD™ and the microSDHC logo are trademarks of SD-3C, LLC. Windows®,
Windows Vista®, and Windows XP® are registered trademarks of Microsoft Corporation in the United States and other countries. Mac® is a trademark of
Apple Inc. HD Radio™ and the HD logo are trademarks of iBiquity Digital Corporation. HD Radio Technology manufactured under license from iBiquity Digital
Corporation. U.S. and foreign patents.
®
Page 3

Table of Contents
Getting Started............................................................... 1
Connecting the Device to Vehicle Power................................... 1
Support and Updates................................................................. 1
Setting Up Garmin Express................................................... 1
nüMaps Guarantee™............................................................ 1
Lifetime Subscriptions........................................................... 1
Updating Maps and Software with Garmin Express.............. 1
Entering and Exiting Sleep Mode............................................... 2
Turning Off the Device............................................................... 2
Resetting the Device............................................................. 2
Acquiring GPS Signals............................................................... 2
Adjusting the Screen Brightness................................................ 2
Adjusting the Volume................................................................. 2
About Automatic Volume....................................................... 2
Status Bar Icons......................................................................... 2
Viewing GPS Signal Status................................................... 2
Battery Information................................................................ 2
Setting the Time.................................................................... 2
Using the On-Screen Buttons.................................................... 2
Using the On-Screen Keyboard................................................. 2
Locations........................................................................ 3
Finding Locations....................................................................... 3
Finding a Location by Category............................................ 3
Finding a Location Using the Search Bar.............................. 3
Changing the Search Area.................................................... 3
Finding a Location by Browsing the Map.............................. 3
Finding an Address............................................................... 3
Finding Recently Found Destinations................................... 3
Finding Parking..................................................................... 3
Search Tools......................................................................... 3
Saving Locations........................................................................ 4
Saving a Location.................................................................. 4
Saving Your Current Location............................................... 4
Saving a Home Location....................................................... 4
Editing a Saved Location...................................................... 4
Assigning Categories to a Saved Location........................... 4
Deleting a Saved Location.................................................... 4
Setting a Simulated Location..................................................... 4
Adding a Shortcut...................................................................... 4
Removing a Shortcut............................................................. 4
Custom Points of Interest........................................................... 4
Installing POI Loader............................................................. 4
Using the POI Loader Help Files........................................... 4
Finding Custom POIs............................................................ 5
Navigation.......................................................................5
Starting a Route......................................................................... 5
Previewing Multiple Routes................................................... 5
Changing the Route Calculation Mode................................. 5
Starting a Route to a Saved Location................................... 5
Navigating to Locations Within a Venue.................................... 5
Exploring a Venue................................................................. 5
Your Route on the Map.............................................................. 5
Using the Map....................................................................... 5
Adding a Point to a Route..................................................... 5
Taking a Detour..................................................................... 5
Stopping the Route............................................................... 5
Viewing Route Activity............................................................... 6
Viewing a List of Turns.......................................................... 6
Viewing the Next Turn........................................................... 6
Viewing Junctions................................................................. 6
About Up Ahead......................................................................... 6
Finding Upcoming Points of Interest..................................... 6
Customizing the Up Ahead Categories................................. 6
Trip Information
Viewing Trip Data from the Map............................................ 6
Viewing the Trip Information Page........................................ 6
Viewing the Trip Log............................................................. 6
Resetting Trip Information..................................................... 6
Using Suggested Routes........................................................... 6
Viewing Current Location Information........................................ 7
Finding Nearby Services....................................................... 7
Getting Directions to Your Current Location......................... 7
Avoiding Road Features............................................................ 7
About Custom Avoidances......................................................... 7
Avoiding an Area................................................................... 7
Avoiding a Road.................................................................... 7
Disabling a Custom Avoidance............................................. 7
Deleting Custom Avoidances................................................ 7
Customizing the Map................................................................. 7
Customizing the Map Tools................................................... 7
Customizing the Map Layers................................................. 7
Changing the Map Data Field............................................... 7
Changing the Map Perspective............................................. 7
Safety Cameras......................................................................... 7
.......................................................................... 6
Traffic.............................................................................. 7
Receiving Traffic Data Using a Traffic Receiver........................ 8
Viewing Upcoming Traffic.......................................................... 8
Viewing Traffic on the Map.................................................... 8
Searching for Traffic Incidents.............................................. 8
Traffic on Your Route................................................................. 8
Taking an Alternate Route.................................................... 8
About Traffic Cameras............................................................... 8
Saving a Traffic Camera....................................................... 8
Viewing a Traffic Camera...................................................... 8
About Traffic Subscriptions........................................................ 8
Subscription Activation.......................................................... 8
Viewing Traffic Subscriptions................................................ 8
Adding a Subscription........................................................... 8
trafficTrends™........................................................................... 9
Disabling trafficTrends.......................................................... 9
Enabling Traffic.......................................................................... 9
Voice Command............................................................. 9
Setting the Wakeup Phrase....................................................... 9
Activating Voice Command........................................................ 9
Voice Command Tips................................................................. 9
Starting a Route Using Voice Command................................... 9
Muting Instructions..................................................................... 9
Disabling Voice Command......................................................... 9
Voice Control..................................................................9
Configuring Voice Control.......................................................... 9
Using Voice Control................................................................... 9
Voice Control Tips...................................................................... 9
Hands-Free Phone Calls................................................9
About Hands-Free Calling.......................................................... 9
Enabling Bluetooth Wireless Technology............................ 10
Pairing Your Phone.................................................................. 10
Tips After Pairing the Devices............................................. 10
Disconnecting a Bluetooth Device...................................... 10
Deleting a Paired Phone..................................................... 10
Placing a Call........................................................................... 10
Dialing a Number................................................................ 10
Calling a Contact in Your Phone Book................................ 10
Calling a Location................................................................ 10
Receiving a Call....................................................................... 10
Using the Call History.............................................................. 10
Using In-Call Options............................................................... 10
Saving a Home Phone Number............................................... 10
Calling Home....................................................................... 10
Table of Contents i
Page 4

Using the Apps.............................................................10
Using Help............................................................................... 10
Searching Help Topics........................................................ 10
Smartphone Link...................................................................... 10
Downloading Smartphone Link........................................... 10
Connecting to Smartphone Link.......................................... 11
Sending a Location from Your Phone to Your Device......... 11
Disabling Calls While Connected to Smartphone Link........ 11
Garmin Live Services............................................................... 11
Subscribing to Garmin Live Services.................................. 11
About ecoRoute....................................................................... 11
ecoRoute HD Accessory..................................................... 11
Setting Up the Vehicle......................................................... 11
Changing the Fuel Price...................................................... 11
Calibrating the Fuel Economy............................................. 11
About ecoChallenge............................................................ 11
Viewing Fuel Economy Information..................................... 12
Mileage Reports.................................................................. 12
Resetting ecoRoute Information.......................................... 12
Driving Tips......................................................................... 12
Foursquare®............................................................................ 12
Checking in with Foursquare............................................... 12
Searching Foursquare Points of Interest............................. 12
Viewing myGarmin Messages................................................. 12
Viewing the Weather Forecast................................................. 12
Viewing Weather Near a Different City............................... 12
Viewing the Weather Radar................................................ 12
Viewing Weather Alerts....................................................... 13
Checking Road Conditions.................................................. 13
Planning a Trip......................................................................... 13
Scheduling a Trip................................................................ 13
Navigating to a Saved Trip.................................................. 13
Editing a Saved Trip............................................................ 13
Viewing Previous Routes and Destinations............................. 13
Data Management........................................................ 13
File Types................................................................................ 13
About Memory Cards............................................................... 13
Installing a Memory Card.................................................... 13
Connecting the Device to Your Computer............................... 13
Transferring Data From Your Computer.................................. 13
Disconnecting the USB Cable............................................. 14
Customizing the Device.............................................. 14
Map and Vehicle Settings........................................................ 14
Enabling Maps.................................................................... 14
Navigation Settings.................................................................. 14
Calculation Mode Settings.................................................. 14
Avoiding Toll Roads............................................................ 14
Avoiding Toll Stickers.......................................................... 14
Bluetooth Settings.................................................................... 14
Disabling Bluetooth............................................................. 14
Display Settings....................................................................... 14
Traffic Settings......................................................................... 14
Units and Time Settings........................................................... 15
Language and Keyboard Settings............................................ 15
Device and Privacy Settings.................................................... 15
Proximity Alerts Settings.......................................................... 15
Restoring Settings.................................................................... 15
Device Information.......................................................15
Specifications........................................................................... 15
Appendix.......................................................................15
Power Cables........................................................................... 15
Charging the Device............................................................ 15
Changing the Fuse in the Vehicle Power Cable.................. 15
Device Care............................................................................. 15
Cleaning the Outer Casing.................................................. 16
Cleaning the Touchscreen
Avoiding Theft..................................................................... 16
Mounting on Your Dashboard.................................................. 16
Removing the Device, Mount, and Suction Cup...................... 16
Removing the Device from the Mount................................. 16
Removing the Mount from the Suction Cup........................ 16
Removing the Suction Cup from the Windshield................. 16
Purchasing Additional Maps.................................................... 16
Purchasing Accessories........................................................... 16
.................................................. 16
Troubleshooting...........................................................16
The suction cup will not stay on my windshield....................... 16
My device is not acquiring satellite signals.............................. 16
The device does not charge in my vehicle............................... 16
My battery does not stay charged for very long....................... 16
The battery gauge does not seem accurate............................ 16
My device does not appear as a removable drive on my
computer.................................................................................. 16
My device does not appear as a portable device on my
computer.................................................................................. 16
My device does not appear as either a portable device or a
removable drive or volume on my computer............................ 17
My phone will not connect to the device.................................. 17
Index..............................................................................18
ii Table of Contents
Page 5
Getting Started
WARNING
See the Important Safety and Product Information guide in the
product box for product warnings and other important
information.
Connecting the Device to Vehicle Power
WARNING
This product contains a lithium-ion battery. To prevent the
possibility of personal injury or product damage caused by
battery exposure to extreme heat, store the device out of direct
sunlight.
Before you use your device on battery power, you should
charge it.
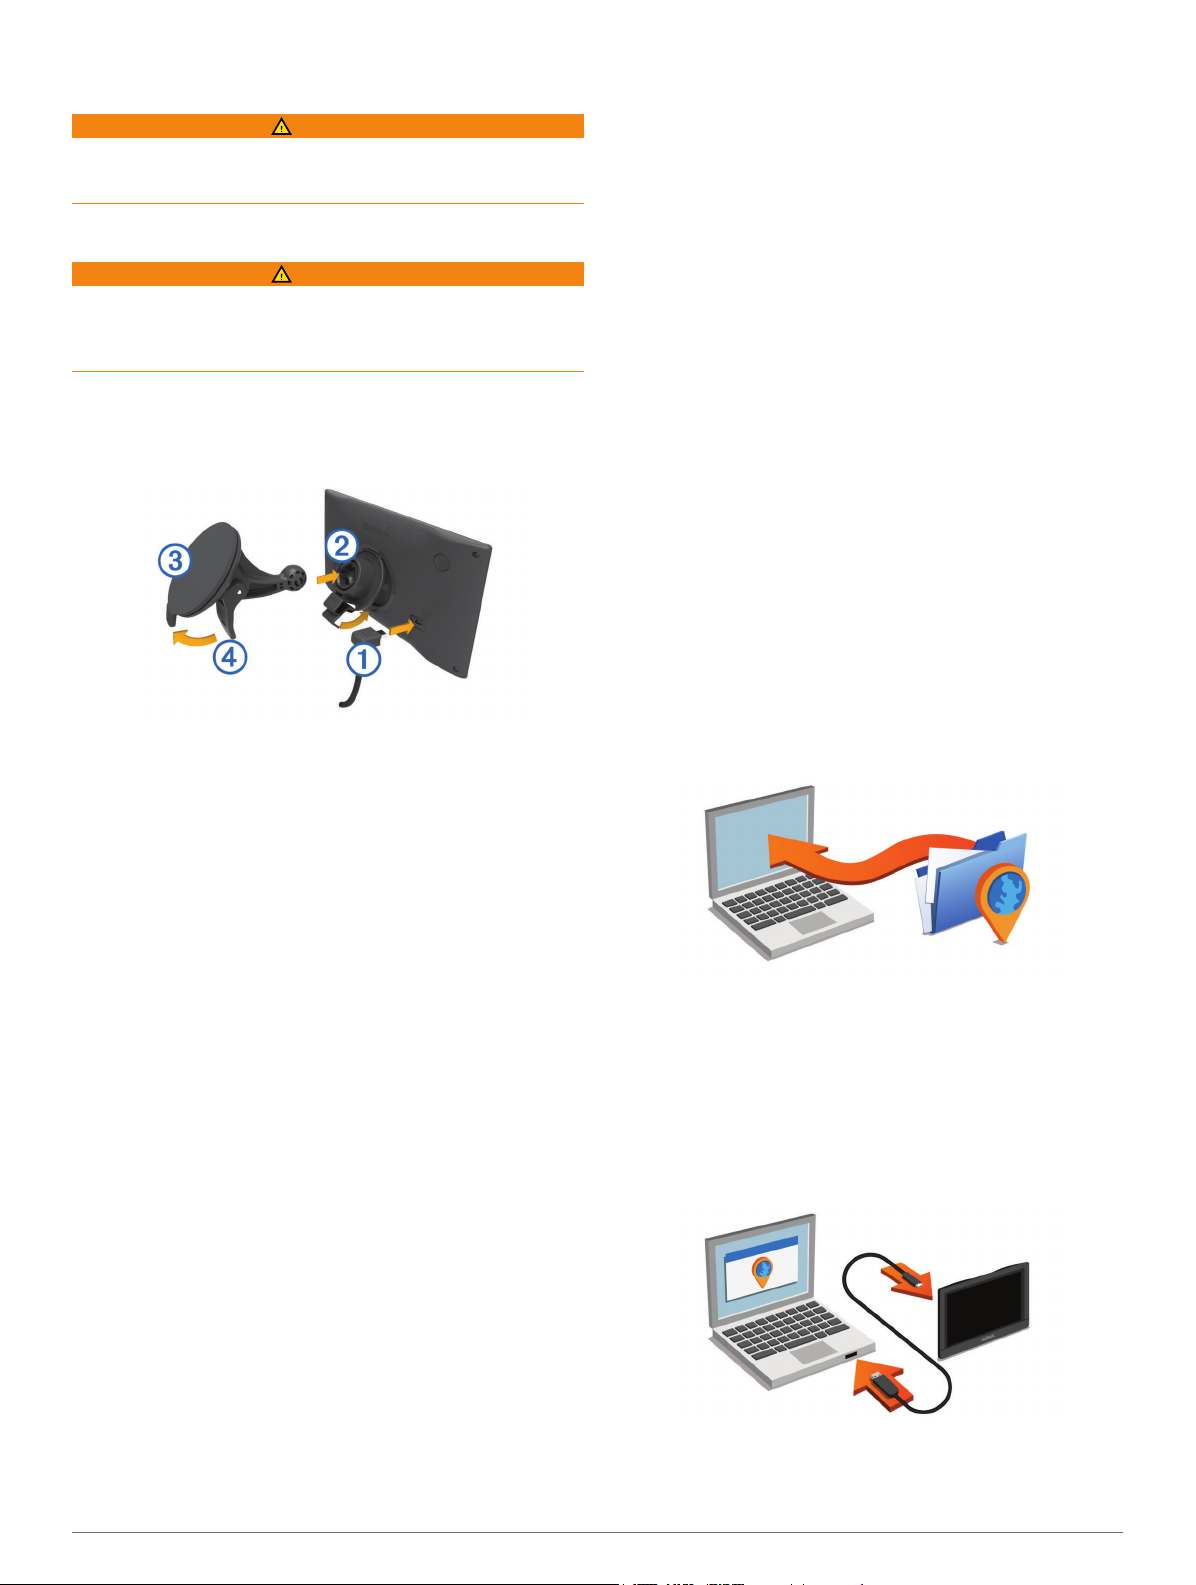
Plug the vehicle power cable À into the USB port on the
1
device.
Press the mount Á onto the suction cup  until it snaps into
2
place.
Press the suction cup to the windshield, and flip the lever
3
back toward the windshield.
Fit the tab on the top of the mount into the slot on the back of
4
the device.
Press the bottom of the mount into the device until it clicks.
5
Plug the other end of the vehicle power cable into a power
6
outlet in your vehicle.
Ã
LM: This model includes a nüMaps Lifetime™ subscription,
which provides quarterly map updates for the useful life of
your device. For terms and conditions go to
www.garmin.com/us/maps/numaps_lifetime.
LMT: This model includes a nüMaps Lifetime subscription,
lifetime traffic subscription, and a traffic receiver.
LMTHD or LMT-D: This model includes a nüMaps Lifetime
subscription, lifetime digital traffic subscription, and a digital
traffic receiver.
Activating Lifetime Maps
NOTE: Lifetime Maps are not applicable to products that do not
have pre-loaded maps.
NOTE: Lifetime Maps entitle you to receive map updates when
and as such updates are made available by Garmin during the
useful life of one compatible Garmin product or as long as
Garmin receives map data from a third party supplier, whichever
is shorter. For the meaning of a product’s “useful life” and for
other important terms and conditions, go to www.garmin.com
/numapslifetime.
Go to www.garmin.com/express.
1
Follow the on-screen instructions.
2
NOTE: If you register the device, you can receive e-mail
notifications when a map update is available.
Updating Maps and Software with Garmin Express
You can use Garmin Express software to download and install
the latest map and software updates for your device. Map
updates provide the latest available mapping data to ensure
your device continues to calculate accurate and efficient routes
to your destinations. Garmin Express is available for Windows
and Mac® computers.
On your computer, go to www.garmin.com/express.
1
®
Support and Updates
Garmin Express™ provides easy access to these services for
Garmin® devices. Some services may not be available for your
device.
• Product registration
• Product manuals
• Software updates
• Map updates
• Vehicles, voices, and other extras
Setting Up Garmin Express
Connect the device to your computer using a USB cable.
1
Go to www.garmin.com/express.
2
Follow the on-screen instructions.
3
nüMaps Guarantee™
Your device may be eligible for a free map update within 90
days of first acquiring satellites while driving. Go to
www.garmin.com/numaps for terms and conditions.
Lifetime Subscriptions
Some models include subscriptions to lifetime features. For
more information, go to www.garmin.com/lmt.
LT: This model includes a lifetime traffic subscription and a
traffic receiver.
Getting Started 1
Select an option:
2
• To install on a Windows computer, select Download for
Windows.
• To install on a Mac computer, select Mac Version.
Open the downloaded file, and follow the on-screen
3
instructions to complete the installation.
Start Garmin Express.
4
Connect your Garmin device to your computer using a USB
5
cable.
The Garmin Express software detects your device.
Enter an email address for product registration (optional).
6
Click save device.
7
Page 6
Click check for updates.
8
A list of available map and software updates appears.
Select the updates to install.
9
Click Install Now.
10
The Garmin Express software downloads and installs the
updates onto your device. Map updates are very large, and this
process may take a long time on slower Internet connections.
Entering and Exiting Sleep Mode
You can use sleep mode to conserve battery power when your
device is not in use. While in sleep mode, your device uses very
little power and can wake instantly for use.
TIP: You can charge your device faster by putting it in sleep
mode while charging the battery.
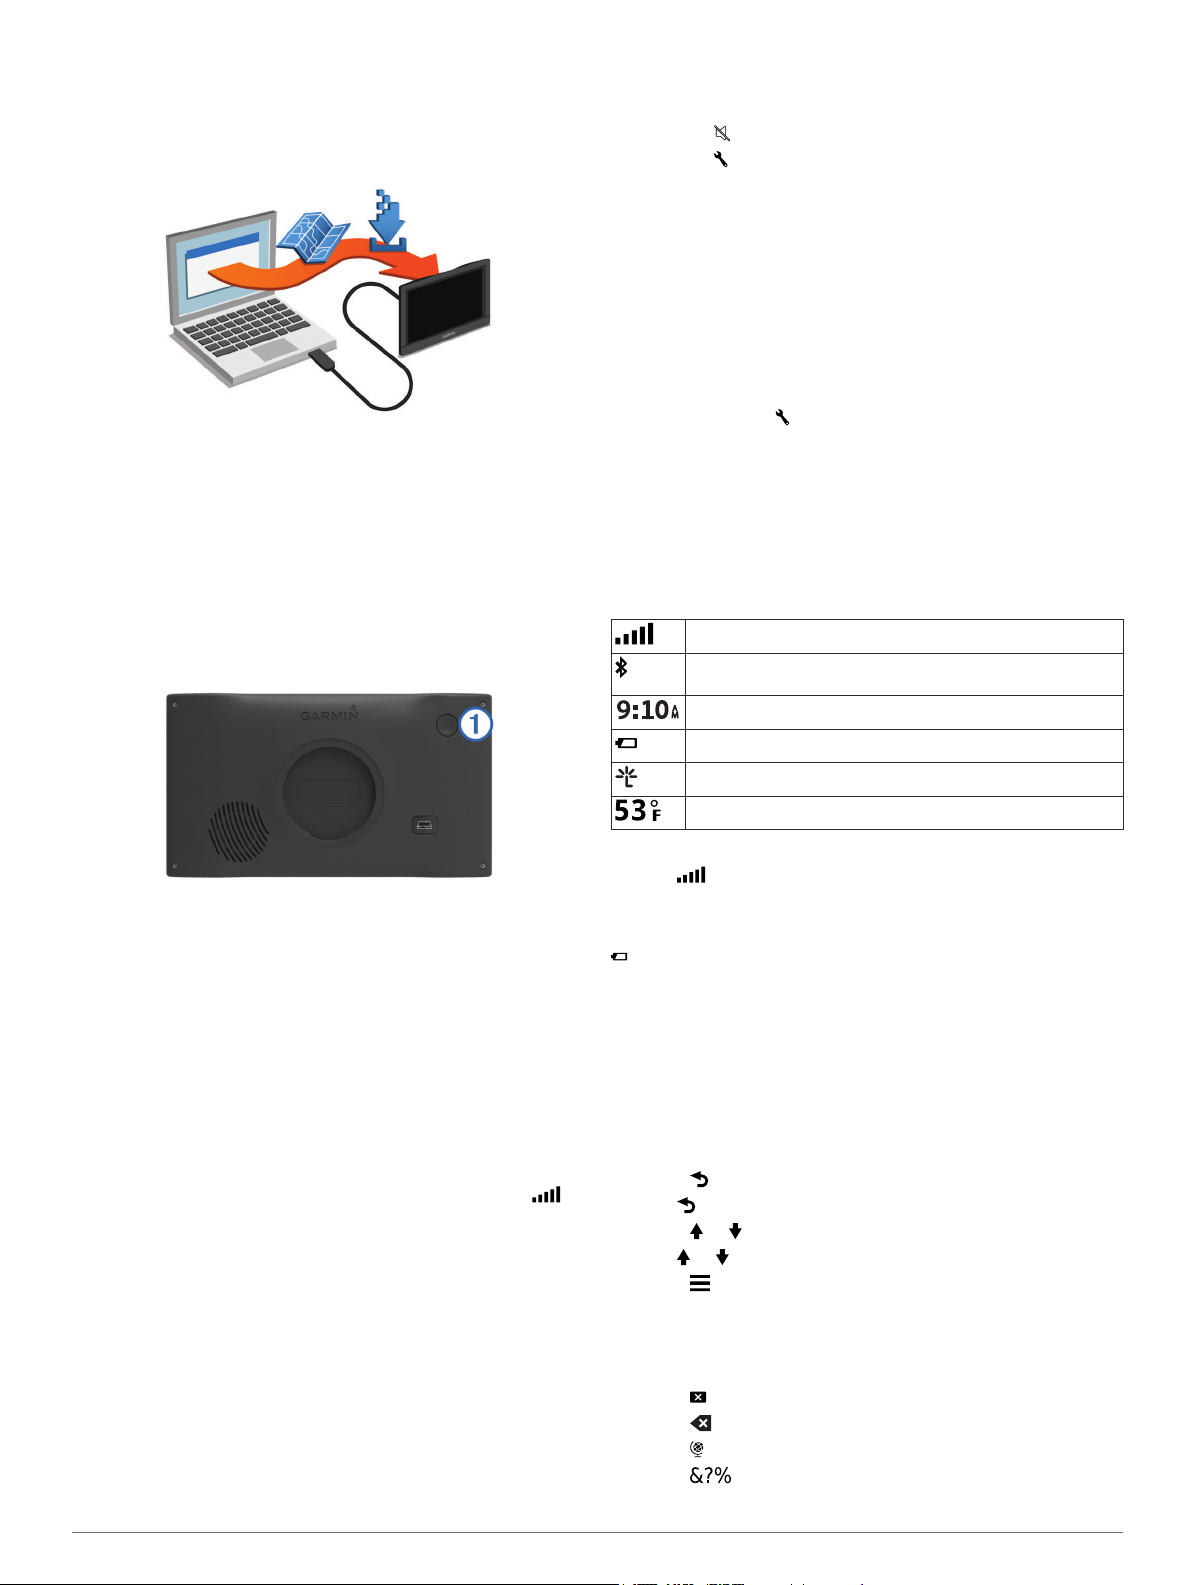
Press the power key À.
Select an option:
2
• Use the slider bar to adjust the volume.
• Select to mute the device.
• Select for additional options.
About Automatic Volume
On devices with hands-free calling, automatic volume allows the
device to adjust the volume level based on the background
noise in the vehicle (Hands-Free Phone Calls).
Automatic volume control lowers the volume of the device when
background noise is low and raises the volume level when
background noise increases.
Enabling Automatic Volume
Your device can increase or decrease the volume automatically
based on the level of background noise.
Select Volume > .
1
If necessary, select Automatic Volume.
2
Select Enabled.
3
Status Bar Icons
The status bar is located at the top of the main menu. The
status bar icons display information about features on the
device. You can select some icons to change settings or view
additional information.
GPS signal status
Bluetooth® technology status (appears when Bluetooth is
enabled)
Current time
Battery status
Connected to Smartphone Link
Temperature
Turning Off the Device
Hold the power key until a prompt appears on the screen.
1
The prompt appears after five seconds. If you release the
power key before the prompt appears, the device enters
sleep mode.
Select Off.
2
Resetting the Device
You can reset your device if it stops functioning.
Hold the power key for 12 seconds.
Acquiring GPS Signals
To navigate with your device, you must acquire satellites. in
the status bar indicates the satellite signal strength. Acquiring
satellites can take several minutes.
Turn on the device.
1
Wait while the device locates satellites.
2
If necessary, go outdoors to an open area, away from tall
3
buildings and trees.
Adjusting the Screen Brightness
Select Settings > Display > Brightness.
1
Use the slider bar to adjust the brightness.
2
Adjusting the Volume
Select Volume.
1
Viewing GPS Signal Status
Hold for three seconds.
Battery Information
After the device is connected to power, it begins to charge.
in the status bar indicates the status of the internal battery.
Setting the Time
From the main menu, select the time.
1
Select an option:
2
• To set the time automatically using GPS information,
select Automatic.
• To set the time manually, drag the numbers up or down.
Using the On-Screen Buttons
• Select to return to the previous menu screen.
• Hold to quickly return to the main menu.
• Select or to see more choices.
• Hold or to scroll faster.
• Select to see a menu of options for the current screen.
Using the On-Screen Keyboard
See "Language and Keyboard Settings" to change the keyboard
layout (Language and Keyboard Settings).
• Select to delete a search entry.
• Select to delete a character.
• Select to change the keyboard language mode.
• Select to enter special characters, such as punctuation
marks.
2 Getting Started
Page 7
• Select to change character capitalization.
Locations
The detailed maps loaded in your device contain locations, such
as restaurants, hotels, auto services, and detailed street
information. You can use categories to browse for nearby
businesses and attractions. You can also search for addresses,
coordinates, cities, and intersections.
Finding Locations
Finding a Location by Category
Select Where To?.
1
Select a category, or select Categories.
2
If necessary, select a subcategory.
3
Select a location.
4
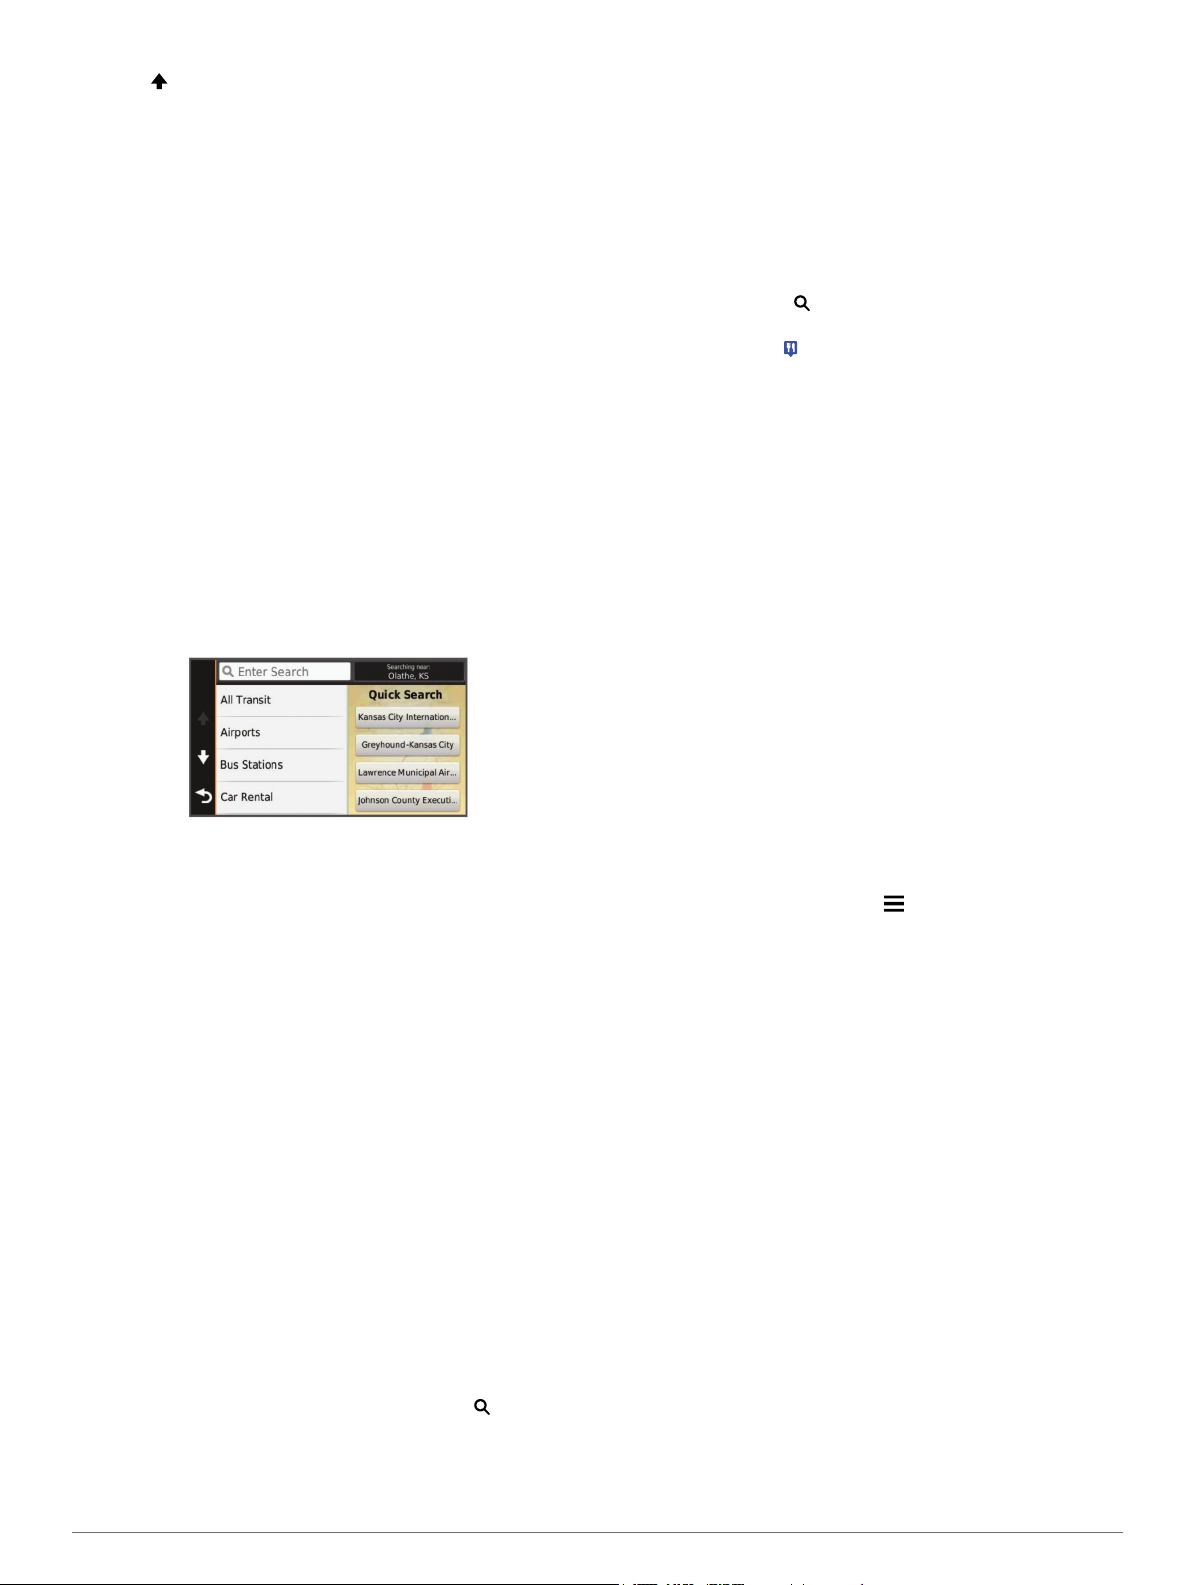
Searching Within a Category
After you have performed a search for a point of interest, certain
categories may display a Quick Search list that shows the last
three destinations you selected.
Select Where To?.
1
Select a category, or select Categories.
2
Select a category.
3
If applicable, select a destination from the Quick Search list.
4
If necessary, select the appropriate destination.
5
Finding a Location Using the Search Bar
You can use the search bar to search for locations by entering a
category, brand name, address, or city name.
Select Where To?.
1
Select Enter Search in the search bar.
2
Enter all or part of the search term.
3
Suggested search terms appear below the search bar.
Select an option:
4
• To search for a type of business, enter a category name
(for example, "movie theaters").
• To search for a business name, enter all or part of the
name.
• To search for an address near you, enter the house
number and street name.
• To search for an address in another city, enter the house
number, street name, city, and state.
• To search for a city, enter the city and state.
• To search for coordinates, enter latitude and longitude
coordinates.
Select an option:
5
• To search using a suggested search term, select the
term.
• To search using the text you entered, select .
If necessary, select a location.
6
Changing the Search Area
From the main menu, select Where To?.
1
Select Searching Near.
2
Select an option.
3
Finding a Location by Browsing the Map
Before you can find places included in the map data, such as
restaurants, hospitals, and fuel stations, you must enable the
map layer for places along the road (Customizing the Map
Layers).
Select View Map.
1
Drag and zoom the map to display the area to search.
2
If necessary, select , and select a category icon to view
3
only a specific category of places.
Location markers ( or a blue dot) appear on the map.
Select an option:
4
• Select a location marker.
• Select a point, such as a street, intersection, or address
location.
If necessary, select the location description to view additional
5
information.
Finding an Address
NOTE: The order of the steps may change depending on the
map data loaded on your device.
Select Where To?.
1
If necessary, select Searching Near to change the search
2
area (Changing the Search Area).
Select Address.
3
Follow the on-screen instructions to enter address
4
information.
Select the address.
5
Finding Recently Found Destinations
Your device stores the last 50 destinations you have found.
Select Where To? > Recent.
1
Select a location.
2
Clearing the List of Recently Found Locations
Select Where To? > Recent > > Clear > Yes.
Finding Parking
Select Where To? > Categories > Parking.
1
Select a parking location.
2
Finding Your Last Parking Spot
When you disconnect the device from vehicle power while the
device is on, your current location is saved as a parking spot.
Select Apps > Last Spot.
Search Tools
Search tools allow you to search for specific types of locations
by responding to on-screen prompts.
Finding an Intersection
Select Where To? > Categories > Intersections.
1
Select an option:
2
• Select a state or province.
• To change the country, state, or province, select State or
Country, and enter a name.
Enter the first street name, and select Next.
3
If necessary, select the street.
4
Enter the second street name, and select Next.
5
If necessary, select the street.
6
If necessary, select the intersection.
7
Finding a City
Select Where To? > Categories > Cities.
1
Locations 3
Page 8

Select Enter Search.
2
Enter a city name, and select .
3
Select a city.
4
Finding a Location Using Coordinates
You can find a location using latitude and longitude coordinates.
This can be helpful when geocaching.
Select Where To? > Categories > Coordinates.
1
If necessary, select , and change the coordinate format or
2
datum.
Select the latitude coordinate.
3
Enter the new coordinate, and select Done.
4
Select the longitude coordinate.
5
Enter the new coordinate, and select Done.
6
Select View on Map.
7
Saving Locations
Saving a Location
Search for a location (Finding a Location by Category).
1
From the search results, select a location.
2
Select .
3
Select Save.
4
If necessary, enter a name, and select Done.
5
Saving Your Current Location
From the map, select the vehicle icon.
1
Select Save.
2
Enter a name, and select Done.
3
Select OK.
4
Saving a Home Location
You can set your home location for the location you return to
most often.
Select Where To? > > Set Home Location.
1
Select Enter My Address, Use Current Location, or
2
Recently Found.
The location is saved as "Home" in the Saved menu.
Going Home
Select Where To? > Go Home.
Editing Your Home Location Information
Select Where To? > Saved > Home.
1
Select .
2
Select > Edit.
3
Enter your changes.
4
Select Done.
5
Editing a Saved Location
Select Where To? > Saved.
1
If necessary, select a category.
2
Select a location.
3
Select .
4
Select > Edit.
5
Select an option:
6
• Select Name.
• Select Phone Number.
• Select Categories to assign categories to the saved
location.
• Select Change Map Symbol to change the symbol used
to mark the saved location on a map.
Edit the information.
7
Select Done.
8
Assigning Categories to a Saved Location
You can add custom categories to organize your saved
locations.
NOTE: Categories appear in the saved locations menu after
you have saved at least 12 locations.
Select Where To? > Saved.
1
Select a location.
2
Select .
3
Select > Edit > Categories.
4
Enter one or more category names, separated by commas.
5
If necessary, select a suggested category.
6
Select Done.
7
Deleting a Saved Location
NOTE: Deleted locations cannot be recovered.
Select Where To? > Saved.
1
Select > Delete Saved Places.
2
Select the box next to the saved locations to delete, and
3
select Delete.
Setting a Simulated Location
If you are indoors or not receiving satellite signals, you can use
the GPS to set a simulated location.
Select Settings > Navigation > GPS Simulator.
1
From the main menu, select View Map.
2
Tap the map twice to select an area.
3
The address of the location appears at the bottom of the
screen.
Select the location description.
4
Select Set Location.
5
Adding a Shortcut
You can add shortcuts to the Where To? menu. A shortcut can
point to a location, a category, or a search tool.
The Where To? menu can contain up to 36 shortcut icons.
Select Where To? > Add Shortcut.
1
Select an item.
2
Removing a Shortcut
Select Where To? > > Remove Shortcut(s).
1
Select the shortcut to remove.
2
Select the shortcut again to confirm.
3
Select Save.
4
Custom Points of Interest
Custom POIs are customized points on the map. They can
contain alerts that let you know if you are near a designated
point or if you are traveling faster than a specified speed.
Installing POI Loader
You can create or download custom POI lists on your computer
and install them on your device using POI Loader software.
Go to www.garmin.com/poiloader.
1
Follow the on-screen instructions.
2
Using the POI Loader Help Files
For more information on the POI loader, refer to the Help file.
With the POI loader open, click Help.
4 Locations
Page 9
Finding Custom POIs
Before you can find custom POIs, you must load custom POIs
on your device using the POI Loader software (Installing POI
Loader).
Select Where To? > Categories.
1
Scroll to the Other Categories section, and select a category.
2
Select > Explore this Venue.
2
Select a category.
3
Select a point of interest.
4
Select Go!.
5
Your Route on the Map
Navigation
Starting a Route
Search for a location (Locations).
1
Select a location.
2
Select Go!.
3
Previewing Multiple Routes
Search for a location (Finding a Location by Category).
1
From the search results, select a location.
2
Select Routes.
3
Select a route.
4
Changing the Route Calculation Mode
The route calculation is based on road speeds and vehicle
acceleration data for a given route. The calculation mode affects
only automobile routes.
Select Settings > Navigation > Calculation Mode.
1
Select an option:
2
• Select Faster Time to calculate routes that are faster to
drive but can be longer in distance.
• Select Shorter Distance to calculate routes that are
shorter in distance but can take more time to drive.
• Select Off Road to calculate point-to-point routes (without
roads).
• Select Less Fuel to calculate routes that are more fuel-
efficient.
Navigating Off Road
If you are not following roadways as you navigate, you can use
Off Road mode.
Select Settings > Navigation.
1
Select Calculation Mode > Off Road > Save.
2
The next route will be calculated as a straight line to the
location.
Starting a Route to a Saved Location
Select Where To? > Saved.
1
If necessary, select a category, or select All Saved Places.
2
Select a location.
3
Select Go!.
4
Navigating to Locations Within a Venue
When navigating to a venue that contains more than one point
of interest, the device lists additional points of interest located
within the venue.
Search for a venue, such as a mall or airport.
1
Select the venue.
2
A list of categories appears below the venue.
Select a category.
3
Select a point of interest, and select Go!.
4
Exploring a Venue
You can view a list of all points of interest located within each
venue.
Select a venue.
1
NOTICE
The speed limit feature is for information only and does not
replace your responsibility to abide by all posted speed limit
signs and to use safe driving judgment at all times. Garmin will
not be responsible for any traffic fines or citations you receive
for failing to follow all applicable traffic laws and signs.
The route is marked with a magenta line. A checkered flag
marks your destination.
As you travel, the device guides you to the destination with
voice prompts, arrows on the map, and directions at the top of
the map. If you depart from the original route, the device
recalculates the route and provides new directions.
A data field displaying the current speed limit may appear as
you travel on major roadways.
Using the Map
Select View Map.
1
Select anywhere on the map.
2
Select an option:
3
• To zoom in or out, select or .
• To switch between North Up and 3-D views, select .
• To view specific categories, select .
Adding a Point to a Route
Before you can add a point, you must be navigating a route.
From the map, select > Where To?.
1
Search for a location.
2
Select a location.
3
Select Go!.
4
Select Add to Active Route.
5
Taking a Detour
Before you can take a detour, you must be navigating a route
and you must add the change route tool to the map tools menu
(Customizing the Map Tools).
You can take a detour for a specified distance along your route
or detour around specific roads. This is useful if you encounter
construction zones, closed roads, or poor road conditions.
From the map, select > Change Route.
1
Select an option:
2
• To detour your route for a specific distance, select Detour
by Distance.
• To detour around a specific road on the route, select
Detour by Road.
Stopping the Route
From the map, select > .
Navigation 5
Page 10
Viewing Route Activity
Viewing a List of Turns
While navigating a route, you can view all of the turns and
maneuvers for your entire route and the distance between turns.
While navigating a route, select the text bar on the top of the
1
map.
Select a turn.
2
The details for the turn appear. If available, an image of the
junction appears for junctions on major roadways.
Viewing the Entire Route on the Map
While navigating a route, select the navigation bar at the top
1
of the map.
Select > Map.
2
Viewing the Next Turn
While navigating a route, a preview of the next turn, lane
change, or other maneuver appears in the upper-left corner of
the map.
The preview includes the distance to the turn or maneuver and
the lane in which you should be traveling, if available.
From the map, select to view the next turn on the map.
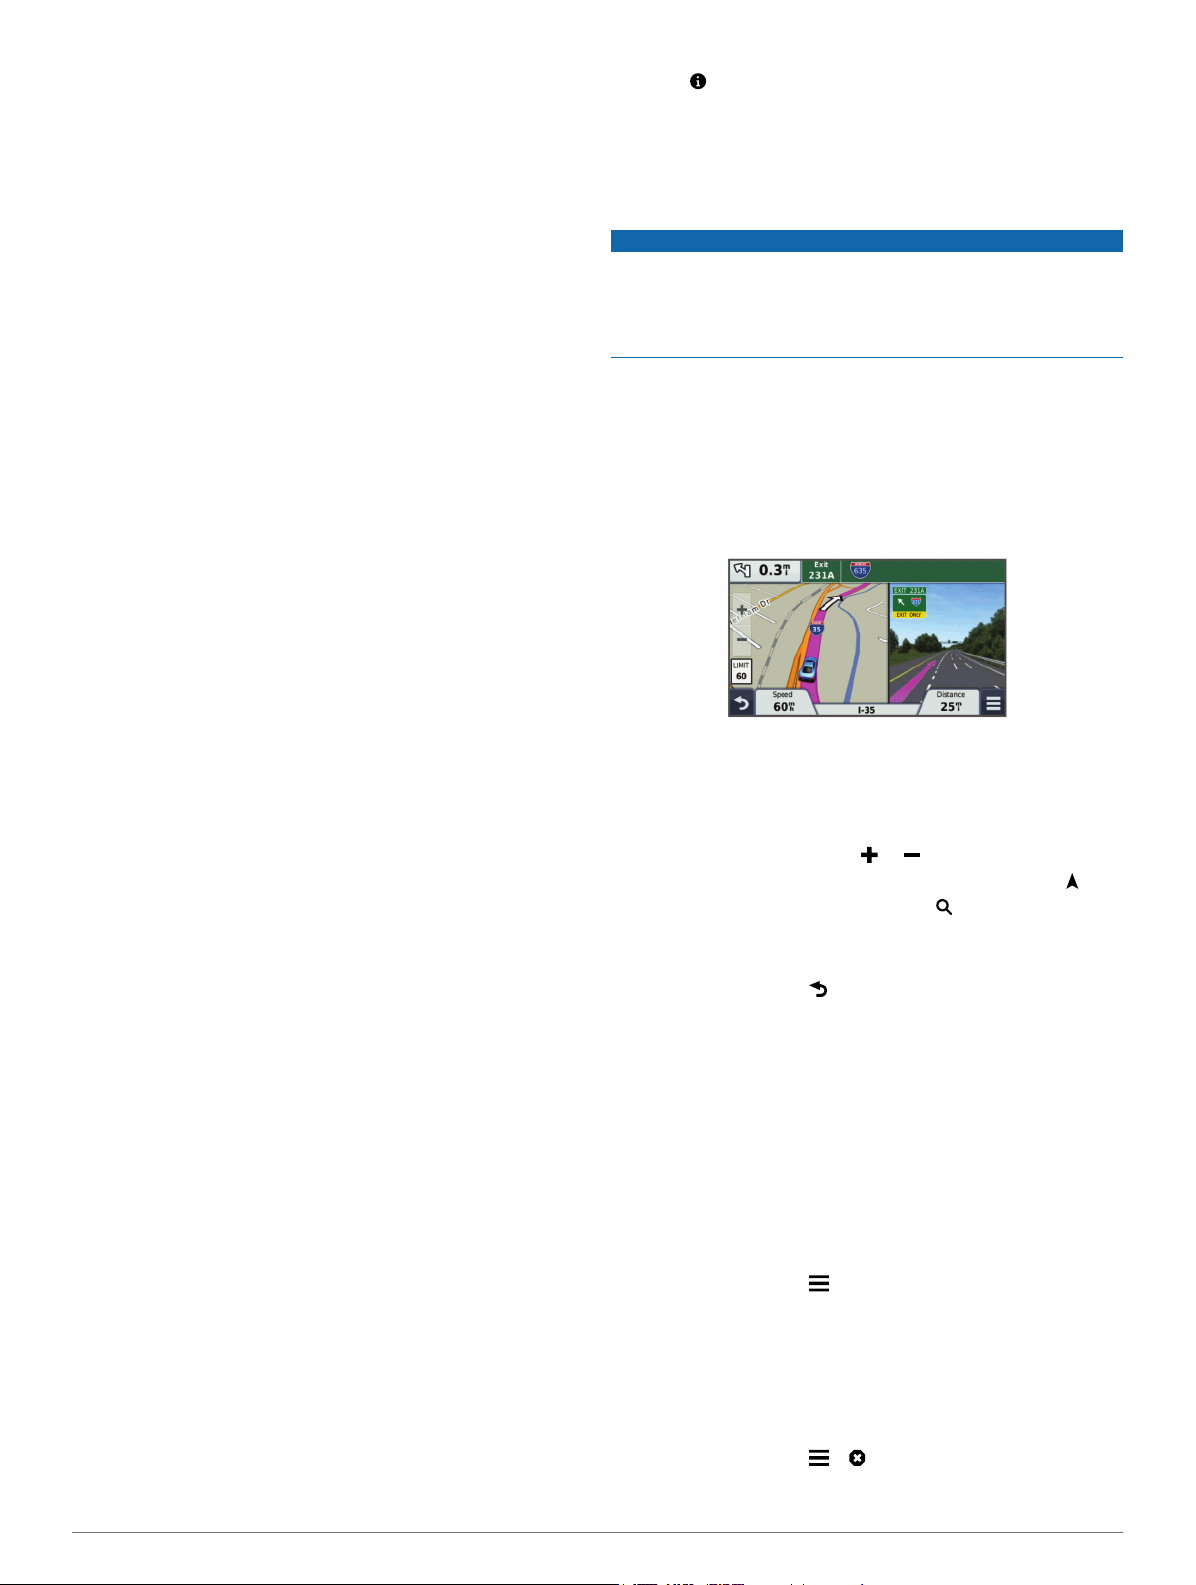
Active Lane Guidance
As you approach a turn while navigating a route, a detailed
simulation of the road appears beside the map, if available. A
colored line indicates the proper lane for the turn.
Viewing Junctions
While navigating a route, you can view the junctions on major
roadways. When you approach a junction in a route, the image
of that junction appears briefly, if available.
From the map, select to view the junction, if available.
• To create a custom category, select a category, select
Custom Search, and enter the name of a business or
category.
Select Done.
5
Trip Information
Viewing Trip Data from the Map
Before you can view trip data on the map, you must add the tool
to the map tools menu (Customizing the Map Tools).
From the map, select > Trip Data.
Customizing the Trip Data Fields
Before you can customize the data that appears in the trip data
fields on the map, you must add the Trip Data tool to the map
tools menu (Customizing the Map Tools).
Select View Map.
1
Select > Trip Data.
2
Select a trip data field.
3
Select an option.
4
The new trip data field appears in the trip data list.
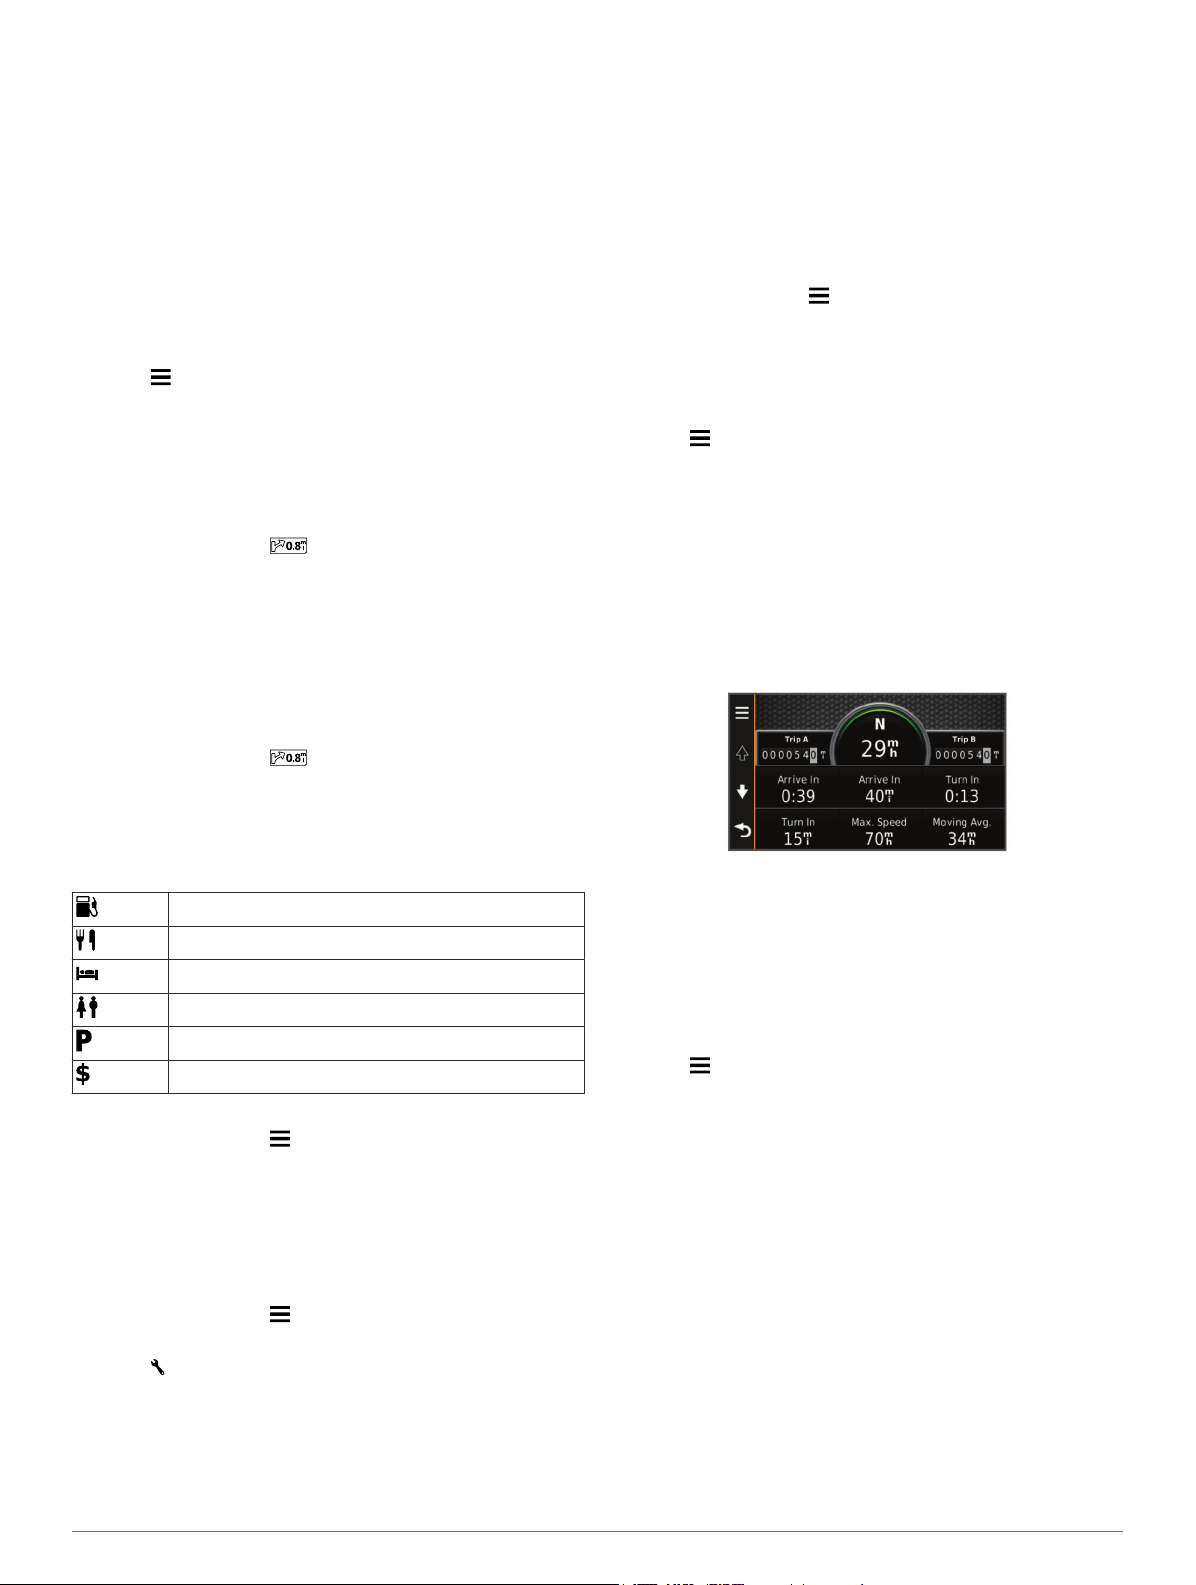
Viewing the Trip Information Page
The trip information page displays your present speed and
provides statistics about your trip.
NOTE: If you make frequent stops, leave the device turned on,
so it can accurately measure elapsed time during the trip.
From the map, select Speed.
About Up Ahead
You can view upcoming businesses and services along your
route or the road on which you are traveling.
Services are listed under tabs by category.
Gas
Food
Lodging
Restrooms
Parking
Banks and ATMs
Finding Upcoming Points of Interest
From the map, select > Up Ahead.
1
Select a tab.
2
Select a point of interest.
3
Customizing the Up Ahead Categories
You can change the categories you search for, rearrange the
order of the categories, and search for a specific business or
category.
From the map, select > Up Ahead.
1
Select a service icon.
2
Select .
3
Select an option:
4
• To move a category up or down in the list, select and drag
the arrow to the right of the category name.
• To change a category, select the category.
Viewing the Trip Log
Your device keeps a trip log, which is a record of the path you
have traveled.
Select Settings > Map & Vehicle > Map Layers.
1
Select the Trip Log check box.
2
Resetting Trip Information
From the map, select Speed.
1
Select > Reset Field(s).
2
Select an option:
3
• When not navigating a route, select Select All to reset
every data field except the speedometer, on the first
page.
• Select Reset Trip Data to reset the information on the trip
computer.
• Select Reset Max. Speed to reset the maximum speed.
• Select Reset Trip B to reset the odometer.
Using Suggested Routes
Before you can use this feature, you must save at least one
location and enable the travel history feature (Device and
Privacy Settings).
Using the myTrends™ feature, your device predicts your
destination based on your travel history, the day of the week,
and the time of day. After you have driven to a saved location
several times, the location may appear in the navigation bar on
the map, along with the estimated time of travel, and traffic
information.
6 Navigation
Page 11
Select the navigation bar to view a suggested route to the
location.
Viewing Current Location Information
You can use the Where Am I? page to view information about
your current location. This feature is helpful if you need to tell
emergency personnel your location.
From the map, select the vehicle.
Finding Nearby Services
You can use the Where Am I? page to find nearby services,
such as fuel, hospitals or police stations.
From the map, select the vehicle.
1
Select a category.
2
Getting Directions to Your Current Location
If you need to tell another person how to get to your current
location, your device can give you a list of directions.
From the map, select the vehicle.
1
Select > Directions to Me.
2
Select a starting location.
3
Select Select.
4
Avoiding Road Features
Select Settings > Navigation > Avoidances.
1
Select the road features to avoid on your routes, and select
2
Save.
About Custom Avoidances
Custom avoidances allow you to avoid specific areas and
sections of road. You can enable and disable custom
avoidances as needed.
Avoiding an Area
Select Settings > Navigation > Custom Avoidances.
1
If necessary, select Add Avoidance.
2
Select Add Avoid Area.
3
Select the upper-left corner of the area to avoid, and select
4
Next.
Select the lower-right corner of the area to avoid, and select
5
Next.
The selected area is shaded on the map.
Select Done.
6
Avoiding a Road
Select Settings > Navigation > Custom Avoidances.
1
Select Add Avoid Road.
2
Select the starting point of the section of road to avoid, and
3
select Next.
Select the ending point of the road section, and select Next.
4
Select Done.
5
Disabling a Custom Avoidance
You can disable a custom avoidance without deleting it.
Select Settings > Navigation > Custom Avoidances.
1
Select an avoidance.
2
Select > Disable.
3
Deleting Custom Avoidances
Select Settings > Navigation > Custom Avoidances.
1
Select an option:
2
• To delete all custom avoidances, select .
• To delete one custom avoidance, select the avoidance,
and select > Delete.
Customizing the Map
Customizing the Map Tools
You can select the shortcuts that appear in the map tools menu.
Select Settings > Map & Vehicle > Map Tools.
1
Select the map tools to include in the menu.
2
Select Save.
3
Customizing the Map Layers
You can customize which data appear on the map, such as
icons for points of interest and road conditions.
Select Settings > Map & Vehicle > Map Layers.
1
Select the layers to include on the map, and select Save.
2
Changing the Map Data Field
From the map, select a data field.
1
NOTE: You cannot customize Speed.
Select a type of data to display.
2
Changing the Map Perspective
Select Settings > Map & Vehicle > Driving Map View.
1
Select an option:
2
• Select Track Up to display the map in two dimensions (2-
D), with your direction of travel at the top.
• Select North Up to display the map in 2-D with north at
the top.
• Select 3-D to display the map in three dimensions.
Select Save.
3
Safety Cameras
NOTICE
Garmin is not responsible for the accuracy of or the
consequences of using a custom point of interest or a safety
camera database.
NOTE: This feature is not available for all regions or product
models.
Information about safety camera locations and speed limits is
available in some areas for some product models. Go to
www.garmin.com/safetycameras to check availability and
compatibility, or to purchase a subscription or one-time update.
You can purchase a new region or extend an existing
subscription at any time.
You can update safety cameras for an existing safety camera
subscription by going to http://my.garmin.com. You should
update your device frequently to receive the most up-to-date
safety camera information.
For some devices and regions, basic safety camera data may
be included with your device. Included data does not include
updates or a subscription.
Traffic
NOTICE
Garmin is not responsible for the accuracy or timeliness of the
traffic information.
Traffic information may not be available in all areas or countries.
For information about traffic receivers and coverage areas, go
to www.garmin.com/traffic.
A traffic receiver is included in some packages, built into either
the vehicle power cable or the device, and is an optional
accessory for all models.
• Traffic alerts appear on the map when there are traffic
incidents along your route or in your area.
Traffic 7
Page 12

• You can receive traffic information through a traffic receiver
or as a subscription service through Smartphone Link
(Garmin Live Services).
• The device must be connected to Smartphone Link with an
active traffic subscription to receive traffic information
through Smartphone Link.
• The device must be connected to vehicle power to receive
traffic information through a traffic receiver.
• The powered traffic receiver and the device may need to be
in data range of a station transmitting traffic data to receive
traffic information.
• You do not need to activate the subscription included with
your device or traffic receiver.
• If your device includes an external traffic antenna, you
should always leave the external antenna plugged in for the
best traffic reception.
the delay. You can choose whether to use alternate routes
automatically, or upon request. See Traffic Settings for more
information (Traffic Settings). Your device may route you
through a traffic delay if a better alternative route does not exist.
The delay time is added into your estimated time of arrival
automatically.
Taking an Alternate Route
If you do not have your device set to use alternate routes
automatically, you can manually start an alternate route to avoid
a traffic delay.
While navigating a route, select > Traffic.
1
Select Alternate Route.
2
NOTE: If a better alternative route does not exist, this option
is not available, and On Fastest Route appears instead.
Select Go!.
3
Receiving Traffic Data Using a Traffic Receiver
NOTICE
Heated (metallized) windshields could degrade the performance
of the traffic receiver.
Before you can receive traffic data using a traffic receiver, you
must have a traffic-compatible power cable. If your device
model includes lifetime traffic, you should use the vehicle power
cable packaged with your device. If your device model does not
include traffic, you must purchase a Garmin traffic receiver
accessory. Go to www.garmin.com/traffic for more information.
Your device can receive traffic signals from a station
broadcasting traffic data.
NOTE: In some areas, traffic information may be received from
FM radio stations using HD Radio™ technology.
Connect the traffic-compatible power cable to an external
1
power source.
Connect the traffic-compatible power cable to the device.
2
When you are within a traffic coverage area, your device
displays traffic information.
Viewing Upcoming Traffic
You can view traffic incidents coming up along your route or
along the road on which you are traveling.
While navigating a route, select > Traffic.
1
The nearest upcoming traffic incident appears in a panel on
the right side of the map.
Select the traffic incident to view additional details.
2
Viewing Traffic on the Map
The traffic map shows color-coded traffic flow and delays on
nearby roads.
From the main menu, select Apps > Traffic.
1
If necessary, select > Legend to view the legend for the
2
traffic map.
Searching for Traffic Incidents
From the main menu, select Apps > Traffic.
1
Select > Incidents.
2
Select an item in the list.
3
If there is more than one incident, use the arrows to view
4
additional incidents.
Traffic on Your Route
When a traffic delay occurs on your route, an alert appears on
the map, and the device calculates an alternate route to avoid
About Traffic Cameras
Traffic cameras provide live images of traffic conditions on
major roadways and intersections. You can save cameras that
you want to view regularly.
Saving a Traffic Camera
Before you can use this feature, you must subscribe to the
photoLive service, and your device must be connected to a
supported phone running Smartphone Link (Smartphone Link).
This feature is not available in all areas.
Select Apps > photoLive.
1
Select Touch to Add.
2
Select a road.
3
Select an intersection.
4
Select Save.
5
Viewing a Traffic Camera
Before you can view a traffic camera, you must save a traffic
camera (Saving a Traffic Camera).
Select Apps > photoLive.
1
Select a camera.
2
About Traffic Subscriptions
You can purchase additional subscriptions or a renewal if your
subscription expires. Go to http://www.garmin.com/traffic.
Subscription Activation
You do not need to activate the subscription included with your
FM traffic receiver. The subscription activates automatically
after your device acquires satellite signals while receiving traffic
signals from the pay service provider.
Viewing Traffic Subscriptions
Select Settings > Traffic > Subscriptions.
Adding a Subscription
You can purchase traffic subscriptions for other regions or
countries.
From the main menu, select Traffic.
1
Select Subscriptions > .
2
Write down the FM traffic receiver unit ID.
3
Go to www.garmin.com/fmtraffic to purchase a subscription
4
and get a 25-character code.
The traffic subscription code cannot be reused. You must
obtain a new code each time you renew your service. If you
own multiple FM traffic receivers, you must obtain a new
code for each receiver.
Select Next on the device.
5
Enter the code.
6
8 Traffic
Page 13

Select Done.
7
trafficTrends™
When the trafficTrends feature is enabled, your device uses
historic traffic data to calculate more-efficient routes.
NOTE: Different routes may be calculated based on traffic
trends for the day of the week or the time of day.
Disabling trafficTrends
To prevent your device from recording or sharing traffic data,
you must disable trafficTrends.
Select Settings > Traffic > trafficTrends™.
Enabling Traffic
You can enable or disable traffic data. When traffic data is
disabled, the device does not receive traffic data, but it still
avoids potentially congested areas in routes using the
trafficTrends feature, if enabled (trafficTrends™).
Select Settings > Traffic.
1
Select the Traffic check box.
2
Voice Command
NOTE: Voice command is not available for all languages and
regions, and may not be available on all models.
NOTE: Voice Activated Navigation may not achieve desired
performance when in a noisy environment.
Voice command allows you to use your device by saying words
and commands. The voice command menu provides voice
prompts and a list of available commands.
Setting the Wakeup Phrase
The wakeup phrase is a word or phrase you can say to activate
voice command. The default wakeup phrase is Voice
Command.
TIP: You can reduce the chance of accidental voice command
activation by using a strong wakeup phrase.
Select Apps > Voice Command > > Wake Up Phrase.
1
Enter a new wakeup phrase.
2
The device indicates the strength of the wakeup phrase as
you enter the phrase.
Select Done.
3
Listen for the voice prompt, and speak the name of the
3
location.
Say the line number.
4
Say Navigate.
5
Muting Instructions
You can disable the voice prompts for voice command without
muting the device.
Select Apps > Voice Command > .
1
Select Mute Instructions > Enabled.
2
Disabling Voice Command
You can disable voice command, which prevents you from
accidentally activating voice command while speaking.
Select Apps > Voice Command > .
1
Select Voice Command > Disabled.
2
Voice Control
For regions where the Voice Command feature is unavailable,
the Voice Control feature is activated. Voice Control allows you
to use your voice to control the device. Before you can use the
Voice Control feature, you must configure it for your voice.
Configuring Voice Control
The Voice Control feature must be configured for a single user's
voice and does not work for other users.
Select Apps > Voice Control.
1
Follow the on-screen instructions to record commands for
2
each voice control phrase.
NOTE: You do not have to read the exact phrase on the
screen. You may say an alternative command with the same
meaning based on your preference.
To use a voice control feature, you must say the command you
recorded for the feature.
Using Voice Control
Say the command you recorded for the Voice Control
1
phrase.
The voice control menu appears.
Follow the on-screen instructions.
2
Activating Voice Command
Say your wakeup phrase.
The voice command menu appears.
Voice Command Tips
• Speak in a normal voice directed at the device.
• Reduce background noise, such as voices, or the radio, to
increase the accuracy of the voice recognition.
• Speak commands as they appear on the screen.
• Respond to voice prompts from the device as needed.
• Increase the length of your wakeup phrase to reduce the
chance of accidental voice command activation.
• Listen for two tones to confirm when the device enters and
exits voice command.
Starting a Route Using Voice Command
You can say the names of popular, well-known locations.
Say your wakeup phrase (Setting the Wakeup Phrase).
1
Say Find Place.
2
Voice Command 9
Voice Control Tips
• Speak in a normal voice directed at the device.
• Reduce background noise, such as voices, or the radio, to
increase the accuracy of the voice recognition.
• Speak commands as they appear on the screen.
• Listen for a tone to confirm when the device successfully
receives a command.
Hands-Free Phone Calls
About Hands-Free Calling
NOTE: Bluetooth wireless technology is not available on all
models, or for all languages and regions.
Hands-free calling is available on some models. Using
Bluetooth wireless technology, your device can connect to your
mobile phone to become a hands-free device. To determine
whether your mobile phone with Bluetooth technology is
compatible with your device, go to www.garmin.com/bluetooth.
Your phone may not support all of the hands-free phone
features your device provides.
Page 14

Enabling Bluetooth Wireless Technology
Select Settings > Bluetooth.
1
Select Bluetooth.
2
Pairing Your Phone
Before you can use hands-free calling, you must pair your
device with a compatible mobile phone.
Place your phone and your Bluetooth device within 33 ft.
1
(10 m) of each other.
On your device, enable Bluetooth wireless technology.
2
Select Settings > Bluetooth > Search for Devices.
3
On your phone, enable Bluetooth wireless technology.
4
On your device, select OK.
5
A list of nearby Bluetooth devices appears.
Select your phone from the list, and select OK.
6
If necessary, on your phone, confirm the device is allowed to
7
connect.
If necessary, enter the device Bluetooth PIN into your phone.
8
Tips After Pairing the Devices
• After the initial pairing, the two devices can connect
automatically each time you turn them on.
• When your phone is connected to your device, you are ready
to receive voice calls.
• When you turn on the device, it tries to connect to the last
phone to which it was connected.
• You might need to set your phone to connect to the device
automatically when the device is turned on.
Disconnecting a Bluetooth Device
You can temporarily disconnect a Bluetooth device without
deleting it from the paired devices list. The Bluetooth device can
still connect to your nüvi device automatically in the future.
Select Settings > Bluetooth.
1
Select the device you want to disconnect.
2
Clear the device check box.
3
Deleting a Paired Phone
You can delete a paired phone to prevent it from automatically
connecting to your device in the future.
Select Settings > Bluetooth.
1
Select the phone, and select Unpair device.
2
Placing a Call
Dialing a Number
Select Apps > Phone > Dial.
1
Enter the number.
2
Select Dial.
3
Calling a Contact in Your Phone Book
Your phone book is loaded from your phone to the device each
time your phone and the device connect. It may take a few
minutes for the phone book to be available. Some phones do
not support this feature.
Select Apps > Phone > Phone Book.
1
Select a contact.
2
Select Call.
3
Calling a Location
Select Apps > Phone > Browse Categories.
1
Select a point of interest.
2
Select Call.
3
Receiving a Call
When you receive a call, select Answer or Ignore.
Using the Call History
Your call history is loaded from your phone to the device each
time your phone and the device connect. It may take a few
minutes for the call history to be available. Some phones do not
support this feature.
Select Apps > Phone > Call History.
1
Select a category.
2
A list of calls appears, with the most recent calls at the top.
Select a call.
3
Using In-Call Options
While on a call, you can select in-call options from the map.
• To transfer audio to your phone, select .
TIP: You can use this feature if you want to turn off your
device and remain on the call, or if you need privacy.
• To use the dial pad, select .
TIP: You can use this feature to use automated systems,
such as voice mail.
• To mute the microphone, select .
• To hang up, select .
Saving a Home Phone Number
TIP: After you save a home number, you can edit the home
number by editing “Home” in your list of saved locations (Editing
a Saved Location).
Select Apps > Phone > > Set Home Number.
1
Enter your phone number.
2
Select Done.
3
Calling Home
Before you can call home, you must enter a phone number for
your home location.
Select Apps > Phone > Call Home.
Using the Apps
Using Help
Select Apps > Help to view information about using the
device.
Searching Help Topics
Select Apps > Help > .
Smartphone Link
Smartphone Link is a phone application that allows you to
synchronize location data with your phone and access live
information using your phone data connection. Your device
transfers data from Smartphone Link using Bluetooth wireless
technology. Live information is available through free and
subscription-based plans from Garmin Live Services (Garmin
Live Services).
Saved locations and recently found locations are synchronized
with your phone each time your device connects to Smartphone
Link.
Downloading Smartphone Link
Smartphone Link is available for some smartphones. Go to
www.garmin.com/smartphonelink or see the application store
for your phone for compatibility and availability information.
10 Using the Apps
Page 15

Download Smartphone Link from the application store on
your supported phone.
See your phone owner's manual for information on
downloading and installing applications.
Connecting to Smartphone Link
Before you can connect to Smartphone Link, you must
download and install the Smartphone Link application on your
phone.
Start Smartphone Link on your phone.
1
From your device, select Settings > Bluetooth.
2
Select the Bluetooth check box.
3
From your phone, enable Bluetooth wireless technology, and
4
scan for nearby Bluetooth devices.
See your phone owner's manual for more information.
From your phone, select your device from the list of nearby
5
devices.
Follow the on-screen instructions on your phone and on your
6
device to confirm the pairing request.
appears in the status bar on your device when
Smartphone Link is connected.
Sending a Location from Your Phone to Your Device
Smartphone Link is registered as a navigation application on
your phone.
From your phone, select the button to start navigating to a
1
location (see the owner's manual for your phone).
From the application menu, select Smartphone Link.
2
The next time you connect your device to your phone, the
location is transferred to the recently found items on your
device.
Disabling Calls While Connected to Smartphone Link
While the device is connected to the phone and receiving
Garmin Live Services, you can disable hands-free calling.
Select Settings > Bluetooth.
1
Select your phone.
2
Clear the Phone calls check box.
3
Garmin Live Services
Before you can use Garmin Live Services, your device must be
connected to a supported phone running Smartphone Link
(Connecting to Smartphone Link).
Connecting to Smartphone Link provides access to Garmin Live
Services. Garmin Live Services provides free and subscriptionbased plans to view live data on your device, such as traffic
conditions and weather.
Some services, like weather, are available as separate apps on
your device. Other services, like traffic, enhance the existing
navigation features on your device. Features that require
access to Garmin Live Services display the Smartphone Link
symbol and appear only when the device is connected to
Smartphone Link.
Subscribing to Garmin Live Services
Before you can subscribe to Garmin Live Services, you must
install the Smartphone Link app on your phone.
Start the Smartphone Link app on your phone (Connecting to
1
Smartphone Link).
Select My Account.
2
A list of services and subscription prices appears.
Select a service.
3
Select the price.
4
Select Subscribe.
5
Follow the on-screen instructions.
6
About ecoRoute
In some areas, before you can use ecoRoute™ features, you
must purchase an unlock code or an ecoRoute HD accessory.
Go to www.garmin.com/ecoroute for more information.
The ecoRoute feature calculates the fuel economy and the fuel
price of navigating to a destination, and offers tools for
improving fuel efficiency.
The data provided by the ecoRoute feature is an estimate only.
The data is not actually read from the vehicle, unless you are
using the ecoRoute HD accessory.
To receive more-accurate fuel reports for your specific vehicle
and driving habits, calibrate the fuel economy (Calibrating the
Fuel Economy).
ecoRoute HD Accessory
When connected to the ecoRoute HD accessory, your device
can receive real-time vehicle information, such as error
messages, RPM, and battery voltage. Your device includes data
read from the vehicle by the ecoRoute HD accessory when
calculating ecoRoute data.
The ecoRoute HD accessory is compatible only with devices
that have Bluetooth wireless technology.
Go to www.garmin.com/ecoRoute.
Setting Up the Vehicle
The first time you use the ecoRoute features, you must enter
vehicle information.
Select Apps > ecoRoute.
1
Follow the on-screen instructions.
2
Changing the Fuel Price
Select Apps > ecoRoute > At the Pump.
1
Enter the current price of fuel, and select Next.
2
Select Yes.
3
Calibrating the Fuel Economy
You can calibrate the fuel economy to receive more-accurate
fuel reports for your specific vehicle and driving habits. You
should calibrate when you fill up your fuel tank.
Select Apps > ecoRoute > At the Pump.
1
Enter the current fuel price.
2
Enter the amount of fuel the vehicle has used since the last
3
time the fuel tank was filled.
Enter the distance you have traveled since the last time the
4
fuel tank was filled.
Select Next.
5
The device calculates the average vehicle fuel economy.
Select Save.
6
About ecoChallenge
ecoChallenge helps you maximize the vehicle fuel economy by
scoring your driving habits. The higher your ecoChallenge
scores, the more fuel you have saved. The ecoChallenge
collects data and calculates a score whenever your device is
moving and in Automobile transportation mode.
Viewing ecoChallenge Scores
Select Apps > ecoRoute > ecoChallenge.
About the ecoChallenge Score
Acceleration: Displays your score for smooth and gradual
acceleration. You lose points for rapid acceleration.
Braking: Displays your score for smooth and gradual braking.
You lose points for hard braking.
Using the Apps 11
Page 16

Overall: Displays an average of the speed, acceleration, and
braking score.
Speed: Displays your score for driving your vehicle at the
optimal speed for conserving fuel.
Resetting the ecoChallenge Scores
Select Apps > ecoRoute > ecoChallenge.
1
Select > Reset.
2
Viewing Fuel Economy Information
Select Apps > ecoRoute > Fuel Economy.
1
Select a section of the graph to zoom in.
2
Mileage Reports
Mileage reports provide the distance, the time, the average fuel
economy, and the fuel cost of navigating to a destination.
A mileage report is created for every route that you drive. If you
stop a route on your device, a mileage report is created for the
distance you traveled.
Viewing a Mileage Report
You can view saved mileage reports on the device.
TIP: You can connect the device to your computer and access
mileage reports in the Reports folder on the device.
Select Apps > ecoRoute > Mileage Report.
1
Select a report.
2
Resetting ecoRoute Information
Select Apps > ecoRoute > Vehicle Profile.
1
Select Reset.
2
Driving Tips
• Drive the speed limit. In most vehicles, you will achieve
optimal fuel economy between 45 mph and 60 mph.
• Drive a consistent speed.
• Brake and accelerate gradually and consistently.
• Avoid stop-and-go traffic and rush hour.
• Do not rest your foot on the brake pedal.
• Use the cruise control.
• Turn your vehicle off instead of idling for temporary stops.
• Combine small trips into one longer trip with multiple stops.
• Turn off the air conditioner and open your windows, unless
you are traveling at high speeds on the highway.
• Tighten your gas cap.
• Park in the shade or in the garage.
• Unload excess weight. Remove unneeded items from your
vehicle.
• Avoid carrying items on your roof. Remove rooftop carriers
and removable racks when not in use.
• Maintain the recommended tire pressure. Check tire
pressure regularly and before long trips.
• Keep your vehicle well-tuned, and follow the vehicle
manufacturer’s recommended maintenance intervals.
• Change your oil, oil filters, and air filters regularly.
• Use the lowest recommended suitable grade of fuel. Use
biofuels when feasible, such as E85 and biodiesel.
Foursquare
Foursquare is a location-based social networking application for
mobile devices. You can connect to your Foursquare account
through Smartphone Link to check in at any location and view
thousands of unique points of interest.
®
Checking in with Foursquare
Before you can check in with Foursquare, you must connect to
a supported phone running Smartphone Link and log in to your
Foursquare account.
Select Apps > Foursquare > Check In.
1
Select a point of interest.
2
Select > Check In.
3
Searching Foursquare Points of Interest
You can use the search bar to search for locations by entering a
category, brand name, address, or city name.
Select Apps > Foursquare.
1
Select Enter Search in the search bar.
2
Enter all or part of the search term.
3
Suggested search terms appear below the search bar.
Select an option:
4
• To search for a type of business, enter a category name
(for example, "movie theaters").
• To search for a business name, enter all or part of the
name.
Select an option:
5
• To search using a suggested search term, select the
term.
• To search using the text you entered, select .
If necessary, select a location.
6
Viewing myGarmin Messages
Before you can use this feature, your device must be connected
to a supported phone running Smartphone Link (Connecting to
Smartphone Link). This feature is not available in all areas.
You can view messages from myGarmin, such as notifications
for software and map updates.
Select Apps > myGarmin.
1
If you have unread messages, the number of unread
messages appears on the myGarmin icon.
Select a message subject.
2
The full message appears.
Viewing the Weather Forecast
Before you can use this feature, your device must be connected
to a supported phone running Smartphone Link (Connecting to
Smartphone Link). This feature is not available in all areas.
Select Apps > Weather.
1
Select a day.
2
The detailed forecast for that day appears.
Viewing Weather Near a Different City
Select Apps > Weather > Current Location.
1
Select an option:
2
• To view weather for a favorite city, select a city in the list.
• To add a favorite city, select Add City, and enter a city
name.
Viewing the Weather Radar
Before you can use this feature, you must purchase Advanced
Weather service using Smartphone Link.
You can view an animated, color-coded radar map of current
weather conditions, as well as a weather icon on the map. The
weather icon changes to show weather in the vicinity, such as
rain, snow, and thunderstorms.
Select Apps > Weather.
1
If necessary, select a city.
2
12 Using the Apps
Page 17

Select > Weather Radar.
3
Viewing Weather Alerts
Before you can use this feature, you must purchase Advanced
Weather service using Smartphone Link.
While you are traveling with your device, weather alerts may
appear on the map. You can also view a map of weather alerts
near your current location or near a selected city.
Select Apps > Weather.
1
If necessary, select a city.
2
Select > Weather Alerts.
3
Checking Road Conditions
Before you can use this feature, you must purchase Advanced
Weather service using Smartphone Link.
Select Apps > Weather.
1
If necessary, select a city.
2
Select > Road Conditions.
3
Planning a Trip
You can use the trip planner to create and save a trip with
multiple destinations.
Select Apps > Trip Planner.
1
Select New Trip.
2
Select Select Start Location.
3
Search for a location (Finding a Location by Category).
4
Select Select.
5
To add additional locations, select .
6
Select Next.
7
Select Save.
8
Enter a name, and select Done.
9
Scheduling a Trip
You can use the trip planner to create and save a trip with
multiple destinations.
Select Apps > Trip Planner.
1
Select a trip.
2
Select a location.
3
Select an option:
4
• Select Departure Time.
• Select Arrival Time.
Select a date and time, and select Save.
5
Select Duration.
6
Select the amount of time you will spend at the location, and
7
select Save.
If necessary, repeat steps 3–7 for each location.
8
Navigating to a Saved Trip
Select Apps > Trip Planner.
1
Select a saved trip.
2
Select Go!.
3
If prompted, select a route (Your Route on the Map).
4
Editing a Saved Trip
Select Apps > Trip Planner.
1
Select a saved trip.
2
Select .
3
Select an option:
4
• Select Rename Trip.
• Select Edit Destinations to add and delete a location, or
to change the order of locations.
• Select Delete Trip.
• Select Optimize Order to arrange the stops on your trip
in the most-efficient order.
Viewing Previous Routes and Destinations
Before you can use this feature, you must enable the travel
history feature (Device and Privacy Settings).
You can view your previous routes and places you have
stopped on the map.
Select Apps > Where I've Been.
Data Management
You can store files on your device. The device has a memory
card slot for additional data storage.
NOTE: The device is not compatible with Windows 95, 98, Me,
Windows NT®, and Mac OS 10.3 and earlier.
File Types
The device supports these file types.
• Maps and GPX waypoint files from myGarmin™ mapping
software, including MapSource®, BaseCamp™, and
HomePort™ (Custom Points of Interest).
• GPI custom POI files from Garmin POI Loader (Installing POI
Loader).
About Memory Cards
You can purchase memory cards from an electronics supplier,
or purchase pre-loaded Garmin mapping software
(www.garmin.com). In addition to map and data storage, the
memory card can be used to store files such as maps, images,
geocaches, routes, waypoints, and custom POIs.
Installing a Memory Card
The device supports microSD™ and microSDHC memory cards.
Insert a memory card into the slot on the device.
1
Press it in until it clicks.
2
Connecting the Device to Your Computer
You can connect the device to your computer using a USB
cable.
Plug the small end of the USB cable into the port on the
1
device.
Plug the larger end of the USB cable into a port on your
2
computer.
A picture of your device connected to a computer appears on
the device screen.
Depending on your computer operating system, the device
appears as either a portable device, a removable drive, or a
removable volume.
Transferring Data From Your Computer
Connect the device to your computer (Connecting the Device
1
to Your Computer).
Depending on your computer operating system, the device
appears as either a portable device, a removable drive, or a
removable volume.
On your computer, open the file browser.
2
Select a file.
3
Select Edit > Copy.
4
Browse to a folder on the device.
5
NOTE: For a removable drive or volume, you should not
place files in the Garmin folder.
Data Management 13
Page 18

Select Edit > Paste.
6
Disconnecting the USB Cable
If your device is connected to your computer as a removable
drive or volume, you must safely disconnect your device from
your computer to avoid data loss. If your device is connected to
your Windows computer as a portable device, it is not
necessary to safely disconnect.
Complete an action:
1
• For Windows computers, select the Safely Remove
Hardware icon in the system tray, and select your device.
• For Mac computers, drag the volume icon to the trash.
Disconnect the cable from your computer.
2
Customizing the Device
Map and Vehicle Settings
To open the Map and Vehicle settings, from the main menu,
select Settings > Map & Vehicle.
Vehicle: Sets the icon that represents your position on the map.
Go to www.garmingarage.com for more icons.
Driving Map View: Sets the perspective on the map.
Map Detail: Sets the level of detail on the map. More detail may
cause the map to draw slower.
Map Theme: Changes the color of the map data.
Map Tools: Sets the shortcuts that appear in the map tools
menu.
Map Layers: Sets the data that appears on the map page
(Customizing the Map Layers).
myMaps: Sets which installed maps the device uses.
Enabling Maps
You can enable map products installed on your device.
TIP: To purchase additional map products, go to
http://buy.garmin.com.
Select Settings > Map & Vehicle > myMaps.
1
Select a map.
2
Navigation Settings
To open the Navigation settings page, from the main menu,
select Settings > Navigation.
Calculation Mode: Sets the route calculation method.
Avoidances: Sets road features to avoid on a route.
Custom Avoidances: Allows you to avoid specific roads or
areas.
Toll Roads: Sets preferences for avoiding toll roads.
Tolls and Fees: Sets preferences for avoiding toll roads and toll
stickers.
NOTE: This feature is not available in all areas.
Safe Mode: Disables all functions that require significant
operator attention and could become a distraction while
driving.
GPS Simulator: Stops the device from receiving a GPS signal,
and saves battery power.
Calculation Mode Settings
Select Settings > Navigation > Calculation Mode.
The route calculation is based on road speeds and vehicle
acceleration data for a given route.
Faster Time: Calculates routes that are faster to drive but can
be longer in distance.
Shorter Distance: Calculates routes that are shorter in distance
but can take more time to drive.
Less Fuel: Calculates routes that could use less fuel than other
routes.
Off Road: Calculates a direct line from your location to your
destination.
Avoiding Toll Roads
Select Settings > Navigation.
1
Select an option:
2
NOTE: The menu changes based on your area and the map
data on your device.
• Select Toll Roads.
• Select Tolls and Fees > Toll Roads.
Select Always Ask, Avoid, or Allow, and select Save.
3
Avoiding Toll Stickers
NOTE: This feature is not available in all areas.
The map data on your device may contain detailed toll sticker
information for some countries. You can avoid or allow toll
stickers for each country.
Select Settings > Navigation > Tolls and Fees > Toll
1
Stickers.
Select a country.
2
Select Always Ask, Avoid, or Allow, and select Save.
3
Bluetooth Settings
Select Settings > Bluetooth.
Bluetooth: Enables Bluetooth wireless technology.
Search for Devices: Searches for nearby Bluetooth devices.
Friendly Name: Allows you to enter a friendly name that
identifies your device on other devices with Bluetooth
wireless technology.
Disabling Bluetooth
Select Settings > Bluetooth.
1
Select Bluetooth.
2
Display Settings
To open the Display settings page, from the main menu, select
Settings > Display.
Orientation: Sets the display to portrait (vertical) or landscape
(horizontal).
Color Mode: Sets the device to display day or night colors. You
can select Auto to allow the device to automatically set day
or night colors based on the time of day.
Brightness: Adjusts the display brightness.
Display Timeout: Sets the amount of idle time before your
device enters sleep mode.
Screenshot: Allows you to take a picture of the device screen.
Screenshots are saved in the Screenshot folder of the device
storage.
Traffic Settings
To open the traffic settings page, from the main menu, select
Settings > Traffic.
Traffic: Enables traffic.
Current Provider: Sets the traffic provider to use for traffic
data. Auto selects the best available traffic data
automatically.
Subscriptions: Lists current traffic subscriptions.
Optimize Route: Selects whether to use optimized alternate
routes automatically or upon request (Traffic on Your Route).
Traffic Alerts: Selects the traffic delay severity for which the
device displays a traffic alert.
14 Customizing the Device
Page 19
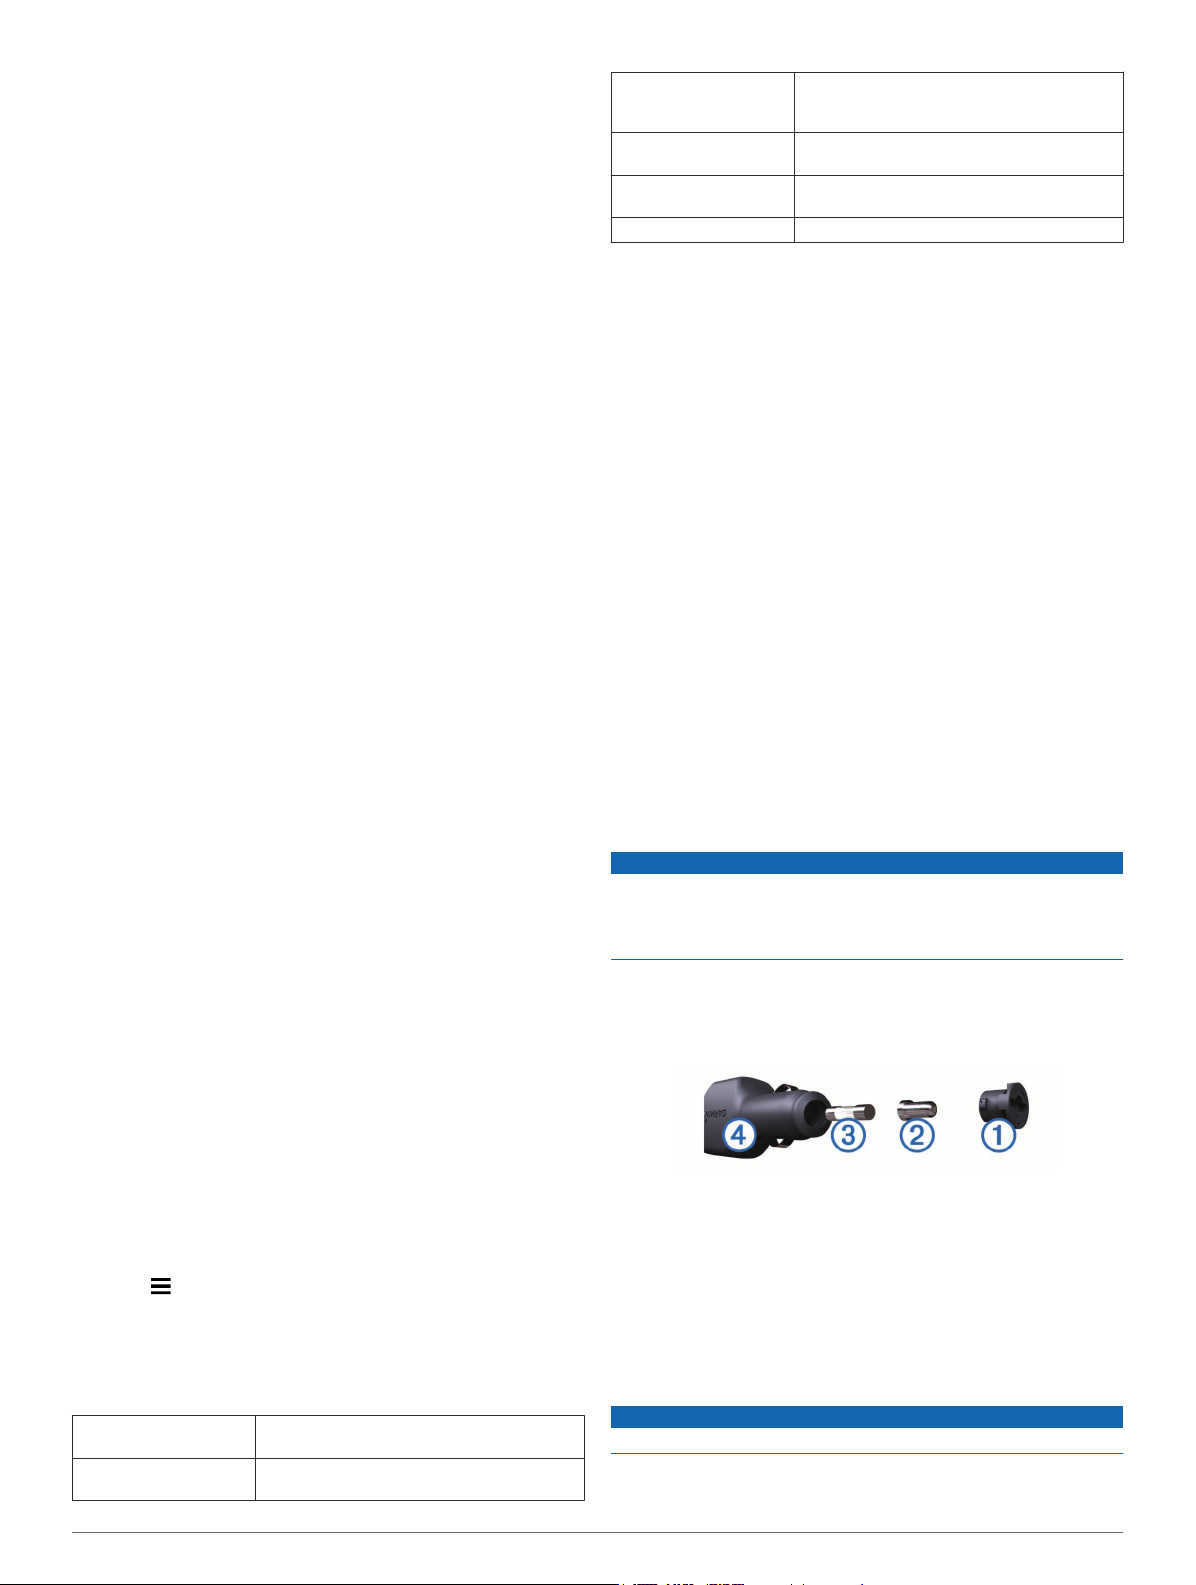
trafficTrends™: Enables the trafficTrends feature
(trafficTrends™).
Units and Time Settings
To open the Units and Time settings page, from the main menu,
select Settings > Units & Time.
Current Time: Sets the device time.
Time Format: Allows you to select a 12-hour, 24-hour, or UTC
display time.
Units: Sets the unit of measure used for distances.
Position Format: Sets the coordinate format and datum used
for geographical coordinates.
Language and Keyboard Settings
To open the Language and Keyboard settings, from the main
menu, select Settings > Language & Keyboard.
Voice Language: Sets the language for voice prompts.
Text Language: Sets all on-screen text to the selected
language.
NOTE: Changing the text language does not change the
language of user-entered data or map data, such as street
names.
Keyboard Language: Enables keyboard languages.
Device and Privacy Settings
To open the device settings, select Settings > Device.
About: Displays the software version number, the unit ID
number, and information on several other software features.
EULAs: Displays the end-user license agreements.
NOTE: You need this information when you update the
system software or purchase additional map data.
Position Reporting: Shares your position information with
Garmin to improve content.
Travel History: Allows the device to record information for the
myTrends, Where I’ve Been, and Trip Log features.
Clear Travel History: Clears your travel history for the
myTrends, Where I’ve Been, and Trip Log features.
Proximity Alerts Settings
NOTE: You must have custom points of interest (POIs) loaded
for proximity points alerts to display.
Select Settings > Proximity Alerts.
Audio: Sets the style of alert that plays when you approach
proximity points.
Alerts: Sets the type of proximity points for which alerts are
played.
Power input Vehicle power using the included vehicle
Battery life (2509 series) Up to 2.5 hours depending on usage and
Battery life (2609 series) Up to 1 hour depending on usage and
Battery type Rechargeable Lithium-ion
power cable or AC power using an optional
accessory
settings
settings
Appendix
Power Cables
Your device can be powered various ways.
• Vehicle power cable
• USB cable
• AC adapter (optional accessory)
Charging the Device
NOTE: This Class III product shall be powered by an LPS
power supply.
You can charge the battery in the device using any of these
methods.
• Connect the device to the vehicle power cable.
• Connect the device to a computer using a USB cable.
The device may charge slowly when connected to a
computer. Some portable computers may not charge the
device.
• Connect the device to an optional power adapter accessory,
such as a wall power adapter.
You can purchase an approved Garmin AC-DC adapter
suitable for home or office use from a Garmin dealer or
www.garmin.com.
Changing the Fuse in the Vehicle Power Cable
NOTICE
When replacing the fuse, do not lose any of the small pieces
and make sure they are put back in the proper position. The
vehicle power cable does not work unless it is assembled
correctly.
If your device does not charge in your vehicle, you may need to
replace the fuse located at the tip of the vehicle adapter.
Rotate the end piece À 90 degrees counter clockwise to
1
unlock it.
Restoring Settings
You can restore a category of settings or all settings to the
factory default values.
Select Settings.
1
If necessary, select a settings category.
2
Select > Restore.
3
Device Information
Specifications
Operating temperature
range
Charging temperature
range
Device Information 15
-4° to 131°F (-20° to 55°C)
32° to 113°F (0° to 45°C)
TIP: You may need to use a coin to remove the end piece.
Remove the end piece, the silver tip Á, and the fuse Â.
2
Insert a new fast-blow fuse that has the same current, such
3
as 1 A or 2 A.
Place the silver tip in the end piece.
4
Push in the end piece and rotate it 90 degrees clockwise to
5
lock it back into the vehicle power cable Ã.
Device Care
NOTICE
Avoid dropping your device.
Page 20

Do not store the device where prolonged exposure to extreme
temperatures can occur, because it can cause permanent
damage.
Never use a hard or sharp object to operate the touchscreen, or
damage may result.
Do not expose the device to water.
Click the Maps tab.
2
Follow the on-screen instructions.
3
Purchasing Accessories
Go to http://buy.garmin.com.
Cleaning the Outer Casing
NOTICE
Avoid chemical cleaners and solvents that can damage plastic
components.
Clean the outer casing of the device (not the touchscreen)
1
using a cloth dampened with a mild detergent solution.
Wipe the device dry.
2
Cleaning the Touchscreen
Use a soft, clean, lint-free cloth.
1
If necessary, lightly dampen the cloth with water.
2
If using a dampened cloth, turn off the device and disconnect
3
the device from power.
Gently wipe the screen with the cloth.
4
Avoiding Theft
• Remove the device and mount from sight when not in use.
• Remove the residue left on the windshield by the suction
cup.
• Do not keep your unit in the glove compartment.
• Register your device at http://my.garmin.com.
Mounting on Your Dashboard
NOTICE
The permanent mounting adhesive is extremely difficult to
remove after it is installed.
You can use an optional mounting disk to mount your device to
the dashboard and comply with certain state regulations. See
www.garmin.com for more information.
Clean and dry the dashboard where you are placing the disk.
1
Remove the backing from the adhesive on the bottom of the
2
disk.
Place the disk on the dashboard.
3
Remove the clear plastic cover from the top of the disk.
4
Place the suction cup mount on top of the disk.
5
Flip the lever down (toward the disk).
6
Removing the Device, Mount, and Suction Cup
Removing the Device from the Mount
Press the release tab or button on the mount.
1
Tilt the device forward.
2
Removing the Mount from the Suction Cup
Turn the device mount to the right or left.
1
Apply pressure until the socket on the mount releases the
2
ball on the suction cup.
Removing the Suction Cup from the Windshield
Flip the lever on the suction cup toward you.
1
Pull the tab on the suction cup toward you.
2
Purchasing Additional Maps
Go to your device product page at (www.garmin.com).
1
Troubleshooting
The suction cup will not stay on my windshield
Clean the suction cup and windshield with rubbing alcohol.
1
Dry with a clean, dry cloth.
2
Mount the suction cup (Connecting the Device to Vehicle
3
Power).
My device is not acquiring satellite signals
• Verify the GPS simulator is turned off (Navigation Settings).
• Take your device out of parking garages and away from tall
buildings and trees.
• Remain stationary for several minutes.
The device does not charge in my vehicle
• Check the fuse in the vehicle power cable (Changing the
Fuse in the Vehicle Power Cable).
• Verify the vehicle is turned on and is supplying power to the
power outlet.
• Verify the interior temperature of the vehicle is between 32°
and 113°F (between 0° and 45°C).
• Verify that the fuse is not broken in the vehicle power outlet.
My battery does not stay charged for very long
• Decrease the screen brightness (Display Settings).
• Shorten the display timeout (Display Settings).
• Decrease the volume (Adjusting the Volume).
• Disable Bluetooth wireless technology (Disabling Bluetooth).
• Put the device in sleep mode when not in use (Entering and
Exiting Sleep Mode).
• Keep your device away from extreme temperatures.
• Do not leave your device in direct sunlight.
The battery gauge does not seem accurate
Allow the device to fully discharge.
1
Fully charge the device without interrupting the charge cycle.
2
My device does not appear as a removable drive on my computer
On most Windows computers, the device connects using Media
Transfer Protocol (MTP). In MTP mode, the device appears as
a portable device and not as a removable drive. MTP mode is
supported by Windows 7, Windows Vista®, and Windows XP
Service Pack 3 with Windows Media Player 10.
My device does not appear as a portable device on my computer
On Mac computers and some Windows computers, the device
connects using USB mass storage mode. In USB mass storage
mode, the device appears as a removable drive or volume, and
not as a portable device. Windows versions prior to Windows
XP Service Pack 3 use USB mass storage mode.
16 Troubleshooting
Page 21

My device does not appear as either a portable device or a removable drive or volume on my computer
Disconnect the USB cable from your computer.
1
Turn off the device.
2
Plug the USB cable into a USB port on your computer and
3
into your device.
TIP: Your device should be connected directly to a USB port
on your computer and not to a USB hub.
The device automatically turns on and goes into MTP mode or
USB mass storage mode. A picture of the device connected to a
computer appears on the device screen.
My phone will not connect to the device
• Select Settings > Bluetooth.
The Bluetooth field must be set to Enabled.
• Enable Bluetooth wireless technology on your phone and
bring your phone within 33 ft. (10 m) of the device.
• Go to www.garmin.com/bluetooth for more help.
Troubleshooting 17
Page 22

Index
Symbols
2-D map view 7
3-D map view 7
A
accessories 16
active lane guidance 6
addresses, finding 3
answering calls 10
audio, proximity points 15
automatic volume 2
enabling 2
avoidances 14
area 7
customizing 7
deleting 7
disabling 7
road 7
road features 7
B
battery
charging 1, 2, 15, 16
maximizing 16
problems 16
Bluetooth technology 9, 10, 17
disabling 14
disconnecting a device 10
enabling 10
settings 14
brightness 2
C
cables, power 15
calibrating fuel economy 11
calls 9, 10
answering 10
contacts 10
dialing 10
disabling 11
history 10
home 10
placing 10
cameras, safety 7
changing search area 3
charging the device 1, 2, 15, 16
cleaning the device 16
cleaning the touchscreen 16
computer, connecting 13, 16, 17
coordinates 4
current location 7
custom POIs 4
customizing, avoidances 7
customizing the device 14
D
dashboard mount 16
deleting
paired Bluetooth device 10
trips 13
destinations. See locations
detours 5
device care 15
dialing 10
directions 6
disconnecting, Bluetooth device 10
display settings 14
driving directions 6
E
ecoChallenge 11
ecoChallenge score 11
resetting 12
ecoRoute 11, 12
calibrating fuel economy 11
ecoChallenge score 11, 12
mileage report 12
mileage reports 12
vehicle profile 11
ecoRoute HD, accessory 11
EULAs 15
extras, custom points of interest 5
F
files
supported types 13
transferring 13
finding locations. 3 See also locations
addresses 3
browsing the map 3
categories 3
cities 3
coordinates 4
intersections 3
using the map 3
finding services, up ahead 6
fuel, prices 11
fuel economy. 11, 12 See also ecoRoute
fuel price, changing 11
fuse, changing 15
G
Garmin Express 1
registering the device 1
updating software 1
Garmin Live Services 11
subscribing to 11
geocaching 4
going home 4
GPS 2
H
hands-free phone calls 9
help. 10 See also product support
home
calling 10
editing location 4
going 4
phone number 10
setting locations 4
I
ID number 15
intersections, finding 3
J
junction view 6
K
keyboard 2
language 15
layout 15
L
language
keyboard 15
voice 15
latitude and longitude 4
lifetime maps 1
locations 3, 13
calling 10
current 4, 7
recently found 3
saving 4
searching for 3
setting home 4
simulated 4
M
map layers, customizing 7
map tools 7
map view
2-D 7
3-D 7
maps 5, 6, 14
browsing 3
data field 6, 7
detail level 14
layers 7
lifetime 1
nüMaps Guarantee 1
nüMaps Lifetime 1
purchasing 16
theme 14
updating 1
viewing routes 6
memory card 13
microSD card, installing 13
mileage reports 12
mount, removing 16
mounting the device
automobile 1
dashboard 16
removing from mount 16
suction cup 1, 16
muting, audio 9
myGarmin, messages 12
myTrends, routes 6
N
navigation 5
off-road 5
previewing routes 5
settings 14
next turn 6
nüMaps Guarantee 1
nüMaps Lifetime 1
O
off-road navigation 5
on-screen buttons 2
P
pairing 10
disconnecting 10
phone 10, 17
parking 3
last spot 3
phone
disconnecting 10
pairing 10, 17
phone book 10
phone calls 9
answering 10
dialing 10
muting 10
voice dial 10
POI. 4 See also point of interest (POI)
POI Loader 4
points of interest (POI Loader) 4
points of interest (POI) 5
custom 4, 5
extras 5
POI Loader 4
power cables 15
changing the fuse 15
vehicle 1
power key 2
product registration 1
product support 10
proximity points alerts, settings 15
Q
Quick Search 3
R
recently found locations 3
registering the device 1
removing mount 16
renaming trips 13
reports, mileage 12
resetting
device 2
trip data 6
restoring settings 15
road conditions, weather 13
routes
adding a point 5
calculating 5
calculation mode 14
18 Index
Page 23

myTrends 6
previewing 5
starting 5
stopping 5
suggested 6
viewing on the map 6
S
safety cameras, subscriptions 7
satellite signals
acquiring 2
viewing 2
saved locations 5, 13
categories 4
deleting 4
editing 4
saving, current location 4
screen, brightness 2
screenshots 14
search bar 3, 12
settings 14, 15
shortcuts
adding 4
deleting 4
simulated locations 4
sleep mode 2
Smartphone Link 10
connecting 11
disabling calls 11
Garmin Live Services 10
software
updating 1
version 15
specifications 15
speech recognition 9
subscriptions
Garmin Live Services 11
nüMaps Lifetime 1
traffic 1
suction cup 16
T
theft, avoiding 16
time settings 2, 15
traffic 7–9, 14
activating a subscription 8
adding subscriptions 8
alternate route 8
cameras 8
incidents 8
lifetime subscriptions 1
map 8
receiver 8
searching for delays 8
trafficTrends 9
traffic cameras 8
viewing 8
trafficTrends 9
disabling 9
travel history 15
trip computer 6
trip information 6
resetting 6
viewing 6
trip log, viewing 6
trip planner 13
editing a trip 13
troubleshooting 16, 17
turn list 6
U
unit ID 15
up ahead
customizing 6
finding services 6
updating
maps 1
software 1
USB, disconnecting 14
V
vehicle power cable 1
vehicle profile 11
voice command 9
activating 9
navigating with 9
tips for using 9
wakeup phrase 9
voice control 9
tips 9
volume, adjusting 2
W
weather 12
radar 12
road conditions 13
Where Am I? 4, 7
Index 19
Page 24
www.garmin.com/support
+43 (0) 820 220230 + 32 2 672 52 54
0800 770 4960 1-866-429-9296
+385 1 5508 272
+385 1 5508 271
+ 45 4810 5050 + 358 9 6937 9758
+ 331 55 69 33 99 + 39 02 36 699699
(+52) 001-855-792-7671 0800 0233937
+47 815 69 555
(+35) 1214 447 460 +386 4 27 92 500
0861 GARMIN (427 646)
+27 (0)11 251 9999
+ 46 7744 52020 +886 2 2642-9199 ext 2
+420 221 985466
+420 221 985465
00800 4412 454
+44 2380 662 915
+34 93 275 44 97
0808 238 0000
+44 (0) 870 8501242
913-397-8200
1-800-800-1020
+49 (0)180 6 427646
20 ct./Anruf. a. d.
deutschen Festnetz,
Mobilfunk max. 60 ct./Anruf
© 2014 Garmin Ltd. or its subsidiaries
 Loading...