

Page 1
GPSMAP® 8700 SERIES
Quick Start Manual
support.garmin.com
© 2018 Garmin Ltd. or its subsidiaries
Garmin®, the Garmin logo, and GPSMAP® are trademarks of Garmin Ltd. or its subsidiaries, registered in the USA and other countries. SmartMode
is a trademark of Garmin Ltd. or its subsidiaries.
The Bluetooth® word mark and logos are owned by the Bluetooth SIG, Inc. and any use of such marks by Garmin is under license. The NMEA 2000
logo is a registered trademark of the National Marine Electronics Association.
United States and other countries.
Windows® is a registered trademark of Microsoft Corporation in the
Printed in Taiwan
December 2018
190-02xxxx-01_01
™
®
Page 2
Introduction
WARNING
See the Important Safety and Product Information guide in
the product box for product warnings and other important
information.
Accessing Owner's Manuals on the Chartplotter
1
Select Info > Owner's Manual.
2
Select a manual.
3
Select Open.
Downloading the Manuals from the Web
You can get the latest owner's manual and translations of
manuals from the Garmin® website. The owner's manual
includes instructions for using device features and
accessing regulatory information.
1
Go to
www.garmin.com/manuals/GPSMAP87xx.
2
Download the manual.
Inserting a Memory Card
NOTE: The memory card reader is not included with all
chartplotters. It is sold as a separate accessory. You must
have a memory card reader connected to the Garmin
Marine Network.
You can use optional memory cards with the chartplotter.
Map cards allow you to view high-resolution satellite
imagery and aerial reference photos of ports, harbors,
marinas, and other points of interest. You can use blank
memory cards to record Garmin Quickdraw™ Contours
mapping, record sonar (with a compatible transducer), and
transfer data such as waypoints and routes to another
compatible chartplotter or a computer.
This device supports up to a 32 GB memory card,
formatted to FAT32.
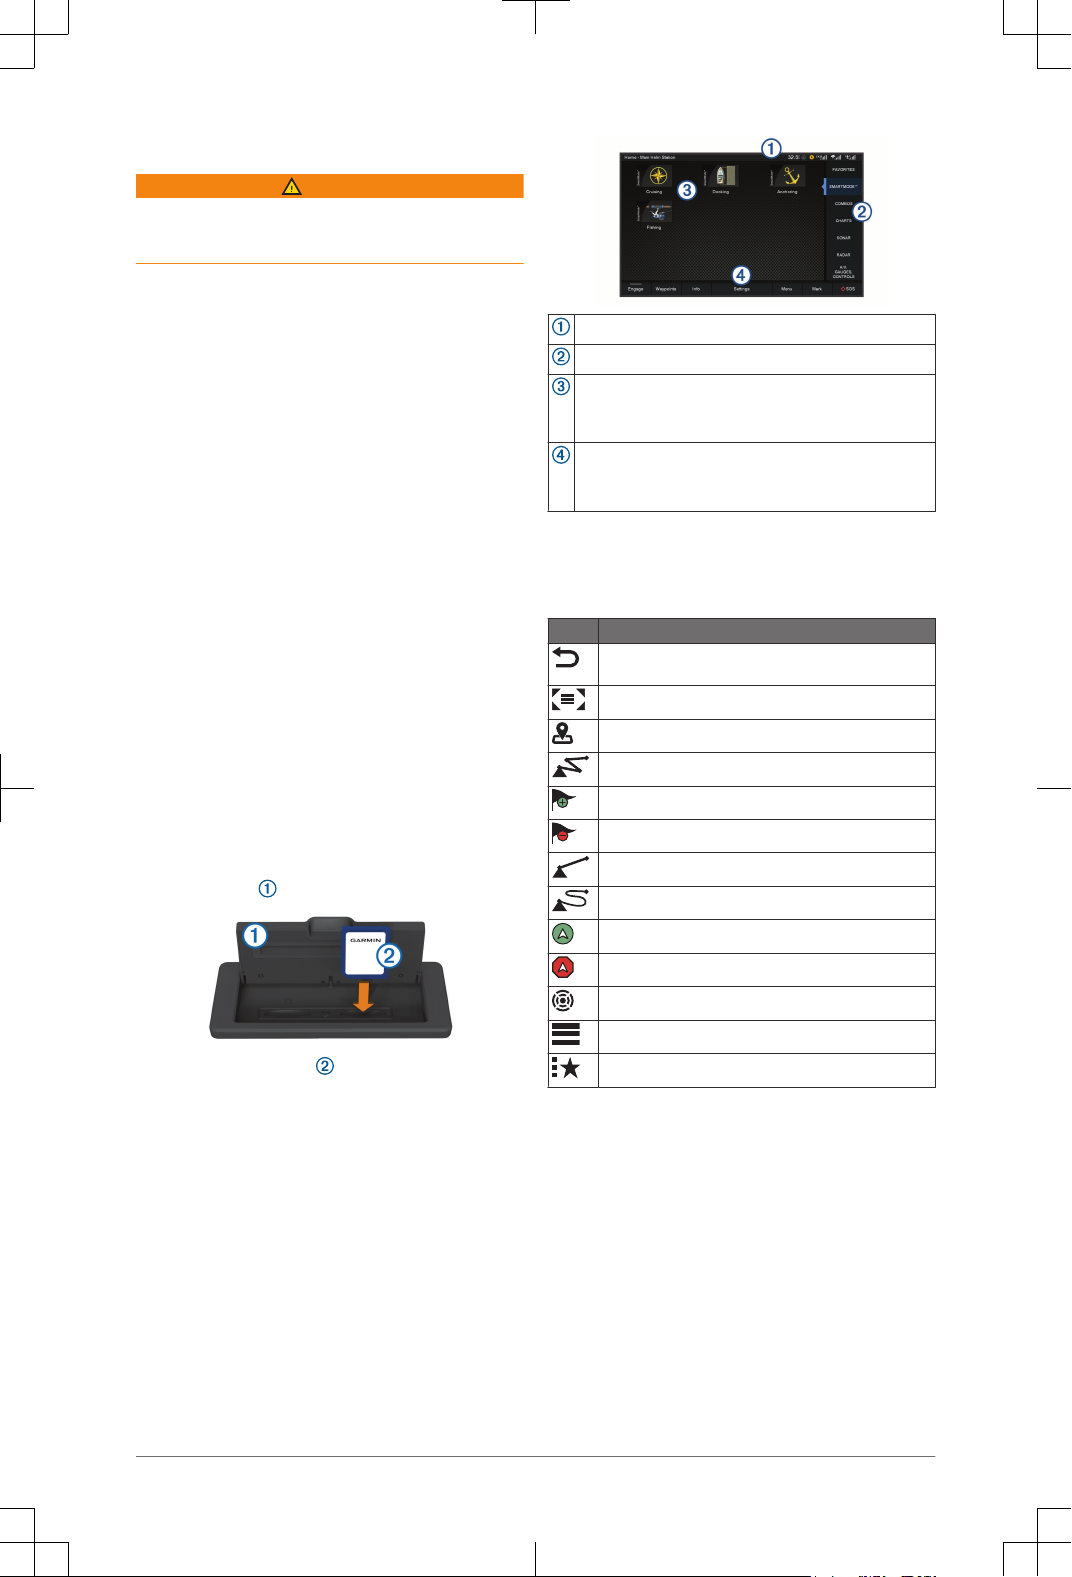
1
Open the door
on the memory card reader.
2
Insert the memory card
with the label facing away
from the door.
3
Press the card in until it clicks.
4
Close the card reader door.
Basic Operation
Home Screen
The chartplotter home screen provides access to all of the
features in the chartplotter. The features are dependant on
the accessories you have connected to the chartplotter.
You may not have all of the options and features discussed
in this manual.
Status bar
Feature categories
Page buttons
TIP: Hold a button to save that page to the Favorites
category.
Menu bar
TIP: When viewing another screen, you can return to the
home screen by selecting Home.
On-Screen Buttons
These on-screen buttons may be displayed on some
screens and functions. Some buttons are accessible only
in a combination page or SmartMode™ layout.
Button Function
Clears the on-screen icons and re-centers the screen on
the boat
Opens a full screen view of the item
Creates a new waypoint
Creates a route, with turns, to the destination
Adds a turn to the route at the selected location
Removes the last turn added from the route
Creates a direct route, without turns, to the destination
Creates an Auto Guidance route to the destination
Begins navigation
Ends navigation
Acquires a radar target and begins tracking it
Opens the menu for the page or function
Opens the presets menu for the page or function
Adding an Item to Favorites
1
From the home screen, select a category from the right.
2
Hold a button on the left.
The item is added to the Favorites home screen
category.
Customizing the Layout of a SmartMode or Combination Page
You can customize the layout and data shown in the
combination pages and SmartMode layouts. When you
change the layout of a page in a display you are interacting
with, the change appears only on that display, except for
the SmartMode name and symbol. When you change the
SmartMode name or symbol for the layout, the new name
or symbol appears on all displays in the station.
1
Open a page to customize.
2 Quick Start Manual
Page 3
2
Select Menu.
3
Select Edit Layout or Edit Combo.
4
Select an item to edit.
TIP: While viewing a screen with data overlay, hold an
overlay box to quickly change the data in it.
Navigating to a Point on the Chart
WARNING
A magenta line displayed on the chartplotter is only
intended to provide general route guidance or to identify
proper channels, and it is not intended to be precisely
followed. Always defer to the navaids and conditions on the
water when navigating to avoid groundings or hazards that
could result in vessel damage, personal injury, or death.
1
From the Navigation chart or Fishing chart, select a
location.
2
If necessary, select Navigate To.
3
Select an option:
• To navigate directly to the location, select Go To
or
.
• To create a route to the location, including turns,
select
Route To or
.
• To use Auto Guidance, select Auto Guidance
or
.
NOTE: Auto Guidance is available with premium
charts, in some areas.
4
Review the course indicated by the magenta line.
NOTE: When using Auto Guidance, a gray segment
within any part of the magenta line indicates that Auto
Guidance cannot calculate part of the Auto Guidance
line. This is due to the settings for minimum safe water
depth and minimum safe obstacle height.
5
Follow the magenta line, steering to avoid land, shallow
water, and other obstacles.
Copying User Data to a Memory Card
You can save user data to a memory card to transfer to
other devices. User data includes waypoints, routes, Auto
Guidance paths, tracks, and boundaries.
1
Insert a memory card into the card slot.
2
Select Info
> User Data > Data Transfer > Save to
Card.
3
If necessary, select the memory card to copy the data
to.
4
Select an option:
• To create a new file, select Add New File, and
enter a name.
• To add the information to an existing file, select the
file from the list, and select Save to Card.
Showing Tracks
1
From a chart, select Menu > Layers > User Data >
Tracks.
2
Select the tracks to display.
A trailing line on the chart indicates your track.
Configuring the Recording Interval of the Track Log
You can indicate the frequency at which the track plot is
recorded. Recording more frequent plots is more accurate
but fills the track log faster. The resolution interval is
recommended for the most efficient use of memory.
1
Select Info > User Data > Tracks > Active Track
Options > Interval > Interval.
2
Select an option:
•
To record the track based on a distance between
points, select Distance
> Change, and enter the
distance.
• To record the track based on a time interval, select
Time > Change, and enter the time interval.
• To record the track plot based on a variance from
your course, select Resolution > Change, and
enter the maximum error allowed from the true
course before recording a track point. This is the
recommended recording option.
ActiveCaptain™ App
CAUTION
This feature allows users to submit information. Garmin
makes no representations about the accuracy,
completeness, or timeliness of information submitted by
users. Any use or reliance on the information submitted by
users is at your own risk.
The ActiveCaptain app provides a connection to your
GPSMAP device, charts, maps, and the community for a
connected boating experience.
On your mobile device with the ActiveCaptain
app, you can
download, purchase, and update maps and charts. You
can use the app to easily and quickly transfer user data,
such as waypoints and routes, connect to the Garmin
Quickdraw Contours Community, and update device
software. You can also plan your trip, and view and control
the GPSMAP device from the app.
You can connect to the ActiveCaptain community for up-todate feedback on marinas and other points of interest. The
app can push smart notifications, such as calls and texts,
to your chartplotter display when paired.
Getting Started with the ActiveCaptain App
You can connect a mobile device to the GPSMAP device
using the ActiveCaptain app. The app provides a quick and
easy way for you to interact with your GPSMAP device and
complete such tasks as sharing data, registering, updating
the device software, and receiving mobile device
notifications.
1
From the GPSMAP device, select OneHelm™, A/V,
Gauges > ActiveCaptain.
2
From the ActiveCaptain page, select Wi-Fi Network >
Wi-Fi > On.
3
Enter a name and password for this network.
4
Insert a memory card in the GPSMAP device's card
slot.
5
Select Set ActiveCaptain Card.
Quick Start Manual 3
Page 4
NOTICE
You might be prompted to format the memory card.
Formatting the card deletes all information saved on
the card. This includes any saved user data, such as
waypoints. Formatting the card is recommended, but
not required. Before formatting the card, you should
save the data from the memory card onto the device
internal memory
.
Be sure the card is inserted each time you want to use
the ActiveCaptain feature.
6
From the application store on your mobile device,
install and open the
ActiveCaptain app.
7
Bring the mobile device within 32 m (105 ft.) of the
GPSMAP device.
8
From your mobile device settings, open the Wi‑Fi
®
connections page and connect to the Garmin device,
using the name and password you entered in the
Garmin device.
For more information about the ActiveCaptain app and
features, see the Owner's Manual at www.garmin.com
/manuals/GPSMAP87xx or watch a video at
www.garmin.com/ActiveCaptainVideo.
Enabling Smart Notifications
WARNING
Do not read or reply to notifications while operating the
vessel. Failure to pay attention to the conditions on the
water can result in vessel damage, personal injury, or
death.
Before your GPSMAP device can receive notifications, you
must connect it to your mobile device and to the
ActiveCaptain app.
1
From the GPSMAP device, select ActiveCaptain >
Smart Notifications > Enable Notifications.
2
Turn on Bluetooth® technology in the mobile device
settings.
3
Bring the devices within 10 m (33 ft.)
of each other.
4
From the ActiveCaptain app on the mobile device,
select Smart Notifications > Pair with Chartplotter.
5
Follow the on-screen instructions to pair the app to the
GPSMAP device using Bluetooth technology.
6
When prompted, enter the key on your mobile device.
7
If necessary, adjust which notifications you receive in
your mobile device settings.
Troubleshooting
My device is not creating waypoints in the correct location
You can manually enter a waypoint location to transfer and
share data from one device to the next. If you have
manually entered a waypoint using coordinates, and the
location of the point does not appear where the point
should be, the map datum and position format of the
device may not match the map datum and position format
originally used to mark the waypoint.
Position format is the way in which the GPS receiver's
position appears on the screen. This is commonly
displayed as latitude/longitude in degrees and minutes,
with options for degrees, minutes and second, degrees
only, or one of several grid formats.
Map datum is a math model which depicts a part of the
surface of the earth. Latitude and longitude lines on a
paper map are referenced to a specific map datum.
1
Find out which map datum and position format was
used when the original waypoint was created.
If the original waypoint was taken from a map, there
should be a legend on the map that lists the map datum
and position format used to create that map. Most often
this is found near the map key.
2
Select Settings > Units.
3
Select the correct map datum and position format
settings.
4
Create the waypoint again.
My chartplotter will not acquire GPS signals
If the device is not acquiring satellite signals, there could
be a few causes. If the chartplotter has moved a large
distance since the last time it has acquired satellites or has
been turned off for longer than a few weeks or months, the
device may not be able to acquire the satellites correctly.
• Make sure the GPS antenna has a clear view of the sky
to receive the GPS signal.
If it is mounted inside of a cabin, it should be close to a
window so it can receive the GPS signal.
•
Make sure the GPS antenna is connected to the
NMEA® network.
• If the chartplotter has more than one GPS antenna
source, select a different source.
• Ensure the device is using the latest software, and
update the device software if necessary.
Updating the Device Software
You may need to update the device software when you
install this device or add an accessory to the network. You
can use one of two methods to update the software.
• Use the ActiveCaptain app.
• Download the update from www.garmin.com/support
/software/marine.html using a memory card (32 GB
max.) and a computer running Windows® operating
system.
For more information, see the owner's manual at
www.garmin.com/manuals/GPSMAP87xx.
Registering Your Device
Help us better support you by completing our online
registration today. You can register your device using one
of two methods.
• Use the ActiveCaptain app.
• Go to my.garmin.com/registration and sign into your
Garmin account to register the device.
Keep the original sales receipt, or a photocopy, in a safe
place. After you add devices to the chartplotter network,
register the new devices.
4 Quick Start Manual
 Loading...