

Page 1

Rino® 700 Series
DRAFT
Owner’s Manual
August 2016 190-01987-00_0A
Page 2

All rights reserved. Under the copyright laws, this manual may not be copied, in whole or in part, without the written consent of Garmin. Garmin reserves the
DRAFT
right to change or improve its products and to make changes in the content of this manual without obligation to notify any person or organization of such
changes or improvements. Go to www.garmin.com for current updates and supplemental information concerning the use of this product.
Garmin®, the Garmin logo, and Rino® are trademarks of Garmin Ltd. or its subsidiaries, registered in the USA and other countries. ANT+®, Connect IQ™, Garmin
Connect™, Garmin Express™, and TracBack® are trademarks of Garmin Ltd. or its subsidiaries. These trademarks may not be used without the express
permission of Garmin.
The Bluetooth® mark and logos are owned by the Bluetooth SIG, Inc. and any use of such marks by Garmin is under license. microSD™ and the microSDHC
logo are trademarks of SD-3C, LLC. Other trademarks and trade names are those of their respective owners.
Page 3

Table of Contents
DRAFT
Introduction.....................................................................1
Device Overview......................................................................... 1
Battery Information.................................................................1
Installing the Lithium-ion Battery............................................ 1
Installing AA Batteries............................................................ 2
Turning On the Device................................................................ 2
Device Operation........................................................................ 2
Opening the App Drawer....................................................... 2
Locking the Touchscreen....................................................... 2
Acquiring GPS Signals............................................................... 2
Radio............................................................................... 3
Transmitting................................................................................ 3
The Radio App............................................................................ 3
Opening the Radio App......................................................... 3
Adjusting the Radio Volume...................................................3
Adjusting the Squelch Level.................................................. 3
Channels and Codes.................................................................. 3
Selecting a Channel............................................................... 3
Selecting a Squelch Code..................................................... 3
Monitoring a Channel for Activity........................................... 3
Scanning Channels................................................................ 4
Repeater Channels................................................................ 4
Peer-to-Peer Positioning.............................................................4
Polling Other Rino Users....................................................... 4
Editing Your Contact Info....................................................... 4
Contacts......................................................................................4
Saving a New Contact........................................................... 4
Viewing Contacts on the Map................................................ 4
Navigating to a Contact..........................................................4
Notes.......................................................................................... 4
Creating, Saving, and Sending Notes.................................... 4
Emergency Alerts....................................................................... 4
Sending an Emergency Alert................................................. 4
Responding to an Emergency Alert....................................... 4
Radio App Settings..................................................................... 4
Radio Setup........................................................................... 5
Connected Features....................................................... 5
Pairing Your Smartphone........................................................... 5
Viewing Widgets......................................................................... 5
Connect IQ Features.................................................................. 5
Downloading Connect IQ Features........................................ 5
Weather........................................................................... 5
Monitoring SAME Weather Alerts............................................... 5
Opening the Weather App.......................................................... 6
Viewing Weather Conditions and Forecasts.......................... 6
Viewing SAME Weather Alerts on the Map........................... 6
Geocaches...................................................................... 6
Registering Your Device at Geocaching.com............................. 6
Connecting to Geocaching.com............................................. 6
Searching for a Geocache.......................................................... 6
Navigating to a Geocache.......................................................... 6
Using Hints and Clues to find a Geocache............................ 6
Logging the Attempt....................................................................6
Filtering the Geocache List......................................................... 7
Saving a Custom Geocache Filter......................................... 7
Editing a Custom Geocache Filter......................................... 7
Applying a Custom Filter to a Geocache List......................... 7
Downloading Geocaches Using a Computer.............................. 7
chirp............................................................................................ 7
Enabling chirp Searching....................................................... 7
Finding a Geocache with a chirp............................................7
Removing Live Geocache Data from the Device........................ 7
Removing Your Device Registration From Geocaching.com..... 7
Activities......................................................................... 7
Recording an Activity.................................................................. 7
Creating a New Activity...............................................................8
Editing an Activity Name........................................................ 8
Editing an Activity Icon........................................................... 8
Deleting an Activity..................................................................... 8
Customizing Your Activity Log.................................................... 8
Pausing an Activity..................................................................... 8
Saving the Current Activity......................................................... 8
Clearing the Current Activity....................................................... 8
Deleting an Activity History......................................................... 8
Viewing Activity Information........................................................ 8
Viewing the Elevation Plot of an Activity..................................... 8
Saving a Location on an Activity................................................. 8
Opening Track Manager............................................................. 8
Navigation....................................................................... 9
Navigating to a Destination......................................................... 9
Finding a Location Near Another Location............................ 9
Stopping Navigation............................................................... 9
Navigating with the Map............................................................. 9
Navigating Using TracBack®...................................................... 9
Optional Maps.............................................................................9
Finding an Address................................................................ 9
Navigating with the Compass..................................................... 9
Calibrating the Compass........................................................9
Course Pointer....................................................................... 9
Navigating with Sight 'N Go........................................................ 9
Elevation Plot............................................................................ 10
Navigating to a Point on the Elevation Plot.......................... 10
Changing the Plot Type....................................................... 10
Resetting the Elevation Plot................................................. 10
Calibrating the Barometric Altimeter.................................... 10
Waypoints..................................................................... 10
Marking Your Current Location as a Waypoint......................... 10
Finding a Waypoint................................................................... 10
Editing a Waypoint.................................................................... 10
Deleting a Waypoint..................................................................10
Increasing the Accuracy of a Waypoint Location...................... 10
Projecting a Waypoint............................................................... 10
Routes........................................................................... 10
Creating a Route Using Route Planner.................................... 10
Creating a Route Using the Map.............................................. 11
Editing the Name of a Route.................................................... 11
Editing a Route......................................................................... 11
Viewing a Route on the Map.................................................... 11
Deleting a Route....................................................................... 11
Viewing the Active Route.......................................................... 11
Reversing a Route.................................................................... 11
Viewing the Elevation Plot of a Route...................................... 11
Garmin Adventures...................................................... 11
Sending Files to BaseCamp..................................................... 11
Creating an Adventure.............................................................. 11
Starting an Adventure............................................................... 11
Camera and Photos...................................................... 12
Taking a Photo..........................................................................12
Applications.................................................................. 12
Sending and Receiving Data Wirelessly................................... 12
Setting a Proximity Alarm......................................................... 12
Calculating the Size of an Area................................................ 12
Viewing the Calendar and Almanacs........................................ 12
Setting an Alarm....................................................................... 12
Starting the Countdown Timer.................................................. 12
Opening the Stopwatch............................................................ 12
Satellite Page............................................................................12
Table of Contents i
Page 4

Changing the Satellite View................................................. 12
DRAFT
Turning Off GPS.................................................................. 12
Simulating a Location...........................................................12
Controlling a VIRB® Action Camera......................................... 12
Phone Notifications................................................................... 13
Hiding Notifications.............................................................. 13
Fitness........................................................................... 13
History.......................................................................................13
Viewing an Activity History................................................... 13
Deleting an Activity from Your History................................. 13
Using Garmin Connect.........................................................13
Optional Fitness Accessories...............................................13
About Heart Rate Zones........................................................... 13
Fitness Goals....................................................................... 13
Setting Your Heart Rate Zones............................................ 13
Customizing the Device............................................... 13
Adjusting the Backlight Brightness........................................... 13
Customizing the Keys............................................................... 14
Customizing the Main Menu..................................................... 14
Changing Items on the Main Menu...................................... 14
Customizing the Dashboard on the Main Menu................... 14
Customizing the App Drawer.................................................... 14
Adding a Shortcut to the Main Menu........................................ 14
Creating a Shortcut.............................................................. 14
Custom Data Fields and Dashboards....................................... 14
Enabling the Map Data Fields.............................................. 14
Customizing the Data Fields................................................ 14
Customizing Dashboards..................................................... 14
Setting the Touchscreen Sensitivity......................................... 14
Display Settings........................................................................ 14
Configuring the Maps................................................................15
Map Settings........................................................................ 15
Advanced Map Settings....................................................... 15
System Settings........................................................................ 15
Satellite Settings.................................................................. 15
GPS and GLONASS............................................................ 15
Appearance Settings................................................................ 15
Setting the Device Tones..........................................................15
Routing Settings....................................................................... 15
Heading Settings...................................................................... 15
Altimeter Settings......................................................................16
Position Format Settings...........................................................16
Changing the Units of Measure................................................ 16
Time Settings............................................................................ 16
Geocaching Settings.................................................................16
ANT+ Sensor Settings.............................................................. 16
Fitness Settings........................................................................ 16
Setting Your Fitness User Profile......................................... 16
Marking Laps by Distance....................................................16
Marine Settings......................................................................... 16
Setting Up Marine Alarms.................................................... 16
Resetting Data and Settings..................................................... 17
Restoring Default Values for Specific Settings.................... 17
Restoring Default Values for Specific Page Settings........... 17
Restoring All Default Settings.............................................. 17
Device Information....................................................... 17
Attaching the Carabiner Clip..................................................... 17
Headsets and Microphones...................................................... 17
Support and Updates................................................................ 17
Device Care.............................................................................. 17
Cleaning the Device............................................................. 17
Cleaning the Touchscreen................................................... 17
Water Immersion..................................................................17
Data Management.................................................................... 17
File Types............................................................................ 17
Installing a Memory Card..................................................... 18
Connecting the Device to Your Computer........................... 18
Transferring Files to Your Device........................................ 18
Deleting Files....................................................................... 18
Disconnecting the USB Cable..............................................18
Specifications............................................................................18
Radio Frequency Charts...................................................... 18
FCC Licensing Information....................................................... 20
Viewing Device Information...................................................... 20
Troubleshooting........................................................... 21
My handheld device is not responding..................................... 21
My device does not turn on...................................................... 21
The battery gauge does not seem accurate............................. 21
My phone will not connect to the device................................... 21
My device is not acquiring satellite signals............................... 21
My device does not go into mass storage mode
automatically............................................................................. 21
I need to reset all settings back to factory default values......... 21
Appendix....................................................................... 21
tempe™.................................................................................... 21
Data Fields................................................................................21
Heart Rate Zone Calculations...................................................23
Index.............................................................................. 24
ii Table of Contents
Page 5
Introduction
DRAFT
WARNING
See the Important Safety and Product Information guide in the
product box for product warnings and other important
information.
Device Overview
FRS/GMRS antenna
À
GPS antenna
Á
Camera lens and flash (not available on all models)
Â
Mini-USB port (under weather cap)
Ã
2.5 mm headset jack (under weather cap)
Battery cover D-ring
Ä
microSD™ card slot (under battery door)
Å
Battery Information
WARNING
The temperature rating for the device may exceed the usable
range of some batteries. Alkaline batteries can rupture at high
temperatures.
Do not use a sharp object to remove batteries.
CAUTION
Contact your local waste disposal department to properly
recycle the batteries.
NOTICE
Alkaline batteries lose a significant amount of their capacity as
the temperature decreases. Use lithium batteries when
operating the device in below freezing conditions.
Maximizing the Battery Life
You can do several things to extend the life of the batteries.
• Reduce the backlight brightness (Adjusting the Backlight
Brightness, page 13).
• Reduce the backlight timeout (Display Settings, page 14).
• Use battery save mode (Turning On Battery Save Mode,
page 1).
• Decrease the map drawing speed (Configuring the Maps,
page 15).
Turning On Battery Save Mode
You can use battery save mode to prolong the battery life.
From the app drawer, select Setup > Display > Battery
Save > On.
In battery save mode, the screen shuts off when the backlight
times out. You can select to turn on the screen.
Long-Term Storage
When you do not plan to use the device for several months,
remove the batteries. Stored data is not lost when batteries are
removed.
Installing the Lithium-ion Battery
Locate the Lithium-ion battery pack included in the product
1
box.
Align the metal contacts on the battery pack with the metal
2
contacts on the back of the device.
Press and hold the battery pack in place.
3
Turn the D-ring clockwise to secure the battery pack onto the
4
device.
Charging the Battery Pack
NOTICE
To prevent corrosion, thoroughly dry the USB port, the weather
cap, and the surrounding area before charging or connecting to
a computer.
Do not attempt to use the device to charge a battery that was
not provided by Garmin®. Attempting to charge a battery that
was not provided by Garmin can damage the device and void
the warranty.
Before you can connect the straight connector of the USB cable
to your device, you may need to remove optional mount
accessories.
NOTE: The device does not charge when outside the approved
temperature range (Specifications, page 18).
You can charge the battery using a standard wall outlet or a
USB port on your computer.
Pull up the weather cap À from the mini-USB port Á.
1
Plug the small end of the USB cable into the mini-USB port.
2
Plug the USB end of the cable into an AC adapter or a
3
computer USB port.
If necessary, plug the AC adapter into a standard wall outlet.
4
When you connect the device to a power source, the device
turns on.
Charge the battery completely.
5
Introduction 1
Page 6
Installing AA Batteries
DRAFT
Instead of the Lithium-Ion battery pack (Installing the Lithium-ion
Battery, page 1), you can use four alkaline, NiMH, or lithium AA
batteries with an optional AA battery pack (not included). This is
useful when you are on the trail and cannot charge the LithiumIon battery pack. Use NiMH or lithium batteries for best results.
The AA battery pack contains two parts.
If necessary, turn the D-ring counter-clockwise, and pull up to
1
remove the battery pack from the device.
Push down on the lever inside the AA battery pack À to
2
separate the two parts Á.
Insert four AA batteries, observing polarity.
3
Widgets Swipe down to view widgets (Viewing Widgets,
À
Á
(Call key)
Â
(Power key)
PTT
Ã
(Push-to-talk)
Main menu Select the radio dashboard at the top of the main
Ä
Volume keys Select to adjust the volume.
Å
Æ
(App drawer)
page 5).
Select to transmit an attention tone on the current
channel.
Hold to send an emergency alert (Emergency Alerts,
page 4).
You can customize the function of this key
(Customizing the Keys, page 14).
Select to adjust the backlight.
Hold to turn the device on or off.
Hold to transmit on the current radio channel
(Transmitting, page 3).
menu to launch the radio app.
You can customize the dashboard on the main menu
(Customizing the Dashboard on the Main Menu,
page 14).
Select the shortcuts to launch applications.
You can customize the shortcuts on the main menu
(Customizing the Main Menu, page 14).
Swipe up to open apps and Connect IQ™ apps.
Starting at the bottom, connect the two parts of the battery
4
pack together and press until the top locks into place.
Align the metal contacts on the battery pack with the metal
5
contacts on the back of the device.
Press and hold the battery pack in place.
6
Turn the D-ring clockwise to secure the battery pack onto the
7
device.
Turning On the Device
Hold .
Device Operation
You can operate this device using a combination of hardware
key and touchscreen actions.
Opening the App Drawer
The app drawer contains all of the applications used to operate
this device.
From the main menu, swipe up from the bottom of the
1
screen.
Swipe down from the top of the screen to return to the main
2
menu without launching an application (optional).
Locking the Touchscreen
You can lock the screen to prevent inadvertent screen touches.
Select > .
Acquiring GPS Signals
When you turn on your navigation device, the GPS receiver
must collect satellite data and establish the current location. The
time required to acquire satellite signals varies based on several
factors, including how far you are from the location where you
last used your navigation device, whether you have a clear view
of the sky, and how long it has been since you last used your
navigation device. The first time you turn on your navigation
device, it may take several minutes to acquire satellite signals.
Turn on the device.
1
Wait while the device locates satellites.
2
If necessary, go to an open area, away from tall buildings and
3
trees.
in the status bar indicates the satellite signal strength. When
at least half the bars are filled, the device is ready for navigation.
2 Introduction
Page 7
Radio
DRAFT
In the United States and Canada, this device uses Family Radio
Service (FRS) and General Mobile Radio Service (GMRS) for
two-way communication with other compatible radio devices.
In Australia, this device uses UHF Citizen Band Radio Service
(UHF CBRS), and in New Zealand, this device uses UHF
Personal Radio Service (PRS) for two-way communication with
other compatible radio devices.
When communicating with other Garmin
additional features are available.
Transmitting
To communicate with other
CBRS/PRS radio users, you must be on the same channel and
code (Channels and Codes, page 3).
Hold PTT.
1
Speak into the front of the device.
2
After you are finished speaking, release PTT.
3
After you release PTT, the radio transmits your position
information, and you cannot hear incoming transmissions
until your transmission is complete . A roger tone sounds on
your radio and on the radios receiving your transmission to
confirm that the transmission is complete.
NOTE: You can change or disable the roger tone (Setting the
Device Tones, page 15).
Rino and FRS/GMRS or UHF
The Radio App
Using the radio app, you can view information about the radio,
control the radio channel and squelch codes, and customize the
radio features.
Icons along the top of the radio page provide useful information
about the radio.
: Indicates the activity status of the radio. When an arrow is
pointing at the radio, the radio is receiving a transmission.
When an arrow is pointing away from the radio, the radio is
transmitting.
: The radio is ready to transmit position information (Peer-to-
Peer Positioning, page 4).
: Weather alerts are enabled (Radio App Settings, page 4).
: The radio is muted (Adjusting the Radio Volume, page 3).
Opening the Radio App
You can manage your channel, code, and other radio settings in
the radio app.
From the app drawer, select Radio.
TIP: You can also select the radio dashboard at the top of the
main menu to open the radio app.
Adjusting the Radio Volume
From any screen, select the volume keys to change the radio
1
volume.
The volume screen appears.
Select to mute or restore the radio volume (optional).
2
Adjusting the Squelch Level
You can adjust the sensitivity level of the squelch to filter out
background noise. When you adjust the squelch level higher,
fewer weak background signals are heard.
When you hear unwanted background noise, from any
1
screen, select the volume keys.
The volume screen appears.
Select under the Squelch bar.
2
You should increase the squelch level until you no longer
hear the unwanted background noise.
Rino devices,
Channels and Codes
To communicate with other
CBRS/PRS radio users, you must be on the same channel.
Rino devices are compatible with third-party FRS/GMRS or UHF
CBRS/PRS radios as long as the radios use standard FRS/
GMRS or CBRS/PRS frequencies. A list of all frequencies used
by this device is available in the product specifications (Radio
Frequency Charts, page 18).
NOTE: GMRS frequencies are regulated by the FCC in the
United States. To transmit on GMRS frequencies, you must
obtain a license from the FCC (FCC Licensing Information,
page 20).
US and Canada Channel Number Channel Type
1 through 7 GMRS and FRS channels
8 through 14 FRS channels
15 through 22 GMRS channels
15R through 22R Repeater channels
Australia and New Zealand Channel
Number
1 through 40 UHF CBRS/PRS channels
1R through 8R CBRS/PRS repeater channels
Squelch codes allow you to filter calls from other users on the
same channel, so you hear only the radios you want to hear.
The device has two different squelch modes, Continuous Tone
Controlled Squelch System (CTCSS) and Digital-Coded Squelch
(DCS). Calls on the channel that are not using the same squelch
code in the same squelch mode are ignored.
NOTE: Squelch codes do not make your conversation private.
Anyone on the same channel can hear your conversation.
Squelch Tone
Mode
CTCSS 1 through 38
DCS Listed in the product specifications (Radio
Squelch Codes
Frequency Charts, page 18)
Selecting a Channel
From the radio app, select Channel.
1
Select or to change the channel.
2
Select .
3
Selecting a Squelch Code
From the radio app, select Code CTCSS or Code DCS.
1
Select or to change the code.
2
NOTE: Selecting Off allows you to hear everything on the
channel.
Select .
3
NOTE: If you cannot hear calls on the same channel with the
same code, make sure all the radios are using the same squelch
tone mode (Changing the Squelch Tone Mode, page 3).
Changing the Squelch Tone Mode
This device can use two types of squelch tone modes, CTCSS
and DCS. If you cannot hear calls on the same channel with the
same code, make sure all the radios are using the same squelch
tone mode.
From the radio app, select > Radio Setup > Squelch
1
Tone Mode.
Select a squelch tone mode.
2
Monitoring a Channel for Activity
You can monitor a single channel for any activity, including static
and weak voice signals. This is helpful if a signal is going out of
range.
From the radio app, select the channel you want to monitor.
1
Rino and FRS/GMRS or UHF
Channel Type
Radio 3
Page 8

Select Monitor.
DRAFT
2
Scanning Channels
You can scan the channels for voice activity. This can help you
find a channel with light activity for your group to use, or to find
other radio users in the area.
From the radio app, select Scan.
Configuring the Scan List
By default, all available channels are included when scanning.
You can configure the scan list to include only specific channels
and squelch codes. Selecting specific channels and codes
reduces the scan time and may help prevent a missed
transmission.
From the radio app, select > Scanlist Setup.
1
Select one or more channels to remove from the list.
2
To restrict the scan to the current squelch code, select >
3
Scan Current Codes (optional).
Select .
4
Repeater Channels
This device can use GMRS repeater channels in the US, and
CBRS/PRS repeater channels in Australia and New Zealand.
GMRS repeater channels are not available in Canada.
Repeater channels use repeaters, when available, to enable
communication around obstacles or increase transmission
distance. Position reporting is not allowed by the FCC on GMRS
repeater channels.
Peer-to-Peer Positioning
You can send your location information to other
using peer-to-peer positioning. Through peer-to-peer
positioning, you can also track the movement of other Rino
users and navigate to their locations.
Peer-to-peer positioning is enabled by default, and your position
information is sent when you press the PTT key (push-to-talk) or
the key (call).
NOTE: You can send location information only once every 30
seconds, due to FCC restrictions.
After you send location information, the icon changes to a
countdown timer so you know when location information can be
sent again.
Polling Other Rino Users
You can request position updates for other Rino users who are
in your saved contacts (Saving a New Contact, page 4).
From the contacts app, select a saved contact.
1
Select Poll Location.
2
The location of the contact is updated on the map.
Editing Your Contact Info
From the radio app, you can change the symbol and name
transmitted to other Rino users through peer-to-peer positioning.
• To change your name, select the name field.
• To change your symbol, select the symbol.
Rino users
Contacts
You can save information about another
You can view location information and navigate to the location of
users in your contacts list.
Saving a New Contact
The first time the device receives a peer-to-peer positioning
signal from another Rino user, the new contact page appears.
To save the contact details or navigate to the contact in the
future, you must save the new contact in your contacts list.
From the new contact page, select OK.
Rino user as a contact.
The new contact is saved in your contacts list.
Viewing Contacts on the Map
From the main menu, select Contacts.
1
TIP: To open the contacts app from the radio app, select .
Select a contact.
2
Select View Map.
3
Navigating to a Contact
From the app drawer, select Contacts.
1
TIP: To open the contacts app from the radio app, select .
Select a contact.
2
Select View Map > Go.
3
Follow to the contact's location.
4
Notes
You can send short notes to other
channel and code. You can review previously received notes
from your contacts. You can edit and save favorite notes to
quickly send them later.
NOTE: Notes transmit to all users on your current channel and
code, not just to your saved contacts.
Creating, Saving, and Sending Notes
From the app drawer, select Notes.
1
TIP: To open the notes app from the radio app, select .
Select Send Note > New Note.
2
Enter the note text.
3
Due to FCC regulations, you can enter a maximum of 13
characters in a note.
Select .
4
Select an option:
5
• To send the note without saving it, select Send Note.
• To save the note without sending it, select Save.
• To save the note and send it, select Send and Save.
Rino users on your current
Emergency Alerts
You can send an emergency alert to all Rino users on the
current channel and code. Users can respond to an emergency
alert to immediately begin navigating to your position.
Sending an Emergency Alert
To send emergency alerts to other Rino and FRS/GMRS or UHF
CBRS/PRS radio users, you must be on the same channel.
Hold .
1
Select Yes.
2
The device sends an emergency alert every 60 seconds until
another Rino user responds to the alert or you cancel the
alert.
Responding to an Emergency Alert
To receive emergency alerts from other Rino and FRS/GMRS or
UHF CBRS/PRS radio users, you must be on the same channel.
When you receive an emergency alert, select Help.
1
The device sends a response to the alert sender, and begins
navigation to the sender's location automatically.
Follow to the sender's location.
2
Radio App Settings
From the radio app, select
Turn Radio Off: Turns off the radio functionality. You cannot
make or receive transmissions when the radio functionality is
turned off.
.
4 Radio
Page 9

Enable Weather Alert: Enables weather alert tones on the
DRAFT
current channel or on all channels (Advanced Radio Setup,
page 5).
Radio Setup
From the radio app, select > Radio Setup.
Send Location: Enables sending position information when you
transmit to other Rino users.
Allow Polling: Allows polling requests from other Rino users.
Power Level: Sets the power level used to transmit using
GMRS channels in the US and Canada, and UHF
CBRS/PRS channels in Australia and New Zealand. FRS
channels in the US and Canada can transmit using only 1/2 W
power. If the battery level is too low to support transmissions
using higher power levels, the value of this setting decreases
automatically.
Squelch Tone Mode: Sets the squelch mode (Changing the
Squelch Tone Mode, page 3).
Repeater Channel: Enables the GMRS repeater channels in
the US, and the CBRS/PRS repeater channels in Australia
and New Zealand. GMRS repeater channels are not
available in Canada (Repeater Channels, page 4).
Advanced Radio Setup
From the radio app, select > Radio Setup >
.
Setup
Headset Type: Sets the type of accessory headset or
microphone you are using with the device (Headsets and
Microphones, page 17).
VOX Level: Sets the sensitivity of a connected Voice Operated
Transmission (VOX) accessory. A lower VOX setting is
recommended for quiet environments, and a higher VOX
setting is recommended for noisy environments.
Weather Alert: Sets the channels that are monitored for
weather alerts when weather alerts are enabled.
Advanced
Connected Features
Connected features are available for your
device when you connect the device to a compatible
smartphone using Bluetooth® wireless technology. Some
features require you to install the Garmin Connect™ Mobile app
on the connected smartphone. Go to www.garmin.com/apps for
more information.
Phone notifications: Displays phone notifications and
messages on your Rino 700 Series device.
Activity uploads to Garmin Connect: Automatically sends
your activity to your Garmin Connect account as soon as you
finish recording the activity.
Connect IQ: Allows you to extend your device features with
widgets, data fields, and apps.
Software Updates: Allows you to update your device software.
EPO Downloads: Allows you to download an extended
prediction orbit file to quickly locate GPS satellites and
reduce the time it takes to calculate your position.
Live Geocache Data: Provides free and subscription-based
services to view live geocache data from
www.geocaching.com .
Weather: Allows you to view current weather conditions and
weather forecasts. You can also view weather radar on the
map.
Pairing Your Smartphone
Go to garmin.com/intosports/apps , and download the
1
Garmin Connect Mobile app to your smartphone.
Bring your smartphone within 10 m (33 ft.) of your device.
2
Rino 700 Series
On your device, from the app drawer, select Setup >
3
Bluetooth, and follow the on-screen instructions.
From your smartphone, open the Garmin Connect Mobile
4
app, and follow the on-screen instructions to connect a
device.
The instructions are provided during the initial setup, or can
be found in the Garmin Connect Mobile app help.
Phone notifications require a compatible smartphone
equipped with Bluetooth Smart wireless technology. Go to
garmin.com/ble for compatibility information.
Viewing Widgets
Your device is preloaded with a widget that displays the status
of your connections and other information. Additional widgets
can be added from the Connect IQ
page 5).
Swipe down from the top of the screen.
1
Swipe left or right to view more widgets.
2
Select to return to the previous screen.
3
app (Connect IQ Features,
Connect IQ Features
You can add Connect IQ features to your device from Garmin
and other providers using the Garmin Connect Mobile app. You
can customize your device with data fields, widgets, and apps.
Data Fields: Allow you to download new data fields that present
sensor, activity, and history data in new ways. You can add
Connect IQ data fields to built-in features and pages.
Widgets: Provide information at a glance, including sensor data
and notifications.
Apps: Add interactive features to your watch, such as new
outdoor and fitness activity types.
Downloading Connect IQ
Before you can download Connect IQ
Connect Mobile app, you must pair your
your smartphone.
From the settings in the Garmin Connect Mobile app, select
1
Connect IQ Store.
If necessary, select your device.
2
Select a Connect IQ feature.
3
Follow the on-screen instructions.
4
Features
features from the Garmin
Rino 700 device with
Weather
The weather app preloaded on this device provides weather
information from two sources.
• When connected to a smartphone, the device provides
current weather conditions, forecasts, and weather-radar
information from the Internet.
• When set to monitor for weather broadcasts, the device can
receive radio-transmitted Specific Area Message Encoding
(SAME) county weather alerts.
Monitoring SAME Weather Alerts
SAME weather alerts allow you to receive radio-transmitted
county weather alerts on your device.
NOTE: SAME weather alerts are available in the US only.
From the radio app, select Weather.
1
Select a channel.
2
You can receive weather alerts only on the selected weather
channel.
When you receive a weather alert on the selected channel, a
message appears containing the alert information.
The weather radio must remain on to receive weather alerts.
Connected Features 5
Page 10

Opening the Weather App
DRAFT
From app drawer, select Weather
Viewing Weather Conditions and Forecasts
To view forecast and weather radar information, you must
connect your device to a smartphone with internet access.
To view forecast and weather radar information, your device
must have an Internet connection. You can connect to a
smartphone with Internet access (Pairing Your Smartphone,
page 5).
To view SAME radio weather alerts on the map, you must
monitor for the alerts (Monitoring SAME Weather Alerts,
page 5).
You can view weather conditions and forecasts, and view
weather radar on the map. When the map is dark, no weather
data is loaded on the device, or the device is out of coverage.
Weather data is not available for out-of-coverage areas on the
map.
When you view a weather radar frame, the device displays the
current time for the frame.
From the app drawer, select Weather.
1
Select an option:
2
• To view the weather radar on the map, select .
TIP: You can animate or pause the weather map. When
you stop the animation, the device displays the most
recent weather data.
• To view current weather conditions and forecasts, select
.
• To view a county map with color-coded SAME watches
and warnings, select
TIP: You can drag the map to view available watches and
warnings in the county, and you can select the information
button to view more detailed information about an alert.
Viewing SAME Weather Alerts on the Map
To view SAME radio weather alerts on the map, you must
monitor for the alerts (Monitoring SAME Weather Alerts,
page 5).
You can view a county map with color-coded SAME watches
and warnings.
From the weather app, select .
1
Drag the map to view available watches and warnings in the
2
county (optional).
Select a shaded area and the name of the alert to view more
3
detailed information about an alert (optional).
.
Geocaches
Geocaching is a treasure hunting activity in which players hide
or search for hidden caches using clues and GPS coordinates.
Registering Your Device at Geocaching.com
You can register your device at
for a list of nearby geocaches, or to search live information for
millions of geocaches.
From the app drawer, select Setup > Geocaching >
1
Register Device.
An activation code appears.
Follow the on-screen instructions.
2
Select Confirm Registration.
3
Connecting to Geocaching.com
After you register, you can view geocaches from
www.geocaching.com on your device while connected
wirelessly.
www.geocaching.com to search
• Connect to the Garmin Connect app.
Searching for a Geocache
You can search the geocaches loaded on your device. If you are
connected to geocaching.com, you can search live geocache
data and download geocaches.
NOTE: You can download detailed information for more than
three geocaches per day with a premium membership. Go to
www.geocaching.com for more information.
From the app drawer, select Geocaching.
1
Select > .
2
Select an option:
3
• To search the geocaches loaded on your device by name,
select Spell Search, and enter a search term.
• To search for geocaches near you or near another
location, select Search Near, and select a location.
If you are connected to geocaching.com, the search
results include live geocache data obtained by GC Live
Download or by selecting the refresh button on the map.
• To search for nearby geocaches on the map, select .
If you are connected to geocaching.com, you can select
to refresh live geocaches that are near your location on
the map.
• To search for live geocaches by code, select GC Live
Download.
This feature allows you to download a specific geocache
from geocaching.com when you know the geocache code.
Select to filter the search results (optional).
4
Select a geocache.
5
The geocache details appear. If you selected a live geocache
and you are connected, the device downloads the full
geocache details to the internal storage, if necessary.
Navigating to a Geocache
Search for a geocache.
1
From the geocache details, select Go.
2
Navigate using the map (Navigating with the Map, page 9)
3
or compass (Navigating with the Compass, page 9).
As you approach the location of the geocache, use the hints
4
and clues to help you find the hidden cache (Using Hints and
Clues to find a Geocache, page 6).
Using Hints and Clues to find a Geocache
You can use hints or clues, such as a description or coordinates,
to help you find a geocache.
While navigating to a geocache, select the geocache name.
1
Select an option:
2
• To view details about the geocache, select Description.
• To view a clue about a geocache location, select Hint.
• To view latitude and longitude for a geocache, select
Coordinates.
• To view feedback about the geocache from previous
searchers, select Logs.
• To turn chirp™ searching on, select chirp.
Logging the Attempt
After you attempt to find a geocache, you can log your results.
While navigating to a geocache, from the app drawer, select
1
Geocaching > Log.
Select Found, Did Not Find, Needs Repair, or
2
Unattempted
.
6 Geocaches
Page 11

Select an option:
DRAFT
3
• To begin navigation to the next geocache nearest you,
select Find Next Closest.
• To stop logging, select Done.
• To enter a comment about looking for the cache or about
the cache itself, select Edit Comment, enter a comment,
and select .
If you are connected to geocaching.com, the log is uploaded to
your geocaching.com account automatically.
Filtering the Geocache List
You can filter your geocache list based on certain factors, such
as the level of difficulty.
From the app drawer, select Geocaching > .
1
Select one or more option to filter:
2
• To filter by a geocache category, such as puzzle or event,
select Type.
• To filter by the physical size of the geocache container,
select Size.
• To filter by Unattempted, Did Not Find, or Found
geocaches, select
• To filter by the GPX file, live data, or pocket queries you
have downloaded, select Geocache Files.
• To filter by the difficulty level of finding the geocache, or
the difficulty of the terrain, use the slider bars to adjust the
difficulty levels.
Select .
3
Status.
Saving a Custom Geocache Filter
You can create and save custom filters for geocaches based on
specific factors.
From the app drawer, select Setup > Geocaching > Filter
1
Setup > Create Filter.
Select items to filter.
2
Select .
3
By default, the new filter is saved automatically as Filter
followed by a number. For example, Filter 2. You can edit the
geocache filter to change the name (Editing a Custom
Geocache Filter, page 7).
Editing a Custom Geocache Filter
From the app drawer, select Setup > Geocaching > Filter
1
Setup.
Select a filter.
2
Select an item to edit.
3
Applying a Custom Filter to a Geocache List
After you create a filter, you can apply it to the geocache list.
From the geocache list, select .
1
Select a filter.
2
Downloading Geocaches Using a Computer
You can load geocaches manually onto your device using a
computer (
can place the geocache files into a GPX file and import them
into the GPX folder on the device. With a premium membership
to geocaching.com, you can use the "pocket query" feature to
load a large group of geocaches onto your device as a single
GPX file.
Connect the device to your computer using a USB cable.
1
Go to www.geocaching.com .
2
If necessary, create an account.
3
Sign in.
4
Transferring Files to Your Device, page 18). You
Follow the instructions at geocaching.com to find and
5
download geocaches to your device.
chirp
A chirp is a small Garmin accessory that is programmed and left
in a geocache. You can use your device to find a chirp in a
geocache. For more information about the chirp, see the chirp
Owner's Manual at www.garmin.com.
Enabling chirp
From the app drawer, select Setup > Geocaching.
1
Select chirp Searching > On.
2
Searching
Finding a Geocache with a chirp
With chirp searching enabled, navigate to a geocache.
1
When you are within approximately 10 m (33 ft.) of the
geocache that contains a chirp
appear.
Select Show Details.
2
If necessary, select Go to navigate to the next stage of the
3
geocache.
, details about the chirp
Removing Live Geocache Data from the Device
You can remove live geocache data to show only geocaches
manually loaded on the device using a computer.
From the app drawer, select
Geocaching Live
Live geocaching data is removed from the device and no
longer appears in the geocache list.
> Remove Live Data
Setup > Geocaching >
.
Removing Your Device Registration From
Geocaching.com
If you transfer ownership of your device, you can remove your
device registration from the geocaching website.
From the app drawer, select
Geocaching Live > Unregister Device.
Setup > Geocaching >
Activities
Your device can be used for indoor, outdoor, athletic, and fitness
activities. When you start an activity, the device displays and
records sensor data. You can save activities and share them
with the
You can also add Connect IQ activity apps to your device using
your Garmin Connect account (Connect IQ Features, page 5).
When you are using an activity and you change some settings,
such as data fields or units of measurement, the changes are
saved automatically as part of the activity. These settings are
loaded automatically the next time you switch the device to this
activity.
Your device includes several preloaded activities with settings
configured for that activity. You can customize the settings for
each preloaded activity, and you can create new custom
activities.
NOTE: By default, the device begins a recreational activity
automatically when it is powered on.
Recording an Activity
By default, the device begins a recreational activity automatically
when you turn it on.
1
Garmin Connect community.
Select an option:
• To record the default recreational activity that began
automatically when you turned on the device, proceed to
step 4.
Activities 7
Page 12

• To record a different activity type, proceed to step 2.
DRAFT
From the app drawer, select Activity Change.
2
Select the activity name.
3
Begin your activity.
4
After you complete your activity, swipe down and select
5
Current Activity.
Select .
6
Select an option:
7
• To continue your activity, select .
• To save your activity, select .
• To delete your activity, select .
Creating a New Activity
If none of the preloaded activities fit the needs of your activity or
trip, you can create a custom activity with its own unique
settings and data fields.
From the app drawer, select Setup > Activities > Create
1
Activity.
Customize your settings and data fields.
2
Editing an Activity Name
You can customize the name of an activity.
From the app drawer, select Setup > Activities.
1
Select an activity.
2
Select Edit Name.
3
Enter the new name.
4
Editing an Activity Icon
You can customize the icon displayed on an activity page.
From the app drawer, select Setup > Activities.
1
Select an activity.
2
Select Edit Icon.
3
Select an icon.
4
Deleting an Activity
NOTE: Before you can delete the active activity, you must
activate a different activity. You cannot delete an activity while it
is active.
From the app drawer, select Setup > Activities.
1
Select an activity.
2
Select Delete.
3
Customizing Your Activity Log
You can customize how your device displays and records
activities.
From the app drawer, select Activity History > Current
1
Activity > .
Select an option:
2
• To change the color of the activity line on the map, select
Color.
• To display a line on the map indicating your activity, select
Show On Map.
Select > Setup Activities > Record Method.
3
Select an option:
4
• To record activities at a variable rate that creates an
optimum representation of your activities, select Auto.
• To record activities at a specified distance, select
Distance.
• To record activities at a specified time, select Time.
Select Interval.
5
Complete an action:
6
• If you selected Auto for the Record Method, select an
option to record activities more or less often.
NOTE: Using the Most Often interval provides the most
activity detail, but fills up the device memory quicker.
• If you selected Distance or Time for the Record Method,
enter a value, and select .
Pausing an Activity
From the app drawer, select Current Activity.
1
Select .
2
Saving the Current Activity
From the app drawer, select Current Activity.
1
Select .
2
Select the date and time field to rename the saved activity
3
(optional).
Select to save the activity.
4
Clearing the Current Activity
You can delete all recorded activity data since the start of the
activity.
From the app drawer, select Current Activity.
1
Select > Clear.
2
Deleting an Activity History
From the app drawer, select Activity History.
1
Select an activity.
2
Select > Delete.
3
Viewing Activity Information
From the app drawer, select Activity History.
1
Select an activity.
2
Select .
3
The beginning and the end of the trail are marked by flags.
Select the information bar at the top of the screen.
4
Information about the activity appears.
Viewing the Elevation Plot of an Activity
From the app drawer, select Activity History.
1
Select an activity.
2
Select .
3
Saving a Location on an Activity
From the app drawer, select Activity History.
1
Select an activity.
2
Select .
3
Select a location on the activity.
4
Select the location information at the top of the map.
5
Information about the location appears.
Select > OK.
6
Opening Track Manager
A track is a .gpx file of your recorded path. The track contains
the same information as an activity except sensor data, but is
saved as a .gpx file. You can customize, use, and archive tracks
using the track manager.
From the app drawer, select Track Manager
.
8 Activities
Page 13
Navigation
DRAFT
You can navigate routes and tracks, to a waypoint, geocache,
photo, or any saved location in the device. You can use the map
or the compass to navigate to your destination.
Navigating to a Destination
If necessary, select the activity to use while navigating
1
(Recording an Activity, page 7).
From the app drawer, select Where To?.
2
Select a category.
3
Select a destination.
4
Select Go.
5
The map opens and your route is marked with a magenta
line.
Navigate using the map (Navigating with the Map, page 9)
6
or compass (Navigating with the Compass, page 9).
Finding a Location Near Another Location
If necessary, select the activity to use while navigating
1
(Recording an Activity, page 7).
From the app drawer, select Where To?.
2
Select > Search Near.
3
Select an option.
4
Select a location.
5
Stopping Navigation
From the map or compass, select > Stop Navigation.
Navigating with the Map
Begin navigating to a destination (Navigating to a
1
Destination, page 9).
From the app drawer, select Map.
2
A blue triangle represents your location on the map. As you
travel, the blue triangle moves and leaves a track log (trail).
Complete one or more actions:
3
• Select , and drag the map to view different areas.
• Select and to zoom in and out of the map.
• Select a location on the map (represented by a pin), and
select the information bar at the top of the screen to view
information about the selected location.
Navigating Using TracBack
While navigating, you can navigate back to the beginning of your
activity. This can be helpful when finding your way back to camp
or the trail head.
From the app drawer, select Activity History > Current
1
Activity
The map displays your route with a magenta line, start point,
and end point.
Navigate using the map or the compass.
2
> TracBack.
>
Optional Maps
You can use additional maps with the device, such as BirdsEye
satellite imagery, BlueChart
maps. Detailed maps may contain additional points of interest,
such as restaurants or marine services. For more information,
go to http://buy.garmin.com or contact your Garmin
Finding an Address
You can use optional City Navigator maps to search for
addresses (Optional Maps, page 9).
From the app drawer, select Where To? > Addresses.
1
Select the country or state, if necessary.
2
®
g2, and City Navigator® detailed
®
dealer.
Enter the city or postal code.
3
NOTE: Not all map data provides postal code searching.
Select the city.
4
Enter the house number.
5
Enter the street.
6
Navigating with the Compass
When navigating to a destination,
regardless of the direction you are moving.
Begin navigating to a destination (Navigating to a
1
Destination, page 9).
From the app drawer, select Compass.
2
Turn until points toward the top of the compass, and
3
continue moving in that direction to the destination.
Calibrating the Compass
Calibrate the electronic compass outdoors. To improve heading
accuracy, do not stand near objects that influence magnetic
fields, such as vehicles, buildings, and overhead power lines.
Your device was already calibrated at the factory, and the
device uses automatic calibration by default. If you experience
irregular compass behavior, for example, after moving long
distances or after extreme temperature changes, you can
manually calibrate the compass.
From the app drawer, select Compass.
1
Select > Calibrate Compass
2
Follow the on-screen instructions.
3
Course Pointer
The course pointer is most useful when you are navigating to
your destination in a straight line, such as when you are
navigating on water. It can help you navigate back to the course
line when you go off-course to avoid obstacles or hazards.
To enable the course pointer, from the app drawer, select Setup
> Heading > Go To Line (Pointer) > Course (CDI).
Course line pointer. Indicates the direction of the desired course line
À
from your starting point to your next waypoint.
Course deviation indicator (CDI). Indicates the location of the
Á
desired course line in relation to your location. If the CDI is aligned
with the course line pointer, you are on course.
Course deviation distance. The dots indicate your distance off
Â
course. The distance represented by each dot is indicated by the
scale in the upper-right corner.
To-and-from indicator. Indicates whether you are headed to or from
Ã
the next waypoint.
points to your destination,
NOTICE
.
> Start
Navigating with Sight 'N Go
You can point the device at an object in the distance with the
compass direction locked in, project the object as a waypoint,
and navigate using the object as a reference point.
From the app drawer, select Sight 'N Go.
1
Point the device at an object.
2
Select Lock Direction > Set Course.
3
Navigate using the compass.
4
Navigation 9
Page 14

Elevation Plot
DRAFT
By default, the elevation plot displays the elevation over the
distance traveled. The top chart displays the full track, and the
bottom chart can display a portion of the track. You can touch
any point on either chart to view details about that point. You
can customize the elevation settings (
page 16).
Navigating to a Point on the Elevation Plot
From the app drawer, select Altimeter.
1
Select an individual point on the plot.
2
Select .
3
Select View Map.
4
Navigate using the map (Navigating with the Map, page 9) or
5
compass (Navigating with the Compass, page 9).
Changing the Plot Type
You can change the elevation plot to display pressure and
elevation over time or distance.
From the app drawer, select Altimeter.
1
Select > Altimeter Setup > Plot Type
2
Select plot type.
3
Resetting the Elevation Plot
From the app drawer, select Altimeter.
1
Select > Reset > Clear Current Activity >
2
Calibrating the Barometric Altimeter
You can manually calibrate the barometric altimeter if you know
the correct elevation or the correct barometric pressure.
Go to a location where the elevation or barometric pressure
1
is known.
From the app drawer, select Altimeter.
2
Select > Altimeter Setup > Calibrate Altimeter.
3
Follow the on-screen instructions.
4
Altimeter Settings,
Clear
.
• Select Search Near to search near a recently found
location, another waypoint, your current location, or a
point on the map.
• Select Sort to view the list of waypoints based on nearest
distance or alphabetical order.
Select a waypoint from the list.
4
Editing a Waypoint
Before you can edit a waypoint, you must create a waypoint.
From the app drawer, select Waypoint Manager.
1
Select a waypoint.
2
Select an item to edit, such as the name.
3
Enter the new information, and select .
4
Deleting a Waypoint
From the app drawer, select Waypoint Manager.
1
Select a waypoint.
2
Select > Delete.
3
Increasing the Accuracy of a Waypoint Location
You can refine the accuracy of a waypoint location by averaging
the location data. When averaging, the device takes several
GPS readings at the same location and uses the average value
to provide more accuracy.
From the app drawer, select Waypoint Averaging.
1
Select a waypoint.
2
Move to the waypoint location.
3
Select Start.
4
Follow the on-screen instructions.
5
When the confidence status bar reaches 100%, select Save.
6
For best results, collect four to eight samples for the waypoint,
waiting at least 90 minutes between samples.
Waypoints
Waypoints are locations you record and store in the device.
Waypoints can mark where you are, where you are going, or
where you have been. You can add details about the location,
such as name, elevation, and depth.
You can add a .gpx file that contains waypoints by transferring
the file to the GPX folder
page 18).
Marking Your Current Location as a Waypoint
You can mark your current location as a waypoint.
From the app drawer, select Mark Waypoint.
1
Select the symbol, the name, or the notes field to add details
2
about the waypoint (optional).
Select for more waypoint options (optional).
3
Select Save.
4
Finding a Waypoint
From the app drawer, select Waypoint Manager.
1
If necessary, select to narrow the search.
2
If necessary, select an option:
3
• Select Spell Search to search using the name of the
waypoint.
• Select Select Symbol to search using the symbol of the
waypoint.
(Transferring Files to Your Device,
Projecting a Waypoint
You can save a new location by projecting the distance and
bearing from a marked location to a new location.
From the app drawer, select Waypoint Manager.
1
Select a waypoint.
2
Select > Project Waypoint.
3
Enter the bearing, and select .
4
Select a unit of measure.
5
Enter the distance, and select .
6
Select Save.
7
Routes
A route is a sequence of waypoints or locations that leads you to
your final destination.
Creating a Route Using Route Planner
A route can include many waypoints, and it should include at
least a starting point and one destination.
From the app drawer, select Route Planner > Create Route
1
>
Select First Point
Select a category.
2
Select the first point in the route.
3
Select Use.
4
Select Select Next Point to add additional points to the
5
route.
.
10 Waypoints
Page 15

Select to save the route.
DRAFT
6
Creating a Route Using the Map
From the app drawer, select Route Planner > Create Route
1
> Select First Point > Use Map.
2
Select a point on the map.
Select Use.
3
Move the map, and select additional points on the map to
4
add to the route.
Select .
5
Editing the Name of a Route
You can customize the name of a route to make it distinct.
From the app drawer, select Route Planner.
1
Select a route.
2
Select Change Name.
3
Enter the new name.
4
Editing a Route
You can add, remove, or rearrange points on a route.
From the app drawer, select Route Planner.
1
Select a route.
2
Select Edit Route.
3
Select a point.
4
Select an option:
5
• To view the point on the map, select Review.
• To change the order of the points on the route, select
Move Up or Move Down.
• To insert an additional point on the route, select Insert.
The additional point is inserted before the point you are
editing.
• To remove the point from the route, select Remove.
Select to save the route.
6
Viewing a Route on the Map
From the app drawer, select Route Planner.
1
Select a route.
2
Select View Map.
3
Deleting a Route
From the app drawer, select Route Planner.
1
Select a route.
2
Select Delete Route.
3
Viewing the Active Route
While navigating a route, from the app drawer, select Active
1
Route.
Select a point in the route to view additional details.
2
Reversing a Route
You can switch the start and end points of your route to navigate
the route in reverse.
From the app drawer, select Route Planner.
1
Select a route.
2
Select Reverse Route.
3
Viewing the Elevation Plot of a Route
The elevation plot displays the elevations for a route based on
your route setting. If your device is configured for direct routing,
the elevation plot displays the straight-line elevations between
route points. If your device is configured for on-road routing, the
elevation plot displays the elevations along the roads included in
your route.
From the app drawer, select Route Planner.
1
Select a route.
2
Select Elevation Plot.
3
Garmin Adventures
You can create adventures to share your journeys with family,
friends, and the Garmin community. Group related items
together as an adventure. For example, you can create an
adventure for your latest hiking trip. The adventure could contain
the track log of the trip, photos of the trip, and geocaches you
hunted. You can use
adventures. For more information, go to
http://adventures.garmin.com.
BaseCamp
Sending Files to BaseCamp
Open BaseCamp.
1
Connect the device to your computer.
2
On Windows® computers, the device appears as a removable
drive or a portable device, and the memory card may appear
as a second removable drive. On Mac® computers, the device
and memory card appear as mounted volumes.
NOTE: Some computers with multiple network drives may not
display device drives properly. See your operating system
documentation to learn how to map the drive.
Open the Garmin or memory card drive or volume.
3
Select an option:
4
• Select an item from a connected device and drag it to My
Collection or to a list.
• From BaseCamp, select Device > Receive from Device,
and select the device.
Creating an Adventure
Before you can create an adventure and send it to your device,
you must download BaseCamp to your computer and transfer a
track from your device to your computer (
BaseCamp, page 11).
Open BaseCamp.
1
Select File > New > Garmin Adventure.
2
Select a track, and select Next.
3
If necessary, add items from BaseCamp.
4
Complete the required fields to name and describe the
5
adventure.
If you want to change the cover photo for the adventure,
6
select Change, and select a different photo.
Select Finish.
7
Starting an Adventure
Before you can start an adventure, you must download an
adventure from Garmin Connect
page 13), or send an adventure from BaseCamp to your
device (Sending Files to BaseCamp, page 11).
When you start a saved adventure, the device follows the saved
track and displays shortcuts to related information along the
track, such as photos and waypoints.
From the app drawer, select Adventures.
1
Select an adventure.
2
Select Start.
3
™
to create and manage your
Sending Files to
(Using Garmin Connect,
Garmin Adventures 11
Page 16

Camera and Photos
DRAFT
NOTE: This feature is available only for models that include a
camera.
When you take a photo, the geographic location is saved with
the photo information. You can navigate to the location.
Taking a Photo
From the app drawer, select Camera.
1
Turn the device horizontally or vertically to change the
2
orientation of the photo.
If necessary, select to turn on the flash.
3
TIP: You can select Auto to use the flash only when the
camera detects a low light scene.
If necessary, use two fingers on the touchscreen to zoom in
4
or out.
Hold to focus and hold the device still.
5
A white frame appears on the screen. The device focuses on
the object inside of the frame. When the photo is in focus, the
frame turns green.
Release to take a photo.
6
Applications
Sending and Receiving Data Wirelessly
Before you can share data wirelessly, you must be within 3 m
(10 ft.) of a compatible device.
Your device can send and receive data when paired with
another compatible device using Bluetooth or ANT+
technology. You can share waypoints, geocaches, routes,
tracks, photos, and custom maps.
From the app drawer, select Share Wirelessly.
1
Select an option:
2
• Select Send, and select a type of data.
• Select Receive to receive data from another device. The
other compatible device must be attempting to send data.
Follow the on-screen instructions.
3
Setting a Proximity Alarm
Proximity alarms alert you when you are within a specified range
of a particular location.
From the app drawer, select Proximity Alarms > Create
1
Alarm.
Select a category.
2
Select a location.
3
Select Use.
4
Enter a radius, and select .
5
When you enter an area with a proximity alarm, the device
sounds a tone.
TIP: You can configure separate alarm tones for when you enter
and leave an area.
Calculating the Size of an Area
From the app drawer, select Area Calculation > Start.
1
Walk around the perimeter of the area you want to calculate.
2
Select Calculate
3
when finished.
Viewing the Calendar and Almanacs
You can view device activity, such as when a waypoint was
saved. You can also view daily almanac information for the sun
and moon, and hunting and fishing.
®
wireless
From the app drawer, select an option:
1
• To view device activity for specific days, select Calendar.
• To view the sunrise, sunset, moonrise, and moonset
information, select Sun and Moon.
• To view the predicted best times for hunting and fishing,
select Hunt and Fish.
If necessary, select or to view a different month.
2
Select a day.
3
Setting an Alarm
From the app drawer, select Alarm Clock.
1
Select and to set the time.
2
Select Turn Alarm On.
3
Select an option.
4
The alarm sounds at the selected time. If the device is off at
the alarm time, the device turns on and sounds the alarm.
Starting the Countdown Timer
From the app drawer, select Alarm Clock > > Timer.
1
Select and to set the time.
2
Select Start Timer.
3
Opening the Stopwatch
From the app drawer, select Stopwatch.
Satellite Page
The satellite page shows your current location, GPS accuracy,
satellite locations, and signal strength.
Changing the Satellite View
From the app drawer, select Satellite.
1
Select .
2
Select an option:
3
• To orient the satellite view with your current track toward
the top of the screen, select Track Up.
• To show a unique color for each satellite and its signal
strength bar, select Multicolor.
Turning Off GPS
You can turn off GPS on your device to stop tracking your
location.
From the app drawer, select Satellite.
1
Select > Use With GPS Off.
2
Simulating a Location
You can use the device with GPS off to perform maintenance on
waypoints and routes, or to conserve battery life. You can set
the location manually to view your current location on the map.
From the app drawer, select Satellite > > Use With GPS
1
Off.
Select > Set Location On Map.
2
Select a location.
3
Select Use.
4
Controlling a VIRB® Action Camera
Before you can use the
the remote control setting on your VIRB camera. For more
information, see the owner's manual for your VIRB
Turn on your VIRB camera, and enable the remote control
1
setting.
On your device, from the app drawer, select VIRB Remote.
2
Wait while the device connects with your VIRB camera.
3
VIRB remote function, you must enable
camera.
12 Camera and Photos
Page 17

Select an option:
DRAFT
4
• To record video, drag the slider bar up.
• To take a photo, select .
Phone Notifications
NOTE: This feature is not available for all device models.
Phone notifications require a compatible smartphone to be
paired with the device. When your phone receives messages, it
sends notifications to your device.
Hiding Notifications
Notifications are enabled by default when you pair your device
with a compatible smartphone. You can hide notifications so
they do not appear on your device screen.
From the app drawer, select Setup > Bluetooth.
1
If necessary, select Bluetooth if it is not turned on.
2
Select Notifications to turn off notifications on the device.
3
Select Search for New.
4
When the sensor is paired with your device, the sensor status
changes from
Tips for Pairing ANT+ Accessories with Your Garmin Device
• Verify that the ANT+ accessory is compatible with your
Garmin
• Before you pair the ANT+ accessory with your Garmin
device, move 10 m (32.9 ft.) away from other ANT+
accessories.
• Bring the Garmin device within range 3 m (10 ft.) of the ANT+
accessory.
• After you pair the first time, your Garmin device automatically
recognizes the ANT+ accessory each time it is activated. This
process occurs automatically when you turn on the Garmin
device and only takes a few seconds when the accessories
are activated and functioning correctly.
• When paired, your Garmin device receives data from only
your accessory, and you can go near other accessories.
Searching to Connected.
device.
Fitness
History
History includes date, time, distance, calories, average speed or
pace, ascent, descent, and optional ANT+ sensor information.
NOTE: History is not recorded while the timer is stopped or
paused.
When the device memory is full, a message appears. The
device does not automatically delete or overwrite your history.
You can upload your history to Garmin Connect (Using Garmin
Connect, page 13) or BaseCamp (Garmin Adventures,
page 11) periodically to keep track of all your activity data.
Viewing an Activity History
From the history, you can view details about a previous activity.
From the app drawer, select Activity History.
1
Select an activity.
2
Deleting an Activity from Your History
From the app drawer, select Activity History.
1
Select an activity.
2
Select > Delete.
3
Using
1
2
3
Optional Fitness Accessories
You can use optional fitness accessories including a heart rate
monitor or a cadence sensor with your device. These
accessories use ANT+ wireless technology to send data to the
device.
Before you can use the fitness accessory with your device, you
must install the accessory according to the instructions included
with the accessory.
Pairing Your ANT+ Sensors
Before you can pair, you must put on the heart rate monitor or
install the sensor.
Pairing is the connecting of ANT+
connecting a heart rate monitor with your device.
1
2
3
Garmin Connect
Connect the device to your computer using the USB cable.
Go to www.garminconnect.com/start.
Follow the on-screen instructions.
wireless sensors, for example,
Bring the device within 3 m (10 ft.) of the sensor.
NOTE: Stay 10 m (30 ft.) away from other ANT+ sensors
while pairing.
From the app drawer, select Setup > ANT Sensor.
Select your sensor.
About Heart Rate Zones
Many athletes use heart rate zones to measure and increase
their cardiovascular strength and improve their level of fitness. A
heart rate zone is a set range of heartbeats per minute. The five
commonly accepted heart rate zones are numbered from 1 to 5
according to increasing intensity. Generally, heart rate zones are
calculated based on percentages of your maximum heart rate.
Fitness Goals
Knowing your heart rate zones can help you measure and
improve your fitness by understanding and applying these
principles.
• Your heart rate is a good measure of exercise intensity.
• Training in certain heart rate zones can help you improve
cardiovascular capacity and strength.
• Knowing your heart rate zones can prevent you from
overtraining and can decrease your risk of injury.
If you know your maximum heart rate, you can use the table
(Heart Rate Zone Calculations, page 23) to determine the best
heart rate zone for your fitness objectives.
If you do not know your maximum heart rate, use one of the
calculators available on the Internet. Some gyms and health
centers can provide a test that measures maximum heart rate.
The default maximum heart rate is 220 minus your age.
Setting Your Heart Rate Zones
Before the device can determine your heart rate zones, you
must set up your fitness user profile (Setting Your Fitness User
Profile, page 16).
You can manually adjust the heart rate zones according to your
fitness goals (Fitness Goals, page 13).
From the app drawer, select Setup > Fitness > HR Zones.
1
Enter the maximum and minimum heart rate for zone 5.
2
The maximum heart rate for each zone is based on the
minimum heart rate of the previous zone. For example, if you
enter 167 as a minimum heart rate for zone 5, the device
uses 166 as the maximum rate for zone 4.
Enter your minimum heart rate for zones 4-1.
3
Customizing the Device
Adjusting the Backlight Brightness
You can adjust the backlight brightness to maximize the battery
life.
Swipe down from the top of the screen.
1
Select or .
2
Fitness 13
Page 18

Customizing the Keys
DRAFT
You can customize some device key actions to provide quick
access to menus, settings, apps, or other device functions.
From the app drawer, select Setup > System > Configure
1
Keys.
Select Power Key or Call Key.
2
Select Single Tap,
3
Select an option.
4
Double Tap, or Hold.
Customizing the Main Menu
You can change the layout of the main menu.
From the app drawer, select Setup > Main Menu.
1
Select an option:
2
• To switch to a different page of the main menu, select
and .
• To change the number of items on a main menu page,
select and .
• To set the current page of the main menu as the starting
page, select > Set as Start Page.
Changing Items on the Main Menu
You can add, remove, and change the order of items on the
main menu.
From the app drawer, select Setup > Main Menu.
1
If necessary, increase the number of items on the main
2
menu, or switch to a different page of the main menu
(Customizing the Dashboard on the Main Menu, page 14).
Select an option:
3
• To add an item to the main menu, select Add Item Here,
and select an item.
• To move an item on the main menu, select the item, and
select Move Item Here.
• To delete an item on the main menu, select the item, and
select .
Customizing the Dashboard on the Main Menu
By default, radio information appears in the dashboard on the
main menu. You can change the information shown in this
dashboard.
From the app drawer, select Setup > Main Menu.
1
Select > Change Dashboards.
2
Select a dashboard.
3
Customizing the App Drawer
You can add, remove, and change the order of items in the app
drawer.
From the app drawer, select Setup > Main Menu
1
Setup Drawer.
Select an option:
2
• To add an item to the app drawer, select Add and select
an item.
• To move an item in the app drawer, select the item, and
select another item to switch positions.
• To delete an item from the app drawer, select the item,
and select .
NOTE: Some items cannot be deleted from the app
drawer.
>
>
Adding a Shortcut to the Main Menu
You can add shortcuts to the application drawer, or to the main
menu or favorites dashboard when the device is in classic
mode. You can create shortcuts to enable the device to perform
multiple actions simultaneously. If the shortcut does not appear
in the list, you can create it
From the app drawer, select Setup > Shortcuts.
1
Select the shortcut.
2
Select Add to Menu.
3
Select Main Menu, Drawer, or Favorites.
4
(Creating a Shortcut, page 14).
Creating a Shortcut
From the app drawer, select Setup > Shortcuts > Create
1
Shortcut.
Select Name, and enter a name.
2
Select Icon, and select an icon.
3
Select an option:
4
• To add a shortcut to a specific device setting. select
Setup.
• To add a shortcut that begins navigation to a specific
waypoint, select Where To?.
• To add a shortcut to a specific application, select
Application.
• To allow a shortcut to quickly change your activity, select
Activity.
Custom Data Fields and Dashboards
Data fields display information about your location or other
specified data. Dashboards are a custom grouping of data that
can be helpful to a specific or general task, such as geocaching.
Enabling the Map Data Fields
You can show custom data fields on the map.
From the map, select > Setup Map > Dashboard.
1
Select Large Data Field or Small Data Fields.
2
If necessary, on the map, select at the top of the screen to
3
show the data fields.
Customizing the Data Fields
Before you can change the map data fields, you must enable
them (Enabling the Map Data Fields, page 14).
You can customize the data fields and dashboards of the map,
compass, trip computer, elevation plot, and status pages.
From a page that displays data fields, select a data field.
1
Select a data field category and a data field.
2
For example, select Trip Data > Speed - Moving Avg..
Customizing Dashboards
Select a page.
1
Select an option:
2
• From the map, select > Setup Map > Dashboard.
• From the compass or trip computer, select > Change
Dashboard.
Select a dashboard.
3
Setting the Touchscreen Sensitivity
You can adjust the touchscreen sensitivity to suit your activity.
From the app drawer, select Setup > Accessibility > Touch
1
Sensitivity.
Select an option.
2
TIP: You can test the touchscreen settings with and without
gloves based on your activity.
Display Settings
From the app drawer, select
Backlight Timeout: Sets the length of time before the backlight
turns off.
Setup > Display.
14 Customizing the Device
Page 19

Orientation Lock: Locks the screen orientation in portrait or
DRAFT
landscape mode, or allows the screen to change orientation
automatically based on the device orientation.
Screen Capture: Allows you to save the image on the device
screen.
Battery Save: Saves the battery power and prolongs the battery
life by turning off the screen when the backlight times out
(Turning On Battery Save Mode, page 1).
Configuring the Maps
You can enable or disable the maps currently loaded on the
device.
From the app drawer, select
Maps.
Setup > Map > Configure
Map Settings
From the app drawer, select Setup > Map.
Orientation: Adjusts how the map is shown on the page. The
North Up option shows north at the top of the page. The
Track Up option shows your current direction of travel toward
the top of the page. The
automotive perspective with the direction of travel at the top.
Dashboard: Sets a dashboard to display on the map. Each
dashboard shows different information about your route or
your location.
Guidance Text: Sets when the guidance text is shown on the
map.
Map Speed: Adjusts the speed at which the map is drawn. A
faster map drawing speed decreases the battery life.
Automotive Mode option shows an
Advanced Map Settings
From the app drawer, select Setup > Map > Advanced Setup.
Detail: Sets the amount of detail shown on the map. Showing
more detail may cause the map to redraw more slowly.
Shaded Relief: Shows detail relief on the map (if available) or
turns off shading.
Vehicle: Sets the position icon, which represents your position
the map. The default icon is a small blue triangle.
Zoom Controls: Sets the auto zoom and the location of the
buttons in portrait or landscape mode.
Zoom Levels: Adjusts the zoom level at which map items
appear. The map items do not appear when the map zoom
level is higher than the selected level.
Text Size: Sets the text size for map items.
System Settings
From the app drawer, select
Satellite: Allows you to adjust the satellite system settings
(Satellite Settings, page 15).
Text Language: Sets the text language on the device.
NOTE: Changing the text language does not change the
language of user-entered data or map data.
Interface: Sets the communication interface mode to Garmin
Spanner, Garmin Serial, NMEA In/Out, Text Out, RTCM, or
MTP.
Configure Keys: Sets the power key or user key as a shortcut
to a menu, setting, or application.
Mode: Sets the home screen to look like a classic outdoor
handheld device home screen or an activity-based home
screen.
NOTE: This device is set to Classic by default. Changing this
setting to Activity significantly alters the user interface, radio
features, and activity recording features.
Battery Type: Sets the battery type for the device.
Setup > System.
Satellite Settings
From the app drawer, select Setup > System > Satellite.
Satellite System: Allows you to set the satellite system to GPS,
GPS + GLONASS (GPS and GLONASS, page 15), or
Demo Mode (GPS off).
WAAS/EGNOS: Sets the satellite system to Wide Area
Augmentation System/European Geostationary Navigation
Overlay Service (WAAS/EGNOS). For more information
about WAAS, go to www.garmin.com/aboutGPS/waas.html.
GPS and GLONASS
The default satellite system setting is GPS + GLONASS, which
offers increased performance in challenging environments and
faster position acquisition. Using GPS and GLONASS can
reduce battery life more quickly than using GPS only.
Appearance Settings
From the app drawer, select
Mode: Sets a light background, a dark background, or
automatically switches between the two based on the sunrise
and sunset time for your current location.
Day Color: Sets the color for the selections made when in day
mode.
Night Color: Sets the color for the selections made when in
night mode.
Landscape Controls: Places the controls on the left or right
side of the screen when in landscape mode.
Setup > Appearance.
Setting the Device Tones
You can customize tones for messages, keys, turn warnings,
and alarms.
From the app drawer, select Setup > Tones > Tones > On.
1
Select a tone for each audible type.
2
Routing Settings
The available routing settings vary based on the activity
selected.
From the app drawer, select
Activity: Sets an activity used for transportation while routing.
The device calculates routes optimized for the type of activity
you are doing.
Calculation Method: Sets the method used to calculate your
route.
Lock On Road: Locks the blue triangle, which represents your
position on the map, onto the nearest road. This is most
useful when driving or navigating on roads.
Off Route Recalculation: Sets recalculation preferences when
navigating away from an active route.
Avoidance Setup: Sets the types of roads, terrain, and
transportation methods to avoid while navigating.
Route Transitions: Sets how the device routes from one point
on the route to the next. This setting is available only for
some activities. The Distance
point on the route when you are within a specified distance of
your current point.
Setup > Routing.
option routes you to the next
Heading Settings
You can customize the compass settings.
From the app drawer, select
Display: Sets the type of directional heading shown on the
compass.
North Reference: Sets the north reference used on the
compass.
Setup > Heading.
Customizing the Device 15
Page 20

Go To Line (Pointer): Allows you to use the bearing pointer that
DRAFT
points in the direction of your destination, or use the course
pointer that shows your relationship to the course line leading
to the destination.
Compass: Automatically switches from an electronic compass
to a GPS compass when you are traveling at a higher rate of
speed for a period of time.
Calibrate Compass: Allows you to calibrate the compass if you
experience irregular compass behavior, for example, after
moving long distances or after extreme temperature changes
(Calibrating the Compass, page 9).
chirp Searching: Allows the device to search for a geocache
containing a chirp accessory (Enabling chirp Searching,
page 7).
Program chirp: Programs the chirp accessory. See the chirp
Owner's Manual at www.garmin.com.
Filter Setup: Allows you to create and save custom filters for
geocaches (Saving a Custom Geocache Filter, page 7).
Found Geocaches: Allows you to edit the number of geocaches
found. This number automatically increases when you log a
find (Logging the Attempt, page 6).
Altimeter Settings
From the app drawer, select
Auto Calibration: Automatically calibrates the altimeter each
time an activity is started. The device continues to
automatically calibrate the altimeter as long as the device
receives GPS signals and auto calibrate continuous is on.
Barometer Mode: Variable Elevation allows the barometer to
measure changes in elevation while you are moving. Fixed
Elevation assumes the device is stationary at a fixed
elevation, so the barometric pressure should only change
due to weather.
Plot Type: Allows you to view elevation changes over a period
of time or distance, barometric pressure over a period of
time, or ambient pressure changes over a period of time.
Calibrate Altimeter: Allows you to calibrate the barometric
altimeter when you know the correct elevation or the correct
barometric pressure (Calibrating the Barometric Altimeter,
page 10).
Setup > Altimeter.
Position Format Settings
NOTE: You should not change the position format or the map
datum coordinate system unless you are using a map or chart
that specifies a different position format.
From the app drawer, select Setup > Position Format.
Position Format: Sets the position format in which a location
reading appears.
Map Datum: Sets the coordinate system on which the map is
structured.
Map Spheroid: Shows the coordinate system the device is
using. The default coordinate system is WGS 84.
Changing the Units of Measure
You can customize units of measure for distance and speed,
elevation, depth, temperature, pressure, and vertical speed.
From the app drawer, select Setup > Units.
1
Select a measurement type.
2
Select a unit of measure.
3
Time Settings
From the app drawer, select
Time Format: Sets the device to show time in a 12-hour or 24-
hour format.
Time Zone: Sets the time zone for the device. Automatic sets
the time zone automatically based on your GPS position.
Setup > Time.
Geocaching Settings
From the app drawer, select
Geocaching Live: Sets the device to display or hide live
geocache data.
Geocache Style: Sets the device to display the geocache list
using names or codes.
Setup > Geocaching.
ANT+ Sensor Settings
For more information about optional fitness accessories, see
Optional Fitness Accessories, page 13.
Fitness Settings
From the app drawer, select
Auto Lap: Sets the device to automatically mark the lap at a
specific distance.
Activity Type: Sets the fitness activity to hiking, running,
cycling, and more. This allows your activity to appear as the
correct type when you transfer it to Garmin Connect.
User: Sets the user profile information (Setting Your Fitness
User Profile, page 16).
HR Zones: Sets the five heart rate zones for fitness activities.
Setting Your Fitness User Profile
The device uses information that you enter about yourself to
calculate accurate data. You can modify user profile information
such as gender, age, weight, height, and lifetime athlete (About
Lifetime Athletes, page 16).
From the app drawer, select Setup > Fitness > User.
1
Modify the settings.
2
About Lifetime Athletes
A lifetime athlete is an individual who has trained intensely for
many years (with the exception of minor injuries) and has a
resting heart rate of 60 beats per minute (bpm) or less.
Marking Laps by Distance
You can use the Auto Lap® feature to automatically mark the lap
at a specific distance. This feature is helpful for comparing your
performance over different parts of an activity.
From the app drawer, select Setup > Fitness > Auto Lap.
1
Enter a value, and select .
2
Setup > Fitness.
Marine Settings
From the app drawer, select
Marine Chart Mode: Sets the type of chart the device uses
when displaying marine data. Nautical displays various map
features in different colors so the marine POIs are more
readable and so the map reflects the drawing scheme of
paper charts. Fishing (requires marine maps) displays a
detailed view of bottom contours and depth soundings and
simplifies map presentation for optimal use while fishing.
Appearance: Sets the appearance of marine navigation aids on
the map.
Marine Alarm Setup: Sets alarms for when you exceed a
specified drift distance while anchored, when you are off
course by a specified distance, and when you enter water of
a specific depth.
Setting Up Marine Alarms
From the app drawer, select Setup > Marine > Marine
1
Alarm Setup.
Select an alarm type.
2
Setup > Marine.
16 Customizing the Device
Page 21
Select On.
DRAFT
3
Enter a distance, and select .
4
Resetting Data and Settings
You can reset trip data, delete all waypoints, clear the current
track, or restore default values.
From the app drawer, select SetupReset.
1
Select an option:
2
• To reset data specific to a trip, such as distance and
averages, select Reset Trip Data.
• To delete all saved waypoints, select Delete All
Waypoints.
• To clear the data recorded since you started your current
activity, select Clear Current Activity.
NOTE: The device continues to record new data for the
current activity.
• To reset the settings for your current activity type to the
factory default values, select Reset Activity Settings.
• To restore all device settings to the factory default values,
select Reset All Settings.
NOTE: Resetting all settings clears all geocaching activity
from your device.
Restoring Default Values for Specific Settings
You can restore the default values for specific settings
categories.
From the app drawer, select Setup.
1
Select a category to restore.
2
Select > Restore Defaults.
3
Restoring Default Values for Specific Page Settings
You can restore the default values for settings for the map,
compass, trip computer, and elevation plot.
Open the page for which you will restore the settings.
1
Select > Restore Defaults.
2
Restoring All Default Settings
You can reset all settings back to the factory default settings.
From the app drawer, select Setup > Reset > Reset All
Settings
NOTE: Restoring all default settings on your device clears
your geocaching registration and all default activities.
> Reset
.
Device Information
Attaching the Carabiner Clip
Position the carabiner clip À in the slots on the mounting
1
spine Á of the device.
By default, the device is set to detect automatically when a new
headset or microphone is connected.
NOTE: When connecting a headset with a push to talk (PTT)
button, you must press the PTT button after connecting the
headset for the device to detect the headset.
This device is compatible with Voice Operated Transmission
(VOX) devices. These accessories allow you to use the device
hands-free by transmitting automatically when a voice is
detected. You can adjust the sensitivity level of connected VOX
devices (Advanced Radio Setup, page 5).
Support and Updates
Garmin Express™ (www.garmin.com/express) provides easy
access to these services for Garmin devices.
• Product registration
• Product manuals
• Software updates
• Data uploads to Garmin Connect
• Map, chart, or course updates
Device Care
NOTICE
Do not store the device where prolonged exposure to extreme
temperatures can occur, because it can cause permanent
damage.
Never use a hard or sharp object to operate the touchscreen, or
damage may result.
Avoid chemical cleaners, solvents, and insect repellents that can
damage plastic components and finishes.
Secure the weather cap tightly to prevent damage to the USB
port.
Cleaning the Device
Wipe the device using a cloth dampened with a mild
1
detergent solution.
Wipe it dry.
2
After cleaning, allow the device to dry completely.
Cleaning the Touchscreen
Use a soft, clean, lint-free cloth.
1
If necessary, lightly dampen the cloth with water.
2
If using a dampened cloth, turn off the device and disconnect
3
the device from power.
Gently wipe the screen with the cloth.
4
Water Immersion
NOTICE
The device is water resistant to IEC Standard 60529 IPX7. It can
withstand immersion in 1 meter of water for 30 minutes.
Prolonged submersion can cause damage to the device. After
submersion, be certain to wipe dry and air dry the device before
using or charging.
Data Management
NOTE: The device is not compatible with Windows 95, 98, Me,
Windows NT®, and Mac OS 10.3 and earlier.
Slide the carabiner clip up until it locks in place.
2
Headsets and Microphones
This device is compatible with many headset and microphone
accessories that connect using a 2.5 mm jack (Device Overview,
page 1).
Device Information 17
File Types
The handheld device supports these file types:
• Files from BaseCamp
/trip_planning.
• GPX track files.
• GPX geocache files (Downloading Geocaches Using a
Computer, page 7).
• JPEG photo files.
or HomePort
™
. Go to www.garmin.com
Page 22
• GPI custom POI files from the Garmin POI Loader. Go to
DRAFT
www.garmin.com/products/poiloader.
• FIT files for exporting to Garmin Connect.
Installing a Memory Card
You can install a microSD memory card for additional storage or
pre-loaded maps.
Turn the D-ring counter-clockwise, and pull up to remove the
1
battery pack.
In the battery compartment, slide the card holder toward the
2
top of the device, and lift up.
Place the memory card with the contacts facing down.
3
Close the card holder.
4
Slide the card holder toward the bottom of the device to lock
5
it.
Replace the battery pack, and turn the D-ring clockwise.
6
Connecting the Device to Your Computer
NOTICE
To prevent corrosion, thoroughly dry the USB port, the weather
cap, and the surrounding area before charging or connecting to
a computer.
Pull up the weather cap from the USB port.
1
Plug the small end of the USB cable into the USB port on the
2
device.
Plug the large end of the USB cable into a computer USB
3
port.
Your device and memory card (optional) appear as
removable drives in My Computer on Windows computers
and as mounted volumes on Mac computers.
Transferring Files to Your Device
Connect the device to your computer.
1
On Windows computers, the device appears as a removable
drive or a portable device, and the memory card may appear
as a second removable drive. On Mac computers, the device
and memory card appear as mounted volumes.
NOTE: Some computers with multiple network drives may not
display device drives properly. See your operating system
documentation to learn how to map the drive.
On your computer, open the file browser.
2
Select a file.
3
Select Edit > Copy.
4
Open the portable device, drive, or volume for the device or
5
memory card.
Browse to a folder.
6
Select Edit > Paste.
7
The file appears in the list of files in the device memory or on
the memory card.
Deleting Files
NOTICE
If you do not know the purpose of a file, do not delete it. Your
device memory contains important system files that should not
be deleted.
Open the Garmin drive or volume.
1
If necessary, open a folder or volume.
2
Select a file.
3
Press the Delete key on your keyboard.
4
Disconnecting the USB Cable
If your device is connected to your computer as a removable
drive or volume, you must safely disconnect your device from
your computer to avoid data loss. If your device is connected to
your Windows computer as a portable device, it is not necessary
to safely disconnect.
Complete an action:
1
• For Windows computers, select the Safely Remove
Hardware icon in the system tray, and select your device.
• For Mac computers, drag the volume icon to the trash.
Disconnect the cable from your computer.
2
Specifications
Battery type Lithium-ion battery pack or four AA batteries
Battery life Lithium-ion battery pack: up to 14 hours of typical
Water rating IEC 60529 IPX7*
Operating
temperature range
Charging
temperature range
Communication
frequency/protocol
Radio channels 1 through 7: GMRS and FRS channels (requires
Radio output power FRS: 0.5 W
*The device withstands incidental exposure to water of up to 1 m
for up to 30 min. For more information, go to www.garmin.com
/waterrating.
Radio Frequency Charts
FRS/GMRS Radio Frequencies
Rino models sold in the United States and Canada use these
frequencies.
NOTE: If you plan to use this device in countries outside of the
United States or Canada, you should check with the government
of that country for any restrictions on FRS or GMRS use.
(NiMH, alkaline, or lithium)
usage.
AA batteries: up to 18 hours of typical usage.
From -20º to 55ºC (from -4º to 131ºF)
From 0º to 40°C (from 32º to 104°F)
2.4 GHz
Bluetooth enabled device
FCC license in the United States)
8 through 14: FRS channels
15 through 22: GMRS channels (requires FCC
license in the United States)
15R through 22R: GMRS repeater channels
(requires FCC license in the United States)
(position reporting is not allowed by the FCC on
repeater channels)
Channels WX 1 through 7: weather radio
channels
GMRS: 0.5, 2.0, or 5.0 W (5.0 W is available only
in the US, and only when using the Lithium-ion
battery pack. )
ANT+ wireless communications protocol
18 Device Information
Page 23
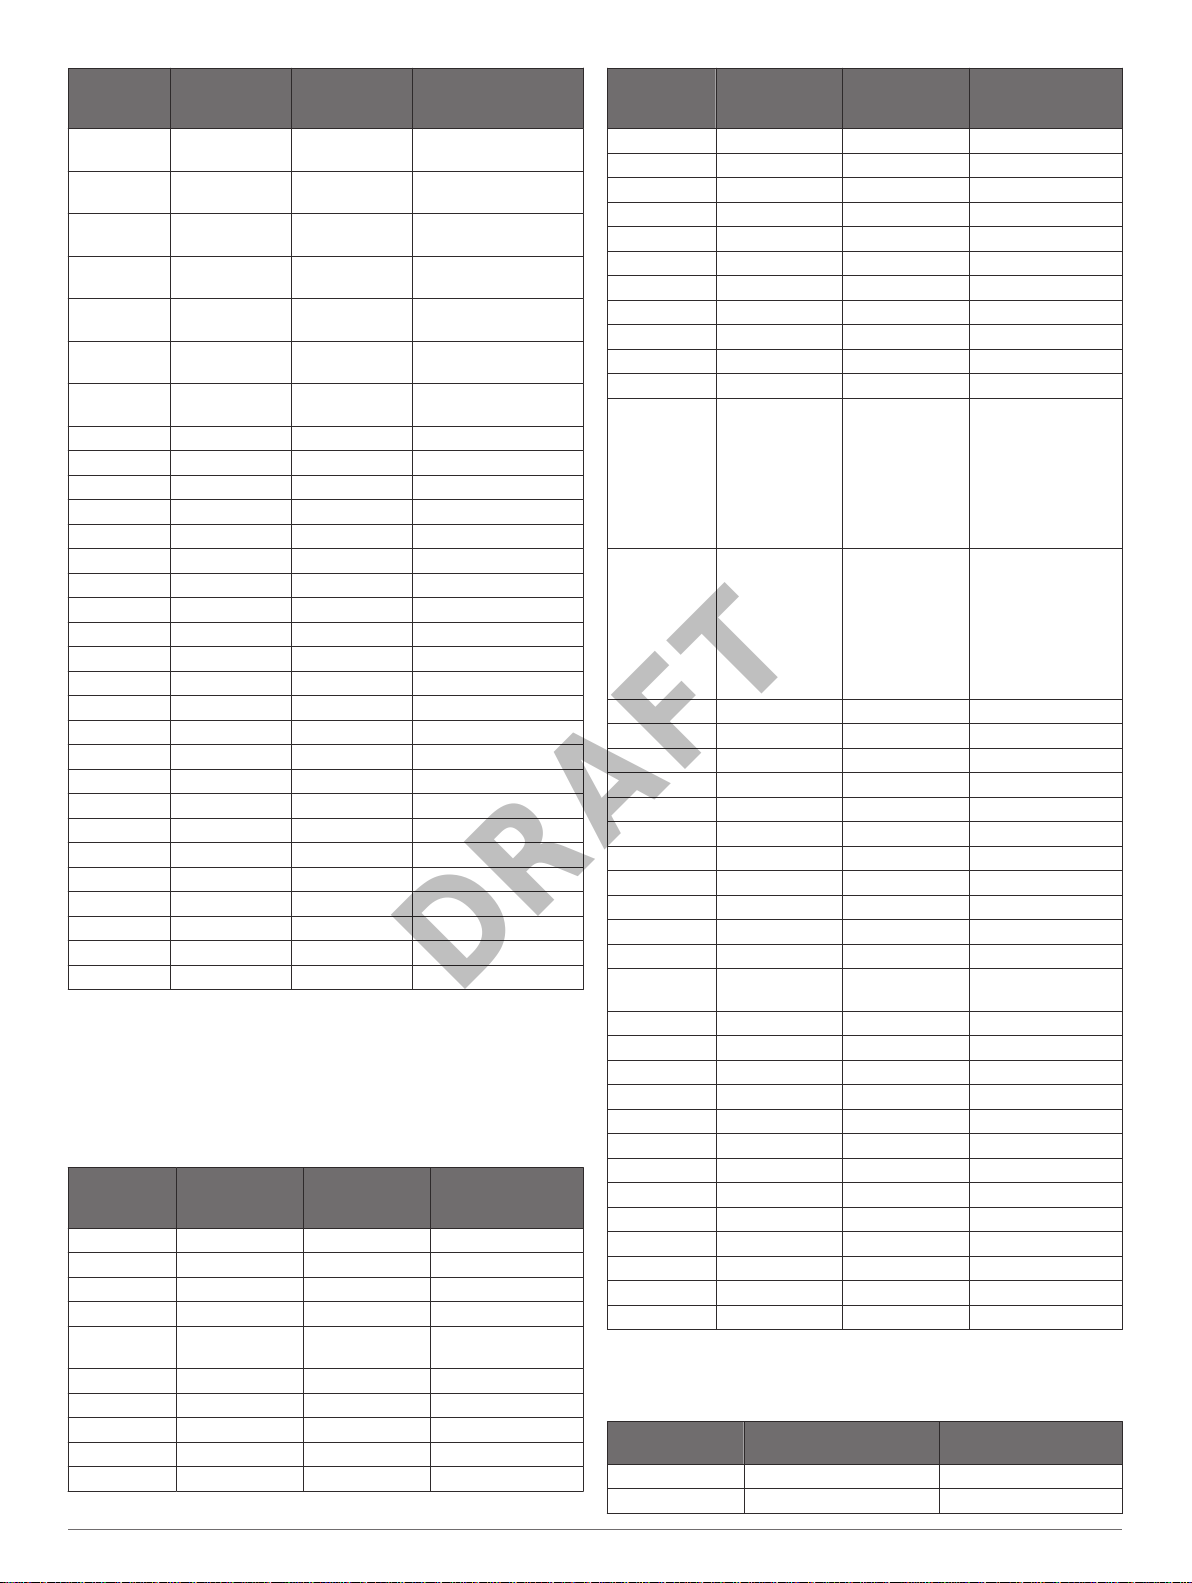
Channel
DRAFT
Number
1 462.5625 462.5625 GMRS Interstitial 1,
2 462.5875 462.5875 GMRS Interstitial 2,
3 462.6125 462.6125 GMRS Interstitial 3,
4 462.6375 462.6375 GMRS Interstitial 4,
5 462.6625 462.6625 GMRS Interstitial 5,
6 462.6875 462.6875 GMRS Interstitial 6.
7 462.7125 462.7125 GMRS Interstitial 7,
8 467.5625 467.5625 FRS-8
9 467.5875 467.5875 FRS-9
10 467.6125 467.6125 FRS-10
11 467.6375 467.6375 FRS-11
12 467.6625 467.6625 FRS-12
13 467.6875 467.6875 FRS-13
14 467.7125 467.7125 FRS-14
15 462.5500 462.5500 GMRS Primary 1
16 462.5750 462.5750 GMRS Primary 2
17 462.6000 462.6000 GMRS Primary 3
18 462.6250 462.6250 GMRS Primary 4
19 462.6500 462.6500 GMRS Primary 5
20 462.6750 462.6750 GMRS Primary 6
21 462.7000 462.7000 GMRS Primary 7
22 462.7250 462.7250 GMRS Primary 8
15R 467.5500 462.5500 GMRS Repeater 1
16R 467.5750 462.5750 GMRS Repeater 2
17R 467.6000 462.6000 GMRS Repeater 3
18R 467.6250 462.6250 GMRS Repeater 4
19R 467.6500 462.6500 GMRS Repeater 5
20R 467.6750 462.6750 GMRS Repeater 6
21R 467.7000 462.7000 GMRS Repeater 7
22R 467.7250 462.7250 GMRS Repeater 8
Transmit
Frequency
(MHz)
Receive
Frequency
(MHz)
Channel Description
FRS 1
FRS 2
FRS 3
FRS 4
FRS 5
FRS 6
FRS 7
CBRS/PRS Radio Frequencies
Rino models sold in Australia and New Zealand use these
frequencies.
NOTE: If you plan to use this device in countries outside of
Australia or New Zealand, you should check with the
government of that country for any restrictions on FRS or GMRS
use.
Channel
Number
1 476.4250 476.4250
2 476.4500 476.4500
3 476.4750 476.4750
4 476.5000 476.5000
5 476.5250 476.5250 Emergency
6 476.5500 476.5500
7 476.5750 476.5750
8 476.6000 476.6000
9 476.6250 476.6250
10 476.6500 476.6500
Transmit
Frequency
(MHz)
Receive
Frequency
(MHz)
Channel
Description
channel: reserved
Channel
Number
11 476.6750 476.6750
12 476.7000 476.7000
13 476.7250 476.7250
14 476.7500 476.7500
15 476.7750 476.7750
16 476.8000 476.8000
17 476.8250 476.8250
18 476.8500 476.8500
19 476.8750 476.8750
20 476.9000 476.9000
21 476.9250 476.9250
22 476.9500 476.9500 Telemetry and
23 476.9750 476.9750 Telemetry and
24 477.0000 477.0000
25 477.0250 477.0250
26 477.0500 477.0500
27 477.0750 477.0750
28 477.1000 477.1000
29 477.1250 477.1250
30 477.1500 477.1500
31 477.1750 477.1750
32 477.2000 477.2000
33 477.2250 477.2250
34 477.2500 477.2500
35 477.2750 477.2750 Emergency
36 477.3000 477.3000
37 477.3250 477.3250
38 477.3500 477.3500
39 477.3750 477.3750
40 477.4000 477.4000
1R 477.1750 476.4250 CBRS Repeater 1
2R 477.2000 476.4500 CBRS Repeater 2
3R 477.2250 476.4750 CBRS Repeater 3
4R 477.2500 476.5000 CBRS Repeater 4
5R 477.2750 476.5250 CBRS Repeater 5
6R 477.3000 476.5500 CBRS Repeater 6
7R 477.3250 476.5750 CBRS Repeater 7
8R 477.3500 476.6000 CBRS Repeater 8
Transmit
Frequency
(MHz)
Receive
Frequency
(MHz)
Channel
Description
telecommand
channel. GPS
position data is
transmitted on this
channel, and audio
transmissions are
not possible.
telecommand
channel. GPS
position data is
transmitted on this
channel, and audio
transmissions are
not possible.
channel: reserved
Weather Radio Frequencies
Weather radio broadcasts are available in the United States
only.
Channel Number Receive Frequency
(MHz)
WX 1 162.550 NOAA 1 (Weather radio)
WX 2 162.400 NOAA 2 (Weather radio)
Channel Description
Device Information 19
Page 24
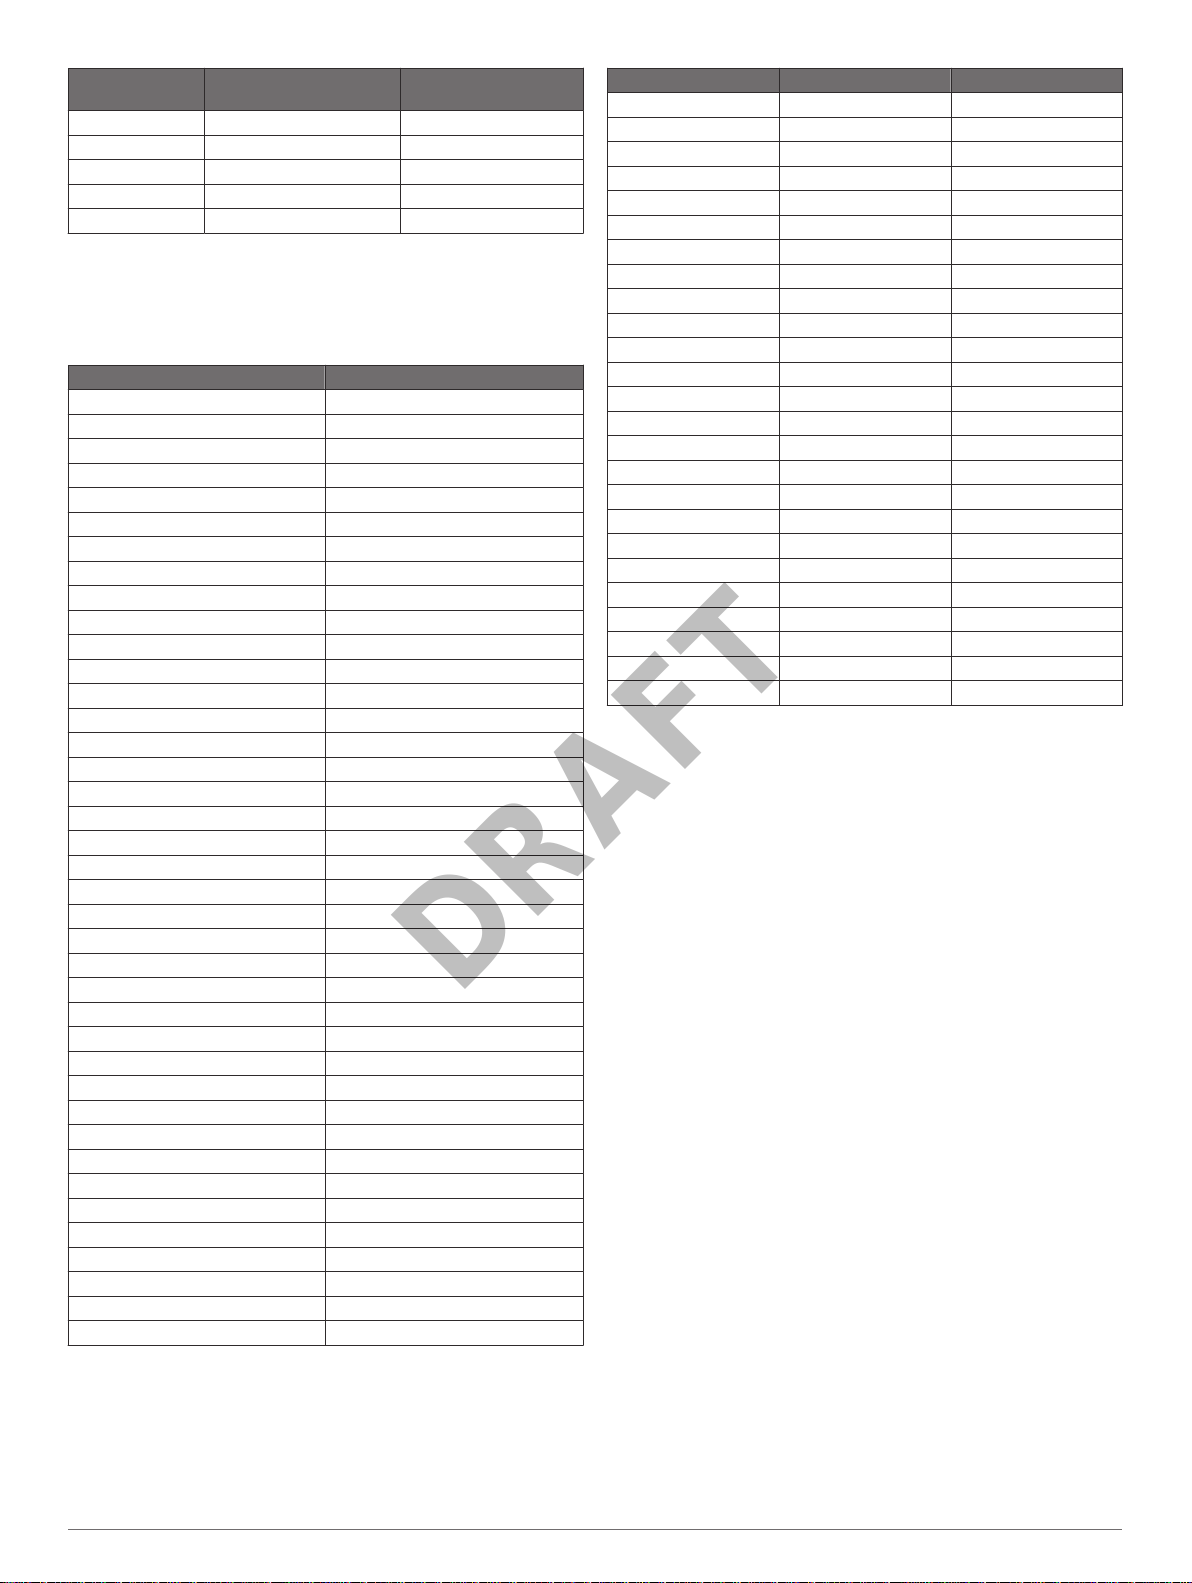
Channel Number Receive Frequency
DRAFT
(MHz)
WX 3 162.475 NOAA 3 (Weather radio)
WX 4 162.425 NOAA 4 (Weather radio)
WX 5 162.450 NOAA 5 (Weather radio)
WX 6 162.500 NOAA 6 (Weather radio)
WX 7 162.525 NOAA 7 (Weather radio)
Channel Description
CTCSS Frequencies
CTCSS frequencies and squelch codes may differ in some
radios from third-party manufacturers. For the best results, you
should compare CTCSS frequency information from your thirdparty radio with the information in this table..
Channel Number Frequency (MHz)
0 199.5
1 67.0
2 71.9
3 74.4
4 77.0
5 79.7
6 82.5
7 85.4
8 88.5
9 91.5
10 94.8
11 97.4
12 100.0
13 103.5
14 107.2
15 110.9
16 114.8
17 118.8
18 123.0
19 127.3
20 131.8
21 136.5
22 141.3
23 146.2
24 151.4
25 156.7
26 162.2
27 167.9
28 173.8
29 179.9
30 186.2
31 192.8
32 203.5
33 210.7
34 218.1
35 225.7
36 233.6
37 241.8
38 250.3
DCS Code DCS Code DCS Code
23 162 466
25 165 503
26 172 506
31 174 516
32 205 532
43 271 546
47 306 565
51 311 606
54 315 612
65 331 624
71 343 627
72 346 631
73 351 632
74 364 654
114 365 662
115 371 664
116 411 703
125 412 712
131 413 723
132 423 731
134 431 732
143 432 734
152 445 743
155 464 754
156 465
FCC Licensing Information
Rino two-way radio operates on General Mobile Radio
The
Service (GMRS) frequencies regulated by the Federal
Communications Commission (FCC) in the United States.
Operation on the GMRS frequencies is subject to rules as
specified in 47 CFR Part 95.
In order to transmit on GMRS frequencies, you are required to
obtain a license from the FCC. An individual 18 years of age or
older, who is not a representative of a foreign government, is
eligible to apply for a GMRS license. To apply for a GMRS
license, you need FCC Form 605 (605 Main Form and Schedule
F) and FCC Form 159. Download the application forms from the
FCC web site at www.fcc .gov/Forms/. You can also request
them through the FCC forms hotline at 1-800-418-FORM
(1-800-418-3676).
File Form 605 online at http://wireless.fcc.gov/uls/. A filing fee is
associated with this application.
For information on fees, go to the FCC fee information web page
at http://wireless.fcc.gov/feesforms/index.html
http://wireless.fcc.gov /services/personal/generalmobile/.
For questions concerning the license application, contact the
FCC at 1-888-Call-FCC (1-888-225-5322).
No license is required to operate on GMRS channels in Canada.
However, GMRS repeater channels are not approved for use by
the Canadian government.
For use in countries outside of the U.S. and Canada, please
check with that government for any restrictions of FRS or GMRS
use.
or at
DCS Frequency Chart
DCS uses a digital signature and is not frequency-based. DCS
squelch codes may differ in some radios from third-party
manufacturers. For the best results, you should compare the
Viewing Device Information
You can view the unit ID, software version, regulatory
information, and license agreement.
From the app drawer, select
Setup > About.
DCS-code information for your third-party radio with the
information in this table..
20 Device Information
Page 25

Troubleshooting
DRAFT
My handheld device is not responding
If your handheld device stops responding, you can reset the
device.
NOTE: This does not erase any of your data or settings.
Remove the batteries.
1
Reinstall the batteries (Installing the Lithium-ion Battery,
2
page 1).
My device does not turn on
• Verify the battery is installed correctly (Installing the Lithium-
ion Battery, page 1).
• Fully charge the battery (Charging the Battery Pack, page 1).
The battery gauge does not seem accurate
Allow the device to fully discharge.
1
Fully charge the device without interrupting the charge cycle.
2
My phone will not connect to the device
• Select Setup > Bluetooth.
The Bluetooth option must be enabled.
• Enable Bluetooth wireless technology on your phone and
bring your phone within 10 m (33 ft.) of the device.
• Go to www.garmin.com/bluetooth for more help.
My device is not acquiring satellite signals
• Verify the GPS simulator is turned off (Simulating a Location,
page 12).
• Take your device out of parking garages and away from tall
buildings and trees.
• Remain stationary for several minutes.
My device does not go into mass storage mode automatically
If your device is connected to the computer but does not go into
mass storage mode automatically, you might have loaded a
corrupt file.
Disconnect the device from your computer.
1
Turn off the device.
2
Hold while you connect the device to your computer.
3
Continue holding for 30 seconds or until the device goes
4
into mass storage mode.
I need to reset all settings back to factory default values
Setup > Reset > Reset All Settings.
Select
Appendix
tempe
The tempe is an ANT+ wireless temperature sensor. You can
attach the sensor to a secure strap or loop where it is exposed
to ambient air, and therefore, provides a consistent source of
accurate temperature data. You must pair the tempe with your
device to display temperature data from the tempe.
Data Fields
Some data fields require you to be navigating or require ANT+
accessories to display data.
24 hr Max. Temperature: The maximum temperature recorded
™
in the last 24 hours.
24 hr Min. Temperature: The minimum temperature recorded in
the last 24 hours.
Accuracy of GPS: The margin of error for your exact location.
For example, your GPS location is accurate to within +/- 12 ft.
(3.65 m).
Activity Distance: The distance traveled for the current track.
Alarm Timer: The current time of the countdown timer.
Ambient Pressure: The uncalibrated environmental pressure.
Ascent - Average: The average vertical distance of ascent
since the last reset.
Ascent - Maximum: The maximum rate of ascent in feet per
minute or meters per minute since the last reset.
Ascent - Total: The total elevation distance ascended since the
last reset.
Automotive Turn: The direction of the next turn in the route.
You must be navigating for this data to appear.
Average Cadence: The average cadence for the current
activity.
Average HR: The average heart rate for the current activity.
Avg HR %Max.: The average percentage of maximum heart
rate for the current activity.
Avg Lap: The average lap time for the current activity.
Barometer: The calibrated current pressure.
Battery Level: The remaining battery power.
Bearing: The direction from your current location to a
destination. You must be navigating for this data to appear.
Cadence: The number of revolutions of the crank arm or
number of strides per minute. Your device must be
connected to a cadence accessory for this data to appear.
Calories: The amount of total calories burned.
Compass Hdg.: The direction you are moving based on the
compass.
Course: The direction from your starting location to a
destination. Course can be viewed as a planned or set route.
You must be navigating for this data to appear.
Current Lap: The stopwatch time for the current lap.
Date: The current day, month, and year.
Depth: The depth of the water. Your device must be connected
to a NMEA® 0183 or NMEA 2000® device capable of acquiring
the water depth.
Descent - Average: The average vertical distance of descent
since the last reset.
Descent - Maximum: The maximum rate of descent in feet per
minute or meters per minute since the last reset.
Descent - Total: The total elevation distance descended since
the last reset.
Distance To Dest.: The remaining distance to the final
destination. You must be navigating for this data to appear.
Distance To Next: The remaining distance to the next waypoint
on the route. You must be navigating for this data to appear.
Elapsed Activity Time: The total time recorded. For example, if
you start the timer and run for 10 minutes, then stop the timer
for 5 minutes, then start the timer and run for 20 minutes,
your elapsed time is 35 minutes.
Elev Abv Ground: The altitude of your current location above
ground level (if maps contain sufficient elevation information).
Elevation: The altitude of your current location above or below
sea level.
Elevation - Maximum: The highest elevation reached since the
last reset.
Elevation - Minimum: The lowest elevation reached since the
last reset.
Troubleshooting 21
Page 26

ETA at Destination: The estimated time of day when you will
DRAFT
reach the final destination (adjusted to the local time of the
destination). You must be navigating for this data to appear.
ETA at Next: The estimated time of day when you will reach the
next waypoint on the route (adjusted to the local time of the
waypoint). You must be navigating for this data to appear.
Glide Ratio: The ratio of horizontal distance traveled to the
change in vertical distance.
Glide Ratio to Dest.: The glide ratio required to descend from
your current position to the destination elevation. You must
be navigating for this data to appear.
GPS Elevation: The altitude of your current location using GPS.
GPS Heading: The direction you are moving based on GPS.
GPS Signal Strength: The strength of the GPS satellite signal.
Grade: The calculation of rise (elevation) over run (distance).
For example, if for every 10 ft. (3 m) you climb you travel
200 ft. (60 m), the grade is 5%.
Heading: The direction you are moving.
Heart Rate: Your heart rate in beats per minute (bpm). Your
device must be connected to a compatible heart rate monitor.
Heart Rate - %Max.: The percentage of maximum heart rate.
Heart Rate Zone: The current range of your heart rate (1 to 5).
The default zones are based on your user profile and
maximum heart rate (220 minus your age).
Lap Ascent: The vertical distance of ascent for the current lap.
Lap Cadence: The average cadence for the current lap.
Lap Descent: The vertical distance of descent for the current
lap.
Lap Distance: The distance traveled for the current lap.
Lap Heart Rate Percent: The average percentage of maximum
heart rate for the current lap.
Lap HR: The average heart rate for the current lap.
Laps: The number of laps completed for the current activity.
Lap Speed: The average speed for the current lap.
Last Lap Ascent: The vertical distance of ascent for the last
completed lap.
Last Lap Cadence: The average cadence for the last
completed lap.
Last Lap Descent: The vertical distance of descent for the last
completed lap.
Last Lap Distance: The distance traveled for the last completed
lap.
Last Lap HR: The average heart rate for the last completed lap.
Last Lap Speed: The average speed for the last completed lap.
Last Lap Time: The stopwatch time for the last completed lap.
Location (lat/lon): The current position in latitude and longitude
regardless of the selected position format setting.
Location (selected): The current position using the selected
position format setting.
Location of Dest.: The position of your final destination. You
must be navigating for this data to appear.
None: This is a blank data field.
Odometer: A running tally of distance traveled for all trips. This
total does not clear when resetting the trip data.
Off Course: The distance to the left or right by which you have
strayed from the original path of travel. You must be
navigating for this data to appear.
Pointer: An arrow points in the direction of the next waypoint or
turn. You must be navigating for this data to appear.
Speed: The current rate of travel.
Speed Limit: The reported speed limit for the road. Not
available in all maps and in all areas. Always rely on posted
road signs for actual speed limits.
Speed - Maximum: The highest speed reached since the last
reset.
Speed - Moving Avg.: The average speed while moving since
the last reset.
Speed - Overall Avg.: The average speed while moving and
stopped since the last reset.
Stopwatch Timer: The stopwatch time for the current activity.
Sunrise: The time of sunrise based on your GPS position.
Sunset: The time of sunset based on your GPS position.
Temperature: The temperature of the air. Your body
temperature affects the temperature sensor.
Temperature - Water: The temperature of the water. Your
device must be connected to a NMEA 0183 device capable
of acquiring the water temperature.
Time of Day: The current time of day based on your current
location and time settings (format, time zone, daylight saving
time).
Time to Destination: The estimated time remaining before you
reach the destination. You must be navigating for this data to
appear.
Time to Next: The estimated time remaining before you reach
the next waypoint in the route. You must be navigating for
this data to appear.
To Course: The direction in which you must move to get back
on the route. You must be navigating for this data to appear.
Total Lap: The stopwatch time for all the completed laps.
Trip Odometer: A running tally of the distance traveled since
the last reset.
Trip Time: A running tally of the total time spent moving and not
moving since the last reset.
Trip Time - Moving: A running tally of the time spent moving
since the last reset.
Trip Time - Stopped: A running tally of the time spent not
moving since the last reset.
Turn: The angle of difference (in degrees) between the bearing
to your destination and your current course. L means turn
left. R means turn right. You must be navigating for this data
to appear.
Velocity Made Good: The speed at which you are closing on a
destination along a route. You must be navigating for this
data to appear.
Vert Dist to Dest: The elevation distance between your current
position and the final destination. You must be navigating for
this data to appear.
Vert Dist to Next: The elevation distance between your current
position and the next waypoint in the route. You must be
navigating for this data to appear.
Vertical Speed: The rate of ascent or descent over time.
Vertical Speed to Dest.: The rate of ascent or descent to a
predetermined altitude. You must be navigating for this data
to appear.
Waypoint at Dest.: The last point on the route to the
destination. You must be navigating for this data to appear.
Waypoint at Next: The next point on the route. You must be
navigating for this data to appear.
22 Appendix
Page 27
Heart Rate Zone Calculations
DRAFT
Zone % of
Maximum
Heart Rate
1 50–60% Relaxed, easy pace,
2 60–70% Comfortable pace,
3 70–80% Moderate pace, more
4 80–90% Fast pace and a bit
5 90–100% Sprinting pace,
Perceived Exertion Benefits
rhythmic breathing
slightly deeper
breathing, conversation
possible
difficult to hold
conversation
uncomfortable, breathing
forceful
unsustainable for long
period of time, labored
breathing
Beginning-level
aerobic training,
reduces stress
Basic cardiovascular
training, good
recovery pace
Improved aerobic
capacity, optimal
cardiovascular training
Improved anaerobic
capacity and
threshold, improved
speed
Anaerobic and
muscular endurance,
increased power
Appendix 23
Page 28

Index
DRAFT
A
accessories 13
activities 7, 8, 13
custom 8
addresses, finding 9
adventures 11
alarms
clock 12
marine 16
proximity 12
tones 15
almanac
hunting and fishing 12
sunrise and sunset times 12
altimeter 10, 16
ANT+ sensors 16
pairing 13
ANT+ sensors, pairing 13
app drawer 2
customizing 14
applications 5
area calculation 12
Auto Lap 16
B
backlight 1, 13
barometer 10
BaseCamp 11, 12, 17
battery 1, 18
charging 1
installing 1, 2
maximizing 1, 13
problems 21
storage 1
Bluetooth technology 5, 21
C
calendar 12
calibrating
altimeter 10
compass 9
camera 12
carabiner clip 17
channel 3
frequency 18, 19
repeater 4
charging 1
chirp 7, 16
City Navigator 9
cleaning the device 17
cleaning the touchscreen 17
code 3, 20
frequency 20
compass 9
navigating 9
settings 15
computer, connecting 18
Connect IQ 5
contact 4
countdown timer 12
customizing the device 13, 14
D
dashboards 14
data
storing 13
transferring 13, 18
data fields 5, 14, 21
deleting
all user data 18
history 13
device, care 17
display settings 14
downloading, geocaches 6, 7
E
elevation 10
plot 8, 10, 11
emergency alert 4
emergency alerts 4
F
FCC, licensing 20
files, transferring 7, 12, 17, 18
fitness 16
G
Garmin Connect 5
storing data 13
Garmin Express
registering the device 17
updating software 17
geocaches 6, 7, 17
downloading 7
navigating to 6
settings 16
geocachesdownloading 6
GLONASS 15
GPS 2, 12, 15
signal 12
H
heading setting 15
headphones 5, 17
heart rate, zones 13, 23
history 13
sending to computer 13
viewing 13
HomePort 17
hunting and fishing times 12
I
ID number 20
K
keys 2, 14
L
lifetime athlete 16
locations
editing 10
saving 10
locking, screen 2
M
main menu, customizing 14
map settings 15
maps 9, 15
data fields 14
navigating 9
optional 9
settings 15
updating 17
marine
alarms setup 16
settings 16
memory card 18
microphone 5, 17
microSD card 1, 18. See memory card
N
navigation 9, 10
compass 9
course pointer 9
Sight 'N Go 9
stopping 9
note 4
notifications 13
P
pairing 5
ANT+ sensors 13
ANT+ sensors 13
phone 21
peer-to-peer positioning 4
phone, pairing 21
photos 12
taking 12
position format 16
power key 2
product registration 7, 17
profiles, user 16
proximity alarms 12
R
radio 3
app 3
contact 4
note 4
peer-to-peer positioning 4
scan 4
settings 4, 5
volume 3
registering the device 6, 17
resetting the device 17, 21
restoring, settings 17
routes 10, 11
creating 10, 11
deleting 11
editing 11
settings 15
viewing on the map 11
S
satellite signals 12
acquiring 2
locations 12
scan 4
screen, locking 2
settings 14–17
device 15
sharing data 12
shortcuts 14
adding 14
Sight 'N Go 9
smartphone 5
applications 5
software, updating 17
specifications 18
squelch 3
stopwatch 12
storing data 18
sunrise and sunset times 12
system settings 15
T
tempe 21
temperature 18, 21
time, zones and formats 16
time settings 16
timer 13
countdown 12
tones 15
touchscreen 14
TracBack 9
tracks 8, 11
training 5
transferring, files 7, 11, 12, 17
trip planner. See routes
troubleshooting 17, 21
U
unit ID 20
units of measure 16
USB 21
connector 1
disconnecting 18
mass storage mode 17, 21
transferring files 17
user data, deleting 18
user profile 16
V
VIRB Remote 12
W
water resistance 17
waypoints 9, 10
deleting 10
editing 10
projecting 10
24 Index
Page 29

saving 10
DRAFT
weather 5, 6
radio 5, 6
Where To? 9
widgets 5
Z
zones, heart rate 13
Index 25
Page 30
www.garmin.com/support
DRAFT
1800 235 822 +43 (0) 820 220230
+ 32 2 672 52 54 0800 770 4960
1-866-429-9296
+420 221 985466
+420 221 985465
+ 358 9 6937 9758 + 331 55 69 33 99
+ 39 02 36 699699 (+52) 001-855-792-7671
0800 427 652 0800 0233937
+47 815 69 555
+35 1214 447 460 +386 4 27 92 500
0861 GARMIN (427 646)
+27 (0)11 251 9800
+385 1 5508 272
+385 1 5508 271
+ 45 4810 5050
00800 4412 454
+44 2380 662 915
+34 93 275 44 97
+ 46 7744 52020 +886 2 2642-9199 ext 2
0808 238 0000
+44 870 850 1242
913-397-8200
1-800-800-1020
+49 (0) 89 858364880
zum Ortstarif - Mobilfunk
kann abweichen
© 2016 Garmin Ltd. or its subsidiaries
 Loading...