

Page 1
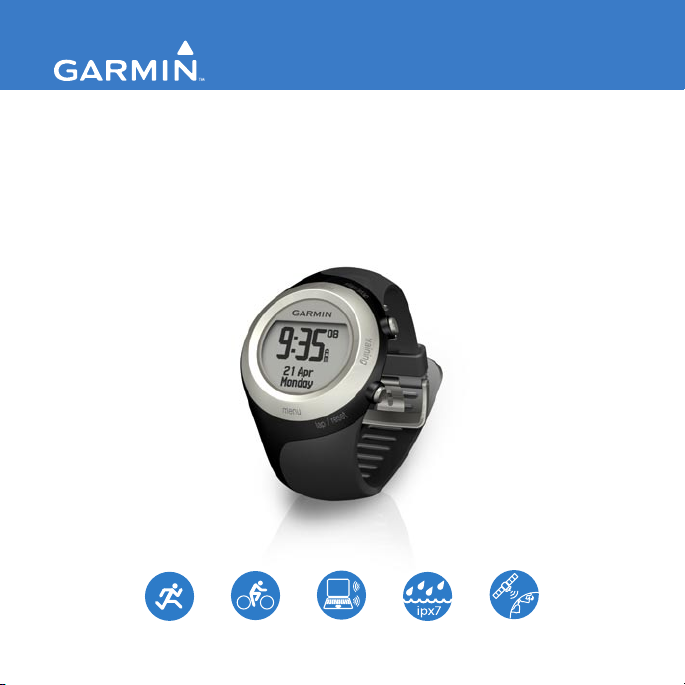
owner’s manual
F O R E R U N N E R® 4 0 5
GPS-ENABLED SPORTS WATCH WITH WIRELESS SYNC
Page 2

© 2007 Garmin Ltd. or its subsidiaries
Garmin International, Inc.
1200 East 151st Street,
Olathe, Kansas 66062,
USA
Tel. (913) 397.8200 or
(800) 800.1020
Fax (913) 397.8282
All rights reserved. Except as expressly
provided herein, no part of this manual may be
reproduced, copied, transmitted, disseminated,
downloaded or stored in any storage medium,
for any purpose without the express prior
written consent of Garmin. Garmin hereby
grants permission to download a single copy
of this manual onto a hard drive or other
electronic storage medium to be viewed and
to print one copy of this manual or of any
revision hereto, provided that such electronic
or printed copy of this manual must contain
the complete text of this copyright notice
and provided further that any unauthorized
commercial distribution of this manual or any
revision hereto is strictly prohibited.
Information in this document is subject to
change without notice. Garmin reserves
the right to change or improve its products
and to make changes in the content without
December 2007 Part Number 190-00700-00 Rev. A Printed in Taiwan
Garmin (Europe) Ltd.
Liberty House,
Hounsdown Business Park,
Southampton, Hampshire, SO40 9RB
UK
Tel. +44 (0) 870.8501241 (outside the
UK) 0808 2380000 (within the UK)
Fax +44 (0) 870.8501251
obligation to notify any person or organization
of such changes or improvements. Visit the
Garmin Web site (www.garmin.com) for
current updates and supplemental information
concerning the use and operation of this and
other Garmin products.
Garmin®, Forerunner®, Garmin Training
Center®, Auto Pause®, Auto Lap®, Virtual
Partner® are trademarks of Garmin Ltd. or its
subsidiaries, registered in the USA and other
countries. Garmin Connect™, Dynastream™,
ANT™, ANT Agent™, and ANT+Sport™ are
trademarks of Garmin Ltd. or its subsidiaries.
These trademarks may not be used without the
express permission of Garmin.
Other trademarks and trade names are those of
their respective owners.
Garmin Corporation
No. 68, Jangshu 2nd Road,
Shijr, Taipei County,
Taiwan
Tel. 886/2.2642.9199
Fax 886/2.2642.9099
Page 3

Introduction
Introduction
Thank you for purchasing the
Garmin® Forerunner® 405 GPSenabled sports watch.
WARNING: Always consult your
physician before you begin or
modify any exercise program. See
the Important Safety and Product
Information guide in the product
box for product warnings and
other important information.
Contact Garmin
In the USA, contact Garmin Product
Support by phone: (913) 397.8200 or
(800) 800.1020, Monday–Friday; or
go to www.garmin.com/support.
In Europe, contact Garmin (Europe)
Ltd. at +44 (0) 870.8501241 (outside
the UK) or 0808 2380000 (within
the UK).
Free Garmin Software
Product Registration
Help us better support you by
completing our online registration
today. Go to http://my.garmin.com.
Keep the original sales receipt, or a
photocopy, in a safe place.
Go to www.garmin.com
/forerunner405 to download the
Garmin Connect™ Web-based
software or the Garmin Training
Center® computer software. Use this
software to store and analyze your
workout data.
DRAFT
Forerunner 405 Owner’s Manual i
Page 4

Introduction
Table of Contents
Introduction .......................... i
Product Registration ...................i
Contact Garmin ..........................i
Free Garmin Software ............... i
Caring for the Forerunner ......... iv
Getting Started .................... 1
Using the Touch Bezel ...............1
Touch Bezel Areas and
Buttons ......................................2
Bezel Tips ..................................3
Locking the Bezel ......................3
Power Save Mode .....................3
Step 1: Charge the Battery ........ 4
Step 2: Congure Your
Forerunner .................................5
Step 3: Pair the Heart Rate
Monitor (Optional) ......................5
Step 4: Acquire Satellite
Signals .......................................7
Step 5: Go for a Run!.................8
DRAFT
Step 6: Download Free
Software ....................................8
Step 7: Pair Your Computer and
Forerunner .................................9
Step 8: Transfer Data to Your
Computer ...................................9
Time/Date Mode ................ 10
Training Mode ................... 11
About the Training Page .......... 11
Auto Pause® ........................... 11
Auto Lap® ................................ 12
Auto Scroll ...............................12
Sport Mode .............................. 13
Speed Units ............................. 13
Virtual Partner .......................... 13
Workouts .................................14
Courses ...................................18
GPS Mode .......................... 20
About GPS...............................21
History ............................... 22
Viewing Activities ..................... 22
ii Forerunner 405 Owner’s Manual
Page 5

Transferring History to Your
Computer .................................22
Deleting History .......................23
Settings .............................24
Data Fields ..............................24
User Prole ..............................27
Alarms .....................................27
Time ......................................... 27
System.....................................28
ANT+Sport ............................... 29
Using Accessories ...........31
Pairing Accessories ................. 31
Heart Rate Monitor ..................32
Foot Pod .................................. 35
GSC 10 ....................................36
Appendix ........................... 37
Resetting the Forerunner.........37
Clearing User Data .................. 37
Updating the Software ............. 37
Battery Information ..................38
Specications ..........................38
DRAFT
Introduction
Software License Agreement...40
Declaration of Conformity ........ 41
Troubleshooting .......................42
Heart Rate Zone Table ............43
Index .................................. 44
Forerunner 405 Owner’s Manual iii
Page 6
Introduction
Caring for the Forerunner
Clean the Forerunner and the heart
rate monitor using a cloth dampened
with a mild detergent solution. Wipe
dry. Avoid chemical cleaners and
solvents that may damage plastic
components.
Do not store the Forerunner where
prolonged exposure to temperature
extremes may occur (such as in the
trunk of a car), as permanent damage
may result.
User information, such as history,
locations, and tracks, is retained
indenitely in the memory of the unit
without the need for external power.
Back up important user data by
transferring it to Garmin Connect or
Garmin Training Center. See page 9.
DRAFT
Water Immersion
The Forerunner is waterproof to
IEC Standard 60529 IPX7. It can
withstand immersion in 1 meter of
water for 30 minutes. Prolonged
submersion can cause damage to the
unit. After submersion, be certain to
wipe dry and air dry the unit before
using or charging.
CAUTION: The Forerunner
is not intended to be used
while swimming. Swimming
or prolonged water submersion
can cause a short in the
unit, which can in rare cases
result in a minor skin burn or
irritation in the area of the unit.
iv Forerunner 405 Owner’s Manual
Page 7
Getting Started
Getting Started
WARNING: This product contains a non-replaceable lithium-ion battery.
See the Important Safety and Product Information guide in the product box
for important battery safety information.
WARNING: Always consult your physician before you begin or modify any
exercise program. See the Important Safety and Product Information guide
in the product box for product warnings and other important information.
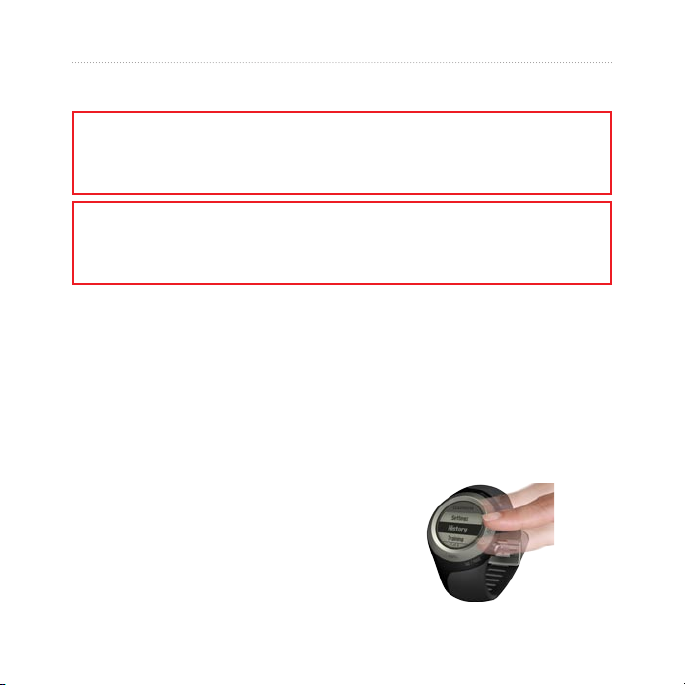
Using the Touch
two areas on the bezel to turn on the
backlight.
Bezel
The silver bezel around the watch
face acts as a multifunction button.
Tap: quickly press your nger on the
bezel to make a selection, toggle a
menu option, or change pages.
Touch and hold: hold your nger on
one of the four labeled areas on the
bezel to switch modes.
Double press: press two ngers on
Forerunner 405 Owner’s Manual 1
DRAFT
Touch and drag (scroll): press your
nger on the bezel and drag it around
the bezel to scroll through the menu
options or to increase or decrease
values.
Page 8
Getting Started
t
e
s
a
r
l
e
p
/
/
t
i
e
m
d
a
t
e
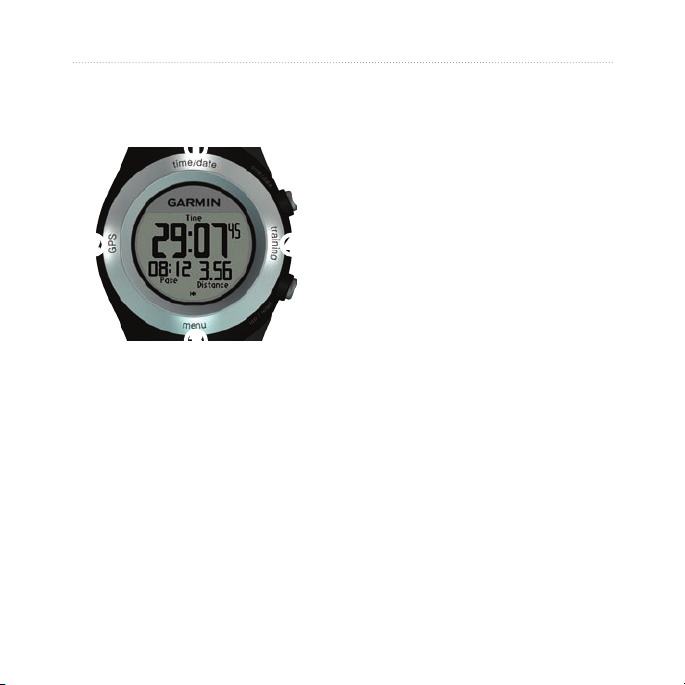
Touch Bezel Areas and Buttons
➊
➎
➋
➍
training: touch and hold to enter
➍
training mode.
start/stop/enter:
➎
Press to start/stop the timer in
•
training mode.
Press to make a selection.
•
Press to exit power save mode.
•
➏
lap/reset/quit:
➏
➌
time/date: touch and hold to
➊
enter time/date mode.
GPS: touch and hold to enter
➋
GPS mode.
menu: touch and hold to open
➌
the menu page.
Press to create a new lap in
•
training mode.
Press and hold to reset the timer
•
in training mode.
Press to exit a menu or page.
•
Press to exit power save mode.
•
DRAFT
2 Forerunner 405 Owner’s Manual
Page 9
Getting Started
Bezel Tips
Touch the bezel rmly.
•
Touch the bezel on the outer ring,
•
where the words appear, not the
inner ring near the watch face.
Make each bezel selection a
•
separate action.
Do not rest your nger or thumb
•
on the bezel while using it.
Do not wear thick gloves while
•
using the bezel.
If bezel is wet, wipe the bezel dry
•
before using it.
Power Save Mode
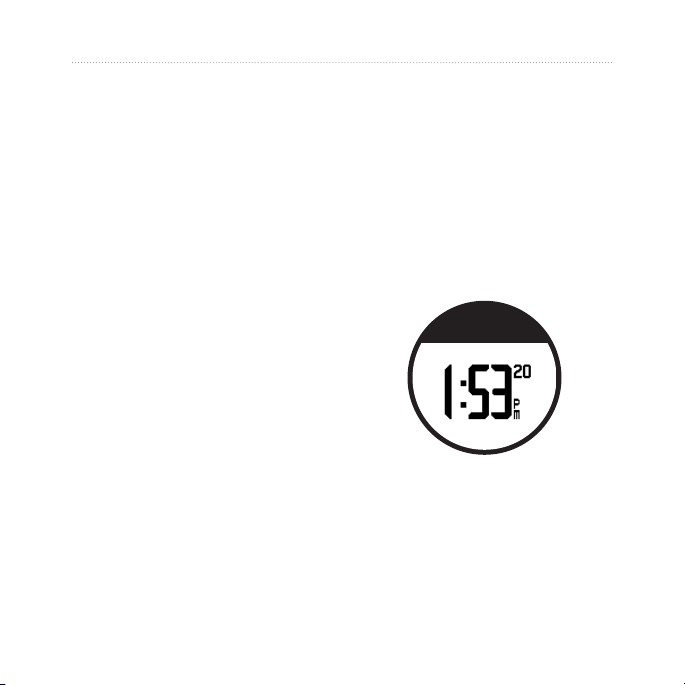
After a period of inactivity, the
Forerunner switches to power save
mode. The Forerunner is inactive
if the timer is not running, you are
not navigating to a destination and
viewing the navigation page, and
you have not pressed any buttons or
tapped the bezel.
Locking the Bezel
To prevent accidental bezel taps,
press enter and quit simultaneously.
To unlock the bezel, press enter and
quit simultaneously again.
Forerunner 405 Owner’s Manual 3
DRAFT
While in power save mode, you can
view the time of day, turn on the
backlight, and use the ANT+Sport
computer connection. To exit power
save mode, press enter or quit.
Page 10
Getting Started
N9
Ì Ï0 2
For erun ner
405
12345678
FCC ID:IPH-01253
IC: 1792A-01253
Designed in the USA
Made in Taiwan
Step 1: Charge the Battery
Your Forerunner ships with the
power off to conserve the battery.
Charge the Forerunner for at least
3 hours before using it. The length
of time a fully charged battery will
last depends upon usage. For more
battery information, see page 38.
1. Plug the USB connector on the
charging clip cable into the AC
adapter.
2. Plug the AC adapter into a
standard wall outlet.
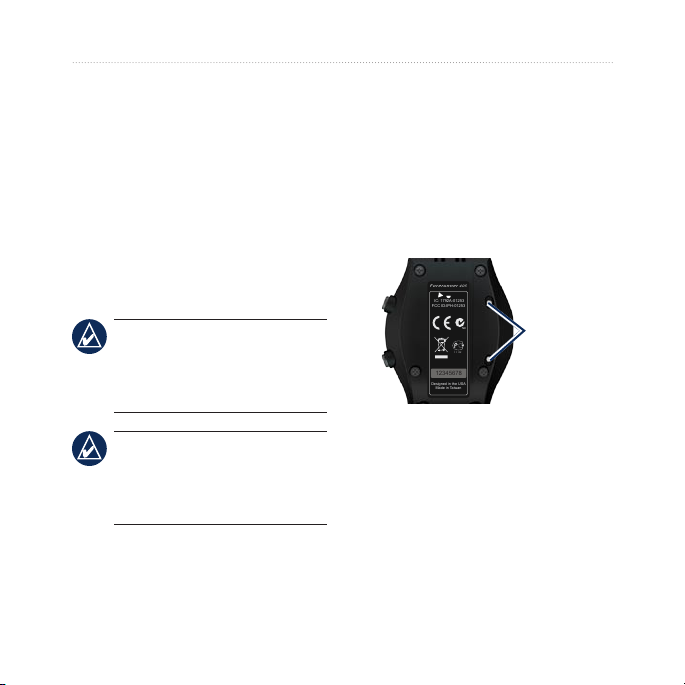
3. Align the charging clip posts with
the contacts on the back of the
Forerunner.
NOTE: To prevent corrosion,
thoroughly dry the charging
contacts and surrounding area
before charging.
TIP: The Forerunner will
not charge when outside
the temperature range of
32°F–122°F (0°C–50°C).
4 Forerunner 405 Owner’s Manual
DRAFT
4. Clip the charger securely over the
face of the Forerunner.
Contacts
Page 11

Getting Started
t
e
s
a
r
l
e
p
/
/
t
i
e
m
d
a
t
e
Step 3: Pair the Heart Rate Monitor (Optional)
While you are trying to pair with
Charging
clip
Step 2: Congure
Your Forerunner
The rst time you use your
Forerunner, follow the on-screen
instructions to learn how to use the
bezel and congure the Forerunner.
If you are using an ANT+Sport™
heart rate monitor, select Yes during
the conguration to allow the heart
rate monitor to pair (connect) with
your Forerunner. See Step 3 for more
information.
Forerunner 405 Owner’s Manual 5
DRAFT
your heart rate monitor with your
Forerunner for the rst time, move
away (10 m) from other ANT+Sport
accessories.
The heart rate monitor is on standby
and ready to send data. Wear the
heart rate monitor directly on your
skin, just below your breastplate.
It should be snug enough to stay in
place during your run.
1. Push one tab on the strap through
the slot in the heart rate monitor.
Press the tab down.
2. Wet both sensors on the back of
the heart rate monitor to create a
strong connection between your
chest and the transmitter.
Page 12

Getting Started
3. Wrap the strap around your chest
and attach it to the other side of
the heart rate monitor.
NOTE: The Garmin logo
should be right-side up.
4. Press quit or enter to exit power
save mode.
5. Bring the Forerunner within range
(3 m) of the heart rate monitor.
The heart rate icon appears
on the training mode pages.
Tab
Heart Rate Monitor Strap
Slot
Heart Rate Monitor (Front)
6. If heart rate data does not appear
or if you have erratic heart rate
data, follow the tips on page 32.
If the problem persists, you may
have to re-pair the sensors. See
page 31.
TIP: Set your maximum
heart rate in Settings > User
Prole. Use Garmin Connect
to customize your heart rate
zones.
For instructions on using accessories,
see pages 31–36.
Sensors
DRAFT
Heart Rate Monitor (Back)
6 Forerunner 405 Owner’s Manual
Page 13
Getting Started
t
e
s
a
r
l
e
p
/
/
t
i
e
m
d
a
t
e
Step 4: Acquire Satellite Signals
To set the correct time of day and
begin using the Forerunner, you must
acquire GPS satellite signals. It may
take a few minutes to acquire signals.
NOTE: To turn off the
GPS receiver and use the
Forerunner indoors, see
page 20.
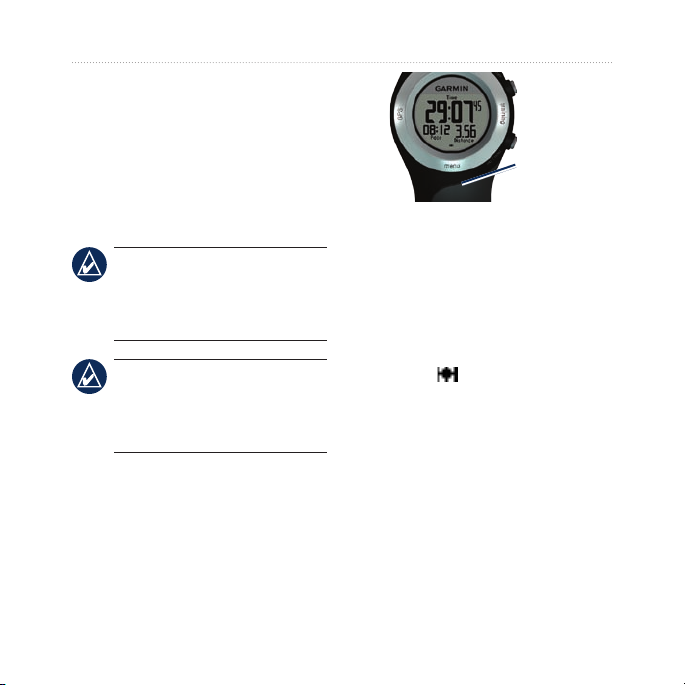
2. Touch and hold
training mode.
3. Stand still and do not begin
moving until the locating satellites
page disappears.
When you are receiving satellite
NOTE: You cannot acquire
satellites in power save mode.
signals, the GPS icon appears in
the training mode pages.
To exit power save mode,
press enter or quit.
1. Go outdoors to an open area. For
the best reception, make sure
the antenna of the Forerunner is
oriented toward the sky.
Forerunner 405 Owner’s Manual 7
DRAFT
Antenna
location
training to enter
Page 14
Getting Started
Step 5: Go for a Run!
TIP: Set your user prole so
the Forerunner can calculate
calories correctly. Touch and
hold menu > select Settings >
User Prole.
1. Touch and hold training.
2. Press
3. After completing your run, press
4. Press and hold
start to start the timer.
stop.
reset to save your
run data and reset the timer.
Step 6: Download Free Software
ANT Agent™ allows you to use your
Forerunner with Garmin Connect, a
Web-based training tool, and Garmin
Training Center, a computer-based
training tool.
1. Go to www.garmin.com
/forerunner405.
2. Follow the on-screen instructions
to download and install ANT
Agent.
DRAFT
8 Forerunner 405 Owner’s Manual
Page 15
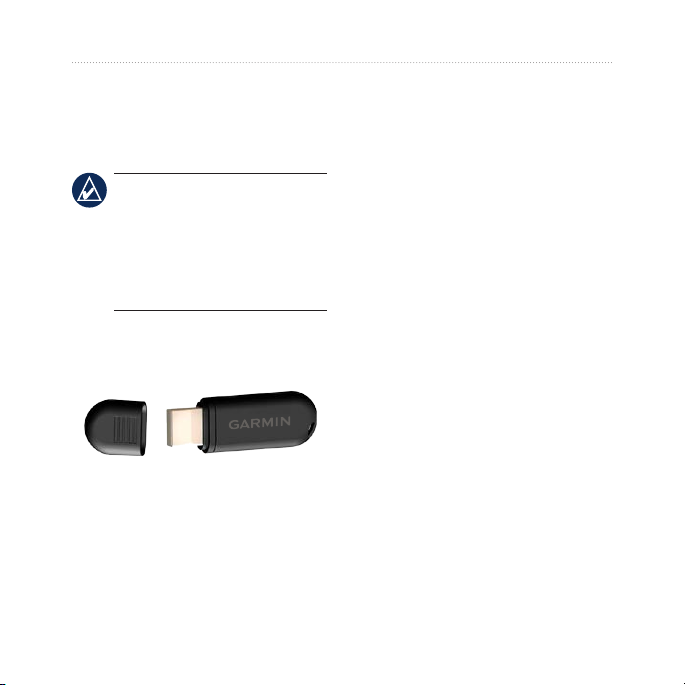
Step 7: Pair Your Computer and Forerunner
NOTE: Before connecting
the USB ANT™ stick to your
computer, you must download
software as instructed in Step
5 so that the necessary USB
drivers are installed.
1. Plug the USB ANT stick into
an available USB port on your
computer.
2. Bring your Forerunner within
range (3 m) of your computer.
3. When the ANT Agent nds your
Forerunner, ANT Agent displays
a unique number and asks you if
you want to pair. Select yes.
DRAFT
Getting Started
4. Your Forerunner should display
the same number ANT Agent
displayed. If so, select yes on
your Forerunner to complete
pairing process.
Step 8: Transfer Data to Your Computer
Bring your Forerunner within
range (3 m) of your computer. ANT
Agent transfers data between your
Forerunner and Garmin Connect.
This may take a few minutes. Use
Garmin Connect to view and analyze
your data.
Forerunner 405 Owner’s Manual 9
Page 16
Time/Date Mode
Time/Date Mode
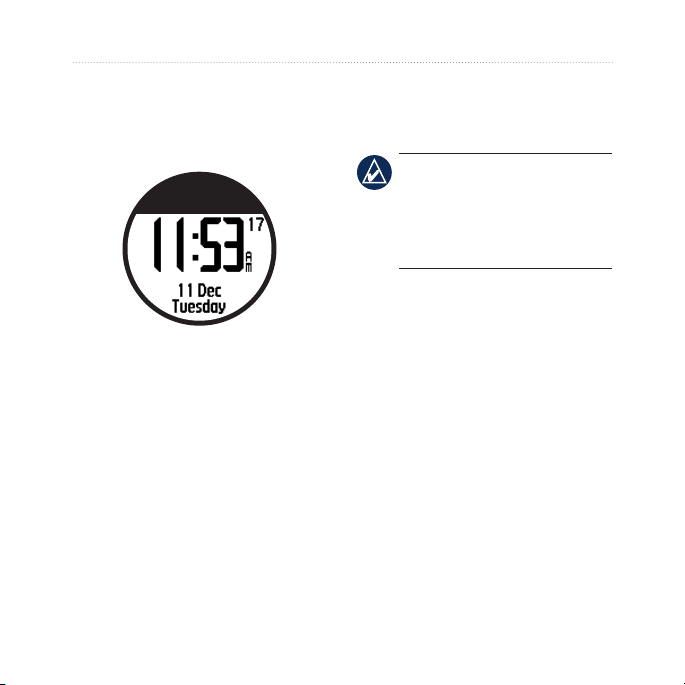
Touch and hold time/date to enter
time/date mode.
Tap the bezel to scroll through the
available pages:
Time
•
Time2. Time for the second time
•
zone, if turned on.
Battery gauge
•
Alarm set (if any)
•
Goal/progress indicator (if any)
•
Today’s scheduled workouts
•
DRAFT
transferred from Garmin Connect
or Garmin Training Center (if
any)
TIP: While on the time2,
alarm, or workout pages,
press the enter button to setup
time2, set the alarm, or do the
scheduled workout.
10 Forerunner 405 Owner’s Manual
Page 17
Training Mode
Training Mode
The Forerunner offers several
training features and optional
settings.
About the Training Page
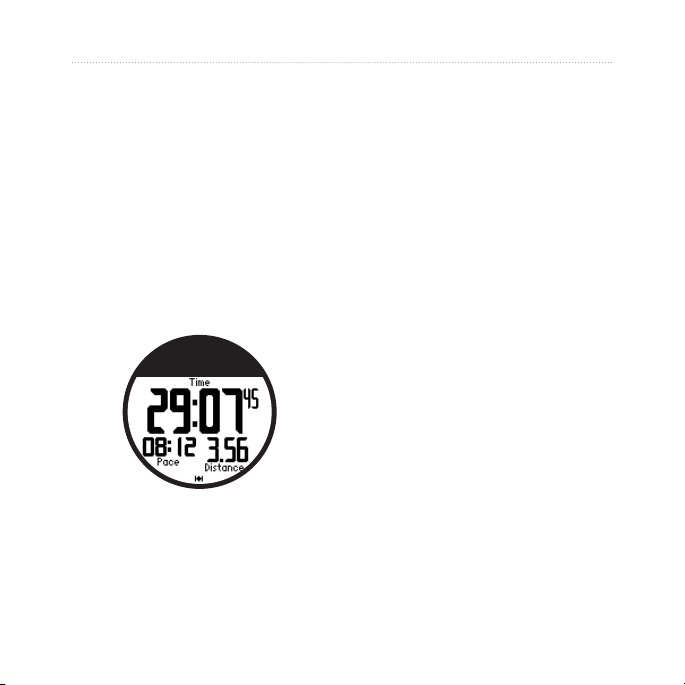
Tap the bezel to scroll through the
available pages.
To customize the data elds on the
training pages, see page 24.
Auto Pause®
1. Touch and hold menu > select
Training > Options > Auto
Pause.
2. Select one of the following
options:
Off
•
Custom Pace—pauses timer
•
automatically when your
speed drops below a specied
value.
When Stopped—pauses
•
timer automatically when you
stop moving.
3. Press
Auto Pause is helpful if your training
includes stop lights or other places
where you need to slow down or
stop.
quit to exit.
DRAFT
Forerunner 405 Owner’s Manual 11
Page 18
Training Mode
Auto Lap®
You can use Auto Lap to
automatically mark the lap at a
specic position or after you have
traveled a specic distance. This
setting is helpful for comparing your
performance over different parts of a
run (every 2 miles or major hill, for
example).
To set Auto Lap:
1. Touch and hold menu > select
Training > Options > Auto Lap.
2. Select
By Distance to enter a
value or By Position to choose
an option:
Lap Press Only—marks a lap
•
each time you press lap and
each time you pass any of
those locations again.
DRAFT
•
Start and Lap—marks a lap
at the GPS location where
you press start and at any
locations during the run where
you pressed lap.
Mark and Lap—marks a lap
•
at the specic GPS location
you mark when you select
this option and at any location
during the run where you
pressed lap.
3. Press
quit to exit.
NOTE: When doing a course
(page 18), use By Position
to mark laps at all of the lap
positions marked in the course.
Auto Scroll
Use the auto scroll feature to
automatically cycle through all of the
training data pages while the timer is
running.
12 Forerunner 405 Owner’s Manual
Page 19
To use auto scroll:
1. Touch and hold menu > select
Training > Options > Auto
Scroll.
2. Select a display speed:
Medium, or Fast.
3. Press
quit to exit.
Slow,
Sport Mode
Touch and hold menu > select
Training > Options > Sport Mode
to select a sport mode.
Running is the default sport mode.
Select Biking to use heart rate zones,
calorie calculations, and speed zones
that are specic for biking. Also, the
activity is tagged as biking activity
when your history is uploaded to
your computer.
DRAFT
Training Mode
Speed Units
Touch and hold menu > select
Training > Options > Speed Units.
Select Pace or Speed for the speed
units.
NOTE: Changing speed units
does not change your custom
data elds (page 24).
Virtual Partner
Touch and hold menu > select
Training > Options > Virtual
Partner > On.
Your Virtual Partner is a unique
tool designed to help you meet your
training goals. The Virtual Partner
competes with you every time you
and the timer are running.
If you make changes to the Virtual
Partner pace/speed before you start
Forerunner 405 Owner’s Manual 13
Page 20
Training Mode
the timer, those changes are saved.
If you make changes to the Virtual
Partner during the run, when the
timer is started, the changes will not
be saved when the timer is reset.
If you make changes to the Virtual
Partner during a run, the Virtual
Partner uses the new pace from your
location.
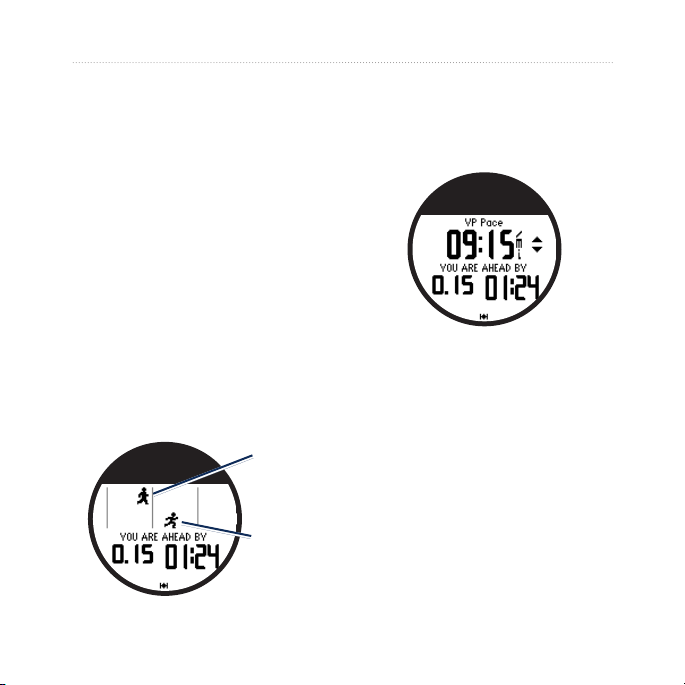
To change the Virtual Partner
(VP) pace:
1. Touch and hold training to enter
Training Mode.
2. Tap the bezel to view the Virtual
Partner page.
Virtual
Partner
You
DRAFT
14 Forerunner 405 Owner’s Manual
3. Touch and drag clockwise to
increase the VP pace. Touch
and drag counter-clockwise to
decrease the VP pace.
4. To save the changes, tap the
bezel or wait for the page to
timeout.
Workouts
Touch and hold menu > select
Training > Workouts to choose the
type of workout right for you.
Simple, interval, and heart rate
workouts are replaced each time you
create a workout of the same type.
Page 21
Advanced workouts must be created
in Garmin Connect or Garmin
Training Center.
NOTE: While performing a
workout, tap the bezel to view
more data pages.
When you complete all steps in your
workout, the “Workout Finished”
message appears.
To end a workout early:
1. Press stop.
2. Press and hold
reset.
Simple Workouts
Simple workouts can be based on the
following custom goals:
Time
•
Distance
•
Calories
•
DRAFT
Training Mode
To set up a simple workout:
1. Touch and hold menu > select
Training > Workouts > Simple.
2. Select the
workout.
3. Enter the
4. Select
5. Press
Type of simple
Duration value.
Do Workout.
start.
Heart Rate Workouts
NOTE: To use heart rate
workouts, you must have a
heart rate monitor.
You can use the Forerunner to train
using a specic heart rate zone or
custom range of beats per minute
(bpm). The Type and Duration
settings function the same as a
simple workout.
Forerunner 405 Owner’s Manual 15
Page 22
Training
To create a heart rate workout:
1. Touch and hold menu > select
Training > Workouts > Heart
Rate.
2. Select the
The minimum and maximum heart
rate values are automatically set
based on your heart rate zones.
For more information about heart
rate zones, see page 33 and
page 43.
OR
Select Custom to set your own
minimum and maximum heart
rate (bpm) values.
NOTE: The minimum value is
Zone you want to use.
35 bpm. The maximum value
is 250 bpm. When entering
custom bpm values, the
minimum and the maximum
values must be at least 5 bpm
apart.
DRAFT
3. Select the Type of heart rate
workout.
4. Enter the
5. Select
6. Press
Duration value.
Do Workout.
start.
Interval Workouts
You can create interval workouts
with your Forerunner. The intervals
can be based on time or distance
for the run and rest portions of the
workout.
To create an interval workout:
1. Touch and hold menu > select
Training > Workouts > Interval.
2. Select the
workout.
3. Enter the
4. Select the
5. Enter the
6. Enter the
Type of interval
Duration value.
Rest Type.
Duration value.
Reps value.
16 Forerunner 405 Owner’s Manual
Page 23
Training
7. Select Warmup Yes and
Cooldown Yes (optional).
8. Select
9. Press
If you are doing a warm up or
cool down, press lap at the end
of your warm-up lap to start
your rst interval. At the end of
your last interval, the Forerunner
automatically starts a cool-down lap.
When you are nished cooling down,
press lap to end your workout.
As you approach the end of each
interval, an alarm counts down the
time until a new interval begins.
To end an interval early, press the
lap/reset button.
Do Workout.
start.
Advanced Workouts
Advanced workouts can include
goals for each workout step and
varied distances, times, and calories.
Forerunner 405 Owner’s Manual 17
DRAFT
Use Garmin Connect or Garmin
Training Center to create and edit
workouts and transfer them to your
Forerunner. You can also schedule
workouts using Garmin Connect or
Garmin Training Center. You can
plan workouts in advance and store
them on your Forerunner.
NOTE: For more information
about transferring data to your
Forerunner, see page 9.
TIP: In time/date mode, tap
the bezel to view today’s
scheduled workout. Press
enter to do the workout.
To start an advanced workout:
1. Touch and hold menu >
select Training > Workouts >
Advanced.
2. Select the workout.
Page 24
Training
3. Select Do Workout.
4. Press
After you begin an advanced
workout, the Forerunner displays
each step of the workout, including
the name of the step, the goal (if
any), and current workout data.
As you approach the end of each
step, an alarm counts down the time
until a new step begins.
To end an advanced workout
step early:
Press the lap/reset button.
To delete an advanced workout:
1. Touch and hold menu >
2. Select the workout.
3. Select
4. Press
start.
select Training > Workouts >
Advanced.
Delete Workout > Yes.
quit to exit.
DRAFT
Courses
Another way you can use the
Forerunner for custom training is to
follow courses based on a previously
recorded activity. You can follow
the course trying to match or exceed
previously set goals. You can also
race against the Virtual Partner when
training with courses.
Creating Courses
Use Garmin Connect or Garmin
Training Center to create courses and
course points and transfer them to
your Forerunner.
NOTE: For more information
about transferring data to your
Forerunner, see page 9.
To start a course:
1. Touch and hold menu > select
Training > Courses.
18 Forerunner 405 Owner’s Manual
Page 25

2. Select a course from the list.
3. Select
4. Press
When you are following a course in
training mode, tap the bezel to view
the navigation page.
To end a course manually, press stop
> press and hold reset.
Doing a Course
You can include a warm up before
you begin your course. Press start to
begin the course, and then warm up.
Stay away from your course path as
you warm up. When you are ready to
begin your course, head toward your
course. When you are on any part
of the course path, the Forerunner
displays an “On Course” message.
Do Course.
start. History is recorded
even if you are not on the course.
DRAFT
When you start a course, your Virtual
Training
Partner also starts the course. If you
are warming up and are not on the
course, the rst time that you join
the course, your Virtual Partner
restarts the course from your current
location.
If you stray away from the course,
the Forerunner displays an “Off
Course” message. Use the navigation
page to nd your way back to the
course.
To delete a course:
1. Touch and hold menu > select
Training > Courses.
2. Select a course from the list.
3. Select
4. Select
5. Press
Delete Course.
Yes to delete the course.
quit to exit.
Forerunner 405 Owner’s Manual 19
Page 26
GPS Mode
GPS Mode
Touch and hold GPS to view the
GPS menu.
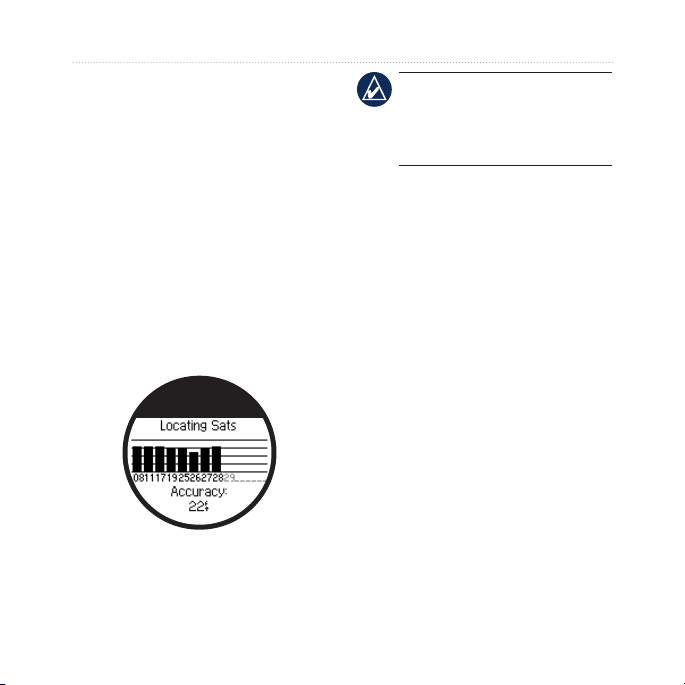
Satellites—view information about
the GPS signals the Forerunner
is currently receiving. The black
bars represent the strength of each
satellite signal. The number of the
satellite appears below each bar. The
GPS accuracy appears at the bottom
of the page.
GPS—turn GPS on or off (for indoor
use).
20 Forerunner 405 Owner’s Manual
DRAFT
NOTE: When GPS is off,
speed and distance data are not
available, unless you are using
the foot pod.
Save Location—save your current
location. Press enter to edit the
location. Press quit to exit.
To mark a known location using
coordinates:
1. Touch and hold GPS > select
Save Location.
2. Press
3. Enter the known coordinates.
4. Edit the location name and
Go To Location—select a location
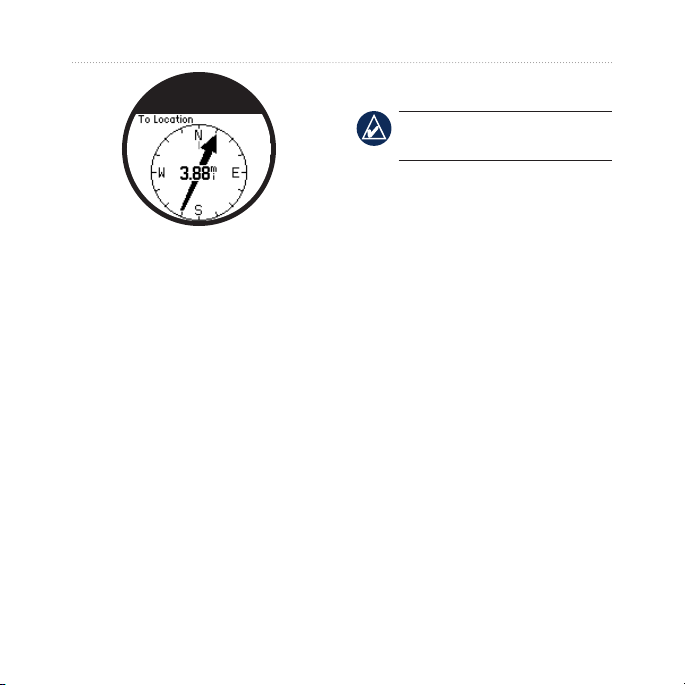
from the list, and then select Go.
Your Forerunner navigates you to the
saved location using the navigation
page.
enter > select Position.
elevation (optional).
Page 27
GPS Mode
to your starting point.
NOTE: You must start the
timer to use Back To Start.
About GPS
The Global Positioning System
To stop navigating to the location,
tap the bezel and select Stop Go To.
To edit a location:
1. Touch and hold GPS > select Go
To Location.
2. Select the location you would like
to edit.
3. Select
4. Select an option to edit.
To delete a location, touch and hold
GPS > select Go To Location.
Select the location you would like to
delete. Select Delete > Yes.
Back To Start—navigates you back
Forerunner 405 Owner’s Manual 21
Edit.
DRAFT
(GPS) is a satellite-based navigation
system made up of a network of
24 satellites. GPS works in any
weather conditions, anywhere in the
world, 24 hours a day. There are no
subscription fees or setup charges to
use GPS.
For more information, go to
www.garmin.com/aboutGPS.
Page 28
History
History
Your Forerunner automatically saves
history when you start the timer. The
Forerunner can record up to 1000
laps and approximately 20 hours
of detailed tracklog data (when
recording approximately 1 trackpoint
every 4 seconds). Tracklog data
includes your GPS position (if
available) and accessory data such as
heart rate data.
When the Forerunner memory is
full, your oldest tracklog data is
overwritten. Upload your history to
Garmin Connect or Garmin Training
Center periodically to keep track of
all of your data.
NOTE: Your Forerunner will
not automatically delete or
overwrite your lap summary
DRAFT
You can view the following History
on your Forerunner: time, distance,
average pace/speed, calories, average
heart rate data (if applicable), and
average cadence (if applicable).
Viewing Activities
1. Touch and hold menu > select
2. Use the bezel to scroll through
3. Press
Transferring History to Your Computer
For information about transferring
data to your computer, see page 9.
data. See the next page to learn
how to delete lap data.
History > Activities.
the activities. Tap the bezel to
view lap information.
quit to exit.
22 Forerunner 405 Owner’s Manual
Page 29

Deleting History
After you have transferred your
history to Garmin Connect or
Garmin Training Center, you
can delete the history from your
Forerunner.
1. Touch and hold menu > select
History > Delete.
2. Select an option:
All Activities—delete all
•
activities from the history.
Old Activities—delete
•
activities recorded more than
one month ago.
Totals—reset all your totals.
•
Deleting Individual Runs
and Laps
You can delete runs, laps, and totals
individually.
DRAFT
History
1. Touch and hold menu > select
History > Activities.
2. Use the bezel to scroll through
the activities. Tap the bezel to
view lap information.
3. Press and hold
viewing the run or lap.
4. Select
reset while
Yes.
Deleting Totals
The Forerunner records the toal
distance traveled and time you have
worked out with your Forerunner.
1. Touch and hold menu > select
History > Totals.
2. Tap the bezel and select
delete the total.
Yes to
Forerunner 405 Owner’s Manual 23
Page 30
Settings
Settings
Touch and hold menu > select
Settings.
TIP: When nished selecting
options or entering values on
your Forerunner, press enter to
save the setting.
To set data elds:
1. Touch and hold menu > select
Settings > Data Fields.
2. Select one of the training pages.
3. Select the number of data elds.
4. Use the bezel to select and
change the data elds.
5. Repeat for each page you wish to
customize.
Data Fields
You can show/hide the following
pages and customize up to three data
elds on each of the pages:
Training 1 (always shown)
•
Training 2
•
Training 3
•
Heart Rate (only appears when
•
the Forerunner is receiving heart
rate data)
24 Forerunner 405 Owner’s Manual
DRAFT
Data Field Options
* Denotes a eld showing statute or
metric units.
** Requires optional accessory.
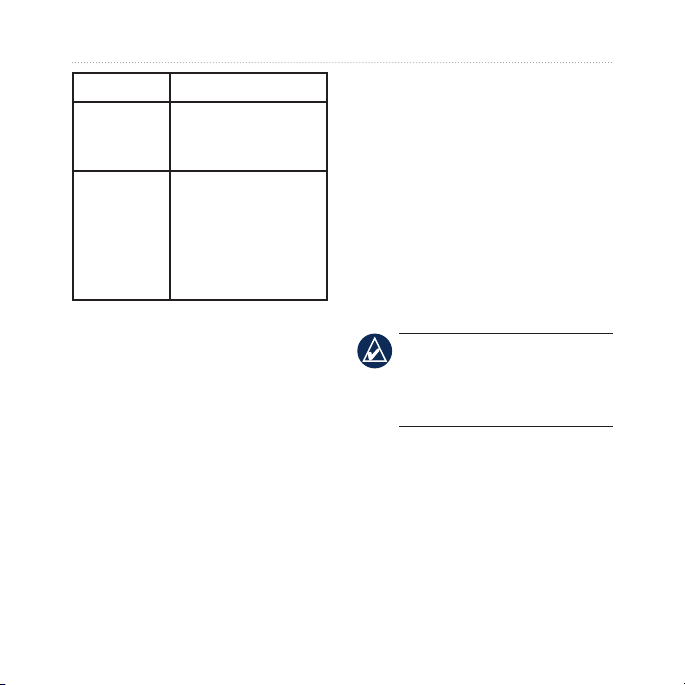
Data Field Description
Cadence ** Steps per minute
or revolutions of
the crank arm per
minute.
Page 31
Settings
Data Field Description
Cadence–
Avg **
Cadence–
Lap **
Calories Number of calories
Distance * Distance traveled on
Dist–Lap * Distance traveled in
Dist–Last
Lap *
Elevation * Distance above/
GPS
Accuracy
Forerunner 405 Owner’s Manual 25
Average cadence
for the duration of
your current ride.
Average cadence
for the current lap.
burned.
the current run.
the current lap.
Distance of the last
completed lap.
below sea level.
Margin of error for
your exact location.
For example, your
GPS location is
accurate to within
DRAFT
+/- 19 ft.
Data Field Description
Grade Calculation of
rise over run. For
example, if for
every 10 feet you
climb (elevation)
you travel 200 feet
(distance), your
grade is 5%.
HR Heart rate in beats
per minute (bpm).
HR–%Max Percentage of
maximum heart rate.
HR Zone Current range of
heart rate (1–5).
The default zones
are based on your
maximum heart rate
and user prole.
HR–Avg Average heart rate
for the run.
Page 32
Settings
Data Field Description
HR–Avg
%Max
HR–Lap Average heart rate
HR–Lap
%Max
Heading Current direction
Laps Amount of laps
Pace * Current pace.
Pace–Avg * Average pace for
Pace–Lap * Average pace in the
Pace–Last
Lap *
Speed * Current speed.
26 Forerunner 405 Owner’s Manual
Average percentage
of maximum heart
rate for the run.
for the lap.
Average percentage
of maximum heart
rate for the lap.
you are traveling.
completed.
the run.
current lap.
Average pace during
the last full lap.
DRAFT
Data Field Description
Speed–Avg *Average speed for
the run.
Speed–Lap *Average speed in
the current lap.
Speed–Last
Lap *
Sunrise Time of sunrise
Sunset Time of sunset
Time Stopwatch time.
Time–Avg
Lap
Time–Lap Amount of time in
Average speed
during the last full
lap.
based on your GPS
position.
based on your GPS
position.
Average time to
complete the laps
so far.
the current lap.
Page 33
Settings
Data Field Description
Time–Last
Lap
Time Of
Day
Amount of time to
complete the last
full lap.
Current time of day
based on your time
settings (format,
time zone, and
daylight saving
time).
User Prole
Touch and hold menu > select
Settings > User Prole. The
Forerunner uses information that
you enter about yourself to calculate
calorie consumption. Set your user
prole before you begin using
the Forerunner to ensure that it is
recording accurate data.
DRAFT
Forerunner 405 Owner’s Manual 27
Alarms
Touch and hold menu > select
Settings > Alarms.
Set Alarm—turn alarm on or off.
When the alarm is on, tap the bezel
in time/date mode to view the alarm
time.
Set Time—use the bezel to set the
alarm time.
TIP: When the alarm sounds,
press enter to snooze for 9
minutes, or press quit to turn
off the alarm.
Type—set the alarm occurrence to
Daily or Once.
Time
The Forerunner automatically sets
the time of day using GPS satellite
signals. If you lose battery power,
Page 34

Settings
you must charge the battery and then
acquire satellites to reset the time
of day.
Touch and hold menu > select
Settings > Time.
Time Format—select 12 Hour or
24 Hour.
Time Zone—select your time zone
or a nearby city.
DST (Daylight Saving Time)—select
Yes, No, or Auto. The Auto setting
automatically adjusts the time for
daylight saving based on your time
zone.
Time2—turn Time2 on or off. When
Time2 is on, you can set Time2
Format, Time2 Zone, and Time2
DST. Tap the bezel in time/date
mode to view Time2.
DRAFT
System
Touch and hold menu > select
Settings > System.
Language—change the on-screen
text language. Changing the text
language does not change the
language of user-entered data, such
as course names.
Alert Tones—turn message tones
on or off.
Key Tones—turn button and bezel
tones on or off.
Sensitivity—select the touch
sensitivity level for the bezel. Select
High to make the bezel respond to a
lighter tap than Low.
Contrast—select the amount of
screen contrast.
About—view your software version,
28 Forerunner 405 Owner’s Manual
Page 35

GPS version, and unit ID.
Units—select Statute or Metric for
the units of measure.
Backlight
Touch and hold menu > select
Settings > System > Backlight.
Mode—select how the backlight
turns on. Select Manual to press
two ngers on the bezel to turn on
the backlight for the timeout period.
Select Keys and Alerts to turn on
the backlight once with the two
nger press, and then any time a key
is pressed or when an alert message
appears. Select Off to always have
the backlight off.
Timeout—select the amount of time
the backlight stays on. Use a short
backlight setting to conserve battery
power.
DRAFT
Settings
Brightness—adjust the brightness.
ANT+Sport
Accessories
See pages 31 to 36 for information
about accessories.
Computer
Move away (10 m) from other
ANT+Sport accessories while the
Forerunner is trying to pair with the
computer for the rst time.
1. Verify that the computer is set up
for data upload and that pairing
is enabled in the ANT Agent. See
page 9.
2. Touch and hold
Settings > ANT+Sport >
Computer.
4. Select
Pairing > On.
menu > select
Forerunner 405 Owner’s Manual 29
Page 36
Settings
5. Bring your Forerunner within
range (3 m) of the computer.
6. When the ANT Agent nds your
Forerunner, ANT Agent displays
a unique number and asks you if
you want to pair. Select yes.
7. Your Forerunner should display
the same number ANT Agent
displayed. If so, select yes on
your Forerunner to complete
pairing process.
NOTE: You can prevent your
Forerunner from transferring
data to/from any computer,
even a paired computer.
Touch and hold menu > select
Settings > ANT+Sport >
Computer > Enabled > No.
Send All Data
By default, your Forerunner only
sends new data to your computer.
You can force the Forerunner to send
DRAFT
all data to your computer. Touch
and hold menu > select Settings >
ANT+Sport > Computer > Force
Send > Yes. All data will be sent
again.
Unit to Unit
You can transfer advanced workouts,
courses, and locations to and from
another Forerunner 405.
1. In the sending Forerunner, touch
and hold menu > select Settings
> ANT+Sport > Unit to Unit >
Transfer. Select the data you
want to send.
2. In the receiving Forerunner, touch
and hold menu > select Settings
> ANT+Sport > Unit to Unit >
Receive.
The sending Forerunner connects to
the other Forerunner and sends the
data.
30 Forerunner 405 Owner’s Manual
Page 37

Using Accessories
The following ANT+Sport
accessories are compatible with the
Forerunner 405:
Heart rate monitor
•
Foot Pod
•
GSC 10 speed and cadence bike
•
sensor
USB ANT stick (see page 29)
•
To purchase accessories, go to
http://buy.garmin.com or contact
your Garmin dealer.
Pairing Accessories
If you purchased an accessory with
ANT+Sport wireless technology, you
need to pair it with your Forerunner.
Pairing is connecting ANT+Sport
accessories, such as the heart rate
DRAFT
Using Accessories
monitor, with your Forerunner.
The pairing process only takes a few
seconds when the accessories are
activated and functioning correctly.
When paired, your Forerunner
only receives data from your
accessory, even if you are near other
accessories.
After you pair the rst time, your
Forerunner automatically recognizes
your accessory each time the
accessory is activated.
To pair accessories:
1. Move away (10 m) from other
accessories. Bring the accessory
to be paired within range (3 m) of
the Forerunner.
2. Touch and hold
Settings > ANT+Sport >
Accessories.
3. Select your accessory.
menu > select
Forerunner 405 Owner’s Manual 31
Page 38
Using Accessories
4. Select Enabled > Yes.
5. Scroll to view
Forerunner cannot pair with the
accessory, select Rescan.
TIP: The accessory needs
to send data to complete the
pairing process. You need to
wear the heart rate monitor,
take a step wearing the foot
pod, or pedal your bike with
the GSC 10.
Status. If the
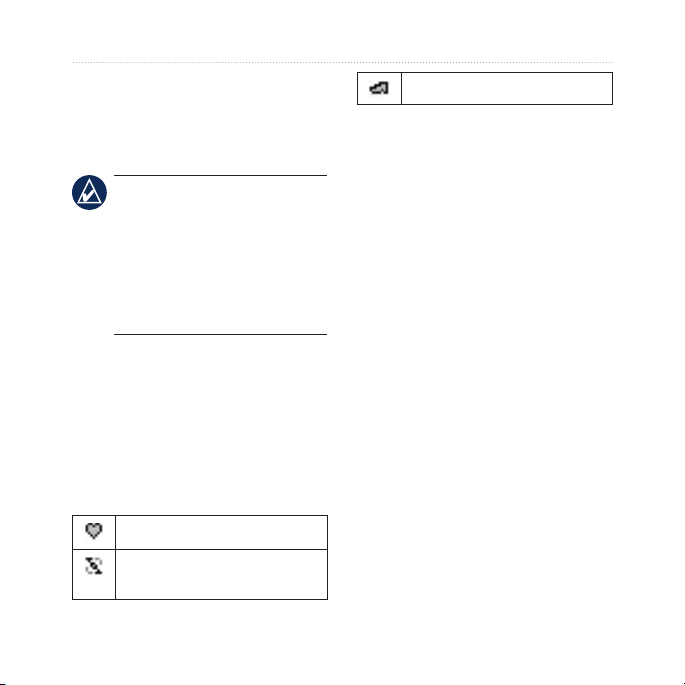
Status Icons
When in training mode, the icon
for the accessory blinks as the
Forerunner scans for the new
accessory. The icon is solid when the
accessory is paired.
Heart rate monitor active
Speed and cadence sensor
active
DRAFT
Foot pod active
Heart Rate Monitor
For information about putting on the
heart rate monitor, see page 5.
Heart Rate Monitor Tips
If you are noticing inaccurate
or erratic heart rate data, use the
following tips.
Make sure the heart rate monitor
•
is snug against your body.
Reapply water, saliva, or
•
electrode gel to the sensors.
Clean the sensors. Dirt and
•
sweat residue on the sensors can
interfere with heart rate signals.
Wear a cotton shirt or wet your
•
shirt if suitable for your activity.
Synthetic fabrics that rub or ap
32 Forerunner 405 Owner’s Manual
Page 39
against the heart rate monitor
can create static electricity that
interferes with heart rate signals.
Move away from sources of
•
strong electromagnetic elds and
some 2.4 GHz wireless sensors,
which can interfere with your
heart rate monitor. Sources of
interference may include very
high voltage power lines, electric
motors, microwave ovens,
2.4 GHz cordless phones, and
wireless LAN access points.
Heart Rate Zones
CAUTION: Consult your
physician to specify heart
rate zones/targets that are
appropriate for your tness
level and health condition.
Many athletes are using heart rate
zones to measure and increase their
DRAFT
Using Accessories
cardiovascular strength and improve
their level of tness. A heart rate
zone is a set range of heartbeats per
minute. The ve commonly accepted
heart rate zones are numbered from
1–5 according to increasing intensity.
The Forerunner sets the heart rate
zone ranges based on your maximum
heart rate set in your user prole.
The Forerunner sets the heart rate
zone ranges based on your maximum
heart rate set in your user prole,
according to the table on page 43.
You can also customize your heart
rate zones in your user prole of
Garmin Connect or Garmin Training
Center. After customizing your heart
rate zones, transfer data to your
Forerunner.
Forerunner 405 Owner’s Manual 33
Page 40
Using Accessories
How Do Heart Rate Zones
Affect Your Fitness Goals?
Knowing your heart rate zones can
help you measure and improve
your tness by understanding and
applying these principles:
Your heart rate is a good measure
•
of exercise intensity.
Training in certain heart rate
•
zones can help you improve
cardiovascular capacity and
strength.
Knowing your heart rate
•
zones can prevent you from
overtraining and decrease your
risk of injury.
Heart Rate Monitor
Battery
The heart rate monitor contains a
user-replaceable CR2032 battery.
DRAFT
NOTE: Contact your local
waste disposal department to
properly dispose of batteries.
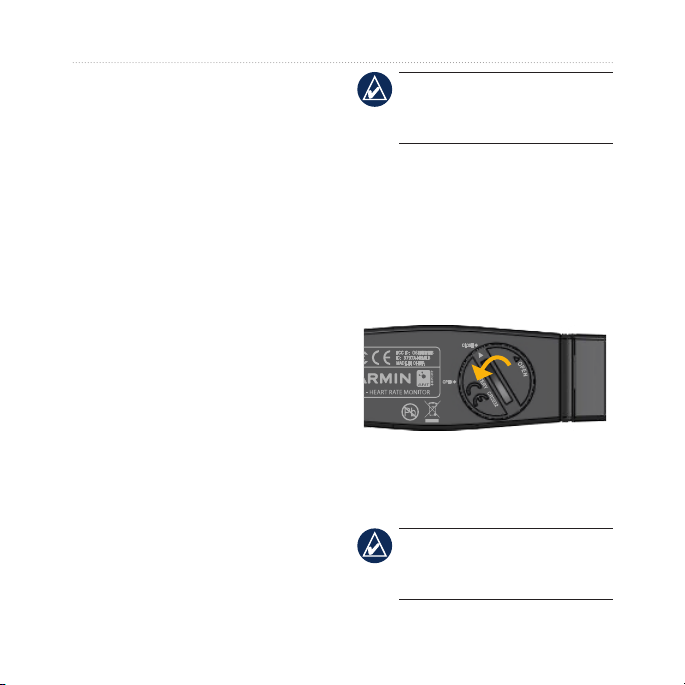
To replace the battery:
1. Locate the circular battery cover
on the back of the heart rate
monitor.
2. Use a coin to twist the cover
counter-clockwise so the arrow on
the cover points to OPEN.
3. Remove the cover and replace
the battery with the positive side
facing up.
NOTE: Be careful not to
damage or lose the O-ring
gasket on the cover.
34 Forerunner 405 Owner’s Manual
Page 41

4. Use a coin to twist the cover
clockwise so the arrow on the
cover points to CLOSE.
Foot Pod
Your Forerunner is compatible with
the foot pod. You can use the foot
pod to send data for your Forerunner
when training indoors or when your
GPS signal is weak or you lose
satellite signals. The foot pod is
on standby and ready to send data
(like the heart rate monitor). You
must pair the foot pod with your
Forerunner. See page 31.
Calibrating the Foot Pod
Calibrating your foot pod is optional
and can improve accuracy. There are
three ways to adjust the calibration:
distance, GPS, and manual.
DRAFT
Using Accessories
Distance Calibration
For best results, the foot pod should
be calibrated using the inside lane of
a regulation track. A regulation track
(2 laps = 800 m) is more accurate
than a treadmill.
1. Touch and hold menu > select
Settings > ANT+Sport >
Accessories > Foot Pod >
Calibrate > Distance.
2. Select a distance.
3. Press
4. Run or walk the distance.
5. Press
GPS Calibration
You must have GPS signals to
calibrate the Foot Pod using GPS.
1. Touch and hold menu > select
start to begin recording.
stop.
Settings > ANT+Sport >
Accessories > Foot Pod >
Calibrate > GPS.
Forerunner 405 Owner’s Manual 35
Page 42

Using Accessories
2. Press start to begin recording.
3. Run or walk approximately
1000 m. The Forerunner informs
you that you have traveled far
enough.
Manual Calibration
If your foot pod distance seems
slightly high or low each time you
run, you can manually adjust the
calibration factor.
Touch and hold menu > select
Settings > ANT+Sport >
Accessories > Foot Pod > Cal
Factor. Adjust the calibration factor.
Increase the calibration factor if your
distance is too low; decrease the
calibration factor if your distance is
too high.
GSC 10
Your Forerunner is compatible with
the GSC 10 speed and cadence bike
sensor. You must pair the GSC 10
with your Forerunner. See page 31.
Calibrating the Bike
Sensor
Calibrating your bike sensor is
optional and can improve accuracy.
1. Touch and hold menu > select
2. Select
DRAFT
Settings > ANT+Sport >
Accessories > Bike Sensor >
Calibration.
Manual to enter the wheel
size. Select Auto to allow GPS to
determine your wheel size.
36 Forerunner 405 Owner’s Manual
Page 43

Appendix
Appendix
Updating the Software
Resetting the Forerunner
If your Forerunner is locked up,
reset your Forerunner. Press and
hold enter and quit simultaneously
until the screen goes blank (about 6
seconds). This does not erase any of
your data or settings.
Clearing User Data
To clear/erase all user data, press and
hold enter and quit simultaneously
until the screen goes blank (about
6 seconds) to reset the Forerunner.
Continue holding the quit button, but
release the enter button. Follow the
on-screen directions.
Forerunner 405 Owner’s Manual 37
DRAFT
1. Go to www.garmin.com/products
/webupdater and download
WebUpdater to your computer.
3. Run WebUpdater, and follow the
on-screen instructions.
After conrming that you want to
perform an update, WebUpdater
downloads the update to your USB
ANT stick. The next time you bring
your Forerunner within range (3 m)
of your computer, your software is
updated.
Page 44

Appendix
Battery Information
Actual battery life depends on use of
the following items: GPS, backlight,
ANT+Sport computer connection,
and time spent in power save mode.
On a fully charged battery, the
Forerunner should last one week if
you train for 30 minutes a week with
GPS and the Forerunner is in power
save mode for the remaining time.
On a fully charged battery, the
Forerunner lasts for up to 2 weeks in
power save mode.
On a fully charged battery, the
Forerunner can last for up to 8 hours
in GPS mode.
DRAFT
38 Forerunner 405 Owner’s Manual
Specications
Forerunner
Watch size: 1.88 in. wide × 2.78 in.
long × 0.646 in. thick (47.75 mm ×
70.5 mm × 16.4 mm)
Weight: 2.1 oz. (60 g)
Display: 1.06 in. (27 mm) diameter,
124 × 95 pixels resolution, with LED
backlight.
Water resistance: IPX7. Not
intended to be used while user is
swimming.
Data storage: approximately 20
hours of data (assuming 1 trackpoint
is being recorded every 4 seconds).
Memory: up to 1000 laps; 100 user
locations (waypoints).
Computer interface: wireless USB
ANT stick
Page 45

Battery type: 300 mAh rechargeable
lithium-ion battery
Battery life: up to 8 hours in GPS
mode; up to 2 weeks in power save
mode.
Operating temperature range:
5°F–122°F (-15°C–50°C)
Charging temperature range:
32°F–122°F (0°C–50°C)
Radio frequency/protocol: 2.4
GHz/Dynastream ANT+Sport
wireless communications protocol
GPS Antenna: internal patch
GPS Receiver: high-sensitivity
integrated
USB ANT stick
Physical size: 59 mm × 18 mm ×
7 mm
DRAFT
Appendix
Weight: 6 g
Transmission range: Approximately
5 m
Operating temperature: 14°F–
122°F (-10°C–50°C)
Radio frequency/protocol:
2.4 GHz / Dynastream ANT+Sport
wireless communications protocol
Power source: USB
Heart Rate Monitor
Physical size: 13.7 in. × 1.3 in. × 0.4
in. (34.7 cm × 3.4 cm × 1.1 cm)
Weight: 1.6 oz. (44 g)
Water resistance: 32.9 ft.
(10 m)
Transmission range: approximately
9.8 ft. (3 m)
Forerunner 405 Owner’s Manual 39
Page 46
Appendix
Battery: user-replaceable CR2032
(3 volts)
Software License Agreement
Battery life: approximately 3 years
(1 hour per day)
Operating temperature: 14°F–
122°F (-10°C–50°C)
NOTE: In cold conditions,
wear appropriate clothing to
keep the heart rate monitor
near your body temperature.
Radio frequency/protocol: 2.4
GHz/Dynastream ANT+Sport
wireless communications protocol
Accuracy may be degraded by
poor sensor contact, electrical
interference, and receiver distance
from transmitter.
DRAFT
40 Forerunner 405 Owner’s Manual
BY USING THE Forerunner, YOU
AGREE TO BE BOUND BY THE
TERMS AND CONDITIONS OF
THE FOLLOWING SOFTWARE
LICENSE AGREEMENT. PLEASE
READ THIS AGREEMENT
CAREFULLY.
Garmin grants you a limited license
to use the software embedded in this
device (the “Software”) in binary
executable form in the normal
operation of the product. Title,
ownership rights, and intellectual
property rights in and to the Software
remain in Garmin.
You acknowledge that the Software
is the property of Garmin and is
protected under the United States
of America copyright laws and
Page 47

international copyright treaties.
You further acknowledge that
the structure, organization, and
code of the Software are valuable
trade secrets of Garmin and that
the Software in source code form
remains a valuable trade secret
of Garmin. You agree not to
decompile, disassemble, modify,
reverse assemble, reverse engineer,
or reduce to human readable form
the Software or any part thereof or
create any derivative works based
on the Software. You agree not to
export or re-export the Software to
any country in violation of the export
control laws of the United States of
America.
Declaration of Conformity
Hereby, Garmin declares that this
Forerunner product is in compliance
with the essential requirements
and other relevant provisions of
Directive 1999/5/EC. To view the
full Declaration of Conformity, see
the Garmin Web site for your Garmin
product: www.garmin.com/products
/forerunner405.
DRAFT
Appendix
Forerunner 405 Owner’s Manual 41
Page 48
Appendix
Troubleshooting
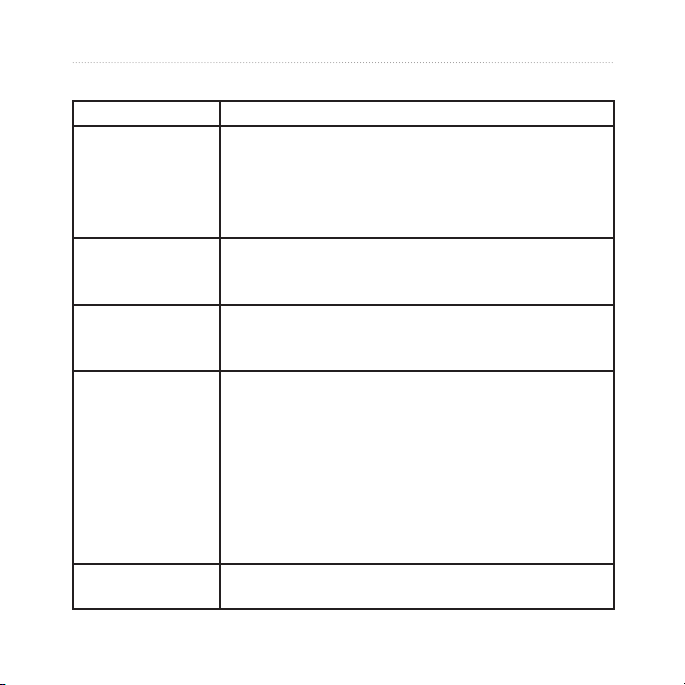
Problem Solution/Answer
Unlock the bezel: press enter and quit simultaneously.
The bezel is not
responding to my
taps.
My Forerunner
never gets satellite
signals.
The battery gauge
does not seem
accurate.
The heart rate
monitor, foot pod, or
GSC 10 will not pair
with the Forerunner.
The heart rate data
is inaccurate.
Press rmly on the bezel for the best results.
Tap the outer ring on the bezel, not the inner ring near
the watch face.
Adjust the sensitivity setting (see page 28).
Touch and hold GPS. Make sure GPS is set to On.
Take your Forerunner outside and away from tall
buildings. Remain stationary for several minutes.
Allow the Forerunner to fully discharge, and then fully
charge it (without interrupting the charge cycle).
Stay 10 m away from other ANT+Sport accessories
while pairing.
Bring the Forerunner within range (3 m) of the sensor
while pairing.
Restart the scan for the accessory (see page 31).
Make sure the accessory is sending data (for example,
you need to be wearing the heart rate monitor).
If the problem persists, replace the battery in the
accessory.
DRAFT
See page 32.
42 Forerunner 405 Owner’s Manual
Page 49
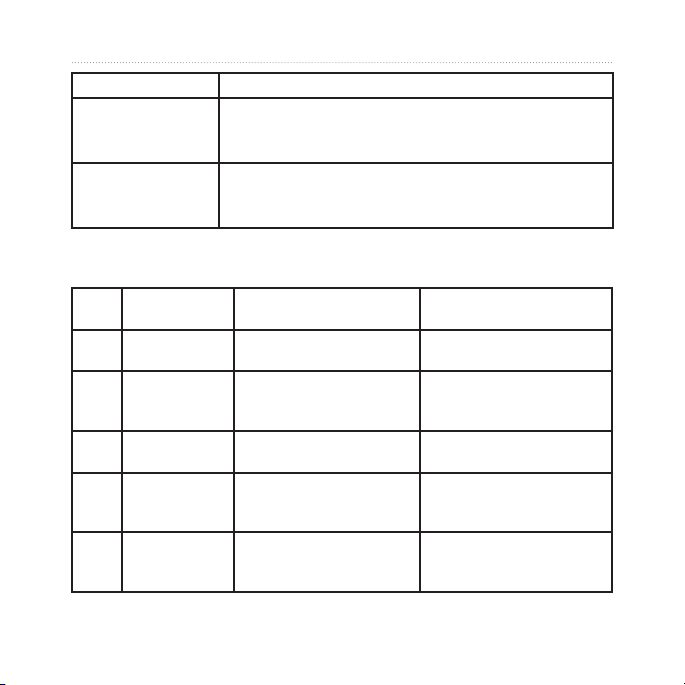
Problem Solution/Answer
The heart rate
monitor strap is too
big.
Some of my data
is missing from my
Forerunner.
A smaller elastic strap is sold separately. Go to
http://buy.garmin.com.
The Forerunner overwrites the oldest detailed data if
you do not transfer it to your computer. Transfer data
regularly to avoid losing data.
Heart Rate Zone Table
Zone % of Maximum
Heart Rate
1 50–60% Relaxed, easy pace; rhythmic
2 60–70% Comfortable pace;
3 70–80% Moderate pace; more difcult
4 80–90% Fast pace and a bit
5 90–100% Sprinting pace, unsustainable
Perceived Exertion Benets
breathing
slightly deeper breathing,
conversation possible
to hold conversation
uncomfortable; breathing
forceful
for long period of time;
DRAFT
labored breathing
Beginning-level aerobic
training; reduces stress
Basic cardiovascular training;
good recovery pace
Improved aerobic capacity;
optimal cardiovascular training
Improved anaerobic capacity
and threshold; improved
speed
Anaerobic and muscular
endurance; increased power
Appendix
Forerunner 405 Owner’s Manual 43
Page 50

Index
Index
A
accessories 5, 29, 31, 31–36
activities 22
advanced workouts 17
alarms 27
all data, erase 37
Auto Lap 12
Auto Pause 11
B
backlight 29
battery
charging 4
information 38
life 38
bezel 2
locking 3
tips for using 1
biking 13
C
cadence data elds 24
calibrating
bike sensor (GSC 10) 36
foot pod 35
calories 25
clean the Forerunner iv
computer connection 9
computer pairing 9, 29
courses 18
deleting 19
starting 18
D
data, send 30
data elds 24
data uploading 9
deleting
advanced workouts 18
courses 19
history 23
laps 23
runs 23
totals 23
distance data elds 25
downloading software i, 8
drivers, USB 9
E
elevation data elds 25
erase all data 37
F
foot pod 35
calibrating 35, 36
force send 30
G
Garmin Connect i
Garmin Product Support i
Garmin Training Center i
GPS 20, 21, 25
grade 25
H
heart rate
data elds 25
zones 33
heart rate monitor 5, 32
battery 34
tips 32
history 22
deleting 23
transfering 9
viewing 22
I
icons 32
indoor use 20
interval workouts 16
L
language 28
license agreement 40
44 Forerunner 405 Owner’s Manual
Page 51

Index
light 29
lithium-ion battery 39
locations 20
P
pace 13
pairing
accessories 31
computer 9
heart rate monitor 5
power save mode 3
product registration i
product support i
R
registration i
reset Forerunner 37
S
satellite page 20
satellite signals 7
screen contrast 28
send all data 30
sensors, pairing 5
simple workouts 15
software downloads i, 8
software license agreement 40
software update 37
software version 28
specications 38
speed data elds 26
speed units 13
sport mode 13
status icons 32
T
technical specications 38
Time 2 28
time data elds 26
time of day 7
time settings 27
tones 28
totals 23
touch bezel 1, 2
training 11
transferring data 9
troubleshooting 42
U
unit ID 29
units 29
updating software 37
uploading data 9
USB ANT stick 9
USB drivers 9
V
Virtual Partner 13, 18
W
water immersion iv
waypoints, See locations
WebUpdater 37
workouts 14
advanced 17
interval 16
simple 15
Z
zones, heart rate 33
Forerunner 405 Owner’s Manual 45
Page 52
For the latest product information and accessories, visit the Garmin Web site
1200 East 151st Street, Olathe, Kansas 66062, USA
Liberty House, Hounsdown Business Park, Southampton, Hampshire, SO40 9RB UK
No. 68, Jangshu 2nd Road, Shijr, Taipei County, Taiwan
at www.garmin.com.
© 2007 Garmin Ltd. or its subsidiaries
Garmin International, Inc.
Garmin (Europe) Ltd.
Garmin Corporation
Part Number 190-00700-00 Rev. A
 Loading...