

Page 1
INSTALLATION AND
OPERATION MANUAL
GARLAND PHD PLUS
PRODUCT HOLDING
DRAWER
FOR YOUR SAFETY:
DO NOT STORE OR USE GASOLINE
OR OTHER FLAMMABLE VAPORS OR
LIQUIDS IN THE VICINITY OF
THIS OR ANY OTHER
APPLIANCE
PLEASE READ ALL SECTIONS OF THIS MANUAL
AND RETAIN FOR FUTURE REFERENCE.
THIS PRODUCT HAS BEEN CERTIFIED AS
COMMERCIAL COOKING EQUIPMENT AND
MUST BE INSTALLED BY PROFESSIONAL
PERSONNEL AS SPECIFIED.
WARNING:
IMPROPER INSTALLATION, ADJUSTMENT,
ALTERATION, SERVICE OR MAINTENANCE
CAN CAUSE PROPERTY DAMAGE, INJURY,
OR DEATH. READ THE INSTALLATION,
OPERATING AND MAINTENANCE
INSTRUCTIONS THOROUGHLY
BEFORE INSTALLING OR
SERVICING THIS EQUIPMENT
INSTALLATION AND ELECTRICAL CONNECTION
MUST COMPLY WITH CURRENT CODES:
IN CANADA - THE CANADIAN ELECTRICAL
CODE PART 1 AND / OR LOCAL CODES.
IN USA – THE NATIONAL ELECTRICAL CODE
ANSI / NFPA – CURRENT EDITION.
ENSURE ELECTRICAL SUPPLY CONFORMS WITH
ELECTRICAL CHARACTERISTICS SHOWN ON
THE RATING PLATE.
Users are cautioned that maintenance and repairs must be performed by a Garland authorized service agent
using genuine Garland replacement parts. Garland will have no obligation with respect to any product that has been
improperly installed, adjusted, operated or not maintained in accordance with national and local codes or installation
instructions provided with the product, or any product that has its serial number defaced, obliterated or removed,
or which has been modified or repaired using unauthorized parts or by unauthorized service agents.
For a list of authorized service agents, please refer to the Garland web site at http://www.garland-group.com.
The information contained herein, (including design and parts specifications), may be superseded and is subject
to change without notice.
GARLAND COMMERCIAL INDUSTRIES
185 East South Street
Freeland, Pennsylvania 18224
Phone: (570) 636-1000
Fax: (570) 636-3903
GARLAND COMMERCIAL RANGES, LTD.
1177 Kamato Road, Mississauga, Ontario L4W 1X4
CANADA
Phone: 905-624-0260
Fax: 905-624-5669
Enodis UK LTD.
Swalloweld Way, Hayes, Middlesex UB3 1DQ ENGLAND
Telephone: 081-561-0433
Fax: 081-848-0041
Part # 1844066 Rev 01 (02/13/08)) © 2004 Garland Commercial Industries, Inc.
Part # 1844066 Rev 01 (02/13/2008) Page 1
Page 2

IMPORTANT INFORMATION
WARNING:
This product contains chemicals known to the state of California to cause cancer and/or birth defects
or other reproductive harm. Installation and servicing of this product could expose you to airborne
particles of glass wool/ceramic fibers. Inhalation of airborne particles of glass wool/ceramic fibers
is known to the state of California to cause cancer.
Part # 1844066 Rev 01 (02/13/2008)Page 2
Page 3

TABLE OF CONTENTS
IMPORTANT INFORMATION. . . . . . . . . . . . . . . . . . . . . . . . . . . . . . . . . . . . . . . . . . 2
DIMENSIONS AND SPECIFICATIONS . . . . . . . . . . . . . . . . . . . . . . . . . . . . . . . . . . 4
PRODUCT INFORMATION. . . . . . . . . . . . . . . . . . . . . . . . . . . . . . . . . . . . . . . . . . . . 5
INTRODUCTION. . . . . . . . . . . . . . . . . . . . . . . . . . . . . . . . . . . . . . . . . . . . . . . . . . . . . 6
Rating Plate . . . . . . . . . . . . . . . . . . . . . . . . . . . . . . . . . . . . . . . . . . . . . . . . . . . . . . . . . . . . . . . . . . . . . .6
Safety . . . . . . . . . . . . . . . . . . . . . . . . . . . . . . . . . . . . . . . . . . . . . . . . . . . . . . . . . . . . . . . . . . . . . . . . . . .6
OPERATING INSTRUCTIONS. . . . . . . . . . . . . . . . . . . . . . . . . . . . . . . . . . . . . . . . . . 7
Explanation of Controls: . . . . . . . . . . . . . . . . . . . . . . . . . . . . . . . . . . . . . . . . . . . . . . . . . . . . . . . . . .7
Control Basics. . . . . . . . . . . . . . . . . . . . . . . . . . . . . . . . . . . . . . . . . . . . . . . . . . . . . . . . . . . . . . . . . . . .7
Getting Started . . . . . . . . . . . . . . . . . . . . . . . . . . . . . . . . . . . . . . . . . . . . . . . . . . . . . . . . . . . . . . . . . .7
Setting Air Temperature (default mode) . . . . . . . . . . . . . . . . . . . . . . . . . . . . . . . . . . . . . . . . . . .8
Setting Humidity (default mode): . . . . . . . . . . . . . . . . . . . . . . . . . . . . . . . . . . . . . . . . . . . . . . . . .8
Programming Menu Presets . . . . . . . . . . . . . . . . . . . . . . . . . . . . . . . . . . . . . . . . . . . . . . . . . . . . . . 9
Selecting Menu Presets . . . . . . . . . . . . . . . . . . . . . . . . . . . . . . . . . . . . . . . . . . . . . . . . . . . . . . . . .10
Reviewing Operating Setpoints . . . . . . . . . . . . . . . . . . . . . . . . . . . . . . . . . . . . . . . . . . . . . . . . . .10
Alarm . . . . . . . . . . . . . . . . . . . . . . . . . . . . . . . . . . . . . . . . . . . . . . . . . . . . . . . . . . . . . . . . . . . . . . . . . .10
Calculating the Water Temperature . . . . . . . . . . . . . . . . . . . . . . . . . . . . . . . . . . . . . . . . . . . . . .10
MAINTENANCE & CLEANING. . . . . . . . . . . . . . . . . . . . . . . . . . . . . . . . . . . . . . . . 11
GETTING MORE INFORMATION . . . . . . . . . . . . . . . . . . . . . . . . . . . . . . . . . . . . . 11
Part # 1844066 Rev 01 (02/13/2008) Page 3
Page 4
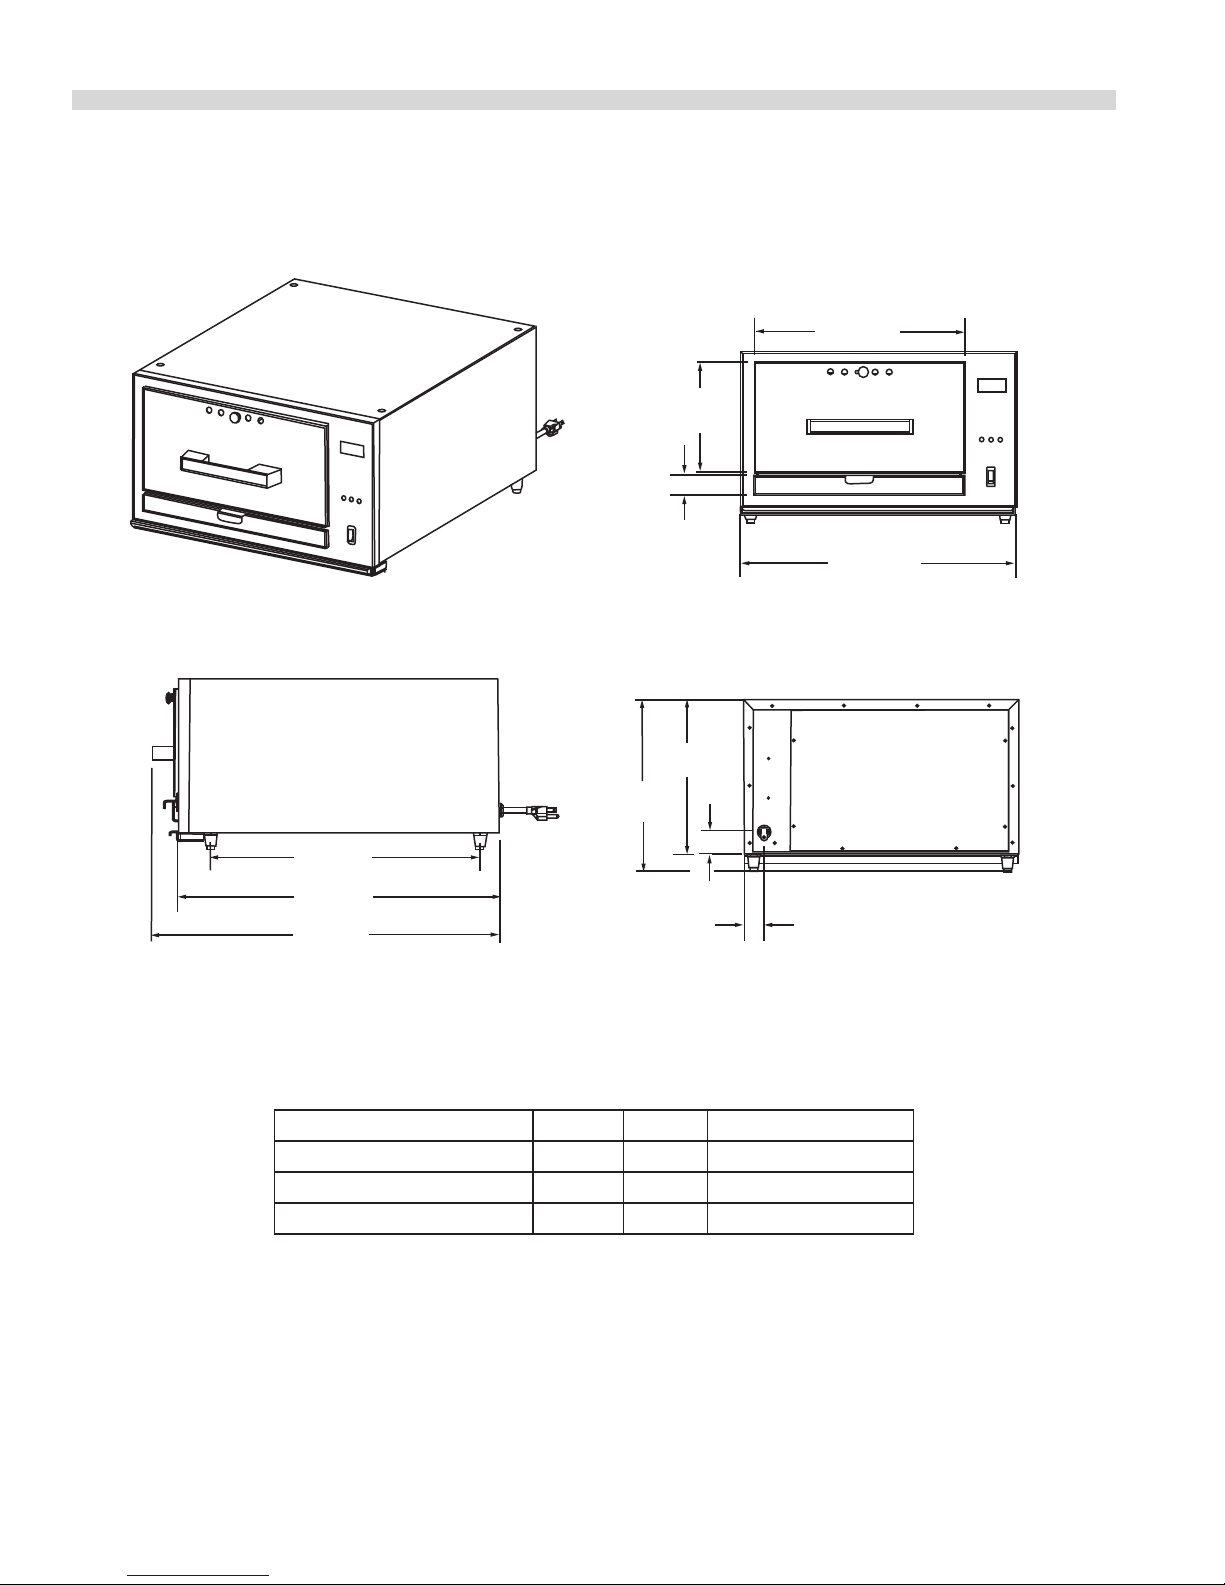
DIMENSIONS AND SPECIFICATIONS
18.875"
[479MM]
22.563
[573MM]
24.344
[618MM]
SIDE VIEW
12.000"
[305MM]
10.828"
[326MM]
1.578"
[40MM]
1.500
[38MM]
REAR VIEW
1.375
[34MM]
14.938
[379MM]
7.672
[195MM]
19.500
[495MM]
FRONT VIEW
Electrical Characteristics Watts Amps Plug Conguration
120V/60Hz/1 Phase 900 7.50 NEMA 5-15P
230V/50Hz/1 Phase 900 3.92 —
240V/50Hz/1 Phase 980 4.08 —
Part # 1844066 Rev 01 (02/13/2008)Page 4
Page 5

PRODUCT INFORMATION
Ventilation
Adjustment
Knob
Water Pan
Vent Holes
LED Display
Solid State
Control
Power
Switch
Condensation
Drip Tray
Product Drawer
2" (50mm) deep Perforated
Pan, standar, (accepts
pans up to 4"/100mm deep)
Removable Drawer
Guides with Stainless
Steel Bal Bearings
Removable Drip Tray
keeps contaminants
out of Water pan
Part # 1844066 Rev 01 (02/13/2008) Page 5
Page 6

PRODUCT INFORMATION Continued
The PHD holding drawer is intended to keep cooked food
warm and fresh. It is not intended for cooking or steaming
food. The product allows food to be cooked ahead of
incoming orders at peak periods and maintain freshness and
quality while the food is being serviced.
The humidity set point is intended to approximate a Relative
Humidity scale not replicate it. There are many factors that
limit the accuracy of an RH scale that can be achieved.
Settings will however be repeatable under consistent
circumstances and our humidity scale will be consistent with
all PHD products.
Air temperature and humidity settings will have to be
determined experimentally for optimal product life and
quality. As a guide we provide the following typical data:
PRODUCT
Hamburger Patties 70 158 60 minutes
Chicken Pieces 85 185 45 minutes
Chicken Chunks 85 185 45 minutes
Bread 60 140 60 minutes +
HOLDING TEMP.
°C °F
TYPICAL
MAXIMUM
HOLDING TIME
NOTE: For Safe hot food holding, NEVER allow food
temperatures to be less than 140°F or 60° C.
For those foods that require additional moisture during the
holding period, water can be added to the interior pan. For
those foods that do not require additional moisture, the
bottom control and heating element can still be utilized
without the additional of water to the pan. It is suggested
that the drawer be closed during the heat up and holding
process to minimize heat loss, also to assure proper
temperature control.
It is suggested prior to holding prepared foods that the
drawer or drawers be preheated for approximately 60
minutes.
INTRODUCTION
Rating Plate
For proper operation, the information on the rating plate of
your new equipment must match your electrical supply.
When corresponding with the factory or your equipment
dealer regarding service problems or replacement parts,
be sure to refer to the particular unit by the correct model
number, including prex and sux letters and numbers and
serial number. The rating plate axed to the unit contains
this information.
Safety
It is the responsibility of the supervisor or equivalent
person to ensure that users of this equipment wear suitable
protective clothing and to draw attention to the fact that
some parts will by necessity, become very hot and will cause
burns if touched accidentally.
Part # 1844066 Rev 01 (02/13/2008)Page 6
Page 7

OPERATING INSTRUCTIONS
°F
°C
°F Display LED
°C Display LED
Parameter Adjust
Mode Indicator LED
Service/Select Key
(hidden on some models)
Increase Key
Decrease Key
The PHD PLUS provides two heating zones. The upper
element rated at 350 Watts is the primary air heat source. The
lower element rated at 550 Watts is used to heat the water
when operating the humidity mode and assists in heating
the air in dry operating modes.
The temperature control provides the following features:
• Continuous actual air temperature display provides an
accurate indication for food safety.
• The temperature can be displayed in Celsius or
Fahrenheit degrees.
• Four Menu settings. Up to four preset air and humidity
setting can be made.
• A unique humidity program provides an accurate
and repeatable method of controlling the humidity
throughout the air temperature range.
• Air temperature settings up to 200°F/93°C.
• Humidity settings up to 90%.
Explanation of Controls:
°F DISPLAY LED: Indicates that the °F display is selected.
°C DISPLAY LED: Indicates that the °C display is selected.
PARAMETER ADJUST MODE LED: Indicates that the
parameter adjust mode is selected.
DIGITAL DISPLAY: Normally displays the actual air
temperature and pre-programmed menus. In set mode
displays other parameters.
SERVICE / SELECT KEY (Hidden on some models): Used to
enter the parameter adjust mode or select a preprogrammed
menu.
INCREASE KEY: Increases the selected parameter value.
Views the air temperature set point in operation mode.
DECREASE KEY: Decreases the selected parameter value.
Views the humidity set point in operation mode.
NOTE The display parameters may be changed in steps by
pushing the or keys repetitively, or automatically by
holding down the same key longer. Digits will increment
or decrement at accelerating rates as the or keys is
continually pressed.
Control Basics
There are a number of control features, which need to be
understood before proceeding with programming and
operating the PHD PLUS.
1. Default air temperature of 150°F or 66°C and 50%
humidity has been programmed in.
2. No preset temperature and humidity has been
programmed.
3. When the unit powers up the control defaults to the last
programmed setting.
Getting Started
Connect the power supply and turn the power switch to the
“1” position.
When power is rst applied to a factory unit: the display
will show [888] and the 3 status LED’s will come on for 10
seconds and then go o for 1 second.
The actual air temperature will be displayed.
Part # 1844066 Rev 01 (02/13/2008) Page 7
Page 8

OPERATING INSTRUCTIONS Continued
°F
°C
°F
°C
°F
°C
°F
°C
Setting Air Temperature (default mode)
1. Press the Select Key until “Air” appears on the display.
Notice the LED is illuminated and will remain
illuminated until the set mode is exited. You will exit set
mode automatically when no key has been pressed for 5
seconds. The last value entered will be stored in memory.
Setting Humidity (default mode):
1. Press the Select Key until “HU” appears on the display.
Notice the LED is illuminated and will remain
illuminated until the set mode is exited. You will exit set
mode automatically when no key has been pressed for 5
seconds. The last value entered will be stored in memory.
2. Press the or key to increase or decrease the
displayed air temperature. The factory default is 150°F or
66°C.
NOTE: The temperature programmed here will become the
default setting. This setting will be restored even after the
power has been turned o.
2. Press the or key to increase or decrease the
displayed humidity setting. To activate the humidity the
setting must be greater than 10. To operate in dry mode
set the display to 10. The factory default is 50.
NOTE: The temperature programmed here will become the
default setting. This setting will be restored even after the
power has been turned o.
Part # 1844066 Rev 01 (02/13/2008)Page 8
Page 9

OPERATING INSTRUCTIONS Continued
°F
°C
°F
°C
°F
°C
°F
°C
Programming Menu Presets
1. Press the Select Key until “Air” appears on the display.
Notice the LED is illuminated and will remain
illuminated until the set mode is exited. You will exit set
mode automatically when no key has been pressed for 5
seconds.
4. Press the Select Key again to program the humidity.
2 Press the Select Key momentarily and scroll through the
“Hu” display until the display reads “PIA”.
3. Press the or key to increase or decrease the
displayed air temperature. The factory default is 150°F or
66°C.
5. Press the or key to increase or decrease the
displayed humidity setting. To activate the humidity the
setting must be greater than 10, to operate in dry mode
set the display to 10. The factory default is 50. Continue
the same procedure to program menu presets P2, P3 and
P4. Note that in user mode P1-P4 does not appear unless
a value has been programmed.
Part # 1844066 Rev 01 (02/13/2008) Page 9
Page 10

OPERATING INSTRUCTIONS Continued
0-5-10-15 5 10 15 20 25 30 35 40
100
90
80
70
60
50
40
110
30
100
90
80
70
60
50
40
110
30
Humidity Relationship Versus (Air set point – Water set point)
Air Set point temperature – Water Set point temperature in Fahrenheit
Humidity %rh
Humidity relationship for humidity
higher than 58% rh
Humidity relationship for a
humidity lower than 58% rh
Selecting Menu Presets
When menu presets have been programmed they are then
available in operation mode. To select a preset, press the
select key momentarily. The rst preset “P_” will appear. Press
the Select key momentarily again to select another menu
preset or continue to press the Select key momentarily to
scroll through the menu presets.
Reviewing Operating Setpoints
In operation mode, press the key to view the air
temperature set point. Press the key to view the humidity
set point
Alarm
If air temperature is < (less than the (Air setpoint – 10°C or
18°F) or > (greater than) the (Air setpoint + 10°C or 18°F), the
air temperature display will ash. Pressing any key will stop
the display from ashing.
Calculating the Water Temperature
To provide a simple and consistent means of setting the
chamber humidity we have created a relationship between
the water temperature and the air temperature where the
lower heat source is scaled in percent relative humidity.
By setting the humidity to minimum (10%), the lower
temperature will match the air temperature. In applications
where it is necessary to set the lower element temperature
less than the air temperature in dry mode or for a reference is
humidity mode we provide the preceding chart to calculate
the set point.
Part # 1844066 Rev 01 (02/13/2008)Page 10
Page 11

MAINTENANCE & CLEANING
WARNING: This appliance is not protected against water
jets. Do not clean with water jets
Keep your cabinet clean by simply wiping the interior and
exterior, as needed with a damp cloth or sponge of mild
soapy solution. Never use abrasives, acids, or strong cleaners.
Do not ood or allow electrical parts to become wet. The
interior pans and humidier pan are removable for easy
cleaning. A stainless steel cleaner/polish may be applied to
the exterior to maintain a like-new appearance. Do not use
wax or strong cleaners on vinyl trim or overlays.
GETTING MORE INFORMATION
The Authorized Dealer from whom you purchased your
Garland PHD has an interest in your continued satisfaction.
Questions regarding accessory items that are available for
use with this equipment or any unusual conditions should
be discussed with your dealer. Of course you may always
contact Garland if you have questions or require further
information about this equipment or desire literature
covering our other ne quality products.
Regular servicing by a competent person is recommended to
ensure the continued safe and ecient performance of the
appliance.
Wherever possible avoid overheating idle equipment, as this
is the primary cause for increased service cost.
WARNING: Disconnect the appliance from electrical supply
before commencing any servicing work.
Part # 1844066 Rev 01 (02/13/2008) Page 11
Page 12

 Loading...