

Page 1
Flex Art. 1890
EN Operator’s manual
Water Control
FR Mode d’emploi
Programmation d’arrosage
SV Bruksanvisning
Bevattningsautomatik
DA Brugsvejledning
Vandingskontrol
IT Istruzioni per l’uso
Unità di controllo per irrigazione
ES Instrucciones de empleo
Control de riego
PT Manual de instruções
Controlador de rega
HU Használati utasítás
Öntözésvezérlés
EL Οδηγίες χρήσης
Σύστημα ελέγχου ποτίσματος
RU Инструкция по эксплуатации
Блок управления поливом
SL Navodilo za uporabo
Upravljalnik zalivanja
UK Інструкція з експлуатації
Блок керування поливом
FR EN
DA SV
IT
ES
HUELRUSLUK PT
Page 2
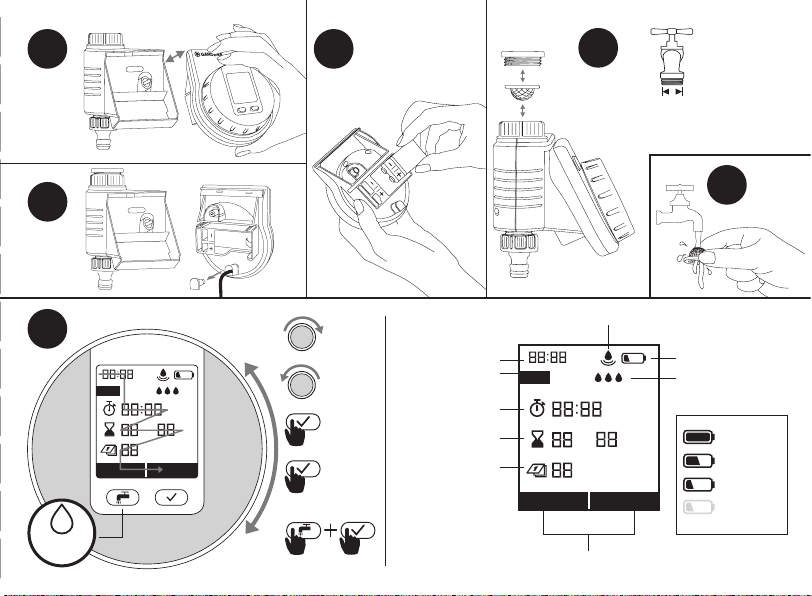
A
SET
ON OFF
min
hrs
sec
Sensor
B
C
Ø 26,5 mm G3/4"
+ Ø 33,3 mm G1"
1x 9V
E
D
F
Water Now
on /off
Active Watering
Next
Back
O.K.
3 sec. Key Lock
3 sec. Reset
(0-23) hrs (0-59) min.
(0-99) min., (0-59) sec.
Time
Connecting
sensor
Start Time
Run Time
Frequency
4, 6, 8, 12, 24,
48, 72 hrs
SET
Sensor
min
sec
hrs
ON OFF
Time Plan active / deactive
Battery Condition*
Sensor Sensitivity
*
max. 1 year
min. 4 weeks
max. 4 weeks
too weak for
opening again
2
Page 3
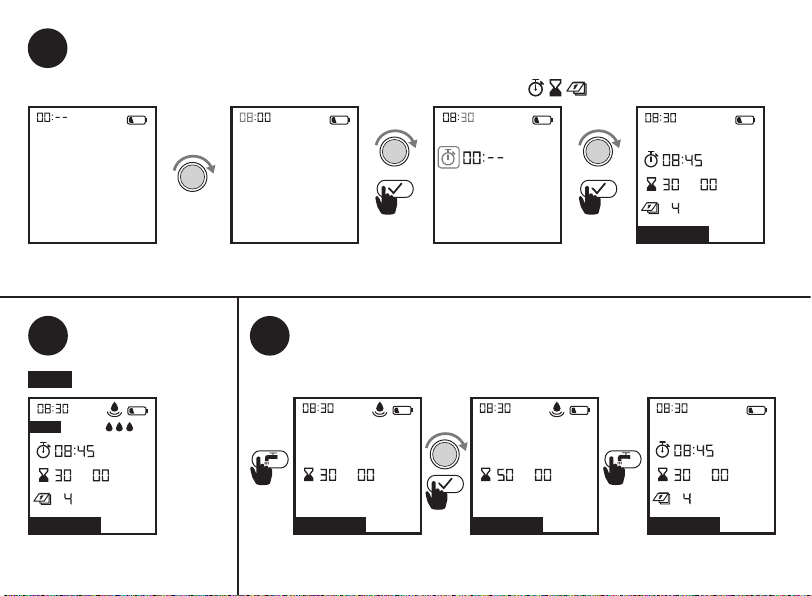
G
1 Set clock (hrs) 2 Set clock (min.)
H
I
1 Active Watering 2 Change Duration
= Connected Sensor
SET
SET
Sensor
sec
min
hrs
ON
3
ON
3 Set time plan
4 Confirm time plan
sec
min
hrs
ON
3 Stop Active
Watering anytime
sec
min
ON
sec
min
ON
sec
min
hrs
Page 4
GARDENA Water Control Flex
EN
Translation of the original instructions.
For safety reasons, children and young
people under 16 as well as anyone who is
not familiar with these operating instructionsshould not use the product. Persons with
reduced physical or mental abilities may use the
product only if they are supervised or instructed by
a responsible person. Children must be supervised
to ensure that they do not play with the product.
Never operate the product when you are tired, ill or
under the influence of alcohol, drugs or medicine.
1. SAFETY
Important!
Read the operator’s manual carefully before use
and keep for future reference.
4
Intended use:
The GARDENA Water Control is intended for private
use in domestic and hobby gardens, exclusively
for outdoor use, to control sprinklers and watering
systems. The Water Control can be used for automatic watering during holidays.
DANGER! The GARDENA Water Control must
not be used for industrial purposes or in
conjunction with chemicals, foodstuffs, easily
flammable and explosive materials.
Battery:
To ensure the Water Control runs safely,
only a 9V alkaline manganese battery
(alkaline) type IEC 6LR61 must be used!
Page 5
In order to stop the Water Control from failing
because of a weak battery if you are away for
along time, the battery must be replaced when
the battery symbol flashes.
CAUTION! If the control section is
removed when the valve is open, the
valve remains open until the control section
is reattached.
EN
Setting up:
The Water Control may only be set up vertically
with the sleeve nut to the top to prevent water
penetrating into the battery compartment.
The minimum water output to ensure that the
Water Control functions correctly is 20 – 30 l/h.
For example, at least 10 x 2-litre Drip Heads are
required to control the Micro-Drip-System.
At high temperatures (over 70 °C at the display)
the LCD display may extinguish. This does not
affect the program in any way. When the computer cools down the LCD display illuminates
again.
The max. temperature for the water flow is
40 °C.
Avoid tensile strain.
v Do not pull the hose connected to the
Water Control.
DANGER! Cardiac arrest!
This product makes an electromagnetic
field while it operates. This field may under some
conditions interfere with active or passive medical
implants. To decrease the risk of conditions that
can possibly injure or kill, we recommend persons
with medical implants to speak with their physician
and the medical implant manufacturer before you
operate the product.
DANGER! Risk of suffocation!
Small parts can be easily swallowed. There
is also a risk that the polybag can suffocate toddlers. Keep toddlers away when you assemble the
product.
5
Page 6

A video of the
EN
commissioning
and setting
processes is
available here:
2. INITIAL OPERATION v (Fig. A – D)
3. FUNCTION v (Fig. F)
The settings can be adjusted when the control
panel is removed. You can change the settings
or move to the next setting by turning the outer
wheel. Pressing the
respective input. Pressing the button for a minimumof 3 seconds locks or unlocks the display.
Time
Connecting
sensor
Start Time
(0 – 23) hrs (0 – 59) min.
Run Time
(0 – 29) sec.
(0 – 99) min.
Frequency
4, 6, 8, 12, 24,
48, 72 hrs
6
button confirms the
SET
Sensor
min
hrs
ON
ON OFF
sec
Active
Watering
Battery
Condition *
Sensor
Sensitivity
The number of
drops represents
the measured
soil moisture.
Timeplan
active /
deactive
*
max. 1 year
min. 4 weeks
max. 4 weeks
too weak for opening again
4. PROGRAMMING v (Fig. G – I)
1 Set time (hours) | 2 Set time (mins) |
Fig. G:
3 Select schedule | 4 Confirm schedule
Fig. H: Set = Sensor connected
Fig. I: 1 Active watering | 2 Change watering duration |
3 Stop active watering at any time
The saved watering schedule can be activated or
deactivated by pressing on / off. By pressing the
button, manual watering can be started or
stopped at a desired time (see fig. I ).
Watering tip: For pot plants that required small
amounts of water at regular intervals, short watering cycles are ideal in combination with a drip
irrigation system.
Connect soil moisture sensor (optional) fig. D:
After a sensor has been connected, the “set sensor” display will appear. By selecting 3-drip / 0-drip
the sensor response will be activated / deactivated.
After successful activation, the “set” display will
disappear (see fig. H).
If the soil is sufficiently moist, watering will be
immediately stopped or prevented.
Page 7

5. MAINTENANCE v (Fig. E)
6. STORAGE
EN
To put into storage:
v The product must be stored away from
children.
v To preserve the battery, it should be
removed (fig. B).
v Store the controller and the valve unit in
a dry, enclosed and frost-free place.
IMPORTANT! Dispose of the product through or via your municipal recycling collection centre.
Disposal of the battery: Please return a flat battery to a GARDENA dealer or dispose of it properly at
your nearest recycling centre. Dispose of the battery only when discharged.
Disposal: (in accordance with RL2012/19/EC)
The product must not be disposed of to
normal household waste. It must be disposed of in line with local environmental
regulations.
7. TROUBLESHOOTING
Problem Possible Cause Remedy
No display appears Battery is inserted incorrectly. v Check the polarity markings
Battery is flat. v Insert a new (alkaline) battery.
Temperature on the display is higher
than 70 °C.
match (+ / –).
v Display appears after the
temperature has dropped.
7
Page 8

Problem Possible Cause Remedy
EN
Manual watering is
not possible using the
button
Watering program is
not being undertaken
(no watering)
Water Control does
not close
8
Low battery is continuously displayed. v Insert a new (alkaline) battery.
Tap is turned off. v Turn the tap on.
Controller is not connected. v Mount the controller on housing.
Minimum pressure of 0.5 bar not
available.
Program entry / modification during or
just before the start pulse.
Valve was opened manually previously. v Avoid possible program over-
Tap is turned off. v Turn the tap on.
Soil moisture or rain sensor registers
damp.
Controller is not connected. v Mount the controller on housing.
Low battery is continuously displayed. v Insert a new (alkaline) battery.
Minimum pressure of 0.5 bar not
available.
Minimum quantity of water drawn is
less than 20 l/h.
Valve soiled. v Flush in the opposite direction to
v Ensure a pressure of at least
0.5 bar.
v Make program entry / modifica-
tion outside the programmed
start times.
laps.
v If dry, check the setting / location
of the soil moisture / rain sensor.
v Ensure a pressure of at least
0.5 bar.
v Connect more drip heads.
the normal flow direction.
Page 9

NOTE: For any other malfunctions please contact the GARDENA service department.
Repairs must only be done by GARDENA service departments or specialist dealers
approved by GARDENA.
8. TECHNICAL DATA
EN
Water Control Value / Unit
Min. / max. operating
pressure
Operating temperature
range
Flow medium Clear fresh water
Max. liquid temperature 40 °C
No. of program-
controlled watering
sequences per day
0.5 bar / 12 bar
5 °C to 50 °C
6 (every 4 h), 4 (every
6 h), 3 (every 8 h),
2 (every 12 h), 1 (every
24 h), every other day
(every 48 h), every
third day (every 72 h)
Water Control Value / Unit
No. of program-
controlled watering
sequences per week
Watering duration 1 sec. ‒ 99 min.
Battery required 1 x 9V alkaline
Operating time of the
battery
max. 42
59 sec.
manganese
Typ IEC 6LR61
approximately
1 year
9. ACCESSORIES
GARDENA Soil Moisture Sensor Art. 1188
GARDENA Anti-theft device Art. 1815-00.791.00 from the GARDENA Service
9
Page 10

10. SERVICE / WARRANTY
EN
Service:
Please contact the address on the back page.
Warranty:
In the event of a warranty claim, no charge is levied
to you for the services provided.
GARDENA Manufacturing GmbH offers a 2-year
warranty for this product (from the date of purchase) if the product has been used exclusively for
private purposes. This manufacturer’s warranty
does not apply to used products purchased from
a secondary market. This warranty includes all
significant defects of the product that can be
proved to be material or manufacturing faults. This
war ranty is fulfilled by supplying a fully functional
replacement product or by repairing the faulty
product sent to us free of charge; we reserve the
right to choose between these options. This
service is subject to the following provisions:
• The product was used for its intended purpose
as per the recommendations in the operating
instructions.
• Neither the purchaser nor a third party has
attempted to repair the product.
10
• Only original GARDENA spare and wear parts
were used.
Normal wear and tear of parts and components,
optical changes, as well as wear parts and consumables, are excluded from the warranty.
This manufacturer’s warranty does not affect
warranty entitlements against the dealer / retailer.
If problems arise with this product, please contactour Service department. In the event of a warranty claim, please send the defective product
together with a copy of the purchase receipt and
a description of the defect, sufficiently stamped, to
the GARDENA service address on the back page.
Consumables:
Faults which occur as a result of incorrectly
installed or leaking batteries are not covered by
the guarantee.
Damage caused by frost is not covered by the
warranty.
Page 11

EN Product liability
In accordance with the German Product Liability Act,
we hereby expressly declare that we accept no
liability for damage incurred from our products where
said products have not been properly repaired by
a GARDENA-approved service partner or where
original GARDENA parts or parts authorised by
GARDENA were not used.
DA Produktansvar
I overensstemmelse med den tyske produktansvarslov
erklærer vi hermed udtrykkeligt, at vi ikke påtager os
noget ansvar for skader på vores produkter, hvis de
pågældende produkter ikke er blevet repareret korrekt
af en GARDENA-godkendt servicepartner, eller hvor
der ikke er brugt originale GARDENA-reservedele eller
godkendte reservedele fra GARDENA.
FR Responsabilité
Conformément à la loi relative à la responsabilité du fait
des produits défectueux, nous déclarons expressément
par la présente que nous déclinons toute responsabilité
pour les dommages résultant de nos produits, si lesdits
produits n‘ont pas été correctement réparés par un
partenaire d‘entretien agréé GARDENA ou si des pièces
d’origine GARDENA ou des pièces agréées GARDENA
n‘ont pas été utilisées.
SV Produktansvar
I enlighet med tyska produktansvarslagar förklarar vi
härmed uttryckligen att vi inte åtar oss något ansvar
för skador som orsakas av våra produkter där produkterna inte har genomgått korrekt reparation från
en GARDENA-godkänd servicepartner eller där
originaldelar från GARDENA eller delar godkända
av GARDENA inte använts.
IT Responsabilità del prodotto
In conformità con la Legge tedesca sulla responsabilità
del prodotto, con la presente dichiariamo espressamente che decliniamo qualsiasi responsabilità per danni
causati dai nostri prodotti qualora non siano stati correttamente riparati presso un partner di assistenza
approvato GARDENA o laddove non siano stati utilizzati
ricambi originali o autorizzati GARDENA.
ES Responsabilidad sobre el producto
De acuerdo con la Ley de responsabilidad sobre productos alemana, por la presente declaramos expresamente que no aceptamos ningún tipo de responsabilidad por los daños ocasionados por nuestros productos
si dichos productos no han sido reparados por un socio
de mantenimiento aprobado por GARDENA o si no se
han utilizado piezas originales GARDENA o piezas autorizadas por GARDENA.
89
Page 12

PT Responsabilidade pelo produto
De acordo com a lei alemã de responsabilidade pelo
produto, declaramos que não nos responsabilizamos
por danos causados pelos nossos produtos, caso os
tais produtos não tenham sido devidamente reparados
por um parceiro de assistência GARDENA aprovado
ou se não tiverem sido utilizadas peças GARDENA
originais ou peças autorizadas pela GARDENA.
EL Ευθύνη προϊόντος
Σύμφωνα με τον γερμανικό νόμο περί Ευθύνης για
τα Προϊόντα, με το παρόν δηλώνουμε ρητώς ότι δεν
αποδεχόμαστε καμία ευθύνη για τυχόν ζημίες που
προκύπτουν από τα προϊόντα μας εάν αυτά δεν
έχουν επισκευαστεί σωστά από κάποιον εγκεκριμένο
συνεργάτη επισκευών της GARDENA ή εάν δεν έχουν
χρησιμοποιηθεί αυθεντικά εξαρτήματα GARDENA
ή εξαρτήματα εγκεκριμένα από την GARDENA.
HU Termékszavatosság
A németországi termékszavatossági törvénnyel összhangban ezennel nyomatékosan kijelentjük, hogy nem
vállalunk felelősséget a termékeinkben keletkezett olyan
károkért, amelyek valamely GARDENA által jóváhagyott
szervizpartner által nem megfelelően végzett javításból
adódtak, vagy amely során nem eredeti GARDENA
alkatrészeket vagy a GARDENA által jóváhagyott alkatrészeket használtak fel.
90
SL Odgovornost proizvajalca
V skladu z nemškimi zakoni o odgovornosti za
izdelke,izrecno izjavljajo, da ne sprejemamo nobene
odgovornosti za škodo, ki jo povzročijo naši izdelki,
če teh niso ustrezno popravili GARDENINI odobreni
servisni partnerji ali pri tem niso bili uporabljeni originalni
GARDENINI nadomestni deli ali GARDENINIMI homologiranimi nadomestnimi deli.
Page 13

EN EC Declaration of Conformity
The undersigned, GARDENA Germany AB,
PO Box 7454, S-103 92 Stockholm, Sweden,
hereby certifies that, when leaving our factory, the
units indicated below are in accordance with the
harmonised EU guidelines, EU standards of safety
and product specific standards. This certificate
becomes void if the units are modified without our
approval.
DA EU-overensstemmelseserklæring
Undertegnede, GARDENA Germany AB, PO Box 7454,
S-103 92 Stockholm, Sverige erklærer hermed, at
nedenfor anførte enheder er i overensstemmelse
med de harmoniserede EUret ningslinjer, EU-standarder
for sikkerhed og produktspecifikke standarder, når de
forlader fabrikken. Denne erklæring ugyldiggøres, hvis
enhederne ændres uden vores godkendelse.
FR Déclaration de conformité CE
Le constructeur, soussigné : GARDENA Germany AB,
PO Box 7454, S-103 92 Stockholm, Suède, déclare
qu’à la sortie de ses usines le matériel neuf désigné
ci-dessous était conforme aux prescriptions des directives européennes énoncées ciaprès et conforme aux
règles de sécurité et autres règles qui lui sont applicables
dans le cadre de l’Union européenne. Toute modification
apportée à cet appareil sans notre accord annule la validité de ce certificat.
SV EG-försäkran om överensstämmelse
Undertecknad firma GARDENA Germany AB,
PO Box 7454, S-103 92 Stockholm, Sverige, intygar
härmed att nedan nämnda produkter, när de lämnar
vår fabrik, överensstämmer med EU:s riktlinjer, EU:s
säkerhetsstandarder och produktspeci fika standarder.
Detta intyg skall ogiltigförklaras om produkten ändras
utan vårt godkännande.
IT Dichiarazione di conformità CE
La sottoscritta GARDENA Germany AB, PO Box 7454,
S-103 92 Stockholm, Svezia, certifica che il prodotto
qui di seguito indicato, nei modelli da noi commercializzati, è conforme alle direttive armonizzate UE nonché
agli standard di sicu rezza UE e agli standard specifici
di prodotto. Qualunque modifica apportata al prodotto
senza nostra specifica autorizzazione invalida la presentedichiarazione.
ES Declaración de conformidad CE
El abajo firmante, GARDENA Germany AB, PO Box 7454,
S-103 92 Stockholm, Suecia, certifica por la presente
que, cuando salen de la fábrica, las unidades indicadas
a continuación cumplen las normas de armonización de
la UE, las normas de la UE sobre seguridad y las normasespecíficas del producto. Este certificado quedará
sin efecto si se modifican las unidades sin nuestra autorización.
91
Page 14

PT Declaração de conformidade CE
O abaixo-assinado, GARDENA Germany AB,
PO Box 7454, S-103 92 Stockholm, Suécia, certifica
por este meio que, ao sair da nossa fábrica, as
unidades indicadas acima estão em conformidade
com as diretrizes uniformizadas da UE, os padrões de
segurança da UE e os padrões específicos do produto.
Este certificado deixa de ser válido se as unidades
forem modificadas sem a nossa aprovação.
EL Δήλωση Συμμόρφωσης ΕΚ
Η υπογεγραμμένη εταιρεία, GARDENA Germany AB,
PO Box 7454, S-103 92 Stockholm, Σουηδία, πιστοποιεί ότι, κατά την έξοδο από το εργοστάσιο, οι μονάδες που αναφέρονται κατω τέρω συμμορφώνονται με
τις εναρμονισμένες οδηγίες ΕΕ, τα πρότυπα ασφαλείας της ΕΕ και τα συγκεκριμένα πρότυπα προϊόντος. Αυτό το πιστοποιητικό καθίσταταιάκυρο εάν οι
μονάδες έχουν τροποποιηθεί χωρίς την έγκρισή μας.
HU EK megfelelőségi nyilatkozat
Alulírott GARDENA Germany AB, PO Box 7454,
S-103 92 Stockholm, Svédország ezzel tanúsítja,
hogy az alábbiakban leírt egységek a gyár elhagyásakor megfeleltek a harmonizált uniós előírásoknak és
bizton sági és termékspecifikus szabványoknak.
Ez a tanúsítvány érvényét veszti, ha az egységeket
jóváhagyásunk nélkül átalakítják.
92
SL Izjava ES o skladnosti
Spodaj podpisana, GARDENA Germany AB, PO Box
7454, S-103 92 Stockholm, Švedska, s to izjavo
potrjuje, da je bila spodaj navedena enota ob izhodu
iz tovarne skladna z usklaje nimi smerni cami EU,
standardi EU za varnost in stan dardi, specifičnimi za
izdelek. Izjava postane neveljavna v primeru neodobrenespremembe enote.
Page 15

Description of the product:
Désignation du produit :
Beskrivning av produkten:
Beskrivelse af produktet:
Descrizione del prodotto:
Descripción del producto:
Descrição do produto:
A termék leírása:
Περιγραφή του προϊόντος:
Opis izdelka:
Product type:
Type de produit :
Produkttyp:
Produkttype:
Tipo di prodotto:
Tipo de producto:
Tipo de produto:
Terméktípus:
Τύπος προϊόντος:
Vrsta izdelka:
Water Control
Programmation d’arrosage
Bevattningsautomatik
Vandingskontrol
Unità di controllo per irrigazione
Control de riego
Controlador de rega
Öntözésvezérlés
Σύστημα ελέγχου ποτίσματος
Upravljalnik zalivanja
Article number:
Référence :
Artikelnummer:
Artikelnummer:
Codice articolo:
Referencia:
Número de referência:
Cikkszámok:
Κωδικός είδους:
Številka izdelka:
Flex 1890
EC-Directives:
Directives CE :
EU-direktiv:
EF-direktiver:
Direttive UE:
Directiva CE:
Diretivas CE:
EK-irányelvek:
Οδηγίες ΕΚ:
Direktive EU:
2014/30/EC
2011/65/EC
Hinterlegte Dokumentation:
GARDENA Technische
Dokumentation,
M. Kugler, 89079 Ulm
Deposited Documentation:
GARDENA Technical
Documentation,
M. Kugler, 89079 Ulm
Documentation déposée:
Documentation technique
GARDENA,
M. Kugler, 89079 Ulm
Year of CE marking:
Année d’apposition du marquage CE :
Märkningsår:
CE-Mærkningsår:
Anno di applicazione della certificazione CE:
Colocación del distintivo CE:
Ano de marcação pela CE:
CE-jelzés elhelyezésének éve:
Έτος σήματος CE:
Leto namestitve CE-oznake:
Ulm, 20.12.2018
Fait à Ulm, le 20.12.2018
Ulm, 2018.12.20.
Ulm, 20.12.2018
Ulm, 20.12.2018
Ulm, 20.12.2018
Ulm, 20.12.2018
Ulm, 20.12.2018
Ulm, 20.12.2018
Ulm, 20.12.2018
Authorised representative
Le mandataire
Auktoriserad representant
Autoriseret repræsentant
Persona delegata
La persona autorizada
O representante
Meghatalmazott
Ο εξουσιοδοτημένος
Pooblaščenec
Reinhard Pompe
Vice President
2018
93
Page 16

Deutschland / Germany
GARDENA Manufacturing GmbH
Central Service
Hans-Lorenser-Straße 40
D-89079 Ulm
Produktfragen:
(+49) 731 490-123
Reparaturen:
(+49) 731 490-290
service@gardena.com
Albania
COBALT Sh.p.k.
Rr. Siri Kodra
1000 Tirana
Argentina
Husqvarna Argentina S.A.
Av.del Libertador 5954 –
Piso 11 – Torre B
(C1428ARP) Buenos Aires
Phone: (+54) 11 5194 5000
info.gardena@ar.husqvarna.com
Armenia
Garden Land Ltd.
61 Tigran Mets
0005 Yerevan
Australia
Husqvarna Australia Pty. Ltd.
Locked Bag 5
Central Coast BC
NSW 2252
Phone: (+ 61) (0) 2 4352 7400
customer.service@
husqvarna.com.au
Austria / Österreich
Husqvarna Austria GmbH
Industriezeile 36
4010 Linz
Tel. : (+43) 732 77 01 01-485
service.gardena@
husqvarnagroup.com
Azerbaijan
Firm Progress
a. Aliyev Str. 26A
1052 Baku
Belgium
Husqvarna België nv/sa
Gardena Division
Rue Egide Van Ophem 111
1180 Uccle / Ukkel
Tel.: (+32) 2 720 92 12
Mail: info@gardena.be
Bosnia / Herzegovina
SILK TRADE d.o.o.
Industrijska zona Bukva bb
74260 Tešanj
Brazil
Husqvarna do Brasil Ltda
Av. Francisco Matarazzo,
o
1400 – 19
andar
São Paulo – SP
CEP: 05001-903
Tel: 0800-112252
marketing.br.husqvarna@
husqvarna.com.br
Bulgaria
AGROLAND България АД
бул. 8 Декември, № 13
Офис 5
1700 Студентски град
София
Тел.: (+359) 24 66 6910
info@agroland.eu
Canada / US A
GARDENA Canada Ltd.
100 Summerlea Road
Brampton, Ontario L6T 4X3
Phone: (+1) 905 792 93 30
info@gardenacanada.com
Chile
Maquinarias Agroforestales
Ltda. (Maga Ltda.)
Santiago, Chile
Avda. Chesterton
# 8355 comuna Las Condes
Phone: (+56) 2 202 4417
Dalton@maga.cl
Zipcode: 7560330
China
Husqvarna (Shanghai)
Management Co., Ltd.
富世华(上海)管理有限公司
3F, Benq Square B,
No207, Song Hong Rd.,
Chang Ning District,
Shanghai, PRC. 200335
上海市长宁区淞虹路207号明
基广场B座3楼, 邮编: 200335
Colombia
Husqvarna Colombia S.A.
Calle 18 No. 68 D-31, zona
Industrial de Montevideo
Bogotá, Cundinamarca
Tel. 571 2922700 ext. 105
jairo.salazar@husqvarna.com.co
Costa Rica
Compania Exim
Euroiberoamericana S.A.
Los Colegios, Moravia,
200 metros al Sur del Colegio
Saint Francis – San José
Phone: (+506) 297 68 83
exim_euro@racsa.co.cr
Croatia
Husqvarna Austria GmbH
Industriezeile 36
4010 Linz
Tel. : (+43) 732 77 01 01-485
service.gardena@
husqvarnagroup.com
Cyprus
Med Marketing
17 Digeni Akrita Ave
P.O. Box 27017
1641 Nicosia
Czech Republic
Husqvarna Česko s.r.o.
Türkova 2319/5b
149 00 Praha 4 – Chodov
Bezplatná infolinka :
800 100 425
servis@cz.husqvarna.com
Denmark
GARDENA DANMARK
Lejrvej 19, st.
3500 Værløse
Tlf.: (+45) 70 26 47 70
husqvarna@husqvarna.dk
www.gardena.com / dk
Dominican Republic
BOSQUESA, S.R.L
Carretera Santiago Licey
Km. 5 ½
Esquina Copal II.
Santiago
Dominican Republic
Phone: (+809) 736-0333
joserbosquesa@claro.net.do
Ecuador
Husqvarna Ecuador S.A.
Arupos E1-181 y 10 de
Agosto Quito, Pichincha
Tel. (+593) 22800739
francisco.jacome@
husqvarna.com.ec
Estonia
Husqvarna Eesti OÜ
Valdeku 132
EE-11216 Tallinn
info@gardena.ee
Finland
Oy Husqvarna Ab
Gardena Division
Lautatarhankatu 8 B / PL 3
00581 HELSINKI
www.gardena.fi
France
Husqvarna France
9/11 Allée des pierres mayettes
92635 Gennevilliers Cedex
France
http : //www.gardena.com/ fr
N° AZUR: 0 810 00 78 23
(Prix d’un appel local)
Georgia
Transporter LLC
8/57 Beliashvili street
0159 Tbilisi, Georgia
Phone: (+995) 322 14 71 71
Great Britain
Husqvarna UK Ltd
Preston Road
Aycliffe Industrial Park
Newton Aycliffe
County Durham
DL5 6UP
info.gardena@husqvarna.co.uk
Greece
Π.ΠΑΠΑΔΟΠΟΥΛΟΣ ΑΕΒΕ
Λεωφ. Αθηνών 92
Αθήνα
Τ.Κ.104 42
Ελλάδα
Τηλ. (+30) 210 5193 100
info@papadopoulos.com.gr
Hungary
Husqvarna Magyarország Kft.
Ezred u. 1 - 3
1044 Budapest
Telefon: (+36) 1 251-4161
vevoszolgalat.husqvarna@
husqvarna.hu
Iceland
Ó. Johnson & Kaaber
Tunguhalsi 1
110 Reykjavik
ooj@ojk.is
Ireland
Husqvarna UK Ltd
Preston Road
Aycliffe Industrial Park
Newton Aycliffe
County Durham
DL5 6UP
info.gardena@husqvarna.co.uk
Italy
Husqvarna Italia S.p.A.
Via Santa Vecchia 15
23868 VALMADRERA (LC)
Phone: (+39) 0341.203.111
assistenza.italia@it.husqvarna.com
97
Page 17

Japan
KAKUICHI Co. Ltd.
Sumitomo Realty &
Development Kojimachi
BLDG., 8F
5 -1 Nibanncyo
Chiyoda-ku
Tokyo 102-0084
Phone: (+81) 33 264 4721
m_ishihara@kaku-ichi.co.jp
Kazakhstan
LAMED Ltd.
155/1, Tazhibayevoi Str.
050060 Almaty
IP Schmidt
Abayavenue 3B
110 005 Kostanay
Korea
Kyung Jin Trading CO.,LTD.
107-4, SunDuk Bld.,
YangJae-dong,
Seocho-gu,
Seoul, (zipcode: 137-891)
Phone: (+82) (0)2 574-6300
Kyrgyzstan
Alye Maki
av. Moladaya Guardir J 3
720014
Bishkek
Latvia
Husqvarna Latvija SIA
Ulbrokas 19A
LV-1021 Rīga
info@gardena.lv
Lithuania
UAB Husqvarna Lietuva
Ateities pl. 77C
LT-52104 Kaunas
info@gardena.lt
Luxembourg
Magasins Jules Neuberg
39, rue Jacques Stas
Luxembourg-Gasperich 2549
Case Postale No. 12
Luxembourg 2010
Phone: (+352) 40 14 01
api@neuberg.lu
98
Mexico
AFOSA
Av. Lopez Mateos Sur # 5019
Col. La Calma 45070
Zapopan, Jalisco, Mexico
Phone: (+52) 33 3818-3434
icornejo@afosa.com.mx
Moldova
Convel S.R.L.
290A Muncesti Str.
2002 Chisinau
Netherlands
Husqvarna Nederland B.V.
GARDENA Division
Postbus 50131
1305 AC ALMERE
Phone: (+31) 36 521 00 10
info@gardena.nl
Neth. Antilles
Jonka Enterprises N.V.
Sta. Rosa Weg 196
P.O. Box 8200
Curaçao
Phone: (+599) 9 767 66 55
pgm@jonka.com
New Zealand
Husqvarna New Zealand Ltd.
PO Box 76-437
Manukau City 2241
Phone: (+64) (0) 9 9202410
support.nz@husqvarna.co.nz
Norway
Husqvarna Norge AS
Gardena Division
Trøskenveien 36
1708 Sarpsborg
info@gardena.no
Peru
Husqvarna Perú S.A.
Jr. Ramón Cárcamo 710
Lima 1
Tel: (+51) 1 3320400 ext. 416
juan.remuzgo@husqvarna.com
Poland
Husqvarna
Poland Spółka z o.o.
ul. Wysockiego 15 b
03-371 Warszawa
Phone: (+48) 22 330 96 00
gardena@husqvarna.com.pl
Portugal
Husqvarna Portugal, SA
Lagoa - Albarraque
2635 - 595 Rio de Mouro
Tel.: (+351) 21 922 85 30
Fax : (+351) 21 922 85 36
info@gardena.pt
Romania
Madex International Srl
Soseaua Odaii 117 - 123,
RO 013603 Bucureşti, S1
Phone: (+40) 21 352.76.03
madex@ines.ro
Russia / Россия
ООО „Хускварна“
141400, Московская обл.,
г. Химки,
улица Ленинградская,
владение 39, стр.6
Бизнес Центр
„Химки Бизнес Парк“,
помещение ОВ02_04
http://www.gardena.ru
Serbia
Domel d.o.o.
Autoput za Novi Sad bb
11273 Belgrade
Phone: (+381) 1 18 48 88 12
miroslav.jejina@domel.rs
Singapore
Hy-Ray PRIVATE LIMITED
40 Jalan Pemimpin
#02-08 Tat Ann Building
Singapore 577185
Phone: (+65) 6253 2277
shiying@hyray.com.sg
Slovak Republic
Husqvarna Česko s.r.o.
Türkova 2319/5b
149 00 Praha 4 – Chodov
Bezplatná infolinka:
800 154 044
servis@sk.husqvarna.com
Slovenia
Husqvarna Austria GmbH
Industriezeile 36
4010 Linz
Tel. : (+43) 732 77 01 01-485
service.gardena@
husqvarnagroup.com
South Africa
Husqvarna
South Africa (Pty) Ltd
Postnet Suite 250
Private Bag X6,
Cascades, 3202
South Africa
Phone: (+27) 33 846 9700
info@gardena.co.za
Spain
Husqvarna España S.A.
Calle de Rivas nº 10
28052 Madrid
Phone: (+34) 91 708 05 00
atencioncliente@gardena.es
Suriname
Agrofix n.v.
Verlengde Hogestraat #22
Phone: (+597) 472426
agrofix@sr.net
Pobox : 2006
Paramaribo
Suriname – South America
Sweden
Husqvarna AB
Gardena Division
S-561 82 Huskvarna
gardenaorder@husqvarna.se
Switzerland / Schweiz
Husqvarna Schweiz AG
Consumer Products
Industriestrasse 10
5506 Mägenwil
Phone: (+ 41) (0) 62 887 37 90
info@gardena.ch
Turk ey
Dost Bahçe Dış Ticaret
Mümessillik A.Ş
Yunus Mah. Adil Sok. No: 3
Ic Kapi No: 1 Kartal
34873 Istanbul
Phone: (+90) 216 38 93 939
info@dostbahce.com.tr
Ukrain e / Україна
ТОВ «Хускварна Україна»
вул. Васильківська, 34,
офіс 204-г
03022, м. Київ
Тел. (+38) 044 498 39 02
info@gardena.ua
Uruguay
FELI SA
Entre Ríos 1083 CP 11800
Montevideo – Uruguay
Tel : (+598) 22 03 18 44
info@felisa.com.uy
Venezuela
Corporación Casa y Jardín C.A.
Av. Caroní, Edif. Trezmen, PB.
Colinas de Bello Monte.
1050 Caracas.
Tlf : (+58) 212 992 33 22
info@casayjardin.net.ve
1890-34.960.01/1218
© GARDENA Manufacturing GmbH
D-89070 Ulm
http://www.gardena.com
 Loading...