

Page 1

GBS
NL
DFIN
GARDENA
®
C 1060 profi
Art. 1815
GB Operating Instructions
Water Computer Profi
S Bruksanvisning
Bevattningscomputer
NL Gebruiksaanwijzing
Besproeiingscomputer
D Gebrauchsanweisung
Bewässerungscomputer
FIN Käyttöohjeet
Kasteluohjain
Page 2
32
GB
GB
GARDENA Water Computer
C 1060 profi
Welcome to the Garden of GARDENA...
Please read these operating instructions carefully and observe
the notes given. Use these instructions to familiarise yourself with
the Water Computer and its proper use as well as the notes on
safety.
For safety reasons, children and young people under 16 as well
as anyone who is not familiar with these operating instructions
must not use the Water Computer.
v Please keep these operating instructions in a safe place.
1. Where to Use Your GARDENA Water Computer
. . . . . . . . . . . . . 3
2. For Your Safety
. . . . . . . . . . . . . . . . . . . . . . . . . . . . . . . . . . . . . . . . . . . . . . 3
3. Function
. . . . . . . . . . . . . . . . . . . . . . . . . . . . . . . . . . . . . . . . . . . . . . . . . . . . . 5
4. Putting Your Water Computer into Operation
. . . . . . . . . . . . . . . . . 8
5. Programming
. . . . . . . . . . . . . . . . . . . . . . . . . . . . . . . . . . . . . . . . . . . . . . . 11
6. Automatic Water Distributor (optional)
. . . . . . . . . . . . . . . . . . . . . . 19
7. Cleaning
. . . . . . . . . . . . . . . . . . . . . . . . . . . . . . . . . . . . . . . . . . . . . . . . . . . . 22
8. Trouble-Shooting
. . . . . . . . . . . . . . . . . . . . . . . . . . . . . . . . . . . . . . . . . . . 22
Contents
Intended use
Please note
9. Putting Your Water Computer out of Operation . . . . . . . . . . . . . . 25
10. Accessories
. . . . . . . . . . . . . . . . . . . . . . . . . . . . . . . . . . . . . . . . . . . . . . . . 25
11. Technical Data
. . . . . . . . . . . . . . . . . . . . . . . . . . . . . . . . . . . . . . . . . . . . . 26
12. Service
. . . . . . . . . . . . . . . . . . . . . . . . . . . . . . . . . . . . . . . . . . . . . . . . . . . . . 27
1. Where to Use Your GARDENA Water Computer
The GARDENA Water Computer C 1060 profi is intended for private use in domestic and hobby gardens, exclusively for outdoor
use, to control sprinklers and watering systems.
The GARDENA Water Computer must not be used for industrial purposes or in conjunction with chemicals, foodstuffs,
easily flammable and explosive materials.
2. For Your Safety
Battery:
To ensure the Water Timer runs safely, only
a 9V alkaline manganese battery (alkaline)
type IEC 6LR61 must be used.
Page 3

54
3. Function
This GARDENA Water Computer C 1060 profi allows you
to water your garden completely automatically any time you
choose up to 6 times a day, whether you are using a sprinkler,
a sprinkler system installation or a drip-head watering system.
Your Water Computer waters your garden completely automatically according to the program you choose.You can use your
Water Computer to water your garden early in the morning or
late at night when water evaporates the least or when you are
on holiday.
You simply program the watering start, watering time and watering
day(s) or cycles.
Key Key-operated function
1
▲ Changes or moves on the input data. (If the
▲-key is held down, the figures change very
quickly.)
2
O.K. Confirms the values set with the ▲-key.
3
Menu Changes to the next program level.
4
man. For switching the water throughput on or off
On/Off manually.
The battery must be exchanged in time to prevent the Water Computer failing due to a low
battery when you are away for longer periods
of time. Make sure that the time the battery
has been in operation and the time you are
planning to be away does not add up to more
than a year.
Setting up
Warning! The Water Computer must not be
used indoors.
v Only use the Water Computer outdoors.
The Water Computer may only be set up verti-
cally with the sleeve nut to the top to prevent
water penetrating into the battery compartment.
The minimum water output to ensure that
the Water Computer functions correctly is
20 - 30 l/h.
For example, at least 10 x 2-litre Drip Heads
are required to control the Micro-Drip-System.
At high temperatures (over 60°C at the display) the LCD display may extinguish. This
does not affect the program in any way.
When the computer cools down the LCD
display illuminates again.
The max. temperature for the water flow is
40 °C.
v Only use clear fresh water.
The minimum operating pressure is 0,5 bar,
the maximum operating pressure is 12 bar.
Avoid tensile strain.
v Do not pull the hose connected to the
Water Computer.
Programming
v Program the Water Computer with the tap
turned off.
In this way you can avoid getting wet when
trying out the manual On / Off function (man.
On/Off). You can remove the control unit from
the housing to program the Water Computer.
Key-operated functions
3214
GB
GB
Page 4

76
Displays
Display Description
5
Weekdays Current weekday or programmed watering days.
(Mo, Tu,...)
6
Prog. Program selected (1 to 6).
7
special Only for controlling the Automatic Water
Distributor Art.-No. 1198.
8
ttiimmee
Flashes when in input mode for the current data
(hours, minutes, day of the week).
9
SSTTAARRTT
Flashes when in input mode for watering
start time.
0
PPMM
Display for 12-h-clock
(e. g. in USA, Canada).
A
(Time / Current time / Watering start time
Start time) (display 13 h = 1 pm; e. g. in USA, Canada).
B
RRUU NN TT ii mmee
Watering time (flashes when in input mode).
C
3rd,2
nd
Watering cycles
(3rdevery 3rdday / 2ndevery 2ndday).
D
% Run- Budget function: the watering time of all watering
Time programs can be reduced centrally in intervals of
10% from 100% to 0%.
E
EE RRRR OORR
Error message for the special function
if watering programs overlap.
5 8 E B
D G
6 9 0 A 7 C F
F
Batt. If the battery indicator begins to flash, the battery
is almost flat and watering programs will no longer
run. Any valves that are still open are closed again
even if the battery is almost flat.
The battery indicator is reset as soon as you
replace the battery with a new one.
G
Prog. Watering program inactive
Off (Budget function: 0%)
The four display levels
• Level 1: Normal display
• Level 2: Enter the current time and day of the week
• Level 3: Insert watering programs
• Level 4: % Run-Time / Prog. Off
can be selected one after the other by pressing the Menu-key.
You can change display level at any time, even during programming. All the program data which have been confirmed up to
that point with the O.K.-key are stored.
Display levels
GB
GB
Page 5

98
The Water Computer is fitted with a sleeve nut Lfor taps with
G1” (33.3 mm) thread. The adaptor supplied Kallows the
Water Computer to be connected to taps with a G 3/4” thread
(26.5 mm).
Connect Water Computer to water tap with G 1” (33.3 mm)
thread:
1. Screw sleeve nut
L
of the Water Computer on to the tap
thread by hand (do not use pliers).
2. Screw tap connector Mon to the Water Computer.
Connect Water Computer to tap with G 3/4 ”(26.5 mm) thread:
1. Screw adaptor
K
on to the tap manually (do not use pliers).
2. Screw sleeve nut Lof the Water Computer on to the adaptor
thread Kby hand (do not use pliers).
3. Screw tap connector Mon to the Water Computer.
Before you start entering the watering data in the computer
we recommend that you write the data on one of the watering
plans in the appendix to maintain more of an overview.
Connect Water Computer :
Compile watering plan:
Insert battery:
P
D
I
H
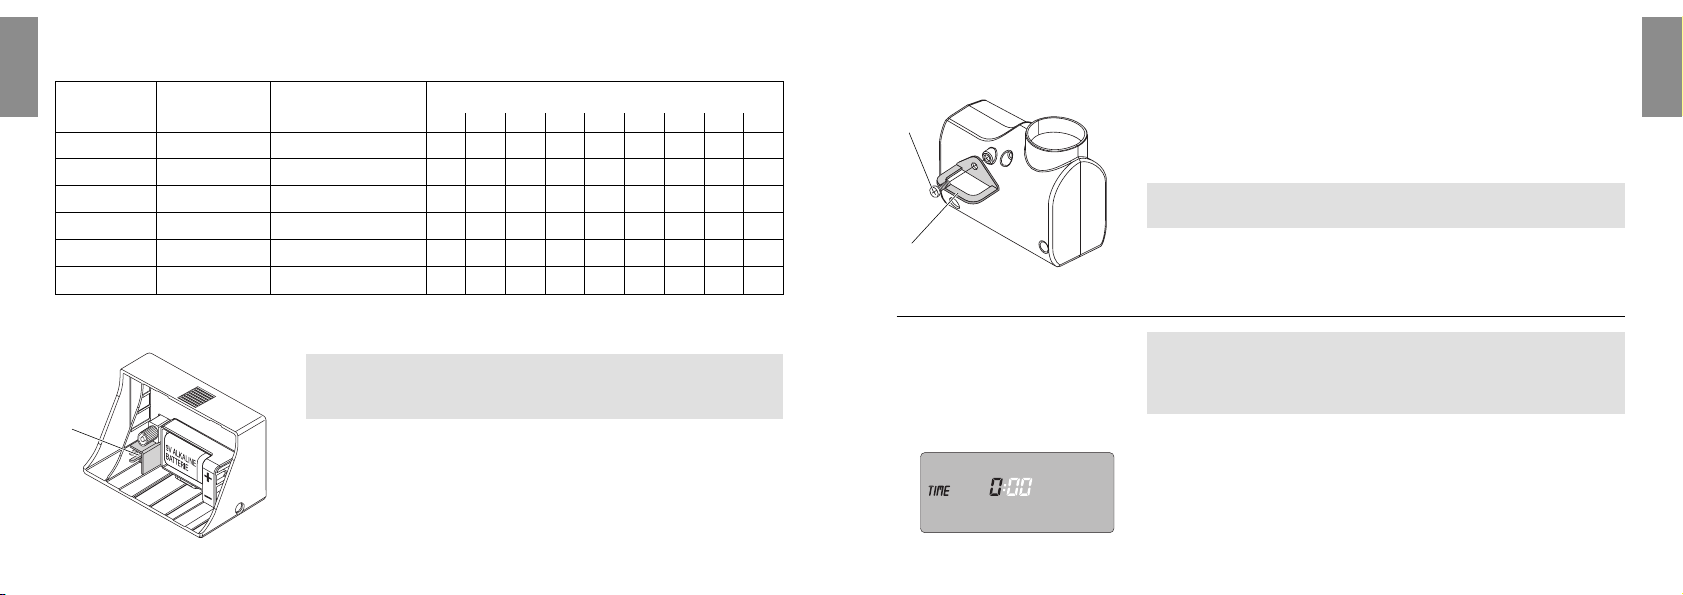
4. Putting Your Water Computer into Operation
This Water Computer must only be powered by a 9V alkaline
manganese (alkaline) battery type IEC 6LR61.
1. Press unlock button
H
and pull control
unit Iout of the Water Computer housing.
2. Insert batteryJinto battery
compartment.
Ensure that the battery polarity is
correct.
The display shows all the LCD-symbols
for 2 seconds and then moves to the
time / day of week level.
3. Re-insert control unit Iin housing.
Programming aid:
v Stick the self-adhesive programming
aid on the inside of the display cover .
The display cover can be folded up to protect the display against
the weather.
J
z
P
z
D
L
M
K
GB
GB
Page 6
1110
Example:
In addition to time-based watering, it is also possible to include
the soil moisture or rain sensor in the watering programs.
If the soil is moist enough, the program will be stopped, or a
program will be prevented from starting. Manual operation via
man. On/Off is unaffected by this.
1. Place soil moisture sensor in the watered area
– or –
place rain sensor (with extension cable if necessary)
outside the watered area.
2. Insert the sensor in the sensor connection
N
of the Water
Computer.
Connect soil moisture
or rain sensor (optional) :
Program Starting time Watering time Watering days / Watering cycles
PROG START TIME RUN TIME Mo Tu We Th Fr Sa So 2nd3
rd
1 7: 30 0 : 30 X X X
2 19 : 00 0 : 20 X X
3 22 : 30 1 : 10 X X X
4 4:00 0:15 X
5 ––
6 ––
To secure your Water Computer against theft, you can obtain
the GARDENA anti-theft device art. no. 1815-00.791.00 from
GARDENA Service.
1. Screw clamp Owith screw Pfirmly to the back of the Water
Computer.
2. Use clamp e.g. for fixing a chain.
It is no longer possible to remove the screw after it has been
screwed in.
5. Programming
The control unit Ican be removed from the housing for programming by pressing the unlock button Hand programming
can be undertaken whilst you are moving around (see 4.
Putting Your Water Computer into Operation
“Insert battery”
).
1. Press Menu-key (not necessary if the battery has just been
inserted).
The hours display and
ttii mmee
flash.
Fit anti-theft device
(optional) :
Set current time
and day of week:
1.
N
P
O
GB
GB
Page 7

1312
2. Set the time in hours with the ▲-key
(example:99hours) and confirm with the O.K.-key.
ttii mmee
and the minutes display flash.
3. Set the time in minutes with the ▲-key
(example:
3300
minutes) and confirm with the O.K.-key.
ttii mmee
and the day of the week display flash.
4. Set the day of the week with the ▲-key
(example: ■ Sa Saturday) and confirm with the O.K.-key.
The display moves to the message Insert watering programs
and program memory setting 1flashes.
You must reset your Water Computer before selecting the
special function (see 6. Automatic Water Distributor).
v Reset: Keep ▲-key and O.K.-key pressed simultaneous
for 2 seconds.
Up to 6 watering programs can be inserted – or –
the special function can be selected.
2.
3.
4.
Enter watering programs:
1. Press Menu-key twice
(not necessary if the current time and day of the week
has been entered).
Program memory setting 1flashes.
2. Only if the Automatic Water Distributor is used:
Select special-function with the ▲-key and confirm with
the O.K.-key (continue with step 4).
Program memory setting 1is selected automatically,
ssttaarrtt ttiimmee
and the hours section flash on the display.
3. Select program memory setting with the ▲-key
(example: Prog. 3 ■ program 3) and confirm with the
O.K.-key.
ssttaarrtt ttiimmee
and the hours section flash on the display.
4. Set the hours for starting the watering time with the ▲-key
(example:
66
hours) and confirm with the O.K.-key.
ssttaarrtt ttiimmee
and the minutes section flash on the display.
1.
2.
3.
4.
GB
GB
Page 8

1514
5. Set the minutes for starting the watering time with the ▲-key
(example:
2200
minutes) and confirm with the O.K.-key.
RRUU NN TT II MMEE
and the hours for the watering time flash on the
display.
6. Set the hours for the watering time with the ▲-key
(example:00hours) and confirm with the O.K.-key.
RRUU NN TT II MMEE
and minutes for the watering time flash on the
display.
7. Set watering time minutes with the ▲-key
(example:
11 00
minutes) and confirm with the O.K.-key.
Watering cycle
■ 3
rd
flashes on the display.
8. (a) Select watering cycle with the ▲-key (example: ■ 2nd)
and confirm with the O.K.-key
(2nd/3rd: watering every 2ndday / 3rdday).
The display returns to step 3 and the next highest
program memory setting flashes.
– or –
5.
6.
7.
8 (a)
8. (b) Select respective watering days with the ▲-key
(example: ■ Mo, ■ Fr Monday and Friday) and confirm
with the O.K.-key. Press ▲-key until the ■ over Su
disappears.
The display returns to step 3 and the next highest program
memory setting flashes.
V If you would like to water your garden every day, press
the OK button to confirm each day one after another.
When the program has been created for program memory setting 6,
the display moves to the message % Run-Time / Prog. Off.
You must select the Run-Time percentage you wish to activate
before the watering programs can run.
9. Press Menu-key 3 times (not necessary if the program has
just been compiled for program memory setting 6).
10. Select the percentage (see Budget Function) for the pro-
grammed watering time using the ▲ key (e.g.
6600
% Run-Time)
and then confirm your selection by pressing the O.K. key.
The display moves to the normal display.
Programming the Water Computer has now been completed,
i.e. the built-in valve opens / closes entirely automatically and
thus undertakes watering at the programmed times.
8. (b)
Activate watering programs:
10.
GB
GB
Page 9

1716
1. Press man. On/ Off-key to open the valve manually
(or to close an open valve).
RRUU NN TT II MMEE
and the watering time in minutes (set to
3300
minutes
in the works) flash for 5 seconds on the display.
2. Whilst the watering time in minutes is flashing, the watering
duration can be modified with the ▲-key (between
00::0000
and
00::5599
) (example:
11 00
minutes).
The valve is opened.
3. Press man. On/ Off-key to close the valve early.
The valve is closed.
The amended manual opening period is stored, i.e. each time
the valve is opened manually in future the modified opening
period is preset. If the manual opening period is amended to
00::0000
, the valve is closed and also remains closed after the
man. On/Off-key is pressed (child lock).
If the valve has been opened manually and a programmed start
of a watering period overlaps the manual opening period, the
programmed starting time is suppressed.
Example: The valve is opened at 9.00 a.m. manually, the
opening period is 30 minutes. A program with a start time
(START TIME) between 9.00 and 9.30 a.m. will not be under-
taken in this case.
1.
2.
GB
GB
Budget-Function (% Run-Time) :
The times of all stored watering programmes can be reduced centrally in intervals of 10%, from 100% down to 10%, without having
to change each interval programme. This is ideal if you wish to
water your garden less in the Autumn than in the Summer.
Note: If you change the watering time percentage, your Water
Computer will still display the watering time you originally programmed for the individual watering programs.
If a program has already been set on one of the 6 program
memory settings, this can be modified without having to compile
it from the beginning again.
1. Press Menu-key twice.
Program memory setting 1flashes.
2. Press O.K.-key to move to the next program step – or –
modify program data with the ▲-key and confirm with the
O.K.-key.
The valve can be opened or closed manually at any time.
A program-controlled open valve can also be closed early without changing the program data (start time, watering duration
and watering days).
Read / modify
watering programs:
Manual operation:
Programmed watering time
Watering program deactivated
1100 -- 110000
% Run-Time = Watering program active
00
Prog. Off = Watering program inactive
Page 10

1918
The factory settings are restored.
v Press ▲-key and O.K.-key simultaneously for 2 seconds.
All the LCD symbols are displayed for 2 seconds and the
display moves to the normal display.
• All the program data are set to zero.
• The manual watering period is set to
00::3300
again.
• The time and day of the week are retained.
If no entry is made during programming for a period of more
than 60 seconds, the normal display reappears.
With overlapping programs and identical watering days, the
1
st
watering starting time has priority and other programs are
not initiated.
Example:
The first program is run on Monday, the 2
nd
program is cancelled.
Program Starting time Watering time Watering days / Watering cycles
PROG START TIME RUN TIME Mo Tu We Th Fr Sa So 2nd3
rd
1 4 : 00 0: 40 X X
2 4 : 30 1:00 X
Reset
Important notes :
GB
GB
6. Automatic Water Distributor (optional)
Connecting the GARDENA Automatic Water Distributor
(Art. No. 1198) allows you to control up to 6 watering lines with
the Water Computer C 1060 profi.
Each of the 6 watering lines can only be actuated once a day.
This is ideal where there is an insufficient amount of water or
where individual areas of the garden have varying water requirements. It allows all watering lines to be operated one after
another.
Using the special function, your Water Computer C 1060 profi is
able to take into account the special requirements of the Automatic
Water Distributor, when programming.
If program data have already been inserted beforehand, a RESET
must be undertaken before the special function can be set.
v Keep ▲-key and O.K.-key pressed simultaneously for
2 seconds.
To ensure the Automatic Water Distributor switches safely there
must be at least a 30 minute break between the programs entered
in the Water Computer.
When you have confirmed the special function with O.K. and
have entered the data for the first program (see 5. Programming)
all the programmes which follow will be pre-programmed automatically.
Function
Programming
Special function
Page 11

2120
The pre-programming takes into consideration the 30 minute
break required between the programs as well as a minimum
watering time of 30 seconds (display:11min.).
This watering time is required to allow the Automatic Water
Distributor to switch to the next outlet and to ensure that the
order of the watering programs to the appropriate watering
line is retained.
The watering days entered for the watering program are valid
for all other watering programs.
You can alter the watering starting times and watering times
pre-programmed by the Water Computer to meet your personal
requirements. However, if you do not take into account the break
times mentioned above, any changes you make are not accepted
and an error message appears on the display (
EE RRRR OORR
).
Since it is very easy for watering times to overlap slightly, especially when the beginnings and ends of programs are very close
together, it is sensible to RESET the Water Computer and to
re-enter the watering data to prevent an error message appearing.
If the watering programs are switched off after you have confirmed the special function (status indicator on Off Prog.) all the
programs which begin in this time are shortened to the minimum
watering time of 30 seconds (display:
11
min.) This ensures that
the order of the watering programs to the appropriate outlet of
the Automatic Water Distributor is retained.
Error message (
EE RRRR OORR
)
On/Off Prog.
By briefly opening the water flow the outlets on the Automatic
Water Distributor are switched further so that when the watering
programs are reactivated (% Run-Time) the original order of the
outlets for the required watering program is retained.
When using the Water Computer C 1060 prof together
with the Automatic Water Distributor, Soil Moisture Sensor
(Art. No. 1187) or Rain Sensor electronic (Art. No. 1189)
please note the following:
If the special function is activated and the Soil Moisture or
Rain Sensor indicates sufficient moisture, watering is interrupted.
The watering time of following watering programs is shortened
to 30 seconds (display:
11
min.) until the Soil Moisture / Rain
Sensor allows the watering programs to be resumed. The watering time originally entered then begins.
Shortening the watering time when the soil is sufficiently moist
ensures that the automatic water distributor is switched to the
next outlet and therefore ensures that the correct order of the
watering program for the respective distributor outlet is retained.
Soil Moisture Sensor /
Rain Sensor
GB
GB
Page 12

2322
GB
GB
7. Cleaning
The filter should be checked regularly and cleaned when
necessary.
1. Unscrew sleeve nut Lof the Water Computer by hand
from the tap thread (do not use pliers).
2. Remove filter from sleeve nut
L
and clean.
3. Screw sleeve nut Lof the Water Computer back on to the
thread of the tap by hand (do not use pliers).
Clean filter:
L
8. Trouble-Shooting
Fault Possible Cause Remedy
No display appears Battery inserted incorrectly. v Check polarity markings
match (+ / –).
Flat battery. v Insert new (alkaline) battery.
v Check function by operating
manually (man. On/ Off).
Fault Possible Cause Remedy
No display appears Temperature on the display Display appears after
is higher than 60 °C. temperature has dropped.
v Check function by operating
manually. (man. On/ Off).
Programs cannot be The current time and the day v Enter time and day of week
entered of the week were not entered (see 5. Programming).
completely.
Manual opening via the Low battery power, Batt. v Insert new (alkaline) battery
man. On/ Off-key is not indicator flashes
possible
Manual watering period is set v Set manual watering period
to
00::0000
. to a figure greater than
00::0000
(see 5. Programming).
Tap turned off. v Turn tap on.
Watering program is not Watering program has not v Read off watering program
being undertaken been entered completely. and modify if necessary.
(no watering)
Programs deactivated v Activate program
(Prog. Off). (% Run-Time).
Program entry/modification v Make program entry/
during or just before the modification outside the
start pulse. programmed start times.
Page 13

2524
GB
GB
Fault Possible Cause Remedy
Watering program is not Valve was opened manually v Avoid possible program
being undertaken previously. overlaps.
(no watering)
Tap turned off. v Turn on tap.
Program overlap v Enter new watering
(1
st
watering start time has program without overlaps.
priority).
Soil moisture or rain sensor v If dry, check setting/
reports sufficient moisture. location of soil moisture /
rain sensor.
Batt. indicator flashes because v Insert new (alkaline) battery
battery is almost flat.
Water Computer does Minimum quantity of water v Connect more drip heads
not close drawn is less than 20 l/ h.
If you have any other problems with your Water Computer, please contact GARDENA Service.
9. Putting Your Water Computer out of Operation
1. Press Menu-key 3 times, select Prog. Off with the ▲-key
and confirm with the O.K.-key.
The watering programs are deleted.
2. Store your Water Computer in a dry place where it is protected
from frost.
Please return flat batteries to a GARDENA dealer or dispose
of them properly at your nearest recycling centre. Only dispose
of batteries when they are flat.
10. Accessories
Automatic control with: GARDENA Soil Moisture Sensor Art. No. 1187
GARDENA Rain Sensor electronic Art. No. 1189
GARDENA Automatic Water Distributor Art. No. 1198
Over-wintering /
storage:
Page 14

2726
12. Service
GARDENA guarantees this product for 2 years (from date of
purchase). This guarantee covers all serious defects of the unit
that can be proved to be material or manufacturing faults.
Under warranty we will either replace the unit or repair it free
of charge if the following conditions apply:
• The unit must have been handled properly and in keeping
with the requirements of the operating instructions.
• Neither the purchaser or a non-authorised third party have
attempted to repair the unit.
Damage caused by frost is not covered by the warranty.
This manufacturer’s guarantee does not affect the user’s existing
warranty claims against the dealer/seller.
If you have any problems with your Water Computer, please
contact our Customer Service or return the defective unit together with a short description of the problem directly to one of
the GARDENA Service Centres listed on the back of this leaflet.
Warranty
GB
GB
11. Technical Data
Min. / max. operating pressure : 0,5 bar / 12 bar
Flow medium: Clear fresh water
Max. medium temperature: 40 °C
Number of program-controlled
watering cycles per day: Up to 6
Watering duration per program: 1 min. to 9 hours 59 min.
Battery required : 1 × 9V alkaline manganese (alkaline) battery
type IEC 6LR61
Operating time of the battery approx. 1 year
Page 15

135134
f
Product Liability
Painotamme tuotevastuulain mukaisesti erityisesti sitä seikkaa, että emme vastaa elektroniselle vesiajastimelle aiheutuneista tai sen aiheuttamasta vahingoista, mikäli ne ovat aiheutuneet epäpätevän korjauksen
takia, mikäli elektroniseen vesiajastimeen on vaihdettu osia, jotka eivät ole alkuperäisiä GARDENA-osia tai
meidän hyväksymiä osia tai mikäli korjauksen on tehnyt jokin muu kuin GARDENA-huolto tai valtuutettu
huolto. Sama koskee myös lisälaitteita ja -varusteita.
G
EU Certificate of Conformity
The undersigned GARDENA International GmbH, Hans-Lorenser-Str. 40, D-89079 Ulm, hereby certifies that, when leaving
our factory, the unit indicated below is in accordance with the harmonised EU guidelines, EU standards of safety and product
specific standards. This certificate becomes void if the unit is modified without our approval.
S
EU Tillverkarintyg
Undertecknad firma GARDENA International GmbH, Hans-Lorenser-Str. 40, D-89079 Ulm, intygar härmed att nedan nämnda
produkter överensstämmer med EU:s direktiv, EU:s säkerhetsstandard och produktspecifikation. Detta intyg upphör att gälla
om produkten ändras utan vårt tillstånd.
N
EU-overeenstemmingsverklaring
Ondergetekende GARDENA International GmbH, Hans-Lorenser-Str. 40, D-89079 Ulm, bevestigt, dat het volgende genoemde apparaat in de door ons in de handel gebrachte uitvoering voldoet aan de eis van, en in overeenstemming is met
de EU-richtlijnen, de EU-veiligheidsstandaard en de voor het product specifieke standaard. Bij een niet met ons afgestemde
verandering aan het apparaat verliest deze verklaring haar geldigheid.
D
EU-Konformitätserklärung MaschinenVerordnung (9. GSGVO) / EMVG / Niedersp. RL
Der Unterzeichnete GARDENA International GmbH, Hans-Lorenser-Str. 40, D-89079 Ulm, bestätigt, dass das nachfolgend bezeichnete Gerät in der von uns in Verkehr gebrachten Ausführung die Anforderungen der harmonisierten
EU-Richtlinien, EU-Sicherheitsstandards und produktspezifischen Standards erfüllt. Bei einer nicht mit uns abgestimmten
Änderung des Gerätes verliert diese Erklärung ihre Gültigkeit.
G
Product Liability
We expressly point out that, in accordance with the product liability law, we are not liable for any damage
caused by our units if it is due to improper repair or if parts exchanged are not original GARDENA parts
or parts approved by us, and, if the repairs were not carried out by a GARDENA Service Centre or an
authorised specialist. The same applies to spare parts and accessories.
S
Produktansvar
Tillverkaren är inte ansvarig för skada som orsakats av produkten om skadan beror på att produkten har
reparerats felaktigt eller om, vid reparation eller utbyte, andra än Original GARDENA reservdelar har använts. Samma sak gäller för kompletteringsdelar och tillbehör.
N
Productaansprakelijkheid
Wij wijzen er nadrukkelijk op, dat wij op grond van de wet aansprakelijkheid voor producten niet aansprakelijk zijn voor schade ontstaan door onze apparaten, indien deze door onvakkundige reparatie veroorzaakt
zijn, of er bij het uitwisselen van onderdelen geen gebruik gemaakt werd van onze originele GARDENA
onderdelen of door ons vrijgegeven onderdelen en de reparatie niet door de GARDENA technische dienst
of de bevoegde vakman uitgevoerd werd. Ditzelfde geldt voor extra-onderdelen en accessoires.
D
Produkthaftung
Wir weisen ausdrücklich darauf hin, dass wir nach dem Produkthaftungsgesetz nicht für durch unsere
Geräte hervorgerufene Schäden einzustehen haben, sofern diese durch unsachgemäße Reparatur verursacht oder bei einem Teileaustausch nicht unsere Original GARDENA Teile oder von uns freigegebene
Teile verwendet werden und die Reparatur nicht vom GARDENA Service oder dem autorisierten Fachmann
durchgeführt wird. Entsprechendes gilt für Ergänzungsteile und Zubehör.
Page 16

136
PROG START TIME RUN TIME Mo Tu We Th Fr Sa So 2nd3
rd
1
2
3
4
5
6
PROG START TIME RUN TIME Mo Tu We Th Fr Sa So 2nd3
rd
1
2
3
4
5
6
Description of the unit: Water Computer Type: Art. No.:
Produktbeskrivning: Bevattningscomputer Type:
C 1060
Art.nr. :
Omschrijving van het apparaat: Besproeiingscomputer Typ: Art. nr.:
1815
Bezeichnung des Gerätes: Bewässerungscomputer Typ :
profi
Art.-Nr.:
EU-direktiivit: Kasteluohjain Tyyppi: art.-nro
EU directives: Year of CE marking :
EU direktiv:
89/336/EC CE-Märkningsår :
EU-richtlijnen: Installatiejaar van de CE-aanduiding:
1998
EU-Richtlinien: 93 / 68 / EC Anbringungsjahr der CE-Kennzeichnung:
EU-direktiivit: CE-hyväksyntä vuosi:
Thomas Heinl
Ulm, 17.07.1998 Technical Dept. Manager
Ulm, 1998.07.17. Technical Director
Ulm, 17-07-1998 Hoofd technische dienst
Ulm, 17.07.1998 Technische Leitung
Ulm, 17.07.1998 Tekn. osaston päällikkö
f
EU-Vakuustodistus
Allekirjoittanut, GARDENA International GmbH, Hans-Lorenser-Str. 40, D-89079 Ulm, vahvistaa, että lähtiessään tehtaalta ko.
tuote (tuotteet) on valmistettu EU-ohjeiden, EU-turvallisuus – ja tuote-erittelystandardien mukaisesti. Tämä vakuus mitätöityy,
mikäli tuotetta (tuotteita) muutetaan ilman hyväksyntäämme.
Page 17

Great Britain
GARDENA UK Ltd.
27- 28 Brenkley Way
Blezard Business Park
Seaton Burn
Newcastle upon Tyne NE13 6DS
Greece
Agrokip
G. Psomadopoulos & Co.
33 A, Ifestou str. – 194 00
Industrial Area Koropi
Athens
Hungary
GARDENA Magyarország Kft.
Késmárk utca 22
1158 Budapest
Iceland
Heimilistaeki hf
Saetun 8
P.O. Box 5340
125 Reykjavik
Republic of Ireland
Michael McLoughlin & Sons
Hardware Limited
Long Mile Road
Dublin 12
Italy
GARDENA Italia S.p.A.
Via Donizetti 22
20020 Lainate (Mi)
Japan
KAKUDAI Mfg. Co. Ltd.
1-4-4, Itachibori Nishi-ku
Osaka 550
Luxembourg
Magasins Jules Neuberg
Grand Rue 30
Case Postale No. 12
Luxembourg 2010
Netherlands
GARDENA Nederland B.V.
Postbus 50176
1305 AD ALMERE
Neth. Antilles
Jonka Enterprises N.V.
Sta. Rosa Weg 196
P.O. Box 8200
Curaçao
New Zealand
NYLEX New Zealand Limited
Private Bag 94001
South Auckland Mail Centre
10 Offenhauser Drive
East Tamaki, Manukau
Norway
GARDENA Norge A/S
Postboks 214
2013 Skjetten
Poland
GARDENA Polska Sp. z o.o.
Szymanóv 9 d
05-532 Baniocha
Portugal
GARDENA Portugal Lda.
Recta da Granja do Marquês
Edif. GARDENA
Algueirão
2725-596 Mem Martins
Russia / Россия
АО АМИДА ТТЦ
ул. Моcфилмовcкая 66
117330 Моcква
Deutschland
GARDENA
International GmbH
Service Center
Hans-Lorenser-Straße 40
D-89079 Ulm
Produktfragen: (07 31) 490 - 246
Reparaturen: (0731) 490-290
Argentina
Argensem S.A.
Calle Colonia Japonesa s/n
(1625) Loma Verde
Buenos Aires
Australia
NYLEX Consumer Division
76-88 Mills Road
P.O. Box 722
Braeside 3195
Melbourne, Victoria
Austria
GARDENA Österreich
Ges. m.b.H.
Stettnerweg 11-15
2100 Korneuburg
Belgium
MARKT (Belgium) NV/SA
Sterrebeekstraat 163
1930 Zaventem
Brazil
RGS Comercial Ltda
Av. Marginal do
Rio Pinheiros, 5200
Edificio Montreal
Bloco e -Térreo
05693-000 Sao Paulo - SP
Bulgaria
DENEX LTD.
2 Luis Ahalier Str.
7th floor
Sofia 1404
Canada
GARDENA Canada Ltd.
100 Summerlea Road
Brampton, Ontario
Canada L6T 4X3
Chile
Antonio Martinic Y CIA. LTDA.
Gilberto Fuenzalida 185 Loc.
Las Condes
Santiago de Chile
Costa Rica
Compania Exim
Euroiberoamericana S.A.
Av. 12 bis Calle 16 y 18
Bodegas Keith y Ramirez
San José
Cyprus
FARMOKIPIKI LTD
P.O. Box 7098
74, Digeni Akrita Ave.
1641 Nicosia
Czech Republic
GARDENA spol. s.r.o.
Шнpskб 20a, и.p. 1153
62700 Brno
Denmark
GARDENA Danmark A/S
Naverland 8
2600 Glostrup
Finland
Habitec Oy
Martinkyläntie 52
01720 Vantaa
France
GARDENA France
Service Après-Vente
BP 50080
95948 ROISSY CDG Cedex
Page 18

Singapore
Hy - Ray Enterprises
Block 1002 Toa Payoh
Industrial Park
#07-1433 /1435 /1451
Singapore 319074
Slowenia / Croatia
Silk d.o.o. Trgovina
Brodiљиe 15
1236 Trzin
South Africa
GARDENA
South Africa (Pty.) Ltd.
P.O. Box 11534
Vorna Valley 1686
Spain
GARDENA IBÉRICA S.L.U.
C/ Basauri, nº 6
La Florida
28023 Madrid
Sweden
GARDENA Norden AB
Box 9003
20039 Malmö
Switzerland
GARDENA AG
Bitziberg 1
8184 Bachenbülach
Ukraine / Украина
АОЗТ АЛЬЦЕСТ
ул. Гайдара 50
г. Киев 01033
Turkey
GARDENA / Dost Diþ Ticaret
Mümessillik A.Þ.
Yeþilbaðlar Mah. Baþkent
Cad. No. 26
Pendik - Ýstanbul
USA
GARDENA
3085 Shawnee Drive
Winchester, VA 22604
1815-28.960 .04 /0041
©
GARDENA Manufacturing GmbH
D- 89070 Ulm
http: //www.gardena.com
 Loading...