

Page 1
P E I N
FI DK S NL
F GB D
D Betriebsanleitung
Benzin-Rasenmäher
GB Operating Instructions
Petrol Lawnmower
F Mode d’emploi
Tondeuse thermique
NL Gebruiksaanwijzing
Benzine grasmaaier
S Bruksanvisning
Bensindriven Gräsklippare
DK Brugsanvisning
Benzinplæneklipper
FI Käyttöohje
Bensiinikäyttöinen ruohonleikkuri
N Bruksanvisning
Bensindrevet Gressklipper
I Istruzioni per l’uso
Rasaerba a scoppio
E Instrucciones de empleo
Cortacésped de gasolina
P Manual de instruções
Máquina de cortar relva a gasolina
46 VDA Art. 4047
51 VDA Art. 4051
46 V Art. 4044
46 VD Art. 4046
Page 2
16
GB
17
GB
16
GARDENA Petrol Lawnmower
46 V / 46 VD / 46 VDA / 51 VDA
Translation of the original German operating instructions.
Please read these operating instructions carefully and observe
the notes given. Use these operating instructions to familiarise
yourself with the correct usage and safety instructions for the
Petrol Lawnmower.
v Please keep these operating instructions in a safe place.
Contents: 1. Range of use for your GARDENA Petrol Lawnmower . . . . . 16
2. Safety Instructions . . . . . . . . . . . . . . . . . . . . . . . . . . . . . . . . . 17
3. Function . . . . . . . . . . . . . . . . . . . . . . . . . . . . . . . . . . . . . . . . . 18
4. Assembly . . . . . . . . . . . . . . . . . . . . . . . . . . . . . . . . . . . . . . . . 19
5. Operation . . . . . . . . . . . . . . . . . . . . . . . . . . . . . . . . . . . . . . . . 20
6. Putting out of Operation . . . . . . . . . . . . . . . . . . . . . . . . . . . . 23
7. Maintenance. . . . . . . . . . . . . . . . . . . . . . . . . . . . . . . . . . . . . . 23
8. Trouble-Shooting . . . . . . . . . . . . . . . . . . . . . . . . . . . . . . . . . . 25
9. Technical Data . . . . . . . . . . . . . . . . . . . . . . . . . . . . . . . . . . . . 27
10. Service / Warranty . . . . . . . . . . . . . . . . . . . . . . . . . . . . . . . . . 28
1. Range of use for your GARDENA Petrol Lawnmower
The GARDENA petrol lawnmower is designed for cutting lawns in
and around the garden. Do not use the mower on a slope steeper
than 20° maximum.
Warning! For environmental and transport safety reasons
the petrol lawnmower is supplied without motor oil.
Therefore, the crankcase of the engine must be filled with
motor oil prior to use (see 7. Maintenance), otherwise the
engine will be damaged!
To prevent injury, the lawnmower must not be used for
trimming bushes, hedges, shrubs, for cutting and pruning
of climbers or grass on roofs or in balcony boxes.
In addition, the lawnmower must not be used for chopping
up branches, twigs or for levelling irregularities in the soil.
Please note:
Purpose:
For safety reason children and young people under 16 and
people who have not read these operating instructions must not
use this Petrol Lawnmower. People with limited physical or
mental capacities may only use the product if they are supervised or instructed by a responsible person.
2. Safety Instructions
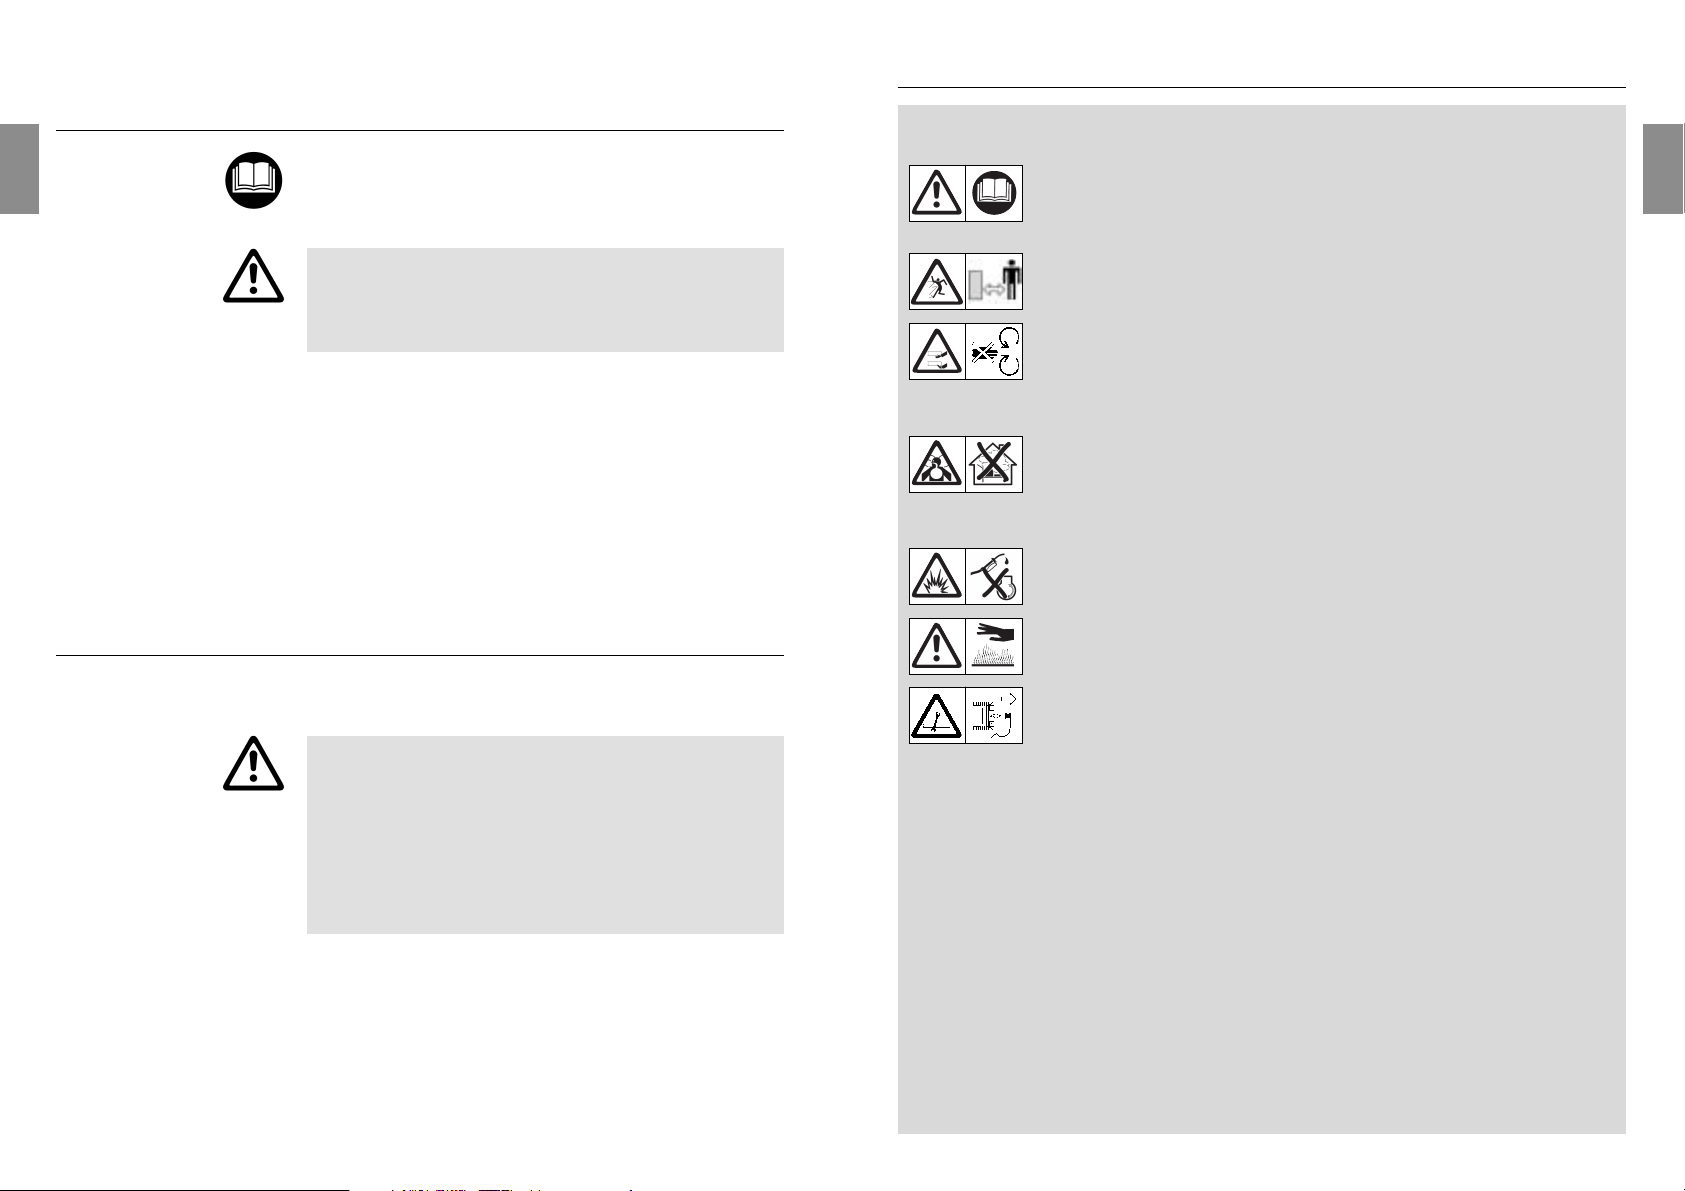
v Please read the notes on safety on the
petrol lawnmower.
Warning!
v Please read the operating
instructions before using
the mower!
Danger!
Risk of injury!
v Keep bystanders away!
Danger!
Danger of injury from the
blade bar!
v Keep fingers and feet away from sharp
cutting tool!
DANGER!
Danger of asphyxiation from
breathing in poisonous gases!
v The mower must not be used in closed or
poorly ventilated areas.
RISK OF EXPLOSION!
v Do not fill with fuel with
the engine running!
DANGER OF COMBUSTION!
Engine is hot!
Warning!
v Before working on the
blade bar remove spark
plug connector. See the enclosed engine
operating instructions!
Check each time you use the mower:
Before using, always visually inspect to see that
the blades, blade bolts and cutter assembly are
not worn or damaged. Replace worn or damaged blades and bolts in sets to preserve balance.
Never operate the lawnmower with defective
guards, or without safety devices, for example
deflectors and/or grass catchers, in place.
Replace damaged or worn parts. Never disable
safety devices.
Keep all nuts, bolts and screws tight to be sure
the equipment is in safe working condition.
Check the grass to be cut before you start
work. Remove any foreign bodies present
(e. g. stones, branches).
The blade bar must be regularly checked for
damage and if necessary repaired properly.
When doing this life the mower up at the front
so that no petrol / oil gets into the air filter or
exhaust.
Operation:
This petrol lawnmower can cause serious
injuries! You are responsible for the safety of
the working area.
Walk, never run.
Do not tilt the lawnmower when starting the
engine or switching on the motor, except if the
lawnmower has to be tilted for starting.
In this case, do not tilt it more than absolutely
necessary and lift only the part which is away
from the operator. Do not tip the mower over to
the side when mowing.
Do not start the engine when standing in front
of the discharge chute.
Never lift or carry the mower with the engine
running.
Only use the mower for the purposes outlined in
the operating instructions.
Wear sturdy shoes and long trousers to protect
your legs. Keep fingers and feet away from the
blade bar and the ejection chute!
Make sure you always take up a safe and
stable stance whilst working, especially on
slopes.
Be particularly careful if you change direction
on a slope.
For wheeled rotary machines, mow across the
face of slopes, never up and down.
Be careful when going backwards.
Risk of stumbling!
Look out for foreign bodies when working
(e. g. stones).
Interruptions of work:
Do not leave the mower unattended in the
workplace. Should you stop working store
the mower in a safe place.
v Remove the spark plug connector!
Should you stop work to go to work some-
where else with the mower, be sure to switch
the mower off while you are going there.
Environmental influences:
Only work when visibility is good.
Familiarise yourself with the surroundings of
your working area. Check for possible risks
which might be not audible due to the noise of
the machine.
Page 3
19
GB
18
GB
3. Function
If grass residue is left in the discharge opening, pull mower
backwards about 1 m so that the grass residue can drop out
downwards.
To produce a well-maintained lawn. we recommend cutting the
lawn regularly once a week if possible. The lawn becomes thicker
if cut frequently.
After relatively long intervals between mowing (holiday lawn),
first of all cut in one direction with the cutting height as high as
possible, then cut in the crosswise direction at the cutting
height required.
If possible, only cut the grass when it is dry, if the grass is damp,
the cutting pattern will be uneven.
You will achieve the best mulching results by cutting the grass
regularly once or twice a week depending on the amount the
grass has grown.
So that the grass mulch can rot down properly, mulch when the
grass is as dry as possible. Mulching is not recommended for
lawns with a great deal of moss or very matted grass. The moss
and weeds must be removed by scarifying.
For mulching the grass must be mown no more than 1/3 of
its height. The cut height must be set at 4 cm at least (for
very dense grass the cut height may have to be set higher).
Mulching tips:
Mowing tips:
Make sure that there are no other people
(especially children) or animals anywhere near
the working area.
Stop the engine and disconnect the spark plug
wire, make sure that all moving parts have
come to a complete Stopp and, where a key is
fitted remove the key: after striking a foreign
object. Inspect the lawnmower for damage and
make repairs before restarting and operating
the lawnmower.
Never use the mower when it is raining or
in damp or wet conditions.
Please observe any local restrictions or noise
levels.
Petrol engine notes:
Warning! Fuel is highly inflammable. Fuel must
be stored only in containers authorised for the
purpose. The fuel must be filled only outdoors;
do not smoke during filling. Fill with petrol prior
to use; the petrol cap must not be removed and
no petrol may be added if the engine is running
or is hot. If petrol is spilled during filling, the
engine must not be started until the spilled
petrol has been wiped up and the mower has
been removed from the area where the fuel
was spilled. You must not attempt to start the
engine until the petrol vapours have dissipated.
To avoid the danger of fire, keep the engine
and exhaust free from grass, leaves, grease or
oil and away from combustible materials.
There is danger of carbon monoxide poisoning.
Do not let the engine run in closed spaces.
When filling with petrol and oil, ensure that no
foreign bodies (e. g. grass) get into the engine.
Always check the oil level before mowing.
For security reasons, replace the tank lid if
damaged.
Never store a mower with fuel in the tank in
a room where petrol fumes could come into
contact with an open flame.
If the fuel tank has to be drained, this should be
done outdoors.
Reduce the throttle setting during engine
shut down and, if the engine is provided with
a shut-off valve, turn the fuel off at the
conclusion of mowing.
Do not change the engine governor settings or
overspeed the engine.)
v Follow the enclosed engine operating
instructions.
When mowing with the mulch unit the cut grass is returned to the
grass as a self fertiliser and there are no waste lawn clippings.
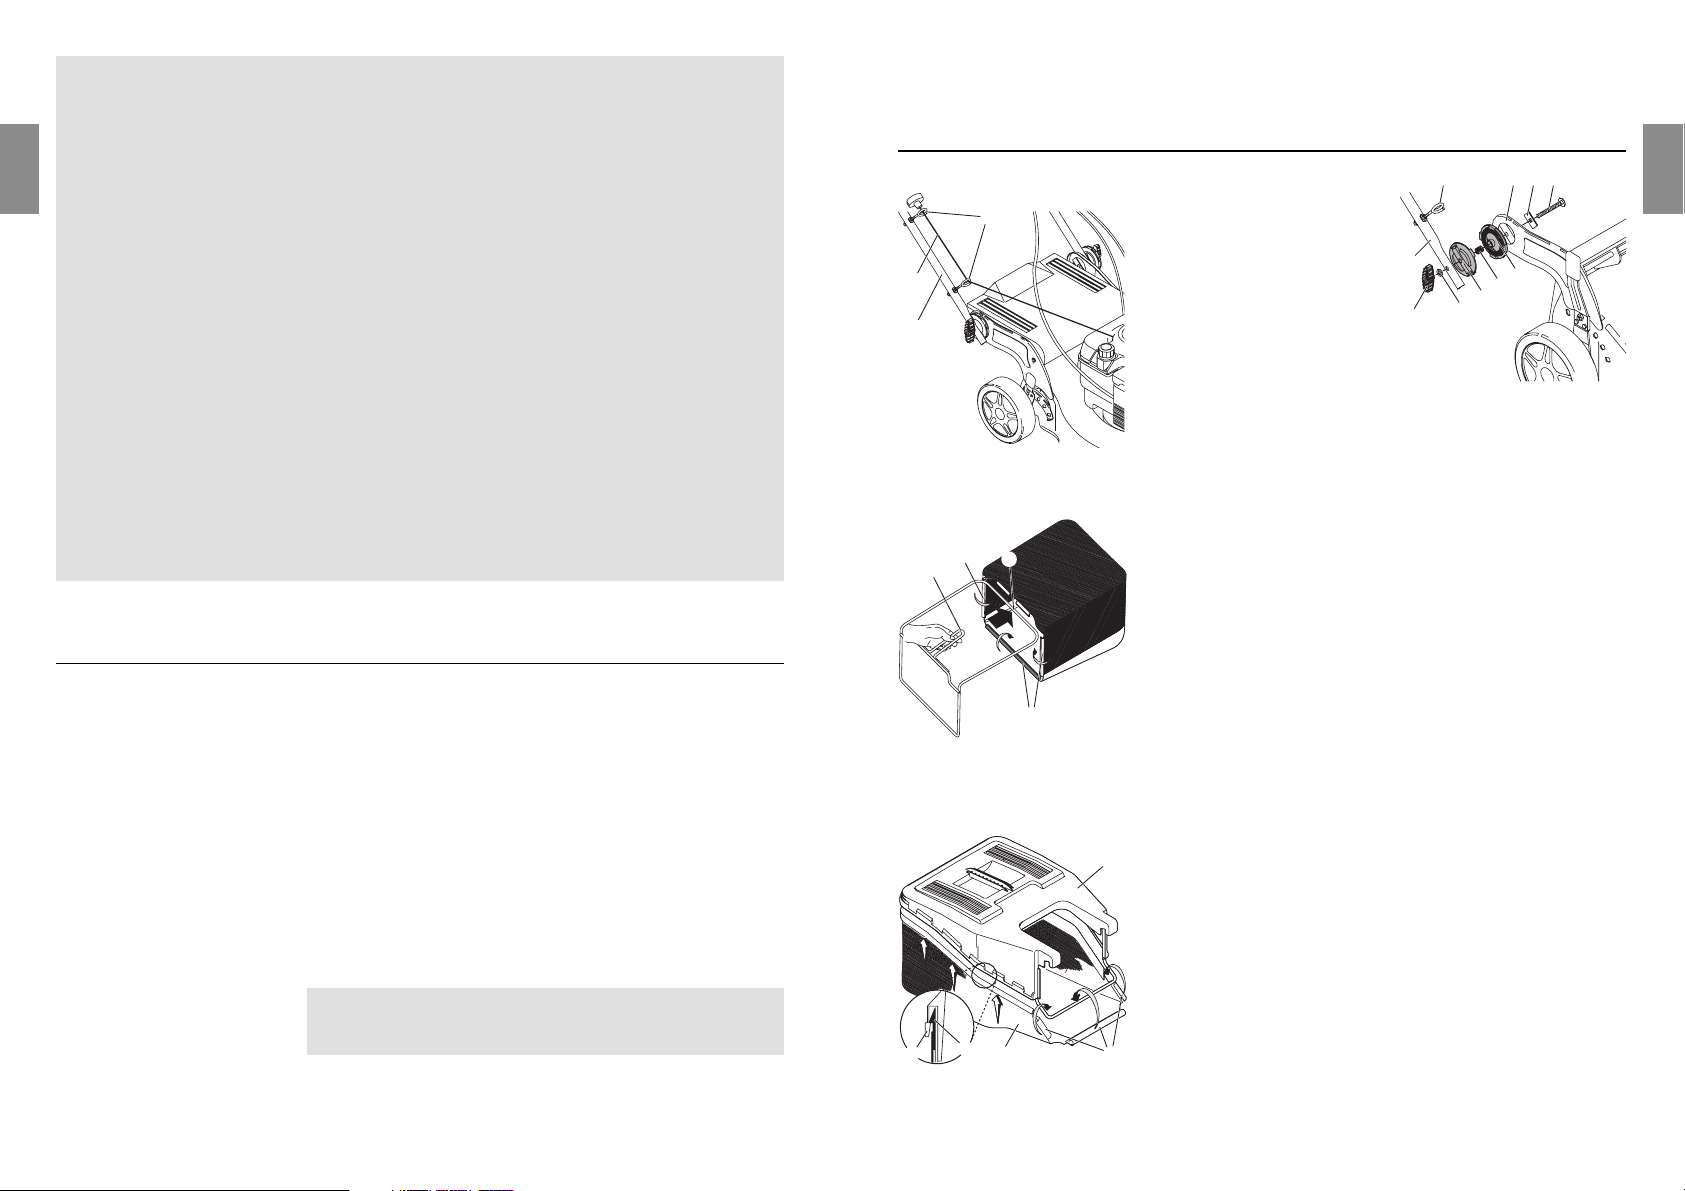
4. Assembly
Fitting the handle: 1. Push the screw 1with the
square washer 2 through the
hole in the handle
3
.
2. Put the handle lock 4 with
spring
5
, handle 6and round
washer
7
on the screw 1and
tighten with the wing nut
8
When doing this the eyes
9
must be on the same side as
the starter cord 0.
3. Thread the starter cord
0
through the two eyes 9on the
handle 6.
1. Feed the bow-shaped handle
q
into the Collecting Bag so that
the handle wis on the top.
2. Fold the safety straps earound the handle q.
1. Place the collection bag cover
r
onto the collecting bag
t
from the top so that ALL the eyes
ß
a
are positioned over the
hook
ß
b
.
2. Push the Collecting Bag cover rdown onto the collecting
bag tuntil all hooks
ß
b
engage securely.
3. Fold the safety straps
e
around the handle.
ß
a
ß
b
t
e
r
Fitting the collection bag
(51 VDA):
ww
e
q
e
Fitting the collection bag
(44 V / 46 VD / 46 VDA):
1239
6
8
4
55
4
7
0
9
6
Page 4
21
GB
5. Operation
The handle can be set to any body size by setting the angle of
inclination.
1. Undo both wing nuts 8until
the handle 6can be inclined.
2. Set the required handle
inclination.
3. Tighten both wing nuts
8
.
The cut height can be set centrally in six stages.
46 V / 46 VD: 30 / 40 / 50 / 60 / 70 / 80 mm
46 VDA / 51 VDA: 25 / 35 / 45 / 65 / 75 / 95 mm
1. Pull the handle
z
towards the wheel uuntil the lock is
released.
2. Set the required cut height by rotating the handle
z
.
The cut height set will be shown in mm on the cut height
display ion the mower.
3. When the cut height has been selected engage the handle
z
in the appropriate locking position again.
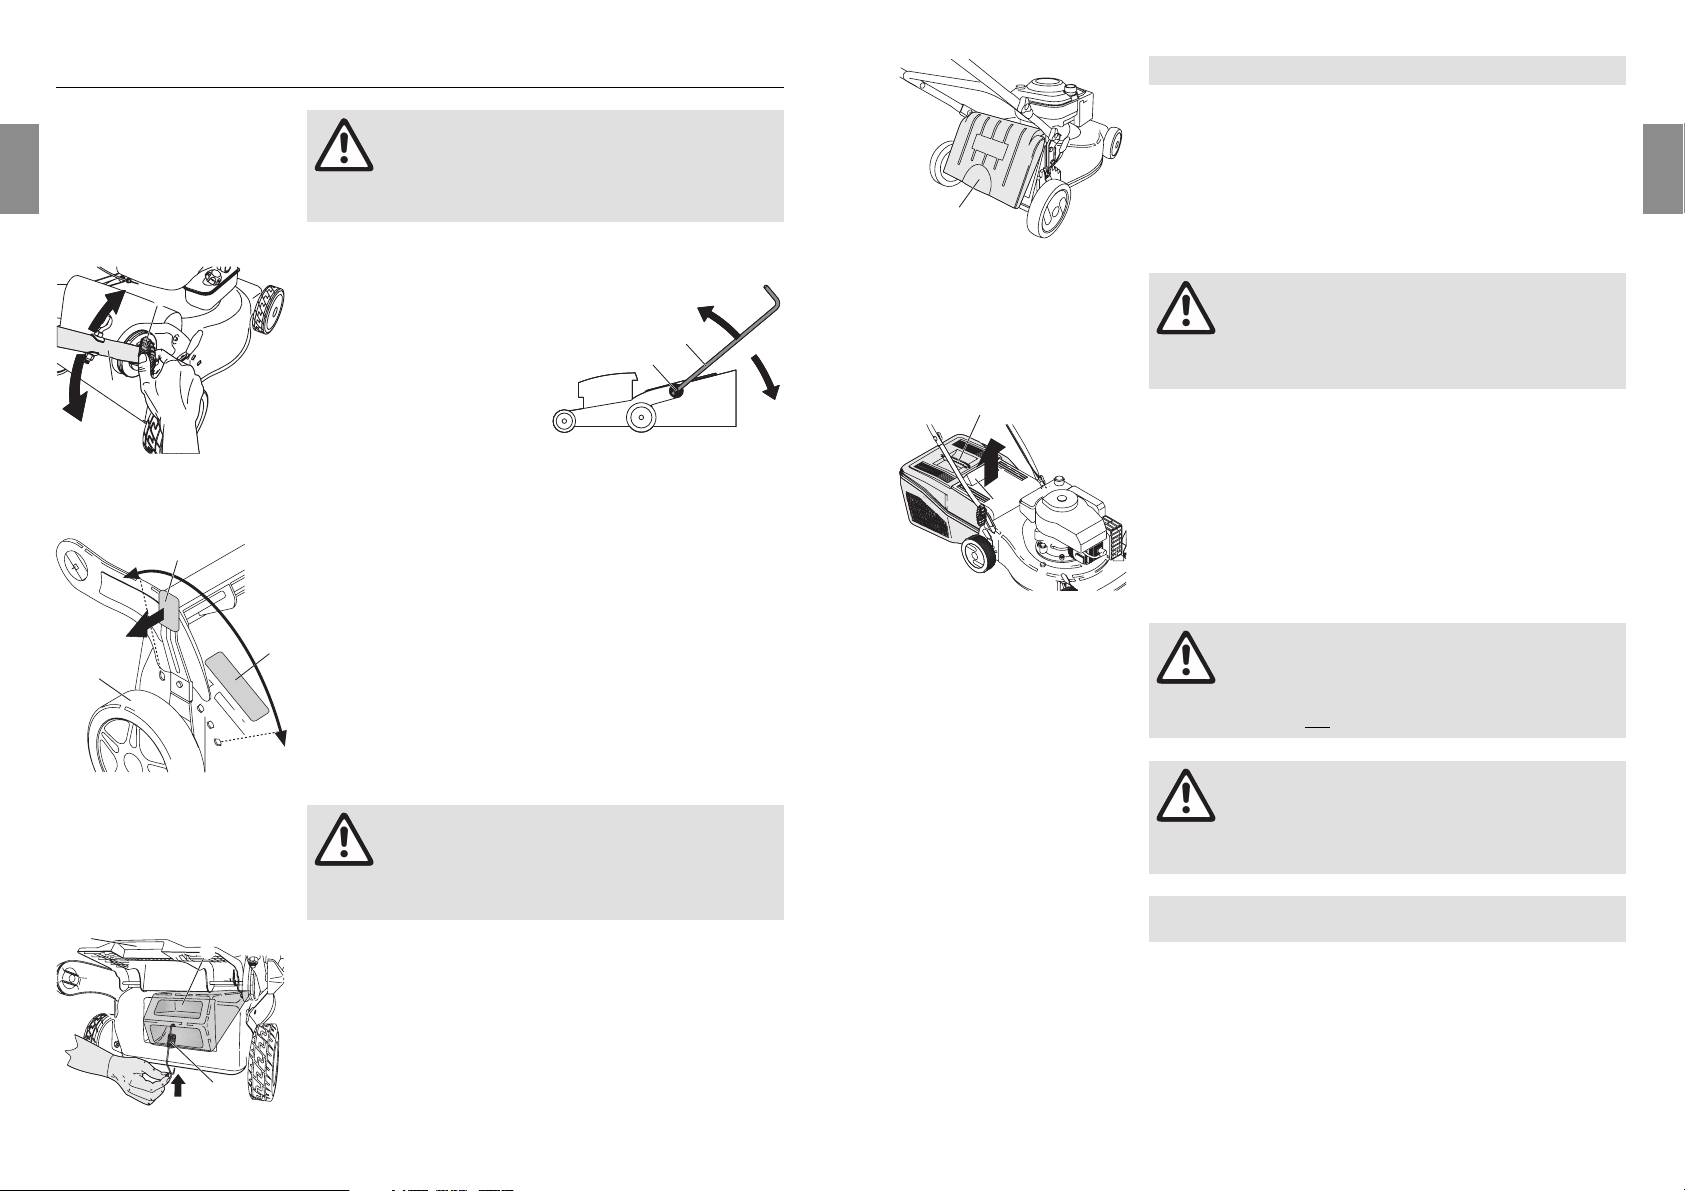
Inserting mulch unit:
1. Lift protective flap
o
and push the mulch unit pinto the
ejection chute until it stops.
2. Fit the retaining spring ato the top of the mulch unit pand
the bottom of the housing.
This stops the mulch unit pfalling out.
Removing the mulch unit:
v Lift the protective flap
o
, unhook the retaining spring afrom
the housing and remove the mulch unit p.
o
p
a
DANGER!
Foreign bodies thrown out of the mower can cause
injuries!
v Only lift the protective flap owhen the engine is turned
off and the blade bar has stopped.
Mowing with mulch unit:
1
2
u
z
i
Setting the cut height:
8
6
8
6
Adjust the handle inclination:
DANGER!
Danger of physical injury from the blade bar!
v Before making any adjustments wait for the
blade bar to stop, put on suitable working
gloves and remove the spark plug connector.
20
GB
If the protective flap ois released it will close automatically and
cover the ejection chute.
The protective flap
o
is designed in such a way that mowing
can take place even if the protective flap is closed without the
mulch unit or Collecting Bag. The cuttings are then left on the
lawn.
The mulch unit must be removed before mowing with the
collection bag (see Mowing with mulch unit).
The collecting bag must be emptied as soon as grass cuttings
are left on the lawn while mowing.
1. Lift the protective flap oand remove the grass collection
bag sfrom the handle.
2. Empty the grass collection bag s, lift up the protective flap
o
and replace the grass collection bag sat the back of the
housing.
The drive handle / lever must not be removed from the
handle when starting.
ATTENTION!
Damage to the engine!
The engine must be filled with oil before starting.
v See 7. Maintenance for instructions on filling the engine
with oil.
DANGER !
Danger of physical injury if the mower does not
switch off automatically!
v The security devices fitted to the mower (safety swich,
drive lever) must not
be removed or bypassed.
Starting the mower:
s
o
DANGER!
Foreign bodies thrown out of the mower can cause
injuries!
v Only lift the protective flap owhen the engine is turned
off and the blade bar has stopped.
Mowing with the
collection bag:
o
Do not grasp the ejection chute with your hand.
Page 5

23
GB
22
GB
Starting the mower:
1. Place the mower on a level spot on the lawn.
2. Only with a cold engine:
46 V / 46 VD: Press the primer
d
3 times.
46 VDA / 51 VDA: Set the rotary lever fto “Choke”.
3. Pull the switch up gto the handle 6and then pull the start
cord hthrough vigorously.
4. After starting the engine feed the starter cord
h
back slowly
(if necessary repeat steps 3. and 4.).
5. 46 VDA / 51 VDA: Set the rotary lever fto the required engine
speed.
6. Only push the mower forwards at walking pace.
Starting the mower with a warm engine:
v 46 V / 46 VD: Do not press the primer
d
.
46 VDA / 51 VDA: Set the rotary lever fto max. speed.
Switching the mower off:
v Release the switch g.
46 VD has a single gear rear wheel drive. 46 VDA / 51 VDA has
a variable rear wheel drive to adjust to your personal walking
speed.
Starting the traction drive:
1. Start the mower.
2. 46 VD: Pull the drive handle
j
down to the handle 6.
ATTENTION! The mower will
start immediately.
46 VDA / 51 VDA: Pull the drive
lever jto the handle 6.
The further the drive lever is
pulled the faster the traction
drive.
To switch the traction drive off:
v Release the drive switch /
lever
j
.
6
j
46 VD
6
j
46 VDA / 51 VDA
Mowing with traction drive:
3x
d
h
6
g
f
46 V / 46 VD
The engine must be filled with petrol (see 7. Maintenance
“Filling engine with petrol”).
6. Putting out of Operation
Let the engine cool down before you store the mower in a closed
area. With engines that have are not to be used for more than
30 days first of all empty the petrol tank, soak up the remaining
petrol with a lint free cloth and then let the engine run until it
stops because it has run out of fuel.
1. Switch off the mower and remove the spark plug connector
k
(see enclosed engine operating instructions).
2. To save space undo both wing nuts 8until the handle can be
bent and fold the handle
6
forward.
3. Store mower in a dry, enclosed and secure place.
The product must not be added to normal household waste.
It must be disposed of properly.
1. Empty the petrol tank (see above).
2. Empty the engine oil tank (see enclosed engine operating
instructions).
7. Maintenance
DANGER!
Injury to persons and damage to property!
v Do not clean the mower, the mulch unit and
the Collecting Bag under high pressure.
DANGER!
Danger of physical injury from the
blade bar.
v Before any maintenance work wait until the blade bar has
stopped, wear suitable working gloves and remove
the spark plug connector (see enclosed engine operating
instructions).
Disposal:
k
6
8
The storage location must not be accessible to children.
Storing / transporting
the mower:
Page 6

25
GB
24
GB
See the enclosed engine
operating instructions.
1. Unscrew the oil cap l.
2. Fill with approx. 0.6 l engine
oil (SAE 30) (OIL).
3. Screw the oil cap lon again.
46 VDA / 51 VDA 46 V / 51 VD
See the enclose engine operating instructions.
1. Undo the petrol cap
ö
.
2. Fill with petrol (at least 87 octane) (FUEL).
3. Do the petrol cap öup again.
1. Remove the mulch unit / collecting bag.
2. Fit the hose connection
ä
to the mower and turn the tap on.
3. Start the mower and switch off again after about 30 seconds.
The rotating blade bar throws the water onto the bottom of the
mower and thus cleans it.
4. Turn off the tap and remove the hose connection
ä
.
5. Clean the top with a cloth (do not use any sharp objects).
v Remove grass deposits from inside and outside the collecting
bag at every mowing (do not use sharp objects).
v Immediately after mulching remove dirt and grass remains
from the mulch unit (do not use any sharp objects).
Cleaning the mulch unit:
The collecting bag must be checked regularly for damage.
Cleaning the collecting bag:
ä
Deposits make the starting process difficult, impair the quality
of the cut and the discharge of the grass. Dirt and grass
residues are easiest to remove immediately after mowing.
The bottom should be cleaned on the grass to avoid getting
the ground dirty.
Cleaning the mower housing:
For further engine maintenance instructions see the
enclosed engine operating instructions.
Filling the engine with petrol:
l
ö
l
ö
ATTENTION!
Damage to the engine!
v The engine must be filled with oil before starting.
Filling the engine with
engine oil:
8. Trouble-Shooting
v Turn the adjusting nut Vin
the relevant direction (+/–).
46 VD:
The adjusting nut is located on
the left-hand handle
6
.
46 VDA / 51 VDA 46 V
1. Detach attachment hook
W
.
2. Insert attachment hook Winto hole 1 of the switch handle g.
46 VDA / 51 VDA
Blade bars must only be replaced by GARDENA
service department or by an authorised GARDENA
dealer.
A damaged or bent blade bar or a blade bar with broken off
edges must be replaced because of the imbalance this
causes. For imbalance reasons the blade bar must not be
re-ground.
Replacing the blade bar:
1
2
O
W
46 VDA / 51 VDA:
If the Bowden cable of the switch handle
g
has moved due to
wear, it can be adjusted.
Adjust Bowden cable of the
switch handle:
V
6
V
If the Bowden cable of the drive has moved due to wear, it can
be adjusted.
Adjust Bowden cable of the
drive:
DANGER!
Danger of physical injury from the blade bar!
v Before remedying faults wait for the blade bar
to stop, wear suitable working gloves and
remove the spark plug connector (see enclosed
engine operating instructions).
Page 7

27
GB
26
GB
Only original GARDENA Blade Bars with original fixing must
be used. Spare GARDENA parts can be obtained from your
GARDENA dealer or the GARDENA service department.
• 46 V / 46 VD / 46 VDA: GARDENA Blade Bar
Art. 531211017
• 51 VDA: GARDENA Blade Bar
Art. 504113301
Fault Possible cause Remedy
v Raise cutting height or
reduce mowing speed.
Cutting height too low for the
lawn or mowing speed too high.
v Have the blade bar replaced.
Blade bar blunt.
Lawn is not cleanly cut.
v Clean mower
(see 7. Maintenance).
If this does not rectify the
fault, contact GARDENA
Service.
Imbalance resulting from very
dirty blade bar.
v Have the blade bar
tightened again or replaced
by an authorised dealer
or GARDENA Service.
Blade Bar damage or blade
fixing on the engine shaft has
come loose.
Runs unevenly,
mower vibrates strongly.
v Have screws tightened by
an authorised specialist dealer or GARDENA Service.
Screws on motor, its fixing or
on the mower casing loose.
Loud noises, mower rattling.
v Let the engine run for
about 3 min. until the oil
has evaporated.
Oil in the exhaust because
the mowr has been tipped
sideways.
A lot of engine smoke after
starting.
v Have the engine serviced
by GARDENA Service.
No motor oil in crankcase.
Piston and crankshaft bearings
have jammed.
Engine runs for a short time
but then suddenly stops with
a loud bang.
v Adjust Bowden cable of the
drive.
Bowden cable of the drive has
moved due to wear.
Drive does not start.
v Adjust Bowden cable of the
switch handle.
Bowden cable of the switch
handle has moved due to
wear.
Motor does not start.
v Raise cutting height or
reduce mowing speed.
Cutting height too low for the
lawn or mowing speed too high.
v Insert spark plug connector/
clean or replace spark plug.
Spark plug connector not
inserted / spark plug faulty.
v See 5. Operation “Starting the
mower with a warm engine”.
Wrong engine setting.
v Fill with petrol.
Petrol tank empty.
Engine does not start.
9. Technical Data
46 V 46 VD 46 VDA 51 VDA
(Art. 4044) (Art. 4046) (Art. 4047) (Art. 4051)
Engine (cubic capacity)
Briggs & Stratton Briggs & Stratton Briggs & Stratton Briggs & Stratton
450 550 675 ready start 675 ready start
(148 cm3) (158 cm3) (190 cm3) (190 cm3)
Wheel drive
– 1 gear rear wheel variable rear wheel variable rear wheel
Engine oil (tank volume)
SAE 30 (0,6 l) SAE 30 (0,6 l) SAE 30 (0,6 l) SAE 30 (0,6 l)
Petrol
unleaded petrol unleaded petrol unleaded petrol unleaded petrol
(min. 87 octane) (min. 87 octane) (min. 87 octane) (min. 87 octane)
Cutting width
46 cm 46 cm 46 cm 51 cm
Cutting height
30 / 40 / 50 / 30 / 40 / 50 / 25 / 35 / 45 / 25 / 35 / 45 / 65 /
60 / 70 / 80 mm 60 / 70 / 80 mm 65 / 75 / 95 mm 75 / 95 mm
Height adjustment
central 6 x central 6 x central 6 x central 6 x
Wheel sizes
190 / 210 mm 190 / 210 mm 190 / 280 mm 190 / 280 mm
Wheel bearing
ball bearing ball bearing ball bearing ball bearing
Mulch function
incl. unit incl. unit incl. unit incl. unit
Collection Bag volume
53 l 53 l 53 l 60 l
Weight
29,9 kg 32,1 kg 34,3 kg 37,5 kg
For lawn areas
up to approx. 500 m2up to approx. 800 m2up to approx. 800 m2up to approx. 1000 m
2
Water connection (cleaning)
Original GARDENA hose connection system
Working area related emission
characteristic value L
PA
1)
84 dB (A) 84 dB (A) 84 dB (A) 84 dB (A)
Noise level L
WA
2)
measured 95 dB (A) measured 95 dB (A) measured 95 dB (A) measured 97 dB (A)
measured / guaranteed
guaranteed 96 dB (A) guaranteed 96 dB (A) guaranteed 96 dB (A) guaranteed 98 dB (A)
Vibrations a
vhw
1)
< 5,0 m/s
2
< 5,0 m/s
2
< 5,0 m/s
2
< 5,0 m/s
2
Measuring method 1)EN 836 2)2000/14/EG
!
Manufacturer
"
Model
§
Product number
$
Maintenance lever
%
Serial number
&
Type
/
Engine Info
(
Weight
)
Sound power level
! § $ %
"
&
/
(
)
For any other malfunctions please contact the GARDENA service department.
Repairs must only be carried out by GARDENA service departments or specialist
dealers authorised by GARDENA.
Page 8

28
GB
10. Service / Warranty
GARDENA guarantees this product for 2 years (from date of
purchase). This guarantee covers all serious defects of the unit
that can be proved to be material or manufacturing faults.
Under warranty we will either replace the unit or repair it free
of charge if the following conditions apply:
• The unit must have been handled properly and in keeping with
the requirements of the Operating Instructions.
• Neither the purchaser or a non-authorised third party have
attempted to repair the unit.
The blade bar, spark plug and air filter are consumables and are
not included in the guarantee.
This manufacturer’s guarantee does not affect the user’s existing
warranty claims against the dealer / seller.
For servicing please contact an authorised GARDENA
Workshop or GARDENA Service.
Page 9

149148 149
Bezeichnung der Geräte: Benzin-Rasenmäher
Description of the units: Petrol Lawnmower
Désignation du matériel : Tondeuse thermique
Omschrijving van de apparaten: Benzine grasmaaier
Produktbeskrivning: Besindriven Gräsklippare
Beskrivelse af produktet: Benzinplæneklipper
Laitteiden nimitys: Bensiinikäyttöinen ruohonleikkuri
Betegnelse på redskap: Bensindrevet Gressklipper
Descrizione dei prodotti: Rasaerba a scoppio
Descripción de la mercancía: Cortacésped de gasolina
Descrição dos aparelhos: Máquina de cortar relva a gasolina
EU-Richtlinien:
EU directives:
Directives européennes :
EU-richtlijnen:
EU directiv:
EU Retningslinier:
EY-direktiivit:
EU-direktiver:
Direttive UE:
Normativa UE:
Directrizes da UE:
98/37/EC
2006/42/EC
2004/108/EC
93/68/EC
2000/14/EC
Harmonisierte EN:
EN 12100-1
EN 12100-2
EN 836
Hinterlegte Dokumentation:
Deposited Documentation:
Dokumentation déposée:
NEMKO AS
Gaustadalleen 30 – PO Box 73
Blindern
0314 OSLO
Norway
Konformitätsbewertungsverfahren:
Nach 2000/14 EG Art. 14 Anhang VI
Conformity Assessment Procedure:
According to 2000/14EC Art. 14
Annex VI
Procédure d’évaluation de la
conformité:
Selon 2000/14CE art. 14 Annexe VI
Anbringungsjahr der
CE-Kennzeichnung:
Year of CE marking:
Année d’apposition du marquage CE :
Installatiejaar van de CE-aanduiding:
Märkningsår:
CE-Mærkningsår:
Schall-Leistungspegel: gemessen / garantiert
Noise level: measured / guaranteed
Puissance acoustique : mesurée / garantie
Geluidsniveau: gemeten / gegarandeerd
Ljudnivå: uppmätt / garanterad
Lydtryksniveau: afmålt / garanti
Melunpäästöarvo: mitattu / taattu
Støyemisjonsverdi: målt / garantert
Livello rumorosità: testato / garantito
Nivel sonoro: medido / garantizado
Nível de ruido: medido / garantido
46 V: 95 dB (A) / 96 dB (A)
46 VD: 95 dB (A) / 96 dB (A)
46 VDA: 95 dB (A) / 96 dB (A)
51 VDA: 97 dB (A) / 98 dB (A)
Ulm, den 01.06.2008
Ulm, 01.06.2008
Fait à Ulm, le 01.06.2008
Ulm, 01-06-2008
Ulm, 2008.06.01.
Ulm, 01.06.2008
Ulmissa, 01.06.2008
Ulm, 01.06.2008
Ulm, 01.06.2008
Ulm, 01.06.2008
Ulm, 01.06.2008
Der Bevollmächtigte
Authorised representative
Le mandataire
De gevolmachtigde
Auktoriserad representant
Autoriseret repræsentant
Valtuutettu edustaja
Den fullmektige
Persona delegata
La persona autorizada
O representante
Bengt Ahlund
Vice President
Typen:
Types:
Types :
Type:
Typ:
Typer:
Tyypit:
Typer:
Tipi:
Típos:
Tipos:
46V TYPE 546SL
46VD TYPE 546SL
46VDA TYPE 546SL
51VDA TYPE 651SL
Art.-Nr.:
Art. No.:
Référence :
Art.nr.:
Art.nr.:
Art. nr.:
Tuoten:o
Art.-Nr.:
Art.:
Art. No:
Art. no:
4044
4046
4047
4051
D EU-Konformitätserklärung
MaschinenVerordnung (9. GSGVO) / EMVG / Niedersp. RL
Der Unterzeichnete GARDENA Manufacturing GmbH · Hans-Lorenser-Str. 40 ·
D-89079 Ulm bestätigt, dass die nachfolgend bezeichneten Geräte in
der von uns in Verkehr gebrachten Ausführung die Anforderungen der
harmonisierten EU-Richtlinien, EU-Sicherheitsstandards und produktspezifischen Standards erfüllen. Bei einer nicht mit uns abgestimmten
Änderung der Geräte verliert diese Erklärung ihre Gültigkeit.
G EU Certificate of Conformity
The undersigned GARDENA Manufacturing GmbH · Hans-Lorenser-Str. 40 ·
D-89079 Ulm hereby certifies that, when leaving our factory, the units
indicated below are in accordance with the harmonised EU guidelines,
EU standards of safety and product specific standards. This certificate
becomes void if the units are modified without our approval.
V EU-overeenstemmingsverklaring
Ondergetekende GARDENA Manufacturing GmbH · Hans-Lorenser-Str. 40 ·
D-89079 Ulm bevestigt, dat de volgende genoemde apparaten in de door
ons in de handel gebrachte uitvoering voldoen aan de eis van, en in overeenstemming zijn met de EU-richtlijnen, de EU-veiligheidsstandaard en de
voor het product specifieke standaard. Bij een niet met ons afgestemde
verandering aan de apparaten verliest deze verklaring haar geldigheid.
S EU Tillverkarintyg
Undertecknad firma GARDENA Manufacturing GmbH · Hans-Lorenser-Str. 40 ·
D-89079 Ulm intygar härmed att nedan nämnda produkter överensstämmer
med EU:s direktiv, EU:s säkerhetsstandard och produktspecifikation.
Detta intyg upphör att gälla om produkten ändras utan vårt tillstånd.
I Dichiarazione di conformità alle norme UE
La sottoscritta GARDENA Manufacturing GmbH · Hans-Lorenser-Str. 40 ·
D-89079 Ulm certifica che il prodotto qui di seguito indicato, nei modelli
da noi commercializzati, è conforme alle direttive armonizzate UE nonché
agli standard di sicurezza e agli standard specifici di prodotto.
Qualunque modifica apportata al prodotto senza nostra specifica autorizzazione invalida la presente dichiarazione.
E Declaración de conformidad de la UE
El que subscribe GARDENA Manufacturing GmbH · Hans-Lorenser-Str. 40
· D-89079 Ulm declara que la presente mercancía, objeto de la presente
declaración, cumple con todas las normas de la UE, en lo que a normas
técnicas, de homologación y de seguridad se refiere. En caso de realizar
cualquier modificación en la presente mercancía sin nuestra previa autorización, esta declaración pierde su validez.
P Certificado de conformidade da UE
Os abaixo mencionados GARDENA Manufacturing GmbH · Hans-LorenserStr. 40 · D-89079 Ulm Por este meio certificam que ao sair da fábrica os
aparelhos abaixo mencionados estão de acordo com as directrizes harmonizadas da UE, padrões de segurança e de produtos específicos. Este certificado ficará nulo se as unidades forem modificadas sem a nossa aprovação.
Q EU Overensstemmelse certificat
Undertegnede GARDENA Manufacturing GmbH · Hans-Lorenser-Str. 40 ·
D-89079 Ulm bekræfter hermed, at enheder listet herunder, ved afsendelse
fra fabrikken, er i overensstemmelse med harmoniserede EU retningslinier,
EU sikkerheds standarder og produkt specifikations standarder. Dette certifikat træder ud af kraft hvis enhederne er ændret uden vor godkendelse.
J EY-vaatimustenmukaisuusvakuutus
Allekirjoittanut GARDENA Manufacturing GmbH · Hans-Lorenser-Str. 40 ·
D-89079 Ulm vakuuttaa, että allamainitut laitteet täyttävät tehtaaltamme
lähtiessään yhdenmukaistettujen EY-direktiivien, EY-turvallisuusstandardien
ja tuotekohtaisten standardien vaatimukset.Laitteisiin tehdyt muutokset,
joista ei ole sovittu kanssamme, johtavat tämän vakuutuksen raukeamiseen.
N EU-samsvarserklæring
Den undertegnede GARDENA Manufacturing GmbH · Hans-Lorenser-Str. 40 ·
D-89079 Ulm erklærer ved dette, at redskapet oppført nedenfor i utførelsen
som vi har introdusert på markedet er i samsvar med kravene i de harmoniserte EU-direktivene, EU-sikkerhetsstandarder og produktspesifikke
standarder. Ved en endring av redskapet som ikke er avstemt med oss,
taper denne erklæringen sin gyldighet.
F Certificat de conformité aux directives européennes
Le constructeur, soussigné : GARDENA Manufacturing GmbH ·
Hans-Lorenser-Str. 40 · D-89079 Ulm déclare qu’à la sortie de ses usines
le matériel neuf désigné ci-dessous était conforme aux prescriptions des
directives européennes énoncées ci-après et conforme aux règles de
sécurité et autres règles qui lui sont applicables dans le cadre de l’Union
européenne. Toute modification portée sur ce produit sans l’accord
express de GARDENA supprime la validité de ce certificat.
CE-merkin kiinnitysvuosi:
CE-merkingen plassert i året:
Anno di applicazione della
certificazione CE:
Colocación del distintivo CE:
Ano de marcação pela CE:
2008
D
Produkthaftung
Wir weisen ausdrücklich darauf hin, dass wir nach dem Produkthaftungsgesetz nicht
für durch unsere Geräte hervorgerufene Schäden einzustehen haben, sofern diese
durch unsachgemäße Reparatur verursacht oder bei einem Teileaustausch nicht unsere
originale GARDENA Teile oder von uns freigegebene Teile verwendet wurden und die
Reparatur nicht vom GARDENA Service oder dem autorisierten Fachmann durchgeführt
wird. Entsprechendes gilt für Ergänzungsteile und Zubehör.
G
Product Liability
We expressly point out that, in accordance with the product liability law, we are not liable
for any damage caused by our units if it is due to improper repair or if parts exchanged
are not original GARDENA parts or parts approved by us, and, if the repairs were not
carried out by a GARDENA Service Centre or an authorised specialist. The same applies
to spare parts and accessories.
F
Responsabilité
Nous vous signalons expressément que GARDENA n’est pas responsable des dommages causés par ses appareils, dans la mesure où ces dommages seraient causés
suite à une réparation non conforme, dans la mesure où, lors d’un échange de pièces,
les pièces d’origine GARDENA n’auraient pas été utilisées, ou si la réparation n’a pas
été effectuée par le Service Après-Vente GARDENA ou l’un des Centres SAV agréés
GARDENA. Ceci est également valable pour tout ajout de pièces et d’accessoires
autres que ceux préconisés par GARDENA.
V
Productaansprakelijkheid
Wij wijzen er nadrukkelijk op, dat wij op grond van de wet aansprakelijkheid voor
producten niet aansprakelijk zijn voor schade ontstaan door onze apparaten, indien
deze door onvakkundige reparatie veroorzaakt zijn, of er bij het uitwisselen van
onderdelen geen gebruik gemaakt werd van onze originele GARDENA onderdelen of
door ons vrijgegeven onderdelen en de reparatie niet door de GARDENA technische
dienst of de bevoegde vakman uitgevoerd werd. Ditzelfde geldt voor extra-onderdelen
en accessoires.
S
Produktansvar
Tillverkaren är inte ansvarig för skada som orsakats av produkten om skadan beror
på att produkten har reparerats felaktigt eller om, vid reparation eller utbyte, andra än
Original GARDENA reservdelar har använts. Samma sak gäller för kompletteringsdelar
och tillbehör.
I
Responsabilità
del prodotto
Si rende espressamente noto che, conformemente alla legislazione sulla responsabilità
del prodotto, non si risponde di danni causati da nostri articoli se originati da riparazioni eseguite non correttamente o da sostituzioni di parti effettuate con materiale non
originale GARDENA o comunque da noi non approvato e, in ogni caso, qualora l’intervento non venga eseguito da un centro assistenza GARDENA o da personale specializzato autorizzato. Lo stesso vale per le parti complementari e gli accessori.
E
Responsabilidad
de productos
Advertimos que conforme a la ley de responsabilidad de productos no nos responsabilizamos de daños causados por nuestros aparatos, siempre y cuando dichos daños
hayan sido originados por arreglos o reparaciones indebidas, por recambios con
piezas que no sean piezas originales GARDENA o bien piezas no autorizadas por
nosotros, así como en aquellos casos en que la reparación no haya sido efectuada
por un Servicio Técnico GARDENA o por un técnico autorizado. Lo mismo es aplicable
para las piezas complementarias y accesorios.
P
Responsabilidade
sobre o produto
Queremos salientar que segundo a lei da responsabilidade do fabricante, nós não nos
responsabilizaremos por danos causados pelo nosso equipa-mento, quando estes
ocorram em decorrência de reparações inadequadas ou da substituição de peças por
peças não originais da GARDENA, ou peças não autorizadas. A responsabilidade
tornar-se-à nula também depois de reparações realizadas por oficinas não autorizadas
pela GARDENA. Esta restrição valerá também para peças adicionais e acessórios.
Q
Produktansvar
Vi gør udtrykkeligt opmærksom på, at vi i henhold til produktansvarsloven ikke er
ansvarlige for skader forårsaget af vores udstyr, såfremt det sker på grund af uautoriserede reparationer eller hvis dele er skiftet ud og der ikke er anvendt originale
GARDENA dele eller dele godkendt af os, eller hvis reparationerne ikke er udført
af GARDENA-service eller en autoriseret fagmand. Det samme gælder for ekstra
udstyr og tilbehør.
J
Tuotevastuu
Korostamme nimenomaan, että tuotevastuulain nojalla emme ole vastuussa
laitteistamme johtuneista vahingoista, mikäli nämä ovat aiheutuneet epäasianmukaisesta korjauksesta tai osia vaihdettaessa ei ole käytetty alkuperäisiä
GARDENA-varaosia tai hyväksymiämme osia ja korjauksen on suorittanut muu
kuin GARDENA-huoltokeskus tai valtuuttamamme ammattihenkilö. Tämä pätee
myös lisäosiin ja lisävarusteisiin.
N
Produktansvar
Vi gjør uttrykkelig oppmerksom på at vi i henhold til produktansvarsloven ikke er
ansvarlige for skader forårsaket av redskapet vårt hvis dette skyldes usakkyndige
reparasjoner eller hvis deler er skiftet ut og det ikke ble benyttet våre originale
GARDENA deler eller deler som er godkjent av oss og reparasjonen ikke er utført
av GARDENA service eller den autoriserte fagmannen. Det samme gjelder for
supplerende deler og tilbehør.
Page 10

152
Deutschland / Germany
GARDENA
Manufacturing GmbH
Central Service
Hans-Lorenser-Str. 40
89079 Ulm
Produktfragen:
(+49) 731 490-123
Reparaturen:
(+49) 731 490-290
service@gardena.com
Argentina
Husqvarna Argentina S.A.
Vera 745
(C1414AOO) Buenos Aires
Phone: (+ 54) 11 4858-5000
diego.poggi@ar.husqvarna.com
Australia
Husqvarna Australia Pty. Ltd.
Locked Bag 18,
Gosford NSW 2250
or: 69 Chivers Rd,
Somersby NSW 2250
Phone: + 61 (0) 2 4372 1500
customer.service@
husqvarna.com.au
Austria / Österreich
Husqvarna Austria GmbH
Consumer Products
Industriezeile 36
4010 Linz
Phone: (+43) (0)732/77 0101-90
consumer.service@husqvarna.at
Belgium
GARDENA Belgium NV/SA
Sterrebeekstraat 163
1930 Zaventem
Phone: (+32) 27 20 921 2
info@gardena.be
Brazil
Palash Importação
e Comércio Ltda
Rua SãoJoão do Araguaia,338
Barueri – SP– CEP: 06409-060
Phone: (+55) 11 4198-9777
eduardo@palash.com.br
Bulgaria
Husqvarna Bulgaria Eood
72 Andrey Ljapchev Blvd.
1799 Sofia
Phone: 02/9 75 30 76
Canada
GARDENA Canada Ltd.
100 Summerlea Road
Brampton, Ontario L6T 4X3
Phone: (+1) 905 792 93 30
info@gardenacanada.com
Chile
Garden Chile S.A.
San Sebastián 2839
Ofic. 701 A
Las Condes -Santiago de Chile
Phone: (+56) 2 20 10 708
garfar_cl@yahoo.com
Costa Rica
Compania Exim
Euroiberoamericana S.A.
Aptdo Postal 1260
San José
Phone: (+506) 223 20 75
exim_euro@racsa.co.cr
Croatia
SILK ADRIA d.o.o.
Josipa Lončara 3
10090 Zagreb
Phone: (+385) 1 3794 580
silk.adria@zg.tcom.hr
Cyprus
FARMOKIPIKI LTD
P.O. Box 7098
74, Digeni Akrita Ave.
1641 Nicosia
Phone: (+357) 22 75 47 62
condam@spidernet.com.cy
Czech Republic
GARDENA spol. s.r.o.
Tuřanka 115
62700 Brno
Phone: (+420) 548 217 777
gardena@gardenabrno.cz
Denmark
GARDENA
Husqvarna Consumer Outdoor
Products
Salgsafdelning Danmark
Box 9003
200 39 Malmö
info@gardena.dk
Estonia
Husqvarna Eesti OÜ
Consumer Outdoor Products
Kesk tee 10, Aaviku küla
Rae vald, Harju maakond 75305
kontakt.etj@husqvarna.ee
Finland
Oy Husqvarna Ab
Consumer Outdoor Products
Lautatarhankatu 8 B / PL 3
00581 HELSINKI
info@gardena.fi
France
GARDENA France
Immeuble Exposial
9 – 11 allée des Pierres Mayettes
ZAC des Barbanniers
B.P. 99
92232 Gennevilliers cedex
Phone: (+33) 01 40 85 30 40
service.consommateurs@gardena.fr
Great Britain
Husqvarna UK Ltd
Preston Road
Aycliffe Industrial Park
Newton Aycliffe
Co Durham
DL5 6UP
info.gardena@husqvarna.co.uk
Greece
HUSQVARNA ∂§§∞™ ∞.∂.µ.∂.
À/Ì· ∏Ê·›ÛÙÔ˘ 33A
µÈ. ¶Â. ∫ÔÚˆ›Ô˘
19 400 ∫ÔÚˆ› ∞ÙÙÈ΋˜
Phone: (+30) 210 6620225 – 6
service@agrokip.gr
Hungary
Husqvarna
Magyarország Kft.
Ezred u. 1 – 3
1044 Budapest
Phone: (+ 36) 80 20 40 33
gardena gardena.hu
Iceland
Ó. Johnson & Kaaber
Tunguhalsi 1
110 Reykjavik
ooj@ojk.is
Ireland
McLoughlins RS
Unit 5
Norther Cross Business Park
North Road, Finglas
Dublin 11
Italy
GARDENA Italia S.p.A.
Via Donizetti 22
20020 Lainate (Mi)
Phone: (+39) 02.93.94.79.1
info@gardenaitalia.it
Japan
KAKUICHI co., Ltd.
Sumitomo Realty & Development
Kojimachi
BLDG., 8F
5 – 1 Nibanncyo, chiyoda-ku,
Tokyo 102-0084
Phone: (+81)-(0)3-3264-4721
m_ishihara@kaku-ichi.co.jp
Latvia
SIA „Husqvarna Latvija“
Consumer Outdoor Products
Bākūžu iela 6, Rīga, LV1024
info@husqvarna.lv
Lithuania
UAB Husqvarna Lietuva
Consumer Outdoor Products
Ateities pl. 77C
LT-52104 Kaunas
centras@husqvarna.lt
Luxembourg
Magasins Jules Neuberg
39, rue Jacques Stas
Luxembourg-Gasperich 2549
Case Postale No. 12
Luxembourg 2010
Phone: (+352) - 40 14 01
api@neuberg.lu
Netherlands
GARDENA Nederland B.V.
Postbus 50176
1305 AD ALMERE
Phone: (+31) 36 521 00 00
info@gardena.nl
Neth. Antilles
Jonka Tuincentrum
Sta. Rosa Weg 196
P.O. Box 8200
Curaçao
Phone: (+599) 9 767 66 55
pgm@jonka.com
New Zealand
Husqvarna New Zealand Ltd.
51 Aintree Avenue
Mangere, Manukau 2022
or: PO Box 76437
Manukau City 2241
Phone: (09)9202410
Norway
GARDENA
Husqvarna Consumer Outdoor
Products
Salgskontor Norge
Kleverveien 6
1540 Vestby
info@gardena.no
Poland
HUSQVARNA Poland Spółka z o.o.
ul. Wysockiego 15 b
03371 Warszawa
Oddział w Szymanowie
Szymanów 9 d
05532 Baniocha
Portugal
GARDENA Portugal Lda.
Escritórios
Sintra Business Park
Edificio 1 · Fracção 0 G
Abrunheira
2710-089 Sintra
info@gardena.pt
Romania
MADEX INTERNATIONAL SRL
Șoseaua Odăii 117 – 123
Sector 1, București,
RO 013603
Phone: (+40) 21 352-7603 / 4 / 5/ 6
madex@gardena.ro
Russia / Россия
OOO «Husqvarna»
Leningradskaya street, vladenie 39
Khimki Business Park
Building 2, 4th floor
141400 Moscow Region, Khimki
Phone: +7 (495) 797 26 70
Singapore
HY-RAY PRIVATE LIMITED
40 Jalan Pemimpin
#02-08 Tat Ann Building
Singapore 577185
Phone: (+65) 6253 2277
shiying@hyray.com.sg
Serbia
DOMEL d.o.o.
Savski Nasip 7
11070 Novi Beograd
Serbia
Phone: (+381) 11 2772 204
miroslav.jejina@domel.co.yu
Slovenia
GARDENA d.o.o.
Brodišče 15
1236 Trzin
Phone: (+386) 1 580 93 32
servis@gardena.si
South Africa
GARDENA
South Africa (Pty.) Ltd.
P.O. Box 11534
Vorna Valley 1686
Phone: (+27) 11 315 02 23
sales@gardena.co.za
Spain
GARDENA IBÉRICA S.L.U.
C/Basauri, nº 6
La Florida
28023 Madrid
Phone: (+34) 91 708 05 00
(4 líneas)
atencioncliente@gardena.es
Sweden
GARDENA
Husqvarna Consumer Outdoor
Products
Försäljningskontor Sverige
Box 9003
20039 Malmö
info@gardena.se
Switzerland / Schweiz
Husqvarna Schweiz AG
Consumer Products
Industriestrasse 10
5506 Mägenwil
Phone: +41 (0) 62 887 37 00
info@gardena.ch
Turkey
GARDENA Dost Dıș Ticaret
Mümessillik A.Ș.
Sanayi Çad. Adil Sok. No. 1
34873 Kartal – Istanbul
Phone: (+90) 216 38 93 939
info@gardena-dost.com.tr
Ukraine / Yкраїна
ТОВ «ГАРДЕНА УКРАЇНА»
Василькiвська, 34, 204-Г
03022, Київ
Тел.: (+38 044) 498 39 02
info@gardena.ua
USA
GARDENA Canada Ltd.
100 Summerlea Road
Brampton, Ontario L6T 4X3
Phone: (+1) 905 792 93 30
info@gardenacanada.com
4044-20.960.02/0409
© GARDENA Manufacturing GmbH
D-89070 Ulm
http://www.gardena.com
Page 11

D Ergänzung zur Betriebsanleitung:
Bestimmung:
Der GARDENA Benzin-Rasenmäher ist für
das Schneiden von Rasen- und Grasflächen mit einer maximalen Hang-Steigung
von 10° im privaten Haus- und Hobbygarten bestimmt.
GB Supplement to the operating
instructions:
Purpose:
The GARDENA petrol lawnmower is
designed for cutting lawns in and around
the garden. Do not use the mower on
a slope steeper than 10° maximum.
F Complément au mode d’emploi :
Finalité :
La tondeuse thermique GARDENA est
destiné pour tondre les pelouses des
jardins privés. La pente maximale de 10°
ne peut pas être dépassée.
NL Aanvulling op de gebruiks-
aanwijzing:
Bestemming:
De GARDENA benzine grasmaaier is voor
het maaien van gazons en grasvelden met
een maximale helling van 10° in particuliere
huis- en hobbytuinen bestemd.
S Komplement till
bruksanvisningen:
Bestämmelse:
GARDENA bensindrivna gräsklipparenär
avsedd för trimning och skötsel av
mindre gräsytor i privata hushålls- och
hobbyträdgårdar med max. lutning 10°.
DK Supplement til brugsanvisningen:
Tiltænkt anvendelse:
GARDENA benzinplæneklipperen er
beregnet til at klippe græsplæner og græsflader med en max. hældning 10° til brug
i private hus- og hobbyhaver.
FI Täydennys käyttöohjeeseen:
Käyttötarkoitus:
GARDENA-bensiinikäyttöinen ruohonleikkuri
on tarkoitettu nurmikon ja ruohoalueiden
leikkaamiseen yksityisessä piha- ja
harrastelupuutarhassa alueen kaltevuuden
ollessa korkeintaan 10°.
N Supplering til bruksanvisning:
Formål:
GARDENA bensindrevet gressklipper er
bestemt for å klippe plen- eller gressflater
med en maksimal bakkeskråning på 10°
i privathager.
I Aggiunta alle istruzioni per l’uso:
Settore di utilizzo:
Il rasaerba a scoppio GARDENA
è concepito per rasare prati e superfici
erbose in giardini e spazi privati
con un’inclinazione massima di 10°.
E Suplemento de las instrucciones
de empleo:
Aplicaciones:
El cortacésped de gasolina GARDENA
es ideal para cortar superficies de hierba
y césped con una pendiente máxima
de 10° en el jardín privado.
P Complemento do manual de
instruções:
Utilização adequada:
O máquina de cortar relva a gasolina
destina-se para o corte de relva ou relvado
de jardins em casas particulares ou jardins
de lazer com declives de uma inclinação
máxima de 10°.
4044-20.965.01/05.09
 Loading...