

Page 1
GARDENA
®
D Gebrauchsanweisung
Hattrick
GB Operating Instructions
Hattrick
F Mode d’emploi
Tondeuse Hattrick
NL Gebruiksaanwijzing
Hattrick
S Bruksanvisning
Hattrick Gräsklippare
I Istruzioni per l’uso
Hattrick
E Manual de instrucciones
Hattrick
P Instruções de utilização
Hattrick
HB 40 Art. 4005
MulchCut HB 40 Art. 4010
Page 2

D
Bitte lesen Sie diese Gebrauchsanweisung vor Montage und
Inbetriebnahme Ihres Gerätes
sorgfältig.
Beim Lesen der Gebrauchsanweisung bitte die Umschlagseiten herausklappen.
Inhaltsverzeichnis Seite
1. Technische Daten 6
2. Hinweise zur
Gebrauchsanweisung 6
3. Ordnungsgemäßer Gebrauch 6
4. Montage des Hattricks 7
5. Inbetriebnahme 7
6. Richtiges Mähen und Lüften 8
7. Wartung, Pflege und
Aufbewahrung 10
8. Behebung von Störungen 12
9. Hinweise zur ordnungsgemäßen Benutzung,
Sicherheitshinweise 13
Garantie 71
G
Please read these operating instructions carefully before assembling and using your lawn mower.
Unfold inside cover pages to read
the operating instructions.
Contents Page
1. Technical data 15
2. Information concerning
the instructions 15
3. Proper use 15
4. Assembly 16
5. Initial operation 16
6. Information concerning
correct mowing and aerating 17
7. Maintenance, service, storage 18
8. Trouble-shooting 20
9. Advice for proper use /
safety instructions 21
Guarantee 71
F
Nous vous remercions de bien
vouloir lire attentivement ce mode
d’emploi avant le montage et l’utilisation de votre tondeuse Hattrick.
Dépliez le 2ème volet de la couverture pour avoir les illustrations
sous les yeux pendant la lecture
du mode d’emploi.
Contenu Page
1. Caractéristiques techniques 23
2. Informations sur le mode
d’emploi 23
3. Domaine d’utilisation 23
4. Montage de la tondeuse
Hattrick 24
5. Mise en service 24
6. Conseils pour tondre et aérer
correctement 25
7. Entretien et rangement 27
8. Incidents de fonctionnement 29
9. Conseils de sécurité et
précautions d’emploi 29
Garantie 71
N
Lees deze gebruiksaanwijzing
voor de montage en ingebruikname
van het apparaat zorgvuldig door.
Bij het lezen van de gebruiksaanwijzing de omslagzijde openslaan.
Inhoudsopgave Pagina
1. Technische gegevens 31
2. Aanwijzing bij de gebruiksaanwijzingen 31
3. Juiste gebruik 31
4. Montage van de Hattrick 32
5. Ingebruikname 32
6. Juiste manier van maaien
en verticuteren 33
7. Verzorging, onderhoud
en opslag 35
8. Opheffen van storingen 37
9. Aanwijzing voor het juiste
gebruik, veiligheidstips 37
Garantie 71
S
Läs omsorgsfullt igenom bruksanvisningen och säkerhetsföreskrifterna innan Du tar Hattrick
i bruk.
Ha omslaget utvikt när Du läser
bruksanvisningen.
Innehållsförteckning Sida
1. Tekniska data 39
2. Viktig information 39
3. Avsedd användning 39
4. Montering 40
5. Drift 40
6. Rätt klippning och luftning 41
7. Underhåll, skötsel och
förvaring 42
8. Felsökning 44
9. Säkerhetsföreskrifter 45
Garanti 72
I
Prima di montare e mettere in
uso l’attrezzo, leggere attentamente le istruzioni tenendo aperto
il pieghevole per avere sott’occhio
i disegni esplicativi.
Indice Pagina
1. Dati tecnici 47
2. Avvertenze 47
3. Uso corretto 47
4. Montaggio 48
5. Messa in uso 48
6. Modalità funzionali 49
7. Manutenzione 51
8. Anomalie di funzionamento 53
9. Norme d’uso e di sicurezza 53
Garanzia 72
E
Lea detenidamente estas instrucciones de este montaje y de la
puesta en marcha del aparato.
Durante la lectura, rogamos desdoble la portada.
Indice Página
1. Datos técnicos 55
2. Indicaciones al manual
de instrucciones 55
3. Uso correcto 55
4. Montaje 56
5. Puesta en marcha 56
6. Cortar y airear correctamente 57
7. Mantenimiento y conservación 58
8. Solucionar averías 61
9. Indicaciones para un correcto
uso / indicaciones de
seguridad 61
Garantía 72
P
Leia atentamente estas instruções
antes de montar ou utilizar esta
máquina de cortar relva Hattrick.
Para ler este manual de instruções,
desdobre a capa.
Indice Página
1. Dados técnicos 63
2. Informação sobre as
instruções de utilização 63
3. Finalidade do produto 63
4. Montagem 64
5. Operação inicial 64
6. Informações sobre a forma
correcta de cortar e aerificar
áreas relvadas 65
7. Manutenção, serviço,
armazenamento 66
8. Guia de avarias 69
9. Conselhos para uma utilização correcta / instruções
de segurança 69
Garantia 72
Beachten Sie die Sicherheitshinweise auf dem Gerät:
Please adhere to the following safety instructions on the casing:
Veuillez respecter les consignes de sécurité figurant sur l’appareil :
Houdt rekening met de de veiligheidsaanwijzingen op het apparaat:
Följ bruksanvisningen noga:
Attenzione ai simboli di sicurezza riportati sull’attrezzo :
Observen las indicaciones de seguridad en el aparato:
Por favor siga atentamente as instruções de segurança fornecidas no aparelho:
Achtung! Vor Inbetriebnahme
Gebrauchsanweisung lesen!
Warning!
Read instruction handbook!
Attention ! Merci de lire attentivement le mode d’emploi avant
d’utiliser cet appareil !
Let op! Voor ingebruikname
gebruiksaanwijzing doorlezen!
Varning! Läs igenom bruksanvisningen före användning.
Attenzione! Prima di mettere in
uso l’attrezzo, leggere attentamente le istruzioni!
¡Atención! Antes de la puesta en
marcha, lea el manual de instrucciones.
Atenção! Leia atentamente este
manual de instruções antes de
usar o aparelho.
Dritte aus dem Gefahrenbereich
fernhalten!
Keep bystanders away!
Maintenez tout tiers hors de la
zone de travail !
Zorg ervoor dat derden buiten
de gevarenzone blijven!
Tillse att inga obehöriga vistas
i området!
Tenere lontano i terzi dalla zona
di lavoro!
¡Mantener alejados a terceros
del área de trabajo!
Mantenha terceiros fora da área
de perigo!
Vor Arbeiten am Schneidwerkzeug
Zündkerzenstecker ziehen!
Before maintenance, disconnect
the spark plug!
Débranchez la cosse de bougie
d’allumage avant toute intervention sur le système de coupe !
Voor werkzaamheden aan de
maaier bougiestekker eraf halen!
Lossa tändkabeln från tändstiftet
före underhåll och service.
Prima di qualsiasi intervento
di manutenzione, scollegare la
candela!
Para ejecutar trabajos de limpieza,
control o de mantenimiento desenchufe el aparato.
Antes de qualquer operação de
reparação desligue o casquilho
do vela.
Achtung, Gefahr! Umlaufende
Schneidwerkzeuge!
Warning! Rotating tools!
Attention ! Danger ! Le système
de coupe continue de tourner.
Let op! Gevaar! Roterend maaimes !
Varning roterande skärverktyg.
Attenzione! Pericolo!
Lame in rotazione!
¡Atención! ¡Peligro!
Cuchillas rotativas.
Atenção! Lâminas rotativas.
Achtung! Verletzungsgefahr durch
scharfes Schneidwerkzeug –
Finger und Füße entfernt halten!
Warning! Risk of injury. Keep
fingers and feet away from sharp
cutting tool!
Attention ! Risque de blessures par
le cylindre de coupe – ne mettez
ni mains ni pieds à proximité !
Let op! Verwondingsgevaar door
scherp snijgereedschap – vingers
en voeten weghouden!
Varning! Risk för skada p.g.a.
skärverktyg med skarp egg –
Håll fingrar och fötter borta!
Attenzione! Tenere sempre mani
e piedi a distanza di sicurezza
dalle lame. Pericolo di lesioni!
¡Atención! ¡ Peligro de lesiones
con las cuchillas de corte afiladas!
¡Mantenga alejados los dedos y
los pies!
Atenção! Perigo de danos pessoais devido a ferramentas de
corte afiadas – manter afastados
os dedos e pés!
Page 3
35
Page 4

15
G
HB 40 / MulchCut HB 40
Motor petrol engine Briggs & Stratton (Quattro 40)
Power 2.1 kW
Capacity 158 cm
3
Spark plug Champion RC-J-8 / Champion RJ-9LM
Gap 0.75 mm
Fuel tank capacity 1.0 l
Fuel Two-star petrol
Oil capacity approx. 0.6 l (SAE 30 or 10 W30)
Casing plastic
Cutting width 40 cm
Cutting height 30- 80 mm
Weight 31 kg
Grass catcher capacity 55 l
Wheels ball bearing
Side force 50 N
Return force 50 N
Operational safety/ gradients 15°
Working area related emission
characteristic value L
pA
1)
81 dB (A)
Noise level L
WA
2)
95 dB (A) / 94 dB (A)
Measuring method according to
Vibrations at handle a
vhw
1)
2.4 ms
-2 1)
EN 836 2)directive 2000/ 14/EC
GARDENA Hattrick HB 40
1. Technical data
Read these instructions carefully
and observe the information
contained in them. Acquaint yourself with the use of the unit, the
adjustments, its proper use and
observe the safety instructions.
A
For safety reasons,
children under the age
of 16 as well as people, who
are not acquainted with the
instructions should not use
this Hattrick.
Keep these instructions in
a safe place.
A
Warning! For environ-
mental and transport
safety reasons the petrol
Hattrick lawn mower is supplied
without motor oil. Therefore,
the crankcase of the engine
must be filled with motor oil
(see 5.1) prior to use, otherwise
the engine will be damaged.
2. Information concerning the instructions
The GARDENA petrol Hattrick
lawn mower has been designed
for cutting lawn and grass areas
of private houses.
This appliance is for private use
only and is not designed for use in
public places, parks, sport arenas,
street-scapes, in agriculture or
forestry.
It is absolutely necessary to
observe the manufacturer’s operating instructions to ensure the
unit’s proper functioning. These
instructions also contain hints on
service, maintenance and repair.
A
Attention! For health and
safety reasons the petrol
Hattrick lawn mower should not
be used for trimming bushes,
hedges or shrubs, for cutting
and pruning of climbers or
grass on roof or balcony gardens. Additionally, the Hattrick
must not be used for chopping
up branches and twigs and
for levelling irregularities in the
soil surface.
3. Proper use
Page 5

1716
GG
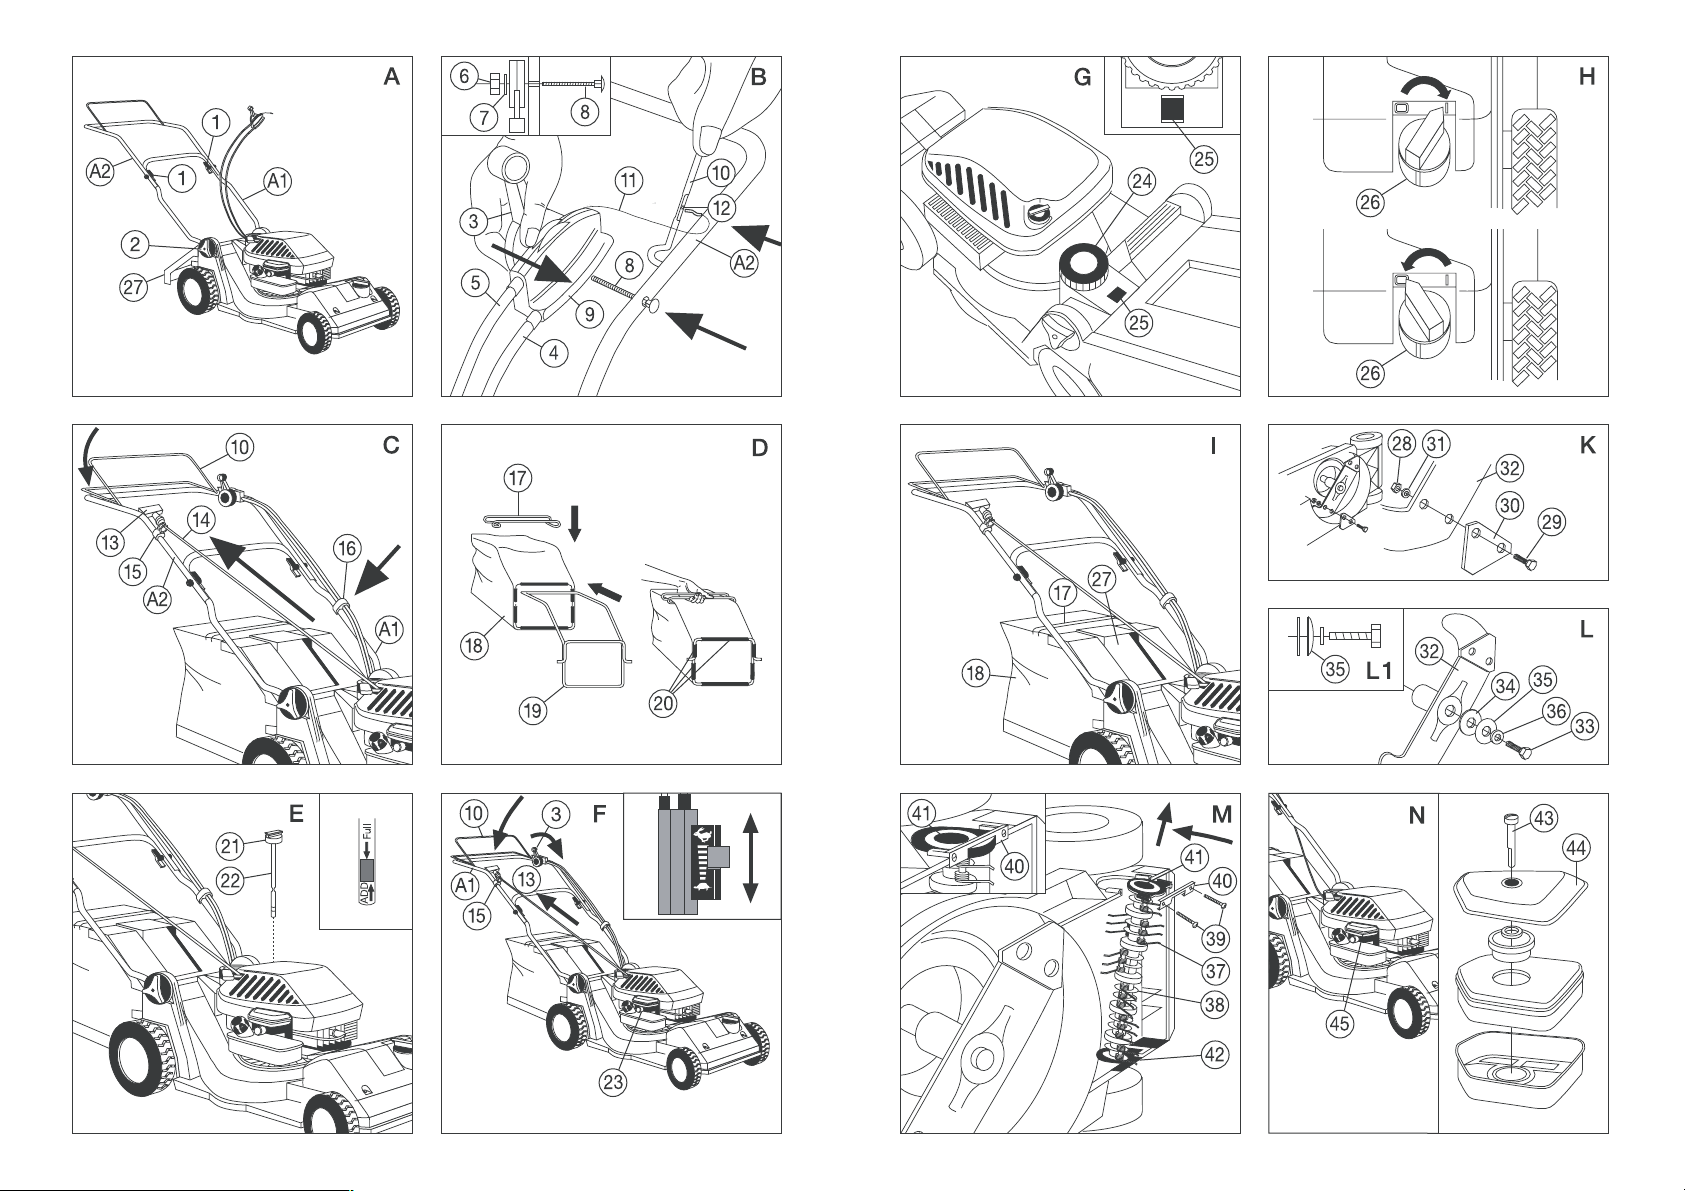
4.1 Contents
The packaging should include
the following parts:
.Hattrick HB 40
.Grass Catcher (disassembled)
.Top of guide handle
.Fastening parts for
guide handle and throttle
.Bowden cable clip
.Spark plug spanner
.Operating instructions
.TORX
®
-wrench
for changing blades
4.2 Assembly of the
guide handle (Fig. A)
Swivel the folded bottom part
of the guide handle (A1) into the
working position and allow it to
engage. Tighten well with the
lower linkage locking handles (2).
Put the top of the guide handle
(A2) onto the bottom part of the
guide handle (A1) and secure
using the fastening parts (threaded bolt; plastic wing nut) (1).
4.3 Assembly of the throttle
(Fig. B)
The throttle (3) is already connected in working order to the
petrol and brake bowden cables
(4/5). Insert the enclosed bolt (8)
from the outside through the
bore hole of the top of the guide
handle (A 2).
The bolt (8) is located firmly by
the square bolt head, into the
guide handle.
Lift the brake lever (10) and insert
the brake bowden cable (11)
from the outside into the corresponding bore hole (12). The casing of the throttle (9) is now inserted onto the bolt (8) on the top of
the guide handle (A 2).
Insert washer (7) before fastening
the nut (6) (as illustrated).
4.4 How to attach the starter
handle onto the top of the
guide handle (Fig. C)
By pushing the brake lever (10)
down, the brake is released from
the engine. The starter handle
(13) with starter cord (14) can now
be pulled out of its resting position
on the petrol motor. Now thread
the starter cord (14) into the guide
rings (15) on the top of the guide
handle (A 2).
4.5 Fixing the bowden cables
(Fig. C)
Insert both petrol and brake
bowden cables into the provided
bowden cable clip (16) and press
them onto the bottom part of
the guide handle (A1).
4.6 Assembly of the
grass catcher (Fig. A / D)
The grass catcher is supplied
loose (3 component parts).
The carrying handle (17) is under
the protective cover (27).
Unfold the grass catcher (18) and
insert the supporting frame (19)
through the opening of the grass
catcher (18) so that the plastic
base is at the bottom.
Then open the fastening clamps
(20) by hand and fix them onto
the supporting frame (19).
Fasten the carrying handle (17)
by pressing onto the supporting
frame (19).
Note:
The supporting frame (19) is
shaped to locate the carrying
handle (17) in the correct
position.
4. Assembly (Fig. A-D)
5.1 Preparation for initial
operation (Fig. E)
A
For environmental and
transport safety reasons
the petrol Hattrick lawn mower
is supplied without motor oil.
Therefore, the crankcase of
the engine must be filled with
0.6 l motor oil (SAE 30 or
10W 30).
Unscrew the oil sealing cap (21)
and fill with 0.6 l of SAE 30 quality
oil.
The oil level can be checked
(when engine is switched off)
by means of the oil dip stick (22)
integrated in the oil sealing cap
(21). The oil level must be between the ADD and FULL mark.
Always check the oil level
before mowing.
The recommended fuel is
unleaded two-stroke petrol.
A
Warning! Fuel is highly
inflammable. Fuel must
be stored only in containers
authorised for the purpose.
The fuel must be filled only
outdoors; do not smoke during
filling. Fill with petrol prior to
use; the petrol cap must not be
removed and no petrol may be
added if the engine is running
or is hot. If petrol is spilled during filling, the engine must not
be started until the spilled
petrol has been wiped up and
the mower has been removed
from the area where the fuel
was spilled. No attempt must
be made to switch on the ignition until the petrol vapours
have dispersed.
To safeguard against fire,
keep grass, leaves, grease and
oil away from engine and exhaust.
5. Initial operation (Fig. E /F)
6.1 General remarks
on the care of lawns
To keep your lawn well-groomed
we recommend cutting it regularly
once a week. Depending on the
growth of moss and weeds,
switch on the aerator cylinder as
required.
With frequent mowing and aerating the lawn becomes healthy
and strong.
Short clippings (up to a length
of about 1 cm) can be left on the
lawn. Longer clippings must be
removed to prevent the lawn
becoming yellow or matted.
Cut and aerate the lawn for the
first time in spring when the grass
begins to grow and can be walked
on. If the grass has grown too
long, first cut it lengthwise with
a high cutting setting (without
switching on the aerator cylinder)
and then cut at right angles with
the desired cutting setting, with
the aerator cylinder (optional)
switched on.
6.2 Mowing (Fig. G - I)
Cut only with sharp blades so
that the grass does not fray and
the lawn does not turn yellow.
To obtain a clean cutting result
guide the petrol Hattrick lawn
mower in rows as straight as possible. Ensure that the rows overlap by a few centimetres so that
no uncut strips are left behind.
Guide the Hattrick in walking
pace only.
Adjusting the cutting height
(Fig. G)
The petrol Hattrick lawn mower
has a central cutting height adjustment knob (24). In front of
the knob (24) the cutting height
is displayed (25) increments
of 5 mm.
Cutting height range 30 - 80 mm
Note:
When working on slopes, always mow at right angles to
the slope. To prevent the petrol
Hattrick lawn mower from sliding way, point it slightly uphill.
Take extra care when changing
direction on slopes.
For safety reasons, slopes
with a gradient of more than
15° must not be mowed.
Always keep the under side of
the mower casing clean and
remove grass deposits. Deposits complicate the start-up
procedure and affect the cutting result as well as discharge
of grass clippings.
6.3 Mowing with the
aerator cylinder (Fig. H)
Switching the aerator cylinder
on/off
Switch off the engine before
switching the aerator cylinder
on or off.
To switch on the aerator cylinder
set the rotary switch (26) to
position “I”.
To switch it off set the rotary
switch (26) to position “0 ”.
Remarks on mowing with the
aerator cylinder switched on
The aerator cylinder can be used
for creating drainage, removing
matting and moss in the lawn
as well as for cutting flat-rooting
weeds.
If the grass is particularly long
due to infrequent lawn care (e.g.
after holidays), disengage the
aerator cylinder, and pre-cut with
the maximum cutting height
to prevent overload of the lawn
mower.
At the end of the cutting row
or for turning around, tilt the
mower on the rear wheels by
pressing on the guide handle.
This way you can turn it easily
with the aerator cylinder running free.
6. Information concerning correct mowing and aerating
5.2 Starting the Hattrick
lawn mower (Fig. F)
Place your petrol Hattrick lawn
mower on an even area of the
lawn.
If the engine is cold, press the
primer (23) several times before
starting. If the engine is hot there
is no need to use the primer (23).
Press brake lever (10) down to
the top of the guide handle (A 2).
Push the throttle (3) to the symbol
(hare) and pull the starter
handle/cord (13) slightly until the
ratchet engages. Start the engine
by quickly pulling out the starter
handle/cord (13).
After that, the starter handle/cord
(13) must be allowed to return
slowly.
The motor speed can be reduced
by pushing the throttle (3) towards
the symbol (turtle).
Release brake lever (10) to switch
off the engine.
A
Make sure that the blades
and aerator roller (see 6.3)
can run freely before starting
the mower. Tilt the mower on
the rear wheels by pressing on
the guide handle.
Do not let the engine run in
closed spaces. There is danger
of carbon monoxide poisoning.
Never start up on a solid surfaced area (e.g. drives, tarred
surfaces etc.) with the aerator
roller switched on and a cutting
height of less than 55 mm as
the aerator springs can have
contact with the ground at this
setting.
Attention! Be aware that the
cutting blades take a while
to stop after turning off the
engine.
Page 6

1918
GG
After having aerated heavily
moss-covered areas, it is recommended to resow the lawn.
This will help the affected lawn
to recover quickly.
The aerator cylinder use is
optional depending on the needs
and condition of the lawn.
The table below provides information on the use of the aerator
cylinder.
6.4 Mowing with the
grass catcher (Fig. I)
As soon as there are grass clippings left on the lawn during
mowing and aerating, the grass
catcher should be emptied.
To remove the grass catcher (18)
lift the protective cover (27) on
your petrol Hattrick lawn mower
with one hand. With the other
hand hold the grass catcher (18)
by the carrying handle (17) and
remove the grass catcher (18)
upwards.
If the protective cover (27) is released, it automatically shuts and
covers the discharge opening.
If grass clippings stick in the discharge opening, the mower may
be difficult to start. Pull the petrol
Hattrick lawn mower back about
1 m so that the grass clippings
drop out easily.
Afterwards, the grass catcher
should be emptied.
Note:
To ensure good collection, regularly clean the grass catcher
inside and outside.
Attaching the grass catcher
A
Attach the grass catcher
only with the engine
switched off and the cutting
blade at a stand still.
Lift the protective cover (27) with
one hand. With the other hand
hold the grass catcher (18) by
the carrying handle (17) and insert into the the discharge opening from above.
Note:
If properly seated the protective cover (27) fits snugly to
the grass catcher (18).
Mowing without
the grass catcher
The protective cover (27) is
mounted in such a way that the
petrol Hattrick lawn mower can
be used without the grass catcher
with the protective cover (27)
closed. The clippings are ejected
onto the lawn below the protective cover (27).
Follow the manufacturer’s
instructions when replacing
the blades, blade bar and for
aerator cylinder.
7.2 How to replace the blades,
blade bar and the aerator
cylinder (Fig. K - M)
Please use only the Original
GARDENA Spare Blades:
Triangular blades
(HB 40) Art. No. 4098
Rectangular Blades
(MulchCut HB 40) Art. No. 4099
Aerator cylinder Art. No. 4097
You can order these spare parts
from your GARDENA dealer
or directly from the GARDENA
customer service.
Never use spare parts or accessories which have not been
designed by the manufacturer!
Replacing the blades (Fig. K)
Note:
The blade has two cutting
edges. If one edge has become
blunt the blade can be reversed. Broken blades must be
replaced immediately as it can
cause an imbalance problem.
Do not regrind the blades, it
will cause imbalance.
The blades must always be
replaced or reversed in pairs.
When replacing the blades
always use the new nuts and
bolts supplied with the spare
blades.
1. Remove the spark plug in
order to avoid risk of injury
if the engine is accidentally
started.
2. Empty the tank or run
A the mower until the
tank is empty! Make sure the
tank lid is properly closed.
Tilt the lawn mower to the
tank-located side; keep spark
plugs and sound absorber of
the motor upwards.
3. Hold the locking nuts (28) at
the back and unscrew the bolts
(29), using the TORX
®
-wrench
provided.
4. Reverse the blades (30) or
mount new blades (30) and
secure tightly (torque 25 Nm).
(During installation make sure
that the ratchet toothed locking
washers (31) are fitted under
the nuts (28) and that the nuts
(28) are on the top of the blade
bar (32).)
Replacing the blade bar
(Fig. L)
Damaged blade bars must be
replaced to prevent imbalance.
1. Remove the spark plug in
order to avoid risk of injury
if the engine accidentally
is started.
2. Empty the tank or run
A the mower until the
tank is empty! Make sure the
tank lid is properly closed.
Tilt the lawn mower to the
tank-located side; keep spark
plugs and sound absorber of
the motor upwards.
3. Release the hexagon head
bolt (33) with an appropriate
wrench (SW 13) and remove
the blade bar (32) from the
drive shaft.
4. Insert new blade bar and
tightly screw with the following
washers (in the same order):
a) fibre washer (34)
b) strain washer (35)
c) small steel washer (36)
and with the hexagon head
bolt (33) (Torque: 40 Nm).
Be sure that strain washer (35)
has been installed in the correct position (see fig. L1).
Replacing the aerator cylinder
(Fig. M)
The aerator cylinder is subject
to natural wear and tear. If the
springs (37) are worn it will not
function correctly.
The aerator cylinder (38) must
be replaced.
1. Remove the spark plug in
order to avoid risk of injury
if the engine is accidentally
started.
2. Empty the tank or run
A the mower until the
tank is empty! Make sure the
tank lid is properly closed.
Tilt the lawn mower to the
tank-located side; keep spark
plugs and sound absorber of
the motor upwards.
3. Release screws (39) with
an appropriate Phillips head
screwdriver.
4. Remove the bearing sheet
steel (40).
5. Remove aerator cylinder (38)
together with end plate (41)
of the drive shaft (42) (square)
by tilting and pulling out.
6. Place new aerator cylinder (38)
onto drive shaft (42) (square);
stick on end plate (41) and
tighten with the bearing sheet
steel (40) in the casing.
7.3 Engine maintenance
Changing oil (Fig.E)
Always change the oil when
the engine is hot and the tank
is empty and closed.
Carry out the first motor oil
change after 5 hours of operation,
then every 50 hours of operation
or once a year at the end of the
mowing season, depending on
which comes first.
In order to do this, open oil sealing cap (21), tilt the mower so
that the old oil can flow into an
oil-trough. Dispose of waste oil
according to local regulations.
Position the mower on a level
surface again and fill it with motor
oil (0.6 l SAE 30 or 10W 30)
(see 5.1).
Checking and cleaning
the spark plug
Clean a contaminated spark plug
with a brass wire brush and rag.
Check the electrode gap (setting:
0.75 mm gap). Replace a badly
worn or damaged plug.
Cleaning the air filter (Fig. N)
Cleaning the air filter is necessary every 3 months or after
25 hours of operation. In extreme dusty conditions do so
more frequently.
Remove screw (43).
Fully remove air filter by pulling
sideways and/ or from the front.
Use of the aerator cylinder Cutting height setting Function of the aerator cylinder
Deep aeration of the soil 30 - 35 mm The aerator springs penetrate up to 7 mm
deep depending on the type of soil.
Aeration of the soil surface 35 - 40 mm The aerator springs remove moss,
matting, and weeds rooting near the
surface.
Combing the lawn 40 - 45 mm The aerator springs remove residues from
the lawn.
Gathering grass clippings etc. 40 - 55 mm The aerator springs remove even wet or
trodden-in grass clippings etc. from the
lawn.
7.1 Maintenance
Maintenance includes all jobs
which keep your petrol Hattrick
lawn mower in perfect working
order. By regularly checking the
unit (firm seating of screw connections, cracks, damage) and
replacing defective or worn parts
you can prevent accidents and
failure.
Repairs may only be carried
out by GARDENA service
centres or dealers authorised
by GARDENA.
A
Attention: Always detach
the spark plug before
working on your petrol Hattrick
lawn mower (for checking and
maintenance) to prevent risk
of injury!
For security reasons, replace
the tank lid if damaged.
Ne
ver clean your petrol Hattrick
lawn mower with running water,
in particular with water under
high pressure.
Store your petrol Hattrick lawn
mower in a dry place where
it is protected from frost. The
lawn mower should be stored
out of the reach of children.
7. Maintenance, service, storage
Page 7

2120
GG
Make sure that no foreign
substances fall into the carburettor. Afterwards pull
cover (44) upwards. Completely
disassemble the air filter (45)
and clean all parts.
Cleaning the foam element.
Clean foam element in liquid
detergent and water. The foam
element should be replaced if
it is extremely dirty or damaged.
After cleaning press dry the
foam element with a clean rag.
Re-moisten the foam element
with oil.
Re-assemble all parts in reverse
order and secure with screw (43)
onto carburettor.
Cleaning the cooling air
passages
Clean grass from cooling fins
and air passages.
Service interval
In order to achieve trouble-free
operation of the engine, this lawn
mower should be checked every
2 to 3 years by a GARDENA
Service Centre or a dealer
authorised by GARDENA.
7.4 Service
Residual dirt and grass can be
most easily removed immediately
after mowing. Place the petrol
Hattrick lawn mower on its side
opposite the tank and clean it
with a brush or rag.
7.5 Storage (Fig. A)
Let the engine cool down before storing the petrol Hattrick
lawn mower in a closed room.
Never store the petrol Hattrick
lawn mower with fuel in the
tank where petrol vapour could
come into contact with an
open flame or could be ignited.
Always store your petrol Hattrick
lawn mower in a closed dry place.
To save space the handle can
be folded down. Loosen the lower
locking handles (2) and pull the
bars sideways out of the mount.
Loosen plastic wing nut (1) at the
joint. Fold guide handle down in
a Z-shape.
A
When folding down the
bars make sure that the
gas and brake bowden cables
are not jammed or damaged.
Wintering
If the engine is shut down for
more than 30 days, firstly empty
the tank. Afterwards, let the
engine run until it runs out of
petrol.
Unscrew the spark plug and
pour 1 tablespoon of motor oil
into the cylinder. Turn the motor
by slowly pulling on the starter
handle/cord so that the oil is
distributed. Screw in the spark
plug again.
After having thoroughly removed
dirt and remaining grass we recommend you to clean the petrol
Hattrick lawn mower with maintenance spray.
If you have any problem with
your petrol Hattrick lawn mower,
please contact our Customer
Service or return the defective
unit together with a short description of the problem and, in case
of guarantee, with a copy of the
receipt to one of the GARDENA
service centres listed on the rear
page.
We expressly point out that,
in accordance with the product
liability law, we are not liable
for any damage caused by our
units if it is due to improper
repair or if parts exchanged are
not original GARDENA parts
or parts approved by us, and
if the repairs were not carried
out by a GARDENA Service
Centre or an authorised specialist. The same applies to
spare parts and accessories.
Problem Possible cause Remedy
Uneven running. Blade bar or blades damaged Replace damaged parts.
Strong vibration of the unit. (imbalance). Tighten the blade or blade bar
Blade bar fastening on motor bolts.
shaft is loose.
Engine does not start. Primer has not been operated Press primer several times
before starting. (see 5.2).
Spark plug defective or Clean and replace spark plug,
tank empty. fill fuel tank.
Engine runs for a short time No motor oil in crankcase. Engine overhaul by a Service
but then suddenly stops Piston and crankshaft bearings Centre.
with a loud bang. have jammed.
Aerator cylinder does not run. Rotary switch is in “0” position. Set rotary switch to “I” position.
V-belt defective. Replace V-belt. Contact
GARDENA service station.
Lawn turns to yellow. Blades are too blunt. Replace or reverse the blades.
Not a clean cut.
Cutting height is too low. Correct cutting height.
If any other faults occur, please contact GARDENA Service.
The following table contains the
problems most frequently occurring and shows how to remedy
them.
For safety, please contact
one of the GARDENA service
centres or an authorised
specialist for any other problem.
8. Trouble-shooting
A
Checks before each
operation
Inspect the unit before each
use. Do not use the petrol
Hattrick lawn mower if safety
devices (safety handle; safety
cover) and/or the blade bar
or the blades are damaged or
worn. Never operate the unit
with the safety devices bypassed or missing.
Inspect the area to be cut
before beginning work.
Remove any foreign objects
(e.g. stones) from the area.
Check the working area for
foreign objects (e.g. stones)
while working.
The blade bar and the blades
must be checked regularly
for damage and properly repaired if necessary.
A
Proper use /
responsibility
Lawn mowers can cause
serious injuries!
You are responsible for the
safety of the working area.
Only use the petrol Hattrick
lawn mower for the purposes
specified in these instructions.
Only work when visibility is
good.
Familiarise yourself with the
surroundings of your working
area. Check for possible risks
which might be not audible due
to the noise of the machine.
Wear non-slip shoes and long
trousers to protect your legs.
Keep fingers and feet away
from the cutting blades and
the aerator cylinder.
Make sure that there are no
other people (especially children) or animals anywhere
near the working area.
Ensure that you have a secure
foothold when working.
Attention! Take extra care
when walking backwards.
You may stumble!
If, in spite of care, there is an
obstruction when cutting, turn
off the petrol Hattrick lawn
mower and remove it. Check
the unit for damage and have
it repaired if necessary.
A Interruption to work
Never leave the petrol Hattrick
lawn mower to run unattended.
If your work is interrupted,
store the unit in a safe place.
Remove the spark plug!
When changing to another
working area, switch off the
petrol Hattrick lawn mower.
A Check local regulations
Never use the unit when it is
raining or in damp or wet areas.
Do not use the petrol Hattrick
lawn mower in or near swimming pools or ponds.
Please observe the local regulations regarding quiet times.
9. Advice for proper use / safety instructions
Problem Possible cause Remedy
Abnormal noise. Motor fixing screws or Tighten screws.
Clattering in the unit. mower casing loose.
Whistling noise. Foreign body blocking Switch off aerator cylinder,
aerator cylinder. remove the spark plug, remove
foreign body.
V-belt slipping. Contact GARDENA Service
Centre.
Page 8

22
G
The undersigned
GARDENA Kress + Kastner GmbH · Hans-Lorenser-Str. 40 · D- 89079 Ulm
hereby certifies that, when leaving our factory, the units indicated below are in accordance with the
harmonised EU guidelines, EU standards of safety and product specific standards.
This certificate becomes void if the units are modified without our approval.
Description of the units:
Hattrick
Types:
HB 40 / MulchCut HB 40
Art. No.:
4005 / 4010
EU directives:
Machinery Directive 98/37/ EC
Electromagnetic Compatibility
89/336/EC
Directive 93/68 / EC
Directive 2000/14/ EC
Harmonised European
standards:
EN 292-1
EN 292-2
EN 836
Noise level:
measured / guaranteed
HB 40 95 / 96 dB (A)
MulchCut HB 40 94 / 96 dB (A)
Year of CE marking:
1996 (HB 40)
1998 (MulchCut HB 40)
Ulm, 08.02.2002
Thomas Heinl
Technical Director
EU Certificate of Conformity
Page 9

71
D
Garantie
GARDENA gewährt für dieses
Produkt die gesetzliche Garantie
(ab Kaufdatum). Abweichend
davon werden für das Kunststoffgehäuse 10 Jahre Garantie gewährt. Diese Garantieleistung
bezieht sich auf alle wesentlichen
Mängel des Gerätes, die nachweislich auf Material- oder Fabrikationsfehler zurückzuführen
sind. Sie erfolgt durch die Ersatzlieferung eines einwandfreien
Gerätes oder durch die kostenlose Reparatur des eingesandten
Gerätes nach unserer Wahl,
wenn folgende Voraussetzungen
gewährleistet sind:
.Das Gerät wurde sachgemäß
und laut den Empfehlungen
in der Gebrauchsanweisung
behandelt.
.Es wurde weder vom Käufer
noch von einem Dritten versucht, das Gerät zu reparieren.
Die Verschleißteile Dreieckmesser (Hattrick) / Rechteckmesser
(MulchCut) und Lüfterwalze sind
von der Garantie ausgeschlossen.
Diese Hersteller-Garantie berührt
die gegenüber dem Händler/
Verkäufer bestehenden Gewährleistungsansprüche nicht.
Im Reklamationsfall schicken Sie
bitte das defekte Gerät zusammen mit einer Kopie des Kaufbelegs und einer Fehlerbeschreibung frankiert an die auf der
Rückseite angegebene Serviceadresse.
G
Guarantee
GARDENA honours the guarantee legally required for this product (starting from the date of
purchase). As an exception, we
guarantee the plastic casing for
10 years. This guarantee covers
all serious defects of the unit
that can be proved to be material
or manufacturing faults. Under
warranty we will either replace
the unit or repair it free of charge
if the following conditions apply:
.The unit must have been
handled properly and in keeping with the requirements of
the operating instructions.
.Neither the purchaser or a
non-authorised third party have
attempted to repair the unit.
The triangular blades (Hattrick)/
rectangular blades (MulchCut)
and the aerator cylinder are wearing parts and are not covered
by the guarantee.
This manufacturer’s guarantee
does not affect the user’s existing warranty claims against the
dealer/seller.
In case of claim, please return
the faulty unit together with a copy
of the receipt and a description
of the fault, with postage paid to
one of the GARDENA Service
Centres listed on the back of
these operating instructions.
F
Garantie
GARDENA accorde pour cet appareil la garantie légale à compter du jour de l’achat. Le carter
en polypropylène est, lui, garanti
10 ans. La garantie est assurée
par le remplacement gratuit des
pièces défectueuses ou de l’appareil. Le choix en étant laissé
à la libre initiative de GARDENA.
En tout état de cause s’applique
la garantie légale couvrant toutes
les conséquences des défauts
ou vices cachés (article 1641 et
suivants du Code Civil).
Pour que ces garanties soient
valables, les conditions suivantes
doivent être remplies :
.L’appareil a été manipulé de
manière adéquate, suivant les
instructions du mode d’emploi.
.Il n’y a eu aucun essai de
réparation, ni par le client, ni
par un tiers.
Les lames triangulaires (Hattrick)
/ lames rectangulaires (MulchCut)
et le rouleau d’aération sont des
pièces d’usure et sont par conséquent exclues de la garantie.
Une intervention sous garantie
ne prolonge pas la durée initiale
de la garantie contractuelle.
Toutes les revendications dépassant le contenu de ce texte
ne sont pas couvertes par la
garantie, quel que soit le motif
de droit.
Pendant la période de garantie,
le Service Après-Vente et les
Centres SAV agréés effectueront, à titre payant, les réparations nécessaires par suite de
manipulations erronées.
En cas de réclamation, veuillez
envoyer le produit en port payé
avec le bon d’achat et une description du problème, à l’adresse
du Service Après-Vente figurant
au verso.
N
Garantie
GARDENA geeft op dit product
de wettelijke garantie (vanaf de
aankoopdatum). Op het kunststof
maaihuis is echter een garantie
van 10 jaar van toepassing. Deze
garantie heeft betrekking op alle
wezenlijke defecten aan het toestel, die aanwijsbaar op materiaal- of fabricagefouten berusten.
Garantie vindt plaats door de levering van een vervangend apparaat of door de gratis reparatie
van het ingestuurde apparaat,
naar onze keuze, indien aan de
volgende voorwaarden is voldaan:
.Het apparaat werd vakkundig
en volgens de adviezen in de
gebruiksaanwijzing behandeld.
.Noch de koper, noch een
derde persoon heeft getracht
het apparaat te repareren.
De aan slijtage onderhevige
driehoeksmessen (Hattrick) /
rechthoeksmessen (Hattrickmulchmaaier) en de verticuteerrol vallen niet onder de garantie.
Deze garantie van de producent
heeft geen betrekking op de ten
aanzien van de handelaar/verkoper bestaande aansprakelijkheid.
Page 10

76
11008
Deutschland
GARDENA Kress + Kastner GmbH
GARDENA Service
Hans-Lorenser-Straße 40
D-89079 Ulm
Produktfragen: (07 31) 490- 123
Reparaturen: (07 31) 490- 290
Argentina
Argensem S.A.
Venezuela 1075
(1618) El Talar - Buenos Aires
Australia
NYLEX Corporation Ltd.
25-29 Nepean Highway
P.O. Box 68
Mentone, Victoria 3194
Austria
GARDENA Österreich Ges. m.b.H.
Stettnerweg 11-15
2100 Korneuburg
Belgium
MARKT (Belgium) NV/SA
Sterrebeekstraat 163
1930 Zaventem
Brazil
M. Cassab
Av. das Nações Unidas, 20.882
Santo Amaro, CEP 04795-000
São Paulo - S.P.
Bulgaria / България
ДЕНЕКС ООД
бул. „Черни връх“ 43
София 1407
Canada
GARDENA Canada Ltd.
100, Summerlea Road
Brampton, Ontario
Canada L6T 4X3
Chile
Antonio Martinic Y CIA. LTDA.
Gilberto Fuenzalida 185 Loc.
Las Condes - Santiago de Chile
Costa Rica
Compania Exim
Euroiberoamericana S.A.
350 Sur del Automercado
Los Yoses
San Pedro
Cyprus
FARMOKIPIKI LTD
P.O. Box 7098
74, Digeni Akrita Ave.
1641 Nicosia
Czech Republic
GARDENA spol. s.r.o.
Řípská 20
62700 Brno
Denmark
GARDENA Danmark A/S
Naverland 8
2600 Glostrup
Finland
Habitec Oy
Martinkyläntie 52
01720 Vantaa
France
GARDENA France
Service Après-Vente
BP 50080
95948 ROISSY CDG Cedex
Great Britain
GARDENA UK Ltd.
27- 28 Brenkley Way
Blezard Business Park
Seaton Burn
Newcastle upon Tyne
NE13 6DS
Greece
Agrokip G. Psomadopoulos & Co.
20, Lykourgou str.
Kallithea - Athens
Hungary
GARDENA Magyarország Kft.
Késmárk utca 22
1158 Budapest
Iceland
Heimilistaeki hf
Saetun 8
P.O. Box 5340
125 Reykjavik
Republic of Ireland
Michael McLoughlin & Sons
Hardware Limited
Long Mile Road
Dublin 12
Italy
GARDENA Italia S.r.l.
Via Donizetti 22
20020 Lainate (Mi)
Japan
KAKUDAI Mfg. Co. Ltd.
1-4-4, Itachibori Nishi-ku
Osaka 550
Luxembourg
Magasins Jules Neuberg
Grand Rue 30
Case Postale No. 12
Luxembourg 2010
Netherlands
GARDENA Nederland B.V.
Postbus 50176
1305 AD ALMERE
Neth. Antilles
Jonka Enterprises N.V.
Sta. Rosa Weg 196
P.O. Box 8200
Curaçao
New Zealand
NYLEX New Zealand Limited
Private Bag 94001
South Auckland Mail Centre
10 Offenhauser Drive
East Tamaki, Manukau
Norway
GARDENA Norge A/S
Postboks 214
2013 Skjetten
Poland
GARDENA Polska Sp. z o.o.
Szymanów 9 d
05-532 Baniocha
Portugal
MARKT (Portugal), Lda.
Recta da Granja do Marquês
Edif. GARDENA
Algueirão
2725-596 Mem Martins
Russia / Россия
АО АМИДА ТТЦ
ул. Моcфилмовcкая 66
117330 Моcква
Singapore
Variware
Holland Road Shopping Centre
227-A 1st Fl., Unit 29
Holland Avenue
Singapore 1027
Slowenia / Croatia
Silk d.o.o. Trgovina
Brodišče 15
1236 Trzin
South Africa
GARDENA South Africa (Pty.) Ltd.
P.O. Box 11534
Vorna Valley 1686
Spain
ANMI Andreu y Miriam S.A.
Calle Pere IV, 111
08018 Barcelona
Sweden
GARDENA Svenska AB
Box 9003
20039 Malmö
Switzerland
GARDENA Kress + Kastner AG
Bitziberg 1
8184 Bachenbülach
Ukraine / Украина
АОЗТ АЛЬЦЕСТ
ул. Гайдара 50
г. Киев 01033
Turkey
Dost Diþ Ticaret Mümessillik A.Þ.
Yeþilbaðlar Mah. Baþkent
Cad. No. 26
Pendik - Ýstanbul
USA
GARDENA
3085 Shawnee Drive
Winchester, VA 22604
4005-20. 960.07/0021
GARDENA Kress + Kastner GmbH
Postfach 27 47, D- 89070 Ulm
http: //www.gardena.com
 Loading...