

Page 1
D Montage- und Gebrauchsanweisung
Regen-Sammelfilter
GB Installation and Operating Instructions
Rain Water Collection Filter
F Montage et Mode d’emploi
Récupérateur-filtre pour eau de pluie
NL Montage- en Gebruiksaanwijzing
Regenopvangfilter
S Monterings- och bruksanvisning
Regnvattenfilter
I Istruzioni per l’uso
Filtro deviatore per pluviale
E Instrucciones para el montaje y uso
Filtro colector de aguas pluviales
P Instruções de uso e montagem
Filtro de colheita de águas pluviais
GARDENA
®
Art. 3820
Art. 3821
Page 2

2
D
Bitte lesen Sie die Anweisung zur
Montage und Handhabung Ihres
Regen-Sammelfilters sorgfältig
und beachten Sie deren Hinweise.
Beim Lesen bitte die Umschlagseiten mit den Abbildungen
herausklappen.
Inhaltsverzeichnis Seite
1. Technische Angaben / Einsatz 8
2. Montageanweisung 8
3. Filterreinigung 9
4. Abstellen des Wasserzulaufes 9
5. Integrierte Überlaufsicherung 10
Garantie 30
G
Please read these notes on installing and handling your Rain
Water Collection Filter carefully
and follow the given instructions.
Unfold inside cover pages to read
the operating instructions.
Contents Page
1. Technical data / Use 11
2. Installation instructions 11
3. Cleaning the filter 12
4. Shutting off the collection
of water 12
5. Integrated overflow 12
Guarantee 30
F
Nous vous remercions de bien
vouloir lire attentivement les
instructions de montage avant de
monter et d’utiliser votre récupérateur-filtre pour eau de pluie.
Pour une meilleure compréhension,
dépliez les volets de la couverture
de manière à faire apparaître les
schémas de montage.
Contenu Page
1. Données techniques et
domaine d’utilisation 14
2. Instructions de montage 14
3. Nettoyage du filtre 15
4. Arrêt de l’écoulement d’eau 15
5. Trop-plein intégré 15
Garantie 30
N
Lees de aanwijzingen voor montage en onderhoud van het regenopvangfilter zorgvuldig door en
let op de aanwijzingen daarin.
Bij het lezen van de gebruiksaanwijzing de bladzijden met de
afbeeldingen openslaan.
Inhoudsopgave Pagina
1. Technische gegevens / Gebruik 16
2. Montagehandleiding 16
3. Filterreiniging 17
4. Blokkeren van de watertoevoer 17
5. Geïntegreerde overloopbeveiliging 17
Garantie 30
S
Läs noggrant igenom anvisningarna för montering och hantering
av Ditt regnvattenfilter och följ
upplysningarna.
Ha omslaget utvikt när Du läser
bruksanvisningen.
Innehåll Sida
1. Tekniska uppgifter /
Användning 19
2. Monteringsanvisning 19
3. Rengöring av filter 20
4. Avstängning av vattentillförseln 20
5. Inbyggd översvämningskran 20
Garanti 30
I
Prima di mettere in uso il filtro
deviatore per pluviale, leggere
attentamente le istruzioni tenendo
aperto il pieghevole per avere
sott’occhio i disegni esplicativi.
Indice pagina
1. Note introduttive 21
2. Montaggio 21
3. Pulizia filtro 22
4. Disattivazione 22
5. Suggerimenti pratici 22
Garanzia 31
E
Por favor, lea detenidamente las
instrucciones para el montaje
y uso del filtro colector de aguas
pluviales y observe las indicaciones contenidas en las mismas.
Para facilitar la lectura, desdoble
la cubierta.
Índice Página
1. Datos técnicos / Montaje 24
2. Instrucciones para el montaje 24
3. Limpieza del filtro 25
4. Cierre de la entrada de aguas
pluviales 25
5. Dispositivo de seguridad de
rebasamiento integrado 25
Garantía 31
P
Por favor, leia atenciosamente
estas instruções de montagem e
de manejo do seu filtro de colheita
de águas pluviais, observando
todas as informações aqui contidas.
Desdobre as páginas na capa
interior para ler as instruções de
manejo.
Conteúdo Página
1. Especificações técnicas /
Emprego 27
2. Instruções de montagem 27
3. Limpeza do filtro 28
4. Fechamento da entrada de
água 28
5. Protecção integrada contra
transbordo 29
Garantia 31
✂
✂
Montagehilfe
Installation aid
Gabarit de montage
Montagehulp
Monteringshjälp
Sagoma da ritagliare
Plantilla de ayuda
Molde de montagem
Page 3

3
Page 4
4
Page 5

5
Page 6

6
✂
Page 7

7
✂
✂
Page 8

11
G
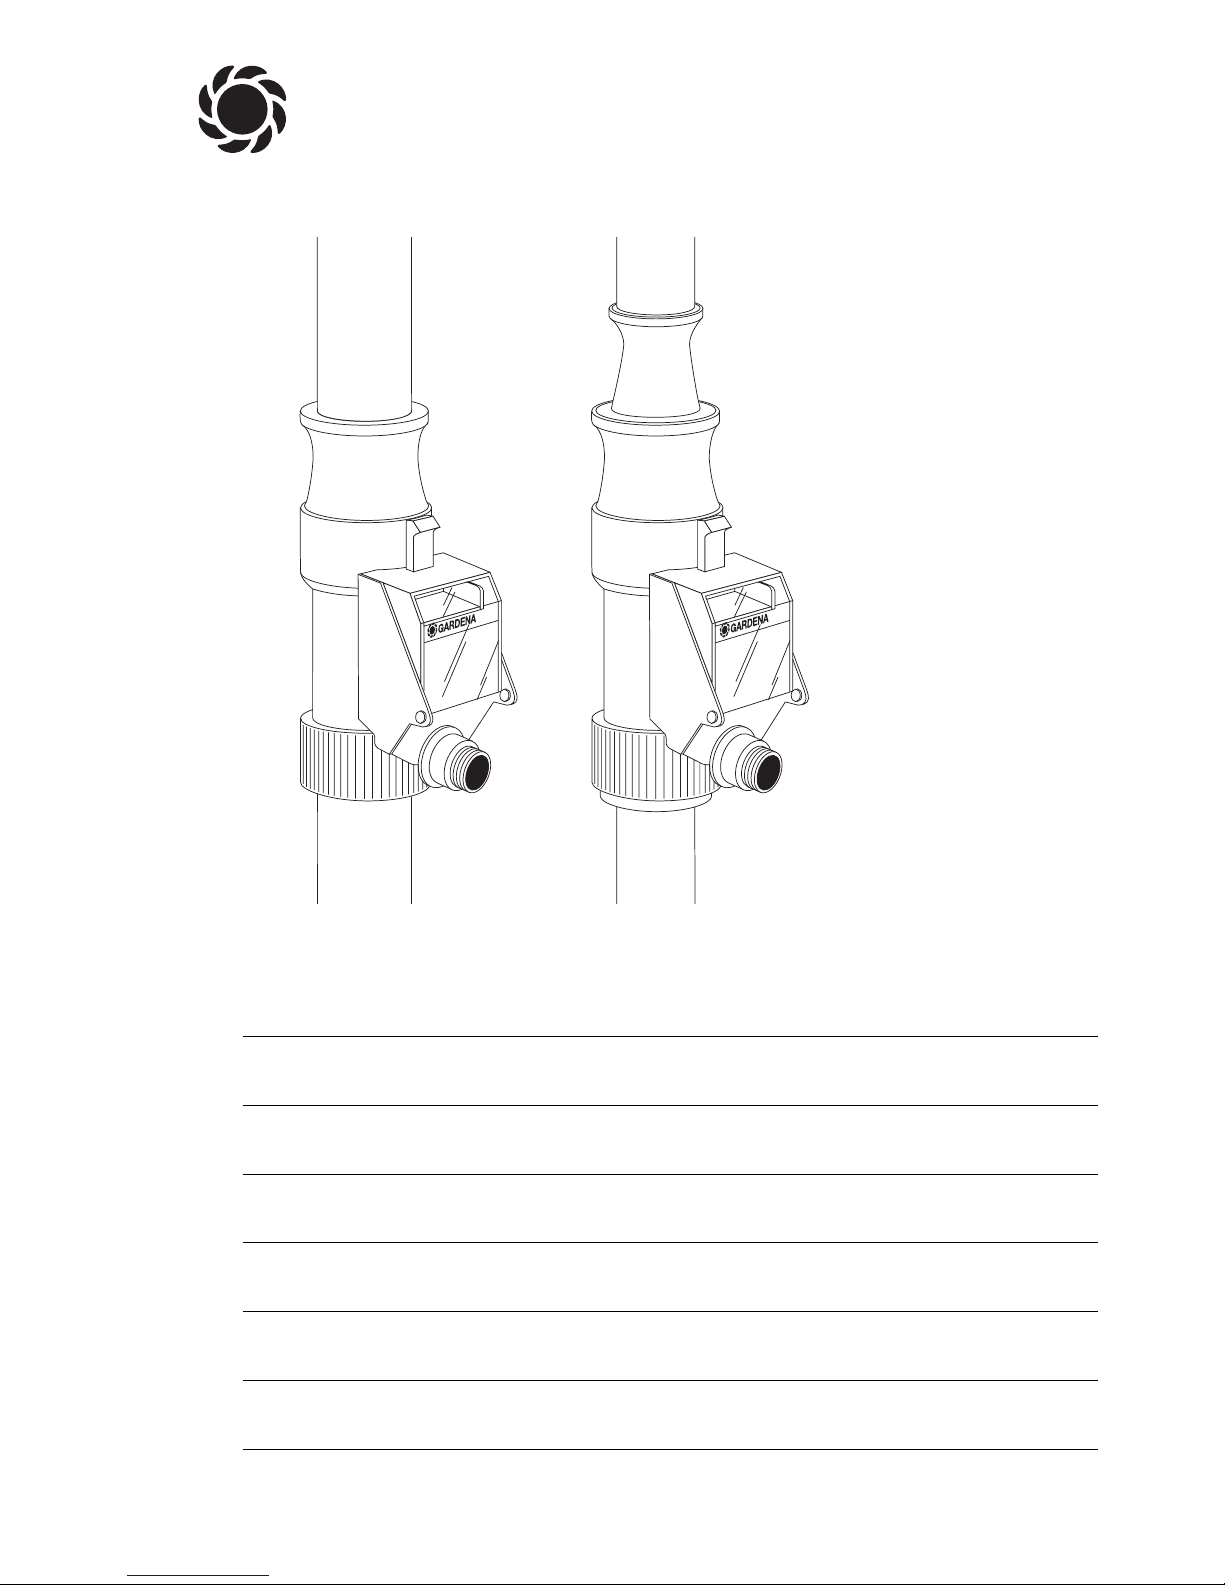
The GARDENA Rain Water
Collection Filter is supplied in
two versions:
Rain Water Collection Filter,
Art.-No. 3820
The Rain Water Collection Filter,
Art. No. 3820, is intended for use
in downpipes with a diameter
between 96 mm and 110 mm.
Rain Water Collection Filter
with Adaptor, Art.-No. 3821
The Rain Water Collection Filter,
Art. No. 3821, consists of the
Rain Water Collection Filter,
Art. No. 3820, and a two-piece
adaptor (Upper Reducing Coupling, Lower Reducing Coupling)
which enables the Rain Water
Collection Filter to be used in
downpipes with a diameter of
between 65 mm and 110 mm.
GARDENA Rain Water Collection Filter
1.Technical data / Use (fig. A)
General note:
In order to ensure proper functioning, the Rain Water Collection
Filter should be installed in the
downpipe in the vertical position
only.
2.1 Installation of the
Rain Water Collection Filter
without Adaptor, Art. No. 3820
Preparation for installation
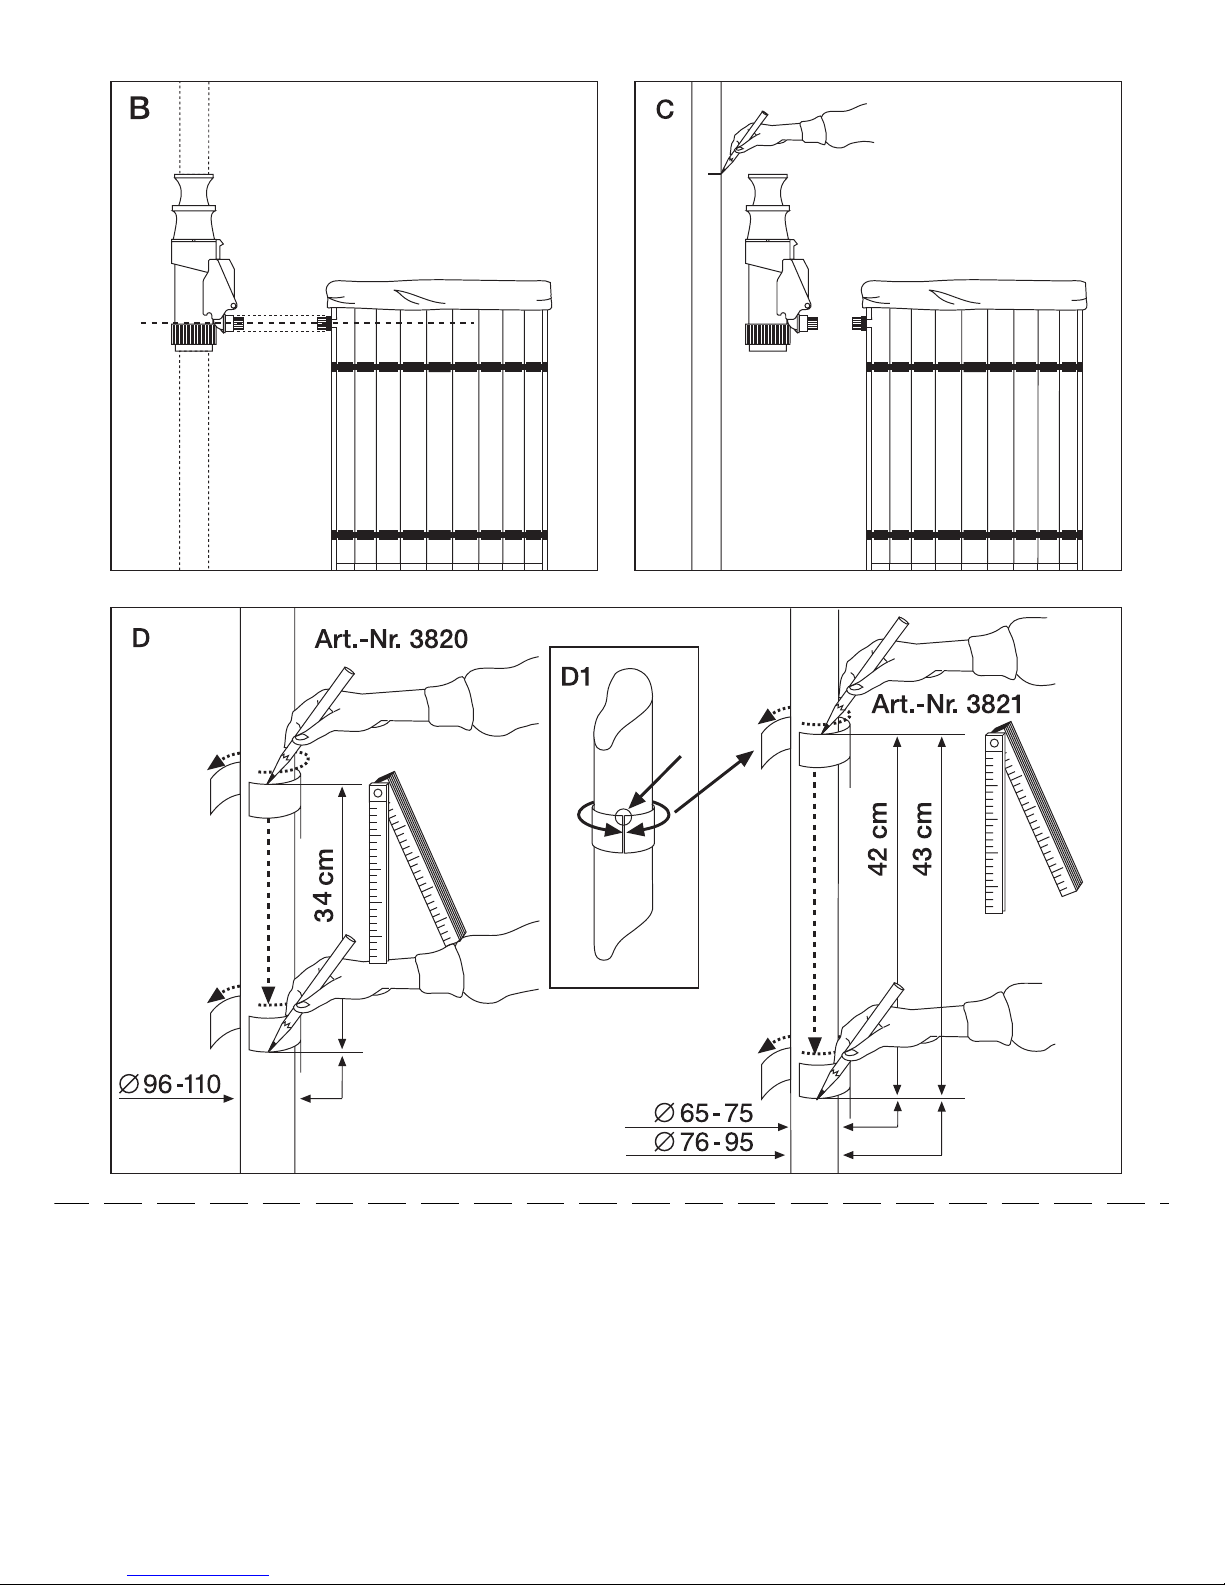
(fig. B- E)
1. Choose the height for the inlet
into the tank.
Ideal: The height for the outlet
of the filter is approximately
the same as the height of the
inlet into the tank (fig. B).
2. Mark the upper edge on the
downpipe for installation of the
Rain Water Collection Filter
(fig. C).
3. Cut out the installation aid
from the perforated pattern
in the operating instructions
and place this flat around the
downpipe as shown in fig. D.
Not
e
: The installation aid
must overlap at both ends in
order to ensure horizontal
scribing (fig. D1).
4. Use the installation aid to draw
a straight line at the top, if possible over the entire diameter,
of the downpipe and preferably
using an indelible pen (fig. D).
5. Use a measuring tape to measure 34 cm downwards from the
top and mark this position (fig.
D).
6. Ensure that the downpipe has
the same diameter as the drain
pipe. If the diameter of the
downpipe is smaller than the
drain pipe, the downpipe must
be secured, for example to
the wall of the house or the
pipe holder to prevent the
lower section of the downpipe
sliding into the drain pipe.
7. Slide the installation aid down
to this marked position and
mark the lower edge for installation, again, if possible over
the entire diameter, of the
downpipe (fig. D).
8. Use a suitable saw to cut out
the marked section from the
downpipe. Ensure that the cut
is clean and straight (fig. E).
Use a file to deburr the cut
edges.
Installation (fig. A/F/G)
1. Turn the nut of the Rain Water
Collection Filter
1
clockwise
as shown in fig. F 1 (a).
2. Insert the Rain Water Collection Filter between the cut
downpipe sections – fig. F 1 (b)
– and tighten up by turning
the nut
1
between both ends
of the downpipe (c).
3. Connect the Rain Water
Collection Filter and the
GARDENA Rain Water Tank
using a 25 mm (1”) hose and
the GARDENA Connecting Set
3815 (fig. G/ G1). By using the
connecting sleeves
3
, there
is also the possibility of connecting up a commercially
available DN 50 pipe, e.g. for
the supply from rain water
cisterns or other types of rain
water vessels.
Ti
p: The 33 mm (G1)
thread 2at the outlet of the
Rain Water Collection Filter
also enables the connection of
the GARDENA Threaded Tap
Connector 902 as well as the
GARDENA “Profi” Maxi-Flow
System Threaded Tap Connector 2802.
2.2 Installation of the
Rain Water Collection Filter
with Adaptor, Art. No. 3821
Preparation for installation
(fig. B- E)
1. Choose the height for the inlet
into the tank.
Ideal: The height for the outlet
of the filter is approximately
the same as the height of the
inlet into the tank (fig. B).
2. Mark the upper edge on the
downpipe for installation of the
Rain Water Collection Filter
(fig. C).
3. Cut out the installation aid
from the perforated pattern
in the operating instructions
and place this flat around the
downpipe as shown in fig. D.
Not
e: The installation aid
must overlap at both ends in
order to ensure horizontal
scribing (fig. D1).
4. Use the installation aid to draw
a straight line at the top, if possible over the entire diameter,
of the downpipe and preferably
using an indelible pen (fig. D).
2. Installation instructions
Page 9

12
G
5. Use a measuring tape to measure 42 cm (for ∅ 65- 75 mm)
or 43 cm (for ∅ 76- 95 mm)
downwards from the top and
mark this position (fig. D).
6. Slide the installation aid down
to this marked position and
mark the lower edge for installation, again, if possible over
the entire diameter, of the
downpipe (fig. D).
7. Use a suitable saw to cut out
the marked section from the
downpipe. Ensure that the cut
is clean and straight (fig. E).
Use a file to deburr the cut
edges.
Installation (fig. A/F/G)
1. Turn the nut of the Rain Water
Collection Filter 1clockwise
as shown in fig. F 2 (a).
2. Insert the lower reducing coupling
7
at the top of the down-
pipe as shown in fig. F 2 (b).
3. Insert the Upper Reducing
Coupling 6at the top of the
Rain Water Collection Filter
as shown in fig. F 2 (c).
4. Insert the Rain Water Collection Filter between the cut
downpipe sections as shown
in fig. F 2 (d) and tighten up
the Rain Water Collection
Filter by turning the nut
1
between both ends of the
downpipe (e).
5. Connect the Rain Water
Collection Filter and the
GARDENA Rain Water Tank
using a 25 mm (1
”
) hose and
the GARDENA Connecting
Set 3815 (fig. G/ G1).
By using the connecting
sleeves
3
, there is also the
possibility of connecting up a
commercially available DN 50
pipe, e.g. for the supply from
rain water cisterns or other
types of rain water vessels.
Ti
p: The 33 mm (G1)
thread 2at the outlet of the
Rain Water Collection Filter
also enables the connection of
the GARDENA Threaded Tap
Connector 902 as well as the
GARDENA “Profi” Maxi-Flow
System Threaded Tap Connector 2802.
The condition of the fine mesh
filter
8
can be determined by
looking through the transparent
filter hood
4
. The fine mesh filter
is practically a self cleaning filter,
larger items such as leaves are
held back from the flow by the
coarse filter at the filter inlet and
pass down the downpipe.
Cleaning the coarse filter
To clean the coarse filter (blockage by larger items e.g. leaves)
remove the Rain Water Collection
Filter reversing the installation
procedure. Then remove all blocking items and reinstall the Rain
Water Collection Filter.
Tip
: If your gutter tends to block,
we recommend the installation of
a leaf collector box at the upper
entrance to the downpipe.
Cleaning the fine mesh filter
Should however the fine mesh
filter become blocked, it can be
cleaned as follows:
1. Open the Rain Water Collection
Filter by unfolding the filter
hood 4forwards (fig. H).
2. Remove the fine mesh filter
insert as shown in fig. I by
pressing (a) forwards and
then lifting the insert (b) upwards.
3. Clean the fine mesh filter
under running water, insert (c)
(along the guide knobs) again
and close the filter hood by
pulling the snap fastener
5
upwards and folding back the
filter hood.
3. Cleaning the filter (fig. H/ I)
Before the frost period begins
or if the Rain Water Tank is full,
the collection of water can be
shut off as follows:
1. Open the filter hood 4as
shown in fig. H.
2. Turn the outlet bypass
9
downwards and away from
you (fig. J) and close the filter
hood again.
The water then flows directly
through the downpipe into
the drainage system and not
through the filter into the Rain
Water Tank.
Advantage: It is not necessary
to dismantle the Rain Water
Collection Filter for the winter
or during rainy periods.
4. Shutting off the collection of water (fig. H/J)
If the outlet of the Rain Water
Collection Filter is installed at the
same height as the Rain Water
Tank, the water automatically
flows back into the downpipe
when the Rain Water Tank is full.
Tip
: If the distance is 50 cm or
more we recommend to create
a 10% gradient for the inlet pipe
5. Integrated overflow (fig. K)
Page 10

13
G
(e.g. for a distance of 1 m this
equals 10 cm). Please note that
in case of such a gradient the
function of the overflow safety
device is no longer guaranteed.
We expressly point out that,
in accordance with the product
liability law, we are not liable
for any damage caused by our
units if it is due to improper
repair or if parts exchanged are
not original GARDENA parts
or parts approved by us, and
if the repairs were not carried
out by a GARDENA Service
Centre or an authorised specialist.The same applies to
spare parts and accessories.
Page 11

30
D
Garantie
GARDENA gewährt für dieses
Produkt 2 Jahre Garantie (ab
Kaufdatum). Diese Garantieleistung bezieht sich auf alle wesentlichen Mängel des Gerätes,
die nachweislich auf Materialoder Fabrikationsfehler zurückzuführen sind. Sie erfolgt durch
die Ersatzlieferung eines einwandfreien Gerätes oder durch
die kostenlose Reparatur des eingesandten Gerätes nach unserer
Wahl, wenn folgenden Voraussetzungen gewährleistet sind:
.
Das Gerät wurde sachgemäß
und laut den Empfehlungen
in der Gebrauchsanweisung
behandelt. Es wurde weder
vom Käufer noch von einem
Dritten versucht, das Gerät
zu reparieren.
Diese Hersteller-Garantie berührt die gegenüber dem Händler/
Verkäufer bestehenden Gewährleistungsansprüche nicht.
Im Störungsfall schicken Sie bitte
das defekte Gerät zusammen mit
dem Kaufbeleg und einer Fehlerbeschreibung frankiert an die
auf der Rückseite angegebene
Serviceadresse.
Nach erfolgter Reparatur senden
wir das Gerät – ebenfalls frei –
zurück.
G
Guarantee
GARDENA guarantees this
product for 2 years (from date of
purchase). This guarantee covers
all serious defects of the unit
that can be proved to be material
or manufacturing faults. Under
warranty we will either replace
the unit or repair it free of charge
if the following conditions apply:
.
The unit must have been handled properly and in keeping
with the requirements of the
operating instructions.
Neither the purchaser or a
non-authorised third party have
attempted to repair the unit.
This manufacturer’s guarantee
does not affect the user’s existing
warranty claims against the
dealer/ seller.
In the event of a fault, please
send the defective unit together
with the receipt and a description
of the fault, postage paid, to
one of the GARDENA Service
Centres listed at the rear.
F
Garantie
GARDENA accorde pour cet appareil une garantie contractuelle
de 2 ans à compter du jour de
l’achat. Elle comprend le remplacement gratuit des pièces
défectueuses ou de l’appareil,
le choix en étant laissé à la libre
initiative de GARDENA.
En tout état de cause s’applique
la garantie légale couvrant toutes
les conséquences des défauts
ou vices cachés (article 1641 et
suivants du Code Civil).
Pour que ces garanties soient
valables, les conditions suivantes
doivent être remplies :
.
L’appareil a été manipulé de
manière adéquate, suivant les
instructions du mode d’emploi.
.
Il n’y a eu aucun essai de réparation, ni par le client, ni par
un tiers.
.
L’appareil et le bon d’achat
ont été retournés en port payé
au Service Après-Vente de
GARDENA France.
Une intervention sous garantie
ne prolonge pas la durée initiale
de la garantie contractuelle.
Toutes les revendications dépassant le contenu de ce texte ne
sont pas couvertes par la garantie, quel que soit le motif de droit.
Pendant la période de garantie,
le Service Après-Vente effectuera,
à titre payant, les réparations
nécessaires par suite de manipulations erronées.
En cas de réclamation, retournez
l’appareil défectueux, dûment
affranchi, muni du bon d’achat
et de la description du défaut
au Service Après-Vente indiquée
au verso.
N
Garantie
GARDENA geeft op dit product
2 jaar garantie (vanaf de aankoopdatum). Deze garantie heeft
betrekking op alle wezenlijke defecten aan het toestel,
die aanwijsbaar op materiaalof fabricagefouten berusten.
Garantie vindt plaats door de
levering van een vervangend apparaat of door de gratis reparatie
van het ingestuurde apparaat,
naar onze keuze, indien aan de
volgende voorwaarden is voldaan:
.
Het apparaat werd vakkundig
en volgens de adviezen in de
gebruiksaanwijzing behandeld.
Noch de koper, noch een
derde persoon heeft getracht
het apparaat te repareren.
Deze garantie van de producent
heeft geen betrekking op de
ten aanzien van de handelaar/
verkoper bestaande aansprakelijkheid.
Stuur bij storingen het defecte
apparaat samen met de kassabon en een beschrijving van
de storing gefrankeerd aan het
op de achterzijde vermelde
serviceadres.
S
Garanti
GARDENA lämnar 2 års garanti
för denna produkt. Garantin gäller
från inköpsdatum. Garantin omfattar väsentliga fel på produkten
som beror på fabrikations- eller
materialfel och som påtalats för
oss före garantitidens utgång.
30
Page 12

3434
Deutschland / Germany
GARDENA
Manufacturing GmbH
Central Service
Hans-Lorenser-Straße 40
D-89079 Ulm
Produktfragen:
(+49) 731 490-123
Reparaturen:
(+49) 731 490-290
service
@gardena.com
Argentina
Husqvarna Argentina S.A.
Vera 745
(C1414AOO) Buenos Aires
Phone: (+54) 11 4858-5000
diego.poggi
@ar.husqvarna.com
Australia
Husqvarna Australia Pty. Ltd.
Locked Bag 18
Gosford NSW 2250
Phone: (+61) (0) 2 4372 1500
customer.service
@
husqvarna.com.au
Austria / Österreich
Husqvarna Austria GmbH
Consumer Products
Industriezeile 36
4010 Linz
Tel. : (+43) 732 7701 01
-
90
consumer.service
@
husqvarna.at
Belgium
GARDENA Belgium NV/SA
Sterrebeekstraat 163
1930 Zaventem
Phone: (+32) 2 720 9212
Mail: info
@gardena.be
Brazil
Palash Comércio e
Importação Ltda.
Rua São João do Araguaia, 338
– Jardim Califórnia –
Barueri – SP - Brasil –
CEP 06409-060
Phone: (+55) 114198 -9777
eduardo
@palash.com.br
Bulgaria
Хускварна България ЕООД
1799 София
Бул. „Андрей Ляпчев” Nº 72
Тел.: (+ 359) 280 99424
www.husqvarna.bg
Canada /USA
GARDENA Canada Ltd.
100 Summerlea Road
Brampton, Ontario L6T 4X3
Phone: (+1) 905 792 93 30
info
@gardenacanada.com
Chile
Antonio Martinic y Cia Ltda.
Cassillas 272
Centro de Cassillas
Santiago de Chile
Phone: (+56) 2 2010 708
garfar_cl
@yahoo.com
Costa Rica
Compania Exim
Euroiberoamericana S.A.
Los Colegios, Moravia,
200 metros al Sur del Colegio
Saint Francis - San José
Phone: (+506) 297 6883
exim_euro
@racsa.co.cr
Croatia
KLIS d.o.o.
Stanciceva 79
10419 Vukovina
Phone: (+385) 1 622777 0
gardena
@klis-trgovina.hr
Cyprus
FARMOKIPIKI LTD
P.O. Box 7098
74, Digeni Akrita Ave.
1641 Nicosia
Phone: (+357) 22 7547 62
condam
@spidernet.com.cy
Czech Republic
GARDENA spol. s r.o.
Tuшanka 115
627 00 Brno
Phone: (+ 420) 548 217 777
gardena
@gardenabrno.cz
Denmark
GARDENA
Husqvarna Consumer Outdoor
Products
Salgsafdelning Danmark
Box 9003
S-200 39 Malmö
info
@gardena.dk
Estonia
Husqvarna Eesti OÜ
Consumer Outdoor Products
Kesk tee 10, Aaviku küla
Rae vald, Harju maakond
75305
kontakt.etj
@husqvarna.ee
Finland
Oy Husqvarna Ab
Consumer Outdoor Products
Lautatarhankatu 8 B /PL 3
00581 HELSINKI
info
@gardena.fi
France
GARDENA France
Immeuble Exposial
9
-
11 allée des PierresMayettes
ZAC des Barbanniers, B.P. 99
-F-
92232 GENNEVILLIERS
cedex
Tél. (+33) 01 40 85 3040
service.consommateurs
@
gardena.fr
Great Britain
Husqvarna UK Ltd
Preston Road
Aycliffe Industrial Park
Newton Aycliffe
County Durham
DL5 6UP
info.gardena
@
husqvarna.co.uk
Greece
HUSQVARNA GREECE S.A.
Branch of Koropi
Ifestou 33A
Industrial Area Koropi
194 00 Athens – Greece
V.A.T. EL094094640
Phone: (+30) 210 66 20 225
info
@husqvarna-consumer.gr
Hungary
Husqvarna
Magyarország Kft.
Ezred u. 1
-
3
1044 Budapest
Phone: (+36) 80 2040 33
gardena
@gardena.hu
Iceland
Ó. Johnson & Kaaber
Tunguhalsi 1
110 Reykjavik
ooj
@ojk.is
Ireland
Michael McLoughlin & Sons
Hardware Limited
Long Mile Road
Dublin 12
Italy
GARDENA Italia S.p.A.
Via Donizetti 22
20020 Lainate (Mi)
Phone: (+39) 02.93.94.79.1
info
@gardenaitalia.it
Japan
KAKUICHI Co. Ltd.
Sumitomo Realty &
Development Kojimachi
BLDG., 8F, 5
-
1 Nibanncyo, Chiyoda-ku, Tokyo 102-0084
Phone: (+81) 33 264 4721
m_ishihara
@kaku-ichi.co.jp
Latvia
SIA „Husqvarna Latvija”
Consumer Outdoor Products
Bakužu iela 6, Riga, LV-1024
info
@husqvarna.lv
Lithuania
UAB Husqvarna Lietuva
Consumer Outdoor Products
Ateities pl. 77C
LT-52104 Kaunas
centras
@husqvarna.lt
Luxembourg
Magasins Jules Neuberg
39, rue Jacques Stas
Luxembourg-Gasperich 2549
Case Postale No. 12
Luxembourg 2010
Phone: (+352) 40 1401
api
@neuberg.lu
Netherlands
GARDENA Nederland B.V.
Postbus 50176
1305 AD ALMERE
Phone: (+31) 36 52100 00
info
@gardena.nl
Neth. Antilles
Jonka Enterprises N.V.
Sta. Rosa Weg 196
P.O. Box 8200, Curaçao
Phone: (+599) 9 76766 55
pgm
@jonka.com
New Zealand
Husqvarna New Zealand Ltd.
PO Box 76437
Manukau City 2241
Phone: (+64) (09) 9202410
Norway
GARDENA
Husqvarna Consumer Outdoor
Products
Salgskontor Norge
Kleverveien 6
1540 Vestby
info
@gardena.no
Poland
Husqvarna Poland Spółka z o.o.
Oddział w Szymanowie
Szymanów 9 d
05-532 Baniocha
Phone: (+ 48) 22 727 56 90
gardena
@gardena.pl
Portugal
GARDENA Portugal Lda.
Sintra Business Park
Edifício 1, Fracção 0-G
2710-089 Sintra
Phone: (+351) 21 922 85 30
info
@gardena.pt
Romania
MADEX INTERNATIONAL SRL
Soseaua Odaii 117-123,
Sector 1,
Bucureєti, RO 013603
Phone: (+ 40) 21 352 76 03
madex
@ines.ro
Russia
ООО ГАРДЕНА РУС
123007, г. Москва
Хорошевское шоссе, д. 32А
Тел.: (+ 7) 495 380 31 92
info
@gardena-rus.ru
Singapore
Hy
-
Ray PRIVATE LIMITED
40 Jalan Pemimpin
#02-08 Tat Ann Building
Singapore 577185
Phone: (+65) 6253 2277
shiying
@hyray.com.sg
Slovak Republic
GARDENA spol. s r.o.
Tuшanka 115
627 00 Brno
Phone: (+ 420) 548 217 777
gardena
@gardenabrno.cz
Slovenia
GARDENA d.o.o.
Brodiљиe 15
1236 Trzin
Phone: (+ 386) 1 580 93 32
servis
@gardena.si
South Africa
GARDENA
South Africa (Pty.) Ltd.
P.O. Box 11534
Vorna Valley 1686
Phone: (+27) 11 315 02 23
sales
@gardena.co.za
Spain
GARDENA IBERICA S.L.U.
C/ Basauri, nº 6
La Florida
28023 Madrid
Phone: (+34) 91 70805 00
atencioncliente
@gardena.es
Sweden
GARDENA
Husqvarna Consumer Outdoor
Products
Försäljningskontor Sverige
Box 9003
200 39 Malmö
info
@gardena.se
Switzerland / Schweiz
Husqvarna Schweiz AG
Consumer Products
Industriestrasse 10
5506 Mägenwil
Phone: (+41) (0) 848800 464
info
@gardena.ch
Turkey
GARDENA / Dost Diþ Ticaret
Mümessillik A.Þ. Sanayi
Çad. Adil Sokak No.1
Kartal - Ýstanbul
Phone: (+90) 216 3893 939
info
@gardena-dost.com.tr
Ukraine / Україна
ТОВ «ГАРДЕНА УКРАЇНА»
Васильківська, 34, 204-Г
03022, Київ
Тел. (+38) 044 498 39 02
info
@gardena.ua
3820-20.960.07/0509
©
GARDENA
Manufacturing GmbH
D-89070 Ulm
http: //www.gardena.com
 Loading...