

Instruction Manual for
No.
Description
Functions
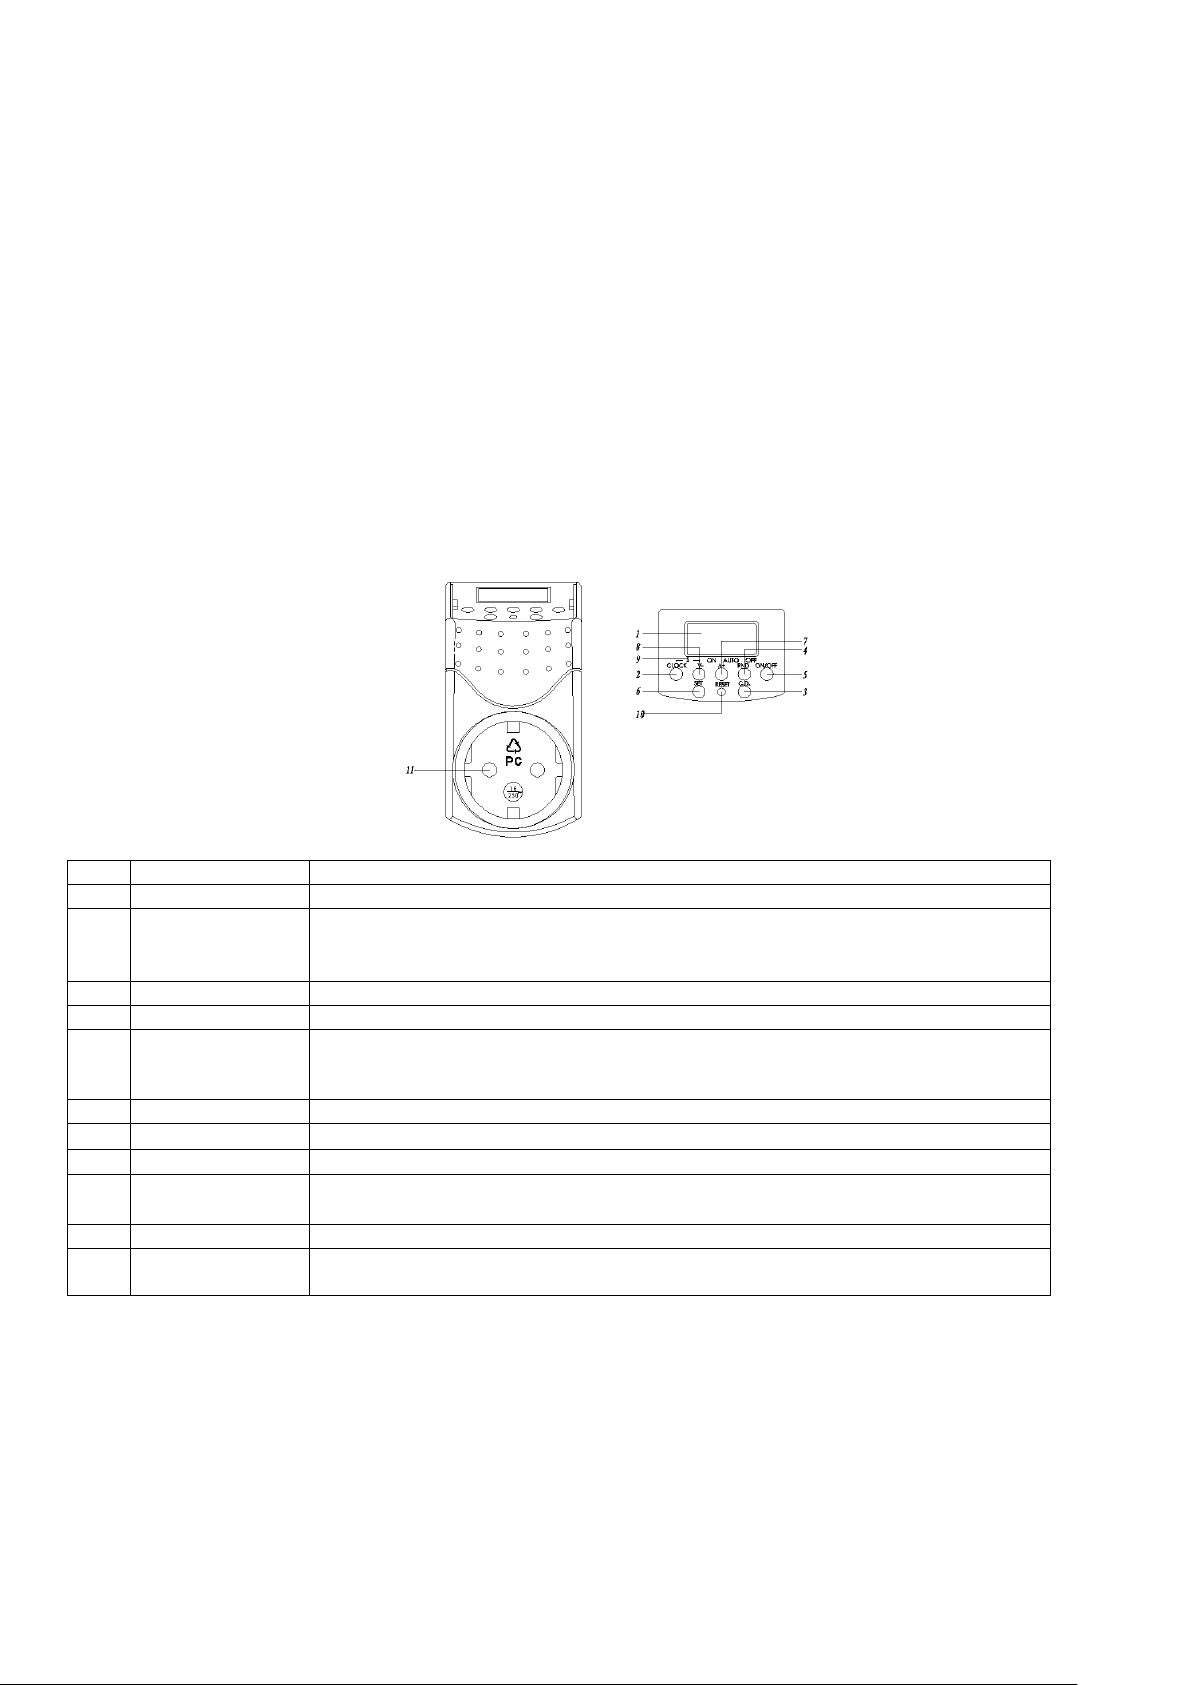
1
LCD Display
Shows time and program setting.
2
CLOCK button
Return to real time display when in program setting
Press and hold to interchange between 24 hours to 12 hours display
press together with ∨ -Button to change to Summer Time
3
CD button
Press the button to start/stop countdown program when it is in AUTO status
4
RND button
Press the button to start/stop random program when it is in AUTO status
5
On/Off button
Change the setting mode to ON, ATUO or OFF. When press the button each
time, the horizontal line in the LCD moves to ONAUTOOFF which were
silk printed on the Timer
6
SET button
To set time and week and to confirm setting
7
+ button
Press the button to increase the time, week or program group
8
- button
Press the button to reduce the time, week or program group
9
S - silk screen
printing
Press CLOCK Button and ∨ - Button at the same time to change to Summer
Time. Time display adds one hour automatically and “S” are shown on the LCD.
10
Reset button
Press once to reset all your preset programs
11
Socket & Plug
Connect your appliance to the socket and plug the timer to the wall AC socket to
get power
Programmable Digital Timer
Item No.: EMT757
A. Functions
1. The Programmable Digital Timer (hereinafter refer as “Timer”) can preset specific on/off time of your home
electrical appliances. It is ideal for energy saving and home security.
2. The countdown function can switch on/off your appliance on your pre-set time and random functions allows you to
switch on and off the appliance in irregular time, it is not only ideal for home automation, also prevent burglary
during your absence.
3. The LCD displays program setting status and real time.
4. With maximum 140 on/off programs per week .
B. Diagram & Descriptions
C. Time Display
There are two different kinds of time displays:
1. 12-hour display: the digital number is from 11:59 to 12:00 with AM or PM shown on the LCD
2. 24-hour display: the digital number is from 00:00 to 23:59, no AM or PM is shown on the LCD
1/5

3. To change from 12-hour display to 24-hour display, or vice versa, press CLOCK Button and hold it till the LCD
display changes. Press CLOCK Button again to return to original display.
D. Week & Time Setting
1. Week Setting
1.1 Press and hold the SET Button until the week display flashes, which indicates setting is ready
1.2 Press ∧ + Button to increase the day, or ∨ - Button to reduce the day, the sequence of the display is shown as
follows:
MoTuWeThFrSaSu
1.3 Press ∧ +/∨ -Button once will increase or reduce the day by sequence slowly. To press and hold the button, the
week display moves quickly. Release the button until your desired day of the week shown on the display. Press
SET Button to confirm your setting.
2. Time Setting
2.1 After setting the day of the week, hour display flashes to indicate setting time can be started
2.2 Press ∧ +Button to increase number of hour, or ∨ - Button to reduce hour.
2.3 Press ∧ +/∨ -Button once will increase or reduce each hour slowly. To press and hold the button, the hour display
moves quickly. Release the button until your desired hour shown on the display. Press SET Button to confirm your
setting.
2.4 “Minute” display then flashes to indicate setting minute is ready. Repeat the same procedures in setting hour as in
#2.2 and #2.3 to set minutes.
3. Summer Time Setting
3.1. Press CLOCK Button and ∨ - Button at the same time to change to summer time, time display automatically adds
one hour and “S” is shown on the LCD.
3.2. By pressing Clock Button and ∨ - Button again to cancel the summer time setting.
Noted:
LCD must be in real time display to start week and time setting. If LCD is in program setting display, press CLOCK
Button once to return to real time display.
E. Program Setting
1. When the LCD is in real time display, press ∧ + Button once to change to program setting display, “1ON” will be
shown on the lower left corner of the LCD:
1.1 “1” indicates the program group’s number (program group is from 1 to 14)
1.2 “ON” indicates power on time.
1.3 “OFF” indicates power off time
2. To chose the program group and on/off status, press ∧ + Button to increase the group number, sequence as
follows:
1ON1OFF …… 20ON20OFF d ON/OFF (for countdown) real time display
2/5
 Loading...