

Page 1
Instruction Manual for
Outdoor Switch Box w/ Dusk-dawn Digital Timer
Ref: EF600RD
A. Function
1. The outdoor switch box equipped with a dusk-dawn digital timer module for controlling outdoor lighting.
Ideal for energy saving and home security purposes
2. Equipped with a built-in photo sensor detects daylight and darkness
3. Lux level adjustable from daylight to darkness
4. Turns power on according to preset lux level
5. Turns power off according to preset time
6. With LED indicator showing power on/off status
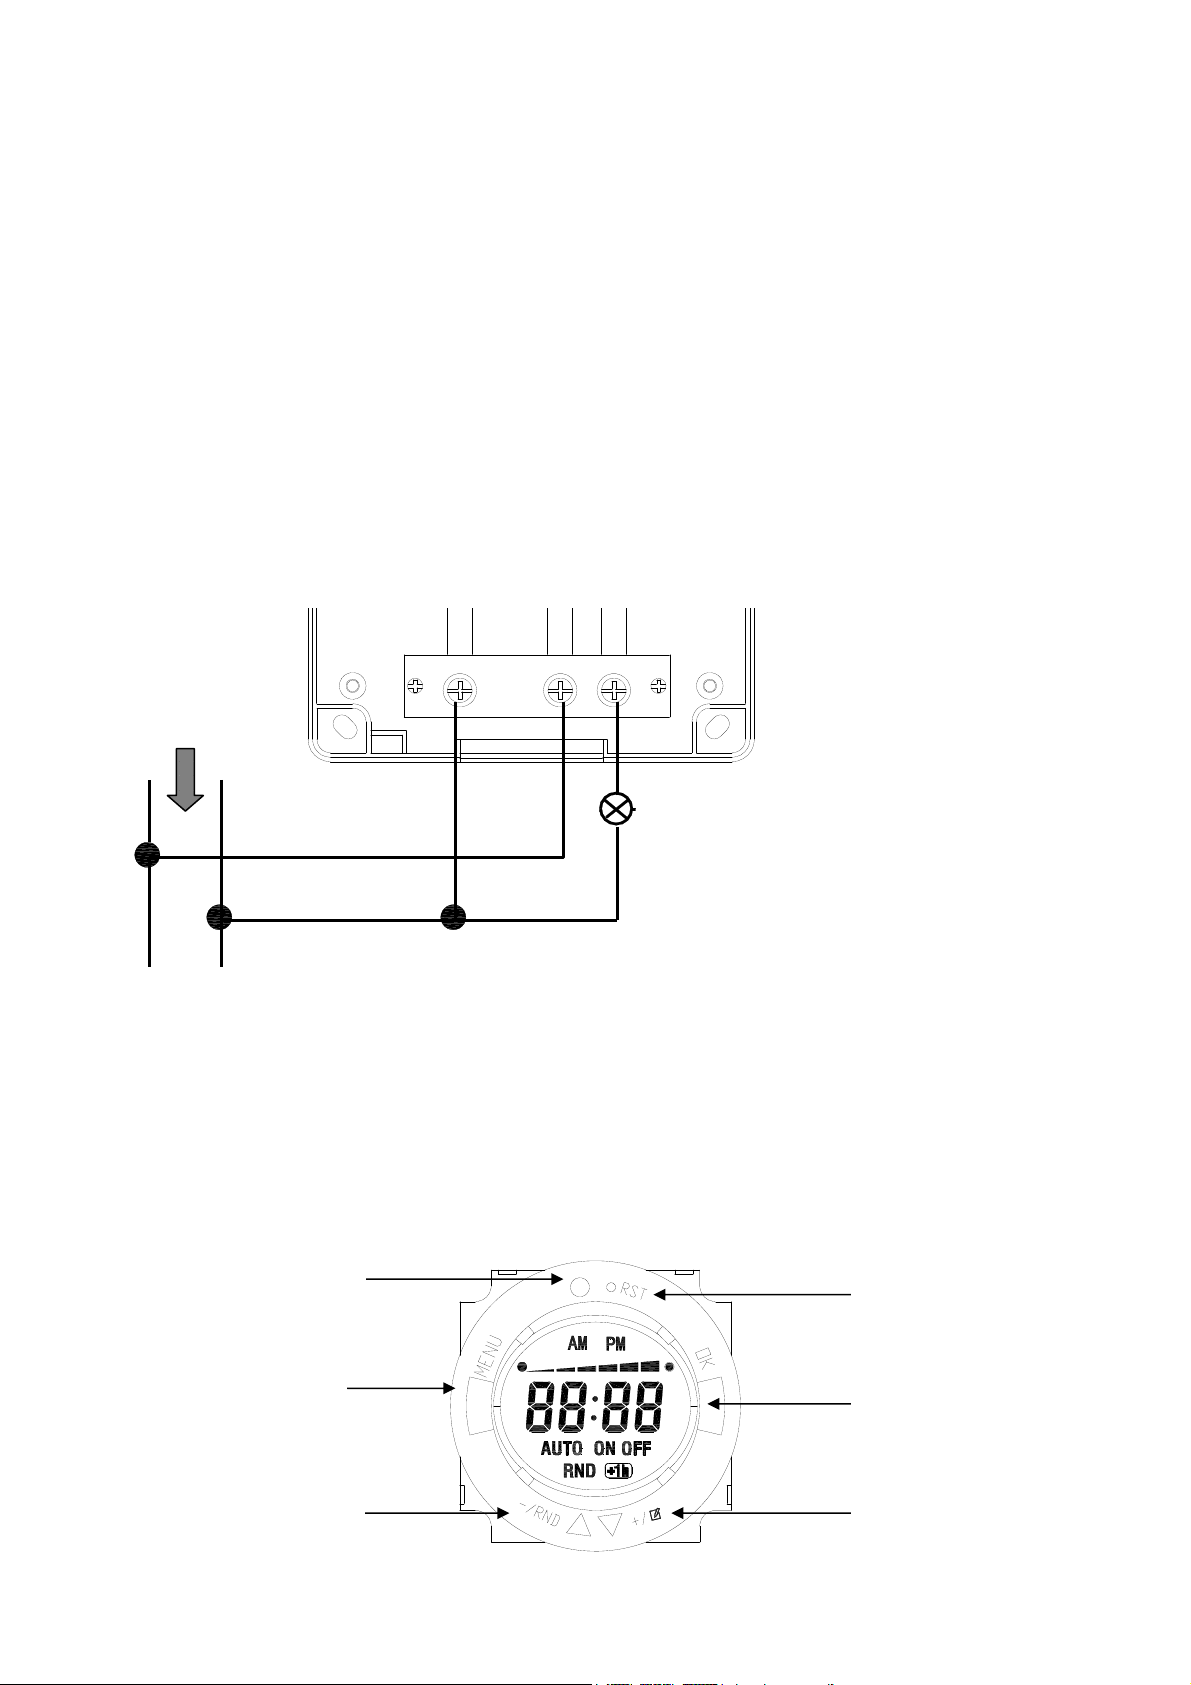
B. Wire connection
230VAC/50Hz/16A
L N
Load
1. Open the cover of the switch box by a screw driver.
2. Use a screw driver or small knife to open the membrane gland at the bottom of the connection box
according to the dimension of your connected cable (do not open the hole bigger than cable diameters, or
it cannot reach IP44.
3. Connect the input and output of N and L according to the above connection diagram.
C. Diagram & Descriptions
N
L-IN
L-OUT
Photocell
MENU
Reduced /
Random function
Reset
OK
Increase /
Program mode
Page 2

Function keys Functions
MENU
Press to select Program Setting or Clock mode.
OK
Press to confirm selected setting.
In current time display, press and hold to enter time setting.
In current time display, press OK then + /
to enter summer time.
Press to increase time.
+ /
In current time display, press to select program mode from: ONAUTO ON
OFFAUTO OFF.
- / RND
Press to reduce time.
In program mode, press to turn on or off random (RDN) function.
RST
Clears all settings.
After a few seconds LCS displayed is restored as 0:00.
Photocell
Detect lux level
D. Clock Setting
1. In current time display, press and hold OK for 2 seconds. Hour display flashes.
2. Press + /
3. Minutes display flashes. Press + /
or –/RND button to select the hour, press OK to confirm.
or – /RND to adjust minute, press OK to confirm.
4. Hour display flashes. Press MENU to finish. LCD shows current time.
5. For summer time, press OK. + /
shows on the LCD. Time is adjusted by adding 1 hour.
To remove summer time, press OK again.
Note:
LCD must be in Current time display before time setting. If LCD is in Program Setting mode, press MENU
twice to return to Clock display. .
E. Program Setting
1. In Clock mode, press MENU. LCD enters to Program Setting mode.
-
: Indicates lux level sensitivity. The lower the lux level it is, the more sensitive the timer will
flashes.
be.
- ON: Indicates the time that photocell start working.
- OFF: Indicates the time that photocell stops working
2. Press + /
or – /RND to adjusted lux level, Press OK to confirm.
Then, set photo cell start working time:
3. Hour display flashes. Press + /
4. Minute display flashes. Press + /
Set photo cell stop working time:
or – /RND to adjust hour. Press OK to confirm.
or – /RND to adjust minute. Press OK to confirm.
Page 3

5. Hour flashes again. Repeat step 3 to 4.
6. Press OK to confirm. Then press MENU to complete setting and return to current time display. .
Note:
y The timer enter to automation program only when A UTO ON or AUTO OFF is shown in LCD.
y When timer is in program mode, timer turns on when it detects dim light, LCD then shows AUTO ON, it
turns off the appliance when there is bright light, LCD shows AUTO OFF.
F. Photocell Random Setting
1. ONLY when LCD is in program mode, LCD is with AUTO ON or AUTO OFF, press - / RND to start random
function.
2. RND is displayed on the LCD indicating timer is in random mode.
3. In random mode, timer turns on/off from 10 to 26 minutes randomly.
4. If the timer is in AUTO OFF status, once random function is activated, it will start to detect lux level ONLY
after 10-26 minutes. When photocell detects dim light, it will then turn on the light for 10 – 26 minutes.
However, if it detect bright light, it will stay power off until dim light is detected.
5. In photocell random mode, after turning on the power for 10 – 26 minutes, it will then turned off according to
time, photocell will not detect lux level when turns power off .
6. This power on /off mode will repeated until random function is cancelled.
7. To cancel random function, press - / RND again. RND disappears from the LCD.
Note:
When random function is activated, auto on/off are suspended.
G. Override / Resume Present Program
1. Press +/
each time can override/resume the preset program. LCD changes in the following
sequence:
y ON: Overrides the preset program and power always on
y AUTO ON / AUTO OFF: Resumes the preset program, appliance turns on and off according to lux
level
y OFF: Overrides the preset program and power always off.
2. To erase ALL preset programs, press RST. (Note: This function cannot be resumed.)
H. Safety Precaution
1. For safety reason, always cut off main power supply and switch off your appliance before connection and
avoid setting up on rainy days.
2. Appliances to be connected to the Switch Box MUST NOT exceed the voltage and frequency ratings as in
“Specifications”.
3. To ensure the photo sensor function properly, the connected switch box to be positioned in direct daylight
and not to be covered by curtain.
4. Do not place the timer directly under street light, or the sensor cannot differentiate day and night phase, to
avoid false triggering.
5. If there is no display in the LCD, connects the switch box to the mains power supply, after 2 hours to
charge the integrated back-up battery.
6. The timer is supplied with a 1.5V rechargeable battery. When fully charged, it can support the LCD
display for 180days.
Page 4

I. Specifications
1. Ratings: 230V~, 50Hz, 16A, 3680W
2. Working Temperature: 0 ~+55
3. Time Setting Interval: 1 Minute
4. IP rating: IP44
Korrekte Entsorgung dieses Produkts
Innerhalb der EU weist dieses Symbol darauf hin, dass dieses Produkt nicht über den Hausmüll entsorgt
werden darf. Altgeräte enthalten wertvolle recyclingfähige Materialien, die einer Wiederverwertung zugeführt
werden sollten und um der Umwelt bzw. der menschlichen Gesundheit nicht durch unkontrollierte
Müllbeseitigung zu schaden. Bitte entsorgen Sie Altgeräte deshalb über geeignete Sammelsysteme oder
senden Sie das Gerät zur Entsorgung an die Stelle, bei der Sie es gekauft haben. Diese wird dann das Gerät
der stofflichen Verwertung zuführen.
- End -
 Loading...