

Ganz ZS-SX Series Installation And Operating Instructions Manual
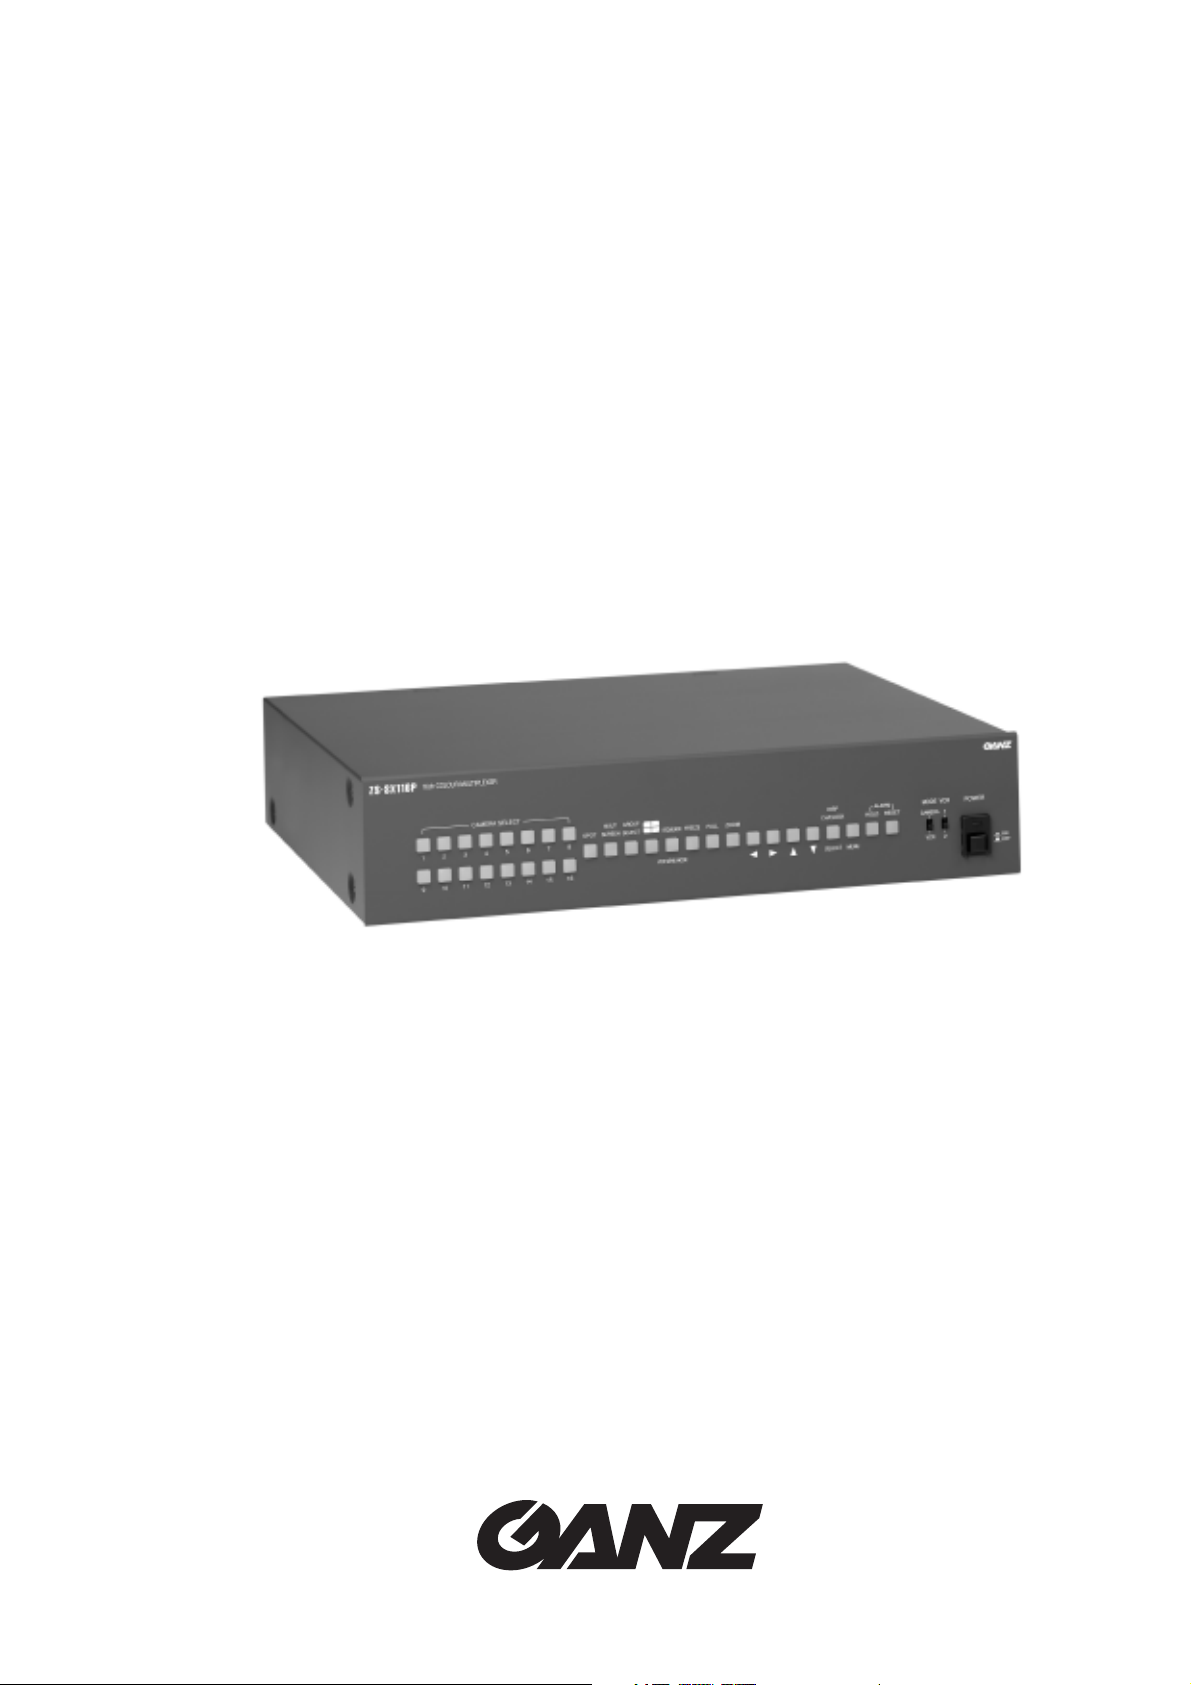
Installation and operating instructions
ZS-SX Series
Simplex Multiplexer
Please read this manual before installing, setting up,
operating, storing or otherwise handling this device.

These Installation and Operating Instructions, (edition of 01 - 06/2000), are for use with the following multiplexers:
ZS-SX116P and ZS-SX109P (year 2000 version)

Contents
Introduction
Intended use 4
European directives 4
Identification plate 4
Safety measures
Electrical hazards 5
Installation 5
Maintenance and Repair 5
Operation 5
Symbols used in this manual 5
Product description
Items supplied 6
Recommended Accessories 6
Summary of functions 6
Operating controls 7
Operation
Switching the unit on and off 8
Control buttons and screen display 8
Change unit type 9
Selection of operating mode 9
Displaying individual camera images 10
Automatic sequencing 10
Displaying several camera images 11
Freeze-frame function 12
Zoom (2× enlargement) 13
Pan-and-tilt function 13
Superimposed additional information 14
Displaying camera images on the
second monitor 15
Alarm functions 16
Recording 18
Playback 18
Search function 19
On-screen video recorder menu 19
Installation
Connection sockets on rear of unit 20
Preparing for installation 21
Rack mounting 21
Connecting peripheral equipment 22
Alarm connections 24
Video recorder control 25
Remote operation 26
Unit type 30
Programming
Basic operation 31
Quick-programming 33
Menu summary 33
OPTION menu 34
CHARACTER menu 35
CLOCK menu 36
ALARM DATA menu 37
TITLE menu 37
REC/ALARM menu 38
REMOTE menu 40
OTHERS menu 41
SEQ SKIP menu 42
REC PTN menu 42
PC-based operation
Requirements 43
Operation 43
Care and maintenance
Cleaning the unit 44
Passing-on, disposal 44
Changing the fuse 44
Changing the battery 45
Troubleshooting 46
Appendix
Synchronized operation of two multiplexers 48
Introduction to the operating principle
of multiplexers 49
System examples 50
Technical specifications 52
Introduction
Introduction
These installation and operating instructions are designed for the use of anyone concerned with the
setting-up or day-today use of the unit. All persons
involved in carrying out installation work (i.e. qualified
electricians or service engineers), must ensure that
they are familiar with the unit’s electrical and electronic
systems and should follow the applicable safety rules
and other relevant legislation at all times.
Intended use
The multiplexers in the ZS-SX range are designed for
professional use as part of video surveillance systems.
These units are designed for the sequential recording
and playback of various camera images on a single
video recorder and for simultaneous display of these
pictures on one or two monitors.
The installation and maintenance of these units should
be carried out by qualified electrical service technicians only.
If you have any queries concerning the operation of
these devices, which are not covered by this manual,
please contact the supplier at:
CBC (Deutschland) GmbH
Hansaallee 191
D – 40549 Düsseldorf
Tel: +49 (0) 2 11 53 06 70
Fax: +49 (0) 2 11 53 06 71 80
CBC (Europe) Ltd.
7/8 Garrick Industrial Centre, Irving Way
GB – London NW9 6AQ
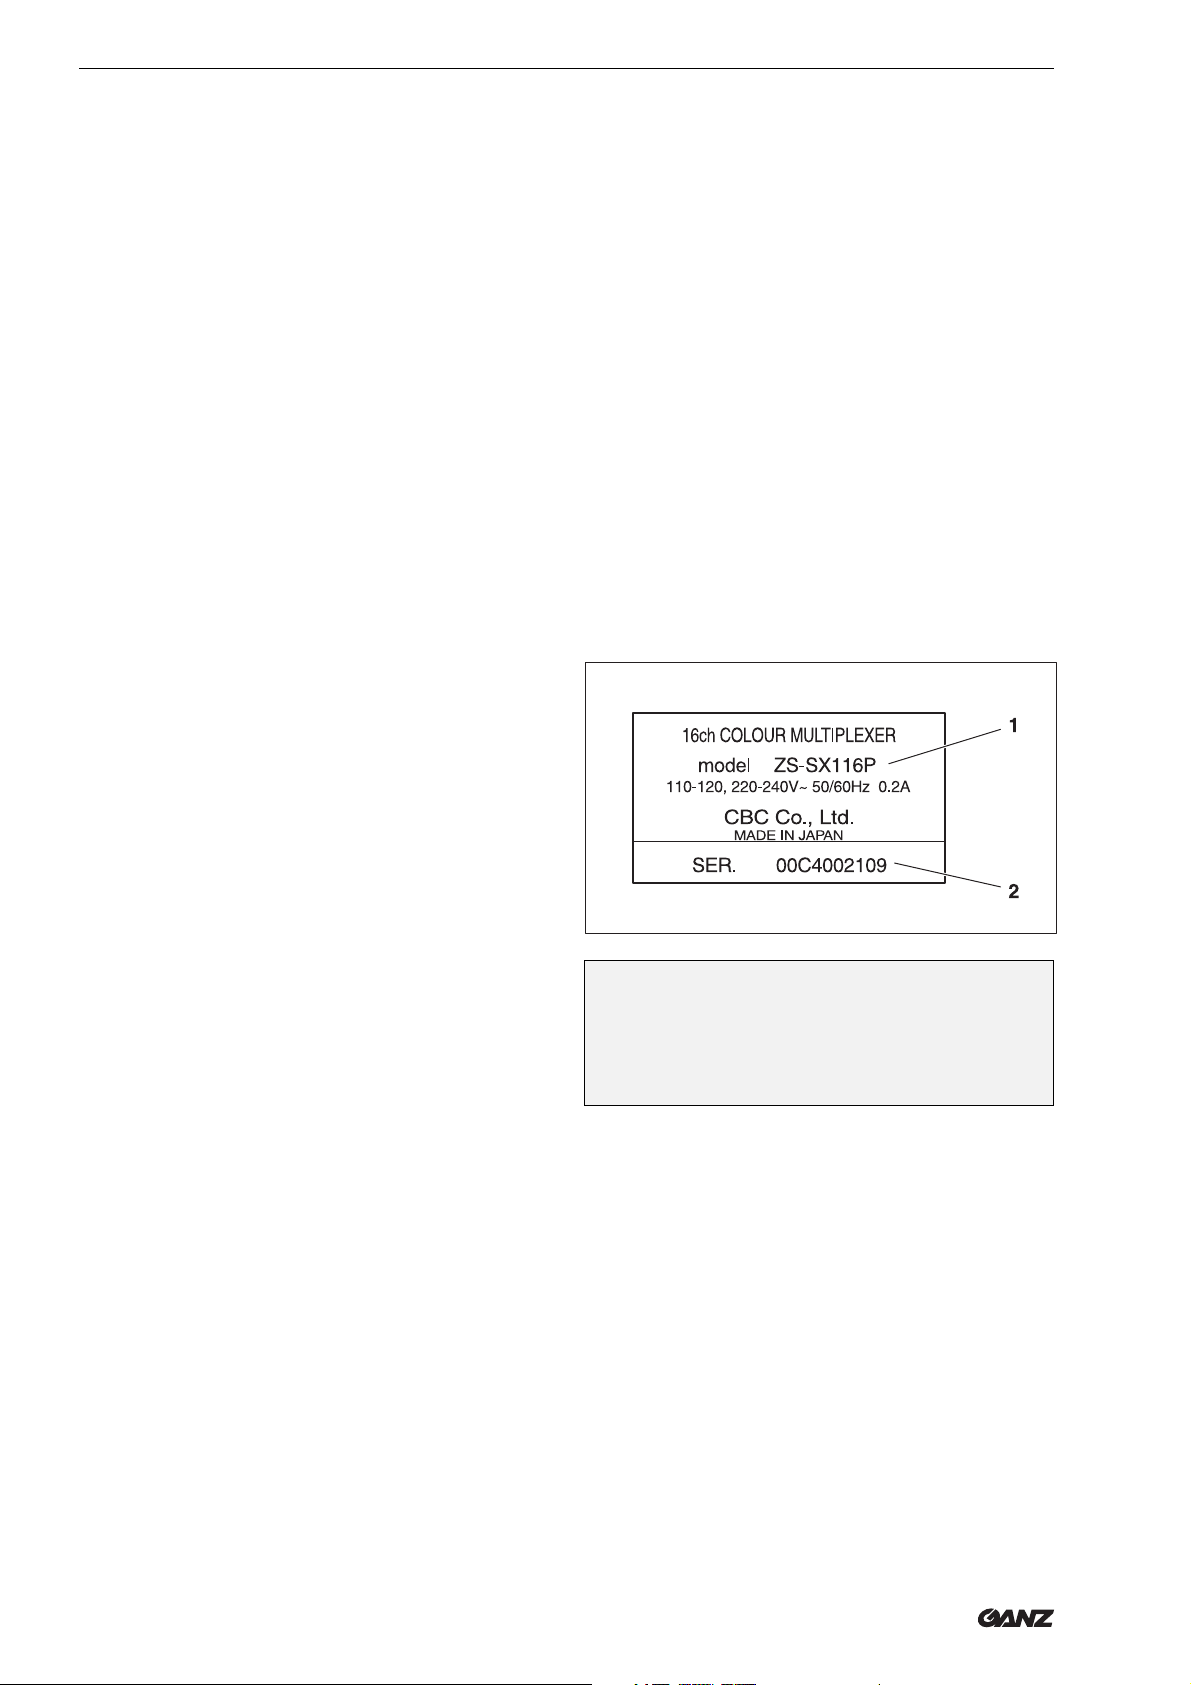
Identification plate
Precise identification of each device is provided by the
plate fixed to the rear of the unit, which shows its
model designation (1) and serial number (2). Please
copy these details into the box below. This will ensure
that you have the required data to hand if a query
arises or whenever you need to order spares.
Model:
Serial number:
Tel: +44 (0) 208 732 33 12
Fax: +44 (0) 208 202 33 87
European directives
Multiplexers ZS-SX116P and ZS-SX109P fulfill the
protection requirements established in European
directives 89/336 (electromagnetic compatibility) and
73/23, as amended by 93/68 (low-voltage devices).
4 ZS-SX Series
(06/2000)

Safety measures
Safety measures
Electrical hazards
• Ensure that the multiplexer and all associated
ancillary equipment are connected to a suitable
mains network power supply.
• Disconnect the multiplexer from the power supply
(and from all other devices) immediately if the
presence of smoke or an acrid smell suggests that
a malfunction has occurred.
• Disconnect the multiplexer from the power supply
(and from all other devices) immediately in the event
of a fault arising.
• Always disconnect the unit from the power supply
before opening its housing.
• Please note that only suitably qualified electrical
technicians are authorized to carry out installation
or servicing work on this unit.
• If you intend to take the multiplexer out of service
for an extended period, disconnect it from the
power supply and ensure that it is stored in a dry,
weather-protected location.
• Do not allow liquids of any type to get inside the
unit (e.g. by placing a full container on top of the
device, or when cleaning).
Installation
• The installation tasks described in this manual are
to be carried out by adequately trained electrical
technicians only, ensure that relevant electrical
standards and legislation are observed at all times.
• Any modifications to the unit are likewise the exclusive preserve of trained electrical specialists.
Maintenance and Repair
• All maintenance and repair operations should be
carried out by trained electrical specialists only.
• Unauthorized repairs can lead to personal injury,
material damage or harm to the unit itself.
Operation
• Operate this unit strictly according to the instructions contained in this manual.
• Unauthorized operation can lead to personal injury,
material damage or harm to the unit.
Symbols used in this manual
• If liquid does enter the housing, shut the unit down
at once and have it examined by the installer or a
qualified service technician.
• Take care to ensure that no cable or wire fitted to
the unit becomes pinched, trapped or otherwise
damaged. Replace any damaged wiring at once.
• If hazard-free operation of the unit cannot be guaranteed, take it out of service immediately and
ensure that it cannot be reconnected by accident.
Hazard-free operation is no longer possible in the
following situations (among others):
– Visible damage to the housing or wiring
– Foreign bodies have managed to get inside
the unit
– After long-term storage in unfavorable
conditions (e.g. damp) or after particularly
rough handling during transport
If in doubt, have the unit examined by CBC.
The safety instructions given in this manual are classified into two groups:
DANGER of electric shock!
B
z
You will also find instructions, at certain points, which
are designed to simplify the operation of the unit:
☞
Failure to observe safety warnings identified
with this symbol can lead to electric shock
injuries. The symbol is used to identify immediate hazards.
Caution!
This symbol identifies hazards likely to cause
harm to the unit itself or other material
damage.
Note
This symbol is used to identify special operating features of the unit.
(06/2000)
ZS-SX Series 5

Product description
Product description
Items supplied
1 x Multiplexer, model ZS-SX, etc.
2 x 25-pin SUB-D plug kits
1 x Mains lead
1 x Installation and operating instructions
1 x Quick start-up guide
Recommended Accessories
❚ All cameras should operate on standard CCIR or
PAL video signals
❚ All monitors should be suitable for receiving these
CCIR- or PAL-standard signals
❚ All normal video recorders and time-lapse VCR
units
❚ Rack mounting kit MB15B (ZS-SX109) or MB23B
(ZS-SX116) by CBC
Note
☞
Do not use video recorders designed for
entertainment purposes, or which digitally
process or alter video signals.
Unit type
You can operate the ZS-SX in multiplexer or multiviewer mode. In multiplexer mode, the ZS-SX supplies
the images of selected cameras to one or more interfaced video recorders. In multiviewer mode, the ZS-SX
functions as a comfortable image splitter. During
playback and in multiviewer mode the ZS-SX offers
various digital video functions such as zoom, freeze
frame or pan.
Digital video functions
Several different monitor display modes are available,
including the following:
❚ Frame-by-frame display of individual camera
images
❚ Simultaneous display of 4, 9, 10 or
16 camera images on a single screen
❚ In multiviewer mode additional 10-segment split-
screen including 2 larger segments
❚ Electronically-operated 2X zoom in conjunction
with electronic pan-and-tilt function
❚ Freeze-frame
Summary of functions
Digital ZS-SX series multiplexers are available in two
different configurations:
❚ ZS-SX116P, for use with up to 16 color cameras
❚ ZS-SX109P, for use with up to 9 color cameras
Programming
Menu-based programming of the multiplexer is carried
out using the on-screen display. The most important
settings can be programmed in just a few minutes,
using the Quick-Setup menu.
Two serial port interfaces are provided to allow PCbased remote control of the multiplexer and the connection of a remote control panel.
Alarm functions
An additional external alarm sensor can be assigned
to each camera input connection. Each sensor alarm
activates an acoustic and an optical signal, along with
further functions if required.
The monitor normally displays the images from each
camera in a pre-programmed sequence or as individual full screen pictures. The system can be programmed to display – in case of an alarm – only the
images from the camera involved in the alarm activation.
Any loss of video signal caused by a malfunctioning
camera likewise activates an alarm.
☞
Note
The appendix to this manual contains a
general introduction to the functioning of
multiplexer systems, along with a number of
examples. This information is designed to
help you to program the system and also –
when necessary – to assist in troubleshooting.
6 ZS-SX Series
(06/2000)
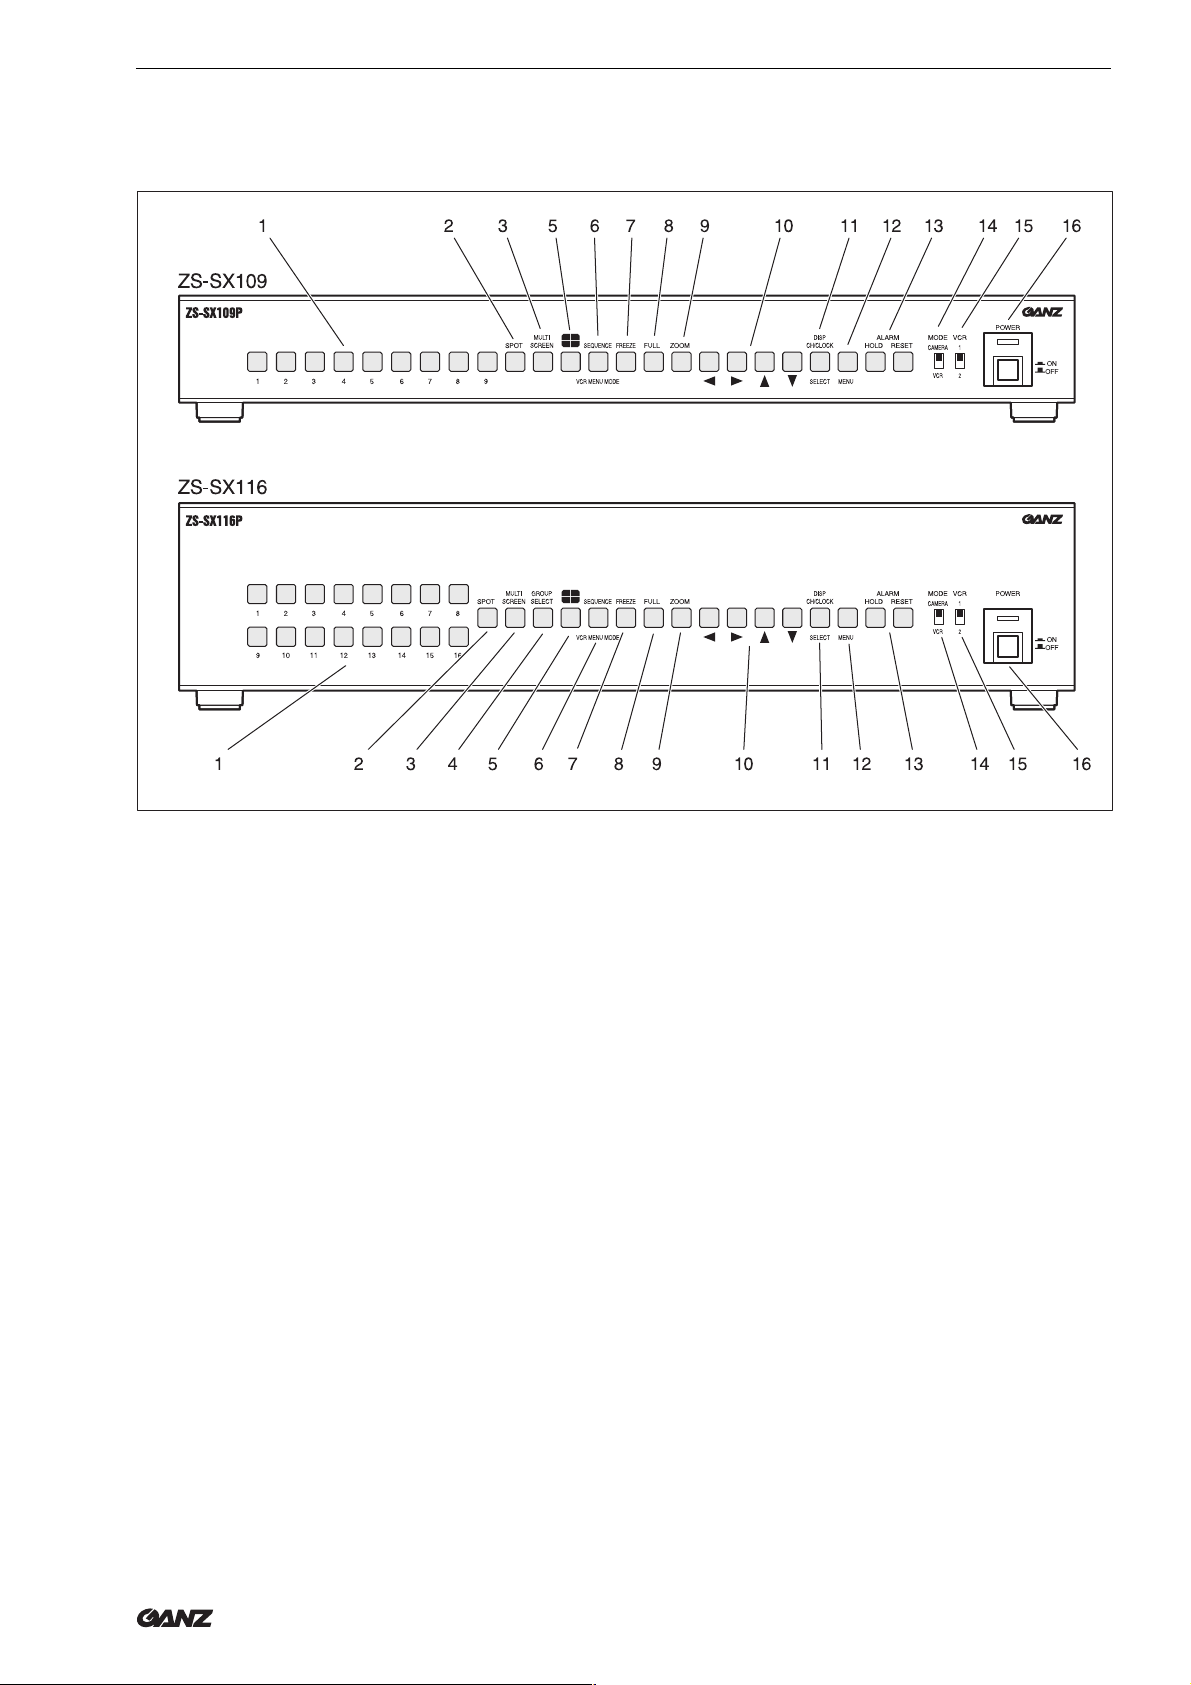
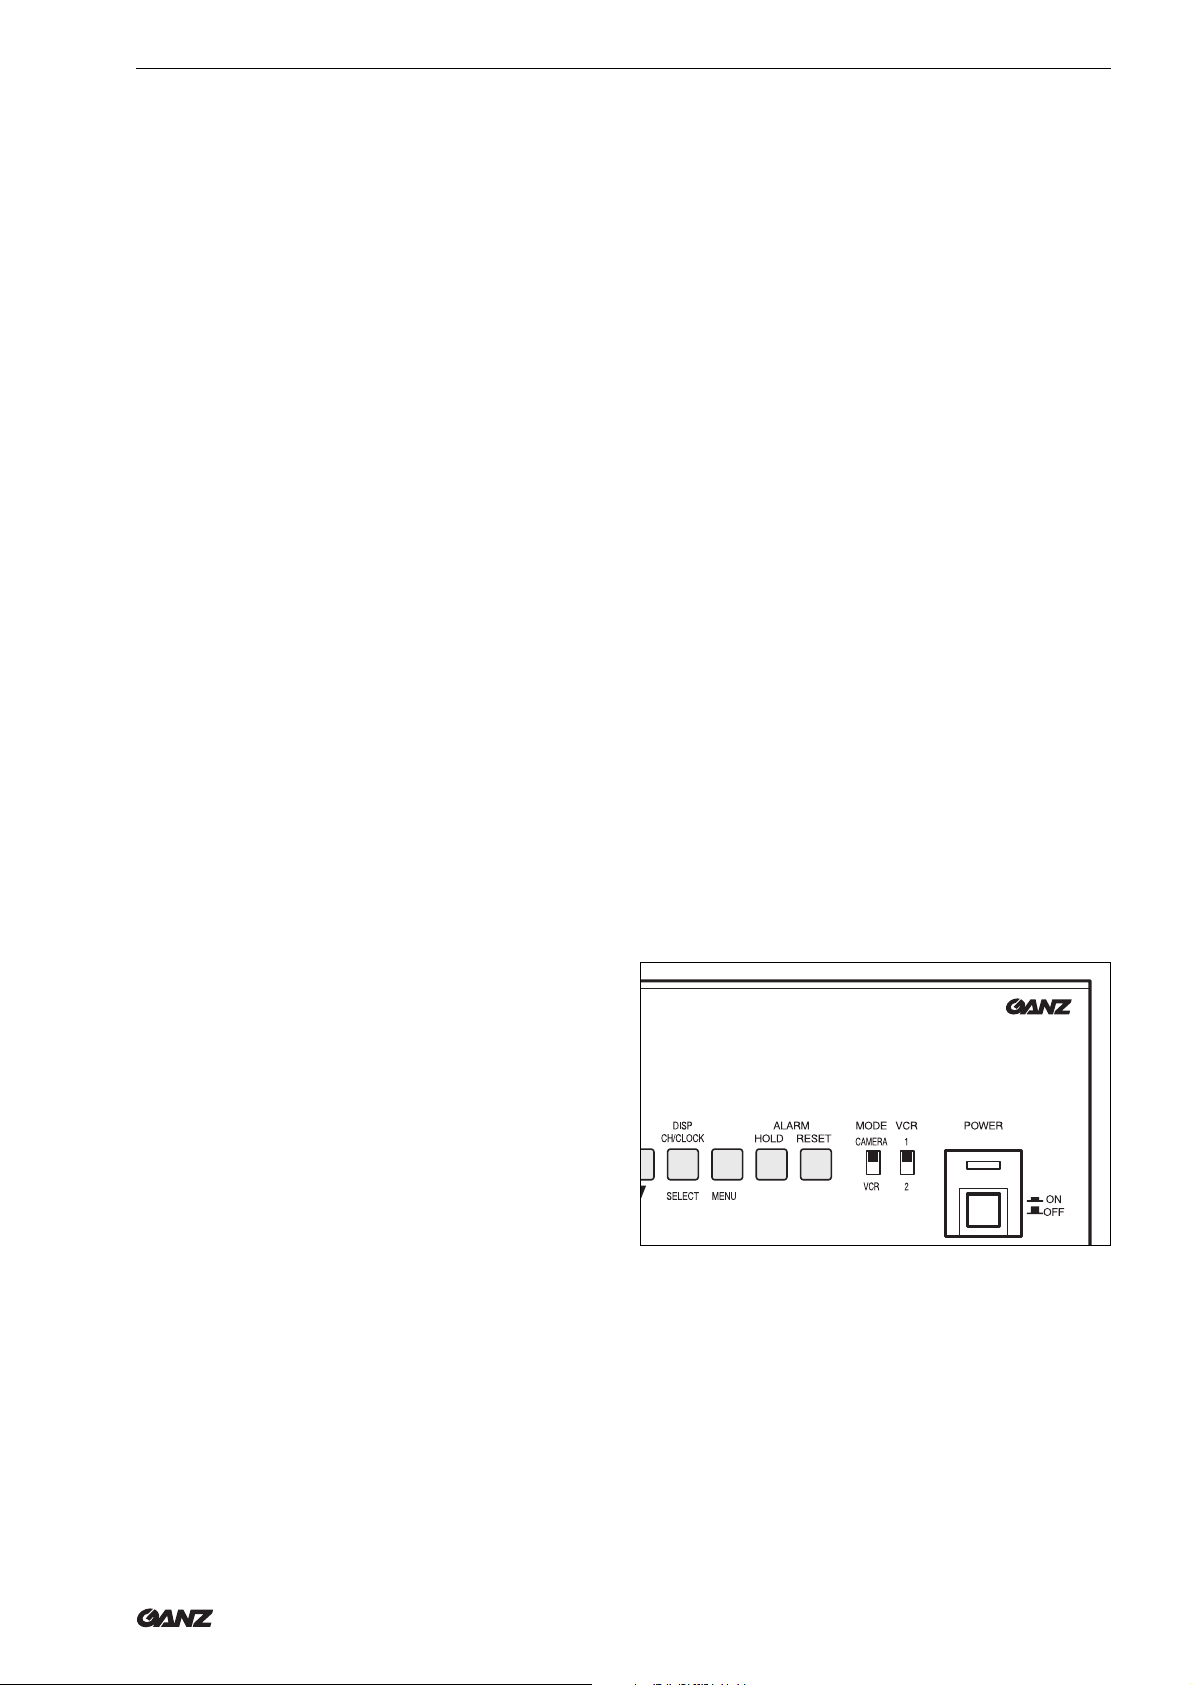
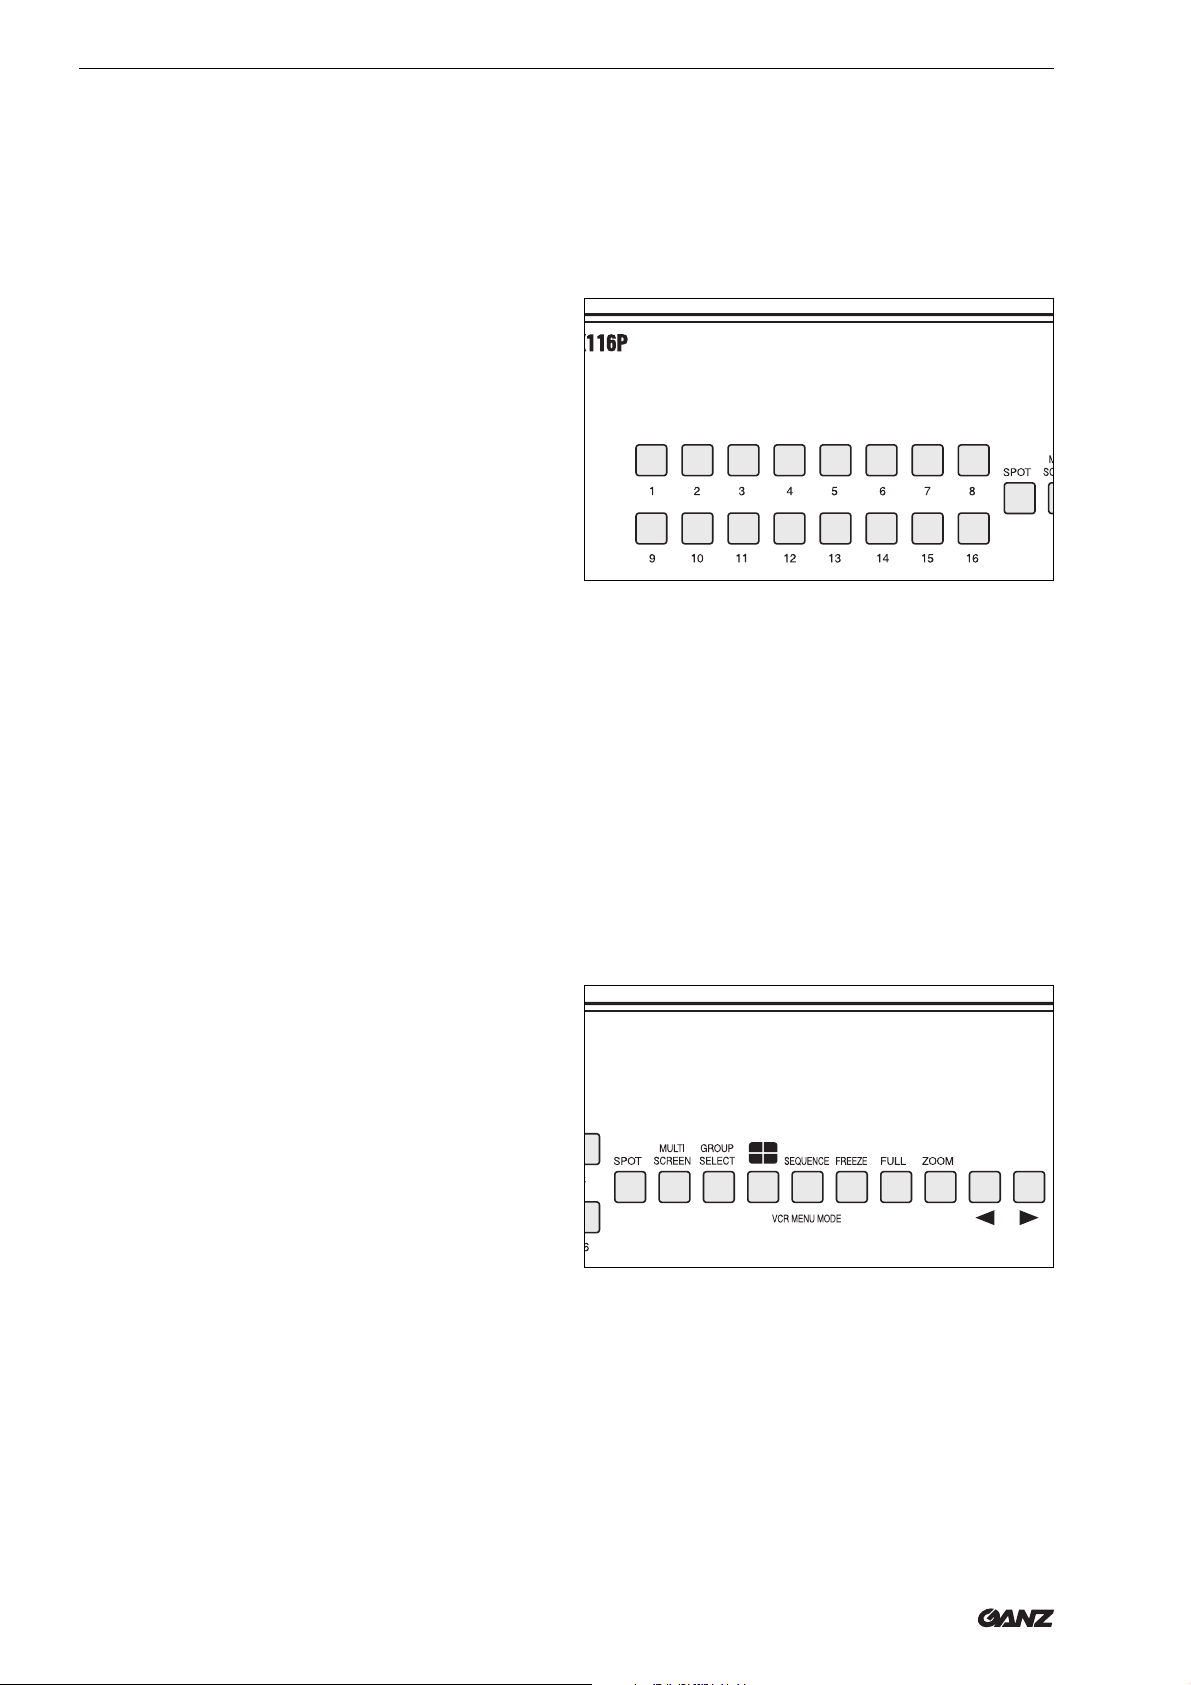
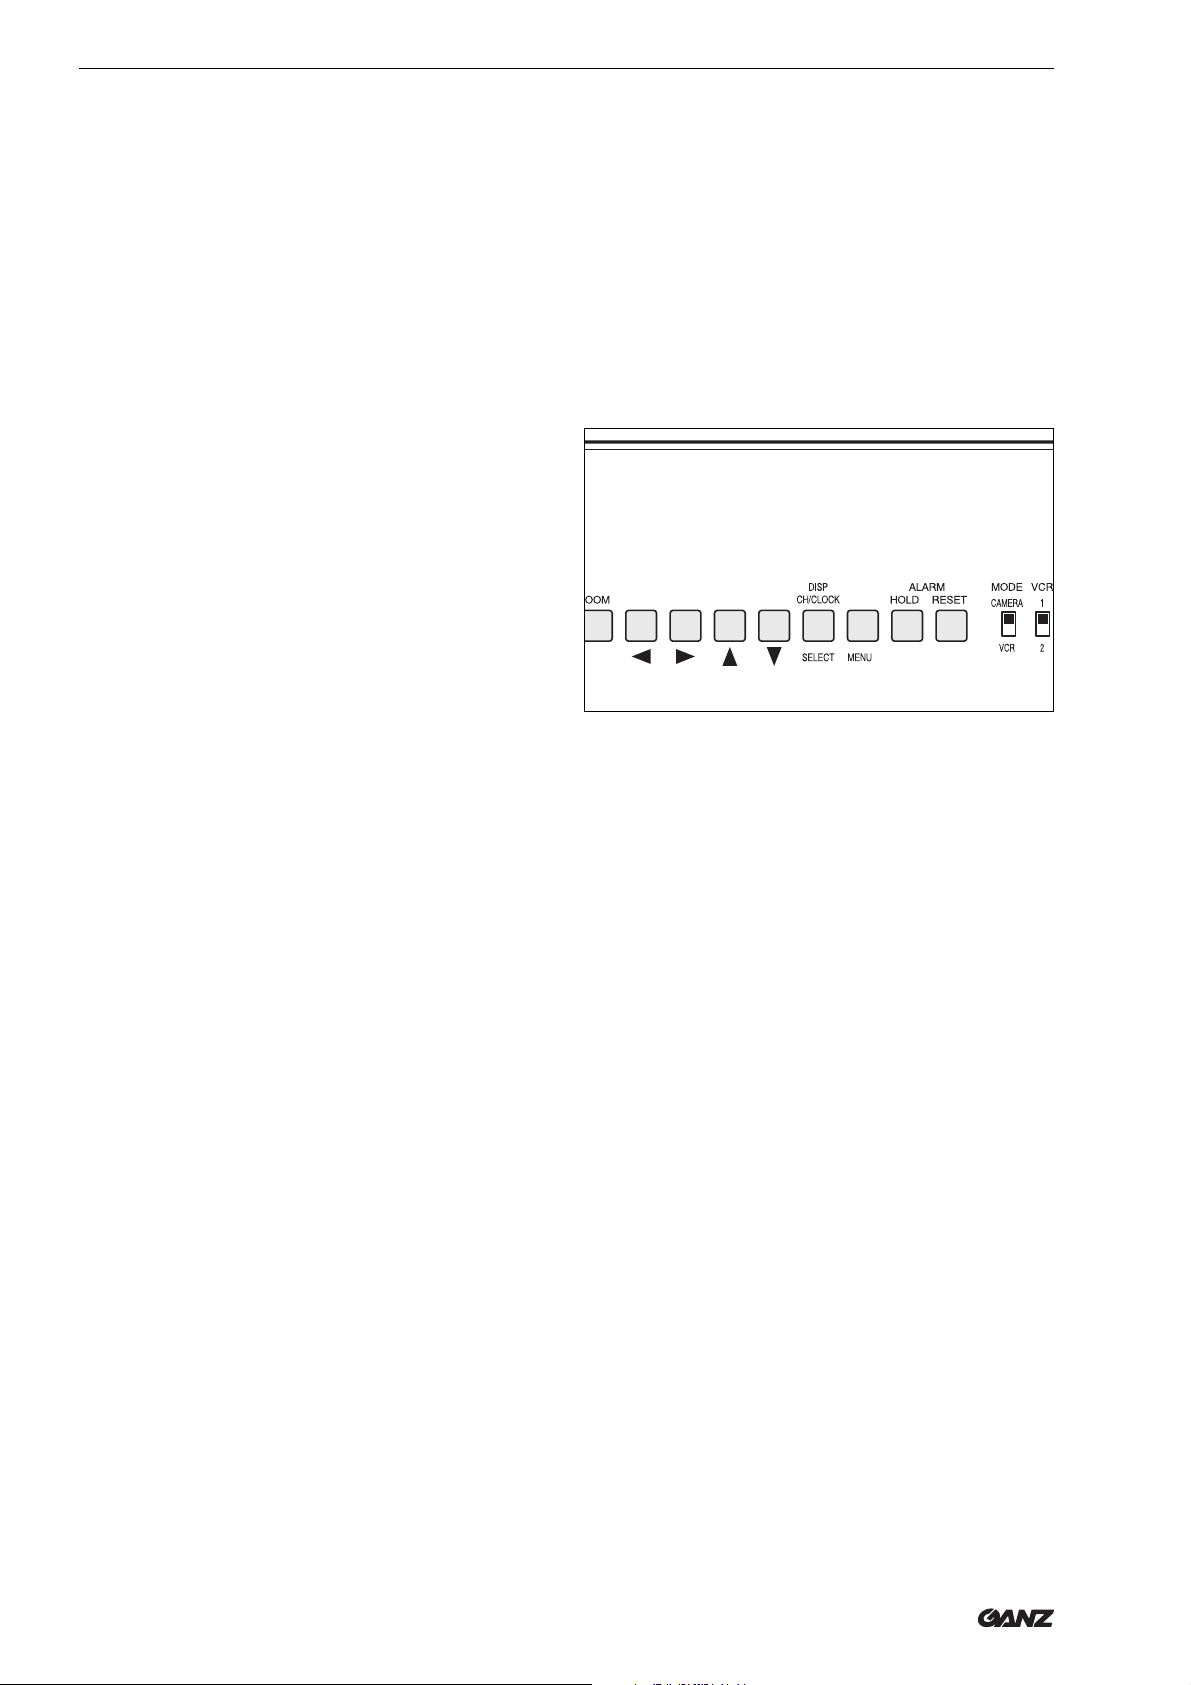
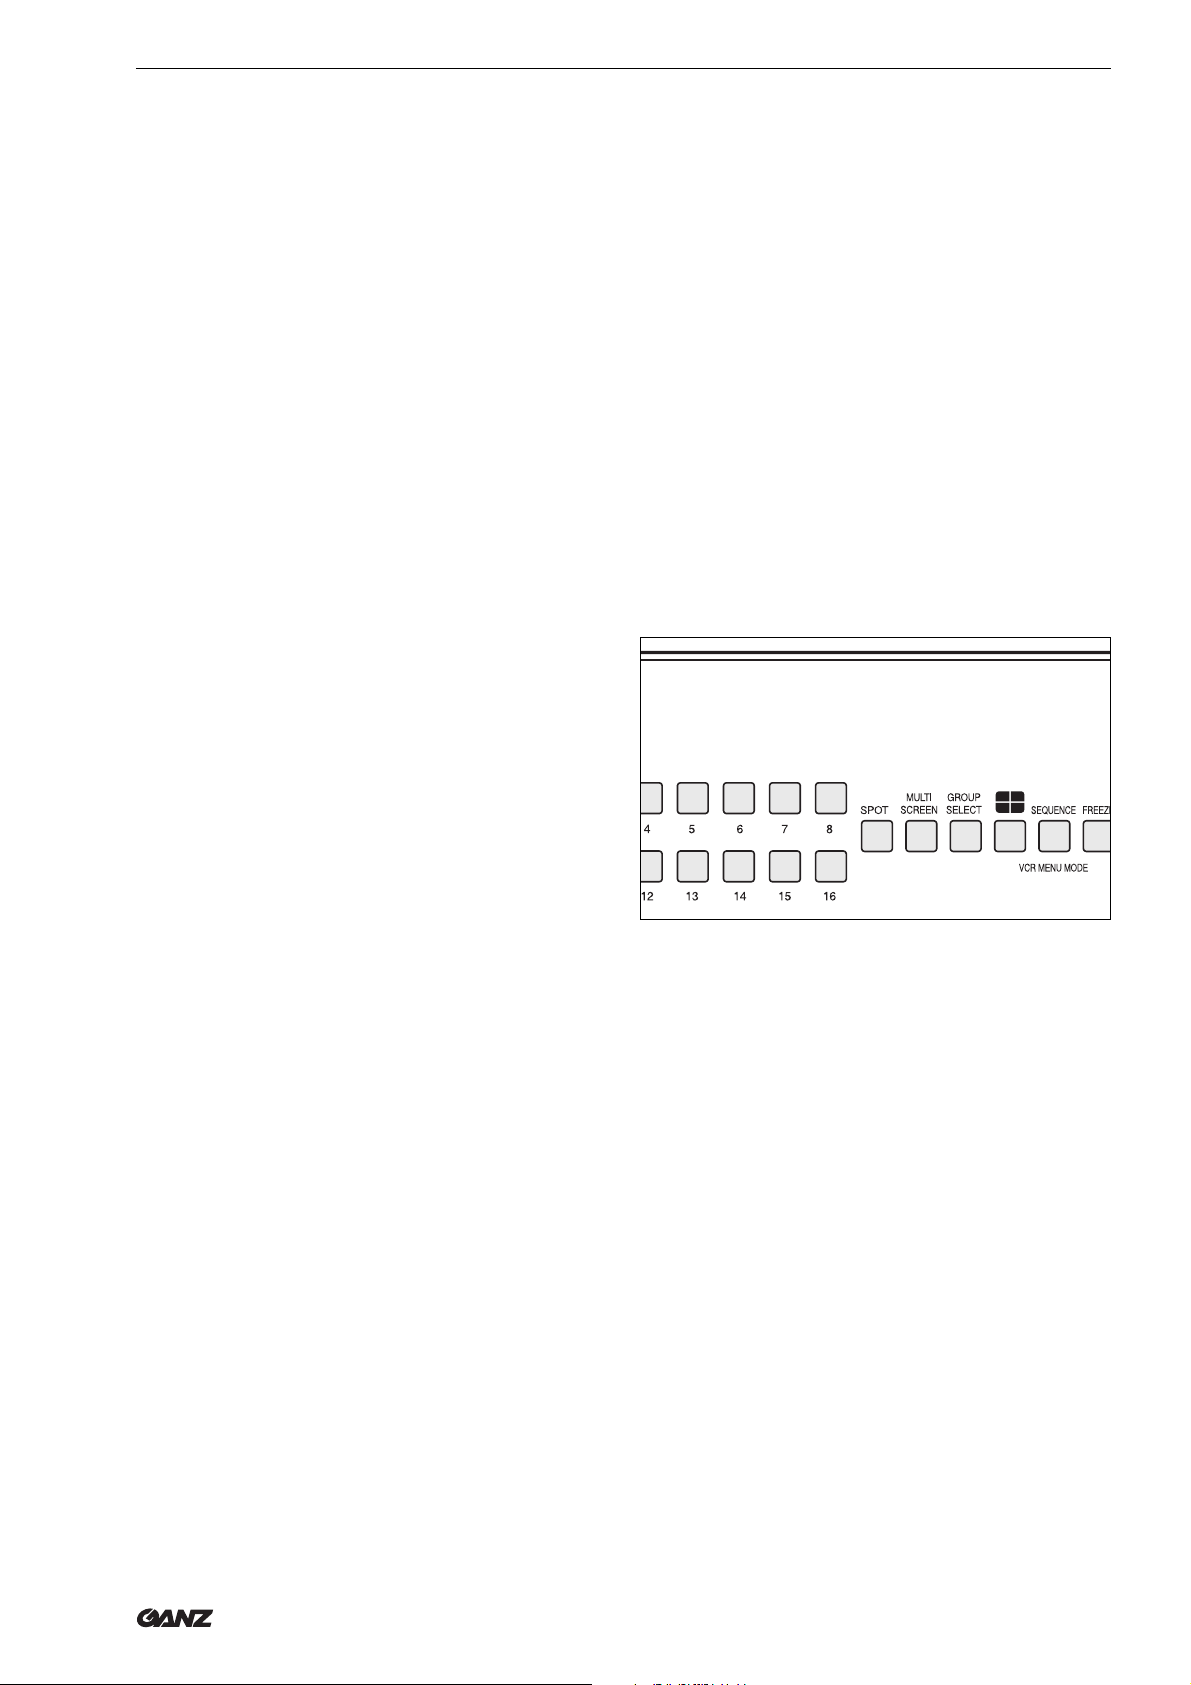
Operating controls
Product description
1 Camera control buttons
Used for selecting a camera image to display on
the monitor
2 SPOT button
Used (along with other controls) for selecting a
camera image to display on the second monitor
3 MULTI SCREEN button
For changing from one item to another
within a split screen
4 GROUP SELECT button
For changing from one camera group to another
within a split screen
5 Quad-splitter button
For displaying four images on a single screen
and for changing from one camera group to
another
6 SEQUENCE button
For activating and ending automatic sequencing
7 FREEZE button
Applies freeze-frame to the current camera
image
9 ZOOM button
Produces an electronic enlargement of a camera
image
10 Cursor keys
Used for operating the display menu and for
exploring images enlarged with the ZOOM function
11 DISP CH/CLOCK button
For superimposing camera details, date and time
12 MENU button
Activates the on-screen menus
13 ALARM buttons
For retaining the current camera image, even in
the event of an alarm (HOLD), and for acknowledging alarms (RESET)
14 MODE switch
Used for selecting live images (CAMERA) or
recordings (VCR) for display on-screen
15 VCR switch
For selecting video-recorder
playback mode
(06/2000)
8 FULL button
For full-screen display of a camera image
ZS-SX Series 7
16 POWER switch
For activating and shutting down the multiplexer
Operation
Operation
Switching the unit on and off
Do not switch the multiplexer on until the system has
been set up as desired and you have checked for
loose connections and correct polarity.
Before operating the multiplexer, ensure that the
technician responsible has installed and programmed
the unit correctly and that all functions are in full working order.
Note
☞
• Press the POWER switch to activate the multiple-
• Press the POWER switch to shut down the multi-
The installer will normally carry out all the
required machine programming operations
before initial start-up. Further multiplexer
installation and programming instructions are
provided elsewhere in this manual.
xer. The green indicator will now light up.
plexer, and the indicator light will go out.
Control buttons and screen display
All multiplexer control buttons are of the light-up type.
Illuminated camera buttons indicate which cameras
are currently selected, while function buttons light up
to show which functions are currently active.
The alarm button lights up red in the event of an
alarm.
Two monitors can be connected directly to the multiplexer. Depending on how the system is programmed,
digital functions – such as zoom or freeze-frame –
may only be available on one of the monitors. Both
monitors display various items of superimposed information in text form, including – for example – date,
time, details of camera from where current image is
being transmitted, or activated alarms.
☞
Note
Certain texts are not permanently displayed,
require activation by pressing the corresponding button and only appear on the
main monitor (see page 14).
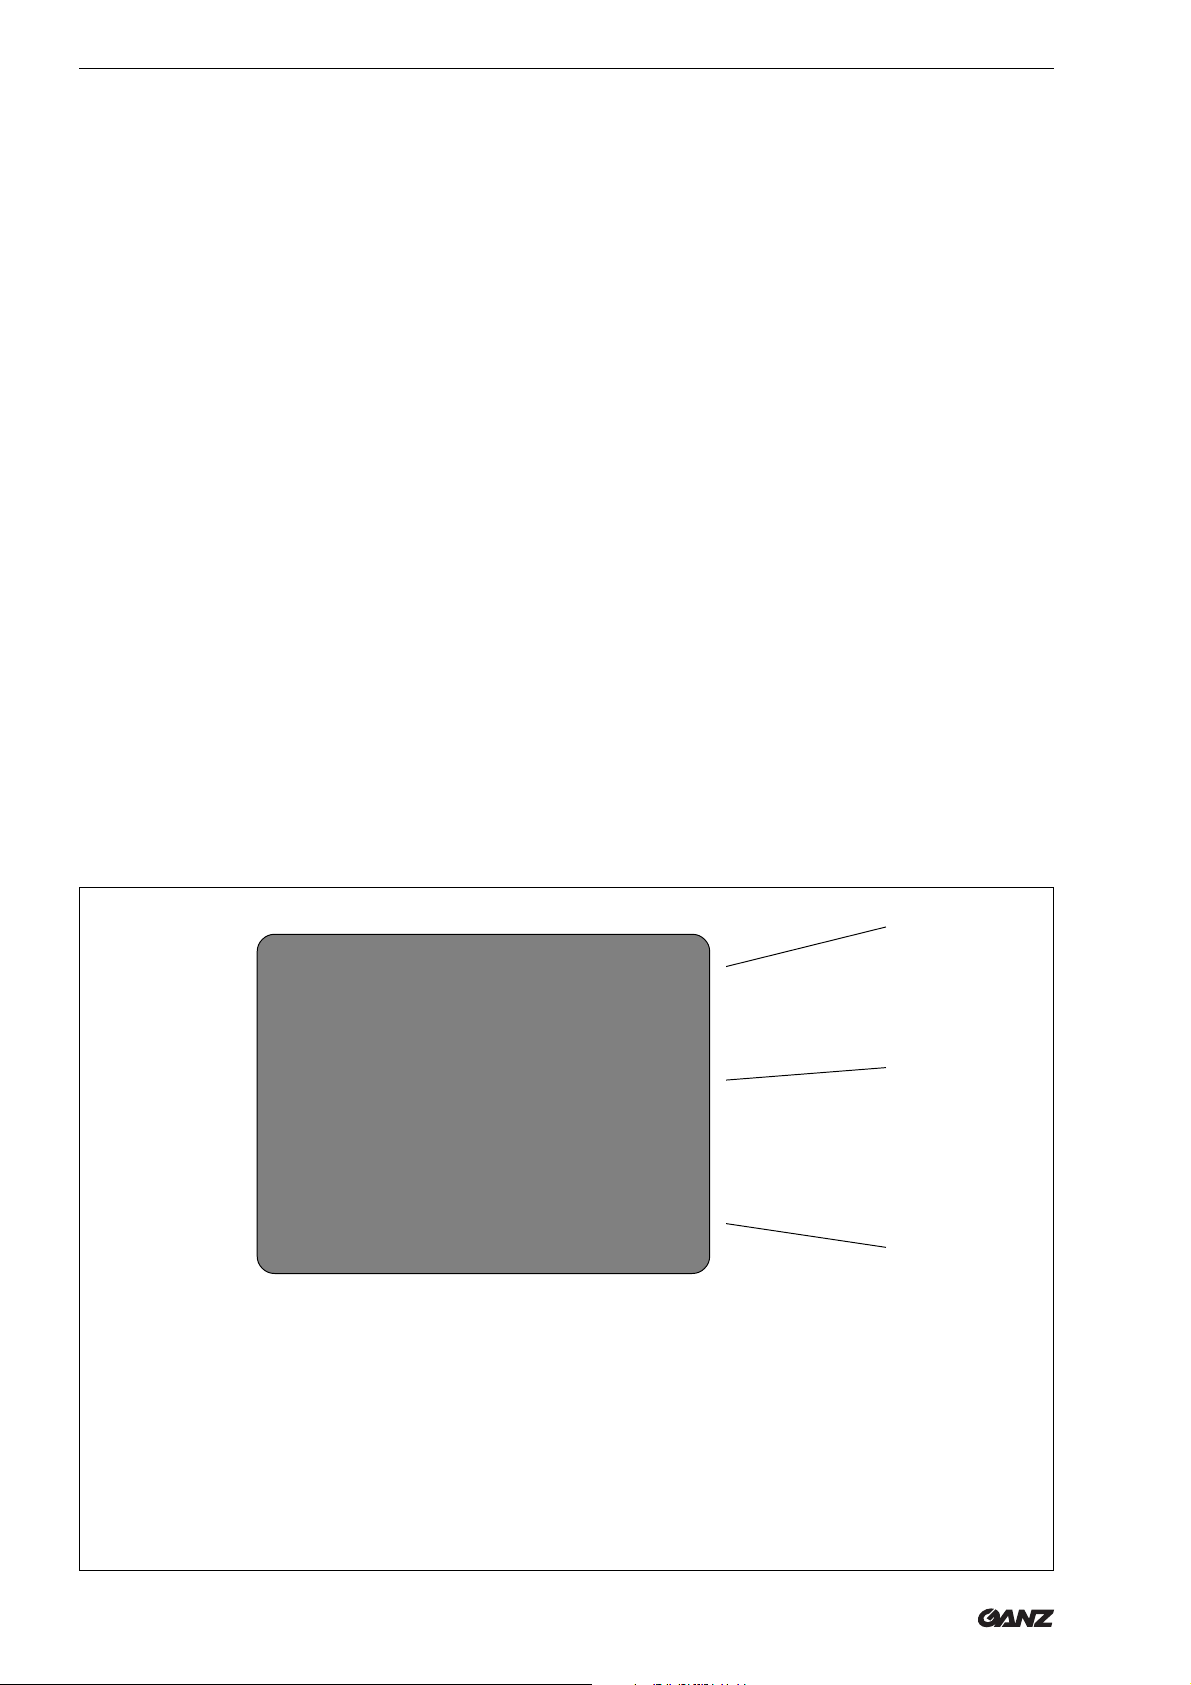
VL02 AL HOLD
TUE.APR.18 00
08:32:00
Camera 1 ZOOM
A Alarm information: VL = video signal interrupted (from camera 2 in this case)
ALARM or AL = sensor-activated alarm (e.g. due to door contact)
AL HOLD = sensor-activated alarm, monitor image does not change
B Date and time: day, month, date, year
hours, minutes, seconds
A
B
C
C Camera information: Programmed details of camera currently transmitting displayed image
ZOOM = electronic image enlargement activated
FREEZE or F = freeze-frame function activated
8 ZS-SX Series
(06/2000)
Changing unit type
The ZS-SX multiplexer allows you to choose the appropriate unit type for different jobs. (see page 30).
In multiplexer mode, the ZS-SX supplies the images
of selected cameras to one or more interfaced video
recorders. Live pictures are simultanously displayed
on full screen as individual picture or in a pre-programmed sequence alternatively. You can select an
individual camera, if you wish to playback a specific
image. At the same time, the ZS-SX offers various
digital functions such as freeze frame or zoom.
In multiviewer mode, the ZS-SX functions as a com-
fortable image splitter, with various digital video functions being available for live pictures such as multiple
screen splitting, freeze frame or zoom.
In this mode you cannot record multiplexed videoIn this mode you cannot record multiplexed video
In this mode you cannot record multiplexed video
In this mode you cannot record multiplexed videoIn this mode you cannot record multiplexed video
on a VCRon a VCR
on a VCR
on a VCRon a VCR
Operation
You can change the unit type at any time desired.
• Switch off the multiplexer. The indicator will go out.
• Press camera buttons 1 and 2 simultanously while
switching on the unit. The green indicator will light
up and the UNIT TYPE SETTING menu will be
displayed.
• Press SELECT button to select the desired unit
type.
• Press MENU button to switch to the selected unit
type.
Selection of operating mode
Select either of these two modes for each of the
operating functions of the multiplexer:
CAMERA For displaying live camera images
VCR For playback of recorded images
☞
Note
Ensure you select the correct operating
mode at all times, otherwise certain functions
may not work correctly or may not be carried
out at all.
(06/2000)
• Turn the MODE switch to the desired position.
ZS-SX Series 9
Operation
Displaying individual camera images
The monitor normally displays the images from each
camera in a pre-programmed sequence. However, if
you wish to display a specific image, you may also
select an individual camera.
• Select CAMERA mode.
• Press the button corresponding to the camera you
wish to select. The button will now light up.
There may be no camera image to display under
certain circumstances:
❚ If no camera is connected or the camera in questi-
on has been switched off. In this case, the monitor
will display only a blue or black-colored blank
screen.
❚ If the camera is malfunctioning. In this case, the
alarm button will flash and the letters VL (= video
loss) will appear on-screen, along with the ID number of the affected camera.
Automatic sequencing
The multiplexer is programmed to determine the order
in which the successive camera images are to be
automatically displayed in sequence on the monitor.
The dwell time for each camera is likewise programmed into the system. As soon as this period
expires, the multiplexer switches over to the next
camera image in the sequence.
• Select CAMERA mode.
• Press the SEQUENCE button. You will now see a
succession of various camera images. The buttons
corresponding to the selected cameras will be
illuminated.
10 ZS-SX Series
(06/2000)
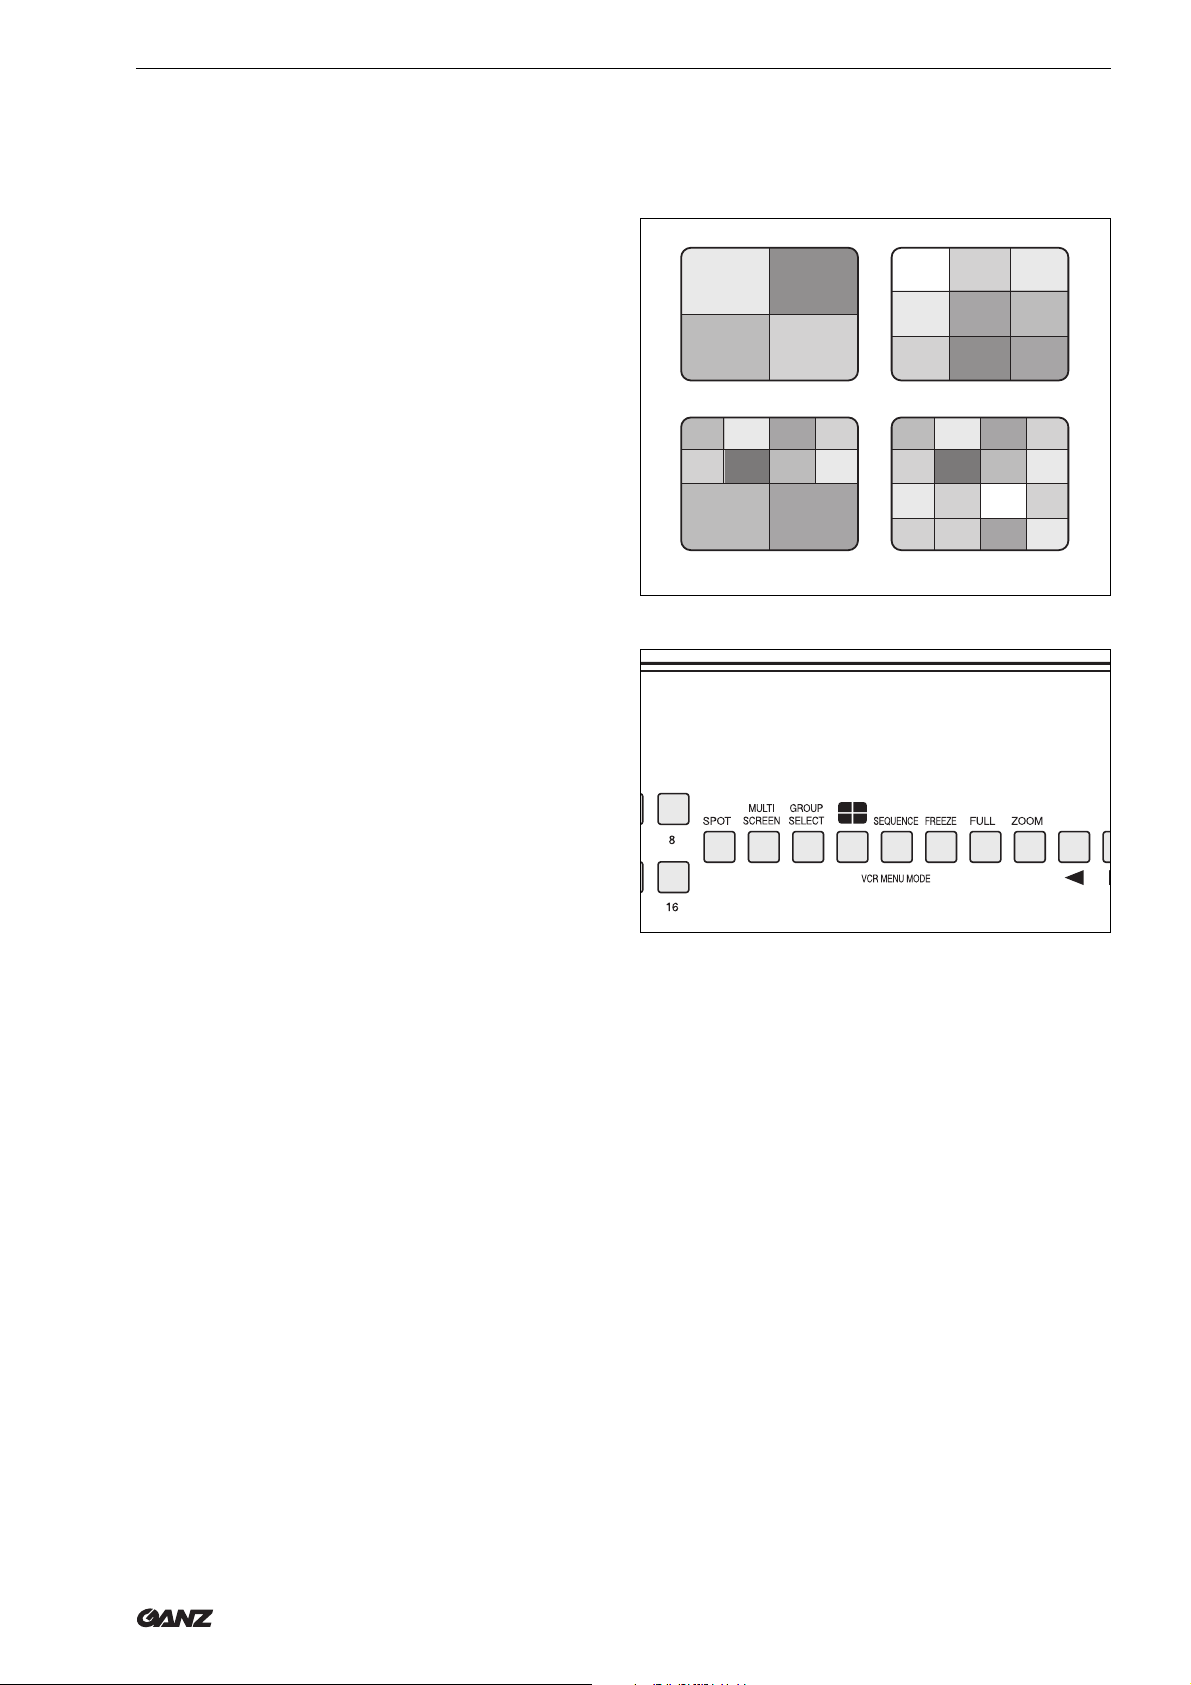
Displaying several camera images
(only during playback or in multiviewer mode)
The multiplexer offers several features that allow simultaneous display of different camera images within a
split screen. Several split-screen options are available,
as follows:
❚ 4 segments (quad-splitting)
❚ 9 segments
❚ 10 segments (only in multiviewer mode)
❚ 16 segments (ZS-SX116 only)
The selection of large images for splitting into 10
segments is established at the programming stage.
Camera details are not superimposed on a splitscreen display.
Multiple splitting
Operation
• Select CAMERA or VCR operating mode and activate the playback function if applicable.
• Press MULTI SCREEN button to display initial split
screen. The buttons corresponding to the selected
cameras will be illuminated.
• Press the MULTI SCREEN button again to display
further split screens.
• Press the GROUP SELECT button to change from
one camera group to another (if screen-splitting is
not suitable for the simultaneous display of all
camera images).
• Press the FULL button to display the last selected
camera image in full-screen mode
or
Press any camera button in order to display the corresponding single image in full-screen mode once more.
The button of the selected camera will now light up.
Quad-splitting
• Press the quad-splitting button. Four different camera images will be displayed. The buttons corresponding to the selected cameras will be illuminated.
(06/2000)
• Press the quad-splitting button again to change
from one camera group to another.
• Press the SEQUENCE button to change automatically from one camera group to another.
• Press the FULL button to display the last selected
camera image in full-screen mode
or
Press any camera button in order to display the corresponding single image in full-screen mode once more.
The button of the selected camera will now light up.
ZS-SX Series 11

Operation
Freeze-frame function
(only during playback or in multiviewer mode)
You can interrupt the camera updating process in
order to capture a particular image.
• Select CAMERA or VCR operating mode and activate the playback function if applicable.
Full-screen display mode
• Press a camera button.
• Press the FREEZE button to capture the frame
currently being displayed. The word FREEZE will be
superimposed on the screen and the FREEZE and
camera buttons will flash.
• Press FREEZE again to return to normal display
mode.
Split screen
• Select a split-screen mode.
• Press the FREEZE button. The button will flash.
• Now press a camera button to freeze the corresponding image. Depending on the size of the splitdisplay segments, the superimposed text will read
either F or FREEZE.
• Press further camera buttons if you wish to freeze
other images.
• Press the corresponding camera button to return to
normal mode, or press FREEZE to return all images
to normal mode.
☞
Note
If you are viewing a freeze-frame image in
full-screen mode, you can also activate the
zoom and pan-and-tilt functions (see following section).
12 ZS-SX Series
(06/2000)
Zoom (2× enlargement)
(only during playback or in multiviewer mode)
You can magnify a camera image to double its normal
size, even if the camera is only fitted with a normal
lens with fixed focal length.
Note
☞
• Select CAMERA or VCR operating mode and acti-
• Press a camera button.
• Press the ZOOM button. The enlarged image is
The quality of the electronic zoom image
depends on the resolution of each camera.
The image is enlarged, but no new details
are added – as would be the case with
optical enlargement.
vate the playback function if applicable.
displayed, with the word ZOOM superimposed.
Operation
• Press FULL to return to normal display mode.
Pan-and-tilt function
(only during playback or in multiviewer mode)
This feature allows you to explore the enlarged image
– displayed in ZOOM mode – by moving up and down
and from side to side, allowing you access to the
entire field of view of the camera.
This feature is provided by the electronic pan-and-tilt
function of the multiplexer.
Note
☞
• Press the ZOOM button. The enlarged image is
• Use the cursor keys to explore the displayed sec-
The pan-and-tilt function is limited to the field
of view of the camera in question, and cannot be extended beyond the visible range
available in full-screen display mode.
displayed, with the word ZOOM superimposed.
tion of image.
(06/2000)
• Press the left and right cursor keys together to
activate the automatic panning function. The view
of the section of image will automatically pan from
side to side.
• Press ZOOM to return to the center of the image.
• Press FULL to return to normal display mode.
ZS-SX Series 13
Operation
Superimposed additional information
You can superimpose additional on-screen information
on the main monitor as required. The superimposed
text disappears automatically after about 10 seconds.
Note
☞
• Select CAMERA or VCR operating mode and acti-
• Press the DISP CH/CLOCK button. This displays
• Press the DISP CH/CLOCK button again to display
Camera ID numbers are only displayed if the
system is in CAMERA mode.
vate the playback function if applicable.
the camera ID numbers corresponding to the visible
images.
the date and time.
The superimposed day, date and time are displayed in
English:
MON Monday
TUE Tuesday
WED Wednesday
THU Thursday
FRI Friday
SAT Saturday
SUN Sunday
14 ZS-SX Series
(06/2000)
Displaying camera images on the
second monitor
The second monitor allows you to view the pre-programmed sequence of camera images or – after
selection of the corresponding camera – an individual
camera image.
This selection is independent of the main monitor
selection, which allows you – for example – to split the
main monitor into nine segments and use the second
monitor to display the pre-programmed image sequence.
Note
☞
The multiplexer can also be programmed to
provide synchronized operation of the two
monitors. In this case, no independent functions are available to the second monitor.
Operation
• Select CAMERA or VCR operating mode and activate the playback function if applicable.
• Press the SPOT button to activate operation of the
second monitor. The button will flash.
• Press a camera button. You will see the corresponding camera image displayed on the second monitor. The button of the selected camera will now light
up.
• Press the SEQUENCE button. You will now see a
succession of various camera images. The buttons
corresponding to the selected cameras will be
illuminated.
• Press the SPOT again to return to operation of the
main monitor. The last-used second monitor settings are retained as the default configuration.
☞
Note
If you press a button corresponding to a
function that is not available on the second
monitor (e.g. ZOOM), the system returns
automatically to main-monitor operation. The
SPOT button stops flashing.
(06/2000)
ZS-SX Series 15
Operation
Alarm functions
Several situations can activate an alarm:
❚ Camera failure
❚ Activation of an external alarm source
(e.g. due to door contact)
The multiplexer can react to an alarm situation in the
following ways:
❚ The corresponding camera button flashes
❚ A flashing red alarm button
❚ One or more alarm messages superimposed on-
screen
❚ An alarm signal from the built-in buzzer
❚ Activation of other devices
(e.g. a video recorder or siren)
The details depend on how the system has been
programmed.
ALARM
Camera 1
Image sequence
The sequence of displayed images may change in the
event of an alarm. The system can be programmed to
display – for example – only the images from the
camera involved in the alarm activation. In the event of
an alarm, pay particular attention to the superimposed
on-screen camera details.
If the HOLD function is active in the event of an alarm,
the monitor image remains unchanged and the HOLD
button flashes. You can activate and disable the
HOLD function as required. You can also program the
multiplexer to block deactivation of the HOLD function.
• Press the HOLD button to activate this function.
The button will light up.
• Press the HOLD button again to disable the
function. The button will not light up or flash.
Alarm information
Whenever an alarm is activated, additional related
information is normally displayed on-screen. This information provides details of the camera involved. The
texts that can appear superimposed are as follows:
ALARM Alarm proceeding from external source
AL Alarm proceeding from external source
VL Alarm due to camera failure
16 ZS-SX Series
(06/2000)
Acknowledging an alarm
Alarms are automatically reset after a maximum of five
minutes, or have to be reset manually. The details
depend on how the system has been programmed.
The alarm function of the multiplexer can be programmed so that an alarm message remains active
(even if it has been acknowledged) as long as the
cause of the alarm – such as an open door – has not
been rectified. In this case, the alarm cannot be reset
unless appropriate steps are taken (e.g. by shutting
the door) to remove the original cause. Once the
cause of the alarm has been dealt with, the alarm
button will stop flashing and light up continuously.
• Press the ALARM RESET button to acknowledge
the alarm. The red alarm button will stop flashing.
• If the alarm is still active, wait for the button to light
up continuously. Then press the ALARM RESET
button to acknowledge the alarm. The red light on
the alarm button will go out.
Operation
Note
☞
Alarm list
This feature allows you to display a list of the last 64
alarm incidents. The data are displayed in chronological order, with an L to identify those caused by camera failure. Once there are more than 64 incidents in
the list, the oldest item is automatically deleted.
• When required, press the ALARM RESET button to
• Keep the MENU button pressed for about three
• Press SELECT to activate the normal menu display.
• Press the cursor keys until the ALARM DATA menu
• Press the SELECT button to display a list of the
Press the flashing red alarm button only if
you wish to reset all current alarm functions
and erase all on-screen alarm messages.
acknowledge the alarm. The red alarm button will
stop flashing.
seconds to display the main menu.
item flashes.
eight most recent alarm incidents.
4.ALARM DATA DISPLAY
DATE TIME CAMERA
43 JAN.01 04:28:52 03L
42 JAN.01 04:30:11 06L
41 JAN.01 04:34:13 01
40 JAN.01 04:25:02 04
39 MAR.26 22:28:52 03
38 MAR.26 22:31:01 08
37 APR.04 18:28:12 02L
36 APR.14 21:19:16 01
(06/2000)
• Press the cursor buttons again if you wish to display any further entries.
• Finally, press the MENU button repeatedly until the
menu disappears from the display.
If no entries are made, the menus will be cancelled
automatically after a short time.
ZS-SX Series 17
 Loading...