

Ganz ZS1-1DS, ZS1A-1DS User Manual

PixelPro GXi Series ZS1-1DS Installation Guide
03-2014-A 1

PixelPro GXi Series ZS1-1DS Installation Guide
Precaution
Please read this manual carefully before installing the unit.
Never disassemble the camera. Unauthorized disassembly may cause equipment
failure or damage to the unit.
Do not operate the encoder in environments beyond the specified temperature.
Refer to “Environment Condition” on “APPENDIX (A) : SPECIFICATIONS” in this manual.
Before applying power to the encoder, check the power source to ensure that it is
within the specifications. Refer to “Electrical Characteristics” on “APPENDIX (A) :
SPECIFICATIONS”
03-2014-A 2

PixelPro GXi Series ZS1-1DS Installation Guide
Table of Contents
Precaution ................................................................................................................ 2
1. FEATURES ............................................................................................................. 4
2. PACKAGE CONTENTS............................................................................................. 5
3. PART NAMES ........................................................................................................ 6
3.1. Front Panel ......................................................................................................................... 6
3.2. Back Panel .......................................................................................................................... 7
4. INSTALLATION ...................................................................................................... 8
5. CONNECTIONS ...................................................................................................... 9
6. CONFIGURATION ................................................................................................ 12
6.1. Set up network environment ........................................................................................... 12
6.1.1. Generic IP Environment ............................................................................................ 12
6.1.2. Custom IP Environment............................................................................................. 13
6.2. View video on web page .................................................................................................. 14
6.2.1. ActiveX Installation .................................................................................................... 14
6.2.2. Access through IPAdmin Tool.................................................................................... 15
6.3. Reset ................................................................................................................................. 16
6.4. Factory Default ................................................................................................................. 16
6.5. Safe Mode ........................................................................................................................ 17
APPENDIX (A): SPECIFICATIONS .............................................................................. 19
Summary ................................................................................................................................. 19
Electrical Characteristics ......................................................................................................... 19
Environment Condition ........................................................................................................... 20
Mechanical Condition ............................................................................................................. 20
APPENDIX (B): POWER OVER ETHERNET ................................................................. 21
PoE compatibility .................................................................................................................... 21
Power Comparison .................................................................................................................. 21
APPENDIX (C): DIMENSIONS ................................................................................... 22
APPENDIX (D): HEXADECIMAL-DECIMAL CONVERSION TABLE ................................. 23
REVISION HISTORY ................................................................................................. 24
03-2014-A 3

PixelPro GXi Series ZS1-1DS Installation Guide
1. FEATURES
Streaming
Dual streaming mode (such as different codec/resolution/bit rate and so on.)
De-interlacing on DSP
Burnt-in text supported
Unicast/Multicast supported
Video/Audio
Video compression: H.264/MJPEG, 25/30FPS@D1(PAL/NTSC)
Audio compression: G.711(µLaw)
Analog video out for external monitors
Video Motion Detection supported
Two-way mono audio supported
Network
RTSP/ HTTP protocol supported
10/100 Base-T Ethernet
Additional Features
RS-485 supported
microSD supported
PoE supported
Built-in Video Content Analysis
SDK (Software Development Kit) provided
VCA (Video Content Analysis)
VCA Presence (Included as basic)
VCA Surveillance (Optional)
03-2014-A 4

PixelPro GXi Series ZS1-1DS Installation Guide
Encoder
DC power adaptor
Mounting brackets
8 Pin terminal blocks
Screws and anchor blocks
Quick Installation Guide
Hex wrench driver
Jumper Cap
The above contents are subject to change without prior notice.
Note
i
2. PACKAGE CONTENTS
Unpack carefully and handle the equipment with care. The packaging contains:
03-2014-A 5
PixelPro GXi Series ZS1-1DS Installation Guide
○1
○2
○3
○4
⑤
3. PART NAMES
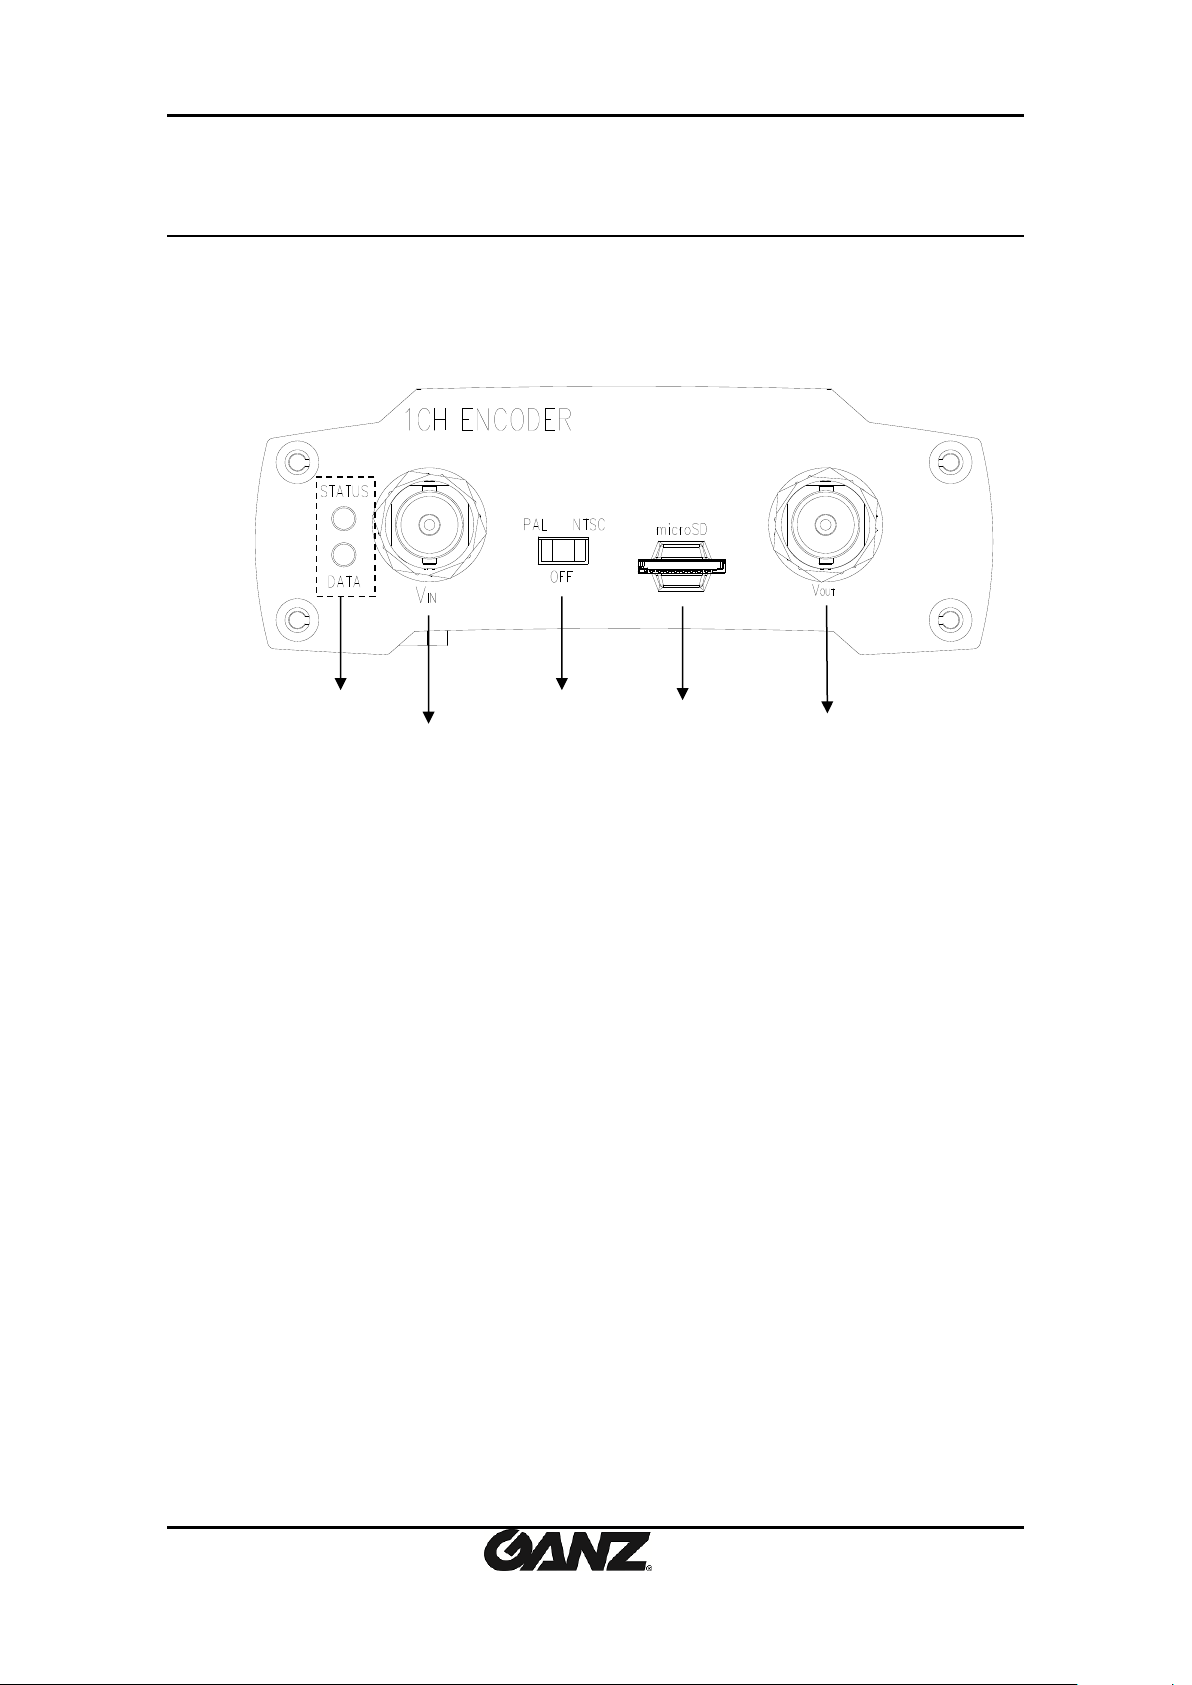
3.1. Front Panel
① System Status LEDs
They indicate certain system information.
- Status: The LED turns on in orange when the encoder is powered on.
- Data: The LED turns on in green when the video signal comes in with a proper
connection.
② Video Input BNC connector
As a video input connector, connect to a camera.
③ Video input/output Configuration Switch
This switch enables video input and output to be turned on or off. No video comes in or out
with this switch off and only some test patterns will be displayed on the Webpage. You can
change the video standard format of the device by moving the switch to NTSC side or PAL side
as required. The device needs to be rebooted after moving the switch in order to apply the
change.
④ microSD slot
Insert a microSD card for local storage.
⑤ Loop out BNC connector
As a loop out connector, connect to a device such as a recorder or monitor.
03-2014-A 6
PixelPro GXi Series ZS1-1DS Installation Guide
⑥
⑦ ⑧ ⑨
⑩
⑪
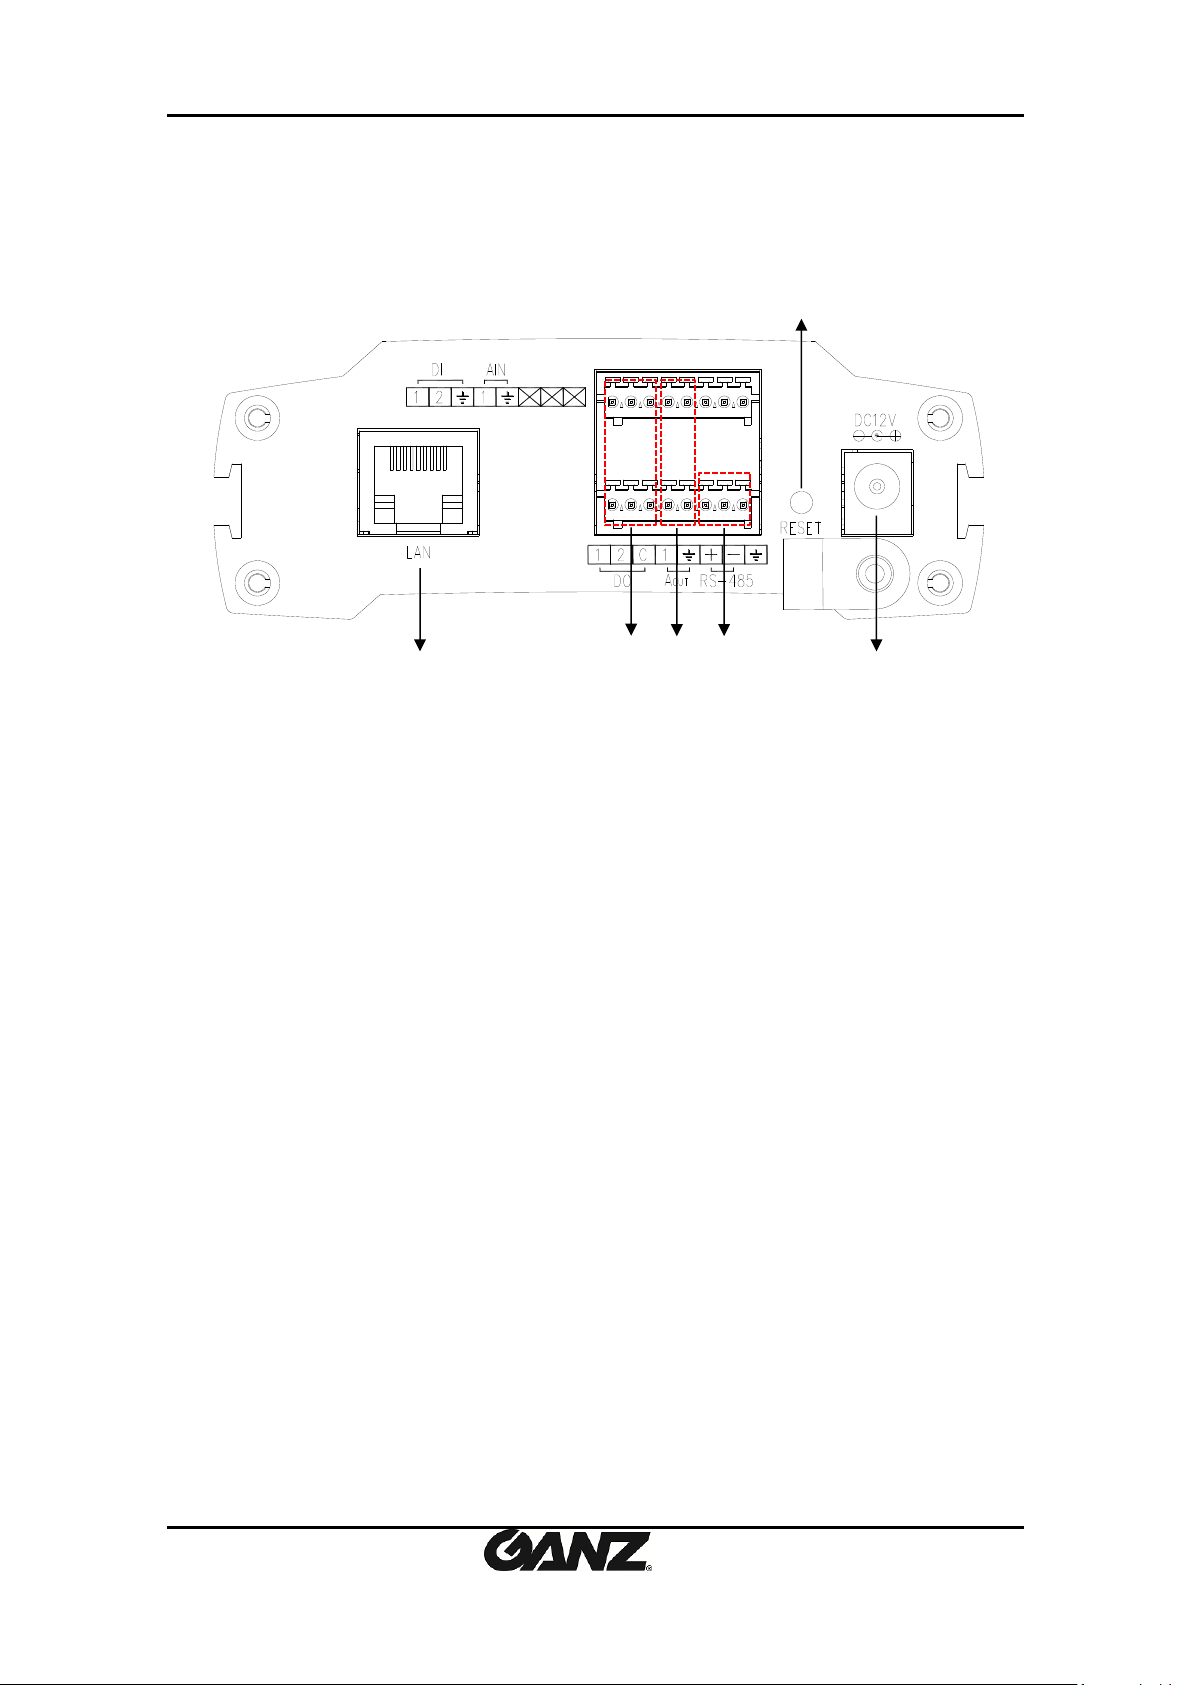
3.2. Back Panel
⑥ LAN connector
Use the RJ45 LAN connector for 10/100 Base-T Ethernet. (PoE supported)
⑦ DI/DO
The encoder supports two channels for each of DI and DO. Refer to the section “エラー! 参照
元が見つかりません。” for more specific information.
⑧ Audio In/Out
The encoder has one channel mono audio input/output. As the output power for the audio is
low, an amplifier speaker is needed.
⑨ RS-485
RS-485 terminal block is used for PTZ controls.
⑩ Reset
Reboot the device system or reset the device to its Factory default settings. Refer to the
section “6.3 Reset” and “6.4 Factory default” for more specific information.
⑪ Power connector
Connect the power adaptor for power supply.
03-2014-A 7

PixelPro GXi Series ZS1-1DS Installation Guide
4. INSTALLATION
To wall-mount the encoder, follow this instruction:
The encoder has one mounting hole on each side. Mount the device using the included screws
and anchor blocks. Refer to the image below.
03-2014-A 8
 Loading...