

Ganz Digimaster DR4N-Lite Instruction Manual


S P E C I F I C AT I O N & O R G A N I Z A T I O N - - - - - - - - - - - - - - - - - - - - - - - - - - - - - - - - - - - - - - - - - - - - - - - - - - 1 1
S p e c i f i c a t i o n s - - - - - - - - - - - - - - - - - - - - - - - - - - - - - - - - - - - - - - - - - - - - - - - - - - - - - - - - - 1 1
P r o d u c t C o n t e n t s L i s t - - - - - - - - - - - - - - - - - - - - - - - - - - - - - - - - - - - - - - - - - - - - - - - - - - - 1 2
S y s t e m O r g a n i z a t i o n - - - - - - - - - - - - - - - - - - - - - - - - - - - - - - - - - - - - - - - - - - - - - - - - - - - - 1 2
P R O D U C T D E S C R I P T I O N - - - - - - - - - - - - - - - - - - - - - - - - - - - - - - - - - - - - - - - - - - - - - - - - - - - - - - - - 1 3
Fr o nt p a n e l d es c r i p t i o n - - - - - - -- - - - -- - -- - - - -- - - - -- - - - -- - - - -- - - - - - -- - - - -- - - - -- - - - -- - - - - - -- - - - 1 3
R e a r p a n e l d e s c r i p t i o n - - - - - - - - - - - - - - - - - - - - - - - - - - - - - - - - - - - - - - - - - - - - - - - - - - - - - - - - - - - - - 1 3
R e m o t e C o n t r o l l e r d e s c r i p t i o n - - - - - - - - - - - - - - - - - - - - - - - - - - - - - - - - - - - - - - - - - - - - - 1 4
C O N N E C T I O N & P O W E R O N - - - - - - - - - - - - - - - - - - - - - - - - - - - - - - - - - - - - - - - - - - - - - - - - - - - - - - - 1 4
L I V E D I S P L AY - - - - - - - - - - - - - - - - - - - - - - - - - - - - - - - - - - - - - - - - - - - - - - - - - - - - - - - - - - - - - - - - - - - - - - - - - - - - - 1 5
D i v i s i o n s c r e e n - - - - - - - - - - - - - - - - - - - - - - - - - - - - - - - - - - - - - - - - - - - - - - - - - - - - - - - - - - - - - - - - - - - - - - - 1 5
M a n u a l R e c o r d i n g - - - - - - - - - - - - - - - - - - - - - - - - - - - - - - - - - - - - - - - - - - - - - - - - - - - - - - - - - - - - - - 1 6
K e y L o c k F u n c t i o n - - - - - - - - - - - - - - - - - - - - - - - - - - - - - - - - - - - - - - - - - - - - - - - - - - - - - 1 7
P T Z C a m e r a c o n t r o l - - - - - - - - - - - - - - - - - - - - - - - - - - - - - - - - - - - - - - - - - - - - - - - - - - - - 1 7
S Y S T E M S E T U P - - - - - - - - - - - - - - - - - - - - - - - - - - - - - - - - - - - - - - - - - - - - - - - - - - - - - - - - - - - 1 8
D i s p l a y - - - - - - - - - - - - - - - - - - - - - - - - - - - - - - - - - - - - - - - - - - - - - - - - - - - - - - - - - - - - - - 1 8
O S D - - - - - - - - - - - - - - - - - - - - - - - - - - - - - - - - - - - - - - - - - - - - - - - - - - - - - - - - - - - 1 8
M o n i t o r - - - - - - - - - - - - - - - - - - - - - - - - - - - - - - - - - - - - - - - - - - - - - - - - - - - - - - - - -
1 9
C a m e r a - - - - - - - - - - - - - - - - - - - - - - - - - - - - - - - - - - - - - - - - - - - - - - - - - - - - - - - - - - - - - - 2 0
C a m e r a T i t l e - - - - - - - - - - - - - - - - - - - - - - - - - - - - - - - - - - - - - - - - - - - - - - - - - - - - - -
2 0
C o l o r S e t u p - - - - - - - - - - - - - - - - - - - - - - - - - - - - - - - - - - - - - - - - - - - - - - - - - - - - - -
2 0
P T Z S e t u p - - - - - - - - - - - - - - - - - - - - - - - - - - - - - - - - - - - - - - - - - - - - - - - - - - - - - - -
2 1
M o t i o n S e n s o r - - - - - - - - - - - - - - - - - - - - - - - - - - - - - - - - - - - - - - - - - - - - - - - - - - - -
2 2
S o u n d - - - - - - - - - - - - - - - - - - - - - - - - - - - - - - - - - - - - - - - - - - - - - - - - - - - - - - - - - - - - - - 2 4
A u d i o - - - - - - - - - - - - - - - - - - - - - - - - - - - - - - - - - - - - - - - - - - - - - - - - - - - - - - - - - - -
2 4
B u z z e r - - - - - - - - - - - - - - - - - - - - - - - - - - - - - - - - - - - - - - - - - - - - - - - - - - - - - - - - - -
2 4
S y s t e m - - - - - - - - - - - - - - - - - - - - - - - - - - - - - - - - - - - - - - - - - - - - - - - - - - - - - - - - - - - - - - - -
2 5
D a t e / T i m e - - - - - - - - - - - - - - - - - - - - - - - - - - - - - - - - - - - - - - - - - - - - - - - - - - - - - - - 2 5
N e t w o r k - - - - - - - - - - - - - - - - - - - - - - - - - - - - - - - - - - - - - - - - - - - - - - - - - - - - - - - - - - 2 6
M a i l - - - - - - - - - - - - - - - - - - - - - - - - - - - - - - - - - - - - - - - - - - - - - - - - - - - - - - - - - - - - - 2 7
U s e r M a n a g e m e n t - - - - - - - - - - - - - - - - - - - - - - - - - - - - - - - - - - - - - - - - - - - - - - - - - - 2 9
S y s t e m M a n a g e m e n t - - - - - - - - - - - - - - - - - - - - - - - - - - - - - - - - - - - - - - - - - - - - - - - - 2 9
C o n t r o l D e v i c e - - - - - - - - - - - - - - - - - - - - - - - - - - - - - - - - - - - - - - - - - - - - - - - - - - - - - 3 2
E v e n t / S e n s o r - - - - - - - - - - - - - - - - - - - - - - - - - - - - - - - - - - - - - - - - - - - - - - - - - - - - - - - -
3 3
H D D E v e n t - - - - - - - - - - - - - - - - - - - - - - - - - - - - - - - - - - - - - - - - - - - - - - - - - - - - - - - 3 3
A l a r m I n p u t - - - - - - - - - - - - - - - - - - - - - - - - - - - - - - - - - - - - - - - - - - - - - - - - - - - - - - - 3 3
A l a r m O u t - - - - - - - - - - - - - - - - - - - - - - - - - - - - - - - - - - - - - - - - - - - - - - - - - - - - - - - - 3 4
B u z z e r O u t - - - - - - - - - - - - - - - - - - - - - - - - - - - - - - - - - - - - - - - - - - - - - - - - - - - - - - - 3 4
E - m a i l N o t i f i c a t i o n - - - - - - - - - - - - - - - - - - - - - - - - - - - - - - - - - - - - - - - - - - - - - - - - - - 3 5
D i s k M a n a g e - - - - - - - - - - - - - - - - - - - - - - - - - - - - - - - - - - - - - - - - - - - - - - - - - - - - - - - - - -
3 6

R E C O R D M E N U - - - - - - - - - - - - - - - - - - - - - - - - - - - - - - - - - - - - - - - - - - - - - - - - - - - - - - - - - - - - 3 7
R e c o r d i n g o p e r a t i o n s - - - - - - - - - - - - - - - - - - - - - - - - - - - - - - - - - - - - - - - - - - - - - - - - - - -
3 7
S i m p l e r e c o r d i n g - - - - - - - - - - - - - - - - - - - - - - - - - - - - - - - - - - - - - - - - - - - - - - - - - - - - - - - - - - - -
3 8
A d v a n c e d r e c o r d i n g - - - - - - - - - - - - - - - - - - - - - - - - - - - - - - - - - - - - - - - - - - - - - - - - - - - - - - - - - - - -
3 9
M a n u a l r e c o r d i n g - - - - - - - - - - - - - - - - - - - - - - - - - - - - - - - - - - - - - - - - - - - - - - - - - - - - - - - - - - - -
4 1
S E A R C H - - - - - - - - - - - - - - - - - - - - - - - - - - - - - - - - - - - - - - - - - - - - - - - - - - - - - - - - - - - - - - - - - 4 2
T i m e S e a r c h - - - - - - - - - - - - - - - - - - - - - - - - - - - - - - - - - - - - - - - - - - - - - - - - - - - - - - - - - -
4 2
E v e n t S e a r c h - - - - - - - - - - - - - - - - - - - - - - - - - - - - - - - - - - - - - - - - - - - - - - - - - - - - - - - - -
4 4
A R C H I V I N G - - - - - - - - - - - - - - - - - - - - - - - - - - - - - - - - - - - - - - - - - - - - - - - - - - - - - - - - - - - - - - - - 4 5
R E M O T E C L I E N T S E T U P - - - - - - - - - - - - - - - - - - - - - - - - - - - - - - - - - - - - - - - - - - - - - - - - - - - - - - - - 4 8
C l i e n t s o f t w a r e i n s t a l l a t i o n - - - - - - - - - - - - - - - - - - - - - - - - - - - - - - - - - - - - - - - - - - - - - - - -
4 8
C l i e n t s o f t w a r e o r g a n i z a t i o n - - - - - - - - - - - - - - - - - - - - - - - - - - - - - - - - - - - - - - - - - - - - - -
5 0
E x p l a n a t i o n o f F u n c t i o n k e y s - - - - - - - - - - - - - - - - - - - - - - - - - - - - - - - - - - - - - - - - 5 1
C r e a t e a c o n n e c t g r o u p - - - - - - - - - - - - - - - - - - - - - - - - - - - - - - - - - - - - - - - - - - - - - - - - -
5 2
D e t a i l S e t u p - - - - - - - - - - - - - - - - - - - - - - - - - - - - - - - - - - - - - - - - - - - - - - - - - - - - - - - - - -
5 3
A d d i t i o n a l C o n f i g u r a t i o n - - - - - - - - - - - - - - - - - - - - - - - - - - - - - - - - - - - - - - - - - - - - - - - - -
5 4
R E M O T E S E A R C H - - - - - - - - - - - - - - - - - - - - - - - - - - - - - - - - - - - - - - - - - - - - - - - - - - - - - - - - - 5 5
E x p l a n a t i o n o f f u n c t i o n k e y s - - - - - - - - - - - - - - - - - - - - - - - - - - - - - - - - - - - - - - - - 5 6
Q u i c k S e a r c h - - - - - - - - - - - - - - - - - - - - - - - - - - - - - - - - - - - - - - - - - - - - - - - - - - - - - - - - - 5 7
A r c h i v i n g - - - - - - - - - - - - - - - - - - - - - - - - - - - - - - - - - - - - - - - - - - - - - - - - - - - - - - - - - 5 8
S t i l l S h o t - - - - - - - - - - - - - - - - - - - - - - - - - - - - - - - - - - - - - - - - - - - - - - - - - - - - - - - - - 5 8
L o g V i e w e r - - - - - - - - - - - - - - - - - - - - - - - - - - - - - - - - - - - - - - - - - - - - - - - - - - - - - - - 5 9
B a c k u p P l a y e r - - - - - - - - - - - - - - - - - - - - - - - - - - - - - - - - - - - - - - - - - - - - - - - - - - - - - 5 9
P r i n t - - - - - - - - - - - - - - - - - - - - - - - - - - - - - - - - - - - - - - - - - - - - - - - - - - - - - - - - - - - - 6 0
E v e n t V i e w e r - - - - - - - - - - - - - - - - - - - - - - - - - - - - - - - - - - - - - - - - - - - - - - - - - - - - - - 6 0
R e m o t e R e c o r d i n g S e t u p - - - - - - - - - - - - - - - - - - - - - - - - - - - - - - - - - - - - - - - - - - - - - - - - 6 1
R e c o r d - - - - - - - - - - - - - - - - - - - - - - - - - - - - - - - - - - - - - - - - - - - - - - - - - - - - - - - - - - 6 1
C a m e r a - - - - - - - - - - - - - - - - - - - - - - - - - - - - - - - - - - - - - - - - - - - - - - - - - - - - - - - - - - 6 2
S o u n d - - - - - - - - - - - - - - - - - - - - - - - - - - - - - - - - - - - - - - - - - - - - - - - - - - - - - - - - - - - 6 2
E v e n t / S e n s o r - - - - - - - - - - - - - - - - - - - - - - - - - - - - - - - - - - - - - - - - - - - - - - - - - - - - - 6 3
S y s t e m - - - - - - - - - - - - - - - - - - - - - - - - - - - - - - - - - - - - - - - - - - - - - - - - - - - - - - - - - - 6 4
W E B C l i e n t S e t u p - - - - - - - - - - - - - - - - - - - - - - - - - - - - - - - - - - - - - - - - - - - - - - - - - - - - - - 6 5

Thank you for purchasing the GANZ DIGIMASTER.
This DVR is produced using the most advanced CBC technology and its quality is guaranteed by strict
reliability and compatibility testing.
This manual provides necessary information for the correct use of this product and also contains some
useful tips.
Please read this manual thoroughly before using your DVR in order to prevent possible malfunctions
due to any mishandling.
This manual applies to the DR4N-Lite.
This manual describes the external features of GANZ DIGIMASTER, part names, correct connection
methods for supported domes or pan/tilt receivers, control devices, peripheral devices and the system
setup instructions. It is important to note here that some features, figures, pictures and references can
only be applied to just one model.
• CBC cannot be held responsible if the DVR is damaged due to the use of non-compatible devices
with this product. If you have any doubts, please check.
• CBC cannot be held responsible if the DVR is damaged due to the product being disassembled or
modified by the user.
• This product is qualified for both domestic and industrial use. This product is qualified under
the Radio Equipment Requirements of Korea and acquired international certification including CE (Europe)
and FCC (USA).
This manual is written based on the 4 Channel DVR. The contents may change
according to the number of Channels and the type of exterior equipment.
All copyrights of this manual are reserved by CBC Co., Ltd.
Copyright© 2009
Any reproduction or republishing of this manual for commercial purposes is prohibited.
It is prohibited to transfer this manual via online media such as, but not limited to, the Internet.
It is also prohibited to post, distribute or translate this manual without permission from CBC.
CBC is not held responsible if the DVR is damaged as a result of improper handling by a user unaware
of how to operate this product or who did not consult this manual before attempting to operate the product.
CBC reserves the right to change the contents of this manual without notice.
CBC reserves all copyrights of registered trademarks in this manual.
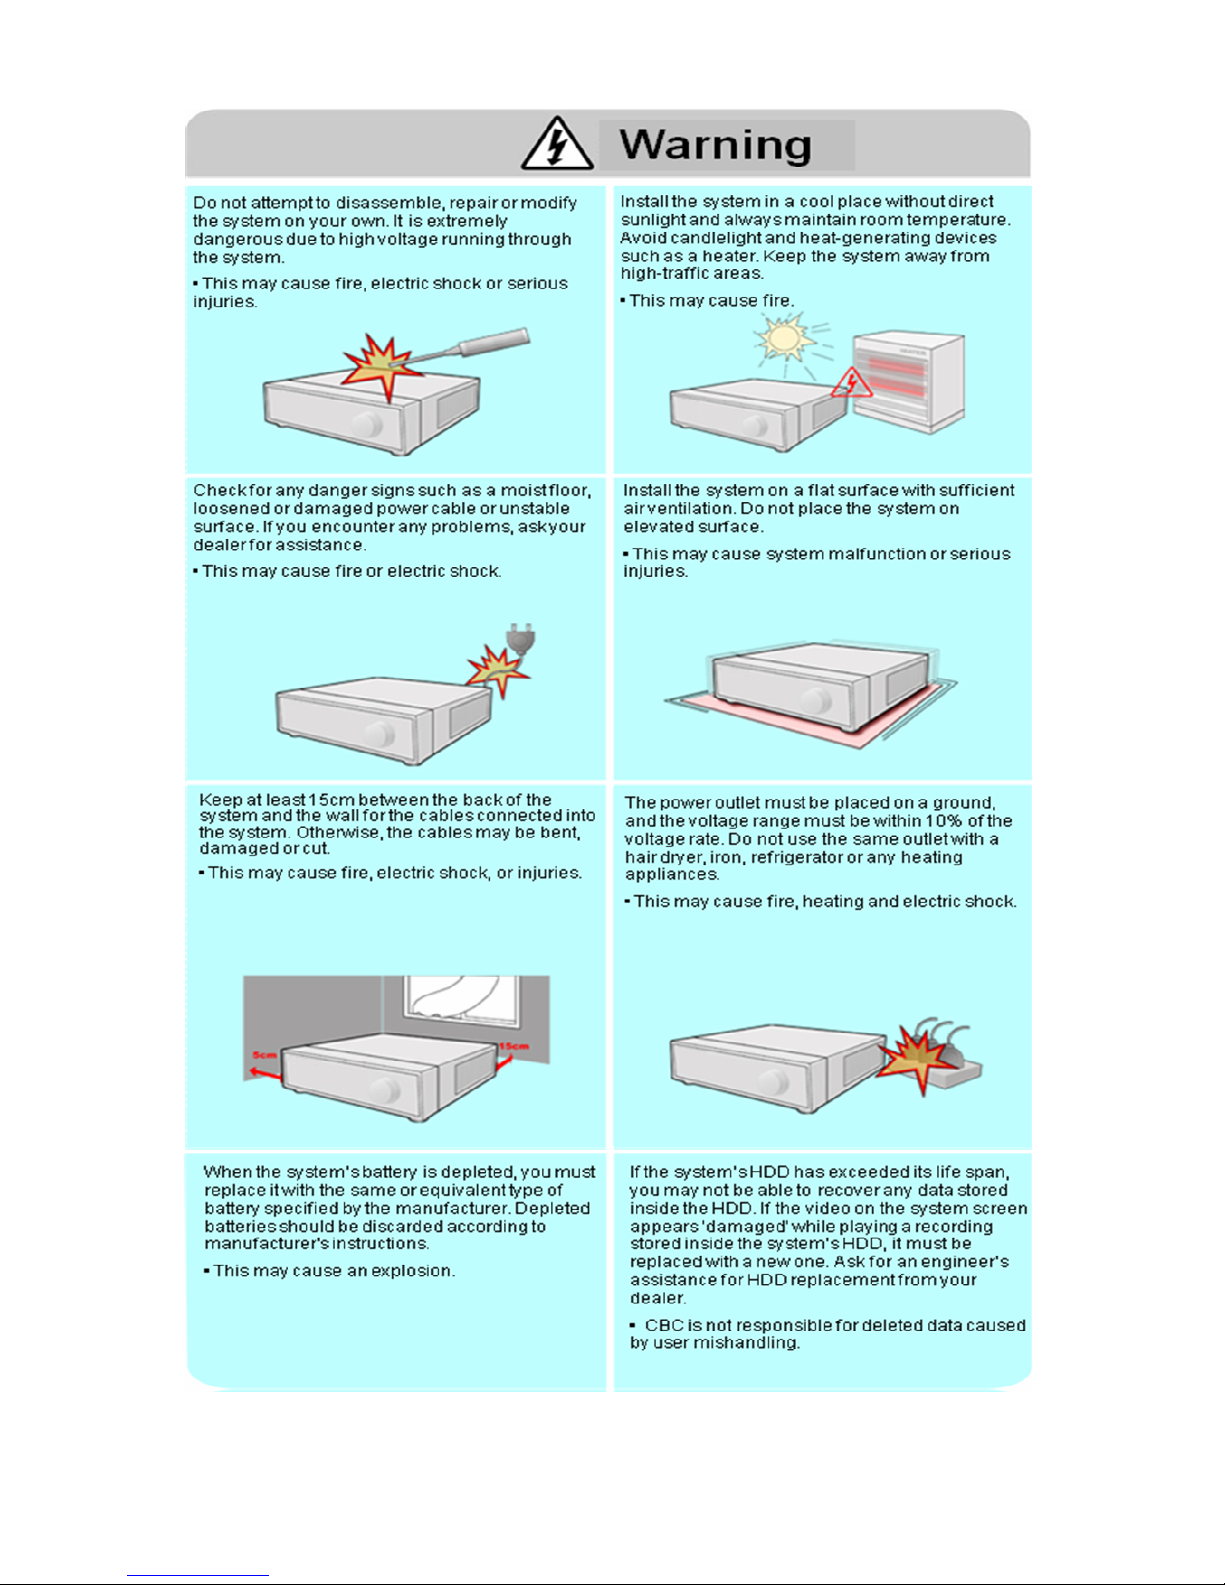
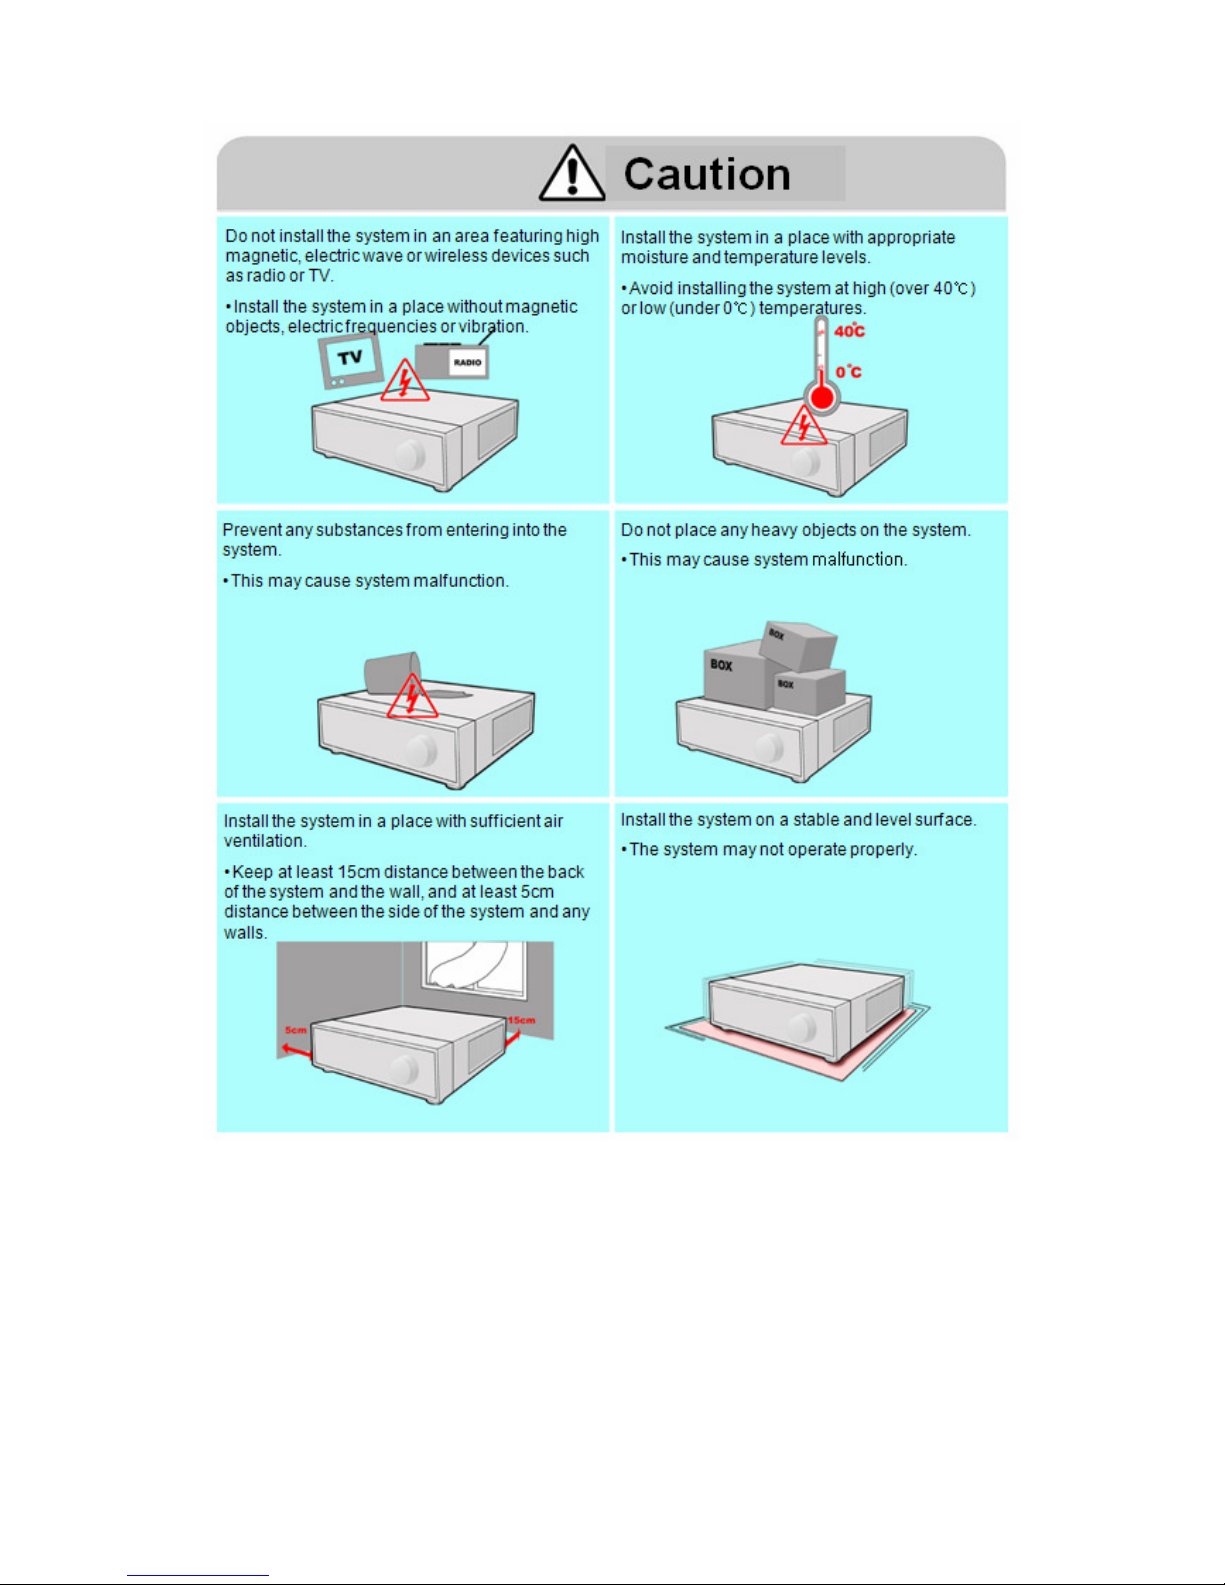
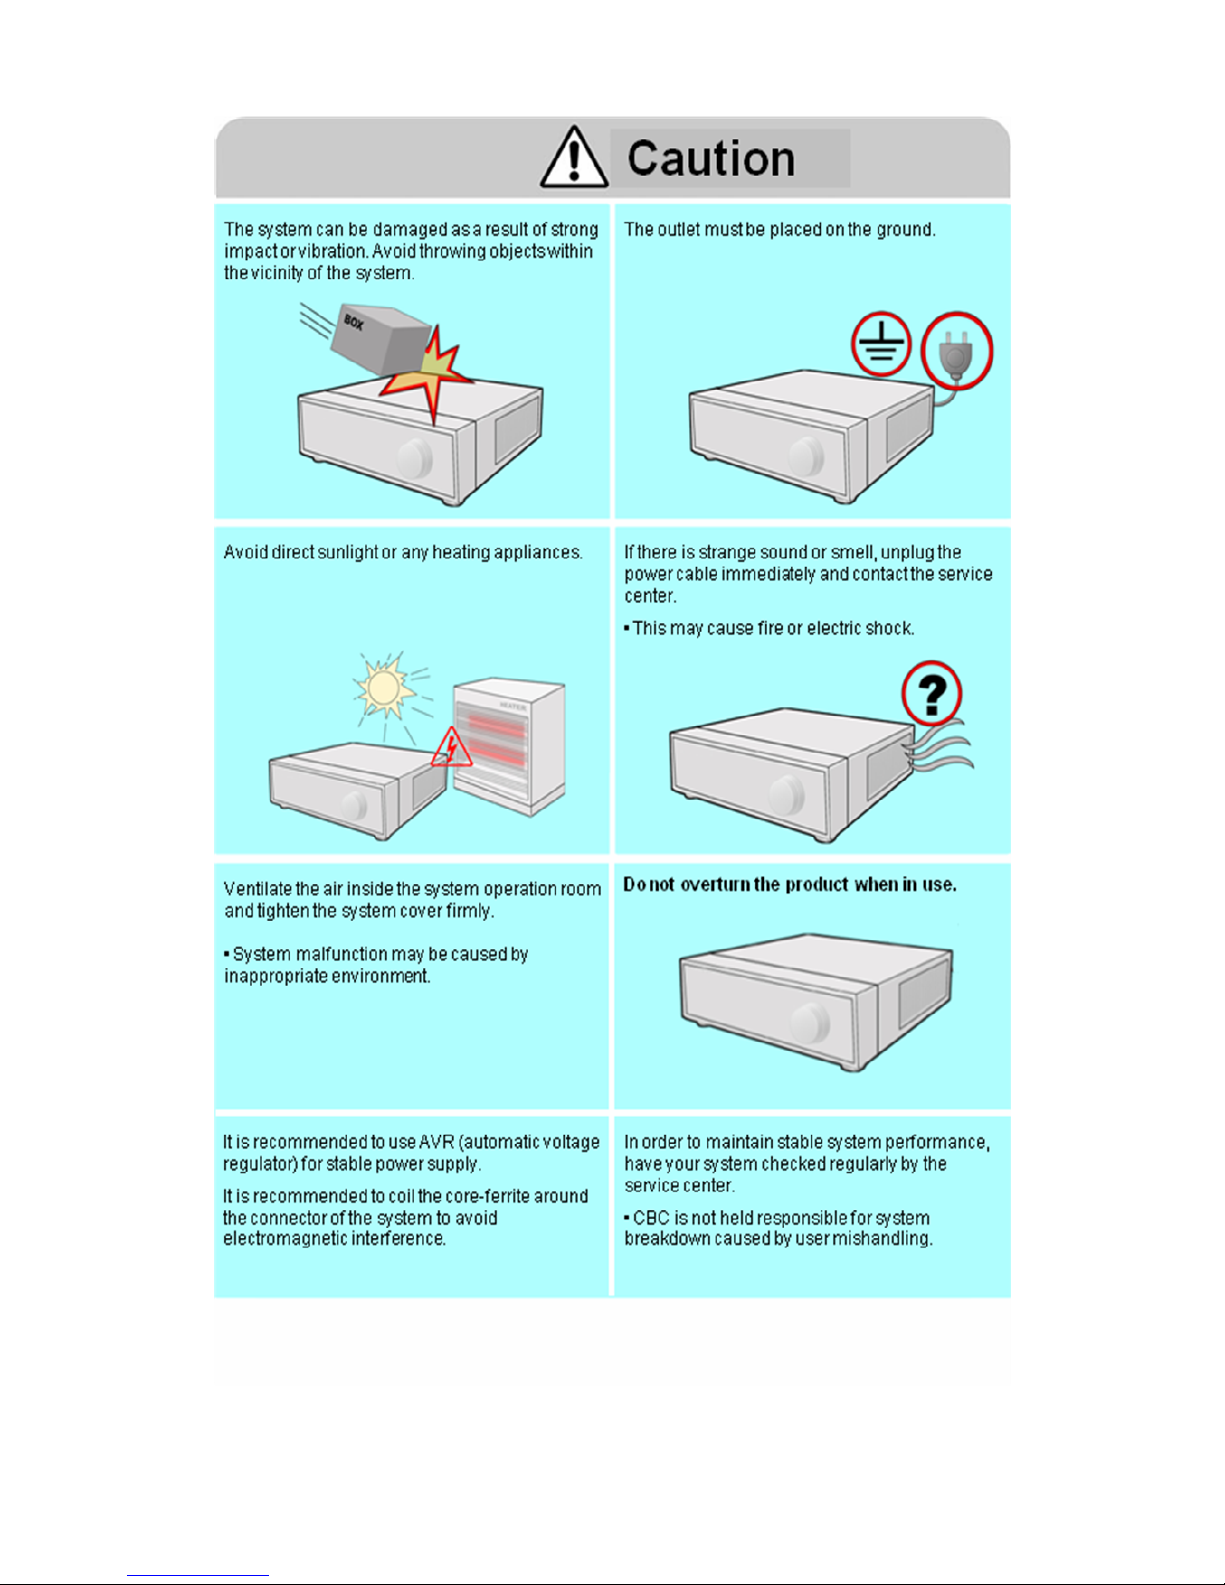
Please be aware of the following precautions before installing the DVR.
Avoid positioning the GANZ DIGIMASTER in any place where the unit may come into contact
with moisture, dust, or soot.
• Avoid placing in direct sunlight or near heating appliances.
• Keep the product away from electric shock or magnetic substances.
• Avoid temperature extremes (recommended operation temperature is between 0°C and ~40°C).
• Do not place any conductive material through the ventilation grills.
• Keep the system turned off before installation.
• Ensure that enough space is left for cable connections.
• Place the system on a solid surface with sufficient air ventilation. Avoid any surface that vibrates.
• Placing the system near electronic devices such as radio or TV may cause the product to malfunction.
• Do not disassemble the product without seeking assistance from the supplier.
• Do not place any heavy object on the system.
• Please keep cleaning the fan filter of front panel.

The following are warnings and cautions to ensure user safety and prevent property damage. Please read the information
below thoroughly.

Important Safety Instructions
1) Read these instructions.
2) Keep these instructions.
3) Read all warnings.
4) Follow all instructions.
5) Do not use this apparatus near water.
6) Clean only with a dry cloth.
7) Do not block any of the ventilation openings. Install in accordance with the manufacturer's
instructions.
8) Do not install near any heat sources such as radiators, heat registers, stoves, or other apparatus
that produce heat.
9) Do not defeat the safety purpose of the polarized or grounding type plug. A polarized plug has
two blades with one wider than the other.
A grounding type plug has two blades and a third grounding prong.
The wide blade or the third prong is provided for your safety.
When the provided plug does not fit into your outlet, consult an electrician for replacement
of the obsolete outlet.
10) Protect the power cord from being walked on or pinched particularly at plugs, convenience
receptacles, and the point where they exit from the apparatus.
11) Only use the attachments/accessories specified by the manufacturer.
12) Use only with a cart, stand, tripod, bracket, or table specified by the manufacturer, or sold
with the apparatus.
When a cart is used, use caution when moving the cart/apparatus combination to avoid injury
from tip-over.
13) Unplug this apparatus during lightning storms or when unused for long periods of time.
14) Refer all servicing to qualified service personnel. Servicing is required when the apparatus
has been damaged in any way, such as power supply cord or plug is damaged, liquid has
been spilled or objects have fallen into the apparatus, the apparatus has been exposed to
rain or moisture, does not operate normally, or has been dropped.
15) This equipment is indoor use and all the communication wirings are limited to inside of the
building.
16) The socket-outlet shall be installed near the equipment and shall be easily accessible.
17) CAUTION
RISK OF EXPLOSION IF BATTERY IS REPLACED BY AN INCORRECT TYPE.
DISPOSE OF USED BATTERIES ACCORDING TO THE INSTRUCTIONS.
# Operation Max temperature : 40℃
# USB Load condition: USB Ports( 5 Vdc, Max. 500 mA)

Specifications & Organization
1. Specifications
Video standard
PAL/NTSC
Audio
2-way Audio conference
Monitor display
Real time:25 Fps (PAL), 30Fps(NTSC) per camera
Covert camera operation
Programmable
Event/Log search
No limitation for user login/out, config changes, remote access,
connects/disconnects
Record Scheduling
Daily, Weekly adjust specific Hr per channel
Remote Access
TCP/IP, View, Search, Recording & Control by Client Program or I.E.
Playback
Up to 4 Channel simultaneous playback
Pre/Post alarm recording
5 seconds(Pre), 3 minutes(Post), programmable per camera
Activity detection
11X8, Sensitivity levels: 10
Video inputs
4CH BNC
Monitor outputs
1 VGA(1024X768), 1 Composite(BNC)
Audio inputs
4 x line-in, RCA socket
Audio output
1 x line-out, RCA socket
Resolution
352x240,704x240,704x480(NTSC), 352x288,704x288,704x576(PAL)
Compression standard
MPEG-4
Recording speed
352x240 : 120/100 (NTSC/PAL) , 704x240 : 60/50 (NTSC/PAL)
704x480 : 30/25 (NTSC/PAL)
Image size
3-5 Kbyte (352x240, 352x288), 5-10 Kbyte (704x240, 704x288)
6-16 Kbyte (704x480, 704x576)
Hard disk capacity
2 X HDD, No limit in capacity
Secondary Storage
USB default (USB memory stick, USB HDD, ODD)
Alarm inputs
4 x TTL, programmable as NC/NO
Alarm outputs
1 relay out
Back-up file formats
AVI
Network Speed Control
8 levels
OSD languages
English, Spanish, Dutch, Portuguese, French, Russian, Japanese, Czech ,
German, Italian
Ethernet interface
10/100-Base-TX, RJ-45
Remote Function
Live View, Live Recording, Search, Set-up, Archiving
PTZ Control
RS-485 interface
Supply voltage
100VAC-240VAC, 60/50Hz
2. Product Contents List
Please check if all the product contents are present after opening the package.
DR4N-Lite
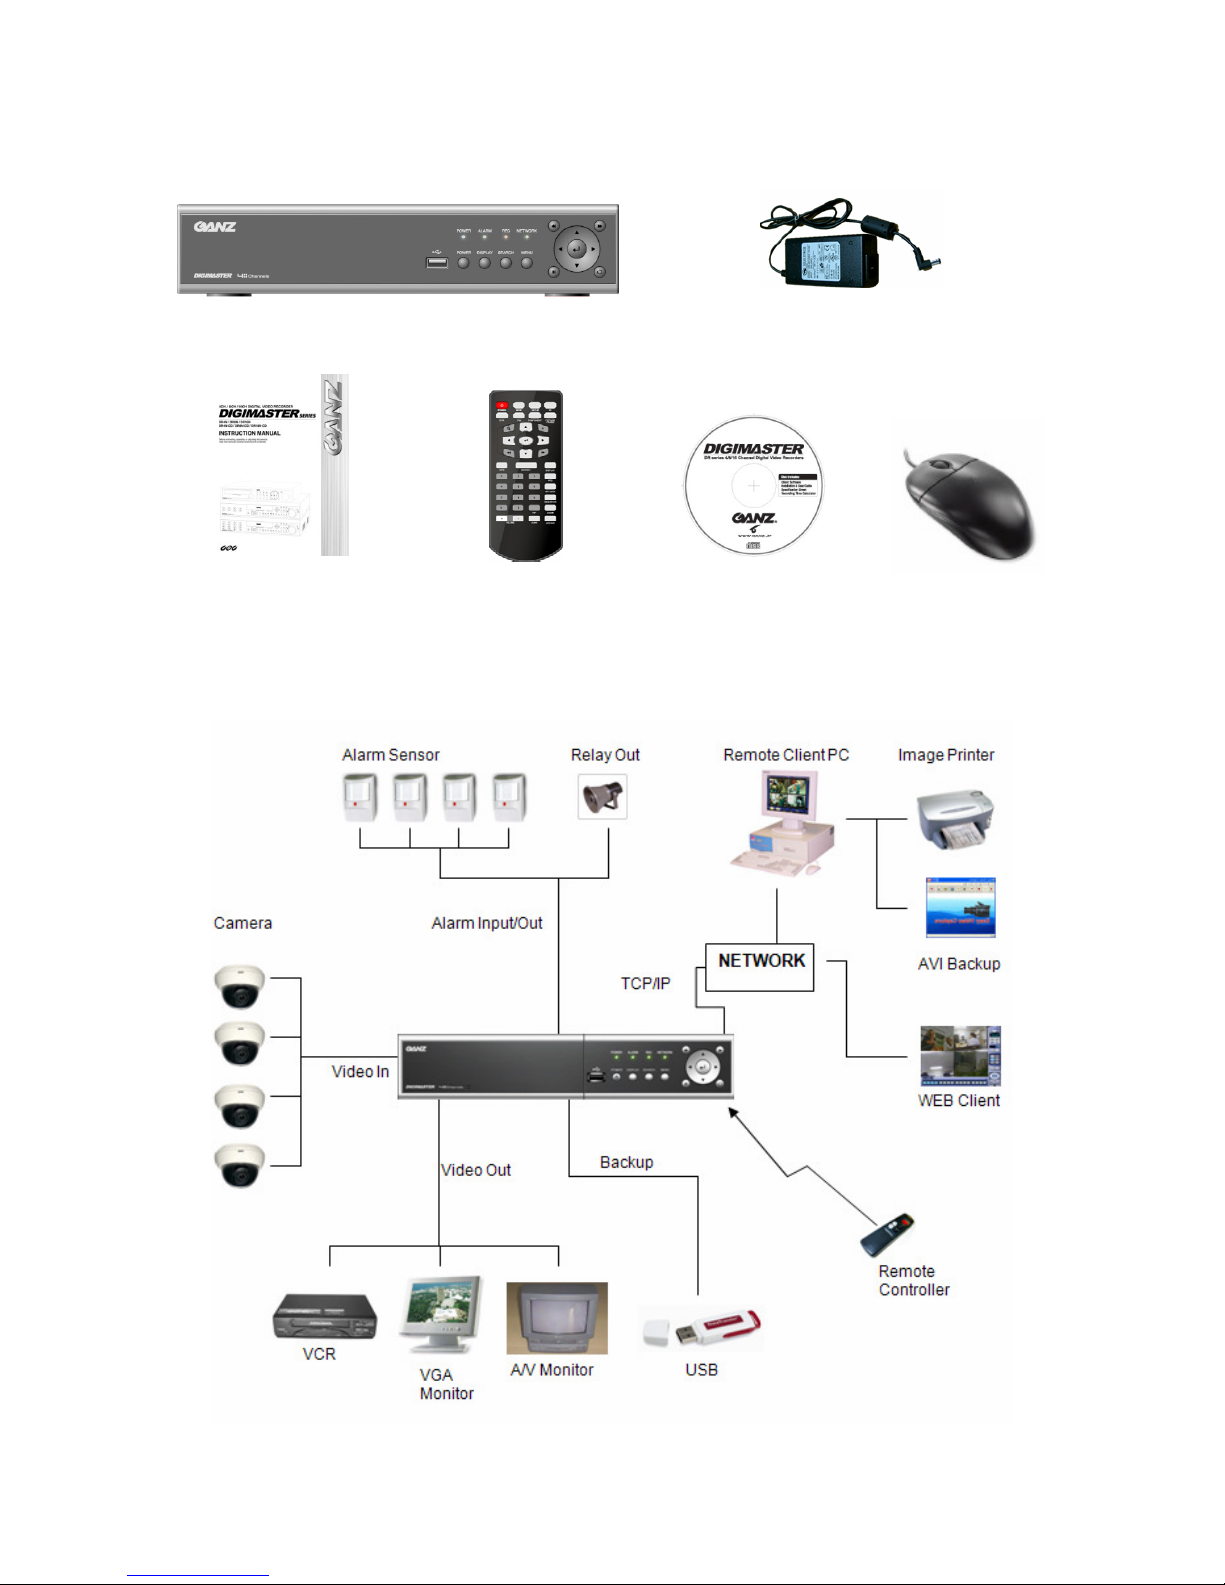
3. System Organization
12V Adaptor
(With ac cord)
Instruction Manual Remote Controller
(With Battery)
Remote Agent
Installation CD
PS2 Mouse
Product Description
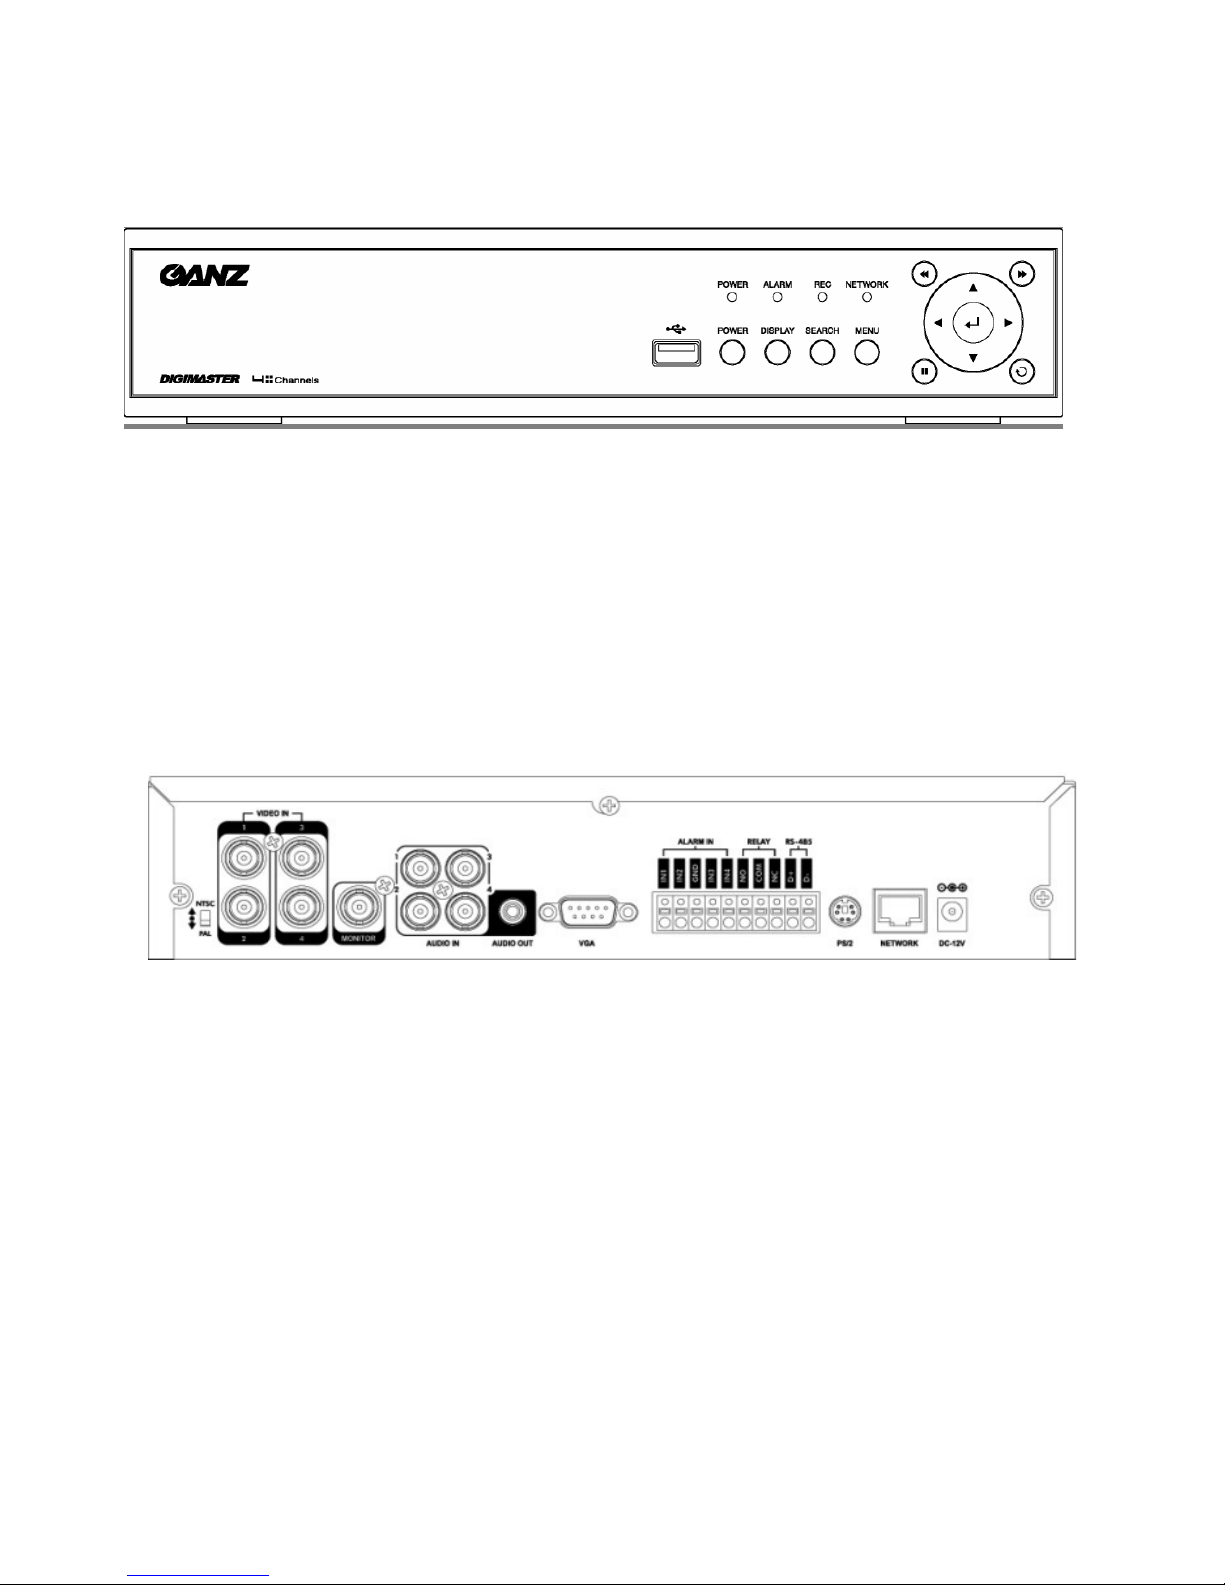
1. Front Panel
- USB PORT: Port for USB devices, for mouse and backup.
- POWER: Turn on power of system.
- DISPLAY: Select display mode between split and full mode.
- SEARCH: Enter to search menu
- MENU: Enter to system configuration menu.
- NAVIGATION KEY: use for navigating on menu or control PTZ.
2. Rear Panel
- NTSC/PAL Switch
- Video Input: Connect the coaxial cables from the video sources to the BNC video in Connectors
- Monitor Out: Connect AV monitor for main system OSD
- Audio Input/Output: Connect Mic to Input / Connect Speaker to Output
- VGA Output: Provide for RGB monitor output
- Alarm in: Connect Sensor devices
- Relay: Connect Relay device for
- RS-485: Connect PTZ camera or Keyboard controller.
- PS2: Connect PS/2 type mouse
- Network: Connect RJ-45 for local network or Internet
- DC12V: Connect the Power Source from Power Adapter.
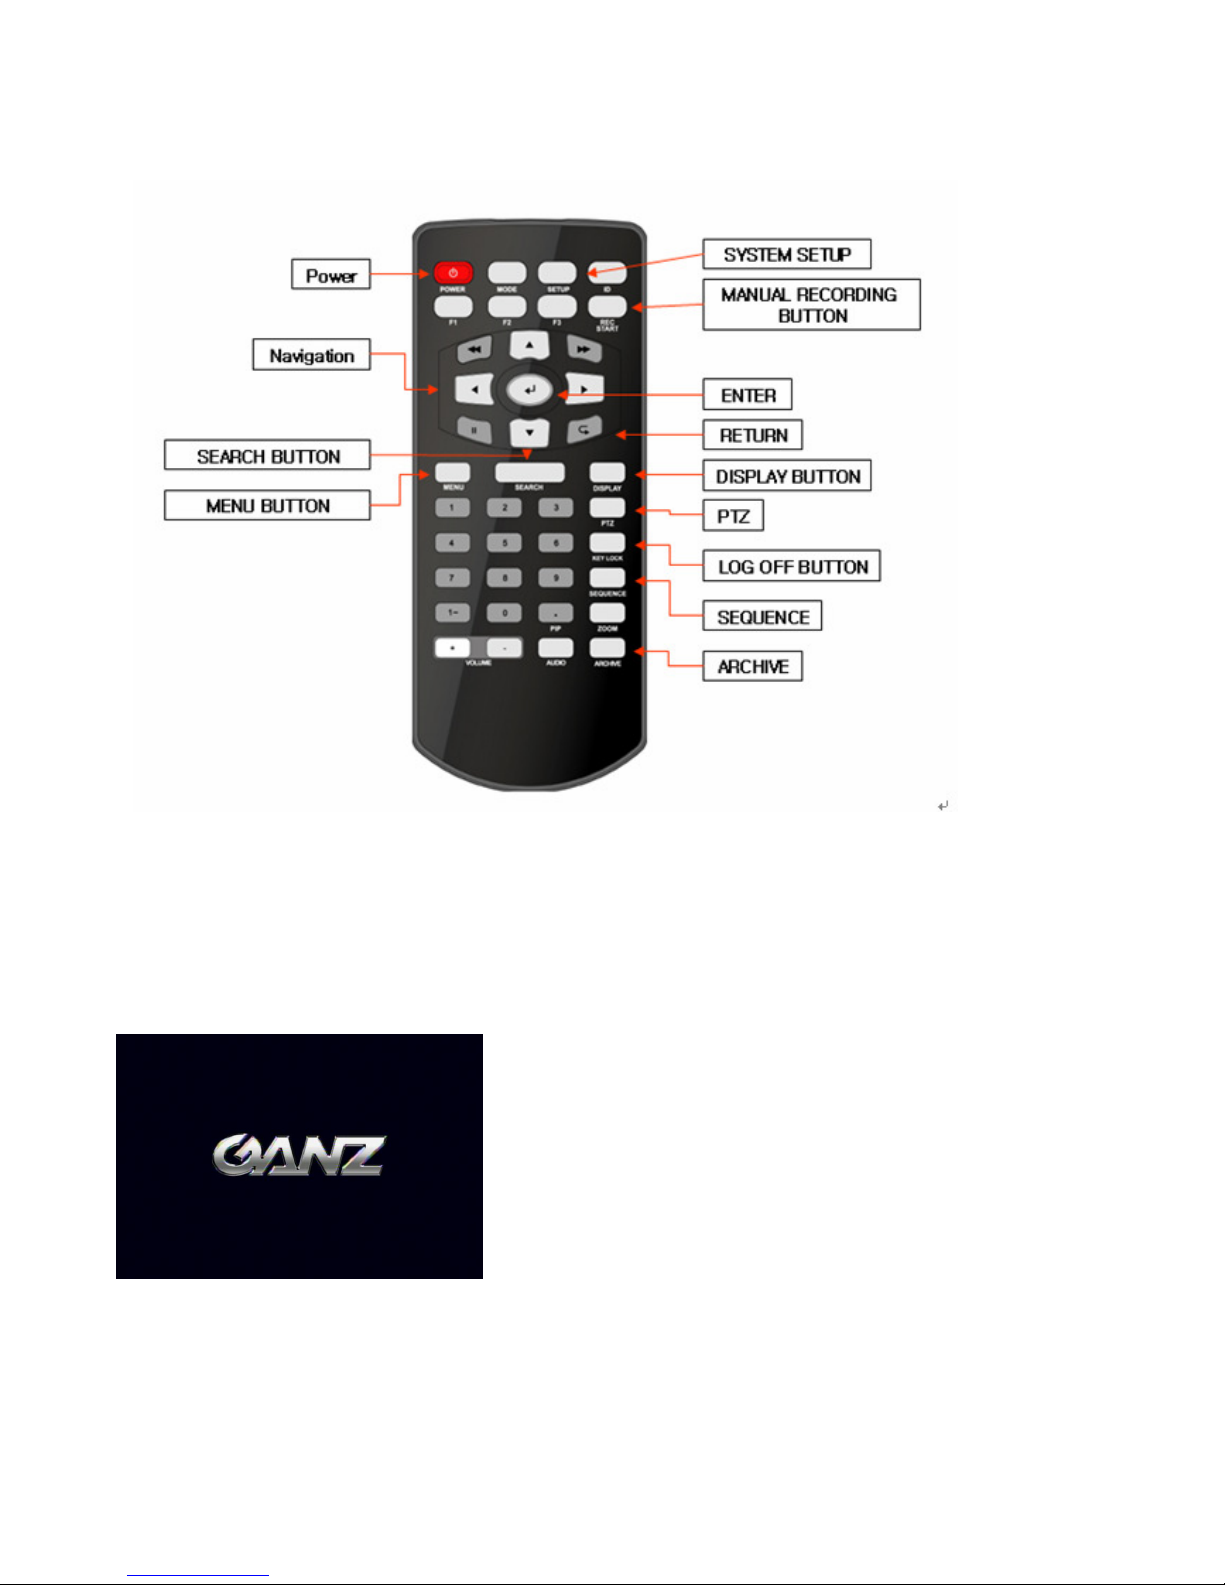
SYSTEM CONFIGURE – Remote Controller
CONNECT & POWER ON
• Connect up to 4 CAMERA INPUTS as necessary.
• Connect one or more monitors to the DVR using the COMPOSITE, VGA connections
• Connect power to the DVR. The DVR checks for proper power connection and emits one beep.
Press the POWER BUTTON on the front panel of the DVR to begin operation.

After startup diagnostics are complete, the operator must
logon to the system. The default user name is ‘ADMIN’.
the default password of ‘1234’ and press the ENTER
button.
Double click on the Password tap then the Virtual Keyboard will be
appeared. Then, click the password and click the OK button.
The DVR begins normal operation and shows the
default display of all 4 channels.
The status bar at the bottom of the screen shows
current time and date and percentage of hard drive used.
A title for each channel is shown.
The red square and letter ‘C’ in the top right of each channel
display shows that the channel is recording in Timer / Schedule
mode.
LIVE DISPLAY
DIVISION SCREEN
2 different display modes are supported by the 4 channel DVR.
By repeatedly pressing the DISPLAY button, the operator can choose
between single screen, 4 screen and basic sequence modes.
Press the Enter button. Then red square on camera title will be shown.
If pressing the Enter button again by moving the navigation key,
user can select the single display channel.
Click the right mouse button on the Live
Display screen and click the SEQUENCE
menu.
All the display modes are static with the exception of the sequence mode. In this mode, the sequence
symbol ( ) is displayed and each channel is shown in full screen for a set period of time
before switching to the next channel.
The sequence runs indefinitely until a different display mode is chosen.
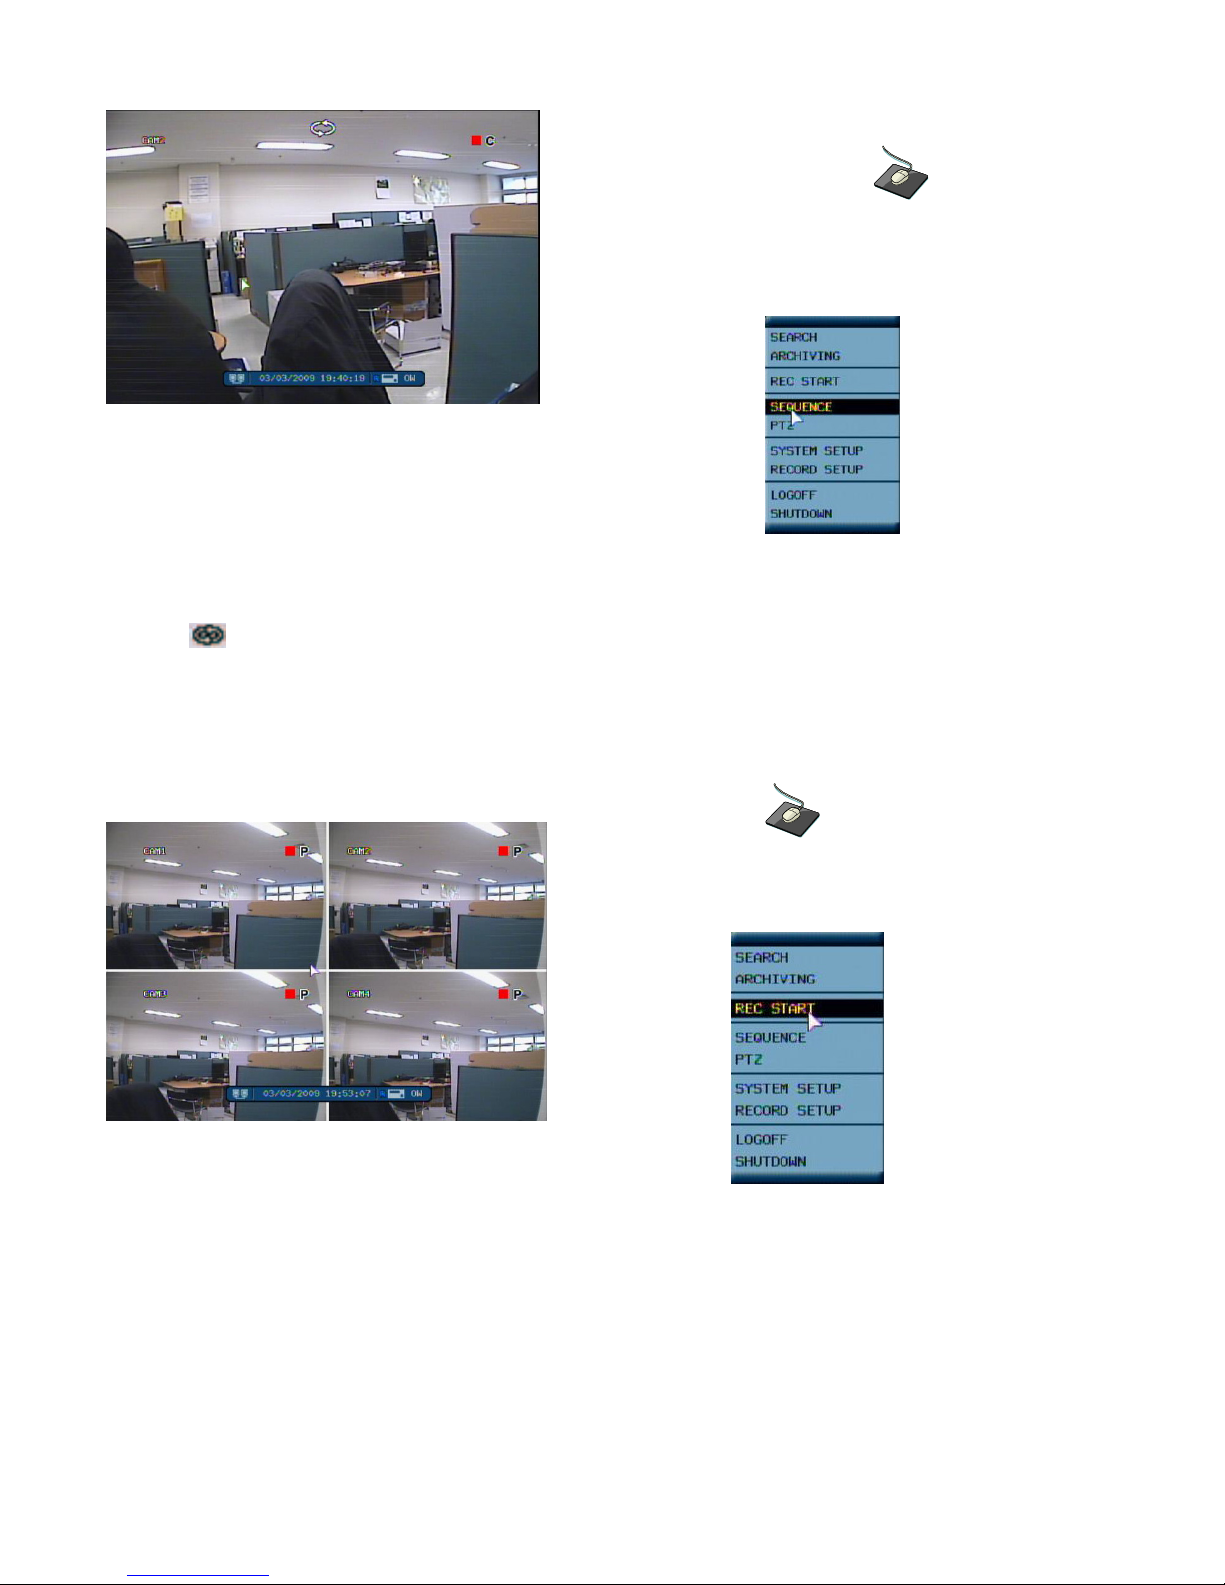
Manual Recording(Panic Recording, REC START)
Click the right mouse button on the Live Display
screen and click the REC START menu
Manual recording will override all standard recording settings to provide, by default, continuous recording on
all channels.
If selecting the REC START, The top right of the display shows a red square and letter ‘P’ only to indicate that the DVR is
in manual recording mode.
Select the REC STOP again to return to normal recording mode.

Key Lock Function
Click the right mouse button on the Live Display
screen and click the LOGOFF menu.
An operator with ADMIN rights can choose to lock the DVR front panel to prevent any unauthorized control.
Select the KEYLOCK button and YES.
PTZ Camera Control
Click the right mouse button on the Live Display
screen and click the PTZ menu.
Speed domes and other telemetry devices connected to the DVR, can be fully controlled from the front panel.
In live display mode, press the PTZ button. To select a camera to control, use the CHANNEL
SELECTION buttons.
Pan,Tilt and Zoom movement is controlled by the CURSOR KEYS
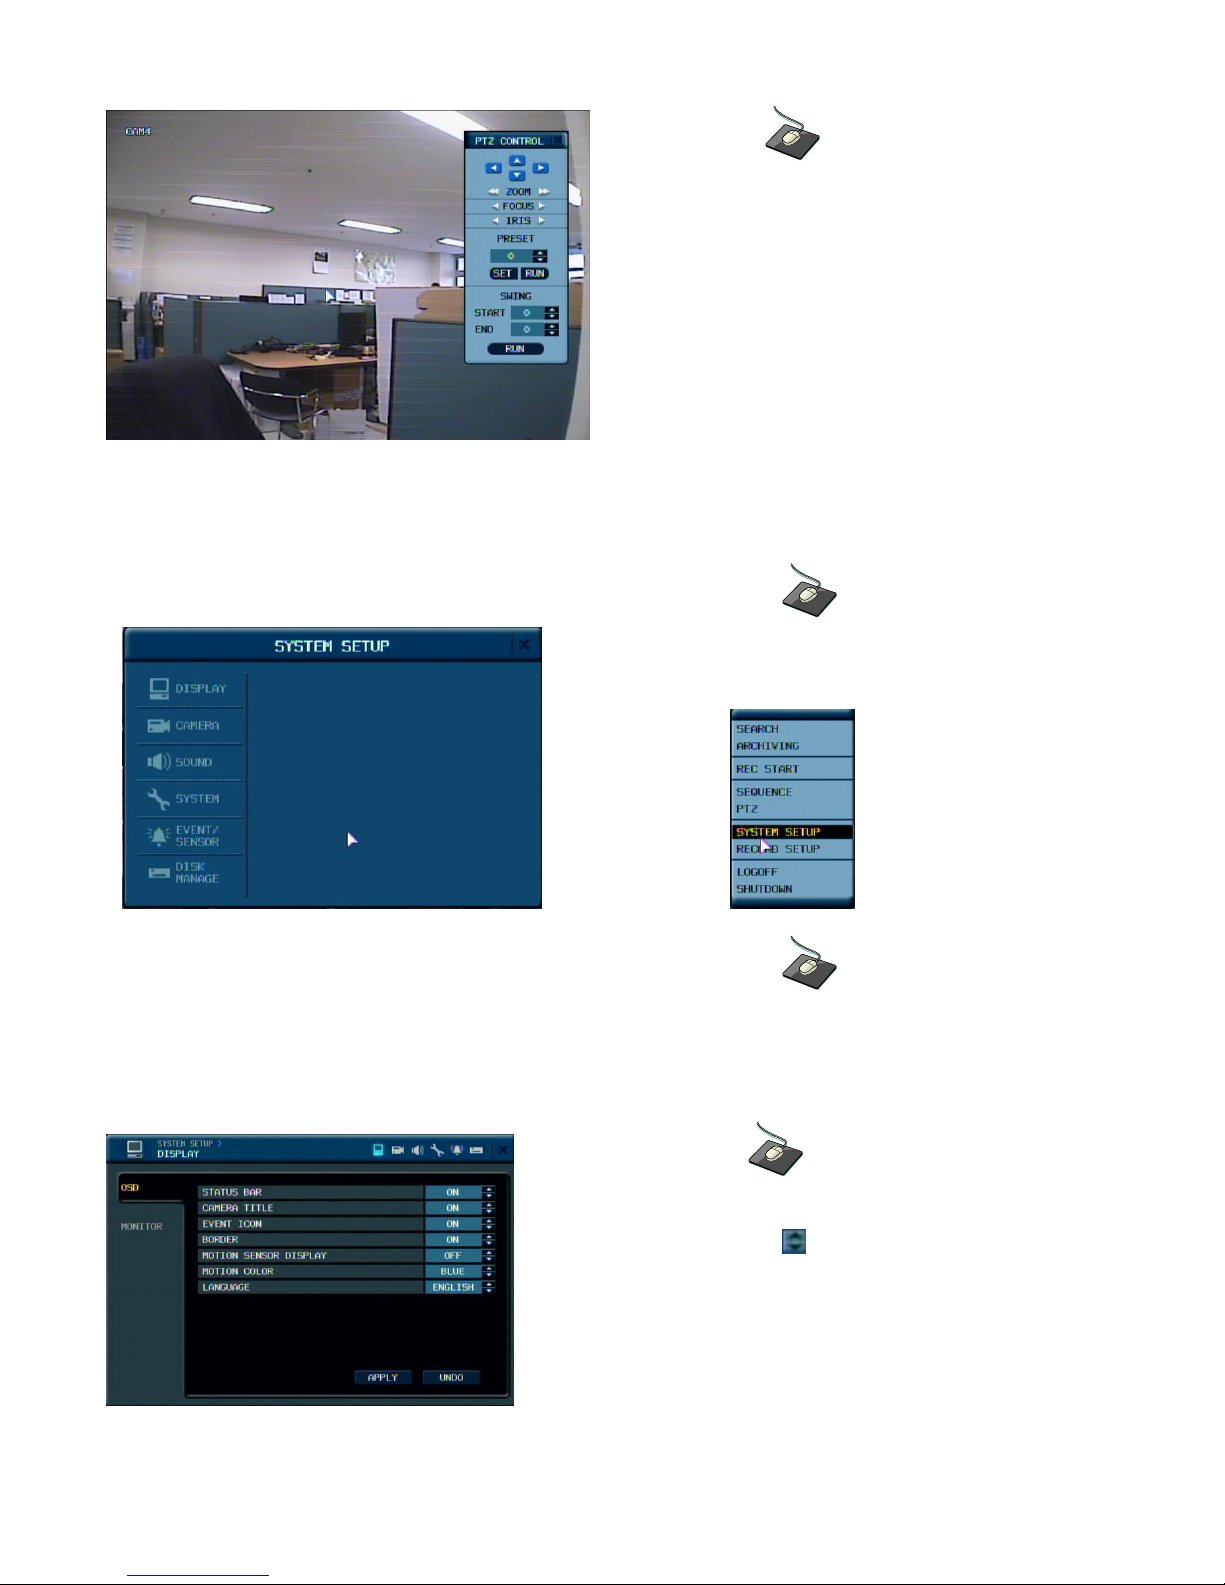
Click the PRESET & SWING menu.
All menus can be controlled by navigation key and pressing the mouse click.
SYSTEM SETUP
Click the right mouse button on the Live Display screen
and click the SETUP menu.
DISPLAY
: To setup the various display options, highlight DISPLAY and press ENTER.
DISPLAY - OSD
Click the OSD menu and click the ON/OFF menu.
Then, click the button for ON/OFF.
STATUS BAR : Turns the status bar at the bottom of the live display ON or OFF.
CAMERA TITLE : Determines whether the camera title is displayed.
EVENT ICON : Determines whether the DVR recording status is shown at the top right of each channel
display window.
BORDER : Determines whether there is a border around each channel in multi screen display mode.
MOTION SENSOR DISPLAY : If false motion recording is occurring, the operator can use this feature to
determine and rectify the cause in realtime.
OFF – normal display mode.
ACTIVE – areas where motion is detected are highlighted with colored blocks.
INACTIVE – areas where no motion is detected are highlighted with colored blocks.
MOTION COLOR: The color of the blocks displayed when MOTION SENSOR DISPLAY is set to
ACTIVE or INACTIVE.
LANGUAGE: To change the Language, after selecting the language, please press the APPLY button, Then system will
reboot and language will be changed.
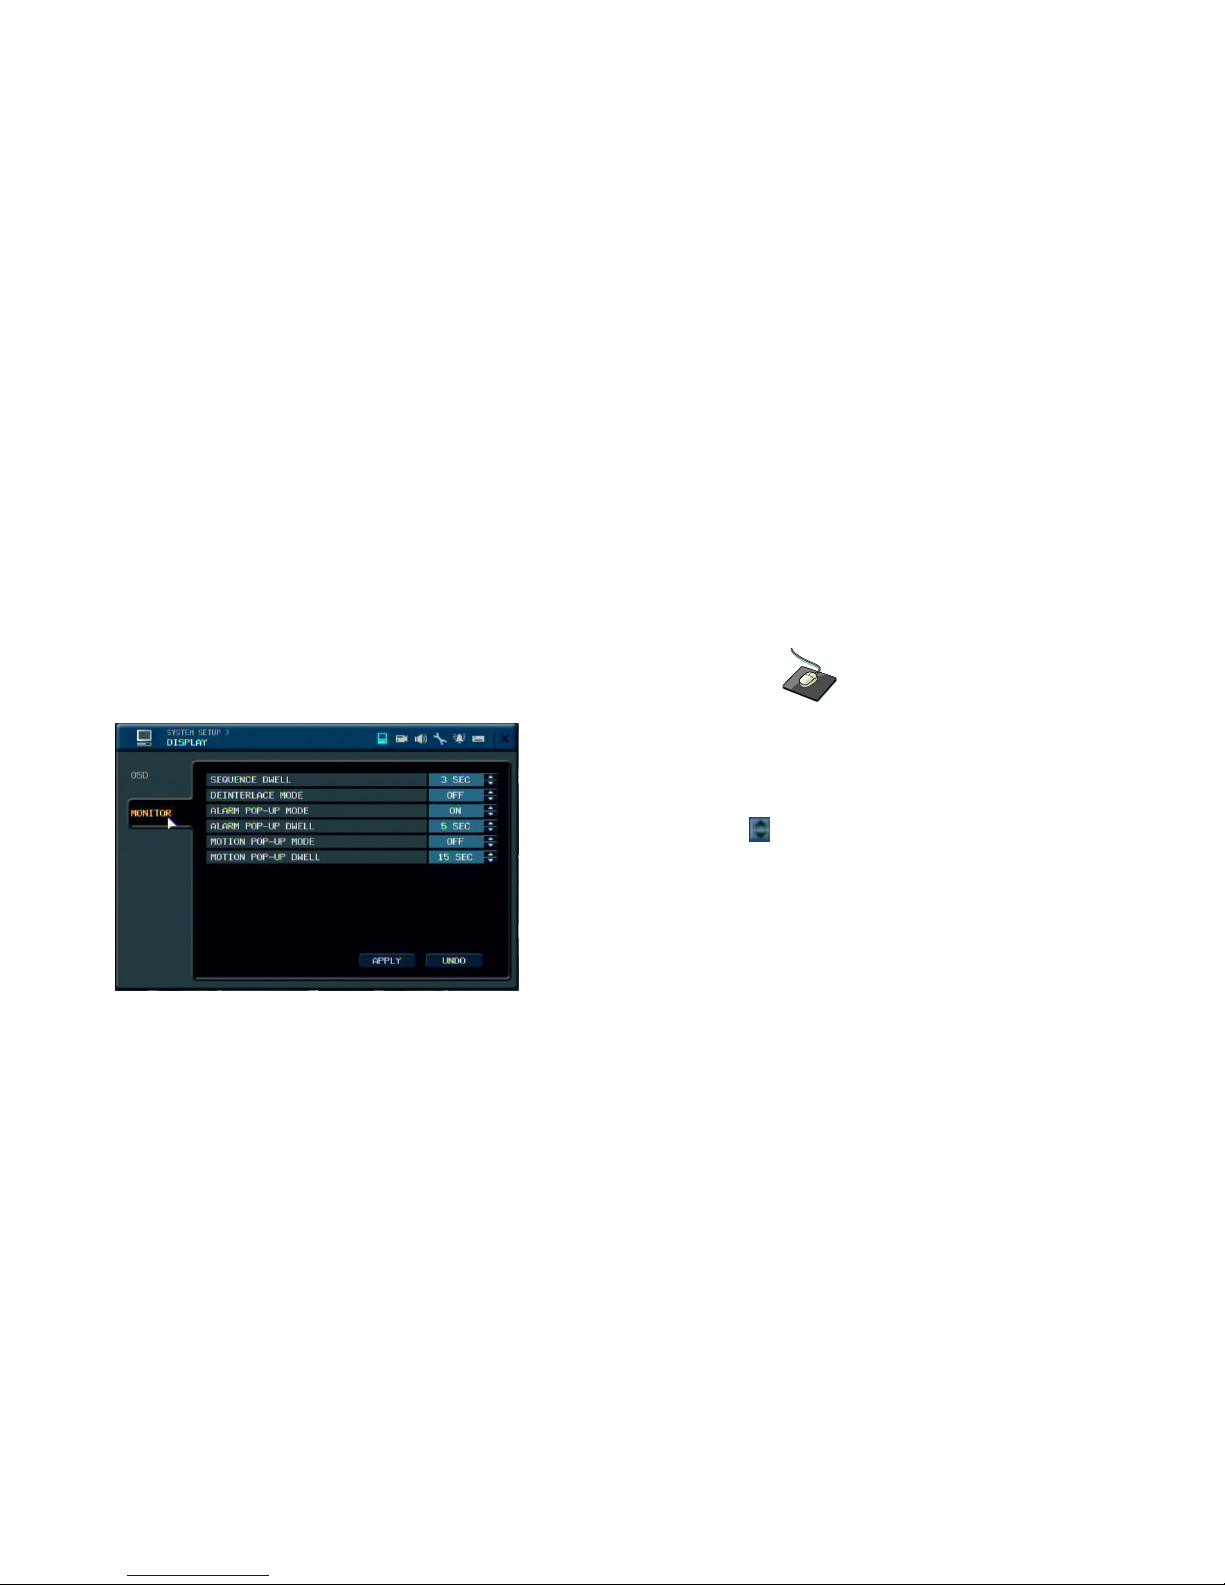
DISPLAY - MONITOR
Click the MONITOR menu and click the ON/OFF menu.
Then, click the button for ON/OFF.
SEQUENCE DWELL : The time that each screen is displayed in a sequence operation.
DE-INTERLACE MODE : When recording any channels in D1 resolution (704 x 480 / 704 x 576) this should be set to
ON to prevent judder during playback.
ALARM POP-UP MODE : When set to ON, an alarm input will cause the associated channel to display
full screen.
ALARM POP-UP DWELL : Determines how long the full screen popup is displayed after an alarm input.
If the alarm condition continues, the popup screen is displayed constantly.
MOTION POP-UP MODE : When set to ON, motion detection will cause the associated channel to display
full screen.
MOTION POP-UP DWELL : Determines how long the full screen popup is displayed after motion detection.
If motion continues, the popup screen is displayed constantly.
To change any of these settings, highlight MONITOR and press ENTER to select.

Use the CURSOR KEYS to navigate to the option required. Press ENTER to select the option (the cursor
changes to orange) and use the CURSOR KEYS to change the setting. Press ENTER to save the setting
or RETURN to cancel.
CAMERA
To setup the various camera options, highlight CAMERA and press ENTER.
CAMERA : CAMERA TITLE
Click the CAMERA TITLE menu and click ON/OFF
menu on the COVERT menu.
Then, click the button for ON/OFF.
Click the CAM No on the TITLE menu and change the
camera name.
COVERT: When it is set to ON, the camera image is not displayed in live display but continues to be recorded.
TITLE: For each camera, a title of up to 11 characters can be set using the virtual keyboard.
DISPLAY : COLOR SETUP
Click the COLOR SETUP menu and click the value on the
BRIGHTNESS, CONTRAST, TINT and COLOR menu.
Brightness, contrast, tint and color can be adjusted for each individual channel.
Highlight which channel to modify and press ENTER.
Click the each value by button.
The selected channel is displayed in full screen.
BRIGHTNESS, CONTRAST, TINT and COLOUR can be changed as necessary.
To modify a different channel, highlight CAMERA and choose the desired channel.
Press RETURN when all changes are completed.
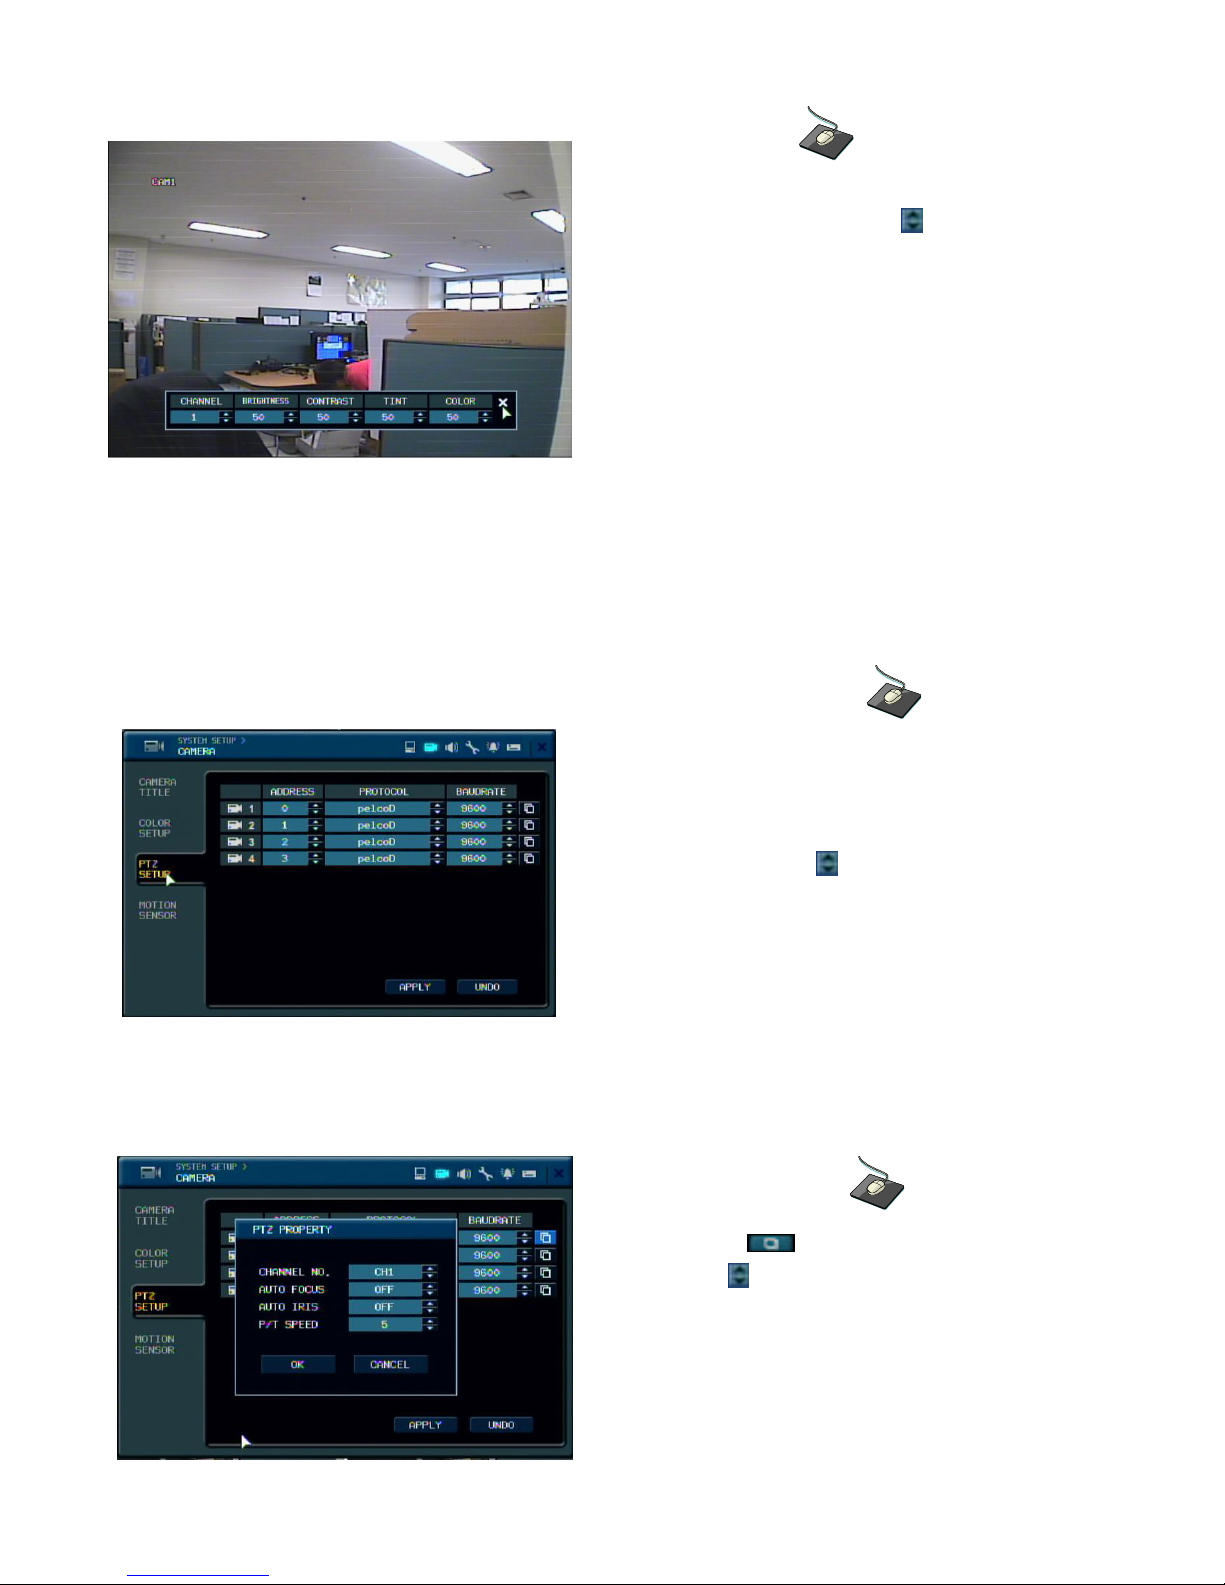
DISPLAY : PTZ SETUP
Click the PTZ SETUP menu and click the each value on
the ADDRESS, PROTOCOL and BAUD RATE menu.
Change the value by button.
ADDRESS: The unique ID of the PTZ device.
PROTOCOL: The protocol of the PTZ device.
BAUD RATE: The baud rate of the PTZ device.
Click the button and change the detail
value by button.
 Loading...