

Page 1
This software is only compatible with the PlayStation®2 computer entertainment system and
4 01 292 7 02 4 1 1 9
" " and "PlayStation" are registered trademarks of Sony Computer Entertainment Inc. All Rights Reserved.
Made in Austria. Pro evolution Soccer 3™ © 2003 KONAMI CORPORATION. Library programmes © 1997-2003
Sony Computer Entertainment Inc. exclusively licensed to Sony Computer Entertainment Europe.
FOR HOME USE ONLY. Unauthorised copying, adaptation, rental, lending, distribution, extraction, re-sale, arcade
use, charging for use, broadcast, public performance and internet, cable or any telecommunications transmission,
access or use of this product or any trademark or copyright work that forms part of this product are prohibited.
Published by Konami of Europe GmbH. Developed by Konami Computer
Entertainment Tokyo.
1 or 2 Player • Memory Card (8MB) (for PlayStation®2) : 1195KB minimum • multitap (for PlayStation®2) adaptable: 1-5 Players (6-8 Players = second multitap required)
Analog Control Compatible: all buttons
SLES
51912
7024119
Pro Evolution Soccer 3
™
Developed by Konami Computer Entertainment Tokyo.
Producer: "Seabass" Takatsuka
©2003 Konami
www.konami-europe.com
A NEW SEASON STARTS!
REAL FOOTBALL IS BACK!
REAL FOOTBALL IS BACK!
A NEW SEASON STARTS!
© 2001 KFA
©1996 JAPAN FOOTBALL ASSOCIATION ©2002 JFA. MAX
adidas, the adidas logo and the 3-Stripe trade mark are registered trade marks of the adidas-Salomon group, used with permission.
the use of real player names and likenesses is authorised by FIFPro and its member associations.
Milan's trademarks, name and logo appear under license from Milan A.C. S.p.A.. Official product manufactured and
distributed by KONAMI under licence granted by Roma International Football Service S.r.l.. Produced under the license from
Lazio Societa Sportiva S.p.A.. Parma and Parma Logo are trademarks of Parma Associazione Calcio S.p.A.. Official
Juventus Product JUVENTUS and the JUVENTUS logo are registered trademarks owned by Juventus F.C. S.p.A..
©1993/all rights reserved Stichting Feyenoord, Rotterdam. Licensed by: Stichting Feyenoord, Rotterdam.
Page 2
UNITED KINGDOM
“”,
“PlayStation”, “Ǹ˛◊” and “DUALSHOCK” are registered trademarks of Sony Computer Entertainment Inc. All Rights Reserved.
4012927024119
SLES-51912
London Office,
Jubilee House,
7/9 The Oaks, Ruislip,
Middlesex, HA4 7LF
FRANCE
Paris Office,
23, Rue Cambon,
75001 Paris
www.konami-europe.com
DEUTSCHLAND
Konami Of Europe GmbH,
Berner Strasse 103-105,
60437 Frankfurt/Main
ESPAÑA
Madrid Office,
Orense 34-9a
28020 Madrid
NEDERLAND
Konami Of Europe GmbH,
Burglaan 41
7314 BK Apeldoorn
SVERIGE
Scandinavian Office,
Langholmgatan 1b
11733 Stockholm
Need help with Pro Evolution Soccer 3? Konami UK Hotline Number: 09067 53 50 70
Calls cost 75p per minute. Please obtain bill payer's permission before calling. Over 16’s only.
Page 3
Precautions
•
This disc contains software for the PlayStation®2 computer entertainment system. Never use this disc on any other system,as it could
damage it.•This disc conforms to PlayStation®2 specifications for the PAL market only. It cannot be used on other
specification versions of PlayStation®2.•Read the PlayStation®2 Instruction Manual carefully to ensure correct usage.•When
inserting this disc in the PlayStation®2 always place it with the required playback side facing down.•When handling the disc, do not
touch the surface. Hold it by the edge.•Keep the disc clean and free of scratches. Should the surface become dirty, wipe it
gently with a soft dry cloth.•Do not leave the disc near heat sources or in direct sunlight or excessive moisture.•Do not use an
irregularly shaped disc, a cracked or warped disc,or one that has been repaired with adhesives, as it could lead to malfunction.
Pro Evolution Soccer 3 © 2003 KONAMI CORPORATION.
Library programmes © 1997-2003 Sony Computer Entertainment Inc. exclusively licensed to Sony Computer Entertainment Europe. FOR HOME USE ONLY. Unauthorised copying,
adaptation, rental, lending, distribution, extraction, re-sale, arcade use, charging for use, broadcast, public performance and internet, cable or any telecommunications transmission, access
or use of this product or any trademark or copyright work that forms part of this product are prohibited. Published by Konami of Europe GmbH. Developed by Konami Computer
Entertainment Tokyo.
Health Warning
For your health, be sure to take a break of about 15 minutes during every hour of play. Avoid playing when tired or suffering from lack
of sleep. Always play in a well-lit room, sitting as far from the screen as the cord will allow. Some people experience epileptic seizures
when viewing flashing lights or patterns in our daily environment. These people may experience seizures while watching TV pictures or
playing video games. Even players who have never had any seizures may nonetheless have an undetected epileptic condition. Consult
your doctor before playing video games if you have an epileptic condition or immediately should you experience any of the following
symptoms during play: dizziness, altered vision,muscle twitching, other involuntary movements, loss of awareness of your surroundings,
mental confusion, and / or convulsions.
See back page of this manual for Customer Service Numbers.
PIRACY
The unauthorised reproduction of all or any game part of this product and the unauthorised use of registered trademarks are likely to
constitute a criminal offence. PIRACY harms Consumers as well as legitimate Developers, Publishers and Retailers. If you suspect this
game product is an unauthorised copy, or have any other information about pirate product, please call your local Customer Service
number given at the back of this Manual.
SLES-51912
1 or 2 Player • Memory Card (8MB) (for PlayStation®2) : 1195KB minimum
multitap (for PlayStation®2) adaptable: 1-5 Players (6-8 Players = second multitap required) • Analog Control Compatible: all buttons
Thank you for purchasing Pro Evolution Soccer 3 from Konami.
Please read this manual thoroughly before playing the game.
Also, please keep this manual in a safe place so you can refer to it easily later.
(Note: Konami does not re-issue manuals.)
Konami is continuously striving to improve its products. As a result this product may differ slightly from
another depending on the Purchase date.
Pro Evolution Soccer 3 is an original game product created by KONAMI CORPORATION and Konami
Computer Entertainment Tokyo, Inc. The parties reserve, jointly or individually, the copyrights and other
intellectual property rights with respect to this game product.
Quick Start
Quick Formation
The Rules of Play
Basic Rules
Multi-Play
Game Controls
Game Controls during Matches
Just Remember This!
Game Modes
Starting the Game
Selecting Game Modes and Player
Modes
Game Mode Descriptions and Settings
Match Mode
League Mode
Cup Mode
Master League Mode
Training Mode
Edit Mode
Game Options
Continuing a Game
Game Setup
general Settings
Match Setup
Screen Layout during Matches
Game
Save
Saving the game to a memory card
(8MB) (for PlayStation® 2)
03
04
05
07
08
08
15
15
16
17
19
20
22
27
29
33
35
36
36
36
43
46
CONTENTS
PES3_Man Guts_uk.qxd 2/9/03 12:27 pm Page 2
Page 4
Select this option to quickly and easily
choose a formation. Open “Formation
Settings” from the Setup screen or the
Pause menu and choose “Quick
Settings”. Selecting an option from this
screen will automatically set the
formation to one of the following types.
Balanced
The team’s normal setting. A wellbalanced formation overall.
Defensive
The team will focus primarily on defense.
Effective when the important thing is to
not concede goals.
Attack
The team will sacrifice defense in favour
of attack. Useful when the team is behind
and needs to score at all costs.
Counterattack
The team will focus on scoring off
defense using counterattacks. Effective
when the team is up against a tough
opponent.
Side Attack
The team will attempt to attack from the
sides. Effective when there are strong
players on the wings.
Centre Drive
The team will attempt to attack by driving
through the centre. Effective when the
opponent’s centre is vulnerable.
Forward Pressure
The team will apply pressure aggressively
at the front and try to steal the ball from
the opposing defenders. This tactic can
be used to score on a counterattack after
stealing the ball.
03 PES3 PES304
Starting a Match
The steps are the same for 1-Player Quick Start and 2-Player Quick Start.
1 Team Select
Select the teams to use in the match.
2 Strip Select
Select the strip.
3 Setup
Choose the settings for the match. Except for the entrance scene, these settings can
also be changed at any time during the game.
Formation Settings Edit formations and team rosters and change strategies.
Button configuration Change the controller button assignments to be used
during the match.
Entrance Scene Choose whether or not to display the opening sequence.
Sound Settings Adjust the sound environment.
Camera Type Select the camera type.
4 Match Start
Start the match.
Select this option to skip the settings
and go straight to the game.
P1 Quick Start
Start a player-versus-computer match.
P2 Quick Start
Start a player-versus-player match.
Quick Start
Quick Setting
Set up your PlayStation®2 computer
entertainment system according to the
instructions in its instruction manual.
Attach game controllers and other
accessories, as appropriate.
It is advised that you do not insert or
remove accessories once the power is
on.
Make sure the MAIN POWER switch
(located at the back of the console) is
turned ON.
Press the /RESET button. When the
indicator is green, press the
button. The disc tray opens.
Place the Pro Evolution Soccer 3 disc on
the disc tray with the label side facing
up. Press the button again and the
disc tray closes.
Follow on-screen instructions and refer
to this manual for information on using
the software.
Make sure there is enough free space on
your memory card (8MB) (for
PlayStation®2) before commencing play.
LANGUAGE SELECT SCREEN
Before the main title screen appears you will be asked to select
which language you would like to play the game in.
50Hz/60Hz Mode
When you boot up Pro Evolution Soccer 3, you have to choose between 50Hz or 60Hz
mode. Use the Test screen to check your TV configuration.
Quick Start
PES3_Man Guts_uk.qxd 2/9/03 12:27 pm Page 4
Page 5
05 PES3 PES306
Match Time
The playing time for each match can be set to 5, 10, 15, 20, 25 or 30 minutes. Match
times can be changed using the Environment Settings in each game mode.
Extra Time
Golden goal/silver goal extra time and penalty shootouts are available depending on
the Game Mode. It is possible to enable/disable extra time, golden goal/silver goal
extra time, and penalty shootouts for Exhibition Matches.
Basic Rules
Game rules are the same as normal
football rules.
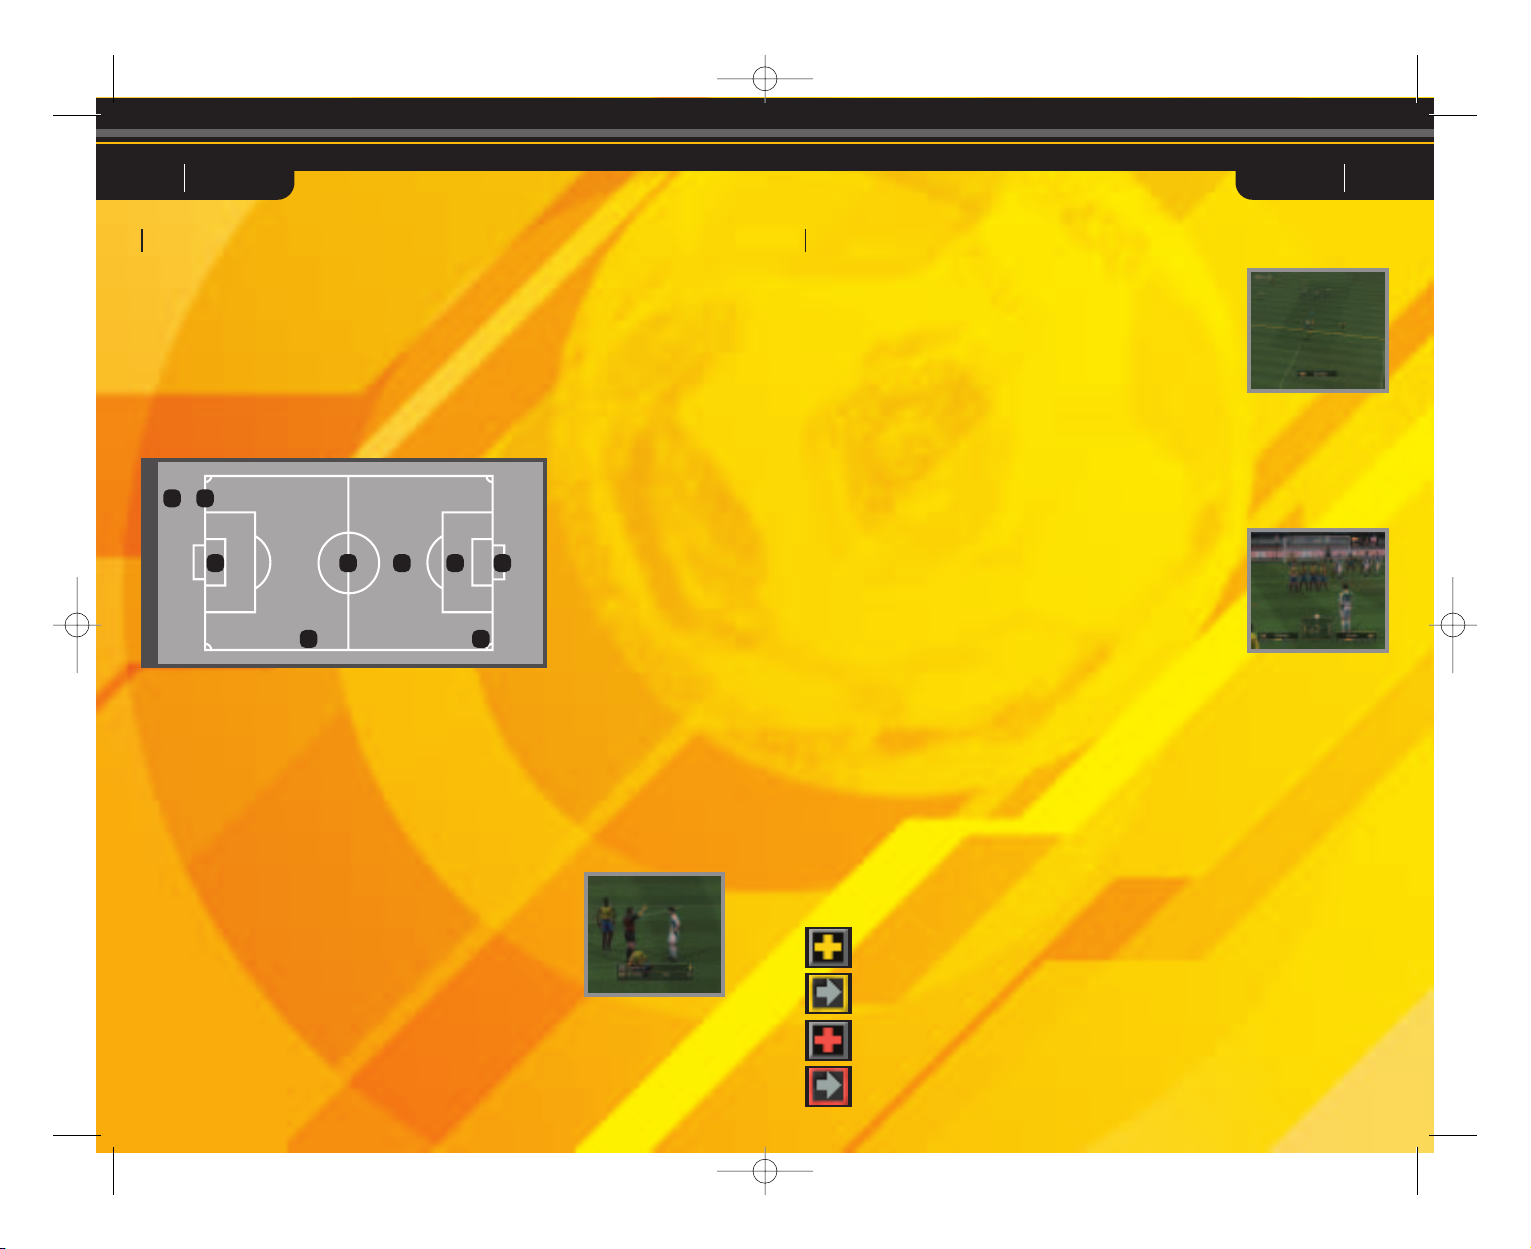
Field Terminology
1 Field (pitch and the surrounding area)
2 Centre Circle
3 Touch Line
4 Goal Line (End Line)
5 Goal Area
6 Goal
7 Corner Area
8 Pitch
9 Penalty Area
Offside
An offside is called when an attacking player is closer to the
opponent's goal line than the defense line of the opposing team
at the moment the ball is passed. A free kick is awarded to the
opposing team.
Maximum number of substitutions
For Exhibition and Superstar XI matches, you can select from
three to seven substitute players for a match. For Cup matches
and League matches, the maximum number of players that you
can change will be three. In the Master League, you may have
three substitutes for regular matches, but for pre-season
matches, the maximum is seven.
Out of Play
“Out of play” refers to times when the game is stopped after the
ball has gone into touch or after a foul. Player substitutions
made while the match is in progress will take place when the
ball is next out of play.
Injury
By altering the settings it is possible to determine whether or
not players receive injuries from sliding tackles or other
aggressive play. Injuries can be slight or serious and are
indicated on the screen by yellow and red crosses respectively.
Players with slight injuries may continue to play in the match,
but their performance levels will be conspicuously reduced.
Players with serious injuries will not be allowed to continue in
the match and are sent off the pitch immediately. In League,
Cup and Masters League tournaments, slight injuries may take
several matches to heal properly. A “recovering” icon may be
displayed after a player has healed from a slight or serious
injury. A player with this icon, although no longer injured, is still
not yet at full strength and continues to suffer under a slight
reduction in abilities.
The Rules of Play The Rules of Play
Yellow Cards/Red Cards
Players issued two yellow cards during the same match will be
sent off. Players issued a red card will be sent off immediately.
Players who accumulate a total of two or more yellow cards or
one red card cannot play in the next match.
Forfeited Game
If the number of eligible players on a team drops below seven
before or during a match, that match will be forfeited.
3
2
7
9
4
5
6
8
1
Light Injury
Light Injury
just recovered
Heavy Injury
Heavy Injury
just recovered
PES3_Man Guts_uk.qxd 2/9/03 12:27 pm Page 6
Page 6
07 PES3 PES308
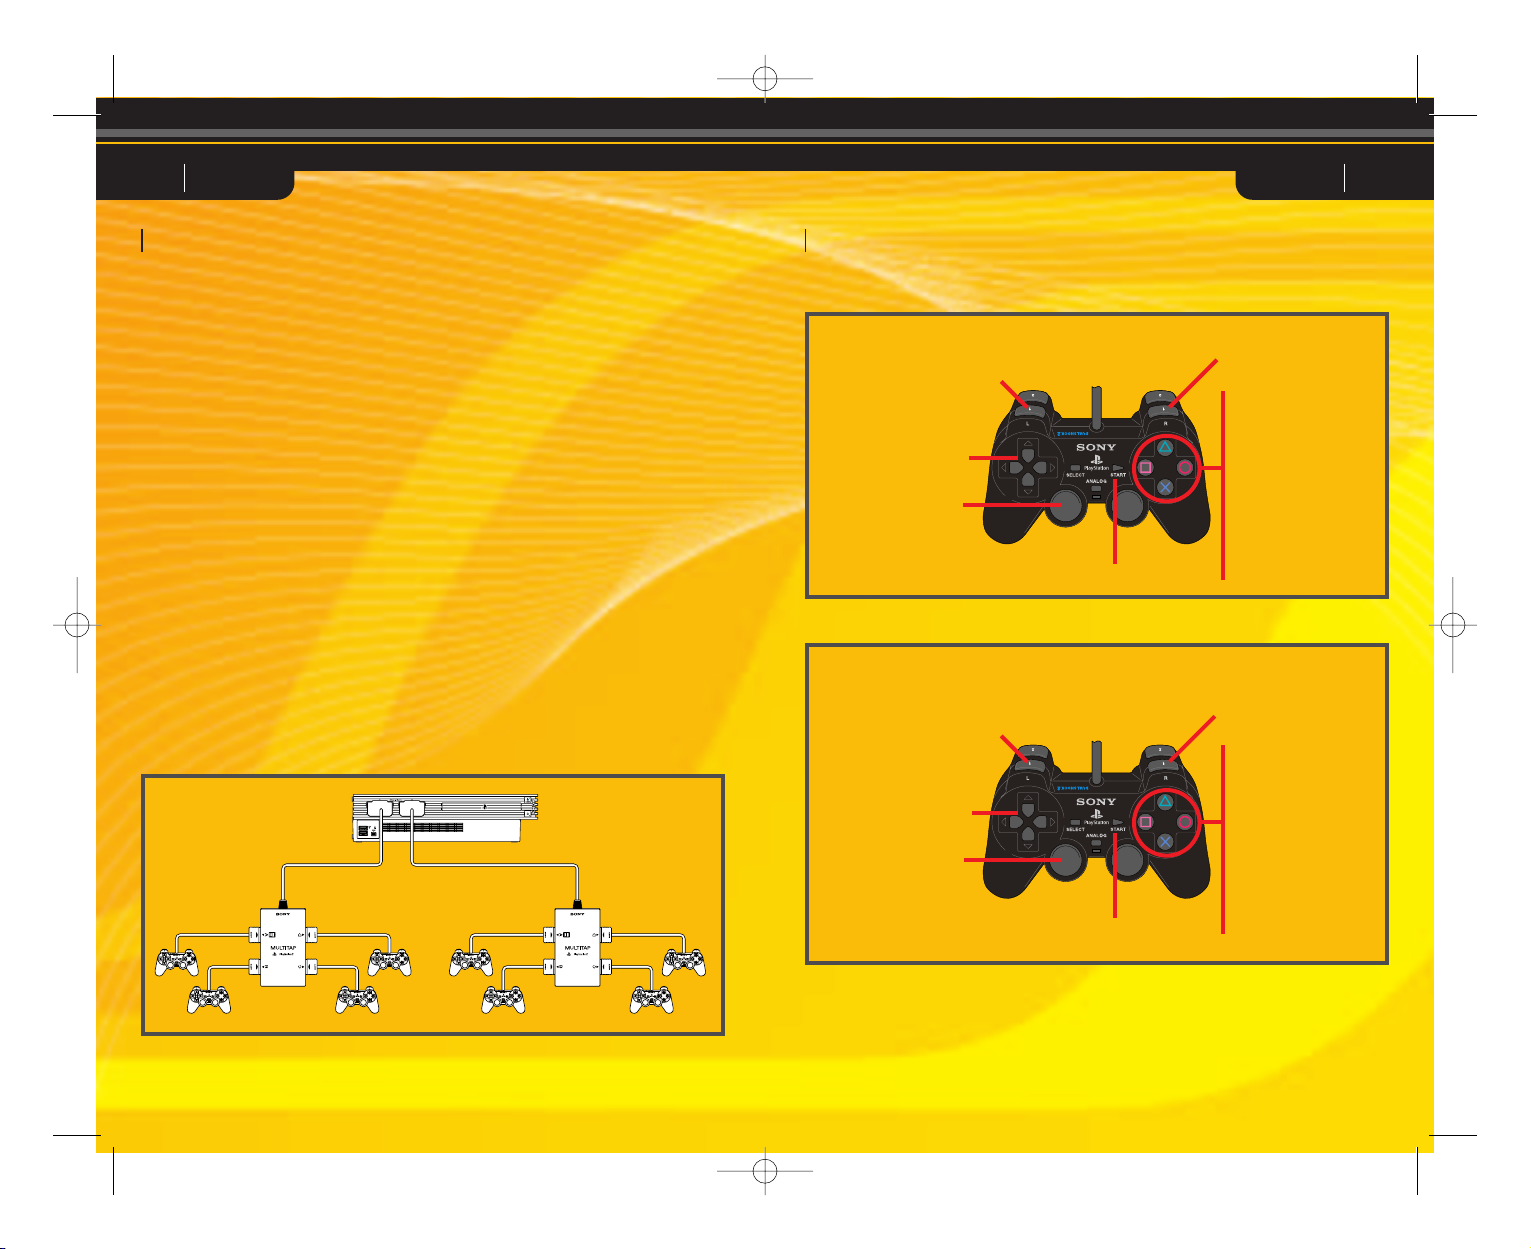
Multi-play
Competitive or co-operative multi-play is possible using additional controllers (sold
separately) and multitaps (for PlayStation®2) (sold separately). Connecting a multitap
(for PlayStation®2) to controller port 1 or controller port 2 makes it possible to attach
controllers to controller ports 1-A, 1-B, 1-C, 1-D and controller ports 2-A, 2-B, 2-C, and
2-D, enabling a maximum of eight people to play simultaneously.
The multitap (for PlayStation®2) is connected to controller port 1 and/or controller port
2 on the console.
Items Necessary
2 players: 2 controllers
3 to 5 players: 1 controller per player and one multitap
(for PlayStation®2) (sold separately)
6 to 8 players: 1 controller per player and two multitaps
( for PlayStation®2) (sold separately)
Precautions When Using the Multitap (for PlayStation™2)
When connecting the multitap (for PlayStation®2), always insert a controller into
controller port 1-A or 2-A before inserting the remaining controllers into controller ports
1-B, 1-C, 1-D, or 2-B, 2-C, and 2-D. inserting
Controller port 1-A (2-A)
Controller port 1-B (2-B)
Controller port 1-D (2-D)
Controller port 1-C (2-C)
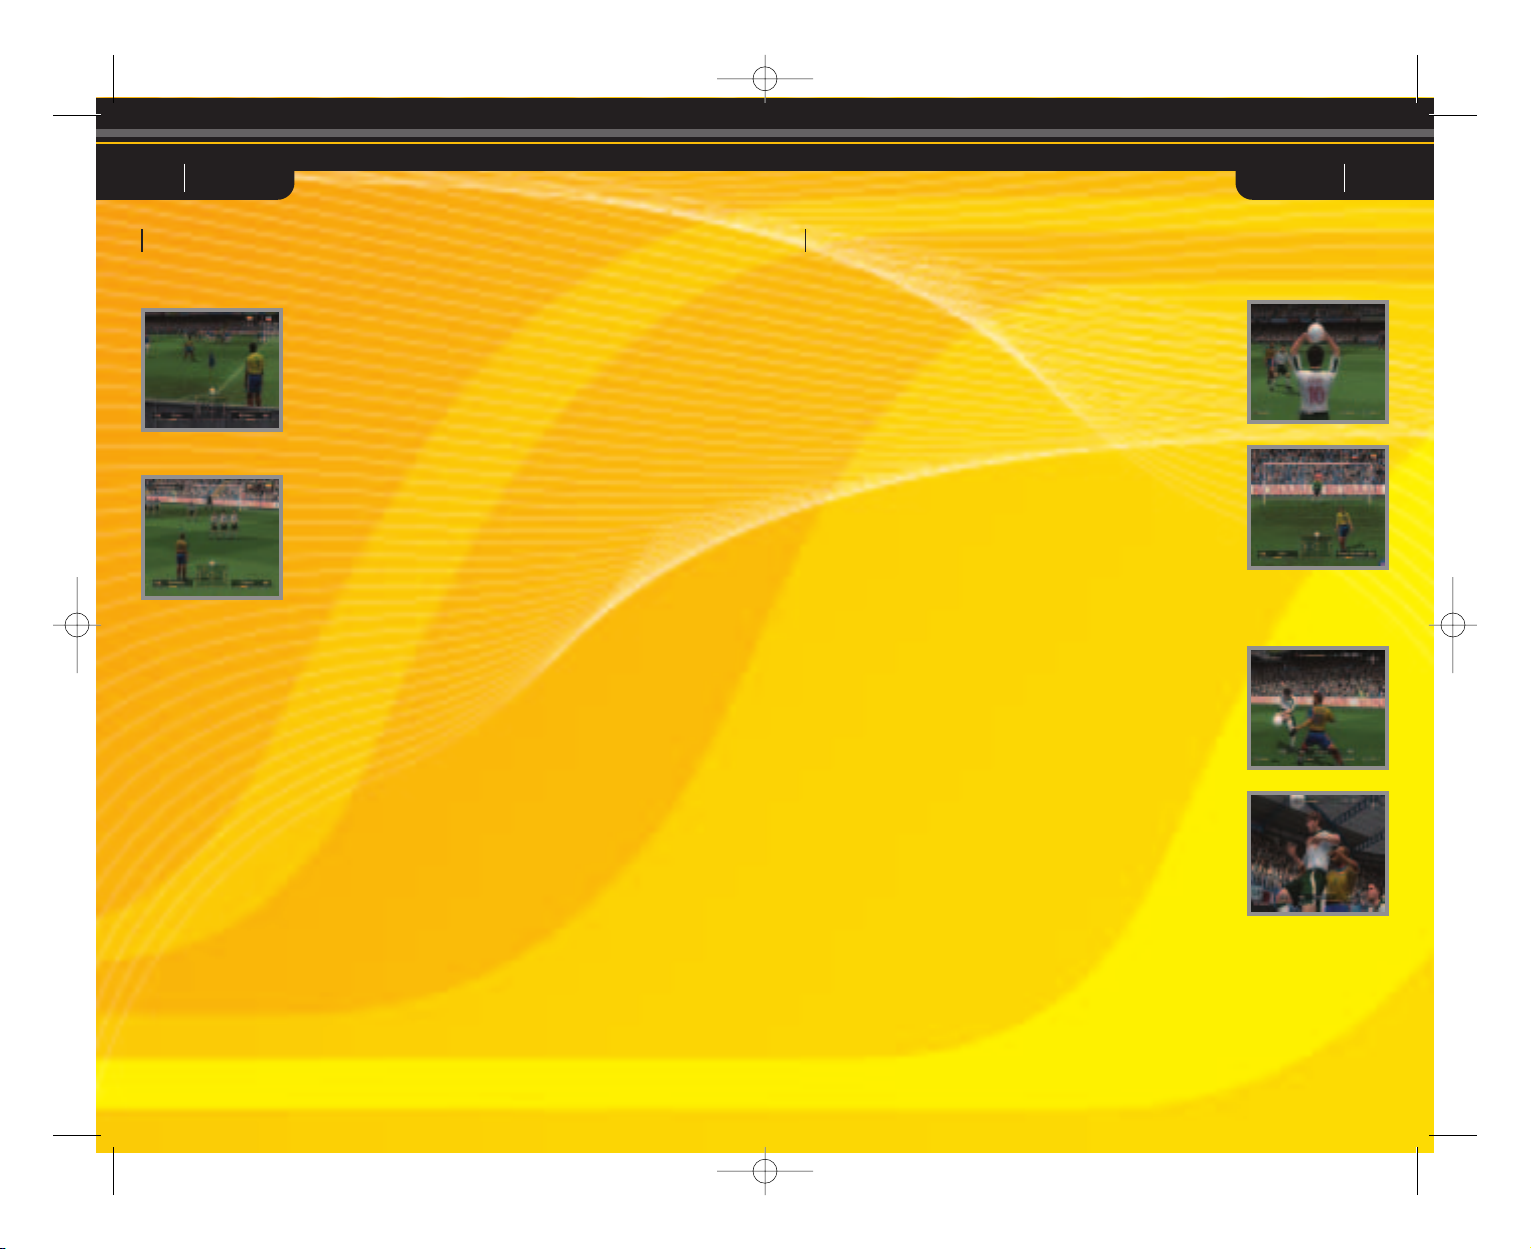
Just remember this! Analog Controller (DUALSHOCK®2)
Attack! Basic Attacking Controls
Multi - Play Game Controls During Matches
L1 button/
Switch between players
Directional button/
Move
Left analog stick/
Move
ç button/
Through ball
Ω button/
Centring/Long pass
≈ button/
Short pass
√ button/
Shoot
R1 button/ Dash
START button/Pause
Defend! Basic Defense Controls
L1 button/
Switch between players
Directional button/
Move
Left analog stick/
Move
ç button
(hold down)/
Goalkeeper
Ω button/
Sliding tackle
≈ button/
Apply pressure
√ button
(hold down)/
Clearance/Pressure 2
R1 button/ Dash
START button/Pause
PES3_Man Guts_uk.qxd 2/9/03 12:27 pm Page 8
Page 7

09 PES3 PES310
* The R3 button is pressed by pushing
down on the right analog stick.
Button assignments for the analog
controller (DUALSHOCK®) are the same
as above.
The basic function of each button is
the same as for the analog controller
(DUALSHOCK®2).
* The left and right analog sticks and the
R3 button are not supported.
This game does not fully support a
digital controller.
Analog controller (DUALSHOCK®2)
L2 button
L1 button
Directional button
Left analog stick
ç button
Ω button
≈ button
√ button
Right analog stick
(R3 button)
R2 button
R1 button
START
button
Game Controls/Attack Game Controls/Attack
Mode indicator/
ANALOG mode button
Passing
Short pass: Press the ≈ button to make
a pass in the direction the directional
button is being held.
Heel pass: Press the directional button in
the opposite direction to that in which the
player’s body is facing, and then
immediately press the ≈ button to
execute a heel pass.
Direct short pass: Press the ≈ button
immediately before trapping the ball to
execute a direct short pass in the
direction the directional button is being
held.
Long Passes
Long pass: Press the Ω button to send a
pass in the direction that the directional
button is being held. The length of the
pass depends on the length of time the Ω
button is held.
Direct long pass: Press the Ω button
immediately before trapping the ball to
send a long pass in the direction that the
directional button is being held. The
length of the pass depends on the length
of time the Ω button is held.
Change sides: Send a long pass to the
opposite wing by holding the directional
button in the desired direction and
pressing the Ω button. The length of the
pass depends on the length of time the Ω
button is held.
Through ball
Through ball: Press the ç button to
make a pass in the direction you are
selecting with the directional button.
Direct through ball: Press the ç button
immediately before trapping the ball to
send a through ball in the direction that
the directional button is being pressed.
Fly Thru pass: While holding L1, press
the ç button to send a chipped through
ball in the direction that the directional
button is being pressed.
One-two passes
One-two pass: Hold down the L1 button
and press the ≈ button to make a short
pass, pressing the ç button immediately
before your team mate receives the ball to
execute a return pass.
One-two pass in the air: Press the ≈
button while holding down the L1 button
to execute a short pass, and then press
the Ω button immediately before the
player traps the ball to execute a return
pass.
Pass and go: Press the R2 button
immediately after passing the ball to
make the player who passed the ball
sprint forward.
Manual passes
Manual pass: Push the right analog stick
in the desired direction and then press the
R3 button to execute the pass. The
strength of the pass is determined by how
long the R3 button is held down.
Manual long pass: While holding down
the L1 button, push the right analog stick
in the desired direction and then press the
R3 button to execute the pass. The
strength of the pass is determined by how
long the R3 button is held down.
Dribbling
Dribble: Press the directional button
when the ball is at your feet.
Jump: When an opponent executes a
sliding tackle, press the R2 button.
Stop the ball: Release the directional
button and press the R1 button to stop
the ball’s movement when dribbling.
Turn and Kick: When changing
directions, press the R2 button to kick the
ball a long distance.
Dash Dribble
Dash Dribble: Press the R1 button while
dribbling.
Super high-speed dribble: When
dribbling, hold down the R1 button and
press the directional button twice, and
again a third time.
High-speed dribble: Press the R2 button
while dribbling. This technique is slower
than the dash dribble, but allows for
better ball control.
Low-speed dribble: Let go of the
directional button while dribbling. When
executing a low-speed dribble, press and
hold the L1 button to maintain the dribble
and use the directional button to change
the direction of the dribble.
PES3_Man Guts_uk.qxd 2/9/03 12:27 pm Page 10
Page 8

11 PES3 PES312
Centring
Centre to the far side: Press the Ω
button once. When there are two or more
players waiting for a cross, the player
further away will receive the cross.
Centre to the near side: Press the Ω
button twice. When there are two or more
players waiting for the cross, the closest
player will receive the cross.
Centre along the ground: Press the Ω
button three times.
High trajectory: Press the R2 button
when centring the ball to increase the
height of the cross.
Early cross: Hold down the L1 button
and press the ≈ button to execute an
early cross. You can make a cross
anywhere on the field, not only in the
opponent’s half.
Shooting
Shoot: Press the √ button to shoot. The
height of the shot depends on the length
of time the button is held. While the
gauge is displayed, press left/right on the
directional button to alter the direction of
the ball.
Direct shot: Press the √ button with the
ball in the appropriate place to execute
heading shots/volley/shots.
Lob shot
Lob shot: Hold down the L1 button and
press the √ button to fire a shot over the
goalkeeper’s head.
Lob shot 2: Hit a low lob shot by pressing
the √ button and then pressing the R1
button while the gauge is displayed.
Feints
Step over dummy 1: Press the right
analog stick twice in the direction of
movement.
Step over dummy 2: Press the L1 button
twice.
Step over dummy 3: Press the R2 button
twice.
Kick feint 1: Press the right analog stick
twice to the side of the direction of
movement.
Kick feint 2: Press the √ button, and
while the gauge is being displayed, press
the ≈ button to execute a kick feint. For
best results, press the √ and ≈ buttons
at nearly the same time.
Kick feint 3: Press the Ω button, and
while the gauge is being displayed, press
the ≈ button.
Kick feint 4: Go through the motions for
a centring cross, and just before the ball
is kicked, press the ≈ button.
Through feint
Through feint: Just before the ball is
trapped, press and hold the R1 button
without pressing the directional buttons
to step over the ball and allow it to
continue to another player.
Game Controls/Attack Game Controls/Defense
Common Controls Attack/Defense
Dash: Press the R1 button while running.
Super Cancel: Press the R1 and R2 buttons while a player is chasing after the ball to force the
player to stop.
When ball is in the air: When the ball is in the air, press the R2 button + the directional button to
control the player.
Switching between players: Press the L1 button.
Activate/cancel strategies (when in Manual Mode)
L2 button + Ω button: Activate/cancel strategies set for the Ω button.
L2 button + ≈ button: Activate/cancel strategies set for the ≈ button.
L2 button + ç button: Activate/cancel strategies set for the ç button.
L2 button + √ button: Activate/cancel strategies set for the √ button.
Activate/cancel strategies (when in Semi-Auto Mode): Press the L2 button.
Attack/Defense level:
L2 button + R1 button: Move the Attack/Defense Level towards Attack.
L2 button + R2 button: Move the Attack/Defense Level towards Defense.
ANALOG mode button: Enable/disable the left/right analog sticks analog mode
(indicator : red) / digital mode (indicator : off).
Mode Indicator: analog mode (indicator : red) (does not support controller vibration function).
* The Tutorial in Training Mode also gives an explanation of game controls.
Game Controls/Defense
Defense
Pressure
Applying pressure: Press the ≈ button when an opponent is in
possession of the ball to move closer to the ball or to extend a leg for
a tackle. Use this together with the R1 button to dash towards the
ball.
Pressure 2: Press the √ button when an opponent is in possession
of the ball to have the team mate closest to the ball (not counting the
player you are controlling) pressure the ball carrier.
Sliding tackle
Sliding tackle: Use the directional button when an opponent is
in possession of the ball to move closer to the ball, and then
press the Ω button to execute a sliding tackle.
Clearance
Clearance: Press the ≈ button when the ball is in your own
team’s possession to execute a long clearing pass forward.
Goalkeeper
Movement
Moving the goalkeeper out of the goalmouth: Press the ç
button when an opposing player has possession of the ball to
make the goalkeeper sprint towards the ball.
Goalkeeper movement: Hold the ç button and press the L1
button until the cursor points to the goalkeeper. Then, press the
directional button in the direction you want the goalkeeper to
move. (Only when the “GK Cursor” option is set to ON.)
Feeds
Drop-kick 1: Ω button (kicks the ball in the direction that the
directional button is being held)
Drop-kick 2: √ button (kicks the ball in the direction that the
directional button is being held)
Throwing: ≈ button (throws the ball to the team mate in the
direction that the directional button is being held)
PES3_Man Guts_uk.qxd 2/9/03 12:27 pm Page 12
Page 9
13 PES3 PES314
Corner kicks
Corner kick: Ω button (Hold up on the directional button or the
R1 button for a low trajectory and hold the R2 button for a high
trajectory. Hold down on the directional button for a cross along
the ground. Hold left or right on the directional button for a
curling kick.)
Short corner kicks: Press the ≈ button when taking a corner
kick to execute a short pass to a nearby team mate.
Free kicks
Short pass: Press the ≈ button when taking a free kick to
execute a short pass in the direction that the directional button
is being held.
Long pass: Ω button (Hold up on the directional button or the
R1 button for a low trajectory and hold the R2 button for a high
trajectory. Hold down on the directional button to pass along the
ground. Hold left or right on the directional button for a curling
kick.)
Through ball: Press the ç button when taking a free kick to
execute a through ball in the direction that the directional button
is being held.
Throw-ins
Short throw-in: Press the ≈ button during a throw-in to throw
the ball to a nearby team mate.
Long throw-in: Press the Ω button during a throw-in to
execute a long throw in the direction the thrower is facing.
Lead throw-in: Press the ç button during a throw in to throw
the ball in front of a team mate.
Penalties/Penalty Matches
A maximum of six directions each can be selected for the
goalkeeper and the kicker.
Directional button directions: For a diagonal, press left/down
or right/down on the directional button.
Kicker: Press the √ button to kick the ball in the direction the
directional button is being held.
Goalkeeper: Try to guess the location of the shot before it is
kicked and hold down the directional button in the appropriate
direction.
Replays
Play: Ω button
Play (while the button is held down): Directional button ñ
Reverse play (while the button is held down):
Directional button ∫
Fast play/Reverse play: Right analog stick ñ
/Right analog stick ∫
Pause: ç button
Fast forward: Ω button + directional button ñ
Rewind: Ω button + directional button ∫
Advance frame: ç button + directional button ñ
Rewind frame: ç button + directional button ∫
Beginning of replay: ç button + L2 button
End of replay: ç button + R2 button
Change view: ≈ button
Save: √ button
Controls display ON/OFF: SELECT button
End replay: START button
Rotate camera: L1/R1 buttons
Switch players: L2/R2 buttons
Zoom in: Directional button µ
Zoom out: Directional button ≤
Game Controls Game Controls
Free kick shots
Shots: Press the √ button to shoot. The height of the shot is determined by the length
of the gauge. While the gauge is being displayed, press up on the directional button for
a stronger shot or down for a weaker shot. Hold the R1 button and press the √ button
for a slightly stronger kick, or hold the R2 button and press the √ button for a slightly
weaker kick. You can also press left or right on the directional button to curl the shot.
Free kick wall
Free kick wall: When the opposing team is executing a free kick (just as the kicker is
approaching the ball), press and hold the following buttons to control the players in the
defensive wall.
Controls
√ button: Everyone jumps.
≈ button: No one jumps.
Ω button (tap): One or two players break from the wall. Those that remain in the wall
jump.
Ω button (tap) + ≈ button: One or two players break from the wall. Those that
remain in the wall do not jump.
No buttons pressed: Some players jump and some do not jump.
Set PieceSet Piece
PES3_Man Guts_uk.qxd 2/9/03 12:27 pm Page 14
Page 10

15 PES3 PES316
Select Player
1 You play the game.
2 The game is played with computer (COM) support.
3 The actual game is played by the computer, but you set up and execute team formation
and strategy. Player settings can be changed before the game starts. Co-operative play is
possible in League Mode, but it is not possible for players to compete against each other.
The same applies for Cup matches played in 1-player mode. Settings are saved in the
Option File. Player Settings for multi-player games in Cup Mode are only valid for the game
in progress and cannot be saved.
Cursor Change Speed: Sets the speed at which the player cursor (which is displayed over
players’ heads during matches) switches between players.
Fixed - The cursor will be fixed on a specific player.
Manual - Cursor switching is controlled by the player.
Semi-Auto - There are 8 speed settings, ranging from I (slow) to IIIIIIII (fast).
(The player can also switch the cursor manually in Semi-Auto mode.)
GK Cursor: Determines whether the player cursor displayed over players’ heads during
matches will switch to the goalkeeper.
ON: While on defense, pressing the
ç button + cursor change will shift the cursor to the
goalkeeper.
OFF: The player cursor cannot be shifted to the goalkeeper
Cursor Name Display: Sets the player cursor display to “Default”, “Player 1”, “Player Name”,
or “Load”.
Controls
1 Press the Ω button to enable the Player Cursor Name Display setting.
2 Press left and right on the directional button to select the display type.
3 Press the Ω button again to exit the Player Cursor Name Display setting.
Default - Displays the player’s number (1-8).
Player 1 - Displays the name entered under “Cursor Name” on the “Game Options” screen.
Player Name - Displays the player name used in the game.
Load - Loads a name stored on a separate memory card (8MB) (for PlayStation®2).
* Refer to “Cursor Name Entry” on page 33 for details on how to enter a name for the cursor.
Load Cursor Names: Loads cursor names from an options file. Select “Load” for the Cursor
Name Display setting and press the ≈ button to load names from a compatible memory card
(8MB) (for PlayStation®2). This will load the options file from the memory card (8MB) (for
PlayStation®2) in the memory card slot of the same number as the controller currently in use.
The cursor name data for controller 1 (1-A) only will be taken from the options file and applied
to the controller currently in use.
Team Selection Select the team that is to take part in the match.
Use the ≈ button to enter the selection, the ç button to go
back and the √ button to select the teams randomly. In Cup
Mode and League Mode, the Ω button resets all teams.
General Settings
Select one of five difficulty levels, from Easy (*) to Hard (*****).
The Masters League is equipped with separate Masters League
difficulty level settings.
Conditions: Set each team’s condition.
Max. no. of Substitutions
Set the number of players that can be brought on as substitutes
during the game.
Stadium effects
Set the effects that occur in the stadium during the game, such as the release of flares,
etc.
* When playing in certain stadiums, or if the Japan national team is playing, flares will
not be released regardless of the “Yes/No” setting.
Stadium
Select the stadium in which the match is to be played.
Commentary stance
Neutral: Commentary favours neither the home or away teams.
Player: Commentary favours the player team. During 2-player games, commentary
reverts to “neutral”.
Home: Commentary favours the home team.
Away: Commentary favours the away team.
Support stance
Home and
Away: Crowd supports the home team.
Neutral: Crowd supports no particular team.
Player: Crowd supports the player’s team. During 2-player games crowd support
reverts to "neutral".
Active: Crowd support changes depending on match conditions.
(Only available in Master League mode.)
Game Modes/Player settings Game Modes/GENERAL Settings
When a mode is selected, a Setup Screen is displayed. Use the
directional button to select options, the
≈ button to enter the
selection and the
ç button to cancel.
PES3_Man Guts_uk.qxd 2/9/03 12:27 pm Page 16
Page 11

17 PES3 PES318
Match Mode (Exhibition Match / Quick Start
/ Penalties)
This mode allows you to choose your favourite teams and play
a single match. For a “PK Match”, the kicking order must be set.
For an “Exhibition Match”, press the L1/R1 buttons to switch
between the 56 national teams and the 64 club teams, and
select your favourite teams. National teams can play against
club teams. Alternatively, select the Master League icon below and to the right of the
club teams to load your own Master League teams and pit them against each other. In
the “Penalties”, two teams are selected from among the 56 national teams and 64 club
teams to participate in a penalty shootout.
Game Modes/Match Modes Game Modes/League Mode
MEMORY CARD slots
When loading Master League Data, MEMORY CARD slot 1 (1-A) is used for Team 1
and MEMORY CARD slot 2 (2-A) is used for Team 2. The MEMORY CARD slots are
not only used for loading Edited Club Team Data and Master League Data, but also
when Formation Setup is accessed immediately before the game starts or from the
Pause Menu while the game is in progress.
Loading Team 1: Use MEMORY CARD slot 1 (1-A).
Load Edited Club Team Data *1
Load Master League Data
Loading Team 2: Use MEMORY CARD slot 2 (2-A).
Load Edited Club Team Data *1
Load Master League Data
Proceed to the Player Settings Screen.
Team 1 vs. Team 2
Rankings: Displays team rankings, points, and goals for and
against.
Consecutive wins: Displays each team’s wins and losses and its longest
winning streak.
Rankings History: Displays a graph showing the changes in each team’s
ranking.
Team Info: Displays points, winning percentage, and player goals
and injuries for each team.
Goal/Assist
Rankings: Displays a list of the 16 highest-scoring players overall.
Schedule: Displays the opponent list for next season and beyond
as well as scores from past matches.
Tournament: Displays the progress of tournaments.
Rankings/Matches: When playing in Group League format, displays the
status of each group.
Information Screen
Memory card slot 1 (1-A) is used to load Team 1.
Load Team Edit Data *1
Load Master League Data
Proceed to the Player Settings Screen
Team 1 vs. Existing Team
Memory card slot 2 (2-A) is used to load Team 2.
Load Team Edit Data *1
Load Master League Data
Proceed to the Player Settings Screen
*1: Loaded data consists of flag, uniform, and team
information, and is only valid for the current match.
Please note that player data is NOT loaded.
Existing Team vs. Team 2
League Mode
Select 16 nations to take part in a round robin
tournament against the computer for a full
season (30 games) or a half season (15 games).
Extra time and penalty shootouts do not take
place.
About Formations
In League and Master League Modes, team
formations can be changed using he “Formation”
option on the “Team Management” screen. These
settings are saved in the League Data. Also,
opening the Pause Menu during a match and
choosing “Formation Settings” ‡ “Stock Current
Formation” will overwrite the formation data with
the team’s current positioning, allowing the team
to start with that formation in future matches. The
“Stock Current Formation” option on the prematch Setup Menu works in the same way.
PES3_Man Guts_uk.qxd 2/9/03 12:27 pm Page 18
Page 12

Environment settings
These settings control various environmental factors in the game.
Basic settings p.16.
Master League-only settings p. 22
Accumulated Fatigue: Allows you to choose whether players carry over built-up
fatigue from one match to the next or recover between matches.
Strip Selection: Allows you to choose each team’s strip type before the match.
Change Environment Settings: Determines whether environmental settings can be
changed after the match starts.
Cheat Prevention Save: Determines whether a penalty is applied for resetting in the
middle of a match.
Auto-Save: Determines whether results will be saved automatically at the end of the
match. (This is not the same Auto-Save as the one for the options file.)
Icons Used in League Mode, Cup Mode and Master League Mode
Win points
Number of wins
Number of losses
Number of draws
Total goals for
Total goals against
Goal difference
Number of yellow cards
Number of red cards
19 PES3 PES320
International Cup
In the International Cup tournament, 32 countries are split into 8
groups of 4 teams each and take part in a round robin qualifying
tournament. The top 16 teams qualify to take part in the main
tournament.
European Cup
In the European Cup, 16 teams are split into 4 groups of 4 teams
each to take part in a round robin qualifying tournament. The top
8 teams qualify to take part in the main tournament.
African Cup/American Cup/Asia-Oceanian Cup
Teams are selected from each region for the African Cup,
American Cup, and Asia-Oceanian, and these teams take part in
a tournament.
KONAMI Cup
The tournament format can be set to Group, Tournament, or
Round Robin. You can also select the number of participating
teams.
See p. 19: “Information Screen” for more details.
Cup Tournaments
International Cup (knockout tournament)
European Cup (knockout tournament)
African Cup
American Cup
Asia-Oceanian Cup
KONAMI Cup (Knockout tournament)
Group League Tournaments
International Cup (qualifying group league)
European Cup (qualifying group league)
KONAMI Cup (qualifying group league)
The two top teams in each group proceed to the final knockout tournament.
Round Robin Tournaments
KONAMI Cup (round robin tournament)
Home and Away Format
In tournaments with a home and away format, each round includes two games
– one home and one away game. When both games result in a draw, the total
number of points for the away games are doubled (away game doubling format).
If this fails to produce a winner, extra time and then penalty shootouts are played
to decide the winner. The home and away format can be set at ON/OFF for the
African Cup, the American Cup, the Asia-Oceanian Cup and the KONAMI Cup.
Game Modes/League Mode Game Modes/Cup Mode
Cup Mode (International Cup, European Cup, Africa Cup, America Cup,
Asia-Oceania Cup, KONAMI Cup)
Win
Loss
Draw
Press up/down on directional
button to navigate
Press left/right on directional
button to scroll
Next/previous page
OK
Go back, previous screen
Help
PES3_Man Guts_uk.qxd 2/9/03 12:27 pm Page 20
Page 13

21 PES3 PES322
Starting the Game
Master League Mode
In Master League Mode, the object is to create and run your own team with players of
your choosing and build it into a powerhouse. There are four leagues - Northern,
Southern, Eastern, and Western - and each league is divided into Division 1 (14 teams)
and Division 2 (8 teams). Your team competes against computer teams (called COM
teams) in a league format. Depending the overall record, teams may be promoted or
relagated between Division 1 and Division 2, and those with good records are invited to
participate in big tournaments. In addition, teams accumulate points by winning
matches, and these points can be used to acquire new players and pay player salaries.
Teams
No matter which team is selected, its beginning roster will be the same. By negotiating
to acquire new players and releasing old players, you can build your own team. The
team roster must consist of no fewer than 16 players and no more than 40 players. You
can only negotiate with a maximum of 5 players at a time.
Game Over
The game ends if the team’s roster falls below 16 players, the team’s point total drops
below -9,999, or the team has a negative point total at the end of the season.
Viewing Information
Results and schedules for Master League and Cup matches can
be found under their respective tournaments. See p. 19:
“Information Screen” for more details.
Master League Mode
Team Management
Choose this option to control team management functions.
Formation: This sets the basic formation of the team. Any
changes made here will affect the match in progress.
Negotiations: Negotiate with players and other teams in order
to acquire new players, renew expired contracts or cancel
existing contracts.
Transfer Program Information: Shows transfers made by all
teams. This screen can be accessed when a transfer is carried out.
Upcoming Transfers: Provides information on transfers
scheduled for the next season.
Team History Log: Displays a record of the team’s history. Up
to 15 past seasons can be viewed.
Team Training: Carry out free training with the player team.
Modify Player Number: Change the player numbers.
Edit Team: Edit team data, including the flag and name of the
club team.
Training Promising Players: If there are young players who
can be developed, select this option to train them.
Calendar: View the current season’s schedule for your team.
Environment Settings
Choose this option to set various environmental factors in the
game.
Basic settings p. 16 League/Cup Mode settings p. 19
Master League Negotiation Settings
Retired Player Acquisition: Determines whether COM teams
will acquire players who are currently retired.
Transfer Frequency: Determines how often COM teams will
initiate transfers.
Level of Acquired Players: Determines the ability levels of
players acquired by COM teams.
Acquisition Difficulty: Determines how willing COM teams are
to negotiate.
Game Modes/Starting the Game Game Modes/Master League Mode
PES3_Man Guts_uk.qxd 2/9/03 12:27 pm Page 22
Page 14

23 PES3 PES324
When an application for contract renewal negotiations is received
At the beginning of the off-season (week 36), you will enter into contract renewal
negotiations with players whose contracts have expired. If no action is taken, all
contracts will automatically be renewed. If “Cancel Negotiations” is selected, the player
will leave the team. Unless a sufficient number of bonus points are offered at contract
renewal time, the player may decline to renew his contract.
Transfer
Used to acquire a player who has a
half year or more left on his contract
with his current team.
Transfer points, bonus points, length
of contract
Free transfer
Used to acquire a player who has less
that half a year left on his contract with
his current team.
Bonus points, length of contract
Trade
Used to exchange one player for
another. If the players are not of equal
value, transfer points must be added
to the trade.
Player to be traded, bonus points,
length of contract, (transfer points)
Loan
Used to acquire a player for a limited
period of time.
Lease points, length of lease
Renewal
Used when the contract of a player on
one’s own team has expired or is
about to expire.
Bonus points, length of contract
Contract
Used when acquiring trainable
players.
Bonus points, length of contract
Game Modes/Master League Mode Game Modes/Master League Mode
Master League Mode Types of Negotiation
Negotiations
In order to acquire a new player, you must negotiate with that
player and the player’s current team. In addition, players on
your own team whose contracts are about to expire must have
their contracts renewed. You are not the only one who can
initiate negotiations; COM teams can do this as well.
Flow of Negotiations
Applying for Negotiations
1 Apply for negotiations: Choose the player you want to
acquire or whose contract you want to renew and select the
type of negotiations to apply for. After confirming the
application, use “Set Negotiation Parameters <IN>” to
adjust the conditions you would like to offer. Players whose
names are dark cannot be negotiated with.
2 Set Negotiation Parameters: Adjust the point distribution
and then submit it to the player and the team. The conditions
set here can be changed at any time before the end of the
current round.
3 Player Response: The conditions will be confirmed at the
beginning of the following week, and you will receive a
response to your offer.
4 Transfer: If negotiations are completed during the first half
of the season or during the off-season, the transfer will take
effect immediately. If negotiations are completed during the
second half of the season, the transfer will always take effect
after the season ends.
When an application for negotiations is received
1 Check the conditions of the transfer: When an application
for negotiations is received from a COM team, the player and
the team concerned will appear in the <OUT> field. Check
the number of points that are being offered for the player.
2 Reply: Decide whether or not to proceed with the
negotiations.
Negotiation Type
Description
Adjustable Details
Symbols Used in Player List
When applying for negotiations,
the following symbols may be
placed before players’ names.
COM team player in transfer
negotiations
Player from own team in transfer
negotiations
COM team player in loan transfer
negotiations. The names of
players currently on lease transfer
are darkened.
Player from own team in loan
transfer negotiations. Players
currently on lease transfer cannot
be negotiated with or released.
COM team player in free transfer
or contract renewal negotiations.
Even if another team has applied
for free transfer negotiations with
a player, the player’s current team
can still apply for contract
renewal negotiations.
Player from one’s own team in
free transfer negotiations.
Player in trade negotiations.
Player in contract renewal
negotiations.
Player from one’s own team
chosen to be released
*Players whose names are
darkened cannot be negotiated
with.
PES3_Man Guts_uk.qxd 2/9/03 12:27 pm Page 24
Page 15

25 PES3 PES326
Master League Mode
Acquiring Created Players
Created players can be acquired for use in the Masters League. It is possible to add
created players to the team selection column on the player selection screen in
Negotiations. Created player data added to a team will be stocked as saved Masters
League Data. This prevents the acquired player from being affected by any future
editing. It is possible to make changes to such players by creating a new player
incorporating the changes and acquiring them. A maximum of 40 edited players can be
stocked in saved Masters League Data.
Editing Club Teams
It is possible to edit Club Team names, strips, flags and other details. See p. 31 for
further details.
Modify Player Numbers
Player numbers can be freely modified. See p. 30 for further details.
Training
It is possible to carry out free training for the player team. In the Masters League, the
weather for a season will not change no matter how many times training is carried out.
See p. 27 for further details on Free Training.
Training Promising Players
Once a promising player has been acquired, It is possible to train that player. Points
earned from winning matches can be allocated to increase the various ability levels of
the player and improve his performance.
Training Time Limit
After a fixed amount of time has elapsed, further training will no longer be possible. Be
sure to pay attention to the time limit.
Advice on avoiding Game Over
Applying for negotiations without a firm plan in mind may result in the number of points
being paid out exceeding the number of points possessed. Keep a close eye on the
number of points you have left.
See the section on Continuing a Saved Game (p. 35) for details on continuing games
using data saved to a memory card (8mb)(for PlayStation®2).
Game Modes/Master League Mode Game Modes/Master League Mode
Overall Flow for Master League
Fixture/Tournament
D2 League
Fixture 1
Fixture 2
Fixture 3
Fixture 4
Fixture 5
Fixture 6
Fixture 7
Fixture 8
Fixture 9
Fixture 10
Fixture 11
Fixture 12
Fixture 13
Fixture 14
D1 League
Fixture 1
Fixture 2
Fixture 3
Fixture 4
Fixture 5
Fixture 6
Fixture 7
Fixture 8
Fixture 9
Fixture 10
Fixture 11
Fixture 12
Fixture 13
Fixture 14
Fixture 15
Fixture 16
Fixture 17
Fixture 18
Fixture 19
Fixture 20
Fixture 21
Fixture 22
Fixture 23
Fixture 24
Fixture 25
Fixture 26
Top 2 teams progress to playoffs
Playoffs Off-season (1 to 8 weeks)
D2 Cup
First Round (1)
First Round (2)
Semifinal (1)
Semifinal (2)
Final
Winning team participates in
Masters’ Cup
Masters’ Cup
MC First Round (1)
MC First Round (2)
Quarterfinal (1)
Quarterfinal (1)
Semifinal (1)
Semifinal (2)
Final
D1 Cup
First Round (1)
First Round (2)
Second Round (1)
Second Round (2)
Semifinal (1)
Semifinal (2)
Final
Winning team
participates in
Masters’ Cup
Championships
Prelim GL Round 1
Prelim GL Round 2
Prelim GL Round 3
Prelim GL Round 4
Prelim GL Round 5
Prelim GL Round 6
Main GL Round 1
Main GL Round 2
Main GL Round 3
Main GL Round 4
Main GL Round 5
Main GL Round 6
Quarterfinal (1)
Quarterfinal (1)
Semifinal (1)
Semifinal (2)
Final
Bottom 2 teams go to
relegation playoffs
PES3_Man Guts_uk.qxd 2/9/03 12:27 pm Page 26
Page 16

27 PES3 PES328
Training Mode
(Free Training / Challenge Training / Beginner Lesson / Control Descriptions)
Free Training
Practice a wide range of techniques, including shots on goal,
free kicks and set plays. Player teams can also be divided into
practice squads for free training.
General Settings
Fouls
Set whether fouls will be called or not.
Offside
Set whether offside calls will be made or not.
G./C. Kick/ Throw in
Set the side on which the game restarts on a goal kick, corner
kick, or throw-in after the ball goes out of play.
Play Again Button
Assigns the Play Again Retry function to the SELECT button.
If you are already in the Free Training, press pause and select the "General Settings".
You will be able to assign the Play Again Retry to the Select Button. This way, when
ever you press select, you can retry with the same conditions.
Squad Games
To play a intra-team practice game, enter the Formation Settings screen from the Pause
Menu. Press the START button to switch control to the away team side. Move the
cursor to the players who will be participating in the match and press the ≈ button to
confirm. To remove the player from the team, press the ≈ button once again. Once
settings are complete and you end pause , the selected players will enter the pitch and
begin practicing.
Challenge Training
This mode allows you to have fun while learning the controls
used in the game. Each event is divided into levels. Beating the
target score for a level will allow you to proceed to the next
level. Achieving a high score will qualify you for the rankings.
Clear progress and rankings data can be saved to a memory
card (8MB) (for PlayStation®2). By loading this data (Challenge
Data), you can compete to break your previous records.
(Turning the Auto-Save setting on the Options screen to ON will
cause data to be saved whenever a new record is set.)
Original Dribble Challenge
This mode can be unlocked by exchanging PES accumulated
during the game at the PES Shop. It allows dribbling courses to
be edited and used for practice.
Beginner Lesson
Get hints on basic game techniques and practice using them.
Control
Provides explanations of the game’s basic controls. Press the
buttons as indicated to learn the controls.
Saving in Training Mode
Environment settings for Free Training and Challenge Training
are saved in the “Pro Evolution Soccer 3” options file.
Game Modes/Training League mode
Game Modes/Training League modeGame Modes/Master League Mode
Prerequisite for moving up to Division 1:
Finish in top 2 in relegation/promotion playoffs
Prerequisites for qualifying for the championships:
To qualify for preliminary group league…finish in 3rd to 6th place in Division 1
To qualify for main group league…finish in top 2 in Division 1
To qualify for main group league…finish in top 2 in preliminary group league
To qualify for championship tournament…finish in top 2 in main group league
Training Mode
(Free Training / Challenge Training / Beginner Lesson / Control)
PES3_Man Guts_uk.qxd 2/9/03 12:27 pm Page 28
Page 17

29 PES3 PES330
Create a player to edit
1 Select Create Player to display the
creation screen.
2 The player first displayed does not
have an assigned name or nationality.
Specify the required details for each
field to create the player. Select “Base
Copy” at the beginning of the process
to create a player based on an existing
player.
Player Name
Enter the name of the player. Players who
have not been named cannot be stocked.
Select Player Commentary Name
Select the name that the player is to be
called by the commentator during
matches. When “Player Number” is
selected, commentary is carried out
based on the player’s shirt number.
Strip Name
Enter the name to be used on the back of
the player’s jersey.
Position Settings
Set the player’s suitability for each
position. If the player is suitable for
multiple positions, the position listed
under “Registered Position” will be
displayed during matches. If the player
participates in a match at a position for
which he is not suited, the player’s
abilities will suffer greatly.
Basic Settings
Enter basic information about the player.
The player’s nationality will initially be
selected randomly at first.
Appearance Settings
Set the player’s appearance. Press the √
button to switch to the Montage Creation
screen.
Ability Settings
Set the player’s abilities.
Special Ability Settings
There is no limit to the number of special
abilities a player can have.
3 After all the parameters have been set,
the player is “stocked”. Stock the
created player in any of the empty NonRegistered Player locations between 1
and 8 in the edit column. Players who
have been stocked can be registered in
a team using the Player Registration
function on the main menu, making
them eligible to play in actual games.
Modify Players
Modify player names, physical appearance, ability and other
parameters. Created players whose nationality is set to “Free”
will assume the nationality of the national team to which they are
registered, so their nationality cannot be changed.
Deleting Created Players
Delete created players. Players who have been registered in
teams cannot be deleted. To delete registered players, use the
Player Registration function to return them to the Created Player
Frame.
Register Players
Select players for the national teams.
Registering players with teams
1 Use the Player Registration screen to register stocked players
with teams.
2 Align the cursor with a stocked edited player, and press the ≈
button.
3 Select the team of the player whom the stocked player is to
replace. Press the ≈ button to complete the registration
process and enable the stocked player to play in actual
games.
Player Name Colours
Player names are colour-coded according to their selection
status (the same colours are used when selecting Classic
players)
White, Blue: Player can be selected.
Grey: Player cannot currently be selected.
* Created players with nationality set to “Free” can be
registered with any team, but cannot be registered in more
than one team.
* The names of players who do no meet the selection
conditions will be dark.
Modify Player Numbers
Set player numbers. If a number that is already being used in the
team is assigned to a second player, the two players concerned
will exchange numbers.
Number Input
Enter a 4-digit number.
Game Modes/Edit Mode Game Modes/Edit Mode
Edit Mode
Edit Players
In this mode, players can be created, edited and registered.
Create
Creating a player from scratch.
PES3_Man Guts_uk.qxd 2/9/03 12:27 pm Page 30
Page 18

31 PES3 PES332
Edit Club Teams
Edit the name, strip, flag and other parameters for teams used
in the Master League. Any changes here will be effective in all
modes.
Team Names
Team names can be written in English or in three-letter codes.
Flags
Edit the flag used by a team or create a new flag. Flags can be freely designed by placing
up to 8 foreground elements on a background. The type, position, size, colour,
transparency, and priority of each element can be edited, and each can be rotated and
reversed up/down/left/right. After selecting “OK” on the Layer List Menu, choose a
location to store the new flag. After all of the foreground elements and the background
have been generated, the flag will be stored in the selected location. The stored flag can
not only be selected as the flag of a club team, but can also be used as the background
when designing a new flag. In addition to stock locations 1 through 64, flags in progress
can also be stored in the layer list. This feature can be used to hold an early version of
a flag in progress; later, if the flag does not turn out the way you want it, you can recall
the earlier version and redo it. Flags in progress are temporary objects, so exiting Edit
Mode (or Team Edit Mode in the case of Master League) will cause them to be lost.
Edit Mode
Team Strip
Edit the team strip. To return strips to their original state, select
“Default Strip” on the Select Strip to Use screen. Goalkeeper
strips/default strips cannot be edited.
Uniform Name and Number
Edit the names and numbers displayed on the back of the
jerseys.
Team Colours
Change the team’s image colour. This affects the colour of the
seats in the stands.
Stadiums
Change the home stadium.
Save Data Manager
Edited Data Manager
Load player names, parameters and other data from a friend’s
Player Data/Edited Club Team Data and copy it into your own
Option File.
Option File
Edited data is saved in the Option File. It is also possible to load
Edited Data that has been saved in the Option File.
Copying Data
Items that can be copied.
Player data
Player names, appearance settings and other parameters.
Edited Club Team Data
Flags, strips, and team information.
Items that cannot be copied
Edited players cannot be copied.
Saving Data
Copied data will be lost when the power is turned OFF. It is
therefore necessary to save copied data in the Option File. By
saving in the Option File, it is possible to restart a game from the
place where the data was last saved, even if the system was
reset.
Game Modes/Edit Mode Game Modes/Edit Mode
Screen Layout
Element controls
Y: Vertical position
X: Horizontal position
W: Width
H: Height
R: Rotation
Layer list
Link
Display on/off
Layers: Layers are ranked in order of priority.
(Priority “1” is displayed on top.)
Link: - linked
- not linked
Linking elements allows several elements to be moved
simultaneously using the Link Move feature on the Elements
Menu.
Colours
Foreground elements
PES3_Man Guts_uk.qxd 2/9/03 12:28 pm Page 32
Page 19

33 PES3 PES334
Game Option
PES Data Control
Choose this option to save and load Option Files and adjust the
Auto-Save settings. Data from previous titles in the “Pro
Evolution” series can also be imported here.
Option File
Auto-Save
Turn the Option File Auto Save function ON/OFF. This setting will be invalid if the Option
File is not loaded/saved when the system is started up.
Load Option File
Load the Option File from the memory card (8MB)(for PlayStation®2) to change game
settings. All settings will change to the loaded settings.
Save Option File
Save the current settings in the Option File on the memory card (8MB)(for
PlayStation®2).
PES2 Data Load
Load edited player names from a “Pro Evolution Soccer 2”.Option File.
Copy Saved Data
Copy game data saved to the memory card (8MB) (for PlayStation®2)
Delete Saved Data
Delete game data saved on the memory card (8MB) (for PlayStation®2)
Button Configuration
Change the controls during matched, pass settings and other parameters.
Enter Cursor Name
Edit the text displayed in the player cursor used in the game. Edited text can be saved
in the Option File.
Sound Settings
Edit the sound environment used during matches.
Gallery
Select this option to view the cup gallery, replays, or the credits.
Cup Gallery
View any cups acquired so far.
Replay Playback
Play back saved replay data.
Credits
See who made “Pro Evolution Soccer 3”.
PES Shop
Exchange PES (points acquired during the game), for the following bonuses.
How to Gain PES
- Play a match in Match Mode (excluding Penalty matches)
- Perform well in Master League Mode, League Mode, or Cup Mode
- Clear a level in Challenge Training
(Does not apply to Original Dribble Challenge. Awarded the first time a level is cleared in a
certain event in normal Challenge mode.)
PES-Related Options
Display when PES are Earned
Tur ns the display that appears when PES are acquired on or off.
PES Auto-Save
If Option File Auto-Save is set to ON, determines whether data will be saved when PES are
acquired or used.
Edit Appearance: Hairstyle
Adds a hair element that can be selected on the Edit screen.
Edit Appearance: Classic Shorts
Adds shorts that can be selected on the Edit screen.
Exhibition Stadium Adds a new stadium and practice field that can be selected
in Exhibition Mode.
Training Ground Adds a new stadium that can be selected in Free Training
Mode.
Replay Ball Effect Allows special effects to be added to the ball’s trail during
replays.
Double-Speed Matches Allows matches to be played at twice the speed.
Fan appreciation Allows music to be played back.
Teams Adds a new selectable team.
Players Adds a new player that can be acquired in Master League
Mode.
Choose Club /
Trade Free Agent Allows a player’s club team affiliation to be changed.
Edit Team Strategy Allows a team’s default strategy to be edited.
Original Dribble Challenge Allows dribble courses in Challenge Training to be edited and
used for practice.
Game Modes/Game Options Game Modes/Game Options
PES3_Man Guts_uk.qxd 2/9/03 12:28 pm Page 34
Page 20

35 PES3 PES336
Game Options
Screen
Adjust the image position on your television or monitor.
Load Data
Insert the memory card (8MB) (for PlayStation®2) that contains saved game data into
MEMORY CARD slot 1. After choosing the game mode, select Load Data and you will
be taken to the memory card (8MB) (for PlayStation®2) screen. Choose the data you
wish to use and start the game.
It is possible to change a wide range of parameters before matches start. Select the
item to alter with up/down on the directional button. Alter the settings with right/left on
the directional button, and then enter the new settings with the ≈ button. Use the ç
button to cancel the selection. The formations and strategies that are normally used are
used as the starting settings. Edited formation/strategy data that has been stocked
using the Stock option from Formation Setup will be automatically loaded when the
Formation Screen is accessed.
Formation Setup
Formation and Strategy Settings
The team formation can be altered even while a match is in progress by pressing the
START button to display the Pause Screen.
Game Modes/Game Options
Continuing a Game
Game Modes/Game Setup
Load General Settings
Load only general settings for Cup Mode. Loads data such as
tournament match-ups. Variables such as the number of
participating teams and players can be changed at any time
If you have accumulated fatigue switched on in the Master League Mode, League Mode
or Cup Mode settings, the fatigue level indicator will also be displayed.
Home Side
Players
L1, R1 buttons:
Change display
Overall strength and
condition during the game/
fatigue levels
Kickers
Cards
Low Normal High
Formation
Away Side
L2, R2 buttons:
Change display
Player number
Attack mindedness
Defense mindedness
PES3_Man Guts_uk.qxd 2/9/03 12:28 pm Page 36
Page 21

37 PES3 PES338
Substitutions
Select the player to be replaced and the substitute player with
the ≈ button. The substitution will take place the next time the
ball is out of play. The players who have received a red card or
accumulated too many yellow cards are not eligible to play, and
their names will be darkened. Use the L2/R2 buttons to switch
the parameters. Use the Ω button to switch the Co-operation
Screen display ON/OFF.
Co-operation Displays
Co-operation level (%)
Co-operation Lines
Formation Settings
Formation
Change
Position Edit
Select Position
Formation
Positions
CF (Centre Forward): Takes shots in front of the goal.
WF (Wing Forward): Creates scoring opportunities by dashing
up the sides.
OMF (Offensive Mid-Fielder): Initiates attacking motions from
the upper mid-field.
SMF (Side Mid-Fielder): Initiates attacking motions from the
sides.
CMF (Centre Mid-Fielder): Provides well-balanced support in
attack and in defense.
DMF (Defensive Mid-Fielder): Defends in the lower mid-field.
Can also initiate attacking motions.
SB (Side Back): Defends against attacks down the sides of the
pitch. Can also move forward to participate in attacking plays.
CBT (Centre Back Stopper): Stops attacks made by the
opposing team in front of the goal.
CBW (Centre Back Sweeper)
Plays a clean-up role behind the back line.
GK (Goalkeeper): Guards the goal.
Automatic Sort
Automatically sort the players in the order of their positions in the formation.
Individual
Attack
To change the attack mindedness of a player, move the cursor to the player you wish
to change, press the ≈ button to select, and use the directional button to change the
setting. Press the ≈ button again to confirm. You can change this setting for a
maximum of two areas of attack.
Defense Mindedness
Move the cursor to the player you wish to change, press the ≈ button and adjust the
player's level of defense mindedness.
Mark Settings
Change each player's mark settings. Move the cursor to the player you wish to change
and press the ≈ button select the player. If you have the Defense System set to Line
Defense, the mark settings option is disabled.
Covering: Defends an area of the pitch rather than a particular player.
Zone Mark: Stays with an opposing player who enters his zone, and stops when they
move away.
Man Mark: Marks a particular opposing player.
Match Setup Match Setup
Match Setup
Match Environment
Team
Attack/Defense
Displayed under each player's nameplate during a match. There are five levels of
settings. The option enables you to raise or lower the whole team's attack mindedness
and defense mindedness. You can select from between four types: Manual (L2 button
+ R1 button OR R2 button), auto-defense, normal, and auto-attack.
PES3_Man Guts_uk.qxd 2/9/03 12:28 pm Page 38
Page 22

39 PES3 PES340
About the attack/defense level.
If the level is raised when attacking, the defense will push up the attacks will become more
effective. On the other hand, if you lower the level your team will be less vulnerable to the
counter-attack.
If the level is raised when you are defending, defenders will play aggressively to win the ball
and the opposition's passing options will be reduced. If the level is lowered, the defense
will drop back in numbers to defend. With this function you can move your defensive line
forward and back.
If you adjust the level to the maximum, either attack or defense, all players on the team will
move to defend or attack accordingly, regardless of their individual attack/defense
mindedness settings. A defensively-minded player can be made to move forward to attack.
(See p. 43 for explanations about the Adjusting Attack/Defense Level option on the
Match/Game Screen.)
Defense System
Choose your defensive strategy.
Normal - If a defensive player does not have individual mark settings, the player will mark
an opposition player that enters his own zone.
Sweeper - A system where one player is kept as a "spare" while other players mark the
opposition players. The sweeper must be selected. In this system, when a player is
designated as the sweeper, you will be unable to change his mark settings.
Line Defense - The back defensive line moves as a unit to preserve its formation. When
this option is selected, you cannot change the mark settings.
Team Strategy
Select team strategies. These settings may also have an effect on other strategy settings.
Back line - Moving the back line forward causes the defense to play further forward.
Zone press - This setting causes multiple defenders to approach the opponent ball carrier.
Offside trap - The defensive line will move forward and play the offside trap.
Counter attack - No matter where the ball is, on player will play well forward in an attacking
position.
A: The strategy will be actively pursued, but the players will tire quickly.
B: The strategy will be pursued at a normal level.
C: The strategy will not be pursued very actively, but the players will tire slowly.
List settings
Change Team Strategy, Defense System, and Attack/Defense Level settings in list format.
Strategy Settings
No Strategy
Normal: Strategy balanced between attack and defense.
Centre Attack: Players move forward the center of the pitch and attack aggressively
through the center.
Right Side Attack: Players move towards the right-hand side of the pitch and
aggressively try to outflank their opponents in the right field.
Left Side Attack: Players move towards the left hand side of the pitch and aggressively
try to outflank their opponents in the left field.
Opposite Side Attack: Positions players on the opposite side of the pitch to where the
action is taking place to facilitate changes.
Change Sides: Left and sides of the formation switch places to confuse the opposing
team.
Centre Back Overlap: The center back takes part in the attack on goal.
Zone Press: Players move towards the ball.
Counter Attack: Attacking players remain near the opponent’s defense line.
Offside Trap: Moves the defense line up-field.
Formation A/B: The team formation can be changed to a preset formation.
*When both Formations A and B are selected, Formation A will be used.
Formation A/B
When the Formation A/B has been selected, you can adjust the settings here.
Copy to "A" / "B"
Copy the current settings to the Formation A/B settings.
Match Setup Match Setup
Setting Strategy
A maximum of four strategies can be set. There are two
Strategy Modes: Semi-Auto and Manual. In Semi-Auto Mode,
one of the four strategies is executed by the player, and the
other three are executed automatically. The strategies are
executed by pressing the L2 button. In Manual Mode, the
player executes all four strategies. A strategy is assigned to
each of the Ω, ≈, ç, and √ buttons, and these strategies are
executed individually during matches by pressing the relevant
button together with the L2 button. The names of the strategies
are not displayed during matches, so you will have to
remember which strategy is assigned to which button. All four
strategies can be executed at the same time.
PES3_Man Guts_uk.qxd 2/9/03 12:28 pm Page 40
Page 23

41 PES3 PES342
Choose a Captain
Select the team captain.
Quick Settings
Please see Quick Formation (p. 4)
Stock
You can save up to ten sets of formation and strategy settings data for each of the
home and away teams. By selecting Stock from the menu with the ≈ button you can
update and change each set of data. Copy the formation data selected with the ≈
button by pressing the ≈ button again in a different location. By indicating data to be
copied as "Current settings" and the copy location as "Copy location" you can record
the "Current settings". On the other hand, by assigning the copy target as "Current
settings", you change the current setting to the recorded settings. (In other words, you
can load the recorded settings. You can select any of the ten data slots to copy
formation data.) By setting the data to be copied as the "Default data" and the copy
target as "Current settings", you can restore all settings to their default values.
If you have your own team data saved, the most recent data will automatically be
loaded and reflected in the Formation Settings when you enter the Formation Settings
screen during set-up (Auto load). This does not apply however, when you play League
Mode, Master League Mode, or Training Mode.
Data currently being used
Saved data
Default data
Stock
Stock current formation (League Mode and Master
League Mode)
Your international league and master league team data is
stocked in Formation Data Manager. In contrast to Formation
Copy of the Formation Settings, the contents are made up of
League Data or Master League Data. If you save the data to a
memory card (8MB) (for PlayStation®2), when continuing with
saved league data, the stocked formation will automatically
load.
Formation Data Manager
Save and load the ten sets of formation data at the formation
settings screen.
Quit - Exit the formation data utility
Save - Save up to ten sets of home team and away team
formation data stocked in Formation Settings on a memory
card (8MB) (for PlayStation®2).
Load - Load formation data from a memory card (8MB) (for
PlayStation®2) into ten stock positions each on the home and
away side.
Copy - Copy one of 10 stocked sets of formation data form the
home (away) side to the away (home) side.
Clear - Delete 10 sets of stocked formation from the home (or
away) side.
Change - Switch the 10 sets of stocked data between the
home and away side.
Caution: When inserting or removing the memory card (8MB)
(for PlayStation®2)
When saving or loading, the MEMORY CARD slot used may
change according to the circumstances. Please read the
instructions on the screen and be sure that are using the
correct MEMORY CARD slot.
MEMORY CARD slot 2 (2-A) is used in the following cases:
* When playing two-player Match Mode, the away side player
formation data is loaded and saved from MEMORY CARD
slot 2.
* When playing a two-player Master League game, the
formation data for Team 2 is loaded and saved from
MEMORY CARD slot 2.
Entrance Scene
Select whether or not to view the Entrance scenes before the
match.
Match Setup Match Setup
P.K.: Penalty kick
CK: Corner Kick
L: Left corner
R: Right corner
FK: Free kick
S: Short
L: Long
Kicker/Captain
Select a kicker
Selects players to take free kicks (short/long),
corner kicks (from left/right) and penalty kicks.
PES3_Man Guts_uk.qxd 2/9/03 12:28 pm Page 42
Page 24

43 PES3 PES344
Adjusting Attack/Defense Level
L2 button + R1 button: Moves the level towards attack.
L2 Button + R 2 button: Moves the level towards defense.
During The Match/Game Screen
Display settings can be altered by selecting “Change Display” from the Pause Menu.
Pause Menu (during matches)
Resume Match
Cancel Pause Mode and return to the
game.
Formation Settings
Access Formation Setup (see p. 36) and
the Formation Data Manager (see p. 42).
In League Mode, change the Stock
Current Formation settings (see p. 42).
Select a kicker (thrower)
Select the player to kick or throw the ball.
Player Settings
Set the speed the player cursor switches
between players.
Camera Type
Select the Camera Pan Angle/Camera
type for the camera in front of the goal.
Screen Settings
Change display settings for the radar
screen, nameplate, time, score and
Strategy Screen.
Sounds Settings
Select the volume of the sound effects,
music, and commentary.
Button Configuration
Change the button configuration or select
the controls of passing.
Replay
Review the previous play.
To Mode Select Menu
Quit the match and return to the mode
select.
Pause Menu (in Training Mode)
Menu items are basically the same as
above.
Formation Settings
Press the START button on the Formation
Screen to control the reserve players. Up
to 11 players on the reserve team can
take part in the training. Select
“Substitutions” for the reserve team,
select the players who are to participate
or to be removed from training and press
the ≈ button to confirm the selections.
Formation and strategy settings can also
be altered. To exchange players with the
starting member team, select
“Substitutions” from the starting member
team, and then move the cursor down.
Reserve team players will be displayed at
the bottom of the list. Follow the normal
procedure for player substitutions to
exchange players with the starting
member team.
Training Menu
Choose from attack training, shooting
practice, free kicks, and set plays.
Game Game
Cursor
Player Name
Position
Score
Team Flag
Elapsed Time
Radar Screen
Play on
When a team is fouled, but in the referee's judgment the team is
in a better position if the game is not stopped for a free kick, play
will be allowed to continue.
Shooting gauge
A mark behind the shooting gauge will indicate the optimum level
for the gauge when taking corner kicks and free kicks.
Players who have received yellow cards
The number over the cursor will be displayed in yellow for players
who have received a yellow card.
Offensive
Normal
Defensive
Other Displays
Penalty Kick Matches
1 Kicker
2 Position, Player, number, Player name, Height, Age
3 Goalkeeper
4 Score
5 Team flag
1
2
3
4
5
PES3_Man Guts_uk.qxd 2/9/03 12:28 pm Page 44
Page 25

45 PES3 PES346
Training Environment Settings
Change environmental settings other than
day/night, season or weather.
Rest
Recovers energy expended during
training.
To Mode Select Menu
Quit training and return to the Mode
Select Screen.
Results
Check the game data and individual
evaluations.
Goal Details
If a goal has been scored in the game,
pushing √ will display a breakdown of
goal data. As well as goals and assists,
shot distance, shot position, and other
shot data can be viewed.
High Ball
Cross
Cross on the ground
Corner Kick
Free Kick
Penalty Kick (PK)
Dribble
Other
Match Details
The number of shot attempts and fouls
can be checked. Also, player movements
within the game can be followed and the
compact line can be analyzed.
Possession
Possession can be checked for each time
period.
Compact Formation
Check the distance between the forwards
and the defensive players (excluding the
goalkeeper). If this distance is short when
you are defending, you are effectively
reducing the opponent's opportunity to
attack. On the other hand, when attacking
it is best for this distance to be long.
Individual Game Records
A list of all the players who participated in
the game is displayed. Select a player to
view a data screen that shows the actions
of that player during the game.
Rating
Assigns a rating out of ten to players who
appeared in the game for more than a set
period of time.
Area of Play
Shows where the player was active on the
field.
Area played to
Shows where on the field the player had
possession of the ball
Area of Possession
Shows where on the field the player had
contact with the ball.
Memory Card (8MB) (for PlayStation®2)
Saving Data
Saving data to the Memory Card (8MB) (for PlayStation®2)
Game settings and progress in each Game Mode can be saved to a memory card (8MB)
(for PlayStation®2)
To save data to a memory card (8MB) (for PlayStation®2), the following available space
is required.
Game Save
MEMORY CARD slot 1 (1 – A) is used for saving data
(with some exceptions, for details see p. 47).
Insert a memory card (8MB)(for PlayStation®2) into MEMORY CARD slot 1. With the
exception of the Option File, the save/load screen will be displayed when “Save” or
“Load” is selected. Select the location in which the data is to be saved with the
directional button, and then press the ≈ button to confirm. Data can only be saved in
empty spaces or over data of the same type.
To save data over a different type of data, the unwanted data must first be deleted in
Delete Mode before saving the new data.
Use the √ button to switch between Save Mode and Delete Mode.
Press the ç button to return to the previous screen.
* Only one Option File can be created per memory card (8MB) (for PlayStation®2). A
maximum of 35 sets of other data can be created.
Memory Card (8MB) (for PlayStation™2) Space Requirements:
Option File at least 793 KB
Master League Data at least 402 KB
Cup Data at least 340 KB
League Data at least 337 KB
Challenge Data at least 70 KB
Original Dribble Course at least 70 KB
Formation Data at least 49 KB
Replay Data at least 260 KB
PES3_Man Guts_uk.qxd 2/9/03 12:28 pm Page 46
Page 26

47 PES3 PES348
Using MEMORY CARD slot 2 (2-A)
MEMORY CARD slot 2 (2-A) is used in the following cases:
• When saving and loading away team formation data for matches played in the Match
Mode.
• When loading Team 2 data for Master League Data Matches played in Match Mode,
and when saving/loading Team 2 formation data for Master League Data Matches
played in the Match Mode.
• When using the Edited Data Manager in Edit Mode to load a friend’s Option File from
a memory card (8MB) (for PlayStation®2).
Data saved in the Option File
The following data is saved in the Option File:
Environment Settings for Exhibition Matches: Weather, match time, level, match
format, etc.
Match Settings: Controller settings, camera angles, screen displays, etc.
Edited Data: Player Data, Edited Club Team Data, etc.
Game Options: Button configuration, sound settings, etc.
Training: Save certain training options.
Auto Save
In order to autosave League Data, Cup Data, and Master League Data, first make a
manual save to activate the autosave.
The game includes two auto-save options: Option File Auto Save and Game Data Auto
Save (League Data, Cup Data, and Master League Data). Note that different data is
saved in each of these cases. Option File Auto Save can be turned ON/OFF from the
Game Options screen or with the Option File Settings in Edit Mode. Game Data Auto
Save can be turned ON/OFF from each game menu.
Copy Saved Data
It is possible to copy data saved in locations 1 to 35 on the memory card (8MB) (for
PlayStation®2) to another location, as long as that location is either empty or contains
the same type of data. To save data over a different type of data, the unwanted data
must first be deleted in Delete Mode before saving the new data. Location 36 on the
memory card (8MB)(for PlayStation®2) is used for the Option File and cannot be
copied.
Delete Saved Data
Delete data saved in locations 1 to 36 on the memory card (8MB) (for PlayStation®2).
(The Option File can also be deleted.)
Save Save
About Cheat Prevention Save
When starting a new League Mode or Master League Mode
game with Cheat Prevention Save set to ON, you must create
save game data on a memory card (8MB) (for PlayStation®2).
Please note that before a game is finished data up to that point
will be automatically saved.
Although it is possible to play the game without the use of an Option File, the Option
File contains saved game environment settings, cup data, edited data and other
parameters, so saving an Option File to a memory card (8MB) (for PlayStation®2) is
recommended. MEMORY CARD slot 1 (1-A) is used for saving and loading the Option
File. The system will automatically attempt to load the Option File when the game is
started, so ensure that the memory card (8MB) (for PlayStation®2) that contains the
Option File has been inserted into MEMORY CARD slot 1 (1-A) before turning on the
power. The Option File will be automatically loaded. The game will automatically create
an Option File if one does not already exist. A warning message will appear if a memory
card (8MB) (for PlayStation®2) has not been inserted or the card inserted does not
contain sufficient available space. In this event, follow the on-screen instructions. Also,
note that a minimum of 793KB of available space is required on the memory card (8MB)
(for PlayStation™2) in order to save the option file. Once the Option File has been
loaded/saved, any changes made during the game will automatically be saved to the
memory card (8MB) (for PlayStation®2) in MEMORY CARD slot 1 (1-A). The Option File
Auto Save function can be turned ON/OFF by selecting Option File Auto Save Settings
on the Game Options Screen.
KOREA FA / © 2001 KFA
JFA / © 1996 JAPAN FOOTBALL ASSOCIATION © 2002 JFA. MAX
adidas / adidas, the adidas logo and the 3-Stripe trade mark are registered trade marks of the adidas-
Salomon group, used with permission
FIFPro / the use of real player names and likenesses is authorised by FIFPro and its member associations.
Club Teams / Milan's trademarks, name and logo appear under license from Milan A.C. S.p.A. Official
product manufactured and distributed by KONAMI under licence granted by Roma International Football
Service S.r.l. Produced under the license from Lazio Societa Sportiva S.p.A. Parma and Parma Logo are
trademarks of Parma Associazione Calcio S.p.A. Official Juventus Product JUVENTUS and the JUVENTUS
logo are registered trademarks owned by Juventus F.C. S.p.A. © 1993/all rights reserved Stichting
Feyenoord, Rotterdam Licensed by: Stichting Feyenoord, Rotterdam
PES3_Man Guts_uk.qxd 2/9/03 12:28 pm Page 48
Page 27

Konami of Europe
President Konami of Europe GmbH
Kunio Neo
Director - Product Management Division
Dave Cox
European Brand Co-ordinator
Ralph Champeau
Konami of Europe Special Thanks
Hans Joachim-Amann
Christopher Heck
Martine Saunders
Martin Schneider
Hans Kohrs
Ella Siebert
Susana González
Jon Murphy
Konami (Japan)
Aki Saito
Ippei Nio
Chikako Tsurumi
Ayako Minagawa
Design
department.x
Manual Translation
Eurotek Multilingual Limited
Front cover
B+T
JC & Laurent
Jean-Daniel Lorieux
Customer Services Numbers
• Australia
___________________________
1300 365 911
______________________________
Calls charged at local rate.
Please call these Customer Service Numbers only for hardware support of PlayStation products.
• Österreich
__________________________
0820 500 535
______________________________
0.145 Euro/Minute.
Rufen Sie diese Kundendienstnummern bitte nur an, wenn Sie Hardware-Support für PlayStation-Produkte benötigen.
• Belgique/België/Belgien
______________
011 516 406
_______________________________
Prix d'un appel local.
Veuillez composer les numéros du service après-vente pour recevoir une assistance technique destinée uniquement aux produits PlayStation.
• Danmark
____________________________
33 26 68 00
_______________________________
Man-Torsdag 9-16.30 Fre 10-15.
Ring venligst kun til disse kundeservicenumre vedrørende hardwaresupport til PlayStation-produkter
.
• Suomi
______________________________
0600–411911
_______________________________
17.00-21.00 ma-to, 0.79 Euro/min.
Tätä asiakaspalvelunumeroa voi käyttää vain PlayStation-tuotteiden laitteistotukeen liittyvissä kysymyksissä.
• France
_____________________________
0820 31 32 33
______________________________
Prix d'un appel local - ouvert du lundi au samedi.
Veuillez composer les numéros du service après-vente pour recevoir une assistance technique destinée
uniquement aux produits PlayStation.
• Deutschland
_______________________
01805 766 977
______________________________
0,12 Euro/minute.
Rufen Sie diese Kundendienstnummern bitte nur an, wenn Sie Hardware-Support für PlayStation-Produkte benötigen.
• ∂ÏÏ¿‰·
________________________
00321 0678 2000
_____________________________
∂ıУИО‹ ГЪ¤ˆЫЛ. ¶·Ъ·О·ПВ›ЫЩВ У· ЩЛПВКˆУВ›ЩВ ЫВ ·˘ЩФ‡ ЩФ˘ ·ЪИıМФ‡ ЩФ˘ ∆М‹М·ЩФ ∂Н˘ЛЪ¤ЩЛЫЛ ¶ВП·ЩТУ МfiУФ БИ· ı¤М·Щ· ˘ФЫЩ‹ЪИНЛ
˘ПИЫМИОФ‡ ЩˆУ ЪФ˚fiУЩˆУ PlayStation.
• Ireland
______________________________
0818 365065
_______________________________
All calls charged at National Rate.
Please call these Customer Service Numbers only for hardw
are support of PlayStation products.
• Israel
_________________________________
09 971170
________________________________
Please call these Customer Service Numbers only for hardware support of PlayStation products.
• Italia
_______________________________
848 82 83 84
______________________________
Tariffa Nazionale.
Chiamare questi numeri del Servizio Clienti solamente se si necessita di assistenza relativa all’hardware dei prodotti PlayStation.
• Malta
________________________________
21 344700
_______________________________
National Rate.
Please call these Customer Service Numbers only for hardware support of PlayStation products.
• Nederland
__________________________
0495 574 817
______________________________
Interlokale kosten.
Bel deze klantenservicenummers alleen bij hardwareproblemen met PlayStation-producten.
• New Zealand
________________________
09 415 2447
______________________________
National Rate.
Please call these Customer Service Numbers only for hardware support of PlayStation products.
• Norge
_______________________________
820 75 050
_______________________________
Mon-Fre 8.30-16.30.Vennligst ring disse kundeservicenumrene bare for maskinvarestøtte i forbindelse med PlayStation-produkter.
• Portugal
____________________________
707 23 23 10
______________________________
Contacte-nos através destes números de Assistência ao Cliente para obter asitÊncia técnica (hardware) apenas para produtos da PlayStation.
• España
_____________________________
902 102 102
_______________________________
Tarifa nacional.
Al llamar a estos números del Servicio de atención al cliente sólo obtendrá asistencia para los productos PlayStation.
• Sverige
_____________________________
08 587 822 40
______________________________
Mån-Tors 8-17 Fre 8-15.30.
Ring endast dessa kundservicenummer för maskinvarusupport av PlayStation-produkter.
• Suisse/Schweiz/Svizzera
____________
0848 84 00 85
______________________________
Tarif appel national / Nationaler Tarif / Tariffa Nazionale.
Veuillez composer les numéros du service après-vente pour recevoir une assistance technique destinée
uniquement aux produits PlayStation.
• UK
________________________________
08705 99 88 77
______________________________
National rate. Calls may be recorded for training purposes.Calls charged at local rate.
Please call these Customer Service Numbers only for hardware support of
PlayStation products.
Please call these Customer Service Numbers only for hardware support of PlayStation products.
49 PES3
Credits
PES3_Man Guts_uk.qxd 2/9/03 12:28 pm Page 50
Page 28

F
O
R
H
O
M
E
U
S
E
O
N
L
Y
.
U
n
a
u
t
h
o
r
i
s
e
d
c
o
p
y
i
n
g
,
a
d
a
p
t
a
t
i
o
n
,
r
e
n
t
a
l
,
l
e
n
d
i
n
g
,
d
i
s
t
r
i
b
u
t
i
o
n
,
e
x
t
r
a
c
t
i
o
n
,
r
e
-
s
a
l
e
,
a
r
c
a
d
e
u
s
e
,
c
h
a
r
g
i
n
g
f
o
r
u
s
e
,
b
r
o
a
d
c
a
s
t
,
p
u
b
l
i
c
p
e
r
f
o
r
m
a
n
c
e
a
n
d
i
n
t
e
r
n
e
t
,
c
a
b
l
e
o
r
a
n
y
t
e
l
e
c
o
m
m
u
n
i
c
a
t
i
o
n
s
t
r
a
n
s
m
i
s
s
i
o
n
,
a
c
c
e
s
s
o
r
u
s
e
o
f
t
h
i
s
p
r
o
d
u
c
t
o
r
a
n
y
t
r
a
d
e
m
a
r
k
o
r
c
o
p
y
r
i
g
h
t
w
o
r
k
t
h
a
t
f
o
r
m
s
p
a
r
t
o
f
t
h
i
s
p
r
o
d
u
c
t
a
r
e
p
r
o
h
i
b
i
t
e
d
.
“”
and “PlayStation” are registered trademarks of Sony Computer Entertainment Inc. All Rights Reserved. Made in Austria.
Library programmes© 1997-2003 Sony ComputerEntertainment Inc.exclusively licensed toSony Computer EntertainmentEurope.
© 2001 KFA
©1996 JAPAN FOOTBALL ASSOCIATION ©2002 JFA. MAX
adidas, the adidas logo and the 3-Stripe trade mark are registered trade marks of the adidas-Salomon group, used with permission.
the use of real player names and likenesses is authorised by FIFPro and its member associations.
All other copyrights and/or trademarks are the property of their respective owners and are used under license.
SLES-51912
Pro Evolution Soccer™ © 2003 KONAMI CORPORATION.
Published by Konami of Europe GmbH. Developed by Konami Computer Entertainment Tokyo
CMYK
Page 29

WHITE BASE
 Loading...