

Page 1
0504 Part No. X09-83520
Get the strategy guide
primagames.com
®
Soundtrack available in stores now or at
http://www.xbox.com/sudeki
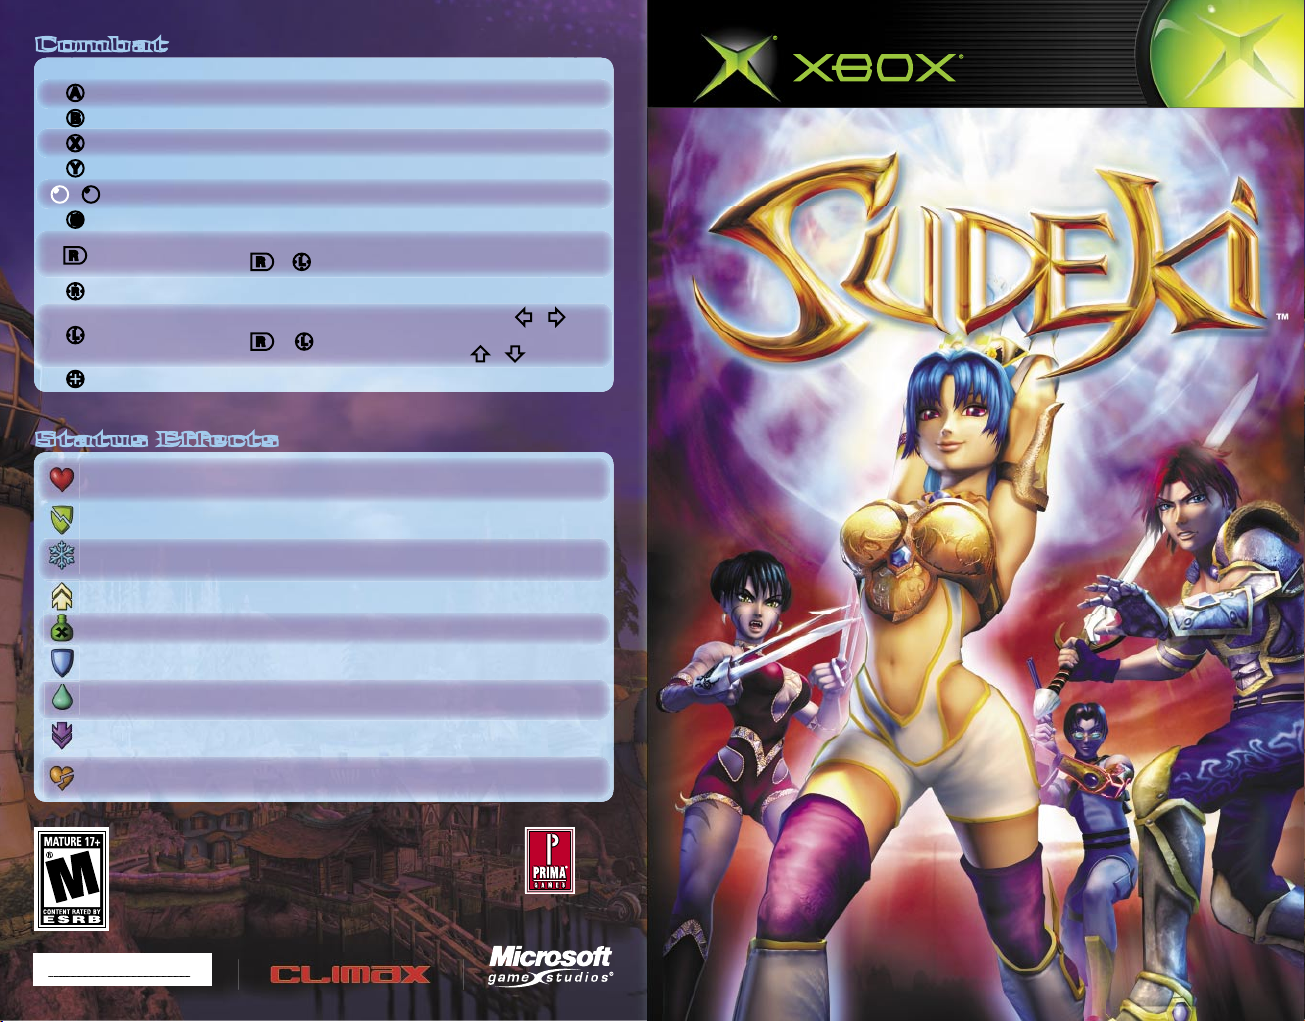
Combat
Melee Ranged
A
Launches a vertical attack. Fires a shot.
B
Clears multiple enemies. Clears multiple enemies.
X
Launches a horizontal attack. Cycles through weapons.
Y
Displays Quick menu. Displays Quick menu.
b
/
b
Switches characters. Switches characters.
>
Pauses game. Pauses game.
r
Raises shield;
Rolls/Back ips ( r+ L).
Fires a shot.
R
Controls camera movement. Aims at an enemy (1st-Person).
L
Moves character;
Rolls/Back ips ( r+ L).
Strafes (1st-Person; 1 / 5);
Moves forward/backward
(1st-Person; 7 / 3).
?
Uses a Quickshot item. Uses a Quickshot item.
Status Effects
Boost
In icts double damage, including weapon damage, on
enemies during combat.
Curse Causes the target to suffer double damage during combat.
Freeze
Stops the target from moving and causes it to suffer full
damage during combat.
Haste Causes the target to move at double speed.
Poison Causes the target to suffer damage over time.
Protect Causes the target to suffer only half damage during combat.
Regen
Regenerates the target’s HP. (The amount of HP regained and
the duration of the effect depend on the target’s Essence.)
Slow Causes the target to move more slowly.
Weaken
Causes the target to in ict half damage on enemies
during combat.
Page 2
1
Safety Information
About Photosensitive Seizures
A very small percentage of people may experience a seizure when exposed to certain visual
images, including ashing lights or patterns that may appear in video games. Even people
who have no history of seizures or epilepsy may have an undiagnosed condition that can
cause these “photosensitive epileptic seizures” while watching video games.
These seizures may have a variety of symptoms, including lightheadedness, altered vision,
eye or face twitching, jerking or shaking of arms or legs, disorientation, confusion, or
momentary loss of awareness. Seizures may also cause loss of consciousness or convulsions
that can lead to injury from falling down or striking nearby objects.
Immediately stop playing and consult a doctor if you experience any of these symptoms.
Parents should watch for or ask their children about the above symptoms—children and
teenagers are more likely than adults to experience these seizures.
The risk of photosensitive epileptic seizures may be reduced by sitting farther from the
television screen, using a smaller television screen, playing in a well-lit room, and not
playing when you are drowsy or fatigued.
If you or any of your relatives have a history of seizures or epilepsy, consult a doctor
before playing.
Other Important Health and Safety Information The Xbox Instruction Manual contains
important health and safety information that you should read and understand before using
this software.
Avoid Damage to Your Television
Do not use with certain televisions. Some televisions, especially front- or rear-projection
types, can be damaged if any video games, including Xbox games, are played on them. Static
images presented during the normal course of gameplay may “burn in” to the screen, causing
a permanent shadow of the static image to appear at all times, even when video games are
not being played. Similar damage may occur from static images created when placing a video
game on hold or pause. Consult your television owner’s manual to determine if video games
can be played safely on your set. If you are unable to nd this information in the owner’s
manual, contact your television dealer or the manufacturer to determine if video games can
be played safely on your set.
Table of Contents
Game Controls.......................................................................... 2
Light and Shadow
.................................................................... 4
Fellow Heroes
........................................................................... 6
The Worlds
............................................................................. 10
Exploring................................................................................12
The Menus
.............................................................................. 15
Equipping a Character
............................................................ 16
Combat ................................................................................... 18
Setting Character Behavior
..................................................... 22
Changing Characters
.............................................................. 23
Health and Healing................................................................. 23
Character Advancement
......................................................... 25
Credits
.................................................................................... 27
Warranty
................................................................................ 28
Technical Support
................................................................. 29
Table of Contents
Page 3
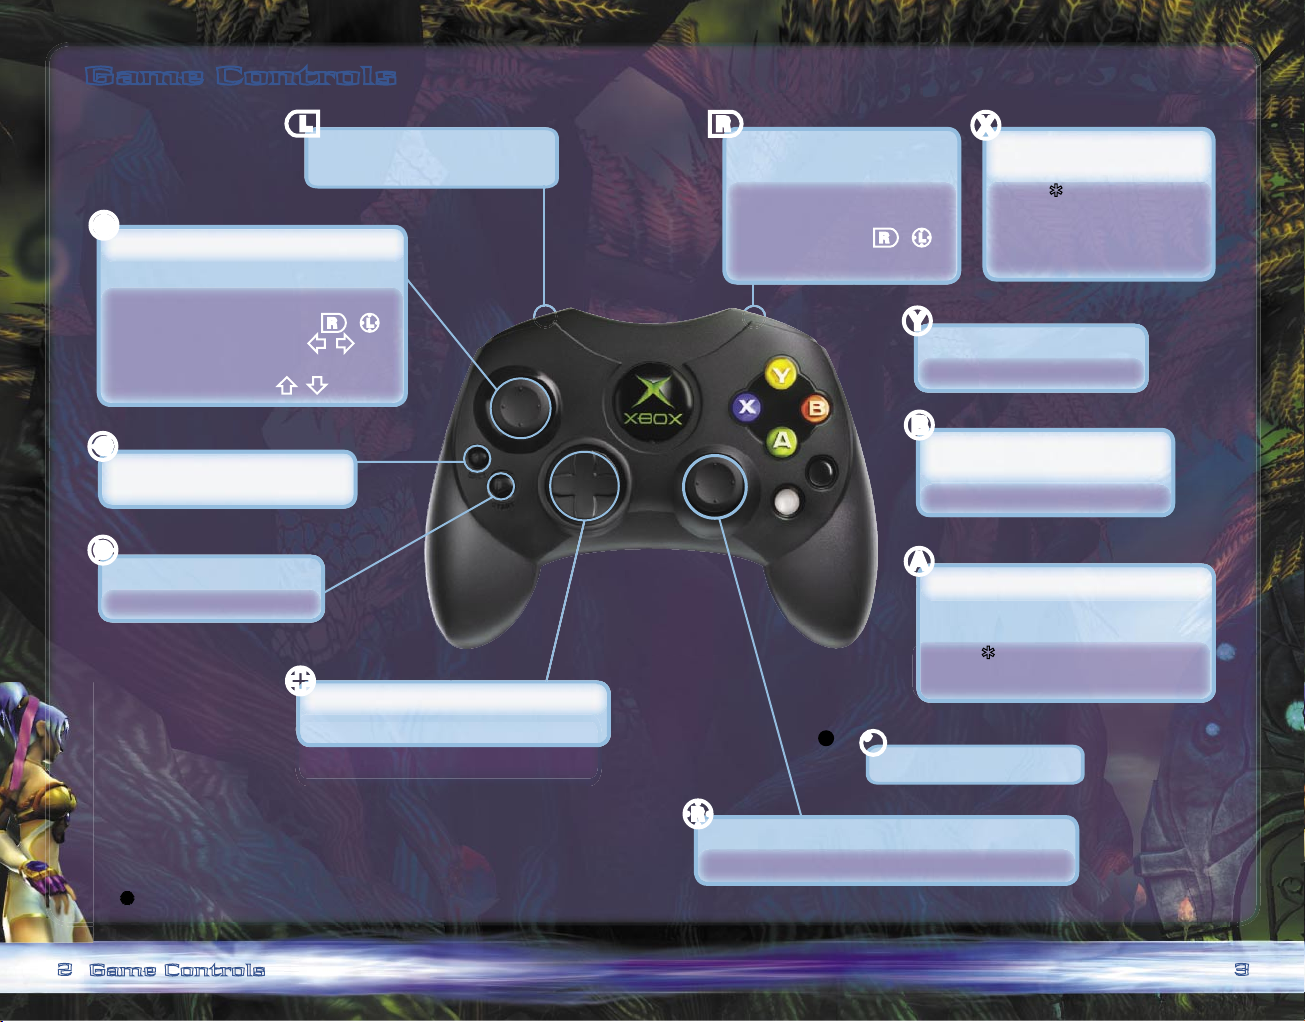
Game Controls
Note: To adjust controller settings, select Options from the
Main
menu.
*
See pg. 18 for more info on combo moves.
>
<
/
b
b
2
3
Game Controls
In-game: Snap camera
behind character.
Combat: Raise shield (melee);
Roll/Back ip
(melee; r+ L);
Fire a shot (ranged).
In-game: Toggle quickly between
1st/3rd-Person views.
Menus: View more info on
current selection.
Combat:* Launch horizontal
attack (melee);
Cycle through
weapons (ranged).
In-game: Display Quick menu.
Combat: Display Quick menu.
Menus: Cancel selection;
Return to previous menu.
Combat: Clear multiple enemies.
Menus: Perform action.
In-game: Talk to another character;
Check an item.
Combat:* Launch vertical attack (melee);
Fire a shot (ranged).
In-game: Switch characters.
In-game: Toggle between 1st/3rd-Person views (click).
Combat: Aim at an enemy (1st-Person).
Menus: Scroll through options.
In-game: Use a Quickshot item (see pg. 17).
In-game: Display Main menu.
Combat: Pause game.
Menus: Cancel selection;
Return to previous menu.
Menus: Scroll through options.
In-game: Move character.
Combat: Move character (melee);
Roll/Back ip (melee; r+ L);
Strafe (1st-Person; 1/5);
Move forward/backward
(1st-Person; 7/3).
L
l
r
X
Y
B
A
R
?
Page 4
4
5
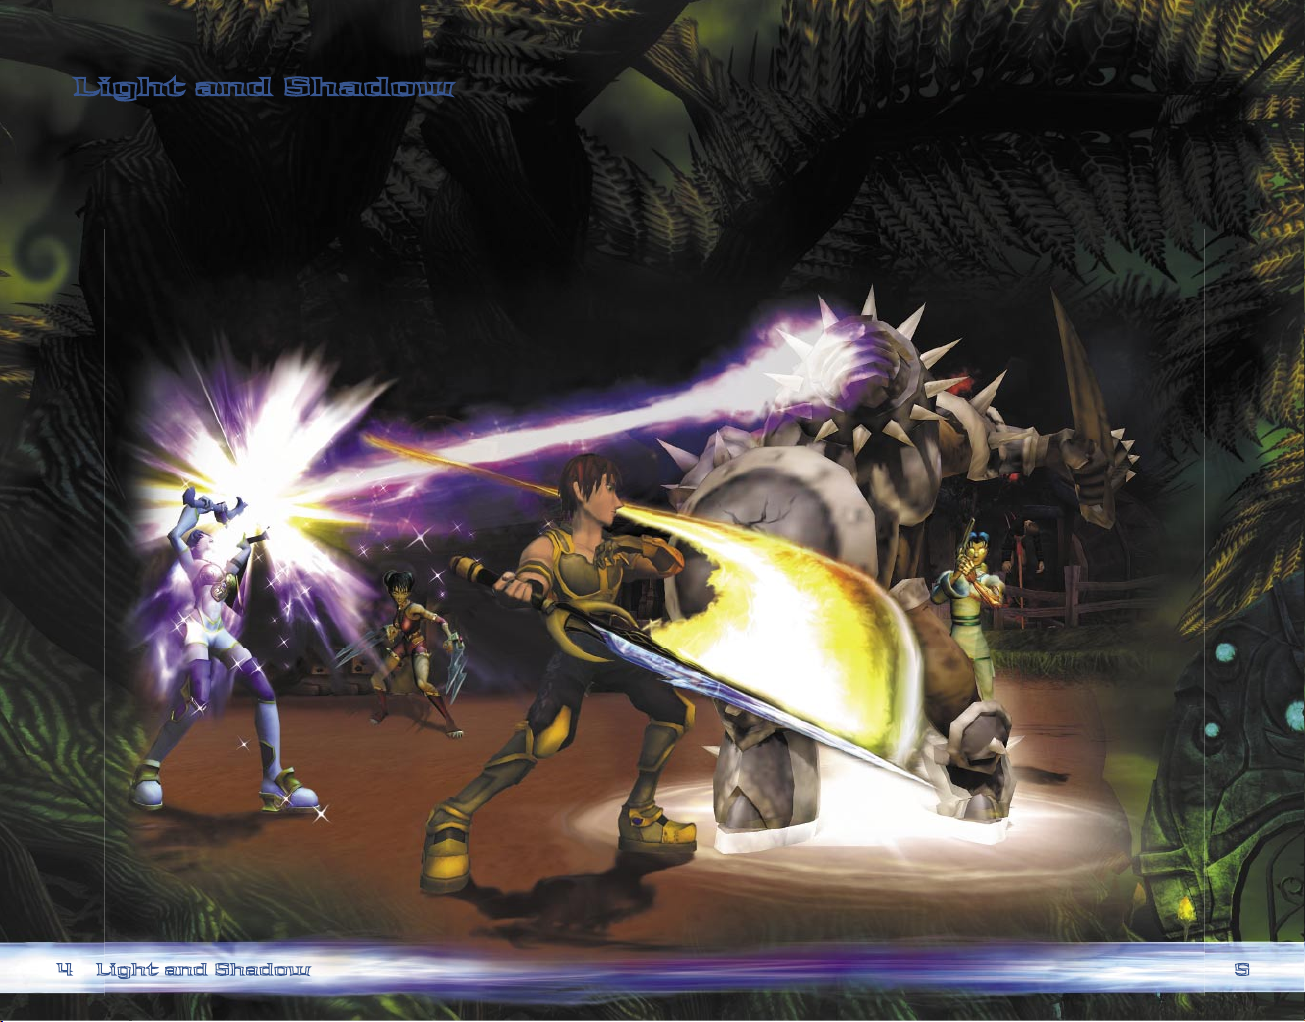
Light and Shadow
Queen Lusica of Haskilia was born into Illumina’s royal family in
much happier times. But with no father and a mother too ill to care
for her, she suffered in her personal life. And now, she nds her
reign troubled by the war that ravages this once-peaceful land.
Understandably embittered, Lusica has turned her anger toward
the invading Aklorians and thrown her considerable powers into
defending her kingdom.
Four friends have joined together to aid their queen. Though
destined to encounter ancient gods, primordial wonders, and
marvelous inventions, foes and betrayal haunt their every step.
A keen eye could prove vital, exposing essential clues. And as the
companions make their way through darkness and light, they’ll
discover that those two extremes have more in common than they
once imagined...
Light and Shadow
Page 5
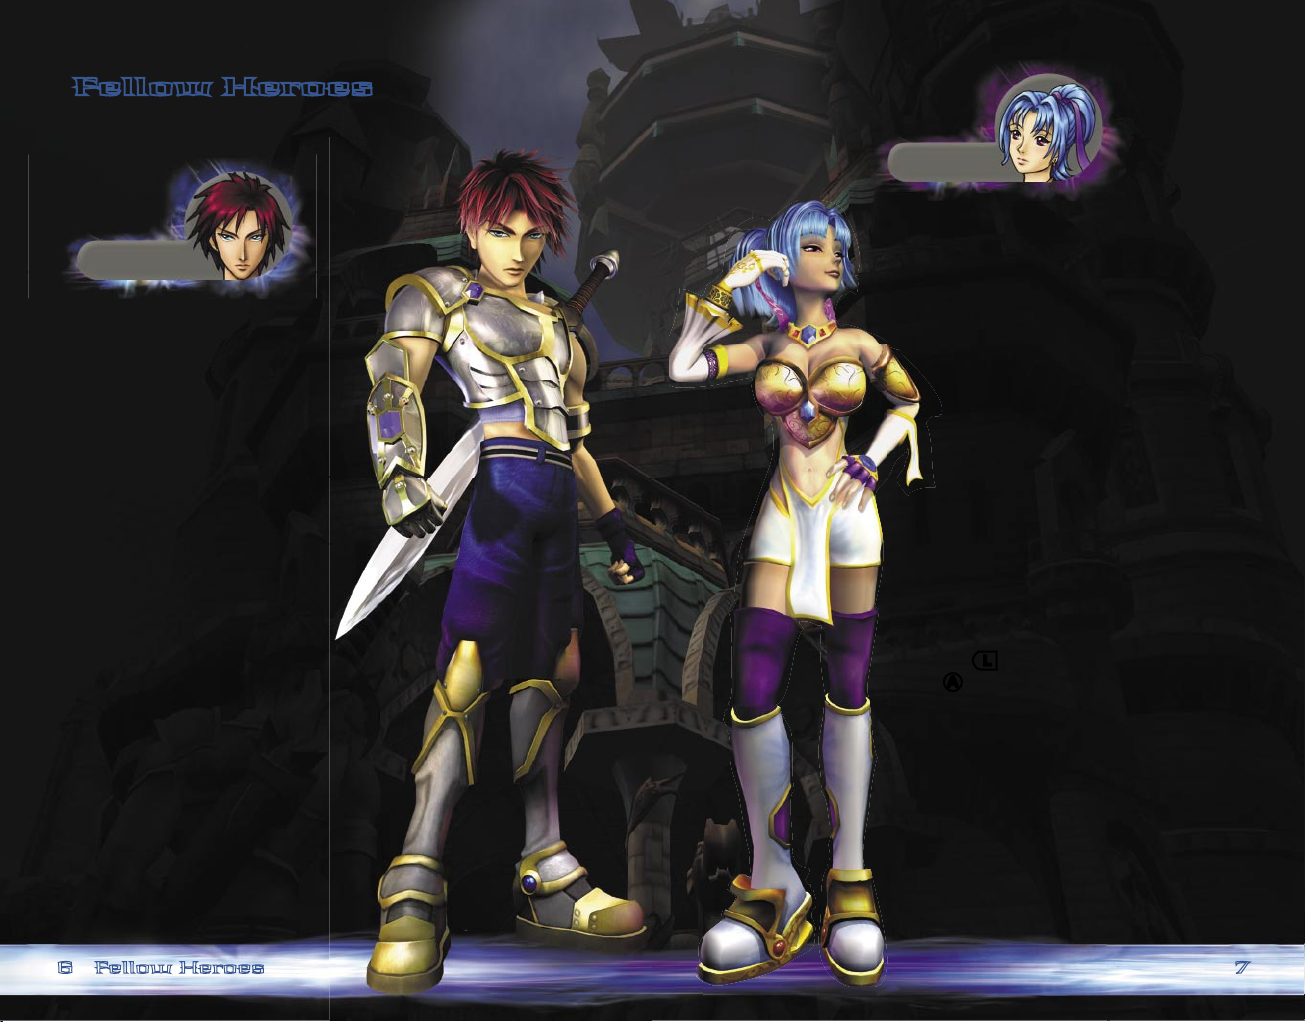
Tal
Ailish
6
7
Fellow Heroes
These four player characters (PCs) hold the future of their world
in their hands—even if they don’t yet realize it.
While his father abandoned the
family in favor of army life, the
ongoing war claimed the lives of
Tal’s mother and younger
brother. A war-torn youth—
scarred by his father’s betrayal
and the passing of those most
dear to him—left Tal with a
burning desire to prove his mettle
as a soldier and to earn the respect
of his father. So upon graduating
from military college, Tal joined
the Elite Illumina Guard,
under the command of none
other than his estranged
father, General Arlo.
Special Ability
Tal’s special ability is strength. He’s a
tough customer who puts his muscles
to good use moving obstacles that
block his path.
Fellow Heroes
Though magic is common in Haskilia, few
wield it with such skill as Princess Ailish.
The powers that manifested in her when
she was very young have grown ever
stronger during her 19 years. And while
she’s been happy enough at Illumina
Castle with her mother, Queen Lusica—
not to mention having handsome
Tal training in the courtyard—the
spreading war soon will test both
her magical abilities and her
dedication to her homeland.
Special Ability
Ailish’s special ability is magical
sight. She can see things on the
magical plane that others can’t, which
is handy when things are looking dark.
She can also make objects appear and
disappear while in First-Person view.
Note: To reveal or dispel items, pull
and hold l, target the item, and then
press A.
Page 6

Buki
Elco
8
9
An exotic mix of human and animal, Buki’s
senses and instincts are far sharper than
any human’s. But because of those very
differences, she, like most of her race,
is somewhat mistrustful of humans.
Nevertheless, her position as an
ambassador has brought her to
Illumina Castle, where her shrewd
and clever nature serves her well.
Special Ability
Buki’s special ability is her climbing
claws. She can scale walls and
clamber sideways with ease to get to
places others can’t even dream
of reaching.
Everyone agrees that Elco displays
wisdom beyond his 24 years. An
unfortunate accident left him with only
one arm but created in him a
formidable will. While still
young, he discovered that
certain large crystals
possessed great magical power,
and with the determination and
precision of a born scientist, Elco
began working to harness that
power. Currently he is creating a “peace
shield” to protect Illumina from invasion.
Special Ability
Elco’s special ability is his rocket pack.
He can y over crevasses with ease,
jetting to places no one else can. Just be
sure he’s got enough rocket fuel.
Fellow Heroes
Page 7

10
11
The Worlds
Haskilia
Citizens of the Bright Empire of Haskilia long enjoyed
prosperity and contentment. But when the ruthless
Aklorians began invading the kingdom, slaughtering
any innocent in their path, all thoughts turned to
survival. Now, the Haskilian Army is called to defend
its people from Aklorian warriors ravaging
the countryside.
Illumina Castle
From within her castle in the capital city of
Illumina, Queen Lusica governs well, despite
the rampaging war. An occasional visit to her
stronghold will be necessary to restock supplies,
regroup your party, or perhaps have an audience with
the queen herself. But while even the most ordinary
of explorers could handle such basic duties, a true
adventurer might just uncover a few secrets hidden
well within those stone walls.
Illumina Countryside
Beyond the protective walls of Illumina Castle lie miles
of pastoral, rolling countryside. Though once a serene
landscape, the Aklorian forces have transformed the
countryside into a charred battleeld. Simply passing
through the region is unsafe, as travelers must be
ever alert for ambushes.
Akloria
Within the dark
world of the invading
Aklorians lie Cyantine
Citadel, Devil’s
Belch Canyon, and a
number of other alien
locations—dim and
menacing, yet strangely
recognizable…
The Realm of Shadows
This foreboding place is sacred to the anthropomorphs,
a race of half-human, half-animal beings. In this
unsettlingly familiar world, you will unlock the secrets
of Durani-Mo and discover the tomb of Farex Lore.
Take careful note of everyone you encounter. For by
observing them, you might learn something
unexpected about yourself.
New Brightwater
Untouched thus far by the war, this seaside village
remains a favorite holiday retreat of many courtiers.
After a harrowing journey through the countryside,
rest at the local inn and stock up on additional
supplies. Be sure to speak with the town’s many
colorful inhabitants; they’re sure to provide
information you may need.
The Worlds
Page 8

12
13
Exploring
Navigating
Sudeki™ provides two types of maps to help you navigate: the
Navigation Map and the World Maps.
Navigation Map
The Navigation Map appears in the upper-left corner of the screen.
• Yellow ray: Direction your character is facing
• Purple dots: Other members of party
• Yellow arrow: Where you entered area
• Green dots: Friends
• Red dots: Enemies
• White arrow: Direction of main quest
World Maps
World Maps help you gure out where
you are and where you’re going.
TO VIEW THE WORLD MAPS
1. Press > to display the Main menu.
2. Highlight the World Maps option on the Options bar at the
bottom of the screen, and then press A.
3. On the World Maps menu, highlight the map you’d like to view,
and then press
A
.
4. Use L to scroll around and view different areas of the map.
The Quest Log
As you adventure through Sudeki, consult your Quest
Log to remind yourself of the task at hand. You are given
your rst quest at the opening tutorial.
TO VIEW THE QUEST LOG
1. Press > to display the Main menu.
2. Highlight the Quest Log on the Options bar at the bottom of the
screen, and then press
A
.
Save Points
The books that you encounter throughout
Sudeki are save points. To save your game,
walk up to the book, and then press
A
.
Collecting Items
Everything you discover in Sudeki
has a use. Occasionally, you’ll discover
something you can’t immediately identify. Pick it up
anyway; chances are good that you’ll need it later.
TO PICK UP AN ITEM
• Move your character over the item. The item will be added
automatically to that character’s inventory.
Remember, watch for the green Check
icon in the lower-left corner of the
screen. When it’s visible, there’s
something nearby for you to investigate,
pick up, or smash.
Exploring
Inn Kamo Shop
Blacksmith
Trader
Page 9

14
15
Trading and Shopping
Pay attention to the things you collect as you make your
way through the world. You can trade some of these to
merchants for orins… and orins buy great gear at
local shops. When you come across merchants and
shops, be sure to stock up on healing potions and other useful
things. Keep in mind that you’re likely to get a better deal from
a wandering trader than a town merchant.
TO EXAMINE YOUR VALUABLES
1. Press > to display the Main menu.
2. Highlight the Valuables option on the Options bar, and
then press
A
.
TO TRADE OR SHOP
• Walk up to a local merchant, and
then press
A
to speak to him or her.
Setting Game Options
You can use the Main menu to adjust game options,
such as music volume, text speed, and camera views.
TO ADJUST GAME SETTINGS
1. Press > to display the Main menu.
2. Highlight Options on the Options bar, and then press A.
3. On the Options menu, scroll up or down to highlight the item
that you’d like to adjust, and then scroll left or right to adjust
the option.
Note: Press X to see more information on each option.
The Menus
You’ll begin your quest with a few items and skills that will come in
handy during an adventure, but soon you’ll gain more weapons,
money, and valuables. You can get to these items through two
menus: the Quick menu and the Main menu.
Quick Menu
Use the Quick menu when you’re in the
thick of things; it slows the game and takes
you directly to the items you’ll need most
often while in combat: weapons, A.I.
settings, items, skills, and Spirit Strikes. That
way, if you need a Spirit Strike or an Emerald
Panacea in a hurry, you can get to it quickly.
Note: Most of the items you can access from the Quick menu
during combat also are available through the Main menu when
you’re
not in combat.
TO USE A QUICK MENU ITEM
1. Press Y to display the Quick menu.
2. Scroll through the items in the list at the top of the Quick menu.
3. Press A to use an item.
Main Menu
Use the Main menu when you’re not in
combat. It pauses the game, and you get
to choose from more game options.
TO USE A MAIN MENU ITEM
1. Press > to display the Main menu.
2. Scroll through the options in the Options bar.
3. Press A to select an item.
The Menus
SLOWS GAME
Always available,
but most useful
when in combat.
PAUSES GAME
Available only
when not
in combat.
Page 10

16
17
Equipping a Character
As you progress, you’ll want to equip yourself with new and
better weapons, spells, and items. Let’s say that you want to
swap your Recruit’s Sword for the more impressive
Mammoth’s Fang sword you just found. Here’s how.
TO EQUIP YOUR CHARACTER
1. Press Y to display the Quick menu.
2. Scroll left or right to highlight an item on the Options bar at the
top of the screen, and then press
A
to select the category (for
example, Weapons
).
3. Scroll up or down to highlight a speci c weapon (for example, the
Mammoth’s Fang), and then press
A
to get it.
Enchanting Weapons and Armor
You can improve the effectiveness of weapons and armor by asking the
local blacksmith to inscribe them with enchanted runes. Smithies are
located in towns and villages.
Note: Round runes are larger and more effective than small, square
runes. Experiment with different rune combinations to create your
own unique weapons.
TO ENCHANT AN ITEM
1. Find and speak to a local blacksmith and request an enchantment
(press A).
2. On the Blacksmith menu, press up or down on ? to highlight the
weapon or armor that you’d like to enchant, and then press
A
.
3. Press up or down on ? to view the available runes.
Note: Each rune costs money, so be sure you have enough orins
before you try to buy a rune.
4. Press A to select the rune that you’d like to have applied to your
weapon or armor.
5. If the weapon or armor can hold multiple runes, select a slot for
another rune, and then press A.
Quickshot Items
While adventuring, you’ll collect such useful items
as healing ointments and antidotes to poison. The
easiest way to retrieve these items is to make them
Quickshot items by assigning them to ?. You can
create up to four Quickshot items, one for each
direction on ?.
TO CREATE QUICKSHOT ITEMS
1. Press > to display the Main menu.
2. Highlight the Items option on the Options bar, and then press A.
3. On the Items menu, scroll to the item in the list that you’d like to
assign to
?
, and then press X.
4. Press ? in the direction to which you’d like to assign the item
(this will appear in the Quickshot box on screen), and then
press
A
.
Your new Quickshot item will appear as one of the four items at the
top of the
Items list.
Equipping a Character
Page 11

18
19
Combat
Some battle strategies work better than others. Fortunately, you and
your friends have many different talents. Ailish favors ranged
magical attacks, while Tal prefers to wield his sword in melee
techniques. Here are different ghting tactics and the characters
that excel at them.
Note: Be sure to look for opportunities to boost your armor with
runes or spells.
Melee Attacks
Got some evil up close? Wipe the smirk off that Aklorian’s face with
a melee attack. This attack form uses swords, claws, and other
hand-held weapons and works best on enemies in your immediate
vicinity.
Melee ghters:
Tal and Buki
The Combo Bar
The Combo bar appears in the lower-left
corner during melee combat and displays the
combo buttons as you press them. The circles
in the Combo bar ash blue to indicate when you need to press the
next button. If you do not press the next button at the correct time,
a red X appears in the circle, and you must restart the combo.
Combo Moves for Tal and Buki
Combat
A
Launch a vertical melee attack
X
Launch a horizontal melee attack
B
Knock multiple enemies away with a sweep attack
Combo Moves
As the rst tutorial in Sudeki demonstrates, melee ghters Tal and
Buki have special combination moves that can in ict different
amounts of damage on one or more enemies. To execute a combo
move successfully, you must press a sequence of three buttons
(listed in the following table) within a speci c amount of time, as
indicated on the Combo bar.
A, A,
A
Stabbing attack Lightning Thrust
Burning Wolf Kick
X, X,
X
Full-circle attack Sidewinder Slash
Lucky Crane’s Feet
A, X, A Spinning air attack Aurora Scythe
Dipping Hawk Punch
X, A,
X
Slow spin attack Typhoon Cutter
Swaying Willow Dance
X, X, A + Juggling move Tornado Spin
( A, A,
A
) * Mystic Tiger’s Fury
A, A, X + Juggling move Blade Mirage
( X, X,
X
) * Devastating Orchid Kick
A, X, X Charge attack Crusader’s Charge
Furious Scorpion Pincer
X, A, A Spinning stun attack Whirlwind Smash
Swirling Storm Strike
* These are “juggling moves.” You can repeat the nal move
in the sequence up to three times by pressing the last
button repeatedly.
Page 12

SSP Bar
20
21
Ranged Attacks
Sometimes it’s smarter to attack from afar,
especially when the enemy either
outnumbers or outclasses you. Ranged
ghters favor pistols, magic staffs, and some spells.
Using ranged attacks will deplete the purple ranged-attack meter.
Generally the meter will recharge over time, but for some weapons,
you must deplete the meter fully before it will recharge.
Ranged ghters: Ailish and Elco
TO LAUNCH A SPIRIT STRIKE
1. Check to make sure you have a full SSP bar.
2. Press Y to launch the Quick menu.
3. Scroll to the Spirit Strikes option.
4. Highlight a Spirit Strike on the list, and then press A.
Monsters
You might have gured out by now that there are a lot of
critters that want nothing more than to make your life
miserable and prevent your success. To view details on
these pests, look for your Monster Compendium on the
Main menu. Each monster you slay appears in the Compendium
along with a list of its strengths and weaknesses.
Combat
R
Aim at an enemy (in 1st-Person view)
r (or
A
) Fire a shot
B
Clear multiple enemies
X
Change ranged weapons
Spirit Strikes
Each character can earn two types of Spirit Strikes—a status strike
or a damage-causing strike.
Spirit Strike ghters: Spirit Strikes are available for all PCs.
The SSP Bar
Before you can launch a Spirit Strike,
your character must have enough
Spirit Strike Points (SSP). A silver SSP
bar lets you know that you have 100
SSP, enough to cast a single status
strike. When the bar changes to gold,
you have 200 SSP, which is enough to
cast either two status strikes or a
single damage-causing strike. The rst
Spirit Strikes you receive generally will be the more expensive
damage-causing strikes, which require a gold SSP bar to cast.
Note: Casting a Spirit Strike depletes your SSP. You can replenish
it by killing enemies and taking hits during combat.
Page 13

Skill Points (SP) bar
A.I. Setting
Hit Points (HP) bar
22
23
Setting Character
Behavior
You can build an effective ghting force by specifying
how your heroes behave during combat. For example,
you may want Tal to attack the enemy aggressively
while Ailish wields her magical staff at the same time.
You do this by adjusting the characters’ A.I. (arti cial intelligence).
Each character has three settings:
• Attack – Attack without any regard for defense.
• Defend – Attack any enemy that threatens the lead character.
• Retreat – Avoid combat no matter the situation.
TO SET A CHARACTER’S A.I.
1. Press Y to display the Quick menu.
2. Scroll left or right to highlight the A.I. Settings option at the top
of the screen.
3. Scroll up or down to highlight the character you’d like to modify,
and then press A.
4. Scroll up or down to examine the attributes in the list, and then
press A to set that attribute for the selected character.
Note: You can set only one A.I. behavior at a time for each
character. For example, Buki can attack or defend, but she
cannot do both at the same time.
Changing Characters
No hero ghts alone. Tal, Ailish, Buki, and Elco are a team, and
you’ll discover that each makes unique and valuable contributions
on quests. In some circumstances, Ailish’s magical ranged attack
may be a smarter choice than Tal’s sword. And Elco’s rocket pack
may be a better choice than Buki’s claws for getting over some
obstacles. So, be sure to switch to the appropriate character for
the circumstances.
TO SWITCH CHARACTERS
• Press
c
or
b
.
Health and Healing
A character’s health is re ected in the green HP bar to
the left of his or her character portrait. When your
character is running low on energy or is gravely
wounded, take a moment to heal before pressing
onward. Sometimes you can acquire healing potions along your
journey by killing enemies. If you’ve a few spare orins, you can
buy a healing potion from a merchant. Some spells also heal
injuries, as will resting at an inn.
TO HEAL A CHARACTER
1. Press c or b to switch to the character who is low on HP.
2. Press Y to display the Quick menu.
3. Scroll to a healing item or magic spell, and then press A.
Note: You can use a healing spell only during combat.
Character Behavior/Health
Page 14

24
25
Status Effects
Some enemies launch status-effect attacks that affect the “status”
of your character. You, in turn, can also affect the status of enemies
by purchasing runes for your weapons and armor.
Some status effects can be bene cial. For example, you can collect
items (such as panaceas) that provide immunity to harmful status
effects (such as Poison) or allow you to “boost” the skills of your
companions.
A black-and-white version of a status-effect icon indicates
that you are temporarily immune to that type of effect.
Note: The duration of a status effect depends on how much
Essence the caster has. The more Essence, the longer the status
effect lasts and the more damage or bene cial magic it bestows.
Character Advancement
Each character in Sudeki starts out with base-level stats.
As you make your way through the game, you’ll gain
Experience Points (XP) by killing monsters, nishing
quests, and solving puzzles. When you earn enough
XP to “level up” (attain the next level) you’ll also gain Advancement
Points (AP). You can advance your character by spending these
AP on attributes and skills on the Advancements menu. The
amount of XP a character needs to attain the next level is shown on
the Main menu.
Note: Be sure to check the Options bar at the bottom
of the Main
menu when you level up. When you earn
new items, a green plus sign appears next to the
category icon.
Attributes
Ideally, you’ll want all the characters to achieve a balance of the
following attributes (which also appear on the
Main menu, next
to the character):
• Health is measured in Hit Points (HP) and enables you to
withstand more damage. You can earn more health for your
characters by buying attributes on the Advancements
menu.
• Skill is measured in Skill Points (SP) and provides more Skill
Strikes for your character to cast (see page 26 for more info).
Spending AP on skills increases the amount of SP that your
character has. Casting Skill Strikes costs SP; resting at inns or
using potions restores SP.
• Power increases your character’s melee and ranged attacks.
• Essence boosts the duration and damage of your character’s Skill
Strikes, increases the strength of creatures they summon, and
increases the amount of healing they can perform.
Character Advancement
Boost In icts double damage, including weapon damage, on
enemies during combat.
Curse Causes the target to suffer double damage during combat.
Freeze Stops the target from moving and causes it to suffer full
damage during combat.
Haste Causes the target to move at double speed.
Poison Causes the target to suffer damage over time.
Protect Causes the target to suffer only half damage during combat.
Regen Regenerates the target’s HP. (The amount of HP regained and
the duration of the effect depend on the target’s Essence.)
Slow Causes the target to move more slowly.
Weaken Causes the target to in ict half damage on enemies
during combat.
Page 15

26
27
Skills
In addition to their innate talents, Tal, Ailish, Elco, and Buki each
have unique skills that you can buy to provide more tactics during
combat. With these they can launch special attacks called Skill
Strikes. Skill Strikes use up Skill Points (SP), so you can cast only a
limited number of them before you’ll need to use potions or rest up
at inns to earn more.
You can control some Skill Strikes for melee ghters Tal and Buki.
Other Skill Strikes, such as healing, affect all party members.
Note: Characters cannot be attacked or damaged while
performing Skill Strikes. Increasing characters’ Essence causes
their Skill Strikes to last longer and in ict more damage.
TO ADVANCE A CHARACTER
(PURCHASE ATTRIBUTES AND SKILLS)
1. Press > to display the Main menu.
2. Scroll left or right to select the Character Advancement option
on the Options bar, and then press A.
3. Scroll up or down on the Advancements menu to examine the
details of the available attributes and skills (amount of increase,
level required, description, etc.).
4. Highlight the attribute or skill you want to purchase, and then
press A.
Note: You cannot advance a character during combat.
So It Begins...
As innocent blood the beasts do spill,
Four join forces to ght this ill.
But when dark and light reverse their roles,
You’ll see the shadow of your own soul.
Credits
Climax Group Ltd.
Game Director
Jason Avent
Producer
Mark Simmons
Lead Designer
Tuomas Pirinen
Designers
Cal Blagbrough, Mark Davies,
Trevor Gamon, Bill Green,
Don Kirkland, Eamon Murtagh,
Nana Louise Nielsen,
Kevin Nolan, Gareth Noyce,
James Parham, Matt Simmonds
Lead Programmer
Stewart Lynch
Lead Tech Programmer
Leigh Bird
Programmers
Will Bolam, Dean Calver,
Andrew Earle, Damien Fagnou,
Alex Houghton, Gareth Lewin,
Mark Lyhane, Mark Neale,
Barry Northern, Dave Owens,
Lee Reeves, Karl Sizmur,
Chris Wasmuth, Dominic Wong
Art Manager
Chris Gottgetreu
UI Artist
Jerry Smith
Lead Character Artist
Kevin Martin
Character Artists
Jim Manning, Francis Martins,
Elco Vossers
Lead Animator
Iain Haskell
Animators
James Clark, Andy Davies,
Guy Davies, Yasumiko Cindy Lo,
Ross Stanton, Lexi Sydie
Lead SFX Artist
Thor Hayton
SFX Artists
Duncan Brown, Paul Christey, Alex Cole,
Shareef El Shanawaney, Neale Williams
Lead Environment Artists
Dan Attwell, Richard Turner
Environment Artists
Andi Forster, Chris Gregory,
Gerrit Lindenboom, Pete Maton,
Graham Potts
Concept Artists
Jason Brashil, Niki Broughton,
Phillip Jackson
Technical Artists
Greg Cox, Doug Townsley,
Wai-Hung Wan
Lead Sound Designer
Tom Colvin
Sound Designers
Rob Bridgett, Mark Knight
Lead QA
Sameer Malik
QA Team
Andy Dobson, Russell Linn,
Barry Martin, Rob Shread,
Aarron Shutt, Stuart Thompson
Climax Management
James Brace, Simon Gardener,
Karl Jefferies, Chris Keegan,
Gary Liddon
Climax Group IT
Graham Archer, Jim Clews
Microsoft
Management
Phil Spencer,
Adam Waalkes
Producer
Peter Connelly
Product Planning
Chris Johnson, Jon Grande
Marketing
Josh Goldberg, Craig Davison
Test Leads
Pamela Jones,
John O’Sullivan (Ireland)
Testers
Dan Bell•, Kendra Boesp ug•,
Wendy Church•, Jared Doerr,
Dylan Eddy•, Nathan Edson•,
Sean Epperson•, Brian Fox (Ireland),
Carolyn Gold, Kevin Hathaway•,
Titus Lowell•, Karla Margeson•,
Wade McNutt•, Chris Novembrino•,
Kevin Salcedo•, Matt Shimabuku,
Kelly Toyama•, Shane White,
Gayle Wiler•, Jason Wohlfeil•
User Experience
Editor: Laura Hamilton
Writers: Michelle Lomba,
Caitlin Sullivan
Manual Design: Todd Lubsen,
Chris Lassen, Doug Startzel•
Creative Direction
Ryan Haveson, Hardy LeBel,
Chia Chin Lee, Drew Robertson,
Ryan Wilkerson.
Usability
Jun Kim, Ramon Romero,
Elizabeth Fitterer•
Development
Andrew Flavell, Craig Link
Localization
Declan MacHugh,
Lief Thompson
Customer Support
Steve Kastner
Administrative Assistance
Yvette Wagner
Climax Special Thanks:
Tim Adams, Sam Allen, Mike Armstrong, Jane Austin, Will Baker,
Robert Bateman, Richard Beech, Karim Biri, Richard Brazier, Andy Catling,
Joseph Cavalla, Anna Chalk, Danny Chapman, Chris Eden, Paul Evans, Andrew
Fowlston, Dan Gould, Ewen Graham, Damien Hammond, David Harrip, Ceri
Harrison, Mattais Hogvall, Paul Jasicki, Caroline Jefferies, Richard Kelly, Steve
Lamb, Kelvin Liew, Andrew Linn, John Lydon, Shaun Pearson, Alex Perkins,
Lee Piper, Tony Mack, Jacqueline Nelson, Bradley Oakley, Jamie Otoole, Julio
Roman, Matt Samsan, Craig Scott, Dave Seward, Duncan Skertchly, Tim Swan,
Julian Tavernier, Jim Watmough, Andreas Westin, Rob Wilmot, Sarah Wells,
Vanessa Wells, and Katherine Wright.
Character Advancement
• = Volt
Microsoft Special Thanks:
Dan Black, William Hodge, Korey Krauskopf, Sebastien Motte,
Kyle Shannon, John Smith, Matt Wilson, and Wes Yanagi.
Page 16

28
29
Limited Warranty For Your Copy of Xbox
Game Software (“Game”) Acquired in the
United States or Canada
Warranty
Microsoft Corporation (“Microsoft”) warrants to you, the original purchaser of the Game,
that this Game will perform substantially as described in the accompanying manual for a
period of 90 days from the date of rst purchase. If you discover a problem with the Game
covered by this warranty within the 90-day period, your retailer will repair or replace
the Game at its option, free of charge, according to the process identi ed below. This
limited warranty: (a) does not apply if the Game is used in a business or for a commercial
purpose; and (b) is void if any dif culties with the Game are related to accident, abuse,
virus or misapplication.
Returns within 90-day period
Warranty claims should be made to your retailer. Return the Game to your retailer
along with a copy of the original sales receipt and an explanation of the dif culty you
are experiencing with the Game. At its option, the retailer will either repair or replace
the Game. Any replacement Game will be warranted for the remainder of the original
warranty period or 30 days from receipt, whichever is longer. If for any reason the Game
cannot be repaired or replaced, you will be entitled to receive your direct (but no other)
damages incurred in reasonable reliance but only up to the amount of the price you paid
for the Game. The foregoing (repair, replacement or limited damages) is your exclusive
remedy.
Limitations
This limited warranty is in place of all other express or statutory warranties, conditions
or duties and no others of any nature are made or shall be binding on Microsoft, its
retailers or suppliers. Any implied warranties applicable to this Game or the media in
which it is contained are limited to the 90-day period described above. TO THE FULL
EXTENT ALLOWED BY LAW, NEITHER MICROSOFT, ITS RETAILERS OR SUPPLIERS ARE
LIABLE FOR ANY SPECIAL, INCIDENTAL, PUNITIVE, INDIRECT OR CONSEQUENTIAL
DAMAGES ARISING FROM THE POSSESSION, USE OR MALFUNCTION OF THIS GAME.
THE FOREGOING APPLIES EVEN IF ANY REMEDY FAILS OF ITS ESSENTIAL PURPOSE.
Some states/jurisdictions do not allow limitations as to how long an implied warranty
lasts and/or exclusions or limitations of incidental or consequential damages so the above
limitations and/or exclusions of liability may not apply to you. This limited warranty gives
you speci c rights, and you may also have other rights that vary from state/jurisdiction to
state/jurisdiction.
For questions regarding this warranty contact your retailer or Microsoft at:
Xbox Product Registration
Microsoft Corporation
One Microsoft Way
Redmond, WA 98052-9953 USA
In the U.S. or Canada, call 1-800-4MY-XBOX. TTY users: 1-866-740-XBOX.
Technical Support
Technical support is available 7 days a week including holidays.
• In the U.S. or Canada, call 1-800-4MY-XBOX. TTY users: 1-866-740-XBOX.
• In Mexico, call 001-866-745-83-12. TTY users: 001-866-251-26-21.
• In Colombia, call 01-800-912-1830.
For more information, visit us on the Web at www.xbox.com
Information in this document, including URL and other Internet Web site references, is subject to
change without notice. Unless otherwise noted, the example companies, organizations, products,
domain names, e-mail addresses, logos, people, places, and events depicted herein are ctitious,
and no association with any real company, organization, product, domain name, e-mail address,
logo, person, place, or event is intended or should be inferred. Complying with all applicable
copyright laws is the responsibility of the user. Without limiting the rights under copyright, no part
of this document may be reproduced, stored in or introduced into a retrieval system, or transmitted
in any form or by any means (electronic, mechanical, photocopying, recording, or otherwise), or for
any purpose, without the express written permission of Microsoft Corporation.
Microsoft may have patents, patent applications, trademarks, copyrights, or other intellectual
property rights covering subject matter in this document. Except as expressly provided in any
written license agreement from Microsoft, the furnishing of this document does not give you any
license to these patents, trademarks, copyrights, or other intellectual property. The names of actual
companies and products mentioned herein may be the trademarks of their respective owners.
Unauthorized copying, reverse engineering, transmission, public performance, rental, pay for play,
or circumvention of copy protection is strictly prohibited.
©
& p 2004 Microsoft Corporation. All rights reserved.
Microsoft, the Microsoft Game Studios logo, Sudeki, Xbox, and the Xbox logos are either registered
trademarks or trademarks of Microsoft Corporation in the United States and/or other countries.
Developed by Climax for Microsoft Corporation. Climax and the Climax logo are trademarks of
Climax Group Ltd.
The names of actual companies and products mentioned herein may be the trademarks of their
respective owners.
Manufactured under license from Dolby Laboratories.
Uses Bink Video. © Copyright 1997-2004 by RAD Game Tools, Inc.
Warranty
 Loading...