

Page 1
o n l i n e e n a b l e d
Page 2

PHANTASY STAR ONLINE EPISODE I&II
1
1
PHANTASY STAR ONLINE EPISODE I&II
ABOUT PHOTOSENSITIVE SEIZURES
A very small percentage of people may experience a seizure when exposed
to certain visual images, including ashing lights or patterns that may
appear in video games. Even people who have no history of seizures
or epilepsy may have an undiagnosed condition that can cause these
“photosensitive epileptic seizures” while watching video games.
These seizures may have a variety of symptoms, including
lightheadedness, altered vision, eye or face twitching, jerking or shaking of
arms or legs, disorientation, confusion, or momentary loss of awareness.
Seizures may also cause loss of consciousness or convulsions that can
lead to injury from falling down or striking nearby objects.
Immediately stop playing and consult a doctor if you experience any of
these symptoms. Parents should watch for or ask their children about the
above symptoms—children and teenagers are more likely than adults to
experience these seizures.
The risk of photosensitive epileptic seizures may be reduced by sitting
farther from the television screen, using a smaller television screen,
playing in a well-lit room, and not playing when you are drowsy or fatigued.
If you or any of your relatives have a history of seizures or epilepsy, consult
a doctor before playing.
Other Important Health and Safety Information The Xbox Instruction
Manual contains important health and safety information that you should
read and understand before using this software.
AVOID DAMAGE TO YOUR TELEVISION
Do not use with certain televisions. Some televisions, especially front- or
rear-projection types, can be damaged if any video games, including Xbox
games, are played on them. Static images presented during the normal
course of game play may “burn in” to the screen, causing a permanent
shadow of the static image to appear at all times, even when video games
are not being played. Similar damage may occur from static images created
when placing a video game on hold or pause. Consult your television
owner’s manual to determine if video games can be played safely on
your set. If you are unable to nd this information in the owner’s manual,
contact your television dealer or the manufacturer to determine if video
games can be played safely on your set.
Thank you for purchasing Phantasy Star Online™ Episode I & II.
Please note that this software is designed only for use with the
Xbox console. Be sure to read this manual thoroughly before
you start playing. Note: “Phantasy Star Online Episode I & II” will
hereafter simply be referred to as “PSO.”
SAFETY INFORMATION INTRODUCTION
Page 3
PHANTASY STAR ONLINE EPISODE I&II
2
PHANTASY STAR ONLINE EPISODE I&II
3
TABLE OF CONTENTS TABLE OF CONTENTS
WHAT IS PSO? 4
WHAT IS XBOX
Connecting Hardware and Signing Up to Xbox Live 5
Obtaining a Hunter’s License 5
LIVE
? 5
PSO CONTROLS 6
Controller 6
Keyboard 7
STARTING A NEW GAME 8
CREATING YOUR PSO CHARACTER 12
PLAYING THE ONLINE GAME 16
Selecting a Ship and Block 16
Visual Lobby 17
Playing on a Team 17
Transporting 19
Setting a Change Marker 20
Chatting in the Visual Lobby 20
Lobby Action 22
Go Go Ball 22
The City 22
Hunter’s Guild 28
CHALLENGE MODE 36
Setting Up a Challenge Mode Game 36
Basic Rules 37
Challenge Mode Display 38
Clearing the Stage 38
Failing in Your Challenge 39
PLAYING THE OFFLINE GAME 40
Single and Multi Modes 40
CONTROLS DURING THE GAME 46
Moving Around 46
Attacking 46
MAIN GAME MENU 48
Item Pack 48
Customize 51
Tools and Techniques 51
Shortcut Display 54
Character Levels 55
CHARACTERS 56
Hunter 56
Force 57
Ranger 58
BATTLE MODE 30
Setting Up a Battle Mode Game 30
Basic Rules 31
Battle Mode Display 32
Setting a Trap 33
Sonar 34
Power-up 34
After the Battle 34
About Data to Be Saved 35
Exploring Planet Ragol in Battle Mode 35
CHARACTER PARAMETERS 59
WARRANTY 60
CUSTOMER SUPPORT 61
XBOX CONTROLLER 62
Page 4
PHANTASY STAR ONLINE EPISODE I&II
4
PHANTASY STAR ONLINE EPISODE I&II
5
PSO is an Xbox Live™ role-playing game where the action takes
place aboard the starship Pioneer 2 and on Planet Ragol. Online
you will meet a variety of people from all over the world. You can
also organize a team to play the game online or embark on Hunter’s
Guild quests, all the while chatting to exchange information. Of
course, you don’t have to be online to play PSO—there is also an
of ine mode. Whether playing online via Xbox Live or of ine, we
hope you will enjoy the exciting world of PSO.
WHAT IS PSO? WHAT IS XBOX
LIVE
?
Xbox Live is a high-speed Internet gaming community where you
can create a permanent gamer identity (a GamerTag), set up a
Friends List, see when they’re online, invite them to play, and talk
to them in real-time as you play. To determine whether or not Xbox
Live is available in your area, go to http://www.xbox.com/live/.
CONNECTING HARDWARE AND SIGNING UP
TO XBOX
LIVE
Before you can play PSO—whether online or of ine—you need
to connect your Xbox console to a direct or shared broadband
connection and sign up for the Xbox Live service. For details on
both connecting and signing up for the service, see the Xbox
Live Quick Start card included with this game, or go to http://
www.xbox.com/live/. If you need more help, call 1-800-4MY-XBOX.
Note: If you ever cancel your Xbox Live subscription, your
GamerTag will change when you subscribe again, and you
will not be able to use the PSO game data created with your
previous GamerTag.
OBTAINING A HUNTER’S LICENSE
To play PSO online, you will need a Hunter’s License in addition to
your regular Xbox Live GamerTag, which you received when signing
up for the Xbox Live service. This license must be purchased before
selecting Online Game.
To purchase a Hunter’s License, select Options, and then select
Purchase Hunter’s License.
Note: The first two months of playing PSO online with your
Hunter’s License are included with your purchase of PSO. To play
PSO after the first two months, you will be charged a monthly
fee. The credit card you used to sign up for Xbox Live will be
charged for the Hunter’s License. This is separate from the cost
of your Xbox Live membership.
Once you have purchased a Hunter’s License, you are ready to dive
into the exciting world of PSO!
Page 5
PHANTASY STAR ONLINE EPISODE I&II
6
PHANTASY STAR ONLINE EPISODE I&II
7
PSO CONTROLS PSO CONTROLS
CONTROLLER
TITLE SCREEN, GAME MENUS, AND MAIN ITEM SELECTIONS
START button
BACK button
Left /right thumbstick/D-pad
A button
B button
Left/right trigger
For a diagram of the Xbox controller and the most
common PSO controls, see the last page of this manual.
VISUAL LOBBY, WITHIN THE CITY, AND DURING BATTLE
START button
BACK button
Black button/White button
Left thumbstick
Right thumbstick/D -pad
A button
Start game/Enter selection
Cancel (return to previous screen)
Select menu item
Enter selection (confirm)
Cancel (return to previous screen)
Switch between pages
Display Main Menu/Enter selection
Close Main Menu/Cancel
Display/close Main Menu
Move character
Select menu item
Enter selection/Center Action Menu
KEYBOARD
In addition to using the Xbox Communicator, you can chat with other
players by typing words via the Software Keyboard or USB keyboard.
D-pad/right thumbstick
START button
BACK button
A button
B button
X button
Y button
Left/right trigger
ESC
DEL
OK
SPACE
BS
EXIT
Select letters and characters
Enter selected letter or character
Delete a letter or character
Enter selected letter or character
Delete a letter or character
Change chat mode
Display/hide Software Keyboard
Toggle between letters and symbols
Delete entire sentence
Delete a letter or character
Send message
Enter space
Delete a letter or character
Cancel chat (hide Software Keyboard)
B button
X button
Y button
Left trigger
Right trigger
Right trigger+Y button
Cancel/Right Action Menu
Left Action Menu action
Display Software Keyboard
Reset camera (view)/Switch page
Switch page/Switch Action Menu
Display Shortcut Display
Page 6
PHANTASY STAR ONLINE EPISODE I&II
8
PHANTASY STAR ONLINE EPISODE I&II
9
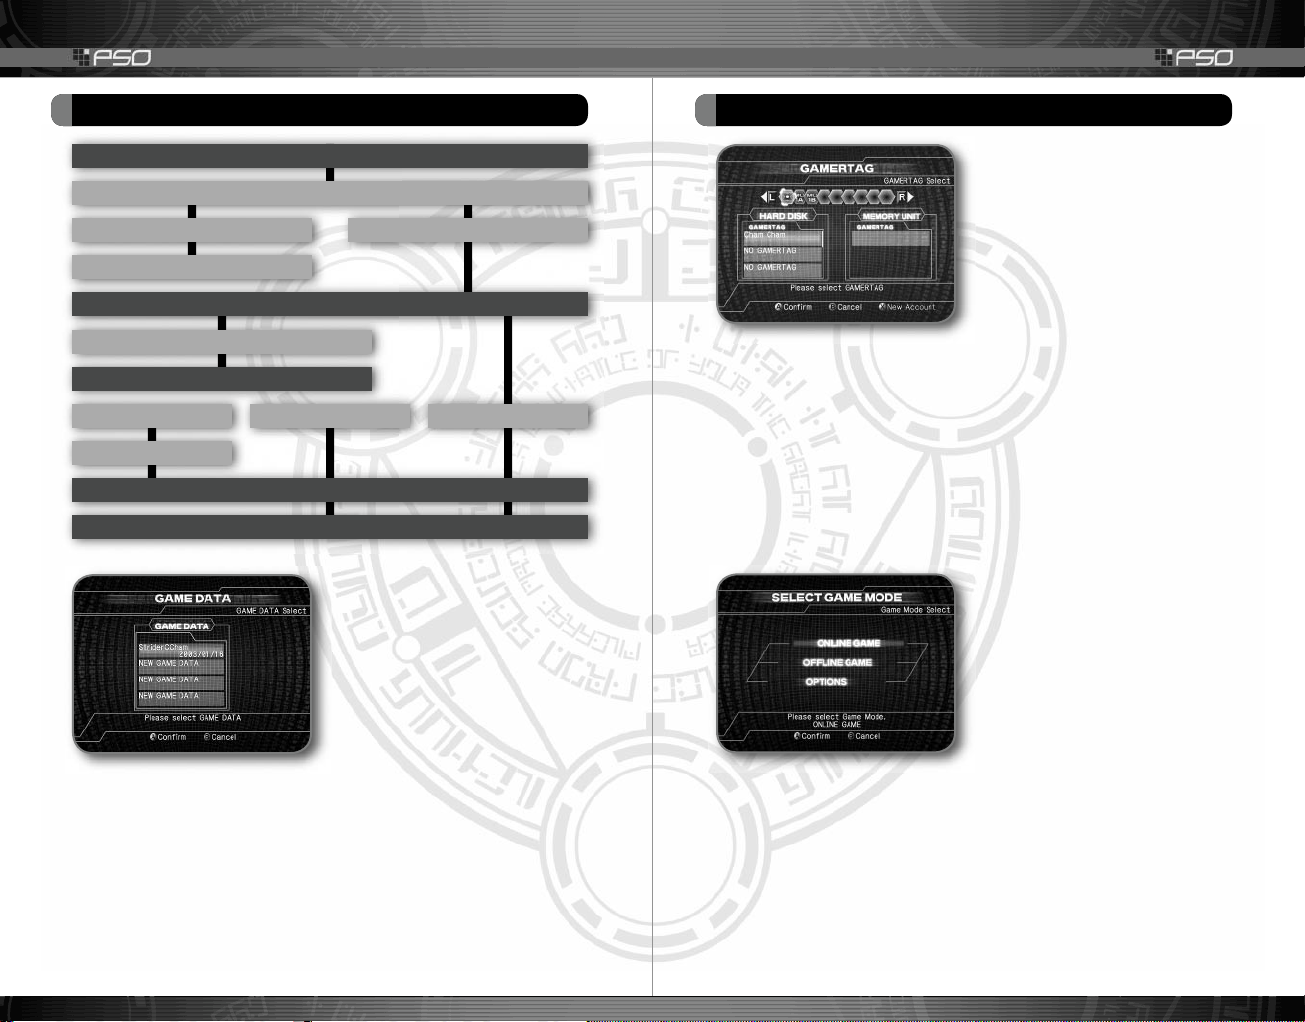
Game Data Screen
When you start the game by
pressing the START button at the
Title Screen, you will be prompted
to select a saved game, if one
exists, at the Game Data Screen.
Select the game data you want,
and then press the A button to
con rm and display the Enter
Pass Code Screen.
If you are starting the game for the rst time, you will see that all of
the game data blocks show “New Game Data.” If you do not already
have a saved game, or want to start a new game, select New Game
Data, and then press the A button to con rm and display the
GamerTag Screen.
STARTING A NEW GAME STARTING A NEW GAME
TITLE SCREEN
ALREADY SIGNED UP TO XBOX LI VE (HAVE GAMERTAG)?
NO YES
TO XBOX DASHBOARD
GAME DATA SELECT SCREEN
CREATE GAME DATA
GAMERTAG SELECT SCREEN
CREATE GAMERTAG SELECT GAMERTAG SELECT GAME DATA
TO XBOX DASHBOARD
ENTER PASS CODE
GAME MENU
GamerTag Screen
At the GamerTag Screen, select
the GamerTag you want to use
with PSO, press the A button,
select Yes, and then press the
A button again to con rm and
display the Enter Pass Code
Screen.
You can select any GamerTag saved on either an Xbox hard disk or
a memory unit. If you do not have an Xbox Live account or want to
create a new GamerTag, press the X button, which will return you to
the Xbox Dashboard, where you can sign up for an account.
Enter Pass Code Screen
At the Enter Pass Code Screen, enter the pass code you selected
when you created your GamerTag, and then select Enter to con rm
and display the Select Game Mode Screen.
Select Game Mode Screen
Once you have selected your
GamerTag, you will see the Select
Game Mode Screen, where you
can choose to play either online
or of ine. You can also set your
game options here.
To play PSO online, select Online
Game, and then press the A button. To play of ine, select Offline
Game, and then press the A button. Whether you choose to play
online or of ine, you will rst create your character (see page 12).
Page 7
PHANTASY STAR ONLINE EPISODE I&II
10
PHANTASY STAR ONLINE EPISODE I&II
11
STARTING A NEW GAME STARTING A NEW GAME
Online Game
To play online, you will need to have a valid Hunter’s License (see
page 5).
In the online game, you can join quests and team up and
communicate with other players. For details on playing the online
game, see page 16.
Ofine Game
You do not need a Hunter’s License to play PSO ofine, but you do
need an Xbox Live GamerTag. Playing ofine, you can still undertake
quests and build up your character’s experience before making your
online debut. You can choose to play either or both Episode I or II;
however, Episode I is recommended if you are a new player.
There are two ofine modes: Single Mode, where you play by
yourself, and Multi Mode, where you can play with up to four other
players. For details on playing the ofine game, see page 40.
Options
At the Options Screen, you can change several game settings.
Select and enter the option you want to change, and then select
and enter that option’s settings. When you are done, select End,
and then enter to save the game settings and return to the Select
Game Mode Screen.
BGM Test With the BGM Test option, you can listen to the
background music (BGM) tracks used in PSO. Select and enter
the music to play. To stop playing the music, press the B or BACK
button. Press the B or BACK button again to return to the Options
Screen.
Sound Balance With the Sound Balance option, you can adjust
the volume levels of the background music and sound effects.
Ship Communication Mode You can enable or disable ship
communication mode. Whenever your character’s display location
jumps around or when there is bad network communication,
enabling ship communication mode may improve the condition.
Purchase Hunter’s License With the Purchase Hunter’s
License option, you can connect online and follow the on-screen
instructions to purchase a Hunter’s License if you do not already
have one (for more information on the Hunter’s License, see page 5).
Page 8
PHANTASY STAR ONLINE EPISODE I&II
12
PHANTASY STAR ONLINE EPISODE I&II
13
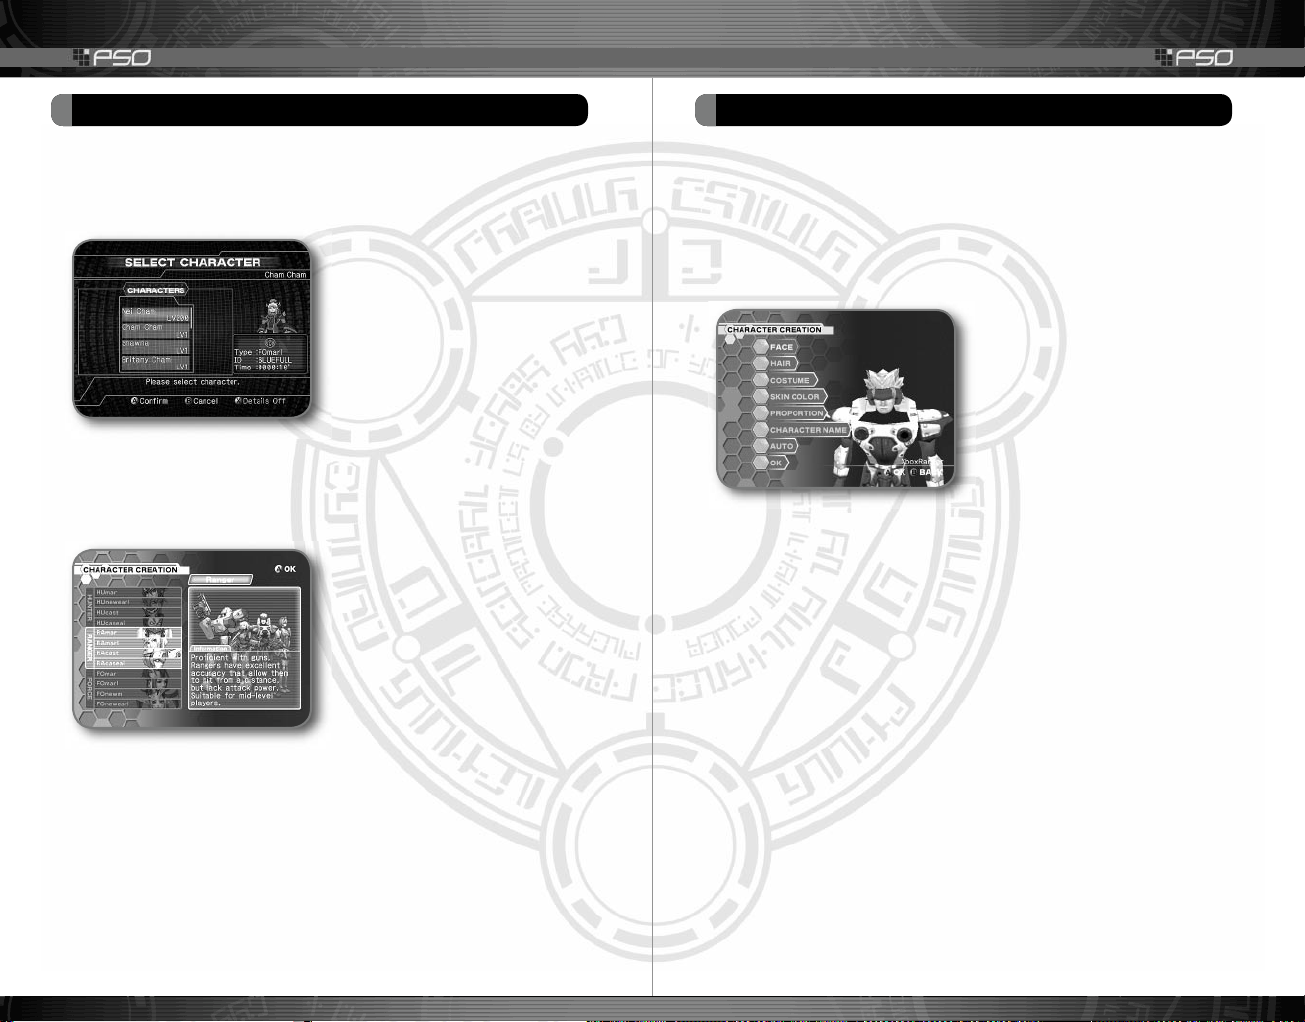
Before you can play PSO, you must create your PSO character. You
can create up to twelve characters for every one game data. You
can also re-create the existing character data from the beginning.
Select Character Screen
At the Select Character Screen,
you will see your GamerTag in the
upper-right corner. If you already
have a character, you can select
or delete it here.
If you do not already have a
character, select any of the
New Character slots, press the A button, and then select Yes to
con rm. A cinematic will introduce you to the world of PSO. After
the cinematic, you can create your character at the Character
Select Screen.
Character Select Screen
“New Character” indicates that
there is no play character saved
onto that selection. Select
New Character to play a brief
movie prologue and display the
Character Creation Screen.
A character’s name and
character level (LV) indicate that a play character already exists
there. Select a play character to con rm that you want to play with
it or to delete it and create a new one in its place.
You can also rename a character whose character name is denied,
readjust a voice effect to be used with the Xbox Communicator, or
move the character data to the memory unit for use in Multi Mode.
Move Characters Screen
To move character data to the memory unit for use in Multi Mode,
select Move Character, use the left and right triggers to select the
memory unit you want to move it to, press the A button to con rm,
and then select Yes. You cannot move more than one character to
the same memory unit.
Character Creation Screen
At the Character Creation Screen,
you rst select one of three
professions for your character.
After selecting the profession,
select one of four character types
available for each profession.
Detailed information on each
character type is displayed at the
lower-right of the screen.
CREATING YOUR PSO CHARACTER CREATING YOUR PSO CHARACTER
Page 9
PHANTASY STAR ONLINE EPISODE I&II
14
PHANTASY STAR ONLINE EPISODE I&II
15
CREATING YOUR PSO CHARACTER CREATING YOUR PSO CHARACTER
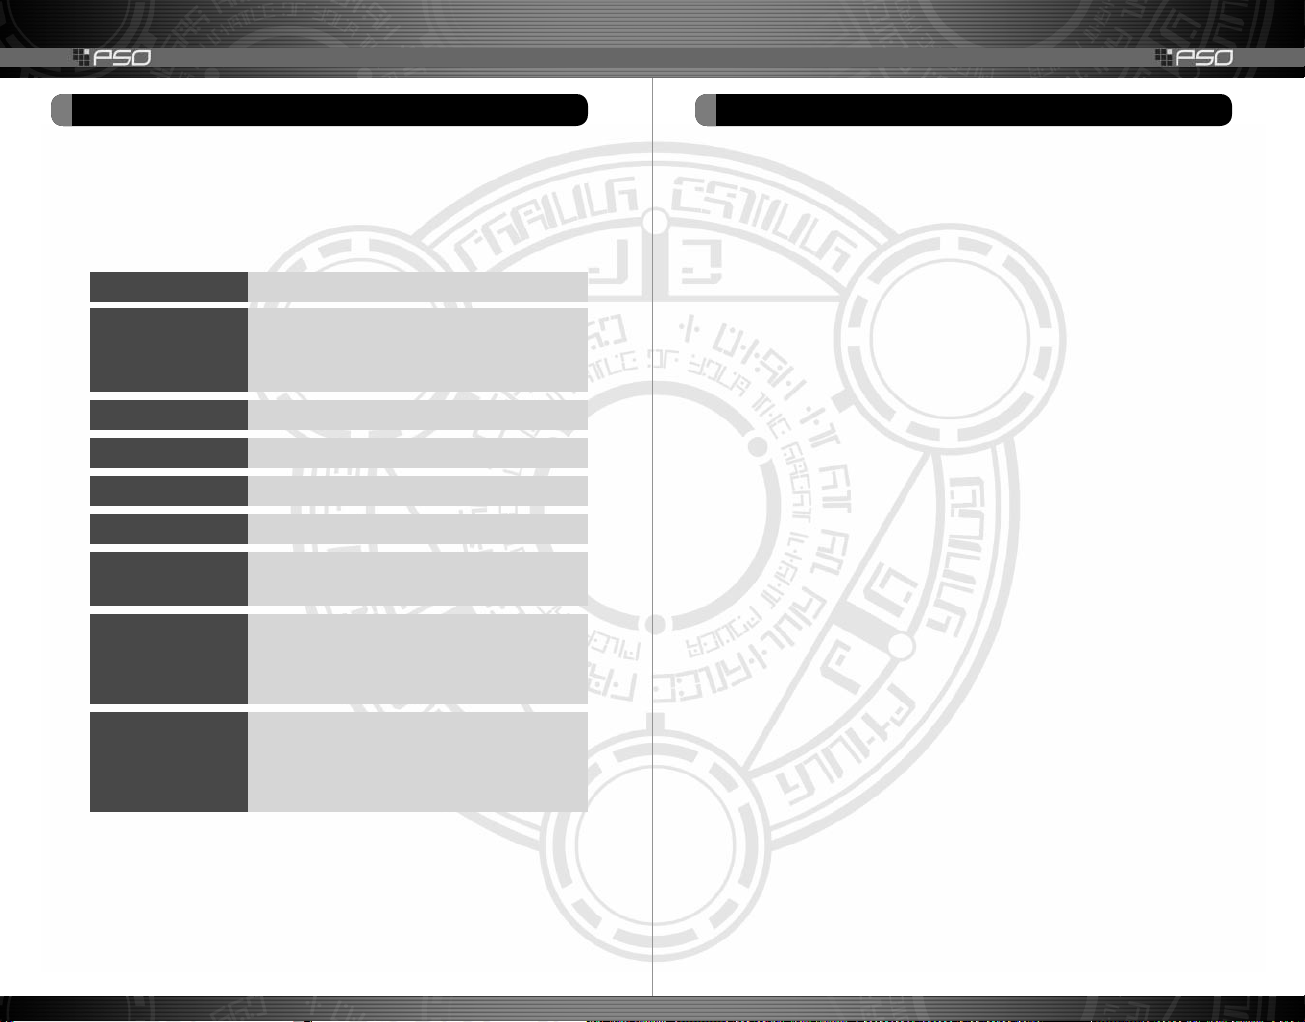
After selecting the character type, you can customize your
character’s appearance by selecting the available features and
modifying them as you want. As you customize your character, you
can rotate him or her by using the left and right triggers to see the
effects of your changes.
Face
Hair
Head
Body
Costume
Skin Color
Proportion
Character
Name
Auto
Hair (or hat) style; change hair color by adjusting
the amount of red, green, and blue (R, G, and B).
Height (up and down arrows) and body size (left
Character name; display the Software Keyboard by
pressing the A button; you cannot select OK until
you have named your character.
Automatically create a random character by
pressing the A button; continue pressing the A
button to cycle through random characters.
Facial type.
Head type (androids only)
Body color (androids only)
Outfit color
Skin color
and right arrows)
When you are done modifying your character, select OK to register
your character. Once you select OK, your character will be assigned
one of the 10 available Section IDs. Press the A button to continue
(at this point, it is not possible to cancel). In PSO, there exist 10
categories of Section IDs, which all Hunters, Rangers, and Forces
belong to: [VIRIDIA] [GREENILL] [SKYLY] [BLUEFULL] [PURPLENUM]
[PINKAL] [REDRIA] [ORAN] [YELLOWBOZE] and [WHITILL].
Voice Effect
Using the Xbox Communicator, you can chat with other players in
actual voice. Use the Change Voice Effect settings to communicate
with other players using your choice of voice masking. There are
ve choices of voice masking to select from and four voice effects.
Terms of Agreement Screen
After you select your PSO character, the PSO Online Game Terms
of Agreement will be displayed. Use the right thumbstick to scroll
the text inside the screen and verify the terms. If you agree to
the terms, select Agree to continue. To reject the agreement and
return to the Select Game Mode Screen, select Disagree.
Hunter’s License and Xbox Live Usage Fee Reminder
A reminder for Hunter’s License Fee and Xbox Live usage fee will be
displayed. If you have already purchased a Hunter’s License, select
Agree to continue. To return to the previous screen, select Disagree.
Page 10

PHANTASY STAR ONLINE EPISODE I&II
16
PHANTASY STAR ONLINE EPISODE I&II
17
PLAYING THE ONLINE GAME PLAYING THE ONLINE GAME
When you select Online Game on the Select Game Mode Screen,
you will connect to the network and, if you are successfully
authenticated, a notice screen will be displayed, followed by the
Ship Select Screen.
Note: If you open the disc tray during online play, the game will
switch to the Xbox Dashboard, and the game data will not be saved.
SELECTING A SHIP AND BLOCK
To go on a quest, you must rst select the Ship and then the Block
you want to join. Select Ship Select to proceed.
Note: During Ship and Block selection, you will not be able
to join if the number of players currently joined has already
reached the maximum capacity. Try looking for a Ship and Block
with vacant spaces, or try again later.
Select a Ship in the Ship Select list, and then select a Block in
the Block Select list. To view the number of players and teams
currently joined, press the X button. After your selection, you will
be transported to the appropriate visual lobby, where you can
communicate with other players as all prepare for the quest.
To go to a different Ship and Block while in the lobby, select
Transport at the Information Counter in your current lobby. To move
from lobby to lobby, use the Teleporter by stepping into it and then
selecting the destination to transport yourself to.
VISUAL LOBBY
Once inside the visual lobby, you can move around and chat in
real-time with other players within the same block. To change the
display shown above your character in the lobby, pull the right
trigger to cycle through the following display options: character
name, name and LV, battle record, Challenge Mode title, and
no display.
PLAYING ON A TEAM
There are two ways to become a team member in PSO, by joining
an existing team or by creating one of your own. Either way requires
a visit to the Information Counter, where you select Organize Team.
Page 11

PHANTASY STAR ONLINE EPISODE I&II
18
PHANTASY STAR ONLINE EPISODE I&II
19
PLAYING THE ONLINE GAME PLAYING THE ONLINE GAME
Joining a Team
To display a list of the teams available in the Block you are currently
in, select Join a Team. To view information about a team, select
it, and then press the X button. When you select a team to join,
you will be transported to the city in the eld where that team is
currently playing. A lock mark will appear next to teams that require
a password to join. If you do not know the password, you will not be
able to join that team.
Creating a Team
To create your own team and become its leader, select Create a
Team. A maximum of four players can join your team. Once three
other players have joined, the team will become automatically
locked. Provided that any one member is still connected online, that
team will remain available for play; however, if all members of a team
return to the visual lobby or disconnect from the network, that team
will disappear.
To create a team
1. Select either Episode 1 or Episode 2.
2. Enter a name for your team.
3. Enter a password to limit access to your team. If you want to
make your team open to anyone, leave it blank.
4. Select either Normal, Challenge (see page 36), or Battle (see
page 30). In Challenge and Battle modes, if you leave the game,
you will not be able to reenter.
5. Select either Normal, Hard, Very Hard, or Ultimate. (Some
dif culty settings may not be displayed until you complete the
game at less dif cult settings.) Depending on the level of the
team leader, it is possible that dif culty settings cannot be
selected. Also, there are no dif culty settings for Challenge Mode.
TRANSPORTING
After arriving in the visual lobby,
if you want to move to a different
Ship or Block, select Transport
at the Information Counter. If
you want to move from lobby to
lobby, use the Teleporter found
in each lobby. In either case,
you will select the destination
to transport yourself. With the
Teleporter, you merely step on it
to display a list of destinations
and step off of it to cancel.
TRANSPORT
TELEPORTER
Page 12

PHANTASY STAR ONLINE EPISODE I&II
20
PHANTASY STAR ONLINE EPISODE I&II
21
PLAYING THE ONLINE GAME PLAYING THE ONLINE GAME
SETTING A CHANGE MARKER
If you are in lobby 14 or 15, you have the additional option to set
a triangular marker above your character. Select Change Marker,
and then select from four available colors (or None). Once you
leave the lobby, the marker will disappear.
CHATTING IN THE VISUAL LOBBY
The visual lobby is where you interact with other players of PSO.
You can chat with anyone who is in the same visual lobby. When
playing the game or while on quests, you will only be able to chat
with those players on your team. The messages will be displayed
inside balloons. It is also possible to communicate using the Xbox
Communicator.
To chat, press the Y button (by default, the Software Keyboard may
be displayed), and then press the X button to cycle to the chatting
method you want to use.
Balloon Chat
By scrolling through the Software Keyboard,
you can form words that will appear in a
balloon over your head. When you are done,
press the Y button to hide the Software
Keyboard. You can also use a USB keyboard.
Symbol Chat
Select a simple picture to represent a feeling
or action from a list of registered Symbol
Chat images. Note: We reserve the right to
terminate your user account for the use
of inappropriate symbols while playing
PSO online.
Word Select
Select from a number of preselected phrases
in any one of ve available languages: English,
French, German, Spanish, and Japanese.
All messages created and sent using Word
Select will be displayed to the recipient in his
or her own selected language.
1. With the Software Keyboard displayed, press the X button to
cycle to the Word Select menu.
2. Select a form.
3. Use the left and right triggers to scroll through the list of
phrases, and then select one.
4. To display the message, select a target. To display the message
without designating a target, select Send during message
construction, and the constructed message will
be displayed.
NOTE: Regardless of the language setting at the receiving end,
the messages created in modes other than Word Select will not
be translated.
Page 13

PHANTASY STAR ONLINE EPISODE I&II
22
PHANTASY STAR ONLINE EPISODE I&II
23
PLAYING THE ONLINE GAME PLAYING THE ONLINE GAME
LOBBY ACTION
Inside the visual lobby, you can make your character take various
actions using the controller. Press the Y button while pulling the
right trigger to display a menu of various categories of actions.
Select a category, and then select the desired action. Also, while
the menu is displayed, pull the right trigger again to take the action
of the gender opposite of your own character.
GO GO BALL
In lobbies 14 and 15, you can play Go Go Ball. When a ball
appears, kick it toward the goal. There are no rules to the game.
You play by your own!
THE CITY
The city in PSO is a safe haven with shops where you can buy or
sell items; a Center, where you can revive your HPs/TPs; and the
Hunter’s Guild, where you can sign up for quests to earn rewards.
In front of each staff person, press the A button to display a menu.
Follow the on-screen messages for your selections. To close the
menu, press the B button.
The City Shops
In the city shops, you can buy or
sell weapons, armor, technique
disks, and various tool items.
Approach the counter, and then
press the A button to display
the current amount of money
(Meseta) you have and the
Buy/Sell menu. Select Buy or
Sell, and then select the item you want to buy or sell. Depending
on your profession, the weapons and armor that can be equipped
differ, which is identi ed by the color.
X
Item can never be equipped (or used).
Green
A specialty item with slot usage, Photon efficiency, etc.
Gray
Item cannot be equipped at current experience level.
White
Item can be equipped.
Medical Center
Visit the Medical Center
whenever you need to restore
your HP/TP levels or cure any
abnormalities in your status.
Page 14

PHANTASY STAR ONLINE EPISODE I&II
24
PHANTASY STAR ONLINE EPISODE I&II
25
PLAYING THE ONLINE GAME PLAYING THE ONLINE GAME
Tekker Booth
If you nd an item labeled “???”
while playing PSO, bring it to the
tekker booth to have it appraised.
Approach the counter, and
then select the item. The fee
you must pay to have the item
identi ed will appear. Select
Yes to continue or No to cancel.
If you agree to appraise the item, you will then be asked whether
you choose to agree with the resulting appraisal. Select Yes or No
accordingly. Note that if you select No, the item will return to an
unidenti ed state and your Meseta will not be refunded.
Check Room
Deposit items or money in the
check room to be held for you.
Approach the counter, and then
press the A button to display the
Deposit/Take menu.
Note: It is strongly
recommended that you deposit
Meseta and items periodically, such as after a quest or before
you quit the game; however, you will not be able to deposit
Meseta or items when playing either Challenge or Battle Mode
of the multi mode. When you talk to the clerk in either mode,
you will only have an option to “delete” items. Make sure not to
delete items by mistake.
Deposit
To deposit, select either Meseta or Item. If you select Meseta, the
amount you currently have will be displayed. Select the amount you
wish to deposit and then enter. If you select Item, all the items you
have will be displayed. Select an item to deposit, and then select
Yes or No on the displayed menu.
Take
To withdraw, select either Meseta or Item, and then select the
amount of money or items you want to withdraw.
The Principal and the Lab
The principal and the lab are
where you begin your PSO
adventure for Episode 1 and
Episode 2, respectively. They
provide details of your upcoming
mission.
THE PRINCIPAL
THE LAB
Page 15

PHANTASY STAR ONLINE EPISODE I&II
26
PHANTASY STAR ONLINE EPISODE I&II
27
PLAYING THE ONLINE GAME PLAYING THE ONLINE GAME
Money (Meseta)
Used to purchase goods
(weapons, tools, armor, and
so forth) and services (HP/TP
recovery) in the city, money is
obtained during gameplay by
picking up the yellow container
or as a reward for quests. If you
do not want to carry it around,
you can deposit your money at the check room (see page 24), from
where it can be accessed at any time.
Transporters
The main transporter is used to
travel back and forth between
Planet Ragol and the city.
Position your character in the
center of the transporter to
display a list of destinations.
Select the destination you
want, and then press the A
button to be transported to that
destination. To cancel, move your
character off of the transporter.
Other types of transporters are
located throughout the game.
The WARP transporter is used to
move around in the same area.
To use it, position your character
in the center of it, and then press
the A button.
The large boss transporter is
used to move you and your
team to a boss’s lair. To use it,
position your character in the
center of it, and then press the
A button. You will be asked to
select which team members
you want to transport. To ght
against the boss as a team, all
team members must use the
boss transporter together. Unlike
other transporters, if one or
more players on your team have
already used it to travel to the
boss’s lair, it will be unavailable
for use until those players return.
MAIN TRANSPORTER
WARP TRANSPORTER
BOSS TRANSPORTER
Page 16

PHANTASY STAR ONLINE EPISODE I&II
28
PHANTASY STAR ONLINE EPISODE I&II
29
PLAYING THE ONLINE GAME PLAYING THE ONLINE GAME
HUNTER’S GUILD
The Hunter’s Guild is where you can undertake quest missions for
rewards. You can also use the guild to begin Battle and Challenge
modes. The reward amount differs depending on the content of
the mission. It is possible to quit a quest midmission, but if you
do you will be unable to claim the reward offered.
Undertaking a Quest
Approach the counter and
speak to the representative.
A list of available quests will
be displayed. Select a quest.
You will then meet with the
client who has commissioned
the quest and nd out further
details about your mission.
Online Game You cannot undertake a quest unless all members
of your team are present at the counter. The team leader is
responsible for quest selection.
Offline Game As soon as you select the desired quest, a scene
where you meet your client will be played. Listen to him or her,
and begin your quest.
Download New Quests
On the Ship Select Screen, select Download to download new
quests from the network. When the download screen is displayed,
select the download item you want, and then select the quest le
you want to download. The quest le will be downloaded and saved
onto the internal hard disk. The downloaded quests can be played
in of ine mode.
Note: To select Download Quest, it is necessary to first connect
to the network and download a file.
Quest Rewards
If you complete a quest successfully, you will be eligible to claim
a reward. To do so, return to the Hunter’s Guild and speak to the
representative there. Online or of ine, you are paid the reward
according to the quest. The amount paid does not change
according to the number of players in an online game.
Page 17

PHANTASY STAR ONLINE EPISODE I&II
30
PHANTASY STAR ONLINE EPISODE I&II
31
BATTLE MODE BATTLE MODE
In Battle Mode, players battle one another by the rules set by the
leader. Players can set traps and attack other players. This mode
can be played either online or ofine, but players cannot join a
game already in progress.
SETTING UP A BATTLE MODE GAME
To play in Battle Mode, when you create a team in the visual lobby,
select Battle as the play mode. Enter all necessary information,
and then register. You will then be transported to the Hunter’s Guild
in the city. The player who created the team becomes the leader.
For information on creating a team, see page 18.
Battle Mode cannot be played alone. There must be two or more
team members to play. Also, all team members must participate.
When all team members gather in front of the counter at the
Hunter’s Guild, the team leader should talk to the representative of
the Hunter’s Guild.
The team leader is responsible for setting the rules and selecting
the battle from the displayed list. The default rules for the selected
battle will be displayed. To be transported to the battleeld,
select Yes.
Rules set by the team leader will be displayed, and each player will
be positioned at one of four starting locations.
BASIC RULES
• Players compete for the number of opponents defeated and the
number of times defeated within the time limit.
• Basically, all contestants are enemies, but the player can heal
opponents as well. There are also Team Battles.
• Depending on selected rules, weapons, items, equipment,
MAGs, and techniques may not be used.
• The player falls when his HPs drop to 0. Within the time limit, the
fallen player will restart from his or her starting location.
• The game is over when the time expires, and the result will be
displayed.
• Other detailed rules differ according to the rules selected by
the leader.
Page 18

PHANTASY STAR ONLINE EPISODE I&II
32
PHANTASY STAR ONLINE EPISODE I&II
33
BATTLE MODE DISPLAY
STATUS SUMMARY
OPPONENT’S CURRENT HP/LV and PLAYER COLOR
PLAYER CONDITION
TIME LIMIT
CURRENT GAME MODE
RADAR MAP Displays positions and directions of opponent
players. s’s indicate the players (in each color), and l’s indicate
the enemies.
COMPASS
WHEN ONE OF THE PARTICIPANT’S HPs DROP TO 0: CURRENT
TOTAL POINTS
ACTION MENU (see page 47)
SETTING A TRAP
During the battle, players can set traps in the battle eld. Each
player is given a xed number of traps (the number varies
according to the selected rule) at the beginning of the battle. Traps
cannot be picked up or handed off to other players.
Note: Traps can only be set by android characters.
To set a trap, switch to the Main Menu, select a trap from the Item
list, and then select Set to set the trap where you are standing. You
can also set the trap by using the Shortcut Display (see page 52).
A few moments after the trap is set, it will be functional. When
another player enters the area, the trap explodes, damaging or
causing adverse effects to all nearby players.
When a trap explodes, if there are other traps nearby, they will be
induced to explode.
BATTLE MODE BATTLE MODE
Freeze Trap
Freezes players for a certain amount
of time and damages them.
Slow Trap
Slows down the movement of players
for a certain amount of time.
Damage Trap
Explodes and damages nearby enemies.
Confuse Trap
Confuses the movement of nearby enemies.
Page 19

PHANTASY STAR ONLINE EPISODE I&II
34
PHANTASY STAR ONLINE EPISODE I&II
35
BATTLE MODEBATTLE MODE
SONAR
As with traps, a xed number of sonars are given to each player
at the beginning of the battle. When activated, a sonar will notify
the distance of the closest opponent by the length of its sound
interval—as you approach your opponent, the sound interval
becomes shorter.
POWER-UP
A defeated player will be powered up a certain number of levels
upon his or her restart. The number of levels varies according to
the rules.
AFTER THE BATTLE
When the time reaches zero, the battle is over, and a results screen
will be displayed. Press the B button to close the results screen,
and press the X button to verify the results again.
After closing the results screen, the team members can chat or
move around until the team leader selects Yes to retry the battle
with the same rules or returns the team to the virtual lobby.
ABOUT DATA TO BE SAVED
Win and loss results of the battle, as well as the number of times
the line was disconnected, are saved and displayed in the results
screen. Any change in a player’s parameters as well as the items
picked up after the Battle Mode rules are given will not be saved.
EXPLORING PLANET RAGOL IN BATTLE MODE
In Battle Mode, apart from dueling, you can explore Planet Ragol
as if you are playing in Normal mode, as well as save regularly. One
difference is that your attacks can harm your team members. It is
necessary to keep the fellow members’ locations and conditions in
mind, so you can enjoy adventures with a higher degree of difculty.
Page 20

PHANTASY STAR ONLINE EPISODE I&II
36
PHANTASY STAR ONLINE EPISODE I&II
37
CHALLENGE MODECHALLENGE MODE
In Challenge Mode, players begin the game with a predetermined
status and venture deeper into the area. Unlike other modes, there
are no difculty settings. This mode can be played either online or
ofine, but players cannot join a game already in progress or
play alone.
SETTING UP A CHALLENGE MODE GAME
To play in Challenge Mode, when you create a team in the visual
lobby, select Challenge as the play mode. Enter all necessary
information, and then register. You will then be transported to the
Hunter’s Guild in the city. The player who created the team becomes
the leader. For information on creating a team, see page 18.
To select a stage to play, talk to the representative at the Hunter’s
Guild. The available stages will be based on the player with the
least number of cleared stages. Select the stage to play, and the
team members will be transported to the starting location of the
selected stage.
Note: In Challenge Mode, the data of the main game in your
save file will not be reflected.
As soon as the whole team is transported to the starting location
of the selected stage, Challenge Mode begins. Cooperate with one
another, and clear as many areas as you can.
BASIC RULES
• When you start, all your status will be reset to each player’s
default value.
• Players cannot return to the city unless the selected stage is
cleared. Use of the Telepipe or Ryuker technique is not possible.
• Use of the Reverser technique, the Moon Atomizer, and the MAG
to revive fallen teammates is not possible. The effect of the
Scape Doll, however, is possible.
• The game is over when the HPs of one of the participating
member drops to 0. The whole team will be sent back to the
Hunter’s Guild.
Page 21

PHANTASY STAR ONLINE EPISODE I&II
38
PHANTASY STAR ONLINE EPISODE I&II
39
CHALLENGE MODE DISPLAY
STATUS SUMMARY
TEAM MEMBER’S CURRENT HP/LV and PLAYER COLOR
ELAPSED TIME
CURRENT AREA/WHOLE AREA
CLEARING THE STAGE
If you explore all the areas of the selected stage, you clear it.
You can retry any stages you have cleared before. If you clear all
the stages, you are awarded a prize, which will be saved on your
character le.
Note: When you receive your prize, leave a space on items in
possession (permanent data). If you already carry the maximum
(30), you will not be able to receive your prize.
FAILING IN YOUR CHALLENGE
Whenever the HPs of one of the team members drops to 0, the
whole team fails the challenge, and all members will be sent back
to the city. The location where the team reached will be saved
onto your game le. When you retry the Challenge Mode, a GravePost will be established on that point. When you approach it, the
information of the fallen player will be displayed.
CHALLENGE MODECHALLENGE MODE
Page 22

PHANTASY STAR ONLINE EPISODE I&II
40
PHANTASY STAR ONLINE EPISODE I&II
41
PLAYING THE OFFLINE GAMEPLAYING THE OFFLINE GAME
When you select Offline Game on the Select Game Mode Screen,
you can enjoy the PSO adventure without having to connect to the
network. Note, however, that even for ofine gameplay you need a
GamerTag, obtained by signing up for Xbox Live (see page 5).
SINGLE AND MULTI MODES
After selecting Challenge Mode, you must select either Single
Mode or Multi Mode.
Single Mode
In single mode, you play the main PSO story as well as undertake
various quests at the Hunter’s Guild, just as you would in an online
game. You play by yourself, but some quests may contain scenarios
where a nonplayer character (NPC) may join you. During these
quests, you can build your character’s experience in preparation for
online play.
To get started, rst select your character on the Select Character
Screen (see page 12), and then select either Episode 1 or Episode
2 on the Select Episode Screen.
The rst time you play PSO with a particular character, the game
difculty is automatically set at the Normal level. After you clear the
game at this level, you will be able to select the game difculty level
the next time you play with the same character—either Normal or
Hard. After you clear the game at the Hard level, the Very Hard level
will be available. Finally, the Ultimate level is available after you
clear the game at the Very Hard level.
Multi Mode
In multi mode, you play the main PSO story with two to four other
players simultaneously in either Battle Mode or Challenge Mode.
Quests are not available in multi mode.
Setting Up a Multi Mode Game
To get started, each player selects a controller (one connected
to the Xbox console) to use in the game, and then presses the A
button. After a player selects a controller, the controller number
selected will be displayed. When all players have selected a
controller, press the A or START button.
Page 23

PHANTASY STAR ONLINE EPISODE I&II
42
PHANTASY STAR ONLINE EPISODE I&II
43
PLAYING THE OFFLINE GAMEPLAYING THE OFFLINE GAME
Selecting a Character
Each player now selects a character on the Select Character
Screen. After a player selects a character, the character is
indicated with “Player x.”
Main Character Data On the Main Character Data Screen, select
either the available character or the “New Character” slot. When
you select a new character slot, you will create a new character
(see page 12).
Temporary Characters To select a temporary character, select
one on the Temp Characters Data Screen. You can either select
the moved character data on the hard disk or select and move the
character data from the memory unit to the hard disk.
Characters in the Xbox Memory Unit In multi mode, you can
partner and play with characters that your friends created on their
own Xbox systems. To do this, you must read in character data
from other Xbox systems through the Xbox memory units. Start by
transferring the character data of each player who wants to join
from his or her respective hard disk to a memory unit. To move a
character from the hard disk to a memory unit, select your game
data, game mode, and then the character to be moved. When the
conrmation box appears, scroll down and select Move Character.
You can then use the left and right triggers to select which memory
unit you would like to transfer your character to.
When completed, move the memory unit to the Xbox console that
will be used to play multi mode. The character data that has been
moved will now be listed under the “Temporary Characters” data.
Note that the original character data that has been transferred
as a temporary character cannot be used as Main Character data
until the data have been returned to the original Xbox that it was
created on.
Selecting a Transferred Character
Select the character transferred to the Temporary Character data
through the following steps. First, select Multi Mode and your
game type, and then have each player press the A button on their
respective controllers. Players can then select their characters
from the hard disk or memory units. If this is your rst time playing
on another person’s Xbox console with a character created on
your own system, you will have to select New Character and use
the left and right triggers to locate your character on the hard
disk or memory unit. You will be asked whether or not to move the
selected character; select Yes and enter to move it or No to cancel.
Warning: If you delete the Temporary Character data, you will
not be able to return it to the memory unit. Also, if you cancel
the “transferred” status on the original hard disk, you will not
only lose all items, but you will not be able to return the moved
character data to its original hard disk.
Transferring Character Data from the Memory Unit
If you select New Character from the Temporary Characters list,
you will be asked to select a memory unit and move the character
data to the hard disk. Use the left and right triggers to select a
memory unit, and the character data will be displayed. You will be
asked whether or not to move the selected character: Select Yes
and enter to move it or No to cancel. The selected character will, at
the same time, be your play character.
Moving Your Character Back to the Memory Unit
Don’t forget to move your character back to the memory unit at the
end of a multi mode session. To do this, select Multi Mode, the
character you want to transfer in the Character Select Screen, and
then Return to MU. After the character is transferred, the memory
unit can be taken back to the original Xbox console and loaded
onto its hard disk.
Page 24

PHANTASY STAR ONLINE EPISODE I&II
44
PHANTASY STAR ONLINE EPISODE I&II
45
Selecting the Game Options
After setting the game options—dif culty, mode, and episode—
select Game Start to start the game.
Multi Mode Display
The Multi Mode screen is divided into the number of participating
players. The basic display setup and status are the same as
those for the online game. Each player’s status can be viewed by
selecting Status on the Main Menu.
Player 1 Display
Player 2 Display
Player 3 Display
Player 4 Display
Basic Rules
• Some functions, such as chatting, cannot be used.
• The Transporter activates when all players are aboard.
• Whenever one of the players falls and is asked whether to
return to Pioneer 2, if he or she selects Yes, all players will be
transported back to the city.
• While playing either Battle or Challenge Mode, you will not be
able to deposit or take Meseta or items. Instead, you have an
option to delete items.
PLAYING THE OFFLINE GAMEPLAYING THE OFFLINE GAME
Page 25

PHANTASY STAR ONLINE EPISODE I&II
46
PHANTASY STAR ONLINE EPISODE I&II
47
ATTACK WHEN THE
CURSOR APPEARS.
Whether you play the main PSO story or quests either online or
of ine, you use the Action Menu, which you can customize before
heading into battle. Note that these controls cannot be used in the
city or visual lobby.
MOVING AROUND
To move your character around the eld, move the left thumbstick.
If any enemies are nearby, your character will walk slowly with his
or her weapon drawn. If the camera view becomes off-center while
walking and/or turning around, pull the left trigger to return the
camera to the default camera view—facing forward with the camera
behind your character.
ATTACKING
There are three basic forms of attack: Attack, Heavy Attack, and
Extra Attack.
Assign each attack to a button by using
the Action Menu, displayed by selecting
Customize on the Main Game Menu (see
page 49). If you can time three attacks
just right, you can achieve a successive
chain of attacks that is overall slightly
faster and more accurate than
executing each attack separately. This
is especially effective when attacking
enemies who are hard to hit, because
the third hit is more likely to nd its
mark. Also, when attacking, the cursor
will be set to the closest target in the direction you are facing.
The colors of the controller buttons correspond to the colors of the
bands that surround each of the three Action Menu spaces.
CONTROLS DURING THE GAMECONTROLS DURING THE GAME
Heavy Attack
Strong; low accuracy, but high damage.
Extra Attack
Special; low accuracy, but
can use with certain weapons.
Standard; high accuracy, but low damage.
Attack
Green A button
Blue X button Red B button
Page 26

PHANTASY STAR ONLINE EPISODE I&II
48
PHANTASY STAR ONLINE EPISODE I&II
49
While playing the game, press the START, Black, or White button
to display the Main Game Menu. From here you can access your
Item Pack, customize your controls, access tools and techniques,
chat, review your status, and change your game options. This
section details some of the most common features of the main
game menus.
Note: Gameplay does not pause while any of the main game
menus are open.
ITEM PACK
Using the Item Pack menu, you can equip yourself with weapons
and armor, utilize tools, maintain your MAG, view a map of the area
you are currently in, trade items if you are in the city, and review the
Quest Board. Your Item Pack can hold a maximum of 30 total items
(including weapons and armor) at a time. To equip your character
with weapons or armor, select Equip.
Items
Weapons, armor, items, and tools can be found (and picked up)
inside the boxes, with their colors indicating what type of item
they are: weapons are orange, armor blue, and tools green. Each
weapon requires a certain amount of ability value to equip it, and
armor requires a certain character level to use it.
Photon Ef ciency
In PSO, all weaponry is
powered by photon energy.
The effectiveness of a weapon
used to attack an enemy will
vary according to that weapon’s
photon ef ciency level. Different
types of enemies have different
attributes, and the amount
of damage you can in ict on each type will vary according to
the suitability of the weapon used to attack it. Also, the photon
ef ciency of weapons will vary, even among weapons with the
same name.
To check the photon ef ciency of a weapon, select the weapon
in question from the Equip or Items Menu in the Item Pack on
the Main Menu; use the left and right triggers to toggle the right
window. A green-colored weapon name indicates that weapon has
a photon ef ciency other than zero.
Native Increase/decrease in ef ciency against native
creatures.
A. Beast Increase/decrease in ef ciency against altered beasts.
Machine Increase/decrease in ef ciency against machine types.
Dark Unknown.
MAIN GAME MENUMAIN GAME MENU
Page 27

PHANTASY STAR ONLINE EPISODE I&II
50
PHANTASY STAR ONLINE EPISODE I&II
51
MAIN GAME MENUMAIN GAME MENU
MAG
Every character has a MAG, a protector unit that oats behind the
character’s shoulders. As a MAG is given items, it will grow and
eventually acquire the Photon Blast attack technique.
Level
Synchro
IQ
DEF
POW
DEX
MIND
Level of MAG; increases when one of
four gauges reaches maximum.
Attachment between character and MAG;
decreases as time passes.
Intelligence of MAG.
Defensive quality of MAG; the higher the value,
the higher your defense ability.
Offensive quality of MAG; the higher the value,
the higher your attack ability.
Accuracy quality of MAG; the higher the value,
the higher your attack ability.
Mental quality of MAG; the higher the value,
the higher your spiritual strength.
When your MAG has developed to a certain level, it will be able
to save up photon power, discharged when you attack enemies.
The reate of storage is indicated by the yellow photon blast guage.
Once this gauge reaches 100%, you can utilize photon blasts. To
do so, pull the right trigger to toggle the Action Menu to display the
available photon blast actions, and then press a controller button.
CUSTOMIZE
A total of six actions, three to each of the two menus available
(see page 47), can be assigned to your Action Menu, displayed by
selecting Customize. Pull the right trigger to toggle between the two
menus, and press the A button to make your selections. While in the
game, hold the right trigger to access the second set of actions.
TOOLS AND TECHNIQUES
Tools and techniques can be used by using the Action Menu (see
page 49), selecting them on the Shortcut Display (see page 52), or
selecting them from the Item list in the Item Pack (see page 48) or
from the Technique list on the Main Menu.
Page 28

PHANTASY STAR ONLINE EPISODE I&II
52
PHANTASY STAR ONLINE EPISODE I&II
53
MAIN GAME MENUMAIN GAME MENU
Tools
Tools can be used to recover HPs/TPs, return your character to a
normal state when affected in some way, open a teleport gate to
the city, or reveal hidden traps. You can purchase items at the Tool
Shop or pick up item boxes dropped by fallen enemies. You can
use tool items by assigning them to the Action Menu or by selecting
them from the Items list in the Item Pack. Once used, the item
will be gone. Up to 10 units of any one item can be carried by the
player at one time.
MONOMATE Recovery
Restores small amount of HPs/TPs depending on level.
ANTIDOTE Recovery
Neutralizes poisons.
ANTIPARALYSIS Recovery
Removes paralysis.
MOON ATOMIZER Revive
Revives fallen team member.
MONOFLUID Recovery
Restores small amount of HPs/TPs depending on level.
TELEPIPE Recovery
Opens teleport gate to the city.
TRAP VISION Recovery
Reveals hidden traps.
Techniques
There are ve types of techniques in PSO: basic attack,
intermediate attack, advanced attack, healing, and support. Each
technique requires a certain level of MST, or Mental Strength, to
be acquired or used. Attack techniques affect targeted enemies,
healing techniques essentially affect only the player using
them, and support techniques of a certain level can affect other
members within range.
FOIE Attack
Hurls a fireball at one enemy.
BARTA Attack
A penetrating linear ice attack.
ZONDE
Lightning strike on one enemy.
RESTA Healing
HP recovery.
REVERSER Healing
Revives a fallen team member.
ANTI Healing
Normalizes a player’s condition.
SHIFTA Support
Raises a team member’s ATP.
DEBAND Support
Raises a team member’s DFP.
JELLEN Support
Lowers the enemy’s ATP.
ZALURE Support
Lowers the enemy’s DFP.
RYUKER Support
Opens a teleport gate to the city.
Attack
Note: SHIFTA and JELLEN are displayed in red, and DEBAND and
ZALURE in blue.
Page 29

PHANTASY STAR ONLINE EPISODE I&II
54
PHANTASY STAR ONLINE EPISODE I&II
55
MAIN GAME MENU
SHORTCUT DISPLAY
The Shortcut Display can be
used to quickly switch weapons,
use items and techniques during
the battle, or select traps while
playing in Battle Mode.
To open the Shortcut Display,
hold down the right trigger
while pressing the Y button. As
you hold down the right trigger, the contents in the display cycle
through weapons, items, traps, and techniques.
When the weapons list is displayed, press the X button to read the
description of the selected weapon. While the techniques list is
displayed, press the Y button to sort the techniques. Press the A or
START button to select the item you want to use, or press the B or
BACK button to cancel and close the Shortcut Display.
In a normal adventure, only the androids can use traps, but they
cannot use techniques. In Battle Mode, however, all characters,
regardless of their race, can use traps.
MAIN GAME MENU
CHARACTER LEVELS
Experience points are earned for defeating an enemy. If your
experience points reach a predetermined amount, you reach a new
level, raising some of your parameters. Also, all of your HPs and
TPs will be restored (for androids, traps will be replenished).
In the event you are felled in battle, you will be asked if you wish to
return to Pioneer 2. If you select Yes, your character will be sent to
the Medical Center and revived so that you can restart. Note that
all of your money (Meseta) will be lost, and your weapon will be in
an unequipped state. If you select No, you will remain where you
fell. You can still chat, so it is possible to call someone to help you
with a reviving item or Recovery technique.
Page 30

PHANTASY STAR ONLINE EPISODE I&II
56
PHANTASY STAR ONLINE EPISODE I&II
57
FORCE
Pro cient with techniques, Forces are excellent as support.
Their powerful abilities make up for their low HPs. Suitable for
advanced players.
CHARACTERS
HUNTER
Pro cient with bladed weapons, Hunters can also use a wide
variety of other weapons. Although lacking in accuracy, they gain
high attack power. Suitable for beginners.
CHARACTERS
FOmar
Force/Human/Male
With low defensive power and
low HPs, challenging to use.
Combination of techniques
and quickness in combat make
them unique.
FOmarl
Force/Human/Female
Besides excelling in support
techniques, competent with
weapons, giving them a more
balanced growth potential.
FOnewm
Force/Newman/Male
Well balanced, and excel
in numerous techniques.
Distinguish themselves with
powerful attack techniques.
FOnewearl
Force/Newman/Female
Has limited combat skills,
but excels in both attack and
support techniques. Has the
highest MST/TP potential of
any class.
HUmar
Hunter/Human/Male
Excels in close-range combat.
Has the most balanced growth
potential. Has some recovery
and attack techniques.
HUnewearl
Hunter/Newman/Female
Has very strong techniques
as well as adeptness at closerange combat. Has the lowest
HPs of the Hunter class.
HUcast
Hunter/Android/Male
Exper t at close-range combat,
has the strongest attack power
potential of any class. Unable
to use techniques, but can
use traps.
HUcaseal
Hunter/Android/Female
Exper t at close-range combat,
with excellent reflexes that give
her high accuracy and evasion.
Unable to use techniques, but
can use traps.
Page 31

PHANTASY STAR ONLINE EPISODE I&II
58
PHANTASY STAR ONLINE EPISODE I&II
59
RANGER
Pro cient with guns, Rangers have excellent accuracy, allowing
them to hit from a distance, but they lack attack power. Suitable for
midlevel players.
CHARACTER PARAMETERSCHARACTERS
ATP
Attack Power
DFP
Defense Power
MST
Mental Strength
ATA Attack Accuracy
EVP
Evasion Power
LCK
Luck
EFR
Elemental Resistance to Fire
EIC
Elemental Resistance to Ice
ETH
Elemental Resistance to Lightning
EDK
Elemental Resistance to Dark
ELT
Elemental Resistance to Light
RAmar
Ranger/Human/Male
Excels in ranged combat.
Has the most balanced set
of abilities and the highest
accuracy potential. Has some
recovery and attack techniques.
RAmarl
Ranger/Human/Female
Has low HPs, but high mental
strength compensates by
providing strong attack
techniques to suppor t them
in ranged combat.
RAcast
Ranger/Android/Male
Has greatest attack power
potential out of the Ranger
classes. Unable to use
techniques, but can use traps.
RAcaseal
Ranger/Android/Female
Has the greatest defensive
power potential out of the
Ranger classes. Unable to use
techniques, but can use traps.
Page 32

PHANTASY STAR ONLINE EPISODE I&II
60
PHANTASY STAR ONLINE EPISODE I&II
61
LIMITED WARRANTY FOR YOUR COPY OF XBOX GAME
SOFTWARE (“GAME”) ACQUIRED IN THE UNITED
STATES OR CANADA
Warranty
Microsoft Corporation (“Microsoft”) warrants to you, the original purchaser
of the Game, that this Game will perform substantially as described
in the accompanying manual for a period of 90 days from the date of
rst purchase. If you discover a problem with the Game covered by this
warranty within the 90 day period, your retailer will repair or replace the
Game at its option, free of charge, according to the process identied
below. This limited warranty: (a) does not apply if the Game is used in a
business or for a commercial purpose; and (b) is void if any difculties with
the Game are related to accident, abuse, virus or misapplication.
Returns within 90 day period
Warranty claims should be made to your retailer. Return the Game to your
retailer along with a copy of the original sales receipt and an explanation of
the difculty you are experiencing with the Game. At its option, the retailer
will either repair or replace the Game. Any replacement Game will be
warranted for the remainder of the original warranty period or 30 days from
receipt, whichever is longer. If for any reason the Game cannot be repaired
or replaced, you will be entitled to receive your direct (but no other)
damages incurred in reasonable reliance but only up to the amount of the
price you paid for the Game. The foregoing (repair, replacement or limited
damages) is your exclusive remedy.
Limitations
This limited warranty is in place of all other express or statutory warranties,
conditions or duties and no others of any nature are made or shall be
binding on Microsoft, its retailers or suppliers. Any implied warranties
applicable to this Game or the media in which it is contained are limited
to the 90 day period described above. TO THE FULL EXTENT ALLOWED BY
LAW, NEITHER MICROSOFT, ITS RETAILERS OR SUPPLIERS ARE LIABLE
FOR ANY SPECIAL, INCIDENTAL, PUNITIVE, INDIRECT OR CONSEQUENTIAL
DAMAGES ARISING FROM THE POSSESSION, USE OR MALFUNCTION OF
THIS GAME. THE FOREGOING APPLIES EVEN IF ANY REMEDY FAILS OF ITS
ESSENTIAL PURPOSE. Some states/jurisdictions do not allow limitations
as to how long an implied warranty lasts and/or exclusions or limitations
of incidental or consequential damages so the above limitations and/or
exclusions of liability may not apply to you. This limited warranty gives you
specic rights, and you may also have other rights that vary from state/
jurisdiction to state/jurisdiction.
For questions regarding this warranty contact your retailer or Microsoft at:
Xbox Product Registration
Microsoft Corporation
One Microsoft Way
Redmond, WA 98052-9953 USA
In the U.S. or Canada, call 1-800-4MY-XBOX. TTY users: 1-866-740-XBOX.
GET AN EDGE ON THE GAME!
Xbox Game Tips (Automated): Available 7 days a week including holidays,
24 hours a day.
• In the U.S., call 1-900-933-TIPS. $.95 per minute.
• In Canada, call 1-900-561-HINT. $1.50 (Canadian) per minute.
Xbox Game Tips (Support Representative): Available 7 days a week
including holidays.
• In the U.S., call 1-900-933-TIPS. $1.40 per minute.
• In Canada, call 1-900-561-HINT. $1.50 (Canadian) per minute.
Important: Individuals under 18 years of age need a parent’s or guardian’s
permission to call a pay-per-call number. Local and long distance
telephone toll charges may apply. It is the customer’s responsibility to
check with their telephone company to determine if additional telephone
charges will apply. Permission required from the telephone bill payer.
Prices subject to change without notice. May not be available in all areas.
Requires a touch-tone telephone. Call length is determined by user.
Messages subject to change without notice.
Games Technical Support : Available 7 days a week including holidays.
• In the U.S. or Canada, call 1-800-4MY-XBOX.
TTY users: 1-866-740-XBOX.
• In Mexico, call 001-866 -745-83-12.
TTY users: 001-866-251-26-21.
Note: Game tips are not available from 1-800-4MY-XBOX. You must call
Xbox Game Tips (Automated) or Xbox Game Tips (Support Representative)
for tips, hints, or codes.
For more information, visit us on the Web at www.xbox.com
Information in thi s document, including URL and other Internet Web site references , is subje ct
to change wi thout notice. Unless o therwise noted, the example companies , organiz ations,
products, pe ople and events depicted herein are ctitious and no association with any real
company, organization, product, person or event is intended or should be inferred. Complying
with all applicable copyright laws is the responsibility of the user. Without limiting the right s under
copyright, no part of this document may be reproduced, stored in or introduced into a retrieval
system, or transmitte d in any form or by any means (electronic, mechanical, photo copying,
recording, or otherwise), or for any purpo se, without the express written permission of Microsoft
Corporation.
Microsoft may have patents, patent applications, trademarks, copyr ights, or other intellectual
proper ty rights covering subject mat ter in this document. Except as expressly provided in any
written license agreement from Microsoft, the furnishing of thi s document does not give you any
license to these patent s, trademarks , copyrights , or other intellectual property.
© & p 2003 Microsof t Corporatio n. All rights reserved.
Microsoft, X box, Xb ox Live, and the Xbox and Xbox Live logos are either registered trademarks or
trademarks of Microsof t Corporation in the United States and/or other countries.
SEGA is reg istered in the U.S. Patent and Trademark Ofce. SEGA , the SEGA logo, Phantasy St ar,
and Phantasy Star Online Episode I & II are either registered trademark s or trademarks of Sega
Corporation. © SONICTEAM/SEGA, 2000, 2002, 2003. All Rights Re served.
Manufac tured under licen se from Dolby Laboratories.
Uses Bink Video. © Copyright 1997–2002 by RAD Game Tools, Inc.
Page 33

CYCLE ITEMS/
MAIN MENU
TALK TO
SELECTED
CHAR ACTER/
SELECT ITEM/
ATTACK
FOIE (FIRE
TECHNIQUE )/
CANCEL
HEAVY
ATTACK
TOGGLE
SOFT WARE
KEYBOARD
CLOSE/ DISPLAY
MAIN MENU
MOVE
CHAR ACTER
CHANGE
ACTION PALETTE
CENTER
CAMERA
BEHIND PLAYER
 Loading...