

Page 1

Universal Arcade Fightstick
For PC, PS4TM, XBOX OneTM and Android
USER MANUAL
Page 2
Package Content:
• Universal Arcade Fightstick x 1
• Hex Screw Driver x 1
• USB Cable (1m) x 1
• User Manual x 1
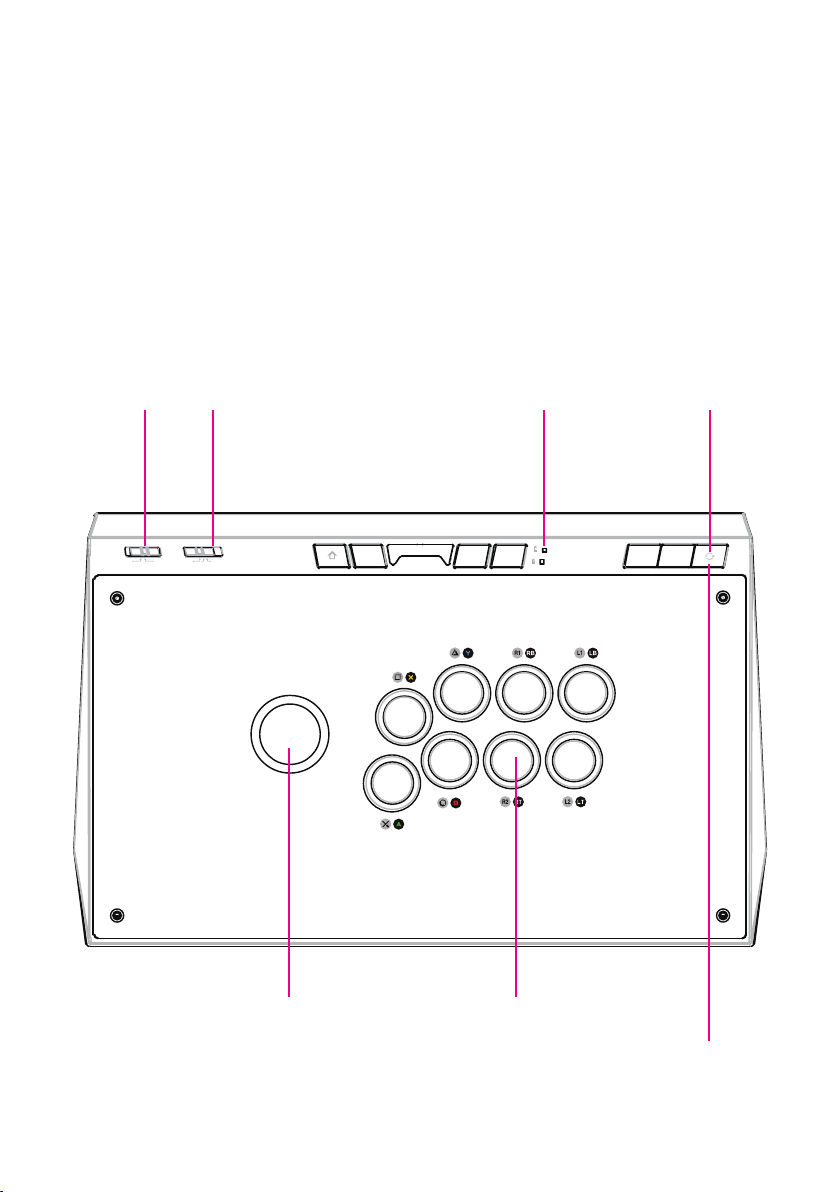
LONG PRESS
TURBO STICK MODE LOCK LED SWITCH BUTTON
SHARE
OFFTURBO ON
DP LS RS
VIEW
OPTIONS
MENU
KEY
LOCK
JOYSTICK ACTION BUTTONS
L3 R3
SINGLE PRESS AT PS4
TM
TOUCHPAD BUTTON
Page 3
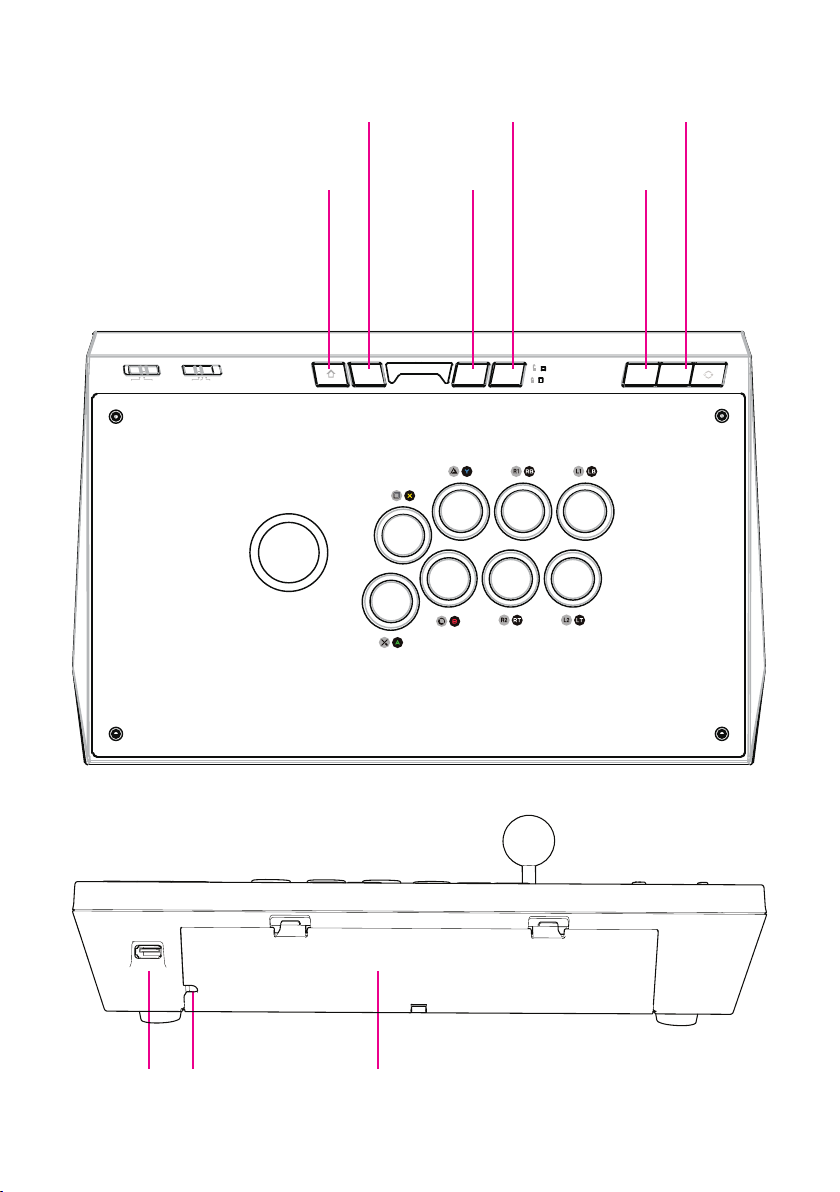
SHARE/VIEW Key Lock R3
HOME BUTTON OPTIONS/MENU L3
SHARE
OFFTURBO ON
DP LS RS
VIEW
OPTIONS
MENU
KEY
LOCK
L3 R3
USB IN CABLE OUT STORAGE COVER
Page 4
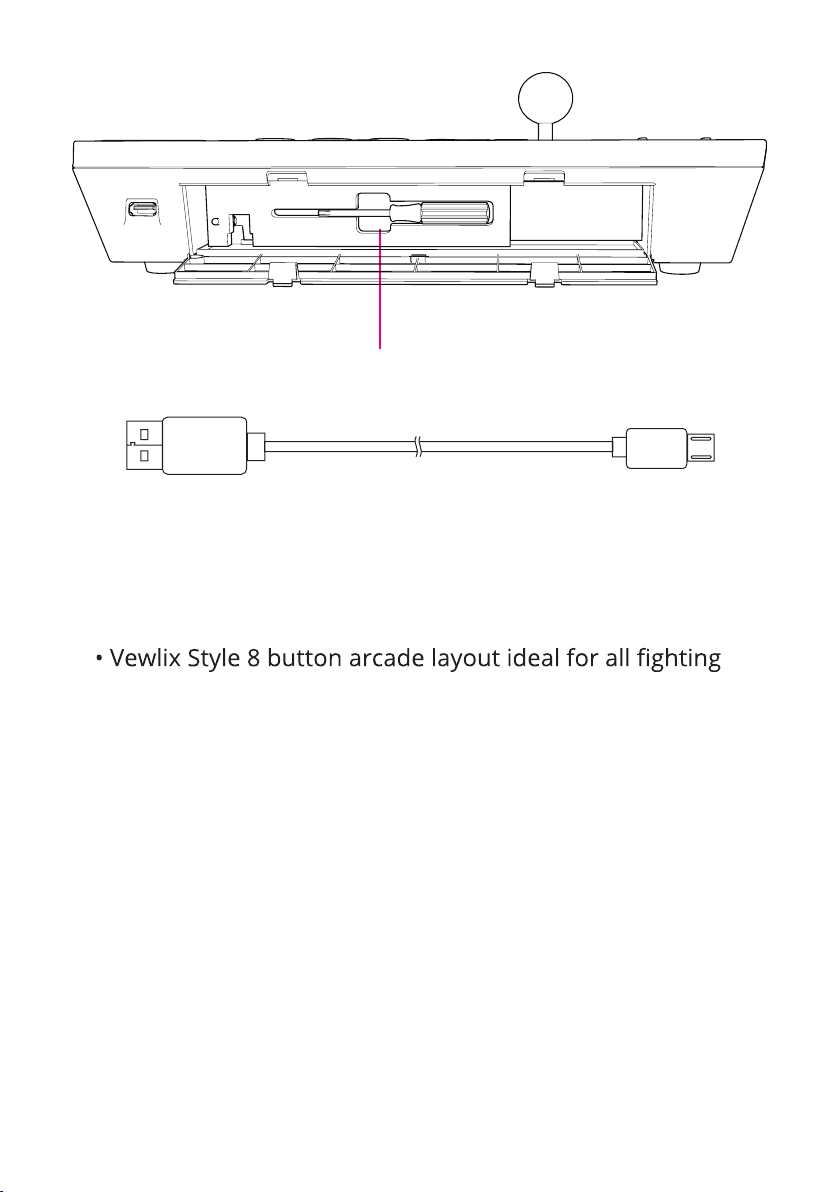
SCREW DRIVER
USB CABLE (1m)
Description:
• Precise and robust Sanwa Denshi parts, stick and buttons
games
• L3, R3 buttons for added game play options
• Turbo mode/switch for all 8 action buttons
• “Key Lock” switch to enable ONLY all 8 action buttons to
avoid slip-ups
• Directional input toggle switch between Dpad, Left Analog
Stick and Right Analog Stick
• Customizable faceplate option, allows you the ability to
create your own artwork and designs
• Discreet, simple and tidy storage space for cable and
spare replaceable buttons when not in use
• 3 meter long USB cable for connecting to console
• Includes a USB cable to connect with PS4/XB1 controller
• Compatible with PS4™, PS4™ Slim, PS4™ Pro, Xbox One™,
Xbox One™ S, PC & Android
Page 5
PC / Android Instruction:
1. Take out the built-in USB cable from the storage space at
the back of the arcade stick.
2. Connect the USB head to the USB port of your PC / Android device.
3. The arcade stick will automatically connect to the Xinput
mode ready to play.
4. If you wish to switch to Dinput mode, hold the Switch
after 30 seconds then back to normal to indicate the
KEYLOCK status). To revert back to Xinput mode hold the
Switch button for 2 seconds.
TM
PS4
Instruction:
1. Take out the built-in USB cable from the storage space at
the back of the arcade stick.
TM
2. Connect the USB head to the USB port of PS4
Console.
3. Holding the Switch button for 2 secs, the two Lock LEDs
ready for connection to PS4TM controller.
4. Using the USB cable (1m) connect the microUSB head
to the microUSB port at the top PS4TM controller, then
connect the USB head to the USB port at the back of the
arcade stick. The two Lock LEDs will both turn ON for 3
TM
seconds indicating the PS4
controller successfully con-
nected to the arcade stick then back to normal to indicate
* Please turn OFF the PS4 Controller before connecting to the Arcade Stick
Page 6

the KEYLOCK status. The arcade stick is now ready to
begin playing. Please press “HOME” button to continue.
Keep the USB connected to your PS4TM controller and
arcade stick while in play.
5. If the PS4TM controller did not successfully connect to the
arcade stick the two LOCK LEDs will both ash 3 times
then back to normal to indicate the KEYLOCK status.
Please remove the USB cable from the USB port at the
back of the arcade stick, repeat steps 2, 3 & 4.
* Single touch “Switch” Button will trigger the same function as press
down the PS4TM controller Touchpad.
Xbox One
TM
Instruction:
1. Take out the built-in USB cable from the storage space at
the back of the arcade stick.
2. Connect the USB head to the USB port of Xbox OneTM
Console.
3. Holding the Switch button for 2 secs, the two Lock LEDs
will ash alternately indicating change to console mode
ready for connection to Xbox OneTM controller.
4. Using the USB cable (1m) connect the microUSB head
to the microUSB port at the top XBOX ONETM controller,
then connect the USB head to the USB port at the back of
the arcade stick. The two Lock LEDs will both turn ON for
3 seconds indicating the Xbox OneTM controller successfully connected to the arcade stick then back to normal
to indicate the KEYLOCK status. The arcade stick is now
ready to begin playing. Please keep the USB connected to
your Xbox One
TM
controller and arcade stick while in play.
Page 7
5. If the Xbox OneTM controller did not successfully connect
to the arcade stick the two LOCK LEDs will both ash 3
times then back to normal to indicate the KEYLOCK status. Please remove the USB cable from the USB port at
the back of the arcade stick, repeat steps 2, 3 & 4.
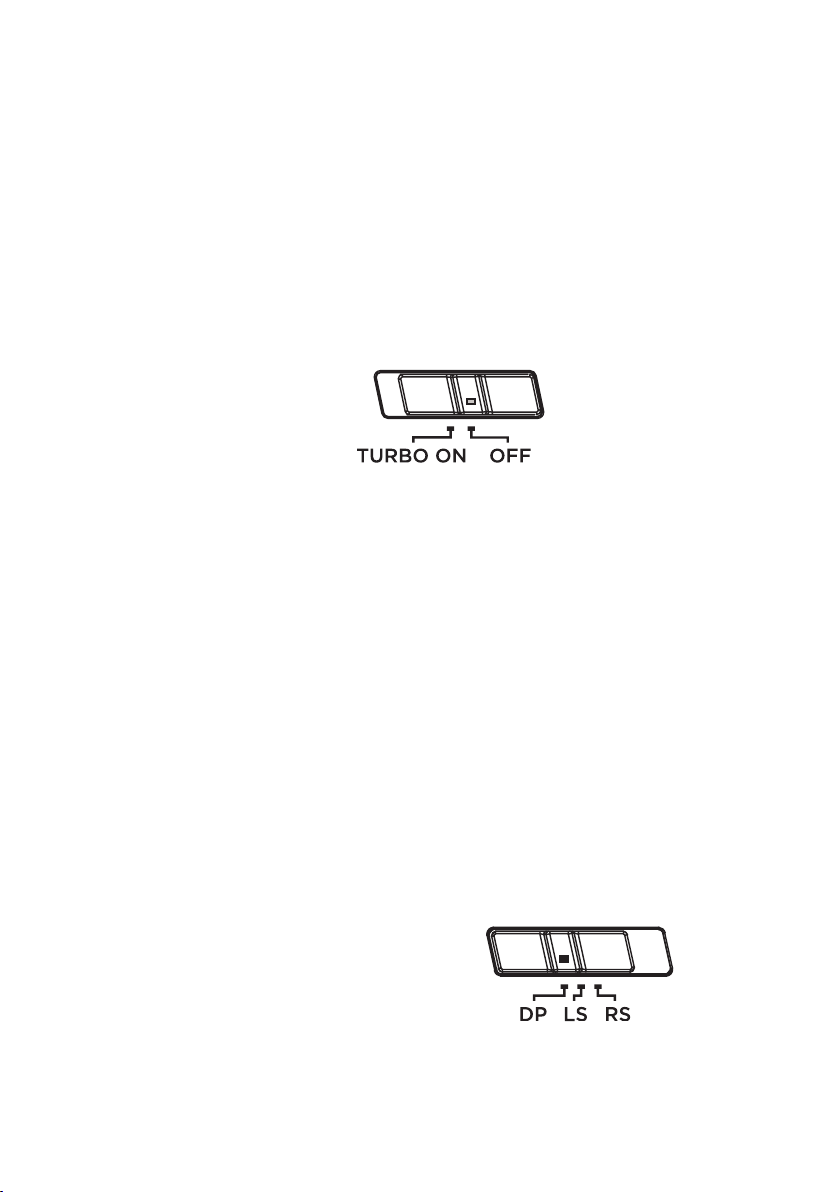
TURBO Function:
TURBO function can be applied to all 8 action buttons.
TURN ON:
Press and hold the buttons which you would like to TUR-
BO, slide the TURBO switch to “TURBO ON” still holding
the action buttons down enables the TURBO function.
These buttons will now have an output command of 10
times per second.
TURN OFF:
Slide the TURBO switch from “TURBO ON” to “OFF”, this
disables the TURBO function.
STICK MODE Switch:
This arcade stick supports a 3 mode switch for Joystick:
1) DP: D-Pad
2) LS: Left Stick
3) RS: Right Stick
Switch between modes to make the Joystick output either
D-pad, Left Stick or Right Stick.
Page 8
* Most games work in DP and LS modes.
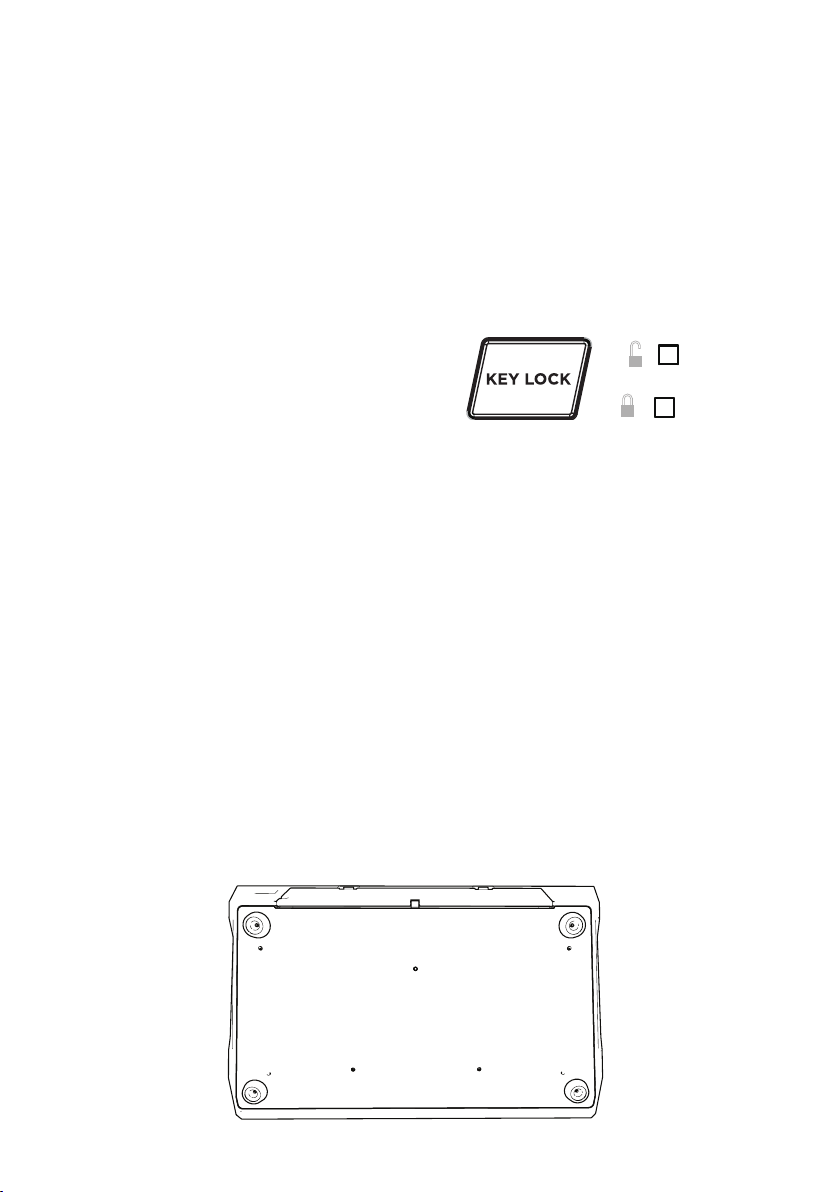
KEY LOCK:
KEY LOCK button allows you to lock certain features to
avoid accidental disruption whilst you are playing a game.
The following ve buttons lock when you press the KEY
LOCK button.
1) HOME
2) SHARE/VIEW
3) OPTIONS/MENU
4) L3
5) R3
The LOCK LED will turn ON when above buttons have
been locked, press the KEY LOCK button again to unlock
these buttons, the UNLOCK LED will turn ON.
Button Replacement:
1.Take out the screw driver from the storage space at the
back of the arcade stick.
2. Detach the 7 screws at the bottom of arcade stick and
remove the bottom plate.
Page 9

3. Disconnect the connect cable from the button you would
like to replace, press in the 2 clips at the side of the button to release.
4. Install the new button from the top, then rotate the button until you hear a click sound it is now locked in place.
5. Following the cable assignment label reconnect the correct colour cable to the button.
Page 10

LB RB Y X
LT RT B A
Artwork Replacement:
1. Take out the hex screw driver from the storage space at
the back of the arcade stick.
2. Detach the 7 screws at the bottom of arcade stick and
remove the bottom plate.
Page 11

3. Disconnect the connect cable from the buttons press in
the 2 clips at the side of the buttons to release.
4. Use normal at screw driver to hold the joystick in place,
then rotate to remove the top ball from the joystick.
Page 12

5. Detach the 4 screws from the top of arcade stick, remove
the top panel.
TOP PANEL ACTION BUTTONS
SCREWS
REPLACEMENT ARTWORK PAPER
6. Replace the artwork paper.
7. Install the top panel, action buttons and top screws.
8. Following the cable assignment label reconnect the correct colour cable to each button.
9. Reinstall the bottom plate screws back on.
Page 13

PRECAUTION AND MAINTENANCE
1. Please make sure there is no extreme pressure put on this product.
2. Don’t dismantle this product without permission.
3. This product should be situated away from heat sources such as
radiators and heaters.
4. Keep this product dry and avoid any contact with damp or wet
areas.
PlayStation4 and PS4™ are registered trademark or trademarks of Sony Computer
Entertainment Inc. Windows
of Microsoft Inc. Android
TM
and Xbox One™ is registered trademark or trademarks
TM
is a registered trademark or trademarks of Google Inc. All
Rights reserved; All other trademarks are property of their respective owners. Photos and illustrations not binding. Contents, designs and specifications are subject to
change without notice and may vary from one country to another. This product is not
distributed under official license from or approved, sponsored or endorsed by Sony
Computer Entertainment Inc. This product is not manufactured for Sony Computer En-
tertainment Inc or Microsoft Inc or Google Inc.
If you come across any issue with this product, please do not hesitate to
contact GameSir's customer service by email: cs@gamesir.hk, or visit our
ocial website: https://gamesir.hk
Page 14

跨平台格斗台杆
For PC, PS4TM, XBOX OneTM and Android
使用说明书
Page 15

包装内容:
• 游戏台杆 x 1
• USB 数据线 x 1
• 六角螺丝刀 x 1
• 使用说明书 x 1
长按
Turbo 开关 摇杆模式切换 锁定指示灯 模式切换键
SHARE
OFFTURBO ON
DP LS RS
VIEW
OPTIONS
MENU
KEY
LOCK
方向摇杆 功能键
L3 R3
TM
主机下短按
PS4
触摸板按键
Page 16

SHARE/VIEW 锁定开关 R3
HOME键 OPTIONS/MENU L3
SHARE
OFFTURBO ON
DP LS RS
VIEW
OPTIONS
MENU
KEY
LOCK
L3 R3
USB输入 线槽 收纳盒盖
Page 17

螺丝刀
USB 数据线 (1米)
产品特性:
• 采用精准耐用的日本三和摇杆及按键
• 采用 Vewlix 标准 8 键街机布局, 适合所有格斗游戏
• Turbo 切换开关控制 8 个格斗按键
• 按键锁定功能避免误操作
• 摇杆可切换三种输出: 方向键, 左摇杆 及 右摇杆
• 可更换面板设计,轻松更换喜爱的图案
• 背部存储空间可存储连接线, 拆卸工具及额外按键 (额外按键
不包含在本产品内)
• 3 米 USB 线连接至主机
• 包含 1 条 1 米 USB 数据线 连接 PS4
• 兼容 PS4
, 安卓
TM
, PS4 SlimTM, PS4 ProTM, Xbox One
TM
及 PC 系统 )式模 063CP tupniX 持支(
TM
/ Xbox OneTM 原装手柄
TM
, Xbox One
TM S
Page 18

PC / Android 使用说明:
1. 打开台杆背面的收纳盒盖, 取出 USB 连接线。
2. USB 连接线插入智能电视、机顶盒、安卓平板、安卓手机或 PC
含 OTG 线)
3. 台杆会自动连接主机进入 Xinput 模式,此时即可开始游戏。
4. 如果你希望进入 Dinput 模式, 保持按住模式切换键 2 秒以
上, 两个按键锁定 LED 会开始交替闪烁, 表示切入 Dinput 模
状态)。 保持按住模式切换键 2 秒以上切换回 Xinput 模式。
TM
PS4
使用说明:
1. 打开台杆背面的收纳盒盖, 取出 USB 连接线。
包不品产本,线 GTO 接连要需备设机手及板平( 。口接 BSU 的
定锁键按示指续继 ,灭熄后次3烁闪速快后秒03在会 DEL( 式
2. USB 连接线插入 PS4
TM
主机的 USB 接口。
3. 保持按住模式切换键 2 秒以上, 两个按键锁定 LED 会开始交
替闪烁, 提示进入主机连接模式,等待接入PS4TM 原装手柄。
4. 使用附带的 1米 USB 数据线, 将 microUSB 接头插入 PS4TM
原装手柄顶部的 microUSB 接口, 将 USB 接头插入台杆背面
的 USB 接口。 两个锁定 LED 会同时亮起 3 秒提示连接成功并
继续指示按键锁定状态, 此时轻按 HOME 键,再根据系统提示
进行游戏。
* 请确保 PS4手柄在连接台杆前保持关闭。
* 游戏进行中必须保持 PS4
TM
原装手柄 与台杆的连接,不得断开 USB 线。
5. 如果 PS4TM 原装手柄没有成功连接上台杆, 两个锁定 LED 会
同时闪烁3次并继续指示按键锁定状态。 请从手柄和台杆上移
除 USB 数据线, 并重复步骤 2,3,4。
* 单击“模式切换键”相当于按下 PS4TM 手柄的触摸板。
Page 19

Xbox One
TM
使用说明:
1. 打开台杆背面的收纳盒盖, 取出 USB 连接线。
2. USB 连接线插入 Xbox One
TM
主机的 USB 接口。
3. 保持按住模式切换键 2 秒以上, 两个按键锁定 LED 会开始交
替闪烁, 提示进入主机连接模式,等待接入Xbox OneTM 原装手
柄。
4. 使用附带的 1米 USB 数据线, 将 microUSB 接头插入 Xbox
OneTM 原装手柄顶部的 microUSB 接口, 将 USB 接头插入台
杆背面的 USB 接口。 两个锁定 LED 会同时亮起 3 秒提示连接
成功并继续指示按键锁定状态, 此时根据系统提示进行游戏。
* 游戏进行中必须保持 Xbox OneTM 原装手柄 与台杆的连接,不得断开 USB
线。
5. 如果 Xbox OneTM 原装手柄没有成功连接上台杆, 两个锁定
LED 会同时闪烁3次并继续指示按键锁定状态。 请从手柄和台
杆上移除 USB 数据线, 并重复步骤 2, 3, 4。
Turbo 功能:
本台杆支持 Turbo 功能, 可设置8个功能键开启或取消 Turbo
功能。
开启 Turbo功能: 按住需要设置 Turbo的功能键
键), 并同时将 Turbo 开关从 OFF 拨到 ON 档位。 此时对应的
(仅支持8个功能
功能键已启用 Turbo 功能, 长按对应的功能键相当于快速点
击按键。
Page 20

摇杆模式切换:
本台杆切换3种类摇杆模式:
1)DP: 方向键
2)LS: 左摇杆
3)RS: 右摇杆
默认档位为 DP 模式, 如部分游戏需要, 可切换至另外两个模
式进行游戏。
按键锁定功能:
为避免游戏时误触按键, 本台杆支持按键锁定功能。 支持如下
按键:
1)HOME
2)SHARE/VIEW
3)OPTIONS/MENU
4 )L 3
5 )R 3
按下 “Key Lock” 键可开启锁定功能, 按键锁定 LED 灯会亮
起, 此时上方列表按键无功能。 再次按下 “Key Lock” 键解锁
以上按键, 按键解锁LED 会亮起。
按键替换:
1. 打开台杆背面储物槽, 取出六角螺丝刀。
2. 移除台杆底部的 7 颗螺丝。
Page 21

3. 断开需要替换按钮的数据线, 并按住按键两侧的塑料卡扣将按
钮从台杆正面取出。
Page 22

4. 从台杆正面安装新按钮, 并选择按钮直至听到“卡塔” 声, 此时
按钮已锁定至台杆面板。
5. 根据以下图示将正确颜色的数据线连接至按钮。
LB RB Y X
LT RT B A
面板图案替换:
1. 打开台杆背面储物槽, 取出六角螺丝刀。
2. 移除台杆底部的 7 颗螺丝。
3. 断开所有按键的数据线, 并按住按键两侧的塑料卡扣将所有按
钮从台杆正面取出。
Page 23

4. 使用普通一字螺丝刀固定住摇杆底部的中轴, 再将台杆摇杆顶
部的小球旋转取下。
5. 将台杆正面的 4 颗螺丝移除。
Page 24

顶部透明面板 动作按键
替换面板图
6. 替换面板图。
7. 将正面面板和动作按键安装好, 并锁上螺丝。
8. 根据按键图将正确颜色的数据线连接至按钮。
LB RB Y X
LT RT B A
9. 将底板安装上并锁上螺丝。
Page 25

注意事项
1. 请确保本产品上不放置重物。
2. 未经允许,请勿擅自拆开本产品。
3. 请保证本产品远离热源及辐射源。
4. 本产品避免接触潮湿环境。
0-9
Windows
是 Sony Computer Entertainment Inc. 的注册商标。 AndroidTM 是 Google 公司
的注册商标。 所有商标的所有权属于它们各自的所有者, 照片和插图 不具备约束
力。 本产品未通过微软公司或Sony Computer Entertainment Inc 或 Google 公司
TM
授权。
™4SP 和 ™4noitatSyalP 。标商或标商册注司公软微是 ™enO xobX 和
 Loading...