

Page 1
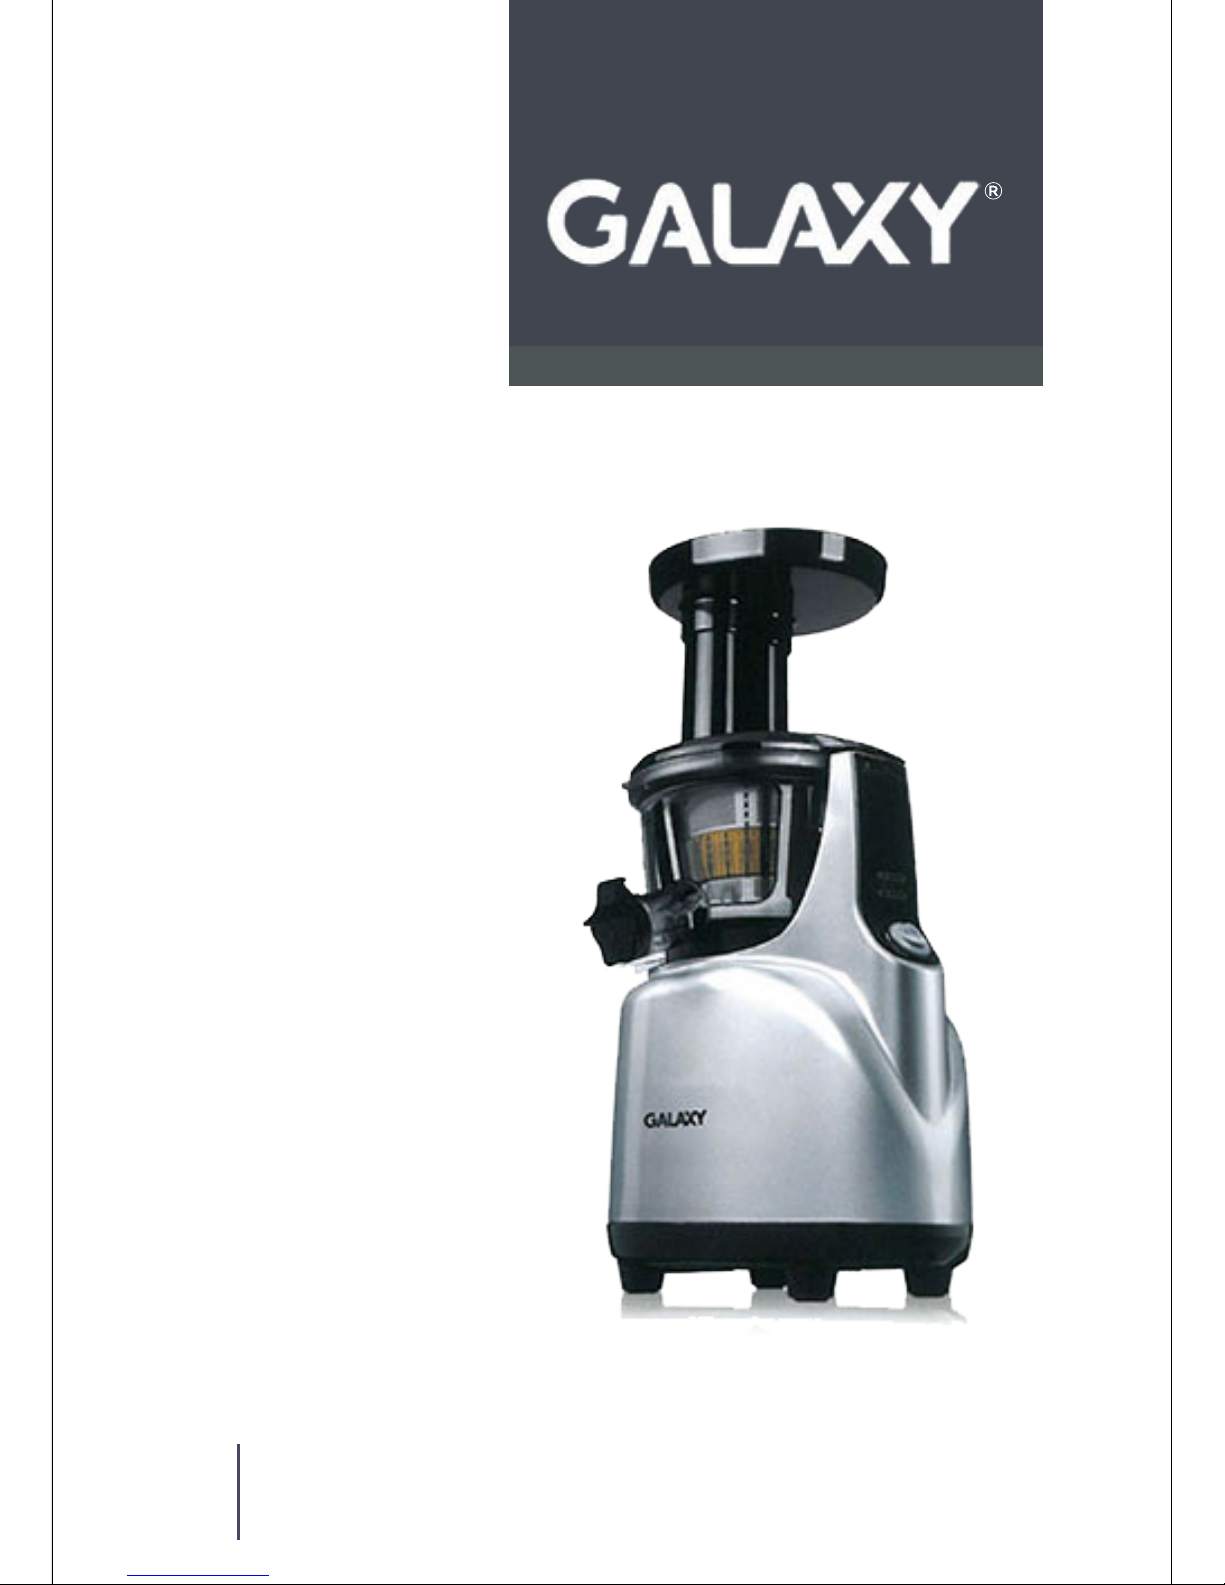
Galaxy premium juice machine
PREMIUM JUICER
SINCE 1990
User Manual
공용 사용설명서로 제품의 색상은 모델별로 다를 수 있습니다.
제품의 색상 및 사양은 품질 향상을 위하여 예고없이 변경될 수 있습니다.
This user manual is for all products and the color of product may vary by model.
The color and specification of product may change without notice for improvement
of the product.
Page 2
CONTENTS
VS
특허받은 원액기가 좋은이유
각부의 명칭
세부 조립방법
사용 방법
사용시 주의사항
분해방법 및 세척방법
실리콘 부품 세척방법
제품의 규격
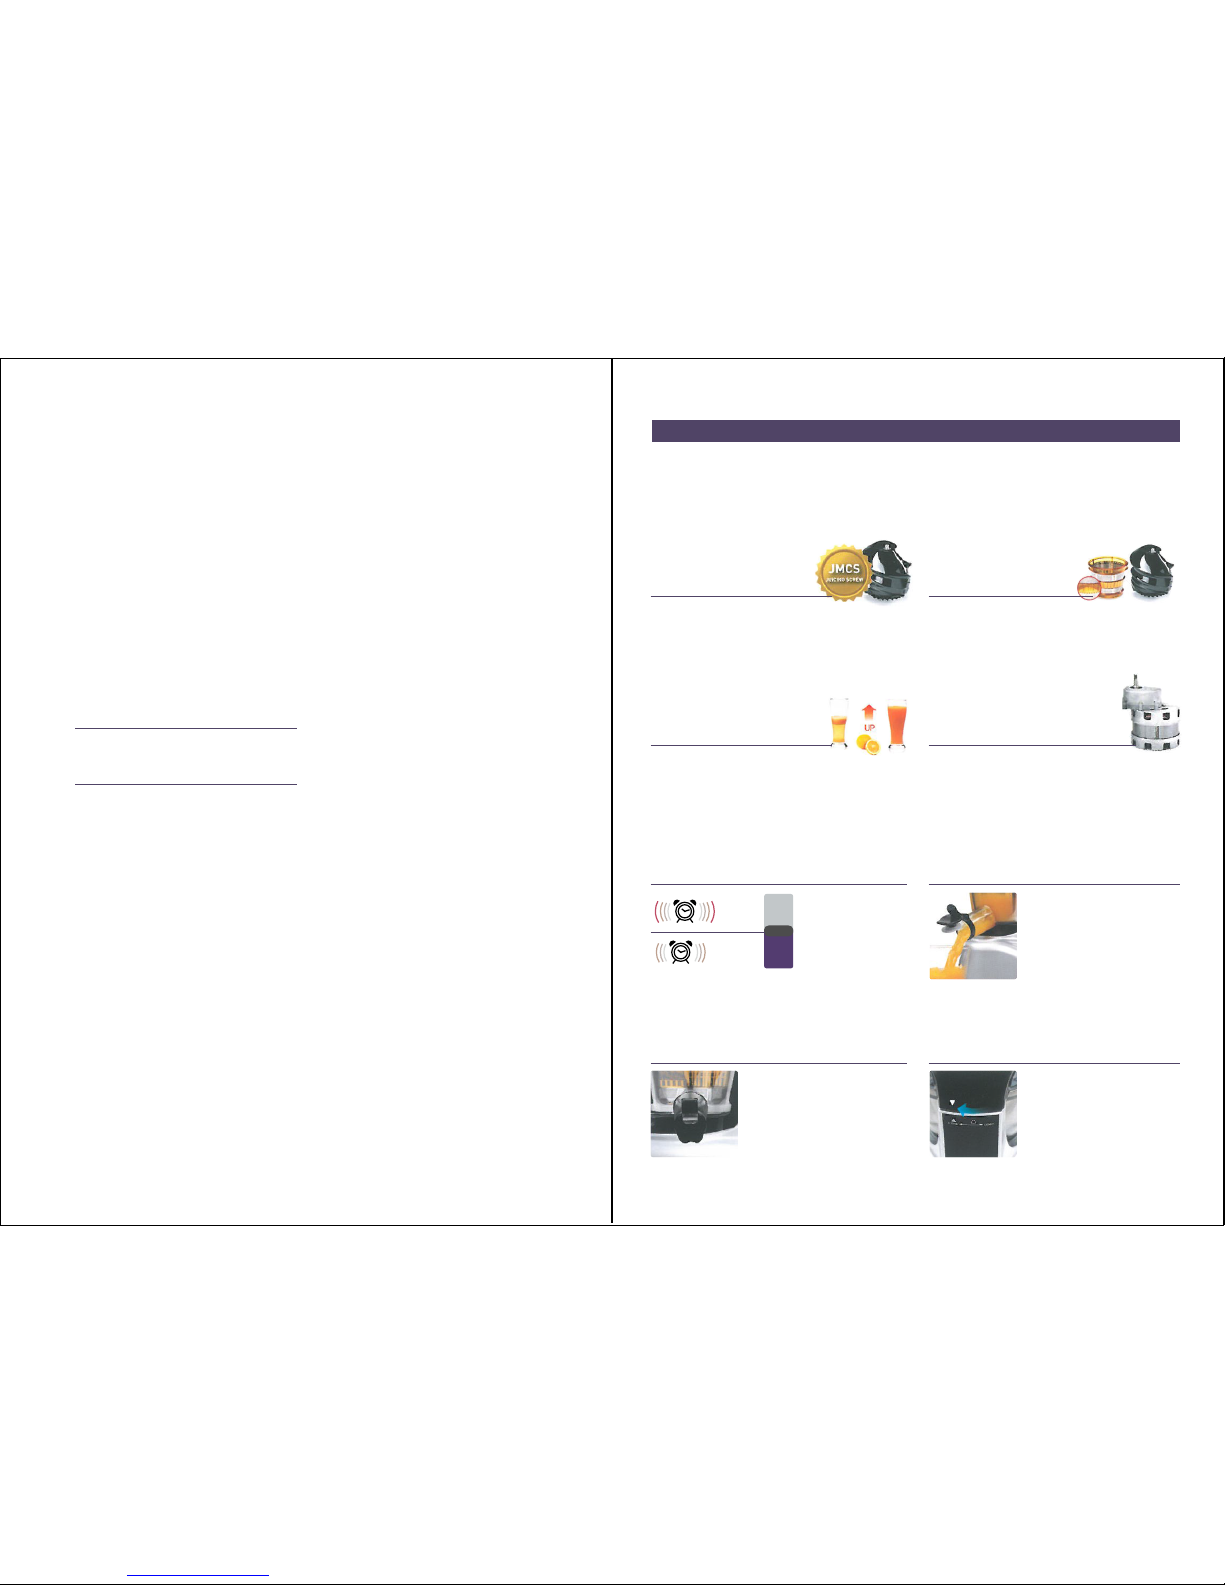
특허받은 원액기가 좋은 이유
더욱 업그레이드된 최신 신기술 특허
특허받은 스크류
독자적 최신 특허 신기술인 J.M.C.S(Juicer Module
Coprsign System)를 도입한 울템 스크류는 야채와
과일의 착즙과 영양소 흡수율을 증가시키고 착즙 후 초기
발생하는 층 분리 현상을 줄여줍니다.
튼튼한 울템소재
지그시 눌러 짜주는 맷돌기능의 스크류와 착즙망의 소재가
울템으로 되어 있어 튼튼하며, 울템 착즙망의 투명창은
스크류에 남아 있는 펄프를 볼 수 있어 투입속도를 조절
할 수 있습니다.
저속압착 착즙방식
갈지 않고 지그시 눌러 짜주는 맷돌 방식(저속압착 착즙
방식)으로 재료의 특성을 유지시켜 주어, 영양소 파괴를
최소화한 맛있고 건강한 원액주스를 드실 수 있습니다.
※ 재료에 따라 차이가 있을 수 있습니다.
강력한 모터지속력
소비자 적정가격 및 품질안정화를 위해 자체 모터 생산을
하고 있으며 강력한 모터지속력으로 30분동안 원액주스를
만들 수 있습니다.
조용한 저소음설계 깔끔하고 편리한 파워 주스캡
파워 주스캡을 이용하여 혼합주스를
만들거나, 원하는 만큼의 주스를
다라 마실 수 있습니다.
자사고속주서기에 비해
소음과 진동이 적고 조용한
작동환경을 제공하도록
설계되었습니다.
편리한 세척 2중 안전설계
본체와 용기세트의 분리형 설계로
세척이 용이하고 위생적입니다.
또한 파워 주스캡은 탈착이 가능하여
분리세척 할 수 있어 더욱 깔끔하고
편리합다.
본체와 용기세트, 뚜껑이 올바르게
결합하지 않을 경우, 작동이 되지
않습니다. 2중 안전장치가 장착되어
있어 잘못된 조립상태에서는 전원이
공급되지 않는 안전 설계입니다.
※ 원액기 소음은 자사고속주서 80dB 거리 동일한 조건으로 측정한 비교
데이터입니다.
80~95dB
(90dB : 지하철 소음)
40~50dB
(30dB : 일반적인 환경)
자사
고속
주서기
원액기
A reason why patented juicer is good
Name of parts
How to assemble parts
How to use
Precautions
How to disassemble and clean
How to wash silicone parts
Product specifications
A reason why patented juicer is good
Upgraded latest technology patent
Patented screw
The PEI screw that adopted latest patent
technology, J.M.C.S(Juicer Module Coprsign
System), increase fruits and vegetable’s juice
and nutrient absorption and reduce segregation
impact.
Durable PEI material
The milling screw and net are made of PEI
material so it is durable and the open window
of PEI net shows the remaining pulp in screw
so you can control the speed.
Slow squeezing method
The milling method (low pressure squeezing
method), which gently press for juicing,
maintains the characteristics of ingredients and
minimize nutrient destruction for delicious and
healthier juice concentration.
※ May vary depends on the ingredients.
Powerful motor sustainability
For stabilization of price and quality, we
produce our motor and this powerful motor
can make juice concentration in 30 minutes.
Quiet design Clean and convenient power juice cap
Due to the power juice cap,
you can mix a drink or only
get as much as you want.
Compare to our
high-speedjuicer, it has
lesser noise and vibration
so it is designed for quiet
operation.
Easy to clean Dual safety design
The body and container set
can be separated so it is easy
to clean.
Also, the power juice cap can
be removed for easy cleaning.
If the body, container set and
the lid are not closed properly,
it will not operate. The dual
locking device does not provide
power when it is assembled
incorrectly.
※ The data on noise of juicer is done in same condition as
high-speed juicer.
80~95dB
(90dB : Subway
noise)
40~50dB
(30dB : General)
same
condition
as high
speed
juicer
Juice
machine
Page 3
※ 제품 모델에 따라 실제 제품 색상과 다를 수 있습니다.
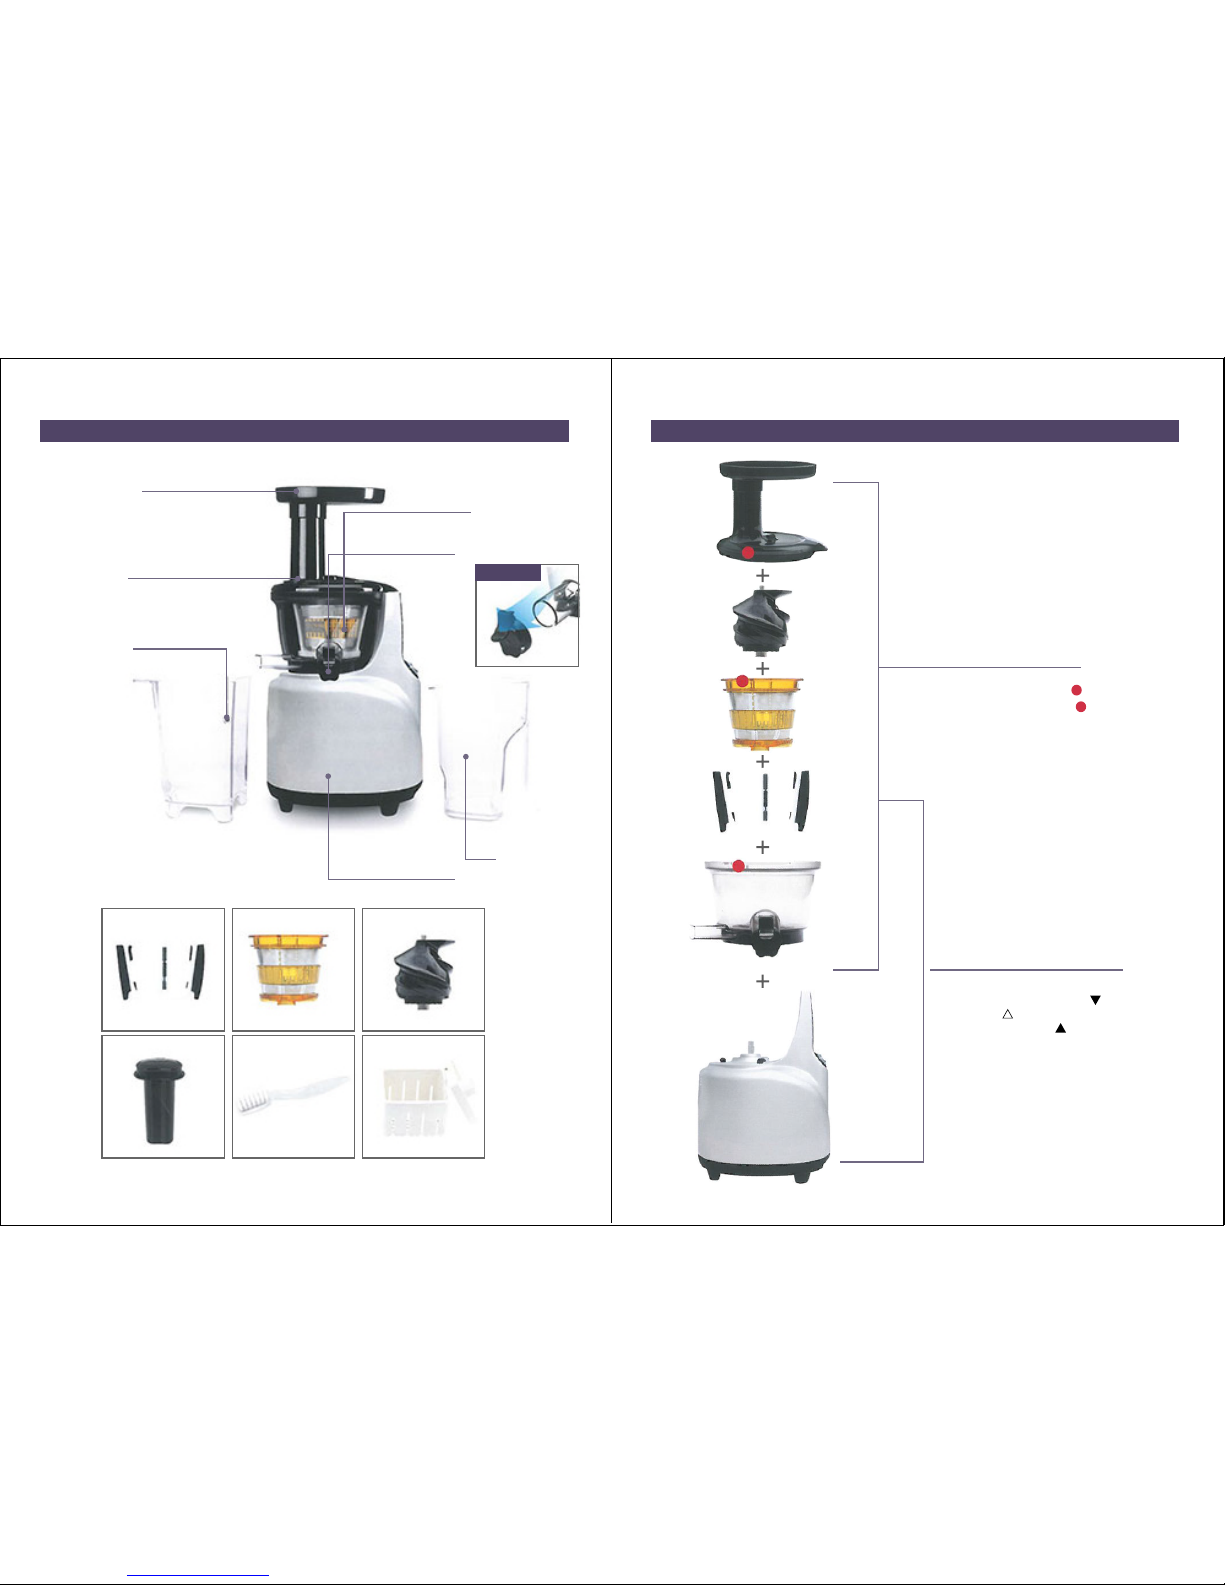
각부의 명칭
1. 호퍼(깔대기)
4. 원액추출용기
5. 파워 주스캡
2. 용기뚜껑
3. 섬유질용기
7. 본체
8. 회전와이퍼
6. 원액컵
9. 착즙망 10. 스크류
11. 누름봉 12. 세척솔 13. 두부틀
탈착가능
※ 제품 모델에 따라 실제 제품 색상과 다를 수 있습니다.
STEP 1
원액추출용기 세트 조립방법
각 부의 A 표시점을 맞추어 순서대로 끼워
줍니다. 용기뚜껑은 A표시점을 맞춘 후, 시계
방향으로 돌려 닫습니다.
STEP 2
원액추출용기 세트와 본체 조립방법
본체에 원액추출용기 세트를 올린 후, 용기
뚜껑에 B표시점과 본체의 C표시점을 맞추어
D 방향으로 돌려줍니다.
※The color may vary by model.
Name of parts
1. Hopper (funnel)
4. Juice extraction
container
5. Power juice cap
2. Container lid
3. Fiber containers
7. Main body
8. Rotating wiper
6. Juice cup
9. Net 10. Screw
11. Pusher 12. Cleaning brush 13. Tofu frame
Removable
※The color may vary by model.
STEP 1
How to assemble juice extraction
container set
Insert each part to in order. Put
the container lid on and turn
clockwise to close.
STEP 2
How to assemble juice extraction
container set with body
Put the juice extraction container set
on the body, then put of container
lid and of the body to meet
and then turn to
open
close.
Page 4

Caution
5 7
6
Open
Locked
Tail
1 3
2 4
Caution Caution
STEP 1 / 원액추출용기 세트 조립방법
사용 전, 반드시
확인하여 주십시오!
·원액추출용기 세트를 충분히 세철 후 사용하여 주십시오.
·압착실리콘과 실리콘링이 바르게 꽂혀 있는지 확인하여 주십시오.
용기바닥면의 압찰실리콘을 사진과 같이
화살표 방향으로 완전히 끼워줍니다.
압착실리콘을 완전히 꽂지 않으면 원액의 양이
적거나, 밖으로 흘러 나올 수 있습니다.
스크류를 착즙망 중앙에 돌려가면서 지그시
눌러 넣습니다.
회전와이퍼에 착즙망을 끼우고 착즙망과
원액추출용기의 A표시점을 일치시켜
조립합니다.
원액추출용기와 용기뚜껑에 있는 각각의 A
표시점을 맞춘 후, 시계방향으로 돌려 B
표시점을 일치시켜 닫아줍니다.
세부 조립 방법
스크류가 완전히 채결되지 않으면 용기의
뚜껑의 체결이 불가합니다.
※ 제품 모델에 따라 실제 제품 색상과 다를 수 있습니다.
STEP 2 / 원액추출용기 세트와 본체 조립방법
원액추출용기 세트를 본체의 표시점에
맞추어 제결합니다.
원액컵과 섬유질 용기를 사진과 같이
배출구에 맞추어 놓습니다.
원액추출용기 세트의 열림/잠김 상태의
표시입니다.
분리하여 세척 후, 반드시 사진과 같이 화살표
방향으로 끼워 사용합니다.
→ 넓은 면이 상부로 향하게 끼워 사용합니다.
→ 꼬리 부분을 아래로 향하게 끼워 사용합니다.
원약추출용기 세트를 본체에 조립시, 조립 표시점을
잘 맞추고, 체결되는 소리가 날 때까지 확실하게
돌려줍니다. 체결이 덜 되면, 작동이 되지 않습니다.
실리콘링/실리콘브러쉬
파워 주스캡
탈착가능
STEP 1 / How to assemble juice extraction container set
Please check
before use!
·Clean juice extraction set before use.
·Make sure the pressure silicon and silicon ring is properly place.
Put in the pressure silicon on the bottom
of container toward the direction of
arrow as shown on the picture.
If the pressure silicon is not placed
properly, the juice may spill.
Rotate the center of net to put in the
screw.
Put on the net on rotation wiper and
make sure the net and point
on juice container meet.
Make sure the point on juice
container and point on container
lid meet and rotate in clockwise to
have points to meet.
How to assemble parts
If the screw is not tightened up
perfectly, then the lid of container will
not fit.
※The color may vary by model.
STEP 2 / How to assemble juice extraction container set with body
Connect the juice container set with
the marked part of the body.
Put the juice cup and fiber cup on
right place as shown on the picture.
This is juice container set’s lock/
unlock status display.
After disassembling and cleansing, put in
according to the direction of arrow as
shown in the picture.
→ Put the wide side face upward.
→ Put the tail end face down.
When putting in the juice container set on
the body, make sure the marked parts are
met and turn until you hear the click sound.
The machine will not work if it is not
tightened up properly.
Silicon ring / silicon brush
Power juice cap
is removable
Page 5

Caution
TIP
Caution
Caution
Caution
Caution
Stop Stop Normal
rotation
Normal
rotation
Normal rotation
Stop
Backlashing
사용 방법
손질된 재료를 준비 후, 전원플러그를 콘센트에 꽂은 다음 전원을 켜 주십시오.
● 젖은 손으로 전원플러그를 조작하지 마십시오. (감전, 누전, 화재의 원인이 됩니다.)
● 콘센트 상태가 올바른지 확인해 주십시오.
작동스위치의 ‘정회전’을 눌러 작동을 시작합니다.
● 정회전 : 재료를 아래로 밀어 저속압착 착즙함.
● 역회전 : 재료를 위로 되돌림.
※ 재료를 과다하게 투입하여 스크류가 멍추거나 열림이 불편할때
역회전 ↔ 정지 ↔ 정회전을 2~3회 반복하여 눌러 줍니다.
사용 도중 갑자기 제품이 정지한 경우
사용 도중 갑자기 제품이 정지하면 스위치를 ‘정지’로 하고, ‘역회전’을 눌러 스크류에 막혀 있는 재료를
위(후방)로 되돌린 후, ‘정회전’을 누르시면 됩니다.
▶ 역회전 ↔ 정지 ↔ 정회전을 2~3회 반복작동
·역회전 : 재료를 위로 되돌림. (역회전 스위치는 누르고 있는 상태에서만 작동함.)
·‘정회전’ 작동 중 ‘역회전’ 작동시에 ‘정지’ 스위치를 눌러 작동이 완전히 멈춘 후,
‘역회전’ 스위치를 눌러 주세요 (역회전 버튼을 ‘탁 탁 탁’ 짧게 끊어서 사용하면 더 효과적입니다.)
(’정회전’ 작동 중 “정지” 하지 않고 ‘역회전 스위치를 누르면 고장의 원인이 될 수 있습니다.)
·그래도 작동하지 않을 경우, 원액추출용기를 분리하여 세척하신 후 사용하십시오.
깨끗이 손질한 재료를 투입구에 하나씩 넣어 주십시오.
● 착즙시, 각 재료의 특성에 맞게 손질하여 주십시오.
- 섬유질이 강한재료 :
두께 (폭) 1.5~2cm 미만, 길이 3~5cm미만
- 엽채류(샐러리, 미나리, 신선초, 케일 등)와 섬유질이 길고 질긴 재료 :
줄기부분 3~5cm 미만(신선초 1cm 미만), 입부분 돌돌 말아 착즙합니다.
- 단단한 씨가 들어 있는 열매는 씨를 제거하고,
동결된 재료의 씨는 작은 크기라도 완전 해동 후 사용하십시오.
● 한번에 다량 투입시, 작동이 멈출 수 있으니 한 개씩 천천히 투입하십시오.
파워 주스캡을 사용하여 혼합주스, 흐름방지, 간이세척을 할 수 있습니다.
● 파워 주스캡을 닫고 착즙하면 과일/채소는 물론 우유 등의 액체류와 콩, 바나나 등을 넣은 혼합주스를
만들 수 있습니다.
● 착즙 후, 파워 주스캡을 닫으면 잔여즙 흐름방지가 되어 용기 이동시 편리하게 사용할 수 있습니다.
● 파워 주스캡을 닫은 상태로 물을 부어 간이세척하면 재료를 바꾸어 연속 착즙시 편리합니다.
● 사과, 샐러리 등 착즙시 거품이 많이 발생되는 착즙재료는 파워 주스캡을 열고 착즙해야 거품
발생이 적어집니다.
● 캡을 막은ㅇ 상태로 많은 양을 착즙시 (500mL이하) 위로 넘칠 수 있으니 주의하십시오.
원액과 섬유질이 완전히 배출되어 착즙이 끝나면 작동스위치를 ‘정지’ 하십시오.
정회전 재료를 아래로 밀어 착즙함 / 정지 작동이 중단된 / 역회전 재료를 위로 되돌림
● 착즙 후 찌꺼기 배출이 완전히 이루어지지 않으면 뚜껑이 열리지 않을 수 있습니다.
(착즙을 마친 후, 약 30초 정도 스크류 속에 남은 섬유질을 배출해 주세요.)
이때, 뚜껑이 잘 열리지 않으면 역회전 ↔ 정지 ↔ 정지 ↔ 정회전을 2~3회 반복 후,
드럼뚜껑의 윗면을 손바닥으로 꾹 누른 상태에서 돌려서 열어주세요.
※ 재료에 따라서는 투입구에 물을 부으면서 간이 세척한 후, 뚜껑을 돌려 열어주세요.
How to use
After preparing the ingredients, plug the power plug into the outlet.
● Do not touch the power plug with wet hands.
(Can cause electrical shock, short-circuiting or fire.)
● Check the status of electrical outlet.
Press the ‘forward’ switch to start the operation.
● Forward : Push down the ingredients to squeeze the juice.
● Reverse : bring the ingredients up.
※ When too much ingredients were added so the screw stopped or
if it is hard to open (Press Reverse ↔ Stop ↔ Forward for 2-3 times.)
If the product stopped during the use
Press the ‘Stop’ switch, then ‘Reverse’ to pull out any ingredients stuck on screw,
then press ‘Forward’.
▶ Press Reverse ↔ Stop ↔ Forward for 2-3 times
·Reverse : Pull out the ingredients. (Only works when Reverse switch is pressed.)
·During ‘Forward’ operation, press ‘Stop’ switch and ‘Reverse’,
(If Reverse button are pressed briefly but repeatedly, then it is better.)
(If you press ‘Reverse’ switch during ‘Forward’ operation without pressing “Stop” button,
then it may break the machine.)
·If it doesn’t work, remove the juice container and wash it.
Enter clean ingredients one a time.
● Cut the ingredients for juicing.
- Strong fibrous ingredients :
Thickness (width) less than 1.5~2cm, Length less than 3~5cm
- Long and tough fibrous ingredients like leafy vegetables
(celery, parsley, angelica keiskei, kale, etc.) :
roll up the 3~5cm of the stem (less than 1cm for angelica keiskei) for juicing.
- For the fruits with hard seeds,
remove the seeds first and thaw the frozen small sized seed before use.
● Insert one piece at a time as excessive ingredients may stop the operation of the
machine.
Use the power juice cap for mixing juices to prevent flow and for easy cleaning.
● Close the power juice cap and add fruits/vegetables and liquid to make mixed drinks.
● After juicing, close the power juice cap to prevent the flow and this makes it easy to
carry.
● Close the power juice cap and pour in the water for easy cleaning.
● For ingredients such as apple, celery, etc. that makes too much bubbles, open the
power juice cap and the amount of bubble will decrease.
● If the cap is closed but there are too much juice (less than 500mL), then it may
overflow so please be careful.
Once the juice and fiber is fully discharged, ‘stop’ the power button.
Forward push down the ingredients / Stop stop the operation / Reverse pull up the ingredients
● If all residues are not discharged, then the lid may not open.
(After juicing, let the fiber discharge from the screw for 30 seconds.)
If the lid doesn’t open, press Reverse ↔ Stop ↔ Stop ↔ Forward for 2-3 times and
press the top of drum lid firmly and rotate to open.
※ Based on the ingredient, you can pour in the water for simple cleaning and
then open the lid.
Page 6

·
·
Caution
Tip
1 4
2
3
5
사용시 주의사항
1. 수분 또는 착즙재료 없이 공회전을 하지 마십시오.
[윤활 역할]을 하는 수분 또는 착즙재료 없이 공회전을 하면 스크류 파손의 원인이 됩니다.
2. 30분 이상 연속해서 사용하지 마십시오.
모터 과열로 고장의 원이 됩니다.
·단, 연속 사용시 일단 정지한 후, 30분 이상 간격을 두고 사용하십시오.
3. 동작 중 절대로 즙배출구에 젓가락이나 숟가락 등을 넣지 마십시오.
동작 중에 즙배출구에 젓가락, 숟가락 등이 도구나 이물질을 넣으면 회전와이퍼에 끼여 부품 파손의 원인이
됩니다.
4. 누름봉 외에 투입구에는 절대로 손, 젓가락(숟가락 등)을 넣지 마십시오.
5. 곡물류나 단단한 씨가 들어있는 열매, 얼음을 넣지 마십시오.
용기, 스크류, 착즙망 등의 파손 및 고장의 원인이 됩니다.
·콩, 쌀과 같은 곡류는 물에 불리거나 삶은 경우 사용 가능하며, 감, 매실, 복숭아 등과 같이 씨가 단단한
열매는 반드시 씨를 제거하고 사용하십시오.
※ 동결된 씨는 작은 크기라도 오나전 해동 후 사용 가능합니다.
※ 얼음(각얼음 등) 사용은 원액기의 수명단축 및 고정의 원인이 됩니다.
6. 식물성 기름(참깨, 들깨 등)을 짜기 위해 원액기를 사용하지 마십시오.
식물성/동물성 기름(식용유, 동물성 지방 등)이 많이 함유된 재료를 착즙하지 마십시오.
※ 식물성/동물성 기름이 스크류에 접촉시 성능저하 및 손상의 원인이 됩니다.
7. 배출된 섬유질을 다시 착즙하면 작동이 멈추거나 드럼뚜껑이 열리지 않을 수
있으므로 재착즙을 금합니다.
8. 씨앗이 있는 재료(복분자, 포도 등)를 사용후엔 반드시 스크류 아래 홈부분까지
깨끗이 세척하여 주십시오.
원액추출용기 내에서 섬유질을 완전히 제거한
후, 정지시켜 줍니다.
편리한 세척을 위하여 착즙 완료 후 약 30초간
작동하여 주세요.
재료에 따라 열림이 어려울 때는
역회전 ↔ 정지 ↔ 정회전을 2~3회 반복 후,
드럼뚜껑의 우시면을 손바닥으로 꾹 누른
상태에서 돌려서 열어주세요.
※ 재료에 따라서는 투입구에 물을 부으면서
간이 세척한 후, 뚜껑을 돌려 열어주세요.
사용 후, 바로 세척하지 않으면 찌꺼기가 말라
붙어 분해 및 세척이 어려울 뿐만 아니라,
성능 저하의 원인이 될 수 있으므로 주의
하십시오.
원액추출용기 세트 분해는 개수대 안에서
위로부터 수돗물을 흘러 내리면 간단히
분해됩니다.
스크류 샤프트의 금속부 내면에 물이 남지
않게 잘 닦아 주십시오.
·
·
·
Caution
베이킹 소다 또는 식기전용 천연락스를 한 두방울
희석한 물에 30분 정도 담궈두시면 깨끗하게
세척하실 수 있습니다.
분해방법 및 세척방법
작동스위치를 ‘정지’ 위치에 놓은 후,
전원플러그를 뽑아 주십시오.
용기에서 회전와이퍼, 착즙망, 스크류를
분해합니다. 조립 방법의 역순으로 각
부품을 분리 후, 부드러운 브러쉬로
세척하여 주십시오.
용기뚜껑을 시계반대방향으로 돌린 후,
용기뚜껑을 들어올려 분리합니다.
원액추출용기 세트를 시계반대방향으로
돌린 후, 원액추출용기 세트를 들어올려
분리합니다.
용기세트를 흐르는 물에 대고 끼워져 있던
압착실리콘을 열어 세척하여 주십시오.
Precautions
1. Do not idle the machine without liquid or ingredients.
If the machine idles without liquid or ingredients that do [lubrication], then it may damage the
screw.
2. Do not use it for more than 30 minutes.
It may overheat the motor.
·However, if you need to use it continuously, stop the machine and use it with interval.
3. Do not insert chopsticks or spoon on juicing part during operation.
If you insert chopsticks or spoon on juicing part during operation, it may get between the
rotating wipers and damage the parts.
4. Do not insert anything besides pusher, such as hand, chopstick
(spoon, etc.).
5. Do not insert grains, fruits with hard seeds, or ice.
It may damage the container, screw, juicing net, etc.
·Soak or boil the grains like beans, rice, etc. and remove hard seeds from fruits before use.
※ Completely thaw all frozen seeds before use.
※ Ice (ice cubes, etc.) can be the cause of reducing life or breakage.
6. Do not use juicer to get vegetable oil (sesame seeds, perilla, etc.).
Do not juice ingredients with too much vegetable/animal oil.
※ Vegetable/animal oil may cause poor performance or damage if it gets on the screw.
7. Do not reuse the fibers that have been used as it may stop the operation
or hold the drum lid.
8. After using the ingredients with seed (raspberry, grape, etc.) clean the
entire screw completely, including the bottom part.
Completely remove the fiber from the juice
container then stop the machine.
For easier cleaning, run the machine for 30
seconds even after the juicing is done.
If the lid doesn’t open, press Reverse ↔
Stop ↔ Stop ↔ Forward for 2-3 times and
press the top of drum lid firmly and rotate to
open.
※ Based on the ingredient, you can pour
in the water for simple cleaning and then
open the lid.
If it is not washed immediately after the
use, then the debris will dry up and
make it difficult to clean and disassemble and also cause poor performance.
The juice container set can be disassembled under running water in the
sink.
Completely wipe off all water inside the
metal part of screw shafts.
·
·
·
Caution
Sink on water mixed with baking soda or
one or two drops of natural lax for 30
minutes for perfect cleaning.
How to disassemble and clean
‘Stop’ the operation switch then pull
out the power cord.
Disassemble rotating wiper, juice
net, and screw from the container.
Disassemble each part from opposite order of assembling and wash
it with soft brush.
Turn the lid counterclockwise and
lift up the lid to disassemble.
After turning the juice container set
toward counterclockwise, lift the
juice container set to disassemble.
Put the container set under the
running water and open the pressure silicon for cleaning.
Page 7

Tip
Caution
Caution
Tip
6
1
7
2
Tip
Caution
스크류는 세척솔로 흐르는 물에 깨끗이
세척합니다. 세척 후에는 건조하여 사용하십시오.
원액추출용기 세트를 조립하기 전, 스크류에
이물질이 없는지 반드시 확인하여 주십시오.
씨앗이 있는 재료(복분자, 포도 등)을 사용후엔
반드시 스크류 아래 홈부분까지 깨끗이 세척하여
주십시오. 씨앗이 남아 있는 경우 착즙시,
스크류와 착즙망의 불규칙적인 움직임으로
스크류가 갈리는 현상이 일어날 수 있습니다.
수분이 많거나 젖은 행주는 물기가 없도록 꼭 짜서
닦아 주십시오.
재료를 바꿔 착즙 할때마다 번거롭게 분리세척 할
필요가 없습니다. 착즙이 끝난 후에는 반드시
분리하여 세척하여 주십시오.
스크류를 흐르는 물에 수세미로 스크류의
겉을 깨끗하게 세척한 다음 세척솔의
끝부분으로 스크류의 홀부분에 낀
이물질(씨, 알갱이) 등을 제거하여 줍니다.
파워 주스캡을 닫은 후 물을 붓고
작동시킵니다.
본체는 수분이 적은 부드러운 행주로
닦아 줍니다.
잠시 후 파워 주스캡을 열어 물을
배출합니다.
※ 제품 모델에 따라 실제 제품 색상과 다를 수 있습니다.
간이세척
회전와이퍼는 흐르는 물에 세척합니다.
세척 후에는 건조하여 사용하십시오. 원액추출용기 세트를 조립하기 전,
압착실리콘과 실리콘링이 바르게 끼워 있는지 반드시 확인하여 주십시오.
압착실리콘과 실리콘링을 완전히 꽂지 않으면 원액의 양이 적거나,
원액이 원액기 밖으로 흘러 나올 수 있습니다.
<실리콘브러쉬>
분리세척이 가능합니다.
세척 후,실리콘브러쉬는 꼬리부분을
아래로 향하게 하여 사진과 같이 가운데
넓은 부분을 통해 아래 → 위 순서대로
끼워 사용합니다.
<압착브러쉬>
열고 세척이 가능합니다.
세척 후, 사진과 같이 화살표방향으로
완전히 끼워 사용합니다.
<실리콘브러쉬>
분리세척이 가능합니다.
세척 후,실리콘브러쉬는 꼬리부분을
아래로 향하게 하여 사진과 같이 가운데
넓은 부분을 통해 아래 → 위 순서대로
끼워 사용합니다.
<실리콘브러쉬>
분리세척이 가능합니다.
세척 후,실리콘브러쉬는 꼬리부분을
아래로 향하게 하여 사진과 같이 가운데
넓은 부분을 통해 아래 → 위 순서대로
끼워 사용합니다.
실리콘 부품 세척방법
실리콘브러쉬 세척 후 결합
압착실리콘 세척 후 결합
실리콘링 세척 후 결합
파워 주스캡 분리세척 후 결합
Clean the screw with sponge under running
water. Completely dry it before use. Before
assembling the juice container set, make
sure there is no debris on the screw.
After using the ingredients with seed
(raspberry, grape, etc.) clean the entire
screw completely, including the bottom part.
If there are seeds remaining, it may damage
the screw due to the irregular movement of
the screw and juice net.
If the wet cloth is too wet or has too much
moisture, squeeze out the water completely.
Don’t need to disassemble and clean for
each ingredients. But must clean the
whole thing after juicing.
Completely clean the screw with
sponge under running water and
remove all debris (seeds, grains)
on the hole on the screw.
Close the power juice cap and
pour in the water for operation.
Wipe the body with soft cloth
with less moisture.
Open the power juice cap and
discharge the water.
※The color may vary by model.
Simple cleaning
Clean the rotating wiper under the running water.
Then dry it before use. Before assembling the juice container, put in the pressure
silicon and silicon ring properly.
If the pressure silicon and silicon ring is not put in properly, then there might be
lesser juice or juice overflowing outside.
<Silicon brush>
Separation washing is possible.
After cleaning, face the tail of brush
toward bottom and put in the silicon
brush bottom → up through the wider
part, as shown in the picture.
<Pressure brush>
Can open for cleaning.
After cleaning, put in the brush
toward the direction of arrow as
shown in the picture.
<Silicon ring>
Can disassemble for cleaning.
After cleaning, the silicon ring fit well
in a home with a large side facing the
top, use the photos and put together.
<Power juice cap>
Separation washing is possible
if needed
After the removal cleaning, use
across to fit correctly into the groove
of the outlet of the stock solution
container extraction and silicon
power juice cap.
How to wash silicone parts
Reassemble after washing the silicon brushReassemble after washing the silicon brush
Reassemble after washing the pressure siliconReassemble after washing the pressure silicon
Reassemble after washing the silicon ring
Reassemble after washing the power juice cap
Page 8

제 품 명
모델명
정격전압
소비전력
동작시간
제품무게
제품크기
제조원
착즙방식
제품의 규격
주서
GJ-110, GJ-120, GJ-130, GJ-140
GJ-150, GJ-160, HMJ-110
AC220V, 60Hz
240W
30분 이하 단시간
6.3kg
225mm X 191mm X 414mm
(주)엔유씨전자
저속압착
※ 본 제품은 국내(대한민국)용 입니다.
전기적 사양이 다른 국외에서는 사용할 수 없습니다.
Model
Model
Rated voltage
Power Consumption
Operating time
Product weight
Product Size
Manufacturer
Juice the way
Product specifications
Juicer
GJ-110, GJ-120, GJ-130, GJ-140
GJ-150, GJ-160, HMJ-110
AC220V, 60Hz
240W
Full short time under 30 minutes
6.3kg
225mm X 191mm X 414mm
Ltd. NUC electronic
Low-speed compression
※ This product is a country (Republic of Korea) only.
It can not be used outside the country that electrical specifications are different.
 Loading...