

Page 1

Pub. 42004-676L2B
GAI-TRONICS® CORPORATION
A HUBBELL COMPANY
Model 69440-001
Master Contr ol Unit PC BA
Confidentiality Notice
This manua l is provide d sole ly as an operatio nal, installation, and ma inte nance guide and conta ins
sensitive business and t e chnical informatio n tha t is confidentia l and pr opri et ary to GAI- Tronics.
GAI-Tronics retains all intellectual property and other rights in or to the information contained herein,
and such information may only be used in connection with the operation of your GAI-Tronics product or
system. This manu al may not be dis clos e d in any form, in whole or in pa rt, direct ly or i ndir ectly, to a ny
third pa r ty.
General Information
The Model 69440-001 Master Control Unit (MCU) is the central component of SmartSeries system
operations, processing all operations through its associated system software. It is installed in the 10457
Card Rack Assembly and maintains constant communication with all other SmartSeries devices installed
in the card rack and the system.
The MCU constantly supervises operations to ensure proper working condition. It is exclusively designed
for use in a SmartSeries system; the MCU is not intended for use with other types of equipment.
CAUTION
personnel unless explic itly stat ed otherw is e in your system manual.
Connections to the MCU are reserved for use by authorized factory-t rained
Description of Major Compo nents
MCU Front Panel LEDs
The LED Array provid es sta tus on i nternal opera tion of the MCU. Ab breviat e d text labels to the right of
the LEDs help to locate a particular LED. Both the LEDs and their labels are divided into two columns;
the left column of labels corresponds to the left column of LEDs; the right column of labels corresponds
to the right column of LEDs.
GAI-Tronics Corporation P.O. Box 1060, Readi ng, PA 19607-1060 USA
610-777-1374 800-492-1212 Fax: 610-796-5954
ISIT WWW.GAI-TRONICS.COM FOR PRODUCT LITERATURE AND MANUALS
V
Page 2
Pub. 42004-676L2B
Model 69440-001 Master Control Unit PCBA Page: 2 of 8
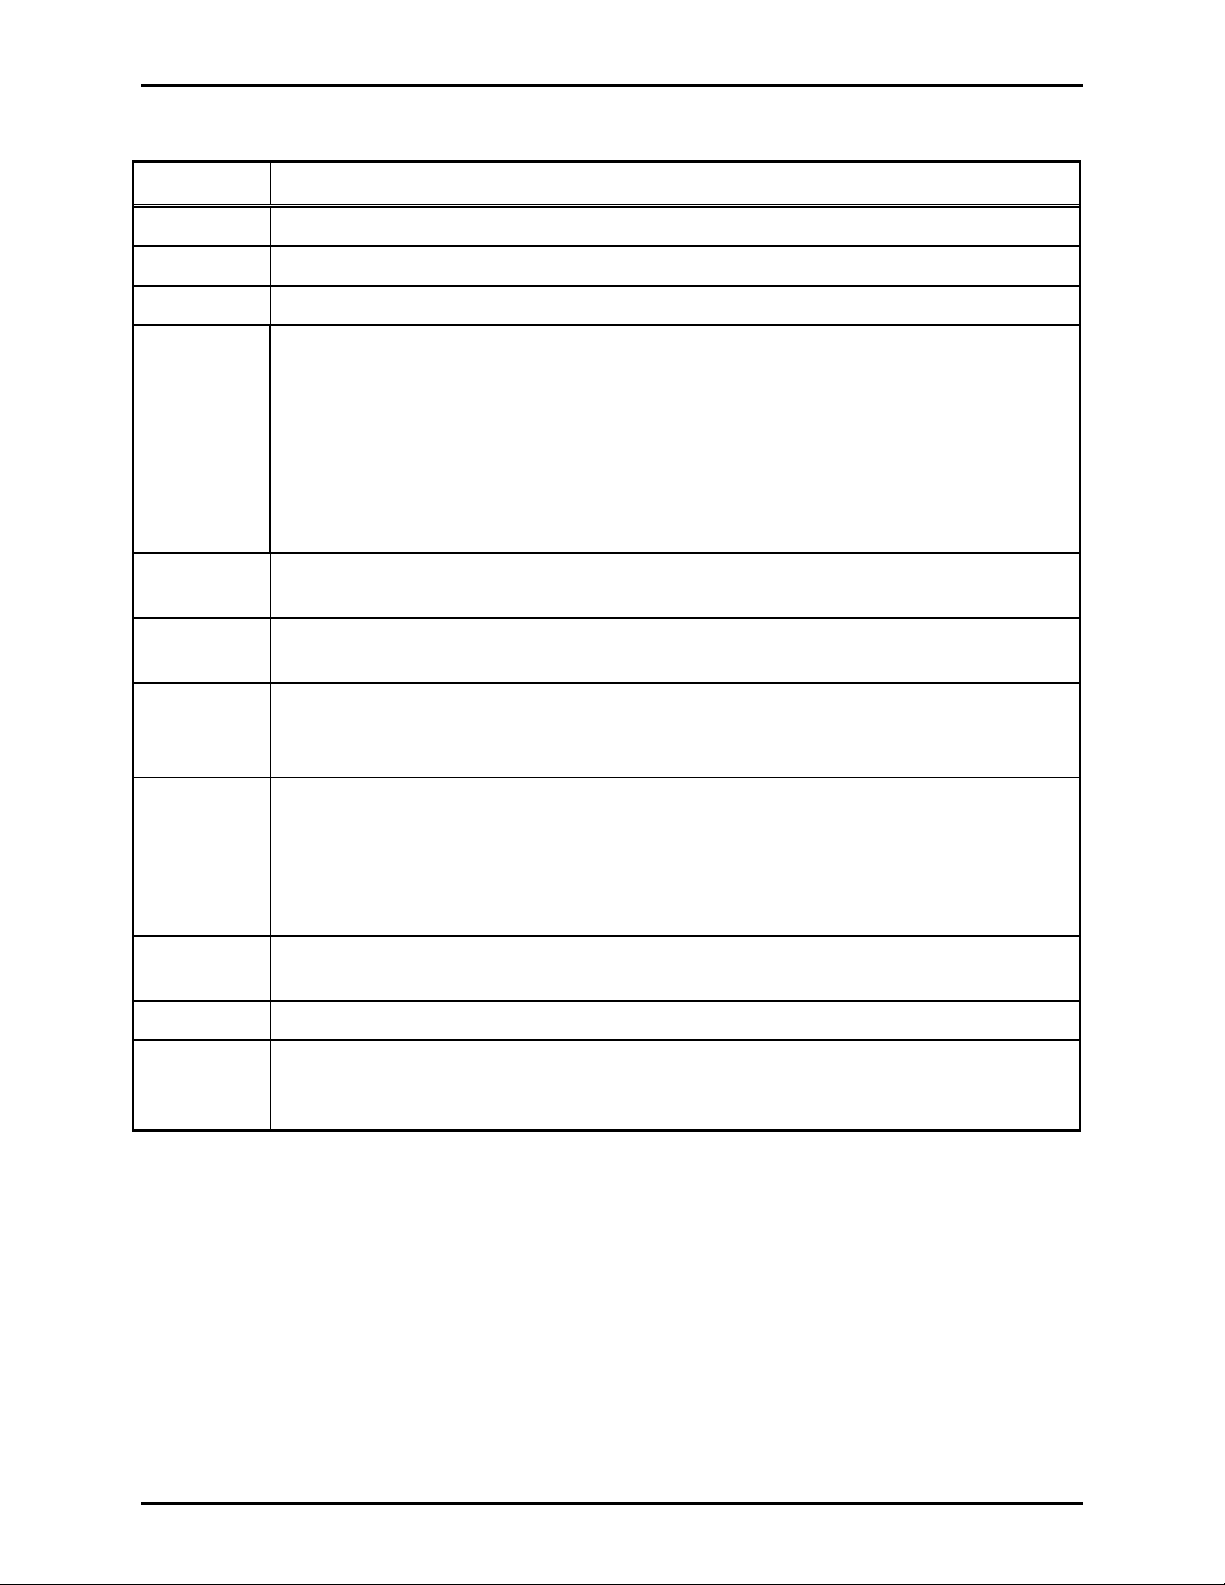
These LEDs a re ON, t hey have the following m ean ings:
LED Description (When ON)
-12V
+12V
+5V
The card rack is providing –12 volts dc to the MCU.
The card rack is providing +12 volts dc to the MCU.
The card rack is providi n g +5 volts dc t o the MCU.
BEEP This LED simulates the CPU module speaker function. The LED emits light instead of a
speaker emitting sound..
N
OTE 1: The LED flashes ON briefly when the PC begins booting, otherwise, this LED
is OFF. If applicable, your system manual lists situations where this LED should be ON.
N
OTE 2: If the CPU Module detects an error during boot-up, this LED will flash more
than once. In this error condition, the CPU Module generates, a one-time “beep code” to
aid in diagnosing the fault. Momentarily pressing the reset button will cause the beep
code to repeat.
LINK Shows Ethernet network status. The MCU has established a communications link with
another Ethernet network device.
ACT Shows Ethernet network status. The MCU detects activity on the attached Ethernet
cable.
BP
The MCU is using the data bus in the card rack.
The card rack is sometimes referred to as “back plane,” which gives this LED its
abbreviation (BP).
SPD This LED operates in conjunction with LINK LED to indicate the speed of the Ethernet
network connection.
(On) SPD (Off) = 10 M B Ether net connection
LINK
LINK
(On) SPD (On) = 100 MB Ethernet connection
LINK
(Off) SPD (On) = no networ k c onnection est ablishe d
SEC The MCU is accessing the Compact Flash card connected to the secondary IDE
controller.
PRI
B7, B6, B5,
B4,
B3, B2,
or B0
B1,
The MCU is accessing the hard disk drive connected to the primary IDE controller.
These LEDS are r eferred to as the Po rt 8 0 LEDS. They are used to show diagnostic
inf ormation that can be used by f actory train e d technicians as a tr oubleshootin g aid.
MCU Front Panel Connections
The PS/2 keyboard and PS/2 mouse connectors enable connecting a PS/2 keyboard and a PS/2 mouse,
respectively, to the MCU. These connectors are color-coded to match the PC99 standard. In order for the
mouse to function properly, it must be connected at power-up.
The COM2 RS232 port provides a RS232 serial connection to the MCU. This connector’s pin-out
matches t hat of a standard PC ’s 9-p in seri al connector pin- out.
OTE: The COM2 RS232 port is logically in parallel with the COM2 RS485 half-duplex port on the rear
N
of the card rack; therefore, both of the ports may not be used simultaneously.
\\s_eng\gtc proddoc s \st andard iom s - current release\42004 instr. manuals \ 42004-676l2b. doc
04/05
Page 3

Pub. 42004-676L2B
Model 69440-001 Master Control Unit PCBA Page: 3 of 8
The VGA conn ector enabl es conn ect ing a VGA monito r to the MCU. This connector is co l or co d ed to
match the PC99 sta ndard.
The USB Port 0 and USB Port 1 connectors enable connecting USB 1.0 devices to the MCU.
The Reset button resets the MCU. Momentarily depress the RESET button to reset and re-boot the
MCU. Holding in the R
ESET button will keep the MCU in reset mode, and it will not re-boot. The
button is recessed to prevent accidental depressions.
Card Rack Rear Panel Connections
The LPT1 parallel port provides a parallel port connection to the MCU. This is typically used for
connecting a printer. This connector’s pin-out matches that of a standard PC’s 25-pin parallel port
connector pin-out.
The COM1 RS485 half-duplex port provides a half-duplex RS485 connection to the MCU. This
connector’s pin- out is prop rietary. Also, this co nnection provides a dry conta c t closur e ou tput. If
applicable, the operation of this connector is described in your system manual.
The COM2 RS485 half-duplex port provides a half-duplex RS485 connection to the MCU. This
connector’s pin- out is prop rietary. Also, this co nnection provides a dry conta c t closur e ou tput. If
applicable, the operation of this connector is described in your system manual.
N
OTE: The COM2 RS232 port is logically in parallel with the COM2 RS485 half-duplex port on the
front panel of the MCU; therefore, both of the ports may not be used simultaneously.
MCU Internal Connections
The CPU Module holds the microprocessor that controls the system.
The Ethernet port provides an Ethernet connection to the CPU Module.
The battery allows the CPU Module to keep track of the date and time in the event of a power failure.
OTE: CMOS settings are stored in EEPROM; their storage does not rely on battery power during a
N
power failure.
A 2.5-inch IDE Hard Drive connects to the CPU Module. The 2.5-inch ID E hard dri ve is format ted and
proper software is f act ory ins talled.
A CompactFlash Card connects to the CPU Module. The Comp act Flash car d is formatted and proper
software is factory-installe d.
The Upper VME Connectors provides the mechanical connection to the card rack’s backplane.
The Lower VME Connector provides the mechanical connection to the rear panel of the card rack. used
for connection of external devices described above under Card Rack Rear Panel Connections section.
\\s_eng\gtc proddoc s \st andard iom s - current release\42004 instr. manuals \ 42004-676l2b. doc
04/05
Page 4

Pub. 42004-676L2B
Model 69440-001 Master Control Unit PCBA Page: 4 of 8
Operation
After inst allation and po w er-up , the MC U s tarts automat ic ally. I t requires n o d i rect user interv e ntio n
during norma l operations.
In general, the MCU maintains data communication with all other cards in the card rack and with
SmartSeries devices located throughout the system. Its software configuration file defines the actual
operat ion of t he MCU. Your system manual prov ides s pecific i nformation how the M CU co ntrols the
operation of your specific system.
The connections on the MCU are for use by factory-trained personnel only, unless explicitly stated
oth erwise in your s ystem manua l . Alt hough t hes e connec tio ns are the same as those found on a PC , and
the MCU func tions similarly to a P C, it is to be used s trictly for operat ing the Smar tSeries syst e m and
should not be used for performing other functions. Failure to follow this advice could result in the failure
of your sys t e m.
Installation and Maintenance
Dire c t ques tions ab out instal lati on and u pdat ing the system sof twa re co nfigurat ion of t his product to the
GAI-Tronics Field Service Department at 800-492-1212 inside the USA or 610-777-1374 outside the
USA.
WARNING
Disconnect po wer t o the card rack before performing any mai ntenance.
Installation Instructions
Refer to Figure 1 for component location and installation details.
1. Verify that power is disconnected to the card rack prior to installation.
2. Find the slot located on the farthest left side of the card rack.
3. Align the MCU into the upper and lower tracks in the card rack.
4. Connect the Ethernet cable supplied within the card rack.
5. Slide the MCU toward the rear of the card rack until it comes in contact with the connectors on the
backplane.
6. Firmly press on the front bezel until the MCU is seated in the back-plane connectors, and tighten the
two screws located on the front bezel to secure it to the card rack.
\\s_eng\gtc proddoc s \st andard iom s - current release\42004 instr. manuals \ 42004-676l2b. doc
04/05
Page 5

Pub. 42004-676L2B
Model 69440-001 Master Control Unit PCBA Page: 5 of 8
Removing the MCU from the Card Rack
1. Remove power from the card rack.
2. Remove the two screws on the front bezel that secures the MCU to the card rack.
3. Gently disenga ge the M CU from the con nector on t he b ackplane and slide the MCU out of t he card
rack.
4. Disconnect the Ethernet cable.
Battery Replacement
1. Lift the retainer clip away from battery and pry the battery out of the holder. See Figure 1 for location.
2. Insert the new battery into the battery holder under the retainer clip.
3. Reinstall the MCU into the card rack per above procedure.
4. Set the date and time as instructed in the system manual.
\\s_eng\gtc proddoc s \st andard iom s - current release\42004 instr. manuals \ 42004-676l2b. doc
04/05
Page 6

Pub. 42004-676L2B
Model 69440-001 Master Control Unit PCBA Page: 6 of 8
Figure 1. Model 69440-001 PCBA Master Control Unit
\\s_eng\gtc proddoc s \st andard iom s - current release\42004 instr. manuals \ 42004-676l2b. doc
04/05
Page 7

Pub. 42004-676L2B
Model 69440-001 Master Control Unit PCBA Page: 7 of 8
Troubleshooting
Symptom Action
The –12V, +12V, or +5V LED
on front bezel is not ON.
The Port 80 LED’s light
pattern remains constant after
applying power.
Date and time settings do not
stay current after a period of
system power interruption.
The Port 80 LEDs appear to be
changing in a periodic pattern,
and the system does not
function at all. Th is proble m
usua lly oc cu r s imme dia tel y
after power-up.
1. Verify power is applied to the card rack.
2. Disconnect power to the card rack.
• Verify the MCU is properly inserted into the card rack.
• Reconnect p ow er t o th e card rack.
• If at least one of th ose LEDs is st ill not ON , call f or service for
th e MCU and the c ard rack.
1. One time only, disconnect and reconnect power to the card rack.
2. Press the R
ESET button.
3. Call f or service of the MCU.
1. Replace the battery.
2. Call f or service of the MCU.
Call for service of the card rack.
This situation aris es if the +5 volt p ower provide d by the card rack t o
the MCU is too low. In this circumstance, the reset circuitry on the
CPU Module oscillates in and out of reset.
\\s_eng\gtc proddoc s \st andard iom s - current release\42004 instr. manuals \ 42004-676l2b. doc
04/05
Page 8

Pub. 42004-676L2B
Model 69440-001 Master Control Unit PCBA Page: 8 of 8
Specification s
Electrical
Power......................................................................................................3 A maximum @ +5 V dc ±5%
20 mA maximum @ +12 V dc ±10%
20 mA maximum @ -12 V dc ±10%
Battery......................................................................................................................................... 3 volts
0.03 mA standard load
Lithium Coin Cell/48 mAh capacity
Environmen tal
Temperature range (operating/storage)................................................+32 ºF to +120 ºF (0 ºC to +49 ºC)
Humidity:..........................................................................10% - 85% non-condensing relative humidity
Mechanical
Unit dimensions .............................................. 10.3 H × 1.6 3 W × 9.07 D inches (262 × 41.3 × 231 mm)
Unit weight .................................................................................................................. 1.55 lb s. nominal
Approval
CE Mark ....................................................... Complies with Low Voltage Directive 73/23/EEC, and the
EMC Directive 89/336/EEC amended by the Directive 93/68/EEC.
Replaceme nt Parts
GTC Model No. Manufactur er /Model N o. Description
40005-005 Panasonic - BR1225
Rayovac – BR1225
Battery, 3 V Lithiu m Coin C e ll
\\s_eng\gtc proddoc s \st andard iom s - current release\42004 instr. manuals \ 42004-676l2b. doc
04/05
Page 9

Warranty
Equipment. GAI-Tronics warrants for a period of one (1) year from the date of shipment, that any
GAI-Tronics equipment supplied hereunder shall be free of defects in material and workmanship, shall
comply with the then-current product specifications and product literature, and if applicable, shall be fit
for the purpose specified in the agreed-upon quotation or proposal document. If (a) Seller’s goods prove
to be defective in workmanship and/or material under normal and proper usage, or unfit for the purpose
specified and agreed upon, and (b) Buyer’s claim is made within the warranty period set forth above,
Buyer may return such goods to GAI-Tronics’ nearest depot repair facility, freight prepaid, at which time
they will be repaired or replaced, at Seller’s option, without charge to Buyer. Repair or replacement shall
be Buyer’s sole and exclusive remedy. The warranty period on any repaired or replacement equipment
shall be the greater of the ninety (90) day repair warranty or one (1) year from the date the original
equipment was shipped. In no event shall GAI-Tronics warranty obligations with respect to equipment
exceed 100% of the total cost of the equipment supplied hereunder. Buyer may also be entitled to the
manufacturer’s warranty on any third-party goods supplied by GAI-Tronics hereunder. The applicability
of any such third-party warranty will be determined by GAI-Tronics.
Services. Any services GAI-Tronics provides hereunder, whether directly or through subcontractors,
shall be performed in accordance with the standard of care with which such services are normally
provided in the industry. If the services fail to meet the applicable industry standard, GAI-Tronics will
re-perform such services at no cost to buyer to correct said deficiency to Company's satisfaction provided
any and all issues are identified prior to the demobilization of the Contractor’s personnel from the work
site. Re-performance of services shall be Buyer’s sole and exclusive remedy, and in no event shall GAITronics warranty obligations with respect to services exceed 100% of the total cost of the services
provided hereunder.
Warranty Periods. Every claim by Buyer alleging a defect in the goods and/or services provided
hereunder shall be deemed waived unless such claim is made in writing within the applicable warranty
periods as set forth above. Provided, however, that if the defect complained of is latent and not
discoverable within the above warranty periods, every claim arising on account of such latent defect shall
be deemed waived unless it is made in writing within a reasonable time after such latent defect is or
should have been discovered by Buyer.
Limitations / Exclusions. The warranties herein shall not apply to, and GAI-Tronics shall not be
responsible for, any damage to the goods or failure of the services supplied hereunder, to the extent
caused by Buyer’s neglect, failure to follow operational and maintenance procedures provided with the
equipment, or the use of technicians not specifically authorized by GAI-Tronics to maintain or service the
equipment. THE WARRANTIES AND REMEDIES CONTAINED HEREIN ARE IN LIEU OF AND
EXCLUDE ALL OTHER WARRANTIES AND REMEDIES, WHETHER EXPRESS OR IMPLIED BY
OPERATION OF LAW OR OTHERWISE, INCLUDING ANY WARRANTIES OF
MERCHANTABILITY OR FITNESS FOR A PARTICULAR PURPOSE.
Return Policy
If the equipment requires service, contact your Regional Service Center for a return authorization number
(RA#). Equipment should be shipped prepaid to GAI-Tronics with a return authorization number and a
purchase order number. If the equipment is under warranty, repairs or a replacement will be made in
accordance with the warranty policy set forth above. Please include a written explanation of all defects to
assist our technicians in their troubleshooting efforts.
Call 800-492-1212 (inside the USA) or 610-777-1374 (outside the USA) for help identifying the
Regional Service Center closest to you.
(Rev. 10/06)
 Loading...