

Page 1

Pub. 42004-395I
GAI-TRONICS® CORPORATION
A HUBBELL COMPANY
Model 530-001 LED Strobe with
Constant-On Feature
Confidential ity Notice
This manual is provided solely as an operational, installation, and maintenance guide and contains sensitive
business and technical information that is confidential and proprietary to GAI-Tronics. GAI-Tronics
retains all intellectual property and other rights in or to the information contained herein, and such
information may only be used in connection with the operation of your GAI-Tronics product or system.
This manual may not be disclosed in any form, in whole or in part, directly or indirectly, to any third party.
General Information
The Model 530-001 LED Strobe features an LED tower for constant-on and flashing operation with
secondary contacts for auxiliary equipment. The glow of the LED tower remains constant for area
location and flashes on and off, 240 flashes per minute, when activated by an emergency telephone.
The LED strobe is designed for top-of-pole mounting, wall mounting, or surface mounting.
The unit is equipped with a ¾-inch NPT female pipe thread in the base; a pipe nipple or conduit with a
corresponding thread should be used for mounting the units. For wall or surface mounting, the
GAI-Tronics Model 4115A Mounting Assembly Kit is recommended.
WARNING
Research indicates that a small portion of the general population,
(approximately 1 in 100,000) with Photosensitive Epilepsy (PSE) may experience
epileptiform seizures upon exposure to certain visual stimuli including lights flashing in
excess of 3Hz (180cpm). Individuals with positive photic response to visual stimuli who are
prone to seizures, such as persons with epilepsy, should avoid prolonged exposure to
environments in which flashing lights are activated.
Installation
CAUTION
These installation instructions are for use by qualified service personnel only.
All field wiring to the beacon must meet the requirements of the National Electric Code (NEC) and
any other applicable local or state codes.
Before beginning any installation or modification, be sure the main electrical disconnect switch is in
the OFF position. TAG THE DISCONNECT SWITCH WITH A SUITABLE WARNING LABEL.
Electrical ground is required on this appliance.
Improper connection of the equipment can result in electrical shock.
GAI-Tronics Corporation 400 E. Wyomissing Ave. Mohnton, PA 19540 USA
610-777-1374 800-492-1212 Fax: 610-796-5954
V
ISIT WWW.GAI-TRONICS.COM FOR PRODUCT LITERATURE AND MANUALS
Page 2
Pub. 42004-395I
Model 530-001 LED Strobe with Constant-On Feature Page 2 of 3
Wiring
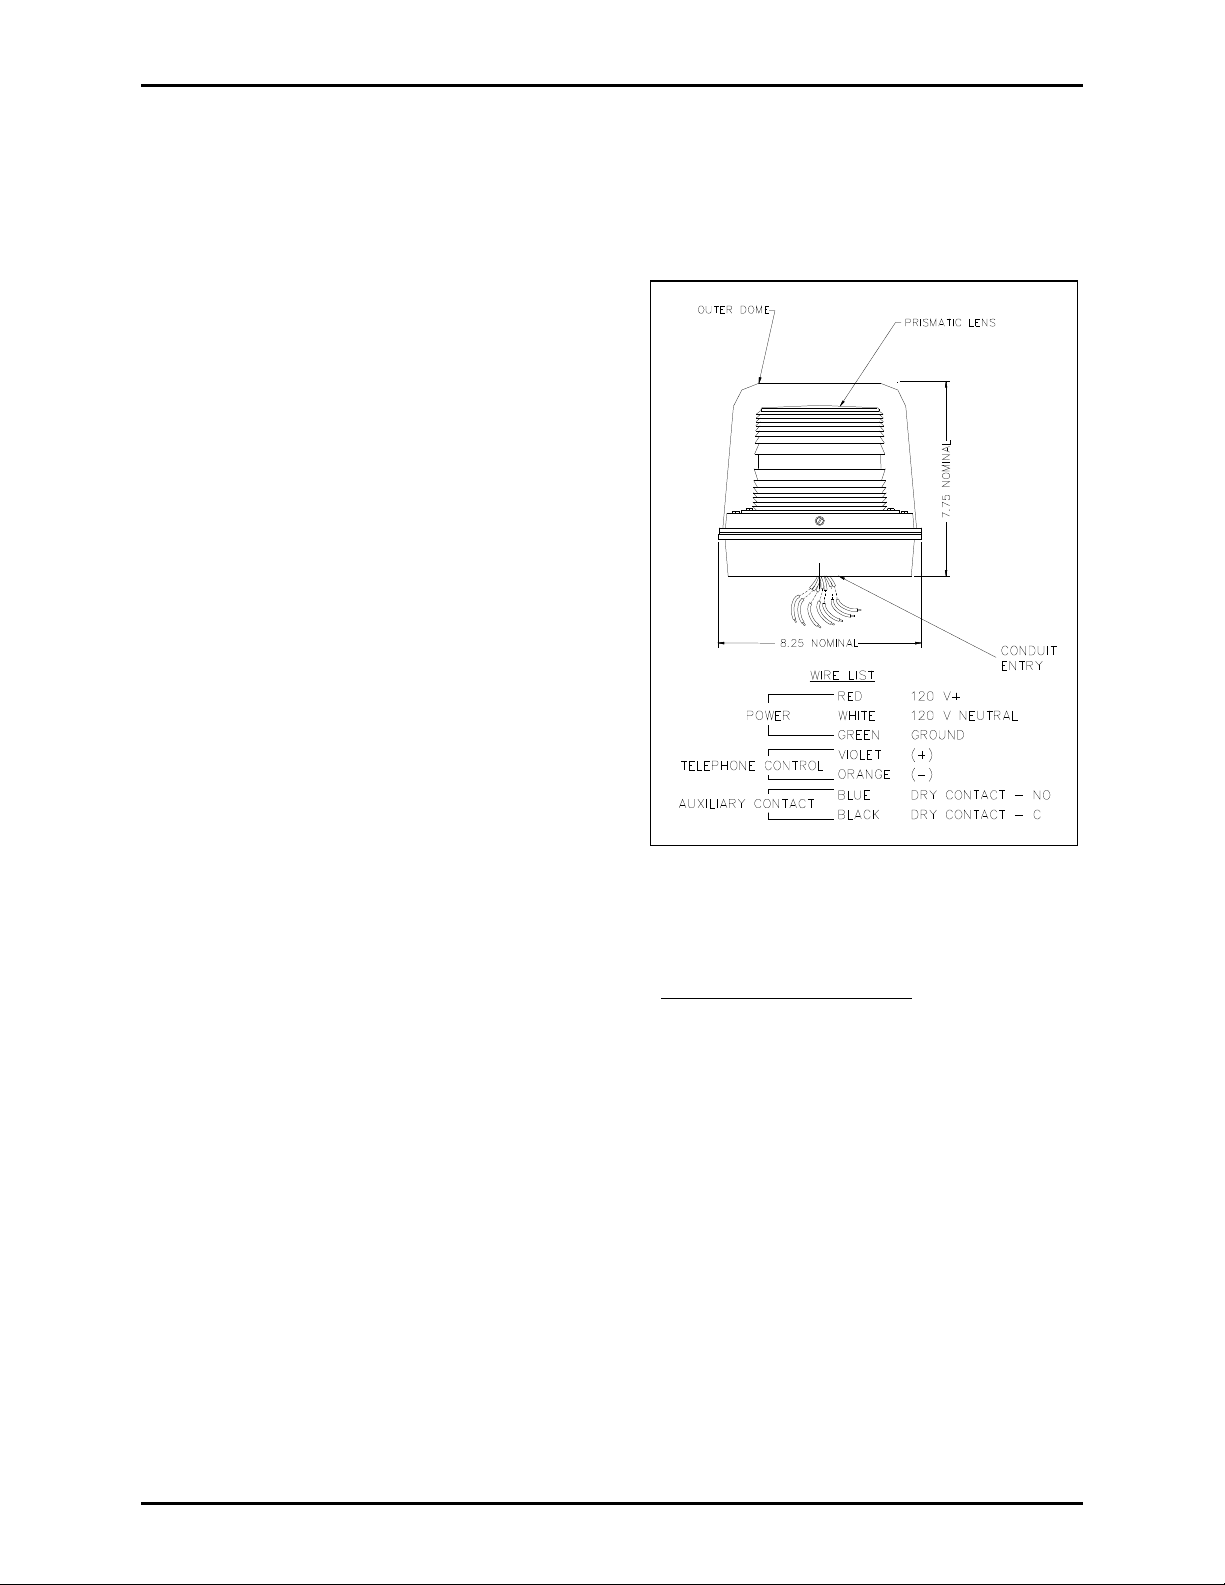
The Model 530-001 LED Strobe is equipped with seven 15-foot conductor leads. Refer to Figure 1. The
red (120 V ac line) and white (120 V ac neutral) leads are connected to the 120 V ac power source. The
green lead is the earth ground wire.
The violet (+) and orange (–) leads are connected to
the emergency telephone to signal the strobe to flash.
The blue and black leads are provided to activate
auxiliary equipment.
1. Connect the red (line) lead to the local power
source.
2. Connect the white (neutral) lead to the local pow er
source.
3. Connect the green lead to a ground connection.
4. Open the front cover of the emergency telephone
to expose the printed circuit board assembly
(PCBA) and locate the terminal block labeled TB-
2 (OUT1).
5. Bring the violet (+) and orange (–) leads through
the entry hole used for the telephone line.
6. Connect the violet (+) lead to terminal 1 and the
orange (–) lead to terminal 2
7. Replace the front cover on the emergency
telephone and test the unit by pressing the
E
MERGENCY button. The strobe is only activated
by pressing the E
N
OTE: The LED strobe provides a blue and black wire to activate auxiliary equipment such as signaling
MERGENCY button, not the CALL button (if so equipped).
on TB2.
Figure 1. Model 530-001 LED Strobe Outline
devices or camera call-up controls. These wires provide a dry contact closure rated for 2 amps @
240 V ac, or 2 amps @ 30 V dc, for the duration of the emergency telephone/strobe activation.
f:\standard ioms - current release\ 42004 instr. manuals\42004-395i.doc
03/15
Page 3

Pub. 42004-395I
Model 530-001 LED Strobe with Constant-On Feature Page 3 of 3
Specification s
Operating voltage ........................................................................................... *Regulated 120 V ac @ 60 Hz
Nominal current ........................................................................................................................ 0.44 amperes
N
OTE: The rated 0.44A current at 120 V ac 60 Hz is average during operation of the steady lights or
strobing LED. A short duration inrush current as high as 45 amps may be experienced when power is
first applied to the strobe. Current limiting and/or current protection devices should be specified
accordingly.
Rated LED life ............................................................................................................... Up to 100,000 hours
Flash rate ..................................................................................................................... 240 flashes per minute
Auxiliary contact maximum rating ................................................................................. 2 amps @ 240 V ac
2 amps @ 30 V dc
Operating (environment) temperature range ....................................... -40° C to +66° C (-40° F to +150° F)
Environmental ...................................................................... NEMA-3R (when mounted with dome upright)
Terminations (ac, control, auxiliary contact) ...................................................... 15-foot, No. 18 AWG wire
Construction: Base: ..................................... Die-cast aluminum (light gray, baked enamel finish)
Dome: ..................................................................................... Polycarbonate (blue)
Dimensions ......................................................................... 7.75 H 8.25 W inches (196.85 209.55 mm)
Shipping weight .................................................................................................................................. 7.5 lbs.
Mounting ............................................................................................................................ ¾-14 NPT female
Approvals .......................................................................................................................................... UL/ cUL
LED Coil Data
Nominal voltage ................................................................................................................................. 24 V dc
Nominal current .................................................................................................................................. 14 mA
Accessories
Part No. Description
4115A Mounting Assembly Kit
530-001DCL Replacement Electronics Assembly
WARRANTY NOTE: LED replacement is not covered under warranty.
*Tested voltage range is 96–132 V ac.
f:\standard ioms - current release\ 42004 instr. manuals\42004-395i.doc
03/15
Page 4

Warranty
Equipment. GAI-Tronics warrants for a period of one (1) year from the date of shipment, that any
GAI-Tronics equipment supplied hereunder shall be free of defects in material and workmanship, shall
comply with the then-current product specifications and product literature, and if applicable, shall be fit
for the purpose specified in the agreed-upon quotation or proposal document. If (a) Seller’s goods prove
to be defective in workmanship and/or material under normal and proper usage, or unfit for the purpose
specified and agreed upon, and (b) Buyer’s claim is made within the warranty period set forth above,
Buyer may return such goods to GAI-Tronics’ nearest depot repair facility, freight prepaid, at which time
they will be repaired or replaced, at Seller’s option, without charge to Buyer. Repair or replacement shall
be Buyer’s sole and exclusive remedy. The warranty period on any repaired or replacement equipment
shall be the greater of the ninety (90) day repair warranty or one (1) year from the date the original
equipment was shipped. In no event shall GAI-Tronics warranty obligations with respect to equipment
exceed 100% of the total cost of the equipment supplied hereunder. Buyer may also be entitled to the
manufacturer’s warranty on any third-party goods supplied by GAI-Tronics hereunder. The applicability
of any such third-party warranty will be determined by GAI-Tronics.
Services. Any services GAI-Tronics provides hereunder, whether directly or through subcontractors,
shall be performed in accordance with the standard of care with which such services are normally
provided in the industry. If the services fail to meet the applicable industry standard, GAI-Tronics will
re-perform such services at no cost to buyer to correct said deficiency to Company's satisfaction provided
any and all issues are identified prior to the demobilization of the Contractor’s personnel from the work
site. Re-performance of services shall be Buyer’s sole and exclusive remedy, and in no event shall GAITronics warranty obligations with respect to services exceed 100% of the total cost of the services
provided hereunder.
Warranty Periods. Every claim by Buyer alleging a defect in the goods and/or services provided
hereunder shall be deemed waived unless such claim is made in writing within the applicable warranty
periods as set forth above. Provided, however, that if the defect complained of is latent and not
discoverable within the above warranty periods, every claim arising on account of such latent defect shall
be deemed waived unless it is made in writing within a reasonable time after such latent defect is or
should have been discovered by Buyer.
Limitations / Exclusions. The warranties herein shall not apply to, and GAI-Tronics shall not be
responsible for, any damage to the goods or failure of the services supplied hereunder, to the extent
caused by Buyer’s neglect, failure to follow operational and maintenance procedures provided with the
equipment, or the use of technicians not specifically authorized by GAI-Tronics to maintain or service the
equipment. THE WARRANTIES AND REMEDIES CONTAINED HEREIN ARE IN LIEU OF AND
EXCLUDE ALL OTHER WARRANTIES AND REMEDIES, WHETHER EXPRESS OR IMPLIED BY
OPERATION OF LAW OR OTHERWISE, INCLUDING ANY WARRANTIES OF
MERCHANTABILITY OR FITNESS FOR A PARTICULAR PURPOSE.
Return Policy
If the equipment requires service, contact your Regional Service Center for a return authorization number
(RA#). Equipment should be shipped prepaid to GAI-Tronics with a return authorization number and a
purchase order number. If the equipment is under warranty, repairs or a replacement will be made in
accordance with the warranty policy set forth above. Please include a written explanation of all defects to
assist our technicians in their troubleshooting efforts.
Call 800-492-1212 (inside the USA) or 610-777-1374 (outside the USA) for help identifying the
Regional Service Center closest to you.
(Rev. 10/06)
 Loading...