

Page 1
Pub. 42004-164B
GAI-TRONICS® CORPORATION
A HUBBELL COMPANY
Model 13350 and 13351
Integral Loudspeakers
Confidentiality Notice
This manual is pr ovided s olely as a n op erat ional, installation, and maintenance guide and contains sens itive
bus ines s and t echnic al infor ma tion tha t is confident ial and prop rieta ry to GAI - Tr onic s. GAI- Tr onic s retains
all intellectual prop erty a nd other r ights in or to the information contained herein, and s uch infor ma tion may
only be used in connection with t he op erat ion of your GAI-T ronics produ c t or s ystem. This manu al may not
be disclos ed in any form, in whole or in pa rt, direct ly or indirectly, t o any third party.
Installation
Mounting
1. Remove the rear enclos ure from the ca rton.
2. There are four 0.280-inch mounting holes located in the four corners of the enclosure. Refer to Figure
2 or 3 for mounting details.
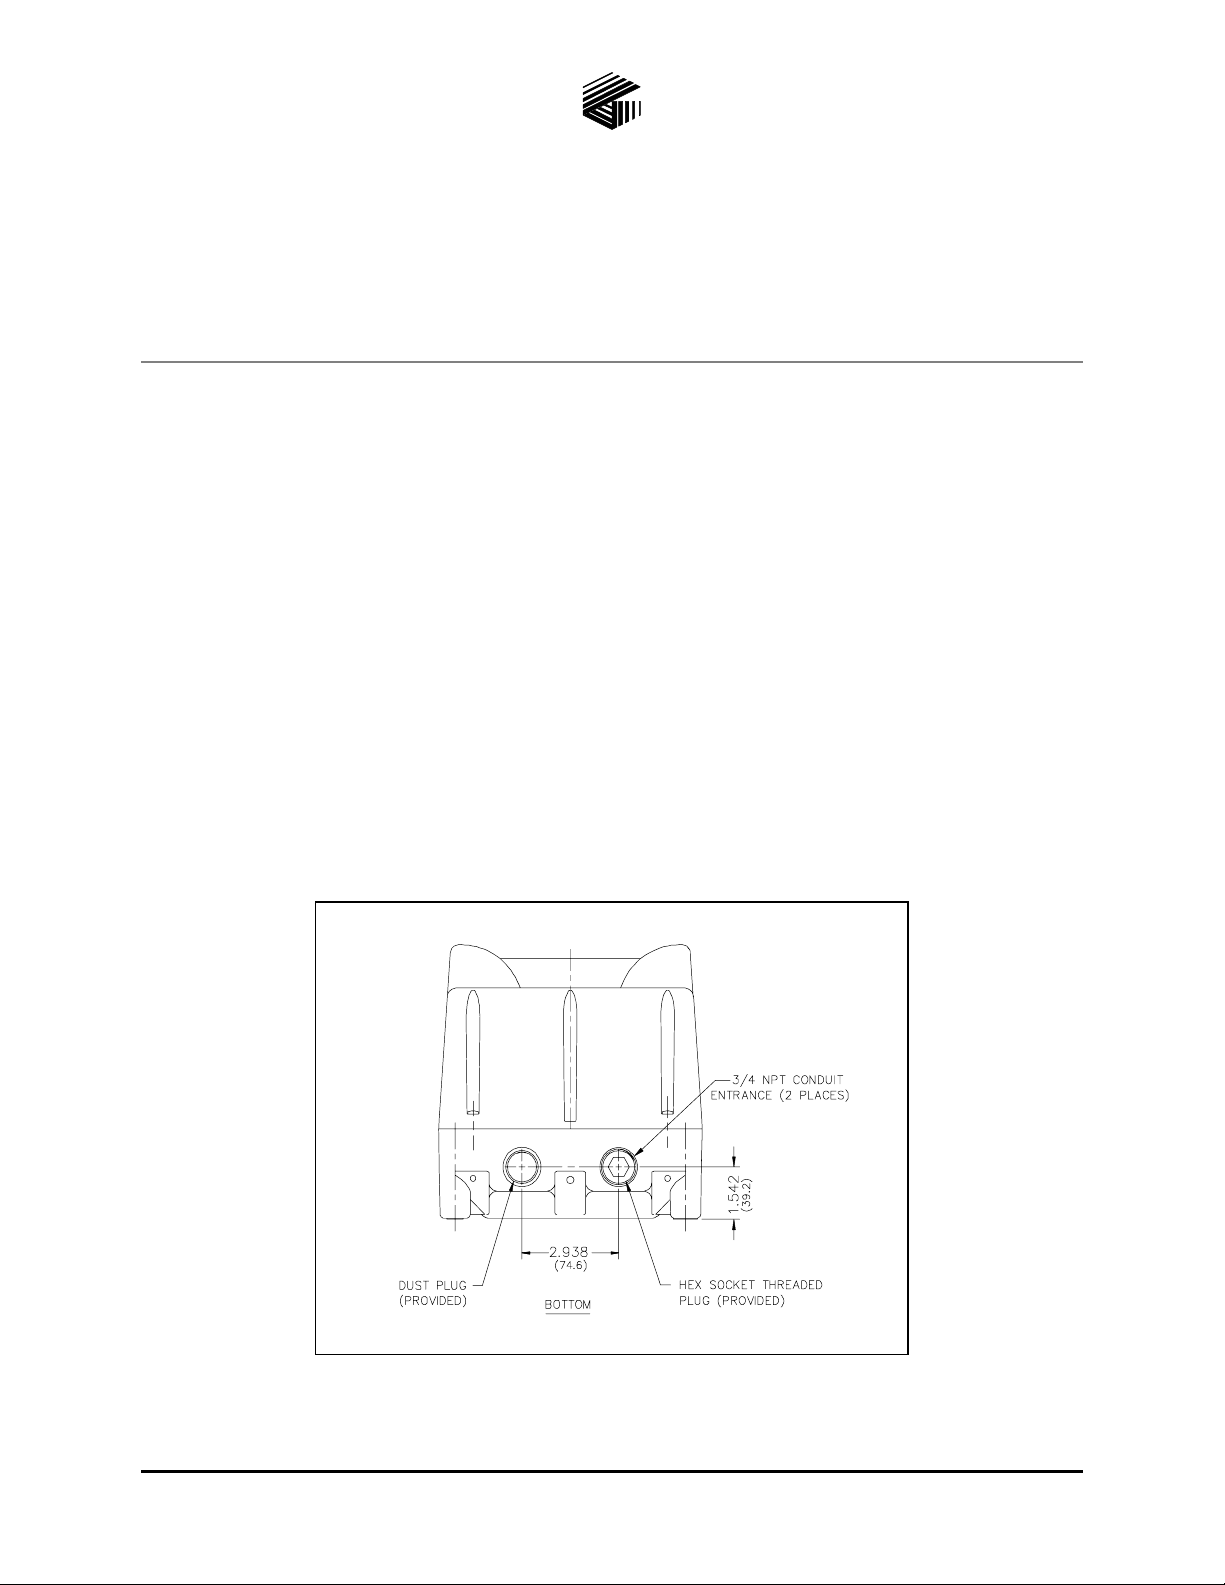
Figure 1. Conduit Entries
GAI-Tronics Corporation P.O. Box 1060, Reading, PA 19607-1060 USA
610-777-1374 800-492-1212 Fax : 610-796-5954
ISIT WWW.GAI-TRONICS.COM FOR PRODUCT LITERATURE AND MANUALS
V
Page 2

Pub. 42004-164B
Model 13350 and 13351 Integral Loudspeakers Page:
2 of 4
Wiring
Model 13350
The r ear enclosure c ontains a two-position terminal block. Field connections are made direct ly on this
block. The rear enc l o sure of the loudspeaker allows versa tile placement beca use i t is full y “reversib l e”
with the front horn enclosure. The unit is shipped a ssembled for bottom cable entr y. If top ca ble entry is
desired, rotate the rear enclosure 180 degrees to move the terminal block to the opposite mounting position.
The screws should be installed and tightened to 10 to 14 in-lbs. torque.
The two 3 /4-inch c onduit entries (female) allow speakers to be eas ily “daisy-chained” without junction
boxes. The ins taller c an ter mina te to the s p eaker wit h rigid conduit, flexible conduit, or c able bu shing. A
3/4 - inc h ma le hex socket-type conduit plug is provided when only one conduit ent ry is u sed. When conduit
entries ar e clos ed , th e speaker is c o mpletel y weat h erproof .
After c onnec ting the conduit to t he enclosure, connect the spea ker wire t o the approp riate terminal blocks .
Refer to Figu re 2. Then plu g the “quic k c onnect” terminals f rom the fr ont sect ion of the spea ker into t he
approp riate terminal blocks . Close the speaker and tighten f ront p anel screws to 1 6 to 20 in-lbs. torque.
Figure 2. Model 13350 Loudspeaker Wiring
N
OTE: If the conduit entries are positioned a t the top of the enclosure, a nd hollow 3/4- inc h c onduit is used,
entries to the enclosu re should be internally plugged using a s uita b le s ealant to avoid c ondens ation
collecting within the enclosur e.
\\s_eng\gtc proddoc s \ s t andard iom s - current release\42004 inst r. m anuals \ 42004-164b. doc
2/97
Page 3

Pub. 42004-164B
Model 13350 and 13351 Integral Loudspeakers Page:
3 of 4
Model 13351
The r ear enclosur e c ontains a six-pos ition ter minal block. Field connections and wat tage tap changes a re
made direct ly on this block; the b loc k is equipp ed wit h a wiri ng harnes s tha t connects to the louds peaker.
The rear enclos ure o f the l o udspeak er allows versa tile placement beca use i t is full y “r ev ers i ble”. T h e unit
is shipped assembled for bottom cable entry. If top cable entry is desired, rotate the rear enclosure
180 degrees to move the terminal blocks to the opposite mounting position. Tighten the screws on the
terminal blocks to 10 to 14 in-lbs. torque.
The 3/4-inch conduit entries (female) allow speakers to be eas ily “daisy-chained” without junction b oxes.
This is particularly desirable in 70- volt distribu ted systems. The installer ma y terminate to the sp ea ker
with ri gid c ondu it, fl exible conduit, or c able bu shing. A 3/4-inch ma le hex socket type conduit p lug is
provided when only one conduit entry is used. Once conduit ent ries a re closed t he speaker is completely
weatherproof.
After c onnec ting the conduit to t he enclosure, connect the spea ker wire t o the approp riate terminal blocks .
Refer to Figu re 3. Then plu g the connector on the r ear enclosur e t o the mating c onnector on the front
section. Clos e the spea ker and t i ghten the fr ont pa nel capt ive s c rews t o 1 6 to 20 in-lbs . torque.
Figure 3. Model 13351 Loudspeaker Wiring
The r ea r enclosu re is completely reversible with the front as sembly, allowing the conduit ent ries to be
positioned at the top or bottom of the sp eaker. Mounting holes are int egral to the rear enclos ure, and will
not affect the watertight integrity of the enclosu re.
OTE: If conduit entries a re positioned at the top of the enclosure, a nd hollow 3/4- inc h c onduit is used,
N
entries to the enclosure shou ld be internally plugged u sing a suita ble sealant to avoid condensa tion within
the enclos ure.
\\s_eng\gtc proddoc s \ s t andard iom s - current release\42004 inst r. m anuals \ 42004-164b. doc
2/97
Page 4

Pub. 42004-164B
Model 13350 and 13351 Integral Loudspeakers Page:
4 of 4
Alternate Mounting Options
For unique mounting applications , please conta ct your GAI-Tronic s sales consultant.
Specifications
Mechanical
Enclosure................................................................................... Glass-reinforced polyester, 0.20 inch thick
Hardware....................................................................................Urethane gaskets, stainless steel hardware
Electrical
RMS power rating....................................................................................................................... 16 watts
Sensitivity.......................................................................................................... 107 dB, 1 watt at 1 meter
Nominal coverage when su rfa c e- mounted to wall (ref. –6 dB)
Vertical...........................................................................................................Upward: 40 degrees
Downwa rd: 6 0 degrees
Horizontal.....................................................................................................................90 degrees
Replacement Parts
Part Number Description
12533-001 Speaker Replacement Kit
12532-001 Transformer Replacement Kit
12531-001 Wire Harness Replacement Kit
\\s_eng\gtc proddoc s \ s t andard iom s - current release\42004 inst r. m anuals \ 42004-164b. doc
2/97
Page 5

Warranty
Equipment. GAI-Tronics warrants for a period of one (1) year from the date of shipment, that any
GAI-Tronics equipment supplied hereunder shall be free of defects in material and workmanship, shall
comply with the then-current product specifications and product literature, and if applicable, shall be fit
for the purpose specified in the agreed-upon quotation or proposal document. If (a) Seller’s goods prove
to be defective in workmanship and/or material under normal and proper usage, or unfit for the purpose
specified and agreed upon, and (b) Buyer’s claim is made within the warranty period set forth above,
Buyer may return such goods to GAI-Tronics’ nearest depot repair facility, freight prepaid, at which time
they will be repaired or replaced, at Seller’s option, without charge to Buyer. Repair or replacement shall
be Buyer’s sole and exclusive remedy. The warranty period on any repaired or replacement equipment
shall be the greater of the ninety (90) day repair warranty or one (1) year from the date the original
equipment was shipped. In no event shall GAI-Tronics warranty obligations with respect to equipment
exceed 100% of the total cost of the equipment supplied hereunder. Buyer may also be entitled to the
manufacturer’s warranty on any third-party goods supplied by GAI-Tronics hereunder. The applicability
of any such third-party warranty will be determined by GAI-Tronics.
Services. Any services GAI-Tronics provides hereunder, whether directly or through subcontractors,
shall be performed in accordance with the standard of care with which such services are normally
provided in the industry. If the services fail to meet the applicable industry standard, GAI-Tronics will
re-perform such services at no cost to buyer to correct said deficiency to Company's satisfaction provided
any and all issues are identified prior to the demobilization of the Contractor’s personnel from the work
site. Re-performance of services shall be Buyer’s sole and exclusive remedy, and in no event shall GAITronics warranty obligations with respect to services exceed 100% of the total cost of the services
provided hereunder.
Warranty Periods. Every claim by Buyer alleging a defect in the goods and/or services provided
hereunder shall be deemed waived unless such claim is made in writing within the applicable warranty
periods as set forth above. Provided, however, that if the defect complained of is latent and not
discoverable within the above warranty periods, every claim arising on account of such latent defect shall
be deemed waived unless it is made in writing within a reasonable time after such latent defect is or
should have been discovered by Buyer.
Limitations / Exclusions. The warranties herein shall not apply to, and GAI-Tronics shall not be
responsible for, any damage to the goods or failure of the services supplied hereunder, to the extent
caused by Buyer’s neglect, failure to follow operational and maintenance procedures provided with the
equipment, or the use of technicians not specifically authorized by GAI-Tronics to maintain or service the
equipment. THE WARRANTIES AND REMEDIES CONTAINED HEREIN ARE IN LIEU OF AND
EXCLUDE ALL OTHER WARRANTIES AND REMEDIES, WHETHER EXPRESS OR IMPLIED BY
OPERATION OF LAW OR OTHERWISE, INCLUDING ANY WARRANTIES OF
MERCHANTABILITY OR FITNESS FOR A PARTICULAR PURPOSE.
Return Policy
If the equipment requires service, contact your Regional Service Center for a return authorization number
(RA#). Equipment should be shipped prepaid to GAI-Tronics with a return authorization number and a
purchase order number. If the equipment is under warranty, repairs or a replacement will be made in
accordance with the warranty policy set forth above. Please include a written explanation of all defects to
assist our technicians in their troubleshooting efforts.
Call 800-492-1212 (inside the USA) or 610-777-1374 (outside the USA) for help identifying the
Regional Service Center closest to you.
(Rev. 10/06)
 Loading...