

Page 1
Page 2

Page 3

Istruzioni per l'uso pag.2
Instructions for use pag.22
Manuel d’instructions pag.42
instrucciones de uso pág.62
Instruções de uso pág.82
Gebrauchsanweisungen Seite 102
Page 4

R
V
S
T
Z
1
U
Y
Z2
Z3
Z4
G
H
I
L
M
N
A
B
C
D
E
F
O
F
P
Q
2
Page 5
DATI TECNICI
Comandi a bassa tensione 24V
Alimentazione elettrica 230V - 50Hz
Resistenza Caldaia 2 x 1000 W (corazzata)
Pressione d'esercizio 0,4 MPa (4 bar)
Potenza aspirazione 1000 W bistadio tangenziale
Depressione max 21 kPa
Flusso d'aria 45 litri/secondo
Capacità nominale caldaia 1,5 litri
Capacità utile caldaia 1,3 litri (trasformabile in vapore)
Resistenza Ferro da stiro 800 W (modello professionale in opzione)
A Manopola regolazione aspirazione
B Interruttore caldaia
C Spia luminosa rossa (mancanza acqua)
D Presa accessori
E Tappo di riempimento
F Gancio di apertura
G Serbatoio di recupero
H Manopola regolazione vapore
I Manometro pressione caldaia
L Spia luminosa verde (macchina pronta)
M Interruttore accessori
N Ganci per avvolgimento cavo
O Presa posteriore per soffiaggio
P Silenziatore
Q Flessibile
R Bocchettina per tessuti
S Lancia
T Spazzola multiuso
U Tubi prolunga
V Spazzola tergivetro
Z1 Telaio setolato con inserti in gomma
applicato alla spazzola multiuso
Z
2 Telaio setolato
Z
3 Inserti rigidi
Z4 Inserti setolati
Y Bottiglia di riempimento
ATTENZIONE
Le istruzioni, i disegni, le tabelle e qant'altro è contenuto nel presente libretto sono di natura tecnica
riservata e, per questo, nessuna informazione può essere riprodotta, nè completamente, nè parzialmente,
e non può essere comunicata a terzi senza l'autorizzazione scritta della ditta costruttrice, che ne é proprietaria esclusiva.
Non mettere in esercizio l'apparecchio senza prima aver letto le istruzioni per l'uso. Qualsiasi
altro uso diverso è ritenuto non regolamentare. La casa produttrice non risponde dei danni
da ciò risultanti. Il rischio relativo è ad esclusivo carico dell'utilizzatore.
3
Page 6

Gentile Cliente,
il gradimento da Lei dimostratoci con l'acquisto del nostro apparecchio
merita molto di più di un semplice ringraziamento.
Per noi è un'importante manifestazione di fiducia di cui Le siamo molto grati.
Il giusto riconoscimento per la Sua scelta non può essere che la sicurezza di avere
acquistato una macchina esteticamente piacevole e tecnicamente valida:
- Abbiamo messo a Sua disposizione tutta la nostra esperienza per offrirLe uno strumento
di lavoro che possa aiutarLa a risolvere i problemi di pulizia e di igiene domestici e
industriali.
- I nostri apparecchi sono stati studiati nei minimi dettagli, con il preciso intento di unire ad
un design moderno la massima funzionalità di utilizzo, Per garantire una lunga durata
sarà sufficiente una minima cura, osservando attentamente quanto specificato in questo
manuale riguardo la manutenzione
- La caldaia è in acciaio INOX 18/10 da 12/10 di spessore ed i componenti
interni sono, per la loro qualità, di livello professionale.
- La macchina è dotata di resistenze corazzate.
- L'apparecchio ha i seguenti dispositivi di sicurezza:
Tappo con valvola di sicurezza incorporata
Termostato di lavoro della caldaia
Termostato di sicurezza della caldaia
- La caratteristica prioritaria che contraddistingue i nostri prodotti è l'assoluta praticità di
utilizzo, unita all'economia di esercizio.
- Con questo acquisto, Lei può ottenere in casa un risultato da stireria professionale con
un notevole risparmio economico.
- Con l'ausilio degli accessori per la pulizia, può utilizzare la forza del vapore per compiere
una completa e profonda disinfezione del Suo ambiente. Una volta pulito con il vapore
può facilmente aspirare lo sporco: questa eccezionale funzione Le permette un notevole
risparmio di fatica ed un perfetto risultato.
4
Page 7
PRECAUZIONI PER L'UTILIZZO
Prima di utilizzare il Generatore - Aspiratore - Stiro, leggere attentamente le presenti
istruzioni d'uso. La ditta Costruttrice declina ogni responsabilità per eventuali danni a
persone o cose causati dall'inosservanza di quanto qui di seguito riportato o dall'utilizzo
improprio dell'apparecchio.
Fig. 3
Fig. 2
Fig. 1
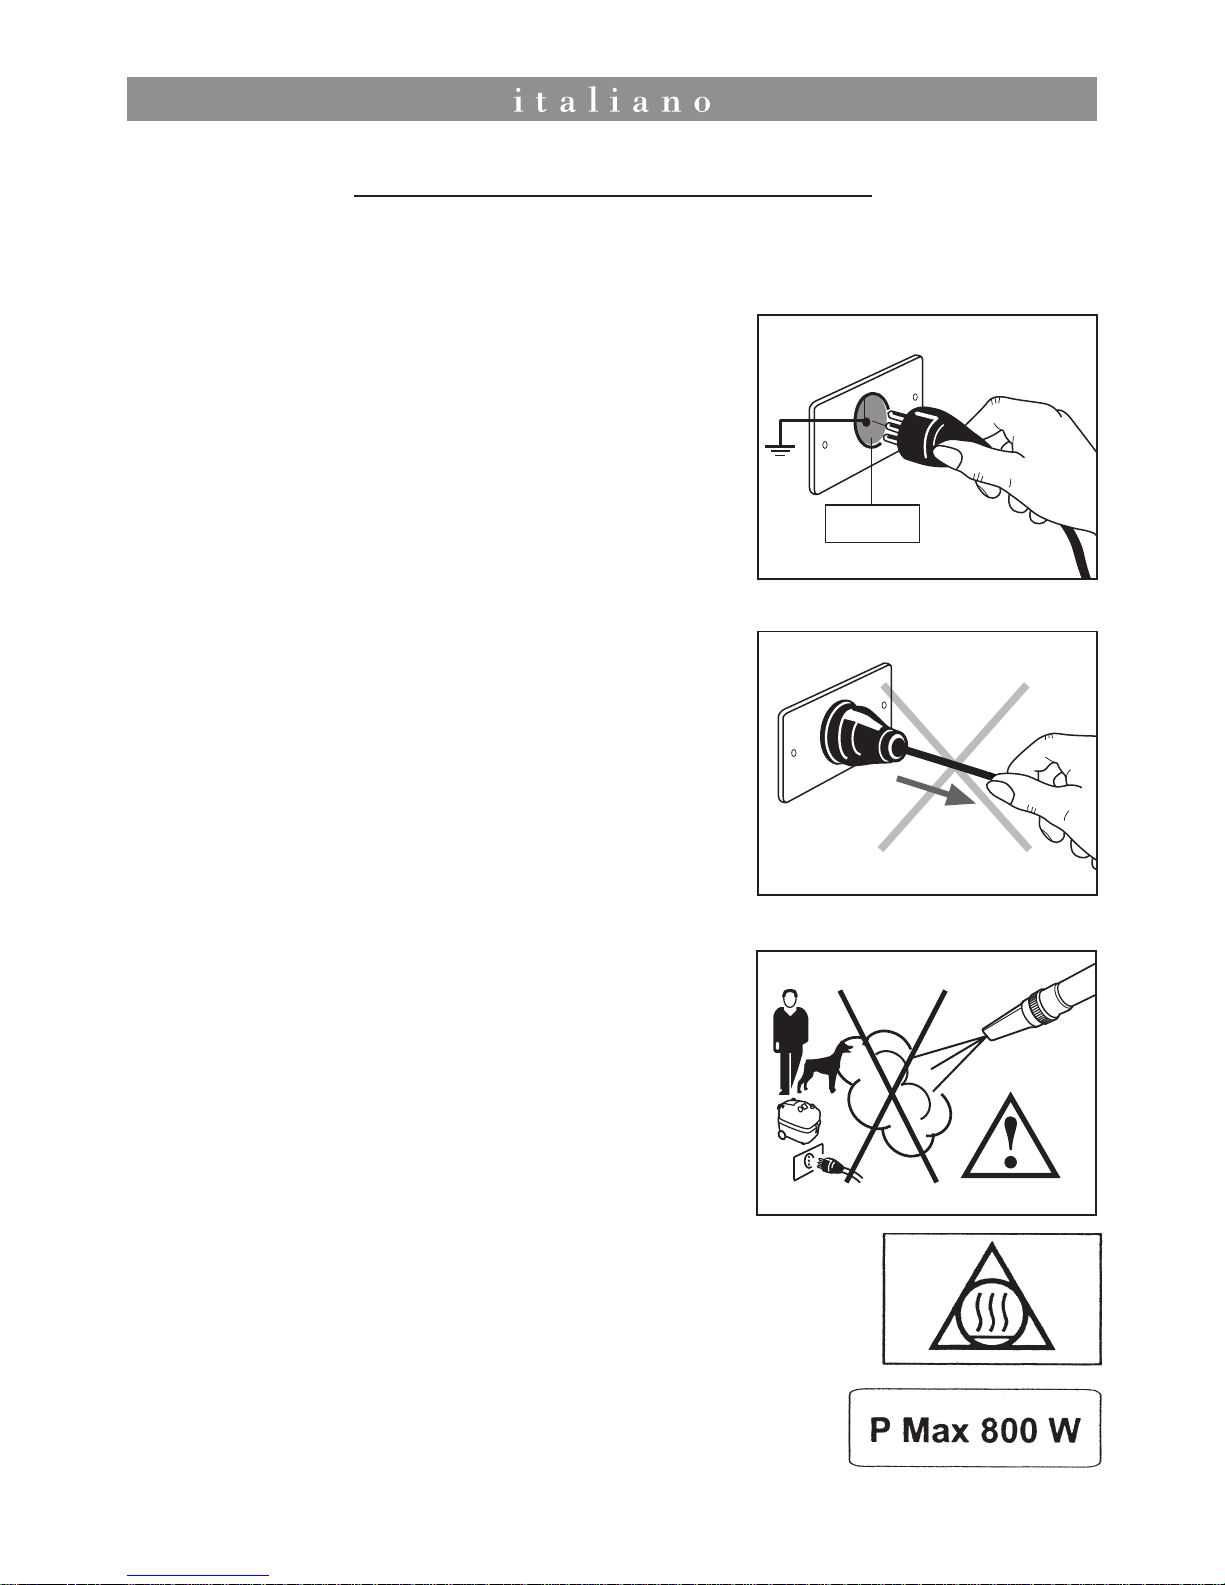
230 V
5
- Assicurarsi che l'impianto elettrico di rete (230V- 50Hz) sia munito di messa a terra e di protezione salvavita, secondo quanto
prescritto dalle normative esistenti in materia (Fig. 1)
- Non tirare il cavo di alimentazione o l'apparecchio stesso per
togliere la spina dalla presa di corrente (Fig. 2)
- Togliere la spina di alimentazione dalla relativa presa prima di
immettere acqua nel serbatoio.
- Non utilizzare l'apparecchio in ambienti saturi di gas.
- Non aspirare sostanze infiammabili, esplosive o corrosive.
- Non utilizzare acqua distillata e non immettere detergenti o
sostanze chimiche nella caldaia.
- Lasciar raffreddare l'acqua all'interno della caldaia prima di
procedere allo svuotamento della stessa.
- Assicurarsi il corretto avvitamento del tappo di riempimento (E),
per evitare fughe di vapore.
- Non lasciare l'apparecchio acceso incostudito, ma spegnerlo
SEMPRE prima di allontanarsi.
- Prima di compiere qualsiasi intervento di manutenzione o
pulizia, togliere SEMPRE la spina dalla presa di alimentazione
elettrica.
- Non toccare l'apparecchio con mani o piedi bagnati quando
la spina è inserita.
- Non immergere mai l'apparecchio in acqua o in altri liquidi. Per
la pulizia utilizzare un panno umido. Evitare l'uso di solventi o
detergenti che potrebbero danneggiare la superficie.
- Evitare nel modo più assoluto di dirigere il getto di vapore,
essendo ad alta temperatura, su persone, animali ed apparecchi
elettrici (Fig. 3).
- Nel caso si dovessero impiegare prolunghe elettriche, le
medesime devono essere adeguate al carico onde evitare
pericoli per l'operatore o per la sicurezza dell'ambiente ove si
opera. Le prolunghe non adeguate possono provocare
anomalie di funzionamento.
- Rivolgersi sempre al rivenditore o ad un tecnico autorizzato per
sostituire il limitatore termico di sicurezza e nei casi di guasto
o malfunzionamento, evitando assolutamente di smontare
l'apparecchio.
- La macchina produce vapore la cui temperatura in uscita può
raggiungere i 130° C. Evitare il contatto diretto tra pelle e vapore
(Fig. 3a).
- La potenza massima erogata dalla presa é di 800W (Fig. 3b)
Fig. 3a
Fig. 3b
Page 8

AVVERTENZA
Qualsiasi intervento sul cavo di alimentazione deve essere eseguito solo dal personale del servizio
tecnico autorizzato GAGGIA.
IMPORTANTE
- Se dal tappo di riempimento (E) dovesse fuoriuscire un forte e continuo getto di vapore, spegnere
l'apparecchio e rivolgersi ad un Centro Assistenza Autorizzato Gaggia.
- Per eventuale sostituzione del tappo di riempimento (E) e degli altri dispositivi di controllo e
sicurezza, usare esclusivamente ricambi originali.
- Non accendere mai la caldaia se la stessa è priva di acqua.
OGNI INTERVENTO ALL'INTERNO DELL'APPARECCHIO DEVE ESSERE ESEGUITO
SOLO DA CENTRI AUTORIZZATI GAGGIA
PRESCRIZIONI DI SICUREZZA
ATTENZIONE
La forza del vapore sostituisce completamente tutti i detersivi, aggiungendo all'azione
pulente quella, importantissima, della disinfezione.
A causa dell’elevata temperatura del vapore si consiglia un attento esame preliminare
delle superfici da trattare, sperimentando l'effetto del vapore su piccoli campioni o
parti non in vista prima di procedere.
- Collocare l'apparecchio in posizione orizzontale. Durante il funzionamento, non tenere mai la
macchina in posizione verticale
- Gli additivi nell'acqua possono lasciare residui nella caldaia. Per tale motivo, non mettere mai
detersivi, essenze profumate o altre sostanze chimiche nella caldaia.
- Gli apparecchi elettrici ( TV, radio, lampade) non devono mai essere puliti con il vapore, anche
se essi non sono allacciati alla rete elettrica.
- L'apparecchio non deve essere utilizzato da bambini o da ragazzi, ma solo da persone adulte
che si siano anticipatamente informate sulle modalità d'uso.
- Evitare il contatto con alcune parti della macchina (spazzole e prolunghe) che possono scottare.
NOTA
I nostri apparecchi sono costruiti nel pieno rispetto delle vigenti normative in materia.
Sotto condizioni di alimentazione sfavorevoli, l'apparecchio può causare cadute di
tensione transitorie.
6
6
Page 9
7
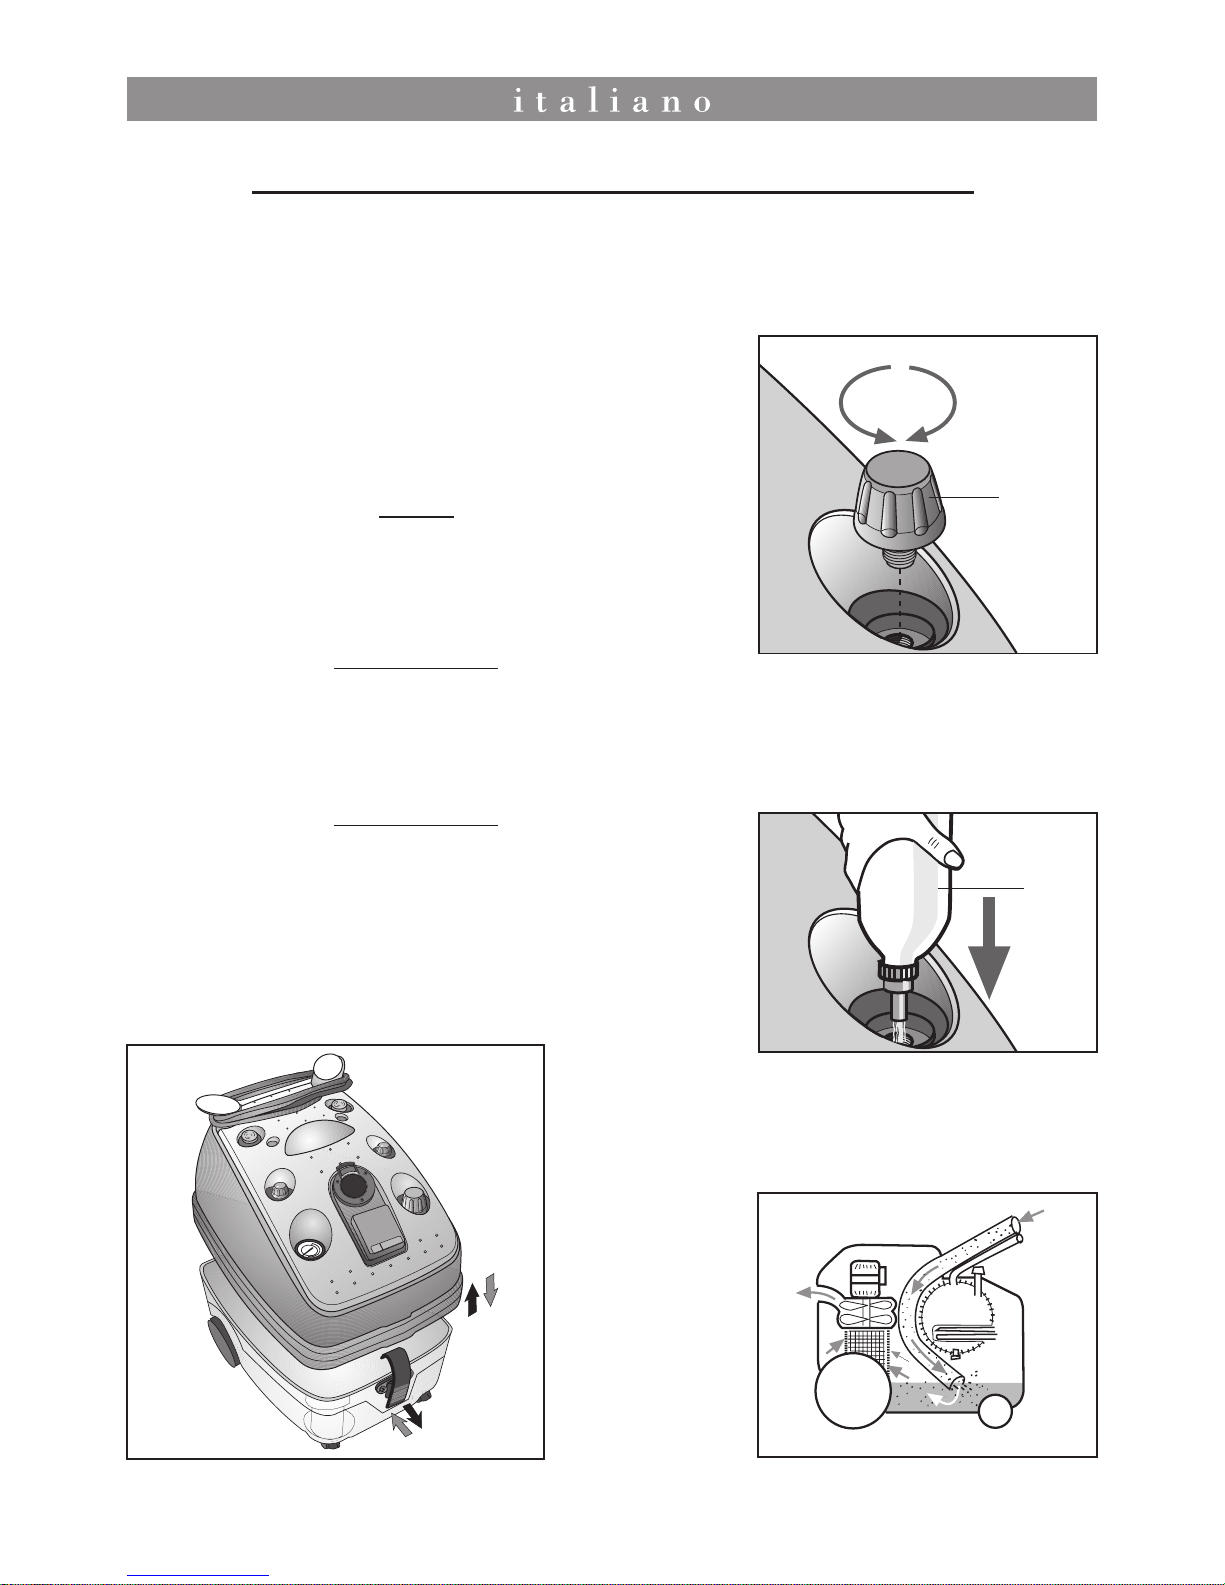
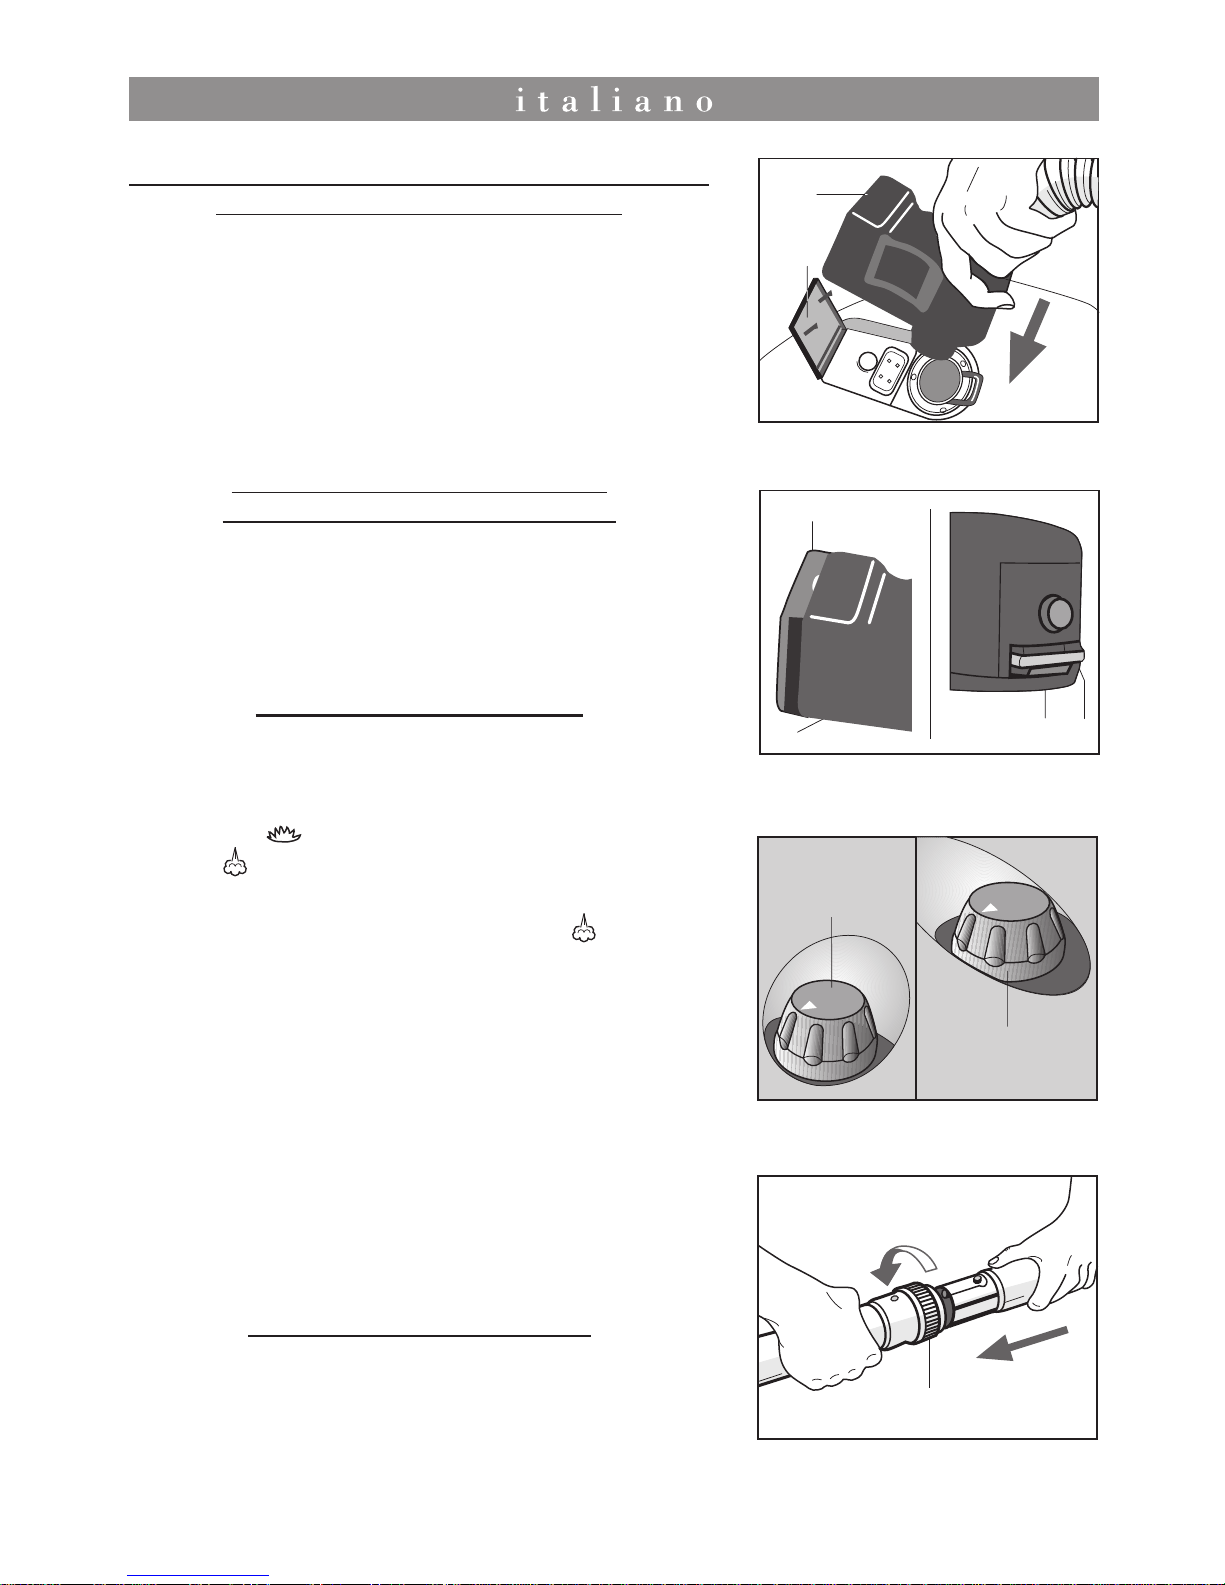
- Svitare il tappo di riempimento (E) (Fig. 4)
- Introdurre acqua del rubinetto o demineralizzata nella
caldaia utilizzando l'apposita bottiglia (1) (Fig. 5)
Una volta raggiunto il livello di riempimento, la bottiglia
cessa automaticamente di immettere acqua.
- Avvitare il tappo di riempimento (E) con una leggera
pressione ed assicurarsi che sia ben serrato. (Fig. 4)
NOTA
Per il ripristino del livello acqua vedere pag 12
- Riempire il serbatoio di recupero (G) con 2,5 litri d'acqua
dopo aver rimosso la parte superiore dell'apparecchio
tramite gli appositi ganci (F).
IMPORTANTE
- Riposizionare la parte superiore della macchina
sul serbatoio di recupero nel verso indicato (Fig. 6)
- Agganciare i ganci di chiusura (F) accertandosi che le
due parti combacino perfettamente.
IMPORTANTE
Versando nel serbatoio di recupero (G) 2,5 litri di
acqua pulita, l'aria viene filtrata e le impurità (polvere,
germi ecc.) trattenute nel serbatoio (G) (Fig. 7). Durante
l'utilizzo controllare sempre di non superare il livello
massimo per evitare fuoriuscite di spruzzi d'acqua
dal silenziatore.
SEQUENZE OPERATIVE DI PREPARAZIONE
Prima di utilizzare l'apparecchio eseguire le seguenti operazioni:
Fig. 6
Fig. 4
AvvitaSvita
E
Filtrazione aria
Entrata aria
Uscita
Aria
pura
Fig. 7
Fig. 5
1
7
Page 10
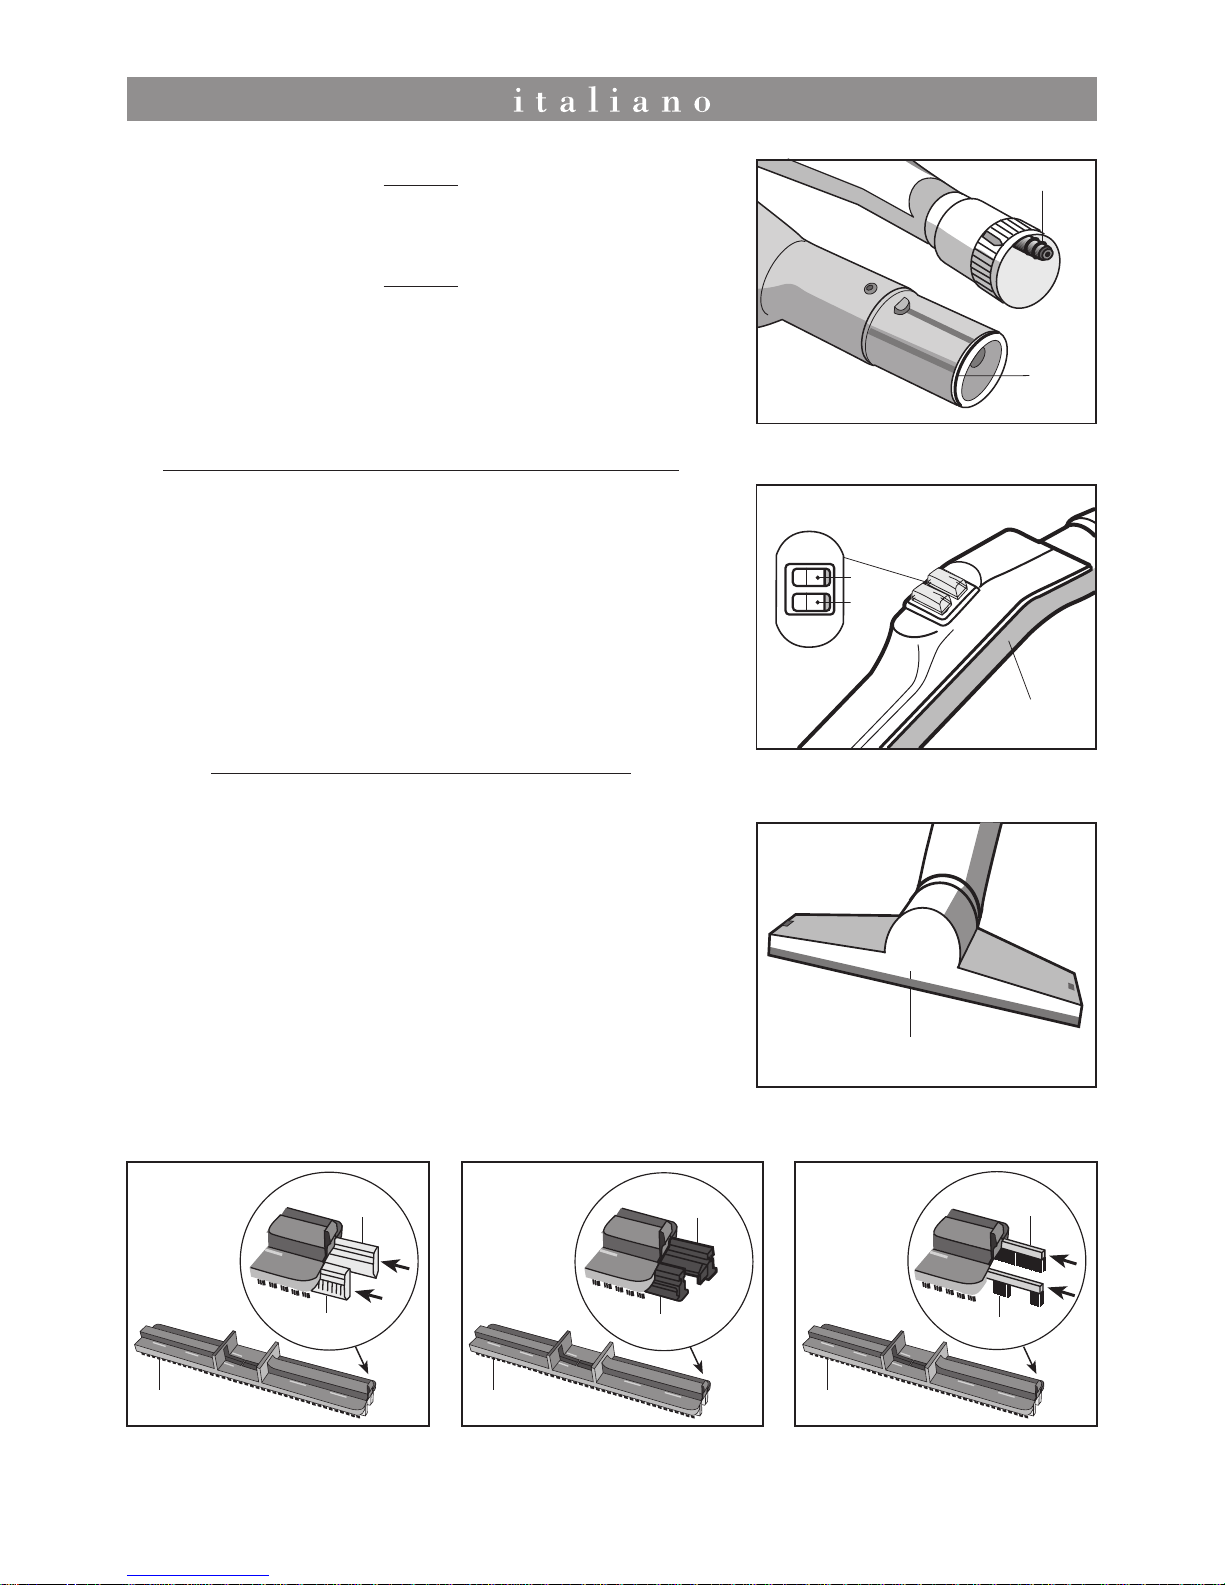
ATTACCO DEL TUBO FLESSIBILE PER LA FUNZIONE
VAPORE ASPIRAZIONE (Fig. 8-9)
- Aprire completamente lo sportello (2) della presa accessori
(D) ed inserire l'attacco rapido (3) del tubo flessibile (o del
ferro da stiro) nella presa posta sulla parte anteriore
dell'apparecchio, premendo a fondo (Fig. 8)
- Chiudere lo sportello (2) contro il fianco dell'attacco rapido
(3) assicurandosi che i due particolari (4 -5) si aggancino
(Fig. 9). Da questa presa è possibile erogare vapore e/o
aspirare.
ATTACCO DEL TUBO FLESSIBILE
PER LA FUNZIONE SOFFIAGGIO
- Potete inserire l'attacco rapido (3) come sopra descritto
per le figure 8 e 9 anche nella presa posteriore di soffiaggio
(O) dopo aver rimosso il silenziatore (P). Da questa presa
non é possibile erogare vapore.
FUNZIONAMENTO
- Inserire la spina di alimentazione elettrica nella presa di
corrente.
- Premere gli interruttori luminosi (B - Caldaia) contrassegnato
dal simbolo e (M - Accessori) contrassegnato dal
simbolo per la funzione a vapore con aspirazione.
- Per la sola funzione di aspirazione, premere l'interruttore
(M - Accessori) contrassegnato dal simbolo .
- Attendere che la caldaia raggiunga la pressione di esercizio.
Quando la spia verde (L) si accende, l'apparecchio è pronto
per l'uso.
- Per ottenere la modulazione della quantità di erogazione
vapore, agire sulla manopola (H) (Fig. 10) ruotandola in
senso orario per una maggiore quantità di vapore ed in
senso antiorario per diminuire il flusso.
- Per regolare l'aspirazione agire sulla manopola (A),
ruotandola in senso orario per una maggiore aspirazione
ed in senso antiorario per una minore aspirazione. (Fig. 10)
UTILIZZO DEGLI ACCESSORI
Per l'accoppiamento dei tubi (U) e degli accessori é sufficiente
inserire la parte terminale maschio dell'uno nella parte
femmina e ruotare la ghiera di bloccaggio (6) nella direzione
indicata (Fig. 11).
Fig. 10
A
H
Fig. 8
Fig. 9
3
2
5
4
2
3
Fig. 11
6
8
Page 11
NOTA
Entrambe le funzioni di aspirazione o di erogazione
vapore possono essere eseguite contemporaneamente.
NOTA
Per un migliore funzionamento e durata degli
accessori, pulire e lubrificare periodicamente con
grassi siliconici gli o ring di tenuta (7 - 8) (Fig. 12) e
tutte le parti d'innesto.
IMPUGNATURA ANATOMICA (Q) (Fig. 13)
- L'impugnatura anatomica (Q) (9) é posizionata alla fine
del tubo flessibile (Q) e può essere collegata ad una delle
prolunghe rigide (U) o direttamente all'accessorio.
Sull'impugnatura (Q) sono presenti due interruttori:
- Interruttore rosso (10): premendolo, si permette
l'erogazione del vapore dall'accessorio.
- Interruttore azzurro (11): premendolo, si permette
l'aspirazione di sostanze liquide o solide.
SPAZZOLA MULTIUSO (T) (Fig. 14)
Grazie allo snodo, che gli consente una rotazione di 360°,
questo accessorio permette di pulire zone particolarmente
difficili da raggiungere (sotto ai mobili, ai letti, su mensole
alte ecc.). E' composta da una parte universale (12) sulla
quale possono essere montati, a seconda delle esigenze:
- Il telaio setolato (Z
1) dotato di inserti in gomma (1 e 1 BIS)
per pavimenti e superfici dure. (Fig. 15)
- Il telaio setolato (Z
2) accoppiato agli inserti rigidi per
moquettes e tappeti (Z
3 e Z3 BIS) (Fig. 16)
- Il telaio setolato (Z
2) accoppiato agli inserti setolati (Z4 e
Z
4 BIS) per la funzione di aspirapolvere. (Fig. 17)
7
Fig. 13
10
9
11
Fig. 16
Z2
12
T
Fig. 15
Z1
1
1 BIS
Z3
Z3 BIS
Fig. 17
Z2
Z4
Z4 BIS
Fig. 14
8
Fig. 12
9
Page 12
10
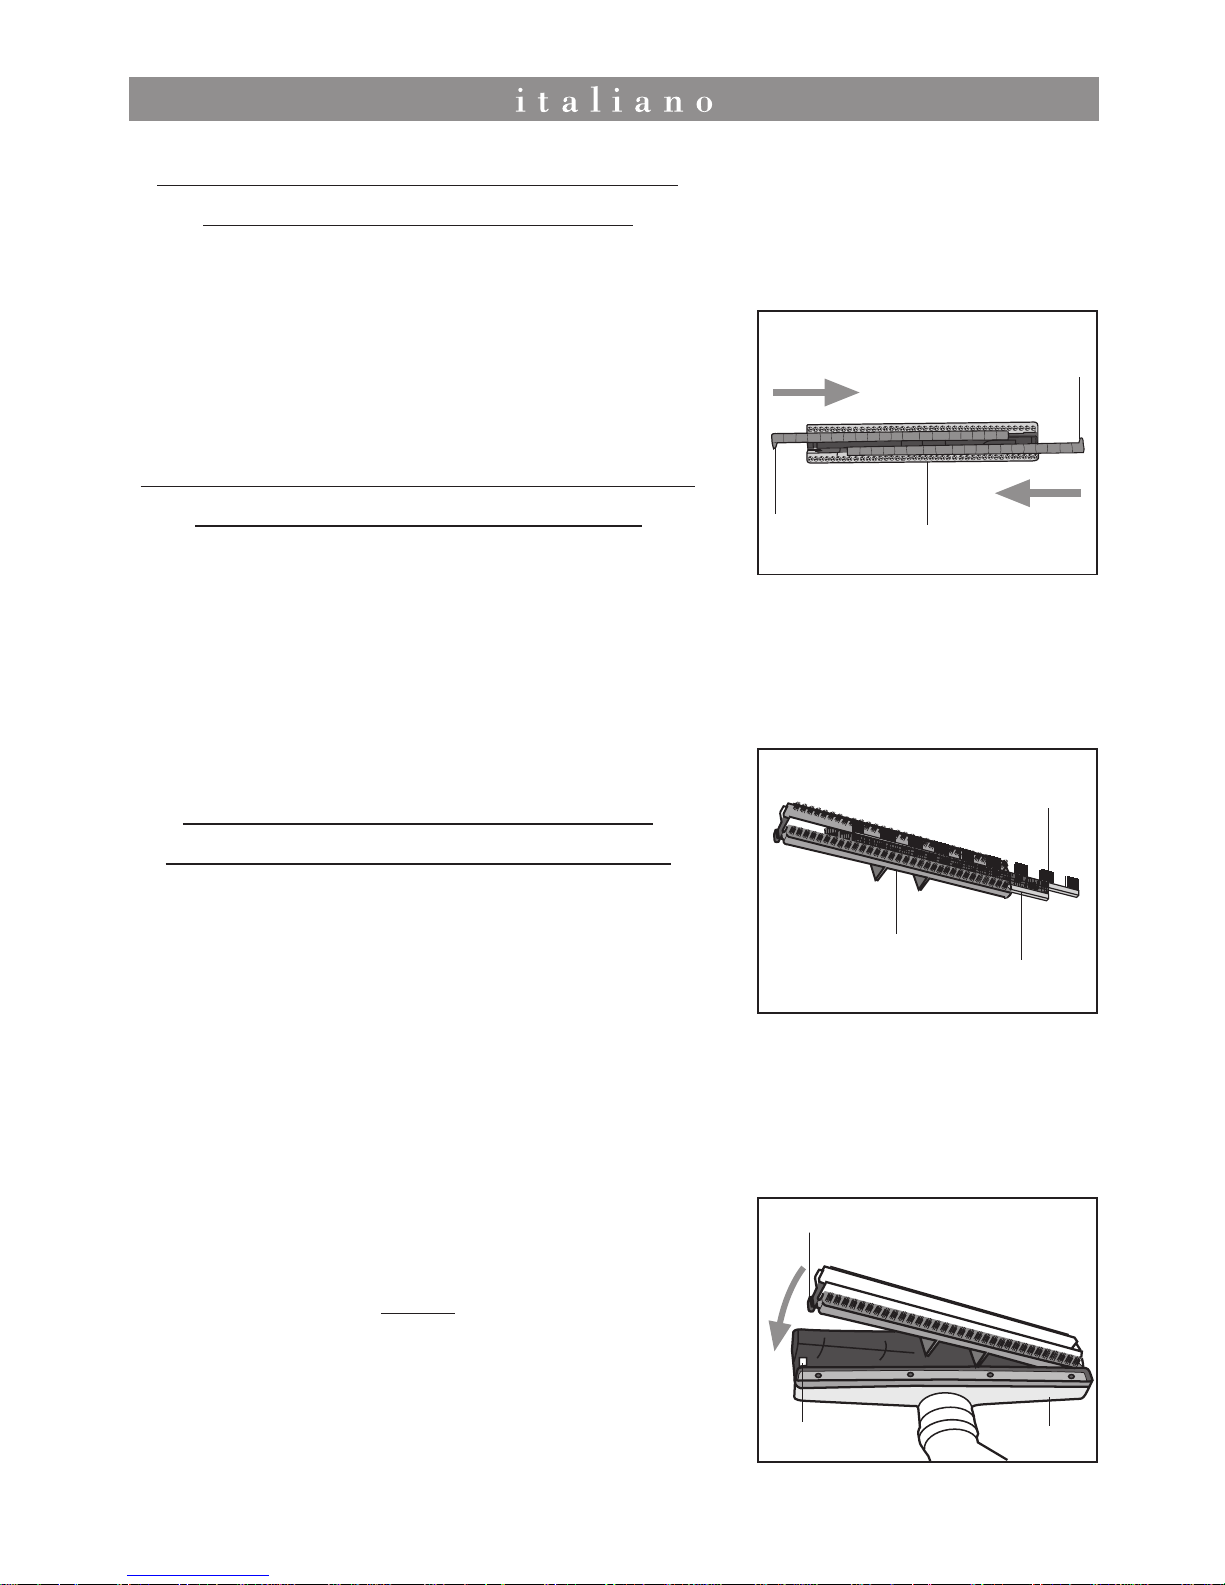
MONTAGGIO INSERTI RIGIDI (Z3 e Z3 BIS)
SU TELAIO SETOLATO (Z2) (Fig. 18)
Per il montaggio degli inserti rigidi (Z
3 e Z3 BIS) per
moquettes e tappeti sul telaio setolato (Z
2) inserirli nelle
apposite guide con le linguette rivolte all'interno.
MONTAGGIO INSERTI SETOLATI (Z4 e Z4 BIS)
SU TELAIO SETOLATO (Z2) (Fig. 18a)
Inserire l’inserto setolato (Z4) con setole continue nella guida
posteriore del telaio (Z
2) e l’inserto setolato (Z4 BIS) con
setole alternate nella guida anteriore del telaio (Z
2), come
mostrato in figura (18a).
MONTAGGIO TELAI SETOLATI (Z1 e Z2)
SULLA SPAZZOLA MULTIUSO (T) (Fig. 19)
Per applicare al corpo spazzola (T) i telai, (Z1 e Z2) desiderati
è sufficiente appoggiare il telaio scelto e premere sino
all'aggancio della levetta (4) nell'apposita fessura (5) sulla
parte universale (12) della spazzola multiuso (T).
Per smontare il telaio inserito, sganciare la levetta (4) dalla
parte universale (12) della spazzola multiuso (T).
NOTA
Per la pulizia su moquettes e tessuti, scaricare
preventivamente la condensa prima di operare sul
tessuto premendo l'interruttore rosso (10) posto
sull'impugnatura (9) del flessibile (Q) (Fig. 13).
Z2
Z3 BIS
Z3
Z2
Z4 BIS
Z4
Fig. 18
Fig. 18a
T-12
4
5
Fig. 19
10
Page 13

LANCIA (S) (Fig. 20)
La lancia (S) viene utilizzata per particolari tipi di pulizie:
fessure tra mobili, giunzione di sedili o divani, angoli acuti,
ecc. dove lo sporco è maggiormente resistente ed è
necessaria una particolare igiene.
Ecco un elenco di alcune possibili applicazioni:
- Disinfettare ed eliminare i cattivi odori (sanitari, ecc.)
- Togliere lo sporco resistente nei punti più nascosti e nelle
fessure sottili (tra le piastrelle, alla base dei sanitari, ecc.).
- Rimozione del grasso più resistente dalle cappe aspiranti,
dai forni, dai cerchi di automobili, dal motore, ecc.
Data l'elevata potenza del vapore è consigliabile non
indirizzare direttamente il vapore su superici delicate (legno,
compensato, parquet). Per l'utilizzo su tali superfici si consiglia
comunque di eseguire sempre una prova su un campione
o su una parte nascosta.
Collegando la lancia (S), tramite il flessibile (Q), alla presa
posteriore (O) dell'apparecchio può essere utilizzata nella
funzione "soffiaggio", ideale per rimuovere la polvere da
superfici difficili da raggiungere come termosifoni, tapparelle,
ecc. Ideale anche per raggruppare le foglie in giardino.
BOCCHETTINA PER TESSUTI (R) (Fig. 21)
La bocchettina per tessuti (R) è utile per la pulizia di divani,
poltrone, materassi, sedili auto e zone particolarmente strette
dove, con la spazzola multiuso, non si riesce ad arrivare
NOTA
Per la pulizia dei tessuti scaricare preventivamente
la condensa prima di operare sul tessuto premendo
l'interruttore rosso (10) posto sull'impugnatura (9)
(Fig. 13). Durante la fase di pulizia, non interrompere
l'erogazione del vapore.
SPAZZOLA TERGIVETRO (V) (Fig. 22)
La spazzola tergivetro (V) è particolarmente indicata per la
pulizia di vetri e specchi e/o superfici similari.
Per il suo corretto impiego, operare come segue:
- Erogare vapore sull'intera superficie da pulire, appoggiando
le setole alla stessa.
- Premere la racla in gomma sulla superficie ed aspirare
l'acqua presente, eseguendo dei movimenti rettilinei verticali
verso il basso.
Usare le funzioni vapore e aspirazione contemporaneamente.
Fig. 22
V
Fig. 20
S
Fig. 21
R
11
Page 14

NOTA
Durante il normale utilizzo, la spia verde (L) accesa segnala che la pressione in caldaia
è sui valori normali; tuttavia, erogando vapore continuo, la pressione diminuisce
leggermente e la spia si spegne automaticamente sino a quando non ritorna al valore
d'esercizio.
Anche in questa condizione si può tranquillamente continuare a lavorare, in quanto le
resistenze sono state dimensionate per permettere il ripristino immediato del valore di
esercizio della pressione.
- L'accensione della spia rossa (C) indica che la caldaia è rimasta senz'acqua: in questo
caso, interviene il termostato che blocca automaticamente l'apparecchio. Procedere quindi come
segue:
a) Smettere immediatamente di lavorare e spegnere la
caldaia agendo sull'interruttore (B - Caldaia).
b) Scaricare la pressione rimasta in caldaia tramite
l'accessorio che si sta utilizzando attivando l'interruttore
rosso (10) presente sull' impugnatura (9) (Fig. 23). Nel
caso si stia utilizzando il ferro da stiro, agire sul pulsante
(22) (Fig. 24).
c) Spegnere la macchina tramite l'interruttore di accensione
(M - Accessori).
d) Togliere la spina di alimentazione elettrica dalla presa.
e) Attendere qualche minuto affinché diminuisca la pressione
della caldaia.
f) Allentare il tappo di riempimento (E) ed attendere che la
pressione si sia completamente scaricata.
ATTENZIONE
Evitare di svitare il tappo di riempimento (E) prima
che la pressione all'interno della caldaia sia
completamente fuoriuscita o quando si sta utilizzando
la macchina. Durante questa operazione potrebbe
fuoriuscire del vapore residuo. Prestare attenzione
a non scottarsi.
g) Rimuovere il tappo di riempimento (E).
h) Aggiungere l'opportuna quantità d'acqua come indicato
nelle sequenze operative di preparazione (pag.7)
i) Avvitare il tappo di riempimento (E).
Fig. 24
22
Fig. 23
10
9
12
Page 15

Fig. 26
22
Fig. 25A
2
3
ACCESSORI OPZIONALI
23
FERRO DA STIRO (Fig. 25 - 26)
UTILIZZO DEL GENERATORE
PER STIRARE
Per il suo utilizzo inserire l'attacco (3) del ferro
da stiro nella sede della presa accessori
(Fig. 25A) al posto del tubo flessibile, come
descritto a pag. 8 (Fig. 8) "Attacco del tubo
flessibile".
- Ruotare il selettore della temperatura (23) del
ferro da stiro, nella zona desiderata per adeguare
la temperatura della piastra al tessuto da stirare.
- Attendere circa 3 minuti affinchè la piastra del
ferro da stiro raggiunga la temperatura
selezionata.
- Procedere normalmente (come per la stiratura
a secco) erogando, quando necessario, il vapore
premendo il pulsante (22) posto sull'impugnatura.
NOTA
Questo tipo di stiratura è particolarmente
indicata per togliere il lucido, ravvivare
tessuti di lana, tende, ecc. E' possibile
ripassare i tessuti anche in posizione
verticale.
IMPORTANTE
Usare la massima attenzione per la
stiratura dei diversi tipi di tessuto: è
preferibile seguire l'ordine crescente delle
temperature:
FIBRE SINTETICHE / SETA / LANA /
COTONE / LINO per evitare pause
improduttive. Comunque, se si deve
passare ad una temperatura bassa (seta,
sintetico, ecc.), occorre attendere almeno
8-10 minuti affinchè la piastra si raffreddi,
diversamente si rischia di rovinare
irreparabilmente il tessuto e sporcare
la piastra.
Fig. 25
13
Page 16

Previene la formazione di schiuma, nel caso venissero aspirate sostanze schiumose ed
evita che nel tempo (max 30 giorni) si formino muffe nel serbatoio di recupero.
USO: versare l'antischiuma-antimuffa nel serbatoio di recupero (G), nelle quantità indicate
sul flacone fornito.
PRODOTTO ANTISCHIUMA-ANTIMUFFA OPZIONALE
(G)
14
ANTISCHIUMA
ANTIMUFFA
Page 17

SPAZZOLA TONDA CON INSERTI MORBIDO, RIGIDO
O TRIANGOLARE RIGIDO
Viene applicata sull'impugnatura o sui tubi prolunga ed è utilissima
per aspirare la polvere dagli interstizi. Sono disponibili tre diversi
inserti con setole morbide, rigide o di forma triangolare con setole
rigide, che vengono inseriti sul corpo
spazzola tondo.
PUNTALE CURVO PER LANCIA
Applicato alla lancia (S) concentra la pressione del vapore in uscita per
asportare lo sporco più difficile e, grazie alla particolare forma, è ideale
per la pulizia di punti particolarmente critici da raggiungere normalmente.
E' possibile abbinare al puntale un ficcanaso con setole in nylon, in ottone
o in acciaio inox.
6
INSERIMENTO: Inserire la spazzola nella parte terminale
femmina del tubo prolunga (U) e ruotare la ghiera di bloccaggio
(6) nella direzione indicata. Inserire sul corpo spazzola l'inserto
con una leggera pressione per bloccarlo.
INSERIMENTO: Inserire il puntale nella punta della
lancia (S) spingendo nella direzione indicata.
FICCANASO NYLON, INOX, OTTONE
Viene applicato al puntale curvo e consente di
esercitare azione meccanica a supporto del vapore
per rimuovere lo sporco ostinato.
INSERIMENTO: Inserire il ficcanaso nel puntale
curvo per lancia avvitando nella direzione indicata.
ACCESSORI OPZIONALI PER LE FUNZIONI VAPORE - ASPIRAZIONE
15
Page 18

KIT SOTTOVUOTO
Permette di richiudere sottovuoto cuscini, piumini,
indumenti, coperte ecc. isolandoli della polvere, tarme,
acari ecc. riducendo il loro volume anche fino al 70 %
USO: inserire il capo nell'apposito sacco. Posizionare
il sacco dal lato aperto sopra il listello cavo e richiudere
con il tubolare. Aspirare ponendo il bocchettone
SPAZZOLA ROTANTE A DEPRESSIONE
Unisce all'azione igienizzante del vapore l'effetto della depressione
generata dall'aspirazione del motore, permettendo di rimuovere peli,
polvere ed impurità da tutte le superfici tessili (tappeti, moquettes,
divani, sedili di automobili, ecc.)
6
INSERIMENTO: Inserire la spazzola nella parte
terminale femmina del tubo prolunga (U) o
dell'impugnatura del flessibile (Q) e ruotare la
ghiera di bloccaggio (6) nella direzione indicata
dell'impugnatura (9) del tubo flessibile (Q) sulla valvola fino ad eliminare completamente l'aria
all'interno del sacco. Richiudere la valvola con l'apposito tappo di sicurezza. Per ripristinare
il tutto basta rimuovere il tubolare.
Con il flessibile vapore - aspirazione (Q) fare attenzione a non attivare il tasto vapore (10).
ACCESSORI OPZIONALI PER LE FUNZIONI VAPORE - ASPIRAZIONE
16
Page 19

UTILIZZO DEGLI ACCESSORI
Per l'utilizzo degli accessori inserire il raccordo
monoblocco (33) del tubo flessibile (32)
(Fig. 29) nella sede della presa accessori al
posto del tubo flessibile, come descritto a pag. 8
(Fig. 8) "Attacco del tubo flessibile".
Per l'accoppiamento dei vari componenti é
sufficiente inserire il raccordo girevole (31) del
flessibile (32) nell' impugnatura (34) e inserire
la parte femmina dell'accessorio che si intende
utilizzare nella parte terminale maschio
dell'impugnatura (34). (Fig. 30).
IMPUGNATURA (34)
Si deve montare all'estremità del tubo flessibile
(32) sul raccordo girevole (31).
Questo accessorio è dotato di anello deflussore
(35) che permette di regolare la forza di
aspirazione (Fig. 31).
ANELLO CHIUSO: massima forza aspirante
ANELLO APERTO: minima forza aspirante
NOTA
Anche se è possibile utilizzare l'apparecchio
montando gli accessori direttamente sul
tubo flessibile, si consiglia di utilizzare
l'impugnatura ergonomica per una migliore
presa ed un più comodo impiego.
Fig. 30
34
31
32
34
35
34
CHIUSO APERTO
Fig. 31
Fig. 29
31
32
33
ACCESSORI OPZIONALI PER LA SOLA FUNZIONE ASPIRAZIONE
17
Page 20

(a) TUBO TELESCOPICO
Particolarmente utile per raggiungere punti alti o nascosti (sotto i
mobili, divani, letti). Si applica direttamente sull'impugnatura (34).
(b) LANCIA ASPIRAZIONE
Indicata per particolari tipi di pulizie (fessure tra mobili, sedili
o divani) dove risulta difficoltosa l'aspirazione.
Si applica o sull'impugnatura (34) o sul tubo telescopico (a).
(c) BOCCHETTA ASPIRAZIONE
E' particolarmente adatta per pulire superfici quali poltroncine,
tappeti, superfici rigide di dimensioni ridotte.
Si applica o sull'impugnatura (34) o sul tubo telescopico (a).
(d) SPAZZOLA ASPIRAZIONE
Indicata per la pulizia di superfici come tappeti, moquettes, passatoie,
tappetini d'auto, pavimenti e pareti. Grazie allo snodo, che consente
una rotazione di 360°, questo accessorio permette di pulire tutte
le zone difficili da raggiungere.
Si applica o sull'impugnatura (34) o sul tubo telescopico (a).
ACCESSORI OPZIONALI PER LA SOLA FUNZIONE ASPIRAZIONE
18
Page 21

(e) PIASTRA FELTRO
Si applica alla spazzola (d) e in questo modo é possibile pulire
efficacemente il parquet.
(d)
(e)
(f) SPAZZOLA TERMOSIFONE
Utile per la pulizia degli spazi come le fessure dei termosifoni e
tutte le superfici di piccole dimensioni difficili da raggiungere.
Si applica solo sulla lancia (b)
(g) SPAZZOLA ASPIRA LIQUIDI
Indicata per aspirare liquidi su superfici rigide come pavimenti. Per
il suo utilizzo, spingerla in avanti o indietro favorendo lo scorrimento
delle racle in gomma.
Si applica o sull'impugnatura (34) o sul tubo telescopica (a)
ACCESSORI OPZIONALI PER LA SOLA FUNZIONE ASPIRAZIONE
19
Page 22

MANUTENZIONE
ATTENZIONE
La manutenzione deve essere eseguita a macchina
spenta e con spina di corrente staccata.
Effettuare periodicamente (circa ogni 100 ore di
funzionamento, oppure ogni 6 mesi) il lavaggio della
caldaia utilizzando un apposito prodotto
disincrostante in commercio (per l'utilizzo seguire le
indicazioni riportate sul prodotto) operando come
segue:
a) Togliere il tappo di riempimento (E) (Fig. 32)
b) Svitare il tappo di scarico (36) (Fig. 33). Far fuoriuscire
l'acqua rimasta in caldaia e riavvitare il tappo di scarico.
c) Riempire la caldaia con il liquido disincrostante
NOTA
Prima di rimuovere il tappo di scarico (36) posizionare
sotto l'apparecchio un recipiente per raccogliere
l'acqua.
d) Fare agire il prodotto disincrostante acquistato come
descritto dalle sue istruzioni d'uso.
e) Svitare il tappo di scarico (36) (Fig. 33) fare fuoriuscire
tutto il liquido disincrostante e risciacquare la caldaia più
volte fino all'eliminazione totale del disincrostante.
f) Riavvitare il tappo di scarico (36) (Fig. 33) e, se si desidera
riempire la caldaia, agire come descritto nelle "SEQUENZE
OPERATIVE DI PREPARAZIONE" a pag. 7.
ATTENZIONE
Utilizzare esclusivamente prodotti specifici per la
pulizia di caldaie a vapore.
Fig. 32
Svita
E
Fig. 33
36
20
Page 23

PULIZIA
Prima di pulire la macchina, è indispensabile
disinserirel'interruttore generale e staccare la spina
dalla presa di corrente. Inoltre, aspettare che la
macchinasi raffreddi.
Mai immergere l'apparecchio nell'acqua! E'
Severamente vietato cercare di intervenire all'interno
della macchina.
Pulire periodicamente il serbatoio di recupero (G) della
macchina dal liquido o dalle impurità solide aspirate
muovendo i ganci apertura (F) e sollevando la parte superiore
dell'apparecchio.
Per la pulizia operare come segue:
- Svuotare il serbatoio di recupero (G).
- Riempire un contenitore con 3 litri max di acqua pulita.
E' possibile aggiungere sostanze disinfettanti purchè non
schiumose.
- Attivare la funzione aspirazione con il tasto (11) ed aspirare
l'acqua con gli accessori precedentemente utilizzati per la
pulizia.
- Svuotare il serbatoio di recupero (G) e ripetere l'operazione
se necessario.
Ogni qualvolta si esegue la pulizia della parte inferiore
dell'apparecchio, pulire il filtro (37) nella parte esterna da
eventuali residui solidi (Fig. 34).
PULIZIA DEGLI ACCESSORI
Pulire gli accessori (tubi prolunga, spazzola multiuso, lancia,
bocchettina per tessuti) con acqua corrente. Per pulire telai
è consigliato l'impiego del vapore.
Fig. 34
37
21
Page 24

R
V
S
T
Z
1
U
Y
Z2
Z3
Z4
G
H
I
L
M
N
A
B
C
D
E
F
O
F
P
Q
22
Page 25

23
A Suction regulation knob
B Boiler switch
C Red warning light (no water)
D Accessories socket
E Fill-up cap
F Opening catch
G Recovery tank
H Steam regulation knob
I Boiler pressure gauge
L Green warning light (machine ready)
M Accessories switch
N Hooks for lead-cable winder
O Rear blowing socket
P Muffler
Q Work hose
R Textiles tool
S Nozzle
T Multipurpose brush
U Extension tubes
V Window-wiping brush
Z1 Bristled frame with rubber inserts for
attachment to the multipurpose brush
Z2 Bristled frame
Z3 Stiff inserts
Z4 Bristled inserts
Y Fill bottle
TECHNIC
AL DATA
Low voltage controls 24 V
Electric supply 230V – 50 Hz
Boiler resistance 2 x 1000 W (armoured)
Operating pressure 0.4 MPa (4bar)
Suction power 1000 W two-stage tangential
Max. depression 21 kPa
Air flow 45 litres/second
Rated boiler capacity 1.5 litres
Boiler working capacity 1.3 litres (can be converted into steam)
Iron resistance 800W (optional professional model)
CAUTION
Read the instructions for use before starting the appliance. Any other use of the
appliance different from the prescribed one is regarded as improper. The manufacturer is not liable for damage resulting from any improper use, for which the user
accepts all related risks.
Instructions, drawings, tables and any other material contained in this booklet are confidential technical materials; no information or part of these materials may be reproduced or handed over to third parties without the prior written permission
of the manufacturing company, which is and remains the exclusive owner of such materials.
english
Page 26

24
Dear Customer,
The appreciation you have shown in purchasing this appliance deserves much
more than a simple thank you note.
Your purchase is an important expression of confidence and we are very grateful about
that.
How can we best reward your choice? By assuring you that you have purchased a
machine combining attractive design and high value technical features.
- We have put all our experience at your service to provide you with a piece of equip-
ment that will help you solve all your cleaning problems, both at home and in industrial
environments.
- Our appliances have been studied to the slightest detail to combine leading-edge desi-
gn with maximum operational features. To obtain long-lasting durability out of your
appliance, you will only need to provide a minimum level of care and observe the maintenance instructions given in this manual.
- The boiler is made of 18/10 stainless steel with thickness grade 12/10.
Because of their high level of quality, inner component parts are of professional standard.
- The machine is provided with armoured resistances.
- The appliance is equipped with the following safety devices:
Cap with built-in safety valve
Boiler operation thermostat
Boiler safety thermostat
- The distinctive feature of our appliances is their ease of use combined with economical
operation.
- By purchasing this appliance, you have acquired a product that will allow you to obtain
professional ironing results with a conspicuous reduction in costs.
- With the help of the cleaning accessories, you can use the power of steam to thorou-
ghly and effectively clean and disinfect your living environments. Once you have
applied steam to the surface you want to clean, you can vacuum the dirt. This extraordinary function will save you an enormous amount of work and provide you with a perfect result.
english
Page 27

Fig. 3
Fig. 2
Fig. 1
230 V
25
PRECAUTIONS TO BE T
AKEN WHEN USING THE MACHINE
Before using the Steam Generator / Suction cleaner / Iron, read these instructions carefully. Under no circumstances shall the manufacturing Company be held responsible for
any damage to people or property that may be caused by a failure to follow the instructions given below or by improper use of the equipment.
- Make sure that the mains electrical installation (230 V 50Hz) is
provided with earthing and automatic safety switch as required by
the relevant regulations in force. (Fig 1)
- Do not tug at the supply lead or at the appliance itself to remove
the plug from the wall socket (Fig 2)
- Unplug the appliance before filling the tank with water.
- Do not use the appliance in rooms saturated with gas
- Do not vacuum flammable, explosive or corrosive substances.
- Do not use distilled water. Do not introduce detergents or chemi-
cals in the boiler.
- Allow water in the boiler to cool down before emptying the
boiler.
- Make sure that the fill-up cap (E) is properly tightened; this is to
avoid any steam leakage.
- Do not leave the appliance running unattended; ALWAYS switch
it off before moving away from it.
- Before attempting to carry out any maintenance or cleaning operation, ALWAYS remove the plug from the power supply socket.
- Do not touch the appliance with wet hands or feet when the
machine is plugged.
- Never immerse the appliance in water or liquids. Use a damp
cloth to clean. Avoid using solvents or detergents as these may
damage the outer finish.
- Do not under any circumstances aim the steam jet at other
people, animals or electrical appliances, as the temperature of
steam is very high. (Fig.3)
- Should extension leads be used, make sure that they are suitable
for the electric load in use. This is to ensure that no danger is posed
for the operator or for the overall safety of the room where the
appliance is used. Inadequate extension leads can result in
appliance malfunction.
- If you need to replace the temperature relief valve or the lead, or
in case of appliance failure or malfunction, contact the dealer or
an authorised service engineer. Do not attempt to disassemble the
appliance.
- The machine produces steam at output temperatures that can
reach 130°C. Avoid any contact with the skin (Fig. 3a)
- The maximum power fed by the socket is 800W (Fig. 3b)
english
Fig. 3a
Fig. 3b
Page 28

26
WARNING
Any servicing of the supply cable must exclusively be carried out by personnel from the GAGGIA
after-sales service.
IMPORTANT
- If a violent and continuous jet of steam is ejected from the fill-up cap (E), switch off the
appliance and contact one of the Gaggia Authorised Service Centres.
- Should you need to replace the fill-up cap (E) or other control or safety devices, make sure you
only use original parts.
- Never switch on the boiler if it is low on water.
SERVICING OF THE INNER PARTS OF THE APPLIANCE SHOULD
ONLY BE CARRIED OUT BY AUTHORISED GAGGIA SERVICE CENTRES
SAFETY PRECAUTIONS
CAUTION
The power of steam substitutes for all detergents. What is most important, it combines
a powerful cleaning action with a disinfecting action.
Because of the extremely high steam temperature developed, before cleaning any
surface we recommend you first test the surface you want to clean by applying
steam to small samples or concealed portions of it.
- Place the appliance in its horizontal position. When operating the appliance, never leave the
machine in the upright position.
- Additives may leave scales in the boiler. For this reason, we recommend that you never
introduce any detergents, perfumed essences, or other chemicals into the boiler.
- Electrical appliances (TVs, radios, lamps) must never be steam-cleaned, including when
unplugged.
- The appliance must not be used by children. It should only be operated by adults who have
learned beforehand how to use the appliance.
- Avoid touching certain parts of the appliance (brushes or extensions), which may be burning hot.
NOTE
Our appliances have been manufactured in compliance with the relevant standards
and regulations in force. Under unfavourable power supply conditions, the appliance
may cause temporary voltage drops.
english
Page 29

Fig. 6
Fig. 4
E
Fig. 7
Fig. 5
1
27
PREPARING THE APPLIANCE READ
Y FOR USE
Before using the appliance, carry out the following operations:
- Unscrew the fill-up cap (E) (Fig. 4).
- Pour tap or demineralised water into the boiler, using the
fill bottle provided (1) (Fig. 5).
- When the max. level is reached, the bottle will automatically stop introducing water into the boiler.
- Tighten the cap (E) while applying slight pressure on it.
Ensure the cap is well tight. (Fig. 4)
NOTE
For topping up, see page 32.
- Fill the recovery tank (G) with 2.5 litres of water. This step
requires that you first disengage and remove the top part of
the machine using the catches provided (F).
IMPORTANT
- Reposition the top part of the machine onto the
recovery tank in the direction shown (Fig. 6).
- Fasten the catches (G) and ensure that the top and bottom parts fit properly.
IMPORTANT
By filling the recovery tank (G) with 2.5 litres of
clean water, you will ensure that the air is filtered
and impurities (dust, germs, etc.) are trapped in the
tank (G). (Fig. 7). When using the appliance,
always make sure not to exceed the maximum level
in order to prevent any water sprinkling out from
the muffler.
Screw Unscrew
Air inlet
Clean
air
outlet
Air filtration
english
Page 30

Fig. 10
A
H
Fig. 8
Fig. 9
3
2
5
4
2
3
Fig. 11
6
28
CONNECTING THE HOSE FOR
THE STEAM/VACUUM FUN
CTION (Fig. 8-9)
- Open the flap (2) of the accessories socket (D) and plug
the quick connection (3) of the hose (or of the iron) into the
socket located on the front portion of the appliance. Push it
in as far as it will go. (Fig.8).
- Close the flap (2) so that it bears against the side of the
quick connection (3) and ensure that the two elements (4-5)
hook up (Fig. 9). This socket provides for steam delivery
and/or suction.
CONNECTING THE HOSE FOR
THE BLOWING FUNCTION
- You can also fit the quick connection (3) as described
above – for Figures 8 and 9 – into the rear blow socket (O)
but first you have to remove the muffler (P). No steam can
be delivered through this socket.
OPERATING THE APPLIANCE
- Introduce the plug into the electricity socket.
- Press warning light buttons (B – Boiler), marked with the
symbol and (M- Accessories), marked with the symbol for the steam + suction function.
- For suction alone, press switch (M- Accessories) marked
with symbol .
- Allow the boiler to reach the operating temperature. When
the green warning light (L) is on, the appliance will be ready
for use.
- To adjust the volume of steam, rotate the knob (H)
(Fig. 10). Rotate the knob clockwise for a powerful steam
flow or anti-clockwise for a weaker steam flow.
- To regulate suction, turn the knob (A). Turn clockwise for
powerful suction and anti-clockwise for reduced suction
(Fig. 10).
USING THE ACCESSORIES
To connect the tubes (U) with the accessories, just insert the
male end of one into the female portion of the other and turn
the locking ring nut (6) in the direction shown (Fig 11).
english
Page 31

7
Fig. 13
10
9
11
Fig. 16
Z2
12
T
Fig. 15
Z1
1
1 BIS
Z3
Z3 BIS
Fig. 17
Z2
Z4
Z4 BIS
Fig. 14
8
Fig. 12
29
NOTE
Both functions, suction and steam delivery, can be
carried out at the same time.
NOTE
For improved accessories performance and
durability, regularly clean the O-rings (7-8) (Fig. 12)
and all connecting parts and lubricate with
silicone-based grease.
ERGONOMIC HANDLE (Q) (Fig. 13)
- The ergonomic handle (Q) (9) is fitted at one end of the
work hose (Q) and may be connected either to one of the
extension tubes (U) or directly to an accessory.
The handle (Q) is provided with two switches.
- Red switch (10): press this switch to enable steam to be
delivered through the accessory.
- Blue switch (11): press this switch to enable the suction of
liquids or solid matter.
MULTIPURPOSE BR
USH (T) (Fig. 14)
This tool is fitted with a joint that allows the brush to rotate by
360°. Because of this particular feature, this accessory can
effectively clean areas that are particularly hard to reach
(under sofas or beds, on top of high shelves, etc.)
The multipurpose brush consists of a universal element (12),
which can be fitted with the following parts according to need:
- Bristled frame (Z
1) with rubber inserts (1 and 1BIS) for hard
floors and surfaces (Fig. 15).
- Bristled frame (Z2) combined with stiff inserts for fitted and
non-fitted carpets (Z3 and Z3 BIS) (Fig. 16).
- Bristled frame (Z
2) combined with bristled inserts (Z4 and
Z4 BIS) for the vacuum cleaner function (Fig. 17).
english
Page 32

Z2
Z3 BIS
Z3
Z2
Z4 BIS
Z4
Fig. 18
Fig. 18a
T-12
4
5
Fig. 19
30
FITTING THE STIFF INSERT
S (Z AND Z BIS)
ONTO THE BRISTLED FRAME (Z ) (Fig. 1
8)
To fit the stiff inserts (Z
3 and Z3
BIS) for fitted and non-fitted
carpets onto the bristled frame (Z
2), introduce the inserts into
the appropriate guides with the tabs facing inwards.
FITTIN
G THE BRISTLED INSERTS (Z AND Z BIS)
ONTO THE BRISTLED FRAME (Z ) (Fig. 18a)
Install the bristled insert (Z4) with continuous bristles to the
rear guide of the frame (Z2) and the bristled insert (Z4 BIS)
with alternate bristles to the front guide of the frame (Z2), as
shown in Figure 18a.
FITTING THE BRISTLED FRAMES (Z and Z )
ONTO THE MULTIPURPOSE BRUSH (T) (Fig. 19)
To fit the desired frames (Z1 and Z2) onto the brush body (T),
simply lay the selected frame against the brush body and
press until the little lever (4) snaps into position in the slot (5)
located on the universal element (12) of the multipurpose
brush (T).
To remove the frame, release the lever (14) from the universal
element (12) of the multipurpose brush (T).
NOTE
Before attempting to clean any carpets or textiles,
discharge any condensation that may be left in the
appliance by pressing the red switch (10) located on
the handle (9) of the work hose (Q) (Fig. 13).
33
2
44
2
12
english
Page 33

Fig. 22
V
Fig. 20
S
Fig. 21
R
31
NOZZLE (S) (Fig. 20)
The nozzle (S) is suitable for specific cleaning jobs: crevices
between furniture units, seams in seats or sofas, sharp corners, etc. – where dirt is generally more stubborn and where
special hygiene is required.
Below is a list of possible applications:
- disinfecting and eliminating bad odours (toilet and bathroom accessories, etc.)
-removing stubborn dirt from hidden areas and narrow crevices (between tiles, at the base of bathroom accessories,
etc.)
- removing stubborn grease from hoods, ovens, car tyre rims,
engines, etc.
Because of the steam’s powerful action, it is advisable not to
direct steam onto delicate surfaces (wood, plywood, parquet flooring). Before using the appliance on any such surfaces, it is advisable to test a sample or hidden portion of
them.
By connecting the nozzle (S) to the hose (Q) and the hose
to the rear socket (O) of the appliance, the nozzle can be
used to perform the “blow” function, which is ideal for removing dust from hard-to-reach areas, such as crevices in radiators, roller shutters, etc. This function is also ideal for gathering leaves in the garden.
TEXTILES TOOL (R) (Fig. 21)
The textiles tool (R) is useful for cleaning sofas, armchairs,
mattresses, car seats and particularly narrow areas where
the multipurpose brush cannot reach.
NOTE
Before cleaning any textile surface, discharge any
condenation by pressing the red switch (10) located
on the handle (9) (Fig. 13). During the cleaning
stage, do not interrupt steam delivery.
WINDOW WIPING BRUSH (V) (Fig. 22)
The window wiping brush (V) is particularly suitable for cleaning window panes and mirrors and/or similar surfaces. For
correct use of this tool, follow the instructions below:
- steam the surface you want to clean by placing the bristles
against it.
- press the rubber blade onto the surface and vacuum the
water from the surface by moving the tool along a vertical
line from top to bottom.
Use the steam and suction functions at the same time.
english
Page 34

Fig. 24
22
Fig. 23
10
9
32
When the red warning light (C) is on, it indicates that there is no water in the boiler: if
this happens, the thermostat will automatically stop the appliance. Carry out the following procedure:
a) stop your cleaning job immediately and switch off the
boiler by pressing the switch (B- Boiler)
b) discharge any pressure in the boiler through the accessory you have been cleaning with by pressing the red switch (10) on the handle (9) (Fig. 23). If you are using the
iron, press button (22) (fig. 24).
c) switch off the machine by pressing the start button (MAccessories).
d) unplug the appliance.
e) wait a couple of minutes to allow the pressure in the
boiler to decrease.
f) slightly loosen the fill-up cap (E) and wait until pressure
has been released completely.
CAUTION
Do not unscrew the cap (E) if the pressure inside the
boiler has not been released completely or if you
are operating the machine. When you unscrew the
cap, some residual steam may be released, so be
careful not to scorch yourself.
g) remove the fill-up cap (E).
h) pour in the adequate amount of water as indicated in
section “Preparing the appliance ready for use” (page 27).
i) Tighten the cap (E).
NOTE
Under normal operating conditions, an illuminated green warning light (L) indicates
that the pressure in the boiler is within normal values. However, prolonged steam delivery will slightly lower the pressure in the boiler, causing the warning light to switch
itself off until the normal operating pressure is restored.
No particular action is required in this case and you may safely continue with your
cleaning or ironing job. The resistances in the boiler have been suitably proportioned
to provide immediate reinstatement of the operating pressure.
english
Page 35

Fig. 26
22
Fig. 25A
2
3
23
Fig. 25
33
OPTIONAL ACCESSORIES
IRON (Fig. 25-26)
USING THE STEAM
GENERATOR FOR IRONING
To use the steam generator for ironing, introduce
the iron connector into the accessories socket
(Fig. 25A) in place of the work hose as described on page 28 (Fig. 8) under section
“Connecting the hose”.
- Point the iron temperature selector (23) to the
desired temperature area to adjust the iron sole
plate temperature to the type of fabric you are
going to iron.
- Wait about 3 min. to allow the iron plate to
reach the temperature selected.
- Proceed as per normal (as you would do with
dry ironing) and release steam when necessary
by pressing the button (22) located on the handle.
NOTE
This ironing method is particularly suitable for removing shine spots from clothes,
and making woollen garments, curtains,
etc. come alive again. Textiles can also be
ironed with the iron in its vertical position.
IMPORTANT
Be extremely careful when ironing different types of fabrics in the same ironing
session. It is advisable to gradually
increase the temperature following the
SYNTHETICS/ SILK / WOOL/ COTTON/
LINEN sequence. This will eliminate any
idle time. However, should you need to
pass to a lower temperature (silk, synthetics, etc.) wait at least 8-10 min to allow
the iron plate to cool down, otherwise
you run the risk of damaging the fabric
and soiling the sole plate.
english
Page 36

(G)
34
FOAM-AND-MOULD GUARD (OPTIONAL)
This product prevents foam formation when picking up foamy agents. It also prevents
the build-up of moulds in the recovery tank (for max 30 days).
HOW TO USE: mix the product in the recovery tank (G) in the quantities specified
on the bottle provided.
english
FOAM-ANDMOULD GUARD
Page 37

6
35
OPTIONAL ACCESSORIES FOR THE STEAM / VACUUM FUNCTIONS
ROUND BRUSH WITH SOFT,
STIFF OR STIFF TRIANGULAR INSERTS
This round brush is designed to be connected to the handle or to the
extension tubes and is handy for vacuuming dust from crevices. Three
different inserts are available – insert with soft bristles, stiff bristles, or
triangular insert with stiff bristles. These inserts are to be fitted to the
body of the round brush.
TOOL FITTING: Fit the brush to the female end of the extension hose (U) and rotate the ring nut (6) in the direction shown.
Fit the insert to the brush body and apply light pressure to
engage it.
CUR
VED END PIECE FOR NOZZLE
For application to the nozzle (S). This tool is capable of building up the pressure of outgoing steam to remove stubborn dirt. Because of its particular
shape, it allows you to reach particularly hard-to-reach areas. It can be provided with a nylon, stainless steel or brass brush.
TOOL FITTING: Fit the curved end piece to the
end portion of the nozzle (S) and push in the direction shown.
SMALL NYLON, STAINLESS STEEL,
OR BRASS BRUSH
This brush can be fitted onto the curved end piece to provide a scrubbing action when steam alone is not sufficient.
Perfect for removing stubborn dirt.
TOOL FITTING: Install the small stainless steel brush
to the nozzle’s curved end and tighten as shown.
english
Page 38

6
36
OPTIONAL ACCESSORIES FOR THE STEAM / VACUUM FUNCTIONS
ROTATING DEPRESSION BRUSH
This tool combines the hygienic cleaning power of steam and the
depression effect generated by the motor’s suction, thus enabling
the removal of hairs, dust and impurities from all textile surfaces (carpets, fitted carpets, sofas, car seats, etc.).
TOOL FITTING: Fit the brush to the female end of the
extension tube (U) or of the handle of the work hose
(Q) and turn the locking gear ring (6) in the direction
shown.
VA
CUUM KIT
This kit allows for pillows, duvets, clothes, blankets, etc.
to be vacuum-packed and protected from dust, moths,
dust mite, etc. The volume of these items can be reduced to up to 70%.
HOW TO USE THE KIT: place the item you want to
vacuum-pack in the bag provided. Place the open
side of the bag on the hollow strip and close with the tubular piece. Place the end fitting of
the handle (9) and work hose (Q) on the valve and activate the vacuum function until the air
inside the bag is completely eliminated. Close the valve with the safety plug provided. To
restore packed items to their normal volume, just remove the tubular piece.
When using the steam/suction hose (Q) be careful not to activate the steam button (10)
inadvertently.
english
Page 39

Fig. 30
34
31
32
34
Fig. 29
31
32
33
Fig. 31
35
34
37
OPTIONAL ACCESSORIES FOR THE VACUUM FUNCTION ALONE
USING THE ACCESSORIES
To use the accessories, introduce the connection piece (33) of the work hose (32) (Fig. 29)
into the accessories socket – in place of the
hose – as described on page 28 (Fig. 8)
under section “Connecting the hose”.
To connect the different attachments, just insert
the rotating connection piece (31) of the hose
(32) into the handle (34) and engage the
female end of the selected accessory to the
male end of the handle (34) (Fig. 30).
HANDLE (34)
The handle must be fitted onto the rotating connection piece (31) at the end of the hose (32).
This accessory is equipped with a flow divider
ring (35), which allows suction power to be
regulated (Fig. 31).
CLOSED RING: maximum suction power
OPEN RING: minimum suction power
NOTE
The appliance can also be used with the
accessories directly connected to the
hose; nevertheless, we advise you to
make use of the ergonomic handle to
achieve a better grip and easier handling.
CLOSED OPEN
english
Page 40

38
OPTIONAL ACCESSORIES FOR THE VACUUM FUNCTION ALONE
(a) TELESCOPIC TUBE
This tool is particularly handy for reaching high or concealed
areas (under furniture, sofas, beds). This tool must be fitted directly
onto the handle (34).
(b) VACUUM NOZZLE
This tool is suitable for particular cleaning tasks (cleaning crevices
in seats or sofas or gaps between furniture units) where suction is
particularly hard to achieve.
This tool is to be applied to the handle (34) or to the telescopic
tube (a)
(c) VACUUM TOOL
This accessory is particularly suitable for cleaning surfaces such as
small armchairs, non-fitted carpets, and small hard surfaces.
This tool is to be applied to the handle (34) or to the telescopic
tube (a)
(d) VACUUM BRUSH
This accessory is suitable for cleaning surfaces such as carpets, fitted carpets, runners, car mats, floors and walls. It is equipped with
a swivel joint which allows the tool to rotate by 360°; because of
this, cleaning of hard-to-reach areas can be achieved effectively.
This tool is to be applied to the handle (34) or to the telescopic
tube (a)
english
Page 41

(d)
(e)
39
OPTIONAL ACCESSORIES FOR THE VACUUM FUNCTION ALONE
(e) FELT PLATE
The felt plate should be applied to the brush (d) to clean parquet
floors effectively.
(f) RADIATOR BRUSH
This tool is useful for cleaning gaps in the radiators, and any small
surface that is particularly hard to reach.
This tool can only be applied to the nozzle (b).
(g) WET VA
CUUM BRUSH
Suitable for vacuuming liquids from hard surfaces, like floors for
instance. Push the brush forward or backward to allow the rubber
blades to slide on the surface you want to clean.
This tool is to be applied to the handle (34) or to the telescopic
tube (a)
english
Page 42

Fig. 32
E
Fig. 33
36
40
MAINTENANCE
ATTENTION
Maintenance of the appliance must be carried out
when the machine is switched off and unplugged.
Approximately every 100 hours of operation, or
every 6 months, wash the boiler using an appropriate scale removing product available on the
market (follow the instructions given by product
manufacturer). Carry out the following procedure:
a) Remove the fill-up cap (E) (Fig. 32).
b) Unscrew the drain cap (36) (fig. 33); drain the boiler
and tighten the cap again.
c) Fill the boiler with the scale removing liquid
NO
TE
Before removing the drain cap (36) position a bowl
under the appliance to collect drain water.
d) Leave the scale removing product in the boiler for as
long as indicated in the product instructions.
e) Unscrew the drain cap (36) (Fig. 33) and let the scale
remover out. Rinse the boiler repeatedly until the scale removing product is eliminated completely.
f) Tighten the cap (36) again (Fig. 36). If you want to fill
the boiler with water, follow the instructions given on page 27
under section “Preparing the appliance ready for use”.
CAUTION
Use only steam boiler-specific cleaning products.
Unscrew
english
Page 43

Fig. 34
37
41
CLEANING THE APPLIANCE
Before cleaning the appliance you should make
sure that the main switch is OFF and the plug is
disconnected from the wall socket. Also, you should
allow the machine to cool down.
You should never immerse the appliance in water!
It is absolutely forbidden to try and repair or service the inner parts of the machine.
The recovery tank (G) should be cleaned regularly by
removing the liquids or impurities picked up by the appliance. This can be done by disengaging the catches (F) and
lifting the top part of the appliance.
To clean he machine, carry out the following procedure:
- Empty the recovery tank (G).
- Fill a container with max. 3 litres of clean water. You may
also add disinfectants as long as they are not foamy.
- Activate the vacuum function at the button (11) and pick
up water from the container through the accessories you
have previously used for cleaning.
- Empty the recovery tank (G) and repeat the procedure if
necessary.
Whenever you clean the lower part of the appliance,
clean any solid debris off the outer portion of the filter (37)
as well . (Fig. 34).
CLEANING THE ACCESSORIES
Wash the accessories (extension tubes, multipurpose brush,
nozzle, textiles tool) under running water. Steam should
preferably be used for cleaning bristled frames.
english
 Loading...