

Page 1
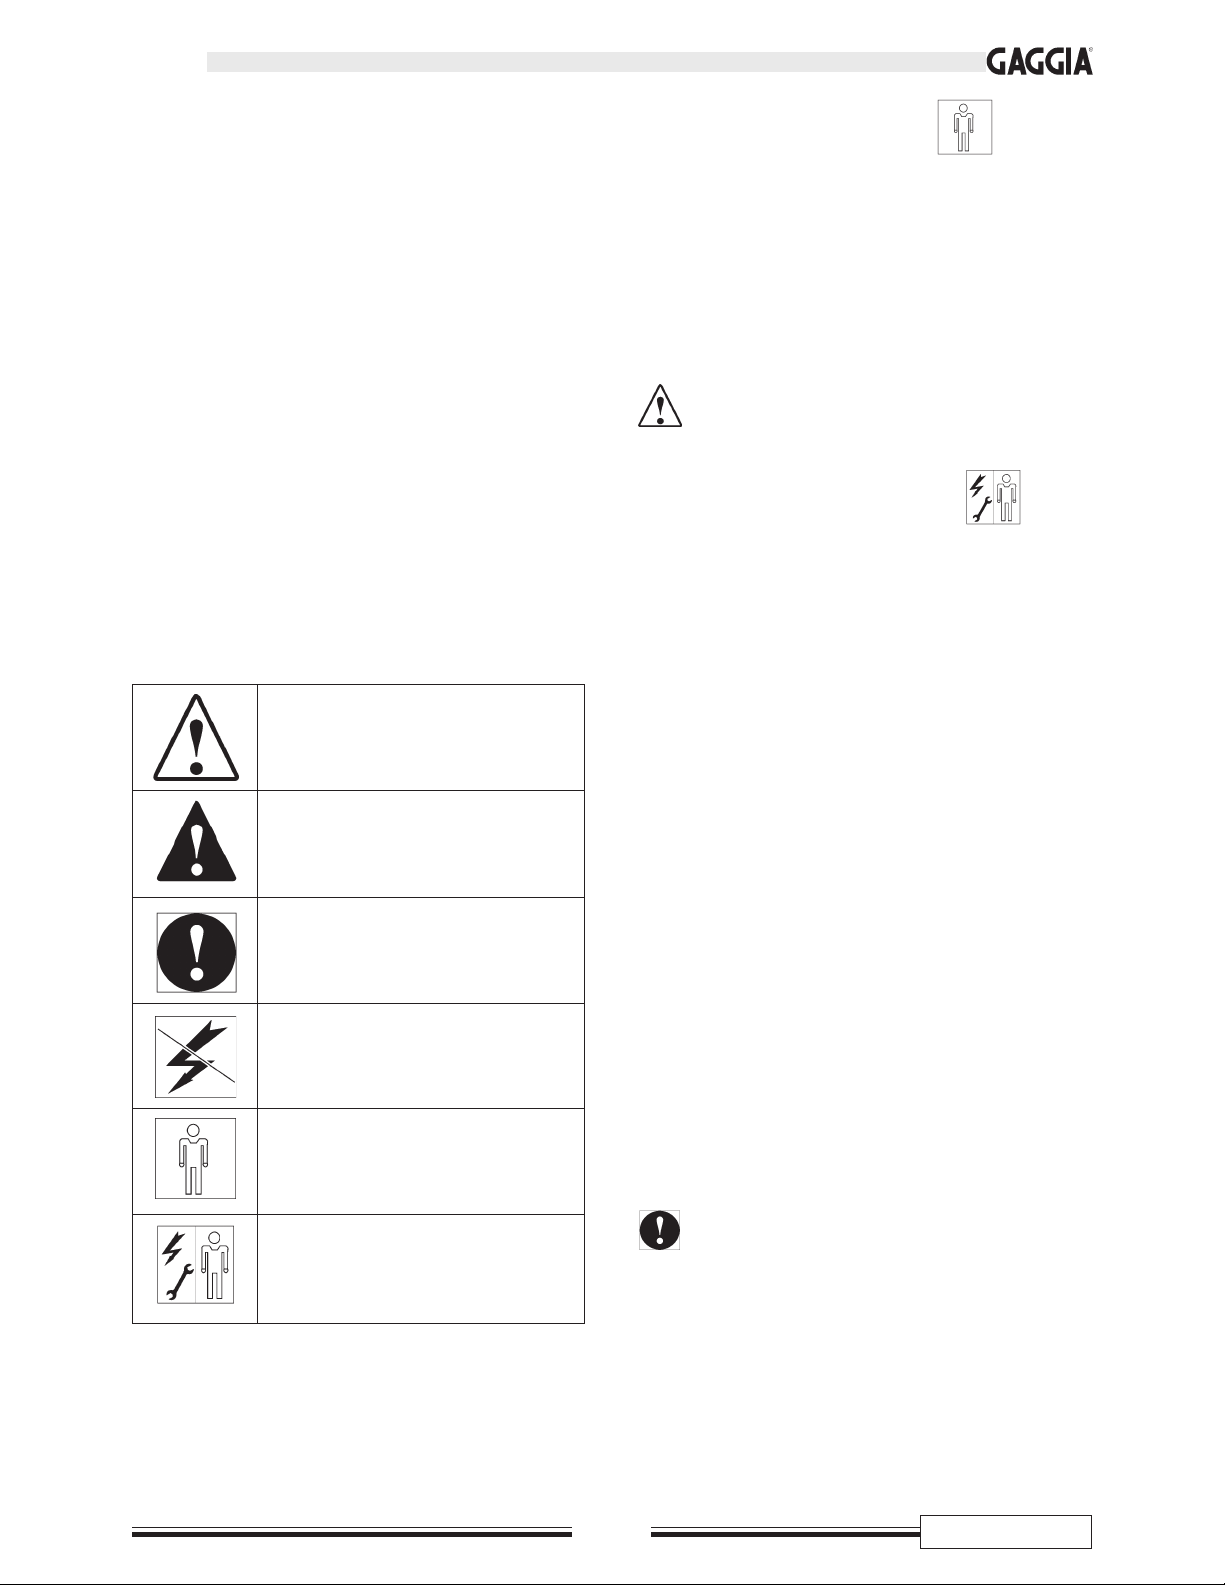
ATTENZIONE: Il presente manuale di istruzione è destinato esclusivamente a personale con adeguata specializzazione.
WARNING: This instruction manual is intended exclusively for specialized personnel.
ACHTUNG: Die Anleitungen in diesem Handbuch sind ausschließlich für Personal mit entsprechender Fachausbildung bestimmt.
ATTENTION: Ce manuel d’instructions est destiné uniquement au personnel spécialisé.
ATENCIÓN: Este manual de instrucciones está dirigido únicamente a personal adecuadamente especializado.
ISTRUZIONI PER L’USO
OPERATING INSTRUCTIONS
GEBRAUCHSANWEISUNG
MODE D’EMPLOI
INSTRUCCIONES DE USO
CONCETTO
Page 2
Noi : GAGGIA S.p.A.
Strada provinciale per Abbiategrasso
20087 Robecco sul Naviglio (MI)
dichiariamo sotto la nostra responsabilità che il prodotto :
MACCHINA PER CAFFE’ PROFESSIONALE AUTOMATICA
TIPO :CAP 002 / CAP002A / CAP002B
al quale si riferisce questa dichiarazione è conforme alle seguenti norme :
Sicurezza di elettrodomestici e apparecchi elettrici - Requisiti generali
EN 60335-1 - 1994 + A11 / A12 / A13
Sicurezza di elettrodomestici e apparecchi elettrici - Parte 2^
Requisiti specifici per apparecchi per riscaldare liquidi
EN 60335-2-15 - Ediz.1996
Sicurezza di elettrodomestici e apparecchi elettrici - Parte 2^
Requisiti specifici per polverizzatori e macinacaffè
EN 60335-2-33 - Aprile 1990
Limiti e metodi di misurazione dei disturbi radio caratteristici di apparecchi con motore
elettrico e termici per uso domestico e simili scopi, strumenti elettrici e simili
apparecchiature elettriche - EN 55014 - Ediz. 1993
Compatibilità elettromagnetica (EMC)
Parte 3^ Limiti - Sezione 2 : Limiti per le emissioni di corrente armonica (corrente in
ingresso dell’apparecchiatura ≤ 16A per fase) - EN 61000-3-2 - Ediz. 1995
Compatibilità elettromagnetica (EMC)
Parte 3^ Limiti - Sezione 3 : Limitazione delle fluttuazioni e dei picchi di tensione nei
sistemi di alimentazione a bassa tensione per apparecchiature con corrente nominale ≤ 16A.
EN 61000-3-3 Ediz. 1995
Requisiti di immunità per elettrodomestici, strumenti e apparecchi similari.
Norma per famiglia di prodotti EN 55104 - Ediz. 1995
Compatibilità elettromagnetica (EMC)
Parte 4^ Tecniche di prova e misura - Sezione 2 : Prova di immunità alle scariche elettrostatiche.
Pubblicazione di base EMC - EN61000-4-2 Ediz.1995
Compatibilità elettromagnetica (EMC)
Parte 4^ Tecniche di prova e misura - Sezione 4 : Prova di immunità ai transitori veloci/burst.
Pubblicazione di base EMC - EN61000-4-4 Ediz.1995
Compatibilità elettromagnetica (EMC)
Parte 4^ Tecniche di prova e misura - Sezione 5 : Prova di immunità a tensioni/correnti impulsive.
EN61000-4-5 Ediz.1995
Compatibilità elettromagnetica (EMC)
Parte 4^ Tecniche di prova e misura - Sezione 6 : Immunità ai disturbi condotti, indotti
da campi a radiofrequenza. EN61000-4-6 Ediz.1996
Compatibilità elettromagnetica (EMC)
Parte 4^ Tecniche di prova e misura - Sezione 11:Prove di immunità a cadute di tensione,
microinterruzioni e variazioni di tensione. EN61000-4-11 Ediz.1994
secondo le disposizioni delle direttive :
CE 73/23, CE 89/336, CE 92/31, CE 93/68.
Robecco sul Naviglio
DICHIARAZIONE DI CONFORMITA' CE
CE 73/23, CE 89/336,
CE 92/31, CE 93/68
S.p.A.
Page 3

S.p.A.
We : GAGGIA S.p.A.
Strada provinciale per Abbiategrasso
20087 Robecco sul Naviglio (MI)
declare under our responsibility that the product :
AUTOMATIC PROFESSIONAL COFFEE MACHINE
TIPO: CAP002 / CAP002A / CAP002B
to which this declaration relates is in conformity with the following standards
or other normative documents :
Safety of household and electrical appliances - General requirements
EN 60335-1 - 1994 + A11 / A12 / A13
Safety of household and electrical appliances - Part 2^
Particular requirements for appliances for heating liquids
EN 60335-2-15 - Edit.1996
Safety of household and electrical appliances - Part. 2^
Particular requirements for coffee mills and coffee grinders
EN 60335-2-33 - April 1990
Limits and methods of measurements of radio disturbance characteristics of electrical
motor-operated and thermal appliances for households and similar purposes, electric
tools and similar electric apparatus - EN 55014 - Edit. 1993
Electromagnetic compatibility (EMC)
Part. 3^ Limits - Section 2 : Limits for harmonic current emissions (equipment input
current ≤ 16A per phase) - EN 61000-3-2 - Edit. 1995
Electromagnetic compatibility (EMC)
Part 3^ : Limits - Section 3 : Limitation of voltage fluttuations and flicker in low-voltage
supply systems for equipment with rated current ≤ 16 A.
EN 61000-3-3 Edit. 1995
Immunity requirements for household appliances, tools and similar apparatus.
Product family standard EN 55104 - Edit. 1995
Electromagnetic compatibility (EMC)
Part 4^ : Testing and measurement technique.- Section 2 : Elelctrostatic discharge immunity test
Basic EMC publication - EN 61000-4-2 Edit.1995
Electromagnetic compatibility (EMC)
Part 4^ : Testing and measurement technique.- Section 4 : Elelctrical fast transient/burst immunity test
Basic EMC publication - EN 61000-4-4 Edit.1995
Electromagnetic compatibility (EMC)
Part 4^ : Testing and measurement technique.- Section 5 : Surge immunity test.
EN 61000-4-5 Edit.1995
Electromagnetic compatibility (EMC)
Part 4^ : Testing and measurement technique.- Section 6 : Immunity to conduced disturbance,
inducted by radio-frequency fields. EN 61000-4-6 Edit.1996
Electromagnetic compatibility (EMC)
Part 4^ : Testing and measurement technique.- Section 11 : Voltage dips, short interruptions and
voltage variations immunity tests. EN 61000-4-11 Edit.1994
following the provisions of the Directives :
EC 73/23, EC 89/336, EC 92/31, EC 93/68.
Robecco sul Naviglio
EC DECLARATION OF CONFORMITY
EC 73/23, EC 89/336,
EC 92/31, EC 93/68
Page 4

Via C. Gomes, 16
ROBECCO SUL NAVIGLIO (MILANO) - ITALY
Tel. 02/9471654 - Fax 02/9470888
www.gaggia.it
PREMESSA
• Il presente manuale è parte integrante della macchina e dovrà quindi essere conservato in luogo noto, facilmente accessibile, in buone
condizioni, per tutta la vita operativa della macchina (compresi gli eventuali passaggi di proprietà). Il suo fine, è la trasmissione delle
informazioni necessarie all’uso competente e sicuro della macchina stessa.
• In caso di smarrimento o deterioramento della presente pubblicazione, richiederne una copia ad un Centro di Assistenza Autorizzato,
specificando il modello e l’anno di costruzione.
• I Centri di Assistenza Autorizzati, sono inoltre disponibili per ogni chiarimento tecnico, informazioni sul funzionamento, assistenza
tecnica e fornitura di parti di ricambio.
• Gli argomenti trattati, sono destinati, in via esclusiva, all’utilizzo della macchina in condizioni di sicurezza per le persone, la macchina
e l’ambiente, interpretando un’elementare diagnostica dei guasti e delle condizioni di funzionamento anomalo, compiendo semplici
operazioni di verifica e manutenzione, nel massimo rispetto delle prescrizioni oggetto delle pagine a seguire e delle Norme di
Sicurezza e Salute vigenti.
• Prima di ogni intervento leggere con la massima attenzione ed accertarsi di avere ben compreso il contenuto della presente pubblicazione.
• L’impiego della macchina da più utilizzatori (singolarmente), prevede l’assoluta necessità di prendere attentamente in esame il manuale
istruzioni, da parte di ognuno di essi.
• Il Costruttore si riserva il diritto di apportare modifiche e migliorie ai modelli in oggetto, senza l’obbligo di fornire alcun preavviso.
• Per esigenze particolari rivolgersi al Distributore o all’Importatore (se presente) della propria Nazione oppure al Costruttore.
• Tutti i diritti della presente pubblicazione, sono riservati alla Ditta GAGGIA. Riproduzioni o divulgazioni anche parziali, che non siano
stati debitamente autorizzate per iscritto, sono assolutamente vietate.
CONCETTO
Italiano
Page 5

CONCETTO
1/120
Italiano
INDICE
11 -PRIMA ACCENSIONE DELLA MACCHINA. .... 7
12- USO DELLA MACCHINA. ............................... 7
12.1 Stati della macchina.............................. 8
12.2 Accensione manuale ............................. 8
12.3 Accensione automatica programmata ....... 8
12.4 Accensione temporanea da standby......... 8
12.5 Pannello comandi ................................. 9
12.6 Programmazione tasti erogazione ............ 10
12.7 Funzioni programmabili del menu ............ 12
12.8 Regolazione della crema ....................... 16
12.9 Regolazione della macinatura ................. 16
12.10 Messaggi sul display. ............................ 17
12.11 Spegnimento della macchina .................. 17
13- MANUTENZIONE ORDINARIA. .................... 18
13.1 Pulizia della macchina ........................... 18
14- MANUTENZIONE STRAORDINARIA. ............ 20
14.1 Blocco del macinacaffè ......................... 20
15- MESSA FUORI SERVIZIO. ............................. 21
16- INCONVENIENTI CAUSE E RIMEDI. .............. 22
1- COMPOSIZIONE DELLA MACCHINA. ........... 2
2- NOTE DI CONSULTAZIONE. .......................... 3
2.1 Abbreviazioni ...................................... 3
2.2 Simbologia di redazione........................ 3
3- UTILIZZATORE............................................... 3
4- MANUTENTORE TECNICO. ........................... 3
5- DESTINAZIONE D’USO DELLA MACCHINA.. 3
6 - AVVERTENZE E CAUTELE. .............................. 4
7- PRECAUZIONI GENERALI. ............................ 4
8- INFORMAZIONI SULLA MACCHINA. ........... 4
8.1 Dati d’identificazione ............................ 4
8.2 Caratteristiche tecniche .......................... 4
8.3 Dimensioni d’ingombro .......................... 4
8.4 Gruppo erogatore caffè ......................... 5
8.5 Gruppo Cappuccinatore ........................ 5
9 - DISPOSITIVI DI SICUREZZA. ......................... 5
9.1 Tubi erogatori vapore ed acqua calda
(escluso allestimento COFFEE) ................. 5
9.2 Rischi residui ........................................ 5
10- INSTALLAZIONE............................................ 6
10.1 Note sull’ubicazione ............................. 6
10.2 Piazzamento e collegamento idrico .......... 6
10.3 Collegamento elettrico ........................... 6
10.4 Collegamento porta seriale .................... 7
Page 6

CONCETTO
2/120
Italiano
13
1617
18
10
11
9
8
32
1 4 5 6
7
14
15
12
19
20
21
28
>
<
ent
esc
>
<
ent
esc
23
24
25
22
26
27
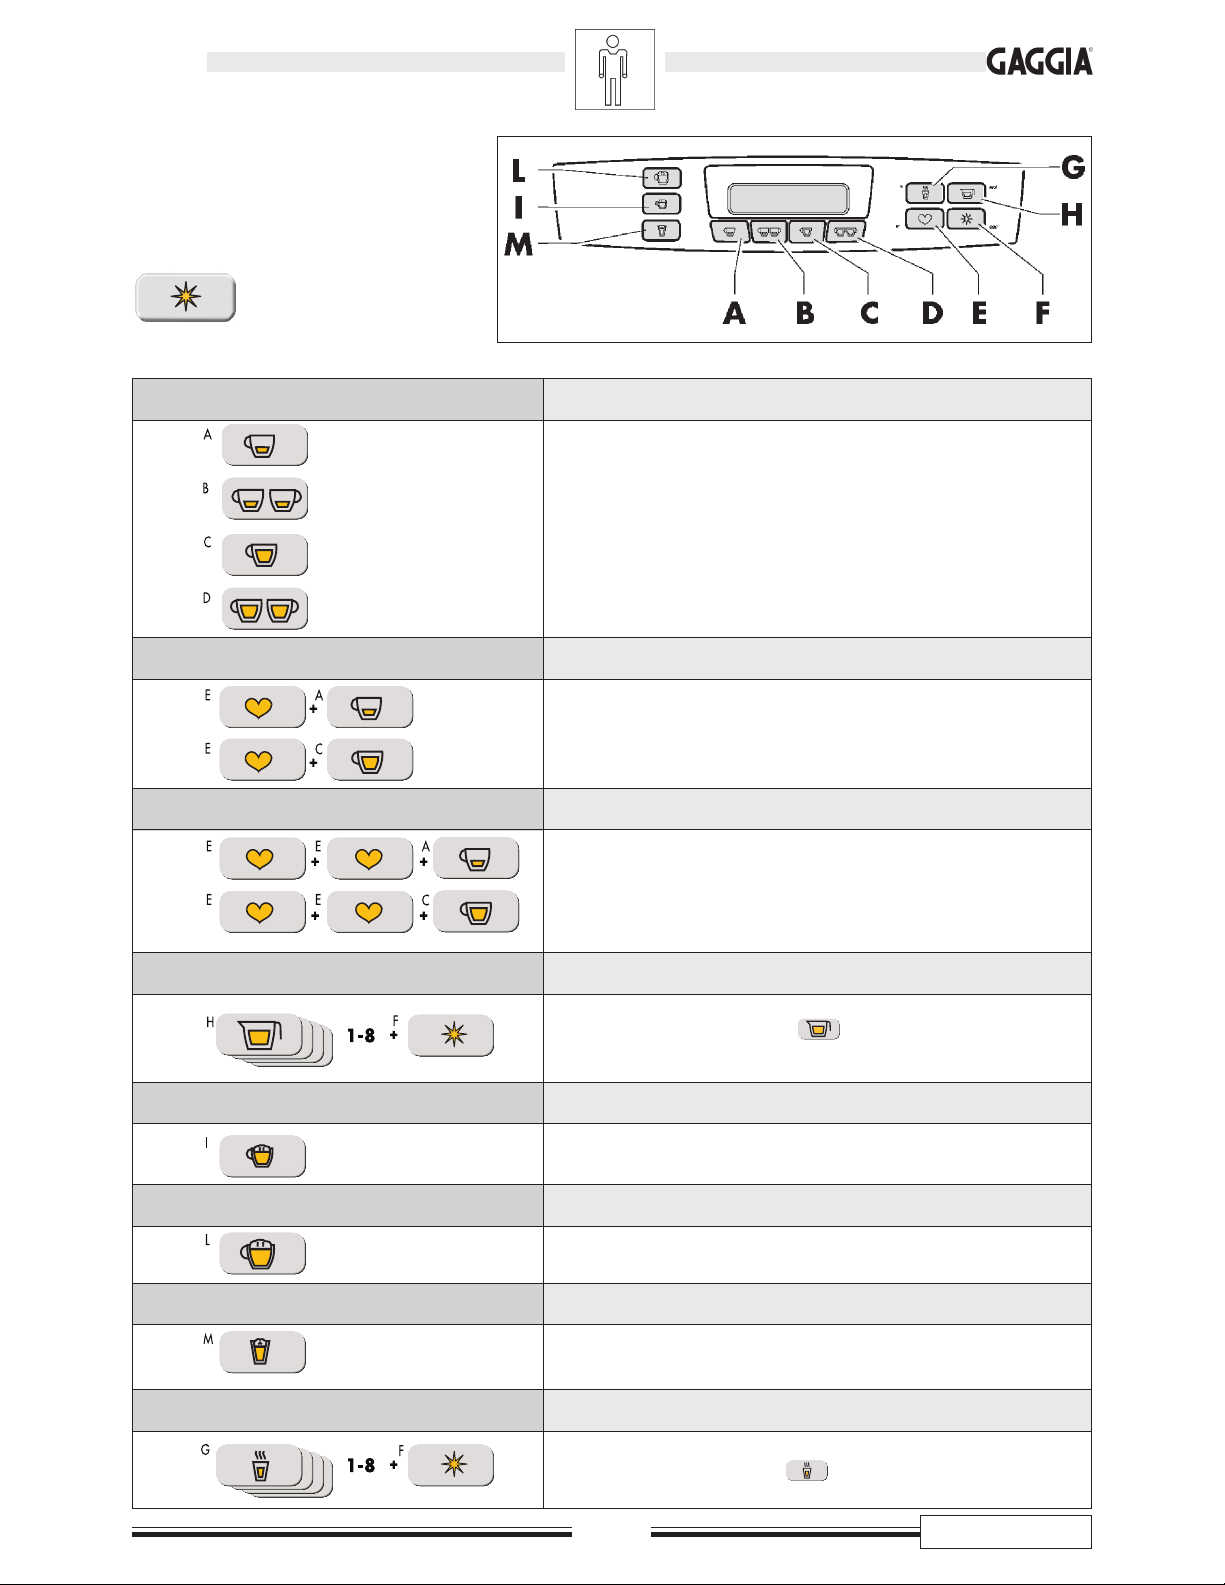
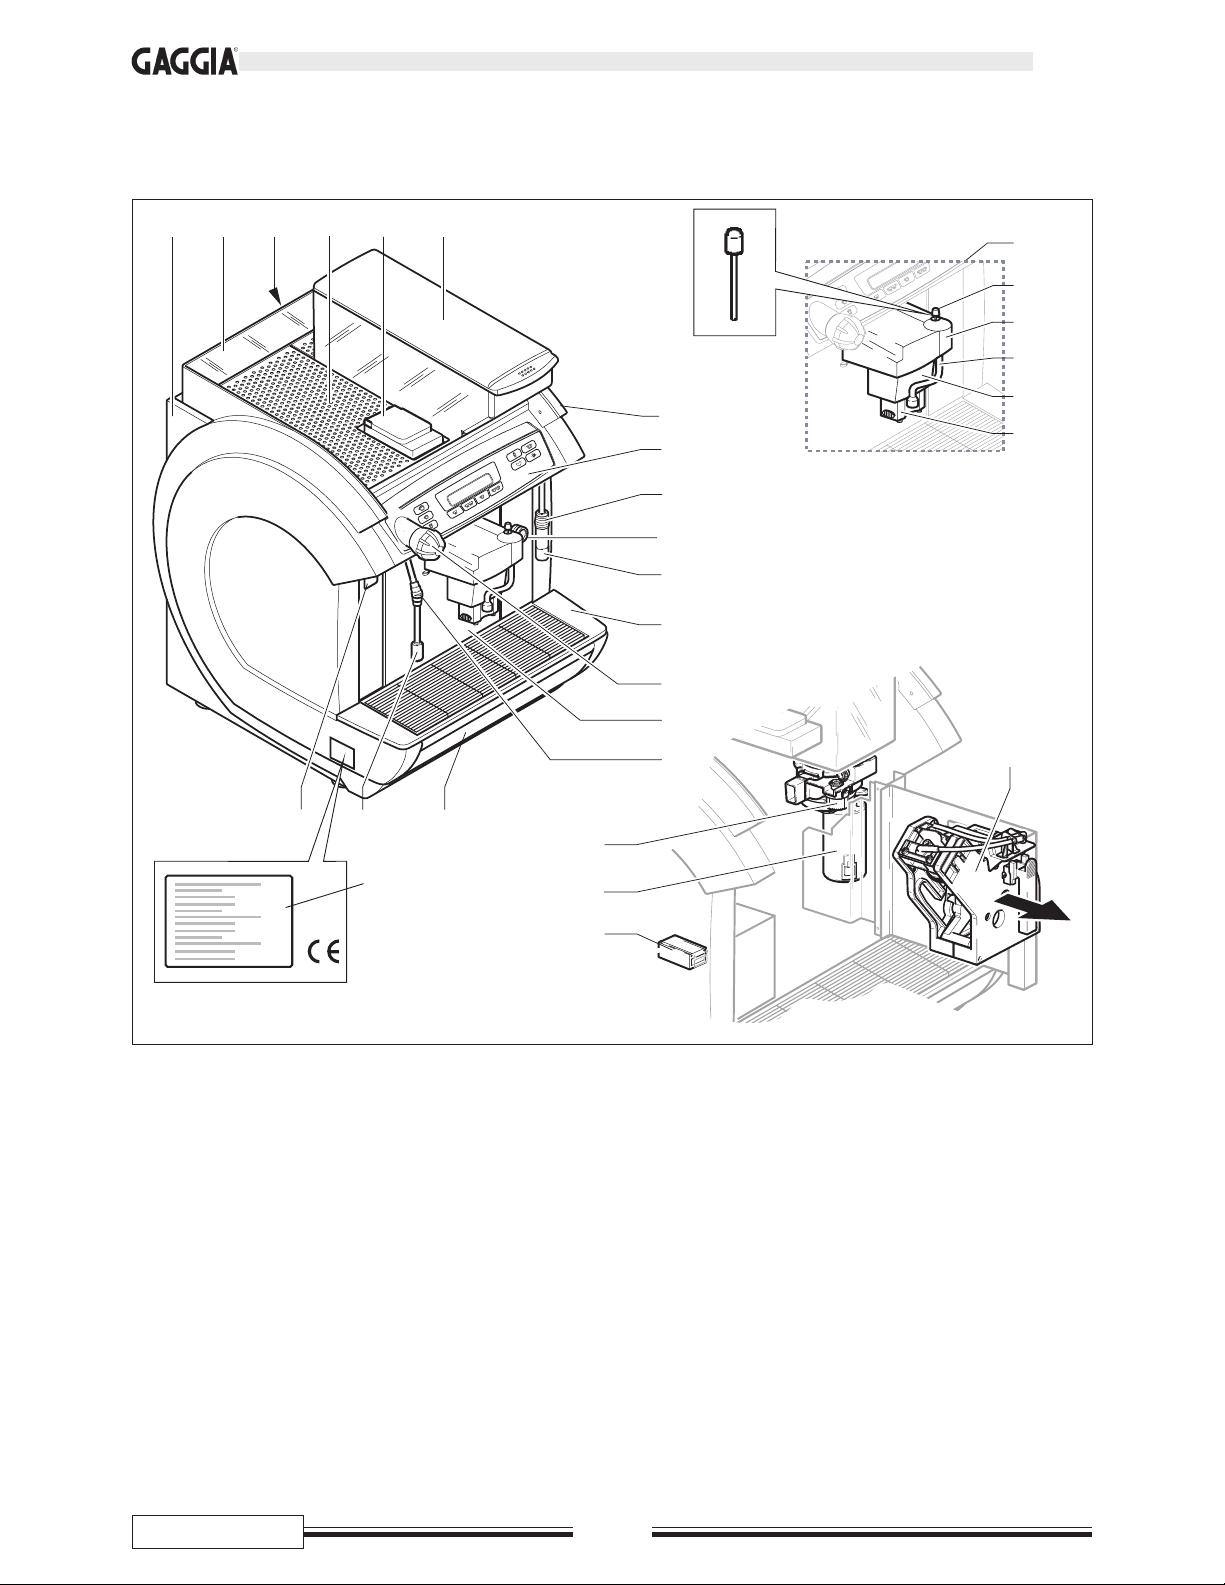
1 - COMPOSIZIONE DELLA MACCHINA
NOTA - Quando non espressamente indicati nel testo, i numeri di posizione di parti della macchina, sono riferiti a questa figura.
A Targa CE
1 Pannello sinistro
2 Vetrinetta
3 Pannello posteriore
4 Piano scaldatazze
5 Sportello caffè premacinato
6 Contenitore caffè in grani
7 Pannello destro
8 Pannello comandi
9 Protezione in gomma
10 Pinza blocca tubo (allestimento CAPPUCCINO)
11
Tubo erogatore acqua calda (escluso allestimento COFFEE)
12 Vasca raccogligocce
13
Rubinetto erogazione vapore (escluso allestimento COFFEE)
Senso orario: getto vapore aperto
Senso antiorario: getto vapore chiuso
14 Sportello
15 Protezione in gomma
16 Cassetto raccoglifondi
17 Tubo erogatore vapore (escluso allestimento COFFEE)
18 Interruttore generale
“I” - Funzioni elettriche abilitate - Macchina attivata
- Lampada spia, luminosa.
“O” - Funzioni elettriche disabilitate - Macchina
spenta - Spia del tasto “I”, spenta.
19 Pomello di regolazione macinatura
20 Gruppo macinacaffè
21 Contaimpulsi meccanico
Visualizza il numero di erogazioni che la macchina
ha effettuato.
22 Gruppo erogatore caffè
23
Spillo di regolazione crema latte (allestimento CAPPUCCINO)
Escursione in altezza regolabile manualmente
24 Copertura per gruppo erogatore
25 Tubo erogatore latte (allestimento CAPPUCCINO)
26 Erogatore mobile
27 Erogatore telescopico
28 Gruppo caffè
F. 1
A
Page 7
CONCETTO
3/120
Italiano
2 - NOTE DI
CONSULTAZIONE
2.1 Abbreviazioni
F. = Figura
P. = Pagina
Pr . = Paragrafo
T. = Tabella
2.2 Simbologia di redazione
ATTENZIONE! Prestare la massima attenzione al significato dei
simboli: la loro funzione è quella di non dover ripetere concetti
tecnici o avvertenze di sicurezza, quindi sono da considerare dei
veri e propri “promemoria”. Consultare quindi, l’elenco dei simboli ogni volta che sorgeranno dubbi sul loro significato.
T. 1
ATTENZIONE! - Informazioni riguardanti la
sicurezza dell’utilizzatore e l’integrità della
macchina.
ATTENZIONE! - Interventi potenzialmente
pericolosi per il manutentore tecnico.
IMPORTANTE! - Richiama l’attenzione su
argomento di particolare importanza.
Manutentore tecnico - Operazioni di
esclusiva competenza di personale preposto
alla manutenzione straordinaria ed alle riparazioni.
Macchina spenta - Operazioni da effettuare con alimentazione di energia elettrica
sezionata.
Utilizzatore - Interventi di competenza
dell’utilizzatore della macchina.
3 - UTILIZZATORE
• Persona adulta per la quale sono di esclusiva competenza le
seguenti operazioni:
- Conduzione, presidio e spegnimento della macchina.
- Rifornimento di caffè in grani.
- Regolazione dei parametri di erogazione.
- Svuotamento vasche di raccolta, fondi e liquidi.
- Pulizia esterna della macchina.
È vietato l’uso della macchina a bambini, adolescenti e
persone non autosufficienti.
4 - MANUTENTORE
TECNICO
• Persona preposta alle seguenti operazioni:
- Installazione, messa in funzione, regolazione e messa a pun-
to della macchina.
- Manutenzione straordinaria, riparazioni e sostituzioni di parti
di ricambio.
5 - DESTINAZIONE D’USO
DELLA MACCHINA
• Le macchine oggetto del presente manuale, sono state proget-
tate, realizzate e protette per l’erogazione automatica (programmabile) di bevande:
- a base di caffè in grani macinato all’istante;
- a base di caffè premacinato;
- a base di latte e caffè in grani macinato all’istante (allestimento CAPPUCCINO).
- acqua calda e vapore acqueo (escluso allestimento
COFFEE) per la preparazione ed il riscaldamento di bevande.
- latte caldo (allestimento CAPPUCCINO).
Ogni altro utilizzo delle macchine, non è previsto dal
Costruttore che si esime da qualsiasi responsabilità per
danni di ogni natura, generati da un impiego improprio
delle macchine stesse. L’uso improprio, determina inoltre
l’annullamento di ogni forma di garanzia.
Page 8
CONCETTO
4/120
Italiano
8 - INFORMAZIONI
SULLA MACCHINA
8.1 Dati d’identificazione
Nella targa (A) sono riportati i seguenti dati d’identificazione del-
la macchina:
• Costruttore e marcatura
• modello
• N° di matricola
• anno di fabbricazione
• tensione elettrica di alimentazione (V) e frequenza (Hz)
• potenza elettrica assorbita (W)
• numero fasi della linea elettrica (PH)
• pressione ammessa nella rete idrica (MPa)
NOTA - Nelle eventuali richieste ai Centri Assistenza
Auorizzati, indicare modello e numero di matricola.
8.2 Caratteristiche tecniche
Tensione di alimentazione ...........................230V/400V 2N
Livello di pressione sonora ponderata A: ....... inferiore a 70 dB
Lunghezza cavo alimentazione ............................ mm 1.500
Potenza installata
Mod. LUXE .................................................. W 3.250
Mod. COFFEE ............................................. W 1.400
Mod. CAPPUCCINO .................................... W 3.250
Pressione idrica ............................. MPa 0,1÷0,8 (1÷8 bar)
Peso ...................................................................... kg 60
Capacità contenitore caffè. ........................................ Kg 2
NOTA - Le macchine sono programmabili per i dosaggi di ogni
tipo di erogazione. La maggior parte dei componenti
elettrici, è alimentata a 24 Vdc.
8.3 Dimensioni d’ingombro
>
<
e
n
t
e
s
c
>
<
e
n
t
e
s
c
LPh
470 550 675
F. 2
L
P
h
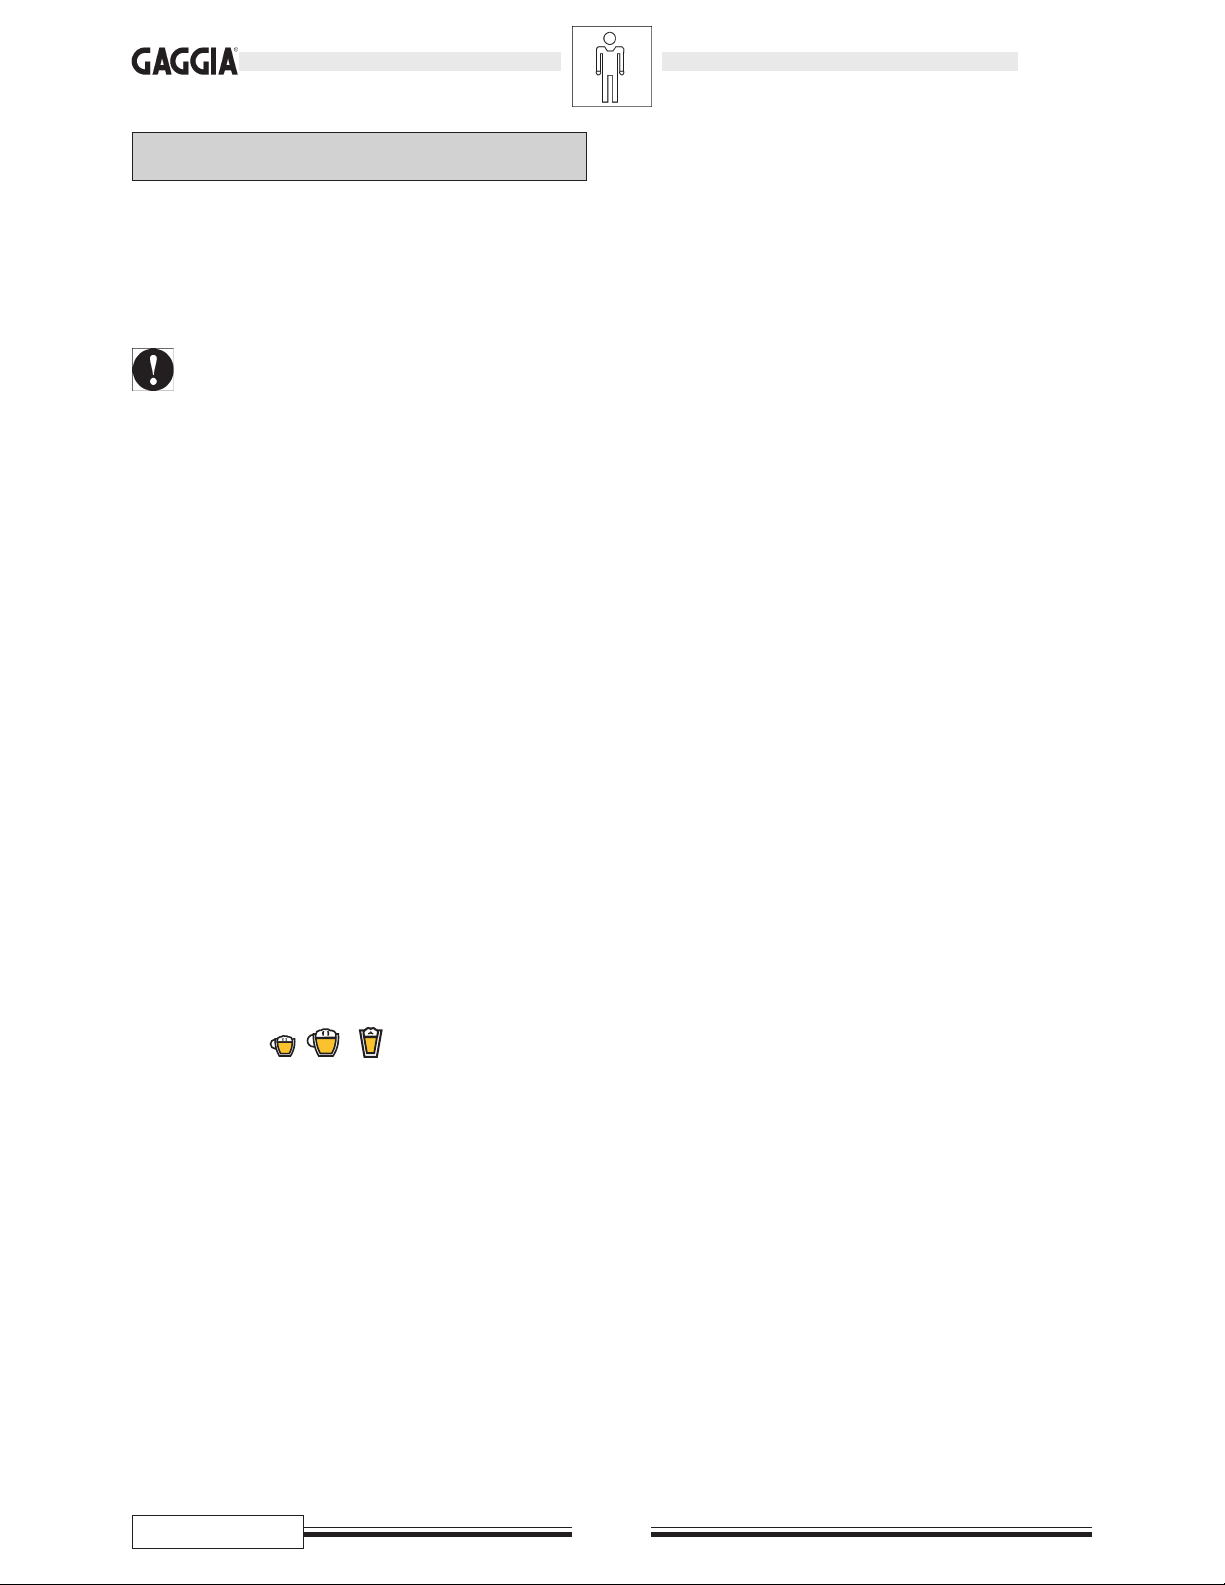
6 - AVVERTENZE E CAUTELE
• Per la manutenzione ordinaria, non utilizzare assolutamente,
detergenti, diluenti, solventi, ecc...
• La pulizia è limitata alle parti non sotto tensione elettrica e va
effettuata con prodotti neutri e biodegradabili e sempre con
l’interruttore generale o l’interruttore onnipolare, in posizione “0”
(OFF), oppure dopo avere estratto la spina dalla presa di corrente.
• La manutenzione ordinaria va eseguita da personale competente o quantomeno, opportunamente avvertito ed istruito e dotato
dei requisiti psico/fisici necessari, nel pieno rispetto delle istruzioni di seguito riportate ed in conformità alle Norme di Sicurezza, Salute, vigenti.
•È tassativamente vietato collocare e/o abbandonare sulla macchina, utensili e quant’altro di potenzialmente lesivo per la sicurezza delle persone e l’integrità della macchina.
• Modifiche e manomissioni (anche lievi) nonché l’impiego di parti
di ricambio non originali, esimono il Costruttore dalla responsabilità per danni di ogni natura e fanno decadere ogni diritto di
garanzia.
• Utilizzare esclusivamente acqua potabile.
• Il latte da utilizzare per il CAPPUCCINATORE deve essere man-
tenuto e riposto in un apparecchio refrigerante ad una temperatura che non superi i 4° C, e non deve essere lasciato inutilizzato, fuori del frigorifero, per un periodo superiore a 30 minuti.
• Quando il CAPPUCCINATORE rimane inutilizzato per un periodo superiore ad 1 ora, occorre eseguire un ciclo di pulizia
delle tubazioni, prima del suo riutilizzo.
Per eseguire un ciclo di pulizia delle tubazioni, occorre:
- immergere il tubo di aspirazione latte in un contenitore con
acqua;
- premere il tasto ;
- attendere la fine dell’erogazione dell’acqua.
N.B.: L’acqua non deve essere calda.
7 - PRECAUZIONI GENERALI
• Prima di operare con l’unità, accertarsi sempre ed in via preventiva di non nutrire dubbi sul contenuto del presente manuale. Il
mancato rispetto delle norme in esso contenute, esime il Costruttore da responsabilità per danni di qualsiasi natura a persone
e/o cose.
• Conservare questa edizione per futuri riferimenti.
• Verificare preventivamente (in caso di nuova installazione), il
rispetto delle norme minimali di sicurezza, piazzamento ed operatività della macchina, rilevando condizioni ambientali (temperatura, umidità, illuminazione) e l’idoneità degli spazi operativi.
• L’eventuale danneggiamento del cavo di alimentazione elettrica, prevede l’intervento dell’Assistenza Tecnica Autorizzata o
del manutentore tecnico.
• Non utilizzare la macchina all’esterno.
• Nei casi di malfunzionamento, richiedere sempre l’intervento
del manutentore tecnico.
• E’ vietato utilizzare getti d’acqua per la pulizia.
Page 9
CONCETTO
5/120
Italiano
F. 3
F. 4
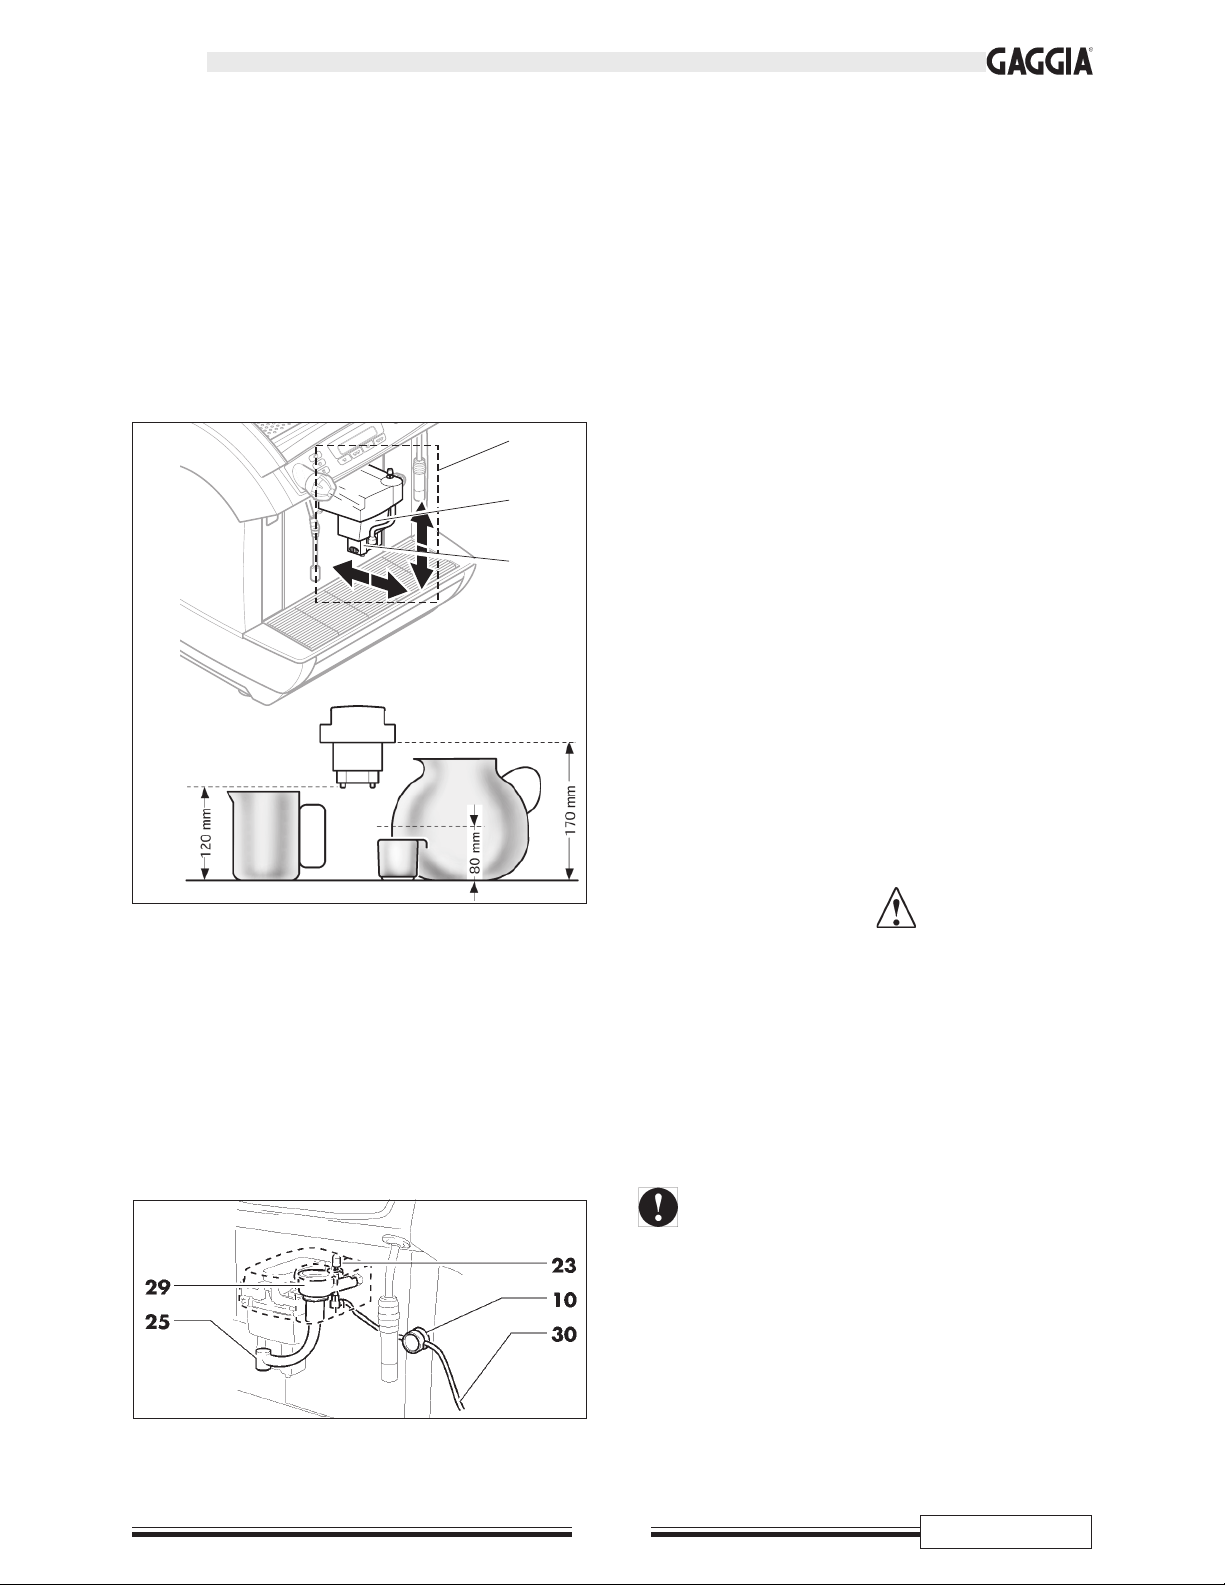
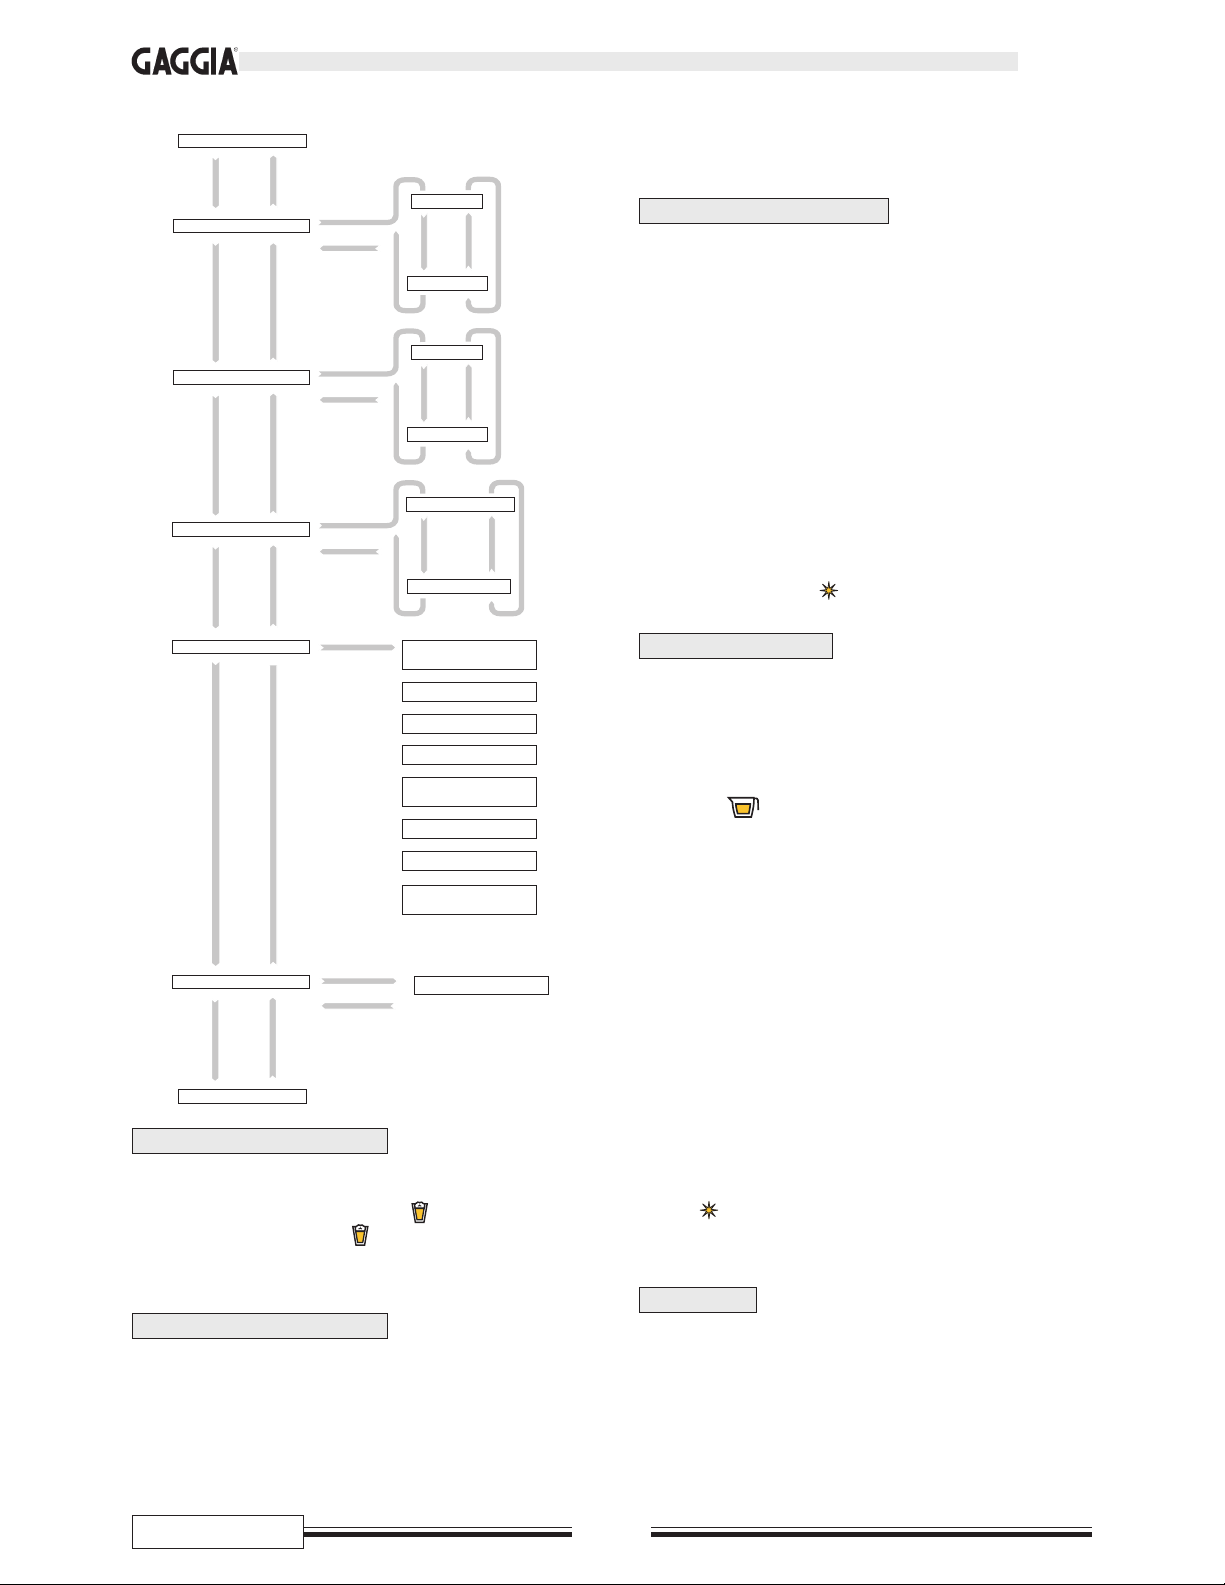
8.4 Gruppo erogatore caffè (F. 2)
La posizione di questo gruppo (22) può essere modificata in
funzione dell’altezza del recipiente utilizzato.
E’ infatti possibile posizionare verso l’esterno l’erogatore mobile (26)
ed in alto o in basso l’erogatore telescopico (27).
Si possono così ottenere diverse altezze di erogazione.
NOTA - Se si utilizza soltanto un recipiente di altezza superiore
a 90 mm è possibile spostare verso il basso l’erogatore
(26).
8.5 Gruppo Cappuccinatore (F. 4)
Il gruppo cappuccinatore, è composto da:
- tubo di aspirazione latte (30);
- pinza blocca tubo (10);
- corpo cappuccinatore (29);
- spillo che regola la qualità di crema (23);
- tubo erogatore regolabile (25).
22
26
27
>
<
ent
esc
>
<
ent
esc
9 - DISPOSITIVI DI
SICUREZZA
NOTA - Le macchine oggetto della presente pubblicazione, sono
realizzate in conformità alle specifiche Normative europee vigenti e sono pertanto protette in tutte le parti potenzialmente pericolose.
• Eventuali sovrapressioni nell’impianto idrico preposto
alla produzione di vapore e di acqua calda, vengono intercettate da n° 3 valvole di sicurezza.
• Un termostato impedisce surriscaldamenti delle caldaie.
• La posizione della vasca antistillicidio (12), del cassetto
raccoglifondi (16) e dello sportello (14), è controllata da n° 3
microinterruttori che determinano l’arresto del funzionamento
della macchina se uno dei componenti non è posizionato correttamente; (sul display apparirà l’indicazione del componente fuori posto).
• Un contaimpulsi elettronico ed uno meccanico, memorizzano il numero di erogazioni prodotte e consentono la programmazione della manutenzione ordinaria.
9.1 Tubi di erogazione vapore ed acqua
calda (escluso allestimento COFFEE) (F. 1)
I tubi erogatori di vapore (17) ed acqua calda (11) sono dotati
di apposite protezioni in gomma (9 e 15) per afferrarli ed orientarli anche se surriscaldati.
9.2 Rischi residui
• Le caratteristiche costruttive delle macchine, oggetto della presente pubblicazione, non consentono di proteggere l’utilizzatore dal getto diretto di vapore o acqua calda (escluso allestimento COFFEE).
• Pericolo di ustioni - Nell’erogazione di acqua calda e
di vapore, non dirigere i getti verso terzi o verso se stessi.
Impugnare il tubo, esclusivamente sulle rispettive protezioni antiustioni (9 - 15).
Non utilizzare contenitori che non siano realizzati in materiale “per alimenti”.
Page 10
CONCETTO
6/120
Italiano
F. 5
10 - INSTALLAZIONE
10.1 Note sull’ubicazione
• La macchina va installata in locale asciutto e riparato, con
temperatura ambientale: 10° C - 40° C
e umidità massima: 90%.
10.2 Piazzamento e collegamento
idrico
NOTA - Verificare che il piano preposto all’installazione della
macchina, sia di dimensioni e robustezza adeguate a
sostenere in sicurezza, la macchina stessa.
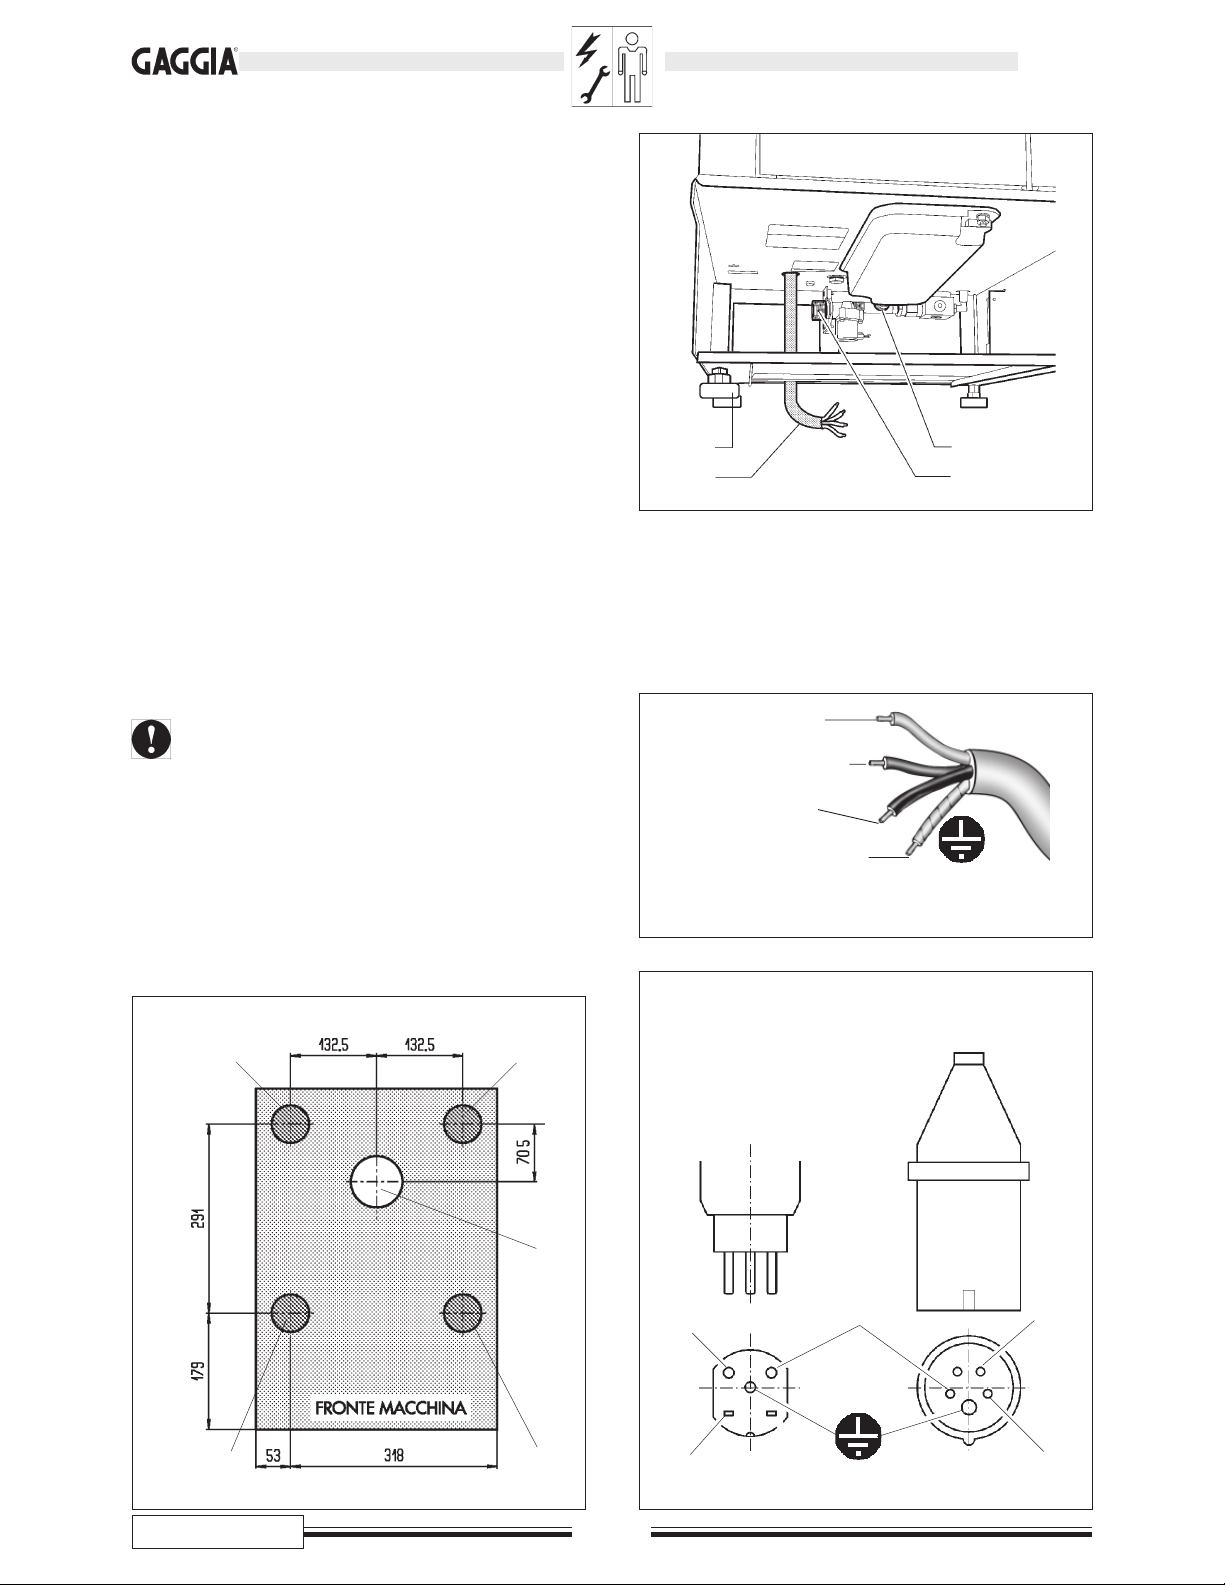
• Praticare sul piano il foro (A - F. 5).
• Appoggiare la macchina sul piano ed inserire il cavo di ali-
mentazione elettrica (B - F. 5) nel foro (A).
• Collegare un tubo di scarico, al raccordo (C - F. 6) e fissarlo
con fascetta a cremagliera.
• Collegare (esclusivamente con tubo e raccordi realizzati in
materiale “per alimenti”) la macchina alla rete di distribuzione
acqua potabile, tramite il raccordo (D - F. 6).
Si consiglia alimentare la macchina con acqua trattata
con un dispositivo di decalcificazione, soprattutto in caso
di acqua ad alto contenuto di sali di calcio e magnesio
(acqua dura).
• Posizionare in modo definitivo, la macchina sul piano di ap-
poggio (i cerchi E - F. 5, indicano la posizione ottimale dei
piedi regolabili).
• Livellare la macchina, agendo sui piedi regolabili (F - F. 6).
F. 7
Neutro (N) - Blu
Fase (L1) - Marrone
Fase (L2) - Nero
Terra - Giallo/verde
F. 8
CH
(Svizzera)
CEI
Cavo di alimentazione
tipo H07RNF sezione 4x2,5 mm
2
Collegamento della spina a linea elettrica bifase 400 V2N~
10.3 Collegamento elettrico
NOTA - Per impianti con corrente bifase 400 V, utilizzare le fasi
in modo da fornire alla macchina 230 V in corrente
monofase (F. 7). Per il collegamento monofase 230 V,
richiedere l’apposito kit per l’installazione
(cod. % 1034.R09).
F. 6
L
1
L
2
N
L
2
L
1
A
E E
E
E
B
F
C
D
Page 11
CONCETTO
7/120
Italiano
F. 9
10.4 Collegamento porta seriale
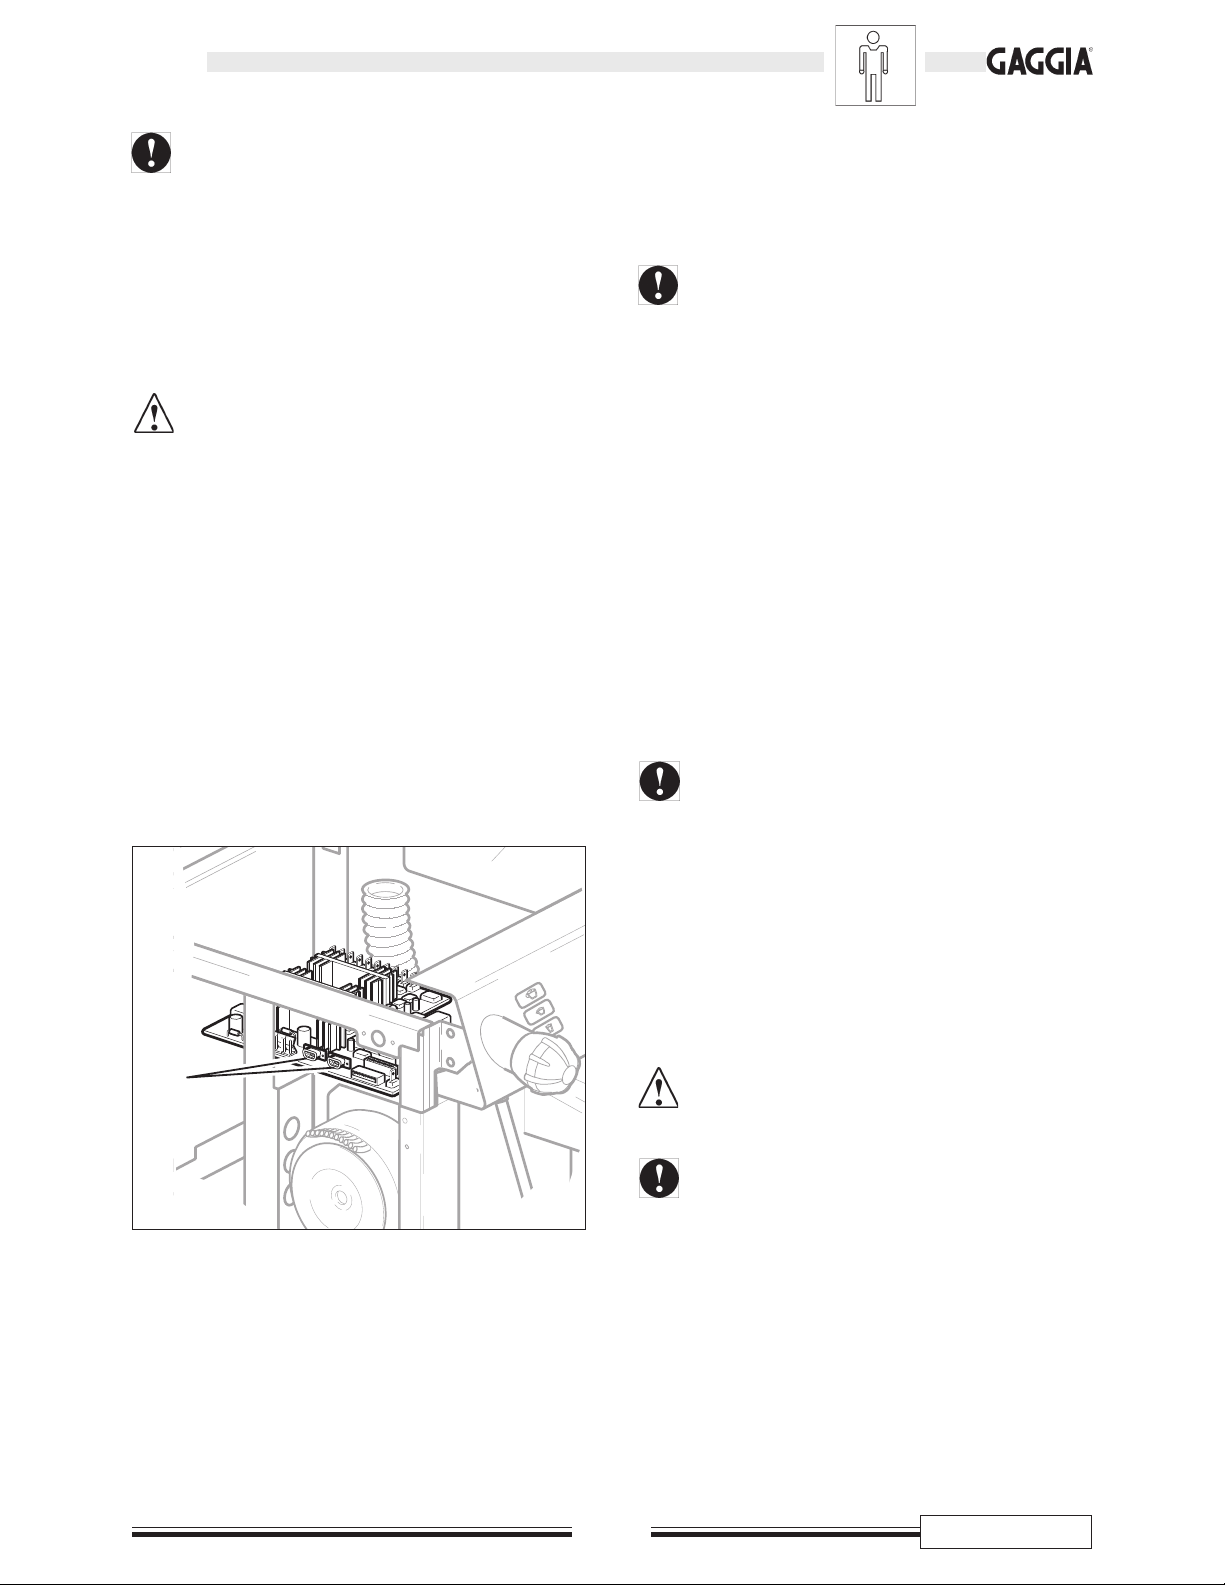
Tramite la porta seriale è possibile collegare la macchina alle
apparecchiature dei CENTRI DI ASSISTENZA AUTORIZZATI per
verifiche ed operazioni di programmazione (A - F. 9).
12 - USO DELLA MACCHINA
Prima di utilizzare la macchina è necessario aver letto
attentamente la presente pubblicazione ed aver acquisito
una buona conoscenza generale della macchina stessa.
Dopo un periodo di inattività della macchina è
consigliabile rileggere, prima di riutilizzarla, il paragrafo precedente “Prima accensione della macchi-
na”.
11 - PRIMA ACCENSIONE
DELLA MACCHINA
- Riempire il contenitore (6) con la miscela di caffè in grani,
prescelta.
Verificare che il caffè non contenga corpi estranei potenzialmente dannosi per le macine.
- Verificare che i componenti asportabili (12 e 16) siano presenti e che lo sportello (14) sia chiuso.
In caso contrario, all’accensione della macchina, sul display
apparirà l’indicazione del componente fuori posto.
- Ruotare l’interruttore onnipolare su “I”.
- Accendere la macchina tramite l’interruttore (18);
sul display appare: “
IN RISCALDAMENTO ATTENDE-
RE
”.
- Quando sul display apparirà: “
PRONTO PER L’USO
”,
occorre:
- Posizionare l’erogatore (26 e 27) in modo da ottenere l’al-
tezza adeguata ai recipienti utilizzati (Pr. 8.4).
- Posizionare uno o due recipienti sotto l’erogatore.
- Premere il pulsante corrispondente al tipo di bevanda prescel-
ta.
Nonostante tutti i pulsanti siano programmati già all’ori-
gine, su valori standard, occorre controllare che la bevanda ottenuta corrisponda alle caratteristiche desiderate. Diversamente bisogna procedere alla programmazione dei pulsanti erogazione (Pr. 12.6)
In funzione delle norme vigenti nel Paese di utilizzo della
macchina, il cavo di collegamento alla linea elettrica, deve
essere predisposto o con un interruttore onnipolare (con
apertura minima dei contatti di 3 mm), (o con una spina
conforme alle norme stesse).
• L’interruttore onnipolare deve essere adeguato all’as-
sorbimento della macchina ed in grado di intercettare
tutte le polarità della tensione.
• Verificare che i cavi elettrici dell’impianto siano pro-
porzionati all’assorbimento della macchina.
Il punto di collegamento (presa elettrica o interruttore
onnipolare) deve essere situato in un luogo facilmente
raggiungibile dall’utilizzatore, per sconnettere la macchina dalla linea elettrica, in caso di necessità.
• Collegare il cavo (B - F. 6) alla linea di alimentazione elettrica.
A
Page 12
CONCETTO
8/120
Italiano
12.1 Stati della macchina
In relazione all’alimentazione elettrica la macchina può risultare
come segue:
Spenta ed isolata elettricamente
- Interruttore generale (18) e interruttore onnipolare in posizione
“0“ (o spina disinserita).
-E’ attiva esclusivamente la memoria di mantenimento dei dati
programmati.
Accesa
- Interruttore generale (18) e interruttore onnipolare in posizione
“I“ (o spina inserita).
- Sono attive tutte le funzioni ed il display (8a) è acceso.
In standby (macchina spenta ma non isolata elettricamente)
- Interruttore generale (18) in posizione “I“.
- Sono attive le funzioni
“ACCENSIONE AUTOM.”, “AN-
TICONGELAMENTO”
, se selezionate, e
“OROLOGIO”
,
nonché il display e la memoria di mantenimento dei dati programmati.
- La retroilluminazione del display è spenta.
12.2 Accensione manuale
Questo tipo di avvio è necessario quando la macchina si trova
nello stato di “spenta ed isolata elettricamente” (Pr. 12.1).
Occorre procedere come descritto nel Pr. 11 escludendo, eventualmente, il controllo della bevanda erogata.
12.3 Accensione automatica
programmata
E’ possibile quando la macchina è in
“STANDBY”
ed è attiva la
funzione
“ACCENSIONE AUTOM.”
.
L’accensione della macchina avviene all’orario programmato.
12.4 Accensione temporanea da
standby
Avvio manuale con la macchina in
“STANDBY”
.
Si ottiene mantenendo premuto per 3 secondi il pulsante .
La macchina ritornerà automaticamente in
“STANDBY”
dopo
60 minuti dall’ultima operazione.
Page 13
CONCETTO
9/120
Italiano
F. 1 0
12.5 Pannello comandi
I tasti erogazione, vanno premuti per meno
di 1 secondo.
Accende temporaneamente
la macchina (in “STANDBY”)
e conferma la selezione dei tasti (H - G).
F
1 basso
2 bassi
1 alto
2 alti
basso
alto
basso
alto
CAFFÈ LIGHT
CAFFÈ IN CARAFFA Erogazione ottenuta automaticamente con più erogazioni di caffè
CAFFÈ MACCHIATO Erogazione ottenuta con caffè macinato più una piccola dose di latte
CAPPUCCINO Erogazione ottenuta con latte caldo più una dose di caffè macinato
LATTE CALDO Erogazione ottenuta utilizzando latte
ACQUA CALDA (escluso allestimento COFFEE) Erogazione ottenuta utilizzando acqua
(*)
(*)
(*)
CAFFÈ Erogazioni ottenute con caffè macinato all’istante
CAFFÈ PREMACINATO Erogazione ottenuta utilizzando dosi di caffè premacinato
Erogazione ottenuta utilizzando dosi di caffè premacinato con l’aggiunta
di caffè macinato all’istante
• Le definizioni: “Caffè basso” - “Caffè alto”, indicano i due diversi livelli di erogazione.
• Alla consegna, le macchine sono programmate su valori standard.
• Queste erogazioni, sono programmabili soltanto per dose singola di caffè
premacinato ed introdotte all’istante.
• Dopo aver premuto il tasto (una volta per “Premacinato” due volte per “Caffè light”),
introdurre una dose di caffè, attraverso lo sportello (5).
• Per il caffè light, verrà aggiunta automaticamente una piccola quantità di caffè
macinato.
• Si possono programmare fino a 8 erogazioni nello stesso recipiente, (max Lt 2,5).
Per fare ciò premere più volte il tasto . Il display visualizza il numero di dosi
programmate. Dopo l’erogazione di Lt. 2,5, attendere 2 minuti prima di richiedere
una nuova erogazione.
• Bevanda composta da caffè macinato all’istante, alla quale viene aggiunta una
piccola dose di latte caldo.
• Bevanda composta da caffè macinato all’istante e latte caldo.
• Si possono programmare fino a 8 erogazioni nello stesso recipiente, (max Lt 1). Per
fare ciò premere più volte il tasto . Il display visualizza il numero di dosi
programmate.
(**) - (***)
(**) - (***)
(***)
Page 14
CONCETTO
10/120
Italiano
VAPORE
(Escluso allestimento COFFEE)
• Immergere il tubo (17) nella bevanda da riscaldare.
• Ruotare in senso antiorario il rubinetto (13). Raggiunta la
temperatura desiderata, richiudere il rubinetto (in senso orario).
Dopo ogni utilizzo, ripulire con panno/spugna (umido e
pulito) il tubo del vapore, dai residui della bevanda riscaldata precedentemente.
(*) Preventivamente ad ogni erogazione, inserire il tubo di aspira-
zione (30 - F. 4) all’interno del contenitore del latte.
(*) (*) Regolare la quantità di crema, tramite lo spillo (23 - F. 4)
(Pr. 12.8).
12.6 Programmazione tasti erogazione
Le quantità di bevande associate ai rispettivi tasti possono essere
programmate direttamente dalla tastiera.
Per programmare e riprogrammare i tasti seguire le seguenti istruzioni:
- Accendere la macchina e predisporla all’uso
- Posizionare il recipiente sotto l’erogazione specifico.
- Premere e mantenere premuto il tasto. Sul display appare
“PROGRAMMAZIONE”
.
- Rilasciare il tasto, per memorizzare la dose erogata.
(***) N.B.: I tasti , e possono essere preimpostati
per erogare bevande composte da latte e caffè in ogni
possibile combinazione. Per attivare impostazioni diverse
da quelle di default occorre rivolgersi ad un centro d’assi-
stenza autorizzato.
Riportiamo di seguito lo schema di programmazione dei tasti.
Page 15

Italiano
CAFFÈ
-Tenere premuto-
1 caffè basso
START
Erogazione
STOP
per effettuare la programmazione degli altri caffè procedere come sopra, utilizzando i seguenti tasti:
2 caffè bassi
1 caffè alto 2 caffè alti
CAFFÈ MACCHIATO
C
A
F
F
È
-Tenere premuto- -Tenere premuto-
L
(7 sec)
A
T
T
E
Sul display appare
“PROGRAMMAZIONE”
START
START
Erogazione Erogazione
STOP
CAPPUCCINO
C
-Tenere premuto- -Tenere premuto-
A
F
F
È
START
STOP
L
A
T
T
E
“PROGRAMMAZIONE”
(7 sec)
Sul display appare
START
ErogazioneErogazione
STOP
STOP
LATTE CALDO
(7 sec)
Sul display appare
“PROGRAMMAZIONE”
CAFFÈ IN CARAFFA
(5 sec)
ACQUA CALDA
-Tenere premuto-
START
Erogazione
-Tenere premuto-
START
Erogazione
-Tenere premuto-
START
STOP
Erogazione
STOP
STOP
NOTA - Questa programmazione, è
ottenibile soltanto se la funzione
“PROGRAMM. ACQUA CALDA” è
in modalità: “ATTIVATA”
(Pr. 12.7.1).
11/120
CONCETTO
Page 16
CONCETTO
12/120
Italiano
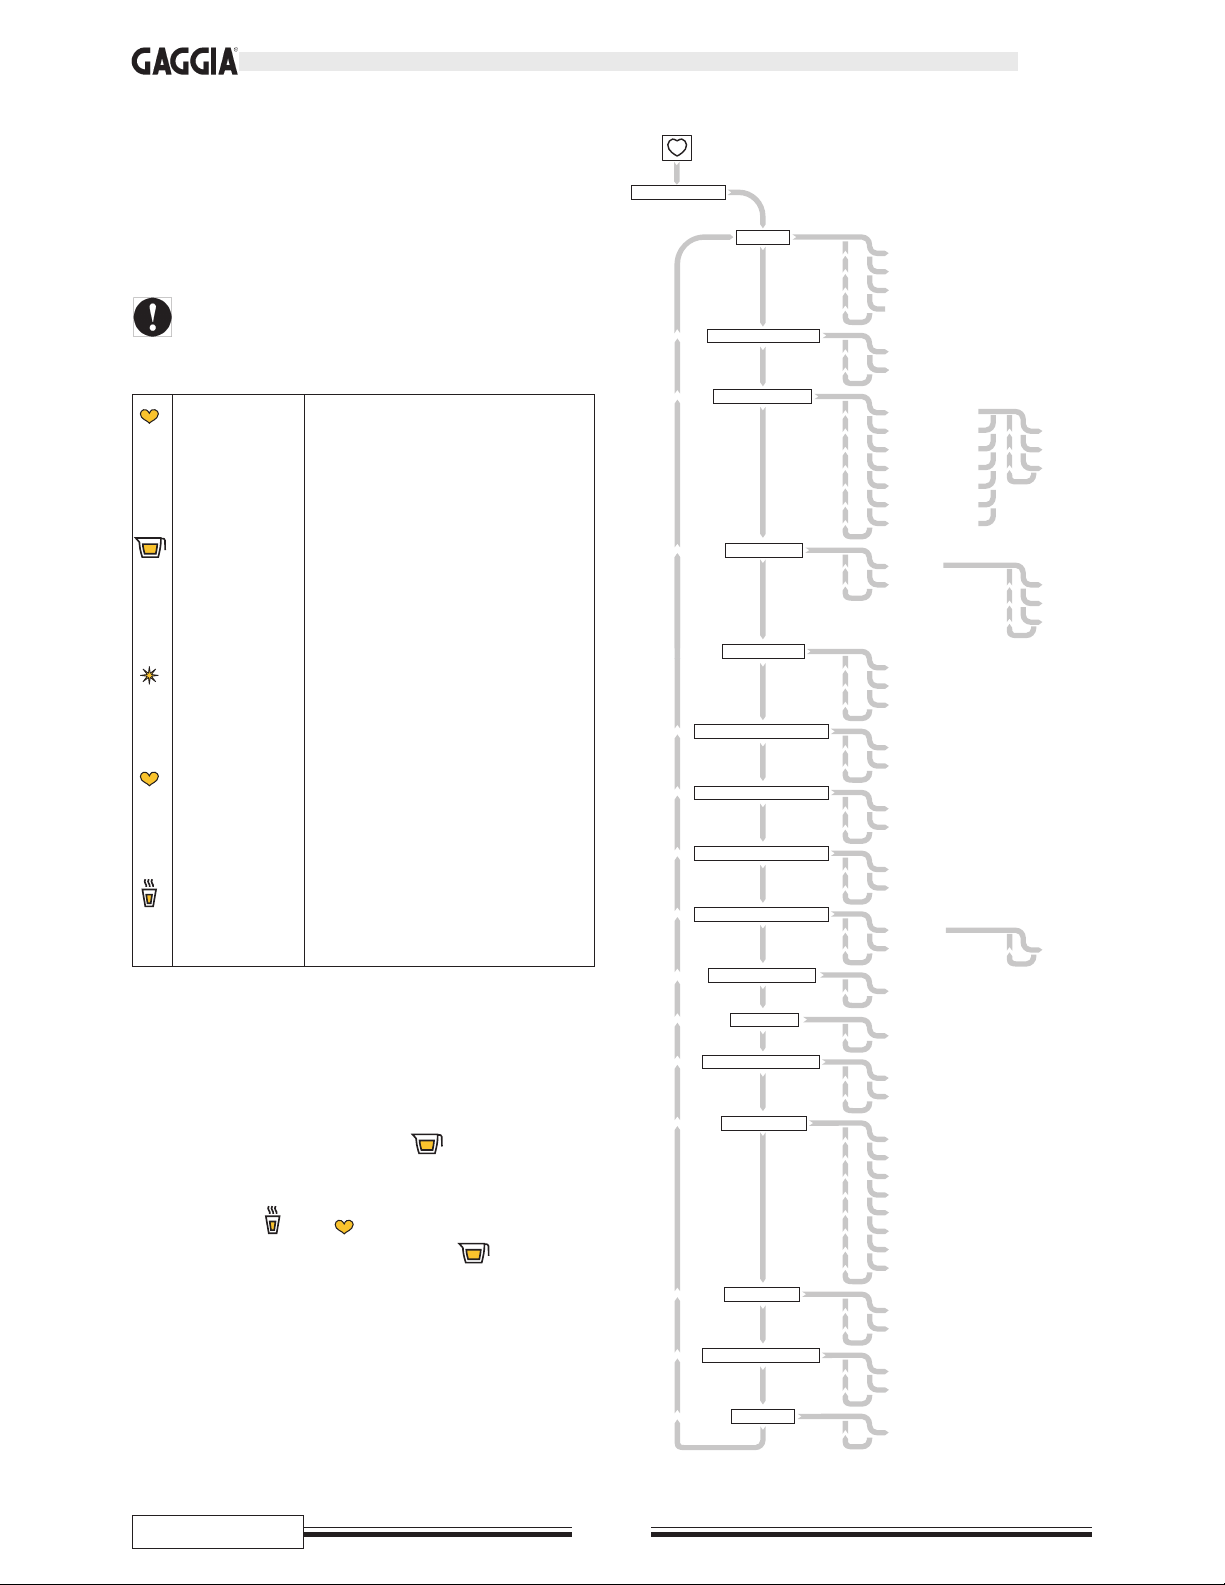
12.7 Funzioni programmabili del menu
NOTA - La macchina consente alcune regolazioni ed
impostazioni tramite la programmazione del menu, che
adeguano il prodotto erogato alle esigenze
dell’Utilizzatore
Durante la programmazione i tasti che seguono, assumono una funzione diversa da quella che hanno normalmente durante l’uso della macchina
(accesso alla entrare nel menu di programmazione
programmazione) mantenendolo premuto per 5 sec.
(sul display apparirà:
““
““
“
PROGRAMMAZIONEPROGRAMMAZIONE
PROGRAMMAZIONEPROGRAMMAZIONE
PROGRAMMAZIONE
””
””
”
);
(Enter) passare da un livello del menu al
successivo; preparare un dato alla
modifica; confermare un dato o una
funzione;
(Escape)
annullare le modifiche non confermate;
risalire al livello precedente del menu fino
all’uscita dallo stesso.
(Down) passare alla voce successiva all’interno
dello stesso livello di programmazione;
incrementare il valore di un dato da
modificare.
(Up) passare alla voce precedente all’interno
dello stesso livello di programmazione;
ridurre il valore del dato da modificare.
Alcune funzioni prevedono la programmazione anche di uno o
più dati (già programmati su valori standard).
Per intervenire sui valori dei dati da riprogrammare occorre:
- Selezionare la funzione.
- Confermare la funzione con il tasto (Enter).
- Il cursore lampeggiante si posiziona sotto al valore da modificare.
- Azionare i tasti (Up) o (Down) per variarne il valore.
- Confermare il dato modificato con il tasto (Enter).
PROGRAMMAZIONE
5 sec.
LINGUA
PIANO SCALDATAZZE
DOSE MACINATURA
TEMPERATURE
PREINFUSIONE
PROGR. ACQUA CALDA
PROGRAMMAZIONE LATTE
MISCELAZ.ACQUA CALDA
LAVAGGIO PROGRAMMATO
LAVAGGIO GRUPPO
OROLOGIO
ACCENSIONE AUTOM.
ORARI ON/OFF
CONTATORI
ANTICONGELAMENTO
SBLOCCO
CODICE: 0000
DISATTIVATO
ATTIVATO
TOTALE ACQUA 000000
TOTALE CAFFE’ 000000
OFF4: lmmgvsd 00:00
OFF3: lmmgvsd 00:00
ON 4: lmmgvsd 00:00
ON 3: lmmgvsd 00:00
OFF1: lmmgvsd 00:00
ON 1: lmmgvsd 00:00
OFF2: lmmgvsd 00:00
ON 2: lmmgvsd 00:00
DISATTIVATA
ATTIVATA
DISATTIVATO
ATTIVATO
DISATTIVATA
ATTIVATA
DISATTIVATA
ATTIVATA
DISATTIVATA
ATTIVATA
DISATTIVATA
BREVE
LUNGA
MIN. XXX
SEGUIRE ISTRUZIONI
16:34 GI 8 NOV 2001
PRIMO CAFFE’
CAFFE’
BASSA
ALTA
STANDARD
BASSA
ALTA
STANDARD
CAFFE’ MACCHIATO
CAPPUCCINO
CARAFFA
2 CAFFE’ LUNGHI
1 CAFFE’ LUNGO
1 CAFFE’ CORTO
2 CAFFE’ CORTI
DISATTIVATO
ATTIVATO
ECC.
FRANCAIS
DEUTSCH
ITALIANO
Page 17
CONCETTO
13/120
Italiano
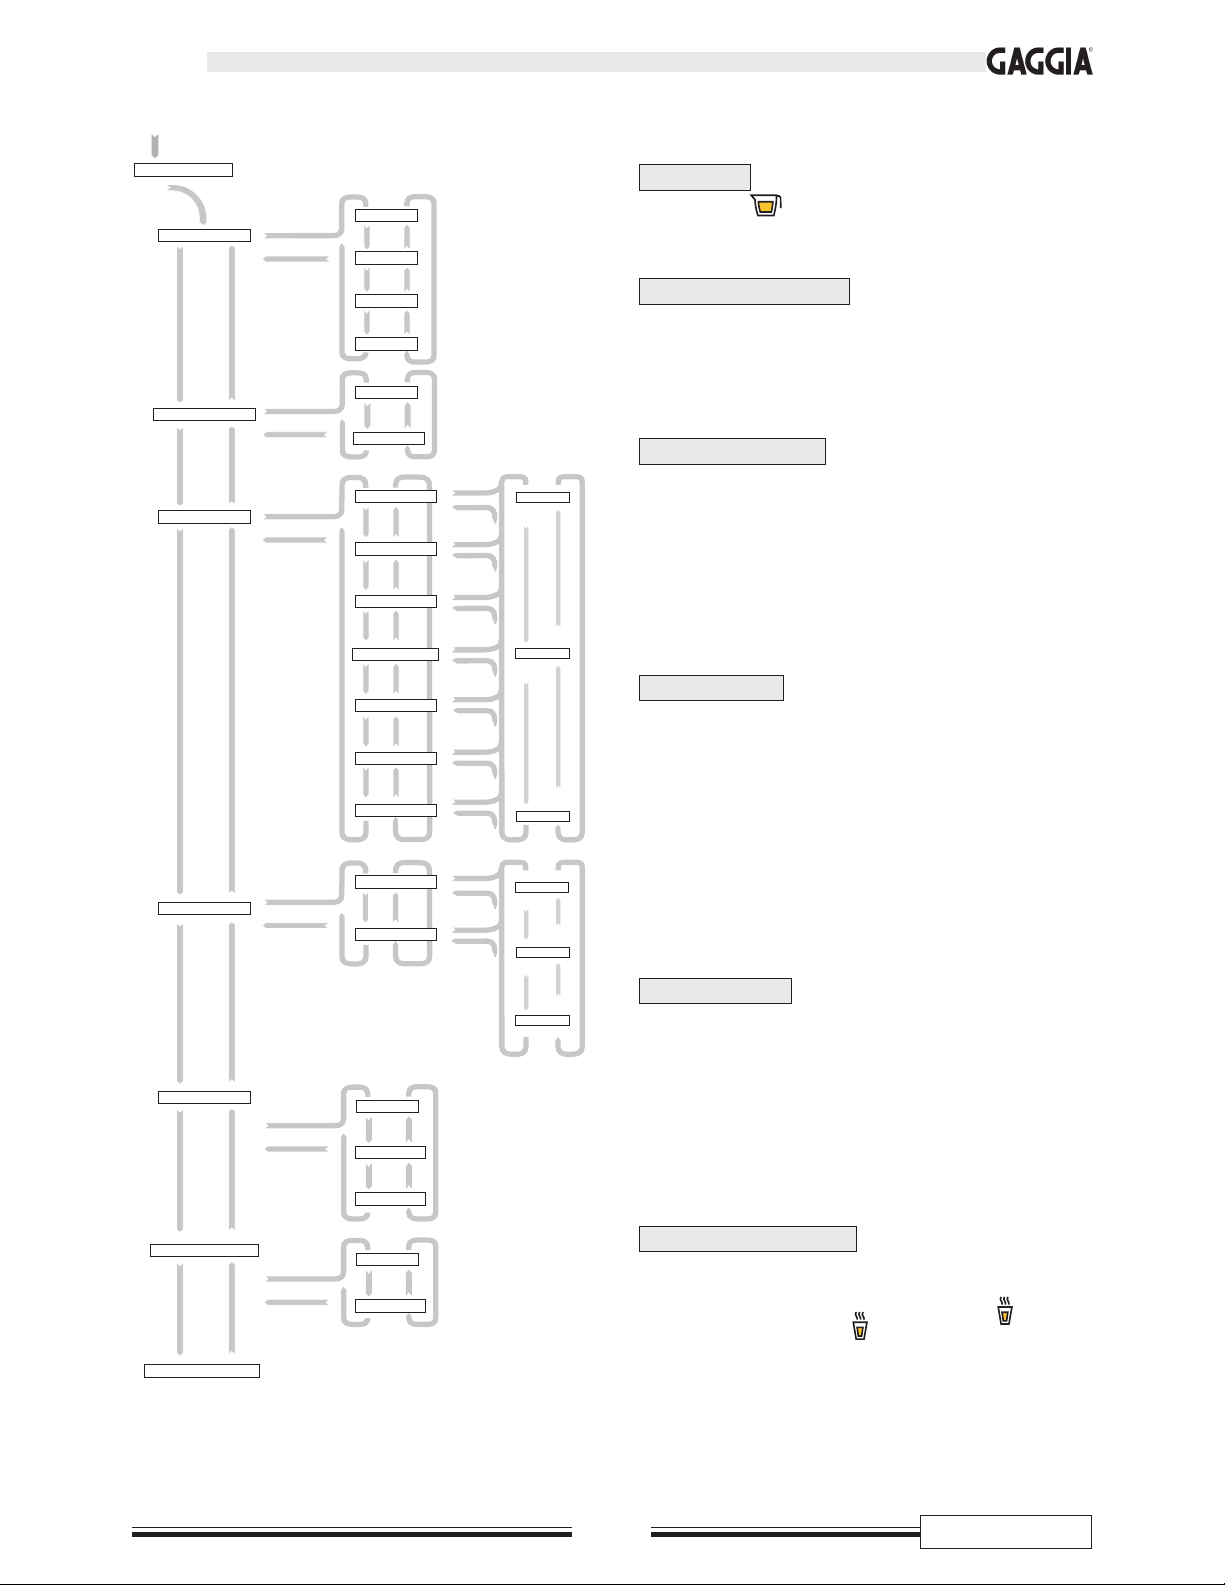
12.7.1 Descrizione delle funzioni
LANGUAGE
- Azionando dal menu “
LANGUAGE
” si può accedere
alla selezione della stessa.
PIANO SCALDATAZZE
- Confermando “ATTIVATO”, si ottiene l’accensione del piano scaldatazze insieme all’accensione della macchina.
- Confermando “DISATTIVATO”, il piano scaldatazze rimane sempre spento.
DOSE MACINATURA
Per ogni erogazione è possibile modificare la quantità del caffè
macinato utilizzato nell’erogazione e programmata in fase di
installazione.
- Confermando “BASSA” o “ALTA”, la dose viene ridotta di
1 gr o incrementata di 1 gr.
- Confermando “STANDARD”, la dose utilizzata nell’erogazione è quella programmata dal Manutentore Tecnico.
TEMPERATURE
Per ogni erogazione di caffè, è possibile modificare la temperatura dell’acqua utilizzata nell’erogazione e programmata in fase
di installazione.
- Confermando “BASSA” tale temperatura viene ridotta di 3°C.
- Confermando “ALTA” la temperatura aumenta di 3 °C.
- Confermando “STANDARD” la temperatura è quella program-
mata dal Manutentore Tecnico.
NOTA - La temperatura “primo caffè” viene utilizzata per la pri-
ma erogazione all'accensione della macchina.
PREINFUSIONE
Questa funzione, consente di effettuare una breve pausa nella
prima fase di erogazione. Questo può migliorare la qualità del
caffè che ha modo, durante la pausa, di "infondersi" con la prima parte di acqua ricevuta. Confermando:
- “DISATTIVATA”, non viene eseguita alcuna preinfusione.
- “BREVE”, si ottiene la “preinfusione” programmata dal
Manutentore Tecnico.
- “LUNGA”, si ottiene la “preinfusione” aumentata di 1 sec.
PROGR. ACQUA CALDA
Con questa funzione è possibile abilitare la programmazione
della quantità d’acqua calda erogabile. Confermando:
- “ATTIVATA”, è possibile programmare il tasto , (Pr. 12.6).
- “DISATTIVATA”, il tasto non accetta la programmazione
della dose che dovrà essere gestita manualmente.
lo sviluppo delle funzioni
prosegue nella pagina seguente
PROGRAMMAZIONE
LINGUA
PIANO SCALDATAZZE
DOSE MACINATURA
TEMPERATURE
PREINFUSIONE
ITALIANO
DEUTSCH
FRANCAIS
ECC.
ATTIVATO
DISATTIVATO
1 CAFFE’ CORTO
2 CAFFE’ CORTI
1 CAFFE’ LUNGO
2 CAFFE’ LUNGHI
CAPPUCCINO
CARAFFA
CAFFE’ MACCHIATO
CAFFE’
PRIMO CAFFE’
BASSA
BASSA
STANDARD
ALTA
STANDARD
ALTA
DISATTIVATA
BREVE
PROGR. ACQUA CALDA
ATTIVATA
DISATTIVATA
LUNGA
PROGRAMMAZIONE LATTE
Page 18
CONCETTO
14/120
Italiano
PROGRAMMAZIONE LATTE
È possibile abilitare la programmazione della quantità di latte
erogabile. Confermando:
- “ATTIVATA”, programma il tasto (Pr. 12.6).
-“DISATTIVATA
”, il tasto non accetta la programmazione
della dose, che dovrà quindi essere gestita manualmente.
MISCELAZ. ACQUA CALDA
Durante l’erogazione dei vari tipi di bevande, la macchina aggiunge una certa quantità di acqua calda, in base alla programmazione effettuata. Confermando:
- “ATTIVATA”, la miscelazione viene effettuata
- “DISATTIVATA”, alla bevanda NON viene aggiunta ac-
qua calda.
NOTA - A funzione disattivata, i valori programmati restano in-
variati e riutilizzabili alla riattivazione.
LAVAGGIO PROGRAMMATO
Funzione che consente l’erogazione di una minima quantità di
acqua calda (circa 5 cc) per evitare la formazione di sedimenti
nell’erogatore caffè; tale lavaggio viene effettuato automaticamente dopo il tempo programmato (20÷240 minuti) dall’ultima
erogazione di caffè. Confermando:
- “ATTIVATO”, il cursore lampeggiante di modifica si posi-
ziona sull’ultima cifra a destra, e il valore può essere modificato con passi di 10 min. per volta;
confermare sempre le eventuali modifiche.
- “DISATTIVATO”, la macchina non esegue alcun lavaggio.
NOTA - Durante il lavaggio, sul display appare:
“LAVAGGIO
PROGRAMMATO”
;
il lavaggio può anche avvenire manualmente tenendo
premuto il tasto per 3 secondi.
LAVAGGIO GRUPPO
Funzione che consente di eseguire il lavaggio del gruppo caffè
(28) utilizzando le apposite pastiglie (per informazioni sulle pa-
stiglie rivolgersi ad un Centro di Assistenza Autorizzato).
Procedura:
- Il processo inizia da: “LAVAGGIO GRUPPO”.
- Premere ; sul display: “INSERIRE PASTIGLIA NEL
GRUPPO”.
- Rimuovere il gruppo caffè; sul display: “INSERIRE IL
GRUPPO”;
- Inserire la pastiglia all’interno del gruppo caffè e reinserire il
gruppo; sul display: “CHIUDERE SPORTELLO”.
- Chiudere lo sportello; sul display: “LAVAGGIO IN COR-
SO”.
La macchina inizia il ciclo di lavaggio, al termine del quale
sul display appare “TOGLIERE IL GRUPPO E LAVARE
IN ACQUA”.
- Rimuovere il gruppo caffè; sul display: “INSERIRE GRUP-
PO”.
- Lavare il gruppo caffè in acqua corrente.
- Reinserire il gruppo caffè; sul display: “CHIUDERE SPOR-
TELLO”
- Chiudere lo sportello; sul display: “LAVAGGIO COMPLETA-
TO PREMERE TASTO STELLA” ;
Premere per uscire definitivamente dal menu e rendere pronta
all’uso la macchina.
OROLOGIO
Funzione che consente di impostare l’orologio ed il datario della
macchina.
- Confermando “OROLOGIO”, il cursore lampeggia e si posiziona sulle ore, che potranno essere modificate.
- Dopo aver confermato l’ora impostata, il cursore si porta al
successivo dato modificabile (i minuti, poi il giorno, il
mese ed infine l’anno).
PROGR. ACQUA CALDA
PROGRAMMAZIONE LATTE
MISCELAZ.ACQUA CALDA
LAVAGGIO PROGRAMMATO
LAVAGGIO GRUPPO
OROLOGIO
ACCENSIONE AUTOM.
ATTIVATA
DISATTIVATA
ATTIVATA
DISATTIVATA
ATTIVATO MIN. 240
DISATTIVATO
INSERIRE PASTIGLIA
NEL GRUPPO
INSERIRE IL GRUPPO
CHIUDERE LO SPORTELLO
LAVAGGIO IN CORSO
TOGLIERE IL GRUPPO
E LAVARE IN ACQUA
INSERIRE IL GRUPPO
CHIUDERE LO SPORTELLO
LAVAGGIO COMPLETATO
PREMERE TASTO STELLA
16:34 GI 8 NOV 2001
Page 19
CONCETTO
15/120
Italiano
ORARI ON/OFF
Funzione che consente di programmare gli orari di accensione e spegnimento automatici della macchina nell’arco di tutta la settimana.
- Confermando “ORARI ON/OFF”, il cursore lampeggiante
si posiziona sul giorno da modificare.
- Inserire il giorno nella programmazione, con il tasto
(down),
facendo diventare la lettera da minuscola a maiuscola.
- Disinserire il giorno nella programmazione, con il tasto
(up), facendo diventare la lettera da maiuscola a minuscola.
- Confermare la modifica.
Per la modifica dell’orario seguire la stessa procedura utilizzata
per l’impostazione dell’orologio.
Esempio:
nello schema di sviluppo delle funzioni è rappresentata
una programmazione della macchina che ne prevede l’accensione alle 08:00 e lo spegnimento alle 18:00 dal lunedì al
venerdì, l’accensione alle 09:00 e lo spegnimento alle 12:30
di sabato, e la sosta completa la domenica.
CONTATORI
Sono due funzioni che rappresentano, l’una il totale dei cicli di
erogazione di caffè, e l’altra il totale dei cicli di erogazione di
acqua calda.
Nel caso in cui la dosatura automatica dell’acqua calda sia
disabilitata (vedi funzione “PROG. ACQUA CALDA”), verrà
conteggiato un ciclo per ogni azionamento dell’elettrovalvola.
NOTA - Entrambe le funzioni sono solo di consultazione in quanto
non sono azzerabili.
ANTICONGELAMENTO
La funzione anticongelamento serve ad evitare che l’eventuale
esposizione della macchina in “STANDBY” a basse temperature possa causare danni dovuti alla formazione di ghiaccio nelle
caldaie. Tale funzione mantiene la temperatura delle caldaie ad
un valore minimo che ne impedisce il congelamento.
- Confermando “ATTIVATO”, si abilita la funzione.
- Confermando “DISATTIVATO”, si disabilita.
NOTA - La funzione è attivata solo se è attivata anche la funzio-
ne
“ACCENSIONE AUTOM.”
e solo quando la mac-
china è in
“STANDBY”
. Quando la funzione è attiva il
display visualizza
“ANTICONGELAMENTO”
.
SBLOCCO
Funzione che consente di sbloccare temporaneamente la macchina quando ha raggiunto il numero di cicli programmati per la
manutenzione o la decalcificazione. Per ottenere il codice sblocco occorre rivolgersi alla ditta che ha effettuato l'installazione o
che fornisce il servizio di manutenzione. Ottenuto il codice bisogna inserirlo nella funzione:
- Confermare la funzione “SBLOCCO”, il cursore lampeggian-
te si posiziona sotto alla prima cifra da modificare;
- inserire la cifra e confermarla;
-
dopo ogni conferma il cursore lampeggiante si posiziona sot-
to la cifra successiva, e così via fino a completare il codice.
ACCENSIONE AUTOM.
Funzione che consente di programmare l’accensione e lo spegnimento automatici della macchina, in due fasce orarie diverse,
per ogni giorno della settimana. Confermando:
- “ATTIVATA”, la macchina si predispone a tale funzione.
- “DISATTIVATA”, la macchina si accende e si spegne solo
manualmente tramite l’interruttore generale (18).
Eventuali orari già programmati, di accensione e spegnimento automatici, rimangono comunque memorizzati.
- Per la programmazione delle fasce orarie e dei giorni vedere
la funzione successiva “ORARI ON/OFF”.
NOTA - L’accensione automatica della macchina è possibile solo
con l’interruttore generale (18) in posizione “I”.
OROLOGIO
ACCENSIONE AUTOM.
ORARI ON/OFF
CONTATORI
ANTICONGELAMENTO
SBLOCCO
CODICE: 0000
DISATTIVATO
ATTIVATO
TOTALE ACQUA 000000
TOTALE CAFFE’ 000000
OFF4: lmmgvsd 00:00
OFF3: lmmgvsd 00:00
ON 4: lmmgvsd 00:00
ON 3: lmmgvsd 00:00
OFF1: lmmgvsd 00:00
ON 1: lmmgvsd 00:00
OFF2: lmmgvsd 00:00
ON 2: lmmgvsd 00:00
DISATTIVATA
ATTIVATA
Page 20
CONCETTO
16/120
Italiano
F. 1 1
19
F. 1 2
14
12.8 Regolazione della crema
La qualità di crema nelle bevande è proporzionale all’escursione
dello spillo dal foro (F. 11).
• Sollevando lo spillo, si ottiene una maggiore quantità di
crema.
• Abbassando lo spillo, si ottiene una minore quantità di crema.
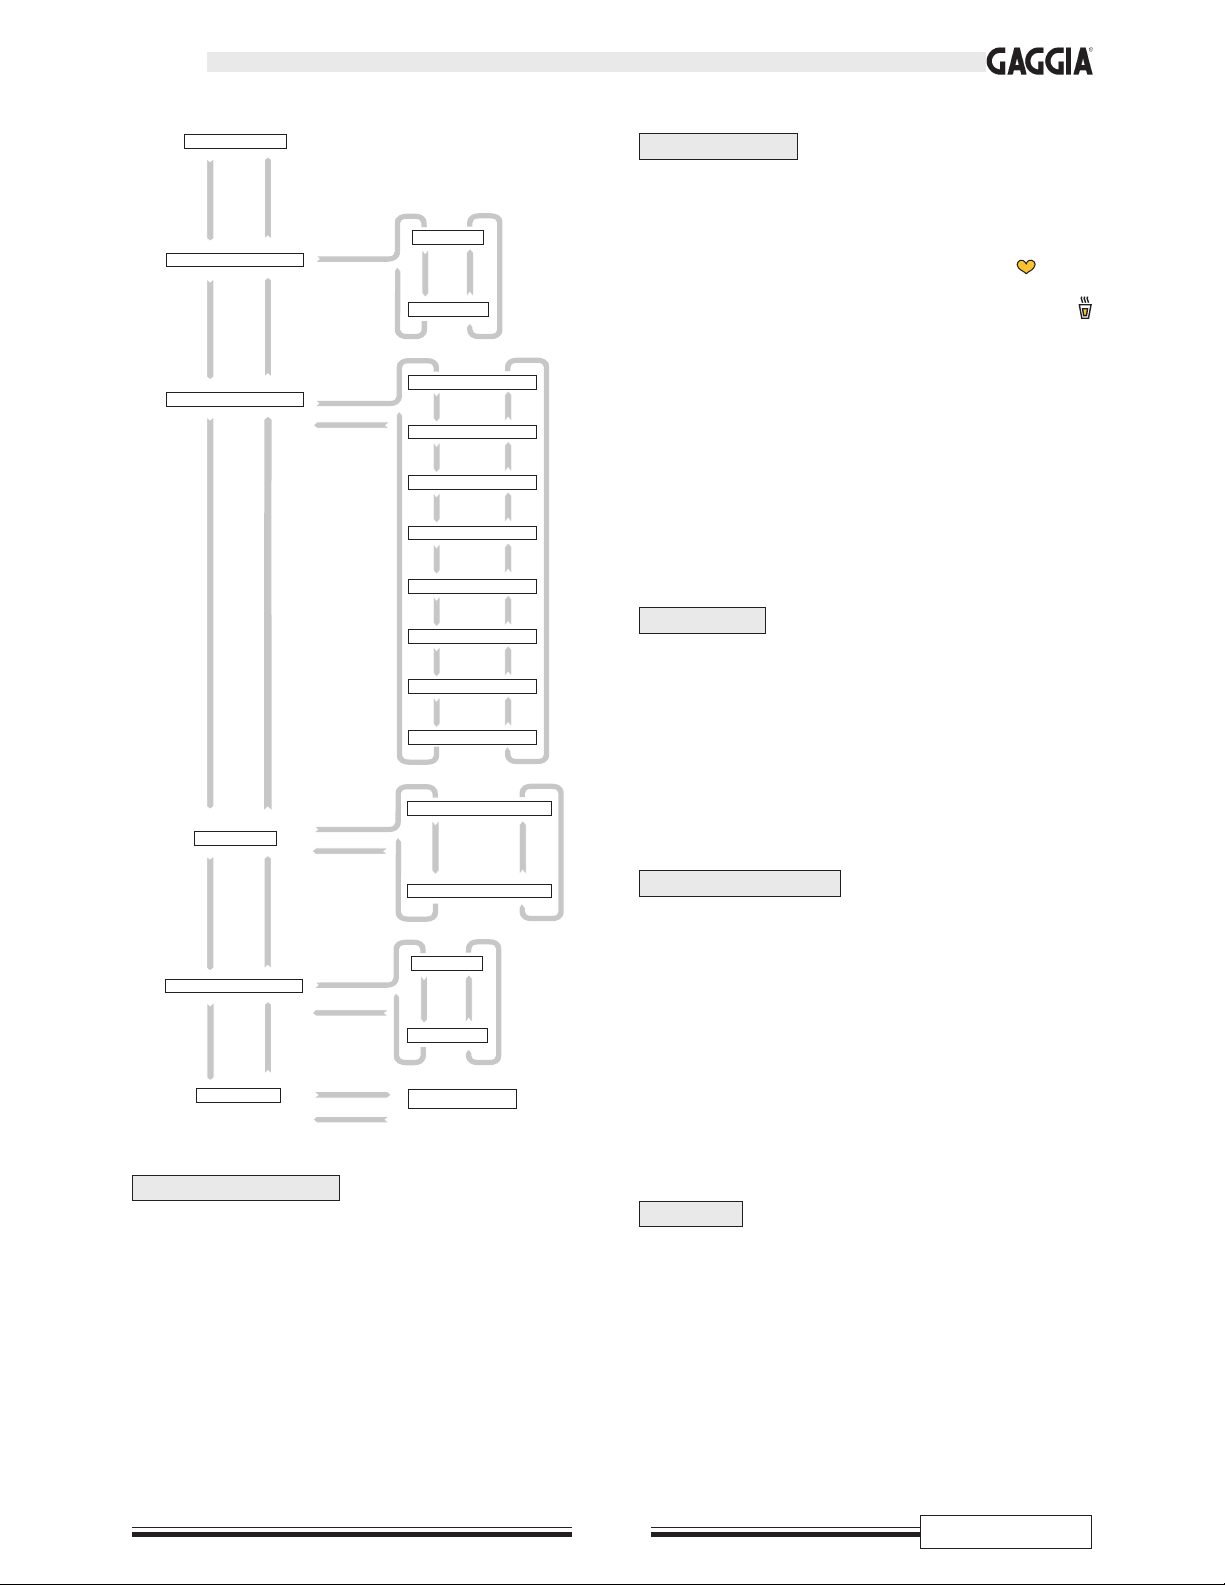
12.9 Regolazione della macinatura
A prescindere dalla miscela di caffè, una macinatura molto fine (indice su valori bassi) aumenta la densità, la
crema della bevanda e il suo tempo di erogazione, viceversa una macinatura grossa (indice su valori alti) ne
diminuisce la densità, la crema, nonché il tempo di
erogazione.
Non ruotare, in senso antiorario, a fine corsa il pomello
(19 - F. 12); la manovra provoca il serraggio delle macine con conseguente blocco della macchina.
In caso di bloccaggio delle macine, dovuto a corpi estranei nella miscela di caffè e conseguente bloccaggio della
macchina (sul display apparirà:
“ERRORE MACINA”
)
rivolgersi ad un Centro di Assistenza Autorizzato.
NOTA - La macinatura viene impostata in fabbrica, su valori
standard, ma è possibile modificarla come segue:
• Aprire lo sportello (14 - F. 12), ruotare il pomello (19 - F. 12)
in senso antiorario per rendere più fine la macinatura (l’indice
si sposta su un valore basso), oppure in senso orario per renderla più grossa (l’indice si sposta su un valore alto).
Page 21

CONCETTO
17/120
Italiano
12.10 Messaggi sul display
NOTA - Di seguito è riportato un elenco di allarmi (oltre a quelli
già trattati) visualizzabili sul display e le condizioni di
macchina, che li determinano.
STANDBY:
macchina spenta (con l’interruttore generale in posizione “I”) con la funzione di accensione/spegnimento automatici
abilitate (Pr. 12.7.1).
ANTICONGELAMENTO:
macchina spenta (con l’interruttore
generale in posizione “I”) il programma che preserva le caldaie
dal ghiaccio è inserito (Pr.12.7.1).
LAVAGGIO PROGRAMMATO:
appare quando la macchina
esegue il lavaggio automatico dell’erogatore del caffè (Pr. 12.7.1).
AGGIUNGERE CAFFE’’
: la macchina, durante la macinatu-
ra, rileva la mancanza del caffè in grani nel relativo contenitore
(6).
CARICARE CIRCUITO
: appare quando la macchina, durante l’erogazione di una qualsiasi bevanda, rileva la mancanza di
acqua nelle caldaie.
Dopo aver verificato la presenza dell’acqua nella rete di distribuzione, premere il tasto ( ^ nella versione COFFEE), fino a
quando esce regolarmente acqua dal tubo (11) e dall’erogatore
caffè (27). Nella versione “COFFEE” l’acqua esce solo dall’erogatore
PROGRAMMAZIONE:
appare quando si entra nella program-
mazione della macchina (Pr. 12.6).
VUOTARE FONDI
: appare quando il cassetto raccoglifondi
(17) è quasi pieno (la macchina ha eseguito il numero programmato di erogazioni).
Si possono comunque eseguire alcune ulteriori erogazioni.
FUORI SERVIZIO - VUOTARE FONDI
: il cassetto racco-
glifondi (16) è completamente pieno (la macchina ha eseguito il
numero programmato di erogazioni).
La macchina è in blocco e non si possono eseguire più erogazioni
finché il cassetto non viene vuotato.
CHIUDERE SPORTELLO
: lo sportello (14) non è chiuso cor-
rettamente.
INSERIRE IL CASSETTO
: il cassetto raccoglifondi (16)
non è inserito correttamente.
INSERIRE VASCA POLVERE
: la vasca raccogligocce (12)
non è inserita correttamente.
INSERIRE IL GRUPPO
: il gruppo caffè (28) non è inserito
correttamente.
ERRORE GRUPPO: il gruppo caffè (28) esegue, in modo non
corretto, il proprio ciclo di lavoro; spegnere la macchina e chiamare
il CENTRO DI ASSISTENZA AUTORIZZATO.
ERRORE POMPA
: una delle pompe ha subito un’avaria. Spe-
gnere la macchina e chiamare il CENTRO DI ASSISTENZA AUTORIZZATO.
ERRORE SENSORE 01
: appare quando un sensore di tempertura ha subito un’avaria. Spegnere la macchina e chiamare il
CENTRO DI ASSISTENZA AUTORIZZATO.
ERRORE TEMPER. 01
: appare quando una delle resistenze
delle caldaie ha subito un’avaria. Spegnere la macchina e chiamare il CENTRO DI ASSISTENZA AUTORIZZATO.
DECALCIFICAZIONE
: la macchina necessita di questo intervento e dopo aver eseguito il numero programmato di erogazioni.
Spegnerla e chiamare il CENTRO DI ASSISTENZA AUTORIZZATO.
Gli interventi di decalcificazione sono stabiliti da cicli di lavoro
della macchina, programmabili dal manutentore tecnico.
MANUTENZIONE
: appare quando la macchina necessita di
manutenzione e dopo aver eseguito il numero programmato di
erogazioni. Spegnere la macchina e chiamare il CENTRO DI ASSISTENZA AUTORIZZATO.
Gli interventi di manutenzione sono stabiliti da cicli di lavoro della
macchina, programmabili dal manutentore tecnico.
12.11 Spegnimento della macchina
Spegnimento automatico programmato
E’ possibile quando è attiva la funzione di
“ACCENSIONE
AUTOM.”
(Pr. 12.7.1) ed è stata effettuata la programmazione
di “
ORARI ON/OFF
” (Pr. 12.7.1).
All’ora programmata la macchina si pone in
“STANDBY”
.
Spegnimento manuale
Questo tipo di spegnimento è necessario quando non è attiva la
funzione di
“ACCENSIONE AUTOM.”
(Pr. 12.7.1).
Si ottiene ponendo sia l’interruttore generale (18) sia l’interruttore
onnipolare in posizione “0” o estraendo la spina.
Page 22
CONCETTO
18/120
Italiano
13 - MANUTENZIONE
ORDINARIA
Avvertenze
• In caso di anomalie di funzionamento, normalmente se-
gnalate dal display, spegnere immediatamente la macchina,
interrompere l’alimentazione elettrica per mezzo dell’inter-
ruttore onnipolare o sfilando la spina e contattare il CENTRO
DI ASSISTENZA più vicino.
•
Prima di eseguire qualsiasi intervento di manutenzione
e/o pulizia, sconnettere l’alimentazione elettrica per mezzo
dell’interruttore generale (18) e dell'interruttore onnipolare
(o sfilando la spina).
•
Ogni intervento va eseguito a macchina fredda.
•
Non eseguire alcun intervento di pulizia con la macchina
in
“STANDBY”
.
•
Non lavare mai i componenti della macchina in lavastoviglie.
•
Non utilizzare getti di acqua diretta.
13.1 Pulizia della macchina
• Va eseguita giornalmente e prima di ogni sosta prolungata della macchina al fine di evitare la solidificazione dei
depositi nei contenitori, nelle vasche e negli erogatori.
• I componenti smontabili della macchina che devono
essere sottoposti a pulizia, vanno lavati e sciacquati in acqua
corrente.
• Pulire i rivestimenti, i pannelli e i comandi della macchina
con panni soffici e moderatamente imbevuti di acqua tiepida.
• I componenti fissi e la macchina stessa vanno puliti solo
con acqua fredda o tiepida, utilizzando spugne non abrasive
e panni umidi.
• Tutte le parti da pulire sono facilmente accessibili e non
richiedono l’utilizzo di attrezzi.
Una manutenzione ed una pulizia regolari preservano e
mantengono efficiente la macchina per un periodo maggiore e garantiscono il rispetto delle normali norme igieniche.
La macchina segnala automaticamente quando devono
essere eseguiti gli interventi di manutenzione e/o
decalcificazione, il numero esatto delle erogazioni è visibile dal contascatti meccanico o sul display della macchina; il mancato intervento del Manutentore Tecnico può
provocare il blocco della macchina.
13.1.1 Erogatore caffè (F. 13)
Si possono rimuovere:
- la protezione superiore (A), dell’erogatore fisso (F), tirandola
verso l’alto;
- la guarnizione in gomma (H);
-l’erogatore mobile (G) tirandolo verso il basso;
-l’erogatore telescopico (E), sfilandolo dall’erogatore (G), dopo
aver premuto sui denti di aggancio (C) dell’elemento interno
(B).
Il convogliatore metallico (D) va pulito con un panno/spugna inumidito, senza essere smontato dell’erogatore fisso (F).
Pericolo di scottatura
Il convogliatore (D) è riscaldato da una resistenza interna; prima di procedere alla sua pulizia attendere che lo
stesso si sia sufficientemente raffreddato.
F. 1 3
A
B
C
D
F
G
E
H
Page 23
CONCETTO
19/120
Italiano
13.1.2 Gruppo caffè (F. 14)
Esaurire il caffè in grani, prima di eseguire la pulizia.
• Il gruppo va pulito periodicamente con le apposite pastiglie
(Pr. “12.7.1 Descrizione delle funzioni - LAVAGGIO GRUP-
PO”).
- Estrarre il gruppo caffè (28) afferandolo per l’apposita mani-
glia (A) e premendo il pulsante contrassegnato dall’indicazio-
ne “PRESS”.
- Lavare con abbondante acqua tiepida.
Non usare detergenti.
- Raschiare moderatamente la doccia superiore (B) con un cuc-
chiaino in materiale plastico.
F. 1 4
B
28
A
13.1.3 Vasca raccogligocce e relativa griglia
Sfilare la vasca raccogligocce (12) dalla macchina e lavarla in
acqua corrente, con particolare cura per la griglia.
13.1.4 Cassetto raccoglifondi
Lavare in acqua corrente il cassetto raccoglifondi (16) dopo aver
rimosso la vasca raccogligocce (12) e averlo sfilato dalla propria
sede.
13.1.5 Tubi erogatori vapore ed acqua calda
(escluso allestimento COFFEE)
Pulire i tubi (11-17) con un panno umido non abrasivo.
In caso di otturazione degli ugelli la parte terminale degli erogatori può essere svitata e gli ugelli riaperti con uno spillo.
13.1.6 Piano scaldatazze
Pulire il piano scaldatazze (4) con un panno umido non abrasivo.
13.1.7 Contenitore caffè
Pulire il contenitore caffè (6) con acqua, utilizzando un panno
umido non abrasivo.
F. 1 5
24
23
31
29
32
25
30
13.1.8 Pulizia del cappuccinatore
Non eseguire alcuna operazione di pulizia del cappuccinatore quando la macchina si trova in “standby”.
La pulizia va eseguita ogni qualvolta si utilizzi il
CAPPUCCINATORE, per evitare la solidificazione dei depositi.
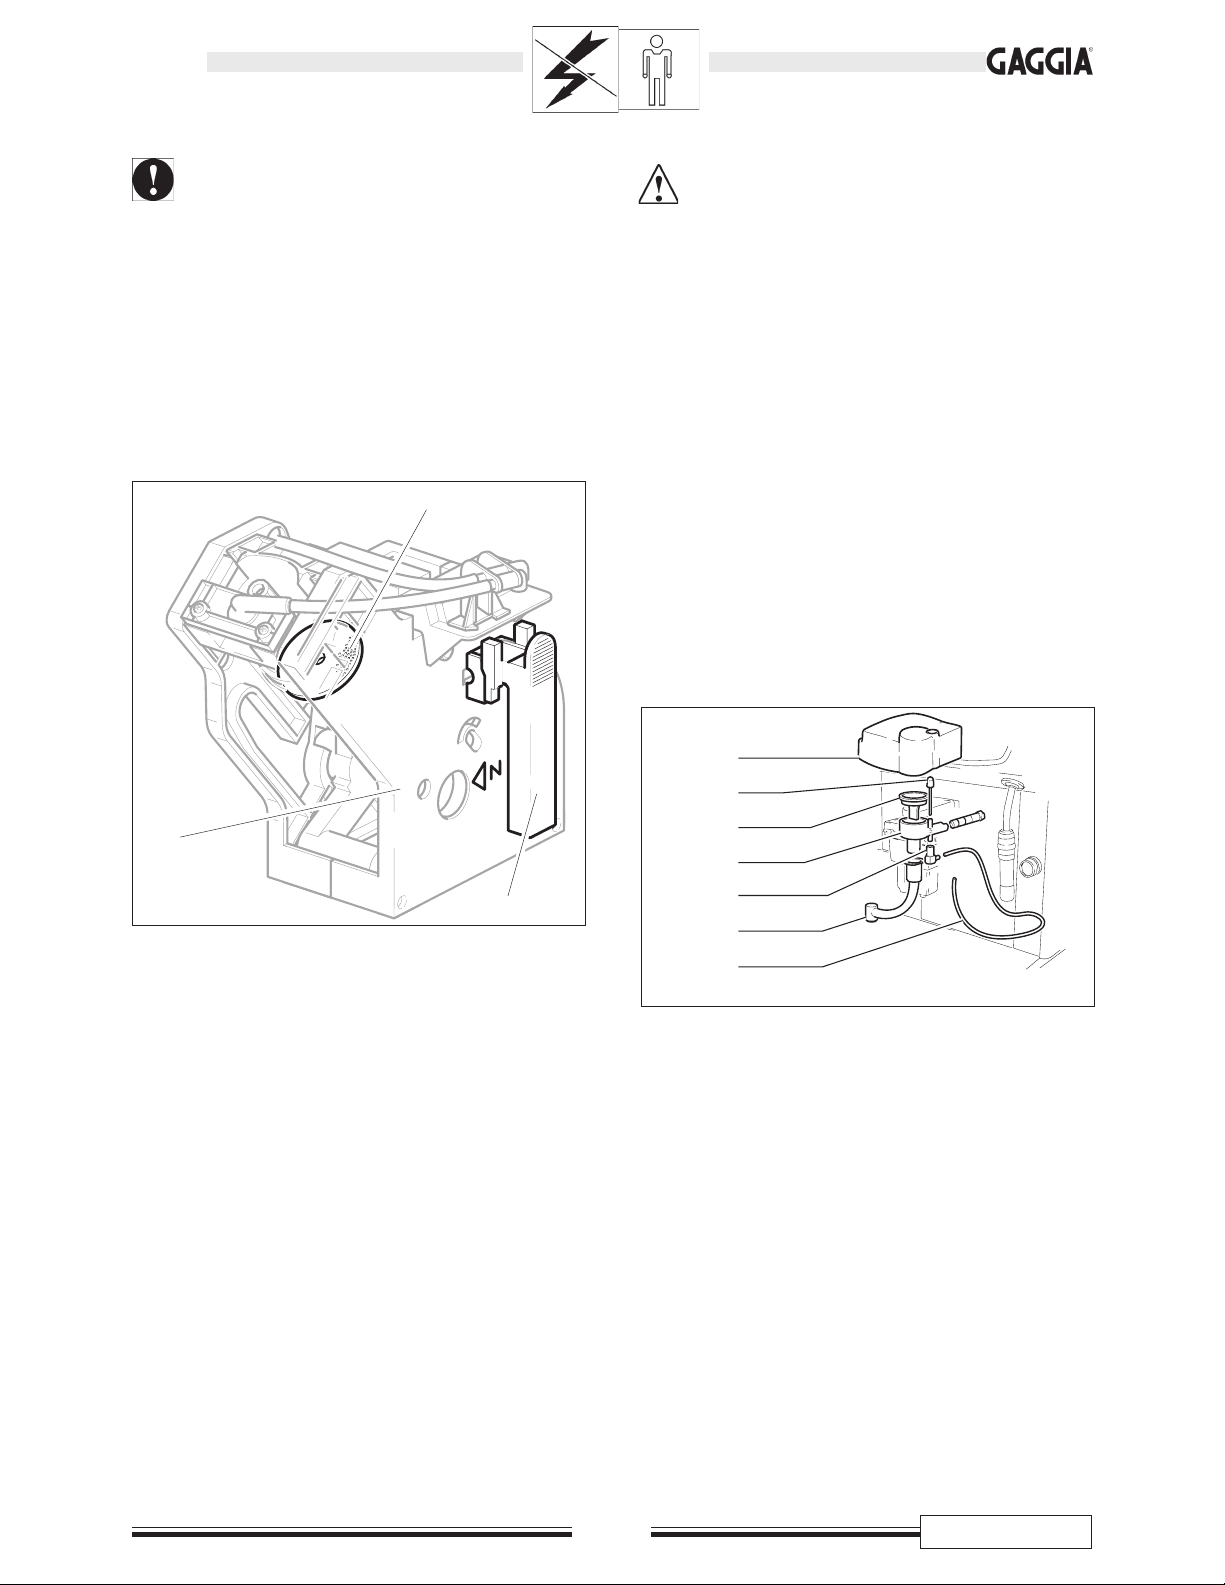
Tutti i componenti smontabili debbono essere lavati e
sciacquati in acqua corrente.
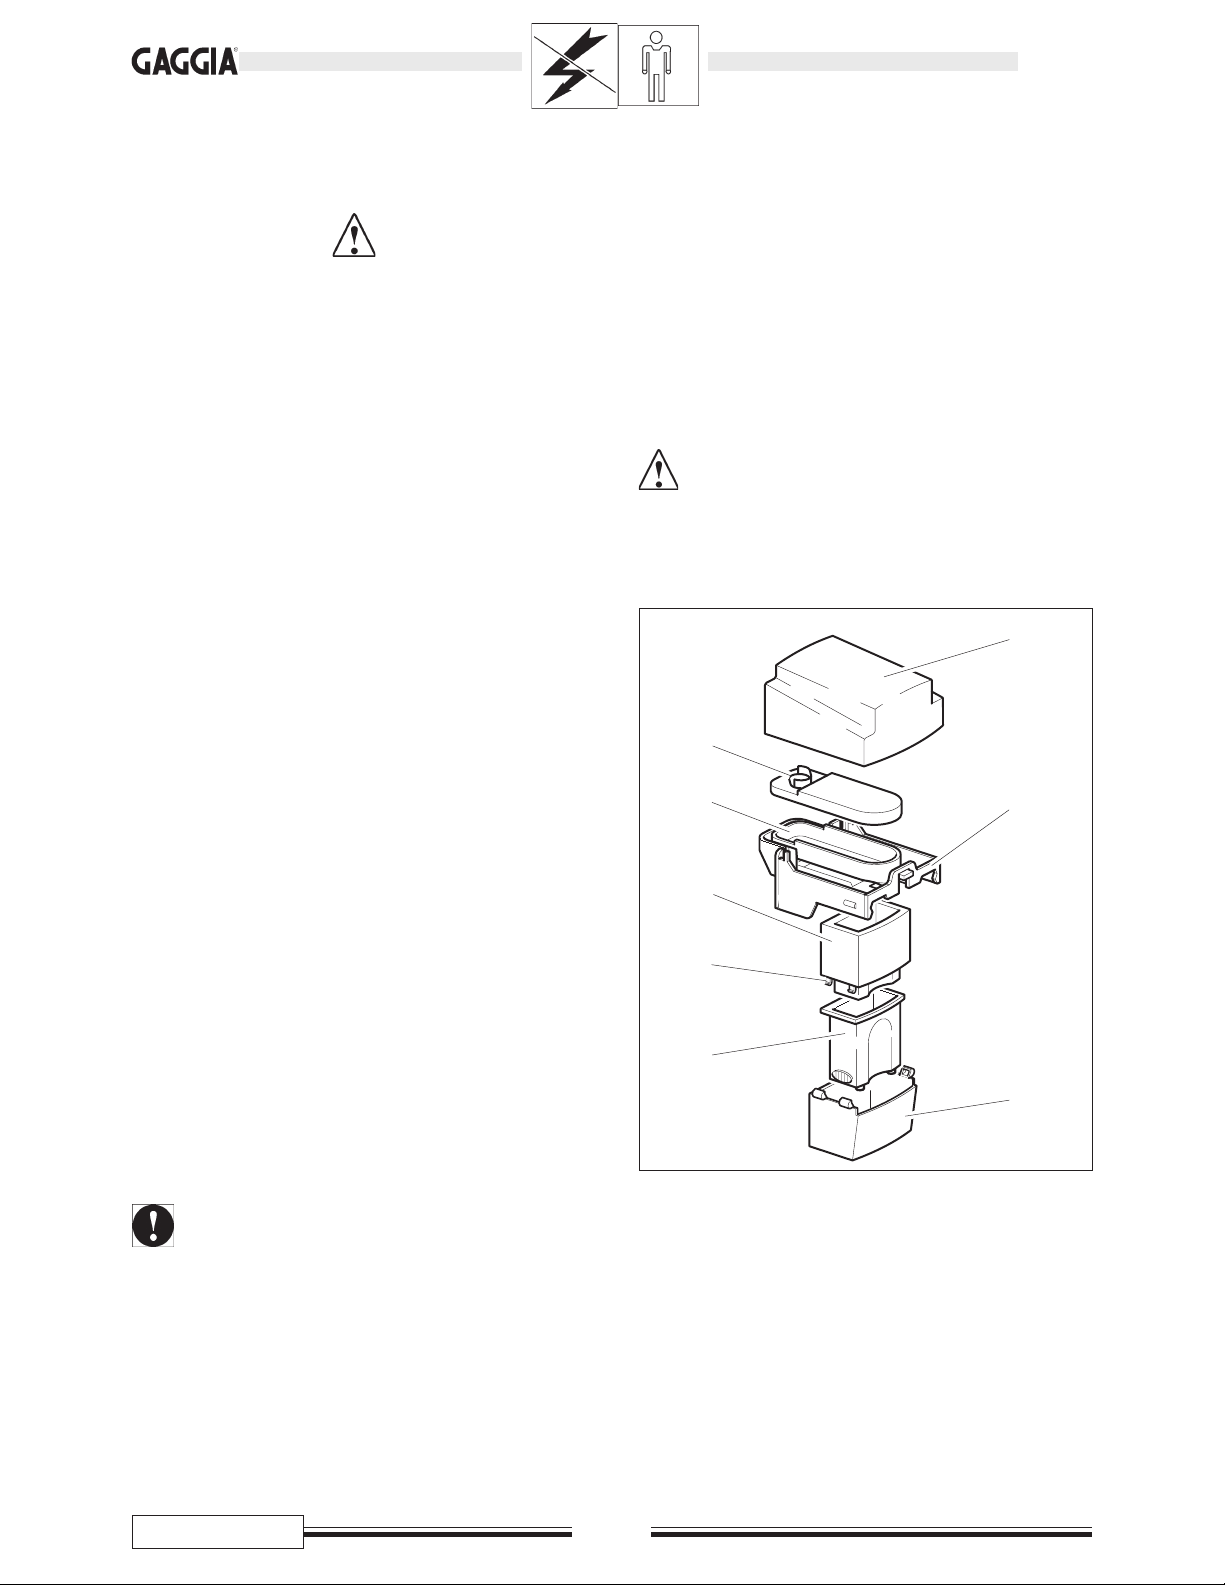
13.1.9 Gruppo erogatore cappuccino (F. 15)
Per pulire singolarmente gli elementi del gruppo cappuccinatore
occorre sfilare:
- la protezione superiore (24), estraendola verso l’alto;
- lo spillo di regolazione qualità crema (23);
- il diffusore aria (31) dal corpo cappuccinatore tirandolo verso
l’alto;
- il corpo cappuccinatore (29) tirandolo a sè;
- il raccordo (32) di collegamento dal tubo di aspirazione al
corpo cappuccinatore;
- il tubo erogatore mobile (25);
- il tubo di aspirazione latte (30).
Page 24
CONCETTO
20/120
Italiano
14 - MANUTENZIONE
STRAORDINARIA
NOTA - Fanno parte della manutenzione straordinaria, tutti gli
interventi di riparazione e sostituzione di parti. Sono
quindi di esclusiva competenza del Manutentore
Tecnico.
14.1 Blocco del macinacaffè
• Un corpo estraneo nel caffè in grani, può provocare il blocco
delle macine con conseguente bloccaggio della macchina,
evidenziato dal messaggio “ERRORE MACINA” (sul display).
• In questo caso, è necessario aprire il macinacaffè (20) e rimuovere il corpo estraneo.
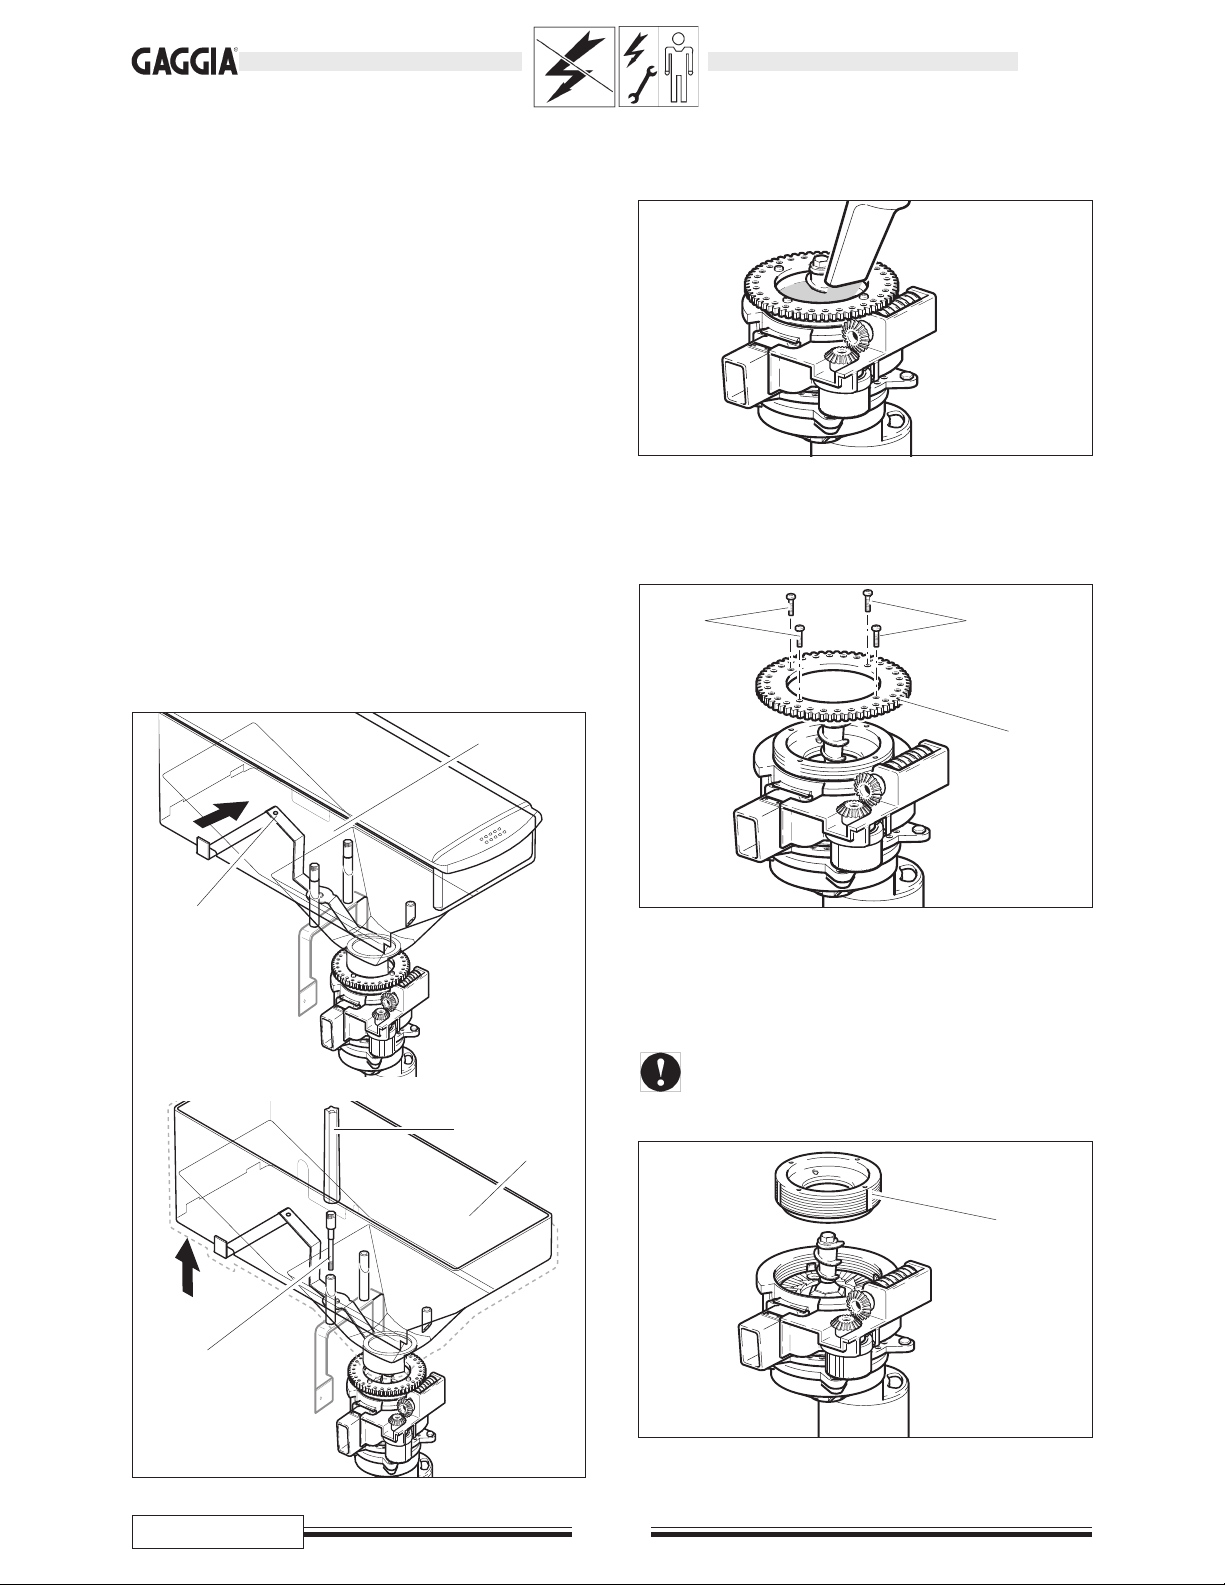
14.1.1 Smontaggio/montaggio del
macinacaffè
• Chiudere la paratia (A) del contenitore caffè (H).
• Rimuovere le viti (B) dal contenitore mediante l’attrezzo in do-
tazione (C). Sfilare il contenitore dalla macchina estraendolo
verso l’alto.
F. 1 6
H
B
H
A
C
• Tramite un aspirapolvere, rimuovere i grani di caffè all’ingres-
so del macinacaffè.
• Rimuovere le viti (D).
• Rimuovere la ruota dentata (E).
F. 1 7
F. 1 8
D
E
D
F. 1 9
F
• Svitare e rimuovere la ghiera di regolazione (F) e pulire entrambe le macine con l’ausilio di un aspirapolvere e di un
pennello.
Verificare lo stato di usura delle macine. In caso di danni
evidenti, sostituirle.
Page 25
CONCETTO
21/120
Italiano
F. 2 1
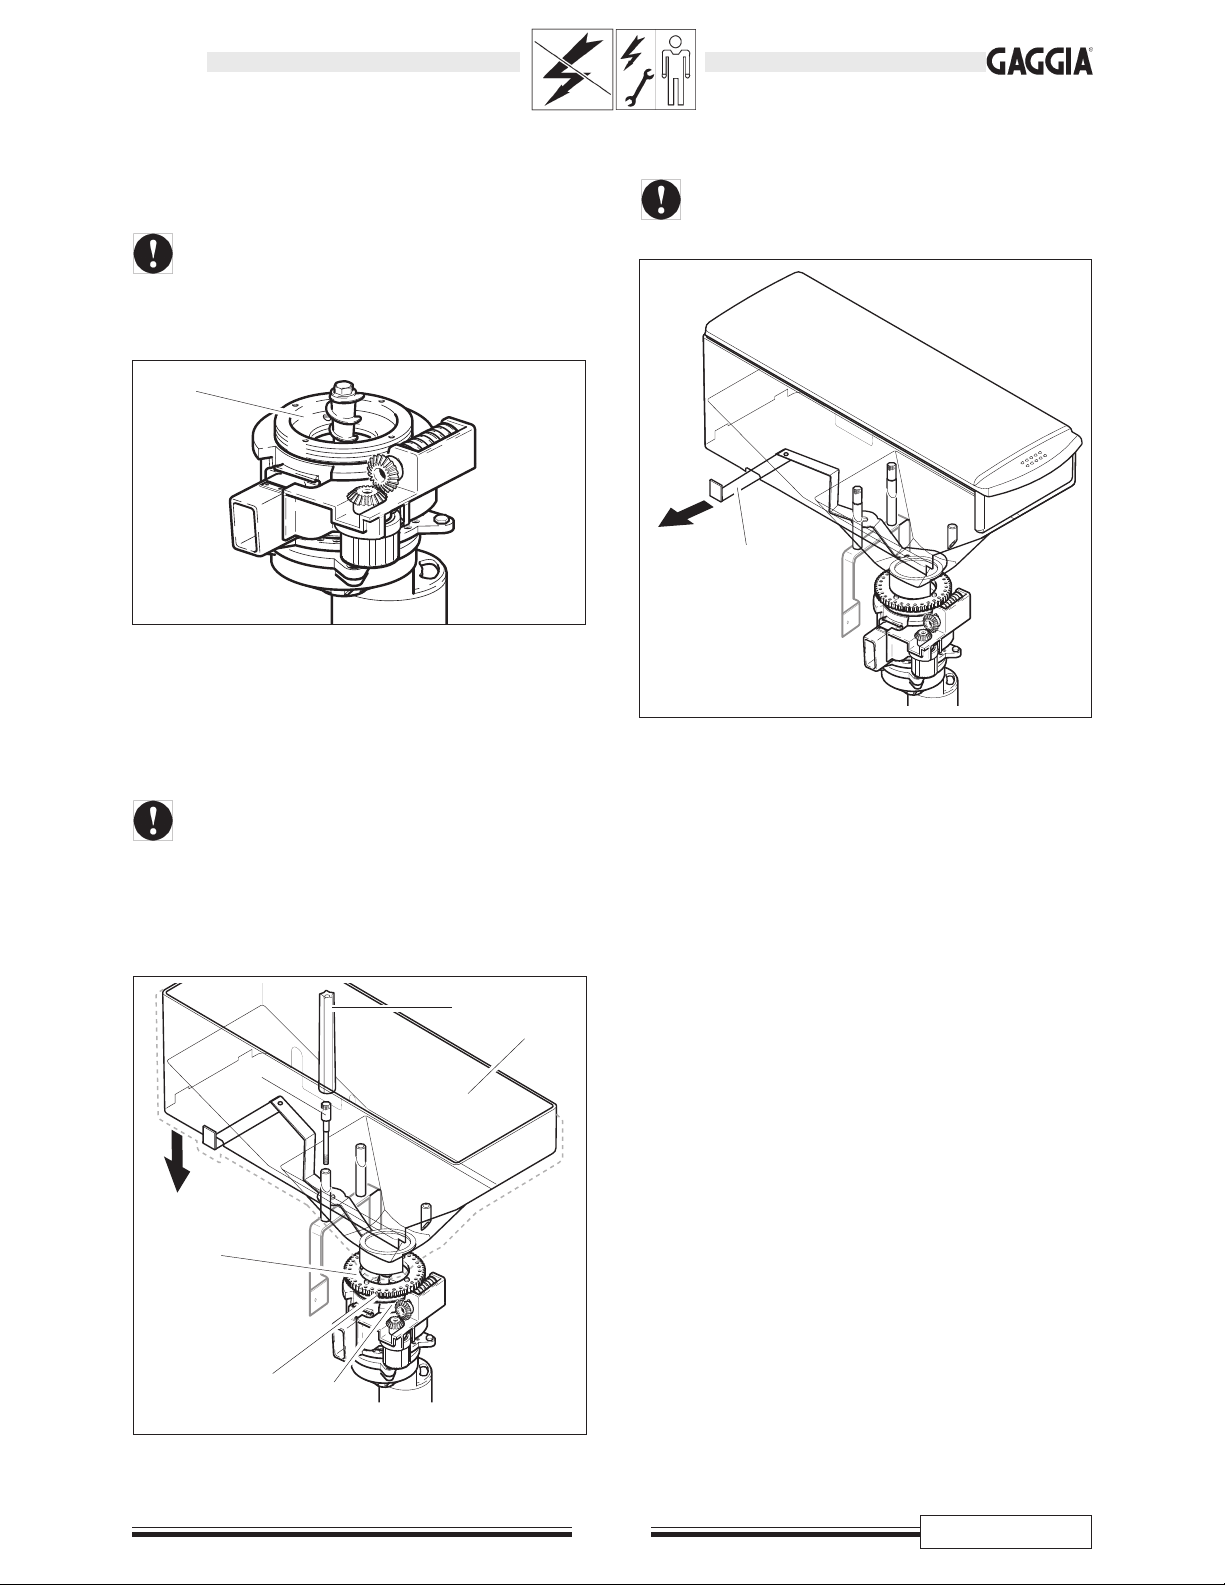
Per il rimontaggio del macinacaffè, procedere come segue:
• Avvitare a fine corsa, la ghiera di regolazione (F), quindi allentarla di 1/2 giro.
L’allentamento di 1/2 giro della ghiera di regolazione, è
fondamentale per evitare il blocco ed il danneggiamento
delle macine.
F. 2 0
F
• Riposizionare la ruota dentata (E) e bloccarla serrando le viti
(D).
• Riposizionare il contenitore caffè (H).
Prestare attenzione al posizionamento della guarnizione
(G) che deve entrare correttamente nella ruota dentata
(E) e nella ghiera (F).
• Fissare il contenitore (H) serrando le viti (B) con l’attrezzo (C).
G
E
F
B
H
C
• Aprire la paratia (A).
Per riprendere il normale impiego della macchina è ne-
cessario eseguire nuovamente la regolazione della
macinatura.
F. 2 2
A
15 - MESSA FUORI
SERVIZIO
In caso di messa fuori servizio della macchina occorre sconnetterla elettricamente ed idricamente, nonché svuotare tutte le vasche
di raccolta, le caldaie e le tubazioni e ripulirla (Pr. “13.1 Pulizia
della macchina”).
In caso di rottamazione si dovrà provvedere alla separazione
dei vari materiali utilizzati nella costruzione della macchina e provvedere al loro smaltimento in base alla loro composizione e alle
disposizioni di legge vigenti nel Paese di utilizzo.
Page 26
CONCETTO
22/120
Italiano
16 - INCONVENIENTI CAUSE E RIMEDI
Di seguito sono elencate alcune eventuali anomalie di funzionamento della macchina.
Quando nella casella “rimedio” appare il simbolo l’intervento deve essere eseguito dal Manutentore Tecnico.
INCONVENIENTE CAUSA RIMEDIO
La macchina non si accende
Nel display appare:
““
““
“
CASSETTOCASSETTO
CASSETTOCASSETTO
CASSETTO
FONDIFONDI
FONDIFONDI
FONDI
PIENOPIENO
PIENOPIENO
PIENO
””
””
”
Errore macina
Al posto del caffè esce soltanto acqua
Non esce acqua o vapore
Il caffè fuoriesce troppo rapidamente
Il caffè fuoriesce troppo lentamente
Il caffè non è a sufficienza caldo
Il caffè ha poca crema
La macchina impiega troppo tempo per
riscaldarsi, la portata dell’acqua è limitata
Il gruppo erogatore non può essere
estratto
Il gruppo erogatore non può essere
inserito
Manca tensione
Il contenitore fondi è pieno
Il macina caffè è bloccato
E’ stato premuto il tasto di selezione caffè
premacinato senza introdurre il caffè in pol-
vere nell’apposito vano
E’ intasato il foro del tubo vapore/acqua calda
La macinatura è troppo grossa
La macinatura è troppo fine
La tazza non è preriscaldata
La macchina non ha ancora raggiunto la giusta temperatura
La miscela non è adatta, il caffè non è fresco
di torrefazione, la polvere di caffè macinata
è macinata troppo fine o troppo grossa
Il circuito della macchina è intasato dal calcare
Il gruppo erogatore caffè non è nella sua
posizione base (N)
Il gruppo erogatore caffè non è nella sua
posizione base (N)
Verificare:
- che la spina sia collegata
- che l’interruttore onnipolare (se presente) sia
acceso
- i fusibili dell’impianto elettrico
- le connessioni elettriche
Vuotare il contenitore raccoglifondi e reinserirlo correttamente
Pulire il macinacaffè
(Pr. “14.1 Blocco del macinacaffè”)
Introdurre la dose di caffè nel vano e ripetere il
ciclo
Pulirlo con un ago sottile
Regolarla su un grado più fine
Regolarla su un grado più grosso
Preriscaldare la tazza sul piano scaldatazze
Attendere il raggiungimento della temperatura
ottimale
Cambiare miscela di caffè o verificarne il gra-
do di macinatura (se premacinata)
Decalcificare la macchina
Spegnere e riaccendere la macchina per mezzo dell’interruttore generale
Ruotare manualmente il gruppo fino a portarlo
nella posizione base (N), facendo coincidere
il riferimento sull'albero con la freccia N (F. 14)
Page 27

CONCETTO
23/120
Italiano
ANNOTAZIONI
.....................................................................................................................................................................
.....................................................................................................................................................................
.....................................................................................................................................................................
.....................................................................................................................................................................
.....................................................................................................................................................................
.....................................................................................................................................................................
.....................................................................................................................................................................
.....................................................................................................................................................................
.....................................................................................................................................................................
.....................................................................................................................................................................
.....................................................................................................................................................................
.....................................................................................................................................................................
.....................................................................................................................................................................
.....................................................................................................................................................................
.....................................................................................................................................................................
.....................................................................................................................................................................
.....................................................................................................................................................................
.....................................................................................................................................................................
.....................................................................................................................................................................
.....................................................................................................................................................................
.....................................................................................................................................................................
.....................................................................................................................................................................
.....................................................................................................................................................................
.....................................................................................................................................................................
.....................................................................................................................................................................
.....................................................................................................................................................................
.....................................................................................................................................................................
.....................................................................................................................................................................
.....................................................................................................................................................................
.....................................................................................................................................................................
Page 28

CONCETTO
24/120
English
Via C. Gomes, 16
ROBECCO SUL NAVIGLIO (MILANO) - ITALY
Tel. 02/9471654 - Fax 02/9470888
www.gaggia.it
INTRODUCTION
• This manual is an integral part of this machine and it must be kept in a handy place, in good conditions, for as long as the machine will
be operating (including any transfer of ownership). It aims at giving the necessary information about a correct and safe use of this
machine.
• In case of lost or deterioration of this brochure, please ask a copy to the Authorized customer Service Center, specifying the model and
the year of construction of your machine.
• The Authorized Customer Service Centers, are also available for any technical explanation, information on its operation, technical
assistance and spare parts supply.
• The subjects mentioned aim, in an exclusive way, at ensuring the proper use of the machine, in the safest way for users, the very machine
and the environment. This is made through a simple diagnostics of troubles and anomalous functioning, and by carrying out some simple
checks and maintenance operations, always respecting the precautions explained in the following pages and the current Safety and
Health Regulations
• Before any intervention read very carefully and be sure to have completely understood the subject of this brochure.
• If several persons use (individually) this machine, everyone must previously and very carefully study the Instruction Manual.
• The manufacturer reserves the right to modify and improve the described models, without being bound to give any notice.
• For any particular need contact the Distributor or your Country Importer (if any) or the Constructor.
• All the rights of this brochure are reserved to GAGGIA. Any copy or even partial divulgation, not expressively authorized in writing, are
strongly forbidden.
Page 29

CONCETTO
25/120
English
CONTENTS
1 - MACHINE COMPOSITION. ........................... 26
2 - REFERENCE NOTES........................................ 27
2.1 Abbreviations....................................... 27
2.2 Editorial symbols................................... 27
3 - USER.............................................................. 27
4 - MAINTENANCE TECHNICIAN. ...................... 27
5 - INTENDED USE OF THE MACHINE. ............... 27
6 - WARNINGS AND CARES. ............................. 28
7 - GENERAL PRECAUTIONARY MEASURES. ..... 28
8 - INFORMATION ABOUT THE MACHINE. ....... 28
8.1 Identification data ................................. 28
8.2 Technical characteristics ......................... 28
8.3 Overall dimensions ............................... 28
8.5 Cappuccinatore Group (F. 4) .................. 29
8.4 Brew group (F. 2) .................................. 29
9 - SAFETY DEVICES. .......................................... 29
9.1 Hot water and steam spouts
(except COFFEE set-up) (F. 1) .................. 29
9.2 Residual risks ....................................... 29
10 -INSTALLATION. ............................................. 30
10.1 Location notes ...................................... 30
10.2 Positioning and water connection............. 30
10.3 Electric connection ................................ 30
10.4 Serial port connection ............................ 31
11 -FIRST SWITCHING-ON.................................. 31
12 -USE OF THE MACHINE.................................. 31
12.1 Machine statuses .................................. 32
12.2 Manual switching-on ............................. 32
12.3 Programmed automatic switching-on ......... 32
12.4 Stand-by temporary switching-on.............. 32
12.5 Control panel....................................... 33
12.6 Brewing buttons programming ................. 34
12.7 Menu programmable functions ................ 36
12.8 Cream adjustment ................................. 40
12.9 Grind adjustment .................................. 40
12.10 Display messages ................................. 41
12.11 Machine switching-off ............................ 41
13 -ROUTINE MAINTENANCE. ............................ 42
13.1 Machine cleaning................................. 42
14 -UNSCHEDULED MAINTENANCE. .................. 44
14.1 Jamming of the coffee grinder unit ............ 44
15 -OUT OF SERVICE. .......................................... 45
16 -TROUBLES, CAUSES AND CURES. ................ 46
Page 30
CONCETTO
26/120
English
13
1617
18
10
11
9
8
32
1 4 5 6
7
14
15
12
19
20
21
28
>
<
ent
esc
>
<
ent
esc
23
24
25
22
26
27
1 - MACHINE COMPOSITION
NOTE - If not differently indicated by the text, the position numbers of the parts of the machine always refer to this figure.
A CE label
1 Left hand side panel
2 Glass
3 Back panel
4 Cup warming plate
5 Pre-ground coffee door
6 Coffee bean hopper
7 Right hand side panel
8 Control panel
9 Rubber protector
10 Spout clamp (CAPPUCCINO set-up)
11 Hot water spout (except COFFEE set-up)
12 Drip tray
13 Steam knob (except COFFEE set-up)
Clockwise: steam jet open
Counterclockwise: steam jet closed
14 Door
15 Rubber protector
16 Dump box
17 Steam spout (except COFFEE set-up)
18 Main switch
“I” - Electrical functions enabled – Machine on –
Pilot light on.
“O” - Electrical functions disabled – Machine off -
“I” button pilot light off.
19 Grind adjustment knob
20 Grinder unit
21 Mechanical pulse counter
It displays the number of brewings.
22 Brew group
23 Cream adjusting pin (CAPPUCCINO set-up)
Upwards manually adjustable pin
24 Brew group cover
25 Milk brewing spout (CAPPUCCINO set-up)
26 Mobile spout
27 Telescopic spout
28 Coffee unit
F. 1
A
Page 31

CONCETTO
27/120
English
2 - REFERENCE NOTES
2.1 Abbreviations
F. = Figure
P. = Page
Pr . = Paragraph
T. = Table
2.2 Editorial symbols
WARNING! Pay the utmost attention to the meaning of symbols.
They are aimed at drawing the attention of the reader on technical
notions or safety warnings. Therefore they have to be considered
as real “memoranda”. Refer to the list of symbols every time any
doubt about their meaning arouses.
T. 1
WARNING! - Information about the user’s
safety and the machine integrity.
WARNING! - Operations that are
potentially dangerous for the maintenance
technician.
IMPORTANT! - It draws the attention on a
particularly important subject.
Maintenance technician - Operations
strictly concerning personnel in charge of
unscheduled maintenance or repairs.
Machine off - Operations to be done
without power supply .
User - Actions concerning the machine user.
3 - USER
• The adult to whom the following operations are strictly
reserved:
- Operating, protecting and switching off the machine.
- Coffee beans supply.
- Brewing parameters adjustment.
- Grounds and liquids tray draining.
- External cleaning of the machine.
The use of this machine is strictly forbidden to
children, teenagers and non self-sufficient persons.
4 - MAINTENANCE
TECHNICIAN
• Person in charge of the following operations:
- Installation, machine starting, adjustment and setting
up.
- Unscheduled maintenance, repairs and spare parts
replacement.
5 - INTENDED USE OF THE
MACHINE
• The machines described in this manual have been designed,
manufactured and protected for the automatic programmable
brewing of the following beverages:
- instantly-ground coffee bean-based;
- pre-ground coffee-based;
- milk and instantly-ground coffee bean-based
(CAPPUCCINO set-up).
- hot water and steam (except COFFEE set-up) for beverage
preparation and heating.
- hot milk (CAPPUCCINO set-up).
The Manufacturer disclaims any responsibility for the
improper use of the machine and any damage resulting.
The improper use also implies the cancellation of any
warranty.
Page 32

CONCETTO
28/120
English
8 - INFORMATION ABOUT
THE MACHINE
8.1 Identification data
In the (A) plate the following identification data of the machine are
mentioned:
• Manufacturer and marking
• model
• serial number
• manufacturing year
• mains electric voltage (V) and frequency (Hz)
• electrical power consumption (W)
• number of phases of the electric line (PH)
• pressure allowed in the water network (MPa)
NOTE -In case of any request to the Authorized Customer
Service Centers, model and serial number must be
specified.
8.2 Technical characteristics
Mains voltage ..........................................230V/400V 2N
A-weighted sound pressur level is ...................... below 70 dB
Length of the power cord .................................... 1,500 mm
Installed power
Mod. LUXE ....................................................... 3,250 W
Mod. COFFEE .................................................. 1,400 W
Mod. CAPPUCCINO ......................................... 3,250 W
Water pressure ...............................0.1÷0.8 MPa (1÷8 bar)
Weight ..................................................................kg 60
Bean hopper capacity................................................. kg 2
NOTE -The machines can be programmed for any type of
dosing. Most electric parts are powered by 24 Vdc.
8.3 Overall dimensions
>
<
e
n
t
e
s
c
>
<
e
n
t
e
s
c
LPh
470 550 675
F. 2
L
P
h
6 - WARNINGS AND CARES
• In routine maintenance, never use detergents, diluents, solvents,
etc...
• Cleaning has to be limited at parts of the machine being not
powered and must be carried out with mild and biodegradable
products. Moreover the main switch or the all-pole switch have
to be on the “O”(OFF) position, or the plug has to be disconnected from the power point.
• The routine maintenance has to be carried out only by competent or adequately trained personnel, having the necessary
psychophysical requirements, in the whole respect of the instructions mentioned below and according to the current Safety and
Health Regulations.
• It is strictly forbidden to place and/or leave on the machine
tools or anything which could potentially be prejudicial to the
people safety and to the integrity of the machine.
• Changing and adjustments (even if slight) as well as the use of
non original spare parts, release the Manufacturer from any
responsibility for any type of damage and implies the cancellation of any warranty right.
• Use only drinking water.
• The milk to be used for the CAPPUCCINATORE must be put in a
fridge at a temperature not over 4° C; do not leave it outside the
fridge for more than 30 minutes.
• If the CAPPUCCINATORE is not used for more than an hour,
carry out a cleaning cycle of the spouts before re-using.
To clean the spouts:
- immerse the milk supply tube in a container of water;
- press the milk key ;
- wait until the water has been dispensed.
PLEASE NOTE: Do not use hot water.
7 - GENERAL PRECAUTIONARY
MEASURES
• Before operating the machine, be previously sure not to have
any doubt about the contents of this manual. Non respecting the
rules explained in it releases the Manufacturer from any
responsibility for any type of injury to persons and/or damage
to things.
• Keep this brochure for any further reference.
• Previously verify (in case of a new installation), the respect of the
minimal regulations of safety, positioning and machine operating
conditions, checking the environment conditions (temperature,
humidity, light) and the suitability of the place of operation.
• Any damage to the electric power cord requires the intervention
of the Technical Authorized Customer Service or of the
maintenance technician.
• Do not use the machine on the outside.
• In case of bad functioning, always ask for the intervention of the
maintenance technician.
• Do not use water jets to clean the machine.
Page 33

CONCETTO
29/120
English
F. 3
F. 4
8.4 Brew group (F. 2)
The position of this group (22) can be adjusted according to the
height of the container used .
In fact the mobile spout (26) can be moved toward the outside and
the telescopic spout upwards or downwards (27).
Many brewing heights can be thus obtained.
NOTE - If the container usually used is higher than 90 mm the
spout can me moved downwards (26).
8.5 Cappuccinatore Group (F. 4)
The cappuccinatore group, is composed of:
- milk suction tube (30);
- spout clamp (10);
- cappuccinatore group(29);
- cream adjusting pin (23);
- adjustable brewing spout (25).
22
26
27
>
<
ent
esc
>
<
ent
esc
9 - SAFETY DEVICES
NOTE - The machines described in this brochure are in conformity
with the specific current European Regulations and
therefore all their potentially dangerous parts are
protected .
• Any overpressure in the water plant that produces steam
and hot water, is detected by 3 safety valves.
• A thermostat avoids boilers overheating.
• The position of the drip tray (12), of the dump box (16)
and of the door (14), is controlled by 3 microswitches, which
stop the machine if one of those parts is not correctly placed the display will indicate which component is out of place.
• An electrical pulse counter and a mechanical one, record
the number or brewings and allow to schedule the routine
maintenance.
9.1 Hot water and steam spouts
(except COFFEE set-up) (F. 1)
Steam spouts (17) and hot water spouts (11) are equipped with
special rubber protectors (9 and 15) so that they can be grabbed
and adjusted even when hot.
9.2 Residual risks
• The structural characteristics of the machines described in this
brochure, do not protect the user from the direct steam or hot
water spouts (except COFFEE set-up).
• Danger of burns – During hot water and steam
brewing do not turn the spouts towards yourself or someone
else. Grab the spout only by the respective anti-burns protectors
(9 - 15).
Do not use containers that are not made of food materials.
Page 34

CONCETTO
30/120
English
F. 5
10 - INSTALLATION
10.1 Location notes
• The machine has to be installed in a dry and protected place,
at the following ambient temperature : 10° C - 40° C; maximum
humidity: 90%.
10.2 Positioning and water connection
NOTE - Check if the surface where the machine is installed has
the adequate dimension and solidity to support the
machine safely.
• Drill a hole in the support (A - F. 5).
• Place the machine on the support and insert the electric power
cord (B - F. 5) in the hole (A).
• Connect a drain tube to the coupling (C - F. 6) and fix it with a
rack clamp.
• Connect (using tube and coupling made of food materials only)
the machine to the drinking water network, through the coupling
(D - F. 6).
We suggest supplying the machine with water treated with
a descaling device, above all in case of a high calcium
and magnesium content (hard water).
• Place definitely the machine on the support (the circles E - F. 5,
indicate the suitable position of the adjustable feet).
• Level off the machine using the adjustable feet (F - F. 6).
F. 7
Neutral (N) – Blue
Phase (L1) – Brown
Phase (L2) – Black
Ground – Yellow/green
F. 8
CH
(Switzerland)
CEI
Power cord type H07RNF
section 4x2,5 mm
2
Connection of the two phase electric line plug 400 V2N~
10.3 Electric connection
NOTE - In case of plants with a 400 V two-phase current, use
the two phases to supply the machine with 230 V single
phase current (F. 7). As for the 230 V single-phase
connection, require the special installation kit (code
%1034.R09).
F. 6
L
1
L
2
N
L
2
L
1
A
E E
E
E
B
F
C
D
MACHINE FRONT
Page 35

CONCETTO
31/120
English
F. 9
10.4 Serial port connection
Through the serial port the machine can be connected to the
AUTHORIZED CUSTOMER SERVICE CENTER’s equipment, for
checks or programming operations (A - F. 9).
12 - USE OF THE MACHINE
Read carefully this brochure until you get a good
understanding of the machine, before starting to operate
it.
After a long time of machine inactivity, read the previous
paragraph “First switching-on” before re-operating
the machine.
11 - FIRST SWITCHING-ON
- Fill the hopper (6) with the selected coffee beans blend.
Be sure the coffee does not contain foreign bodies which
could be dangerous for grinders.
- Check if the removable components (12 and 16) are in the
right position and if the door (14) is closed.
If they are not, when the machine is switched-on, the display
will indicate which component is in the wrong position.
- Turn the all-pole switch on “I”.
- Switch on the machine through the switch (18);
the message “WARMING UP” will be displayed.
- When the message “READY FOR USE” is displayed :
- Adjust the brew group (26 and 27) to obtain the suitable
height depending on the container used (Pr. 8.4).
- Place one or two containers under the brew group.
- Select the beverage and press the corresponding button.
Although buttons are previously programmed on a
standard base, check your beverage has the selected
features. If not, they must be reprogrammed (Pr. 12.6).
Depending on the current regulations of the Country where
the machine operates, the cable connecting the electric
line has to be pre-set or equipped with an all-pole switch
(with a minimum contact opening of 3 mm), (or with a
plug in accordance with the same regulations).
• The all-pole switch has to be adequate to the machine
power consumption and must be able to intercept every
voltage polarity.
• Check if the electric cables of the system are
proportioned to the machine power consumption.
The connection point (electric plug or all-pole switch) must
be located in an easily reachable place, in order to
disconnect the machine from the electric line in case of
need.
• Connect the cord (B - F. 6) to the electric network.
A
Page 36

CONCETTO
32/120
English
12.1 Machine statuses
With regard to the power supply, the machine can have the
following statuses:
Off and electrically insulated
- Main switch (18) and all-pole switch on the ”0“ position
(or plug disconnected).
- Only the memory for the programmed data storing is enabled.
On
- Main switch (18) and all-pole switch on the “I“ position (or
plug connected).
- All the functions are enabled and the display (8a) is on.
In standby mode (machine switched off but not electrically
insulated):
- Main switch (18) is on “I” position.
- The following functions are enabled: “AUTOM. SWITCHING-
ON”, “ANTI-FREEZING”, if selected, and “CLOCK”, as
well as the display and the memory for the programmed data
storing.
- The display’s backlight is off.
12.2 Manual switching-on
This switching-on is necessary when the machine is in the “off
and electrically insulated” status (Pr. 12.1). Proceed as
explained is Pr. 11 excluding, in case, the beverage brewing
check.
12.3 Programmed automatic
switching-on
The machine has to be on “STANDBY” and the function “AUTOM.
SWITCHING-ON” has to be enabled.
The machine will automatically switch-on at the programmed time.
12.4 Stand-by temporary switching-on
Manual switching-on when the machine on “STANDBY”.
Press and hold the button for 3 seconds.
The machine will automatically return on “STANDBY”, 60
minutes after the last operation.
Page 37

CONCETTO
33/120
English
F. 1 0
12.5 Control panel
The brewing buttons have to be pressed for less
than 1 second.
It switches the machine temporarily on (“STANDBY”)
and confirms the buttons (H - G) selection.
F
1 strong
coffee
Weak
Strong
Weak
Strong
2 strong
coffee
1 weak
coffee
2 weak
coffee
LIGHT COFFEE Brewing obtained from pre-ground coffee doses and instantly-ground coffee
COFFEE IN JUG Multiple automatic coffee brewing.
COFFEE WITH A DASH OF MILK Brewing obtained from ground coffee and a small milk dose
CAPPUCCINO Brewing obtained from hot milk and one ground coffee dose
HOT MILK Brewing obtained from milk
HOT WATER (except COFFEE set-up) Brewing obtained from water.
(*)
(*)
(*)
COFFEE Brewing obtained from instantly-ground coffee
PREGROUND COFFEE Brewing obtained from pre-ground coffee doses.
• The definitions “Strong coffee” - “Weak coffee” mean two different levels of brewing.
• When sold, the machines are programmed on a standard base.
• This brewing is programmed only for a single pre-ground coffee dose
introduced instantly in the machine.
• Press the button (once for “Pre-ground Coffee”, twice for “Coffee light”) and introduce
one coffee dose through the door (5).
• To obtain light coffee, a small quantity of ground coffee will be added.
• Up to 8 brewings can be programmed in the same container, (max 2.5 liters). To
set the number of brewings press the button repeatedly. The number of
programmed doses will be displayed. After a 2.5 liter brewing, wait 2 minutes
before programming a new brewing.
• This beverage consists in instantly ground coffee and a small dose of hot milk.
• This beverage consists in instantly ground coffee and hot milk.
• Up to 8 brewings in the same container can be programmed (max 1 liter). Push the
button several times The number of programmed doses will be displayed.
(**) - (***)
(**) - (***)
(***)
Page 38

CONCETTO
34/120
English
STEAM
(Except COFFEE set-up)
• Immerse the spout (17) in the beverage to be heated.
• Turn the knob counterclockwise (13). When the required
temperature is reached, close the knob (clockwise).
After every operation, clean the steam spout with a (damp
and clean) cloth/sponge from the residues of the previously
heated beverage.
(*) Before any brewing, place the milk suction tube (30 - F. 4)
inside the milk container.
(*) (*) Adjust the cream quantity using the pin (23 - F. 4)
(Pr. 12.8).
12.6 Brewing buttons programming
The beverage quantities linked to the respective buttons, can be
directly programmed by keypad.
To program and re-program the buttons follow these instructions:
- Switch on the machine and prepare it for the use
- Place the container under the selected spout
- Push and hold the button. The message “
PROGRAMMING
”
will be displayed
- Release the button and set the dose to be brewed
(***) N.B.: Keys , and can be preset for brewing
beverages with any possible combination of milk and coffee. Please refer to an authorized customer service center
to change default settings.
Here is the button programming scheme.
Page 39

English
COFFEE
-Hold-
1 strong coffee
START
Brewing
STOP
to program the other coffees follow the above instructions via the following buttons:
2 strong coffees
1 weak coffee and 2 weak coffees
COFFEE WITH A DASH OF MILK
C
O
F
F
E
E
START
-
Hold
--
M
I
L
Brewing Brewing
STOP
K
(7 sec)
The message
“PROGRAMMING”
will be displayed
CAPPUCCINO
-
Hold
C
--
O
F
F
E
E
START
STOP
M
I
L
K
(7 sec)
The message
“PROGRAMMING”
will be displayed
START
START
Hold
Hold
-
STOP
-
BrewingBrewing
STOP
HOT MILK
(7 sec)
The message
“PROGRAMMING”
will be displayed
COFFE IN JUG
(5 sec)
HOT WATER
-
Hold
-
START
Brewing
START
START
STOP
Hold
-
Hold
-
-
Brewing
-
Brewing
STOP
STOP
NOTE - This programming is only possible if the
function “PROGRAMM. HOT WATER”
is on the “ON” mode (Pr. 12.7.1).
35/120
CONCETTO
Page 40

CONCETTO
36/120
English
12.7 Menu programmable functions
NOTE - The machine allows some adjustments and setting-ups
through the menu programming, in order to meet all
customer requirements.
During the programming the following buttons take on a
different function from the one they usually have during
the use of the machine
(programming to enter the programming menu
access) hold it for 5 sec.
(the message:
““
““
“
PROGRAMMINGPROGRAMMING
PROGRAMMINGPROGRAMMING
PROGRAMMING
””
””
”
will be displayed);
(Enter) to switch from one menu level to the
following; to prepare a datum for the
adjustment; to confirm a datum or a
function;
(Escape) to cancel the non-confirmed adjustments;
to go back to the previous level, up to
the menu exit.
(Down) go to the following item in the same
programming level; increase the value
of the datum to be adjusted.
(Up) go to the previous item in the same
programming level; decrease the value
of the datum to be adjusted.
Some functions also enable the programming of one or more
data (already programmed on standard figures).
To adjust the figures to be re-programmed:
- Select the function.
- Confirm the function through the button (Enter).
- The cursor will blink under the figure to be adjusted.
- Press the buttons (Up) or (Down) to adjust its value.
- Confirm the adjustment through the button (Enter).
PROGRAMMING
5 sec.
LANGUAGE
CUP WARMING PLATE
GROUND DOSE
TEMPERATURES
PREBREWING
PROGR. HOT WATER
MILK PROGRAMMING
HOT WATER MIXING
PROGRAMMED CLEANING
BREW GROUP CLEANING
CLOCK
AUTOM. SWITCHING-ON
TIMES ON/OFF
COUNTERS
ANTI-FREEZING
UNBLOCK
CODE: 0000
OFF
ON
OFF4: mtwtfss 00:00
OFF3: mtwtfss 00:00
ON 4: mtwtfss 00:00
ON 3: mtwtfss 00:00
OFF1: mtwtfss 00:00
ON 1: mtwtfss 00:00
OFF2: mtwtfss 00:00
ON 2: mtwtfss 00:00
OFF
ON
OFF
ON
OFF
ON
OFF
ON
OFF
ON
OFF
SHORT
LONG
MIN. XXX
FOLLOW INSTRUCTIONS
16:34 THU 8 NOV 2001
FIRST COFFEE
COFFEE
LOW
HIGH
STANDARD
LOW
HIGH
STANDARD
COFFEE WITH A
DASH OF MILK
CAPPUCCINO
JUG
2 WEAK COFFEES
1 WEAK COFFEE
1 STRONG COFFEE
2 STRONG COFFEES
OFF
ON
ECC.
FRANCAIS
DEUTSCH
ITALIANO
WATER TOTAL 000000
COFFEE TOTAL 000000
Page 41

CONCETTO
37/120
English
12.7.1 Description of functions
LANGUAGE
- Language can be selected through the “LANGUAGE” menu
.
CUP WARMING PLATE
- By selecting “ON”, the cup warming plate is switched on
together with the machine.
- By selecting “OFF”, the cup warming plate remains off.
GROUND DOSE
The quantity of ground coffee, programmed during the installation,
can be adjusted at every brewing.
- By selecting “LOW” or “HIGH”, the dose is decreased or
increased by 1 g.
- By selecting “STANDARD”, the machine will brew the dose
initially programmed by the Maintenance Technician.
TEMPERATURES
The brewing temperature of water, programmed during the
installation, can be adjusted at every brewing.
- By selecting “LOW” the temperature decreases by 3°C.
- By selecting “HIGH” the temperature increases by 3 °C.
- By selecting “STANDARD” the temperature will the one
programmed by the Maintenance Technician.
NOTE - The temperature “first coffee” is selected at the first
brewing, when the machine is switched on.
PREBREWING
This function allows a short dwell time during the first brewing
phase. This can improve the quality of the coffee which, during the
dwell, has the time to “infuse” into the first part of water received.
Selecting:
- “OFF”, no pre-brewing is performed.
- “SHORT”, the “pre-brewing” programmed by the Maintenance
Technician is performed.
- “LONG”, the “pre-brewing” is extended by 1 sec.
PROGR. HOT WATER
This function enables to set the quantity of brewed hot water. By
selecting:
- “ON”, the button , (Pr. 12.6) can be programmed.
- “OFF”, the button cannot be programmed, therefore the
quantity of hot water has to be manually adjusted.
functions explanation
follows in the next page
PROGRAMMING
LANGUAGE
CUP WARMING PLATE
GROUND DOSE
TEMPERATURES
PREBREWING
ITALIANO
DEUTSCH
FRANCAIS
ECC.
ON
OFF
1 STRONG COFFEE
1 WEAK COFFEE
2 WEAK COFFEES
CAPPUCCINO
JUG
COFFEE
FIRST COFFEE
LOW
LOW
STANDARD
HIGH
STANDARD
HIGH
OFF
SHORT
PROGR. HOT WATER
ON
OFF
LONG
MILK PROGRAMMING
2 STRONG COFFEES
COFFEE WITH A
DASH OF MILK
Page 42

CONCETTO
38/120
English
MILK PROGRAMMING
The milk quantity programming can be enabled by selecting:
- “ON”, the button (Pr. 12.6) is programmed .
- “
OFF
”, the button cannot be programmed, and the dose
has to be manually adjusted.
HOT WATER MIXING
While the different types of beverages are brewed, the machine
adds a certain amount of hot water, according to the programming.
By selecting:
- “ON”, the mixing is performed
- “
OFF
”, NO hot water will be added to the beverage.
NOTE - If the function is disabled the programmed figures remain
unchanged and ready to be used when the function is
re-activated.
PROGRAMMED CLEANING
This function enables the brewing of a small hot water quantity
(abt 5 cc), in order to avoid any deposits in the brew group. This
cleaning starts automatically after the programmed time (20÷240
minutes), from the last coffee brewing. By selecting:
- “ON”, the adjustment cursor blinks under the last right figure,
and the value can be increased or decreased by 10 min;
every adjustment must always be confirmed.
- “
OFF
”, no cleaning is performed.
NOTE - During the cleaning, the message
“PROGRAMMED“PROGRAMMED
“PROGRAMMED“PROGRAMMED
“PROGRAMMED
CLEANING” CLEANING”
CLEANING” CLEANING”
CLEANING”
will be displayed
;
cleaning can also be activated manually by holding the
button for 3 seconds.
BREW GROUP CLEANING
This function enables the cleaning of the brew group (28) using
the provided tablets (for any information about tablets ask to an
Authorized Customer Service Center).
Procedures:
- The process begins from: “BREW GROUP CLEANING”.
- Press ; on display: “INSERT TABLET IN THE GROUP”.
- Remove the brew group; on display: “INSERT THE GROUP”;
- Put the tablet inside the brew group and refit the group; on
display: “CLOSE DOOR”.
- Close the door; on display: “CLEANING IN PROGRESS”.
The cleaning cycle begins; at the end of the cycle the message
on display will be “REMOVE THE GROUP AND WASH IN
WATER”.
- Remove the brew group; on display: “INSERT THE GROUP”.
- Wash the brew group in running water.
- Refit the brew group; on display: “CLOSE DOOR”
- Close the door; on display: “CLEANING COMPLETED.
PRESS STAR BUTTON” ;
Press to exit the menu definitely and make the machine ready
to be used.
CLOCK
This function enables the clock and calendar set-up.
- By selecting “CLOCK”, the cursor blinks on the hours, that can
thus be adjusted.
- After confirming the hour setting, the cursor moves on the next
figure to be adjusted (the minutes, then the day, the month
and finally the year).
PROGR. HOT WATER
MILK PROGRAMMING
HOT WATER MIXING
PROGRAMMED CLEANING
BREW GRO UP CLEANING
CLOCK
AUTOM. SWITCHING-ON
ON
OFF
ON MIN. 240
OFF
INSERT TABLET
IN THE GROUP
INSERT THE GROUP
CLOSE DOOR
CLEANING IN PROGRESS
REMOVE THE GROUP AND
WASH IN WATER
INSERT THE GROUP
CLOSE DOOR
CLEANING COMPLETED
PRESS STAR BUTTON
16:34 GI 8 NOV 2001
ON
OFF
Page 43

CONCETTO
39/120
English
TIMES ON/OFF
This function enables to program the automatic switching-on and
off times over a whole week.
- By selecting “TIMES ON/OFF”, the cursor blinks on the day
to be modified.
- Enter the day, using the button (down), turning the small
letter into a capital one.
- Remove the day from the setting, using the button (up), turning
the capital letter into a small one.
- Confirm the adjustment.
To set the time use the same procedure followed to set the clock.
Example:
the function explanation scheme shows a machine
programming which schedules the machine switching-on at 08:00
and the switching-off at 18:00 from Monday to Friday. The
switching-on at 09:00 and off at 12:30 on Saturday, and a stop
over the whole Sunday.
COUNTERS
One of these two functions indicates the total number of coffee
brewing cycles; the other indicates the number of hot water brewing
cycles.
If the automatic dosing of hot water is disabled (see “HOT WATER
PROG.” function), one cycle will be counted every time the
electrovalve is switched-on.
NOTE - Both functions cannot be reset and are just reference
functions.
ANTI-FREEZING
When the machine on “STANDBY” is exposed to low
temperatures, the anti-freezing function is important to prevent the
damages caused by icing-up in boilers. This function keeps the
boilers temperature at the minimum value to prevent freezing.
- By selecting “ON”, the function is enabled.
- By selecting “OFF”, the function is disabled.
NOTE - This function can only be enabled if also function
“AUTOM. SWITCHING-ON”
is on and if the machine
is on
“STANDBY”
. When the function is enabled the
message
“ANTI-FREEZING”
will be displayed.
UNBLOCK
This function enables to temporarily unblock the machine when the
number of cycles programmed for maintenance and descaling
has been reached. To get the unblock code refer to the firm that
has installed the machine or that supplies maintenance. Then enter
the code into the function:
- Select “UNBLOCK”; the cursor will blink under the first figure to
be modified;
- enter the datum and confirm;
- after every confirmation, the cursor blinks under the following
figure and goes on until the code is completed.
AUTOM. SWITCHING-ON
This function enables the programming of automatic switching-on
and off of the machine, in two different time ranges, every day of
the week. By selecting:
- “ON”, the function can be programmed .
- “OFF”, the machine can only be switched on and off manually,
through the main switch (18).
Any automatic switching-on and off times previously set, remain
stored anyway.
- To program the time ranges and the days see the following
function “TIMES ON/OFF”.
NOTE - The automatic switching-on of the machine is possible
only if the main switch (18) is on the “I” position.
CLOCK
AUTOM. SWITCHING-ON
TIMES ON/OFF
COUNTERS
ANTI-FREEZING
UNBLOCK
CODE: 0000
OFF
ON
OFF4: mtwtfss 00:00
OFF3: mtwtfss 00:00
ON 4: mtwtfss 00:00
ON 3: mtwtfss 00:00
OFF1: mtwtfss 00:00
ON 1: mtwtfss 00:00
OFF2: mtwtfss 00:00
ON 2: mtwtfss 00:00
OFF
ON
COFFEE TOTALE 000000
WATER TOTALE 000000
Page 44

CONCETTO
40/120
English
F. 1 1
19
F. 1 2
14
12.8 Cream adjustment
The quality of cream in beverages is proportional to the adjustment
of the pin (F. 11).
• By lifting the pin, a higher quantity of cream is brewed.
• By lowering the pin, a lower quantity of cream is brewed.
12.9 Grind adjustment
Whatever the coffee blend is, a very fine grinding (notch
on low values) increases the density, the cream quantity
and the brewing time of the beverage. On the contrary a
coarse grinding (notch on high values) decreases the
density, the cream, as well as the brewing time.
Do not turn the knob counterclockwise to the limit stop
(19 - F. 12); this action causes the grinders tightening
and the consequent machine block.
If any foreign body in the coffee blend should cause the
block of grinders and the subsequent block of the
machine(on display:
“GRINDER ERROR”
), refer to an
Authorized Customer Service Center.
NOTE - The grinding is preset by the Manufacturer on standard
values, but it can be adjusted in the following way:
• Open the door (14 - F. 12), turn the knob (19 - F. 12)
anticlockwise to obtain a finer grinding (the notch moves onto
lower values), and clockwise to obtain a coarser grinding (the
notch moves onto higher values).
Page 45

CONCETTO
41/120
English
12.10 Display messages
NOTE - Here follows a list of alarm messages (in addition to
those explained before) that can be displayed and the
relative machine conditions.
STANDBY: the machine is switched off (the main switch is on “I”)
and the automatic switching-on/off functions enabled (Pr. 12.7.1).
ANTI-FREEZING: the machine is switched off (the main switch
is on “I”) and the function protecting boilers from icing-up is enabled
(Pr.12.7.1).
PROGRAMMED CLEANING: it is displayed when the machine is
performing the automatic cleaning of the brew group (Pr. 12.7.1).
ADD COFFEE: the machine, during the grinding, detects the lack
of coffee beans in the relative container (6).
FILL CIRCUIT: this message is displayed if the machine detects
the lack of water in the boilers during a beverage brewing.
After checking if there is actually water in the supply network,
press the button ( ^ in the COFFEE version), until water comes
out properly from the spout (11) and from the brew group (27). In
the “COFFEE” version the water comes out only from the brew
group
PROGRAMMING: it is displayed during the machine programming
(Pr. 12.6).
REMOVE GROUNDS: it is displayed if the dump box (16) is almost
full (the machine performed the programmed number of brewings).
More brewings can anyway be performed.
OUT OF SERVICE – REMOVE GROUNDS: the dump box (16)
is completely full (the machine performed the programmed number
of brewings).
The machine is blocked and no more brewings can be performed
until the dump box is emptied.
CLOSE DOOR: the door (14) is not properly closed.
INSERT BOX: the dump box (16) is not properly inserted.
INSERT DRIP TRAY: the drip tray (12) is not properly inserted.
INSERT GROUP: the brew group (28) is not properly inserted.
GROUP ERROR: the brew group (28) is not properly performing
his working cycle; switch the machine off and call the AUTHORIZED
CUSTOMER SERVICE CENTER.
PUMP ERROR: one of the pumps is damaged. Switch the machine
off and call the AUTHORIZED CUSTOMER SERVICE CENTER.
SENSOR ERROR 01: is displayed when a temperature sensor
fails. Switch the machine off and call the AUTHORIZED CUSTOMER
SERVICE CENTER.
TEMPER. ERROR 01: is displayed when one of the boilers
resistance is damaged. Switch the machine off and call the
AUTHORIZED CUSTOMER SERVICE CENTER.
DESCALING: it is displayed when the machine needs a descaling
intervention, and after performing the programmed number of
brewings. Switch the machine off and call the AUTHORIZED
CUSTOMER SERVICE CENTER.
The descaling interventions are set on working cycles of the
machine, and can be programmed by the maintenance
technician.
MAINTENANCE: it is displayed when the machine needs
maintenance and after performing the programmed number of
brewings. Switch the machine off and refer to the AUTHORIZED
CUSTOMER SERVICE CENTER.
The maintenance interventions are set on working cycles of the
machine, and can be programmed by the maintenance
technician.
12.11 Machine switching-off
Programmed automatic switching-off
This is possible when the function “AUTOM.SWITCHING-ON”
(Pr. 12.7.1) is enabled and the function “TIMES ON/OFF”
(Pr. 12.7.1) has been programmed .
At the programmed time the machine goes on “STANDBY”.
Manual switching-off
This switching-off is necessary if the function “ AUTOM.
SWITCHING-ON” (Pr. 12.7.1) is not enabled.
It can be obtained by switching both the main switch (18) and the
all-pole switch on the “0” position or by disconnecting the plug.
Page 46

CONCETTO
42/120
English
13 - ROUTINE
MAINTENANCE
Warning
• In case of troubles, usually indicated on display, switch
the machine immediately off, disconnect the power supply
through the all-pole switch or by disconnecting the plug, and
call the nearest CUSTOMER SERVICE.
•
Before intervening with any type of maintenance or
cleaning, disconnect the power supply through the main switch
(18) and the all-pole switch(or disconnecting the plug).
•
Any operation must be done when the machine is cool.
•
Never perform any cleaning operation when the machine
is on
“STANDBY”
.
•
Never wash any part of the machine in the dishwasher.
•
Do not use direct water jets.
13.1 Machine cleaning
• The cleaning must be done every day and before an
extended out-of-service times, in order to avoid the solidification
of residues in containers, trays and brew groups.
• The removable parts of the machine which have to be
cleaned, must be washed and rinsed in running water.
• To clean coatings, panels and the machine controls, use soft
cloths moderately soaked in warm water.
• To clean the fixed parts and the very machine, use only cold
or warm water, non-abrasive sponges and damp cloths.
• All the parts to be cleaned are easily reachable and do
not require the use of any tool.
Routine maintenance and cleaning preserve and extend
the machine efficiency and durability, as well as granting
the respect of the hygienic standard regulations.
The machine automatically indicates when maintenance
and descaling operations are required. The exact number
of brewings is indicated by the mechanical counter or by
the machine display. If the Maintenance Technician fails
to intervene, the machine could block.
13.1.1 Brew group (F. 13)
Removable parts:
- upper protection panel (A), of the fixed brew group (F) can be
pulled upwards;
- rubber gasket (H);
- mobile dispenser (G) can be pulled downwards;
- telescopic spout (E), can be removed from the brew group
(G), after pressing the coupling teeth (C) of the inner unit (B).
Clean the metal conveyor (D) with a damp cloth or sponge, without
removing it from the fixed brew group (F).
Danger of burns
The conveyor (D) is heated by an internal heating element;
therefore wait for its cooling before cleaning it.
F. 1 3
A
B
C
D
F
G
E
H
Page 47

CONCETTO
43/120
English
13.1.2 Brew group (F. 14)
Cleaning must be carried out with the group empty.
• Periodically clean the brew group using the special tablets
(Pr. “12.7.1 Explanation of functions – CLEANING GROUP”).
- Remove the brew group (28) pulling the appropriate handle
(A) and pressing the button marked by “PRESS”.
- Wash abundantly with warm water.
Do not use detergents.
- Delicately scrape the upper filter (B) with a plastic coffee spoon.
F. 1 4
B
28
A
13.1.3 Drip tray and relative grill
Remove the drip tray (12) from the machine and wash it with
running water, paying particular attention to the grill.
13.1.4 Dump box
Remove the drip tray (12), remove the dump box (16) from its
place and then wash it with running water .
13.1.5 Steam and hot water spouts
(except COFFEE set-up)
Clean the spouts (11-17) with a non-abrasive damp cloth.
If the nozzles are clogged the final section of the spouts can be
unscrewed, and the nozzles can be cleared with a pin.
13.1.6 Cup warming plate
Use a non abrasive damp cloth to clean the cup warming plate
(4).
13.1.7 Coffee bean hopper
Use a non abrasive damp cloth to clean the coffee bean hopper
(6).
F. 1 5
24
23
31
29
32
25
30
13.1.8 Cappuccinatore cleaning
Never clean the cappuccinatore when the machine is on
“standby”.
Every time the CAPPUCCINATORE is used, it must be
cleaned in order to avoid the solidification of residues.
All the removable parts must be washed and rinsed in
running water.
13.1.9 Cappuccino brew group (F. 15)
To clean each part of the cappuccinatore group separately, remove:
- upper protection panel (24), pulling it upwards;
- cream adjusting pin (23);
- air diffuser (31) from the cappuccinatore group, pulling upwards;
- cappuccinatore group (29) by pulling;
- joint (32) connecting the suction pipe to the cappuccinatore;
- adjustable brewing spout (25);
- milk suction tube (30).
Page 48

CONCETTO
44/120
English
14 - UNSCHEDULED
MAINTENANCE
NOTE- Unscheduled maintenance includes every repairing or
part replacing. The Maintenance Technician is the
only person authorized to perform these operations.
14.1 Jamming of the coffee grinder
unit
• A foreign body among the coffee beans can cause the grinders
jamming and the subsequent machine block; the message
“GRINDER ERROR” will be displayed.
• In this case open the coffee grinder unit (20) and remove the
foreign body.
14.1.1 Grinder unit assembly/disassembly
• Close the bean hopper (H) bulkhead (A)
• Remove the screws (B) from the container using the appropriate
tool (C). Remove the container from the machine pulling
upwards.
F. 1 6
H
B
H
A
C
• Remove the coffee beans on the grinder’s top with a vacuum
cleaner.
• Remove the screws (D).
• Remove the gearwheel (E).
F. 1 7
F. 1 8
D
E
D
F. 1 9
F
• Unscrew and remove the adjustment ring nut (F) and clean
both grinders with a vacuum cleaner and a brush.
Check the grinder’s degree of wear. In case of manifest
damages, they must be replaced.
Page 49

CONCETTO
45/120
English
F. 2 1
To re-assemble the coffee grinder unit, do as follows:
• Screw fully the adjustment ring nut (F), then unscrew it
by 1/2 turn.
This 1/2 turn untightening of ring nut is necessary to
avoid grinders jamming and damage.
F. 2 0
F
• Replace the gearwheel (E) and fix it tightening the screws (D).
• Replace the coffee bean hopper (H).
Be careful to place the gasket properly (G). It has to
correctly engage with the gearwheel (E) and the ring nut
(F).
• Fix the container (H) tightening the screws (B) with the
appropriate tool (C).
G
E
F
B
H
C
• Open the bulkhead (A).
Before re-operating the machine, a new grind
adjustment is required.
F. 2 2
A
15 - OUT OF SERVICE
In case you will put the machine out of service, disconnect the
power and the water supply, empty the drip trays, boilers and
piping and clean the machine (Pr. “13.1 Machine cleaning”).
If the machine is scrapped, the different materials composing
the machine have to be separated and disposed of according to
their composition and to the current State regulations.
Page 50

CONCETTO
46/120
English
16 - TROUBLES, CAUSES AND CURES
Here is a list of the possible machine troubles.
The symbol in the “cure” box means that the operation must be carried out by the Maintenance Technician only.
TROUBLE CAUSE
CURE
The machine does not start
Display message:
““
““
“
DUMPDUMP
DUMPDUMP
DUMP
BOXBOX
BOXBOX
BOX
FULLFULL
FULLFULL
FULL
””
””
”
Grinder error
Instead of coffee only water is
brewed
No water or steam supply
Coffee flows too rapidly
Coffee flows too slowly
Coffee is not hot enough
Coffee has not enough cream
The machine requires too much time
to warm up, the water quantity is
reduced
The brew group cannot be removed
The brew group cannot be refit
No voltage
Dump box full
Coffee grinder unit blocked
The button selecting pre-ground coffee has
been pressed but the relative container has
not been filled with instant coffee.
The steam/hot water spout’s hole is
clogged
Grinding is too coarse
Grinding is too fine
The cup has not been preheated
The machine has not yet reached the
suitable temperature
The coffee blend is not appropriate, coffee
is not fresh off the roasting, the coffee powder
has been ground too finely or too coarsely.
The machine circuit is clogged by scale
The brew group is not in the right position
(N)
The brew group is not in the right position
(N)
Check:
- if the plug is connected
- if the all-pole switch (if any) is on
- the system fuses
- the electric connections
Empty the dump box and reintroduce it
properly
Clean the coffee grinder (Pr. “14.1
Jamming of the coffee grinder unit”)
Place the coffee dose in the relative hopper
and restart the cycle
Clean it with a thin needle
Set a finer grinding
Set a coarser grinding
Preheat the cup on the cup warming plate
Wait for the machine to reach the suitable
temperature
Change the coffee blend or check its
grinding (if pre-ground)
Descale the machine
Switch the machine on and off through the
main switch
Manually turn the group onto the standard
position (N), matching the reference mark
placed on the structure with the arrow N
(F. 14)
Page 51

CONCETTO
47/120
English
NOTES
.....................................................................................................................................................................
.....................................................................................................................................................................
.....................................................................................................................................................................
.....................................................................................................................................................................
.....................................................................................................................................................................
.....................................................................................................................................................................
.....................................................................................................................................................................
.....................................................................................................................................................................
.....................................................................................................................................................................
.....................................................................................................................................................................
.....................................................................................................................................................................
.....................................................................................................................................................................
.....................................................................................................................................................................
.....................................................................................................................................................................
.....................................................................................................................................................................
.....................................................................................................................................................................
.....................................................................................................................................................................
.....................................................................................................................................................................
.....................................................................................................................................................................
.....................................................................................................................................................................
.....................................................................................................................................................................
.....................................................................................................................................................................
.....................................................................................................................................................................
.....................................................................................................................................................................
.....................................................................................................................................................................
.....................................................................................................................................................................
.....................................................................................................................................................................
.....................................................................................................................................................................
.....................................................................................................................................................................
.....................................................................................................................................................................
Page 52

CONCETTO
48/120
Deutsch
Via C. Gomes, 16
ROBECCO SUL NAVIGLIO (MILANO) - ITALY
Tel. 02/9471654 - Fax 02/9470888
www.gaggia.it
VORWORT
• Dieses Handbuch ist ein Bestandteil der Maschine und muss daher während der gesamten Betriebslebensdauer der Maschine (auch im
Fall eines Besitzerwechsels) sorgfältig an einem leicht zugänglichen Ort aufbewahrt werden. Zweck des Handbuchs ist die Vermittlung
von den für eine kompetente und sichere Verwendung der Maschine notwendigen Informationen.
• Sollte das Handbuch verloren gehen oder beschädigt werden, ist unter Angabe des Modells und Herstellungsjahres eine Kopie davon
bei einer autorisierten Kundendienststelle anzufordern.
• Die autorisierten Kundendienststellen stehen außerdem für alle technischen Erklärungen, Informationen zum Betrieb, den technischen
Kundendienst und die Lieferung von Ersatzteilen zur Verfügung.
• Die behandelten Argumente dienen ausschließlich der sowohl für die Personen, als auch für die Maschine und die Umgebung sicheren
Verwendung der Maschine. Sie helfen bei der einfachen Diagnose von Störungen und anomalen Betriebsbedingungen, bei der Durchführung einfacher Kontroll- und Wartungsarbeiten unter strikter Einhaltung der auf den nächsten Seiten angeführten Bestimmungen und
geltenden Vorschriften zur Sicherheit und Gesundheit.
• Vor jedem Eingriff den Inhalt dieser Ausgabe aufmerksam lesen und sicherstellen, dass dieser auch richtig verstanden wurde.
• Wird die Maschine von mehreren Personen (einzeln) verwendet, muss jeder von ihnen das Handbuch genauestens lesen.
• Der Hersteller behält sich das Recht vor, ohne Vorankündigung Änderungen und Verbesserungen an den betreffenden Modellen dur-
chzuführen.
• Wenden Sie sich im Bedarfsfall an den Händler oder Importeur Ihres Landes (wenn vorhanden) bzw. direkt an den Hersteller.
• Die Firma GAGGIA behält sich alle Rechte der vorliegenden Ausgabe vor. Auch teilweise Vervielfältigungen oder die Verbreitung sind
strikt verboten, wenn sie nicht zuvor ausdrücklich schriftlich genehmigt wurden.
Page 53

CONCETTO
49/120
Deutsch
INHALTSVERZEICHNIS
1 - BESTANDTEILE DER MASCHINE. ................... 50
2 - HINWEISE ZUR VERWENDUNG DES
HANDBUCHS. ............................................... 51
2.1 Abkürzungen ....................................... 51
2.2 Verwendete Symbole ............................. 51
3 - BEDIENER . .................................................... 51
4 - WARTUNGSTECHNIKER. ............................... 51
5 - VERWENDUNGSZWECK DER MASCHINE. ... 51
6 -
HINWEISE UND VORSICHTSMASSNAHMEN
..52
7 - ALLGEMEINE VORSICHTSMASSNAHMEN. ... 52
8 - INFORMATIONEN ZUR MASCHINE. ............ 52
8.1 Identifikationsdaten ............................... 52
8.2 Technische Eigenschaften ....................... 52
8.3 Raumbedarf ......................................... 52
8.4 Ausgabeeinheit (Abb. 2) ........................ 53
8.5 Cappuccinatore (Abb. 4) ....................... 53
9 - SICHERHEITSVORRICHTUNGEN. .................. 53
9.1 Dampf- und Heißwasserrohr
(fehlen beim Modell COFFEE) (Abb. 1) ..... 53
9.2 Weitere Gefahren................................. 53
10 -AUFSTELLUNG. ............................................. 54
10.1 Hinweise zum Standort .......................... 54
10.2 Aufstellung und Wasseranschluss ............. 54
10.3 Elektrischer Anschluss ............................. 54
10.4 Anschluss an seriellen Eingang ................ 55
11 -ERSTE INBETRIEBNAHME DER MASCHINE...55
12 -GEBRAUCH DER MASCHINE. ........................ 55
12.1 Zustände der Maschine ......................... 56
12.2 Manuelle Einschaltung ........................... 56
12.3
Automatische, programmierte Einschaltung ..
56
12.4 Zeitweilige Einschaltung aus Standby ....... 56
12.5 Bedienfeld ........................................... 57
12.6 Programmierung der Ausgabetasten ......... 58
12.7 Programmierbare Menüfunktionen ............ 60
12.8 Einstellung des Schaums......................... 64
12.9 Einstellung der Mahlfeinheit .................... 64
12.10 Displayanzeigen................................... 65
12.11 Ausschaltung der Maschine .................... 65
13 -PLANMÄSSIGE WARTUNG. .......................... 66
13.1 Reinigung der Maschine ........................ 66
14 -AUSSERPLANMÄSSIGE WARTUNG. ............. 68
14.1 Mahlwerkblockierung ............................ 68
15 -AUSSERBETRIEBNAHME. .............................. 69
16 -FUNKTIONSSTÖRUNGEN,
URSACHEN UND ABHILFEN. ........................ 70
Page 54

CONCETTO
50/120
Deutsch
13
1617
18
10
11
9
8
32
1 4 5 6
7
14
15
12
19
20
21
28
>
<
ent
esc
>
<
ent
esc
23
24
25
22
26
27
1 - BESTANDTEILE DER MASCHINE
HINWEIS - Wenn nicht ausdrücklich anders angeführt, beziehen sich die Nummern zur Angabe der Position der Maschinenteile auf
diese Abbildung.
A CE-Schild
1 Linke Seitenwand
2 Blende
3 Rückwand
4 Wärmeplatte
5 Abdeckung für vorgemahlenen Kaffee
6 Bohnenbehälter
7 Rechte Seitenwand
8 Bedienfeld
9 Verbrennungsschutz
10 Schlauchklemme (Modell CAPPUCCINO)
11 Heißwasserrohr (fehlt beim Modell COFFEE)
12 Abtropfschale
13 Dampfventil (fehlt beim Modell COFFEE)
Im Uhrzeigersinn: Dampfentnahme öffnen
Gegen den Uhrzeigersinn: Dampfentnahme schließen
14 Tür
15 Verbrennungsschutz
16 Kaffeesatzbehälter
17 Dampfausgabe (fehlt beim Modell COFFEE)
18 Hauptschalter
“I” - Elektrische Funktionen freigegeben – Maschine
eingeschaltet – Kontrolllampe leuchtet.
“O” - Elektrische Funktionen gesperrt – Maschine
ausgeschaltet – Kontrolllampe der Taste “I”
leuchtet nicht.
19 Einstellgriff für Mahlfeinheit
20 Mahlwerk
21 Mechanischer Zähler
Zeigt die Anzahl der von der Maschine durchgeführten
Ausgaben an.
22 Ausgabeeinheit
23 Einstellnadel zur Milchaufschäumung (Modell
CAPPUCCINO)
Ausschlag mit der Hand höhenverstellbar
24 Abdeckung der Ausgabeeinheit
25 Milchausgabe (Modell CAPPUCCINO)
26 Beweglicher Auslauf
27 Teleskopischer Auslauf
28 Brühgruppe
F. 1
A
Page 55

CONCETTO
51/120
Deutsch
2 - HINWEISE ZUR
VERWENDUNG DES
HANDBUCHS
2.1 Abkürzungen
Abb. = Abbildung
S. = Seite
Abs. = Absatz
T. = Tabelle
2.2 Verwendete Symbole
ACHTUNG! Die Bedeutung der Symbole immer beachten: sie
dienen dazu, technische Konzepte oder Sicherheitshinweise nicht
wiederholen zu müssen und sind daher als Erinnerungshilfen
gedacht. Wann immer Zweifel zur Bedeutung der Symbole
auftreten, im entsprechenden Symbolverzeichnis nachschlagen.
T. 1
ACHTUNG! - Informationen zur Sicherheit
des Bendieners und der Unversehrtheit der
Maschine.
ACHTUNG! - Arbeiten, die für den
Wartungstechniker eine potentielle
Gefahr darstellen.
WICHTIG! - Lenkt die Aufmerksamkeit auf
ein besonders wichtiges Argument.
Wartungstechniker - Arbeiten,
die ausschließlich von dem für die
außerplanmäßige Wartung und Reparaturen
zuständigen Personal durchgeführt werden
dürfen.
Maschine ausgeschaltet - Für diesen
Vorgang ist die Maschine von der
Stromversorgung zu trennen.
Bediener - Vorgänge, für die der Bediener
der Maschine zuständig ist.
3 - BEDIENER
• Erwachsene Person, in deren Kompetenz folgende
Vorgänge liegen:
- Verwaltung und Kontrolle sowie die Ausschaltung der
Maschine.
- Befüllung mit Bohnenkaffee.
- Einstellung der Ausgabeparameter.
- Leeren der Kaffeesatz- und Abwasserbehälter.
- Äußere Reinigung der Maschine.
Kindern, Jugendlichen und unselbständigen
Personen ist die Verwendung der Maschine untersagt.
4 - WARTUNGSTECHNIKER
• Person, die für folgende Vorgänge zuständig ist:
- Aufstellung, Inbetriebnahme, Regulierung und Einstellung
der Maschine.
-Außerplanmäßige Wartung, Reparaturen und
Auswechseln von Ersatzteilen.
5 - VERWENDUNGSZWECK
DER MASCHINE
• Die in diesem Handbuch beschriebenen Maschinen wurden
für die automatische (programmierbare) Ausgabe folgender
Getränke entworfen, hergestellt und geschützt:
- Getränke aus frisch gemahlenem Bohnenkaffee;
- Getränke aus vorgemahlenem Kaffee;
- Getränke aus Milch und frisch gemahlenem Bohnenkaffee
(Modell CAPPUCCINO).
-Heißwasser und Wasserdampf (fehlt beim Modell COFFEE)
für die Zubereitung und Erwärmung von Getränken.
- heißer Milch (Modell CAPPUCCINO).
Jede andere Verwendung der Maschinen ist vom Hersteller
nicht vorgesehen, dieser lehnt daher die Verantwortung
für Schäden jeglicher Art ab, die durch einen
unzweckmäßigen Einsatz der Maschinen entstehen. Durch
einen unzweckmäßigen Einsatz erlischt außerdem jeder
Anspruch auf Garantie.
Page 56

CONCETTO
52/120
Deutsch
8 - INFORMATIONEN ZUR
MASCHINE
8.1 Identifikationsdaten
Auf dem Schild (A) sind folgende Daten zur Identifikation der
Maschine angeführt:
• Hersteller und -Kennzeichnung
• Modell
• Seriennummer
• Herstellungsjahr
• Anschlussspannung (V) und Frequenz (Hz)
• Aufgenommene elektrische Leistung (W)
• Phasenanzahl der elektrischen Leitung (PH)
• Zulässiger Druck im Wassernetz (MPa)
HINWEIS - Im Fall von Anfragen an die autorisierten
Kundendienststellen immer das Modell und die
Seriennummer angeben.
8.2 Technische Eigenschaften
Anschlussspannung.................................... 230V/400V 2N
A-bewerteter Schalldruckpegel ............................ unter 70 dB
Länge des Netzkabels ....................................... 1.500 mm
Installierte Leistung
Mod. LUXE ....................................................... 3.250 W
Mod. COFFEE .................................................. 1.400 W
Mod. CAPPUCCINO ......................................... 3.250 W
Wasserdruck..................................... 0,1-0,8 MPa (1-8 bar)
Gewicht ................................................................. 60 kg
Fassungsvermögen des Bohnenbehälters. ....................... 2 Kg
HINWEIS -Bei den Maschinen können die Dosen aller einzelnen
Ausgaben programmiert werden. Die Mehrheit der
elektrischen Komponenten wird mit 24 V Gleichstrom
gespeist.
8.3 Raumbedarf
>
<
e
n
t
e
s
c
>
<
e
n
t
e
s
c
LPh
470 550 675
F. 2
L
P
h
6 - HINWEISE UND
VORSICHTSMASSNAHMEN
• Für die planmäßige Wartung keinesfalls Reinigungs-,
Verdünnungs- oder Lösungsmittel etc. verwenden.
• Die Reinigung beschränkt sich auf Teile, die nicht unter elektrischer
Spannung stehen und sie ist mit neutralen und biologisch
abbaubaren Produkten durchzuführen. Der Hauptschalter oder
allpolige Netztrennschalter muss dabei immer auf “0” (OFF)
gestellt sein oder der Netzstecker gezogen werden.
• Die planmäßige Wartung ist von kompetentem oder zumindest
ausreichend informiertem und eingewiesenem Personal
durchzuführen, das über die notwendigen geistigen und
körperlichen Fähigkeiten verfügt. Die in der Folge angeführten
Anweisungen sind strikt zu befolgen und die geltenden
Bestimmungen zur Sicherheit und Gesundheit einzuhalten.
• Es ist strikt verboten, auf der Maschine Werkzeuge oder andere
für die Sicherheit von Personen und die Unversehrtheit der Maschine
gefährliche Gegenstände abzulegen oder zurückzulassen.
•Änderungen und Umstellungen (auch in kleinem Ausmaß) sowie
die Verwendung nicht originaler Ersatzteile befreien den Hersteller
von seiner Verantwortung für Schäden jeder Art und führen zum
Verfall aller Garantieansprüche.
• Ausschließlich Trinkwasser verwenden.
• Die für den CAPPUCCINATORE verwendete Milch sollte in einem
Kühlgerät bei einer Temperatur von maximal 4°C aufbewahrt
werden. Sie sollte nicht länger als 30 Minuten unbenutzt
außerhalb des Kühlschrankes aufbewahrt werden.
• Wird mit dem Cappuccinatore länger als 1 Stunde keine Milch
aufgeschäumt, muß vor der nächsten Produktentnahme eine
Reinigung desselben durchgeführt werden.
Dazu wie nachfolgend beschrieben vorgehen:
- Den Milchansaugschlauch in einen Behälter mit Wasser tauchen.
- die Taste drücken
- Warten, bis aus dem Auslaufrohr kein Wasser mehr ausfließt.
Hinweis: Für den Reinigungsvorgang kein heißes Wasser benutzen.
7 - ALLGEMEINE
VORSICHTSMASSNAHMEN
• Vor dem Hantieren mit der Maschine immer vorbeugend
sicherstellen, dass keine Zweifel zum Inhalt dieses Handbuchs
bestehen. Die Nichteinhaltung der darin enthaltenen Vorschriften
befreit den Hersteller von seiner Verantwortung für Personen- oder
Sachschäden jeder Art.
• Diese Ausgabe für spätere Konsultationen aufbewahren.
• Vorbeugend kontrollieren (im Fall einer neuen Aufstellung), ob
die Mindestanforderungen für die Sicherheit, den Aufstellungsort
und den Betrieb der Maschine gegeben sind. Dazu die
Umgebungsbedingungen (Temperatur, Luftfeuchtigkeit,
Beleuchtung) sowie die Eignung des Betriebsortes prüfen.
• Ist das Netzkabel beschädigt, sind die autorisierte
Kundendienststelle oder der Wartungstechniker hinzuzuziehen.
• Die Maschine nicht im Freien verwenden.
• Im Fall von Betriebsstörungen immer den Einsatz des
Wartungstechnikers anfordern.
• Bei der Reinigung darf keinesfalls ein Wasserstrahl verwendet werden.
Page 57

CONCETTO
53/120
Deutsch
F. 3
F. 4
8.4 Ausgabeeinheit (Abb. 2)
Die Position dieser Einheit (22) kann je nach Höhe des verwendeten
Gefäßes geändert werden.
Der bewegliche Auslauf (26) kann nach außen gedreht werden, der
teleskopische Auslauf (27) nach oben oder unten geschoben werden.
Auf diese Weise lassen sich unterschiedliche Ausgabehöhen
erzielen.
HINWEIS - Wird nur ein Gefäß verwendet, das höher als 90
mm ist, kann der Auslauf (26) nach unten
verschoben werden.
8.5 Cappuccinatore (Abb. 4)
Der Cappuccinatore besteht aus:
- Milchansaugschlauch (30);
- Schlauchklemme (10);
-Körper des Cappuccinatore (29);
- Nadel zur Einstellung der Schaumqualität (23);
- einstellbares Milchausgaberohr (25).
22
26
27
>
<
ent
esc
>
<
ent
esc
9 -SICHERHEITSVORRICHTUNGEN
HINWEIS - Die in dieser Ausgabe beschriebenen Maschinen
wurden unter Einhaltung der geltenden spezifischen
europäischen Richtlinien hergestellt, daher sind alle
potentiell gefährlichen Teile entsprechend geschützt.
• Ein eventuell herrschender Überdruck in der
Wasseranlage für die Zubereitung von Dampf und Heißwasser
wird von 3 Sicherheitsventilen abgefangen.
• Ein Thermostat verhindert die Überhitzung der Boiler.
• Die Positionen der Abtropfschale (12), des
Kaffeesatzbehälters (16) und der Tür (14) werden von 3
Mikroschaltern kontrolliert, die die Einstellung des
Maschinenbetriebs bewirken, wenn eine der Komponenten nicht
richtig eingesetzt ist (auf dem Display erscheint ein Hinweis
auf die Komponente, die sich nicht in der richtigen Position
befindet).
• Ein elektronischer und ein mechanischer
Impulszähler speichern die Anzahl der durchgeführten
Ausgaben und ermöglichen die Programmierung der
planmäßigen Wartung.
9.1 Dampf- und Heißwasserrohr
(fehlen beim Modell COFFEE) (Abb. 1)
Das Dampfrohr (17) und das Heißwasserrohr (11) sind mit einem
Verbrennungsschutz aus Gummi (9 und 15) ausgestattet, damit
sie auch im heißen Zustand angefasst und bewegt werden können.
9.2 Weitere Gefahren
• Die baulichen Eigenschaften der in dieser Ausgabe
beschriebenen Maschinen ermöglichen keinen Schutz des
Bedieners vor dem direkten Dampf- oder Heißwasserstrahl (beim
Modell COFFEE nicht vorhanden).
• Verbrennungsgefahr – Während der Ausgabe von
Heißwasser oder Dampf den Strahl nicht auf Dritte oder
sich selbst richten. Das Rohr nur an der mit dem Gummischutz
versehenen Stelle anfassen (9 - 15).
Keine Gefäße verwenden, die nicht aus lebensmittelechtem
Material hergestellt sind.
Page 58

CONCETTO
54/120
Deutsch
F. 5
10 - AUFSTELLUNG
10.1 Hinweise zum Standort
• Die Maschine wird in einem trockenen, geschützten Raum mit
einer Umgebungstemperatur zwischen 10°C und 40°C
und einer maximalen Luftfeuchtigkeit von 90% aufgestellt.
10.2 Aufstellung und Wasseranschluss
HINWEIS - Sicherstellen, dass die Fläche, auf die die Maschine
gestellt wird, ausreichend groß und tragfähig ist, um
die Maschine sicher aufnehmen zu können.
• Eine Öffnung in die Abstellfläche bohren (A - Abb. 5).
• Die Maschine auf die Fläche stellen und das Netzkabel
(B – Abb. 5) durch die Öffnung (A) ziehen.
• Einen Abflussschlauch an die Verschraubung (C - Abb. 6)
schließen und mit einer Zahnschelle befestigen.
• Die Maschine mit der Verschraubung (D – Abb. 6) an das
Trinkwassernetz anschließen (dazu ausschließlich einen
Schlauch und Verbindungsstücke aus lebensmittelechtem
Material verwenden).
Es wird empfohlen, die Maschine mit Wasser zu versorgen,
das zuvor mit einer entsprechenden Vorrichtung entkalkt
wurde, vor allem in Gebieten, in denen das Wasser einen
hohen Kalzium- und Magnesiumgehalt aufweist (hartes
Wasser).
• Die Maschine endgültig auf der Abstellfläche positionieren (die
Kreise E – Abb. 5 geben die optimale Position der einstellbaren
Füße an).
• Die Maschine durch Regulieren der einstellbaren Füße eben
ausrichten (F – Abb. 6).
F. 7
Nullleiter (N) – Dunkelblau
Phase (L1) – Braun
Phase (L2) – Schwarz
Erdleiter – Gelb/grün
F. 8
CH
(Schweiz)
CEI
Netzkabel vom Typ H07RNF
Querschnitt 4 x 2,5 mm
2
Anschluss des Steckers an eine Zweiphasenleitung 400 V2N~
10.3 Elektrischer Anschluss
HINWEIS - Bei Anlagen mit 400 V Zweiphasenstrom die Phasen
so verwenden, dass die Maschine mit 230 V in
Einphasenstrom versorgt wird (Abb. 7). Für den
Anschluss an 230 V Einphasenstrom ist ein
entsprechender Installationssatz anzufordern
(Code %1034.R09).
F. 6
L
1
L
2
N
L
2
L
1
A
E E
E
E
B
F
C
D
VORDERSEITE DER
MASCHINE
Page 59

CONCETTO
55/120
Deutsch
F. 9
10.4 Anschluss an seriellen Eingang
Über einen seriellen Eingang kann die Maschine an die Geräte
der AUTORISIERTEN KUNDENDIENSTSTELLEN angeschlossen
werden, um so Kontrollen und Programmierungen durchzuführen
(A - Abb. 9).
12 - GEBRAUCH DER
MASCHINE
Vor der Benutzung der Maschine ist dieses Handbuch
aufmerksam zu lesen, um ein gutes Allgemeinwissen über
die Maschine zu erlangen.
Nach einer längeren Nichtbenutzung der Maschine sollte
vor der erneuten Inbetriebnahme der vorhergehende
Absatz “Erste Inbetriebnahme der Maschine”
nochmals gelesen werden.
11 - ERSTE
INBETRIEBNAHME DER
MASCHINE
- Den Behälter (6) mit der zuvor gewählten Kaffeebohnenmischung füllen.
Sicherstellen, dass der Kaffee keine für die Maschine
gefährlichen Fremdkörper enthält.
- Überprüfen, ob die herausnehmbaren Teile (12 und 16) vorhanden sind und ob die Tür (14) zu ist.
Im gegenteiligen Fall erscheint beim Einschalten der Maschine
auf dem Display ein Hinweis auf die Komponente, die nicht
richtig positioniert ist.
- Den allpoligen Netztrennschalter auf “I” drehen.
- Die Maschine mit dem Schalter (18) einschalten;
auf dem Display erscheint: “AUFHEIZEN. BITTE WARTEN”.
- Wenn auf dem Display der Hinweis: “BETRIEBSBEREIT”
erscheint:
- den Auslauf (26 und 27) so positionieren, dass er die
richtige Höhe für die benutzten Gefäße aufweist (Abs. 8.4);
- ein oder zwei Gefäße unter den Auslauf stellen.
- Die dem gewünschten Getränk entsprechende Taste drücken.
Obwohl alle Tasten bereits im Werk auf Standardwerte
programmiert wurden, muss kontrolliert werden, ob das
zubereitete Getränk den gewünschten Eigenschaften
entspricht. Im gegenteiligen Fall müssen die Ausgabetasten
programmiert werden (Abs. 12.6).
Je nach den im Benutzerland der Maschine geltenden
Bestimmungen, muss das Kabel für den Netzanschluss
entweder mit einem allpoligen Netztrennschalter (mit einer
Kontaktöffnung von mindestens 3 mm) oder mit einem
den Vorschriften entsprechenden Stecker ausgestattet sein.
• Der allpolige Netztrennschalter muss der
Stromentnahme der Maschine entsprechen und
imstande sein, alle Polungen der Spannung
abzufangen.
•Überprüfen, ob die elektrischen Kabel der Anlage der
Stromentnahme der Maschine angemessen sind.
Der Anschlusspunkt (Steckdose oder allpoliger
Netztrennschalter) muss sich an einer für den Bediener
leicht zugänglichen Stelle befinden, damit dieser die
Maschine im Bedarfsfall vom Stromnetz trennen kann.
• Das Kabel (B - Abb. 6) an die elektrische Versorgungsleitung
anschließen.
A
Page 60

CONCETTO
56/120
Deutsch
12.1 Zustände der Maschine
In Bezug auf die Stromversorgung kann sich die Maschine in
folgenden Zuständen befinden:
Ausgeschaltet und vom Stromnetz getrennt
- Hauptschalter (18) und allpoliger Netztrennschalter auf “0“
(oder Stecker gezogen).
- Es ist nur der Sicherungsspeicher der programmierten Daten
aktiv.
Eingeschaltet
- Hauptschalter (18) und allpoliger Netztrennschalter auf “I“
(Stecker eingesteckt).
- Alle Funktionen sind aktiv und das Display (8a) ist eingeschaltet.
Standby (Maschine ausgeschaltet, aber nicht vom Stromnetz
getrennt)
- Hauptschalter (18) auf “I“.
- Wurden die Funktionen “AUTOM. EINSCHALTUNG”,
“FROSTSICHERUNG” gewählt, sind sie aktiv, ebenso die
“UHRZEIT”, das Display und der Sicherungsspeicher der
programmierten Daten.
- Die Hintergrundbeleuchtung des Displays ist ausgeschaltet.
12.2 Manuelle Einschaltung
Diese Einschaltung ist zu wählen, wenn sich die Maschine im
Zustand “ausgeschaltet und vom Stromnetz getrennt”
befindet (Abs. 12.1). Laut Absatz 11 vorgehen, wobei eventuell
die Kontrolle des ausgegebenen Getränks übergangen werden
kann.
12.3 Automatische, programmierte
Einschaltung
Diese Einschaltung ist möglich, wenn sich die Maschine im Zustand
“STANDBY” befindet und die Funktion “AUTOM.
EINSCHALTUNG” aktiv ist.
Die Einschaltung der Maschine erfolgt zur programmierten Uhrzeit.
12.4 Zeitweilige Einschaltung aus
Standby
Manuelle Einschaltung, wenn sich die Maschine im Zustand
“STANDBY” befindet.
Dazu die Taste 3 Sekunden lang drücken.
Die Maschine kehrt automatisch 60 Minuten nach dem letzten
Vorgang in den Zustand “STANDBY” zurück.
Page 61

CONCETTO
57/120
Deutsch
F. 1 0
12.5 Bedienfeld
Die Ausgabetasten werden weniger als 1
Sekunde lang gedrückt.
Schaltet die Maschine zeitweilig ein (in “STANDBY”)
und bestätigt die Auswahl der Tasten (H - G).
F
1 Espresso
Kaffee
Espresso
2 Espresso
1 Kaffee
2 Kaffee
Kaffee
Espresso
LIGHT-KAFFEE
KAFFEE IM KÄNNCHEN
KAFFEE MIT SCHUSS MILCH
CAPPUCCINO Ausgabe aus heißer Milch und einer Portion gemahlenen Kaffees
HEISSE MILCH Ausgabe unter Verwendung von Milch
HEISSWASSER (fehlt beim Modell COFFEE) Ausgabe unter Verwendung von Wasser.
(*)
(*)
(*)
KAFFEE
Ausgaben aus frisch gemahlenem Bohnenkaffee
PULVERKAFFEE Ausgabe unter Verwendung einer Portion vorgemahlenen Kaffees
Ausgabe unter Verwendung einer Portion vorgemahlenen Kaffees und dem
Zusatz von frisch gemahlenem Bohnenkaffee
• Die Bezeichnungen: “Espresso” und “Kaffee”, beziehen sich auf die zwei unterschiedlichen
Ausgabemengen.
• Bei der Zustellung sind die Maschinen auf Standardwerte programmiert.
• Diese Ausgaben sind nur für Einzelportionen unter Verwendung vorgemahlenen und zum
Zeitpunkt der Zubereitung eingefüllten Kaffees programmierbar.
• Nach dem Drücken der Taste (einmal für “Vorgemahlen”, zweimal für “Light-Kaffee”) die
Abdeckung (5) öffnen und eine Portion Pulverkaffee einfüllen.
• Für Light-Kaffee wird automatisch eine kleine Menge frisch gemahlenen Bohnenkaffees
beigefügt.
• Es können bis zu 8 Ausgaben in dasselbe Gefäß programmiert werden (max. 2,5 l). Dazu die
Taste mehrmals drücken. Auf dem Display wird die Anzahl der programmierten
Portionen angezeigt. Nach der Ausgabe von 2,5 Litern 2 Minuten warten, bevor eine neue
Ausgabe erfolgen kann.
• Getränk aus frisch gemahlenem Bohnenkaffee, dem eine kleine Menge heißer Milch zugefügt
wird.
• Getränk aus frisch gemahlenem Bohnenkaffee und heißer Milch.
• Es können bis zu 8 Ausgaben in dasselbe Gefäß programmiert werden (max. 1 Liter). Dazu
die Taste mehrmals drücken. Auf dem Display wird die Anzahl der programmierten
Ausgaben angezeigt.
Ausgabe, die durch die automatische Ausgabe mehrerer Kaffeeportionen
erzielt wird
Ausgabe unter Verwendung von gemahlenem Kaffee und einem kleinen
Schuss Milch
(**) - (***)
(**) - (***)
(***)
Page 62

CONCETTO
58/120
Deutsch
DAMPF
(fehlt beim Modell COFFEE)
• Das Rohr (17) in das zu erwärmende Getränk tauchen.
• Das Dampfventil (13) gegen den Uhrzeigersinn drehen.
Nach Erreichen der gewünschten Temperatur das Ventil
schließen (im Uhrzeigersinn drehen).
Das Dampfrohr nach jeder Verwendung mit einem Tuch
oder Schwamm (feucht und sauber) reinigen, um die Reste
des erwärmten Getränks zu entfernen.
(*) Vor jeder Ausgabe den Ansaugschlauch (30 - Abb. 4) in den
Milchbehälter stecken.
(*) (*) Die Schaummenge mit der Nadel einstellen (23 - Abb. 4)
(Abs. 12.8).
12.6 Programmierung der
Ausgabetasten
Die Ausgabemenge der den einzelnen Tasten zugeordneten
Getränke kann direkt über das Bedienfeld programmiert werden.
Die Tasten werden wie folgt programmiert oder umprogrammiert:
- Die Maschine einschalten und gebrauchsfertig machen.
- Das Gefäß unter den entsprechenden Auslauf stellen.
- Die Taste drücken und gedrückt halten. Auf dem Display
erscheint “PROGRAMMIERUNG”.
- Die Taste loslassen, um die ausgegebene Portion zu speichern.
(***) HINWEIS - Die Tasten , e können für die
Ausgabe von Getränken aus Milch und Kaffee in jeder
möglichen Kombination voreingestellt werden. Für die Aktivierung von Einstellungen, die von den Grundeinstellungen
abweichen, wendet man sich an eine autorisierte Kundendienststelle.
Es folgt ein Programmierungsschema der Tasten.
Page 63

Deutsch
CAFFÈ
-
Gedrückt halten
-
1 Espresso
START
zum Programmieren der anderen Kaffeeausgaben wie zuvor vorgehen und dazu folgende Tasten verwenden:
2 Espresso
1 Kaffee und 2 Kaffee
Ausgabe
STOP
CAFFÈ MACCHIATO
K
A
F
F
E
E
-
Gedrückt halten
START
--
M
I
L
Ausgabe
STOP
C
H
(7 Sek.)
Auf dem Display erscheint
“PROGRAMMIERUNG”
Gedrückt halten
START
Ausgabe
-
CAPPUCCINO
-
K
Gedrückt halten
A
F
F
E
E
START
--
M
I
L
C
Ausgabe Ausgabe
STOP
H
(7 Sek.)
Auf dem Display erscheint
“PROGRAMMIERUNG”
Gedrückt halten
START
STOP
-
STOP
LATTE CALDO
(7 Sek.)
Auf dem Display erscheint
“PROGRAMMIERUNG”
CAFFÈ IN CARAFFA
(5 Sek.)
ACQUA CALDA
-
Gedrückt halten
START
-
Ausgabe
Gedrückt halten
-
START
Gedrückt halten
-
START
STOP
Ausgabe
Ausgabe
-
STOP
-
STOP
HINWEIS - Diese Programmierung kann nur dann
durchgeführt werden, wenn sich die Funktion
“PROGRAMM. HEISSWASSER” im Modus:
“EIN” befindet (Abs. 12.7.1).
59/120
CONCETTO
Page 64

CONCETTO
60/120
Deutsch
12.7 Programmierbare Menüfunktionen
HINWEIS - Mit der Maschine können mit Hilfe des
Programmmenüs einige Einstellungen durchgeführt
werden, um das ausgegebene Produkt an die
Bedürfnisse des Bedieners anzupassen
Während der Programmierung kommt den folgenden
Tasten eine andere Funktion zu, als während des normalen
Gebrauchs der Maschine.
(Zutritt zur das Programmmenü betreten, indem
Programmierung) die Taste 5 Sekunden lang gedrückt
wird. (auf dem Display erscheint:
“PROGRAMMIERUNG”);
(Enter) Übergang von einer Menüebene zur
nächsten; einen Parameter für die
Änderung vorbereiten; einen Parameter
oder eine Funktion bestätigen;
(Escape)
nicht bestätigte Änderungen löschen;
zur vorhergehenden Menüebene
zurückkehren bis das Menü
verlassen wird.
(Down) zum nächsten Punkt innerhalb derselben
Programmebene weitergehen;
den Wert eines zu ändernden
Parameters erhöhen.
(Up) zum vorhergehenden Punkt innerhalb
derselben Programmebene gehen;
den Wert eines zu ändernden
Parameters vermindern.
Bei einigen Funktionen können auch ein oder mehrere Daten
programmiert werden (bereits auf Standardwerte
programmiert).
Zum Ändern der Werte der neu zu programmierenden Daten:
- Die Funktion wählen.
- Die Funktion mit der Taste (Enter) bestätigen.
- Der blinkende Cursor geht unter den zu ändernden Wert.
- Die Tasten (Up) oder (Down) drücken, um den Wert zu
ändern.
- Den geänderten Wert mit der Taste (Enter) bestätigen.
PROGRAMMIERUNG
5 Sek.
SPRACHE
WÄRMEPLATTE
MAHLMENGE
TEMPERATUREN
VORBRÜHEN
PROGRAMM. HEISSWASSER
PROGRAMMIERUNG DER MILCH
MISCHWASSER
PROGRAMM. SPÜLEN
BRÜHGRUPPE SPÜLEN
UHRZEIT
SCHALTUHR
SCHALTZEITEN
ZÄHLER
FROSTSICHERUNG
DEBLOCKIERUNG
CODE: 0000
AUS
EIN
OFF4: MDMDFSS 00:00
OFF3: MDMDFSS 00:00
ON 4: MDMDFSS 00:00
ON 3: MDMDFSS 00:00
OFF1: MDMDFSS 00:00
ON 1: MDMDFSS 00:00
OFF2: MDMDFSS 00:00
ON 2: MDMDFSS 00:00
EIN
AUS
AUS
EIN
AUS
EIN
AUS
EIN
AUS
EIN
AUS
KURZ
LANG
MIND. XXX
16:34 DO 8. NOV 2001
ERSTER KAFFEE
KAFFEE
TIEF
HOCH
STANDARD
TIEF
HOCH
STANDARD
KAFFEE MIT
SCHUSS MILCH
CAPPUCCINO
KÄNNCHEN
2 KAFFEE
1 KAFFEE
1 ESPRESSO
2 ESPRESSO
AUS
EIN
ECC.
FRANCAIS
DEUTSCH
ITALIANO
ANLEITUNG BEFOLGEN
GESAMTAUSGABEN KAFFEE 000000
GESAMTAUSGABEN WASSER 000000
Page 65

CONCETTO
61/120
Deutsch
12.7.1 Beschreibung der Funktionen
SPRACHE
- Durch Anwählen von im Menü “SPRACHE” kann diese
gewählt werden.
WÄRMEPLATTE
- Wird “EIN” bestätigt, schaltet sich die Wärmeplatte beim
Einschalten der Maschine ebenfalls ein.
- Wird “AUS” bestätigt, bleibt die Wärmeplatte immer
ausgeschaltet.
MAHLMENGE
Die für jede Ausgabe während der Aufstellung der Maschine
programmierte Menge gemahlenen Kaffees kann geändert werden.
- Wird “TIEF” oder “HOCH” bestätigt, wird die Menge um 1
g vermindert oder erhöht.
-Wird “STANDARD” bestätigt, wird die vom Wartungstechniker
programmierte Menge für die Ausgabe verwendet.
TEMPERATUREN
Für jede Ausgabe von Kaffee kann die Wassertemperatur, die für
die Ausgabe verwendet wird und die im Zuge der Aufstellung der
Maschine programmiert wurde, geändert werden.
- Wird “TIEF” bestätigt, wird die Temperatur um 3°C reduziert.
- Wird “HOCH” bestätigt, wird die Temperatur um 3°C erhöht.
-Wird “STANDARD” bestätigt, wird die vom Wartungstechniker
programmierte Temperatur verwendet.
HINWEIS - Die Temperatur “erster Kaffee” wird für die erste
Ausgabe nach dem Einschalten der Maschine
verwendet.
VORBRÜHEN
Diese Funktion ermöglicht die Einlegung einer kurzen Pause während
der ersten Ausgabephase. Dies bewirkt eine Verbesserung der
Kaffeequalität, weil der Kaffee während der Pause in der ersten
Menge Wasser „ziehen“ kann.
- Wird “AUS” bestätigt, wird der Kaffee nicht vorgebrüht.
- Wird “KURZ” bestätigt, entspricht der Vorbrühvorgang der
vom Wartungstechniker programmierten Dauer.
- Wird “LANG” bestätigt, wird der Vorbrühvorgang um 1
Sekunde verlängert.
PROGRAMM. HEISSWASSER
Mit dieser Funktion wird die Programmierung der auszugebenden
Heißwassermenge freigegeben.
- Wird “EIN” bestätigt, kann die Taste programmiert werden
(Abs. 12.6).
- Wird “AUS” bestätigt, akzeptiert die Taste keine
Programmierung der Menge. Diese muss manuell dosiert
werden.
Fortsetzung der Abwicklung der
Funktionen auf der folgenden Seite
PROGRAMMIERUNG
SPRACHE
WÄRMEPLATTE
MAHLMENGE
TEMPERATUREN
VORBRÜHEN
ITALIANO
DEUTSCH
FRANCAIS
ETC.
EIN
AUS
1 ESPRESSO
1 KAFFEE
2 KAFFEE
CAPPUCCINO
KÄNNCHEN
KAFFEE
ERSTER KAFFEE
TIEF
TIEF
STANDARD
HOCH
STANDARD
HOCH
AUS
KURZ
PROGRAMM.
HEISSWASSER
EIN
AUS
LANG
PROGRAMMIERUNG
DER MILCH
2 ESPRESSO
KAFFEE MIT
SCHUSS MILCH
Page 66

CONCETTO
62/120
Deutsch
PROGRAMMIERUNG DER MILCH
Damit kann die Programmierung der auszugebenden Milchmenge
freigegeben werden.
- Wird “EIN” bestätigt, kann die Taste programmiert werden
(Abs. 12.6).
- Wird “AUS” bestätigt, akzeptiert die Taste keine
Programmierung der Menge. Diese muss manuell dosiert
werden.
MISCHWASSER
Während der Ausgabe der verschiedenen Getränke fügt die
Maschine je nach Programmierung eine bestimmte Menge
Heißwasser zu.
- Wird “EIN” bestätigt, erfolgt die Mischung.
- Wird “AUS” bestätigt, wird dem Getränk KEIN Heißwasser
zugefügt.
HINWEIS - Bei ausgeschalteter Funktion bleiben die
programmierten Werte unverändert und können bei
der erneuten Aktivierung wieder verwendet werden.
PROGRAMM. SPÜLEN
Diese Funktion ermöglicht die Ausgabe einer kleinen
Heißwassermenge (circa 5 cm+), um die Bildung von
Ablagerungen in der Ausgabeeinheit zu vermeiden; diese Spülung
wird automatisch durchgeführt, wenn die programmierte Zeit
(20-240 Minuten) nach der letzten Kaffeeausgabe abgelaufen ist.
- Wird “EIN” bestätigt, geht der blinkende Cursor zur letzten
Ziffer rechts und der Wert kann in Schritten zu je 10 Minuten
geändert werden;
eventuelle Änderungen müssen immer bestätigt werden.
-Wird “AUS” bestätigt, führt die Maschine keine Spülung durch.
HINWEIS - Während der Spülung erscheint auf dem Display
“PROGRAMM. SPÜLUNG”“PROGRAMM. SPÜLUNG”
“PROGRAMM. SPÜLUNG”“PROGRAMM. SPÜLUNG”
“PROGRAMM. SPÜLUNG”
;
die Spülung kann auch manuell eingeleitet werden,
indem die Taste 3 Sekunden lang gedrückt wird.
BRÜHGRUPPE SPÜLEN
Diese Funktion ermöglich die Spülung der Brühgruppe (28) unter
Verwendung entsprechender Tabletten (Informationen zu den
Tabletten erhalten Sie bei den autorisierten Kundendienststellen).
Vorgangsweise:
- Der Vorgang beginnt bei: “BRÜHGRUPPE SPÜLEN”.
- drücken; auf dem Display erscheint: “TABLETTE IN
BRÜHGRUPPE GEBEN”.
- Die Brühgruppe entfernen; auf dem Display erscheint:
“BRÜHGRUPPE EINSETZEN”;
- Die Tablette in das Innere der Brühgruppe stecken und die
Gruppe wieder einsetzen; auf dem Display erscheint: “TÜRE
SCHLIESSEN”.
- Die Türe schließen, auf dem Display erscheint: “SPÜLEN”.
Die Maschine beginnt mit dem Spülvorgang, an dessen Ende
auf dem Display “BRÜHGRUPPE ENTFERNEN UND
WASCHEN” erscheint.
- Die Brühgruppe entfernen; auf dem Display erscheint:
“BRÜHGRUPPE EINSETZEN”.
- Die Brühgruppe unter fließendem Wasser waschen.
- Die Brühgruppe wieder einsetzen; auf dem Display erscheint:
“TÜRE SCHLIESSEN”.
- Die Türe schließen; auf dem Display erscheint: “SPÜLEN
BEENDET TASTE STERN DRÜCKEN”;
drücken, um das Menü definitiv zu verlassen und die Maschine
wieder betriebsbereit zu machen.
UHRZEIT
Mit dieser Funktion können Uhrzeit und Datum der Maschine
eingestellt werden.
- Bestätigt man “UHRZEIT”, blinkt der Cursor und geht zu den
Stunden, die nun geändert werden können.
- Nach der Bestätigung der eingestellten Stunden geht der Cursor
weiter zum nächsten Wert, der geändert werden kann (zu
den Minuten, dann zum Tag, dem Monat und zuletzt
zum Jahr).
PROGRAMM. HEISSWASSER
PROGRAMMIERUNG DER MILCH
MISCHWASSER
PROGRAMM. SPÜLEN
BRÜHGRUPPE SPÜLEN
UHRZEIT
SCHALTUHR
EIN
AUS
EIN
AUS
EIN
MIND. 240
AUS
TABLETTE IN
BRÜHGRUPPE GEBEN
BRÜHGRUPPE EINSETZEN
TÜRE SCHLIESSEN
SPÜLEN
BRÜHGRUPPE ENTFERNEN
UND WASCHEN
BRÜHGRUPPE EINSETZEN
TÜRE SCHLIESSEN
SPÜLEN BEENDET TASTE
STERN DRÜCKEN
16:34 DO 8. NOV 2001
Page 67

CONCETTO
63/120
Deutsch
SCHALTZEITEN
Funktion, die die Programmierung der automatischen Ein- und
Ausschaltzeiten der Maschine während der gesamten Woche
ermöglicht.
- Bestätigt man “SCHALTZEITEN”, geht der blinkende Cursor
zum Tag, an dem Änderungen erfolgen sollen.
- Den Tag mit der Taste (down) in die Programmierung
einfügen, wobei der Kleinbuchstabe in einen Großbuchstaben
verwandelt wird.
- Den Tag mit der Taste (up) aus der Programmierung nehmen,
wobei der Großbuchstabe in einen Kleinbuchstaben verwandelt
wird.
- Die Änderung bestätigen.
Für die Änderung der Ein- und Ausschaltzeit auf dieselbe Weise
vorgehen wie für die Einstellung der Uhrzeit.
Beispiel:
im Ablaufplan der Funktionen wird eine Programmierung
der Maschine dargestellt, die die Einschaltung von Montag bis
Freitag um 08:00 und die Ausschaltung um 18:00 vorsieht.
Samstags erfolgt die Einschaltung um 09:00 und die Ausschaltung
um 12:30 und am Sonntag steht die Maschine still.
ZÄHLER
Den Zählern kommen zwei Funktionen zu, nämlich die Zählung
der gesamten Kaffeeausgabezyklen und die Zählung der gesamten
Ausgabezyklen von Heißwasser.
Sollte die automatische Dosierung des Heißwassers ausgeschaltet
sein (siehe Funktion “PROGRAMM. HEISSWASSER”), wird bei
jeder Betätigung des Elektroventils ein Zyklus gezählt.
HINWEIS - Beide Funktionen dienen nur der Information, sie
können nicht rückgestellt werden.
FROSTSICHERUNG
Im “STANDBY” schützt die Frostschutzfunktion die Maschine bei
niedrigen Temperaturen vor Schäden durch die Entstehung von Eis
in den Boilern. Diese Funktion hält die Temperatur der Boiler auf
einem Mindestwert, um die Frostbildung zu vermeiden.
- Wird “EIN” bestätigt, ist die Funktion eingeschaltet.
- Wird “AUS” bestätigt, ist die Funktion ausgeschaltet.
HINWEIS - Die Funktion ist nur dann aktiviert, wenn auch die
Funktion
“SCHALTUHR”
aktiviert ist und sich die
Maschine im
“STANDBY”
befindet. Wenn die
Funktion aktiviert ist, erscheint auf dem Display
“FROSTSICHERUNG”
.
DEBLOCKIERUNG
Funktion, mit der die Maschine vorübergehend entsperrt werden
kann, wenn die für die Wartung oder Entkalkung programmierte
Anzahl von Zyklen erreicht ist. Der Entsperrcode ist bei der Firma,
die die Aufstellung durchgeführt hat oder das Wartungsservice
innehat, erhältlich. Ist der Code bekannt, muss er in die Funktion
eigngegeben werden:
- Die Funktion “DEBLOCKIERUNG” bestätigen; der blinkende
Cursor geht unter die erste zu ändernde Ziffer;
- die Ziffer eingeben und bestätigen;
- nach jeder Bestätigung geht der blinkende Cursor weiter unter
die nächste Ziffer, bis der gesamte Code komplett ist.
SCHALTUHR
Funktion, mit der die automatische Ein- und Ausschaltung der
Maschine an jedem Wochentag zu zwei unterschiedlichen Zeiten
programmiert werden kann.
- Wird “EIN” bestätigt, ist die Maschine für diese Funktion
bereit.
- Wird “AUS” bestätigt, kann die Maschine nur manuell über
den Hauptschalter (18) ein- und ausgeschaltet werden.
Eventuell programmierte Zeiten für die automatische Ein- und
Ausschaltung bleiben dabei jedoch gespeichert.
-Für die Programmierung der Zeitspannen und Tage siehe
folgende Funktion “SCHALTZEITEN”.
HINWEIS - Die automatische Einschaltung der Maschine kann
nur dann erfolgen, wenn der Hauptschalter (18) auf
“I” steht.
UHRZEIT
SCHALTUHR
SCHALTZEITEN
ZÄHLER
FROSTSICHERUNG
DEBLOCKIERUNG
CODE: 0000
AUS
EIN
GESAMTAUSGABEN WASSER 000000
GESAMTAUSGABEN KAFFEE 000000
OFF4: MDMDFSS 00:00
OFF3: MDMDFSS 00:00
ON 4: MDMDFSS 00:00
ON 3: MDMDFSS 00:00
OFF1: MDMDFSS 00:00
ON 1: MDMDFSS 00:00
OFF2: MDMDFSS 00:00
ON 2: MDMDFSS 00:00
AUS
EIN
Page 68

CONCETTO
64/120
Deutsch
F. 1 1
19
F. 1 2
14
12.8 Einstellung des Schaums
Die Schaumqualität im Getränk ist proportional zum Ausschlag
der Nadel aus dem Loch (Abb. 11).
• Durch Anheben der Nadel erhält man eine größere
Schaummenge.
• Durch Senken der Nadel erhält man eine kleinere
Schaummenge.
12.9 Einstellung der Mahlfeinheit
Abgesehen von der Kaffeemischung erhöht ein sehr
feiner Mahlgrad (Zeiger auf niedrigen Werten) die
Dickflüssigkeit, die Schaummenge im Getränk und die
Ausgabedauer, während ein grober Mahlgrad (Zeiger
auf hohen Werten) die Dickflüssigkeit, die Schaummenge
und die Ausgabezeit vermindert.
Den Einstellgriff nicht bis zum Anschlag gegen den
Uhrzeigersinn drehen (19 – Abb. 12), da diese Bewegung
zur Festspannung des Mahlwerks und zur anschließenden
Sperre der Maschine führt.
Sollte das Mahlwerk und in der Folge die Maschine
aufgrund von Fremdkörpern in der Kaffeemischung
blockiert werden, wenden Sie sich bitte an eine autorisierte
Kundendienststelle (auf dem Display erscheint:
“MAHLWERKFEHLER”
).
HINWEIS - Die Mahlfeinheit wird bereits im Werk auf
Standardwerte eingestellt, sie kann aber wie folgt
geändert werden:
• Die Tür (14 - Abb. 12) öffnen, den Einstellgriff (19 - Abb. 12)
gegen den Uhrzeigersinn drehen, um den Mahlgrad feiner
einzustellen (der Zeiger geht zu einem niedrigeren Wert). Für
einen gröberen Mahlgrad den Griff im Uhrzeigersinn drehen
(der Zeiger geht zu einem höheren Wert).
Page 69

CONCETTO
65/120
Deutsch
12.10 Displayanzeigen
HINWEIS - Es folgt eine Auflistung der Alarme (zusätzlich zu den
bereits behandelten), die auf dem Display angezeigt
werden sowie der Umstände, durch die sie ausgelöst
werden.
STANDBY: Maschine ausgeschaltet (Hauptschalter auf “I”) und
die Funktion der automatischen Ein- und Ausschaltung (Schaltuhr)
ist aktiviert (Abs. 12.7.1).
FROSTSICHERUNG: Maschine ausgeschaltet (Hauptschalter auf
“I”), das Programm, das die Boiler vor Frost schützt, ist eingeschaltet
(Abs. 12.7.1).
PROGRAMM. SPÜLEN: erscheint, wenn die Maschine die
automatische Spülung der Ausgabeeinheit durchführt (Abs. 12.7.1).
BOHNEN NACHFÜLLEN: während des Mahlvorgangs wird
festgestellt, dass der Kaffeebohnenbehälter (6) leer ist.
ENTLÜFTEN: erscheint, wenn während der Ausgabe eines
beliebigen Getränks festgestellt wird, dass sich in den Boilern kein
Wasser befindet.
Nachdem sichergestellt worden ist, dass im Verteilernetz Wasser
vorhanden ist, die Taste ( ^ beim Modell COFFEE) drücken, bis
ein gleichmäßiger Wasserstrahl aus dem Rohr (11) und aus dem
Auslauf (27) austritt. Beim Modell “COFFEE” tritt das Wasser nur
aus dem Auslauf aus.
PROGRAMMIERUNG: erscheint, wenn man den Programmiermodus
der Maschine betritt (Abs. 12.6).
SATZBEH. LEEREN: erscheint, wenn der Kaffeesatzbehälter (16)
fast voll ist (die Maschine hat die programmierte Anzahl von
Ausgaben erreicht).
Es können aber weitere Ausgaben erfolgen.
AUSSER BETRIEB – SATZBEH. LEEREN: der
Kaffeesatzbehälter (16) ist ganz voll (die Maschine hat die
programmierte Anzahl von Ausgaben erreicht).
Der Maschinenbetrieb ist gesperrt und solange der Behälter nicht
geleert wird, können keine weiteren Ausgaben erfolgen.
TÜRE SCHLIESSEN: die Tür (14) ist nicht richtig geschlossen.
SATZBEH. EINSETZEN: der Kaffeesatzbehälter (16) wurde nicht
richtig eingesetzt.
SCHALE EINSETZEN: die Abtropfschale (12) wurde nicht richtig
eingesetzt.
BRÜHGRUPPE EINSETZEN: die Brühgruppe (28) wurde nicht
richtig eingesetzt.
BRÜHGRUPPENFEHLER: die Brühgruppe (28) führt ihren
Arbeitszyklus nicht korrekt durch; die Maschine ausschalten und
die AUTORISIERTE KUNDENDIENSTSTELLE benachrichtigen.
PUMPENFEHLER: eine der Pumpen ist defekt. Die Maschine
ausschalten und die AUTORISIERTE KUNDENDIENSTSTELLE
benachrichtigen.
SENSORFEHLER 01: erscheint, wenn einer der Temperatursensoren
defekt ist. Die Maschine ausschalten und die AUTORISIERTE
KUNDENDIENSTSTELLE benachrichtigen.
TEMPERATURFEHLER 01: erscheint, wenn einer der Widerstände
der Boiler defekt ist. Die Maschine ausschalten und die
AUTORISIERTE KUNDENDIENSTSTELLE benachrichtigen.
ENTKALKUNG: erscheint, wenn die Maschine diesen Vorgang
benötigt bzw. nach einer programmierten Anzahl von Ausgaben.
Die Maschine ausschalten und die AUTORISIERTE
KUNDENDIENSTSTELLE benachrichtigen.
Der Zeitpunkt der Entkalkung wird von einer bestimmten Anzahl
von Arbeitszyklen bestimmt, die vom Wartungstechniker
programmiert werden.
WARTUNG: erscheint, wenn die Maschine gewartet werden muss
bzw. nach einer programmierten Anzahl von Ausgaben. Die
Maschine ausschalten und die AUTORISIERTE
KUNDENDIENSTSTELLE benachrichtigen.
Die Wartungsintervalle werden von einer bestimmten Anzahl von
Arbeitszyklen bestimmt, die vom Wartungstechniker
programmiert werden.
12.11 Ausschaltung der Maschine
Programmierte automatische Ausschaltung
Diese Ausschaltung ist möglich, wenn die Funktion “SCHALTUHR”
(Abs. 12.7.1) aktiv ist und die Programmierung der
“SCHALTZEITEN” (Abs. 12.7.1) durchgeführt wurde.
Zum programmierten Zeitpunkt geht die Maschine in den Zustand
“STANDBY” über.
Manuelle Ausschaltung
Auf diese Weise ist die Maschine auszuschalten, wenn die Funktion
“SCHALTUHR” (Abs. 12.7.1) nicht aktiv ist.
Dazu den Hauptschalter (18) oder den allpoligen Netztrennschalter
auf “0” stellen oder den Netzstecker ziehen.
Page 70

CONCETTO
66/120
Deutsch
13 - PLANMÄSSIGE
WARTUNG
Hinweise
• Im Fall von Funktionsstörungen, die normalerweise
auf dem Display angezeigt werden, die Maschine sofort
ausschalten, von der Stromversorgung trennen (über den
allpoligen Netztrennschalter oder durch Ziehen des
Netzsteckers) und die nächste KUNDENDIENSTSTELLE
benachrichtigen.
• Vor der Durchführung irgendwelcher Wartungs- oder
Reinigungsarbeiten die Stromversorgung durch Betätigen des
Hauptschalters (18) und des allpoligen Netztrennschalters
(oder durch Ziehen des Netzsteckers) unterbrechen.
• Alle Arbeiten sind bei kalter Maschine durchzuführen.
• Keine Reinigungsarbeiten durchführen, wenn sich die
Maschine im Zustand
“STANDBY”
befindet.
• Die Maschinenteile niemals im Geschirrspüler waschen.
• Keinen direkten Wasserstrahl auf die Maschine
richten.
13.1 Reinigung der Maschine
• Die Reinigung wird täglich sowie vor jedem längeren
Stillstand der Maschine durchgeführt, um ein Erhärten von
Ablagerungen in den Behältern, Schalen und Ausgabeeinheiten
zu vermeiden.
• Die herausnehmbaren Maschinenteile, die zu
reinigen sind, werden unter fließendem Wasser gewaschen
und gespült.
• Die Verkleidungen, Seitenwände und das Bedienfeld
werden mit weichen und leicht mit lauwarmem Wasser
befeuchteten Tüchern gereinigt.
• Die nicht abnehmbaren Teile und die Maschine selbst
werden nur mit kaltem oder lauwarmem Wasser und weichen
Schwämmen und feuchten Tüchern gereinigt.
• Alle Teile, die gereinigt werden müssen, sind leicht
und ohne die Zuhilfenahme von Werkzeugen zugänglich.
Die regelmäßige Wartung und Reinigung dienen dem
Schutz der Maschine und verlängern ihre
Funktionstüchtigkeit. Außerdem gewährleisten sie die
Einhaltung der Hygienevorschriften.
Die Maschine zeigt automatisch an, wann Reinigungs- oder
Entkalkungsarbeiten durchzuführen sind. Die genaue
Anzahl von Ausgaben kann vom Impulszähler oder vom
Display der Maschine abgelesen werden. Führt der
Wartungstechniker die Arbeit nicht durch, kann es zur
Sperre der Maschine kommen.
13.1.1 Ausgabeeinheit (Abb. 13)
Folgende Teile können entfernt werden:
- die obere Schutzabdeckung (A) des festen Auslaufs (F), indem
sie nach oben abgezogen wird;
- die Gummidichtung (H);
- der bewegliche Auslauf (G), indem er nach unten gezogen
wird;
- der teleskopische Auslauf (E), indem er vom Auslauf (G)
abgezogen wird; dazu auf die Zähne (C) des inneren Elements
(B) drücken.
Der Metallkanal (D) wird mit einem feuchten Tuch oder Schwamm
gereinigt, ohne dabei vom festen Auslauf (F) abmontiert zu werden.
Verbrennungsgefahr
Der Kanal (D) wird von einem internen Widerstand
aufgeheizt, daher vor der Reinigung desselben abwarten,
bis er ausreichend abgekühlt ist.
F. 1 3
A
B
C
D
F
G
E
H
Page 71

CONCETTO
67/120
Deutsch
13.1.2 Brühgruppe (Abb. 14)
Vor der Reinigung die Kaffeebohnen aufbrauchen.
• Die Gruppe wird regelmäßig mit den entsprechenden Tabletten
gereinigt (Abs. “12.7.1 Beschreibung der Funktionen –
BRÜHGRUPPE SPÜLEN”).
- Die Brühgruppe am Griff (A) anfassen, die mit “PRESS”
gekennzeichnete Taste drücken und die Brühgruppe (28)
herausziehen.
- Mit reichlich lauwarmem Wasser spülen.
Keine Reinigungsmittel dazu benutzen.
- Das obere Sieb (B) leicht mit einem Plastiklöffel abkratzen.
F. 1 4
B
28
A
13.1.3 Abtropfschale und Rost
Die Abtropfschale (12) aus der Maschine nehmen und unter
fließendem Wasser spülen. Den Rost besonders sorgfältig reinigen.
13.1.4 Kaffeesatzbehälter
Die Abtropfschale (12) herausnehmen, den Kaffeesatzbehälter (16)
herausziehen und unter fließendem Wasser reinigen.
13.1.5 Dampf- und Heißwasserrohr
(fehlt beim Modell COFFEE)
Die Rohre (11-17) mit einem weichen, feuchten Tuch reinigen.
Sollten die Düsen verstopft sein, die Endstücke der Ausläufe
abmontierten und die Düsen mit einer Nadel öffnen.
13.1.6 Wärmeplatte
Die Wärmeplatte (4) mit einem weichen, feuchten Tuch reinigen.
13.1.7 Bohnenbehälter
Den Bohnenbehälter (6) mit Wasser und einem weichen, feuchten
Tuch reinigen.
F. 1 5
24
23
31
29
32
25
30
13.1.8 Reinigung des Cappuccinatore
Den Cappuccinatore nicht reinigen, wenn sich die
Maschine im Zustand “Standby” befindet.
Den CAPPUCCINATORE nach jeder Benutzung reinigen,
um zu vermeiden, dass sich die Rückstände erhärten.
Alle abnehmbaren Teile müssen unter fließendem Wasser
gereinigt und gespült werden.
13.1.9 Cappuccino-Ausgabeeinheit (Abb. 15)
Um die Komponenten der Cappuccino-Ausgabeeinheit einzeln
reinigen zu können, müssen folgende Teile abgenommen werden:
- die obere Abdeckung (24), indem sie nach oben abgezogen
wird;
- die Nadel für die Einstellung der Schaumqualität (23);
- der Luftverteiler (31), indem er nach oben vom Körper des
Cappuccinatore abgezogen wird;
- der Körper des Cappuccinatore (29), indem man ihn zu sich
wegzieht;
- das Anschlussstück (32) für die Verbindung zwischen
Ansaugschlauch und Körper des Cappuccinatore;
- den beweglichen Milchauslauf (25);
- den Milchansaugschlauch (30).
Page 72

CONCETTO
68/120
Deutsch
14 - AUSSERPLANMÄSSIGE
WARTUNG
HINWEIS - Zur außerplanmäßigen Wartung gehören alle
Reparaturarbeiten und der Austausch von Teilen. Sie
liegen daher ausschließlich in der Kompetenz des
Wartungstechnikers.
14.1 Mahlwerkblockierung
• Fremdkörper zwischen den Kaffeebohnen können zu einer
Blockierung des Mahlwerks und in der Folge zur Sperre des
Maschinenbetriebs führen. Dies wird von der Displaymeldung
“MAHLWERKFEHLER” angezeigt.
• In diesem Fall muss das Mahlwerk (20) geöffnet und der
Fremdkörper entfernt werden.
14.1.1 Ein- und Ausbauen des Mahlwerks
• Die Abdeckung (A) des Bohnenbehälters (H) schließen.
• Die Schrauben (B) mit dem mitgelieferten Werkzeug (C) vom
Behälter entfernen. Den Behälter nach oben aus der Maschine
ziehen.
F. 1 6
H
B
H
A
C
• Die Kaffeebohnen am Eingang des Mahlwerks mit einem
Staubsauger aufsaugen.
• Die Schrauben (D) entfernen.
• Das Zahnrad (E) entfernen.
F. 1 7
F. 1 8
D
E
D
F. 1 9
F
• Die Einstellmutter (F) aufschrauben und entfernen und beide
Mühlen mit einem Staubsauger und einem Pinsel reinigen.
Den Verschleißzustand der Mühlen überprüfen und diese
im Fall sichtbarer Beschädigungen austauschen.
Page 73

CONCETTO
69/120
Deutsch
F. 2 1
Das Mahlwerk wie folgt wieder einbauen:
• Die Einstellmutter (F) bis zum Anschlag festschrauben
und dann eine 1/2 Umdrehung weit lockern.
Die Lockerung der Einstellmutter um 1/2 Umdrehung ist
unbedingt notwendig, um eine Blockierung und
Beschädigung der Mühlen zu vermeiden.
F. 2 0
F
• Das Zahnrad (E) wieder anbringen und die Schrauben (D)
festziehen.
• Den Bohnenbehälter (H) wieder an seinen Platz zurücksetzen.
Dabei auf die Position der Dichtung (G) achten: sie muss
sich korrekt ins Zahnrad (E) und in die Mutter (F) einfügen.
• Den Behälter (H) befestigen, indem die Schrauben (B) mit dem
Werkzeug (C) festgezogen werden.
G
E
F
B
H
C
• Die Abdeckung (A) öffnen.
Um den normalen Betrieb der Maschine wieder aufnehmen
zu können, muss der Mahlgrad neu eingestellt
werden.
15 - AUSSERBETRIEBNAHME
Wird die Maschine außer Betrieb genommen, ist sie von der Stromund Wasserversorgung zu trennen. Alle Sammelschalen, die Boiler
und Leitungen müssen geleert und die Maschine gereinigt werden
(Abs. “13.1 Reinigung der Maschine”).
Im Fall der Verschrottung müssen die Materialien, aus welchen
die Maschine besteht, getrennt und je nach ihrer Zusammensetzung
gemäß den im Benutzerland geltenden Bestimmungen entsorgt
werden.
F. 2 2
A
Page 74

CONCETTO
70/120
Deutsch
16 - FUNKTIONSSTÖRUNGEN, URSACHEN UND ABHILFEN
Es folgt eine Auflistung einiger eventuell auftretender Funktionsstörungen der Maschine.
Erscheint in der Spalte “ABHILFE” das Symbol muss der Eingriff vom Wartungstechniker durchgeführt werden.
FUNKTIONSSTÖRUNG URSACHE
ABHILFE
Die Maschine schaltet sich nicht ein
Auf dem Display erscheint:
“SATZBEH. LEEREN”
Mahlwerkfehler
Anstelle des Kaffees fließt nur
Wasser aus
Es tritt weder Wasser noch Dampf aus
Der Kaffee fließt zu schnell aus
Der Kaffee fließt zu langsam aus
Der Kaffee ist nicht heiß genug
Der Kaffee hat zu wenig Schaum
Die Maschine braucht zu lange
für die Erwärmung, die
Wasserdurchlaufmenge ist gering
Die Brühgruppe kann nicht
herausgenommen werden
Die Brühgruppe kann nicht eingesetzt
werden
Es fehlt Spannung
Der Kaffeesatzbehälter ist voll
Das Mahlwerk ist blockiert
Es wurde die Auswahltaste für vorgemahlenen
Kaffee gedrückt, jedoch kein Pulverkaffee in
den entsprechenden Behälter gefüllt
Die Öffnung des Dampf-/Heißwasserrohres
ist verstopft
Der Mahlgrad ist zu grob
Der Mahlgrad ist zu fein
Die Tasse wurde nicht vorgewärmt
Die Maschine hat die richtige Temperatur
noch nicht erreicht
Die Kaffeemischung ist nicht geeignet, der
Kaffee ist nicht röstfrisch, das Kaffeepulver
wurde zu fein oder zu grob gemahlen
Der Maschinenkreislauf ist verkalkt
Die Brühgruppe befindet sich nicht in ihrer
Grundstellung (N)
Die Brühgruppe befindet sich nicht in ihrer
Grundstellung (N)
Folgendes überprüfen:
- ob der Stecker ans Stromnetz angeschlossen ist
- ob der allpolige Netztrennschalter (wenn
vorhanden) eingeschaltet ist
- ob die Sicherungen der elektrischen
Anlage intakt sind
- den Zustand der elektrischen
Anschlüsse kontrollieren
Den Kaffeesatzbehälter leeren und wieder
korrekt einsetzen
Das Mahlwerk reinigen (Abs. “14.1
Mahlwerkblockierung”)
Eine Portion Kaffee in den Behälter geben und
den Zyklus wiederholen
Mit einer dünnen Nadel reinigen
Die Mahlfeinheit um einen Grad feiner stellen
Die Mahlfeinheit um einen Grad gröber stellen
Die Tasse auf der Wärmeplatte vorwärmen
Das Erreichen der optimalen Temperatur
abwarten
Die Kaffeemischung wechseln oder den
Mahlgrad kontrollieren (wenn vorgemahlen)
Die Maschine entkalken
Die Maschine mit dem Hauptschalter aus- und
wieder einschalten
Die Brühgruppe mit der Hand drehen, bis sie
sich in ihrer Grundstellung (N) befindet; der
Bezugspunkt auf der Welle muss mit dem Pfeil
N (Abb. 14) übereinstimmen.
Page 75

CONCETTO
71/120
Deutsch
ANMERKUNGEN
.....................................................................................................................................................................
.....................................................................................................................................................................
.....................................................................................................................................................................
.....................................................................................................................................................................
.....................................................................................................................................................................
.....................................................................................................................................................................
.....................................................................................................................................................................
.....................................................................................................................................................................
.....................................................................................................................................................................
.....................................................................................................................................................................
.....................................................................................................................................................................
.....................................................................................................................................................................
.....................................................................................................................................................................
.....................................................................................................................................................................
.....................................................................................................................................................................
.....................................................................................................................................................................
.....................................................................................................................................................................
.....................................................................................................................................................................
.....................................................................................................................................................................
.....................................................................................................................................................................
.....................................................................................................................................................................
.....................................................................................................................................................................
.....................................................................................................................................................................
.....................................................................................................................................................................
.....................................................................................................................................................................
.....................................................................................................................................................................
.....................................................................................................................................................................
.....................................................................................................................................................................
.....................................................................................................................................................................
.....................................................................................................................................................................
Page 76

CONCETTO
72/120
Français
Via C. Gomes, 16
ROBECCO SUL NAVIGLIO (MILANO) - ITALY
Tel. 02/9471654 - Fax 02/9470888
www.gaggia.it
AVANT-PROPOS
• Ce manuel fait partie intégrante de la machine et il est donc à garder en bonnes conditions, dans un endroit facilement accessible
pendant toute la vie opérationnelle de la machine (compte tenu des passages de propriété aussi). L’objectif de ce manuel est le passage
d’informations nécessaires pour l’utilisation correcte et en toute sécurité de la machine.
• En cas de perte ou bien de détérioration de ce manuel, s’adresser à un Centre d’Assistance Autorisé, afin d’en demander une copie, et
préciser le modèle et l’année de fabrication de la machine.
• Les Centres d’Assistance Autorisés sont également disponibles pour tout renseignement concernant les aspects techniques, le fonctionnement,
l’assistance technique et les pièces de rechange.
• Les sujets présentés dans ce manuel sont valables pour l’utilisation de la machine en conditions de sécurité pour les personnes, la
machine et l’environnement, dans l’interprétation d’un simple diagnostic des endommagements et des conditions de fonctionnement
anomal, en effectuant de simples opérations de contrôle et entretien, dans le respect absolu des prescriptions reportées dans les pages
suivantes et des Normes de Sécurité et de Santé en vigueur.
• Avant d’effectuer toute intervention, lire attentivement le manuel et s’assurer d’en avoir bien compris le contenu.
• Si la machine est employée (individuellement) par plusieurs utilisateurs, il faut absolument que chaque utilisateur connaisse en détail le
mode d’emploi.
• Le Constructeur se réserve le droit de modifier ou bien d’effectuer des améliorations de la machine sans préavis.
• En cas d’exigences spéciales, s’adresser au Distributeur ou bien à l’Importateur (si présent) de son pays ou bien au Constructeur de la
machine.
• Tous les droits de ce manuel sont strictement réservés à la Maison GAGGIA. La reproduction ou la diffusion même en partie sans
autorisation écrite sont interdites.
Page 77

CONCETTO
73/120
Français
TABLE DES MATIÈRES
1 - COMPOSITION DE LA MACHINE. ................. 74
2 - REMARQUES À CONSULTER. ........................ 75
2.1 Abréviations ........................................ 75
2.2 Symboles utilisés ................................... 75
3 - UTILISATEUR.................................................. 75
4 - TECHNICIEN DE MAINTENANCE................... 75
5 - UTILISATION PRÉVUE DE LA MACHINE........ 75
6 - AVERTISSEMENTS ET PRÉCAUTIONS. ........... 76
7 - PRÉCAUTIONS GÉNÉRALES. ......................... 76
8 - INFORMATIONS SUR LA MACHINE. ............ 76
8.1 Données d’identification ......................... 76
8.2 Caractéristiques techniques..................... 76
8.3 Dimensions d’encombrement ................... 76
8.4 Groupe de distribution de café (Fig. 2) ..... 77
8.5 Groupe Cappuccinatore (Fig. 4) ............. 77
9 - DISPOSITIFS DE SÉCURITÉ. ........................... 77
9.1 Tuyaux de distribution vapeur et eau chaude
(équipement COFFEE exclu) (Fig. 1) ......... 77
9.2 Risques résiduels ................................... 77
10 -INSTALLATION. ............................................. 78
10.1 Remarques sur l’emplacement.................. 78
10.2 Positionnement et branchement de l’eau .... 78
10.3 Raccordement électrique ........................ 78
10.4 Connexion du port série ......................... 79
11 -PREMIER ALLUMAGE DE LA MACHINE......... 79
12 -EMPLOI DE LA MACHINE. ............................. 79
12.1 États de la machine ............................... 80
12.2 Allumage manuel .................................. 80
12.3
Mise en marche automatique programmée..
80
12.4 Mise en marche momentanée à partir
de standby. ......................................... 80
12.5 Tableau de commande .......................... 81
12.6
Programmation des touches de distribution ..
82
12.7 Fonctions programmables du menu. ......... 84
12.8 Réglage de la crème ............................. 88
12.9 Réglage de la mouture........................... 88
12.10 Messages affichés. ............................... 89
12.11 Mise hors circuit de la machine. .............. 89
13 -ENTRETIEN DE ROUTINE. .............................. 90
13.1 Nettoyage de la machine. ..................... 90
14 -ENTRETIEN CURATIF. ..................................... 92
14.1 Blocage du moulin à café. ..................... 92
15 -MISE HORS SERVICE. .................................... 93
16 -INCONVÉNIENTS - PROBLÈMES
ET SOLUTIONS NOTES. ................................. 95
Page 78

CONCETTO
74/120
Français
13
1617
18
10
11
9
8
32
1 4 5 6
7
14
15
12
19
20
21
28
>
<
ent
esc
>
<
ent
esc
23
24
25
22
26
27
1 - COMPOSITION DE LA MACHINE
REMARQUE - Si non spécifiés dans le texte, les chiffres de position des parties de la machine font référence à cette figure
A Plaque CE
1 Panneau gauche
2 Vitre
3 Panneau arrière
4 Plaque chauffante
5 Volet pour café prémoulu
6 Réservoir à café en grains
7 Panneau droit
8 Tableau de commande
9 Protecteur en caoutchouc
10 Pince bloque-tuyaux (équipement CAPPUCCINO)
11 Tuyau de distribution de l’eau chaude
(équipement COFFEE exclu)
12 Bac d’égouttement
13 Robinet de distribution de la vapeur
(équipement COFFEE exclu)
Dans le sens des aiguilles d’une montre : jet vapeur
ouvert
Dans le sens inverse des aiguilles d’une montre : jet
vapeur fermé
14 Volet
15 Protecteur en caoutchouc
16 Tiroir à marc
17 Tuyau de distribution de vapeur
(équipement COFFEE exclu)
18 Interrupteur général
«I» Fonctions électriques activées - Machine
activée - Lampe voyant, lumineuse.
«O» Fonctions électriques désactivées - Machine
éteinte - Voyant de la touche «I», éteint.
19 Poignée de réglage de la mouture
20 Groupe du moulin à café
21 Compteur mécanique d’impulsions
Affiche le nombre de distributions effectuées par la machine.
22 Unité centrale de distribution de café
23 Aiguille de réglage crème lait (équipement CAPPUCCINO)
Réglage manuel de la hauteur
24 Couverture pour unité centrale
25 Tuyau de distribution de lait (équipement CAPPUCCINO)
26 Distributeur mobile
27 Distributeur télescopique
28 Groupe café
F. 1
A
Page 79

CONCETTO
75/120
Français
2 - REMARQUES À
CONSULTER
2.1 Abréviations
F. = Figure
P. = Page
Paragr. = Paragraphe
Tab. = Tableau
2.2 Symboles utilisés
ATTENTION ! Faire très attention à la signification des symboles
:
ils ont la fonction de ne pas répéter les concepts techniques ou les
avertissements de sécurité ; il faut donc les utiliser comme des
«pour-mémoires». Consulter donc la liste des symboles en cas de
doute à propos de leur signification.
T. 1
ATTENTION ! Informations concernant la
sécurité de l’utilisateur et l’intégrité de la
machine.
ATTENTION ! Interventions éventuellement
dangereuses pour le technicien préposé
à l’entretien.
IMPORTANT ! - Éveille l’attention sur un
sujet particulièrement important.
Technicien préposé à l’entretien :
opérations relevant exclusivement du
personnel préposé à l’entretien curatif et aux
réparations.
Machine éteinte - Opérations à effectuer
avec l’alimentation électrique coupée
Utilisateur - Opérations relevant des
compétences de l’utilisateur de la machine.
3 - UTILISATEUR
• Personne adulte possédant les compétences nécessaires
pour effectuer les opérations suivantes :
- Gestion, contrôle et arrêt de la machine.
- Remplissage de café en grain.
-Réglage des paramètres de distribution.
- Vidange des tiroirs à marc et des bacs de récolte
liquides.
- Nettoyage extérieur de la machine.
L’utilisation de la machine est interdite aux enfants,
aux mineurs et aux personnes non-autonomes.
4 - TECHNICIEN DE
MAINTENANCE
• Personne préposée aux opérations suivantes :
- Installation, mise en service, réglage et mise au point
de la machine.
- Entretien curatif, réparations et remplacements des
pièces de rechange.
5 - UTILISATION PRÉVUE DE
LA MACHINE
• Les machines présentées dans ce Manuel ont été élaborées,
réalisées et protégées par la distribution automatique
(programmable) :
- de boissons à base de café en grains moulu à l’instant ;
- de boissons à base de café prémoulu;
- de boissons à base de café en grains moulu à l’instant
(équipement CAPPUCCINO) ;
-d’eau chaude et de vapeur d’eau (équipement COFFEE
exclu) pour la préparation et le chauffage de boissons.
- de lait chaud (équipement CAPPUCCINO).
Toute autre utilisation des machines n’est pas prévu par
le Constructeur, qui décline toute responsabilité pour toute
sorte d’endommagements provoqués par une utilisation
incorrecte des machines. L’utilisation incorrecte provoque
l’annulation de toute forme de garantie.
Page 80

CONCETTO
76/120
Français
8 - INFORMATIONS SUR LA
MACHINE
8.1 Données d’identification
Sur la plaque (A) sont reportées les données d’identification de la
machine :
• Constructeur et marquage .
• modèle
• N° de matricule
• année de fabrication
• tension électrique d’alimentation (V) et fréquence (Hz)
• puissance électrique absorbée (W)
• numéro des phases de la ligne électrique (PH)
• pression admissible dans le réseau de distribution de l’eau
(MPa)
REMARQUE - Lors de la demande d’intervention auprès des
Centres d’Assistance Autorisés, fournir le
modèle et le numéro de matricule.
8.2 Caractéristiques techniques
Tension d’alimentation. ...............................230V/400V 2N
Niveau de pression acoustique pondéré A .... inférieur à 70 dB
Longueur câble d’alimentation .............................. mm 1500
Puissance installée.
Mod. LUXE ........................................................ W 3250
Mod. COFFEE ................................................... W 1400
Mod. CAPPUCCINO .......................................... W 3250
Pression hydraulique ....................... MPa 0,1÷0,8 (1÷8 bar)
Poids : ................................................................... kg 60
Contenance réservoir à café ........................................ kg 2
REMARQUE - Les machines sont programmables pour les
dosages de tout type de distribution. La plupart
des composants électriques est alimenté à 24 Vdc.
8.3 Dimensions d’encombrement
>
<
e
n
t
e
s
c
>
<
e
n
t
e
s
c
LPh
470 550 675
F. 2
L
P
h
6 - AVERTISSEMENTS ET
PRÉCAUTIONS
• Pour l’entretien de routine, ne pas utiliser de détergents, diluants,
solvants, etc.
• Le nettoyage concerne les composants hors tension électrique,
s’effectue avec des produits neutres et biodégradables, toujours
avec l’interrupteur général ou l’Interrupteur omnipolaire sur «0»
(OFF) ou après avoir débranché la fiche de la prise de courant.
• L’entretien de routine est à effectuer par le personnel préposé à
cet effet, ou par du personnel formé et muni des conditions
psychophysiques nécessaires et dans le respect des instructions
reportées ci-dessous, en conformité avec les Normes de Sécurité
et de Santé en vigueur.
• Il est absolument interdit de placer et/ou d’abandonner sur la
machine des outils ou toute autre objet dangereux pour la
sécurité des personnes et pour l’intégrité de la machine.
• Toute modification et falsification, ainsi que l’utilisation de pièces
de rechange non originales, exemptent le Constructeur de toute
responsabilité pour toute sorte d’endommagements, et
provoquent l’annulation de la garantie.
• Utiliser seulement de l’eau potable.
• Le lait à employer avec le CAPPUCCINATORE doit être conservé
au réfrigérateur à une température non supérieure à 4° C ; il ne
doit pas rester hors du réfrigérateur pendant plus de 30 minutes.
• Quand le CAPPUCCINATORE reste inutilisé pendant une
période supérieure à 1 heure, il faut commander un cycle de
nettoyage des tuyaux avant toute nouvelle utilisation.
Pour exécuter un cycle de nettoyage des tuyaux il faut:
- immerger le tuyau d’aspiration du lait dans un récipient avec
de l’eau;
- appuyer sur la touche ;
- attendre jusqu’à la fin de la sortie d’eau.
N.B.: L’eau ne doit pas être chaude.
7-PRÉCAUTIONS GÉNÉRALES
• Avant d’utiliser la machine, s’assurer toujours préalablement
de ne pas avoir des doutes sur le contenu de ce manuel. La
non observation des normes reportées dans le manuel exempte
le Constructeur de toute responsabilité pour tout
endommagement aux personnes et/ou aux objets.
• Garder ce manuel afin de le consulter dans le futur.
• En cas d’une nouvelle installation, vérifier préalablement si les
normes minimales de sécurité, positionnement et fonctionnement
de la machine sont respectées ; vérifier également si les conditions
de l’environnement (température, humidité, illumination) et
l’adéquation des espaces opérationnels sont respectées.
• L’endommagement éventuel du câble d’alimentation électrique
prévoit l’intervention du Service d’Assistance Technique Autorisé
ou du Technicien de Maintenance.
• Ne pas utiliser la machine à l’extérieur.
• En cas de mauvais fonctionnement, s’adresser toujours au
Technicien de Maintenance.
• Il est interdit d’utiliser des jets d’eau pour le nettoyage.
Page 81

CONCETTO
77/120
Français
F. 3
F. 4
8.4 Groupe de distribution de café
(Fig. 2)
La position de ce groupe (22) peut être modifiée en fonction de la
hauteur du récipient utilisé.
Il est donc possible de positionner le distributeur mobile (26) vers
l’extérieur, et le distributeur télescopique (27) vers le haut ainsi que
vers le bas.
On peut donc régler différentes hauteurs de distribution.
REMARQUE - Si on utilise seulement un récipient plus bas que
90 mm, il sera possible de déplacer le distributeur
(26) vers le bas.
8.5 Groupe Cappuccinatore (Fig. 4)
le groupe cappuccinatore se compose de :
- Tuyau d’aspiration de lait (30) ;
- pince bloque-tuyaux (10) ;
- corps du cappuccinatore (29)
- aiguille pour le réglage de crème (23) ;
- tuyau de distribution réglable (25)
22
26
27
>
<
ent
esc
>
<
ent
esc
9 - DISPOSITIFS DE SÉCURITÉ
REMARQUE - Les machines présentées dans ce manuel ont été
réalisées en conformité avec les Réglementations
Européennes en vigueur et sont munies des
protections correspondantes pour les parties
éventuellement dangereuses.
• En cas de surcroît de pression dans l’installation hydraulique préposée à la production de vapeur et d’eau chaude,
trois vannes de sécurité sont interceptées.
• Un thermostat empêche la surchauffe des chaudières.
• La position du bac antistillation (12), du tiroir à marc (16)
et du volet (14) est contrôlée par trois microinterrupteurs qui
arrêtent la machine si un composant n’est pas correctement
positionné (l’écran affiche le signalement du composant positionné incorrectement).
• Un compteur d’impulsions électronique et un compteur d’impulsion mécanique mémorisent le numéro des
distributions et permettent la programmation de l’entretien de
routine
9.1 Tuyaux de distribution vapeur et
eau chaude (équipement COFFEE exclu)
(Fig. 1)
Les tuyaux de distribution de vapeur (17) et d’eau chaude (11)
sont muni de protections spéciales en caoutchouc (9 et 15) afin
de pouvoir les saisir et les orienter en cas de surchauffe.
9.2 Risques résiduels
• Les caractéristiques de fabrication des machines présentés dans
ce manuel, ne permettent pas de protéger l’utilisateur du jet
direct de vapeur ou d’eau chaude (équipement COFFEE exclu).
• Danger de brûlures - Au cours de la distribution d’eau
chaude et de vapeur, ne pas orienter les jets vers soi-même
ou d’autres personnes. Saisir le tuyau seulement au niveau des
protections anti-brûlures correspondantes (9 - 15).
Utiliser exclusivement des récipients préposé à contenir
des aliments et fabriqués en matériel «pour aliments».
Page 82

CONCETTO
78/120
Français
F. 5
10 - INSTALLATION
10.1 Remarques sur l’emplacement
• La machine est à installer dans un endroit sec et sûr, avec une
température ambiante entre 10° C et 40° C et une humidité
maximale de 90%.
10.2 Positionnement et branchement de
l’eau
REMARQUE - Vérifier si le plan préposé à l’installation de la
machine a des dimensions et une robustesse
adéquates à soutenir la machine en toute sécurité.
• Faire un trou dans le plan (A - Fig. 5)
• Appuyer la machine sur le plan et insérer le câble d’alimentation
électrique (B - Fig. 5) dans le trou (A).
• Brancher un tuyau de déchargement au raccord (C - Fig. 6) et
le fixer avec le collier à crémaillère.
• Connecter (seulement avec tuyau et raccords réalisés en matériel
«pour aliments») la machine au réseau de distribution d’eau
potable au moyen du raccord (D - Fig. 6).
Nous conseillons d’alimenter la machine en eau traitée
par un dispositif de détartrage, surtout en cas d’eau à
contenu élevé de sels de calcium et magnésium (eau dure).
• Positionner définitivement la machine sur le plan d’appui (les
cercles E - Fig. 5 indiquent la position optimale des pieds
réglables).
• Niveler la machine, en opérant sur les pieds réglables (F - Fig.
6).
F. 7
Neutre (N) - Bleu
Phase (L ) - Marron
Phase (L2) - Noir
Terre - Jaune/vert
F. 8
CH
(Suisse)
CEI
Câble d’alimentation type
H07RNF section 4x2,5 mm+.
Raccordement de la fiche à la ligne électrique biphasée à
400 V 2N
10.3 Raccordement électrique
REMARQUE - En cas d’installations dotées de courant biphasé à
400 V, utiliser les phases de sorte que la machine
soit alimentée en courant monophasé à 230 V (fig.
7 ). Pour le raccordement monophasé à 230 V,
demander le kit correspond pour l’installation
(cod. %1034.R09).
F. 6
L
1
L
2
N
L
2
L
1
A
E E
E
E
B
F
C
D
AVANT DE LA MACHINE
Page 83

CONCETTO
79/120
Français
F. 9
10.4 Connexion du port série
Au moyen du port série il est possible de connecter la machine
aux appareils des CENTRES D’ASSISTANCE AUTORISÉS, afin
d’effectuer les contrôles et les opérations de programmation
(A - Fig. 9).
12 - EMPLOI DE LA
MACHINE
Avant d’employer la machine il faut avoir lu attentivement
cette publication et avoir acquis une bonne connaissance
générale de la machine.
Après une période de non utilisation de la machine, relire
le paragr. précédent «premier allumage de la
machine» avant de recommencer à l’utiliser.
11 - PREMIER ALLUMAGE
DE LA MACHINE
- Remplir le réservoir (6) avec la variété de café en grains que
vous avez choisie.
Vérifier si dans le mélange de café il n’y a pas de corps
étrangers qui pourraient éventuellement endommager les
meules.
-Vérifier si les composants amovibles (12 et 16) sont présents
et si le volet (14) est fermé.
En cas contraire, lors de la mise en circuit de la machine,
l’afficheur montrera l’indication de la partie qui n’est pas en
place.
- Tourner l’interrupteur omnipolaire sur «I».
- Allumer la machine par l’interrupteur (18) ;
l’écran affiche : «EN PHASE DE CHAUFFAGE - ATTENDEZ»
- Lorsque l’écran affiche : «PRÊT POUR L’UTILISATION»,
il faut :
- Positionner le distributeur (réf. 26 et 27) de sorte que sa
hauteur soit adéquate aux récipients employés (paragr. 8.4)
- Positionner un ou deux récipients sous le distributeur.
- Appuyer sur la touche correspondant au type de boisson
choisie.
Même si toutes les touches sont déjà programmées par
défaut, il faut vérifier si la boisson obtenue correspond
aux caractéristiques souhaitées. En cas contraire il faut
procéder avec la programmation des touches de
distribution (paragr. 12.6).
D’après les normes en vigueur dans votre Pays, le câble
de connexion à la ligne électrique doit être doté soit d’un
interrupteur omnipolaire (avec ouverture minimum des
contacts de 3 mm), soit d’une fiche conforme.
• L’interrupteur omnipolaire doit être adéquat à
l’absorption de la machine et en mesure de détecter
toutes les polarités de la tension.
• Vérifier si les câbles électriques de l’installation sont
proportionnés à l’absorption de la machine.
Le point de connexion (prise électrique ou interrupteur
omnipolaire) doit être positionné dans un lieu aisément
accessible à l’utilisateur lorsqu’il faut déconnecter la
machine de la ligne électrique.
• Connecter le câble (B - F. 6) à la ligne d’alimentation électrique.
A
Page 84

CONCETTO
80/120
Français
12.1 États de la machine
En ce qui concerne l’alimentation électrique de la machine, cette
dernière peut se présenter :
Hors circuit et isolée électriquement
- Interrupteur général (18) et interrupteur omnipolaire en position «0» (ou fiche désinsérée).
- Seule la mémoire de conservation des données programmées
est active.
En marche
- Interrupteur générale (18) et interrupteur omnipolaire en position
«I» (ou fiche insérée).
- Toutes les fonctions sont actives, et l’afficheur (8a) est allumé.
En standby (machine hors circuit mais pas isolée électriquement)
- Interrupteur général (18) en position «I».
- Fonctions activées : «ALLUMAGE AUTOMATIQUE»,
«ANTICONGÉLATION» (si sélectionnées), «HORLOGE», ainsi
que l’écran et la mémoire de stockage des données
programmées.
-L’afficheur n’est pas illuminé de fond.
12.2 Allumage manuel
Ce type de mise en service est nécessaire lorsque la machine est
«hors circuit et isolée électriquement». 12.1). Il faut suivre
les instructions au paragr. 11 en excluant éventuellement le contrôle
de boisson distribuée.
12.3 Mise en marche automatique
programmée
Elle est possible si la machine est en «STANDBY» et si la fonction
«ALLUMAGE AUTOM.» a été activée.
La machine se met en marche à l’heure programmée.
12.4 Mise en marche momentanée à
partir de standby.
Démarrage manuel avec la machine en «STANDBY».
S’obtient en gardant la touche appuyée pendant 3 secondes .
La machine retournera automatiquement dans l’état de «STANDBY»
60 minutes après la dernière opération.
Page 85

CONCETTO
81/120
Français
F. 1 0
12.5 Tableau de commande
Les touches de distribution sont à appuyer
pendant moins qu’une seconde
Met en marche la machine
momentanément lorsqu’elle
est en «STANDBY» et confirme la sélection
des touches (H - G).
F
1 Expresso
2 Expressos
1 Long
2 Longs
Expresso
Long
Expresso
Long
CAFÉ LIGHT
CAFÉ EN CARAFE Distribution obtenue automatiquement par plusieurs distributions de café.
CAFÉ CRÈME Distribution obtenue avec du café moulu en ajoutant une petite dose de lait.
CAPPUCCINO Distribution obtenue avec du lait chaud en ajoutant une dose de café moulu.
LAIT CHAUD Distribution obtenue en utilisant du lait
EAU CHAUDE (équipement COFFEE exclu) Distribution obtenue en utilisant de l’eau.
(*)
(*)
(*)
CAFÉ Distributions obtenues avec café moulu à l’instant
CAFÉ PRÉMOULU Distribution obtenue en utilisant des doses de café pré-moulu.
Distribution obtenue en utilisant des doses de café pré-moulu et en ajoutant
du café moulu à l’instant.
• Les définitions : «Café expresso» - «Café long», indiquent deux niveaux différents
de distribution.
• Lors de la livraison, les machines sont programmées par défaut.
• Ces distributions ne sont programmables que pour la dose simple de café prémoulu insérées à l’instant.
• Après avoir appuyé sur la touche (une fois pour «Pré-moulu», deux fois pour «Café
light»), introduire une dose de café par le volet (5).
• Pour le café light, une petite quantité de café moulu sera ajoutée.
• Il est possible de programmer jusqu’à 8 distributions dans le même récipient (L 2,5
au maximum) Appuyer donc plusieurs fois sur la touche . L’écran affiche le
numéro de doses programmées. Après la distribution de L 2,5 attendre deux minutes
avant de demander une autre distribution
• Boisson composée de café moulu à l’instant, en ajoutant une petite dose de lait
chaud.
• Boisson composée de café moulu à l’instant et de lait chaud.
• Il est possible de programmer jusqu’à 8 distributions dans le même récipient (L 1 au
maximum) Appuyer donc plusieurs fois sur la touche . L’écran affiche le
numéro de doses programmées.
(**) - (***)
(**) - (***)
(***)
Page 86

CONCETTO
82/120
Français
VAPEUR
(équipement COFFEE exclu)
• Immerger le tuyau (17) dans la boisson à réchauffer
• Tourner le robinet (13) dans le sens inverse des aiguilles
d’une montre Une fois atteinte la température souhaitée,
refermer le robinet en le tournant dans le sens des aiguilles
d’une montre.
Après chaque distribution, nettoyer toujours le tuyau à
vapeur des résidus laissés par la boisson chauffée
précédemment à l’aide d’un chiffon propre et humide
(*) En guise de prévention, avant chaque opération insérer le tuyau
d’aspiration (30 - Fig. 4) à l’intérieur du réservoir à lait.
(*) (*) Régler la quantité de crème à l’aide d’e l’aiguille
(23 - Fig. 4) (Paragr. 12.8).
12.6 Programmation des touches de
distribution
Les quantités de boissons associées aux touches correspondantes
peuvent être programmées directement à partir du clavier.
Afin de programmer et de reprogrammer les touches, suivre les
instructions suivantes :
- Allumer la machine et la préparer pour l’utilisation
- Positionner le récipient sous le distributeur correspondant.
- Appuyer sur la touche et la garder enfoncée. L’écran affiche
«PROGRAMMATION»
- Relâcher la touche afin de mémoriser la dose distribuée;
(***) N.B.: Les touches , e peuvent être réglées de
façon à distribuer toutes boissons préparées avec du lait et
du café. Pour changer les réglages par défaut s’adresser à
un centre d’assistance agréé.
Par la suite le schéma de programmation des touches.
Page 87

Français
CAFÉ
-Maintenir la touche
enfoncée-
1 café expresso
Départ
afin d’effectuer la programmation des autres cafés, effectuer comme ci-dessus, en utilisant les touches suivantes:
2 cafés expressos
1 café long et 2 cafés longs
Distribution
Arrêt
CAFÉ PRÉMOULU
-Maintenir la touche
C
A
F
É
enfoncée-
L
A
I
Départ ArrêtDépart
Distribution Distribution
T
(7 sec)
L’écran affiche
«PROGRAMMATION»
-Maintenir la touche
enfoncée-
CAPPUCCINO
-Maintenir la touche
C
enfoncée-
A
F
É
Départ
Distribution Distribution
Arrêt
L
A
I
T
(7 sec)
L’écran affiche
«PROGRAMMATION»
-Maintenir la touche
enfoncée-
Départ
Arrêt
Arrêt
LAIT CHAUD
(7 sec)
L’écran affiche
«PROGRAMMATION»
CAFÉ EN CARAFE
(5 sec)
EAU CHAUDE
-Maintenir la touche
enfoncée-
Départ
Distribution
-Maintenir la touche
enfoncée-
Départ
-Maintenir la touche
Départ
Arrêt
Distribution
enfoncée-
Distribution
Arrêt
Arrêt
REMARQUE - Cette programmation ne s’obtient que
si la fonction «PROGRAMMATION
EAU CHAUDE» est en modalité :
«ACTIVÉE». (paragr. 12.7.1).
83/120
CONCETTO
Page 88

CONCETTO
84/120
Français
12.7 Fonctions programmables du
menu.
REMARQUE - Au moyen de la programmation du menu, la
machine permet d’effectuer les réglages qui
peuvent adapter le produit distribué aux exigences
de l’usager.
Au cours de la programmation, les touches suivantes ont
une fonction différente que pendant l’utilisation normale
de la machine.
(accès à la accéder à la programmation en
programmation) gardant la touche enfoncée pendant
5 secondes (l’écran affiche
«PROGRAMMATION»);
(Enter) passer d’un niveau du menu
au niveau successif ; préparer
une donnée à modifier ; confirmer
une donnée ou bien une fonction ;
(Escape)
annuler les modifications non
confirmées ; retourner au niveau
précédent du menu
jusqu’à la sortie du menu.
(Down) passer à l’entrée successive
à l’intérieur du même niveau de
programmation ; incrémenter la valeur
d’une donnée à modifier.
(Up) passer à l’entrée précédente
à l’intérieur du même niveau de
programmation ; réduire la valeur de
la donnée à modifier.
Certaines fonctions permettent de programmer une ou plusieurs
données (déjà programmées sur des valeurs de défaut).
Pour modifier les valeurs des données à reprogrammer il faut :
-Sélectionner la fonction.
- Confirmer la fonction par la touche (Entrer)
- Le curseur clignotant se positionne sous la valeur à modifier.
- Activer les touches (Up) ou (Down) afin de changer la
valeur.
- Confirmer la donnée modifiée par la touche (Entrer)
PROGRAMMATION
5 sec.
LANGUE
PLAQUE CHAUFFANTE
DOSE DE MOULURE
TEMPÉRATURE
PRÉINFUSION
PROGRAMM. EAU CHAUDE
PROGRAMMATION LAIT
MÉLANGE EAU CHAUDE
LAVAGE PROGRAMMÉ
LAVAGE GROUPE
HORLOGE
ALLUMAGE AUTOMATIQUE
HORAIRES ON/OFF
COMPTEURS
ANTICONGÉLATION
DÉBLOCAGE
CODE: 0000
DÉSACTIVÉ
ACTIVÉ
OFF4: lmmjvsd 00:00
OFF3: lmmjvsd 00:00
ON 4: lmmjvsd 00:00
ON 3: lmmjvsd 00:00
OFF1: lmmjvsd 00:00
ON 1: lmmjvsd 00:00
OFF2: lmmjvsd 00:00
ON 2: lmmjvsd 00:00
DÉSACTIVÉ
ACTIVÉ
DÉSACTIVÉ
ACTIVÉ
DÉSACTIVÉE
ACTIVÉE
DÉSACTIVÉE
ACTIVÉE
DÉSACTIVÉE
ACTIVÉE
DÉSACTIVÉE
BREF
LONGUE
MIN. XXX
SUIVRE LES INSTRUCTIONS
16:34 GI 8 NOV 2001
PREMIER CAFÉ
CAFÉ
BAISSE
HAUTE
STANDARD
BAISSE
HAUTE
STANDARD
CAFÉ CRÈME
CAPPUCCINO
CARAFE
2 CAFÉS LONGS
1 CAFÉ LONG
1 CAFÉ EXPRESSO
2 CAFÉS EXPRESSOS
DÉSACTIVÉE
ACTIVÉE
ECC.
FRANCAIS
DEUTSCH
ITALIANO
TOTAL EAU 000000
TOTAL CAFÉ 000000
Page 89

CONCETTO
85/120
Français
PROGRAMMATION
LANGUE
PLAQUE CHAUFFANTE
TEMPÉRATURE
PRÉINFUSION
ITALIANO
DEUTSCH
FRANCAIS
ECC.
ACTIVÉ
DÉSACTIVÉ
1
CAFÉ
EXPRESSO
1 CAFÉ LONG
2 CAFÉ LONGS
CARAFE
CAFÉ
PREMIER
CAFÉ
BAISSE
BAISSE
STANDARD
HAUTE
STANDARD
HAUTE
BREF
PROGRAMM. EAU CHAUDE
ACTIVÉE
DÉSACTIVÉE
LONGUE
PROGRAMMATION LAIT
2
CAFÉ
EXPRESSOS
DOSE DE MOULURE
CAFÉ CRÈME
DÉSACTIVÉE
CAPPUCCINO
12.7.1 Description des fonctions
LANGUE
- Afin d’accéder à la sélection, activer à partir du menu
«LANGUE».
PLAQUE CHAUFFANTE
- Confirmer «ACTIVÉE», afin d’allumer la plaque chauffante
lors de l’allumage de la machine.
- Confirmer «DÉSACTIVÉE», afin de garder la plaque
chauffante toujours éteinte.
DOSE DE MOULURE
Pour chaque distribution il est possible de modifier la quantité de
café moulu utilisée en phase de distribution et programmée en
phase d’installation.
- Confirmer «BAISSE» ou «HAUTE», afin de réduire ou
d’augmenter la dose d’un gramme.
- Confirmer «STANDARD», afin d’utiliser en phase de distribution
la dose programmée par le technicien de maintenance.
TEMPÉRATURE
Pour chaque distribution de café, il est possible de modifier la
température de l’eau utilisée en phase de distribution et programmée
en phase d’installation.
- Confirmer «BAISSE» : la température est réduite de 3° C.
- Confirmer «HAUTE» : la température augmente de 3° C.
- Confirmer «STANDARD», afin d’utiliser la température
programmée par le Technicien de Maintenance
REMARQUE - La température «premier café» est employée pour
la première distribution lors de la mise en circuit
de la machine.
PRÉINFUSION
Cette fonction permet d’effecteur une petite pause pendant la
première phase de distribution. Cela peut améliorer la qualité du
café qui, pendant la pause, «se mêle» avec la première partie
d’eau fournie. Confirmer :
- «DÉSACTIVÉE», afin de n’effectuer aucune préinfusion.
- «BREF», afin d’effectuer la «préinfusion» programmée par le
Technicien de Maintenance.
- «LONGUE», afin d’effectuer la «préinfusion» augmentée d’une
seconde.
PROGRAMM. EAU CHAUDE
Par cette fonction, il est possible d’activer la programmation de la
quantité d’eau chaude qui peut être distribuée. Confirmer :
- «ACTIVÉE», afin d’activer la touche , (paragr. 12.6)
- «DÉSACTIVÉE», la touche n’accepte pas la programmation
de la dose, elle sera gérée manuellement.
le développement des fonctions
continue à la page suivante
Page 90

CONCETTO
86/120
Français
PROGRAMM. EAU CHAUDE
PROGRAMMATION LAIT
MÉLANGE EAU CHAUDE
LAVAGE PROGRAMMÉ
LAVAGE GROUPE
HORLOGE
ALLUMAGE AUTOMATIQUE
ACTIVÉE
DÉSACTIVÉE
ACTIVÉE
DÉSACTIVÉE
ACTIVÉ
MIN. 240
DÉSACTIVÉ
INSÉRER LE GROUPE
FERMER LE VOLET
LAVAGE EN COURS
ENLEVER LE GROUPE ET
LAVER AVEC DE L’EAU
INSÉRER LE GROUPE
FERMER LE VOLET
LAVAGE TERMINÉ
APPUYER SUR LA TOUCHE
ÉTOILE
16:34 GI 8 NOV 2001
INSÉRER LA PASTILLE
DANS LE GROUPE
PROGRAMMATION LAIT
Il est possible d’activer la programmation de la quantité de lait qui
peut être distribuée. Confirmer :
- «ACTIVÉE», programmation de la touche (paragr. 12.6)
- «DÉSACTIVÉE», la touche n’accepte pas la programmation
de la dose, elle sera gérée manuellement.
MÉLANGE EAU CHAUDE
Pendant la distribution des différents types de boissons, la machine
ajoute une quantité d’eau chaude en fonction de la programmation
effectuée. Confirmer :
- «ACTIVÉ», le mélange est effectué
- «DÉSACTIVÉ», AUCUN rajout d’eau chaude à la boisson.
REMARQUE - Si la fonction est désactivée, les valeurs
programmées restent inchangées et réutilisables
lors de la réactivation.
LAVAGE PROGRAMMÉ
Cette fonction permet la distribution d’une quantité minimale d’eau
chaude (5 cc. environ), afin d’éviter la formation de sédiments
dans le distributeur de café ; le lavage est à effectuer
automatiquement après le temps programmé (20÷240 minutes) à
partir de la dernière distribution de café. Confirmer :
- «ACTIVÉ», afin de positionner le curseur clignotant sur le
dernier chiffre à droite, la valeur peut être modifiée par des
variations de 10 minutes à la fois.
confirmer toujours les modifications éventuelles.
- «DÉSACTIVÉ», la machine n’effectue pas le lavage.
REMARQUE - Pendant le lavage, l’écran affiche :
««
««
«
LAVAGELAVAGE
LAVAGELAVAGE
LAVAGE
PROGRAMMÉPROGRAMMÉ
PROGRAMMÉPROGRAMMÉ
PROGRAMMÉ
»»
»»
» ;
le lavage peut se faire manuellement en gardant
la touche enfoncée pendant 3 secondes.
LAVAGE GROUPE
Cette fonction permet d’effectuer le lavage du groupe café (28)
en utilisant les pastilles (pour tout détail, s’adresser à un Centre
d’Assistance Autorisé).
Démarche :
-L’opération commence par : «LAVAGE GROUPE»
- Appuyer sur ; l’écran affiche : «INSÉRER LA PASTILLE
DANS LE GROUPE».
- Enlever le groupe café ; l’écran affiche : «INSÉRER LE
GROUPE» ;
- Insérer la pastille à l’intérieur du groupe café et réinsérer le
groupe ; l’écran affiche : «FERMER LE VOLET».
- Fermer le volet ; l’écran affiche : «LAVAGE EN COURS».
La machine commence le cycle de lavage, à la fin duquel
l’écran affiche «ENLEVER LE GROUPE ET LAVER AVEC
DE L’EAU».
- Enlever le groupe café ; l’écran affiche : «INSÉRER LE
GROUPE».
- Laver le groupe café sous l’eau courante.
-Réinsérer le groupe café ; l’écran affiche : «FERMER LE
VOLET».
- Fermer le volet ; l’écran affiche : «LAVAGE TERMINÉ -
APPUYER SUR LA TOUCHE ÉTOILE» ;
Appuyer sur , afin de quitter définitivement le menu et d’apprêter
la machine pour l’utilisation.
HORLOGE
Cette fonction permet de régler l’horloge et la date de la machine.
- En confirmant «HORLOGE», le curseur clignote et se positionne
sur les heures, afin de les modifier.
- Après avoir confirmé l’heure réglée, le curseur se positionne
sur la donnée successive à modifier (les minutes, ensuite le
mois et enfin l’année).
Page 91

CONCETTO
87/120
Français
HORLOGE
ALLUMAGE AUTOMATIQUE
HORAIRES ON/OFF
COMPTEURS
ANTICONGÉLATION
DÉBLOCAGE
CODE: 0000
DÉSACTIVÉ
ACTIVÉ
OFF4: lmmjvsd 00:00
OFF3: lmmjvsd 00:00
ON 4: lmmjvsd 00:00
ON 3: lmmjvsd 00:00
OFF1: lmmjvsd 00:00
ON 1: lmmjvsd 00:00
OFF2: lmmjvsd 00:00
ON 2: lmmjvsd 00:00
DÉSACTIVÉE
ACTIVÉE
TOTAL EAU 000000
TOTAL
CAFÉ
000000
HORAIRES ON/OFF
Cette fonction permet de programmer les horaires d’allumage et
d’arrêt automatiques de la machine pendant toute la semaine.
- En confirmant «HORAIRES ON/OFF», le curseur clignotant
se positionne sur le jour à modifier.
- Insérer le jour dans la programmation par la touche (down),
et changer la lettre de minuscule à majuscule.
-Désinsérer le jour dans la programmation par la touche
(up), et changer la lettre de majuscule à minuscule.
- Confirmer les modifications.
Pour la modification de l’horaire, utiliser la même démarche utilisée
pour le réglage de l’horloge.
Exemple :
une programmation de la machine est représentée
dans le schéma de développement des fonctions ; elle prévoit
l’allumage à 8h00 et l’arrêt à 18h00 du lundi au vendredi,
l’allumage à 9h00 et l’arrêt à 12h30 le samedi, l’arrêt complet le
dimanche.
COMPTEURS
Il s’agit de deux fonctions représentant respectivement le total des
cycles de distribution de café et le total des cycles de distribution
d’eau chaude.
Au cas où le dosage automatique d’eau chaude serait désactivé,
(V fonction «PROGRAMM. EAU CHAUDE»), un cycle sera compté
pour chaque mise en fonction de l’électrovanne.
REMARQUE - On ne peut pas remettre les deux fonctions à zéro,
et donc on ne peut que les consulter.
ANTICONGÉLATION
Cette fonction évite l’exposition de la machine en état «STANDBY»
à de basses températures qui puissent provoquer des
endommagements dus à la formation de glace dans les chaudières.
Cette fonction maintient la température des chaudière à une valeur
minimale pour empêcher la congélation.
- Confirmer «ACTIVÉE», afin d’activer la fonction.
- Confirmer «DÉSACTIVÉE», afin de la désactiver.
REMARQUE - Cette fonction ne s’active que si la fonction
«ALLUMAGE AUTOMATIQUE»
aussi est activée
et que si la machine est en état
«STANDBY»
.
Lorsque la fonction est activée, l’écran affiche
«ANTICONGÉLATION»
.
DÉBLOCAGE
Cette fonction permet de débloquer temporairement la machine
lorsqu’elle a atteint le numéro de cycles programmés pour l’entretien
ou la décalcification. Afin d’obtenir le code de déblocage, il faut
s’adresser à l’entreprise qui a effectué l’installation ou qui fournit le
service d’entretien. Après avoir obtenu le code, il faut l’insérer
dans la fonction :
- Confirmer la fonction «DÉBLOCAGE», le curseur clignotant se
positionne sous le premier chiffre à modifier ;
- insérer le chiffre et le confirmer ;
- après chaque confirmation, le curseur clignotant se positionne
sous le chiffre successif, et ainsi de suite jusqu’à l’achèvement
du code.
ALLUMAGE AUTOMATIQUE
Cette fonction permet de programmer l’allumage et l’arrêt
automatiques de la machine à deux couches horaire différentes,
pour chaque jour de la semaine. En confirmant :
- «ACTIVÉ», la machine s’apprête pour cette fonction.
- «DÉSACTIVÉ», la machine s’allume et s’éteint seulement
manuellement au moyen de l’interrupteur général (18).
Les horaires d’allumage et d’arrêt déjà programmés restent en
tout cas mémorisés.
- Pour la programmation des couches horaires et des jours,
consulter la fonction successive «HORAIRES ON/OFF».
REMARQUE - L’allumage automatique de la machine se fait
seulement au moyen de l’interrupteur général (18)
en position «I».
Page 92

CONCETTO
88/120
Français
F. 1 1
19
F. 1 2
14
12.8 Réglage de la crème
La quantité de crème dans les boissons est proportionnelle à
l’excursion du pointeau du trou (F. 11).
• En soulevant l’aiguille, on obtient une quantité majeure de
crème.
• En baissant l’aiguille, on obtient une quantité mineure de
crème.
12.9 Réglage de la mouture
Indépendamment du mélange de café, une mouture très
fine (index sur des valeurs basses) augmente la
densité, la crème du boisson et son temps de distribution,
vice versa une mouture grossière (index sur des valeurs
élevées) en fait diminuer la densité, la crème et le temps
de distribution.
À la fin de la course, ne pas tourner la poignée (19 - Fig.
12) dans le sens inverse des aiguilles d’une montre, car
cette opération provoque le verrouillage des meules et
par conséquent le blocage de la machine.
En cas de blocage des meules à cause des corps étrangers
dans le mélange de café, et par conséquent en cas de
blocage de la machine( l’écran affiche :
«ERREUR»
),
s’adresser à un Centre d’Assistance Autorisé.
REMARQUE - La moulure est réglée par défaut lors de la
fabrication en usine, mais il est également possible
de la modifier en suivant les instructions suivantes :
• Ouvrir le volet (14 - Fig. 12), tourner la poignée (19 - F. 12)
en sens inverse aux aiguilles d’une montre pour rendre la
mouture plus fine (l’index se porte sur une valeur plus basse),
ou bien dans le sens des aiguilles d’une montre pour la rendre
plus grossière (l’index se porte sur une valeur plus élevée).
Page 93

CONCETTO
89/120
Français
12.10 Messages affichés.
REMARQUE - Par la suite est reportée une liste des alarmes (outre
que les alarmes déjà décrits) affichables à l’écran
et les conditions correspondantes de la machine.
STANDBY : machine éteinte (avec l’interrupteur général en position
«I») avec la fonction allumage/arrêt automatiques activées (Paragr.
12.7.1.)
ANTICONGÉLATION : machine éteinte (avec l’interrupteur général
en position «I») le programme qui protège les chaudières du givrage
est activé (paragr. 12.7.1).
LAVAGE PROGRAMMÉ : affiché lorsque la machine effectue le
lavage automatique du distributeur de café (paragr. 12.7.1).
AJOUTER DU CAFÉ la machine, pendant la mouture, détecte le
manque de café en grains dans le réservoir correspondant (6).
CHARGER LE CIRCUIT affiché lorsque la machine, pendant la
distribution d’une boisson quelconque, détecte le manque d’eau
dans les chaudières.
Après avoir vérifié la présence d’eau dans le réseau de distribution,
appuyer sur la touche ( ^ dans la version COFFEE), tant que
l’eau sort régulièrement du tuyau (11) et du distributeur de café
(27). Dans la version «COFFEE» l’eau ne sort que du distributeur.
PROGRAMMATION affiché lorsqu’on entre dans la programmation
de la machine (paragr. 12.6).
VIDER LES MARCS : affiché lorsque le tiroir à marc (17) est
presque plein (la machine a effectué le numéro programmé de
distributions).
Il est quand même possible d’effectuer des distributions ultérieures.
HORS SERVICE - VIDER LES MARCS : le tiroirs à marc
(16) est complètement plein (la machine a effectué le numéro
programmé de distributions).
La machine est bloquée et aucune distribution n’est plus possible
tant que le tiroir n’est vidé.
FERMER LE VOLET le volet (14) n’est pas fermé correctement.
INSÉRER LE TIROIR : le tiroir à marc (16) n’est pas inséré
correctement.
INSÉRER LE BAC D’ÉGOUTTEMENT : le bac d’égouttement
(12) n’est pas inséré correctement.
INSÉRER LE GROUPE : le groupe café (28) n’est pas inséré
correctement.
ERREUR GROUPE : le groupe café (28) effectue de manière
incorrecte son cycle de travail ; éteindre donc la machine et appeler
le CENTRE D’ASSISTANCE AUTORISÉ.
ERREUR POMPE : une pompe est endommagée. Éteindre la
machine et appeler le CENTRE D’ASSISTANCE AUTORISÉ.
ERREUR CAPTEUR 01 : il est affiché lorsque un capteur de
température est endommagé. Éteindre la machine et appeler le
CENTRE D’ASSISTANCE AUTORISÉ.
ERREUR TEMPÉRATURE. 01: il est affiché lorsque une résistance
des chaudière est endommagée. Éteindre la machine et appeler
le CENTRE D’ASSISTANCE AUTORISÉ.
DÉCALCIFICATION : il est nécessaire d’intervenir sur la machine,
et après avoir effectué le numéro programmé de distributions,
éteindre la machine et appeler le CENTRE D’ASSISTANCE
AUTORISÉ.
Les interventions de décalcification sont établies par des cycles de
travail de la machine et programmables par le Technicien de
Maintenance.
ENTRETIEN : il est nécessaire d’intervenir sur la machine, et
après avoir effectué le numéro programmé de distributions Éteindre
la machine et appeler le CENTRE D’ASSISTANCE AUTORISÉ.
Les interventions d’entretien sont établies par des cycles de travail
de la machine et programmables par le Technicien de
Maintenance.
12.11 Mise hors circuit de la machine.
Arrêt automatique et programmé
Cette fonction est possible lorsque la fonction «ALLUMAGE
AUTOMATIQUE» est activée. (paragr. 12.7.1) et la programmation
de «HORAIRES ON/OFF» a été effectuée
À l’heure programmée la machine passe en «STANDBY».
Arrêt manuel
Ce type d’arrêt est nécessaire lorsque la fonction «ALLUMAGE
AUTOMATIQUE» n’est pas activée. (paragr. 12.7.1)
À cette fin, il faut régler l’interrupteur général (18) et l’interrupteur
omnipolaire en position «0» ou bien retirer la fiche.
Page 94

CONCETTO
90/120
Français
13 - ENTRETIEN DE
ROUTINE
Avertissements
• En cas de mauvais fonctionnement (généralement
affiché à l’écran) éteindre immédiatement la machine, couper
l’alimentation électrique à l’aide de l’interrupteur omnipolaire
ou en débranchant la fiche, et contacter le CENTRE
D’ASSISTANCE le plus proche.
• Avant d’effectuer toute intervention d’entretien et/ou de
nettoyage, couper l’alimentation électrique à l’aide de
l’interrupteur général (18) et de l’interrupteur omnipolaire (ou
en débranchant la fiche).
• Toute intervention est à effectuer si la machine est refroidie.
• N’effectuer aucune opération de nettoyage si la machine
est en
«STANDBY»
.
• Ne jamais laver les composants de la machine dans le
lave-vaisselle.
• Ne pas utiliser de jet directs d’eau.
13.1 Nettoyage de la machine.
• Le nettoyage de la machine est à effectuer
quotidiennement et avant chaque interruption prolongée
de la machine, afin d’éviter la solidification des accumulations
dans les récipients, dans les bacs et dans les distributeurs.
• Toutes les parties amovibles de l’appareil à nettoyer
doivent être lavées et rincées à l’eau courante.
• Nettoyer les revêtements, les panneaux et les commandes
de la machine au moyen d’un chiffon souple, légèrement
humecté avec de l’eau tiède.
• Les composants fixes et la machine doivent être nettoyés
avec de l’eau froide ou tiède, en utilisant des éponges non
abrasives et des chiffons humides.
• Toutes les parties à nettoyer sont aisément accessibles; il
ne faut employer aucun outil.
L’entretien et le nettoyage de routine protègent et gardent
la performance de l’appareil pour longtemps et
garantissent le respect des normes hygiéniques
élémentaires.
La machine signale automatiquement si des intervention
d’entretien et/ou de décalcification sont à effectuer, le
numéro précis de distributions est visible sur le compteur
d’unité mécanique ou à l’écran de la machine ; si le
Technicien de Maintenance n’intervient pas, cela peut
engendrer le blocage de la machine.
13.1.1 Distributeur de café (Fig. 13)
Il est possible d’enlever :
- La protection supérieure (A) du distributeur fixe (F) en la tirant
vers le haut ;
- la garniture en caoutchouc (H) ;
- le distributeur mobile (G) en le tirant vers le bas ;
- le distributeur télescopique (E), en le défilant du distributeur
(G), après avoir appuyé sur les crochets (C) de l’élément intérieur
(B).
le convoyeur métallique (D) (à ne pas démonter du distributeur fixe
(F) est à nettoyer au moyen d’un chiffon humide.
Danger de brûlures
Le convoyeur (D) est réchauffé par une résistance
intérieure ; avant d’effectuer le nettoyage de ce composant,
s’assurer qu’il est suffisamment refroidi.
F. 1 3
A
B
C
D
F
G
E
H
Page 95

CONCETTO
91/120
Français
13.1.2 Groupe café (Fig. 14)
Terminer le café en grains avant d’effectuer le nettoyage.
• Le nettoyage du groupe s’effectue régulièrement avec les
pastilles spéciales (paragr. «12.7.1 Description des fonctions
- LAVAGE GROUPE»).
- Retirer le groupe café (28) en le saisissant par la poignée
spéciale (A) et en appuyant sur la touche «PRESS».
- Laver avec beaucoup d’eau tiède.
Ne pas utiliser de détergents.
- Gratter avec modération le filtre supérieur (B) avec une petite
cuillère en plastique.
F. 1 4
B
28
A
13.1.3 Bac et grille d’égouttement.
Enlever le bac d’égouttement (12) de la machine et le laver à
l’eau courante en ayant soin de ne pas abîmer la grille.
13.1.4 Tiroir à marc
Laver à l’eau courante le tiroir à marc (16) après avoir enlevé le
bac d’égouttement (12) de son logement.
13.1.5 Tuyaux distributeurs vapeur et eau
chaude (équipement COFFEE exclu)
Nettoyer les tuyaux (11-17) avec un chiffon humide non abrasif.
En cas d’obturation des buses, la partie finale des distributeurs
peut être dévissée et les buses peuvent être ouverts par un pointeau.
13.1.6 Plaque chauffante
Nettoyer la plaque chauffante (4) avec un chiffon humide non
abrasif.
13.1.7 Réservoir à café.
Nettoyer le réservoir à café (6) avec de l’eau et au moyen d’un
chiffon humide non abrasif.
F. 1 5
24
23
31
29
32
25
30
13.1.8 Nettoyage du cappuccinatore.
N’effectuer aucune opération de nettoyage du
cappuccinatore si la machine est en
«STANDBY»
.
Le nettoyage est à effectué à chaque utilisation du
CAPPUCCINATORE, afin d’éviter la solidification des
accumulations.
Tous les composants démontables doivent être lavés et
rincés à l’eau courante.
13.1.9 Groupe distributeur cappuccino
(Fig. 15)
Afin de nettoyer séparément les éléments du groupe cappuccinatore,
il faut défiler :
- la protection supérieure (24) et le retirer vers le haut ;
-l’aiguille de réglage qualité crème (23) ;
- le diffuseur d’air (31) du corps cappuccinatore en le tirant vers
le haut ;
- le corps cappuccinarore (29) en le tirant vers l’utilisateur ;
- le raccord (32) de raccordement du tuyau d’aspiration au corps
cappuccinatore ;
- le tuyau distributeur mobile (25) ;
- le tuyau d’aspiration du lait (30).
Page 96

CONCETTO
92/120
Français
14 - ENTRETIEN CURATIF
REMARQUE - Toutes les interventions concernant des réparations
et des remplacements de composants font partie
de l’entretien curatif. Ces opérations doivent être
exécutées seulement par le Technicien de
Maintenance.
14.1 Blocage du moulin à café.
• La présence d’un corps étranger dans le café en grains peut
provoquer le blocage des meules et par conséquent le blocage
de la machine : l’écran affiche le message «ERREUR MEULE».
• Dans ce cas-là, il est nécessaire d’ouvrir le moulin à café (20)
et d’enlever le corps étranger.
14.1.1 Démontage/montage du moulin à
café.
• Fermer le cloison (A) du réservoir à café (H).
• Enlever les vis (B) du réservoir à l’aide de l’outil fourni (C).
Défiler le réservoir de la machine en le retirant vers le haut.
F. 1 6
H
B
H
A
C
•À l’aide d’un aspirateur, enlever les grains de café de l’entrée
du moulin à café.
• Enlever les vis (D).
• Enlever la roue dentée (E).
F. 1 7
F. 1 8
D
E
D
F. 1 9
F
• Dévisser et ôter la bague de réglage (F) et nettoyer les deux
meules à l’aide d’un aspirateur et d’une aiguille.
Vérifier l’état d’usure des meules. Remplacer les meules
en cas d’endommagements.
Page 97

CONCETTO
93/120
Français
F. 2 1
Afin de remonter le moulin à café, suivre les instructions
suivantes :
• Visser à la fin de course la bague de réglage (F) et
donc la desserrer d’un demi tour.
Le desserrage d’un demi tour de la bague de réglage est
fondamental, afin d’éviter le blocage et
l’endommagement des meules.
F. 2 0
F
• Repositionner la roue dentée (E) et la bloquer en serrant les vis
(D).
• Remplir le réservoir à café (H).
Faire attention au positionnement de la garniture (G):
elle doit entrer correctement dans la roue dentée (E) et
dans la bague (F).
• Fixer le réservoir (H) en serrant les vis (B) au moyen de l’outil
(C).
G
E
F
B
H
C
• Ouvrir le cloison (A).
Pour reprendre l’emploi ordinaire de la machine, il est
nécessaire de régler la mouture de nouveau.
15 - MISE HORS SERVICE
En cas de mise hors service de la machine il faut débrancher la
partie électrique aussi bien que la partie hydraulique et tous les
bacs de récolte liquides, les chaudières et les tuyaux ; ensuite
nettoyer la machine. (paragr. «13.1 Nettoyage de la machine»).
En cas d’élimination de l’appareil, il faudra trier les matériaux
de construction de l’appareil et les éliminer par rapport à leur
composition et aux dispositions de loi en vigueur dans votre Pays.
F. 2 2
A
Page 98

CONCETTO
94/120
Français
16 - INCONVÉNIENTS - PROBLÈMES ET SOLUTIONS
Par la suite sont reportées les anomalies éventuelles de fonctionnement de la machine.
Si la case «solution» contient le symbole , cela signifie que l’intervention doit être effectuée par le Technicien de Maintenance.
INCONVÉNIENT CAUSE SOLUTION
La machine ne se met pas en circuit
L’écran affiche :
««
««
«
TIROIRTIROIR
TIROIRTIROIR
TIROIR
AA
AA
A
MARCMARC
MARCMARC
MARC
- -
- -
-
PLEINPLEIN
PLEINPLEIN
PLEIN
»»
»»
»
Erreur de la meule
À la place du café, ne sort que de
l’eau
Ni eau ni vapeur ne sortent
Le café coule trop rapidement
Le café coule trop lentement
Le café n’est pas assez chaud
Le café a peu de crème
La machine met trop de temps pour
se chauffer, la quantité d’eau est
limitée
Le groupe de distribution ne peut pas
être enlevé
L’unité centrale ne peut pas être mise
en place
Pas de courant
Le tiroir à marc est plein
Le moulin à café est bloqué
On a pressé la touche de sélection café
prémoulu avant de remplir le compartiment
à café en poudre
Le trou du tuyau de la vapeur/eau chaude
est engorgé
La mouture est trop grosse
La mouture est trop fine
La tasse n’est pas préchauffée
La machine n’a pas encore atteint la
température idéale
Le mélange n’est pas adapté, le café torréfié
n’est pas frais, la poudre de café moulue est
trop fine ou trop grossière
Le circuit de la machine est engorgé par le
calcaire
Le groupe de distribution de café n’est pas
dans sa position de base (N).
Le groupe de distribution de café n’est pas
dans sa position de base (N).
Contrôles :
vérifier si la fiche est branchée;
vérifier si l’interrupteur omnipolaire (si présent)
est allumé ;
contrôler les fusibles de l’installation
électrique ;
vérifier les connexions électriques ;
Vider le tiroir à marc et le remettre en place
correctement.
Nettoyer le moulin à café (paragr.
«14.1 Blocage du moulin à café»).
Introduire la dose de café dans le compartiment
et répéter le cycle
Le nettoyer par une aiguille très fine
La régler sur un degré plus fin
Le régler sur un degré plus grossier
Préchauffer la tasse sur la plaque chauffante
Attendre que la machine atteint la température
optimale.
Changer de mélange de café ou contrôler le
degré de mouture (si prémoulu)
Détartrer la machine
Mettre hors circuit et en circuit la machine par
l’interrupteur général
Tourner manuellement le groupe jusqu’à la
position base (N), en faisant correspondre la
référence sur l’arbre avec la flèche N (Fig. 14).
Page 99

CONCETTO
95/120
Français
NOTES
.....................................................................................................................................................................
.....................................................................................................................................................................
.....................................................................................................................................................................
.....................................................................................................................................................................
.....................................................................................................................................................................
.....................................................................................................................................................................
.....................................................................................................................................................................
.....................................................................................................................................................................
.....................................................................................................................................................................
.....................................................................................................................................................................
.....................................................................................................................................................................
.....................................................................................................................................................................
.....................................................................................................................................................................
.....................................................................................................................................................................
.....................................................................................................................................................................
.....................................................................................................................................................................
.....................................................................................................................................................................
.....................................................................................................................................................................
.....................................................................................................................................................................
.....................................................................................................................................................................
.....................................................................................................................................................................
.....................................................................................................................................................................
.....................................................................................................................................................................
.....................................................................................................................................................................
.....................................................................................................................................................................
.....................................................................................................................................................................
.....................................................................................................................................................................
.....................................................................................................................................................................
.....................................................................................................................................................................
.....................................................................................................................................................................
Page 100

CONCETTO
96/120
Español
Via C. Gomes, 16
ROBECCO SUL NAVIGLIO (MILANO) - ITALY
Tel. 02/9471654 - Fax 02/9470888
www.gaggia.it
PRELIMINAR
• El presente manual es parte integrante de la máquina y, por consiguiente, se deberá mantener en un lugar conocido y de fácil acceso,
en buen estado de conservación, por toda la vida operativa de la máquina (incluidos los cambios de propiedad que pudieran
efectuarse). Su finalidad es la de transmitir las informaciones necesarias para el uso competente y seguro de la misma máquina.
• En caso de pérdida o deterioro de la presente publicación, solicitar un ejemplar a un Centro de Asistencia Autorizado, especificando
el modelo y el año de fabricación de la máquina.
• Los Centros de Asistencia Autorizados, además, están a su disposición para las aclaraciones técnicas que pudieran necesitar, facilitarles
información acerca del funcionamiento del aparato, brindarles asistencia técnica y repuestos.
• Los temas tratados tienen el objetivo exclusivo de usar la máquina en condiciones de seguridad para las personas, la misma máquina
y el ambiente, interpretando un elemental diagnóstico de averías y condiciones de funcionamiento anómalo, desempeñando simples
tareas de verificación y mantenimiento, dentro de un marco de máximo respeto de las prescripciones objeto de las páginas que están
a continuación y de las Normas de Salud y Seguridad vigentes.
• Antes de todo servicio, leer atentamente, y cerciorarse de haber entendido correctamente, el contenido de la presente publicación.
• El empleo de la máquina por varios usuarios (individualmente) exige la indudable necesidad de examinar atentamente el manual de
instrucciones por parte de cada uno de ellos.
• El Fabricante se reserva el derecho de aportar mejoras y modificaciones a los modelos en cuestión, sin la obligación de dar ningún
aviso previo.
• Por cuestiones peculiares, dirigirse al Distribuidor o, en su caso, al Importador de su Nación o al mismo Fabricante.
• Todos los derechos de la presente publicación están reservados a la Firma GAGGIA. Queda terminantemente prohibida toda reproducción
o divulgación, incluso parcial, sin la debida autorización por escrito.
 Loading...