

Page 1
ISTRUZIONI PER L'USO
OPERATING INSTRUCTIONS
BEDIENUNGSANLEITUNG
MODE D'EMPLOI
INSTRUCCIONES DE USO
INSTRUÇÕES DE USO
ItalianoEnglishDeutschFrançaisEspañolPortuguês
Type: SIN 042 GM
Type: SIN 042 GP
LEGGERE ATTENTAMENTE QUESTE ISTRUZIONI D'USO PRIMA DI UTILIZZARE LA MACCHINA.
READ THESE INSTRUCTIONS CAREFULLY BEFORE USING THE MACHINE.
DIESE BEDIENUNGSANLEITUNG IST VOR DEM GEBRAUCH DER MASCHINE AUFMERKSAM ZU LESEN.
LIRE ATTENTIVEMENT CETTE NOTICE AVANT D’UTILISER LA MACHINE.
LEER ATENTAMENTE ESTAS INSTRUCCIONES DE USO ANTES DE UTILIZAR LA MÁQUINA.
LEIA ATENTAMENTE ESTAS INSTRUÇÕES DE USO ANTES DE UTILIZAR A MÁQUINA.
Page 2

2
1
3
4
5
8
10
21
6
7
11 1713 15
12 14 16 18
19 20
9
23
22
24
25
16 in
40 cm
26
27
20 cm
8 in
20 cm
8 in
20 cm
8 in
Fig. - Abb. - Afb. - R ys. - Kuva. - Εικ. (A) Fig. - Abb. - Afb. - R ys. - Kuva. - Εικ. (B)
20 cm
8 in
• 2 •
Page 3
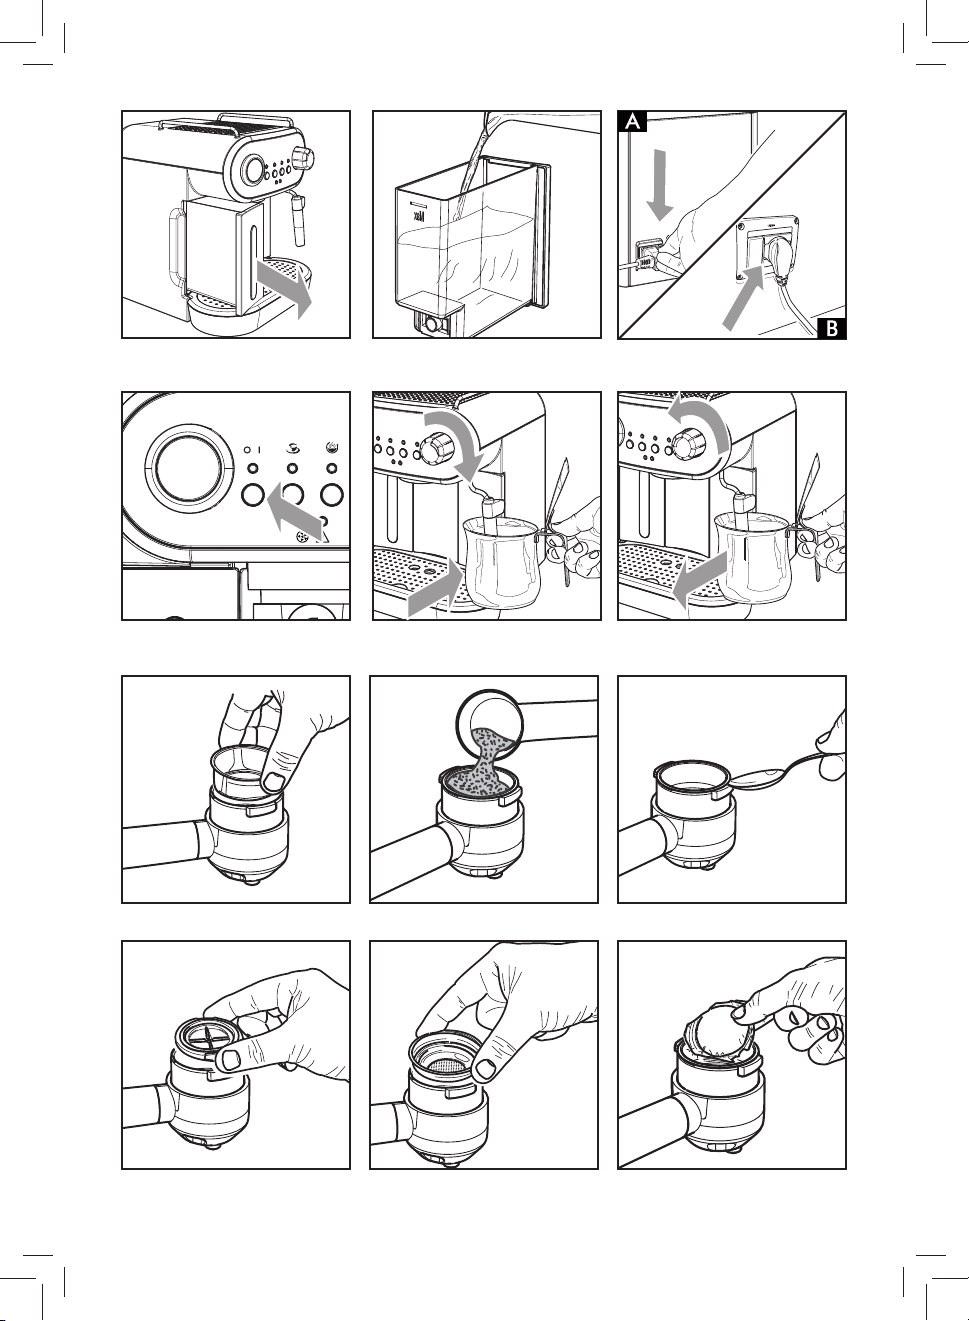
Fig. - Abb. - Afb. - R ys. - Kuva. - Εικ. (1)
Fig. - Abb. - Afb. - R ys. - Kuva. - Εικ. (2)
Fig. - Abb. - Afb. - R ys. - Kuva. - Εικ. (3)
Fig. - Abb. - Afb. - R ys. - Kuva. - Εικ. (4)
Fig. - Abb. - Afb. - R ys. - Kuva. - Εικ. (7)
Fig. - Abb. - Afb. - R ys. - Kuva. - Εικ. (10)
Fig. - Abb. - Afb. - R ys. - Kuva. - Εικ. (5)
Fig. - Abb. - Afb. - R ys. - Kuva. - Εικ. (8)
Fig. - Abb. - Afb. - R ys. - Kuva. - Εικ. (11)
Fig. - Abb. - Afb. - R ys. - Kuva. - Εικ. (6)
Fig. - Abb. - Afb. - R ys. - Kuva. - Εικ. (9)
Fig. - Abb. - Afb. - R ys. - Kuva. - Εικ. (12)
• 3 •
Page 4
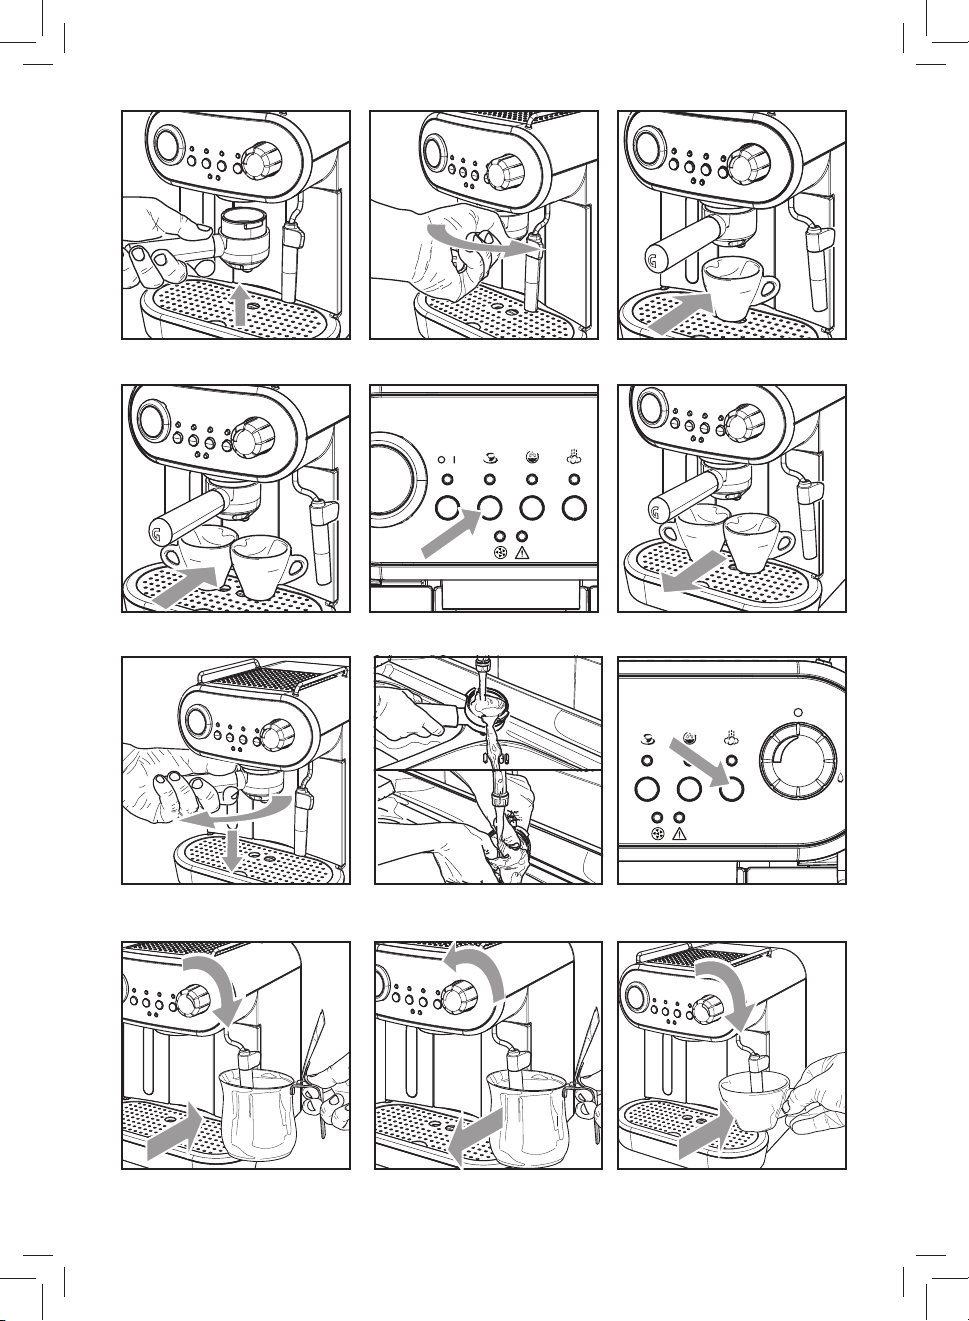
Fig. - Abb. - Afb. - R ys. - Kuva. - Εικ. (13)
Fig. - Abb. - Afb. - R ys. - Kuva. - Εικ. (14)
Fig. - Abb. - Afb. - R ys. - Kuva. - Εικ. (15)
Fig. - Abb. - Afb. - R ys. - Kuva. - Εικ. (16)
Fig. - Abb. - Afb. - R ys. - Kuva. - Εικ. (19)
Fig. - Abb. - Afb. - R ys. - Kuva. - Εικ. (22)
Fig. - Abb. - Afb. - R ys. - Kuva. - Εικ. (17)
Fig. - Abb. - Afb. - R ys. - Kuva. - Εικ. (20)
Fig. - Abb. - Afb. - R ys. - Kuva. - Εικ. (23)
Fig. - Abb. - Afb. - R ys. - Kuva. - Εικ. (18)
Fig. - Abb. - Afb. - R ys. - Kuva. - Εικ. (21)
Fig. - Abb. - Afb. - R ys. - Kuva. - Εικ. (24)
• 4 •
Page 5

Fig. - Abb. - Afb. - R ys. - Kuva. - Εικ. (25)
Fig. - Abb. - Afb. - R ys. - Kuva. - Εικ. (26)
Fig. - Abb. - Afb. - R ys. - Kuva. - Εικ. (27)
Fig. - Abb. - Afb. - R ys. - Kuva. - Εικ. (28)
Fig. - Abb. - Afb. - R ys. - Kuva. - Εικ. (31)
Fig. - Abb. - Afb. - R ys. - Kuva. - Εικ. (34)
Fig. - Abb. - Afb. - R ys. - Kuva. - Εικ. (29)
Fig. - Abb. - Afb. - R ys. - Kuva. - Εικ. (32)
Fig. - Abb. - Afb. - R ys. - Kuva. - Εικ. (35)
Fig. - Abb. - Afb. - R ys. - Kuva. - Εικ. (30)
Fig. - Abb. - Afb. - R ys. - Kuva. - Εικ. (33)
Fig. - Abb. - Afb. - R ys. - Kuva. - Εικ. (36)
• 5 •
Page 6
1 Generalità
La macchina per ca è è indicata per la preparazione di 1 o 2
tazze di ca è espresso ed è dotata di un tubo orientabile per
l’erogazione del vapore e dell’acqua calda. I co man di sulla parte frontale del l’ap pa rec chio sono contras segnati con simboli di
facile in ter pre ta zio ne.
La macchina è st ata progettata per u so domestico e non è indicata per un funzionamento continuo di tipo professionale.
Attenzione. Non si assumono re spon sa bi li tà per
eventuali danni in caso di:
• Impiego errato e non con for me agli scopi previsti;
• Riparazioni non ese gui te presso centri d’assistenza
autorizzati;
• Manomissione del cavo d'alimentazione;
• Manomissione di qual si a si com po nen te della macchina;
• Impie go di pezzi di ri cam bi o e accessori non or iginali;
• Mancata decalci cazione e stoccaggio in locali al di
sotto di 0°C.
In questi casi viene a decadere la garanzia.
1.1 Per facilitare la lettura
Il triangolo d’avvertimento indica
tutte le istruzioni importanti per
scrupo losamente a tali in dicazioni per evi tare ferimenti gra vi!
Il riferimen to ad illustrazioni, par ti dell’apparecchio o elementi
di co man do, ecc. è in di ca to da numeri o lettere; in questo caso
si rimanda all’illus trazione.
Questo simbolo evidenzia le in for ma zio ni da
tenere in maggiore con si de ra zio ne, per un mi-
gliore uti liz zo della mac chi na.
la sicurezza del l’uten te. Attenersi
2 Dati tecnici
Il costruttore si riserva il diritto di modi care le carat teristiche
tecniche del prodotto.
Tensione nominale - Potenza nominale - Alimentazione
Vedi targhetta posta sull’apparecchio
Materiale corpo
Plastica modello SIN 042 GM
Metallo modello SIN 042 GP
Dimensioni (l x a x p) (mm)
210 x 300 x 280
Peso
SIN 042 GM = 5 Kg
SIN 042 GP = 5,8 Kg
Lunghezza cavo
1,3 m
Pannello di comando
Sulla parte frontale
Porta ltro
Pressurizzato
Pannarello
Speciale per cappuccini
Serbatoio acqua
1,25 litri - Estraibile
Pressione pomp a
15 ba r
Caldaia
Inox
Dispositivi di sicurezza
Ter mof us ibi le
3 Norme di sicurezza
Le illustrazioni corrispondenti al te sto si trovano nelle
prime pagine del manuale. Consultare queste pagine
du ran te la lettura delle istr u zio ni per l’uso.
1.2 Impiego di queste istruzioni per l’uso
Conservare queste ist ruzioni per l’uso in un luogo sicur o e allegarle alla mac chi na per ca è qualora un’altra persona dovesse
utilizzarla.
Per ulteriori informazioni o nel caso di problemi, rivolgetevi ai
centri assistenza autorizzati.
• 6 •
Mai mettere a contatto del l’ac qua le parti sotto corrente: pe ri co lo di cortocircuito! Il vapore sur ri scal da to
e l’acqua calda possono pro vo ca re scottature! Mai dirigere il getto di va po re o dell’acqua calda ver so parti
del corpo, toccare con pre cau zio ne il beccuccio vapore /
ac qua calda: pe ri co lo di scottature!
Destinazione d’uso
La macchina per ca è è prevista esclu si va men te per l’impiego
do me sti co. Questo apparecchio può essere utilizzato da bambini di età superiore a 8 anni e da persone con ridotte capacità
si che, sensoriali o mentali o con mancanz a di esperienza e conoscenza, se sono controllate o istruite all’uso dell’apparecchio
in modo sicuro e comprendano i pericoli che sono presenti. I
bambini non giochino con l’apparecchio. Pulizia e manutenzione da parte dell’utente non deve essere fatta dai bambini
Page 7

senza sorveglianza.
Alimentazione di corrente
Collegare la macchina per ca è soltanto ad una presa di corrente adeguata. La tensione deve corrispondere a quella indicata sulla targhetta dell’apparecchio.
Cavo d’alimentazione
Mai usare la macchi na per ca è se il cavo d’alimenta zione è di fet to so. Se il cavo d’alimentazione è danneggiato, deve essere
cambiato dal produttore o dal suo servizio assistenza clienti.
Non far passare il cavo d’ali men ta zio ne per angoli e su spigoli
vivi, sopra oggetti molto caldi e pro teg ger lo dall ’olio.
Non portare o tirare la macchina per ca è tenendola per il
cavo. Non estr arre la spina tirandola per il cavo op pure toccarla
con le mani bagnate. Evitare che il cavo d’ali men ta zio ne cada
liberamente da tavoli o sca ali.
Protezione d’altre persone
Tenere i bambini sotto supervisione, per evitare che giochino
con l’apparecchio. I bambini non si rendono conto del pericolo
connesso agli elettrodomestici. Non lasciare alla portata dei
bam bi ni i ma te ria li utilizzati per im bal la re la mac chi na.
Pericolo d’ustioni
Evitare di dirigere contro se stessi e/o altri il getto di vapore
sur ri scal da to e/o d’acqua calda. Non toccare direttamente il
tubo vapore; us are sempre le apposite maniglie o ma no po le.
Non disinserire (to glie re) mai il porta ltro pressurizzato durante l’erogazione del ca è. Durante la fase di riscaldamento
dal grup po erogazione ca è pos so no uscire gocce d’acqua
calda. Non toccare il gruppo erogazione a macchina accesa o
prima che ques to si sia ra reddato.
Ubicazione
Sistemare la macchina per ca è in un po sto sicuro, dove nessuno può rovesciarla o venirne ferito. Acqua calda o vapore
s u r ri s c a l d a t o p o t r e b b e r o f u o r i u s c i r e : pericolo di scottature!
Non tenere la macchina a tem peratura inferiore a 0°C; c'è il pe ricolo che il gelo possa danneggiare la macchina.
Non usare la macchina per ca è al l’aper to. Non posare la macchina su su per ci mol to calde e nelle v icinanze di amme libere per evitare c he la carcassa fonda o co mun que si danneggi.
Pulizia
Prima di pulire la macchina, è in di spensa bi le spegnere la macchina con il tasto ON/OFF e poi staccare la spina dalla presa di
corrente. Inoltre, aspettare che la macchina si ra red di.
Mai immergere la mac chi na nel l ’ac qua!
È severamente vietato cercare d’in ter ve ni re all’interno della
macchina. Non utilizzare, per scopi alimentari, l’acqua rimasta
nel serbatoio per alcuni giorni, lavare il serbatoio e riempirlo
con acqua fresca potabile.
Spazio per l’uso e la ma nu ten zio ne
Per il corretto e buon funzionamento della macchina per ca è
si consiglia quanto segue:
• Scegliere un piano d’appoggio ben li vel la to;
• Scegli ere un ambiente su c i e n t e m e n t e i l l u m i n a t o , i g i e n i co e con presa di cor ren te facilmente acce ssibile;
• Prevedere una distanza minima dal le pa re ti della macchina come indicato in gu ra - Fig.A.
Custodia della macchina
Quando la macchina rimane inutilizzata per un pe ri o do prolungato, spegnere la mac chi na e staccare la spina dalla pre sa.
Custodirla in luo go asciutto e non ac ces si bi le ai bam bi ni. Prote ggerla dalla polvere e dallo sp orco. Non tenere la macchina a temperatura inferiore a 0 ° C. Il gelo può danneggiare la macchina.
Riparazioni / Manutenzione
Nel caso di guasti, difetti o sospetto di di fet to dopo una caduta, stac ca re subito la spina dalla p resa. Mai mettere in fun zione
una macchina di fet to sa. Soltanto i Centri di Assistenza Au to riz za ti possono e ettuare in ter ven ti e riparazioni. Nel caso di
interventi non eseguiti a regola d’arte, si declina ogni re spon sa bi li tà per eventuali danni.
Antincendio
In caso di incendio utilizzare estin to ri ad anidride carbonica
(CO
). Non utilizz are acqua o estintori a polvere.
2
Legenda componenti macchina (Pag.2)
1 Pannello comandi
2 Supporto app oggia tazze
3 Pomello acqua calda / vapore
4 Gruppo erogatore c a è
5 Serbatoio acqua
6 Vasca recupero acqua
7 Griglia appoggia tazze
8 Tubo vapore (pannarello)
9 Presa per cavo alimentazione
10 Termometro temperatura acqua
11 Tasto ON/OFF
12 LED "Macchina accesa"
13 Tasto "Erogazione c a è"
14 LED "Temperatura"
15 Tasto "Risciacquo"
16 LED "Risciacquo"
17 Tasto "Vapore"
18 LED "Vapore"
19 LED "Decalci cazione"
20 LED "Allarme"
21 Porta ltro pressurizzato
22 Misurino per ca è macinato
23 Filtro per ca è macinato (unico per 1 o 2 ca è)
24 Adattatore per ltro ca è in cialde
25 Filtro per ca è in cialde
26 Cavo alimentazione
27 Filtro acqua "Intenza+" (Opzionale)
Italiano
• 7 •
Page 8

4 Installazione
Per la propr ia sicurezza e qu ella di ter z i at te ner si scr upolosamente alle “Nor me di si cu rez za” ripor tate nel cap. 3.
4.1 Imballaggio
L’imballaggio originale è stato progettato e realizzato per
proteggere la macchina durante la spedizione. Si consiglia di
conservarlo per un eventuale trasporto f uturo.
4.2 Avvertenze d'installazione
Non prelevare la macchina prendendola dalle
ringhiere protezione tazze.
Prima di inst allare la macchina, attenersi alle seguenti prescrizioni di sicurez za:
• sistemare la macchina in un luogo si cu ro;
• accer tarsi che i bambin i non ab bia no la possibilità di gioca re con la mac chi na;
• evitare che la macchina venga col lo ca ta su super ci molto
calde o vicino a am me libere.
La macchina per ca è è ora pronta per es se re collegata alla
rete elettrica.
Nota: si consiglia di lavare i componenti prima
del loro primo utilizzo e/o dopo un periodo d'i-
nutilizzo.
4.3 Ser ba to io ac qua
•
Estrarre il serbatoio del l’ac qua (5).
1
Sciacquarlo e riemp irlo con ac qua fre sca potabile; no n
•
2
superare il livello (MAX) riport ato nel serbatoio.
Immettere nel ser ba to io sem pre e sol tan to ac-
qua fre sca po ta bi le non gas sa ta. Ac qua cal da
non ché al tri liquidi possono dan neg gia re il ser ba to io.
Non mettere in fun zio ne la mac chi na se il livello di acqua è al di sotto dell'indicazione MIN: ac cer tar si che ve
ne sia a su cien za al l’in ter no del serbatoio acqua.
4.4 Collegamento della macchina
La corrente elettrica può es se re pe ri co lo sa! Di
c o n s e g u e n z a , a t te n e r s i s e m p r e s c r u p o l o s a m e n te al le nor me di si cu rez za. Non usar e mai cavi di f et to si!
I cavi e le spi ne difettosi de vo no es se re so sti tu i ti im me dia ta men te da Centri di Assistenza Autorizzati.
La tensione dell’apparecchio è stata impos tata in fabbrica. Veri care che la tensione della rete corrisponda alle indicazioni
riportate sulla targhetta d’identi cazione posta sul fondo
dell’apparecchio.
•
Inserire la spina nella presa di corrente posta nella
3A
parte pos teriore della macchina da ca è.
Inserire l'altro c apo della spina in una presa di corr ente
•
3B
a parete di tensione adeguata.
4.5 Primo avvio
Durante il primo avvio della macchina da ca è il circuito deve
essere caricato.
Premere il ta sto ON/OFF (11) e il Led (12) " " si accende;
4
iI led (14) "
sto indica che il circuito deve essere caricato.
Inserire un contenitore sotto al tubo vapore (pannarello).
5
Aprire il pomello (3) "acqua calda/vapore" ruotandolo in
senso orario. La pompa viene attivata automaticamente.
Attendere che dal tubo vapore (pannarello) fuoriesca un
getto regolare d'acqua.
Chiudere il pomello (3) "acqua calda /vapore" ruotandolo
6
in senso antiorario. Rimuovere il contenitore.
Solo dopo aver eseguito correttamente il caricamento del circuito la macchina inizia la fase di risc aldamento.
Nota: se il pomello viene lasciato aperto dopo
alcuni se condi la pompa vie ne disattivat a auto-
maticamente e lampeggia il led (20)"
", (20 )" " e (18) " " lampeggiano; que-
".
4.6 Caricamento del circuito
Dopo aver terminato l'acqua n el serbatoio, il circuito della macchina deve essere ricaric ato.
• Inserire il serbatoio acqua nel suo alloggiamento della
macchina da ca è assicurandosi d'inserirlo no a battuta;
il pro lo deve essere aderente a quello della macchina da
ca è.
Nota: il livello dell'acqua può essere visualizzato tramite la nestra inserita nella parte fron-
tale del serbatoio.
• 8 •
Nota: se la macchina ha funzionato per molto
tempo senz a acqua e il led (14) "
(18) "
" lampeggiano, consultare la tabella "soluzioni
dei problemi".
•
Inserire un contenitore sotto al tubo vapore (panna-
5
rello).
• Aprire il pomello (3) “ac qua cal da/va po re” ruotandolo in
sen s o orario. La pompa viene attivata automaticamente.
• Attendere che dal tubo va po re (pannarello) fuoriesca un
", ( 20) " " e
Page 9

get to regolare d'acqua.
Chiudere il pomello (3) “ac qua calda/vapore” ruotan-
•
6
dolo in sen so antiorario. Rimuovere il contenitore.
Nota: se durante la fase di riscaldamento viene
erroneamente aperto il pomello vapore il led
(20) "
" lampeggia. Chiudere la manopola e attende-
re il pronto macchina.
4.7 Primo utilizzo o dopo un periodo di inutilizzo
Questa semplice operazione vi assicura un'erogazione ottimale
e deve essere eseguita:
- al primo av vio;
- quando la macchina rimane inutilizzata per lungo tempo
(per più di 2 settimane).
F 13 14 Inserire dal basso il porta ltro nel gruppo ero-
gazione (4) e ruotarlo da sinistra verso destra no al suo
bloccaggio.
G
Inserire un contenitore adeguato sot to al porta ltro.
15
Premere il tasto " " ed erogare una tazza di acqua
H
17
calda.
Al termine fermare l ’erogazione premere il tasto " ".
I Ripetere le operazioni descritte al punto (H) no al termi-
ne dell'acqua presente nel serbatoio dell'acqua.
Riempire nuovamente il serbatoio dell'acqua con ac-
L
2
qua fresc a potabile.
Rimuovere il porta ltro dal gruppo ruotandolo da de-
M
19
stra verso sinistra e sciacquarlo con acqua fresca potabile.
La macchina ora è pronta; per i dettagli di funzionamento per
l’erogazione del ca è e del va po re si rimanda ai c a pi to li relativi.
Italiano
L’acqua erogata deve essere vuotata in un ap-
posito scarico e non può essere utilizzata per
l’alimentazione. Se il contenitore si riempie, durante il
ciclo, fermare l’erogazione e vuotarlo prima di riprendere l’operazione.
A
Risciacquare il serbatoio acqua e riempirlo con acqua
2
fresca po tabile. Reinserire il serbatoio a cqua nel suo alloggiamento nella macchina da c a è assicurandosi d'inserirlo
no a bat tuta; i l pro lo deve essere aderen te a quell o della
macchina da ca è.
B Accendere la macchina premendo il tasto (11). Attendere
che il led (14) "
Sis tem are u n con teni tor e sot to a l tub o va po re ( pan na-
C
5
rello).
Aprire il rub inetto (3) ruotandolo in se nso orario. La pompa
viene attivata automaticamente.
D Erogare tutto il contenuto d el serbatoio dell’acqua dal tubo
vapore/acqua calda (p annarello); per terminare l'erogazione chiudere il r ubinetto (3) ruotandolo in senso antiorario.
Durante questa operazione è assolutamente
normale che la pompa si disattivi automaticamente lampeggiando il led (20 )"
manopola. Attendere che il led (14) "
modo sso prima di riapr ire la manopola".
E
Riempire il serbatoio dell'acqua con acqua fresca po-
2
tabile. Reinserire il serbatoio acqua nel suo alloggiamento
della macchina da ca è assicurandosi d'inserirlo no a
battuta; il pro lo deve essere aderente a quello della macchina da ca è.
" si accenda in modo sso.
". Richiudere la
" si accenda in
5 Risciacquo
Nota: assicurarsi che il porta ltro sia inserito
per ottenere un riscaldamento ottimale di tut-
ta la macchina.
La macchina da ca è è predisposta per eseguire un risciacquo
automatico del circuito ca è con acqua fresca ogni volta che
la si accende; questo garantisce un corretto riscaldamento di
tutta la macchina e un miglior aroma del ca è.
Si consiglia di posizionare un contenitore sotto
l'erogatore.
Questa funzione è attivata all'acquisto della macchina (il Led
(16) "
" è acceso) e viene eseg uita al termine della fase di r i-
scaldamento quando Led (14) "
Nota: nel caso in cui non esca acqua dal porta ltro eseguire il risciacquo manualmente come
descritto nel par. 7.1.
Il risciacquo può:
A essere interrotto premendo il tasto (15) "
tasto (13).
B essere disattivato premendo il tasto (15) " "
led
(14) " "
(16) "
tasto "
è lampeggiante o sso
" si spegne.
Nota: nel caso in cui il risciacquo venga disattivato può essere riattivato solo premendo il
".
" si accende in modo sso.
" oppure il
quando il
; in qu esto ca so il Led
• 9 •
Page 10

6 Risparmio energia
La macchina è predisposta per il r isparmio dell'energia.
La macchina dopo 9 minuti che non viene utilizzata, si spegne
per risparmiare l'energia nel pieno rispetto della natura.
Per utilizzare la macchina si deve premere il tasto ON/OFF (11)
"
".
• 19 Togliere il porta ltro pressurizzato dalla macchina ruotandolo da destra verso sinis tra e vuotare l’acqua residua.
Si consiglia di posizionare un contenitore sotto
l'erogatore.
Ora procedere con le operazioni descritte nei paragra successivi per l'erogazione del ca è.
7 Erogazione del ca è
Attenzione! Durante l’erogazione del ca è è
vie ta to disinserire il porta ltro pressurizzato
ruotandolo ma nual men te da destra verso sinistra. Pe r i c o l o d ’u s t i o n i .
• Durante questa operazione, il Led (14) "
tale funzionamento deve essere considerato normale e
non un’anomalia.
• Assicurarsi prima dell'uso che il serbatoio dell'acqua con-
tenga una quantità su ciente.
Nota: se durante la fase di riscaldamento viene
erroneamente aperto il pomello vapore il led
(20) "
" lampeggia. Chiudere la manopola e attende-
re il pronto macchina.
Se d opo ave r prem uto il t asto (13) " " NON esce
ca è, premere nuovamente il tasto (13) "
consultare la tabella "Risoluzione problemi" prima di
rimuovere il porta ltro.
Prima di erogare ca è si deve veri care che la macchina sia
pronta. La macchina è pronta quando il led (14) "
cende in modo sso.
7.1 Riscaldamento porta ltro
Se la funzione "ri sciacquo" non è attivata e/o si vuole pr eriscaldare manualmente il por ta ltro procedere come segue:
•
Inserire dal basso il porta ltro pressurizz ato nel grup-
13
po erogazione (4).
Ruotare il porta ltro pressurizzato da si ni stra verso
•
14
destra no al suo bloccaggio. Lasciare la presa dal ma ni co
del porta ltro pressurizzato, il manico ruota leg ger men te
verso sinistra. Questo movimento garantisce il perfetto
funzionamento del porta ltro.
• 17 Preriscaldare il porta ltro pressurizzato premendo il
tasto (13); l’acqua co min ce rà ad usci re dal porta ltro pressurizzato (que sta operazione si rende ne ces s a ria solo per il
primo ca è).
• Dopo aver fatto scorrere 50cc di acqua, premere nuova-
mente il tasto (13) per fer ma re l’erogazione.
" lampeggia;
" e
" si ac-
7.2 Con ca è macinato
• 7 Inserire il ltro (23) nel porta ltro pressurizzato (21);
al primo utilizzo il ltro è già inserito.Con lo speciale ltro
(23) di cui è dotata la mac chi na, non occor re cambiare l tro
per ottenere uno o due ca è.
Versare 1-1,5 misurini per il ca è singolo o 2 misurini
•
8
rasi per il ca è doppio; pulire il bor do del porta ltro pressurizzato dai re si dui di ca è.
Nota: non pressare il ca è perchè il porta ltro
è dotato di u n sistema già otti mizzato per l'ero-
gazione di un vero espresso.
•
Inserire dal basso il porta ltro (21) nel gruppo eroga-
13
zione (4).
Ruotare il porta ltro da si ni stra verso destra no al
•
14
suo bloccaggio.
Prelevare 1 o 2 tazzin e preriscaldat e e posizionarle
•
16
sotto al porta ltro pressurizzato; veri care che siano correttamente si ste ma te sotto ai fori di uscita ca è.
Premere il tasto (13) " " .
•
17
Rag giun ta la quantità di ca è de si de ra ta, premere
•
18
nuovamente il tasto (13) "
del ca è. Al termine dell’erogazione at ten de re qual che
secondo; prelevare le tazzine con il ca è.
Al termine dell'erogazione ca è attendere la ne del
•
19
lampeggio del led ca è (14) "
ltro pressurizzato ruotandolo da destra verso sinistra e
vuotarlo dei fondi residui
Nota: nel porta ltro pressurizzato rimane una
piccola quantità di acqua; questo è normale ed
è dovuto alle caratte ristiche del por ta ltro.
Nota importante: Il ltro (23) deve essere mantenuto pulito per garantire un perfetto risulta-
to. Lavare giornalmente a ne utilizzo.
" per fermare l’erogazione
" poi estrarre il porta-
• 10 •
Page 11
7.3 Con ca è in cialde
• 9 Togliere il ltro per ca è macinato (23) dal porta ltro
pressurizzato (21).
• 10 Inserire, nel por ta ltro pr essurizzato (21), l'adatt atore
per cialde (24), con la parte bombat a rivolta verso il basso.
Dopo, inserire il ltro per cialde (25) nel porta ltro
•
11
pressurizzato (21).
•
Inserire la cialda n el porta ltro; assicurarsi che la c arta
12
della cialda non fuoriesca dal porta ltro.
Inserire dal basso il porta ltro pressurizz ato nel grup-
•
13
po erogazione (4).
Ruotare il porta ltro da si ni stra verso destra no al
•
14
suo bloccaggio.
Prelevare 1 tazzin a preriscaldata e posizionar la sotto
•
15
al porta ltro; veri care che sia correttamente sistemata
sotto ai for i d'uscita ca è.
Premere il tasto (13) " ".
•
17
• Rag giun ta la quantità di ca è de si de ra ta, premere nuovamente il tasto (13) "
fè. Al termine dell’erogazione at ten de re qual che secondo;
prelevare la tazzina con il ca è.
Al termine dell'erogazione ca è attendere la ne del
•
19
lampeggio del led ca è (14) "
ltro pressurizzato ruotandolo da destra verso sinistra e
smaltire la cialda utilizzata.
Nota importante: Il ltro (25) e l'adattatore (24)
devono esse re mantenuti pulit i per garantire un
perfetto risultato. Lavare giornalmente a ne utilizzo.
" per fermare l’erogazione del c af-
" poi estrarre il porta-
PRIMA DI ESEGUIRE QUALSIASI OPERA ZIONE RELA-
TIVA ALL’EROGAZIONE DEL VAPORE O DELL’ACQUA
CALDA VERIFICARE CHE IL TUBO VAPORE (PANNARELLO)
SIA ORIENTATO SOPRA LA VASCA RECUPERO ACQUA.
9 Ac qua calda
Pericolo di scottature! All’inizio dell’erogazione
posso no ve ri car si brevi spruzzi di acqua calda.
Il tubo d’erogazione può rag giun ge re temperature elevate: evitare di toc car lo di ret ta men te con le mani.
•
Inserire dal basso il porta ltro pressurizz ato nel grup-
13
po erogazione (4).
Ruotare il porta ltro pressurizzato da si ni stra verso
•
14
destra no al suo bloccaggio. Lasciare la presa dal ma ni co
del porta ltro pressurizzato, il manico ruota leg ger men te
verso sinistra. Questo movimento garantisce il perfetto
funzionamento del porta ltro.
• Premere il tasto ON/OFF (11) e il Led (12) " " si accen-
de; il Led (16) "
lampeggiare. At tendere che il Led (14) "
modo sso.
Sistemare un contenitore o un bic chie re da tè sot to al
•
5
tubo va po re (pannarello).
• Aprire il pomello (3) in senso orario, il led 14 "
gne.
Quando è stata prelevata la quan ti tà de si de ra ta di
•
6
ac qua cal da, chiudere il po mel lo (3) ruotandolo in senso
antiorario.
• Prelevare il contenitore con l'acqua c alda.
" si accende e il Led (14) " " inizia a
" si accenda in
" si spe-
Italiano
8 Scelta del tipo di ca è - Con si gli
In linea di massima si possono uti liz za re tut ti i tipi di ca è esistenti in commercio. Tuttavia, il ca è è un prodotto na tu ra le
ed il suo gusto cambia in funzione del l’ori gi ne e della mi sce la;
per tan to si co nsig lia di p rova re div ersi t ipi d i ca è a l n e di tr ovare la miscela più adat ta al vostro gusto personale.
Per migliori risult ati si consiglia co mun que di utiliz zare miscele
espres sa men te pre pa ra te per macchine espresso. Il ca è dovrebbe sempre fuo riu sci re re golar men te dal porta ltro pressurizzato senza goc cio la re. La velocità di fuoriuscita del ca è
può es se re modi cata cambiando leggermente la dose del
ca è nel lt ro e/o utilizzando ca è con un grado di maci natura
di erente. Per un miglior risultato in tazza e per facilità di pulizia e prepara zione, Gaggia consiglia l'utilizzo di c a è in cialde
monodose contrassegnate dal marchio ESE.
Nota: Se durante la fase di riscaldamento viene
erroneamente aperto il pomello vapore il led
(20)"
" lampeggia. Chiudere la manopola e attendere
il pronto macchina.
Durante questa operazione è assolutamente
normale che la pompa si disattivi automaticamente lampeggiando il led (20)"
manopola. Attendere che il led (14) "
modo sso prima di riapr ire la manopola.
". Richiudere la
" si accenda in
10 Va po re / Cappuccino
Pericolo di scottature! All’inizio dell’erogazione
pos so no ve ri car si brevi spruzzi di acqua calda.
Il tubo d’erogazione può rag giun ge re temperature elevate: evitare di toc car lo di ret ta men te con le mani.
•
Inserire dal basso il porta ltro pressurizz ato nel grup-
13
po erogazione (4).
• 11 •
Page 12
• 14 Ruotare il porta ltro pressurizzato da si ni stra verso
destra no al suo bloccaggio. Lasciare la presa dal ma ni co
del porta ltro pressurizzato, il manico ruota leg ger men te
verso sinistra. Questo movimento garantisce il perfetto
funzionamento del porta ltro.
• Premere il tasto ON/OFF (11) e il Led (12) "
de; il Led (16) "
lampeggiare. At tendere che il Led (14) "
modo sso.
Premere il tas to (17) " "; si spegne il Led (14) " "
•
21
e comincia a lampeggiare il Led (18) "
Nota: se durante la fase di riscaldamento viene
erroneamente apero il pomello vapore il (20)"
" lampeggia. Chiudere la manopola e attendere il
pronto macchina.
• Attendere che il Led (18) "
a questo punto la mac chi na è pron ta per l’erogazione del
va po re.
Inserire un contenitore sotto al tubo vapore.
•
22
• Aprire il po mel lo (3) per qual che istante, in modo da far
uscire l’ac qua residua dal tubo vapore (pannarello); in breve tem po co min ce rà ad uscire solo vapore.
•
Chiudere il pomello (3) e togliere il contenitore.
23
• Riempire con latte freddo 1/3 del con te ni to re che si desidera uti liz za re per pre pa ra re il cappuccino.
Per garantire un miglior risultato utilizzare
latte freddo.
•
Immergere il tubo vapore nel latte e aprire il pomello
24
(3) ruotandolo in senso orario; la pompa viene attivat a automaticamente. Far ruotare lentamente il recipiente contenente il latte, dal bas so verso l’alto per rendere unifor me
il riscaldamento.
• 25 Al t ermi ne, c hiud ere i l pom ello (3) ru otan dolo in se nso
antiorario; prelevare la tazz a con il latte montato.
• Pulire, dop o ques ta operazione, il tubo vapore con un p anno umido.
Lo stesso sistema può essere utilizzato per il
riscaldamento di altre bevande.
• Quando si vuole terminare con l'utilizzo del vapore, premere il tasto tasto (17) "
" e (20) " " lampeggiano contemporaneamente. Questo
indica che la macch ina ha una temperatura troppo alta pe r
erogare ca è.
" si accende e il Led (14) " " inizia a
" si accenda in modo sso;
"; i Led (14) " ", (18) "
" si accen-
" si accenda in
".
10.1 Ra reddamento della macchina
Per abbass are la temperatura agire come segue:
Sistemare un contenitore o un bic chie re da tè sot to al
•
5
tubo va po re (pannarello).
• Aprire il po mel lo (3) ruotandolo in senso orar io.
• Quando la macchina ha raggiunto la temperatura corretta
la pompa si spegne automaticamente e lampeggia il led
(20) "
".
Chiudere il pomello (3) ruotandolo in senso antiorario
6
e togliere il contenitore.
• Pri ma di erogare ca è si deve veri care che la macchina sia
pronta. La macchina è pronta quando il led (14) "
accende in modo sso.
" si
11 Pulizia
La manutenzion e e la pulizia possono essere e ettuate solt anto quando la macchina è fr edda e scollegata dalla rete elet trica.
• Non immergere la mac chi na nel l’ac qua e non inserire i
com po nen ti nella la va sto vi glie.
• Non utilizzare alcol etilico, solventi e/o agenti chimici aggressivi.
• Si consiglia di pulire quo ti dia na men te il serbatoio del l’ac qua e di riempirlo con acqua fresca.
Ogni settimana pulire l'anello caldaia a macchina
•
30
spenta, fredda e scollegata con un panno umido.
•
•
•
• Per la puli zia dell’apparecchio utiliz zare un panno morbid o
•
Gio rnalm ente, d opo av er ris calda to il l at te, s mon-
26 28
tare la parte esterna del pannarello e lavarla con acqua
potabile fresca.
26 27 28
re. Per eseguire questa op erazione, si deve:
- rimuovere la parte e sterna del pannarello (per la re golare
pulizia);
- s lare la parte super iore del pannarello dal tubo vapo re;
- lavare la parte superiore del pannarello con acqua fresca
potabile;
- lavare il tubo vapore con un panno umido e rimuovere
eventuali residui di lat te;
- riposizionare la parte superiore nel tubo vapore (assicurarsi che sia completamente inserita);
29
rello assicurandosi che sia inserita no a battuta. Assicurarsi che la parte in plastica sia correttamente inserita
nella parte in metallo.
31
inumidito d'acqua.
20
come segue:
Settimanalmente si deve pulire il tubo vapo -
Dopo la pulizia rimontare la parte esterna del panna-
Giornalmente vuotare e lavare la vasca raccogli gocce.
Per la pulizia del porta ltro pressurizzato pro ce de re
• 12 •
Page 13
- 9 estrarre il ltro, lavarlo con cura con acqua c alda.
- estrarre l'adattatore (se presente), lavarlo con cura con
acqua calda.
- lavare l’interno del por ta ltro pressuriz zato.
• Non as ciugare la macchina e/o i suoi componenti uti lizzando un forno a microonde e/o un forno convenzionale.
Nota: non lavare il porta ltro pressurizzato
nella lavastoviglie.
12 De cal ci ca zio ne
Il calcare è naturalmente presente nell’acqua che viene utilizzata per il funzionamento della macchina. Questo deve essere
rimosso reg olarmente perchè può intas are il circuito dell’acqua
e del ca è del vostro appare cchio.
Per la vostra macchina Gaggia questo è un processo facile. La
decalci cazione è consi gliata quando si accende Led (19) "
La decalci cazione è o bbligatoria quando lampeggia il Led (19)
"
".
Eseguire questa operazione prima che il vostro
apparecchio smetta di funzionare perchè in
questo caso la riparazione non è coperta da garanzia.
Usare il prodotto decalci cante Gaggia (Fig.B).
E' stato fo rmulato speci catame nte per mantenere al meglio la performance e la funzionalità della
macchina per tutta la sua vita, nonchè per evitare, se
correttamente usato, ogni alterazione del prodotto
erogato. prima d’iniziare il ciclo di decalci cazione
assicurarsi che: SIA STATO RIMOSSO IL FILTRO ACQUA se
utilizzato.
Non bere la soluzione decalci cante e i prodotti
erogati no al com pletamento del c iclo. Non uti-
lizzar e in nessun caso l’aceto come decalci cante.
1
2
3
4
Inserire dal basso il porta ltro pressurizzato nel
13 14
gruppo erogazione (4) e ruotarlo da sinistra verso destra
no al suo bloccaggio.
Rimuovere e svuot are il serbatoio dell’acqua.
1
Versare METÀ del contenuto della bottiglia di de-
2
calci cante concentrato Gaggia nel serbatoio dell’acqua
dell’apparecchio e riempire con acqua fresca potabile no
al livello MAX.
Accendere la macchina premendo il tasto ON/OFF (11)
4
e il Led (12) "
Prelevare (come descritto nel capitolo 9 del manuale),
5
dal tubo vapore (panna rello), 2 tazze (circ a 150 ml. ciascuna)
" si accende.
di acqua; dopodichè spegnere la macchina premendo il tasto ON/OFF (11) e il Led (12) "
5 Lasciare agire il decalci cante circa 15-20 minuti con la
macchina spenta.
6
Accendere la macchina premendo il tasto ON/OFF (11)
"
".
Prelevare (come descritto nel capitolo 9 del manuale)
5
dal
tubo vapore (pannarello)
di acqua. Successivamente spegnere la macchina
il tasto ON/OFF (11) "
7 Ripetere le operazioni descritte al punto 6 no al comple-
to svuotamento del serbatoio dell’acqua.
Durante questa operazione è assolutamente
normale che la pompa si disattivi automaticamente lampeggiando il led (20) "
manopola. Attendere che il led (14) "
modo sso prima di riapr ire la manopola".
".
8
Risciacquare il serbatoio acqua con acqua fresca pota-
2
bile e riempirlo completamente.
9 Inserire un contenitore sotto al por ta ltro.
10 Accendere la macchina premendo il tasto ON/OFF (11)
premere il tasto
l’intero contenu to del serbatoio. Per fermare l ’erogazio ne premere nuovamente il t asto
11 2
Riempire nuovamente il serbatoio acqua con acqua fre-
sca.
Posizionare un contenitore capiente (circa 1 litro) sot-
5
to al tubo vapore (pannarello).
Aprire il rubinetto di erogazione dell’acqua (3) ruotandolo
in senso orario e prelevare l’intero contenuto del serbatoio
acqua tramite il tubo vapore (pannarello).
Dopo aver nito il preli evo di acqua, per f ermare l’ero-
12
6
gazione chiude re il rubinetto erogaz ione acqua (3) ruotando in senso antiorario.
13 Ripetere un’altra volta le operazioni dal punto (8) per un
totale di 4 serbatoi.
14 19
Rimuovere il porta ltro dal gruppo ruotandolo da de-
stra verso sinistra e sciacquarlo con acqua fres ca potabile.
Il ciclo di decalci cazione è cosi concluso.
Al termine di tale operazione tener premuto per 3 secondi i
tasti erogazione ca è e vapore, in questo modo il led decalci cazione si spegne.
Riempire nuovamen te il serbatoio con acqua fresc a. Se ne-
2
cessario e ettuare il caricamento del circuito come descritto
nel par. 4.6.
(13) " "
" si spegne.
2 tazze (circa 150 ml ciascuna)
"
e lasciarla spent a per 3 minuti.
". Richiudere la
" si accenda in
e tramite il porta ltro, prelevare
(13) " "
.
premendo
" "
Italiano
;
• 13 •
Page 14

La soluzione decalci cante deve essere smaltita secondo quanto previsto dal costruttore e/o
dalle norme vigenti ne l Paese d’utilizzo.
13 Filtro "Intenza+" (opzionale)
Il ltro acqua “INTENZA +” può migliorare la qualità dell’acqua.
L’utilizzo del ltro “INTENZA+” limiterà la formazione di calcare
e garantirà un aroma più intenso al vostro espresso . Quindi,
per gustare al meglio il vostro espresso, si consiglia d’installare
il ltro acqua “INTENZA +”, che può essere acquistato presso
il vostro rivenditore di ducia, on-line nel negozio Philips
all’indirizzo http://shop.philips.com o presso i centri di assistenza autorizzati.
• 34 Rimuovere il ltrino bianco presente nel serbatoio,
conservar lo in luogo asciutto protet to dalla polvere.
Togliere il ltro acqua “INTENZA+” dalla confezione.
•
32
Impostare il ltro in base alla durezza dell’acqua.
Immergere il ltro acqua “INTENZA+" in posizione
•
33
verticale (con l’apertura vers o l’alto) in acqua fre dda e premere delicatamente i lati per far usc ire le bolle d’aria.
Inserire il ltro nel serbatoio vuoto. Premere no al
•
35
punto d’arresto.
• Rie mpire il serbatoio dell'acqua con acqua f resca potabile e
reinserirlo nella macchina.
14 Smaltimento
INFORMAZIONE AGLI UTENTI: ai sensi dell’art. 13 del Decreto
Legislativo 25 luglio 2005, n. 151"Attuazione delle Direttive
2002/95/CE, 2002/96/CE e 2003/108/CE, relative alla riduzione
dell'uso di sostanze pericolose nelle apparecchiature elettriche
ed elettroniche, nonché allo smaltimento dei ri uti"
Il simbolo del cassonet to barrato riportato sull’apparecchiatura o sulla sua confezione indica che il prodotto alla
ne della propria vita utile d eve essere raccolto separat amente
dagli altri ri uti. L’utente dovrà, pertanto, conferire l’apparecchiatura giunta a ne vita agli idonei centri di raccolta di erenziata dei ri uti elettronici ed elettrotecnici, oppure riconsegnarla al rivenditore al momento dell’acquisto di una nuova
apparecchiatura di tipo equivalente, in ragione di uno a uno.
L’adeguata raccol ta di erenziata per l’avvio succe ssivo dell’apparecchiatura dismessa al riciclaggio, al trattamento e allo
smaltimento ambientalmente compatibile contribuisce ad
evitare possibili e etti negativi sull’ambiente e sulla salute e
favorisce il rei mpiego e/o riciclo dei materiali di c ui è composta
l’apparecchiatura.
Lo smaltimento abusivo del prodotto da parte dell’utente
comporta l’applicazione delle sanzioni amministrative previste dalla normativa vigente.
Per attivare il ltro "Intenza+" procedere come segue:
Premere il tasto ON/OFF (11) e il Led (12) " " si ac-
•
4
cend e; il Le d (16) "
a lampeggiare. Attendere che il Led (14) "
in modo sso.
Sistemare un contenitore o un bic chie re da tè sot to al
•
5
tubo va po re (pannarello).
• Aprire il po mel lo (3) ruotandolo in senso orar io.
Quando è stato prelevato circa 1 litro di acqua cal da,
•
6
chiudere il po mel lo (3) ruotandolo in senso antiorario.
• Svuotare il contenitore con l'acqua calda.
Durante questa operazione è assolutamente
normale che la pompa si disattivi automaticamente lampeggiando il led (16). Richiudere la manopola. Attendere che il led (14) si accenda in modo sso
prima di riaprire la manopola.
A questo punto il ltro è attivato e la macchina è pronta per
l'utilizzo.
" si accende e il Led (14) " " inizia
" si accenda
• 14 •
Page 15

Guasto Cause possibili Rimedio
La macchina non si ac cen de. Macchina non collegata alla rete elettrica. Collegare la macchina alla rete elettrica.
La pompa è molto ru mo ro sa. Manca acqua nel ser ba to io.
I Led (14) "
"
neamente
Il ca è é troppo freddo.
Non si forma la sc hiu ma del lat te.
Non si riesce a preparare un cappuccino.
Il ca è sgorga troppo ve lo ce men te, non si forma la c rema.
Il ca è non sgorga o sgor ga solo
a gocce.
Il ca è sgorga dai bordi.
Led (20) "
Led (19) " " acceso.
La pompa si spegne durante l'e-
rogazione di acqua o di vapore e
si accende il led (20) "
", ( 18) " " e (20)
" lampeggiano contem pora-
" acceso.
".
Primo avvio macchina oppure la macchina
è in sovratemperatura
Porta ltro non inserito per il preriscaldamento (cap. 7).
Tazzine fredde. Preriscadare le tazzine con acqua calda.
Latte non adatto: latte in polvere, latte
magro.
Pannarello sporco. Pulire il pannarello come descritto nel Cap.11.
Manca acqua nel serbatoio.
Troppo poco ca è nel porta ltro. Aggiungere il ca è (cap. 7).
Macinatura trop po grossa. Usare una miscela diversa (cap.8).
Ca è vecchio o non adatto. Usare una mi sce la diversa (cap.8).
Cialda vecchia o non adat ta. Cambiare la cialda utilizzata.
Manca un componente nel porta ltro.
Mancanza di acqua.
Macinatura trop po ne. Usare una miscela diversa (cap.8).
Ca è premuto nel porta ltro. Smuovere il ca è macinato.
Troppo ca è nel porta ltro. Ridurre la quantità di ca è nel porta ltro.
Macchina calci cata. Decalci care la macchina (cap.12).
Filtro nel porta ltro otturato.
Cialda non adatta. Cambiare il tipo di cialda.
Porta ltro inserito male nel grup po ero-
gazione ca è.
Bordo superiore del porta ltro sporco. Pulire il bordo del porta ltro.
Cialda inserita in modo errato.
Troppo ca è nel porta ltro.
Pomello acqua (3) aperto. Chiudere pomello (3).
Eseguire decalci cazione. Consultare il capitolo (12).
Time out di sicurezza. Chiudere pomello acqua.
Rabboccare con ac qua ed eseguire il caricamento
del circuito (Par 4.6).
Assicurarsi che il serbatoio sia pieno ed inserito
no a battuta e abbassare la temperatura come
descrit to nel paragrafo 10.1.
Preriscaldare il porta ltro.
Utilizzare latte intero.
Rabboccare con acqua ed eseguire il caricamento
del circuito (Par. 4.6).
Veri care che tutti i componenti siano presenti e
correttamente montati.
Rabboccare con acqua ed eseguire il caricamento
del circuito (Par 4.6).
Spe gne re la m acc hina e d at tend ere c he s i ra r eddi (circa 1 ora). Successivamente rimuovere e lavare bene il porta ltro. Se il problema si presenta
nuovamente contattare il centro assistenza.
Inserire correttamente il porta ltro (cap.7).
Inserire correttamente la cialda facendo in modo
che non esca dal p orta ltro.
Ridurre la quantità di ca è uti liz zan do il misurino.
Italiano
Per i guasti non con tem pla ti d alla suddetta ta bel la o in c aso che i rimedi sug ge ri ti non li ri sol va no, rivolger si ad un
centro assistenza.
• 15 •
Page 16

IMPORTANT SAFEGUARDS
When using electrical appliances, basic safety precautions should always
be followed, including the following:
1. Read all instructions.
2. Do not touch hot surfaces. Use handles or knobs.
3. To protect against fire, electric shock and injury to persons do not
immerse cord, plugs, or appliance in water or other liquid.
4. Close supervision is necessary when the appliance is used by or near
children.
5. Unplug from outlet when not in use and before cleaning. Allow to cool
before putting on or taking off parts, and before cleaning the appliance.
6. Do not operate any appliance with a damaged cord or plug or after the
appliance malfunctions, or has been damaged in any manner. Return
appliance to the nearest authorized service facility for examination,
repair or adjustment.
7. The use of accessory attachments not recommended by the appliance
manufacturer may result in fire, electric shock or injury to persons.
8. Do not use outdoors.
9. Do not let cord hang over edge of table or counter, or touch hot surfaces.
10. Do not place on or near a hot gas or electric burner, or in a heated
oven.
11. Always attach plug to appliance first, then plug cord into wall outlet. To
disconnect, turn any control to “off”, then remove plug from wall outlet.
12. Do not use appliance for other than intended use.
13. Save these instructions.
SAVE THESE INSTRUCTIONS
• 16 •
Page 17

CAUTION
This appliance is for household use only. Any servicing, other than cleaning
and user maintenance, should be performed by an authorized service
center. Do not immerse machine in water. To reduce the risk of fire or
electric shock, do not disassemble the machine. There are no parts inside
the machine serviceable by the user. Repair should be done by authorized
service personnel only.
1. Check voltage to be sure that the voltage indicated on the nameplate
corresponds with your voltage.
2. Never use warm or hot water to fill the water tank. Use cold water only.
3. Keep your hands and the cord away from hot parts of the appliance
during operation.
4. Never clean with scrubbing powders or harsh cleaners. Simply use a
soft cloth dampened with water.
5. For optimal taste of your coffee, use purified or bottled water. Periodic
descaling is still recommended every 2-3 months.
6. Do not use caramelized or flavored coffee beans.
INSTRUCTIONS FOR THE POWER
English
SUPPLY CORD
A. A short power-supply cord (or detachable power-supply cord) is to
be provided to reduce risks resulting from becoming entangled in or
tripping over a longer cord.
B. Longer detachable power-supply cords or extension cords are available
and may used if care is exercised in their use.
C. If a long detachable power-supply cord or extension cord is used,
1. The marked electrical rating of the detachable power-supply cord or
extension cord should be at least as great as the electrical rating of
the appliance
2. If the appliance is of the grounded type, the extension cord should
be a grounding-type 3-wire cord, and
3. The longer cord should be arranged so that it will not drape over
the counter top or table top where it can be pulled on by children or
tripped over.
• 17 •
Page 18

1 General Information
The co ee machine is suitable for preparing 1 or 2 cups of
espresso co ee and is provided with a swivel steam and hot
water wand. The controls on the front side of the machine are
labelled with eas y-to-read symbols.
The machine has been designed for domestic use and is not
suitable for professional, continuous use.
Warning. No liability is held for damage caused
by:
• Incorrect use not in accordance with the intended
purposes;
• Repairs not carried out in authorised service centres;
• Tampering with the power cor d;
• Tampering with any part of the machine;
• Use of non-o riginal spare par ts and accessories;
• Failure to descale the machine and storage at temperatures below 0°C.
In these cases, the warranty is void.
1.1 To Simplify Manual Reading
The warning triangle indicates
all important instructions for the
instructions to avoid serious injur y!
References to illustrations, parts of the appliance or controls,
etc. are indicated by numbers or letters. Whenever possible,
refer to the illus tration.
This symbol is used to highlight information
that is particularly important to ensure opti-
mal use of the machine.
user’s safety. Carefully follow these
2 Technical Speci cations
The manufacturer reserves the right to make changes to the
technical speci c ations of the product.
Nominal Voltage - Power Rating - Power Supply
See label on the appliance
Housing Material
Plastic model SIN 0 42 GM
Metal model SIN 0 42 GP
Size (w x h x d) (mm)
210 x 300 x 280
Weight
SIN 042 GM = 5 Kg
SIN 042 GP = 5.8 Kg
Power Cord Length
1.3 m
Control Panel
Front side
Filter Holder
Pressurized type
Pannarello
Special for cappuccinos
Water Tank
1.25 litres - Removable type
Pump Pressure
15 ba r
Boiler
Stainless steel
Safety Devices
Thermal fuse
3 Safety Regulations
The illustrations corresponding to the text can be
found on the rst pages of the manual. Please refer to
these pages while reading the operating instructions.
1.2 How to Use these Operating Instructions
Keep these operating instructions in a safe place and make
them available to anyone who may use the co ee machine.
For further information or in case of problems, please refer to
an authorised service centre.
• 18 •
Never allow water to come into contact with any of the
electrical par ts of the machine: danger of short circuit!
Overheated steam and hot water may cause burning!
Never direct the steam or hot water jet towards body
parts. Handle the steam/hot water spout with care:
danger of scalding!
Intended Use
This co ee machine is intended for domestic use only. The use
by children older than 8 years and by persons with reduced
physical, mental or sensory abilities or with lack of experience
and skills is allowed, provided that they are supervised or instructed on how to use the appliance correctly and that they
understand the hazards involved. Children must not play with
the appliance. Children must not carry out any cleaning and
maintenance operations without being monitored.
Page 19

Power Supply
Connect the co ee machine only to a suit able socket. The voltage must correspond to that indicated on the appliance label.
Power Cord
Never use the co ee machine if the power cord is defective or
damaged. If the power cord is damaged, it must be replaced
by the manufac turer or by its author ised service centre. Do not
pass the power cord around corners, over sharp edges or over
hot objec ts and keep it away from oil.
Do not use the power cord to carry or pull the co ee machine.
Do not pull out the plug by the power cord o r touch it with wet
hands. Do not let the power cord hang freely from tables or
shelves.
For the Safety of Others
Prevent children from playing with the machine. Children are
not aware of the risks related to electrical household appliances. Do not leave the machine packaging materials within
the reach of children.
Danger of burns
Never direct jets of overheated steam and/or hot water towards yourself or others. Do not touch the steam wand with
bare hands. Always us e the handles or knobs provided.
Do not disconnect (remove) the pressurized lter holder while
co ee is brewed. Hot water drips may spill o ut of the brew unit
during the warm-up phase. Do not touch the brew unit when
the machine is on or before it cools down.
Location
Place the co ee machine in a safe place, wh ere there will be no
danger of overt urning or injury. Hot water or overhe ated steam
may spill out of the machine: danger of scalding!
Do not keep the machine at a temperature below 0°C. Frost
may damage it.
Do not use the co ee machine outdoors. In order to prevent
its housing from melting or being damaged, do not place the
machine on ver y hot surfaces and close to open ames.
Cleaning
Bef ore c leani ng th e mach ine, t urn i t o by pre ssin g the O N/OFF
button, th en remove the plug from th e socket. Wait also for the
machine to cool down.
Never immerse the machine in water!
It is strictly forbidden to tamper with the internal parts of the
machine. Water left in the tank for several days should not be
consumed. Wash the tank and ll it with fresh drinking water.
Suitable Location for Operation and Maintenance
In order to ensure correct and e cien t performance of the coffee machine, we reco mmend following the instr uctions below:
• Choose a level surface.
• Choose a location that is su ciently well-lit, clean and
near an easily reachable socket.
• Allow for a minimum distance from the sides of the ma-
chine as shown in Fig. A.
Storing the Machine
If the machine is to remain inactive for a long time, turn it o
and unplug it. Store the machine in a dr y place, out of the reach
of children. Keep it protected from dust and dirt. Do not keep
the machine at a temperature below 0°C. Frost may damage it.
Repairs / Maintenance
In case of failure, problems or a suspected fault resulting from
the falling of the machine, immediately remove the plug from
the socket. Never attempt to operate a faulty machine. Servicing and repairs may only be carried out by Authorised Service
Centres. All liability for damages resulting from work not carried out by prof essionals is declined.
Fire Safety Precautions
In case of re, use carbon dioxide (CO2) extinguishers. Do not
use water or dry powder extinguishers.
Key to Machine Parts (Page 2)
1 Control panel
2 Cup holder res t
3 Hot water/steam knob
4 Co e e brew unit
5 Water tank
6 Water recovery tray
7 Cup holder grill
8 Steam wand (Pannarello)
9 Power cord socket
10 Water temperature thermometer
11 ON/OFF button
12 "Machine on" light
13 "Co ee brew" button
14 "Temperature" light
15 "Rinsing" button
16 "Rinsing" light
17 "Steam" button
18 "Steam" light
19 "Descaling" light
20 "Alarm" light
21 Pressurized lter holder
22 Ground co ee measuring scoop
23 Ground co ee lter (single piece for 1 or 2 co ee(s))
24 Co ee pod lter adapter
25 Co ee pod lter
26 Power cord
27 "Intenza+" water lter (Optional)
English
• 19 •
Page 20

4 Installation
For your own and other people safety, carefully follow
the "Safety Regulations" indicated in chapter 3.
4.1 Packaging
The original packaging has been designed and manufactured
to protect the machine during transport. We recommend
keeping the pac kaging material for possible future transport.
4.2 Installation Precautions
Do not move the machine by grabbing the cup
protection grilles.
4.4 Machine Connection
Electric power may be very dangerous! It is
therefore necessary to strictly follow the safety
regulat ions. Do not use fau lty power cords . Faulty cords
and plugs m ust be replaced im mediately by Author ised
Service Centres.
The voltage of the appliance has been pre-set by the manufacturer. Check that the voltage matches the indication on the
data plate at the bottom of the appliance.
•
Insert the plug into the socket on the back of the ma-
3A
chine.
Insert the o ther end of the plug into a wall socke t with
•
3B
suitable power voltage.
Before installing the machine, read the following safety precautions carefully:
• Place the machine in a safe place.
• Make sure children cannot play with the machine.
• Do not place the machine on hot surfaces or near open
a m e s .
The co ee machine is now ready to b e connected to the elec tric
network.
Note: we recommend washing the components
before using them for the rst time and/or af-
ter they have not be en used for a cert ain period of tim e.
4.3 Water tank
• 1 Remove the water tank (5).
Rinse it and ll it with fresh drinking water, making
•
2
sure that the (MAX) level indicated in the tank is not exceeded.
Fill the tank only with fresh, non-sparkling,
drinking water. Hot water or any other liquid
may damage the tank. Do not operate the machine
when the water level in the tank is below the MIN
threshold. Make sure there is enough water in the water tank.
• Insert the water tank back into its seat in the co ee ma-
chine and make sure that it locks into place - its pro le
should adhere to that of the co ee machine.
Note: the water level can be checked looking
through the window on the front side of the
tank.
4.5 First Use
At rs t start-up, the co ee machine circuit must be primed.
Press the ON/O FF button (11): the " " light (12) turns on
4
and the "
prompting the user to prime the circuit.
Place a container under the steam wand (Pannarello).
5
Open the "hot water/steam" knob (3) by turning it clock-
wise. The pump is activated automatically. Wait until
a steady jet of water ows out of the steam wand (Pannarello).
Close the "hot water/steam" knob (3) by turning it coun-
6
ter-clockwise. Remove the container.
The machine begins the warm-up phase only after the water
circuit has been correctly primed.
the "
" (14), " " (20) and " " (18) lights blink,
Note: if the knob is left open, the pump is automatically disengaged after a few seconds and
" light (20) star ts blinking.
4.6 Circuit Priming
When the water tank is empty, the machine circuit must be
primed again.
Note: if the machine has been operating without water for a lot of time and the "
" (20) and " " (18) lights are blinking, please refer
to the "Troubleshooti ng" table.
•
Place a container under the steam wand (Pannarello).
5
• Open the "hot water/steam" knob (3) by turning it clockwise. The pump is ac tivated automatically.
• Wait until a steady jet of water ows out of the steam
wand (Pannarello).
" (14), "
• 20 •
Page 21
• 6 Close the "hot water/steam" knob (3) by turning it
counter-clock wise. Remove the container.
Note: if the steam knob is opened by mistake
during the warm-up phase, the "
starts blinking. Close the knob and wait until the machine is ready.
" light (20)
4.7 Using the Machine for the First Time or
After a Period of Inactivity
This simple operation ensures an optimum brewing and must
be performed:
- at r st start-up;
- when the machine remains inactive for a long time (more
than 2 weeks).
Dispensed water must be emptied into an ad-
equate drain. It is not suitable for food use. If
the container lls up during the cycle, stop dispensing
water and empty the container before resuming the
operation.
A
Rinse the water tank and re ll it with fresh drinking
2
water. Insert the water t ank back into its seat in the co ee
machine and make sure that it locks into place - its pro le
should adhere to that of the co ee machine.
B Turn on th e machine by pressing the (11) button. Wait until
the " " light (14) turns on steady.
Place a container under the steam wand (Pannarello).
C
5
Open the knob (3) by turning it clockwise. The pump is ac-
tivated automatically.
D Dispense the whole water tank content from the steam/
hot water wand (Pannarello); to stop the dispensing process, close the knob (3) by turning it counter-clockwise.
During this operation the pump is automatical-
ly disengaged and the "
ing: this is a normal behaviour of the machine. Close
the knob. Wait until the "
before opening the knob again.
E
Fill the water tank with fresh drinking water. Insert
2
the water tank back into its seat in t he co ee machine and
make sure that it lock s into place - its pro le should adhere
to that of the co ee machine.
F
G
Insert the lter holder into the brew unit (4) from
13 14
the bottom and turn it from left to right until it locks into
place.
Place a suitable container under the lter holder.
15
" light (20) is blink-
" light (14) is steady on
H 17 Press the " " but ton and dispense a cup of hot wa-
ter.
At the end of the process, stop the operation by pressing
the "
" button.
I Repeat the operations described in step (H) until the wa-
ter tank is completely empty.
Re ll the water tank with fresh drinking water.
L
2
Remove the lter holder from the unit by turning it
M
19
from right to left and rinse it with fresh drinking water.
Now the machine is rea dy. Please see r elated chapters for operating details on how to brew co ee and dispense steam.
5 Rinsing
Note: make sure the lter holder is inserted to
ensure a proper war m-up of the machine.
The machine is set s o as to automatically rinse the co ee circui t
with fresh water every time it is turned on. This is conceived to
ensure the correct machine warm-up and an optimum co ee
aroma.
Place a container under the dispensing spout.
On new ly purcha sed machi nes this f unction is active (the "
" light (16) is on) and is performed at the end of the warm-up
phase, when the "
Note: should no water pour from the lter
holder, perform a manual rinse as described in
sect. 7.1.
The rinsing procedure may:
A be stopped by pressing the "
B be deactivated by pressing the " "
" "
light (14) is blinking or steady on
" light (16) turns o .
Note: if the rinsing procedure is deactivated,
it can be reactivated only by pressing the "
" button.
" light (14) turns on steady.
" (15) or (13) button.
button (15) while the
; in this case the "
6 Energy Saving
The machine is designed for energy saving.
After 9 minutes of inactivity, the machine turns o in order to
save energy and respect nature.
Press the ON/OFF "
" button (11) to operate the machine.
English
• 21 •
Page 22

7 Co ee Brewing
Warning! During co ee brewing it is forbidden
to r emo ve th e pr ess uri zed l ter h old er b y man u-
ally turning it from right to lef t. Danger of burns!
• During this operation, the "
is to be considered as a s tandard and not a faulty ope rating
mode.
• Before using the machine, make sure that there is enough
water in the machine tank.
Note: if the steam knob is opened by mistake
during the warm-up phase, the "
starts blinking. Close the knob and wait until the machine is ready.
If co ee is NOT brewed after pressing the brew
button "
(13) again and check the "Troubleshooting" table before
removing the lter holder.
Ensure the machine is ready before brewing co ee. The machine is ready when the "
" (13), press the brew button " "
7.1 Filter Holder Warm-Up
If the "rinse" func tion is not activa ted and/or the lter ho lder is
to be warmed-up manually, do as follows:
•
Insert the pressurized lter holder into the brew unit
13
(4) from the bottom.
Turn th e press urized lter h older f rom lef t to rig ht un-
•
14
til it locks into place. Release the pressurized lter holder
grip. The handle will turn slightly to the left. This movement guarantees optimum lter holder perf ormance.
Preheat the pressurized lter holder by pressing the
•
17
(13) button; some water will ow out of the pressurized
lter holder (this operation is necessary only for the rst
co ee).
• After 50cc of water have been dispensed, press the (13)
button again to stop the dispensing procedure.
• 19 Remove the pressurized lter holder by turning it from
right to lef t and then drain the remaining water.
Place a container under the dispensing spout.
Now you can go on with the co ee brewing procedures described in the following sec tions.
" light (14) is blinking; this
" light (20)
" light (14) is steady on.
7.2 Using Ground Co ee
• 7 Insert the lter (23) in the pressurized lter holder
(21); at rst use, the lter is already on. With the special
lter (23) provided there is no need to change the lter to
make one or two co ee(s).
•
Add 1-1.5 measuring scoop(s) for a single co ee and 2
8
measuring scoops for a double co ee. Remove any co ee
residues from the rim of the pressurized lter holder.
Note: do not press the co ee, since the lter
holder is provided with an optimized system
for original espresso brewing.
•
Insert the lter holder (21) into the brew unit (4) from
13
the bottom.
Turn the lter holder from left to right until it locks
•
14
into place.
Take 1 or 2 preheated cups and place them un-
•
16
der the pressurized lter holder. Make sure that they are
placed correc tly under the co ee brewing nozzles.
Press the " " but ton (13).
•
17
When the desired qu antity of co e e has been brewed,
•
18
press the "
cedure. Wait for a few se conds after brewing, then r emove
the cups of co ee.
After brewing, wait until the " " co ee light (14)
•
19
stops blinking, then remove the pressurized lter holder
by turning it from right to left and empty the remaining
co ee grounds.
ere d as a bsol utel y norm al an d is du e to th e lter h olde r
characteristics.
after use.
" button (13) again to stop the brewing p ro-
Note: a small quantity of water remains in the
pressurized lter holder. This has to be consid-
Important note: the lter (23) should be kept
clean to guarantee perfect results. Clean daily
7.3 Using Co ee Pods
• 9 Remo ve the gr ound co ee l ter (23) fr om the p ressurized lter holder (21).
Insert the pod adapter (24) into the pressurized lter
•
10
holder (21) ensuring that its convex par t faces down.
Then insert the pod lter (25) into the pressurized l-
•
11
ter holder (21).
Insert the p od into the l ter holder; make sure that the
•
12
paper of the po d does not stick out of the lter holder.
• 22 •
Page 23
• 13 Insert the pressurized lter holder into the brew unit
(4) from the bottom.
• 14 Turn the lter holder from left to right until it locks
into place.
Take 1 preheated cup and place it under the lter
•
15
holder. Check that it is placed correctly under the co ee
brewing noz zles.
•
Press the " " but ton (13).
17
• When the desired quantity of co ee has been brewed,
press the "
cedure. Wait for a few se conds after brewing, then r emove
the cup of co ee.
After brewing, wait until the " " co ee light (14)
•
19
stops blinking, then remove the pressurized lter holder
by turning it f rom right to left and dispos e of the used pod.
results. Clean daily after use.
" button (13) again to stop the brewing p ro-
Important note: the lter (25) and the adapter
(24) should be kept clean to guarantee perfect
8 Tips for Choosing Co ee
As a general rule, any type of co ee available on the market
can be used. However, co ee is a natural product and its avour changes according to its origin and blend; therefore, it is
advisable to t ry di e rent types of co ee in order to nd out the
blend that best suits your personal tastes.
For optimal results, we recommend using espresso machine
blends. As a rule, co ee should always co me out of the pressurized lter holder, without dripping. The co ee brewing speed
can be modi ed by slightly changing the amount of co ee in
the lter and/or using a di erent co ee grind. Gaggia recommends using ESE single-dos e co ee pods for a tast y co ee and
easier cleaning and preparing.
9 Hot Water
Danger of scalding! Dispensing may be preced-
ed by small jets of hot water. The steam wand
may reach high temperatures: never touch it with bare
hands.
•
Insert the pressurized lter holder into the brew unit
13
(4) from the bottom.
Turn th e press urized lter h older f rom lef t to rig ht un-
•
14
til it locks into place. Release the pressurized lter holder
grip. The handle will turn slightly to the left. This movement guarantees optimum lter holder perf ormance.
• Press the ON/OFF button (11): the "
(16) lights turn on while the "
ing. Wait until the "
Place a container or a tea glass under the steam wand
•
5
(Pannarello).
• Open the knob (3) by turning it clockwise: the "
(14) turns o .
When the desired amount of hot water has been dis-
•
6
pensed, clo se the knob (3) by turning it counter-cloc kwise.
• Remove the hot water container.
Note: if the steam knob is opened by mistake
during the warm-up phase, the "
starts blinking. Close the knob and wait until the machine is ready.
During this operation the pump is automatical-
ly disengaged and the "
ing: this is a normal behaviour of the machine. Close
the knob. Wait until the "
before opening the knob again.
" light (14) turns on steady.
" (12) and " "
" light (14) starts blink-
" light
" light (20)
" light (20) is blink-
" light (14) is steady on
English
BEFORE PERFORMING ANY OPERATIONS RELATED
TO HOT WATER/STEAM DISPENSING, MAKE SURE
THAT THE STEAM WAND (PANNARELLO) IS DIRECTED OVER
THE WATER RECOVERY TRAY.
10 Steam / Cappuccino
Danger of scalding! Dispensing may be preceded
by small jets of hot water. The steam wand may
reach high temperatures: never touch it with bare
hands.
•
Insert the pressurized lter holder into the brew unit
13
(4) from the bottom.
Turn th e press urized lter h older f rom lef t to rig ht un-
•
14
til it locks into place. Release the pressurized lter holder
grip. The handle will turn slightly to the left. This movement guarantees optimum lter holder perf ormance.
• Press the ON/OFF button (11): the "
(16) lights turn on while the "
ing. Wait until the "
" light (14) turns on steady.
" (12) and " "
" light (14) starts blink-
• 23 •
Page 24
• 21 Press the " " but ton (17). The " " light (14) turns
o and the "
" light (18) starts blinking.
• Ensure the machine is ready before brewing co ee. The
machine is ready when the "
" light (14) is steady on.
Note: if the steam knob is opened by mistake
during the warm-up phase, the "
starts blinking. Close the knob and wait until the machine is ready.
• Wait until the "
chine is ready for dispensing steam.
Place a container under the steam wand.
•
22
• Open the knob (3) for a few seconds so that the remaining
water can ow out of the steam wand (Pannar ello). Within
a short time only steam will come out.
•
Close the knob (3) and remove the container.
23
• Fi ll 1/3 of the co ntainer - the one you wish to use to pre pare
the cappuccino - with cold milk.
Use cold milk to get a better result.
•
Immerse the steam wand in the milk and open the
24
(3) knob by turning it clockwise; the pump is automatically engaged. Rot ate the milk container with slow upward
movements to obt ain uniform warmth.
Once nished, close the knob (3) by turning it cou nter-
•
25
clockwise and remove the cup with frothed milk.
• After this operation, clean the steam wand with a wet
cloth.
The same procedure can be performed to heat
other beverages.
• To stop the steam dispensing procedure, press the "
" button (17). The (14) " ", (18) " " and (20) " "
lights blink fast at the same time. This is to indicate that
the machine temperature is too high to brew co ee.
" light (18) is steady on. Now the ma-
" light (20)
10.1 Machine Cooling
Proceed as follows to lower the temperature:
Place a container or a tea glass under the steam wand
•
5
(Pannarello).
• Open the knob (3) by turning it clockwise.
• When the machine reaches the proper temperature, the
pump is automatic ally disengaged and the "
is blinking.
Close the kno b (3) by turning it cou nter-clo ckwise and
6
remove the container.
" light (20)
11 Cleaning
Maintenance and cleaning can only be carried out when the
machine is cold and disconnected from the ele ctric network.
• Do not immerse the machine in water or place any of its
parts in a dishwasher.
• Do not use spirit, solvents and/or aggressive chemical
agents.
• We recommend cleaning the water tank and re lling it
with fresh water every day.
Clean the boile r ring with a wet cloth week ly when the
•
30
machine is o , cold and disconnected from the mains.
•
•
• 31 Empty and wash the drip tray daily.
• Use a sof t, dampened cloth to clean the appliance.
•
• Do not dr y the machine and/or its par ts using a microwave
Every day, after heating milk, remove the exter-
26 28
nal part of the Pannarello and wash it with fresh drinking
water.
26 27 28
this, perform the following operations:
- Remove the external part of the Pannarello (for standard
cleaning).
- Remove the upper part of the Pannarello from the steam
wand.
- Wash the upper par t of the Pannarello with f resh drinking
water.
- Wash the steam wand with a wet cloth and remove any
milk residue.
- Re t the upper part in the steam wand (make sure it is
completely inserted).
29
Pannarello and make sure it reaches its limit stop. Make
also sure that the plastic part is correctly t in the metal
part.
20
-
9
water.
- Remove the adapter (if tted), and wash it thoroughly
with hot water.
- Wash the internal part of the pressurized lter holder.
and/or standard oven.
Clean the steam wand weekly. In order to do
After cleaning, reassemble the external part of the
Clean the pressurized lter holder as follows:
remove the lter and wash it thoroughly with hot
Note: do not wash the pressurized lter holder
in the dishwasher.
• 24 •
Page 25

12 Descaling
Limescale is a natural part of the water used for machine operation. It needs to be removed regularly as it may clog the
water and co ee circuit of your appliance.
This is an easy procedure for your Gaggia machine. When the
"
" light (19) turns on, a descaling cycle is recommende d.
When the "
case rep air is not covered by warranty.
machine performance and operation for its whole operating life. If correctly used, it also avoids alterations
in the brewed product. Before starting a descaling cycle make sur e that: THE WATER FILTER (if used) HA S BEEN
REMOVED.
ried out. Never use vinegar as a descaling solution.
1
unit (4) from the bot tom and turn it from lef t to right until
it locks into place.
2
3
descaling solution into the water tank, then ll the tank
with fresh drinking water up to the MAX level.
4
(11). The "
this manual, dispense 2 cups of water (about 150ml each)
from the steam wand (Pannarello) and turn the machine
o by pressing the ON/OFF but ton (11); the "
turns o .
5 Let the descaling solution take e ect for approx.15-20
minutes with the machine turned o .
6 Turn on the machine by pressing the ON/OFF " "
button (11).
this manual, dispense 2 cups of water (about 150ml each)
from the
pressing the ON/OFF "
minutes.
7 Repeat the operations described in step 6 until the water
tank is completely empty.
" light (19) turns on, descaling is compulsory.
This operation needs to be carried out before
the appliance stops working properly, as in this
Use the Gaggia descaling product (Fig. B). Its
formula has been designed to ensure better
Never drink the descaling solution or any products di spensed until the c ycle has been ful ly car-
Insert the pressurized lter holder into the brew
13 14
Remove and empty the water tank.
1
Pour HALF the content of the Gaggia concentrated
2
Turn on the machine by pressing the ON/OFF button
4
5
5
" light (12) turns on.
Following the instructions provided in chapter 9 of
" light (12)
Following the instructions provided in chapter 9 of
steam wand (Pannarello).
Turn o the m achine
"
button (11) and leave it o fo r 3
by
During this operation the pump is automati-
cally disengaged and the "
blinking: this is a normal behaviour of the machine.
Close the knob. Wait until the "
on before opening the knob again.
8
Rinse the water t ank with fresh drinkin g water and ll
2
it up.
9 Place a container under the lter holder.
10 Turn on the machine by pressing the
(11); press the
content of the tank by means of the lter holder. Press the
" "
11
2
Place a large container (about 1l capacity) under the
5
steam wand (Pannarello).
Open the water dispensing knob (3) by turning it clock-
wise and dispense the whole content of the water tank by
means of the steam wand (Pannarello).
After the water dispensing process is complete, close
12
6
the water dispensing knob (3) by turning it counter-clockwise.
13 Repeat the o perations once again from step (8), for a tot al
of 4 tanks.
14
19
right to lef t and rinse it with fresh dr inking water.
The descaling cycle is now comp lete.
At the end, press and hold the co ee brewing and steam dispensing but tons for 3 seconds: the descaling light turns o .
Re ll the tank with fresh water. If necessary, prime the
2
circuit as described in section 4.6.
and/or the regulations in force in the country of use.
" "
button (13) and dispense the whole
button (13) again to stop the dispensing proce ss.
Re ll the tank with fresh water.
Rem ove t he l ter hold er f rom t he u nit b y tur nin g it f rom
The descaling solution is to be disposed of ac-
cording to the manufacturer’s instructions
" light (20) is
" light (14) is steady
" "
ON/OFF button
13 "Intenza+" Filter (Optional)
The "INTENZA+" water lter can improve the quality of water.
Using the "INTENZA+" lter will prevent limescale from
building up and will ensure a much more intense aroma to
your espresso co ee. We therefore recommend you install the
"INTENZA+" water lter, which can be purchased from your
local dealer or on-line at the Philips on-line store http://shop.
philips.com or at authorized service centres.
• 34 Remove the small white lter from the tank and store
it in a dry place sheltered from dust.
English
• 25 •
Page 26

• 32 Remove the "INTENZ A+" water lter from its packag e.
Set the lter according to the water hardness.
Immerse the "INT ENZA+" water lter vertically in cold
•
33
water (with the opening positioned upwards) and gently
press its sides to let the air bubbles out.
• 35 Put the lter into the empty t ank. Press it until its li mit
stop.
• Fill th e water tank with fresh dr inking water and reinser t it
into the machine.
Carry out the following steps to activate the "Inten-
za+" lter:
• 4 Press the ON/O FF button (11): the " " (12) and "
" (16) lights turn on while the " " light (14) start s blinking. Wait until the "
Place a container or a tea glass under the steam wand
•
5
" light (14) turns on steady.
(Pannarello).
• Open the knob (3) by turning it clockwise.
When about 1 litre of hot water has been dispensed,
•
6
close the knob (3) by turning it counter-clockwise.
• Empty the hot water container.
During this operation the pump is automatical-
ly diseng aged and the (16) light is blinki ng: this
is a normal behaviour of the machine. Close the knob.
Wait until the (14) light is s teady on before ope ning the
knob again.
and human health, which could otherwise be caused by inappropriate waste handling of this product. For more detailed
information about recycling of this product, please contact your
local city o ce, your household waste disposal service or the
shop where you purchased the product.
Now the lter is active and the machine is ready for use.
14 Disposal
- The packing materials can be recycled.
- Appliance: unplug the appliance and cut the power cord.
- Deliver the appliance and power cord to a service center or
public waste disposal facility.
This product complies with EU directive 2002/96/EC.
The symbol
on the product or on its packaging indicates that this product may not be treated as household waste.
Instead it shall be handed over to the applicable collection point
for the recycling of electrical and electronic equipment.
By ensuring this product is disposed of correctly, you will help
prevent potential negative consequences for the environment
• 26 •
Page 27

Problem Possible Causes Solution
The machine does not switch on.
The pump is very noisy. No water in the tank .
The (14) "
(20) "
neously.
Co ee is too cold.
The milk does not f roth.
It is not possible to prepare a
cappuccino.
Co ee is brewed too fast, crema
does not for m.
Co ee does not come out or dr ips
only.
Co ee ows out of the edges.
The "
The "
The pump turns o during water
or steam dispensing an d the "
" light (20) turns on.
", (18) " " and
" lights blink simulta-
" light (20) is on.
" light (19) is on.
The machine is not connected to the electric network.
This is the rst start-up or the machine is
overheated.
The lter holder is not inserted for preheating (chapter 7).
The cups are cold. Preheat the cups with hot water.
The milk is not suitable: powdered milk,
low-fat milk.
Dirty Pannarello. Clean the Pannarello as describe d in chapter 11.
No water in the tank.
There is too litt le co ee in th e lter holde r. Add co ee (chapter 7).
The grind is too coarse. Use a di erent blend (chapter 8).
Co ee is old or not suitable. Use a di erent blend (chapter 8).
The pod is old or not suitable. Change the pod.
Missing component in the lter holder.
No water.
The grind is too ne. Use a di erent blend (chapter 8).
Co ee tamped in the lter holder. Shake the ground co ee.
There is too much co ee in the lter
holder.
The machine has limescale build-up. Descale the machine (chapter 12).
The lter in the lter holder is clogged.
Not suitable pod. Change type of pod.
The lter holder is not correctly inserted
in the brew unit.
The upper rim of the lter holder is dir ty. Clean the rim of the lter holder.
Pod inserted incorrectly.
There is too much co ee in the lter
holder.
The water knob (3) is open. Close the knob (3).
Descale the machine. Please refer to chapter (12).
Safety time-out. Clos e the water knob.
Connect the machine to the electric network.
Fill the tank up with water and prime the circuit
(sec tion 4.6).
Make sure the tank is full and fully inserted and
lower the temperature as described in section
10.1.
Preheat the lter holder.
Use whole milk.
Fill the tank up with water and prime the circuit
(sec tion 4.6).
Make sure that all the components are present
and properly installed.
Fill the tank up with water and prime the circuit
(sec tion 4.6).
Reduce the quantity of co ee in the lter holder.
Turn the machine o and let it cool down (approx.
1 hour), then remove and wash the lter holder
thoroughly. If the problem persists, contact the
service centre.
Insert the lter holder correctly (chapter 7).
Insert the pod correctly. Make sure it does not
come out of the lter holder.
Reduce the quantity of co ee using the measuring scoop.
English
Please cont act an authoris ed service cent re for any problems n ot covered in the above tab le or when the sugges ted
solutions do not solve the problem.
• 27 •
Page 28

1 Allgemeines
Die Ka eemaschine eignet sich für die Zubereitung von 1
oder 2 Tassen Espresso und ist mit einer drehbaren Düse für
die Dampf- und die Heißwasserausgabe ausgestattet. Die Bedienelemente auf der Vorderseite des Geräts sind mit einfach
verständlichen Symbolen gekennzeichnet.
Die Maschine wurde für den Einsatz im Haushalt entwickelt
und eignet sich daher nicht für den Dauerbetrieb im gewerblichen Einsatz.
Achtung. In folgenden Fällen wird für eventuelle Schäden keine Haftung übernommen:
• Falsche und n icht den vorgesehenen Verwendu ngs-
zwecken entsprec hende Verwendung;
• Reparaturen, die nicht in autorisierten Kunden-
dienststellen durchgeführt wurden;
• Veränderungen am Netzkabel;
• Veränderungen an beliebigen Bestandteilen der
Maschine;
• Verwen dung von anderen a ls originalen Er satz- und
Zubehörteilen;
• Fehlende Entkalkung und Lagerung in Räumen bei
Temperaturen unter 0°C.
In diesen Fällen erlisc ht die Garantie.
1.1 Hinweise zur einfacheren Lektüre
Das Warndreieck weist auf alle
wichtigen Hinweise für die Si-
cherheit des Benutzers hin. Diese
Hinweise sind strikt zu beachten, um schwere Verletz
ungen zu vermeiden!
2 Technische Daten
Der Hersteller behält sich das Recht vor, technische Änderungen am Produkt vorzunehmen.
Nennspannung - Nennleistung - Versorgung
Siehe Typenschild auf dem Gerät
Gehäusematerial
Kunststo Modell SIN 0 42 GM
Metall Modell SIN 0 42 GP
Abmessungen (L x H x T) (mm)
210 x 300 x 280
Gewicht
SIN 042 GM = 5 kg
SIN 042 GP = 5,8 kg
Kabellänge
1,3 m
Bedienfeld
Auf der Vorderseite
Filterhalter
Druckverdichtet
Pannarello
Spezialzubehör für Cappuccino
Wasse rtank
1,25 Liter - herausnehmbar
Pumpendruck
15 ba r
Durchlauferhitzer
Rostfreier Edelstahl
Sicherheitsvorrichtungen
Thermosicherung
Der Bezug auf Abbildungen, Teile des Geräts oder Bedienelemente usw. erfolgt über Zahlen oder Buchstaben. In diesem
Falle wird auf die Abbildung verwiesen.
Mit diesem Symbol werden Informationen gekennzeichnet, auf die besonders geachtet wer-
den muss, um den Betrieb der Masc hine zu optimier en.
Die dem Text entsprechenden Abbildungen be nden
sich auf den ersten Seiten des Handbuchs. Diese Seiten
sind beim Lesen der vorliegenden Bedienungsanleitung zu berücksichtigen.
1.2 Gebrauch dieser Bedienungsanleitung
Bewahren Sie diese Bedienungsanleitung an einem sicheren
Ort auf und legen Sie der Ka eemaschine immer bei, wenn
diese von anderen Personen benutz t wird.
Für weitere Informationen oder bei Problemen wenden Sie
sich bitte an die autorisierten Kundendiensts tellen.
• 28 •
3 Sicherheitsvorschriften
Die unter Strom stehenden Teile dürfen keinesfalls
mit Wasser in Berührung kommen: Kurzschlussgefahr! Der heiße Dampf und das heiße Wasser können
Verbrennungen verursachen! Keinesfalls den Dampfoder Heißwasserstrahl auf Körperteile richten und die
Dampf-/Heißwasserdüse immer vorsichtig anfassen:
Verbrennungsgefahr!
Sachgemäßer Gebrauch
Die Ka eemaschine ist ausschließlich für den Gebrauch im
Haushalt bestimmt. Dieses Gerät dar f von Kindern über 8 Jahren und von Personen mit eingeschränkten körperlichen oder
geistigen Fähigkeiten oder ohne Erfahrung und Kenntnisse bedient werden, wenn diese im sicheren Umgang mit dem Gerät
geschult oder dabei überwacht werden, und die vorhandenen
Gefahren verstehen. Kindern sollten nicht mit dem Gerät spie-
Page 29

len. Die vom Benutzer auszuführende Reinigung und Instandhaltung darf ni cht von Kindern ausgef ührt werden, wenn diese
nicht über wacht werden.
Stromversorgung
Die Ka eemaschine darf ausschließlich an eine geeignete
Steckdose angeschlossen werden. Die Spannung muss mit
derjenigen übereinstimmen, die auf dem Typenschild des Geräts angegeben ist.
Netzkabel
Die Ka eemaschine darf keinesfalls mit defektem Netzkabel
betrieben werden. Bei Schäden am Netzkabel muss dieses
vom Hersteller oder von dessen Kundendienst ausgetauscht
werden. Das Net zkabel darf nicht in Ecke n, über scharfe Kante n
oder auf sehr heißen Gegenständen verlegt werden. Es sollte
vor Öl geschützt werden.
Die Ka eemaschine darf nicht am Kabel getragen oder gezogen werden. Der Ste cker darf nicht durch Zie hen am Kabel herausgezogen werden. Er sollte nicht mit nassen Händen berührt
werden. Der fr eie Fall des Netzkabels von Tis chen oder Regalen
sollte vermieden werden.
Schutz anderer Personen
Kinder beaufsichtigen, damit sie nicht mit dem Gerät spielen.
Kinder können die Gefahrensituationen, die durch Haushaltsgeräte entstehen können, nicht abschätzen. Die für die Verpackung der Maschine benutzten Materialien sollten nicht in
Reichweite von Kindern aufbewahrt werden.
Verbrühungsgefahr
Den Heißwasser- oder Dampfstrahl keinesfalls auf sich selbst
oder auf andere Personen richten. Die Dampfdüse keinesfalls
direkt ber ühren. Dabei sollten stets die en tsprechenden Handgri e oder Drehknöpfe benutzt werden.
Der Druck lterhalter dar f keinesfalls während der Au sgabe des
Ka ees herausgenommen (abgenommen) werden. Während
der Aufheizphase der Brühgruppe besteht die Möglichkeit des
Austrit ts von Tropfen heißen Wassers. Die Brühgruppe keinesfalls bei eingeschalteter Maschine, oder bevor die Brühgruppe
abgekühlt ist, berühren.
Standort
Die Ka eemaschine sollte an einem sicheren Ort aufgestellt
werden, an dem nicht die Gefahr des Umkippens oder der Verletzung von Personen besteht. Es besteht die Möglichkeit des
Austrittes von heißem Wasser oder Dampf: Verbrennungs-
gefahr!
Die Maschine sollte Temperaturen von unter 0°C nicht ausgesetzt werden. Es besteht die Gefahr, dass die Maschine durch
gefrierendes Wasser beschädigt wird.
Die Ka eemaschine darf nicht im Freien betrieben werden.
Die Maschine nicht auf heißen Flächen oder in der Nähe von
o enem Feuer aufstellen, da das Gehäuse schmelzen oder auf
andere Art beschädigt werden könnte.
Reinigung
Bevor die Maschine gereinigt wird, muss sie mit der Taste ON/
OFF ausgeschaltet und dann der Stecker von der Steckdose
abgenommen werden. Darüber hinaus abwarten, bis die Maschine abgekühlt ist.
Die Maschine keinesfalls in Wasser tauchen!
Der Versuch von Eingr i en im Inneren der Maschine i st strengstens verboten. Wasser, das einige Tage lang im Wassertank
verblieben is t, darf nicht für Lebensmi ttelzwecke genut zt oder
getrunken werden. Den Tank reinigen und mit frischem Trinkwasser füllen.
Raumbedarf für den Betrieb und die Wartung
Für einen korrekten und einwandfreien Betrieb der Ka eemaschine sollten folgende Empfehlungen berücksichtigt werden:
• Eine ebene Au age äche auswählen.
• Der Raum sollte ausreichend beleuchtet und hygienisch
unbedenklich sein und die Steckdose muss leicht zugänglich sein.
• Gemäß der Angaben in der Abbildung einen Mindestabstand von den Ma schinenwänden berüc ksichtigen - Abb. A.
Aufbewahrung der Maschine
Die Maschine ausschalten, wenn sie längere Zeit nicht benutzt
wird, und den Stec ker aus der Steckdose ziehen.
An einem trockenen und für Kinder unzugänglichen Ort aufbewahren. Vor Staub und Schmutz schützen. Die Maschine sollte
Temperaturen von unter 0 ° nic ht ausgesetzt wer den. Sie könnte
durch gefrierendes Wasser beschädigt werden.
Reparaturen / Wartungsarbeiten
Die Maschine bei Störungen, Defekten oder dem Verdacht auf
Defekte nach einem Sturz nicht verwenden und unverzüglich
den Netzstecker ziehen. Eine defekte Maschine keinesfalls in
Betrieb setzen. Eingri e und Reparaturen dürfen ausschließlich von autorisierten Kundendienststellen vorgenommen
werden. Im Falle von nicht fachgerecht ausgeführten Eingriffen wird jede Haf tung für eventuelle Schäden abgelehnt.
Brandschutz
Im Fall eines Brands einen Kohlensäurelöscher (CO2) verwenden. Keinesfalls sind Wasser- oder Pulverlöscher einzuset zen.
Deutsch
• 29 •
Page 30

Legende der Maschinenbestandteile (S. 2)
1 Bedientafel
2 Halterung Tassenabstell äche
3 Drehknopf Heißwasser / Dampf
4 Ka eebrühgruppe
5 Wassertank
6 Wasserau angschale
7 Tassenabstellrost
8 Dampfdüse (Pannarello)
9 Steckdose für Netzkabel
10 Thermometer Wassertemperatur
11 Taste ON/OFF
12 LED "Maschine ein"
13 Taste "Ka eeausgabe"
14 LED "Temperatur"
15 Taste "Spülung"
16 LED "Spülung"
17 Taste "Dampf"
18 LED "Dampf"
19 LED "Entkalkung"
20 LED "Alarm"
21 Druck lterhalter
22 Messlö el für gemahlenen Ka ee
23 Filter für gemahlenen Ka ee (ein Filter für 1 ode r 2 Ka ee)
24 Filteradapter für Ka eepads
25 Filter für Ka eepads
26 Netzkabel
27 Wasser lter "Intenza+" (Optional)
4 Aufstellung
Für Ihre eigene Sicherheit und die der anderen müssen
die “Sicherheitsvorschriften” im Kap. 3 strikt eingehalten werden.
4.1 Verpackung
Die Original-Verpackung wurde für den Schutz der Maschine
während des Versandes entwickelt und hergestellt. Es wird
empfohlen, die se Verpackung für eventuelle z ukünftige Transporte aufzubewahren.
4.2 Installationshinweise
Die Maschine darf nicht an den Tassenschutzleisten angehoben werden.
Bevor die Maschine installiert wird, müssen die folgenden Sicherheitsvorschriften beachtet werden:
• die Maschine an einem sicheren Ort aufstellen;
• sicherstellen, dass Kinder nicht mit der Maschine spielen
können;
• die Maschine nicht auf heißen Flächen oder in der Nähe
von o enem Feuer aufstellen.
Nun kann die Ka eemaschi ne an das Stromnetz angesc hlossen
werden.
Hinweis: Es wird empfohlen, die Bestandteile
vor deren Benutzung und/oder nach einer län-
geren Nichtbenutzung zu reinigen.
4.3 Wassertank
• 1 Den Wassertank (5) herausnehmen.
Den Tank ausspülen und mit frischem Trinkwasser
•
2
füllen. Der Füllstand (MAX ), der im Tank markiert ist, s ollte
nicht überschritten werden.
In den Tank stets ausschließlich frisches Trinkwasser ohne Kohlensäure einfüllen. Heißes
Wasser oder andere Flüssigkeiten können den Tank
beschädigen. Die Maschine keinesfalls betreiben,
wenn der Wasserfüllstand unter der Angabe MIN liegt:
sicherstellen, dass im Tank eine ausreichende Menge
Wasser vorhanden ist.
• Den Wassertank in seine Aufnahme in der Ka eemaschi-
ne einsetzen und sicherstellen, dass er bis zum Anschlag
eingesetzt wird. Das Pro l des Tanks und das der Ka eemaschine müssen übereinstimmen.
Hinweis: Der Füllstand des Wassers kann über
das Fenster im Frontteil des Tanks angezeigt
werden.
4.4 Anschluss der Maschine
Elektrischer Strom kann gefährlich sein! Aus
diesem Grunde müssen die Sicherheitsvor-
schriften stets strikt beachtet werden. Defekte Kabel
dürfen keinesfalls benutzt werden! Beschädigte oder
defekte Kabel und Stecker müssen umgehend von einer autorisierten Kundendienststelle ersetz t werden.
Die Spannung des Geräts wurde werkseitig eingestellt. Überprüfen, ob die Netzspannung den auf dem Typenschild auf der
Unterseite der Mas chine aufgeführten Angaben entspricht.
•
Den Stecker in die Ste ckdose auf der Rück seite der Kaf-
3A
feemaschine einstecken.
Das andere Ende des Steckerkabels in eine Wandsteck-
•
3B
dose mit geeigneter Spannung einstecken.
• 30 •
Page 31

4.5 Erste Inbetriebnahme
Bei der ersten Inbetriebnahme der Ka eemaschine muss das
System entlüftet werden.
Die Taste ON/OFF (11) drücken und die LED (12) " "
4
leuchtet auf. Die LED (14 ) "
blinken. Dies zeigt an, dass das System entlüftet werden
muss.
Einen Behälter unter die Dampfdüse (Pannarello) stellen.
5
Den Drehknopf (3) "Heißwasser/Dampf" ö nen, indem er
im Uhrzeigersinn gedreht wird. Die Pumpe wird automatisch gestartet. Abwar ten, bis aus der Dampfdüse (Pannarello) ein regelmäßiger Wasserstrahl austritt.
Den Drehkno pf (3) "Heißwass er/Dampf " schließen, indem
6
er im Gegenuhrzeigersinn gedreht wird. Den Behälter entfernen.
Erst nach der korrekten Ausführung der Entlüftung des Systems beginnt die Maschine die Aufheizphase.
Hinweis: Wird der Drehknopf o en gelassen,
so wird die Pumpe nach einigen Sekunden au-
tomatisch ausgeschaltet und die LED (20) "
", (20 ) " " und (18) " "
" blinkt.
4.6 Entlüftung des Systems
Wenn kein Wasser mehr im Tank vorhanden ist, muss das System der Maschine entlüftet werden.
Hinweis: Wurde die Maschine für einen länger-
en Zeitraum ohne Wasser betrieben, und die
LED (14) "
auf die Tabelle "Problemlösung" Bezug zu nehmen.
", (20) " " und (18) " " blinken, so ist
4.7 Erste Inbetriebnahme oder Benutzung
nach längerer Nichtbenutzung
Dieser einfache Vorgang gewährleistet eine optimale Ausgabe
und muss ausgef ührt werden:
- bei der ersten Inbetriebnahme;
- nach einem längeren Zeitraum der Nichtbenutzung der
Maschine (länger als 2 Wochen).
Das ausgegebene Wasser muss über einen
entsprechenden Ab uss entsorgt werden, und
darf nicht für Lebensmittelzwecke verwendet werden.
Sollte der Behälter während des Zyklus voll werden,
muss die Ausgabe gestoppt und der Behälter geleert
werden, bevor der Vorgang fortgesetzt wir d.
A
Den Wassertank ausspülen und mit frischem Trink-
2
wasser füllen. Den Wassertank wieder in seine Aufnahme
in der Ka eemaschine einsetzen und sicherstellen, dass er
bis zum Anschla g eingesetzt wird . Das Pro l des Tanks und
das der Ka eemaschine müssen übereinstimmen.
B Die Taste (11) drücken, um die Maschine einzuschalten.
Abwarten, bis die LED (14) "
Einen Behälter unter die Dam pfdüse (Pannarello) stel-
C
5
len.
Den Regler (3) im Uhrzeigersinn drehen. Die Pumpe wird
automatisch gestar tet.
D Den gesamten Inhalt des Wassertanks über die Heißwas-
ser-/Dampfdüse (Pannarello) ab ießen lassen. Um die
Ausgabe zu beenden, den Regler (3) schließen, indem er
im Uhrzeigersinn gedreht wird.
" dauerhaft au euchtet.
Deutsch
•
Einen Behälter unter die Dam pfdüse (Pannarello) stel-
5
len.
• Den Drehknopf (3) “Heißwasser/Dampf” ö nen, indem er
im Uhrzeigersinn gedreht wird. Die Pumpe wird automatisch gestartet.
• Abwarten, bis aus der Dampfdüse (Pannarello) ein regelmäßiger Wasserstrahl austritt.
Den Drehknopf (3) “Heißwasser/Dampf” schließen,
•
6
indem er im Gegenu hrzeigersinn gedreht wir d. Den Behälter entfernen.
Hinweis: Wird während der Aufheizphase der
Drehknopf Dampf fälschlicherweise geö net,
so blinkt die LED (20) "
und abwar ten, bis die Maschine bereit ist.
". Den Drehknopf schließen
Während diesem Vorgang ist es absolut nor-
mal, dass di e Pumpe sich automa tisch ausscha ltet und die LED (20 ) "
schließen. Abwarten, bis die LED (14) "
au euchtet, bevor der Drehknopf wieder geö net
wird.
E
Den Wassertank mit frischem Trinkwasser füllen.
2
Den Wassertank wieder in seine Aufnahme in der Kaffeemaschine einsetzen und sicherstellen, dass er bis zum
Anschlag eingesetzt wird. Das Pro l des Tanks und das der
Ka eemaschine müssen übereinstimmen.
F 13 14 Den Filterhalter von unten in die Brühgruppe (4)
einsetzen und von links nach rechts drehen, bis er einrastet.
Einen geeigneten Behälter unter den Filterhalter stel-
G
15
len.
Die Taste " " drücken und ei ne Tasse he ißes Wasser
H
17
ausgeben.
" blink t. Den Drehknopf w ieder
" dauerhaft
• 31 •
Page 32

Ab schließend die Ausgab e beenden, indem die Taste "
" gedrückt wird.
I Die unter Punkt (H) beschriebenen Vorgänge wiederho-
len, bis sich kein Wasser mehr im Wassertank be ndet.
Den Wasserbehälter erneut mit frischem Trinkwasser
L
2
füllen.
M 19 Den Filterhalter durch Drehung von rechts nach links
aus der Brühgruppe herausnehmen und mit frischem
Tri nkwa sser au sspü len.
Die Maschine i st nun bereit. Für die Betr iebseinzelheiten für die
Ausgabe von Ka ee und Dampf wird auf die entsprechenden
Kapitel verwiesen.
5 Spülung
Hinweis: Sicherstellen, dass der Filterhalter
eingesetzt wurde, um eine optimale Aufhei-
zung der gesamten Maschine zu gewährleis ten.
Die Ka eemaschine führt bei jeder Einschaltung eine automatische Spülung des Ka eesystems mit frischem Wasser aus.
Dadurch wird eine korrekte Aufheizung der gesamten Maschine sowie ein optimales Aroma des K a ees gewährleistet.
Es wird empfohlen, einen Behälter unter den
Auslauf stellen.
Diese Funktion ist beim Kauf der Maschine aktiv (die LED (16)
"
" ist eingeschaltet) und wird nach Abschluss der Aufheizphase ausgeführt, wenn die LED (14) "
au euchtet.
Hinweis: Sollte kein Wasser aus dem Filterhal-
ter aus ießen, so muss die Spülung manuell
vorgenommen werden, wie im Abschn. 7.1 beschrieben.
Bei der Spülung sind folgende Vorgänge möglich:
A Abbruch durch Druck der Taste (15)
(13).
B Ausschaltung durch Druck der Taste (15) " ",
LED
(14) " "
sem Falle wird die LED (16) "
Hinweis: Wird die Spülung ausgeschaltet, so
kann sie nu r durch Druck der Taste "
eingeschaltet werden.
blinkt oder dauerhaft au euchtet
" ausgeschaltet.
" "
oder der Taste
" dauerhaft
wenn die
. In die-
" wieder
6 Energiesparmodus
Die Maschine ver fügt über einen Energiesparmodus.
Wird die Maschine für einen Zeitraum von 9 Minuten nicht benutzt, so wird sie umweltfreundlich ausgeschaltet, um Energie
zu sparen.
Um die Maschine zu benutzen, muss die Taste ON/OFF (11)
"
" gedrück t werden.
7 Ka eeausgabe
Achtung! Die Herausnahme des Druck lterhal-
ters durch manuelle Drehung von rechts nach
links während der Ausgabe des Ka ees ist verboten.
Verbrennungsgefahr.
• Währe nd dieses Vorgangs blinkt d ie LED (14) "
Betrieb ist völlig normal und nicht als Störung zu betrachten.
• Vor dem Gebrauch sicherstellen, dass der Wassertank der
Maschine eine ausreichende Menge Wasser enthält.
Hinweis: Wird während der Aufheizphase der
Drehknopf Dampf fälschlicherweise geö net,
so blinkt die LED (20) "
und abwar ten, bis die Maschine bereit ist.
Wird nach dem Druck der Taste (13) " " KEIN
Ka ee ausgegeben, so ist erneut die Taste (13)
"
" zu drücken und auf die Tabelle "Problemlösung"
Bezug zu nehmen, bevor der Filterhalter entfernt wird.
Vor der Ausgabe von Ka ee muss überprüft werden, ob die
Maschine bereit ist. Die Maschine ist bereit, wenn die LED (14)
"
" dauerhaft au euchtet.
". Den Drehknopf schließen
7.1 Aufheizung Filterhalter
Ist die Funktion "Spülung" nicht eingeschaltet und/oder der
Filterhalter soll von Hand vorgeheizt werden, so ist wie folgt
vorzugehen:
•
Den Druck lterhalter von unten in die Brühgruppe (4)
13
einsetzen.
Den Druck lterhalter von links na ch rechts drehen, bis
•
14
er blockiert. Den Gri des Druck lterhalters loslassen; der
Gri dreht sich leicht nach links. Diese Bewegung gewährleistet die korrekte Funk tion des Filterhalters.
Den Druck lterhalter vorwärmen, indem die Taste
•
17
(13) gedrückt wird. Das Wasser beginnt, aus dem Druck lterhalter auszuströmen (dieser Vorgang ist lediglich für
den ersten Ka ee er forderlich).
". D ie se r
• 32 •
Page 33

• Nachdem 50 ml Wasser durchgelaufen sind, wird erneut
die Taste (13) gedrückt, um die Ausgabe zu stoppen.
• 19 Den Druck lterhalter aus der Maschine nehmen, indem
er von rechts nach links gedreht wird, und das Restwasser
entfernen.
Es wird empfohlen, einen Behälter unter den
Auslauf stellen.
Nun die in den folgenden Abschnitten beschriebenen Vorgänge für die Ausgabe des Ka ees vornehmen.
7.2 Betrieb mit gemahlenem Ka ee
• 7 Den Filter (23) in den Druck lterhalter (21) einsetzen.
Bei der ersten Benutzung ist der Filter bereits eingesetzt.
Mit dem speziellen Filter (23), mit dem die Maschine ausgestattet ist, muss der Filter für die Ausgabe von einem
oder zwei Ka ee nicht gewechselt werden.
• 8 1 oder 1,5 Messlö el für einen einzelnen Ka ee oder
2 gestric hene Messlö e l für einen doppelten Ka ee in den
Filter geben. Den Ka eesatz vom Rand des Druck lterhalters entfernen.
Hinweis: Den Ka ee nicht andrücken, da der
Filterhalter mit einem bereits optimierten System für die Ausgabe eines köstlichen Espresso ausgestattet ist.
•
Den Filterhalter (21) von unten in die Brühgruppe (4)
13
einsetzen.
Den Filterhalter von links nach rechts drehen, bis er
•
14
blockiert.
1 oder 2 vorgewärmte Tassen entnehmen und
•
16
unter den Druck lterhalter stellen. Überprüfen, ob diese
korrekt unter den Ka eeausgabeö nungen stehen.
Die Taste (13) " " drücken.
•
17
Wenn die gewünschte Ka eemenge erreicht wurde,
•
18
erneut die Taste (13) "
beenden. Zum Abschluss der Ausgabe einige Sekunden
abwarten, dann die Tassen mit dem Ka ee entnehmen.
Nach Abschluss der Ka eeausgabe abwarten, bis die
•
19
LED Ka ee (14) "
lterhalter herausnehmen, indem er von rechts nach links
gedreht wird, und den Ka eesatz entfernen.
" drücken, um die Ausgabe zu
" nicht mehr blinkt. Dann den Druck-
Wichtiger Hinweis: Der Filter (23) muss stets
sauber gehalten werden, um ein optimales
Ergebnis zu gewährleisten. Täglich nach Gebrauch reinigen.
7.3 Betrieb mit Ka eepads
• 9 Den Filter für gemahlenen Ka ee (23) aus dem Druck-
lterhalter (21) herausnehmen.
Den Adapter für Ka eepads (24) mit der gewölbten
•
10
Seite nach unten in den Dr uck lterhalter (21) einsetzen.
Danach den Filter für Ka eepads (25) in den Druck l-
•
11
terhalter (21) einsetzen.
Den Ka eepad in den Filter halter einlegen. Sicherste l-
•
12
len, dass das Papier des Ka eepads nicht über den Filterhalter übersteht.
Den Druck lterhalter von unten in die Brühgruppe (4)
•
13
einsetzen.
Den Filterhalter von links nach rechts drehen, bis er
•
14
blockiert.
1 vorgewärmte Tasse entnehmen und unter den
•
15
Filterhalter s tellen. Überprüfen, ob die se korrekt unter den
Ka eeausgabeö nungen steht.
Die Taste (13) " " drücken.
•
17
• Wenn die gewünschte Ka eemenge erreicht wurde,
erneut die Taste (13) "
beenden. Zum Abschluss der Ausgabe einige Sekunden
abwarten, dann die Tasse mit dem Ka ee entnehmen.
Nach Abschluss der Ka eeausgabe abwarten, bis die
•
19
LED Ka ee (14) "
lterhalter herausnehmen, indem er von rechts nach links
gedreht wird, und den verbrauchten Pad entfer nen.
Wichtiger Hinweis: Der Filter (25) und der Adap-
ter (24) müssen stets sauber gehalten werden,
um ein optimales Ergebnis zu gewährleisten. Täglich
nach Gebrauch reinigen.
" drücken, um die Ausgabe zu
" nicht mehr blinkt. Dann den Druck-
Deutsch
Hinweis: Im Druck lterhalter verbleibt eine geringe Men ge Wasser. Dies ist norm al und auf die
Eigenschaften des Filterhalters zurückzuf ühren.
• 33 •
Page 34

8 Auswahl der Ka eesorte Empfehlungen
Im Allgemeinen können alle handelsüblichen Ka eesorten
verwendet werden. Dennoch handelt es sich bei Ka ee um ein
Naturprodukt und sein Geschmack ist je nach Ursprungsland
und Mischung unterschiedlich. Aus diesem Grunde wird empfohlen, verschiedene Sorten zu testen, um die Mischung zu
ermitteln, die den persönlichen Vorlieben am besten gerecht
wird.
Für optimale Ergebnisse empfehlen wir, nur ausdrücklich für
die Zubereitung in Espressomaschinen zusammengestellte
Mischungen zu verwenden. Der Ka ee sollte stets gleichmäßig aus dem Druck lterhalter austreten und dabei keine
Tropfen bilden. Die Geschwindigkeit des Austritts des Ka ees
kann geändert werden, indem der Umfang der Ka eeportion
im Filter leicht variiert und/oder ein Ka ee mit einem anderen
Mahlgrad verwendet wird. Um ein optimales Ergebnis in der
Tasse zu gewährleisten und die Reinigung und Zubereitung zu
erleichtern, emp ehlt Gaggia die Verwendung von Einzelportionen-Ka eepads mit dem Markenzeichen ESE.
BEVOR DAMPF ODER HEISSES WASSER AUSGEGE-
BEN WIRD, MUSS ÜBERPRÜFT WERDEN, OB DIE
DAMPFDÜSE (PANNARELLO) AUF DIE WASSERAUFFANGSCHALE GERICHTET IST.
9 Heißes Wasser
Verbrennungsgefahr! Zu Beginn der Ausgabe
können Spritzer mit heißem Wasser auftreten.
Die Ausgabedüse kann hohe Temperaturen erreichen:
nicht dir ekt mit den Händen berühren.
•
Den Druck lterhalter von unten in die Brühgruppe (4)
13
einsetzen.
Den Druck lterhalter von links na ch rechts drehen, bis
•
14
er blockiert. Den Gri des Druck lterhalters loslassen; der
Gri dreht sich leicht nach links. Diese Bewegung gewährleistet die korrekte Funk tion des Filterhalters.
• Die Taste ON/OFF (11) drücken und die LED (12) "
leuchtet auf. Die LED (16) "
(14) "
" beginnt zu blinken. Abwarten, bis die LED (14)
"
" dauerhaft au euchtet.
Einen Behälter oder ein Teeglas unter die Dampfdüse
•
5
(Pannarello) stellen.
" leuchtet auf und die LED
• Den Drehknopf (3) im Uhrzeigersinn ö nen, die LED 14
"
" wird ausgeschaltet.
Nachdem die gewünschte Menge Heißwasser ausge-
•
6
geben wurde, den Drehknopf (3) schließen, indem er im
Gegenuhrzeigersinn gedreht wird.
• Den Behälter mit dem heißen Wasser entnehmen.
Hinweis: Wird während der Aufheizphase der
Drehknopf Dampf fälschlicherweise geö net,
so blinkt die LED (20)"
und abwar ten, bis die Maschine bereit ist.
Während diesem Vorgang ist es absolut nor-
mal, dass di e Pumpe sich automa tisch ausscha ltet und die LED (20) "
schließen. Abwarten, bis die LED (14) "
au euchtet, bevor der Drehknopf wieder geö net
wird.
". Den Drehknopf schließen
" blinkt. Den Drehknopf wieder
10 Dampf / Cappuccino
Verbrennungsgefahr! Zu Beginn der Ausgabe
können Spritzer mit heißem Wasser auftreten.
Die Ausgabedüse kann hohe Temperaturen erreichen:
nicht dir ekt mit den Händen berühren.
•
Den Druck lterhalter von unten in die Brühgruppe (4)
13
einsetzen.
Den Druck lterhalter von links na ch rechts drehen, bis
•
14
er blockiert. Den Gri des Druck lterhalters loslassen; der
Gri dreht sich leicht nach links. Diese Bewegung gewährleistet die korrekte Funk tion des Filterhalters.
• Die Taste ON/OFF (11) drücken und die LED (12) " "
leuchtet auf. Die LED (16) "
(14) "
" beginnt zu blinken. Abwarten, bis die LED (14)
"
" dauerhaft au euchtet.
Die Taste (17) " " drücken. Die LED (14) " " wird
•
21
ausgeschalte t und die LED (18) "
Hinweis: Wird während der Aufheizphase der
Drehknopf Dampf fälschlicherweise geö net,
so blinkt die LED (20) "
und abwar ten, bis die Maschine bereit ist.
• Abwarten, bis die LED (18) "
"
nun ist die Maschine für die Dampfausgabe bereit.
•
Einen Behälter unter die Dampfdüse stellen.
22
• Den Drehknopf (3) kurz ö nen, um das Restwasser aus der
Dampfdüse (Pannarello) aus ießen zu lassen; nach kurzer
Zeit strömt nur mehr Dampf aus.
•
Den Drehknopf (3) wieder schließen und den Behälter
23
" leuchtet auf und die LED
" beginnt zu blinken.
". Den Drehknopf schließen
" dauerhaft au euchtet;
" dauerhaft
• 34 •
Page 35

entfernen.
• Den Behälter, der für die Cappuccinozubereitung benutzt
werden soll, zu 1/3 mit kalter Milch füllen.
Für ein gutes Ergebnis kalte Milch verwenden.
•
Die Dampfdüse in die Milch tauchen und den Dreh-
24
knopf (3) ö nen, indem er im Uhrzeigersinn gedreht wird.
Die Pumpe wird automatisch gestartet. Das Gefäß mit
langsamen Bewegungen von unten nach oben kreisend
bewegen, um eine gleichmäßige Erhitzung zu gewährleisten.
•
Abschließend den Drehknopf (3) schließen, indem er
25
im Gegenuhrzeigersinn gedreht wird. Die Tasse mit der
aufgeschäumten Milch entnehmen.
• Nach diesem Vorgang die Dampfdüse mit einem feuchten
Tuc h rei nige n.
Auf dieselbe Weise können auch andere Getränke erhitzt werden.
• Um die Dampfentnahme zu beenden, die Taste (17) "
drücken. Die LED (14) "
blinken gleichzeitig. Dies zeigt an, dass die Maschine eine
zu hohe Temperatur für die Ausgabe von Ka ee aufweist.
", (18) " " und (20) " "
10.1 Abkühlung der Maschine
Um die Temperatur abzusenken, ist wie folgt vorzuge-
hen:
Einen Behälter oder ein Teeglas unter die Dampfdüse
•
5
(Pannarello) stellen.
• Den Drehknopf (3) ö nen, indem er im Uhrzeigersinn gedreht wird.
• Wenn die Maschine die korrekte Temperatur erreicht hat,
wird die Pumpe automatisch ausgeschaltet und die LED
" blinkt.
(20) "
Den Drehknopf (3) schließen, indem er im Gegenuhr-
6
zeigersinn gedreht wird, und den Behälter entfernen.
• Vor der Aus gabe von Ka e e muss überprüf t werden, ob die
Maschine bereit ist. Die Maschine ist bereit, wenn die LED
" dauerhaft au euchtet.
(14) "
11 Reinigung
Die Wartung und die Reinigung dürfen nur dann durchgeführt
werden, wenn die Maschine vom Stromnetz abgenommen
wurde und abgekühlt ist.
• Die Maschine darf nicht in Wasser getaucht werden. Teile
der Maschine dürfen nicht in der Spülmaschine gereinigt
werden.
• Für die Reinigung sollten kein Äthylalkohol, Lösungsmit tel
und/oder chemisch aggressive Produkte verwendet werden.
• Es wird empfohlen, den Wassertank täglich zu reinigen
und mit frischem Trinkwasser zu füllen.
•
Die Schleife des Durchlauferhitzers wöchentlich bei
30
ausgeschalteter, kalter und von der Versorgung abgenommener Maschine mit einem feuchten Tuch reinigen.
•
•
"
•
• Für d ie Reinigung des Gerät s ein weiches, leicht mit Wass er
•
• Die Vorrichtung und/oder deren Bestandteile nicht unter
Den äußeren Bereich des Pannarello täglich nach
26 28
dem Erhitze n von Milch abnehmen und mit fr ischem Trinkwasser waschen.
26 27 28
werden. Dazu wie folgt vorgehen:
- Den äußeren Teil des Pannare llo (für die regelmäßige Reinigung) entfernen;
- Den oberen Teil des Pannarello von d er Dampfdüse abziehen;
- Den oberen Bereich des Pannarello mit frischem Trinkwasser reinigen;
- Die Dampfdüse mit einem feuchten Tuch reinigen und
eventuelle Milchrückstände entfernen;
- Den oberen Teil der Dampfd üse wieder anbringen (siche rstellen, dass diese vollständig eingesetz t ist);
29
wieder montieren, und sicherstellen, dass er bis zum
Anschlag eingesteckt wird. Sicherstellen, dass der Kunststo teil korrekt in den Metallteil einges teckt wurde.
31
befeuchtetes Tuch verwenden.
20
vorzugehen:
-
9
mem Wasser waschen.
- Den Adapter (sofern vorhanden) herausnehmen und
sorgfältig mit warmem Wasser reinigen.
- Den Innenbereich des Druck lterhalters reinigen.
Verwendung einer Mikrowelle oder eines herkömmlichen
Backofens trocknen.
Die Dampfdüse muss wöchentlich gereinigt
Nach der Reinigung den äußeren Teil des Pannarello
Die Abtropf schale täglich entleeren und reinigen.
Für die Reinigung des Druck lterhalters ist wie folgt
Den Filter herausnehmen und sorgfältig mit war-
Deutsch
Hinweis: Den Druck lterhalter nicht in der
Spülmaschine reinigen.
• 35 •
Page 36

12 Entkalkung
Kalk ist von Natur aus im Wass er enthalten, das für den Betri eb
der Maschine benutzt wird. Dieser Kalk muss regelmäßig entfernt werden, da er da s Wasser- und Ka eesystem Ihr es Geräts
verstopfen kann.
Bei Ihrer Masch ine Gaggia ist dies nicht seh r schwierig. Die Entkalku ng wird empf ohlen, wenn die LED (19) "
Die Entkalkung ist dann unbedingt erforderlich, wenn die LED
" blinkt.
(19) "
Dieser Vorg ang muss ausgef ührt werden, bevo r
die Maschine bereits nicht mehr störungsfrei
funktioniert, da in diesem Falle die Reparatur nicht
durch die Garantie gedeckt ist.
Den Gaggia-Entkalker verwenden (Abb. B).
Dieser wurde eigens dafür entwickelt, um die
Leistungen und den Betrieb der Maschine für deren
gesamtes Betriebsleben optimal zu erhalten, und, soweit er korrekt verwendet wird, Beeinträchtigungen
des ausgegebenen Produktes zu vermeiden. Bevor
der Entkalkungszyklus gestartet wird, ist folgendes
sicherzustellen: DER WASSERFILTER (wenn verwendet)
WURDE ENTFERNT.
Die Entkalkerlösung und die bis zum Abschluss
des Zyklus ausgegebenen Produkte dürfen keinesfalls getrunken werden. Keinesfalls darf Essig als
Entkalker verwende t werden.
1
2
3
4
5 Den Entkalker für ca. 15-20 Minuten bei ausgeschalteter
6 Die Maschin e durch Druck der Taste ON/OFF (11) " "
Den Druck lterhalter von unten in die Brühgrup-
13 14
pe (4) einsetzen und von links nach rechts drehen, bis er
einrastet.
Den Wassertank abnehmen und leeren.
1
Die HÄLFTE des Inhalts der Flasche mit konzen-
2
triertem Gaggia-Entkalker in den Wassertank des Geräts
einfüllen und den Tank mit frischem Trinkwasser bis zum
Füllstand MAX au üllen.
Die Maschine einschalten, indem die Taste ON/OFF
4
(11) gedrück t wird, und die LED (12) "
Über die Dampfdüse (Pannarello) 2 Tassen mit jeweils
5
ca. 150ml Wasser entnehmen (wie im Kapitel 9 des Handbuchs beschrieben). Dann die Maschine durch Druck der
Taste ON/OFF (11) ausschalten, die LED (12) "
sich aus.
Maschine einwirken lassen.
einschalten.
" au euchtet.
" leuchtet auf.
" schaltet
Über die
5
ca. 150ml Wasser entnehmen (wie im Kapitel 9 des Handbuchs besc hrieben). Nachfolgend die Maschine
der Taste ON/OFF (11) "
raum von 3 Minuten ausgeschaltet lassen.
7 Die unter Punkt 6 beschriebenen Vorgänge bis zur voll-
ständigen Leerung des Wasser tanks wiederholen.
tet und die LED (20 )"
schließen. Abwarten, bis die LED (14) "
au euchtet, bevor der Drehknopf wieder geö net
wird.
8
2
vollständig au üllen.
9 Einen Behälter unter den Filter halter stellen.
10 Die Maschine durch Druck der Taste ON/OFF (11)
schalten. Die Taste
halter den gesamten Inhalt des Tanks entnehmen. Um die
Ausgabe zu beenden, erneut die Taste
11
2
5
se (Pannarello) stellen.
Den Regler für die Wasserausgabe (3) ö nen, indem er im
Uhrzeigersinn gedreht wird und den gesamten Inhalt des
Wassertanks über die Dampfdüse (Pannarello) entnehmen.
12
6
be stoppen, indem der Regler für die Wasserausgabe (3)
durch Drehung im Gegenuhrzeigersinn geschlossen wird.
13 Die Vorgänge a b Punkt (8) für insgesamt 4 Tankfüllungen
wiederholen.
14
19
aus der Brühgruppe herausnehmen und mit frischem Trinkwasser ausspülen.
Der Entkalkungszyklus ist nun abgeschlossen.
Nach Abschlus s dieses Vorgangs die Tasten für di e Ausgabe von
Ka ee und Dampf 3 Sekunden lang gedrück t halten. Auf diese
Weise wird die LED Entkalkung ausgeschaltet.
Den Tank erneut mit frischem Wasser füllen. Soweit erfor-
2
derlich, das Syste m entlüften, wie im Absch n. 4.6 beschrieben.
den im Benut zerland geltenden Vorschriften er folgen.
Dampfdüse (Pannarello)
"
Während diesem Vorgang ist es absolut normal, dass di e Pumpe sich automa tisch ausscha l-
" blinkt. Den Drehknopf wie der
Den Wassertank mit frischem Trinkwasser spülen und
(13) " "
Den Wassert ank erneut mit frisch em Trinkw asser füllen.
Einen großen Behälte r (ca. 1 Liter) unter di e Dampfdü-
Nach Beendigung der Wasserentnahme die Ausga-
Den Filterhalter durch Drehung von rechts nach links
Die Entsorgung der Entkalkerlösung muss gemäß den Vorgaben des Herstellers und/oder
2 Tassen mit jeweils
durch Druc k
ausschalten und f ür einen Zeit-
" dauerhaft
" "
ein-
drücken und über den Filter-
(13) " "
drücken.
• 36 •
Page 37

13 Wasser lter "Intenza+" (optional)
Mit dem Wasser lter “INTENZA+” kann die Wasserqualität
verbessert werden. Der Einsatz des Filters “INTENZA+” begrenzt
die Bildung von Kalk und gewährleistet ein intensiveres Aroma
des Espresso. Daher wird für die Zubereitung eines optimalen Espresso die Installation des Wasser lters “INTENZA +”
empfohlen. Dieser ist beim Händler Ihres Vertrauens, online im
Philips-Shop unter der Adresse http://shop.philips.com oder bei
autorisierten Kundendienstzentren erhältlich.
• 34 Den kleinen weißen Filter aus dem Tank herausneh-
men, an einem trockenen Ort aufbewahren und vor Staub
schützen.
Den Wasser lter “INTENZA+” aus der Verpackung
•
32
nehmen. Den Filter e ntsprechend der Wasserhär te einstellen.
Den Wasser lter “INTENZA+” senkrecht (so dass die
•
33
Ö nung nach oben zeigt) in kaltes Wasser tauchen. Den
Filter leicht an den S eiten zusammendrücken, um die Lu ftblasen zu entfernen.
Den Wasser lter in den lee ren Tank einse tzen. Bis zum
•
35
Einrasten drücken.
• Den Wassertank mit frischem Trinkwasser füllen und wie-
der in die Maschine einsetzen.
Um den Wasser lter "Intenza+" zu aktivieren, ist wie
folgt vorzugehen:
Die Taste ON/OFF (11) drücken und die LED (12) " "
•
4
leuchtet auf. Die LED (16) "
(14) "
" beginnt zu blinken. Abwarten, bis die LED (14)
"
" dauerhaft au euchtet.
Einen Behälter oder ein Teeglas unter die Dampfdüse
•
5
(Pannarello) stellen.
• Den Drehknopf (3) ö nen, indem er im Uhrzeigersinn ge-
dreht wird.
Nach der Entnahme von c a. 1 Liter heißem Wasser den
•
6
Drehknopf (3) schließen, indem er im Gegenuhrzeigersinn
gedreht wird.
• Den Behälter mit dem heißen Wasser leeren.
" leuchtet auf und die LED
14 Entsorgung
Dieses Produkt entspricht der EU-Richtlinie 2002/96/EG
Das Symbol
weist darauf hin, dass das Produkt nicht als normaler Haushaltsabfall zu behandeln ist, sondern an einem Sammelpunkt
für das Recycling von elektrischen und elektronischen Geräten
abgegeben werden muss.
Durch Ihren Beitrag zum korrekten Entsorgen dieses Produkts
schützen Sie die Umwelt und die Gesundheit Ihrer Mitmenschen. Umwelt und Gesundheit werden durch falsches Entsorgen gefährdet.
Weitere Informationen über das Recycling dieses Produkts erhalten Sie von Ihrer Gemeinde, der Müllabfuhr oder dem Geschäft, in dem Sie das Produkt gekauft haben.
auf dem Produkt oder seiner Verpackung
Deutsch
Während di esem Vorgang ist e s absolut norm al,
dass die Pumpe sich automatisch ausschaltet
und die LED (16) blinkt. Den Drehknopf wieder schließen. Abwarten, bis die LED (14) dauerhaft au euchtet,
bevor der Drehknopf wieder geö net wird.
In diesem Falle ist der Filter aktiviert und die Maschine betriebsbereit.
• 37 •
Page 38

Störung Mögliche Ursachen Abhilfe
Die Maschine schaltet sich nicht
ein.
Die Pumpe ist sehr laut. Wasser im Tank fehlt.
Die LED (14) "
und (20) "
zeitig.
Der Ka ee ist zu kalt.
Es bildet sich kein Schaum auf
der Milch.
Die Zubereitu ng des Cappuccinos
gelingt nicht.
Der Ka ee sprudelt zu schnell
heraus, es bildet sich keine Crema.
Der Ka ee läuft nicht oder nur
tropfenweise heraus.
", (18) " "
" blinken gleich-
Die Maschine ist nicht an das Stromnetz
angeschlossen.
Erste Einschaltung Maschine oder die Maschine be ndet sich in Übertemperatur.
Filterhalter zum Vorheizen nicht eingesetzt (Kap. 7).
Tassen kalt. Wärmen Sie die Tassen mit heißem Wasser vor.
Nicht geeignete Milch: Milchpulver, fett-
arme Milch.
Pannarello verschmutzt.
Wasser im Tank fehlt.
Zu wenig Ka ee im Filterhalter. Füllen Sie mehr Ka ee ein (Kap. 7).
Der Mahlgrad ist zu grob. Eine andere Ka eemischung ver wenden (Kap. 8).
Der Ka ee ist alt oder nicht ge eignet. Eine andere Ka eemischung verwenden (K ap. 8).
Alter oder ungeeigneter Ka eepad. Wechseln Sie den verwendeten Ka eepad.
Im Filterhalter fehlt ein Bestand teil.
Wasse r fehlt.
Mahlgrad zu f ein. Eine andere Ka eemischung verwenden (Kap. 8).
Ka ee im Filterhalter zu fest angedrückt. Lockern Sie den gemahlenen Ka ee.
Zu viel Ka ee im Filterhalter. Reduzieren Sie die Ka e emenge im Filterhalter.
Maschine verkalkt. Entkalken Sie die Maschine (Kap. 12).
Filter im Filterhalter verstopft.
Ka eepad nicht ge eignet. Wechseln Sie die Ka eepadsorte.
Die Maschine an das Stromnetz anschließen.
Mit Wasser au üllen und das System entlüften
(Abschn. 4.6).
Sicherstellen, dass der Tank voll und bis zum Anschlag eingesetzt ist. Dann die Temperatur senken, wie im Abschnitt 10.1 beschrieben.
Den Filterhalter vorwärmen.
Verwenden Sie Vollmilch.
Den Pannarello r einigen, wie im Kap. 11 beschrie ben.
Den Wassert ank au üllen und das System entl üften (Abschn. 4.6).
Überprüfen, ob alle Bestandteile vorhanden sind
und korrek t montiert wurden.
Mit Wasser au üllen und das System entlüften
(Abschn. 4.6).
Die Maschine ausschalten und abwarten, bis sie
abkühlt (ca. 1 Stunde). Anschließend den Filterhalter abnehmen und sorgfältig reinigen. Sollte
das Problem ern eut auftreten, die Kunden dienststelle kontaktieren.
• 38 •
Page 39

Störung Mögliche Ursachen Abhilfe
Der Filterhalter wurde nicht korrekt in die
Brühgruppe eingesetzt.
Oberer Rand des Filterhalters verschmutzt.
Der Ka ee läuft über die Ränder.
Pad falsch eingelegt.
Zu viel Ka ee im Filterhalter.
LED (20) "
LED (19) "
Die Pumpe wird während der
Ausgabe von Wasser oder Dampf
ausgeschaltet und die LED (20)
"
Bei Störun gen, die nicht in der o ben aufgefüh rten Tabelle behan delt werden oder i n Fällen, in denen die em pfohlenen Vorgehensweisen das Problem nicht beheben, wenden Sie sich bit te an eine Kundendienststelle.
" ein.
" ein.
" leuchtet.
Drehknopf Wasser (3) o en. Schließen Sie den Drehknopf (3).
Die Entkalkung ausführen. Siehe Kapitel (12).
Sicherheits-Timeout. Drehknopf Wasser schließen.
Setzen Sie den Filterhalter korrekt ein (Kap. 7).
Reinigen Sie den Rand des Filterhalter s.
Legen Sie den Ka eepad richtig ein und achten
Sie darauf, dass er nicht über den Filterhalter
hinausragt.
Reduzieren Sie die Ka eemenge mit einem
Messlö el.
Deutsch
• 39 •
Page 40

IMPORTANT
Lors de l’utilisation d’appareils électriques, il est indispensable de respecter
toujours les précautions de sécurité principales, y compris les suivantes :
1. Lire toutes les instructions.
2. Ne pas toucher de surfaces chaudes. Utiliser les poignées ou les
boutons.
3. Afin d’éviter tout incendie, choc électrique et blessure, ne pas plonger
le cordon, la fiche ou l’appareil dans l’eau ou dans n’importe quel
liquide.
4. Il est nécessaire de contrôler attentivement lorsque l’appareil est utilisé
par des enfants ou à leur proximité.
5. Débrancher de la prise de courant lorsque l’appareil n’est pas en
service et avant son nettoyage. Laisser refroidir l’appareil aussi bien
avant de retirer et de mettre en place ses accessoires qu’avant de le
nettoyer.
6. Ne pas utiliser l’appareil avec un cordon ou une fiche détériorés, après
un mauvais fonctionnement de l’appareil ou son endommagement de
n’importe quelle manière. Renvoyer l’appareil au centre d’assistance
agréé le plus proche pour tout contrôle, réparation et réglage.
7. L’utilisation d’accessoires non recommandés par le constructeur de
l’appareil pourrait engendrer des incendies, des chocs électriques et
des blessures.
8. Ne pas utiliser à l’extérieur.
9. Ne pas laisser les cordons pendre des bords de la table ou du plan de
travail, ni toucher des surfaces chaudes.
10. Ne pas placer près du feu ou sur une cuisinière, électrique et à gaz, ou
dans un four chaud.
11. Toujours brancher le cordon d’alimentation à la machine d’abord et
ensuite à la prise de courant sur le mur. Pour débrancher, éteindre toute
commande en appuyant sur « OFF » et ensuite enlever la fiche de la
prise de courant sur le mur.
12. Ne pas utiliser l’appareil pour toute autre utilisation non prévue.
13. Garder ces instructions.
CONSERVER CES INSTRUCTIONS
• 40 •
Page 41

PRÉCAUTIONS
La machine est réservée à un usage domestique. Tout entretien, en dehors
du nettoyage et de l’entretien usuel par l’usager, doit être fait par un service
après-vente autorisé. Ne pas plonger la base dans l’eau. Pour éviter les
courts-circuits et les décharges électriques, ne pas démonter la base. Elle
ne contient aucune pièce qui demande un entretien de la part de l’usager.
Toute réparation doit être effectuée par le personnel d’un service aprèsvente autorisé.
1. Vérifier si le voltage correspond bien aux spécifications apparaissant
sur la plaque signalétique.
2. Ne jamais mettre de l’eau tiède ou chaude dans le réservoir ; mais
toujours de l’eau froide.
3. Ne pas toucher les surfaces chaudes de l’appareil pendant le
fonctionnement et en écarter le cordon électrique.
4. Ne pas utiliser d’alcool éthylique, de solvants, d’essences, de poudre à
récurer et/ou d’objets abrasifs pour le nettoyage de la machine
5. Utiliser de l’eau purifiée ou en bouteille pour assurer le bon goût du
café. Il sera toutefois nécessaire de procéder au détartrage de votre
machine tous les 2-3 mois.
6. Ne pas utiliser du café au préparation à base de sucre (ex : caramel)
ou mélangé avec toute autre recette.
INSTRUCTIONS SUR LE
Français
CORDON ELECTRIQUE
A. Votre appareil est muni d’un cordon électrique court ou d’un cordon
d’alimentation détachable, afin d’éviter de trébucher ou de s’emmêler
avec un câble plus long.
B. Des cordons détachables plus longs ou bien des rallonges sont
disponibles et ne peuvent être utilisés que si l’on prend toutes les
précautions d’usage.
C. En cas d’utilisation d’un long cordon d‘alimentation détachable ou
d’une rallonge,
1. La tension électrique de fonctionnement marquée sur le cordon
d’alimentation détachable ou sur la rallonge doit être au moins
égale à celle de l’appareil.
2. Si la fiche de l’appareil a une connexion de terre, la rallonge devrait
être une rallonge de terre à 3 fils et
3. La rallonge ne devra pas encombrer le plan de travail ou le dessus
de table, afin d’éviter que les enfants la tirent ou trébuchent
accidentellement.
• 41 •
Page 42

1 Informations générales
Cette machi ne à café est indiquée pou r la préparation d’une ou
de deux tasses de café expresso. Elle est équipée d’une buse
orientable pour la distribution de la vapeur et de l’eau chaude.
Les commandes sur la façade de l’appareil sont marquées par
des symboles faciles à comprendre.
Cette machin e a été conçue pour un usage dome stique et n’est
pas indiquée pour un fonctionnement continu de type professionnel.
Attention. Nous déclinons toute responsabilité
pour les dommages éventuels se produisant en
cas de:
• Usage impropre et non conforme aux utilisations
prévues;
• Réparations non e ectuées auprès des centres
d'assistance agréés;
• Altération du câble d'alimentation;
• Altération de n’importe quel composant de la machine;
• Utilisation de pièces de rechange et d’accessoires
non d’origine;
• Défaut de détartrage et stockage dans un local où
la température est inférieure à 0°C.
Dans tous ces cas, la garantie n'est pas valable.
1.1 Pour faciliter la lecture
Le triangle d’avertissement indique
toutes les instructions à retenir
pour la sécurité de l’utilisateur. Se
conformer scrupuleusement à ces indications pour éviter tout risque de blessu res graves!
2 Données techniques
Le construc teur se réserve le dro it d'apporter des modi cations
aux caractéristiques techniques du produit.
Tension nominale - Puissance nominale - Alimentation
Voir la plaquette située sur l'appareil
Matériau du corps
Plastique pour le modèle SIN 042 GM
Métal pour le mo dèle SIN 042 GP
Dimensions (l x h x p) (mm)
210 x 300 x 280
Poids
SIN 042 GM = 5 kg
SIN 042 GP = 5,8 kg
Longueur du câble
1,3 m
Bandeau de commande
En façade
Porte- ltre
Pressurisé
Pannarello
Spécial pour les cappuccinos
Réservoir à eau
1,25 litres - Amovible
Pression de la pompe
15bars
Chaudière
Acier inoxydable
Dispositif s de sécurité
Coupe-circuit thermique
Les images, les parties de l’appareil, les éléments de commande, etc. sont marqués par des let tres ou des chi res. Dans
ce cas, consulter les images.
Ce symbole met en évidence les informations
à retenir pour une meilleure utilisation de la
machine.
Les images qui correspondent au texte se trouvent
dans les premières pages du manuel. Consulter ces
pages pendant la lec ture du mode d’emploi.
1.2 Utilisation de ce mode d’emploi
Conserver ce mode d'emploi dans un endroit sûr. Joindre le
mode d’emploi à la machine à café au cas où une autre personne devrait l’utiliser.
Pour de plus amples informations ou en cas de problèmes,
s’adresser aux centres d’assistance agréés.
• 42 •
3 Consignes de sécurité
Ne jamais mettre les pa rties sous tension au contact d e
l’eau: danger de court-circuit! La vapeur surchau ée
et l’eau chaude peuvent provoquer des brûlures ! Ne
jamais diriger le jet de vapeur ou d’eau chaude vers
des parties du corps. Toucher la buse de vapeur / eau
chaude en faisant très attention: danger de brûlures!
Utilisation prévue
Cette machine à café est destinée uniquement à un usage domestique. Cet appareil peut être utilisé par les enfant s à partir
de 8 ans et par des personnes ayant de faibles capacités physiques, mentale s ou sensorielles, ou n'ayant aucune ex périence
ou conn aissance, p ourvu qu'i ls soient so us la super vision d'un e
personne responsable et qu'ils aient été formés à utiliser l'appareil en toute séc urité et comprennent les dangers éventuels.
Page 43

Empêcher aux enfants d'utiliser l'appareil pour jouer. Le nettoyage et l'entretien de l'appareil chez l'utilisateur ne doivent
pas être fai ts par des enfants hor s du contrôle d'un adulte.
Alimentation du secteur
Ne brancher la machine à café que sur une prise de courant
appropriée. La tension doit correspondre à celle indiquée sur
la plaquette de l’appareil.
Câble d’alimentation
Ne jamais utiliser la machine à café si le câble d’alimentation
est défectueux. Si le câble d'alimentation est abîmé, il doit
être remplacé par le fabricant ou par son service d'assistance
aux clients. Ne pas faire passer le câble d’alimentation sur des
arêtes vives ou sur des objets très chauds. Le protéger contre
l’huile.
Ne pas transporter ou tirer la machine à café par son câble. Ne
pas retirer la che en la tirant par le câble. Ne pas la toucher
avec les mains mouillées. Éviter que le câble d’alimentation ne
pende librement des tables ou des étagères.
Protection des autres personnes
Garder les enfants sous supervision, pour qu’ils ne jouent pas
avec l’appareil. Les enfants ne se rendent pas compte des
risques liés aux électroménagers. Les matériaux utilisés pour
l'emballage de la machine doivent être gardés hors de la portée des enfant s.
Danger de brûlures
Ne pas diriger le je t d’eau chaude ou de vapeur surchau ée vers
soi et/ou vers d’autres personnes. Ne pas toucher directement
la buse de vapeur; toujours utiliser les poignées ou les boutons.
Ne ja mais ôte r le por te- ltre press urisé p endant la dist ribut ion
du café. Pendant la phase de chau age, des gouttes d’eau
chaude peuvent sortir du groupe de distribution du café. Ne
pas toucher le groupe de distribution quand la machine est
allumée ou avant qu'il soit refroidi.
Emplacement
Ranger la machine à café dans un endroit sûr pour éviter tout
risque de renversement ou de blessures. Risque de fuite d’eau
chaude ou de vapeur surchau ée: danger de brûlures!
Ne pas garder la machine à une température inférieure à 0°C:
le gel pourr ait l'endommager.
Ne pas utiliser la machine à café en plein air. Ne pas poser la
machine sur des surfaces très chaudes ou à proximité d'une
amme nue: le châssis pourrait fondre ou s'abîmer.
Nettoyage
Avant de nettoyer la machine, il faut éteindre la machine
avec le bouton ON/OFF et ôter la che de la prise de courant.
Attendre quelques instants pour que la machine se refroidisse.
Ne jamais plonger la machine dans l’eau!
Il est strictement interdit d’essayer d’intervenir à l’intérieur
de la machine. Ne pas utiliser l’eau qui est restée pendant plusieurs jours dans le réservoir pour un usage alimentaire; laver
le réservoir et le remplir d ’eau fraîche potable.
Espace pour l’utilisation et l’entretien
Pour un fonctionnement correct et e cace de la machine à
café, il est cons eillé de:
• choisir une surface d’appui plane et nivelée;
• choisir un endroit assez bien éclairé, propre et pourvu
d’une prise de courant facilement accessible;
• prévoir une distance minimum des parois de la machine,
comme indiqué à la Fig.A.
Rangement de la machine
Étein dre la mac hine et la débranc her, si elle d oit res ter inuti lisée
pendant une longue période. Ranger la machine dans un lieu sec
et hors de la portée des enfants. La protéger contre la poussière
et les saletés. Ne pas garder la machine au-dessous de 0°C. Le
gel pourrait l’endommager.
Réparations / Entretien
En cas de pannes, de dommages ou de défauts présumés à la
suite d’une chute, débrancher immédiatement la che de la
prise. Ne jamais mettre en marche une machine défectueuse.
Seuls les centres d'assistance agréés peuvent e ectuer des intervention s et des réparations. Nous déclinons toute responsabilité en cas de dommages pour toute opération non e ectuée
dans les règles de l ’art.
En cas d’incendie
En cas d’incendie, utiliser des extincteurs au dioxyde de carbone (CO
). N’utiliser ni d'eau ni d'extinc teurs à poudre.
2
Français
• 43 •
Page 44

Légende des composants de la machine
(page 2)
1 Bandeau de commande
2 Plaque repose tasses
3 Bouton eau-chaude/vapeur
4 Groupe de dis tribution du café
5 Réservoir à eau
6 Bac de récupération de l'eau
7 Grille repose tasses
8 Buse de vapeur (Pannarello)
9 Prise du câble d’alimentation
10 Thermomètre pour la température de l'eau
11 Touche ON/OFF
12 DEL «Machine allumée»
13 Touche «Distr ibution du café»
14 DEL «Température»
15 Touche «Rinçage»
16 DEL «Rinçage»
17 Touche «Vapeur»
18 DEL «Vapeur»
19 DEL «Détartrage»
20 DEL «Alerte»
21 Porte- ltre pressurisé
22 Mesure à café moulu
23 Filtre à café moulu (unique p our 1 ou 2 cafés)
24 Adaptateur du ltre à dosette s de café
25 Filtre à dosettes de café
26 Câble d'alimentation
27 Filtre à eau «Intenza+» (en option)
4 Installation
Pour votre sécurité et celle de tiers, s’en tenir scrupuleusement aux «Consignes de sécurité» indiquées à la
section 3.
4.1 Emballage
L’emballage original a été conçu et réalisé pour protéger la
machine lors de son expédition. Il est conseillé de le garder
pour d’éventuels transports à venir.
4.2 Avertissements d'installation
Ne pas extraire la machine de son emballage
en la prenant par les barres de protection des
tasses.
Avant d’installer la machine, s’en tenir aux consignes de sécurité suivantes:
• placer la machine dans un endroit sûr;
• s’assurer que les enfants n’ont pas la possibilité de jouer
avec la machine;
• ne pas pla cer la machine sur des surfaces t rès chaudes ou à
proximité d’une amme nue.
La machine à café est en n prête pour être branchée sur le
réseau électrique.
Rema rque: il est reco mmandé de laver l es composants avant leur toute première utilisation
et/ou après des périodes d’inactivité.
4.3 Réservoir à eau
• 1 Retirer le réservoir à eau (5).
Le rincer et le remp lir avec de l’eau fraîche potable; ne
•
2
pas dépasser le niveau (MAX) indiqué sur le réservoir.
Ne remplir le réservoir qu’avec de l'eau fraîche
potable non pétillante. L'eau chaude ou tout
autre liquide peuvent endommager le réservoir. Ne jamais mettre la machine en marche si le niveau de l'eau
est en-dessous du MIN: s’assurer que le réservoir à eau
est su samment plein.
• Int roduire le réser voir à eau dans son logement à l'intér ieur
de la machine à café et s'assurer qu'il soit à la butée; son
pro l doit adhérer à celui de la machine à café.
Remarque: le niveau de l'eau peut être contrôlé par la fenêtre sur la partie antérieure du
réservoir.
4.4 Branchement de la machine
Le courant électrique peut être dangereux!
Par conséquent, s'en tenir toujours scrupuleusement aux consignes de sécurité. Ne jamais utiliser
de câbles défectueux ! Les câbles et les ches défectueux doivent être immédiatement remplacés par des
Centres d'Assistance Agréés.
La tension de l’appareil a été préréglée à l'usine. Véri er si la
tension du réseau correspond aux indications gurant sur la
plaquette d'identi cation qui se trouve sur le fond de l’appareil.
•
Brancher la che sur la prise de courant se t rouvant au
3A
dos de la machine à c afé.
Brancher l'autre extrémité de la che sur une prise de
•
3B
courant murale ayant une tension appropriée.
• 44 •
Page 45

4.5 Premier démarrage
Lors du premier démarrage de la machine à café le circuit doit
être amorcé.
Appuyer sur la touche ON/OFF (11): la DEL (12) « »
4
s'allume, alors que les DEL (14) «
«
» cl ignote nt; ce la indi que qu' il fau t amor cer le c ircui t.
Placer un récipient sous la buse de vapeur (Pannarello).
5
Ouvrir le bouton (3) «eau chaude/vapeur» en le tournant
dans le sens des aiguill es d’une montre. La pompe démarr e
automatiquement. Attendre jusqu’à ce que un jet d'eau
régulier sor te de la buse de vapeur (Pannarello).
Fermer le bouton (3) «eau chaude/vap eur» en le tournant
6
dans le sens inverse des aiguilles d'une montre. Enlever le
récipient.
La phase de chau age de la machine ne commence que si
l'amorçage du circuit s'est correctement déroulé.
Remarque: si le bouton est laissé ouvert,
la pompe s'arrête automatiquement après
quelques secondes et la DEL (20) «
», (20) « » et (18)
» clignote.
4.6 Amorçage du circuit
Après avoir épui sé l'eau contenu e dans le réservoir, le circuit de
la machine doit être réamorcé.
Remarque: si la machine a été longtemps utili-
sée sans eau et si les DEL (14) «
et (18) «
nage».
•
• Ouvrir le bouton (3) «eau chaude/vapeur» en le tournant
• Attendre jusqu’à ce que un jet d'eau régulier sorte de la
•
(20) «
la machine soit prê te.
» clignotent, consulter le tableau «Dépan-
Pl ac er u n r éc ip ien t s ou s l a bu se de vap eu r ( Pan na re ll o).
5
dans le sens des aiguill es d’une montre. La pompe démarr e
automatiquement.
buse de vapeur (Pannarello).
Fermer le bouton (3) «eau chaude/vapeur » en le
6
tournant dans le sens inverse des aiguilles d'une montre.
Enlever le récipient.
Remarque: si, pendant la phase de chau age,
le bouton vapeur est ouvert par erreur, la DEL
» clignote. Fermer le bouton et attendre que
», (20) « »
4.7 Première utilisation ou après une période d'inactivité
Cet te si mple o péra tion v ous ga rant it une dist ribut ion o ptima le
et doit être e ectuée
- lors du premier démarrage;
- lorsque la machine reste inactive pendant une longue
période (pendant plus de 2 semaines).
L'eau distribuée doit être vidée dans un réci-
pient de vidange spécial et ne peut pas être
utilisée pour l'alimentation. Si le récipient se remplit,
pendant le cycle, arrêter la distribution et le vider
avant de recommencer l'opération.
A
Rincer le réservoir à eau et le remplir d’eau fraîche
2
potable. Introduire à nouveau le réservoir à eau dans son
logement à l'intér ieur de la machine à café et s'assurer qu'il
soit à la butée; son pro l doit adhérer à celui d e la machine
à café.
B Mettre en marche la machine en appuyant sur la touche
(11). Attendre que la DEL (14) «
Pl ac er u n r éc ip ien t s ou s l a bu se de vap eu r ( Pan na re ll o).
C
5
Ou vr ir l e r obi ne t (3) en l e to ur na nt d ans le s en s de s a igu il les
d’une montre. La pompe démarre automatiquement.
D Distribuer tout le contenu du réservoir à eau depuis la
buse eau chaude/vapeur (Pannarello); pour terminer la
distribution, fermer le robinet (3) en le tournant dans le
sens inverse de s aiguilles d'une montre.
Pendant cette opération il est tout à fait nor-
mal que la pompe s'arrête automatiquement
et que la DEL (20) «
Attendre que la DEL (14) «
réouvrir le bouton.
E
Remplir le rés ervoir à eau avec de l’eau fraîc he potable.
2
Introduire à nouveau le réservoir à eau dans son logement
à l'intérieur de la machine à café et s'assurer qu'il soit à la
butée; son pro l doit adhérer à celui de la machine à café.
F
G
H
À la n, appuyer sur la touche «
I Rép éter les opérations décri tes au point (H) jusqu'à ce que
L
Intr oduire l e porte - l tre par l e bas dans le group e
13 14
de distribution (4) et le tourner de gauche à droite jusqu'à
ce qu'il se bloque.
Placer un récipient approprié sous le porte- ltre.
15
Appuyer sur la touche « » et distribuer une tasse
17
d'eau chaude.
distribution.
toute la quantité d'eau dans le réservoir soit terminée.
Remplir à nouveau le réservoir à eau avec de l’eau
2
fraîche potable.
» clignote. Refermer le bouton.
» s'allume xe.
» s'allume xe avant de
» pour arrêter la
Français
• 45 •
Page 46

M 19 Enlever le porte- ltre du groupe en le tournant de
droite à gauche et le rincer à l'eau fraîc he potable.
La machine est prête; quant aux mécanismes de fonctionnement de la distribution du café et de la vapeur, consulter les
sections correspondantes.
5 Rinçage
Remarque: s'assurer que le porte- ltre soit
introduit, pour obtenir le chau age optimal de
toute la machine.
La machine à caf é a été conçue pour e ectuer un rinçage auto matique du circuit de café avec de l'eau fraîche chaque fois
qu'elle est allumée; ceci garanti t un chau age correc t de toute
la machine et donne au café un arôme meilleur.
Il est conseillé de placer un récipient sous la
buse de distribution.
Cette fonction est activée lors de l'achat de la machine (la DEL
(16) «
» est allumée) et es t exécutée à la n de la phas e de
chau age lorsque la DEL (14) «
Remar que: au ca s où l'eau ne so rt pas du p orte l t r e , e ectuer un rinçage manuel tel que
décrit à la section 7.1.
Le rinçage peu t:
A être interrompu en appuyant sur la touche (15) «
sur la touche (13);
B être désactivé en appuyant sur la touche (15) « »
lorsque la DEL
dans ce cas la DEL (16) «
touche «
(14 ) « »
Remarque : au cas où le rinçage est désactivé,
on ne peut le réactiver qu'en appuyant sur la
».
» s'allume xe.
» ou
clignote ou est allumée xe
» s'éteint.
6 Économie d'énergie
La machine a été conçue pour l'économie d'énergie.
9 minutes après la dernière utilisation, elle s’éteint pour une
économie d'énergie dans le respect total de la nature.
Pour utiliser la machine, appuyer sur la touche ON/OFF (11)
«
».
7 Distribution du café
Attention ! Pendant la distribution du café, il
est interdit d’ôter le porte- ltre pressurisé en
le tournant manuellement de la droite vers la gauche.
Danger de br ûlures.
• Pendant cette opération, la DEL (14) «
fonctionnement doit être considéré comme normal et ne
constitue pas une anomalie.
• Avant d’utiliser la machine, s'assurer que le réser voir à eau
contient une quantité d ’eau su sante.
Remarque: si, pendant la phase de chau age,
le bouton vapeur est ouvert par erreur, la DEL
(20) «
» clignote. Fermer le bouton et attendre que
la machine soit prê te.
Si après avoir appuyé sur la touche (13) « »
la machine NE distribue PAS de café, appuyer à
nouveau sur la touche café (13) «
tableau «Dépannage» avant d'enlever le porte- ltre.
Avant de distribuer du café, véri er que la machine est prête.
La machine es t prête lorsque la DEL (14) «
7.1 Chau age du porte- ltre
Si la fonction de «rinçage» n'est pas activée et/ou si l'on veut
préchau er le porte- ltre en manuel, procéder comme indiqué ci-après:
•
Introduire le porte- ltre pressurisé par le bas dans le
13
groupe de distribution (4).
Tourner le porte- ltre pressurisé de gauche à droite
•
;
14
jusqu’à ce qu’il s e bloque. Laisser la poigné e du porte- ltre
pressurisé; la poignée tourne légèrement vers la gauche.
Ce mouvement garantit le parfait fonctionnement du
porte- ltre.
• 17 Préchau er le porte- ltre pressurisé en appuyant
sur la touche (13): l'eau commence à sortir du porte- ltre
pressurisé (cette opération n’est nécessaire que pour le
premier café).
• Après avoir laissé l'eau s'écouler (50 ml), appuyer à
nouveau sur la touche (13) pour arrêter la distribution.
• 19 Enlever le porte- ltre pressurisé de la machine en le
tournant de droite à gauche et vider l’eau résiduelle.
Il est conseillé de placer un récipient sous la
buse de distribution.
» clignote; ce
» et consulter le
» s'allume xe.
• 46 •
Exécuter maintenant les opérations décrites dans les sections
suivantes pour dis tribuer du café.
Page 47

7.2 Avec du café moulu
• 7 Introduire le ltre (23) dans le porte- ltre pressurisé
(21); lors d e la premiè re utilis ation, le l tre est dé jà inséré.
Grâce au ltre spécial (23) dont la machine est pourvue, il
n’est pas nécessaire de changer de ltre pour obtenir une
ou deux doses de café.
•
Verser 1-1,5 mesures pour un café individuel ou 2
8
mesures pour un café double. Éliminer le café en excès se
trouvant sur le bord du porte- ltre pressurisé.
Remarque: ne pas presser le café car le porte ltre est équipé d'un système déjà optimisé
pour la dis tribution d'un vrai café expresso.
•
Intro duire le po rte- ltre (21) par le ba s dans le gro upe
13
de distribution (4).
Tourner le porte- ltre de gauche à droite jusqu’à ce
•
14
qu’il se bloque.
Prélever 1 ou 2 tasses préchau ées et les placer
•
16
sous le porte- ltre pressurisé. Véri er si elles sont
correctement placées sous les trous de distribution du
café.
• 17 Appuyer sur la touche (13) « ».
Une fois la quantité de café souhaitée atteinte,
•
18
appuyer à nouveau sur la touche (13) «
la distribution du café. La distribution terminée, attendre
quelques secondes; retirer les tasses de c afé.
La distribution de café terminée, attendre que la DEL
•
19
café (14) «
ltre pressurisé en le tournant de la droite vers la gauche
et évacuer le marc de café
mal et n'est dû qu’aux caractéristiques du por te- ltre.
propre. Le laver tous les jours après son utilisation.
» s'arrête de clignoter puis retirer le porte-
Remarque : dans le porte- ltre pressurisé il
reste une petite quantité d’eau; cela est nor-
Re mar qu e im po rt ant e: a n de gar an tir de b on s
résultats, le ltre (23) doit être gardé toujours
» pour arrêter
• 13 Introduire le porte- ltre pressurisé par le bas dans le
groupe de distribution (4).
• 14 Tourner le porte- ltre de gauche à droite jusqu’à ce
qu’il se bloque.
Prélever 1 tasse préchau ée et la placer sous le
•
15
por te- ltr e. Véri er si elle e st cor recte ment p lacée s ous le s
buses de distribution du café.
•
Appuyer sur la touche (13) « ».
17
• Une fois la quantité de café souhaitée atteinte, appuyer
à nouveau sur la touche (13) «
distribution du café. La distribution terminée, attendre
quelques secondes; retirer la tasse de café.
La distribution de café terminée, attendre que la DEL
•
19
café (14) «
ltre pressurisé en le tournant de la droite vers la gauche
et jeter la doset te utilisée.
Remarque importante: a n de garantir de
bons résultats, le ltre (25) et l'adaptateur (24)
doivent être gardés toujours propres. Les laver tous les
jours après leur utilisation.
» s'arrête de clignoter puis retirer le porte-
» pour arrêter la
8 Choix du type de café - Conseils
Généralement, tous les types de café disponibles dans le commerce peuvent être utilisés. Toutefois, le café est un produit
naturel et son goût change en fonction de l’origine et des
mélanges réalisés. Il est donc conseillé d’essayer plusieurs
types de c afé, a n de trouver le mélange qui s’adapte le mieux
à votre goût per sonnel.
Pour des résultats optimaux, il est conseillé d’utiliser des
mélanges spécialement préparés pour les machines à café expresso. Le café devrait toujours sortir régulièrement du porte ltre pressurisé sans qu'il s'égoutte. La vitesse de distribution
du café peut être modi ée en modi ant légèrement la dose
de café dans le ltre et/ou en utilisant un degré de mouture
di érent. Pour obtenir un meilleur résultat et pour faciliter le
nettoyage et la préparation, Gaggia vous conseille d’utiliser
des doset tes unidose marquées ESE.
Français
7.3 Avec du café en dosettes
• 9 Retirer le ltre à café moulu (23) du porte- ltre
pressurisé (21).
Insérer l'adaptateur pour dosettes (24) dans le porte-
•
10
ltre pressurisé (21), la partie bombé e tournée vers le bas.
Ensuite, introduire le ltre pour dosettes (25) dans le
•
11
porte- ltre pressurisé (21).
Introduire la dosette dans le porte- ltre et s’assurer
•
12
que le papier de la dosette ne sort pas du por te- ltre.
AVANT TOUTE OPÉRATION DE DISTRIBUTION DE
VAPEUR OU D’EAU CHAUDE, VÉRIFIER SI LA BUSE
DE VAPEUR (PANNARELLO) EST CORRECTEMENT ORIENTÉE
VERS LE BAC DE RÉCUPÉRATION D’EAU.
• 47 •
Page 48

9 Eau chaude
Danger de brûlures ! Il peut y avoir quelques
éclaboussures d’eau chaude au début de la distribution. La buse de distribution peut atteindre des
températures élevées: éviter tout contact direct avec
les mains.
•
Introduire le porte- ltre pressurisé par le bas dans le
13
groupe de distribution (4).
Tourner le porte- ltre pressurisé de gauche à droite
•
14
jusqu’à ce qu’il s e bloque. Laisser la poigné e du porte- ltre
pressurisé; la poignée tourne légèrement vers la gauche.
Ce mouvement garantit le parfait fonctionnement du
porte- ltre.
• Appuyer sur la touche ON/OFF (11): la DEL (12) « »
s'allum e; la DEL (16) «
commence à clignoter. Attendre que la DEL (14) «
s'allume xe.
Placer un bac ou un verre à thé sous la buse de vapeur
•
5
(Pannarello).
• Ou vrir le bouton (3) en le tournant dans le sens des aiguilles
d’une montre, la DEL 14 «
Une fois que la quanti té d’eau désiré e a été distribuée,
•
6
fer mer le bout on (3) en l e tour nant d ans le sens i nvers e des
aiguilles d’une montre.
• Retirer le récipient contenant l’eau chaude.
» s'all ume et la D EL (14) « »
» s'éteint.
pressurisé; la poignée tourne légèrement vers la gauche.
Ce mouvement garantit le parfait fonctionnement du
porte- ltre.
• Appuyer sur la touche ON/OFF (11): la DEL (12) «
s'allum e; la DEL (16) «
commence à clignoter. Attendre que la DEL (14) «
s'allume xe.
•
Appuyer sur la touche (17) « »; la DEL (14) « »
21
s'éteint et la DEL (18) «
Remarque: si, pendant la phase de chau age,
le bouton vapeur est ouvert par erreur, la DEL
(20) «
» clignote. Fermer le bouton et attendre que
la machine soit prê te.
• Attendre jusqu’à ce que la DEL (18) «
»
manière xe. La machine est prête pour la distribution de
la vapeur.
Placer un récipient sous la buse de vapeur.
•
22
• Ouvrir le bouton (3) pendant quelques instants pour faire
écouler l’eau résiduelle de la buse de vapeur (Pannarello);
seule de la vapeur commence à sortir au bout de quelques
secondes.
•
Fermer le bouton (3) et retirer le récipient.
23
• Remplir 1/3 du récipient servant à préparer le cappuccino
avec du lait froid.
» s'all ume et la D EL (14) « »
» commence à clignoter.
»
»
» s'allume de
Remarque: si, pendant la phase de chau age,
le bouton vapeur est ouvert par erreur, la DEL
(20) «
» clignote. Fermer le bouton et attendre que
la machine soit prê te.
Pendant cette opération il est tout à fait nor-
mal que la pompe s'arrête automatiquement
et que la DEL (20) «
Attendre que la DEL (14) «
réouvrir le bouton.
» clignote. Refermer le bouton.
» s'allume xe avant de
10 Vapeur / Cappuccino
Danger de brûlures ! Il peut y avoir quelques
éclaboussures d’eau chaude au début de la distribution. La buse de distribution peut atteindre des
températures élevées: éviter tout contact direct avec
les mains.
•
Introduire le porte- ltre pressurisé par le bas dans le
13
groupe de distribution (4).
Tourner le porte- ltre pressurisé de gauche à droite
•
14
jusqu’à ce qu’il s e bloque. Laisser la poigné e du porte- ltre
• 48 •
Pour obtenir de meilleurs résultats, utiliser du
lait froid.
•
Plonger la buse de vapeur dans le lait et ouvrir le
24
bouton (3) en le tournant dans le sens des aiguilles d'une
montre ; la pompe démarre automatiquement. Tourner
lentement le récipient contenant le lait, du bas vers le
haut, pour rendre uniforme le chau age.
• 25 Une f ois ce p rocéd é term iné, fe rmer l e bouto n (3) en le
tournant dans le sens inverse des aiguilles d'une montre.
Prélever la tasse ave c le lait émulsionné.
• Il faut ensuite nettoyer la buse de vapeur avec un chi on
humide.
Procéder de la même façon pour réchau er
d'autres boissons.
• Si on veut terminer d'utiliser la vapeur, appuyer sur la
touche (17) «
(20) «
la machine a atteint une température trop élevée pour
distribuer du café.
»; les DEL (14) « », (18) « » et
» clignotent simultanément. Ceci signi e que
Page 49

10.1 Refroidissement de la machine
Pour diminuer la température, procéder de la façon
suivante:
• 5 Placer un bac ou un verre à thé sous la buse de vapeur
(Pannarello).
• Ou vrir le bouton (3) en le tournant dans le sens des aiguilles
d’une montre.
• Lorsque la machine atteint la température correcte, la
pompe s'arrête automatiquement et la DEL (20) «
clignote.
Fermer le bouton (3) en le tournant dans le sens
6
inverse des aiguilles d'une montre et retirer le récipient.
• Avant de distribuer du café, véri er que la machine est
prête. La machine est prête lorsque la DEL (14) «
s'allume xe.
»
»
• 31 Vider et laver tous les jours le bac d'égouttement.
• Pour nettoyer l’appareil, utiliser un chi on doux
légèrement imbibé d’eau.
Pour nettoyer le porte- ltre pressurisé, procéder
•
20
comme suit:
- 9 retirer le ltre, le laver soig neusement à l’eau chaude.
- retirer l’adaptateur (s’il est présent) et le laver
soigneusement à l’eau chaude.
- laver la partie intérieure du porte- ltre pressurisé.
• Ne pas faire sécher la machine et/ou ses composants dans
un four à micro -ondes et/ou dans un four traditionnel.
Remarque: ne pas mettre le porte- ltre pressurisé au l ave-vaisselle.
Français
11 Nettoyage
L’entretien et le nettoyage ne peuvent être e ectués que si la
machine est f roide et débranchée du réseau élect rique.
• Ne pas plonger la machine dans l’eau. Ne pas laver ses
composants au lave-vaisselle.
• Ne pas utiliser d’alcool éthylique, de solvants ni d’agents
chimiques agressifs.
• Il est recommandé de nettoyer quotidiennement le
réservoir à eau et de le remplir avec de l'eau fraîche.
Toutes les semaines nettoyer avec un chi on humide
•
30
l'anneau de la chaudière lorsque la machine est éteinte,
froide et débranchée.
•
•
Tous les jours, après avoir réchau é le lait,
26 28
démonter la partie extérieure du Pannarello et la laver
avec de l’eau fraîche potable.
26 27 28
vapeur. Pour ce faire, il f aut:
- enlever la partie extérieure du Pannarello (pour le
nettoyage normal);
- retirer la partie supérieure du Pannarello de la buse de
vapeur;
- laver la partie supérieure du Pannarello avec de l'eau
fraîche potable;
- laver la buse de vapeur avec un chi on humide et enlever
tout éventuel résidu de lait;
- replacer la partie supérieure dans la buse de vapeur
(véri er qu’elle est insérée complètement);
29
extérieure du Pannarello en s'assurant qu'elle est
introduite jusqu'à la butée. S'assurer que la partie en
plastique est correctement insérée dans la partie en
métal.
Une fois par semaine, nettoyer la buse de
Après le nettoyage monter à nouveau la partie
12 Détartrage
Le calcaire est naturellement présent dans l'eau utilisée pour
le fonctionnement de la machine. Il doit être enlevé régulièrement car il peut boucher le circuit de l'eau et du café de votre
appareil.
Avec votre machine Gaggia ce processus est vraiment simple.
Le détartrage est conseillé lorsque la DEL (19) «
Le détartrage est obligatoire lorsque la DEL (19) «
gnote.
E ectuer cette opération avant que la machine
ne fonctionne plus car dans ce cas-là la répara-
tion n'est pas couverte par la garantie.
Utiliser le produit détartrant Gaggia (Fig.B). Ce
produit a été spécialement conçu pour assurer,
si utilisé correctement, la meilleure performance et
fonctionnalité de l'appareil pendant toute sa vie opérationnelle et pour éviter toute altération du produit
distribué. Avant de commencer le cycle de détartrage,
véri er: QUE LE FILTRE À EAU, si utilisé, A ÉTÉ ENLEVÉ.
Ne pas boire la solution détartrante et les
produits distribués jusqu'à la conclusion du
cycle. Ne jamais utiliser de vinaigre pour détartrer la
machine.
1
2
Introduire le porte- ltre pressurisé par le bas
13 14
dans l e groupe d e distr ibution (4) e t le tourn er de gauc he à
droite jusqu'à ce qu'il se bloque.
Enlever et vider le réservoir à eau.
1
» s'allume.
» cli-
• 49 •
Page 50

3 2 Verser la MOITIÉ du contenu de la bouteille de
détartrant concentré Gaggia dans le réservoir à eau
de l'appareil et le remplir avec de l’eau fraîche potable
jusqu'au niveau MAX indiqué.
4
Allumer la machine en appuyant sur la touche ON/OFF
4
(11); la DEL (12) «
Prélever (comme il est décrit à la section 9 du mode
5
d'emploi) 2 tasses d'eau (à peu près 150 ml chacune) de
la buse de vapeur (Pannarello). Arrêter ensuite la machine
en appuyant sur la touche ON/OFF (11): la DEL (12) «
s'éteint.
5 La machine arrêtée, attendre 15 à 20 minutes pour que le
détart rant fasse son e et.
6 Allumer la machine, en appuyant sur la touche ON/
OFF (11) «
Prélever (comme indiqué à la section 9 du mode
5
d'emploi) 2 tasses d'eau
buse de vapeur (Pannarello). Arrêter ensuite la machine
appuyant sur la touche ON/OFF (11) «
ainsi pendant 3 minutes.
7 Répéter les opérations décrites au point 6 jusqu'à vider
complètement le réservoir à eau.
Pendant cette opération il est tout à fait nor-
mal que la pompe s'arrête automatiquement
et que la DEL (20) «
Attendre que la DEL (14) «
réouvrir le bouton.
8
Rincer le réservoir à eau avec de l’eau fraîche potable
2
et le remplir complètement.
9 Placer un récipient sous le porte - ltre.
10 Allumer la machine en appuyant sur la touche ON/OFF (11)
« »
; appuyer sur la touche
le contenu du réservoir par le porte- ltre. Pour arrêter la
distribution, appuyer à nouveau sur la touche
11
2
Remplir à nouveau le réservoir à eau avec de l’eau
fraîche.
Placer un grand récipient (1 litre environ) sous la buse
5
de vapeur (Pannarello).
Ouvrir le robinet de distribution de l'eau (3) en le tournant
dans le sens des aiguilles d'une montre et prélever
tout le contenu du réservoir à eau par la buse de vapeur
(Pannarello).
Une fois l'eau prélevée, pour arrêter la distribution
12
6
fermer le robinet de distribution d'eau (3) en le tournant
dans le sens inverse des aiguilles d'une montre.
13 Répéter encore une fois les opérations du point (8) pour
un total de 4 réser voirs.
» s'allume.
».
(à peu près 150 ml chacune)
» clignote. Refermer le bouton.
» s'allume xe avant de
(13) « »
et prélever tout
»
et la garder
(13) « »
de la
en
.
14
19
Enlever le porte- ltre du groupe en le tournant de
droite à gauche et le rincer à l'eau fraîche potable.
Le cycle de dét artrage est ainsi terminé.
Cette opération terminée, appuyer pendant 3 secondes sur les
touches de distribution du café et de la vapeur, de cette façon
la DEL détartrage s'éteint.
Remplir à nouveau l e réservoir avec de l’eau fraîc he. Le cas
2
»
échéant, réamorcer le circuit comme indiqué à la sec tion 4.6.
La solution détartrante doit être éliminée
conformément à ce qui est prévu par le fabricant et/ou par les normes en vigueur dans le Pays où la
machine est utilisée.
13 Filtre «Intenza+» (en option)
Le ltre à eau «INTENZA+» peut améliorer la qualité de l'eau.
L’utilisation du ltre «INTENZA+ limitera la formation
de calcaire et garantira un arôme plus intense à votre café
expresso. Pour mieux savourer votre café expresso, il est
recommandé d'installer le ltre à eau «INTENZA +, pouvant
être acheté chez votre revendeur habituel, dans le magasin en
ligne Philips à l'adresse http://shop.philips.com ou bien auprès
des centres d'assistance agréés.
• 34 Enlever le petit ltre blanc à l’intérieur du réservoir,
le conserver dans un endroit sec et le protéger contre la
poussière.
Enlever le ltre à eau «INTENZA+ » de son emballage.
•
32
Régler le ltre en fonction de la dureté de l'eau.
Plonger le ltre à eau «INTENZA+ » verticalement
•
33
dans l'eau froide (l'ouverture vers le haut) et pousser le
ltre délicatement sur les bords pour faire sortir toute
bulle d'air.
Introduire le ltre dans le réservoir vide. Appuyer
•
35
jusqu'au point d'arrêt.
• Rem plir le réservoir à eau ave c de l’eau fraîche potable et le
réintroduire dans la machine.
Pour activer le ltre « Intenza+ », procéder comme
suit:
Appuy er sur la touc he ON/OFF (11): la DEL (12) « »
•
4
s'allum e; la DEL (16) «
commence à clignoter. Attendre que la DEL (14) «
s'allume xe.
Placer un bac ou un verre à thé sous la buse de vapeur
•
5
(Pannarello).
» s'all ume et la D EL (14) « »
»
• 50 •
Page 51

• Ou vrir le bouton (3) en le tournant dans le sens des aiguilles
d’une montre.
Lorsque 1 litre d'eau chaude environ a été prélevé,
•
6
fer mer le bout on (3) en l e tour nant d ans le sens i nvers e des
aiguilles d’une montre.
• Vider le récipient contenant l ’eau chaude.
Pendant cette opération il est tout à fait nor-
mal que la po mpe s'arrête automat iquement et
que la DEL (16) clignote. Refermer le bouton. Attendre
que la DEL (14) s'allume xe avant de réou vrir le bouton.
Maintenant le ltre est activé et la machine est prê te pour être
utilisée.
14 Élimination
L’ appareil est conçu et fabriqué pour faciliter sa valorisation,
son recyclage ou sa réutilisation conformément à la directive
européenne 2002/96/CEE relative aux appareils électriques et
électroniques usagés (waste electrical and electronic equipment - WEEE).
Français
Le logo
ci-contre apposé sur l’appareil indique que ce
produit ne peut pas être éliminé avec les déchets ménagers non
triés.
Lorsque vous aurez décidé de vous en séparer dé nitivement, il
convient de faire procéder à la collecte sélective de cet appareil
en vous conformant au mode de reprise mis en place dans votre
commune (collecte ponctuelle des encombrants, déchèterie),
ou en faisant appel au service de reprise proposé par votre distributeur, ou bien, en le con ant à des organisations caritatives
et des associations à but non lucratif.
En vous assurant que ce produit est éliminé correctement, vous
favorisez la prévention des conséquences négatives pour l’environnement et la santé humaine.
• 51 •
Page 52

Panne Causes possibles Solution
La machine ne se met pas en
marche.
La pompe est très bruyante. Manque d’eau dans le réservoir. Remplir d'eau et amorcer le circuit (sec tion 4.6).
Les DEL (14) «
et (20) «
tanément.
Le café est trop froid.
La mousse du lait ne se forme
pas.
Il n’est pas possible de préparer
du cappuccino.
Le café coule trop rapidement, la
crème ne se forme pas.
Le café ne coule pas ou bien il
coule goutte à goutte.
Le café coule des bords.
», (18) « »
» clignotent simul-
La machine n'est pas branchée sur le
réseau électrique.
Premier démarrage de la machine ou la
température de la machine est trop élevée.
Le p orte - ltre n ’est p as ins éré po ur le p réchau age (section 7).
Les tasses sont froides. Préchau er les tasses avec de l'eau chaude.
Lait inapproprié : lait en poudre, lait
écrémé.
Pannarello sale.
Manque d’eau dans le réser voir. Remplir d'eau et amorcer le circuit (section 4.6).
Pas assez de café dans le porte- ltre. Ajouter du café (section7).
Mouture trop grossière. Changer de mélange (section 8).
Café non frais ou inapproprié. Changer de mélange (section 8).
La dosette est vieille ou inappropriée. Changer de dosette.
Un composant dans le porte- ltre fait
défaut.
Eau insu sante. Remplir d'eau et amorcer le circuit (sec tion 4.6).
Mouture trop ne. Changer de mélange (section 8).
Café pressé dans le porte- ltre. Remuer le café moulu.
Trop de café dans le porte- ltre. Réduire la quantité de caf é dans le porte- ltre.
Machine entartrée. Détartrer la machine (section 12).
Le ltre dans le porte- ltre est bouché.
La dosette est inappropriée. Changer de type de dosette.
Porte- ltre mal inséré dans le groupe de
distribu tion du café.
Bord supérieur du porte- ltre encrassé. Nettoyer le bord du por te- ltre.
Dosette introduite de manière incorrecte.
Trop de café dans le porte- ltre. Réduire la quantité de café à l’aide de la mesure.
Brancher la machine sur le réseau élec trique.
S'assurer que le réservoir est plein et est inséré
jusqu'à la butée et bais ser la température comme
décrit à la se ction 10.1.
Préchau er le porte- lt re.
Utiliser du lait entier.
Nettoyer le Pannarello comme indiqué à la section 11.
Véri er si tous les composants sont présents et
montés correctement.
Éteindre la machine et attendre qu'elle se refroidisse (1 heure environ). Ensuite enlever et bien
laver le porte- ltre. Si le problème se représente
contacter le centre d'assistance.
Insérer correc tement le porte- ltre (section 7).
Introduire correctement la dosette de manière
qu'elle ne sorte pas du porte- ltre.
• 52 •
Page 53

Panne Causes possibles Solution
DEL (20) « » allumée.
DEL (19) «
La pompe s'éteint pendant la
distribution d'eau ou de vapeur
et la DEL (20) «
Pour toute panne non détaillée dans le tableau ci-dessus ou en cas de solutions insu santes à résoudre le problème, s'adresser à un centre d'assistance agréé.
» allumée.
» s'allume.
Bouton de l'eau (3) ouvert. Fermer le bou ton (3).
E ectuer un cycle de détartrage. Consulter la section (12).
Temporisation de sécurité. Fermer le bouton de l'eau.
Français
• 53 •
Page 54

1 Información de carácter general
Esta máquina de café está indicada para la preparación de 1 o
2 tazas de café exprés y dispone de un tubo orientable para el
suministro de vapor y de agua caliente. Los mandos situados
en la parte delantera del aparato llevan símbolos de fácil interpretación.
La máquina ha sido diseñada para uso doméstico y no está indicada para un funcionamiento continuo de tipo profesional.
Atención. Se declina toda responsabilidad por
posibles daños en caso de:
• Uso indebido o no confor me a los nes previstos;
• Reparaciones realizadas en centros de asistencia
técnica no autorizados;
• Alteración del cable de alimentac ión;
• Alteración de cualquier componente de la máquina;
• Utilizac ión de repuestos y accesorios no originales;
• Descalci cación de la máquina no realizada y alma-
cenamiento en locales con temperatura por debajo
de 0°C.
En dichos c asos la garantía pierde su validez.
1.1 Para facilitar la lectura
El triángulo de advertencia señala
todas aquellas instrucciones impor-
tantes para la seguridad del usuario. ¡Respetar escrupulosamente dichas indicaciones
para evitar heridas graves!
La referenc ia a ilustraciones, par tes del aparato, elementos del
panel de mandos, etc. está indicada con números o letras; en
dichos casos, consultar la ilus tración correspondiente.
2 Datos técnicos
El fabricante se reserva el derecho a modi car las características técnic as del producto.
Tensión nominal - Potencia nominal - Alimentación
Véase placa en el aparato
Estruc tura exterior
Plástico modelo SIN 042 GM
Metal modelo SIN 0 42 GP
Dimensiones (l x a x p) (mm)
210 x 300 x 280
Peso
SIN 042 GM = 5 kg
SIN 042 GP = 5,8 kg
Longitud del cable
1,3 m
Panel de mandos
En la parte delantera
Porta ltro
Presurizado
Pannarello
Especial para capuchinos
Depósito de agua
1,25 litros - Extraíble
Presión de la bomba
15 ba r
Caldera
Acero inoxidable
Dispositivos de seguridad
Ter mof us ibl e
Este símbolo señala la información que debe
considerarse más relevante para garantizar el
uso correcto de la máquina.
Las ilustraciones a las que se hace referencia en el texto se encuentran en las primeras páginas del manual.
Consultar dichas páginas durante la lectura de las instrucciones de uso.
1.2 Cómo utilizar estas instrucciones de
uso
Guardar estas instrucci ones de uso en un lugar seguro y adjuntarlas a la máquina de café en caso de que otra persona vaya
a utilizarla.
Para más información o en caso de problemas, dirigirse a los
centros de asistencia autorizados.
• 54 •
3 Normas de seguridad
No dejar nunca que las partes bajo tensión entren en
contacto con el agua: ¡riesgo de cor tocircuito! ¡El vapor
recalentado y el agua caliente pueden causar quemaduras! No dirigir nunc a el chorro de vapor o de agua caliente hacia partes del cuerpo; manipular con cuidado
la boquilla de salida de vapor / agua caliente: ¡peligro
de quemaduras!
Uso previsto
Esta máquina de café ha sido diseñada exclusivamente para
uso doméstico. Este aparato puede ser utilizado por niños de
edad superior a 8 años y por personas con capacidades físicas,
sensoriales o mentales reducidas o con falta de experiencia y
conocimiento siempre que estén supervisadas o hayan sido
Page 55

instruida s en el uso del aparato de forma seg ura y comprendan
los peligros existentes. Los niños no deben jugar con el aparato. La limpieza y el mantenimiento a cargo del usuario no
deben ser llevados a cabo por niños sin vigilancia.
Alimentación de corriente
Conectar la máquina de café sólo a una toma de corriente adecuada. La tensión debe corresponderse con la indicada en la
placa de datos del aparato.
Cable de alimentación
No usar nunca la máquina de café si el cable de alimentación
está defectuoso. Si el cable de alimentación está dañado, solici tar a l fab ric ant e o al s er vici o de a sis tenc ia al cli ente la su sti tución del mismo. Procurar que el cable de alimentación no pase
por esquinas o cantos agudos ni por encima de objetos muy
calientes. Protegerlo del aceite.
No transpor tar ni tirar de la máquina de caf é sosteniéndola por
el cable. No desenchufar la máquina tirando del cable ni tocar
el enchufe con las manos mojadas. Procurar que el cable de
alimentación no cuelgue libremente de mesas o estanterías.
Protección de terceras personas
Mantener la máquin a fuera del alcance de los niños para evita r
que jueguen con ella. Lo s niños no se dan cuenta de los peligr os
relacionados con el uso indebido de un electrodoméstico. No
dejar al alcance de los niños los materiales usados para embalar la máquina.
Riesgo de quemaduras
No dir igir con tra uno m ismo ni con tra terc eras per sonas el chorro de vapor recalentado y/o de agua caliente. No tocar directamente el tubo de vapor; usar siempre las empuñaduras o los
mandos correspondientes.
No quitar nunca el porta ltro presurizado durante el suministro de café. Durante la fase de calentamiento, pueden salir
algunas gotas de agua caliente por el grupo de café. No tocar
el grupo de café con la máquina encendida o antes de que se
haya enfriado.
Colocación
Colocar la máquina de café en un lugar seguro, donde nadie
puede volcarla o resultar herido. Podría salir agua caliente o
vapor recalentado: ¡riesgo de quemaduras!
No colocar la máquina en un lugar con temperatura inferior a
0°C; las bajas temperaturas pueden dañar la máquina.
No usar la máquina de café al aire libre. No poner la máquina
sobre super cies muy calien tes ni cerca de llamas abierta s a n
de evitar que su car rocería se derrita o resulte dañada.
Limpieza
Antes de limpiar la máquina, apagarla mediante el botón ON/
OFF y, a continuación, desconectar el enchufe de la toma de
corriente. Esperar a que la máquina se enfríe.
¡No sumergir nunca la máquina en agua!
Se prohíbe terminantemente tratar de intervenir en el interior
de la máquina. No utilizar el agua que haya permanecido en
el depósito durante varios días para uso alimentario; lavar el
depósito y volver a llenarlo con agua fresca potable.
Área destinada al uso y el mantenimiento
Para un cor recto y buen fu ncionamiento de la má quina de café
se recomienda lo siguiente:
• Elegir una super cie de apoyo bien nivelada;
• Elegir un lugar su cientemente iluminado e higiénico. La
toma de corriente debe ser de fácil acceso;
• Dejar una distancia mínima entre la máquina y la pared tal
como se muestra en la gura - Fig. A.
Almacenaje de la máquina
En caso de que la máquina vaya a permanecer durante un largo
período sin utilizarse, apagarla y desconectar el enchufe de la
toma de corriente. Guardar la máquina en un lugar seco y fuera
del alcance de los niños. Protegerla del polvo y de la suciedad.
No someter la máquina a temperaturas inferiores a 0°C; el hielo
puede dañarla.
Reparaciones / Mantenimiento
En caso de averías, desperfectos o sospecha de desperfectos
tras una caída, desconectar enseguida la máquina de la toma
de corriente. No poner nunca en funcionamiento la máquina
si está defectuosa. Sólo los Centros de Asistencia Autorizados
pueden realizar reparaciones a la máquina. En caso de reparaciones realizadas de forma incorrecta, se declina toda responsabilidad por posibles daños.
Antiincendio
En caso de incendio usar extintores de anhídrido carbónico
(CO
). No usar agua ni ex tintores de polvo.
2
Español
• 55 •
Page 56

Componentes de la máquina (pág. 2)
1 Panel de mandos
2 Super cie apoyatazas
3 Mando de agua caliente/vapor
4 Grupo de café
5 Depósito de agua
6 Bandeja de goteo
7 Rejilla apoyatazas
8 Tubo de vapor (Pannarello)
9 Toma para el cable de alimentación
10 Termómetro de temperatura del agua
11 Botón ON/OFF
12 Piloto luminoso "Máquina encendida"
13 Botón "Suministro de café"
14 Piloto luminoso "Temperatura"
15 Botón "Enjuague"
16 Piloto luminoso "Enjuague"
17 Botón "Vapor"
18 Piloto luminoso "Vapor"
19 Piloto luminoso "Descalci cación"
20 Piloto luminoso "Alarma"
21 Porta ltro presurizado
22 Cuchara dosi cadora para café molido
23 Filtro para café molido (el mismo para 1 o 2 cafés)
24 Adaptador de ltro para pas tillas de café
25 Filtro para pastillas de café
26 Cable de alimentac ión
27 Filtro de agua "Intenz a+" (opcional)
4 Instalación
Por su segur idad y la de los demás, a tenerse escr upulosamente a las "Normas de s eguridad" desc ritas en el cap. 3.
4.1 Embalaje
El emb alaje or iginal h a sido dis eñado y re alizad o para pr oteger
la máquina durante el transporte. Se aconseja guardarlo para
posibles transportes futuros.
4.2 Advertencias para la instalación
No sacar la máquina del embalaje agarrándola
por las barandas de protección de las tazas.
Antes de instalar la máquina, atenerse a las siguientes indicaciones de seguridad:
• colocar la máquina en un lugar seguro;
• asegurarse de que los niños no tengan la posibilidad de
jugar con la máquina;
• no apoyar la máquina sobre super cies muy calientes ni
cerca de llamas abier tas.
Ya se puede conectar la máquina de café a la red eléct rica.
Nota: se aconseja lavar los componentes antes
de utilizarlos por primera vez y/o tras un perío-
do sin haberlos utilizado.
4.3 Depósito de agua
• 1 Extraer el depósito de agua (5).
Enjuagarlo y llenarlo con ag ua fresca potable sin supe -
•
2
rar el nivel máximo (MAX) indic ado en el depósito.
Introducir siempre en el depósito sólo agua
potable fresca sin gas. El agua caliente y otros
líquidos pueden dañar el depósito. No poner en funcionamiento la máquina si el nivel de agua se encuentra
por debajo de la indicación MIN: asegurarse de que
haya su ciente agua en el depósito de agua.
• Introducir el depósito de agua en su alojamiento de la
máquina de café asegurándose de que quede introducido
hasta el tope; el per l debe quedar a ras del de la máquina
de café.
Nota: el nivel de agua puede visualizarse a través de la mirilla ubicada en la parte frontal del
depósito.
4.4 Conexión de la máquina
¡La corriente eléctrica puede ser peligrosa! Por
consiguiente, respetar siempre escrupulosa-
mente las normas de seguridad. ¡No usar nunca el cable si está dañado! En caso de que el cable o el enchufe
estén defectuosos, contactar inmediatamente con un
Centro de Asistencia Autorizado para su sustitución.
La tensión del aparato ha sido determinada en fábrica. Comprobar que la tensión de red se corresponda con los valores indicados en la pla ca de identi c ación situada en la parte tr asera
del aparato.
•
Introducir la clavija en la toma de corriente situada en
3A
la parte pos terior de la máquina de café.
Conectar el enchufe del otro extremo del cable a una
•
3B
toma de corriente de pared de tensión adecuada.
• 56 •
Page 57

4.5 Primera puesta en marcha
Durante la prim era puesta en marcha de la máqui na de café, se
debe cargar el circuito.
Pulsar el botón ON/OFF (11); el piloto luminoso (12) " "
4
se enciende; los pilotos luminosos (14) "
y (18) "
debe cargar el circuito.
Colocar un rec ipiente bajo el tubo de vapor (Pannarello).
5
Abrir el mando (3) "agua caliente/vapor" girándolo en el
sentido de las agujas del reloj. La bomba se activará automáticamente. Esperar a que salga un chorro de agua
regular por el tubo de vapor (Pannarello).
Cerrar el mando (3) "agua caliente/vapor" girándolo en el
6
sentido contr ario a las agujas del reloj. Reti rar el recipiente.
Sólo después de haber realizado correctamente la carga del
circuito, la máquina comenzará la fase de calentamiento.
automática y el piloto luminoso (20) "
parpadear.
" comienzan a parpadear, lo que indica que se
Nota: si se deja el mando abierto, tras unos
segundos la bomba se desactiva de forma
", (20) " "
" comienza a
4.6 Carga del circuito
Una vez que se haya agota do el agua del depósito, se debe volver a cargar el circuito de la máquina.
Nota: si la máquina ha funcionado durante
mucho tiempo sin agua y los pilotos luminosos
(14) "
", ( 20) " " y (18) " " parpadean, consultar la
tabla "Resolución de problemas".
•
Colocar un recipiente bajo el tubo de vapor (Pannare-
5
llo).
• Abrir el mando (3) "agua caliente/vapor" girándolo en el
sentido de las agujas del reloj. La bomba se activará automáticamente.
• Esperar a que salga un chorro de agua regular por el tubo
de vapor (Pannarello).
Cerrar el mando (3) "agua caliente/vapor" girándolo
•
6
en el sentido contrario a las agujas del reloj. Retirar el recipiente.
Nota: si durante la fase de calentamiento se
abriera por error el mando de vapor, el piloto
luminoso (20) "
perar a que la máquina esté lista.
" parpadeará. Cerrar el mando y es-
4.7 Al utilizar por primera vez o tras un período sin utilizar
Esta sencilla operación garantiza un suministro óptimo y debe
realizarse:
- al poner en marcha la máquina por primera vez;
- cuando la máqu ina haya permanecido un largo pe ríodo sin
utilizarse (más de 2 semanas).
El agua suministrada debe verterse en un desa-
güe apropiado y no puede utilizarse con nes
alimentarios. Si durante el ciclo el recipiente se llena,
detener el suministro y vaciarlo antes de seguir con la
operación.
A
Enjuagar el depósito de agua y llenarlo con agua fres-
2
ca potable. Volver a introducir el depósito de agua en su
alojamiento de la máquina de café asegurándose de que
quede introd ucido hasta el tope; el per l debe quedar a ra s
del de la máquina de c afé.
B Encender la máquina pulsando el botón (11). Esperar a que
el piloto luminoso (14) "
Colocar un recipiente bajo el tubo de vapor (Pannare-
C
5
llo).
Abr ir el mando (3) girándolo en el sentido de las agujas del
reloj. La bomba se activará automáticamente.
D Suministrar todo el contenido del depósito de agua a
través del tubo de vapor/agua caliente (Pannarello); para
detener el suministro, cerrar el mando (3) girándolo en el
sentido contrario a las agujas del reloj.
Durante esta operación es absolutamente
normal que la bomba se desactive automáticamente y que parpadee el piloto luminoso (20) "
ver a cerrar el mando. Esperar a que el piloto luminoso
(14) "
" se encienda (sin parpadear) antes de volver a
abrir el mando.
E
Llenar el depósito de agua con agua fresca potable.
2
Volver a introducir el depósito de agua en su alojamiento
de la máquina de café asegurándose de que quede introducido hasta el tope; el per l debe quedar a ras del de la
máquina de café.
F 13 14 Int roduc ir el p orta ltr o en el g rupo d e caf é (4) por
la parte inferior y girarlo de izquierda a derecha hasta que
quede bloqueado.
Colocar un recipiente adecuado bajo el por ta ltro.
G
15
Pulsar el botón " " y suministrar una taza de agua
H
17
caliente.
Para detener el suministro, pulsar el botón "
I Repetir las operaciones descritas en el punto (H) hasta
agotar el agua presente en el depósito de agua.
" se encienda (sin parpadear).
". V ol-
".
Español
• 57 •
Page 58

L 2 Volver a llenar el depósito de agua con agua fresca
potable.
M 19 Extraer el porta ltro del grupo de café girándolo de
derecha a izquierda y enjuagarlo con agua fresc a potable.
La máquina y a está lista; para co nocer los detalles de f uncionamiento del suministro de café y vapor, consultar los capítulos
correspondientes.
5 Enjuague
Nota: asegurarse de que el porta ltro esté colocado para obtener un calentamiento óptimo
de toda la máquina.
La máquina de café está programada para realizar un enjuague
automático del circ uito de café con agua fresca c ada vez que se
enciende; esto garantiza el correcto calentamiento de toda la
máquina y un mejor aroma del café.
Se aconseja colocar un recipiente bajo la salida
de café.
Esta función está activada de fábrica (piloto luminoso (16)
"
" encendido) y tiene lugar cuand o al término de la fase de
calentamiento el piloto luminoso (14) "
parpadear).
Nota: en cas o de que no salga agua p or el porta ltro, realizar el e njuague manualm ente según
lo descrito en el apdo. 7.1.
El enjuague puede:
A interrumpirse, pulsando el botón (15) "
tón (13).
B desactivarse, pulsando el botón (15) " "
luminoso
(14) " "
dear
; en ese caso, el piloto luminoso (16) " " se apaga.
Nota: en caso de haber desactivado el enjuague, puede vo lver a activar se pulsando el b otón
"
".
parpadeante o encendido sin parpa-
" se enciende (sin
" o bien el bo-
con el piloto
6 Ahorro energético
La máquina est á diseñada para ahorrar energía.
La máquina, tras 9 minutos sin ser utilizada, se apaga para
ahorrar energía y respetar así el medio ambiente.
Para poder utilizar la máquina se debe pulsar el botón ON/OFF
(11) "
".
7 Suministro del café
¡Atención! Durante el suministro de café, queda
prohibido quitar el porta ltro presurizado girándolo manualmente de derecha a izquierda. Riesgo
de quemaduras.
• Du rante est a operaci ón, el pilot o luminoso (14) "
padea; dicho funcionamiento debe considerarse normal y
no una anomalía.
• Antes de utilizar la máquina, asegurarse de que el depósito
de agua esté su cientemente lleno.
Nota: si durante la fase de calentamiento se
abriera por error el mando de vapor, el piloto
luminoso (20) "
perar a que la máquina esté lista.
Si tras haber pulsado el botón (13) " " NO sa-
liera café, pulsar de nuevo el botón (13) "
consultar la tabla "Resolución de problemas" antes de
quitar el porta ltro.
Antes de suministrar café, comprobar que la máquina esté lista. La máquina está lista cuando el piloto luminoso (14) "
está encendido sin parpadear.
" parpadeará. Cerrar el mando y es-
7.1 Calentamiento del porta ltro
Si se ha desactivado la función "enjuague" y/o se desea precalentar manualmente el porta ltro, realizar lo siguiente:
•
Introducir el porta ltro presurizado en el grupo de
13
café (4) por la parte inferior.
Girar el porta ltro presurizado de izquierda a derecha
•
14
hasta que quede bloqueado. Soltar el mango del porta ltro presurizado; el mango girará levemente hacia la
izquierda. Este movimiento garantiza el perfecto funcionamiento del porta ltro.
• 17 Precalentar el porta ltro presurizado pulsando el bo-
tón (13); comenzará a salir agua por el porta ltro presurizado (esta oper ación es necesaria sólo p ara el primer café).
• Tras haber dejado correr 50 cc de agua, pulsar de nuevo el
botón (13) para detener el suministro.
• 19 Extraer el porta ltro presurizado de la máquina girán-
dolo de derecha a izquierda y vaciar el agua residual.
Se aconseja colocar un recipiente bajo la salida
de café.
A continuación, proceder al suministro de café siguiendo las
operacione s descritas en los apar tados siguientes.
" par-
" y
"
• 58 •
Page 59

7.2 Con café molido
• 7 Introducir el ltro (23) en el porta ltro presurizado
(21); al utiliz ar la máquina por primera vez, el ltro ya está
introducido. Gracias al ltro especial (23) de la máquina,
no es necesario cambiar de ltro para obtener uno o dos
cafés.
•
Añadir 1-1,5 cucharadas para un café individual o 2
8
cucharadas rasas para un café doble; limpiar los restos de
café del borde del por ta ltro presuriz ado.
Nota: no comprimir el café, el porta ltro está
dotado de un sistema ya optimizado para el
suminis tro de un verdadero c afé exprés.
•
Intr oducir el por ta ltro (21) en e l grupo d e café (4) p or
13
la parte inferior.
Girar el porta ltro de izquierda a derecha hasta que
•
14
quede bloqueado.
Tomar 1 o 2 tazas precalentadas y posicionarlas
•
16
bajo el porta ltro presurizado; comprobar que estén correctamente colocadas bajo los ori cios de salida del café.
Pulsar el botón (13) " ".
•
17
Una vez alcanza da la cantidad de café deseada, pulsar
•
18
de nuevo el botón (13) "
de café. Al nalizar el suministro, esperar unos segundos;
retirar las tazas con el café.
Tras el suministro de caf é, esperar a que el piloto lumi-
•
19
nos o de ca fé (14) "
extraer el porta ltro presurizado girándolo de derecha a
izquierda y vaciar los posos residuales.
Nota: en el porta ltro presurizado queda una
pequeña cantidad de agua; esto es normal y se
debe a las caracter ísticas del por ta ltro.
Nota importante: para garantizar un resultado
perfecto, el ltro (23) debe mantenerse limpio.
Lavar diar iamente tras el uso.
" para detener el suministro
" deje de parpadear ; a continuación,
porta ltro.
Introducir el porta ltro presurizado en el grupo de
•
13
café (4) por la parte inferior.
• 14 Girar el porta ltro de izquierda a derecha hasta que
quede bloqueado.
Tomar 1 taza precalentada y posicionarla bajo el por-
•
15
ta ltro; comprobar que esté correctamente colocada bajo
los ori cios de salida del café.
Pulsar el botón (13) " ".
•
17
• Una vez alcanzada la cantidad de café deseada, pulsar de
nuevo el botón (13) "
café. Al nalizar el suministro, esperar unos segundos; retirar la taza con el café.
Tras el suministro de caf é, esperar a que el piloto lumi-
•
19
nos o de ca fé (14) "
extraer el porta ltro presurizado girándolo de derecha a
izquierda y eliminar la pastilla de café utilizada.
Nota importante: para garantizar un resultado
perfecto, el ltro (25) y el adaptador (24) deben
mantener se limpios. Lavar diariamente tras el uso.
" para detener el suministro de
" deje de parpadear ; a continuación,
8 Elección del tipo de café - Consejos
Por lo ge nera l, es posi ble u tili zar cual quie r tip o de c afé exis ten te en el mercado. No obstante, el c afé es un producto nat ural y
su sabor cambia en función del origen y de la mezcla; por ello,
se aconseja probar varios tip os de café hasta encontrar la mezcla que mejor se adapte al gusto per sonal.
En cualquier caso, para obtener unos mejores resultados se
aconseja utilizar mezclas expresamente preparadas para máquinas de café exprés. El café debería salir siempre de forma
regular por el porta ltro presurizado sin gotear. Es posible
modi car la velocidad de salida del c afé cambiando levemente
la cantidad de café en el ltro y/o usando un café que tenga
un grado de molido diferente. Para asegurar un excelente resultado en taza y facilitar la limpieza y la preparación, Gaggia
recomienda usar pastillas de caf é monodosis de tipo ESE.
Español
7.3 Con pastillas de café
• 9 Quitar el ltro para café molido (23) del porta ltro
presuriz ado (21).
Introducir en el por ta ltro presurizado (21) el adapta-
•
10
dor para pastillas de café (24), con la parte convexa orientada hacia abajo.
A continuación, introducir el ltro para pastillas de
•
11
café (25) en el porta ltro presurizado (21).
Introducir la pastilla de café en el porta ltro; asegu-
•
12
rarse de que el papel de la pastilla de café no salga del
ANTES DE REALIZAR CUALQUIER OPERACIÓN DE
SUMINISTRO DE VAPOR O DE AGUA CALIENTE,
COMPROBAR QUE EL TUBO DE VAPOR (PANNARELLO) ESTÉ
ORIENTADO HACIA LA BANDEJA DE GOTEO.
• 59 •
Page 60

9 Agua caliente
¡Riesgo de quemaduras! Al principio del sumi-
nistro se pueden producir pequeñas salpicaduras de agua caliente. El tubo de suministro puede
alcanzar temperaturas elevadas: evitar el contacto
direc to con las manos.
•
Introducir el porta ltro presurizado en el grupo de
13
café (4) por la parte inferior.
Girar el porta ltro presurizado de izquierda a derecha
•
14
hasta que quede bloqueado. Soltar el mango del porta ltro presurizado; el mango girará levemente hacia la
izquierda. Este movimiento garantiza el perfecto funcionamiento del porta ltro.
• Pulsar el botón ON/OFF (11); el piloto luminoso (12) " "
se enciende; el piloto luminoso (16) "
piloto luminoso (14) "
a que el piloto luminos o (14) "
dear).
Colocar un recipiente o una taza de té bajo el tubo de
•
5
vapor (Pannarello).
• Abrir el mando (3) en el sentido de las agujas del reloj; el
piloto luminoso 14 "
Una vez obtenida la cantidad de agua caliente desea-
•
6
da, cerrar el mando (3) girándolo en el sentido contrario a
las agujas del reloj.
• Retirar el recipiente con el agua caliente.
Nota: si durante la fase de calentamiento se
abriera por error el mando de vapor, el piloto
luminoso (20) "
mando y esperar a que la máquina esté lista.
Durante esta operación es absolutamente
normal que la bomba se desactive automáticamente y que parpadee el piloto luminoso (20) "
ver a cerrar el mando. Esperar a que el piloto luminoso
(14) "
" se encienda (sin parpadear) antes de volver a
abrir el mando.
" comienza a parpadear. Esperar
" se apaga.
" comenzará a parpadear. Cerrar el
" se enciende y el
" se encienda (sin parpa-
". V ol-
10 Vapor / capuchino
¡Riesgo de quemaduras! Al principio del sumi-
nistro se pueden producir pequeñas salpicaduras de agua caliente. El tubo de suministro puede
alcanzar temperaturas elevadas: evitar el contacto
direc to con las manos.
•
Introducir el porta ltro presurizado en el grupo de
13
café (4) por la parte inferior.
Girar el porta ltro presurizado de izquierda a derecha
•
14
hasta que quede bloqueado. Soltar el mango del porta ltro presurizado; el mango girará levemente hacia la
izquierda. Este movimiento garantiza el perfecto funcionamiento del porta ltro.
• Pulsar el botón ON/OFF (11); el piloto luminoso (12) "
se enciende; el piloto luminoso (16) "
piloto luminoso (14) "
a que el piloto luminos o (14) "
dear).
Pul sar e l botó n (17) " "; se apagará el piloto lumino-
•
21
so (14) "
(18) "
luminoso (20) "
mando y esperar a que la máquina esté lista.
• Esp erar a que el piloto luminoso (18) "
parpadear), lo que indica que la máquina está lista para el
suministro de vapor.
•
22
• Abrir el mando (3) durante algún instante para que salga
el agua residual del tubo de vapor (Pannarello); en poco
tiempo, empezará a salir sólo vapor.
•
23
• Llen ar con leche fría 1/3 del recipi ente que se desea utilizar
para preparar el capuchino.
•
24
(3) girándolo en el sentid o de las agujas del reloj; la bomba
se activará de forma automática. Girar lentamente el recipiente que contiene la leche, de abajo arriba para que el
calentamiento sea unifor me.
• 25 Al na lizar, cerrar el mando (3) girándolo en el sentido
contrario a las agujas del reloj; retirar la taza con la leche
montada.
• Tras el uso, limpiar el tub o de vapor con un paño húmedo.
• Cuando se desee dejar de utilizar el vapor, pulsar el botón
(17) "
(20) "
indica que la máquina tiene una temperatura demasiado
elevada para suministrar café.
" y comenzará a parpadear el piloto luminoso
".
Nota: si durante la fase de calentamiento se
abriera por error el mando de vapor, el piloto
Colocar un recipiente bajo el tubo de vapor.
Cerrar el mando (3) y retirar el recipiente.
Para garantizar un mejor resultado, usar leche
fría.
Sumergir el t ubo de vapor en la leche y abr ir el mando
Puede utilizarse este mismo sistema para calentar otras bebidas.
"; los pilotos luminosos (14) " ", (18) " " y
" comenzarán a parpadear al mismo tiempo. Esto
" comienza a parpadear. Esperar
" comenzará a parpadear. Cerrar el
" se enciende y el
" se encienda (sin parpa-
" se encienda (sin
"
• 60 •
Page 61

10.1 Enfriamiento de la máquina
Para bajar la temperatura, realizar lo siguiente:
Colocar un recipiente o una taza de té bajo el tubo de
•
5
vapor (Pannarello).
• Abri r el mando (3) giránd olo en el sentido de las agujas del
reloj.
• Cuando la máquina haya alcanzado la temperatura correcta, la bomba se apagará de forma automática y el piloto
luminoso (20) "
Cerrar el mando (3) giránd olo en el sentido contrario a
6
las agujas del reloj y retirar el recipiente.
• Antes de suministrar café, comprobar que la máquina esté
lista. La máquina está lista cuando el piloto luminoso (14)
" está encendido sin parpadear.
"
" comenzará a parpadear.
11 Limpieza
El m ante nim ient o y la limp iez a se p ued en ef ec tuar sól o cua ndo
la máquina está fría y descone ctada de la red eléctr ica.
• No sumergir la máquina en agua ni introducir sus componentes en el lavavajillas.
• No usar alcohol etílico, solventes y/o agentes químicos
agresivos.
• Se aconseja limpiar el depósito de agua diariamente y llenarlo con agua fresca.
Cada semana, limpiar el an illo de la caldera con la má-
•
30
quina apagada, fría y desenchufada con un paño húmedo.
•
•
•
• Limpiar la máquina usando un paño suave humedecido
•
Diariamente, tras haber calentado leche, des-
26 28
montar la pieza externa del Pannarello y lavarla con agua
potable fresca.
26 27 28
Para realizar esta operac ión, se debe:
- desmontar la pieza externa del Pannarello (para la limpieza habitual);
- extrae r la pieza superior del Pannare llo del tubo de vapor;
- lavar la pieza superior del Pannarello con agua potable
fresca;
- lavar el tubo de vapor con un paño húmedo y eliminar los
posibles restos de leche;
- volver a colocar la piez a superior en el tubo de vapor (asegurarse de que quede complet amente introducida).
29
Pannarello asegu rándose de que quede intro ducida hasta
el tope. Asegurarse de que la pieza de plástico quede correct amente introducida en la piez a de metal.
31
con agua.
20
Una vez a la semana, limpiar el tu bo de vapor.
Tras la limpieza, volver a montar la pieza externa del
Diariamente, vaciar y lavar la bandeja de goteo.
Para limpiar el porta ltro presurizado, realizar lo si-
guiente:
extraer el ltro y lavarlo cuidadosamente con agua
-
9
caliente.
- extraer el adaptador (en su caso) y lavarlo bien con agua
caliente.
- lavar el interior del por ta ltro presurizado.
• No secar la máquina ni sus componentes usando un horno
de microondas y/o un horno convencional.
Nota: no lavar el porta ltro presurizado en el
lavavajillas.
12 Descalci cación
La cal está presente de forma natural en el agua utilizada para
el f uncio namien to de la máquin a. Para que no l legue a obst ruir
el circuito de agua y de café de la máquina, debe ser eliminada
con regularidad.
Para la máquina Gaggia éste es un proceso fácil.
Se aconseja realizar la descalci cación cuando el piloto luminoso (19) "
Es o bligat orio r ealiz ar la de scalc i cació n cuand o el pi loto lu minoso (19) "
ese caso, la reparación no estará cubierta por la garantía.
mantener al máximo el rendimiento y la funcionalidad
de la máquina durante toda su vida operativa así como
para evit ar, siemp re que se utilice cor rectamente, c ualquier alteración de los productos suministrados. Antes
de iniciar el ciclo de descalci cación asegurarse de: HABER EXTRAÍDO EL FILTRO DE AGUA, en su caso.
completado. No utilizar bajo ningún concepto vinagre
como producto descalci cante.
1
2
3
" se encienda.
" parpadee.
Llevar a cabo esta operación antes de que la
máquina haya dejado de funcionar ya que, en
Utilizar el producto descalci cante Gaggia (Fig.
B). Ha sido formulado especí camente para
No beber la solución descalci cante ni los productos suministrados hasta que el ciclo se haya
Introducir el porta ltro presurizado en el grupo
13 14
de café (4) por la parte inferior y girarlo de izquierda a derecha hasta que quede bloqueado.
Extraer y vaciar el depósito de agua.
1
Verter la MITAD del contenido de la botella de pro-
2
ducto descalci cante concentrado Gaggia en el depósito
de agua del aparato y rellenarlo con agua potable fresca
Español
• 61 •
Page 62

hasta el nivel MAX.
Encender la máquina pulsando el botón ON/OFF (11);
4
4
el piloto luminoso (12) "
Suministrar (tal como se describe en el capítulo 9 del
5
manual) 2 tazas de agua (150 ml aprox. cada una) por el
tubo de vapor (Pannarello). A continuación, apagar la máquina pulsando el botón ON/OFF (11); el piloto luminoso
(12) "
" se apaga.
5 Dejar que el producto descalci cante actúe durante unos
15-20 minutos con la máquina apagada.
6 Encender la máquina pulsando el botón ON/OFF (11)
"
".
Suministrar (tal como se describe en el capítulo 9 del
5
manual)
2 tazas
tubo de vapor (Pannarello). A continuación, apagar la máquina
gada durante 3 minutos.
7 Repetir las operaciones descritas en el punto 6 hasta que
el depósito de agua quede completamente vacío.
Durante esta operación es absolutamente
normal que la bomba se desactive automáticamente y que parpadee el piloto luminoso (20) "
ver a cerrar el mando. Esperar a que el piloto luminoso
(14) "
abrir el mando.
8
Enjuagar el depósito de agua con agua fresca potable
2
y llenarlo completamente.
9 Colocar un recipiente bajo el porta ltro.
10 Encender la máquina pulsando el botón ON/OFF (11)
pulsar el botón
ltro todo el contenido del depósito. Para detener el suministro, pulsar de nuevo el botón
11
2
Volver a llenar el depósito de agua con agua fresc a.
Colocar un recipiente grande (1 litro aprox.) bajo el
5
tubo de vapor (Pannarello).
Abrir el mando de suministro de agua (3) girándolo en el
sentido de las agujas del reloj y suministrar todo el contenido del depósito de agua a través del tubo de vapor (Pannarello).
Una vez que el agua se haya agotado, para detener
12
6
el suministro, cerrar el mando de suministro de agua (3)
girándolo en el sentido contrario a las agujas del reloj.
13 Repet ir de nuevo las operaciones desde el punto (8) has-
ta un total de 4 depósitos.
14
19
Extraer el porta ltro del grupo de café girándolo de de-
recha a izquierda y enjuagarlo con agua fresca potable.
El ciclo de descalci cación ha concluido.
de agua (150 ml aprox. cada una) por el
pulsando el botón ON/OFF (11) " "
" se encienda (sin parpadear) antes de volver a
(13) " "
" se enciende.
y dejarla apa-
". V ol-
" "
y suministrar a través del porta-
(13) " "
.
Una vez que dicha operación haya nalizado, mantener pulsados durante 3 segundos los botones de suministro de café y
vapor; el piloto luminoso de descalci cación se apagará.
Volver a llenar el depósito con agua fresca. Si fuera ne-
2
cesario, efectuar la carga del circuito tal como se describe en
el apdo. 4.6.
La solución descalci cante se debe eliminar
según lo previsto por el fabricante y/o por las
norm as vige ntes en el p aís don de se util ice la máq uina.
13 Filtro "Intenza+" (opcional)
El ltro de agua "INTENZA+" puede mejorar la calidad del
agua. El uso del ltro "INTENZA+" limita la formación de cal y
garantiza un café exprés con un aroma más intenso. De forma
que, para obtener todavía un mejor café exprés, se aconseja
instalar el ltro de agua "INTENZA+", que puede adquirir en
su establecimiento habitual, en la tienda en línea de Philips
a través de la dirección http://shop.philips.com o bien en los
centros de asistencia autorizados.
• 34 Retirar el ltro blanco presente en el depósito, guardarlo en un lugar seco protegido del polvo.
Sacar el ltro de agua "INTENZA+" del envase. Con -
•
32
gurar el ltro en base a la dureza del agua.
Sumergir el ltro de agua "INTENZA+" en posición
•
33
vertical (con la abe rtura hacia arriba) en agua f ría y apretar
suavemente en los lados para que salgan las burbujas de
aire.
;
Int rod uci r el l tro en el dep ósit o vac ío. P res iona r has ta
•
35
el tope.
• Llenar e l depósito de agua con agua fresc a potable y volver
a introducirlo en la máquina.
Para activar el ltro "Intenza+", realizar lo siguiente:
Pulsar el botón ON/OFF (11); el piloto luminoso (12)
•
4
"
" se enciende; el piloto luminoso (16) " " se enciende y el piloto luminoso (14) "
padear. Esperar a que el piloto luminoso (14) "
encienda (sin parpadear).
Colocar un recipiente o una taza de té bajo el tubo de
•
5
vapor (Pannarello).
• Abri r el mando (3) giránd olo en el sentido de las agujas del
reloj.
•
Cua ndo s e hay a sumi nis trad o 1 li tro a prox . de a gua c a-
6
liente, cerrar el mando (3) girándo lo en el sentido contrario
a las agujas del reloj.
• Vaciar el recipiente con el agua caliente.
" comienza a par-
" se
• 62 •
Page 63

Durante esta operación es absolutamente
normal que la bomba se desactive automáticamente y que parpadee el piloto luminoso (16). Volver a
cerrar el mando. Esperar a que el piloto luminoso (14)
se encienda (sin parpadear) antes de volver a abrir el
mando.
El ltro ya está activado y la máquina está lista para ser utilizada.
14 Eliminación
Este producto cumple con la Directiva EU 2002/96/CE.
Español
El símbolo
que este producto no se puede tratar como desperdicios normales del hogar.
Este producto se debe entregar al punto de recogida de equipos
eléctricos y electrónicos para reciclaje.
Al asegurarse de que este producto se deseche correctamente,
usted ayudará a evitar posibles consecuencias negativas para el
ambiente y la salud pública, lo cual podría ocurrir si este producto no se manipula de forma adecuada. Para obtener información
más detallada sobre el reciclaje de este producto, póngase en
contacto con la administración de su ciudad, con su servicio de
desechos del hogar o con la tienda donde compró el producto.
en el producto o en su embalaje indica
• 63 •
Page 64

Avería Causas posibles Solución
La máquina no se enciende. Máquina no conectada a la red eléctric a. Conectar la máquina a la red eléctrica.
La bomba es muy ruidosa. Falta agua en el depósito.
Los pilotos luminoso s (14) "
(18) "
" y (20) " " parpadean
al mismo tiempo.
El café está demasiado frío.
No se forma la crema de la leche.
No se logra preparar un capuchino.
El café sale muy rápidamente y
no se forma crema.
El café no sale o s ale a gotas.
El café se sale por los bordes.
Se trata de la primera puesta en marcha
",
de la máquina o bien la máquina está sobrecalentada.
Porta ltro no introducido para el precalentamiento (cap. 7).
Tazas frías. Precalentar las tazas con agua c aliente.
Leche no adecuada: leche en polvo, leche
desnatada.
Pannarello sucio.
Falta agua en el depósito.
Hay muy poco café en el porta ltro. Añadir café (cap. 7).
Molido demasiado gr ueso. Usar una mezcla distinta (cap. 8).
Café viejo o no adecuado. Usar una mezcla distinta (cap. 8).
Pastilla de café vieja o inadecuada. Cambiar la pastilla de café utilizada.
Falta un componente en el porta ltro.
Falta agua.
Molido demasiado no. Usar una mezcla distinta (cap. 8).
Café comprimido en el porta ltro. Remover el café molido.
Hay demasiado café en el porta ltro. Re ducir la cantidad de café en el porta ltro.
Máquina con cal. Descalci car la máquina (cap. 12).
Filtro del porta ltro obstruido.
Pastilla de café inadecuada. Cambiar el tipo de pastilla de café.
Porta ltro colocado de forma incorrecta
en el grupo de café.
Borde superior del porta ltro sucio. Limpiar el borde del porta ltro.
Pastilla de café introducida de forma in-
correcta.
Hay demasiado café en el porta ltro.
Llenar con agua y realizar la carga del circuito
(apd o. 4.6).
Asegurarse de que el depósito esté lleno e introducido hasta el tope y bajar la temperatura
siguiendo lo descrito en el apar tado 10.1.
Precalentar el porta ltro.
Utilizar leche entera.
Limpiar el Pannarello según lo descrito en el cap.
11.
Llenar con agua y realizar la carga del circuito
(apd o. 4.6).
Comprobar que todos los componentes se encuentren instalados y de forma correcta.
Llenar con agua y realizar la carga del circuito
(apd o. 4.6).
Apagar la máquina y esperar a que se enfríe (1
hora aprox.). A continuación, quitar y lavar bien
el porta ltro. Si el problema vuelve a aparecer,
contactar con el centro de asistencia.
Colocar el por ta ltro de forma corre cta (cap. 7).
Colocar la pastilla de café correctamente de manera que no salga del porta ltro.
Reducir la cantidad de café utilizando la cuchara
dosi cadora.
• 64 •
Page 65

Avería Causas posibles Solución
Piloto luminoso (20) " " encendido.
Piloto luminoso (19) " " encendido.
La bomba se apaga durante el
suministro de agua o de vapor y
se enciende el piloto luminoso
(20) " ".
Para las averías no mencionadas en la tabla o en caso de que las soluciones indicadas no las resuelvan, contactar
con un centro de asistenc ia.
Mando del agua (3) abier to. Cerrar el mando (3).
Realizar la desc alci cación. Consultar el capítulo (12).
Tiempo de espera de seguridad. Cerrar el mando de agua.
Español
• 65 •
Page 66

1 Generalidades
A máquina de café é indicada para a preparação de 1 ou 2 chávenas de café expresso e está equipada com um tubo orientável para distribuição de vapor e de água quente. Os comandos
na parte frontal do aparelho são marcados com símbolos de
fácil interpretação.
A máquina foi projectada para uso doméstico e não está indicada para um funcionamento contínuo de tipo pro ssional.
Atenção. Não se assume qualquer tipo de responsabilidade por eventuais danos, no caso de:
• Utilização errada e não conformidade com os objec-
tivos previstos;
• Reparações não realizadas em centros de assistên-
cia autorizados;
• Alteração do cabo de alimentação;
• Alteração de qualquer outro componente da má-
quina;
• Utilização de peças sobresselentes e acessórios não
originais;
• Falta de des calci cação e armazena gem em lugares
com temperatura inferior a 0°C.
Nestes casos ocorre a anulação da garantia.
1.1 Para facilitar a leitura
O triângulo de advertência indica
todas as instruções importantes
para a segurança do utilizador.
Preste muita atenção a essas indicações para evitar
ferimentos graves!
A referência a imagens, partes do aparelho ou elementos de
comando, etc., está indicada através de números ou letras;
neste caso é realizada através da própria imagem.
2 Dados técnicos
O fabrican te reserva-se o dir eito de modi c ar as caracterís ticas
técnicas do produto.
Tensão nominal - Potência nominal - Alimentação
Consulte a placa colo cada no aparelho
Material do corpo
Plástico modelo SIN 042 GM
Metal modelo SIN 0 42 GP
Dimensões (c x a x p) (mm)
210 x 300 x 280
Peso
SIN 042 GM = 5 kg
SIN 042 GP = 5,8 kg
Comprimento do cabo
1,3 m
Painel de comando
Na parte frontal
Porta- ltro
Pressurizado
Pannarello
Especial para cappuccinos
Reservatório de água
1,25 litros - Ex traível
Pressão da bomba
15 ba r
Caldeira
Inox
Dispositivos de segurança
Ter mof us íve l
3 Normas de segurança
Este símbolo evidencia as informações que se
devem ter em consideração, para uma melhor
utilizaç ão da máquina.
As ilustrações correspondentes ao texto encontram-se
nas primeiras páginas do manual. Consulte estas páginas durante a leitura das instruções de utilização.
1.2 Aplicação destas instruções de utilização
Gua rde es tas ins truç ões de u tiliz ação e m lugar segur o e anex e-
-as à máquina de café caso uma outra pessoa tenha de a utilizar.
Para mais informações ou em caso de problemas, contacte os
centros de assistência autorizados.
• 66 •
Nunca col oque em contac to com água as peça s ligadas à
corrente: perigo de curto-circuito! O vapor sobreaquecido e a água quente podem provocar queimaduras!
Nunca dirija o jacto de vapor ou de água quente para
qualquer parte do corpo, tome precauções quando tocar no tubo de vapor/água quente: perigo de queimaduras!
Utilização prevista
A máquina de café é indicada exclusivamente para utilização
doméstica. Este aparelho pode ser utilizado por crianças com
uma idade superior a 8 anos e por pessoas com capacidades
físicas reduzidas, sensoriais ou mentais ou com falta de experiência e conhecimentos, caso sejam controladas ou instruídas
Page 67

quanto à utilização do aparelho de forma segura e desde que
compreendam os perigos associados. As crianças não devem
brincar com o aparelho. A limpeza e manutenção por parte do
utilizador não devem ser efectuadas por crianças sem supervisão.
Alimentação de corrente
Ligue a máquina de café somente numa tomada de corrente
adequada. A tensão deve corresponder à indicada na placa do
aparelho.
Cabo de alimentação
Nunca utilize a máquina de café se o cabo de alimentação estiver defeituoso. Se o cabo de alimentação estiver dani cado,
deve ser substituído pelo fabricante ou pelo seu serviço de
assistência a c lientes. Não passe o cabo de alim entação por ângulos e sobre ar estas vivas, por c ima de objectos muito q uentes
e proteja-o do óleo.
Não transporte ou puxe a máquina de café segurando-a pelo
cabo. Não ex traia a cha da tomada puxan do-a pelo cabo, nem
lhe toque com as mãos molhadas. Evite que o cabo de alimentação caia livremente abaixo de mesas ou estante s.
Protecção de outras pessoas
Mantenha as crianças sob supervisão, para evitar que brinquem com o aparelho. As crianças não se apercebem do perigo
associado aos electrodomésticos. Não deixe ao alcance das
crianças os materiais utilizados para embalar a máquina.
Perigo de queimaduras
Evite dirigir contra si mesmo e/ou outros o jacto de vapor sobreaquecido e/ou de água quente. Não toque directamente no
tubo de vapor; utilize sempre as pegas ou asas apropriadas.
Nunca retire o porta- ltro pressurizado durante a distribuição
do café. Durante a fase de aquecimento podem sair gotas de
água quente do grupo de distribuição do café. Não toque no
grupo de distribuição com a máquina ligada ou antes que arrefeça.
Localização
Coloque a máquina de café num local seguro, onde ninguém
possa virá-la ou ser ferido por ela. Pode ser expelida água
quente ou vapor sobreaquecido: perigo de queimaduras!
Não mantenha a máquina a temperaturas inferiores a 0 ºC; o
gelo poderia dani car a máquina.
Não utilize a máquina d e café ao ar livre. Não coloque a máqui na em superf ícies muito quentes e per to de chamas livres, para
evitar que a carcaça derreta ou que dani cada.
Limpeza
Antes de limpar a máqu ina, é indispensável desligar a máq uina
com a tecla ON/OFF e depois extrair a cha da tomada de corrente. Além disso, deve esperar que a máquina arref eça.
Nunca mergulhe a máquina em água!
É rigorosamente proibido tentar modi car de algum modo os
componentes internos da máquina. Não utilize, para ns alimentares, a águ a restante no reser vatório durante alguns dias,
lave o reservatório e encha com água f resca potável.
Espaço para a utilização e manutenção
Para o correcto e bom funcionamento da máquina de café
recomenda-se o seguinte:
• Seleccione uma superfície de apoio bem nivelada;
• Seleccione um ambiente su cientemente iluminado,
higiénico e com uma tomada de corrente facilmente
acessível;
• Preveja uma distância mínima das paredes à máquina
como indicado na gura - Fig.A.
Armazenamento da máquina
Quando a máquina car inutilizada por um período prolongado,
desligue a máquina e t ire a cha da tomada. Guard e-a num local
seco e não acessível a crianças. Proteja-a do pó e da sujidade.
Não mantenha a máquina a temperaturas inferiores a 0 ºC. O
gelo poderia dani car a máquina.
Reparações / Manutenção
No caso de avarias, defeitos ou suspeita de defeito após uma
queda, retire imediatamente a cha da tomada. Nunca coloque em funcionamento uma máquina defeituosa. Somente os
Centros de Assistência Autorizados podem realizar intervenções e reparações. No caso de intervenções não realizadas segundo as normas, rejeita-se qualquer tipo de responsabilidade
por eventuais danos.
Medidas contra incêndio
Em caso de incêndio, utilize extintores de dióxido de carbono
(CO
). Não utilize água ou ex tintores de pó.
2
Português
• 67 •
Page 68

Legenda dos componentes da máquina
(Pág.2)
1 Painel de comando
2 Suporte de ap oio para chávenas
3 Botão de água quente / vapor
4 Grupo de distribuição de café
5 Reservatório de água
6 Depósito de recuperação de água
7 Grelha de apoio para chávenas
8 Tubo de vapor (Pannarello)
9 Tomada para cabo de alimentação
10 Termómetro da temperatura da água
11 Tecla ON/OFF
12 Indicador luminoso de "Máquina ligada"
13 Tecla "Distribuição de café"
14 Indicador luminoso de "Temperatura"
15 Tecla "Enxagúe"
16 Indicador luminoso de "Enxagúe"
17 Tecla "Vapor"
18 Indicador luminoso de "Vapor"
19 Indicador luminoso de "Descalci cação"
20 Indicador luminoso de "Alarme"
21 Porta- ltro pressurizado
22 Medidor para café moído
23 Filtro para café moído (único para 1 ou 2 café s)
24 Adaptador para ltro de café em pastilhas
25 Filtro para café em pas tilhas
26 Cabo de alimentaç ão
27 Filtro de água "Intenz a+" (Opcional)
4 Instalação
Para a sua segurança e para a de terceiros, siga escrupulosamente as “Normas de segurança” indicadas no cap. 3.
4.1 Embalagem
A embalagem original foi concebida e realizada para proteger
a máquina durante o transporte. Recomenda-se conservá-la
para uma possível necessidade de tr ansporte no futuro.
4.2 Advertências de instalação
Não retire a máquina, segurando-a pelos frisos
de protecção das chávenas.
Antes de instalar a máquina, observe as seguintes indicações
de segurança:
• coloque a máquina num local seguro;
• cer ti que-se de que as cria nças não têm a possibilidade de
brincar com a máquina;
• não colo que a máquina sobre super fícies muito quentes ou
perto de chamas livres.
A máquina de café está agora pronta para ser ligada à rede
eléctrica.
Obs.: aconselha-se lavar os componentes antes
da sua primeira utilização e/ou depois de um
período sem utilização.
4.3 Reservatório de água
• 1 Retire o reservatório de água (5).
Enxagúe-o e encha-o com água fresca potável; não
•
2
ultrapasse o nível (MAX.) indicado no reservatório.
Introduza no reservatório sempre e unicamente água fresca potável sem gás. Água quente e
também outros líquidos podem dani car o reservatório. Não coloque a máquina em funcionamento se o nível de água estiver abaixo da indicação MÍN: assegure-
-se que haja água su ciente dentro do reservatório de
água.
• Intr oduza o reservatór io de água no seu compartime nto da
máquina de café, garantindo que o introduz até ao m; o
per l deve estar aderente ao per l da máquina de café.
Obs.: o nível de água pode ser visualizado através da janela situada na parte frontal do reser-
vatório.
4.4 Ligação da máquina
A corrente eléctrica pode ser perigosa! Por conseguinte, siga sempre escrupulosamente as nor-
mas de segurança. Nunca utilize cabos defeituosos! Os
cabos e as chas de feituosos devem se r imediatament e
substituídos pelos Centros de Assistência Autorizados.
A tensão do aparelho foi programada na fábrica. Certi que-
-se de que a tensão de rede corresponde às indicações apre-
sentadas na placa de identi cação posicionada no fundo do
aparelho.
•
Introduza a cha na tomada de corrente posicionada
3A
na parte traseira da máquina de c afé.
Introduza a outra extremidade da cha numa tomada
•
3B
de parede de tensão adequada.
• 68 •
Page 69

4.5 Primeira utilização
Durante a primeira utilização da máquina de café, o circuito
deve ser carregado.
Pressione a tecla ON/OFF (11) e o indicador luminoso (12)
4
"
" acende-se; os indicadores luminosos (14 )" ",
(20 )"
" e (18)" " piscam; isto indic a que o circuito deve
ser carregado.
Coloque um recipiente debaixo do tubo de vapor
5
(Pannarello).
Abra o botão (3) “água quente/vapor” rodando-o no
sentido oposto ao dos ponteiros do relógio. A bomba é
activada automaticamente. Aguarde que saia um jacto
regular de água do tubo de vapor (Pannarello).
Feche o botão (3) “água quente/vapor” rodando-o no
6
sentido oposto ao dos ponteiros do relógio. Remova o
recipiente.
A máq uina ini cia a fa se de aq uecime nto ape nas dep ois de ef ectuar correc tamente o carregamento do circuito.
Obs.: se o bot ão for deixado abe rto, após alguns
segundos a bomba é desactivada automatica-
mente e o indicador luminoso (20) "
" pisca.
4.6 Carregamento do circuito
Quando a água no res ervatório terminar, o circuito da máqu ina
deve ser recarregado.
Obs.: se a máq uina tiver funcion ado muito tempo sem água e os indicadores luminosos (14)
"
", (20)" " e (18) " " começarem a piscar, consul-
te a tabela "soluções dos problemas".
•
Coloque um recipiente debaixo do tubo de vapor
5
(Pannarello).
• Abra o botão (3) “água quente/vapor” rodando-o no
sentido oposto ao dos ponteiros do relógio. A bomba é
activada automaticamente.
• Aguarde que saia um jacto regular de água do tubo de
vapor (Pannarello).
Feche o botão (3) “água quente/vapor” rodando-o
•
6
no sentido oposto ao dos ponteiros do relógio. Remova o
recipiente.
Obs.: se durante a fase de aquecimento o botão
de vapor for aberto acidentalmente, o indicador luminoso (20) "
que a máquina esteja pronta.
" pisca. Feche o botão e aguarde
4.7 Primeira utilização ou após um período
sem utilização
Esta simples operação assegura-lhe uma óptima distribuição
e deve ser realizada:
- na primeira utilização;
- quando a máquina permanecer sem ser utilizada por um
longo período de tempo (por mais de 2 semanas).
A água distribuída deve ser esvaziada num lo-
cal de descarga apropriado e não pode ser utilizada para a alimentação. Se o recipiente se encher,
durante o ci clo, pare a distribu ição e esvazie-o a ntes de
recomeç ar a operação.
A
Enxagúe o reservatório de água e encha-o com água
2
fresca p otável. Volte a introduzir o rese rvatório de água no
seu compartimento na máquina de café, garantindo que o
introduz até ao m; o per l deve estar aderente ao per l
da máquina de café.
B Ligue a máquina pressionando a tecla (11). Aguarde até
que o indicador luminoso (14) "
x o .
Coloque um recipiente por baixo do tubo de vapor
C
5
(Pannarello).
Abra a torneira (3) rodando-a no sentido dos ponteiros do
relógio. A bomb a é activada automaticamente.
D Distribua todo o conteúdo do reservatório de água pelo
tubo de vapor/água quente (Pannarello); para nalizar
a distribuição feche a torneira (3) rodando-a no sentido
contrário ao dos ponteiros do relógio.
Durante esta operação é absolutamente nor-
mal que a bomba se desac tive automaticamente, piscando o indicador luminoso (20 )"
char o botão. Aguarde até que o indicador luminoso (14)
"
" se acenda de modo xo antes de reabrir o botão.
E
Encha o reservatório da água com água fresca
2
potável. Volte a introduzir o reservatório de água no seu
compartimento da máquina de café, garantindo que o
introduz até ao m; o per l deve estar aderente ao per l
da máquina de café.
F 13 14 Introduza a p artir de baixo o por ta- ltr o no grupo
de distribuição (4), virando-o da esquerda para a direita
até se bloquear.
Introduza um recipiente adequado debaixo do porta-
G
15
l t r o .
Pressione a tecla " " e distribua uma chávena de
H
17
água quente.
" se acenda de modo
". Volte a fe-
Português
• 69 •
Page 70

No nal, termine a distribuiç ão pressionando a tecla " ".
I Repita as operações descritas no ponto (H) até ao m da
água presente no reservatório de água.
Encha novamente o reservatório da água com água
L
2
fresca potável.
M 19 Remova o porta- ltro do grupo virando-o da direita
para a esquerda e enxagúe-o com água fresc a potável.
6 Poupança de energia
A máquina está preparada para a poupança de energia.
Após 9 minutos de inutilização, a máquina desliga-se para
poupar energia, re speitando totalmente a natureza.
Para utilizar a máquina, é necess ário pressionar a tecla ON/OFF
(11) "
".
Agora a máquina está pronta; os detalhes de funcionamento
para a distribuição de café e de vapor podem ser consultados
nos respec tivos capítulos.
5 Enxagúe
Obs.: certi que-se de que o porta- ltro está
inserido para obter um aquecimento ideal de
toda a máquina.
A máquina de café está preparada para efectuar um enxagúe
automático do circuito de café com água fresca sempre que a
ligar; isto garante um correc to aquecimento de toda a máquina
e um melhor aroma do c afé.
É recomendável posicionar um recipiente debaixo do distribuidor.
Esta função é activada aquando da aquisição da máquina (o
indicador luminoso (16) "
nal da fase de aquecimento quando o ind icador luminoso (14)
"
" se acende de modo xo.
Obs.: cas o não saia água do por ta- ltro, ef ectue
o enxagúe manualmente conforme descrito no
par. 7.1.
O enxagúe pode:
A ser interrompido p ressionando a tecla (15) "
(13).
B ser desactivado pressionando a tecla (15) " "
indicador lumin oso
caso, o indicador luminoso (16) "
Obs.: caso o enxagúe se ja desactivado, pode ser
reactivado apenas pressionando a tecla "
" está aceso) e é efectuada no
(14) " "
estiver a pis car ou xo
" apaga-se.
" ou a tecla
quando o
; neste
".
7 Distribuição do café
Atenção! Du rante a distribui ção do café é proib ido remover o porta- ltro pressurizado rodando-
-o manualmente da direita para a esquerda. Perigo de
queimaduras.
• Durante esta operação, o indicador luminoso (14) "
pisca; este funcionamento deve ser considerado normal e
não uma anomalia.
• Antes de utilizá-lo, veri que se o reservatório de água
contém uma quantidade su ciente.
Obs.: se durante a fase de aquecimento o botão
de vapor for aberto acidentalmente, o indicador luminoso (20) "
que a máquina esteja pronta.
Se após ter pressionado a tecla (13) " "NÃO
sair café, pressione novamente a tecla (13) "
e consulte a tabela "Resolução de problemas" antes de
remover o porta- ltro.
Antes de distribuir café, veri que se a máquina está pronta. A
máquina está pronta quando o indicador luminoso (14) "
estiver aceso de modo xo.
7.1 Aquecimento do porta- ltro
Se a função de "enxagúe" não estiver activada e/ou se deseja
pré-aquecer manualmente o porta- ltro, proceda da seguinte
forma:
•
Introduza a partir de baixo o porta- ltro pressurizado
13
no grupo de dis tribuição (4).
Rode o porta- ltro pressurizado da esquerda
•
14
para a direita até se bloquear. Solte a pega do porta ltro pressurizado, a própria pega virará ligeiramente
para a esquerda. Este movimento garante o perfeito
funcionamento do porta- ltro.
• 17 Pré-aqueça o porta- ltro pressurizado, pressionando
a tecla (13); a água começará a sair do porta- ltro
" pisca. Feche o botão e aguarde
"
"
"
• 70 •
Page 71

pressurizado (esta operação é necessária apenas para o
primeiro café).
• Depois de ter feito escorrer 50cc de água, pressione
novamente a tecla (13) para interromper a distribuiç ão.
• 19 Retire o porta- ltro pressurizado da máquina rodando-o
da direita para a esquerda e esvazie a água res tante.
É recomendável posicionar um recipiente debaixo do distribuidor.
Agora, proceda com as operações descritas nos parágrafos seguintes para a distribuição do café.
7.2 Com café moído
• 7 Introduza o ltro (23) no porta- ltro pressurizado
(21); na primeira utilização o ltro já está inserido. Graças
ao ltro especial (23) fornecido com a máquina, não
precisa de t rocar o ltro para obter um ou dois cafés.
Deite 1-1,5 medidores para um único café ou 2
•
8
medidores cheios para o café duplo; limpe a borda do
porta- ltro pressurizado dos resíduos de café.
Obs.: não comprima o café, pois o porta- ltro
possui um sistema já optimizado para a distri-
buição de um verdadeiro expresso.
•
Introduza a p artir de baixo o por ta- ltro (21) no grupo
13
de distribuição (4).
Rode o porta- ltro da esquerda para a direita até se
•
14
bloquear.
Pegue em 1 ou 2 chávenas pequenas pré-
•
16
aquecidas e coloque-as debaixo do porta- ltro
pressurizado; certi que-se de que estão colocadas
correctamente debaixo dos furos de saída do café.
• 17 Pressione a tecla (13) " ".
Depois de obter a quantidade de café desejada,
•
18
pressione novamente a tecla (13) "
a distribuição do café. Depois de terminada a distribuição,
aguarde alguns segundos; retire as chávenas com o caf é.
Depois de termin ada a distribuição do caf é, esper e até
•
19
que o indicado r luminoso do café (14) "
e depois extraia o porta- ltro pressurizado, rodando-o da
direita para a esquerda e esvazie-o das borras residuais
Obs.: no porta- ltro pressurizado permanece
uma pequena quantidade de água; isto é nor-
mal e é devido às características do por ta- ltro.
" para interromper
" deixe de pisc ar
Observação importante: O ltro (23) deve estar
sempre limpo para garantir um resultado per-
feito. Lave diariamente após a utilização.
7.3 Com café em pastilhas
• 9 Retire o ltro para café moído (23) do porta- ltro
pressurizado (21).
•
Introduza no porta- ltro pressurizado (21), o
10
adaptador para as pastilhas (24), com a parte convexa
virada para baixo.
Depois, intr oduza o ltro p ara pastilhas (25) no port a-
•
11
ltro pressurizado (21).
Introduza a pastilha no porta- ltro; certi que-se de
•
12
que o papel da pastilha não saia do por ta- ltro.
Introduza a partir de baixo o porta- ltro pressurizado
•
13
no grupo de dis tribuição (4).
Rode o porta- ltro da esquerda para a direita até se
•
14
bloquear.
Pegue 1 chávena pequena pré-aquecida e
•
15
posicione-a debaixo do porta- ltro; certi que-se de que
está coloc ada correctamente deb aixo dos furos de saída do
café.
Pressione a tecla (13) " ".
•
17
• Depois de obter a quantidade de café desejada, pressione
novamente a tecla (13) "
distribuição do café. Depois de terminada a distribuição,
aguarde alguns segundos; retire a chávena com o café.
Depois de terminada a distribuição do café, espere
•
19
até que o indicador luminoso do café (14) "
de piscar e depois extraia o porta- ltro pressurizado,
rodando- o da direita para a esquerda e des carte a pastilha
utilizada.
Observação importante: O ltro (25) e o adap-
tador (24) devem estar sempre limpos para garantir um resultado perfeito. Lave diariamente após a
utilização.
" para interromper a
" deixe
8 Escolha do tipo de café - Sugestões
Em linhas gerais é possível utilizar todos os tipos de café existentes à venda. Todavia, o café é um produto natural e o seu
gosto muda conforme a origem e a mistura; por isso, é recomendável provar vários tipos de café para encontrar a mistura
mais adequada ao seu gosto pessoal.
Para um melhor resultado, aconselha-se utilizar misturas preparadas espe cialmente para máquinas de caf é expresso. O café
deverá sair sempre regularmente do porta- ltro pressurizado
Português
• 71 •
Page 72

sem gotejar. A velocidade de saíd a do café pode ser modi cada
mudando levemente a dose de café no ltro e/ou utilizando
um café com um grau de moagem diferente. Para obter um
melhor resultado na chávena e para facilitar a limpeza e a
preparação, a Gaggia aconselha a utilizar café em pastilhas
monodose da marc a ESE.
ANTES DE REALIZAR QUALQUER OPERAÇÃO RE-
LATIVA À DISTRIBUIÇÃO DO VAPOR OU DA ÁGUA
QUENTE, CERTIFIQUE-SE DE QUE O TUBO DE VAPOR (PANNARELLO) ESTEJA ORIENTADO SOBRE O DEPÓSITO DE RECUPERAÇÃO DE ÁGUA.
9 Água quente
Perigo de queimaduras! Durante o início da
distribuição podem veri car-se breves salpicos
de água quente. O tubo de distribuição pode alcançar
temperaturas elevadas: evite tocá-lo directamente
com as mãos.
•
Introduza a partir de baixo o porta- ltro pressurizado
13
no grupo de dis tribuição (4).
Rode o porta- ltro pressurizado da esquerda
•
14
para a direita até se bloquear. Solte a pega do porta ltro pressurizado, a própria pega virará ligeiramente
para a esquerda. Este movimento garante o perfeito
funcionamento do porta- ltro.
• Pressione a tecla ON/OFF (11) e o indicador luminoso
(12) "
" acende-se; o indicador luminoso (16) " "
acende-se e o indicador luminoso (14) "
piscar. Aguarde até que o indicador luminoso (14) "
se acenda de modo xo.
Coloque um recipiente ou um copo de chá debaixo do
•
5
tubo de vapor (Pannarello).
• Abra o botão (3) no sentido dos ponteiros do relógio; o
indicador luminoso 14 "
Depois de retirada a quantidade desejada de água
•
6
quente, feche o botão (3) rodando-o no sentido contrário
ao dos ponteiros do relógio.
• Retire o recipiente com a água quente.
Obs.: se durante a fase de aquecimento o botão
de vapor for aberto acidentalmente, o indicador luminoso (20) "
que a máquina esteja pronta.
" apaga-se.
" pisca. Feche o botão e aguarde
" começa a
Durante esta operação é absolutamente nor-
mal que a bomba se desac tive automaticamente, piscando o indicador luminoso (20) "
fechar o botão. Aguarde até que o indicador luminoso
(14) "
" se acenda de m odo xo antes re abrir o botão.
10 Va po r / Cappuccino
Perigo de queimaduras! Durante o início da
distribuição podem veri car-se breves salpicos
de água quente. O tubo de distribuição pode alcançar
temperaturas elevadas: evite tocá-lo directamente
com as mãos.
•
Introduza a partir de baixo o porta- ltro no grupo de
13
distribuição (4).
Rode o porta- ltro pressurizado da esquerda
•
14
para a direita até se bloquear. Solte a pega do porta ltro pressurizado, a própria pega virará ligeiramente
para a esquerda. Este movimento garante o perfeito
funcionamento do porta- ltro.
• Pressione a tecla ON/OFF (11) e o indicador luminoso
(12) "
" acende-se; o indicador luminoso (16) "
" acende-se e o indicador luminoso (14) " " começa a
piscar. Aguarde até que o ind icador luminoso (14) "
acenda de modo xo.
Pressione a tecla (17) " "; o indicador luminoso (14)
•
21
"
" apaga-se e o indicador luminoso (18) " " começa
a piscar.
Obs.: se durante a fase de aquecimento o botão
de vapor for aberto acidentalmente, o (20) "
" pisca. Feche o botão e aguarde que a máquina esteja
pronta.
• Aguarde que o indicador luminoso (18) "
"
de modo xo; neste ponto a máquina está pronta para
distribuir o vapor.
Coloque um recipiente debaixo do tubo de vapor.
•
22
• Abr a o botão (3) durante alguns segundo s, de modo a fazer
sair a água restante do tubo de vapor (Pannarello); em
pouco tempo começará a sair apenas vapor.
•
Feche o botão (3) e retire o recipiente.
23
• Encha com leite frio 1/3 do recipiente que deseja utilizar
para prepar ar o cappuccino.
Para garantir um resultado melhor utilize leite
frio.
•
Coloque o tubo de vapor no leite e abra o botão (3)
24
rodando-o no sentido dos ponteiros do relógio; a bomba
". Volte a
" se
" se acenda
• 72 •
Page 73

é activada automaticamente. Vire o recipiente com leite
com movimentos lentos de baixo para cima para tornar o
aquecimento uniforme.
• 25 No nal, feche o botão (3) rodando-o no sentido
contrário ao do s ponteiros do relógio; retire a c hávena com
o leite batido.
• Após esta operação, limpe o tubo de vapor com um pano
húmido.
O mesmo sistema pode ser utilizado para o
aquecimento de outras bebidas.
• Qu ando se de seja termi nar a utili zação do v apor, press ione
a tecla (17) "
(18) "
que a máquina apresenta uma temperatura demasiado
elevada para distribuir c afé.
"; os indicadores luminosos (14) " ",
" e (20) " " piscam ao mesmo te mpo. Isto indica
10.1 Arrefecimento da máquina
Para diminuir a temperatura proceda da seguinte
forma:
Coloque um recipiente ou um copo de chá debaixo do
•
5
tubo de vapor (Pannarello).
• Abra o botão (3) rodando-o no sentido dos ponteiros do
relógio.
• Quando a máquina alcançar a temperatura correcta,
a bomba desliga-se automaticamente e o indicador
luminoso (20) "
Feche o botão (3) rodando-o no sentido contrário ao
6
dos ponteiros do relógio e retire o recipiente.
• Antes de distribuir caf é, veri que se a máquina est á pronta.
A máquina está pronta quando o indicador luminoso (14)
" estiver aceso de modo xo.
"
" pisca.
• 26 28 Diariamente, depois de aquecido o leite,
desmonte a par te externa do Pannarello e lave -a com água
potável fresca.
•
26 27 28
vapor. Para realizar essa operação, deve-se:
- remover a parte externa do Pannarello (para a limpeza
regular);
- retirar a parte superior do Pannarello do tubo de vapor;
- lavar a parte superior do Pannarello com água fresca
potável;
- lavar o tubo de vapor com um pano húmido e remover
eventuais resíduos de leite;
- reposicionar a parte superior no tubo de vapor (certi quese de que está completamente int roduzida);
29
Pannarello assegurando-se que seja introduzida até o
m. Veri que se a parte em plástico está correctamente
introduzida na parte em met al.
•
31
• Para a limpeza do aparelho utilize um pano macio
humedecido com água.
•
20
seguinte forma:
-
9
quente.
- retire o adaptador (quando presente), lave-o
cuidadosamente com água quente.
- lave o interior do porta- ltro pressurizado.
• Não s eque a máquina e/ou os seus componente s utilizando
um forno de microondas e/ou um forno convencional.
Semanalmente será preciso limpar o tubo de
Após a limpeza, torne a montar a parte externa do
Esvazie e lave diariamente a bandeja de limp eza.
Para a limpeza do porta- ltro pressurizado proceda da
retire o ltro, lave-o cuidadosamente com água
Obs.: não lave o porta- ltro pressurizado na
máquina de lavar louça.
Português
11 Limpeza
A manutenção e a limpeza só podem ser realizadas quando a
máquina estiver fria e desligada da corrente eléc trica.
• Não mergulhe a máquina em água e não introduza os
componentes na máquina de lavar louça.
• Não utilize álcool etílico, solventes e/ou agentes químicos
agressivos.
• Aconselha-se a limpar quotidianamente o reservatório de
água e a enchê-lo com água fresca.
Semanalmente, limpe o O-ring da caldeira com
•
30
um pano húmido e com a máquina desligada, fria e
desconectada da rede eléctrica.
12 Descalcificação
O calcário está naturalmente presente na água que é utilizada
para o funcionamento da máquina. Este deve ser removido regularmente porque pode obstruir o circuito de água e do café
do seu aparelho.
Para a sua máquina Gaggia, este é um processo simples. É
aconselhável proceder à descalci cação quando se acende o
indicador luminoso (19) "
É obrigatório proceder à descalci cação quando o indicador
luminoso (19) "
Efect ue esta operação ante s que o seu aparelho
deixe de fun cionar, pois neste cas o, a reparação
não está coberta pela garantia.
".
" pisca.
• 73 •
Page 74

Utilize o pr oduto descalci cante Gaggi a (Fig.B).
Foi concebido especi camente para manter da
melhor forma o desempenho e a funcionalidade da
máquina durante toda a sua vida útil, assim como para
evitar, se for utilizado cor rectamente, qualquer alteração do produto distribuído. Antes de iniciar o ciclo de
descalci cação assegure-se que: O FILTRO DA ÁGUA TENHA SIDO REMOVIDO, se utiliz ado.
Não beba a solução descalci cante e os produ-
tos distribuídos até à conclusão do ciclo. Nunca
utilize, em nenhuma circunstância, o vinagre como
descalci cante.
1
2
3
4
5 Deixe o descalci cante actuar cerca de 15-20 minutos com
6 Ligue a máquina pressionando a tecla ON/OFF (11)
7 Repita as operações descritas no ponto 6 até ao completo
te, piscando o indicador luminoso (20) "
fechar o botão. Aguarde até que o indicador luminoso
(14) "
8
9 Introduza um recipiente por baixo do porta- ltro.
Introduza a partir de baixo o porta- ltro
13 14
pressurizado no grupo de distribuição (4), virando-o da
esquerda para a direita até se bloquear.
Remova e esvazie o reservatório de água.
1
Deite METADE do conteúdo da garrafa de
2
descalci cante concentrado Gaggia no reservatório de
água do aparelho e encha-o com água fresca potável até
alcançar o nível MÁX.
Ligue a máquina pressionando a tecla ON/OFF (11) e o
4
indicador luminoso (12) "
Retire (como descrito no capítulo 9 do manual) pelo
5
tubo de vapor (Pannar ello), 2 chávenas (aproxima damente
150 ml cada uma) de água; depois disso desligue a
máquina pressionando a tecla ON/OFF (11) e o indicador
luminoso (12) "
a máquina desligada.
"
".
Retire (como descrito no capítulo 9 do manual) pelo
5
tubo de vapor (Pannarello)
150 ml cada uma) de água. De seguida, desligue a máquina
pressionand o a tecla ON/OFF (11) " "
durante 3 minutos.
esvaziamento do reservatório de água.
Durante esta operação é absolutamente normal que a bomba se desac tive automaticamen-
" se acenda de m odo xo antes re abrir o botão.
Enxagúe o reservatório de água com água fresca
2
potável e encha-o completamente.
" acende-se.
" apaga-se.
2 chávenas (aproximadamente
e deixe-a des ligada
". Volte a
• 74 •
10 Ligue a máquina pressionando a tecla ON/OFF (11)
pressione a tecla
todo o conteúdo do reservatório. Para parar a distribuição
pressione novamente a tecla
11
2
Encha novamente o reservatório de água com água
fresca.
Coloque um recipiente grande (cerca de 1 litro)
5
debaixo do tubo de vapor (Pannarello).
Abra a torneira de distribuição de água (3) rodando-a no
sentido dos ponteiros do relógio e retire todo o conteúdo
do reservatório de água através do tubo de vapor
(Pannarello).
Depois de nalizar a retirada de água, para parar
12
6
a distribuição feche a torneira de distribuição de água
(3) rodando-a no sentido contrário ao dos ponteiros do
relógio.
13 Repita mais uma vez as operações do ponto (8) num total
de 4 reservatórios.
14
19
Remova o porta- ltro do grupo virando-o da direita
para a esquerda e enxagúe-o com água fresc a potável.
O ciclo de desc alci cação está conc luído.
No nal dessa operação, mantenha pressionadas durante 3
segundos as teclas de distribuição do café e do vapor; desta
forma, o indic ador luminoso da descalci cação apaga-se.
Encha novamente o reservatório com água fresca. Se for
2
necessário, realize o carregamento do circuito conforme descrito no parag. 4.6.
A solução descalci cante deverá ser eliminada
de acordo com o previsto pelo fabricante e/ou
pelas nor mas vigentes no país de utilizaç ão.
(13) " "
e através do porta- ltro, retire
(13) " "
.
" "
13 Filtro "Intenza+" (opcional)
O ltro de água "INTENZA +" pode melhorar a qualidade da
água. A utilização do ltro “INTENZA+” limita a formação de
calcário e garante um aroma mais intenso do seu expresso.
Sendo assim, para desfrutar da melhor forma do seu expresso,
é recomendável instalar o ltro de água “INTENZA+”, que pode
ser adquirido junto do seu revendedor de con ança, online na
loja da Philips, através do endereço http://shop.philips.com ou
nos centros de assistência autorizados.
• 34 Retire o pequeno ltro branco presente no
reservatório, guarde-o num lugar seco protegido do pó.
Retire o ltro de água “INTENZA+” da embalagem.
•
32
Escolha o ltro com base na dureza da água.
Mergulhe o ltro de água "INTENZA+" na posição
•
33
vertical (com a abertura para cima) em água fria e
;
Page 75

pressione delicadamente os lados para que saiam as
bolhas de ar.
Introduza o ltro no reservatório vazio. Pressione até
•
35
ao ponto de paragem.
• Encha o reservatório da água com água fresca potável e
reintroduza-o na máquina.
Para activar o ltro "Intenza+" proceda da seguinte
forma:
•
Pressione a tecla ON/OFF (11) e o indicador luminoso
4
(12) "
" acende-se; o indicador luminoso (16) " "
acende-se e o indicador luminoso (14) "
piscar. Aguarde até que o indicador luminoso (14) "
se acenda de modo xo.
Coloque um recipiente ou um copo de chá debaixo do
•
5
tubo de vapor (Pannarello).
• Abra o botão (3) rodando-o no sentido dos ponteiros do
relógio.
Depois de retirado cerca de 1 litro de água quente,
•
6
feche o botão (3) rodando-o no sentido contrário ao dos
ponteiros do relógio.
• Esvazie o recipiente com a água quente.
Durante esta operação é absolutamente nor-
mal que a bomba se desac tive automaticamente, piscando o indicador luminoso (16). Volte a fechar
o botão. Aguarde até que o indicador luminoso (14) se
acenda de modo xo antes reabrir o botão.
" começa a
"
Português
Neste ponto, o ltro está activado e a máquina está pronta
para ser utilizada.
14 Eliminação
Este produto está conforme a directiva da UE 2002/96/CE.
O simbolo
gem indica que este produto não se pode tratar como lixo doméstico normal.
Este produto deve ser entregue num ponto de recolha de
equipamentos eléctricos e electrónicos para reciclagem. Ao
assegurar-se de que este produto é eliminado correctamente,
estará a ajudar a evitar possiveis consequências negativas para
o ambiente e saúde pública que resultariam se este produto não
fosse manipulado de forma adquada. Para obter informações
mais detalhadas sobre a reciclagem deste produto, por favor
contacte o gabinete da câmara municipal da sua cidade ou a loja
onde comprou o produto.
impresso no produto ou na sua embala-
• 75 •
Page 76

Avaria Causas possíveis Solução
A máquina não liga. Máquina não ligada à rede eléctrica. Ligue a máquina à rede eléctric a.
A bomba é muito ruidosa. Falta água no reservatório.
Os indicadores luminosos (14)
"
", (18) " " e (20) " "
piscam simultaneamente.
O café está muito frio.
Não é possível obter a espuma
do leite.
Não é possível preparar um cappuccino.
O café sai demasiado rápido, não
se forma o creme.
O café não sai ou s ai só às pingas.
O café jorra das bordas.
Indicador luminoso (20) "
aceso.
Primeira ligação da máquina ou a máquina está em sobreaquecimento.
Porta- ltro não introduzido para o pré-
-aquecimento (Cap. 7).
Chávenas frias. Pré-aqueça as chávenas com água quente.
Leite não apropriado: leite em pó, leite
magro.
Pannarello sujo. Limpe o Pannarello como descrito no Cap.11.
Falta água no reser vatório.
Pouco café no porta- ltro. Adicione o café (Cap. 7).
Moagem demasiado grossa. Utilize uma mistura diferente (Cap.8).
Café antigo ou inapropriado. Utilize uma mistura diferente (Cap.8).
Pastilha velha ou inapropriada. Troque a pastilha utiliz ada.
Falta um componente no porta- ltro.
Falta de água.
Moagem demasiado na. Utilize uma mistura diferente (Cap.8).
Café comprimido no porta- ltro. Mexa o café moído.
Demasiado café no porta- ltro. Diminua a quantidade de café no por ta- ltro.
Máquina calci cada. Descalci que a máquina (Cap.12).
Filtro entupido no porta- ltro.
Pastilha inapropriada. Mude o tipo de pastilha.
Porta- ltro mal introduzido no grupo de
distribuição de café.
Borda superior do porta- ltro suja. Limpe a borda do por ta- ltro.
Pastilha introduzida de modo incor recto.
Demasiado café no porta- ltro.
"
Botão de água (3) aber to. Feche o botão (3).
Reabasteça com água e efectue o carregamento
do circuito (Parag. 4.6).
Veri que se o reservatório está cheio e introduzido até o m e re duza a temperatura como descrito no parágrafo 10.1.
Pré-aqueç a o porta- ltro.
Utilize leite inteiro.
Reabasteça com água e efectue o carregamento
do circuito (Parag. 4.6).
Certi que-se de que todos os co mponentes estão
presentes e montados correctamente.
Reabasteça com água e efectue o carregamento
do circuito (Parag. 4.6).
Desligue a máquina e aguarde que arrefeça (cerca de 1 hora). De seguida, remova e lave bem o
porta- ltro. Se o problema se repetir, contacte o
centro de assistência.
Introduza cor rectamente o porta - ltro (Cap.7).
Introduza correctamente a pastilha de modo a
não sair do porta- ltro.
Diminua a quantidade de café utilizando o medidor.
• 76 •
Page 77

Avaria Causas possíveis Solução
Indicador luminoso (19) " "
aceso.
A bomba desliga-se durante a
distribuição de água ou de vapor
e o indicador lum inoso (20) "
acende-se.
Para as avarias que não estão incluídas na tabela supracitada ou no caso das soluções sugeridas não resolverem o
problema, contacte um centro de assistência.
Execute a de scalci caç ão. Consulte o capít ulo (12).
Time out de segurança. Feche o botão da água.
"
Português
• 77 •
Page 78

Page 79

Page 80

GAGGIA s.p.a.
Sede Legale/Registered Office
Piazza Eleonora Duse, 2
20122 MILANO
Sede Amministrativa/Administrative Office
Via Torretta, 240
40041 Gaggio Montano (BO)
+39 0534 77111 www.gaggia.com
Cod.15003268 Rev.01 del 15-11-12
www.gaggia.com
Il produttore si riserva il diritto d`apportare qualsiasi modi ca senza preavviso.
The manufacturer reserves the right to make changes without prior notice.
Der Hersteller behält sich das Recht vor, Änderungen jeder Art ohne Vorankündigung vorzunehmen.
Le producteur se réserve le droit d’apporter des modi cations sans aucun préavis.
El fabricante se reserva el derecho de modi car el producto sin aviso previo.
O fabricante reserva-se o direito de efectuar qualquer alteração sem aviso prévio.
© Gaggi a S.p.A.
 Loading...