

Page 1
EnglishItaliano
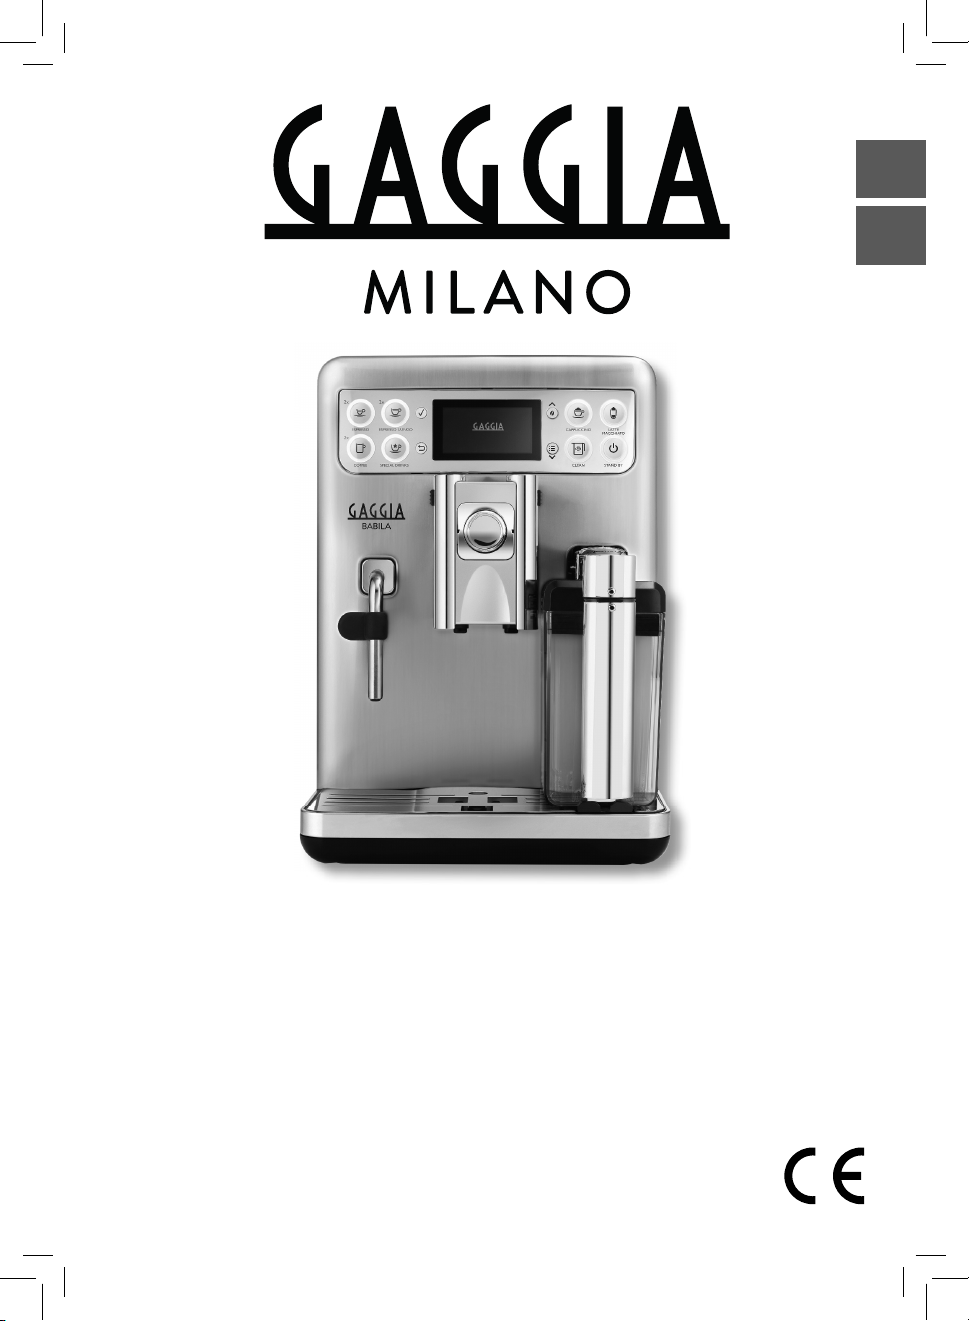
GAGGIA BABILA
SUP046DG
Quick Instruction Guide
READ THIS GUIDE CAREFULLY BEFORE USING THE MACHINE.
Page 2

EN - CONTENT
SAFETY INSTRUCTIONS ........................................................................................................................................................................................4
FIRST INSTALLATION ..........................................................................................................................................................................................12
MANUAL RINSE CYCLE ........................................................................................................................................................................................13
MEASURING WATER HARDNESS ..........................................................................................................................................................................14
AQUACLEAN FILTER ............................................................................................................................................................................................ 15
FIRST ESPRESSO .................................................................................................................................................................................................18
HOW TO PROGRAM MY FAVORITE ESPRESSO .......................................................................................................................................................18
BREWING BEVERAGES USING PREGROUND COFFEE ...........................................................................................................................................19
ADJUSTING THE DISPENSING SPOUT HEIGHT ......................................................................................................................................................20
COFFEE STRENGTH GAGGIA BREWING SYSTEM ..................................................................................................................................................20
OPTIDOSE INDICATION OF THE COFFEE QUANTITY TO GRIND ............................................................................................................................21
ADJUSTING THE CERAMIC COFFEE GRINDER ........................................................................................................................................................21
GAGGIA ADAPTING SYSTEM ................................................................................................................................................................................22
ENERGY SAVING STANDBY ...............................................................................................................................................................................22
MILK CARAFE .....................................................................................................................................................................................................23
FIRST CAPPUCCINO LATTE MACCHIATO .............................................................................................................................................................. 24
“CLEAN” SELFCLEANING CYCLE AFTER EACH USE ..............................................................................................................................................25
HOW TO PROGRAM MY FAVORITE CAPPUCCINO ...................................................................................................................................................25
“SPECIAL” BEVERAGES ........................................................................................................................................................................................26
MENU FOR CUSTOMIZATION AND MAINTENANCE ................................................................................................................................................27
BEVERAGE MENU ................................................................................................................................................................................................................................27
MACHINE MENU .................................................................................................................................................................................................................................31
CLEANING AND MAINTENANCE ...........................................................................................................................................................................36
DESCALING .........................................................................................................................................................................................................38
INTERRUPTION OF THE DESCALING CYCLE ........................................................................................................................................................... 42
MILK CARAFE CLEANING .....................................................................................................................................................................................43
BREW GROUP CLEANING ....................................................................................................................................................................................49
MEANING OF THE DISPLAY .................................................................................................................................................................................52
MAINTENANCE PRODUCTS ..................................................................................................................................................................................53
TROUBLESHOOTING ...........................................................................................................................................................................................54
TECHNICAL SPECIFICATIONS ...............................................................................................................................................................................58
Page 3

IT - INDICE
NORME DI SICUREZZA ...........................................................................................................................................................................................8
PRIMA INSTALLAZIONE ......................................................................................................................................................................................12
CICLO DI RISCIACQUO MANUALE ......................................................................................................................................................................... 13
MISURAZIONE DELLA DUREZZA DELL’ACQUA .......................................................................................................................................................14
FILTRO AQUACLEAN ...........................................................................................................................................................................................15
PRIMO ESPRESSO ...............................................................................................................................................................................................18
COME PROGRAMMARE IL MIO ESPRESSO IDEALE ................................................................................................................................................18
EROGAZIONE BEVANDA CON CAFFÈ PREMACINATO ............................................................................................................................................19
REGOLAZIONE DELL’ALTEZZA DELL’EROGATORE ................................................................................................................................................... 20
INTENSITÀ DEL CAFFÈ GAGGIA BREWING SYSTEM .............................................................................................................................................20
OPTIDOSE INDICAZIONE QUANTITÀ DI CAFFÈ DA MACINARE ............................................................................................................................21
REGOLAZIONE MACINACAFFÈ IN CERAMICA ........................................................................................................................................................21
GAGGIA ADAPTING SYSTEM ................................................................................................................................................................................22
RISPARMIO ENERGETICO STANDBY .................................................................................................................................................................22
CARAFFA LATTE ..................................................................................................................................................................................................23
PRIMO CAPPUCCINO LATTE MACCHIATO ............................................................................................................................................................24
CICLO DI AUTOPULIZIA “CLEAN” DOPO OGNI UTILIZZO .......................................................................................................................................25
COME PROGRAMMARE IL MIO CAPPUCCINO IDEALE ............................................................................................................................................25
BEVANDE “SPECIAL” ............................................................................................................................................................................................27
MENU PERSONALIZZAZIONE E MANUTENZIONE ..................................................................................................................................................18
MENU BEVANDA .................................................................................................................................................................................................................................27
MENU MACCHINA ...............................................................................................................................................................................................................................31
PULIZIA E MANUTENZIONE .................................................................................................................................................................................36
DECALCIFICAZIONE .............................................................................................................................................................................................38
INTERRUZIONE DEL CICLO DI DECALCIFICAZIONE ................................................................................................................................................42
PULIZIA DELLA CARAFFA DEL LATTE ....................................................................................................................................................................43
PULIZIA DEL GRUPPO CAFFÈ ...............................................................................................................................................................................49
SIGNIFICATO DEL DISPLAY ..................................................................................................................................................................................52
PRODOTTI PER LA MANUTENZIONE ..................................................................................................................................................................... 53
RISOLUZIONE DEI PROBLEMI ..............................................................................................................................................................................55
CARATTERISTICHE TECNICHE ..............................................................................................................................................................................59
EnglishItaliano
Page 4

Safety instructions
4
Norme di sicurezza
EN IMPORTANT SAFETY INFORMATION
This machine is equipped with safety features.
Nevertheless, read and follow the safety instructions carefully and only use the machine
as described in these instructions, to avoid accidental injury or damage due to improper use of
the machine. Keep this safety booklet for future
reference.
Warning
General
- Check if the voltage indicated on the machine corresponds to the local mains voltage
before you connect the appliance.
- Connect the machine to an earthed wall
socket.
- Do not let the power cord hang over the
edge of a table or worktop and do not let it
touch hot surfaces.
- To avoid the danger of electric shock, never
immerse the machine, mains plug or power
cord in water or any other liquid.
- Do not pour liquids on the power cord connector.
- To avoid the danger of burns, keep body
parts away from hot water jets produced by
the machine.
- Do not touch hot surfaces. Use handles and
knobs.
- Switch o the machine with the main switch
located on the back (if present) and remove
the mains plug from the wall socket:
• If a malfunction occurs.
• If you are not going to use the appliance
for a long time.
• Before you clean the machine.
- Pull at the plug, not at the power cord.
- Do not touch the mains plug with wet
hands.
- Do not use the machine if the mains plug,
the power cord or the machine itself is damaged.
- Do not make any modi cations to the machine or its power cord.
- Only have repairs carried out by a service
center authorized by Gaggia to avoid a hazard.
- The machine should not be used by children
younger than 8 years old.
- This machine can be used by children aged
from 8 years and above and by persons with
reduced physical, sensory or mental capabilities or lack of experience and knowledge
if they have been given supervision or instruction concerning use of the machine in a
safe way and if they understand the hazards
involved.
- Cleaning and user maintenance shall not be
made by children unless they are older than
8 and supervised.
- Keep the machine and its cord out of the
reach of children aged less than 8 years.
- Children should be supervised to ensure
that they do not play with the machine.
- Never insert ngers or other objects into the
co ee grinder.
- Be careful when you dispense hot water.
Dispensing may be preceded by small jets of
hot water. Wait until the end of the dispensing cycle before you remove the hot water
dispensing spout.
Page 5

Safety instructions
Norme di sicurezza
5
Caution
General
- This machine is intended for normal household use only. It is not intended for use in
environments such as sta kitchens of
shops, o ces, farms or other work environments.
- Always put the machine on a at and stable
surface. Keep it in upright position, also during transport.
- Do not place the machine on a hotplate or
directly next to a hot oven, heater or similar
source of heat.
- Only put roasted co ee beans in the bean
hopper. Putting ground co ee, instant coffee, raw co ee beans or any other substance
in the co ee bean hopper may cause damage to the machine.
- Let the machine cool down before you insert
or remove any parts. The heating surfaces
may retain residual heat after use.
- Never ll the water tank with warm, hot or
sparkling water, as this may cause damage
to the water tank and the machine.
- Never use souring pads, abrasive cleaning
agents or aggressive liquids such as petrol
or acetone to clean the machine. Simply use
a soft cloth dampened with water.
- Descale your machine regularly. The machine indicates when descaling is needed.
Not doing this will make your appliance
stop working properly. In this case repair is
not covered by your warranty.
- Do not keep the machine at temperatures
below 0°C/32°F. Water left in the heating
system may freeze and cause damage.
- Do not leave water in the water tank when
you are not going to use the machine for a
long period of time. The water can become
contaminated. Use fresh water every time
you use the machine.
- Never use any accessories or parts from
other manufacturers or that Gaggia does
not speci cally recommend. If you use such
accessories or parts, your warranty becomes
invalid.
- Regular cleaning and maintenance prolongs
the lifetime of your machine and ensures
optimum quality and taste of your co ee.
- The machine is exposed continuously to
moisture, co ee and scale. Therefore it is
very important to regularly clean and maintain the machine as described in the user
manual. If you do not perform these cleaning and maintenance procedures, your machine eventually may stop working. In this
case repair is not covered by warranty.
- Do not clean the brew group in the dishwasher and do not use washing-up liquid or
a cleaning agent to clean it. This may cause
the brew group to malfunction and may
have a negative e ect on the co ee taste.
- Do not dry the brew group with a cloth to
prevent bers from collecting inside the
brew group.
- Never drink the solution dispensed during
the descaling process.
- Only put preground co ee into the preground co ee compartment. Other substances and objects may cause severe damage to the machine. In this case, repair is not
covered by your warranty.
ItalianoEnglish ItalianoEnglish
Page 6
Safety instructions
6
Norme di sicurezza
- The machine shall not be placed in a cabinet
when in use.
Machines with milk carafe
Warning
- To avoid the danger of burns, be aware that
dispensing may be preceded by jets of milk
and steam. Wait until the end of the cycle
before you remove the milk carafe.
Caution
- Make sure that the milk carafe is installed
and the milk dispensing spout is open before you select a milk-based co ee beverage
or milk froth.
- Do not put any other liquids in the milk jug/
carafe than water (for cleaning) or milk.
- Do not clean the milk carafe in the dishwasher.
Machines with classic milk frother
Warning
- To avoid the danger of burns, be aware that
dispensing may be preceded by small jets of
hot water.
- Never touch the classic milk frother with
bare hands, as it may become very hot. Use
the appropriate protective handle only.
Machines with automatic milk frother
Warning
- To avoid the danger of burns, be aware that
dispensing steam or hot water may be preceded by small jets of hot water. Never touch
the hot water/steam dispensing spout with
bare hands, as it may become very hot. Use
the appropriate protective handle only.
- Never drink the solution dispensed during
the monthly cleaning procedure of the automatic milk frother.
Caution
- For hygienic reasons, make sure that the
outer surface of the hot water/steam dispensing spout is clean.
- After frothing milk, quickly clean the automatic milk frother by dispensing a small
quantity of hot water. Follow the cleaning
instructions in the user manual.
- Be careful, the hot water/steam dispensing
spout could be hot if the machine has recently been used.
- Do not push the rubber tting too far on the
hot water/steam dispensing spout when
you insert it. In this case, the automatic milk
frother would not work correctly as it would
not be able to suck up milk.
Caution
- After frothing milk, quickly clean the classic
milk frother by dispensing a small quantity
of hot water into a container. Then remove
the external part of the classic milk frother
and wash it with lukewarm water.
Electromagnetic elds (EMF)
This machine complies with all applicable
standards and regulations regarding exposure
to electromagnetic elds.
Page 7
Recycling
- This symbol means that this product shall
not be disposed of with normal household
waste (2012/19/EU).
- Follow your country’s rules for the separate
collection of electrical and electronic products. Correct disposal helps prevent negative
consequences for the environment and human health.
Warranty and support
For service or support, contact your local dealer
or an authorized service center.
Contact details are included in the warranty
booklet supplied separately or visit www.gaggia.com/n-m-co/espresso/world-wide or www.
gaggia.it/n-m-co/espresso/contact.
Safety instructions
Norme di sicurezza
7
ItalianoEnglish ItalianoEnglish
Page 8
Safety instructions
8
Norme di sicurezza
IT INFORMAZIONI DI SICUREZZA
IMPORTANTI
Questa macchina è dotata di funzionalità di
sicurezza. Tuttavia, leggete e seguite con attenzione le istruzioni di sicurezza e utilizzate la
macchina solo come descritto in questo manuale per evitare lesioni accidentali o danni dovuti
a un uso improprio. Tenete a portata di mano
questo libretto sulla sicurezza per eventuali riferimenti futuri.
Avvertenza
Indicazioni generali
- Prima di collegare l’apparecchio, veri cate
che la tensione riportata sulla macchina corrisponda alla tensione disponibile.
- Collegate la macchina a una presa di corrente dotata di messa a terra.
- Assicuratevi che il cavo di alimentazione
non penda dal bordo del tavolo o del piano
di lavoro e non lasciate che tocchi super ci
calde.
- Per evitare il pericolo di scosse elettriche,
non immergete mai la macchina, la spina o
il cavo di alimentazione in acqua o in qualsiasi altro liquido.
- Non versate liquidi sul connettore del cavo
di alimentazione.
- Per evitare il pericolo di ustioni, tenete le
parti del corpo lontane dai getti di acqua
calda prodotti dalla macchina.
- Non toccate le super ci calde. Utilizzate impugnature e manopole.
- Spegnete la macchina dall’interruttore principale sulla parte posteriore (se presente) e
rimuovete la spina di alimentazione dalla
presa di corrente nei seguenti casi:
• In caso di malfunzionamento.
• Se pensate di non usare l’apparecchio
per un lungo periodo di tempo.
• Prima di pulire la macchina.
- Tirate la spina e non il cavo di alimentazione.
- Non toccate la spina con le mani bagnate.
- Non utilizzate la macchina se la spina, il cavo
di alimentazione o la macchina stessa sono
danneggiati.
- Non apportate modi che alla macchina o al
cavo di alimentazione.
- In caso di riparazioni rivolgetevi esclusivamente a un centro di assistenza autorizzato
Gaggia per evitare pericoli.
- La macchina non deve essere usata da bambini di età inferiore agli 8 anni.
- Questa macchina può essere usata da bambini di età superiore agli 8 anni e da persone con capacità mentali, siche o sensoriali
ridotte, prive di esperienza o conoscenze
adatte, a condizione che tali persone abbiano ricevuto assistenza o formazione per utilizzare la macchina in maniera sicura e capiscano i potenziali pericoli associati a tale
uso.
- La manutenzione e la pulizia possono essere
eseguite da bambini purché di età superiore
agli 8 anni e in presenza di un adulto.
- Tenete la macchina e il relativo cavo lontano
dalla portata di bambini di età inferiore agli
8 anni.
- Adottate le dovute precauzioni per evitare
che i bambini giochino con la macchina.
- Non inserite mai dita o altri oggetti nel macinaca è.
- Fate attenzione quando erogate acqua cal-
Page 9

Safety instructions
Norme di sicurezza
9
da. All’inizio dell’erogazione possono veri carsi brevi spruzzi di acqua calda. Prima di
rimuovere l’erogatore di acqua calda attendete che il ciclo di erogazione termini.
Attenzione
Indicazioni generali
- Questa macchina è destinata esclusivamente a un uso domestico. Non deve essere
utilizzata in ambienti quali cucine dei dipendenti all’interno di punti vendita, u ci,
aziende agricole o altri ambienti lavorativi.
- Posizionate sempre la macchina su una super cie piana e stabile. Tenetela in posizione verticale, anche durante il trasporto.
- Non posizionate la macchina su una piastra
calda o vicino a un forno caldo, un calorifero
o fonti di calore simili.
- Inserite esclusivamente chicchi di ca è tostato nel contenitore del ca è in grani. L’inserimento di ca è macinato, ca è solubile,
ca è in grani non tostato o qualsiasi altra
sostanza potrebbe danneggiare la macchina.
- Lasciate ra reddare la macchina prima di inserire o rimuovere qualsiasi componente. Le
super ci riscaldanti potrebbero trattenere
calore residuo dopo l’uso.
- Non riempite mai il serbatoio dell’acqua con
acqua calda, bollente o frizzante per evitare
di danneggiare il serbatoio stesso e la macchina.
- Non usate prodotti o sostanze abrasive o
detergenti aggressivi, come benzina o acetone, per pulire la macchina. Utilizzate semplicemente un panno morbido inumidito
con acqua.
- Eseguite regolarmente la pulizia anticalcare della macchina. Sarà la macchina stessa
a indicare quando è necessaria. In mancanza di tale pulizia l’apparecchio smetterà di
funzionare correttamente. In questo caso
un’eventuale riparazione non è coperta da
garanzia.
- Non lasciate la macchina a temperature inferiori a 0°C/32°F. L’acqua lasciata nel sistema di riscaldamento potrebbe congelarsi e
causare danni.
- Non lasciate acqua nel serbatoio quando la
macchina non verrà utilizzata per un lungo
periodo di tempo. L’acqua potrebbe diventare contaminata. Utilizzate acqua fresca tutte
le volte che usate la macchina.
- Non utilizzate mai accessori o parti di altri
produttori oppure componenti non consigliati in modo speci co da Gaggia. In caso di
utilizzo di tali accessori o parti, la garanzia si
annulla.
- Una regolare pulizia e manutenzione prolungano la vita utile della macchina e assicurano un ca è dal gusto e dalla qualità
ottimale.
- La macchina è esposta continuamente a
umidità, ca è e calcare. Pertanto è molto
importante pulire regolarmente la macchina ed eseguire la manutenzione come
descritto nel manuale dell’utente. Se non
si eseguono queste procedure di pulizia e
manutenzione, la macchina potrebbe anche smettere di funzionare. In questo caso
un’eventuale riparazione non è coperta da
garanzia.
- Non lavate il gruppo infusore in lavastoviglie
e non utilizzate detersivi per piatti o detergenti, poiché potreste provocare il malfun-
ItalianoEnglish ItalianoEnglish
Page 10
Safety instructions
10
Norme di sicurezza
zionamento del gruppo infusore e il sapore
del ca è potrebbe risentirne.
- Non asciugate il gruppo infusore con panni
per evitare l’accumulo di bre al suo interno.
- Non ingerite mai la soluzione erogata durante il processo di rimozione del calcare.
- Inserite solo ca è premacinato nell’apposito
scomparto. Altre sostanze e altri oggetti potrebbero causare seri danni alla macchina.
In questo caso un’eventuale riparazione non
è coperta da garanzia.
- La macchina non dovrebbe essere posizionata in un armadietto quando in uso.
Macchine con cara a del latte
Avvertenza
- Per evitare il pericolo di ustioni, prestate attenzione che l’erogazione sia preceduta da
getti di latte e vapore. Prima di rimuovere
la cara a del latte attendete che il ciclo di
erogazione termini.
Attenzione
- Prima di selezionare una bevanda a base di
ca è e latte o la schiuma di latte, assicuratevi che la cara a del latte sia installata e che
l’erogatore di latte sia aperto.
- Non inserite nel contenitore/nella cara a
del latte altri liquidi oltre l’acqua (per la pulizia) o il latte.
- Non pulite la cara a del latte in lavastoviglie.
Macchine con il pannarello classico
Avvertenza
- Per evitare il pericolo di ustioni, prestate attenzione che l’erogazione sia preceduta da
piccoli getti di acqua calda.
- Non toccate mai il pannarello classico a
mani nude perché potrebbe diventare bollente. Utilizzate solo l’impugnatura protettiva appropriata.
Attenzione
- Dopo aver preparato la schiuma di latte, pulite velocemente il pannarello classico erogando una piccola quantità di acqua calda
in un contenitore. Rimuovete quindi la parte esterna del pannarello classico e lavatela
con acqua tiepida.
Macchine con il pannarello automatico
Avvertenza
- Per evitare il pericolo di ustioni, prestate attenzione che l’erogazione di vapore o acqua
calda sia preceduta da piccoli getti di acqua
calda. Non toccate mai l’erogatore di acqua
calda/vapore a mani nude perché potrebbe
diventare bollente. Utilizzate solo l’impugnatura protettiva appropriata.
- Non ingerite mai la soluzione erogata durante la procedura di pulizia mensile del
pannarello automatico.
Attenzione
- Per motivi di igiene, assicuratevi che la super cie esterna dell’erogatore di acqua calda/vapore sia pulita.
Page 11
Safety instructions
Norme di sicurezza
11
- Dopo aver preparato la schiuma di latte, pulite velocemente il pannarello automatico
erogando una piccola quantità di acqua calda. Seguite le istruzioni di pulizia riportate
nel manuale per l’utente.
- Prestate attenzione perché l’erogatore di acqua calda/vapore potrebbe essere bollente
se la macchina è stata usata di recente.
- Non spingete il supporto in gomma troppo
avanti sull’erogatore di acqua calda/vapore
quando lo inserite. In questo caso, il pannarello automatico non funzionerà correttamente poiché potrebbe non aspirare il latte.
Campi elettromagnetici (EMF)
Questa macchina è conforme a tutti gli standard
e alle norme applicabili relativi all’esposizione a
campi elettromagnetici.
Riciclaggio
ta di prodotti elettrici ed elettronici superiore ai 400 m
2
.
- In tutti gli altri casi, attenetevi alle normative di raccolta di erenziata dei prodotti elettrici ed elettronici in vigore nel vostro paese:
un corretto smaltimento consente di evitare
conseguenze negative per l’ambiente e per
la salute.
Garanzia e assistenza
Per ricevere assistenza, contattare il rivenditore
locale o un centro di assistenza autorizzato.
I recapiti sono indicati nel libretto di garanzia
fornito separatamente o visitare www.gaggia.
com/n-m-co/espresso/world-wide o www.
gaggia.it/n-m-co/espresso/contact.
ItalianoEnglish ItalianoEnglish
- Questo simbolo indica che il prodotto non
può essere smaltito con i normali ri uti domestici (2012/19/UE).
- Ci sono due situazioni in cui potete restituire gratuitamente il prodotto vecchio a un
rivenditore:
1 Quando acquistate un prodotto nuovo, po-
tete restituire un prodotto simile al rivenditore.
2 Se non acquistate un prodotto nuovo, potete
restituire prodotti con dimensioni inferiori a
25 cm (lunghezza, altezza e larghezza) ai rivenditori con super cie dedicata alla vendi-
Page 12
Instructions
12
Istruzioni
FIRST INSTALLATION
PRIMA INSTALLAZIONE
H2O
Attach the external drip tray. Open the lid and remove the water tank by the handle. Rinse and ll the water tank with fresh water.
EN
Inserire la vasca raccogli-
IT
gocce esterna.
Sollevare il coperchio ed estrarre il serbatoio dell'acqua
utilizzando la maniglia.
Sciacquare e riempire il serbatoio con acqua fresca.
CLICK!
MAX
Make sure the dispensing
spout is in the correct posi-
EN
tion.
Veri care che l'erogatore sia
IT
nella posizione corretta.
Insert the plug into the socket located on the back of the
EN
machine.
Inserire la spina nella presa di corrente posta sul retro della
IT
macchina.
Open the co ee bean hopper lid and take out the inner lid. Slowly pour co ee beans into the hopper. Put the inner lid
Sollevare il coperchio del contenitore ca è in grani ed
estrarre il coperchio interno.
back and close the outer one.
Versare lentamente il ca è in grani nel contenitore. Riposizionare il coperchio interno e chiudere quello esterno.
Insert the plug at the other end of the power cord into a wall
socket.
Inserire la spina all’estremità opposta del cavo di alimentazione in una presa di corrente a muro.
Switch the power button
to “I”.
Portare l’interruttore su “I”.
Page 13
Instructions
HEATING UP…
RINSING
STOP
ACTIVATE
AQUACLEAN
FILTER?
ESC
OK 0/8
LANGUAGE
ITALIANO
ENGLISH
DEUTSCH
INSERT
GROUND COFFEE
AND PRESS OK
ESC
OK
13
Istruzioni
ItalianoEnglish ItalianoEnglish
2
1
Select the desired language by pressing the scrolling buttons
EN
or . Press the button to con rm.
Selezionare la lingua desiderata premendo i tasti di scor-
IT
rimento
o . Premere il tasto per confermare.
The machine is heating up. Place a container under the
dispensing spout.
La macchina è in fase di riscaldamento.
Posizionare un contenitore
sotto l’erogatore.
The display shows the icon above to indicate you have to install the AquaClean lter.
For further information on the lter and on how to install it, see chapter “AquaClean lter”. If you want to install it after-
EN
wards press the
button and continue with the manual rinse cycle.
Il display visualizza questo simbolo per indicare che occorre installare il ltro AquaClean.
Per ulteriori informazioni sul ltro e sulle relative modalità d’installazione, consultare il capitolo “Filtro AquaClean”. Se
IT
si desidera installarlo in un altro momento, premere il tasto
e proseguire con il ciclo di risciacquo manuale.
MANUAL RINSE CYCLE
CICLO DI RISCIACQUO MANUALE
The machine performs an
automatic rinse cycle.
La macchina esegue un ciclo
di risciacquo automatico.
Note: The automatic
rinse cycle is also initiated when the machine
is in standby mode or
switched o for more
then 15 minutes.
Nota: il ciclo automatico
di risciacquo viene avviato anche quando la
macchina è rimasta in
stand-by, oppure è stata spenta, per più di 15
minuti.
Place a container under the
EN
dispensing spout.
Posizionare un contenitore
sotto l’erogatore.
IT
Press the
the
Premere il tasto
Premere il tasto
2
button untill the icon is displayed. Press
button.
no a visualizzare il simbolo .
.
1
Do not add pre-ground co ee to the compartment. Press the
button. Wait until dispensing has nished.
Non aggiungere ca è pre-macinato nello scompartimento. Premere il tasto
rogazione.
. Attendere no al termine dell'e-
Page 14
Instructions
SPECIAL BEVERAGES
MILK FROTH
HOT WATER
STEAM
HOT WATER
STOP
14
Istruzioni
3
2
When the hot water dispensing procedure has been completed, empty the container.
Terminata l’erogazione di acqua calda, vuotare il contenitore.
Place a container under the
EN
steam/hot water wand.
Posizionare un contenitore
sotto il tubo vapore/acqua
IT
calda.
1
Press the
Premere il tasto
do il tasto
button. Select “HOT WATER” by pressing the
button. Then press the button.
. Selezionare “ACQUA CALDA” premen-
, quindi premere il tasto .
H2O
MAX
Repeat steps 4 to 6 until the water tank is empty. Fill the water tank again up to the MAX level. The machine
EN
Ripetere la procedura dal punto 4 al punto 6 no ad esauri-
IT
re l'acqua nel serbatoio.
is now ready for use.
Riempire di nuovo il serbatoio dell'acqua no al livello
MAX: la macchina è ora pronta al funzionamento.
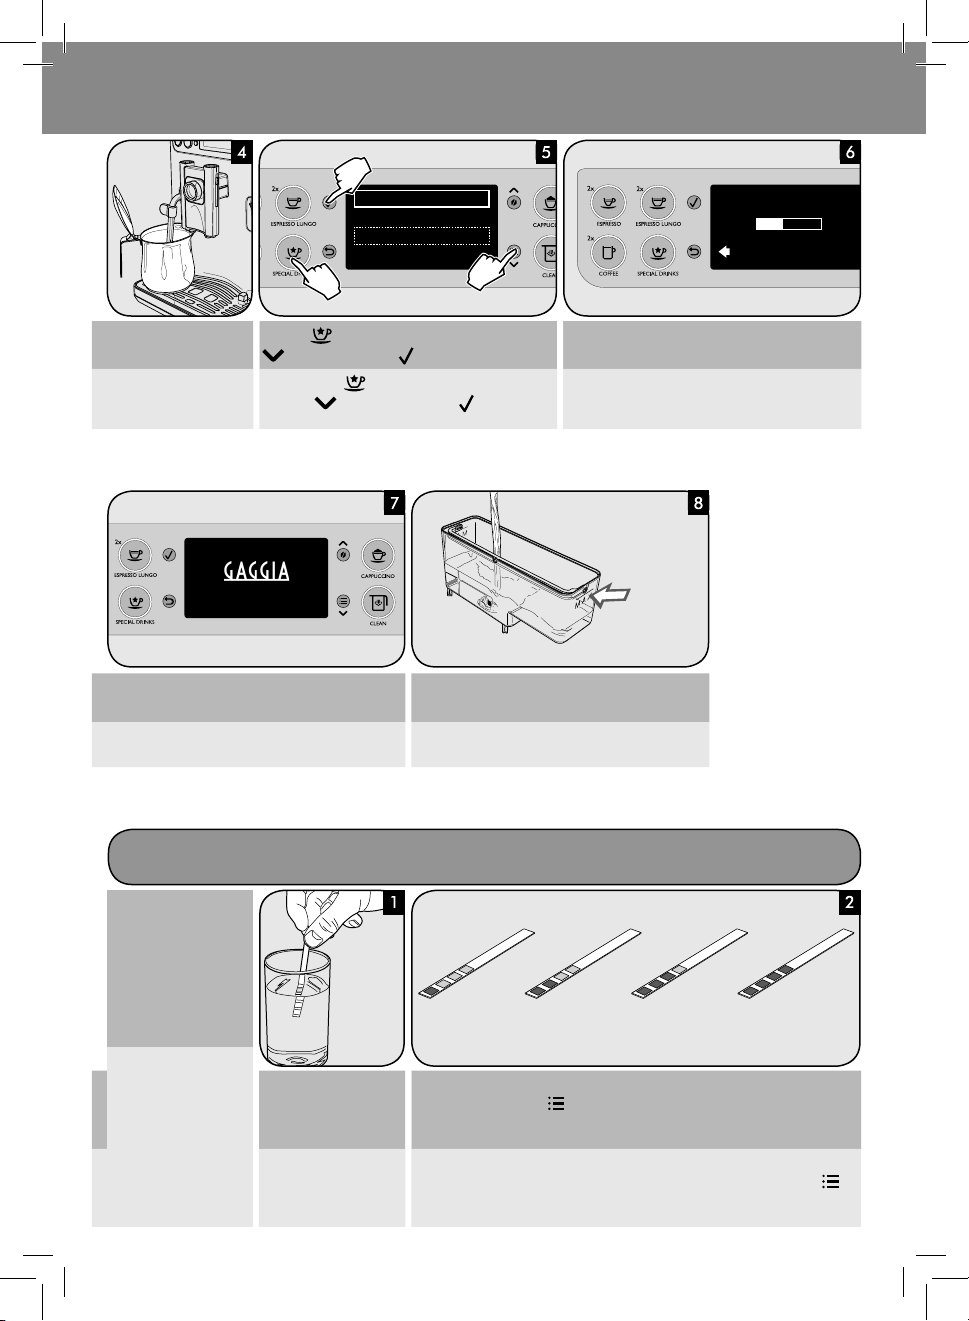
MEASURING WATER HARDNESS
MISURAZIONE DELLA DUREZZA DELL’ACQUA
The test strip can only be
used for one single measurement.
Machine Water Hardness Setting
Impostazione durezza acqua macchina
Il provino può essere
utilizzato per una sola
misurazione.
EN
IT
Immerse the water hardness test strip supplied with
the machine in water for 1
second.
Immergere, per 1 secondo
nell’acqua, il provino per i
test di durezza dell’acqua,
presente nella macchina.
1
(Very soft)
(Molto dolce)
2
(Soft)
(Dolce)
3
(Hard)
(Dura)
4
(Very hard)
(Molto Dura)
Wait for one minute. Check how many squares have changed to red. Enter the programming mode by pressing the
button to set the value in the machine.
Attendere un minuto. Veri care il numero di quadrati che diventano rossi. Programmare il valore nella macchina accedendo alla programmazione premendo il tasto
.
Page 15

Instructions
MENU
BEVERAGE MENU
MACHINE MENU
MACHINE MENU
AQUACLEAN FILTER
SETTINGS
MAINTENANCE
ACTIVATE
AQUACLEAN
FILTER?
ESC
OK
Istruzioni
AQUACLEAN FILTER
FILTRO AQUACLEAN
The AquaClean lter is designed to reduce limescale deposits in your co ee machine and provide ltered water to preserve the aroma and
avour of each cup of co ee. Using 8 AquaClean lters correctly allows you to descale your machine every 2 years only, or every 5000 cups
EN
(with 100-ml capacity).
Il ltro AquaClean è studiato per ridurre la formazione di depositi calcarei nella vostra macchina e per fornire acqua depurata in
grado di preservare l’aroma e il gusto di ogni ca è. L’utilizzo corretto degli otto ltri AquaClean permette di e ettuare la decalci ca-
IT
zione della macchina solo ogni due anni, oppure ogni 5000 tazze (da 100 ml).
Your machine has to be completely limescale-free
before starting to use the AquaClean lter. If you
did not activate the lter upon rst use and brewed
more than 50 cups (with 100-ml capacity), you need
to descale the machine before activating it.
When you install the AquaClean lter upon rst machine installation, start with step 4.
Assicurarsi che la macchina sia del tutto priva di calcare prima di utilizzare il ltro AquaClean. Se non
Installing the
EN
AquaClean Filter
Installazione
IT
ltro AquaClean
avete attivato il ltro al primo utilizzo e avete già
erogato più di 50 tazze da 100 ml, occorre procedere
alla decalci cazione prima di attivarlo.
In caso di installazione del ltro AquaClean al momento dell’installazione della macchina, iniziare
con il punto 4.
Press the button to access the machine main menu.
Premere il tasto per accedere al menu principale della
macchina.
15
ItalianoEnglish ItalianoEnglish
2
1
Press the and buttons to select MACHINE MENU. Press the button to select AQUACLEAN FILTER. Press the button to con-
EN
Premere il tasto e premere il tasto per selezionare
MENU MACCHINA.
IT
Premere il tasto per selezionare FILTRO AQUACLEAN. Premere il tasto per
rm the lter activation procedure.
confermare la procedura di
attivazione del ltro.
Page 16
Instructions
PLACE A CONTAINER
UNDER THE
WATER SPOUT
OK
ESC
0/8
ACTIVATING FILTER
1/8
100%
16
Istruzioni
Remove the AquaClean lter from its packaging. Shake the lter for about 5 seconds. Immerse the lter upside down in a jug with cold water and wait until no more air bubbles
EN
come out.
Rimuovere il ltro AquaClean dalla confezione. Scuoterlo per circa 5 secondi. Immergere
il ltro in posizione capovolta in una cara a piena di acqua fredda e aspettare che le bolle
IT
d’aria smettano di uscire.
The numbers in the screen indicate the amount of lters that have been installed from 0 to 8. After the rst
activation the display will indicate this as 1/8.
It can take a while until water comes out of the water
dispensing spout. The lter needs to be fully lled and
rinsed with water.
I numeri sullo schermo indicano la quantità di ltri
installati, da 0 a 8. Dopo la prima attivazione, sullo
schermo apparirà 1/8.
Può essere necessario attendere un attimo prima
che l’acqua inizi a uscire dall’erogatore dell’acqua.
Il ltro deve riempirsi completamente ed essere risciacquato con acqua.
EN
IT
EN
IT
Remove the water tank from the machine and insert the lter
vertically onto the cartridge connection.
Fill the water tank with fresh
water and put it back into
the machine.
Rimuovere il serbatoio acqua dalla macchina e inserire il
ltro in posizione verticale sul raccordo della cartuccia.
Riempire il serbatoio acqua
con acqua fresca e reinserirlo nella macchina.
The machine starts dispensing water. The screen shown in the gure is displayed. When dispensing stops, remove the container.
La macchina inizia a erogare acqua. Viene visualizzata la schermata come da immagine.
Al termine dell’erogazione rimuovere il contenitore.
Press the
button to con rm that a container has been
placed under the water dispensing spout.
Premere il tasto
per confermare la presenza di un reci-
piente sotto l’erogatore dell’acqua.
The machine is ready for use and the display indicates that
the lter is active.
La macchina è pronta all’uso e il display indica che il ltro
è attivo.
Page 17
10%
0%
You need to replace the lter
DESCALE BEFORE
ACTIVATING FILTER
ESC
OK
when the icon starts blinking
on the display or at least after 3 months of use.
Il ltro deve essere sostituito quando il simbolo sul display inizia a lampeggiare,
oppure dopo ogni 3 mesi di
utilizzo.
Replacing the
EN
AquaClean Filter
Sostituzione
IT
ltro AquaClean
10% + icon ashes. The performance of this lter is decreasing. It is recommended to remove the old lter and
place the new lter as described in the “Installing the AquaClean Filter” section to retain proper lter performance.
10% + simbolo lampeggiante. Le prestazioni del ltro
stanno peggiorando. Per un funzionamento ottimale del
ltro, si consiglia di rimuovere quello usato e di posizionare il nuovo ltro come descritto nel paragrafo “Installazione ltro AquaClean”.
Instructions
17
Istruzioni
0% + icon ashes. Remove the old lter immediately and
place the new lter as described in the “Installing the AquaClean Filter” section.
0% + simbolo lampeggiante. Rimuovere immediatamente il ltro usato e posizionare il nuovo ltro come indicato nel paragrafo “Installazione ltro AquaClean”.
Note: after replacing
8 lters, you need to
descale the machine.
Please refer to the “Descaling” chapter.
ItalianoEnglish ItalianoEnglish
0% and icon disappears from display. You rst need to descale the machine before you can place and activate a new
lter. Remove the old lter, descale the machine and place the new lter as described in the “Installing the AquaClean Filter”
EN
section. The counter will restart from 1/8.
0% e simbolo che scompare dallo schermo. Prima di poter posizionare e attivare un nuovo ltro, occorre innanzitutto decalci care la macchina. Rimuovere il ltro usato, e ettuare la decalci cazione e posizionare il nuovo ltro come
IT
descritto nel paragrafo “Installazione ltro AquaClean”. Il contatore ripartirà da 1/8.
Nota: dopo avere sostituito 8 ltri, decalci care la macchina
riferendosi al capitolo
“Decalci cazione”.
Page 18
Instructions
ESPRESSO
MEMO
STOP
ESPRESSO
MEMO
STOP
2 x ESPRESSO
18
Istruzioni
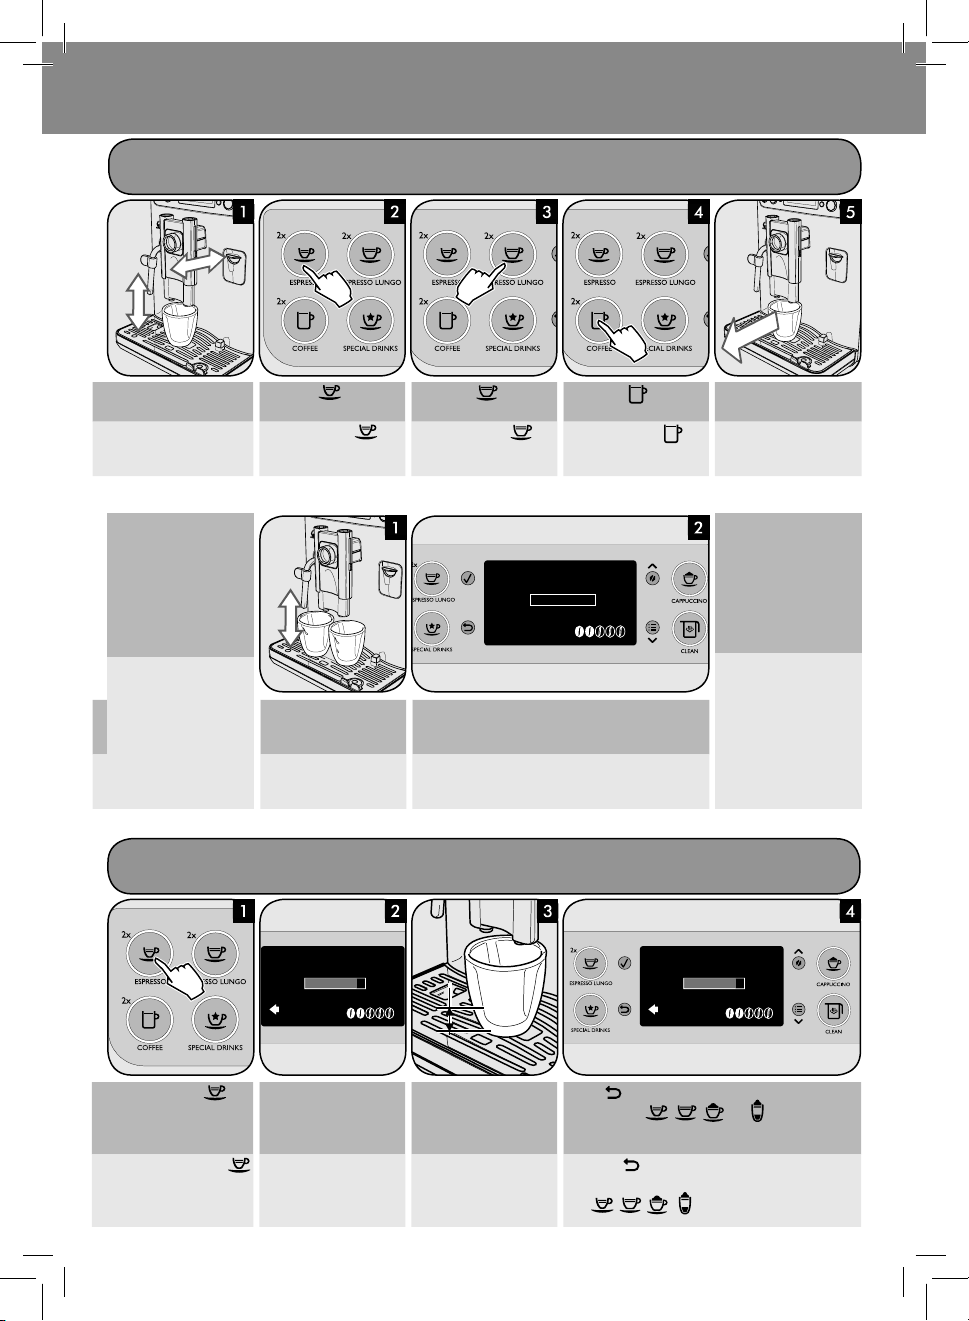
FIRST ESPRESSO
PRIMO ESPRESSO
Adjust the dispensing spout.
EN
Regolare l’erogatore.
IT
DOUBLE COFFEE
EN
DOPPIO CAFFÉ
IT
Press the
button to
brew an espresso or..
Premere il tasto per
erogare un espresso o...
Palce two cups under the dispensing spout.
...press the
brew a long espresso or...
...premere il tasto per
erogare un espresso lungo
o...
To brew 2 cups of espresso, 2 cups of long espresso or 2 cups
of co ee, press the desired button twice consecutively.
button to
...press the
brew a co ee.
...premere il tasto
erogare un ca è.
button to
per
This screen will be displayed.
Posizionare 2 tazzine sotto
l’erogatore.
Per erogare 2 espressi, 2 espressi lunghi, o 2 ca è, premere
il tasto desiderato due volte consecutive. Viene visualizzata la schermata.
HOW TO PROGRAM MY FAVORITE ESPRESSO
COME PROGRAMMARE IL MIO ESPRESSO IDEALE
At the end of the process, remove the cup.
Al termine del processo, rimuovere la tazzina.
Brewing two cups of
products requires two
grinding and brewing
cycles, automatically carried out by the machine.
La preparazione di due
prodotti richiede due cicli di macinatura e due
cicli di erogazione eseguiti in automatico.
Press and hold the button until the “MEMO” icon is
EN
displayed.
Tenere premuto il tasto
no a visualizzare il simbolo
IT
“MEMO”.
The machine is in programming mode. After a few
seconds, the machine starts
brewing.
Macchina in fase di programmazione: dopo pochi
secondi la macchina avvia
l'erogazione.
OK
Wait until the desired quantity is reached...
Attendere no al raggiungimento della quantità desiderata...
... press
to stop. Saved!
To program the
, , and buttons, the same
steps should be followed.
... premere
per interrompere. Memorizzato!
Eseguire la stessa procedura per la programmazione dei
, , e .
tasti
Page 19

Instructions
INSERT
GROUND COFFE
AND PRESS O
ESC
OK
INSERT
GROUND COFFEE
AND PRESS OK
ESC
OK
Istruzioni
BREWING BEVERAGES USING PRE-GROUND COFFEE
EROGAZIONE BEVANDA CON CAFFÈ PRE-MACINATO
19
ItalianoEnglish ItalianoEnglish
Adjust the dispensing spout. Press one or more time the button until the icon appears
EN
Regolare l’erogatore ca è. Premere il tasto una o più volte no a far apparire l’i-
IT
on the display.
cona sul display.
This screen will be displayed. Press on the lid to open it. Lift the lid. Add pre-ground co ee
EN
to the compartment by using the measuring scoop supplied
with the machine.
Viene visualizzata la schermata. Premere sullo sportello per aprirlo; sollevare lo sportello.
IT
Versare ca è pre-macinato nell’apposito scomparto utilizzando il misurino fornito a corredo.
Press the
button for an espresso, the button for a
long espresso or the
Premere il tasto
per un espresso, il tasto per un
espresso lungo o il tasto
button for a classic co ee.
per un ca è classico.
Press
to con rm and start
brewing.
Premere il tasto
ziare l’erogazione.
per ini-
If the brewing start button is not pressed within 30 seconds, the machine will return to the main menu and discharge any co ee into
the co ee grounds drawer.
If no pre-ground co ee is poured into the compartment, only water will be dispensed.
EN
If the dose is excessive or 2 or more measuring scoops of co ee are used, the machine will not brew the product. Only water will be dispensed and the ground co ee will be discharged into the co ee grounds drawer.
Se dopo 30 secondi non si preme il tasto per avviare l’erogazione, la macchina ritorna al menu principale e scarica l’eventuale ca è
inserito nel cassetto raccoglifondi.
IT
Se nello scompartimento non viene versato il ca è pre-macinato, si avrà solo l’erogazione dell’acqua.
Se la dose è eccessiva oppure vengono versati 2 o più misurini di ca è, la macchina non eroga il prodotto. Si avrà solo l’erogazione
dell’acqua e il ca è macinato verrà scaricato nel cassetto raccoglifondi.
Page 20

Instructions
20
Istruzioni
The height of the dispensing spout may be adjusted to better t the size of
the cups that you wish to
use.
L’erogatore è regolabile in altezza per meglio
adattarsi alle dimensioni delle tazzine in uso.
EN
IT
ADJUSTING THE DISPENSING SPOUT HEIGHT
REGOLAZIONE DELL’ALTEZZA DELL’EROGATORE
Move the dispensing spout up or down with your ngers to
adjust its height as shown in the gure.
The recommended positions are:
Per e ettuare la regolazione, alzare o abbassare manualmente l’erogatore con le dita come mostrato in gura.
Le posizioni consigliate sono:
For small cups; For large cups;
Per tazzine piccole; Per tazze grandi;
For Latte Macchiato cups.
The dispensing spout can also be removed to allow the
EN
use of large containers.
Per tazze di latte macchiato.
É inoltre possibile rimuovere l’erogatore per con-
IT
sentire l’uso di grandi contenitori.
COFFEE STRENGTH (GAGGIA BREWING SYSTEM)
INTENSITÀ DEL CAFFÈ (GAGGIA BREWING SYSTEM)
The Gaggia Brewing System allows you to control the
co ee crema and avour intensity by adjusting the
co ee brewing speed.
The speed can be adjusted while brewing co ee.
Il Gaggia Brewing System consente di controllare
la crema e l’intensità del gusto del ca è regolando
la velocità di fuoriuscita del ca è durante il ciclo di
erogazione.
EN
La regolazione della velocità può essere eseguita
durante l’erogazione del ca è.
IT
Two cups can be placed under the dispensing spout to brew
two co ees at the same time.
Sotto l’erogatore si possono posizionare due tazze/tazzine
per l’erogazione simultanea di due ca è.
- Turn the knob to ( ) to increase the ow rate: co ee becomes lighter and has less
crema.
- Turn the knob to (
) to decrease the ow rate: co ee becomes stronger and has more
crema.
- Ruotare la manopola verso ( ) per aumentare la velocità del usso: il ca è diventa
più leggero e con meno crema.
- Ruotare la manopola verso (
) per diminuire la velocità del usso: il ca è diventa più
forte e con più crema.
Page 21

V 09
(OPTI-DOSE) INDICATION OF THE COFFEE QUANTITY TO GRIND
V 09
(OPTI-DOSE) INDICAZIONE QUANTITÀ DI CAFFÈ DA MACINARE
The machine allows you
to adjust the right quantity of ground co ee for
each product.
= VERY MILD
= MILD
= REGULAR
= STRONG
= VERY STRONG
= pre-ground co ee
Instructions
Istruzioni
21
ItalianoEnglish ItalianoEnglish
La macchina consente di
regolare la giusta quantità di ca è macinato
per ogni prodotto.
EN
IT
The grinder adjustment
knob inside the co ee
bean hopper MUST be
turned only when the
ceramic co ee grinder is
in use.
La manopola di regolazione della macinatura
posta all’interno del contenitore ca è in grani
EN
DEVE essere ruotata solo
quando il macinaca è in
IT
ceramica è in funzione.
= MOLTO LEGGERO
= LEGGERO
Press the button to temporarily change the quantity of
co ee to grind, or to select the pre-ground co ee function.
Premendo il tasto si modi ca temporaneamente la
quantità di ca è che viene macinato e si può anche sele-
= NORMALE
= FORTE
= MOLTO FORTE
= ca è pre-macinato
zionare la funzione di ca è pre-macinato.
ADJUSTING THE CERAMIC COFFEE GRINDER
REGOLAZIONE MACINACAFFÈ IN CERAMICA
Press and turn the grinder adjustment knob one notch at a
time.
Premere e ruotare di uno scatto alla volta la manopola di
regolazione della macinatura.
Select (15) for a lighter taste. Ideal for dark roasted co ee
blends.
Selezionare (15) per un gusto più leggero, adatto a miscele
con tostatura scura.
Select (1) for a bolder taste. Ideal for light roasted co ee
EN
blends.
Selezionare (1) per un gusto più forte, adatto a miscele con
IT
tostatura chiara.
Brew 2-3 products to taste the di erence. If co ee is watery,
change the co ee grinder settings.
Erogare 2-3 prodotti per gustare la di erenza. Se il ca è è
acquoso, modi care le impostazioni del macinaca è.
Page 22

Instructions
22
Istruzioni
GAGGIA ADAPTING SYSTEM
GAGGIA ADAPTING SYSTEM
Co ee is a natural product whose characteristics may change according to its origin, blend and roast. The machine is equipped with a selfadjusting system allowing you to use all types of co ee beans available on the market (except for caramelized beans).
EN
The machine automatically adjusts itself after brewing several cups of co ee in order to optimise extraction in relation to the compac tness
of ground co ee.
Il ca è è un prodotto naturale e le sue caratteristiche possono cambiare in funzione dell’origine, della miscela e della tostatura. La
macchina è dotata di un sistema di auto-regolazione che consente di utilizzare tutti i tipi di ca è in grani esistenti in commercio (non
caramellati).
IT
La macchina si regola automaticamente dopo l’erogazione di alcuni ca è per ottimizzare l’estrazione in relazione alla compattezza
del ca è macinato.
ENERGY SAVING (STAND-BY)
RISPARMIO ENERGETICO (STAND-BY)
After a certain time of inactivity that can be set by the user (see the “MENU FOR CUSTOMIZATION AND MAINTENANCE”
chapter), the machine turns o automatically. If a product has been brewed, the machine performs a rinse cycle.
In stand-by mode, the energy consumption is below 1Wh.
To turn on the machine, press the
cold, the machine performs a rinse cycle.
The machine status can be manually changed to stand-by mode by keeping the
Note:
The machine will not go into stand-by mode if the service door is open.
EN
When the stand-by mode is activated, the machine may perform a rinse cycle. The cycle can be interrupted
by pressing the “STOP” button.
button (if the power button on the back of the machine is set to “I”). If the boiler is
button pressed for 3 seconds.
The machine can be reactivated by:
Pressing any button on the control panel.
Opening the service door (when closing the door, the machine goes back to stand-by mode).
The red indicator light on the
Dopo un determinato periodo di inattività che può essere programmato dall’utente (vedere capitolo “MENU PERSONALIZZAZIONE E MANUTENZIONE”), la macchina si spegne automaticamente. Se è stato erogato un prodotto, la
macchina e ettua un ciclo di risciacquo.
In modalità stand-by il consumo energetico è inferiore a 1Wh.
Per accendere la macchina, premere il tasto
Se la caldaia è fredda, la macchina e ettua un ciclo di risciacquo.
La macchina può essere portata manualmente in stand-by tenendo premuto il tasto
Nota:
IT
La macchina non entra in modalità stand-by se lo sportello di servizio è aperto.
All’attivazione della modalità stand-by, la macchina può eseguire un ciclo di risciacquo. Per interrompere il ciclo premere il tasto “STOP”.
La macchina può essere riattivata:
premendo un tasto qualsiasi sul pannello di comando;
aprendo lo sportello di servizio (alla chiusura dello sportello la macchina torna in modalità stand-by).
Quando la macchina è in modalità stand-by, la spia rossa sul tasto
button ashes when the machine is in stand-by mode.
(se l’interruttore generale sul retro della macchina è in posizione “I”).
per 3 secondi.
lampeggia.
Page 23

MILK CARAFE
CARAFFA LATTE
Instructions
Istruzioni
23
ItalianoEnglish ItalianoEnglish
Remove the protection cover
from the milk container con-
EN
nection.
Rimuovere il coperchio di
protezione dal collegamen-
IT
to del contenitore del latte.
Close the milk carafe dispensing spout by turning it
EN
counter-clockwise.
Chiudere l’erogatore della
cara a del latte ruotandolo
IT
in senso antiorario.
Open the milk carafe dispensing spout by turning it
Press the release buttons and
lift the lid.
clockwise.
Aprire l’erogatore della cara a del latte ruotandolo in
Premere i tasti di sgancio e
sollevare il coperchio.
senso orario.
E
Slightly tilt the milk carafe and then insert the front part into
the guides of the machine.
Inclinare leggermente la cara a del latte e inserire la parte
anteriore nelle guide della macchina.
Pour a milk amount between
Place back the lid.
the MIN and MAX level of the
carafe.
Versare una quantità di lat-
Riposizionare il coperchio.
te compresa tra i livelli MIN
e MAX della cara a.
Push the milk carafe towards the bottom while rotating it at
the same time, until it is locked onto the (external) drip tray.
Premere e ruotare la cara a del latte verso il basso no ad
agganciarla alla vasca raccogligocce (esterna).
REMOVING THE CARAFE
RIMOZIONE DELLA
EN
CARAFFA
IT
Rotate the milk carafe upwards until it is released from the (external) drip tray.
Pull it away until it is completely detached.
Ruotare la cara a del latte verso l’alto no a sganciarla dalla vasca raccogligocce (esterna).
Tirare la cara a per completare l'estrazione.
Page 24

Instructions
CAPPUCCINO
STOP
CAPPUCCINO
STOP
CAPPUCCINO
PLEASE WAIT …
STOP
24
Istruzioni
Dispensing may be preceded by small jets of milk
and steam.
Danger of burning!
All’inizio dell’erogazione
possono veri carsi brevi
spruzzi di latte e vapore.
Pericolo di ustioni!
EN
IT
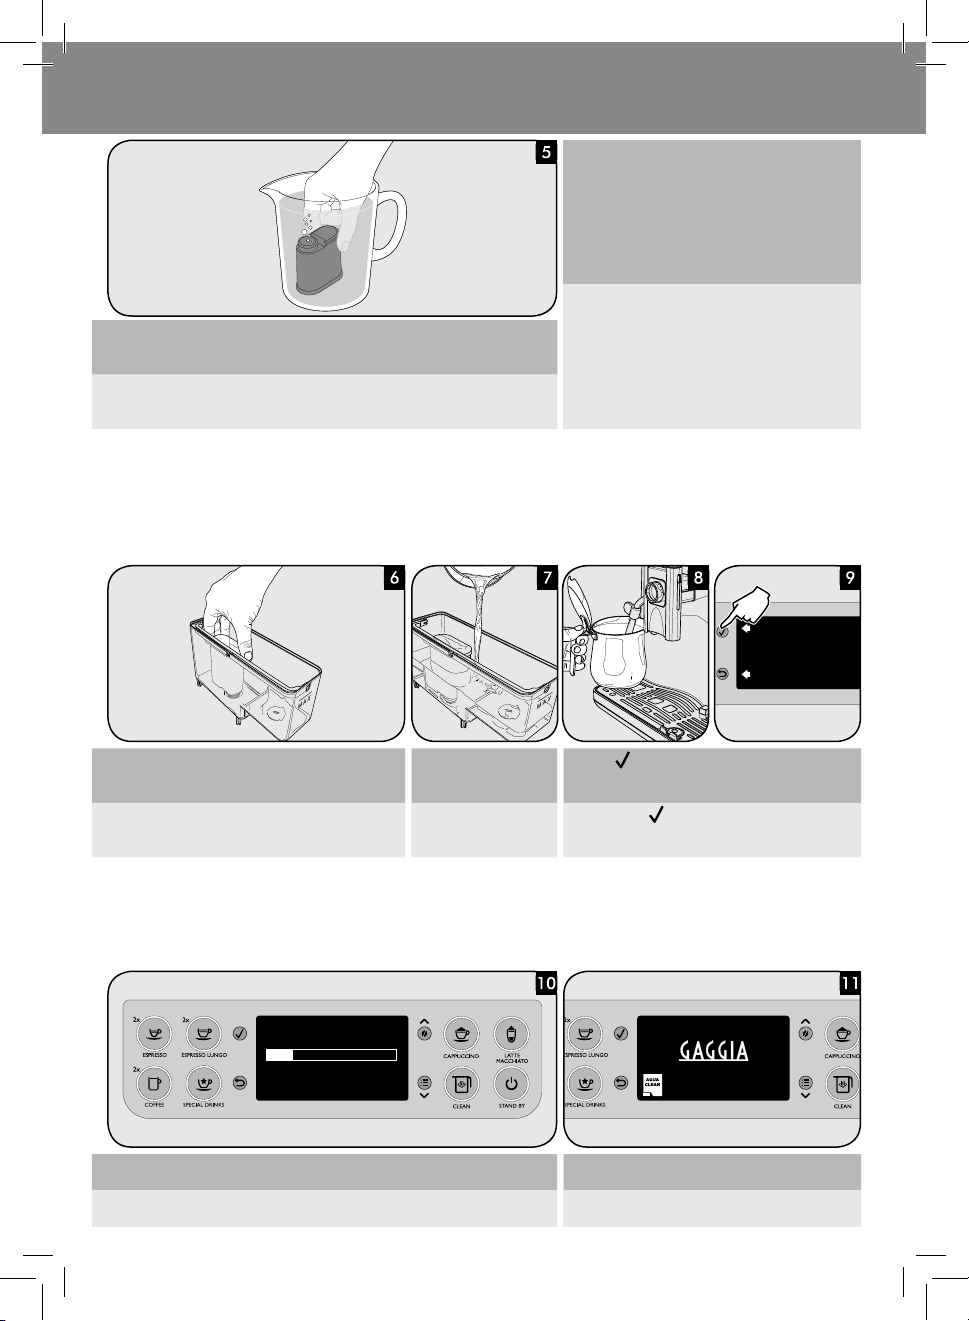
FIRST CAPPUCCINO - LATTE MACCHIATO
PRIMO CAPPUCCINO - LATTE MACCHIATO
Place a cup under the dispensing spout. Open the milk carafe dispensing spout by turning it clock-
wise.
Posizionare una tazza sotto l’erogatore. Aprire l’erogatore della cara a del latte ruotandolo in sen-
so orario.
Press the button to brew
EN
a cappuccino....
Premere il tasto per
IT
erogare un cappuccino...
..or press the
brew a Latte Macchiato.
...o premere il tasto
erogare un latte macchiato.
The machine is heating up. The machine starts dispens-
button to
La macchina è in fase di ri-
per
scaldamento.
Close the milk carafe dispensing spout by turning it counter-clockwise. The machine starts
the automatic carafe cleaning cycle.
EN
At the end, remove the cup.
Chiudere l’erogatore della cara a del latte ruotandolo in senso antiorario. A questo punto
la macchina avvia il ciclo di pulizia automatica della cara a.
IT
Al termine, rimuovere la tazzina.
ing frothed milk.
The machine brews co ee.
La macchina inizia a erogare
La macchina eroga ca è.
latte montato.
Note:
The carafe must be fully closed so as to prevent steam
from escaping.
Use cold (~5°C / 41°F) milk with a protein content of
at least 3% to ensure optimum results when preparing a cappuccino. You can use both whole milk and
skimmed milk, depending on individual taste.
Nota:
La cara a deve essere completamente chiusa al ne
di evitare fuoriuscite di vapore.
Utilizzare latte freddo (~5°C / 41°F) con contenuto
proteico pari almeno al 3% per ottenere un cappuccino di buona qualità. È possibile utilizzare sia latte
intero che latte scremato, in base ai gusti personali.
Page 25

“CLEAN” SELF-CLEANING CYCLE (AFTER EACH USE)
CAPPUCCINO
MEMO
PLEASE WAIT …
STOP
CAPPUCCINO
MEMO
STOP
CAPPUCCINO
MEMO
STOP
CAPPUCCINO
STOP
CAPPUCCINO
STOP
CICLO DI AUTOPULIZIA “CLEAN” (DOPO OGNI UTILIZZO)
After preparing a milk-based beverage, the machine
performs an automatic cleaning cycle by releasing
steam jets from the milk dispensing spout.
You can also activate this cycle manually by pressing
the
button on the control panel. You can perform
this operation at any time.
Al termine della preparazione di una bevanda a
base di latte, la macchina e ettua un ciclo di pulizia
automatico emettendo getti di vapore dall’erogato-
EN
re del latte. Questo ciclo può essere attivato anche
manualmente premendo il tasto
di comando. È possibile eseguire questa operazione
IT
in qualsiasi momento.
sul pannello
HOW TO PROGRAM MY FAVORITE CAPPUCCINO
COME PROGRAMMARE IL MIO CAPPUCCINO IDEALE
Insert the milk carafe into the machine as described in the
“Milk Carafe” chapter. Close the milk dispensing spout.
Inserire la cara a del latte nella macchina come descritto
nel capitolo “Cara a latte”.
Chiudere l’erogatore del latte.
Instructions
Istruzioni
Press the
start the cleaning cycle.
Premere il tasto
avviare il ciclo di pulizia.
button to
25
ItalianoEnglish ItalianoEnglish
per
Press and hold the button until the “MEMO” icon is
EN
displayed.
Tenere premuto il tasto
IT
no a visualizzare il simbolo
“MEMO”.
The machine starts brewing
EN
the co ee.
La macchina avvia l’eroga-
IT
zione del ca è.
The machine is now in programming mode. The ma-
The machine starts dispensing milk froth into the cup.
chine is warming up.
Macchina in fase di programmazione: La macchina
è in fase di riscaldamento.
La macchina avvia l’erogazione della schiuma di latte
in tazza.
OK
When the desired amount of co ee is reached, press the
button. Saved!
Quando viene raggiunta la quantità di ca è desiderata,
premere il tasto
. Memorizzato!
OK
When the desired amount of milk is reached, press the
button.
Premere il tasto
di latte desiderata.
Note:
To program the
beverages, the same steps should be followed.
Nota:
Eseguire la stessa procedura per la programmazione del tasto
no latte.
non appena si è raggiunta la quantità
button and the other milk-based
e delle altre bevande che contengo-
Page 26

Instructions
SPECIAL BEVERAGES
MILK FROTH
HOT WATER
STEAM
SPECIAL BEVERAGES
MILK FROTH
HOT WATER
STEAM
SPECIAL BEVERAGES
MILK FROTH
HOT WATER
STEAM
SPECIAL BEVERAGES
MILK FROTH
HOT WATER
STEAM
26
Istruzioni
“SPECIAL” BEVERAGES
BEVANDE “SPECIAL”
2
1
Press the button to access the “SPECIAL BEVERAGES”
EN
menu.
Premere il tasto per accedere al menu “BEVANDE SPECIAL”.
IT
Press the button to start dispensing.
EN
Premere il tasto per avviare la preparazione.
IT
Place a container under the
steam/hot water wand.
Posizionare un contenitore
sotto il tubo vapore/acqua
calda.
Select the desired beverage by pressing the
ton.
Selezionare la bevanda desiderata premendo il tasto
o
.
Special beverages include frothed milk, hot water and
steam, strong co ee, Espresso Macchiato, at white.
Tra le bevande speciali sono compresi latte emulsionato,
acqua calda e vapore, ristretto, espresso macchiato, at
white.
2
or but-
Page 27

Press the button.
MENU
BEVERAGE MENU
MACHINE MENU
MENU
BEVERAGE MENU
MACHINE MENU
BEVERAGE MENU
COFFEE
CAPPUCCINO
LATTE MACCHIATO
CAPPUCCINO
STRENGTH
COFFEE AMOUNT
TEMPERATURE
EN
Premere il tasto
IT
MENU FOR CUSTOMIZATION AND MAINTENANCE
MENU PERSONALIZZAZIONE E MANUTENZIONE
When you enter the programming mode:
button = (con rms a selection or a change you have made)
button = (scrolls up the menu)
button = (scrolls down the menu)
button = (con rms when you exit a selection)
Quando si entra nella modalità programmazione:
= (conferma una selezione o una modi ca e ettuata)
tasto
= (scorre il menu verso l’alto)
tasto
.
tasto
= (scorre il menu verso il basso)
= (conferma l’uscita da una selezione)
tasto
BEVERAGE MENU
MENU BEVANDA
The machine can be programmed to tailor the co ee taste to your personal preferences.
You can customize the settings for each beverage.
EN
Press the
button. Then press .
Instructions
Istruzioni
27
ItalianoEnglish ItalianoEnglish
2
1
La macchina può essere programmata per adattare il gusto del ca è alle preferenze
dell'utente. Per ogni bevanda è possibile personalizzare le impostazioni.
IT
Premere il tasto
, quindi premere .
The following procedure describes how to program a cappuccino.
The settings of each submenu are explained below. You can select these by pressing the
EN
or scrolling button. Con rm the settings with .
La seguente procedura descrive la programmazione di un cappuccino.
Qui di seguito sono illustrate le impostazioni relative a ogni sottomenu. Per selezio-
IT
narle, premere il tasto di scorrimento
o . Confermare le impostazioni con .
Page 28

Instructions
STRENGTH
TEMPERATURE
TASTE
COFFEE AMOUNT
28
Istruzioni
This setting allows you to adjust the amount of co ee to be ground for beverage brewing.
EN
This setting enables the prebrewing function.
Questa impostazione regola la quantità di ca è che verrà macinata per l’erogazione
della bevanda.
IT
Questa impostazione consente di eseguire la funzione di pre-infusione.
COFFEE AMOUNT
By adjusting the bar on the display with the or scrolling button, you can choose
the amount of water used for co ee brewing.
EN
to con rm the change.
Press
Regolando la barra sul display attraverso i tasti di scorrimento o , è possibile
IT
scegliere la quantità d’acqua per l’erogazione di ca è. Premere
per confermare la
modi ca.
This setting allows you to adjust the co ee temperature.
EN
to con rm the change.
Press
Questa impostazione consente di regolare la temperatura del ca è.
IT
Premere
per confermare la modi ca.
During prebrewing, the co ee is slightly dampened to bring out the aroma in full.
DELICATE: the prebrewing function is not performed.
EN
BALANCED: the prebrewing function is enabled.
FULL BODY: the prebrewing function takes more time to enhance the co ee taste.
Durante la pre-infusione il ca è viene leggermente inumidito per esaltarne al massimo l’aroma.
DELICATO: la funzione di pre-infusione non viene eseguita.
IT
BILANCIATO: la funzione di pre-infusione è attiva.
CORPOSO: la funzione di pre-infusione dura di più per esaltare il gusto del ca è.
Page 29

Instructions
RESTORE TO DEFAULT
MILK AMOUNT
BEVERAGE MENU
LATTE MACCHIATO
SPECIAL BEVERAGES
Istruzioni
29
MILK AMOUNT
By adjusting the bar on the display with the or scrolling button, you can choose
the amount of milk to be used for the selected beverage. Press
EN
The milk managing options are displayed only for the milk-based beverages.
to con rm the change.
Regolando la barra sul display attraverso i tasti di scorrimento o , è possibile
scegliere la quantità di latte da utilizzare per la bevanda selezionata. Premere
confermare la modi ca.
IT
Le opzioni riguardanti il trattamento del latte vengono mostrate solo per le
bevande a base di latte.
For each beverage it is possible to reset the original factory settings. Upon selection of this
function, the customized settings are deleted.
EN
To exit programming, press the
button at least once until the main menu is displayed.
Per ogni bevanda è possibile ripristinare le impostazioni di fabbrica. Una volta selezionata questa funzione, le impostazioni personali vengono eliminate.
IT
Per uscire dalla programmazione, premere una o più volte il tasto
no a visualiz-
zare il menu principale.
ItalianoEnglish ItalianoEnglish
per
EN
IT
Hot Water
Acqua Calda
The following procedure describes how to program hot water.
EN
Select SPECIAL BEVERAGES from the beverage menu by pressing the
or scrolling button. Press to con rm.
La seguente procedura descrive la programmazione dell’acqua calda.
Selezionare BEVANDE SPECIAL dal menu bevande premendo il tasto di scorri-
IT
mento
o . Premere per confermare.
Page 30

Instructions
SPECIAL BEVERAGES
MILK FROTH
HOT WATER
STEAM
HOT WATER
WATER AMOUNT
TEMPERATURE
RESTORE TO DEFAULT
TEMPERATURE
WATER AMOUNT
RESTORE TO DEFAULT
30
Istruzioni
Select HOT WATER by pressing the or scrolling button.
EN
to con rm the change.
Press
Selezionare ACQUA CALDA premendo il tasto di scorrimento o o .
IT
Premere
per confermare la modi ca.
WATER AMOUNT
By adjusting the bar on the display with the or scrolling button, you can choose
the amount of water used for co ee brewing.
EN
Press
to con rm the change.
Regolando la barra sul display attraverso i tasti di scorrimento o , è possibile
scegliere la quantità d’acqua per l’erogazione di ca è.
IT
Premere
per confermare la modi ca.
This setting allows you to adjust the hot water temperature.
EN
to con rm the change.
Press
Questa impostazione consente di regolare la temperatura dell’acqua calda.
IT
Premere
per confermare la modi ca.
For each beverage it is possible to reset the original factory settings. Upon selection of this
function, the customized settings are deleted.
EN
To exit programming, press the
button at least once until the main menu is displayed.
Per ogni bevanda è possibile ripristinare le impostazioni di fabbrica. Una volta selezionata questa funzione, le impostazioni personali vengono eliminate.
IT
Per uscire dalla programmazione, premere una o più volte il tasto
no a visualiz-
zare il menu principale.
Page 31

Instructions
AQUACLEAN FILTER
MENU
BEVERAGE MENU
MACHINE MENU
MENU
BEVERAGE MENU
MACHINE MENU
Istruzioni
MACHINE MENU
MENU MACCHINA
The machine can be programmed to tailor the co ee taste to your personal preferences.
You can customize the settings for each beverage.
EN
Press the
La macchina può essere programmata per adattare il gusto del ca è alle preferenze
dell'utente. Per ogni bevanda è possibile personalizzare le impostazioni.
IT
Premere il tasto
Press the button to select “MACHINE MENU”; press the button to access the menu.
EN
Premere il tasto per selezionare la voce “MENU MACCHINA”; premere il tasto
IT
per accedere al menu.
button.
.
31
ItalianoEnglish ItalianoEnglish
The general menu allows you to adjust the water parameters in order to brew the best
possible co ee.
EN
Il menu generale consente di impostare i parametri relativi all’acqua per un ca è ottimale.
IT
Page 32

Instructions
LANGUAGE
SETTINGS
BRIGHTNESS
BUTTON SOUND
ECOMODE
32
Istruzioni
The general menu allows you to change the operation settings.
EN
Il menu generale consente di modi care le impostazioni di funzionamento.
IT
This setting is important to automatically adjust the machine parameters according to
EN
the user’s country.
Questa impostazione è importante per regolare automaticamente i parametri della
IT
macchina a seconda del Paese dell’utente.
This setting allows you to adjust the display brightness.
EN
Questa impostazione è importante per regolare la luminosità del display.
IT
The BUTTON SOUND function activates/deactivates the sound feedback.
EN
La funzione SUONO TASTI attiva/disattiva i segnali acustici.
IT
The ECOMODE function allows you to save energy by keeping the boiler activation level
at one when starting up the machine. If you wish to dispense more milk-based bever-
EN
ages, warm-up time may increase.
The function is set by default to ON.
La funzione ECOMODE consente di risparmiare energia mantenendo al livello uno l’attivazione della caldaia all’avvio della macchina. Se si desidera erogare più bevande a
IT
base di latte, il tempo di riscaldamento potrebbe aumentare.
Di default, la funzione è impostata su ON.
Page 33

Instructions
STAND-BY TIME
WATER HARDNESS
RESTORE TO DEFAULT
Istruzioni
The STAND-BY TIME function sets the time lapse for the machine to go into stand-by
mode after the last brewing.
EN
The stand-by time ranges from 15, 30, 60 and 180 minutes.
The default time value is 15 minutes.
La funzione TEMPO STAND-BY determina dopo quanto tempo dall’ultima erogazione
la macchina entra in modalità stand-by. Il tempo di stand-by varia tra 15, 30, 60 e
IT
180 minuti.
Il tempo di default impostato è 15 minuti.
Under WATER HARDNESS you can set the water hardness level.
For water hardness measuring, refer to the “Measuring Water Hardness” chapter.
EN
In DUREZZA ACQUA è possibile impostare il grado di durezza dell’acqua.
Per misurare la durezza dell’acqua, consultare il capitolo “Misurazione della durezza
IT
dell’acqua”.
Activating the RESTORE TO DEFAULT option will restore all machine settings to their
default values. In this case, all customized parameters will be deleted.
EN
33
ItalianoEnglish ItalianoEnglish
Attivando la voce RIPRISTINA DEFAULT, tutte le impostazioni della macchina ver-
ranno riportate ai valori di default. In questo caso tutti i parametri personali vengono
IT
eliminati.
Page 34

Instructions
BREW GROUP CLEAN
MAINTENANCE
CARAFE CLEANING
DESCALING
CARAFE CLEAN
34
Istruzioni
The MAINTENANCE menu allows you to set all the functions for correctly managing ma-
EN
chine maintenance.
Il menu MANUTENZIONE consente di impostare tutte le funzioni per gestire corretta-
IT
mente la manutenzione della macchina.
The BREW GROUP CLEAN function enables the brew group monthly cleaning.
EN
La funzione PULIZIA GRUPPO consente la pulizia mensile del gruppo ca è.
IT
The CARAFE CLEANING function enables the milk carafe monthly cleaning.
EN
La funzione PULIZIA CARAFFA consente la pulizia mensile della cara a del latte.
IT
The DESCALING function activates the descaling cycle (see the “Descaling” chapter).
EN
La funzione DECALCIFICAZIONE attiva il ciclo di decalci cazione (vedere il capitolo
IT
“Decalci cazione”).
The CARAFE CLEAN function allows you to run the milk carafe automatic self-cleaning
EN
cycle. The function is set by default to ON.
La funzione CLEAN CARAFFA attiva il ciclo automatico di autopulizia della cara a del
IT
latte. Di default, la funzione è impostata su ON.
Page 35

Instructions
RESET STATISTICS
STATISTICS
Istruzioni
35
The STATISTICS menu shows how many products have been brewed for every single type
EN
of co ee since the last reset.
Il menu STATISTICHE consente di visualizzare quanti prodotti sono stati preparati per
IT
ogni singolo tipo di ca è a partire dall’ultimo azzeramento.
The RESET STATISTICS function allows you to reset all counts carried out until that mo-
EN
ment.
La funzione AZZERA STATISTICHE consente di azzerare tutti i conteggi e ettuati no
IT
a quel momento.
ItalianoEnglish ItalianoEnglish
Page 36

Instructions
36
Istruzioni
CLEANING AND MAINTENANCE
PULIZIA E MANUTENZIONE
Note:
- Use a sof t, dampened cloth to clean the machine.
- Do not wash any removable part in the dishwasher.
- Do not use alcohol, solvents and/or abrasive objects to clean the machine.
EN
- Do not immerse the machine in water.
- Do not dr y the machine and/or its components using a microwave and/or standard oven.
Empty and clean the co ee grounds drawer and the (internal) drip tray every day with the machine turned on. Please follow the steps below.
Nota:
- Per la pulizia della macchina, utilizzare un panno morbido inumidito con acqua.
- Non inserire in lavastoviglie i componenti rimovibili.
- Non utilizzare alcol, solventi e/o oggetti abrasivi per pulire la macchina.
IT
- Non immergere la macchina in acqua.
- Non asciugare la macchina e/o i suoi componenti utilizzando un forno a microonde e/o un forno convenzionale.
Ogni giorno, a macchina accesa, vuotare e pulire il cassetto raccoglifondi e la vasca raccogligocce (interna). Attenersi alle seguenti istruzioni.
Daily Cleaning
EN
Pulizia
IT
giornaliera
Correctly reinstall all the
components.
EN
Riposizionare correttamente i componenti.
IT
Press the button and open
the service door.
Premere il pulsante e aprire
lo sportello di servizio.
Insert the drip tray and the
co ee grounds drawer and
close the service door.
Inserire la vasca e il cassetto
raccoglifondi e chiudere le
sportello di servizio.
Remove the (internal) drip
tray and co ee grounds
drawer.
Rimuovere la vasca raccogligocce (interna) e il cassetto raccoglifondi.
Empty the co ee grounds
drawer and wash it with
fresh water.
Svuotare il cassetto raccoglifondi e lavarlo con acqua
fresca.
Empty the (internal) drip
tray and the lid and wash
them with fresh water.
Svuotare e lavare la vasca
raccogligocce (interna) e il
coperchio con acqua fresca.
If the co ee grounds drawer is emptied when the machine is o , the count of the
co ee grounds in the drawer is not reset.
In this case, the machine might display the “EMPTY COFFEE GROUNDS DRAWER”
message too soon.
Vuotando i fondi a macchina spenta, il conteggio del fondi presenti nel cassetto non viene azzerato.
In tal caso la macchina può visualizzare il messaggio “SVUOTARE CONTENITORE
FONDI” troppo presto.
Page 37

Daily Cleaning of the
EN
Water Tank
Pulizia giornaliera del
IT
serbatoio acqua
Remove the water tank.
Rimuovere il serbatoio.
Instructions
37
Istruzioni
1 Remove the small white lter or the AquaClean lter (if installed) from the water tank
and wash it with fresh water.
2 Put the small white lter or the AquaClean lter (if installed) back in its housing by
gently pressing and turning it at the same time.
3 Fill the water tank with fresh water.
1 Rimuovere il ltrino bianco o il ltro AquaClean (se presente) dal serbatoio e lavarlo
con acqua fresca.
2 Riposizionare il ltrino bianco o il ltro AquaClean (se presente) nel suo alloggia-
mento esercitando una leggera pressione combinata a una leggera rotazione.
3 Riempire il serbatoio con acqua fresca.
ItalianoEnglish ItalianoEnglish
Weekly Cleaning
EN
Pulizia
IT
Settimanale
Dry the grill, reassemble it
and place it back in the ma-
EN
chine.
Asciugare la griglia, montarla e riposizionarla nella
IT
macchina.
Turn o the machine and
unplug it.
Spegnere la macchina e scollegare la spina.
Remove the dispensing
spout and wash it with water.
Estrarre l’erogatore e lavarlo
con acqua.
Remove the (external) drip
tray.
Estrarre la vasca raccogligocce (esterna).
Remove the grill and wash it
thoroughly.
Estrarre la griglia e lavarla
con cura.
Clean the pre-ground co ee compartment with a brush or
a dry cloth.
Con un pennello o un panno asciutto, pulire lo scompartimento del ca è pre-macinato.
Remove the support under
the grill. Wash the support
and the drip tray.
Estrarre il supporto sotto la
griglia. Lavare il supporto e
la vasca raccogligocce.
Clean the steam/hot water
wand and the display with a
damp cloth.
Con un panno umido pulire
il tubo vapore/acqua calda
e il display.
Page 38

Instructions
MENU
BEVERAGE MENU
MACHINE MENU
38
Istruzioni
DESCALING - APPROX. 30 MIN.
DECALCIFICAZIONE - CIRCA 30 MIN.
When the “CALC CLEAN” icon is displayed, you need to descale the machine.
The descaling cycle takes approx. 30 minutes.
Not doing this will ultimately make your machine stop working properly. In this case, repair is NOT covered
by your warranty.
Warning:
Use the Gaggia descaling solution only. Its formula has been designed to ensure better machine per-
formance. The use of other descaling solutions may damage the machine and leave residues in the water.
EN
Warning:
Never drink the descaling solution or any products dispensed until the cycle has been carried out to
the end. Never use vinegar as a descaling solution.
Note: Do not remove the brew group during the descaling process.
Se viene visualizzato il simbolo “CALC CLEAN”, è necessario procedere alla decalci cazione.
Il ciclo di decalci cazione richiede circa 30 minuti.
Se questa operazione non viene eseguita, la macchina smetterà di funzionare regolarmente; in tal caso
la riparazione NON è coperta da garanzia.
Attenzione:
Usare esclusivamente la soluzione decalci cante Gaggia appositamente formulata per ottimiz-
zare le prestazioni della macchina. L’utilizzo di altri prodotti può causare danni alla macchina e lasciare
IT
residui nell’acqua.
Descaling Phase
EN
Fase di
IT
Decalci cazione
Attenzione:
Non bere la soluzione decalci cante ed i prodotti erogati no al completamento del ciclo. Non
utilizzare in nessun caso l’aceto come decalci cante.
Nota: Non estrarre il gruppo ca è durante il processo di decalci cazione.
Press the
button. Press the button to select “MACHINE MENU” ; press the
button to access the menu.
Premere il tasto . Premere il tasto per selezionare la voce “MENU MAC-
CHINA”; premere il tasto
per accedere al menu.
Page 39

Instructions
START DESCALING?
(~ 30 MINUTES)
ESC
OK
REMOVE
WATER FILTER
ESC
OK
MAINTENANCE
CARAFE CLEANING
DESCALING
CARAFE CLEAN
MACHINE MENU
SETTINGS
MAINTENANCE
STATISTICS
EMPTY TRAY UNDER
BREW GROUP
OK
Istruzioni
39
ItalianoEnglish ItalianoEnglish
Press the button to select “MAINTENANCE” ; press the
EN
button to access the menu.
Premere il tasto per selezionare la voce “MANUTENZIONE”; premere il tasto
IT
Remove the AquaClean water lter (if installed).
EN
Rimuovere il ltro AquaClean (se installato).
IT
per accedere al menu.
Press the
button to select “DESCALING” ; press the
button to access the menu.
Premere il tasto
per selezionare la voce “DECALCIFICA-
ZIONE”; premere il tasto
Press the
Premere il tasto
button.
.
Press the button to start
the DESCALING cycle.
per accedere al menu.
Premere il tasto
viare il ciclo di DECALCIFI-
per av-
CAZIONE.
Pour the entire Gaggia descaler in the water tank. Do not use
vinegar as a descaler.
Versare l’anticalcare Gaggia nel serbatoio dell’acqua. Non
utilizzare aceto come anticalcare.
H2O
Fill with fresh water up to the MAX level.
EN
Riempire con acqua fresca no al livello MAX.
IT
MAX
Press the
button.
Premere il tasto .
Press the button and open
the service door.
Premere il pulsante e aprire
lo sportello di servizio.
Page 40

Instructions
FILL HALF CARAFE
WITH WATER. INSERT
IN BREW. POSITION
OK
FILL TANK WITH
DESCALING SOLUTION
OK
PLACE A CONTAINER
UNDER HOT WATER &
CARAFE DISP SPOUT
OK
PAU SE
STEP 1/2 DESCALING
40
Istruzioni
Remove the drip tray and co ee grounds drawer. Empty the drip tray and co ee grounds drawer and put them
EN
Rimuovere la vasca raccogligocce e il cassetto raccoglifon-
IT
di.
Press the button.
EN
Premere il tasto .
IT
Fill half the carafe with fresh
water.
Riempire per metà la caraffa con acqua fresca.
back.
Svuotare la vasca raccogligocce e il cassetto raccoglifondi e
rimetterli in posizione.
Insert the carafe and open
the milk dispensing spout.
Inserire la cara a e aprire
l'erogatore del latte.
Press the button.
Premere il tasto .
Close the service door.
Chiudere lo sportello di
servizio.
Place a container (1.5 l) under the co ee and milk carafe
dispensing spout.
EN
Posizionare un contenitore (1,5l) sotto l'erogatore ca è e
l'erogatore latte della cara a.
IT
Put the water tank back into
the machine.
Press the
button.
Reinserire il serbatoio dell'acqua nella macchina.
Premere il tasto .
The descaling cycle is activated.
The bar shows the progress.
Il ciclo di decalci cazione viene avviato.
La barra consente di visualizzare lo stato di avanzamento.
Page 41

Instructions
PAU SE
STEP 1/2 DESCALING
RINSE TANK &
FILL WITH WATER
OK
PAU SE
STEP 2/2 RINSING
RINSE TANK &
FILL WITH WATER
OK
Istruzioni
41
ItalianoEnglish ItalianoEnglish
To empty the container during the process and to pause the descaling cycle, press the
EN
button. To resume the cycle, press the
Per svuotare il contenitore durante il processo e mettere in pausa il ciclo di decalci cazio-
IT
ne, premere il tasto
. Per proseguire con il ciclo, premere il tasto .
button.
H2O
MAX
Remove the water tank and rinse it.
Fill it with fresh water up to the MAX level and put it
EN
back into the machine.
Estrarre il serbatoio dell’acqua e risciacquarlo.
Riempirlo con acqua fresca no al livello MAX e rein-
IT
serirlo nella macchina.
Rinse Phase
Fase di
Risciacquo
When this screen is displayed, the descaling phase has been
completed.
Quando appare questa videata, la fase di decalci cazione
è terminata.
Press the
button to start the rinse cycle.
Premere il tasto per avviare il ciclo di risciacquo.
If the water tank was not lled up to the MAX level,
the machine may require another rinse cycle to be
performed. In this case, ll the water tank up to the
MAX level, put it back and repeat the “Rinse Phase”.
Se il serbatoio dell’acqua non è stato riempito no
al livello MAX la macchina può richiedere l’esecuzione di un altro ciclo di risciacquo. In questo caso,
EN
riempire il serbatoio dell’acqua no a livello MAX,
reinserirlo e ripetere la “Fase di risciacquo”.
IT
11
20
Repeat the operations described from step 11 to step
20, then continue with step 27.
Ripetere le operazioni descritte dal punto 11 al punto 20,
quindi passare al punto 27.
The rinse cycle is activated. The bar shows the progress.
Il ciclo di risciacquo viene avviato. La barra indica lo stato di
avanzamento del processo.
Page 42

Instructions
42
Istruzioni
At the end of the second step, the machine is ready for use. Disassemble and wash the
EN
Al termine della seconda fase, la macchina è pronta per
IT
l'uso.
Clean the brew group. For further guidance, see the “Brew
EN
Group Cleaning” chapter.
Pulire il gruppo ca è. Per ulteriori indicazioni, vedere il ca-
IT
pitolo “Pulizia del gruppo ca è”.
milk carafe.
Smontare e lavare la cara a
del latte.
You can now install the AquaClean lter (if used).
A questo punto, se utilizzato, è possibile installare il ltro
AquaClean.
Empty and rinse the drip tray.
Vuotare e risciacquare la vasca raccogligocce.
INTERRUZIONE DEL CICLO DI DECALCIFICAZIONE
Once the descaling cycle has
started, you must complete
it till the very end without
EN
turning o the machine.
Una volta avviato il ciclo di
decalci cazione deve essere
completato evitando di spegnere la macchina.
IT
INTERRUPTION OF THE DESCALING CYCLE
In case you get stuck during the cycle you can exit by
pressing the ON/OFF button.
Qualora la macchina si dovesse bloccare è possibile
uscire dal ciclo premendo il
tasto ON/OFF.
If this occurs, or in the event
of power failure or accidental
disconnection of the power
cord, empty and rinse carefully the water tank, then ll
it up to the MAX level.
In questo caso o in caso di
interruzione della corrente elettrica o accidentale
scollegamento del cavo di
alimentazione, vuotare e
sciacquare accuratamente il
serbatoio acqua e riempirlo
no al livello MAX.
Follow the instructions in
the “Manual Rinse Cycle”
chapter before brewing beverages.
Seguire le istruzioni riportate nel capitolo “Ciclo di risciacquo manuale” prima di
procedere con l’erogazione
delle bevande.
If the cycle was not completed, the machine will require
another descaling cycle to be
performed at your earliest
convenience.
Se il ciclo non è stato
completato la macchina
continuerà a richiedere l’esecuzione di un ciclo di decalci cazione da eseguirsi
non appena possibille.
Page 43

EN
IT
Quotidiana
Daily
MILK CARAFE CLEANING
PULIZIA DELLA CARAFFA DEL LATTE
It is important that you
clean the milk carafe
daily or after each use
in order to preserve hygiene and ensure perfect
frothed milk consistency.
È importante pulire la
cara a del latte ogni
giorno e dopo ogni utilizzo al ne di mantenere l’igiene e garantire
la preparazione di latte
emulsionato dalla consistenza perfetta.
Disengage the handle by rotating it clockwise.
Sganciare il manico ruotandolo in senso orario.
Press on the sides and lift the lid.
Premere ai lati e sollevare il coperchio.
Instructions
Istruzioni
43
ItalianoEnglish ItalianoEnglish
Rinse the top of the carafe and the milk carafe with luke-
EN
warm water. Remove all milk residues.
Risciacquare la parte superiore della cara a e la cara a del
IT
latte con acqua tiepida. Rimuovere ogni residuo di latte.
Insert the milk carafe by pushing it downwards until it is
EN
locked onto the (external) drip tray.
Inserire la cara a del latte verso il basso no ad agganciarla alla vasca raccogligocce (esterna).
IT
Fit the lid on the carafe. Rotate the handle counter-clockwise to bring it to the locked
position.
Inserire il coperchio nella
cara a.
Press the
button. The machine performs an additional
cleaning cycle.
Premere il tasto
lizia aggiuntivo.
Ruotare il manico in senso antiorario per riportarlo nella
posizione di chiusura.
At the end, you can remove
the carafe now ready for use.
. La macchina esegue un ciclo di pu-
Al termine, è possibile rimuovere la carafa che è già
pronta all’uso.
Page 44

Instructions
44
Istruzioni
Weekly
EN
IT
Settimanale
Rotate the handle counterclockwise to the unlock po-
EN
sition.
Ruotare il manico nella posizione di sblocco ruotando-
IT
lo in senso antiorario.
Remove the carafe from the
machine.
Rimuovere la cara a dalla
macchina.
Remove the connector that comes into contact with the ma-
Disengage the handle by rotating it clockwise.
Sganciare il manico ruotandolo in senso orario.
Press on the sides and lift the lid.
Premere ai lati e sollevare il coperchio.
Remove the handle with the suction tube.
chine.
Estrarre il connettore che va a contatto con la macchina. Estrarre il manico con il tubo di aspirazione.
Remove the suction tube. Remove the external tting by pulling it. Remove the internal tting.
EN
Estrarre il tubo di aspirazione. Rimuovere il raccordo esterno tirandolo. Rimuovere il raccordo in-
IT
terno.
Page 45

Instructions
Istruzioni
45
ItalianoEnglish ItalianoEnglish
Clean all the parts thoroughly with lukewarm water. Insert the internal tting in
EN
the tube and press until fully
inserting it.
Pulire a fondo tutti i componenti con acqua tiepida. Inserire il raccordo interno
IT
nel tubo e premerlo no in
fondo.
Insert the tube in the exter-
EN
nal tting.
Inserire il tubo nel raccordo
IT
esterno.
Insert the newly-assembled unit in the cover base. Pay attention to the reference.
Inserire il gruppo appena montato nella base del coperchio. Fare attenzione al riferimento.
Insert the external tting in the previous tting. Refer to the
arrow in the gure to insert it correctly.
Inserire il raccordo esterno nel precedente raccordo. Fare
attenzione, il verso d’inserimento è mostrato dalla freccia.
Fit the external cover. Make sure it is inserted into the base
guides.
Inserire la copertura esterna. Questa si deve inserire nelle
guide della base.
Rotate the handle clockwise up to the ( ) symbol.
EN
Ruotare in senso orario il manico no al simbolo ( ).
IT
Fit the lid on the carafe. Rotate the handle counter-clockwise to bring it to the closed
position. The carafe is now ready for use.
Inserire il coperchio nella
cara a.
Ruotare il manico in senso antiorario per riportarlo nella
posizione di chiusura. La cara a è pronta per l’uso.
Page 46

Instructions
MENU
BEVERAGE MENU
MACHINE MENU
START CARAFE
WASHING?
ESC
OK
MACHINE MENU
SETTINGS
MAINTENANCE
STATISTICS
MAINTENANCE
BREW GROUP CLEAN
CARAFE CLEANING
DESCALING
REFILL
WATER TANK
OK
46
Istruzioni
Monthly
EN
IT
Mensile
Press the button to select the “MAINTENANCE” menu.
EN
Then press
.
Press the button. Press the button to select “MACHINE MENU” ; press the
Premere il tasto
.
Premere il tasto per selezionare il menu “MANUTENZIONE”, quindi premere
IT
.
Press the
menu. Then press
Premere il tasto
button to select the “CARAFE CLEANING”
.
RAFFA”, quindi premere
button to access the menu.
Premere il tasto per selezionare la voce “MENU MACCHINA”; premere il tasto
per accedere al menu.
Press the
the CARAFE CLEANING cycle.
per selezionare il menu “PULIZIA CA-
.
Premere il tasto
avviare il ciclo PULIZIA CARAFFA.
button to start
per
H2O
MAX
Rinse the water tank and ll
it with fresh water up to the
EN
MAX level.
Risciacquare il serbatoio e
riempirlo con acqua fresca
no al livello MAX.
IT
Put the water tank back into the machine.
button.
Press the
Reinserire il serbatoio dell'acqua nella macchina.
Premere il tasto
.
Fill the carafe with fresh
drinking water up to the
MAX level.
Riempire la cara a con acqua fresca potabile no al
livello MAX.
Pour one milk circuit cleaner
bag into the milk carafe and
let it dissolve completely.
Versare una confezione di
prodotto per la pulizia nella
cara a del latte e attendere
che si sciolga completamente.
Page 47

Instructions
POUR DETERGENT
INTO CARAFE & FILL
WITH WATER
OK
CARAFE CLEANING
REFILL
WATER TANK
OK
REFILL
WATER TANK
OK
Istruzioni
47
ItalianoEnglish ItalianoEnglish
Put the lid back on. Rotate the milk dispensing spout counter-clockwise to the
EN
Riposizionare il coperchio. Portare l'erogatore del latte nella posizione di blocco ruo-
IT
Place a container (1.5 l) under the co ee dispensing spout.
EN
Open the milk dispensing spout by turning it clockwise.
Posizionare un contenitore (1,5l) sotto l'erogatore ca è.
IT
Aprire l’erogatore del latte ruotandolo in senso orario.
lock position.
tandolo in senso antiorario.
Press the
button.
Premere il tasto
.
Insert the milk carafe into the machine.
Inserire la cara a del latte nella macchina.
The cleaning cycle starts. The bar shows the progress.
Il ciclo di pulizia ha inizio. La barra visualizza lo stato di
avanzamento del processo.
When the machine stops dispensing, ll the tank with fresh
EN
water up to the MAX level.
Al termine dell'erogazione, riempire il serbatoio con acqua
IT
fresca no al livello MAX.
Put the water tank back.
Press the
button.
Riposizionare il serbatoio dell'acqua.
Premere il tasto
.
Remove the carafe and lift
the lid.
Rimuovere la cara a e sollevare il coperchio.
Page 48

Instructions
FILL CARAFE
WITH FRESH WATER
OK
CARAFE RINSING
48
Istruzioni
Wash the carafe thoroughly
and ll it with fresh water.
EN
Lavare accuratamente la cara a e riempirla con acqua
IT
fresca.
Press the button.
EN
Premere il tasto .
IT
Insert the milk carafe into the machine. Empty the container and place it back under the co ee dis-
pensing spout. Open the milk dispensing spout by turning it
clockwise.
Inserire la cara a del latte nella macchina. Vuotare il contenitore e riposizionarlo sotto l'erogatore caf-
fè. Aprire l’erogatore del latte ruotandolo in senso orario.
The rinse cycle is activated. The bar shows the cycle progress. At the end of the cycle, the machine returns to the normal
operating mode.
Disassemble and wash the milk carafe.
Il ciclo di risciacquo viene avviato. La barra consente di visualizzare lo stato di avanzamento del ciclo.
Al termine del ciclo, la macchina torna alla modalità di funzionamento normale.
Smontare e lavare la cara a del latte.
Page 49

BREW GROUP CLEANING
PULIZIA DEL GRUPPO CAFFÈ
Instructions
Istruzioni
49
ItalianoEnglish ItalianoEnglish
Weekly
EN
Press the button and open
the service door.
Premere il pulsante e aprire
IT
Settimanale
lo sportello di servizio.
Clean the co ee outlet duct thoroughly with a spoon handle
or with another round-tipped kitchen utensil.
EN
Pulire a fondo il condotto di uscita del ca è con il manico
di un cucchiaino o con un altro utensile da cucina arroton-
IT
dato.
Remove the drip tray and
co ee grounds drawer.
Rimuovere la vasca raccogligocce e il cassetto racco-
Remove the brew group. Pull it by the handle and press the
«PUSH» button.
Estrarre il gruppo ca è tirando l’apposita maniglia e premendo il tasto «PUSH».
glifondi.
Thoroughly wash the brew group with fresh, lukewarm water and carefully clean the upper lter.
Do not use any detergent or soap to clean the brew
group.
Lavare accuratamente il gruppo ca è con acqua fresca e
tiepida; pulire con cura il ltro superiore.
Non utilizzare detergenti o sapone per la pulizia del
gruppo ca è.
Let the brew group airdry thoroughly.
Thoroughly clean the inside of the machine using
a soft, dampened cloth.
Lasciare asciugare completamente all’aria il
gruppo ca è.
Pulire accuratamente
l’interno della macchina
utilizzando un panno
morbido inumidito con
acqua.
Make sure that the brew group is in the o position; the two
reference marks must match. If they do not match, proceed
EN
as described in step (7).
Assicurarsi che il gruppo ca è sia in posizione di riposo;
i due segni di riferimento devono corrispondere. In caso
IT
contrario, eseguire l’operazione descritta al punto (7).
Gently pull down the lever until it is in contact with the brew
group base and the two reference marks on the side of the
brew group match.
Premere delicatamente la leva verso il basso no a toccare
la base del gruppo ca è e nché i due segni di riferimento
a lato del gruppo corrispondono.
Press the “PUSH” button
rmly.
Premere con forza il tasto
“PUSH”.
Page 50

Instructions
50
Istruzioni
Make sure that the hook which locks the brew group is in the
correct position. If it is still in the downward position, push it
EN
upwards until it locks correctly into place.
Assicurarsi che il gancio per il blocco del gruppo ca è sia
nella posizione corretta. Se è ancora in posizione abbassata
IT
spingerlo verso l’alto no ad agganciarlo correttamente.
Lubricate the brew group after approximately 500 brewing
cycles or once a month.
Caution:
Before lubricating the brew group, clean it with fresh
water and dry it as described in the “Weekly” section
of the “Brew Group Cleaning” chapter.
Lubri care il gruppo ca è dopo circa 500 erogazioni o una
volta al mese.
Avvertenza:
EN
IT
Monthly
Mensile
prima di lubri care il gruppo ca è, pulirlo con acqua fresca e lasciarlo asciugare come spiegato nella
sezione “Settimanale” del capitolo “Pulizia gruppo
ca è”.
Once washed and dried, insert the brew group. DO NOT
PRESS THE “PUSH” BUTTON.
Inserire il gruppo ca è lavato e asciugato. NON PREMERE
IL TASTO “PUSH”.
Apply the lubricant evenly on both side guides.
Applicare il lubri cante in modo uniforme su entrambe le
guide laterali.
Insert the co ee grounds
drawer and the drip tray.
Close the service door.
Inserire il cassetto raccoglifondi e la vasca raccogligocce. Chiudere lo sportello di
servizio.
Also lubricate the shaft. Once washed and dried, insert the brew group. DO NOT
EN
PRESS THE “PUSH” BUTTON.
Lubri care anche l’albero. Inserire il gruppo ca è lavato e asciugato. NON PREMERE
IT
IL TASTO “PUSH”.
Insert the co ee grounds
drawer and the drip tray.
Close the service door.
Inserire il cassetto raccoglifondi e la vasca raccogligocce. Chiudere lo sportello di
servizio.
Page 51

Besides weekly cleaning, we recommend performing a cleaning cycle with “Co ee Oil Re-
MAINTENANCE
BREW GROUP CLEAN
CARAFE CLEANING
DESCALING
PERFORM BREW
GROUP CLEANING
ESC
OK
INSERT GROUP
CLEAN TAB
OK
REFILL
WATER TANK
OK
PLACE A CONTAINER
UNDER THE
DISPENSING SPOUT
OK
BREW GROUP CLEAN
mover” after approximately 500 cups of co ee or once a month. This operation completes
the maintenance process for the brew group.
Caution:
The “Co ee Oil Remover” tablets are to be used for cleaning only and do not have
a descaling function. For descaling, use the Gaggia descaling solution and follow
the procedure described in the “Descaling” chapter.
Oltre alla pulizia settimanale, si consiglia di eseguire questo ciclo di pulizia con pastiglie
sgrassanti dopo circa 500 tazze di ca è o una volta al mese. Questa operazione completa
il processo di manutenzione del gruppo ca è.
Avvertenza:
EN
le pastiglie sgrassanti sono indicate esclusivamente per la pulizia e non hanno
funzione decalci cante. Per la decalci cazione, utilizzare il decalci cante Gag-
IT
gia seguendo la procedura descritta nel capitolo “Decalci cazione”.
Instructions
51
Istruzioni
Select the MAINTENANCE option from the machine menu.
Select BREW GROUP CLEAN. Press the
Selezionare la voce MANUTENZIONE nel menu macchina.
Selezionare PULIZIA GRUPPO. Premere il tasto
button.
.
ItalianoEnglish ItalianoEnglish
EN
IT
EN
IT
Press the button to con r m .
Premere il tasto per confermare.
Place a container (1.5 l) under the co ee dispensing
spout.
Posizionare un contenitore
(1,5 l) sotto l’erogatore del
ca è.
Fill the water tank with fresh water up to the MAX level. Press
the
button.
Riempire il serbatoio dell’acqua con acqua fresca no al livello MAX. Premere il tasto
Press the
button to start the cleaning cycle.
.
Premere il tasto per avviare il ciclo di pulizia.
Put a “Co ee Oil Remover” tablet in the pre-ground co ee
compartment. Press the button.
Inserire una pastiglia sgrassante nello scompartimento del
ca è pre-macinato. Premere il tasto
.
The icon above is displayed. The bar shows the cycle progress.
Never drink the solution dispensed during this step.
Viene visualizzato il simbolo sopra. La barra consente di
visualizzare lo stato di avanzamento del ciclo.
Non bere la soluzione erogata durante il processo.
Page 52

Instructions
EMPTY DRIP TRAY
INSERT CARAFE
ESC
TURN CARAFE
INTO
BREWING POSITION
ESC
TURN CARAFE
INTO
RINSING POSITION
ESC
INSERT COFFEE
GROUNDS DRAWER
CLOSE
HOPPER DOOR
ADD COFFEE
REFILL
WATER TANK
CLOSE
FRONT DOOR
INSERT BREW GROUP
52
Istruzioni
When the machine stops dispensing, remove and empty the
EN
container.
Al termine dell’erogazione, rimuovere e svuotare il conte-
IT
nitore.
MEANING OF THE DISPLAY
SIGNIFICATO DEL DISPLAY
Clean the brew group as described in the “Weekly”
section of the “Brew Group Cleaning” chapter.
Eseguire la pulizia del gruppo ca è come descritto
nella sezione “Settimanale” del capitolo “Pulizia
gruppo ca è”.
EN
IT
EN
IT
Close the service door. Open the service door and
empty the internal drip tray.
Chiudere lo sportello di servizio.
Aprire lo sportello di servizio e svuotare la vasca raccogligocce interna.
The brew group must be inserted into the machine.
Il gruppo ca è deve essere
inserito nella macchina.
Insert the milk carafe to start
brewing.
Inserire la cara a del latte
per avviare l'erogazione.
Insert the co ee grounds
drawer and the internal drip
tray.
Inserire il cassetto raccoglifondi e la vasca raccogligocce interna.
Open the milk carafe dispensing spout to brew products.
Aprire l’erogatore del latte
della cara a per erogare
prodotti.
Close the co e bean hopper
inner cover.
Chiudere il coperchio interno del contenitore ca è in
grani.
Close the milk carafe dispensing spout to start the
carafe rinse cycle.
Chiudere l'erogatore del latte della cara a per avviare
il ciclo di risciacquo della
cara a.
Remove the water tank and
ll it.
Estrarre il serbatoio dell'acqua e riempirlo.
Fill the co ee bean hopper.
Riempire il contenitore ca è
in grani.
Page 53

Instructions
EMPTY COFFEE
GROUNDS DRAWER
0%
RESTART TO SOLVE
Istruzioni
53
ItalianoEnglish ItalianoEnglish
Remove and empty the co ee grounds drawer with the ma-
EN
chine turned on.
A macchina accesa, rimuovere e svuotare il cassetto racco-
IT
glifondi.
An event has occurred which requires the machine to be restarted. Take note of the code (E xx) shown at the bottom. Switch o the machine, wait 30 seconds
EN
and then switch it on again. If the problem persists, visit www.gaggia.com/n-m-co/espresso/world-wide or www.gaggia.it/n-m-co/espresso/contact.
Si è veri cato un evento che richiede il riavvio della macchina. Prendere nota del codice (E xx) riportato in basso. Spegnere la macchina, attendere
IT
30 secondi e riaccenderla. Se il problema persiste, visita www.gaggia.com/n-m-co/espresso/world-wide o www.gaggia.it/n-m-co/espresso/contact.
The machine needs to be descaled. Go to the Maintenance
menu to select and start the cycle.
È necessario decalci care la macchina. Accedere al menu di
manutenzione per selezionare e avviare il ciclo.
Replace the AQUACLEAN water lter with a new one.
Sostituire il ltro AQUACLEAN.
MAINTENANCE PRODUCTS
PRODOTTI PER LA MANUTENZIONE
AQUACLEAN water lter Co ee oil remover Descaling solution Grease
EN
Filtro acqua AQUACLEAN Pastiglie sgrassanti Soluzione decalci cante Grasso
IT
Page 54

Instructions
54
Istruzioni
TROUBLESHOOTING
Machine actions Causes Solutions
The machine does not turn on. The machine is not connected to the electric net-
The drip tray gets lled although no
water is drained.
work.
The power button is set to "0". Check that the power button is set to "I".
Water is sometimes drained automatically by the
machine into the drip tray to manage circuit rinsing
and ensure optimum machine performance.
Connect the machine to the electric network.
This is a normal behaviour of the machine.
Co ee is not hot enough. The cups/mugs are cold. Preheat the cups/mugs with hot water or use the hot wa-
The beverage temperature in the programming
menu is set on Low.
You added cold milk to the co ee. Cold milk lowers the temperature of the nal product. Pre-
No hot water is dispensed. The steam/hot water dispensing spout is clogged
The machine does not ll the cup/mug. The machine has not been programmed. Access the beverage programming menu and adjust the
Co ee does not have enough crema
(see note).
Milk does not froth. The carafe is dirty or not inserted correctly. Ensure that the carafe is clean and has been correctly in-
The machine takes a long time to warm
up or the amount of water dispensed
from the wand is too little.
The brew group cannot be removed. The brew group is out of place. Turn on the machine. Close the service door. The brew
The brew group cannot be inserted. The brew group is not in the o position. Make sure that the brew group is in the o position. The
or dirty.
The blend is unsuitable, co ee is not freshly roasted
or the grind is too coarse.
The co ee beans or the pre-ground co ee are too
old.
The machine circuit is clogged by limescale. Descale the machine.
The co ee grounds drawer is inserted. Remove the co ee grounds drawer before removing the
The gear is not in the initial position. Insert the drip tray and the co ee grounds drawer and
ter dispensing spout.
Make sure that the temperature in the programming
menu is set on Normal or High.
heat milk before adding it to the beverage.
Clean the steam/hot water dispensing spout (see the
"Cleaning and Maintenance" chapter).
Inspect the spout to check that the dispensing spout is
not clogged. Make a hole in the limescale using a pin or
a needle.
co ee length setting according to your personal taste for
each type of beverage.
Change co ee blend or adjust grinding as explained in the
“Adjusting the Ceramic Co ee Grinder” chapter.
Make sure that you use fresh co ee beans or pre-ground
co ee.
serted.
group automatically returns to the initial position.
brew group.
arrows must face each other. To this purpose, see the
“Monthly” section of the “Brew Group Cleaning” chapter.
close the service door. Turn on the machine. The gear automatically returns to the initial position. You can now
insert the brew group.
Page 55

Instructions
Istruzioni
55
RISOLUZIONE DEI PROBLEMI
Comportamenti Cause Rimedi
La macchina non si accende. La macchina non è collegata alla rete elettrica. Collegare la macchina alla rete elettrica.
L'interruttore generale è in posizione “0”. Veri care che l’interruttore generale sia in posizione “I”.
La vasca raccogligocce si riempie anche se non viene scaricata acqua.
Il ca è non è abbastanza caldo. Le tazze/tazzine sono fredde. Preriscaldare le tazze/tazzine con acqua calda o utilizza-
Non fuoriesce acqua calda. L’erogatore vapore/acqua calda è otturato o spor-
La macchina non riempie la tazza/
tazzina.
Il ca è ha poca crema
(vedere nota).
Il latte non viene montato. Cara a sporca o non inserita correttamente. Veri care la corretta pulizia della cara a e il suo inse-
La macchina impiega troppo tempo
per scaldarsi o la quantità di acqua
che fuoriesce dal tubo è limitata.
Impossibile estrarre il gruppo ca è. Il gruppo ca è è fuori posizione. Accendere la macchina. Chiudere lo sportello di servizio.
Impossibile inserire il gruppo ca è. Il gruppo ca è non è in posizione di riposo. Assicurarsi che il gruppo ca è sia nella posizione di ripo-
A volte la macchina scarica automaticamente
l’acqua nella vasca raccogligocce per gestire il risciacquo dei circuiti e garantire un funzionamento
ottimale.
La temperatura della bevanda è impostata su Bassa nel menu di programmazione.
Al ca è viene aggiunto latte freddo. Il latte freddo abbassa la temperatura del prodotto -
co.
La macchina non è stata programmata. Accedere al menu di programmazione delle bevande e
La miscela non è adatta, il ca è non è fresco di torrefazione oppure è macinato troppo grosso.
I chicchi di ca è o il ca è pre-macinato sono troppo vecchi.
Il circuito della macchina è intasato dal calcare. Decalci care la macchina.
Il cassetto raccoglifondi è inserito. Estrarre il cassetto raccoglifondi prima di rimuovere il
L'ingranaggio non è in posizione iniziale. Inserire la vasca raccogligocce e il cassetto raccoglifondi
Questo comportamento è considerato normale.
re l'erogatore di acqua calda.
Assicurarsi che la temperatura sia impostata su Normale
o Alta nel menu di programmazione.
nale: preriscaldare il latte prima di aggiungerlo alla
bevanda.
Pulire l'erogatore vapore/acqua calda (vedere il capitolo
“Pulizia e manutenzione”).
Ispezionare il beccuccio per veri care che l'erogatore
non sia otturato. Praticare un foro nel calcare servendosi
di uno spillo o un ago.
regolare l'impostazione di lunghezza del ca è secondo
le proprie preferenze per ogni tipo di bevanda.
Cambiare miscela di ca è o regolare la macinatura come
al capitolo “Regolazione macinaca è in ceramica”.
Assicurarsi di utilizzare chicchi di ca è o ca è pre-macinato freschi.
rimento.
Il gruppo ca è ritorna automaticamente nella posizione
iniziale.
gruppo ca è.
so. Le frecce devono essere orientate una verso l'altra. A
tal ne, consultare sezione “Mensile” del capitolo “Pulizia gruppo ca è”.
e chiudere lo sportello di servizio. Accendere la macchina. L'ingranaggio torna automaticamente nella posizione iniziale, quindi è possibile inserire il gruppo ca è.
ItalianoEnglish ItalianoEnglish
Page 56

Instructions
56
Istruzioni
Machine actions Causes Solutions
There is a lot of ground co ee under or
over the brew group.
The machine produces too humid or too
dry co ee grounds.
The machine grinds the co ee beans
but no co ee is brewed (see note).
The co ee is too weak (see note). This might occur when the machine is automatically
Co ee is brewed slowly (see note). The co ee grind is too ne. Change co ee blend or adjust grinding as explained in the
Co ee leaks out of the dispensing
spout.
The co ee used may not be suitable for automatic
machines.
The machine is adjusting the co ee grinder for a
new kind of co ee beans or pre-ground co ee.
Adjust the co ee grinder. Adjusting the ceramic co ee grinder a ects the quality of
There is no water. Fill the water tank and prime the circuit (see the "Manual
The brew group is dirty. Clean the brew group (see the “Weekly” section of the
This might occur when the machine is automatically
adjusting the dose.
The dispensing spout is dirty. Clean the dispensing spout.
adjusting the dose.
The ground co ee is too coarse. Change co ee blend or adjust grinding as explained in the
The circuits are clogged. Perform a descaling cycle.
The brew group is dirty. Clean the brew group (see the “Weekly” section of the
The dispensing spout is clogged. Clean the dispensing spout and its holes.
You may need to change the type of co ee or the co ee
grinder settings (see the “Adjusting the Ceramic Co ee
Grinder” chapter).
The machine automatically adjusts itself after brewing
several cups of co ee in order to optimise extraction in
relation to the compactness of ground co ee.
It may be necessary to brew 2 or 3 products to completely
adjust the co ee grinder.
This is not a machine malfunction.
residues.
If the residues are too humid, set a coarser grind.
If the residues are too dry, set a ner grind.
Refer to the “Adjusting the Ceramic Co ee Grinder” chapter.
Rinse Cycle" chapter).
“Brew Group Cleaning” chapter).
Brew some cups of co ee as described in the “Gaggia
Adapting System” chapter.
Brew some cups of co ee as described in the “Gaggia
Adapting System” chapter.
“Adjusting the Ceramic Co ee Grinder” chapter.
“Adjusting the Ceramic Co ee Grinder” chapter.
“Brew Group Cleaning” chapter).
Page 57

Comportamenti Cause Rimedi
È presente molto ca è macinato sotto
o sopra il gruppo ca è.
La macchina produce fondi di ca è
troppo umidi o troppo asciutti.
La macchina macina i chicchi di ca è
ma il ca è non fuoriesce
(vedere nota).
Il ca è è troppo acquoso
(vedere nota).
Il ca è fuoriesce lentamente
(vedere nota).
Fuoriesce ca è all’esterno dell’erogatore.
Il ca è utilizzato potrebbe non essere idoneo
all'uso con macchine automatiche.
La macchina sta regolando il macinaca è per un
nuovo tipo di chicchi di ca è o ca è pre-macinato.
Regolare il macinaca è. La regolazione del macinaca è in ceramica incide sulla
Manca acqua. Riempire il serbatoio dell’acqua e ricaricare il circuito
Il gruppo ca è è sporco. Pulire il gruppo ca è (sezione “Settimanale” della “Puli-
Questo può veri carsi quando la macchina sta regolando automaticamente la dose.
L'erogatore è sporco. Pulire l'erogatore.
Questo può veri carsi quando la macchina sta regolando automaticamente la dose.
Il ca è è macinato grosso. Cambiare miscela di ca è o regolare la macinatura come
Il ca è è troppo ne. Cambiare miscela di ca è o regolare la macinatura come
I circuiti sono ostruiti. Eseguire un ciclo di decalci cazione.
Il gruppo ca è è sporco. Pulire il gruppo ca è (sezione “Settimanale” della “Puli-
L'erogatore è otturato. Pulire l’erogatore e i fori di uscita.
Potrebbe essere necessario cambiare tipo di ca è oppure modi care la regolazione del macinaca è (vedere il
capitolo “Regolazione macinaca è in ceramica”).
La macchina si regola automaticamente dopo l'erogazione di alcuni ca è per ottimizzare l'estrazione in relazione alla compattezza del ca è macinato.
Potrebbe essere necessario erogare 2 o 3 prodotti per la
completa regolazione del macinaca è.
Non si tratta di un malfunzionamento della macchina.
qualità dei residui.
Se i residui sono troppo umidi, impostare una macinatura più grossa.
Se i residui sono troppo asciutti, impostare una macinatura più ne.
Consultare il capitolo “Regolazione macinaca è in ceramica”.
(consultare il capitolo “Ciclo di risciacquo manuale”).
zia gruppo ca è”).
Erogare alcuni ca è come descritto nel capitolo “Gaggia
Adapting System”.
Erogare alcuni ca è come descritto nel capitolo “Gaggia
Adapting System”.
al capitolo “Regolazione macinaca è in ceramica”.
al capitolo “Regolazione macinaca è in ceramica”.
zia gruppo ca è”).
Instructions
Istruzioni
57
ItalianoEnglish ItalianoEnglish
Page 58

Instructions
58
Istruzioni
TECHNICAL SPECIFICATIONS
The manufacturer reserves the right to make changes to the technical speci cations of the product.
Nominal Voltage - Power Rating - Power Supply See data plate on the appliance
Housing material Thermoplastic material
Size (w x h x d) 245 x 360 x 420 mm
Weight 13.4 kg
Power cord length 1200 mm
Control panel Front panel
Cup size 110 mm
Water tank 1.5 litres - Removable type
Co ee bean hopper capacity 300 g
Co ee grounds drawer capacity 11
Pump pressure 15 bar
Boiler Stainless Steel
Safety devices Boiler pressure safety valve – Double safety thermostat
Safety devices Thermostat
Page 59

Instructions
Istruzioni
59
CARATTERISTICHE TECNICHE
Il costruttore si riserva il diritto di modi care le caratteristiche tecniche del prodotto.
Tensione nominale - Potenza nominale - Alimentazione Vedere targhetta posta sull’apparecchio
Materiale corpo Termoplastico
Dimensioni (l x a x p) 245 x 360 x 420 mm
Peso 13,4 kg
Lunghezza cavo 1200 mm
Pannello di comando Frontale
Dimensioni tazzina 110 mm
Serbatoio acqua 1,5 litri - Estraibile
Capacità contenitore ca è in grani 300 g
Capacità cassetto raccoglifondi 11
Pressione pompa 15 bar
Caldaia Acciaio inox
Dispositivi di sicurezza Valvola di sicurezza pressione caldaia - Doppio termostato di sicurezza
Dispositivi di sicurezza Termostato
ItalianoEnglish ItalianoEnglish
Page 60

GAGGIA S.p.A. reserves the right to make any necessary modifi cation.
GAGGIA S.p.a. si riserva il diritto di apportare tutte le modifi che ritenute necessarie.
GAGGIA S.p.A.
Sede Legale/Registered O ce
Piazza A. Diaz, 1
20123 MILANO
Sede Amministrativa/Administrative O ce
Via Tor retta, 240
40041 Gaggio Montano (BO)
+39 0534 771111
www.gaggia.com
COD. - Rev.00 - 15/01/17
 Loading...