

Gaggenau VR414610 INSTALLATION INSTRUCTIONS AND OPERATION MANUAL

Gaggenau
Use and care manual
Notice d’utilisation
Manual de instrucciones
VR 414 610
Electric grill
Gril électrique
Grill eléctrico

Table of Contents 3
Table des Matières 17
Contenido 32
2

Table of Contents
Use and care manual
9 Safety Definitions 3
IMPORTANT SAFETY INSTRUCTIONS 4
Fire Safety 4
Cooking Safety 5
Burn Prevention 5
Child Safety 6
Cleaning Safety 6
Cookware Safety 6
Proper Installation and Maintenance 6
Proposition 65 Warning 7
Causes of Damage 8
Protecting the environment 8
Tips for saving energy 8
Your new appliance 9
Electric grill 9
Control knob 9
Display on the illuminated ring 10
Accessories 10
Special accessories 10
9 Safety Definitions
Saf ety Definitions
9 WARNING
This indicates that death or serious injuries may
occur as a result of non-observance of this
warning.
9 CAUTION
This indicates that minor or moderate injuries may
occur as a result of non-observance of this
warning.
NOTICE: This indicates that damage to the appliance
or property may occur as a result of non-compliance
with this advisory.
Note: This alerts you to important information and/or tips.
Operation 10
Before first use 10
Turning on 10
Turning off 11
Residual heat display 11
Overheating protection 11
Working with the cast roaster pan 11
Settings table 12
Tips and tricks 13
Care and cleaning 13
Cleaning the appliance 13
Do not use these cleaning agents 14
Troubleshooting 15
Customer Service 16
Additional information on products, accessories,
replacement parts and services can be found at
www.gaggenau.com and in the online shop
www.gaggenau.com/zz/store
3

9 IMPORTANT SAFETY INSTRUCTIONS
READ AND SAVE THESE INSTRUCTIONS
IMPORTANT SAFET Y INSTRUCTIONS
WARNING
When properly cared for, your new appliance has been
designed to be safe and reliable. Read all instructions
carefully before use. These precautions will reduce the
risk of burns, electric shock, fire, and injury to persons.
When using kitchen appliances, basic safety
precautions must be followed, including those in the
following pages.
This appliance is not intended for operation with an
external time switch or external remote control.
READ AND SAVE THESE INSTRUCTI ONS
Fire Safety
Do not allow aluminum foil, plastic, paper or cloth to
come in contact with a hot surface element, burner or
grate. Do not allow pans to boil dry.
If the cooktop is near a window, forced air vent or fan,
be certain that flammable materials such as window
coverings do not blow over or near the burners or
elements. They could catch on fire.
Always have a working smoke detector near the kitchen.
Never leave the cooktop unattended when in use.
Boilovers cause smoking and greasy spillovers may
ignite.
WARNING
WARNING
TO REDUCE THE RISK OF INJURY TO PERSONS IN
THE EVENT OF A GREASE FIRE, OBSERVE THE
FOLLOWING:
a) SMOTHER FLAMES with a close-fitting lid, cookie
sheet, or metal tray, then turn off the burner. BE
CAREFUL TO PREVENT BURNS. If the flames do
not go out immediately, EVACUATE AND CALL THE
FIRE DEPARTMENT.
b) NEVER PICK UP A FLAMING PAN – You may be
burned.
c) DO NOT USE WATER, including wet dishcloths or
towels – a violent steam explosion will result.
d) Use an extinguisher ONLY if:
‒ You know you have a Class ABC extinguisher,
and you already know how to operate it.
‒ The fire is small and contained in the area where
it started.
‒ The fire department is being called.
‒ You can fight the fire with your back to an exit.
Whenever possible, do not operate the ventilation
system during a cooktop fire. However, do not reach
through fire to turn it off.
WARNING
Risk of fire
The appliance becomes very hot, and flammable
materials can catch fire. Do not use any charcoal or
similar fuels in this appliance.
TO REDUCE THE RISK OF A GREASE FIRE:
a) Never leave surface units unattended at high
settings. Boilovers cause smoking and greasy
spillovers that may ignite. Heat oils slowly on low or
medium settings.
b) Always turn hood ON when cooking at high heat or
when flambéing food (i.e. Crepes Suzette, Cherries
Jubilee, Peppercorn Beef Flambé).
c) Clean ventilating fans frequently. Grease should not
be allowed to accumulate on fan or filter.
d) Use proper pan size. Always use cookware
appropriate for the size of the surface element.
In the event that personal clothing or hair catches fire,
drop and roll immediately to extinguish flames.
Have an appropriate fire extinguisher available, nearby,
highly visible and easily accessible near the appliance.
Smother flames from food fires other than grease fires
with baking soda. Never use water on cooking fires.
4
WARNING
Risk of fire
The appliance becomes very hot, and flammable
materials can ignite. Never store flammable items (such
as spray cans or cleaners) under or in the direct vicinity
of the appliance. Never place flammable items on or in
the appliance.

9 IMPORTANT SAFETY INSTRUCTIONS
READ AND SAVE THESE INSTRUCTIONS
Cooking Safety
WARNING
Use this appliance only for its intended use as
described in this manual. NEVER use this appliance as
a space heater to heat or warm the room. Doing so may
result in overheating the appliance. Never use the
appliance for storage.
WARNING
NEVER cover any slots, holes or passages in the oven
bottom or cover an entire rack with materials such as
aluminum foil. Doing so blocks air flow through the
oven. Aluminum foil linings may also trap heat, causing a
fire hazard.
WARNING
Risk of burns
During grilling, dripping fat may flare up briefly.
Burn Prevention
WARNING
Risk of burns
The grill stays hot for a long time after switching off. Do
not touch the grill for 30 - 45 minutes after switching it
off.
DO NOT TOUCH SURFACE UNITS OR AREAS NEAR
UNITS - Surface units may be hot even though they are
dark in color. Areas near surface units may become hot
enough to cause burns. During and after use, do not
touch, or let clothing, potholders, or other flammable
materials contact surface units or areas near units until
they have had sufficient time to cool. Among these areas
are the cooktop and areas facing the cooktop.
Do not heat or warm unopened food containers. Buildup of pressure may cause the container to burst and
cause injury.
Always use dry potholders. Moist or damp potholders on
hot surfaces may result in burns from steam. Do not let
potholder touch hot heating elements. Do not use a
towel or other bulky cloth.
WARNING
Risk of burns
The grill stays hot for a long time after switching off. Do
not touch the grill for 30 - 45 minutes after switching it
off.
WARNING
Risk of burns
When the appliance cover is closed, this leads to a
build-up of heat. Only operate or switch on the
appliance when the appliance cover is open. Do not use
the appliance cover for keeping warm or setting down.
Only close the appliance cover once the appliance has
cooled down.
CAUTION
Damage to the appliance
Remove spilled liquids before opening the appliance
cover.
Always turn hood ON when cooking at high heat or
when flambéing food (i.e. Crêpes Suzette,
Cherries Jubilee, Peppercorn Beef Flambé).
Use high heat settings on the cooktop only when
necessary. To avoid bubbling and splattering, heat oil
slowly, on no more than a low-medium setting. Hot oil is
capable of causing extreme burns and injury.
Never move a pan of hot oil, especially a deep fat fryer.
Wait until it is cool.
Secure all loose garments, etc., before beginning. Tie
long hair so that it does not hang loose, and do not wear
loose-fitting clothing or hanging garments, such as ties,
scarves, jewelry, or dangling sleeves.
WARNING
Risk of burns
If the appliance cover (VD) is fitted: do not close the
appliance cover until the appliance has cooled down
completely. Do not operate the appliance with the cover
closed. Do not use the appliance cover for placing
objects or for keeping things warm.
5

9 IMPORTANT SAFETY INSTRUCTIONS
READ AND SAVE THESE INSTRUCTIONS
Child Safety
When children become old enough to use the
appliance, it is the responsibility of the parents or legal
guardians to ensure that they are instructed in safe
practices by qualified persons.
Do not allow anyone to climb, stand, lean, sit, or hang
on any part of an appliance, especially a door, warming
drawer, or storage drawer. This can damage the
appliance, and the unit may tip over, potentially causing
severe injury.
Do not allow children to use this appliance unless
closely supervised by an adult. Children and pets
should not be left alone or unattended in the area where
the appliance is in use. They should never be allowed to
play in its vicinity, whether or not the appliance is in use.
CAUTION
Items of interest to children should not be stored in an
appliance, in cabinets above an appliance or on the
backsplash. Children climbing on an appliance to reach
items could be seriously injured.
Cookware not approved for use with ceramic cooktops
may break with sudden temperature changes. Use only
pans that are appropriate for ceramic cooktops (only
certain types of glass, heatproof glass, ceramic,
earthenware, or other glazed utensils are suitable).
Always position handles of utensils inward so they do
not extend over adjacent work areas, burners, or the
edge of the cooktop. This reduces the risk of fires, spills
and burns.
Proper Installation and Maintenance
Have the installer show you the location of the circuit
breaker or fuse. Mark it for easy reference.
This appliance must be properly installed and grounded
by a qualified technician. Connect only to properly
grounded outlet. Refer to Installation Instructions for
details.
This appliance is intended for normal family household
use only. It is not approved for outdoor use. See the
Statement of Limited Product Warranty. If you have any
questions, contact the manufacturer.
Cleaning Safety
Do not clean the appliance while it is still hot. Some
cleaners produce noxious fumes when applied to a hot
surface. Wet clothes and sponges can cause burns
from steam.
Do not use steam cleaners to clean the appliance.
Do not soak removable heating elements - Heating
elements should never be immersed in water.
Cookware Safety
Hold the handle of the pan when stirring or turning food.
This helps prevent spills and movement of the pan.
Use Proper Pan Size.
The use of undersized cookware will expose a portion of
the heating element or burner to direct contact and may
result in ignition of clothing. Select cookware having flat
bottoms large enough to cover the surface heating unit.
This appliance is equipped with one or more surface
units of different sizes. Proper relationship of cookware
to heating element or burner will also improve
efficiency.
Do not store or use corrosive chemicals, vapors,
flammables or nonfood products in or near this
appliance. It is specifically designed for use when
heating or cooking food. The use of corrosive chemicals
in heating or cleaning will damage the appliance and
could result in injury.
WARNING
Risk of electric shock
The cable insulation of electrical appliances can melt on
hot parts of the appliance. Never let connecting cables
of electrical appliances come into contact with hot parts
of the appliance.
Make sure reflector pans or drip bowls are in place Absence of these bowls or pans during cooking may
subject wiring or components underneath to damage.
WARNING
Failure to operate knobs properly may result in personal
injury and damage to the appliance.
Do not operate this appliance if it is not working
properly, or if it has been damaged. Contact an
authorized servicer.
6

9 IMPORTANT SAFETY INSTRUCTIONS
READ AND SAVE THESE INSTRUCTIONS
Do not cook on a broken cooktop. Cleaning solutions
and spillovers may create a risk of electric shock.
Do not repair or replace any part of the appliance
unless specifically recommended in this manual. Refer
all servicing to a factory authorized service center.
To avoid electrical shock hazard, before servicing the
appliance, switch power off at the service panel and
lock the panel to prevent the power from being switched
on accidentally.
Proposition 65 Warning:
This product may contain a chemical known to the State
of California, which can cause cancer or reproductive
harm. Therefore, the packaging of your product may
bear the following label as required by California:
67$7(2)&$/,)251,$352326,7,21:$51,1*
:$51,1*
&DQFHUDQG5HSURGXFWLYH+DUPZZZ3:DUQLQJVFDJRY
7

Causes of Damage
Protecting the environment
9 CAUTION
Damage to device through inappropriate accessories
Only use the designated original accessories.
Don't use grill trays or aluminum foil. This
damages the grill shelf.
9 CAUTION
Malfunction
Always set control knobs to the zero position
when the appliance is not in operation.
Unpack the appliance and dispose of the packaging in
an environmentally friendly manner.
Tips for saving energy
▯ Only preheat the grill for as long as is necessary to
reach the required temperature.
▯ Exploit the opportunity to switch on only the front or
the rear grill heating element to prepare small
amounts.
8
Your new appliance
Here you will get to know your new appliance and obtain
information about accessories.
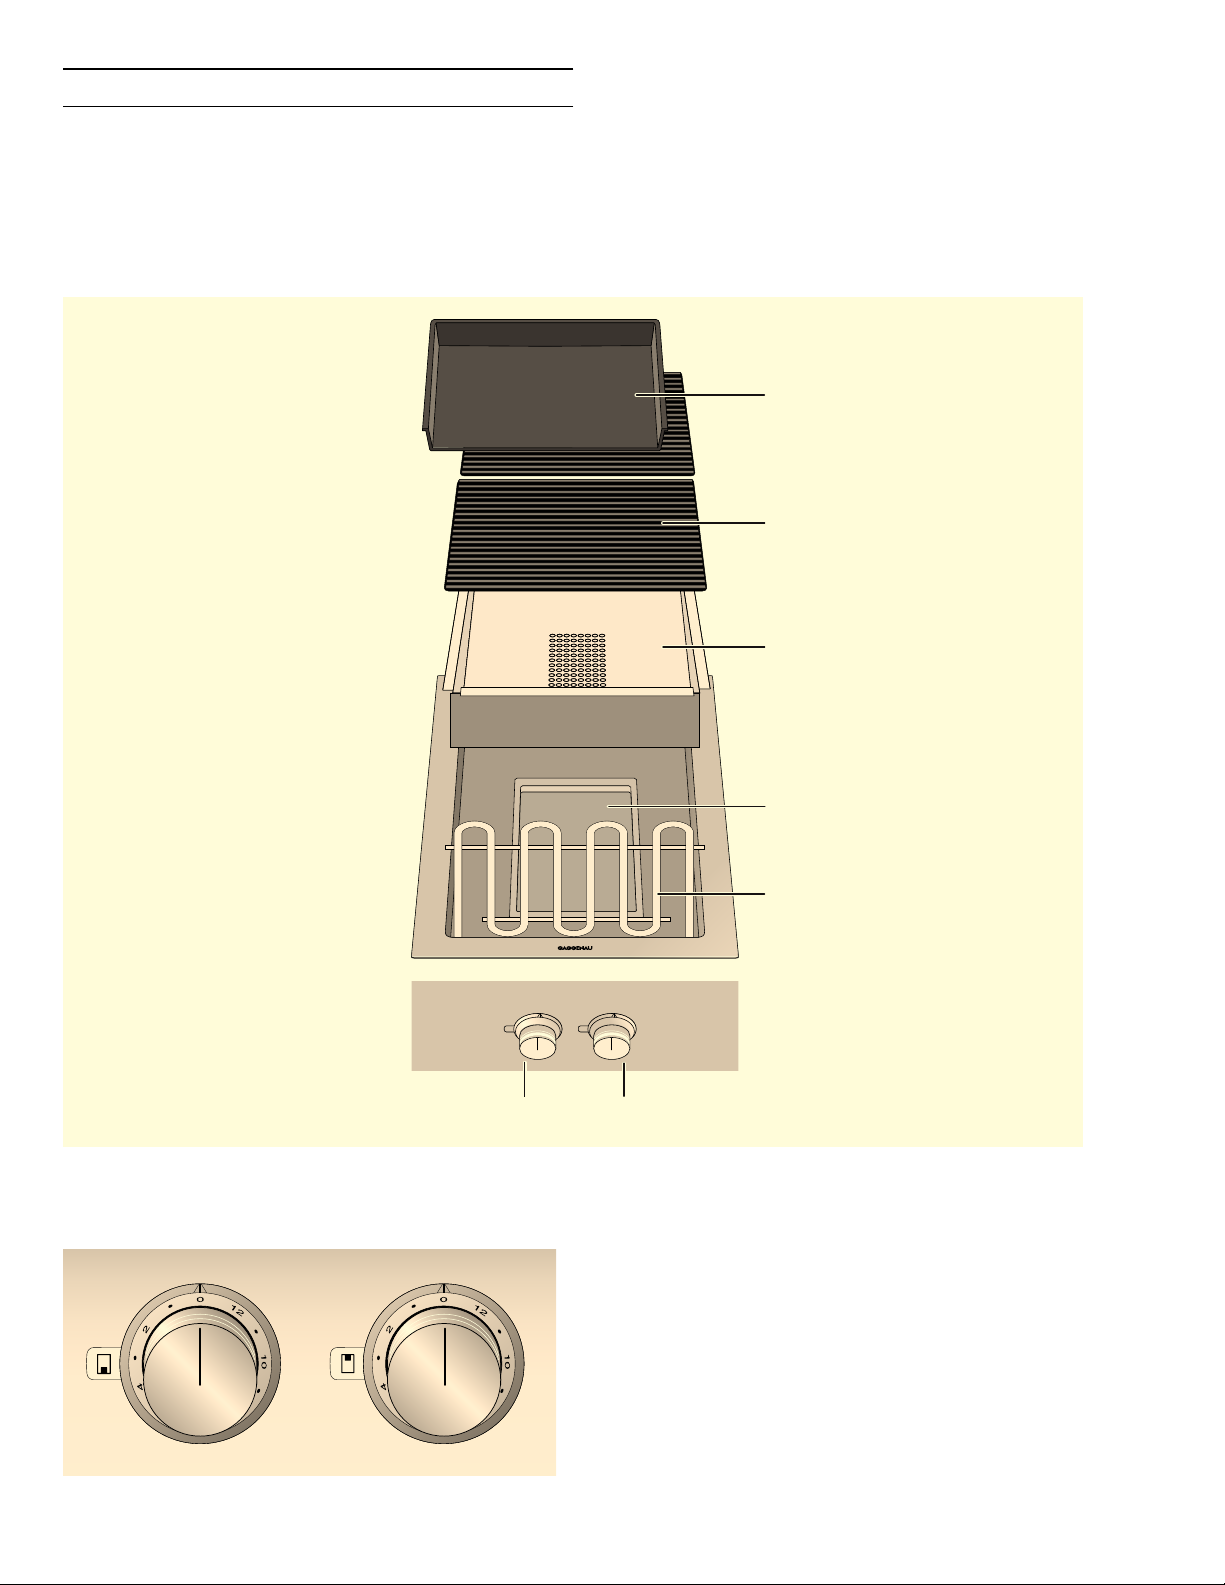
Electric grill
&DVWURDVWHUSDQ
:LUHJULOOWUD\
/DYDVWRQHWURXJK
Control knob
)URQWJULOOKHDWLQJHOHPHQW
*UHDVHFROOHFWLQJWUD\
*ULOOKHDWLQJHOHPHQW
5HDUJULOOKHDWLQJHOHPHQW
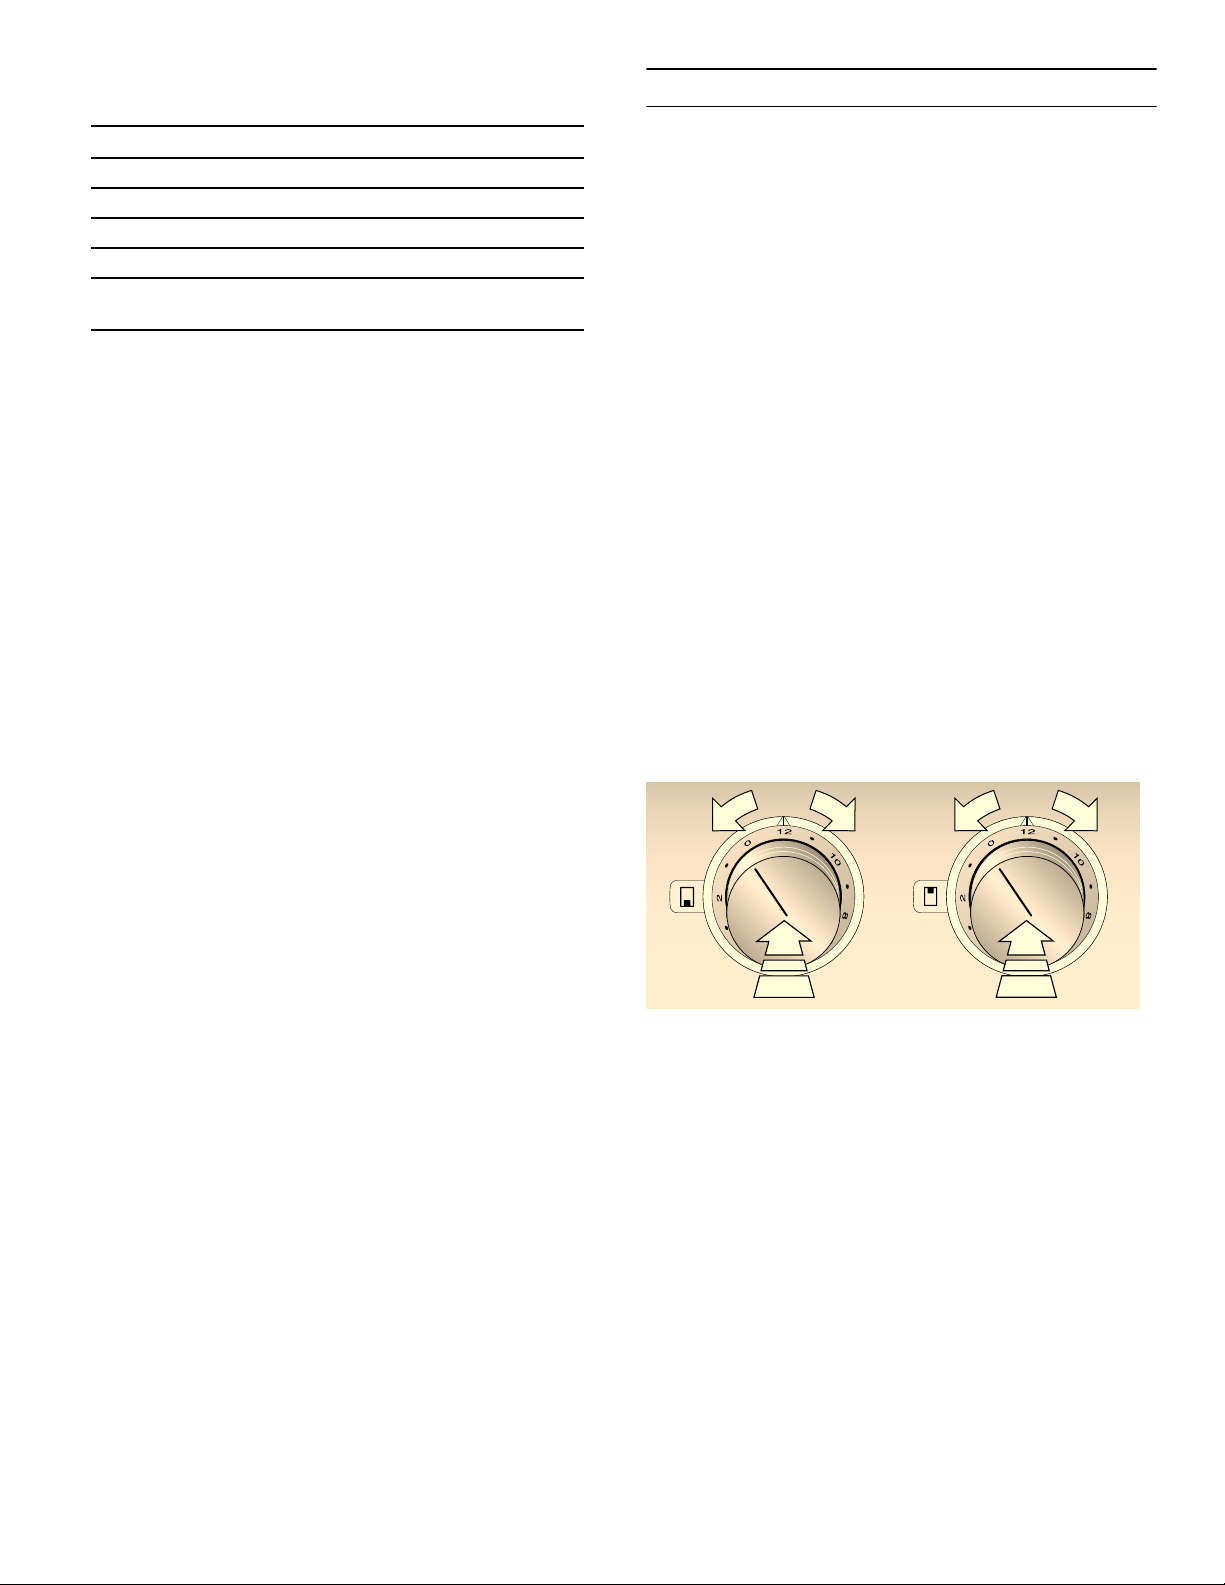
You use the control knobs to select the front or rear grill
heating element and the grill setting between 1 and 12.
9
Display on the illuminated ring
Display Meaning
Off Appliance OFF
Û
Lit constantly Appliance ON
Ú
Flashing slowly Appliance ON, heating up
ˆ
Flashing slowly Residual heat display
ˆ
Flashing fast Safety shut-off,
ˆ
power outage
Illuminated ring off
Û
Illuminated ring lit
Ú
Illuminated ring flashing
ˆ
Accessories
As standard, your device comes with the following
accessories:
Lava stones
Cast roaster pan, small
Cleaning brush
Special accessories
You can order the following accessories from your
specialist dealer:
Operation
Before first use
Bear in mind the following instructions before grilling for the first time:
1 Thoroughly clean the appliance and accessories. 2 Remove lava stones from the plastic film and place
them in the lava stone trough.
3 Fold both grill heating elements down. The grill
heating elements must lie flat.
4 Put on the wire racks and heat up the grill to level
12 for a few minutes. This eliminates potential
contaminants and smells of newness.
Turning on
Note: The two grill heating elements can be regulated
separately. This allows you to grill food with different
temperature requirements at the same time.
1 Press in the control knob and turn it to the required
grill setting. If you do not want to fry on the entire
grilling zone, turn on the front or the rear grill
heating element only.
VA 461 000 Cast roaster pan, small
VA 461 001 Cast roaster pan, large
LV 030 000 Lava stones (replaceable)
VA 440 010 Stainless steel appliance cover
VA 420 000 Connection strip for combination with
other Vario appliances in the 400 series
for flush installation
VA 420 001 Connection strip for combination with
other Vario appliances in the 400 series
for flush installation with appliance
cover/compensation strip
VA 420 010 Connection strip for combination with
other Vario appliances in the 400 series
for surface-mounted installation
VA 420 011 Connection strip for combination with
other Vario appliances in the 400 series
for surface-mounted installation with
appliance cover/compensation strip
VA 450 401 Appliance extension 15” (38 cm)
Use the accessories only as indicated. The
manufacturer assumes no liability for incorrect usage of
the accessories.
2 The illuminated rings behind the control knobs flash
fast as long as the appliance warms up. The
illuminated rings light up constantly once the set
grill setting has been reached. For grill setting 12,
the preheating phase takes about 15 minutes.
3 Do not put food on it until preheating is complete.
10

Turning off
Turn the control knobs to the 0 position.
9 WARNING
Risk of burns
When the appliance cover is closed, this leads to
a build-up of heat. Only operate or switch on the
appliance when the appliance cover is open. Do
not use the appliance cover for keeping warm or
setting down. Only close the appliance cover
once the appliance has cooled down.
9 CAUTION
Damage to the appliance
Remove spilled liquids before opening the
appliance cover.
Residual heat display
3 Turn the control knob for the rear grill heating
element to level 12. Pre-heat the grill until the
heating-up signal goes off.
4 Lightly coat the cast roaster pan with oil and place
the food on it that you wish to grill.
The illuminated rings behind the control knobs flash
after turning off as long as the appliance is too hot to
safely touch it.
Overheating protection
In the event of overheating, the appliance automatically
turns off the grill heating elements in order to protect
the countertop and cabinets. After the appliance has
sufficiently cooled down, turn it back on.
Working with the cast roaster pan
The cast roaster pan is especially suitable for preparing
chopped or liquid foods, vegetables, egg dishes and
desserts.
The cast roaster pan is placed on the rear grill heating
element after removing the wire rack. You can prepare
other grilled food on the front wire rack at the same
time.
You can obtain further case roaster pans from your
specialist dealer as special accessories (large or small).
Note: Leave the lava stone trough with the lava stones in the grill while working with the cast roaster pan.
How to grill with the cast roaster pan 1 Remove the rear wire rack. 2 Carefully place the cast roaster pan on the rear grill
heating element.
11

Settings table
Always preheat the grill until the heating-up signal goes
off.
Food Grill setting Grilling time Notes
Meat and poultry
Beefsteak, medium, 2 - 3 cm (0.8
- 1 in) Lamb chop, 2 cm (¾ in) 10 - 11 6 min. per side Shish kebabs, 100 g (4 oz) each 8 - 9 12 - 15 min. Turn several times Lamb chop, pink, 2 cm (¾ in) 10 - 11 6 min. per side Pork neck steak, 2 cm 10 - 11 6 - 8 min. per side Bratwurst, 50 - 100 g (2 - 4 oz) 9 - 10 10 - 15 min. Turn several times Hamburger, 1 cm (1/2 in) 9 - 10 12 - 15 min. Turkey steaks (2 cm; ¾ in) 9 - 10 12 - 15 min. Chicken wings 100 g (4 oz) 9 15 - 20 min. Turn several times
Fish and seafood
King prawns 9 - 10 6 - 8 min. Use prawns with shells, raw or pre-cooked. Lobster, pre-cooked 10 - 11 7 - 15 min. Salmon steak (3 cm; ¾ in) 7 - 8 10 - 15 min. Tuna steak (3 cm; ¾ in) 8 - 9 7 - 15 min. Fish fillet, 2 cm (0.8 in) 7 - 8 6 - 8 min. e.g. halibut, tilapia (St. Peter's fish), perch, monkfish, cod Trout, whole, 200 g (0.4 lb) 9 - 10 12 - 15 min. Coat trout with oil so that the skin doesn't stick to the grill
12 4 - 6 min. per side The steak is medium when meat juice appears on the sur-
The values in the settings table should only be regarded
as guidelines, since more or less heat may be required
depending on the type and condition of the food.
face.
shelf.
Side dishes
Vegetables 8 - 9 10 - 12 min. e.g. zucchini and eggplant in slices, bell pepper in quar-
ters Mushroom heads 9 - 10 6 - 8 min. Fruit 6 - 7 5 - 10 min. per side e.g. peach or pear halves, pineapple slices
Fry with the cast roaster pan
Pancakes, 180 g (0.4 lb) 7 - 8 1 - 2 min. per side Sautéed mushrooms, 250 g (0.6
lb) Scrambled egg, 300 g (0.7 lb) 8 - 9 5 - 6 min. Fried potatoes, 500 g (1 lb) 11 - 12 10 - 12 min. Ground meat, 400 g (1 lb) 11 - 12 5 - 6 min. Pan-fried vegetables, 400 g (1 lb) 9 - 10 6 - 8 min. Coarsely diced, e.g. bell pepper, onions, carrots, zuc-
11 - 12 5 - 7 min.
chini
12

Tips and tricks
Care and cleaning
▯ Always preheat the grill. The intense heat helps a
crust to form quickly, preventing meat juice from
escaping.
▯ Prior to grilling, you can coat the food with heat-
resistant oil (e.g. peanut oil) or marinade it. This
improves the taste. Make sure not to use too much
oil/marinade, as otherwise it may catch fire and
generate thick smoke.
▯ Don't salt meat prior to grilling. Otherwise soluble
nutrients and meat juice may be lost.
▯ Lay the food on the grill. Don't use aluminum foil or
grill trays.
▯ Only turn the meat once it can be easily removed
from the grill. If the meat sticks to the grill, this
destroys fibers and causes meat juice to escape.
▯ Don't pierce the meat while grilling, as otherwise
meat juice can come out.
▯ Cured meat such as ham or smoked pork chops is
not suitable for grilling. Unhealthy chemical
compounds may form.
▯ Make several cuts along the bone and in the fat
layer of cutlets so that they don't curve while
grilling.
▯ Remove layers of fat after rather than prior to
grilling, because otherwise the meat loses juice
and flavor.
▯ For especially crispy and brown poultry, coat it with
butter, salt water or orange juice when you're
almost done grilling.
▯ After grilling, fruit can be seasoned to taste with
honey, maple syrup or lemon juice.
▯ Vegetables with longer cooking times (e.g. corn on
the cob) can be precooked prior to grilling.
▯ Grill fish fillets on the skin side first. Coat skin with
oil so that it doesn't stick to the wire rack.
▯ Especially fish with firm meat (such as salmon, tuna
or monkfish) is suitable for grilling on the rack.
▯ Serve grilled food hot Grilled food will go tough if
you keep it warm.
▯ The grilling surface is hotter in the center than in
the edge zone. You can optimally spread the food
around the grilling surface, especially when grilling
meals with different cooking times and required
temperatures at the same time.
To do this, you can of course also use the two
grilling zones are different levels of intensity. Rule
of thumb: the thinner the food you are grilling, the
higher the temperature and the shorter the cooking
time.
In this chapter you will find tips and information on
optimal care and cleaning of your appliance.
9 WARNING
Risk of electrical shock
Moisture entering the appliance can cause an
electrical shock. Don't use a high-pressure
cleaner or steam cleaner.
9 WARNING
Risk of burns
The accessible parts get hot during operation.
Never touch hot parts. Keep children away.
Cleaning the appliance
Clean the appliance after each use, once it has cooled
down. By doing so, you avoid baking in of residues.
Residue is difficult to eliminate once it has burned in on
several occasions.
Do not crape off burned-in residues, but soak them in
water with detergent instead.
Detach the wire rack and swivel up the heating
elements. Take out the lava stone trough with the lava
stones.
Appliance part/
surface
Wire rack and cast
roaster pan
Stainless steel
cooktop
Recommended cleaning
Eliminate coarse residue with a cleaning
brush. Soak them in the sink. Clean with
the cleaning brush and detergent and dry
thoroughly.
Brush stubborn grime with our grill
cleaner gel (order number 00311761)
and leave on for at least 2 hours, or overnight for heavy grime. Then rinse thoroughly and dry. Observe the information
on the cleaner's packaging.
Do not wash them in a dishwasher!
Apply detergent with a soft, damp cloth
and dry with a soft cloth. Let stubborn
grime soak.
For heavy grime, use our stainless steel
cleaner (order number 00311499) or the
grill cleaner gel (order number
00311761).
13

Appliance part/
surface
Lava stone trough Take out the lava stones. Clean the lava
Lava stones The lava stones must be replaced when
Grease collecting
insert
Control knobs Clean with a soft, moist cloth and a little
Recommended cleaning
stone trough in in the sink with water and
dishwashing liquid; dry off with a soft
cloth. Let stubborn grime soak or remove
it with our grill cleaner gel (order number
00311761).
they are black. This means that they are
saturated with fat and may smoke heavily
during operation or the fat may catch
flame.
You can obtain suitable lava stones from
your specialist dealer (order number
LV 030 000).
Clean in a dishwasher.
dishwashing liquid; the cloth must not be
too wet.
Do not use these cleaning agents
▯ Caustic or corrosive cleaners
▯ Acidic cleaners (e.g. vinegar, citric acid, etc.)
▯ Cleaners containing chlorine or large proportions
of alcohol
▯ Baking oven spray
▯ Hard, scratchy dish-washing sponges, brushes or
scourers
▯ Thoroughly wash out new sponge cloths before
using them.
14

Troubleshooting
You can often easily eliminate problems that may occur
on your own. Before calling customer service, take into
account the following information.
Malfunction Possible cause Solution
Appliance does not heat up. Illuminated
rings light up.
Appliance does not heat up. Illuminated
rings flash fast.
Appliance does not heat up. Illuminated
rings do not light up.
The corners of the appliance curve
upwards slightly during operation.
Overheating protection: grill has been
operated at the level 12 for a very long
time.
Safety shut-off: appliance has not been
operated in the past four hours.
Power outage: after a power outage, the
appliance stays switched off for safety
reasons.
Installation error Check correct fitting of the connecting cable
The heat causes the cooktop's metal to
expand.
9 WARNING
Risk of electric shock
Incorrect repairs are dangerous. Repairs may only
be carried out by an authorized servicer. If the
appliance is not functioning properly, unplug the
power cord or switch off the fuse in the fuse box.
Contact Customer Support.
The appliance turns itself on again automatically after it has cooled down enough.
Turn the control knob to 0 and then switch on
again, if necessary.
Turn the control knob to 0 and then switch on
again, if necessary.
to the control panel. The plug must engage.
This is normal. No curving is visible after cool-
ing down.
15
 Loading...