

Page 1
Gaggenau
de Gebrauchs- und Montageanleitung
en Operating and installation instructions
fr Notices d’utilisation et de montage
it Istruzioni per l’uso ed il montaggio
nl Gebruiksaanwijzing en installatievoorschrift
RW 424
Page 2

deInhaltsverzeichnis 3
Table of contents 21
en
frTable de matières 39
Indice 57
it
Inhoudsopgave 75
nl
2
Page 3

Inhalt
Gratulation 4. . . . . . . . . . . . . . . . . . . . . . . . . . . . . . . .
Sicherheits- und Warnhinweise 4. . . . . . . . . . . . .
Bevor Sie das Gerät in Betrieb nehmen 4. . . . . . . .
Technische Sicherheit 4. . . . . . . . . . . . . . . . . . . . . . .
Beim Gebrauch 5. . . . . . . . . . . . . . . . . . . . . . . . . . . .
Kinder im Haushalt 5. . . . . . . . . . . . . . . . . . . . . . . . . .
Allgemeine Bestimmungen 5. . . . . . . . . . . . . . . . . . .
Hinweise zur Entsorgung 5. . . . . . . . . . . . . . . . . . .
Verpackung entsorgen 5. . . . . . . . . . . . . . . . . . . . . . .
Altgerät entsorgen 6. . . . . . . . . . . . . . . . . . . . . . . . . .
Aufstellhinweise 6. . . . . . . . . . . . . . . . . . . . . . . . . . .
Aufstellort 6. . . . . . . . . . . . . . . . . . . . . . . . . . . . . . . . . .
Klimaklassen 6. . . . . . . . . . . . . . . . . . . . . . . . . . . . . . .
Nische 6. . . . . . . . . . . . . . . . . . . . . . . . . . . . . . . . . . . .
Belüftung 7. . . . . . . . . . . . . . . . . . . . . . . . . . . . . . . . . .
Gerät transportieren 7. . . . . . . . . . . . . . . . . . . . . . . . .
Elektrischer Anschluss 7. . . . . . . . . . . . . . . . . . . . . . .
Einbau des Gerätes 8. . . . . . . . . . . . . . . . . . . . . . . .
Türanschlag bei Bedarf wechseln 8. . . . . . . . . . . . .
Ausstattung 16. . . . . . . . . . . . . . . . . . . . . . . . . . . . . . .
Flaschenauszüge 16. . . . . . . . . . . . . . . . . . . . . . . . . . .
Einlagerungsskizze 16. . . . . . . . . . . . . . . . . . . . . . . .
Praktische Tipps zur Weinlagerung 16. . . . . . . . . .
Trinktemperaturen 16. . . . . . . . . . . . . . . . . . . . . . . . .
Luftaustausch durch Aktivkohlefilter 17. . . . . . . . .
Abtauen 17. . . . . . . . . . . . . . . . . . . . . . . . . . . . . . . . . .
Gerät ausschalten 17. . . . . . . . . . . . . . . . . . . . . . . . .
Gerät stilllegen 17. . . . . . . . . . . . . . . . . . . . . . . . . . . .
Gerät reinigen 17. . . . . . . . . . . . . . . . . . . . . . . . . . . . .
Pflegehinweise für Edelstahlflächen 18. . . . . . . . . . . .
Betriebsgeräusche 18. . . . . . . . . . . . . . . . . . . . . . . . .
Normale Geräusche 18. . . . . . . . . . . . . . . . . . . . . . . . .
Geräusche vermeiden 18. . . . . . . . . . . . . . . . . . . . . . .
Kleine Störungen selbst beheben 19. . . . . . . . . . .
Einbaumaße 9. . . . . . . . . . . . . . . . . . . . . . . . . . . . . . .
Befestigung und Montage 9. . . . . . . . . . . . . . . . . . . .
Ihr neues Gerät 12. . . . . . . . . . . . . . . . . . . . . . . . . . . .
Bedienblende 12. . . . . . . . . . . . . . . . . . . . . . . . . . . . .
Gerät einschalten 13. . . . . . . . . . . . . . . . . . . . . . . . . .
Temperatur einstellen 13. . . . . . . . . . . . . . . . . . . . . .
Ventilator 13. . . . . . . . . . . . . . . . . . . . . . . . . . . . . . . . .
Temperatur-Alarm 13. . . . . . . . . . . . . . . . . . . . . . . . .
Kindersicherung 14. . . . . . . . . . . . . . . . . . . . . . . . . . .
Leuchtkraft der Anzeige 14. . . . . . . . . . . . . . . . . . . .
Innenbeleuchtung LED 15. . . . . . . . . . . . . . . . . . . . .
Kundendienst 20. . . . . . . . . . . . . . . . . . . . . . . . . . . . .
3
Page 4

Gratulation
Sicherheits- und Warnhinweise
Mit dem Kauf Ihres neuen Weintemperierschrankes
haben Sie sich für ein modernes, qualitativ
hochwertiges Haushaltsgerät entschieden.
Erst in der richtigen Trinktemperatur entfalten gute
Weine ihr Aroma und ihren Geschmack zum vollen
Genuss. In Ihrem Weintemperierschrank werden Weine
langsam und gleichmäßig auf ideale Trinktemperatur
gebracht. In zwei unabhängig voneinander einstellbaren
Temperaturzonen können gleichzeitig Rotweine und
Weißweine in der optimalen Trinktemperatur gelagert
werden.
Ihr neues Gerät zeichnet sich durch einen sparsamen
Verbrauch an Energie aus.
Jedes Gerät, das unser Werk verlässt, wird sorgfältig auf
Funktion und einwandfreien Zustand geprüft.
Bei Fragen − insbesondere zum Aufstellen und
Anschließen des Gerätes − steht Ihnen unser
Kundendienst gerne zur Verfügung, siehe Kapitel
Kundendienst.
Bevor Sie das Gerät in Betrieb nehmen
Lesen Sie die Gebrauchs- und Montageanleitung
aufmerksam durch!
Sie enthalten wichtige Informationen über Aufstellen,
Gebrauch und Wartung des Gerätes.
Bewahren Sie alle Unterlagen für späteren Gebrauch
oder für Nachbesitzer auf.
Technische Sicherheit
d Das Gerät enthält in geringer Menge das
umweltfreundliche aber brennbare Kältemittel R600a.
Achten Sie darauf, dass die Rohre des KältemittelKreislaufes bei Transport oder Montage nicht beschädigt
werden. Herausspritzendes Kältemittel kann zu
Augenverletzungen führen oder sich entzünden.
Bei Beschädigung
D Offenes Feuer oder Zündquellen vom Gerät
fernhalten,
Weitere Informationen und eine Auswahl unserer
Produkte finden Sie auf unserer Internetseite.
Lesen Sie diese Gebrauchsanleitung sowie die
Aufstellanleitung und alle anderen dem Gerät
beigefügten Informationen und handeln Sie
entsprechend.
D Netzstecker ziehen,
D Raum für einige Minuten gut durchlüften,
D Kundendienst benachrichtigen.
Je mehr Kältemittel in einem Gerät ist, umso größer
muss der Raum sein, in dem das Gerät steht. In zu
kleinen Räumen kann bei einem Leck ein brennbares
Gas-Luft-Gemisch entstehen.
Pro 8 g Kältemittel muss der Raum mindestens 1 m
groß sein. Die Menge des Kältemittels Ihres Gerätes
steht auf dem Typenschild im Inneren des Gerätes.
Das Wechseln der Netzanschlussleitung und andere
Reparaturen dürfen nur vom Kundendienst durchgeführt
werden. Unsachgemäße Installationen und Reparaturen
können den Benutzer erheblich gefährden.
Laserstrahlung
Das Gerät ist mit Lasern der Klasse 1M zur Beleuchtung
ausgestattet.
3
Gefahr von Augenschäden!
Nicht mit optischen Instrumenten direkt in die
Laserstrahlung blicken.
Reparaturen an den Lasereinrichtungen dürfen nur vom
Kundendienst oder von autorisierten Fachkräften
ausgeführt werden.
4
Page 5

Beim Gebrauch
Allgemeine Bestimmungen
D Nie elektrische Geräte innerhalb des Gerätes
verwenden (z. B. Heizgeräte, elektrische Eisbereiter
usw.). Explosionsgefahr!
D Nie das Gerät mit einem Dampfreinigungsgerät
abtauen oder reinigen! Der Dampf kann an
elektrische Teile gelangen und einen Kurzschluss
oder einen Stromschlag auslösen.
Stromschlaggefahr!
D Keine Produkte mit brennbaren Treibgasen
(z. B. Spraydosen) und keine explosiven Stoffe
lagern. Explosionsgefahr!
D Sockel, Auszüge, Türen usw. nicht als Trittbrett oder
zum Abstützen missbrauchen.
D Zum Abtauen und Reinigen Netzstecker ziehen oder
Sicherung ausschalten.
Am Netzstecker ziehen, nicht am Anschlusskabel.
D Hochprozentigen Alkohol nur dicht verschlossen
und stehend lagern.
D Kunststoff-Teile und Türdichtung nicht mit Öl oder
Fett verschmutzen. Kunststoff-Teile und Türdichtung
werden sonst porös.
D Be- und Entlüftungsöffnungen für das Gerät nie
abdecken oder zustellen.
Dieses Gerät ist ausschließlich zur Lagerung von Wein
bestimmt.
Das Gerät ist nur für die Verwendung im Haushalt
bestimmt.
Das Gerät ist funkentstört nach EU−Richtlinie
2004/108/EC.
Der Kältekreislauf ist auf Dichtheit geprüft.
Dieses Erzeugnis entspricht den einschlägigen
Sicherheitsbestimmungen für Elektrogeräte
(EN 60335/2/24).
Hinweise zur Entsorgung
x Verpackung entsorgen
Die Verpackung schützt Ihr Gerät vor Transportschäden.
Alle eingesetzten Materialien sind umweltverträglich und
wieder verwertbar. Bitte helfen Sie mit: Entsorgen Sie
die Verpackung umweltgerecht.
Über aktuelle Entsorgungswege informieren Sie sich
bitte bei Ihrem Fachhändler oder bei der Gemeindeverwaltung.
D Dieses Gerät ist von Personen mit eingeschränkten
physischen, sensorischen oder psychischen
Fähigkeiten oder mangelndem Wissen nur unter
Aufsicht oder ausführlicher Anleitung zu benutzen.
Kinder im Haushalt
D Verpackungen und deren Teile nicht Kindern
überlassen. Erstickungsgefahr durch Faltkartons
und Folien!
D Das Gerät ist kein Spielzeug für Kinder!
D Bei Gerät mit Türschloss: Schlüssel außer
Reichweite von Kindern aufbewahren!
5
Page 6

Aufstellhinweise
x Altgerät entsorgen
Altgeräte sind kein wertloser Abfall!
Durch umweltgerechte Entsorgung können wertvolle
Rohstoffe wiedergewonnen werden.
Dieses Gerät ist entsprechend der europäischen
Richtlinie 2002/96/EG über Elektro- und
Elektronikaltgeräte (waste electrical and electronic
equipment − WEEE) gekennzeichnet. Die Richtlinie
gibt den Rahmen für eine EU-weit gültige
Rücknahme und Verwertung der Altgeräte vor.
d Bei ausgedienten Geräten:
D Netzstecker ausstecken.
D Anschlusskabel durchtrennen und mit dem
Netzstecker entfernen.
D Türen abnehmen.
D Ablagen und Behälter nicht herausnehmen,
um Kindern das Hineinklettern zu erschweren!
Aufstellort
Als Aufstellort eignet sich ein trockener, belüftbarer
Raum. Der Aufstellort sollte keiner direkten
Sonneneinstrahlung ausgesetzt sein und nicht neben
einer Wärmequelle wie einem Herd, einem Heizkörper
usw. liegen. Lässt sich eine Installation neben einer
Wärmequelle nicht vermeiden, ist eine geeignete
Isolierplatte zu verwenden oder es sind folgende
Mindestabstände von der Wärmequelle einzuhalten:
− 30 mm von Elektroherden,
− 300 mm von Öl- oder Kohleanstellherden.
Der Boden am Aufstellplatz darf nicht nachgeben,
Boden eventuell verstärken.
Klimaklassen
Die Klimaklasse steht auf dem Typenschild. Sie gibt an,
innerhalb welcher Raumtemperaturen das Gerät
betrieben werden kann.
D Kinder nicht mit ausgedienten Geräten spielen
lassen. Erstickungsgefahr!
Kältegeräte enthalten Kältemittel und in der Isolierung
Gase. Kältemittel und Gase müssen fachgerecht
entsorgt werden. Rohre des Kältemittel-Kreislaufes bis
zur fachgerechten Entsorgung nicht beschädigen.
Klimaklasse zulässige Raumtemperatur
SN +10 °C bis 32 °C
N +16 °C bis 32 °C
ST +16 °C bis 38 °C
T +16 °C bis 43 °C
Nische
Das Gerät muss in eine geeignete Nische eingebaut
werden.
Die Nische muss mit einer Wasserwaage ausgerichtet
sein. Sie muss mit den Nachbarmöbeln oder der Wand
stabil verschraubt sein.
Die Nische muss ausreichende Be- und
Entlüftungsöffnungen im Möbelsockel vorn und
Möbelumbau oben haben.
6
Page 7
Belüftung
Elektrischer Anschluss
Auf keinen Fall die Be- und Entlüftungsöffnungen im
Möbelsockel vorn und Möbelumbau oben abdecken.
Die Kühlmaschine muss sonst mehr leisten und das
erhöht den Stromverbrauch.
Folgende Maße unbedingt einhalten:
Tiefe des Entlüftungsschachts an der Möbelrückwand:
min. 38 mm
Be− und Entlüftungsquerschnitte im Möbelsockel und
Möbelumbau oben:
min. 200 cm
2
Gerät transportieren
!
Warnung!
Verletzungsgefahr durch Glasscherben!
Beim Transport in einer Höhe von mehr als 1500 m
können die Glasscheiben der Tür zerbrechen. Die
Bruchstücke sind scharfkantig und können
schwere Verletzungen verursachen.
Das Gerät eingepackt und stehend transportieren.
Die Steckdose zum Anschluss des Gerätes muss frei
zugänglich sein. Das Gerät an 220 − 240 V/50 Hz
Wechselstrom über eine vorschriftsmäßig installierte
Steckdose anschließen. Die Steckdose muss mit einer
10-A- bis 16-A-Sicherung abgesichert sein.
Keine Verlängerungskabel oder Verteiler benutzen.
Bei Geräten, die in nicht-europäischen Ländern
betrieben werden, ist auf dem Typenschild zu
überprüfen, ob die angegebene Spannung und
Stromart mit den Werten Ihres Stromnetzes
übereinstimmt. Das Typenschild befindet sich im
Gerät links unten. Ein eventuell notwendiger
Austausch der Netzanschlussleitung darf nur durch
einen Fachmann erfolgen.
!
Warnung!
Auf keinen Fall darf das Gerät an elektronische
Energiesparstecker (z.B. Ecoboy; Sava Plug) und an
Wechselrichter, die Gleichstrom in
230 V Wechselstrom umwandeln, angeschlossen
werden (z.B. Solaranlagen, Schiffsstromnetze).
Hinweis!
Zum Schutz der Glastür die Transportsicherung erst
entfernen, wenn das Gerät in der Nische steht.
Vor jedem erneuten Transport die Transportsicherung
anbringen.
7
Page 8

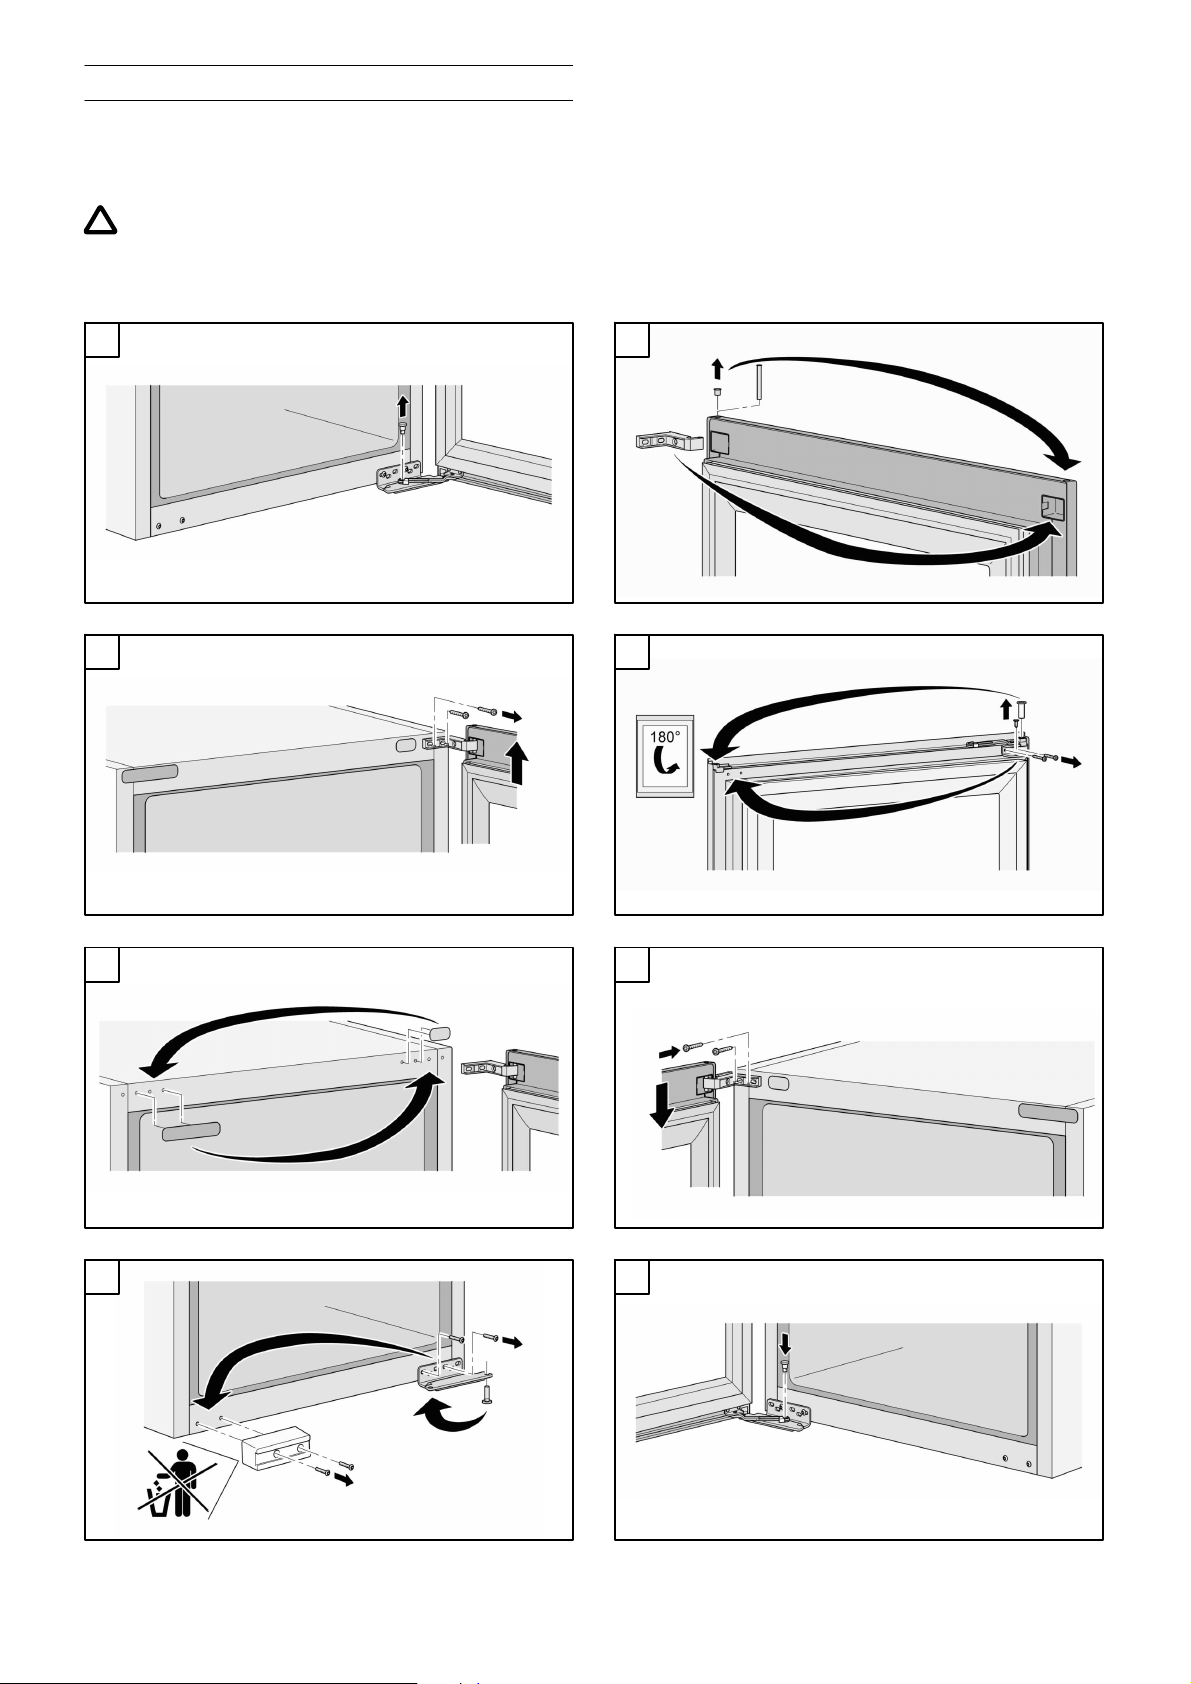
Einbau des Gerätes
Türanschlag bei Bedarf wechseln
!
Warnung!
Verletzungsgefahr durch schwere Türe!
Zum Wechseln der Glastüre sind zwei Personen erforderlich.
1
1.
2
2.
3.
5
10.
11.
13.
12.
6
15.
12.
17.
14.
16.
3
4.
5.
4
9.
6.
7.
8.
7
19.
18.
8
20.
8
Page 9

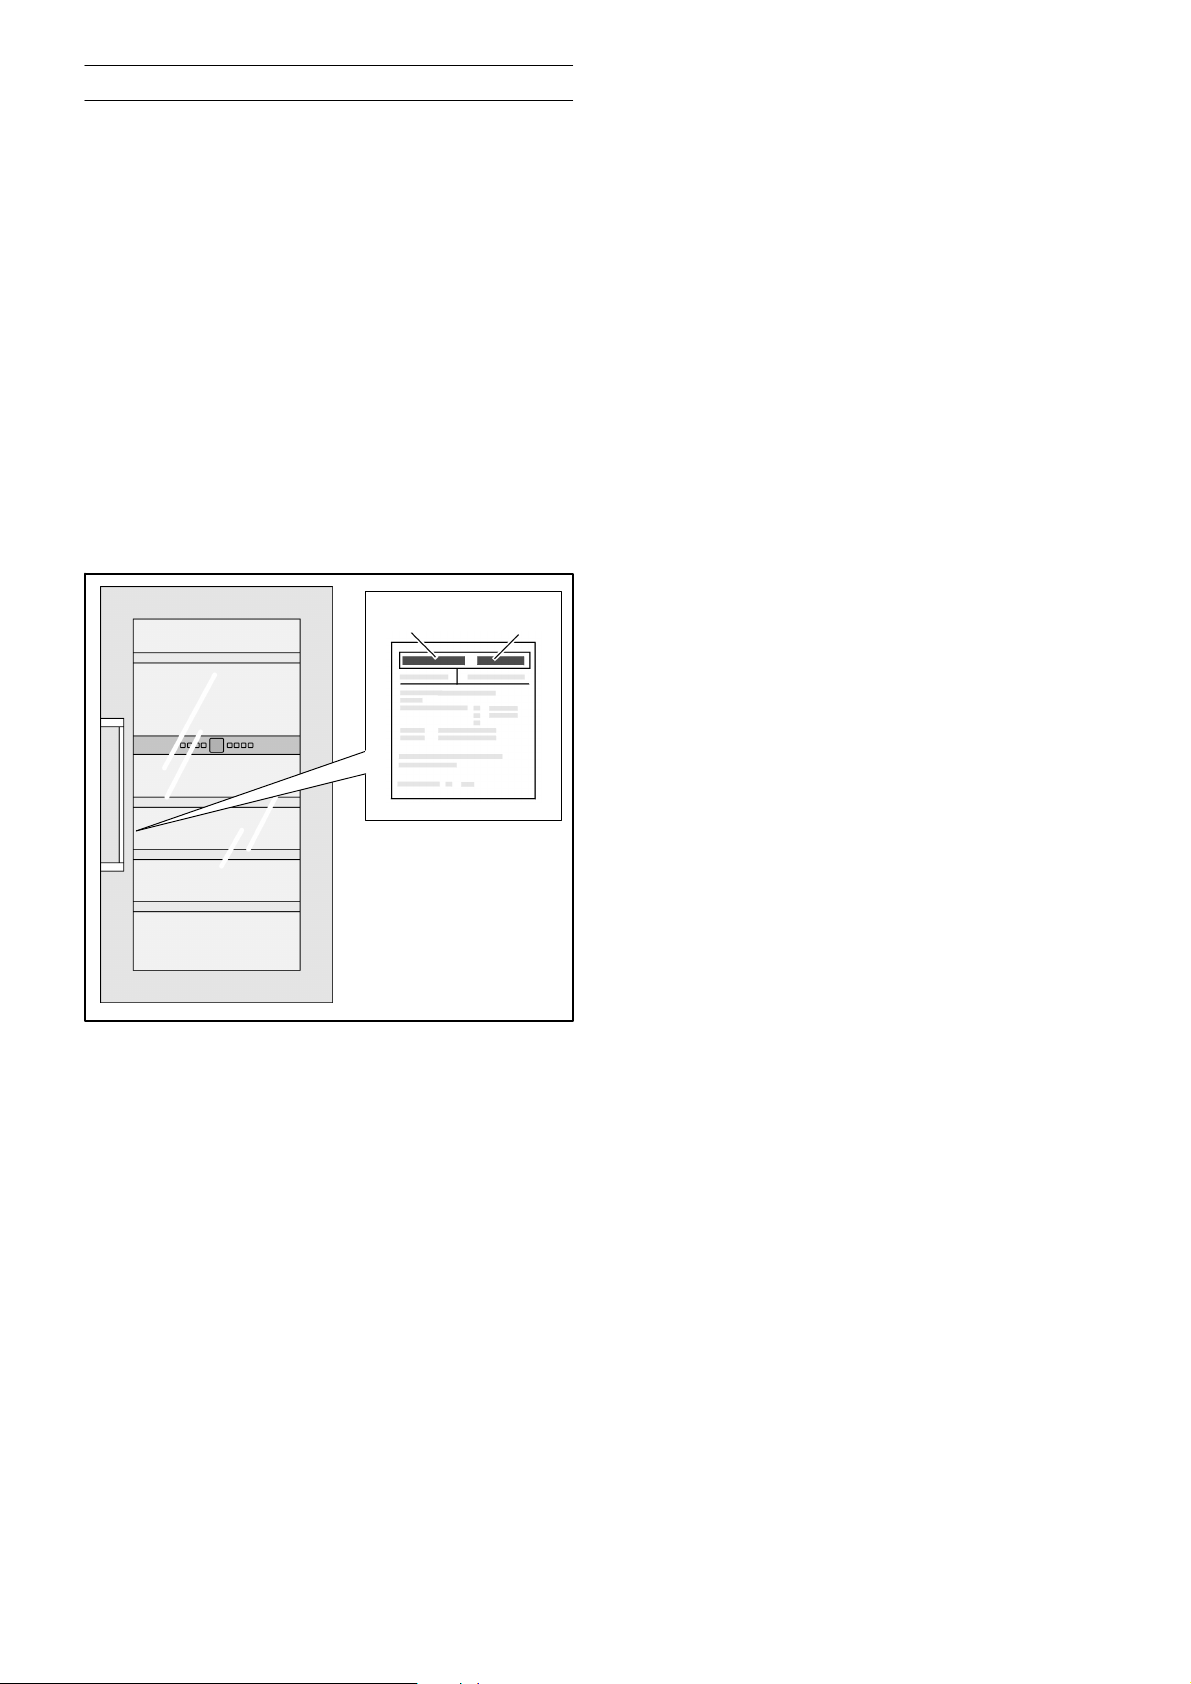
Einbaumaße
max. 2100
min. 200 cm
2
1221−
1225
min. 38
560−570
min.
550
min. 38
1218
557
502
58
592
113
49
3
1229
min. 200 cm
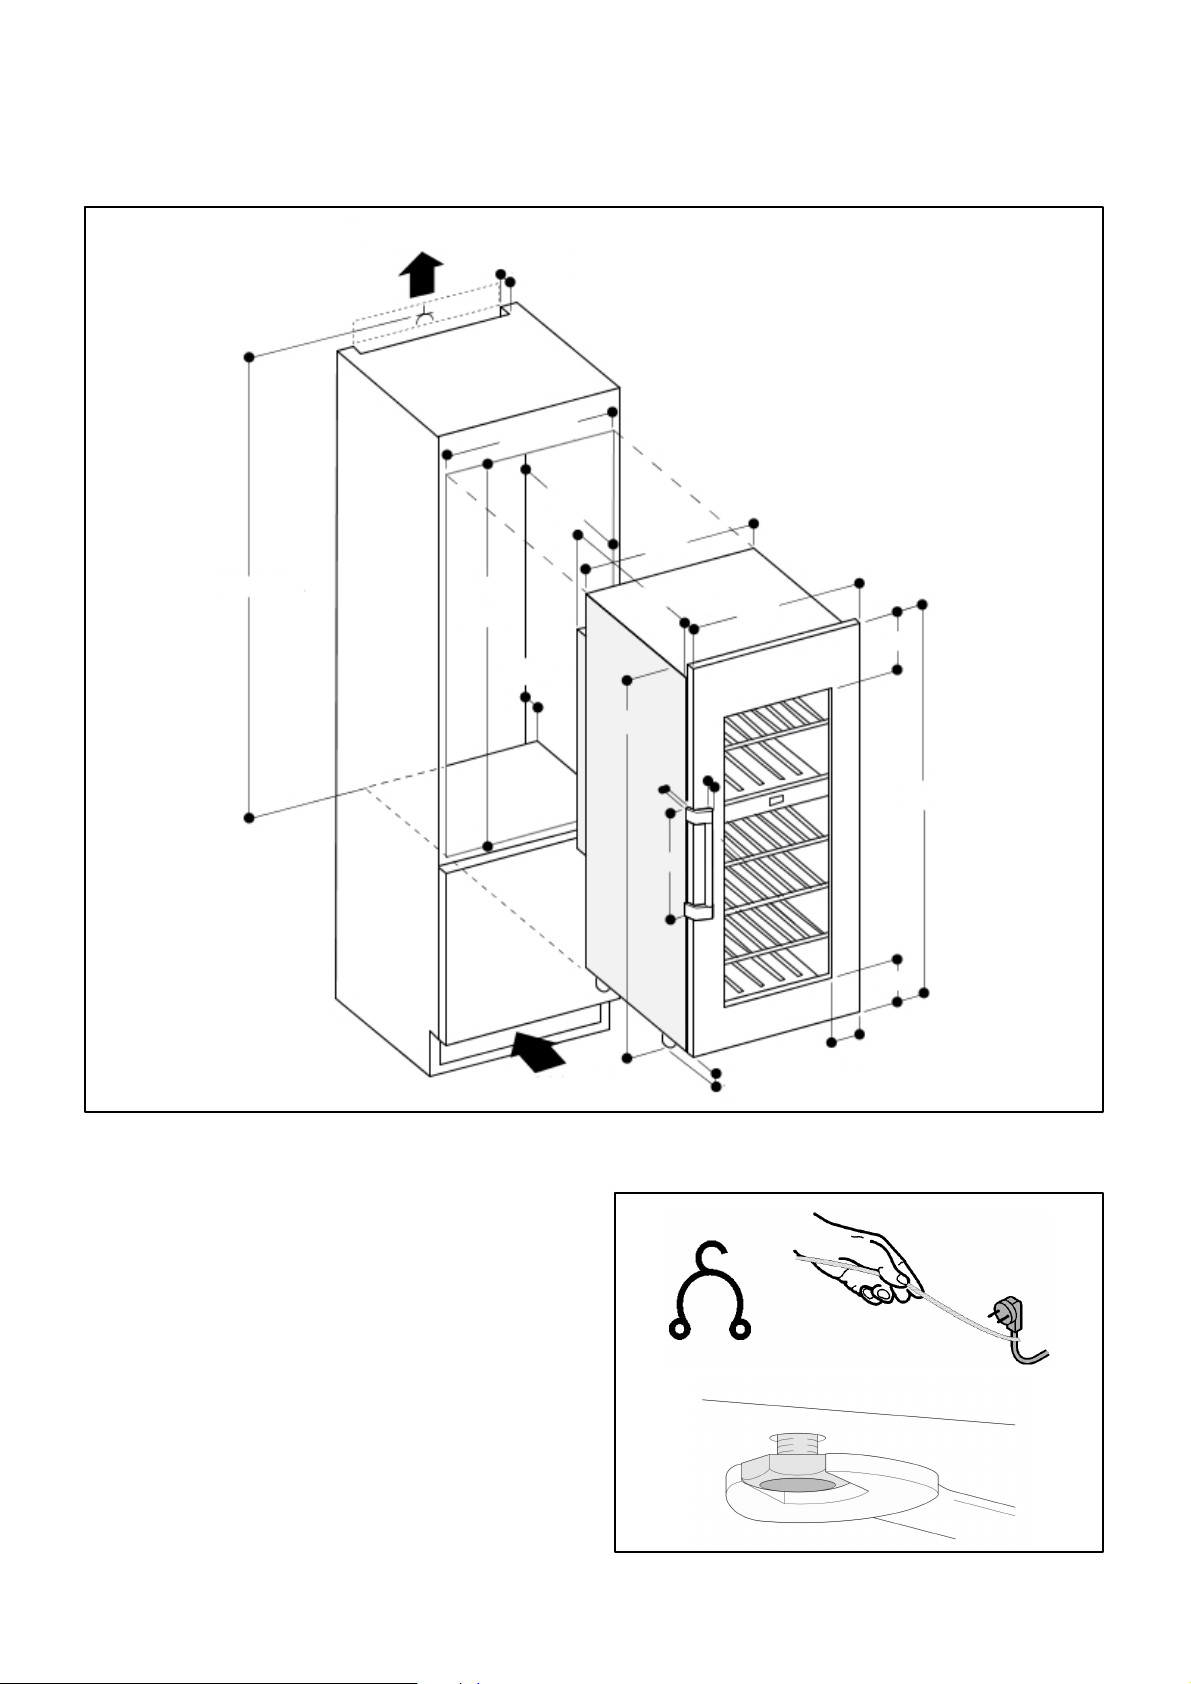
Befestigung und Montage
1. Das Anschlusskabel von der Rückseite des Gerätes
abnehmen.
2. Den Kabelhalter entfernen (sonst entstehen
Vibrationsgeräusche).
3. Das Anschlusskabel mit Hilfe einer Schnur so
verlegen, dass das Gerät nach dem Einbau leicht
angeschlossen werden kann.
450
103
100
2
5. Die Stellfüße ganz hineindrehen.
5
4. Das Gerät zu 2/3 in die Nische schieben. Dabei das
Anschlusskabel nicht einklemmen.
9
Page 10
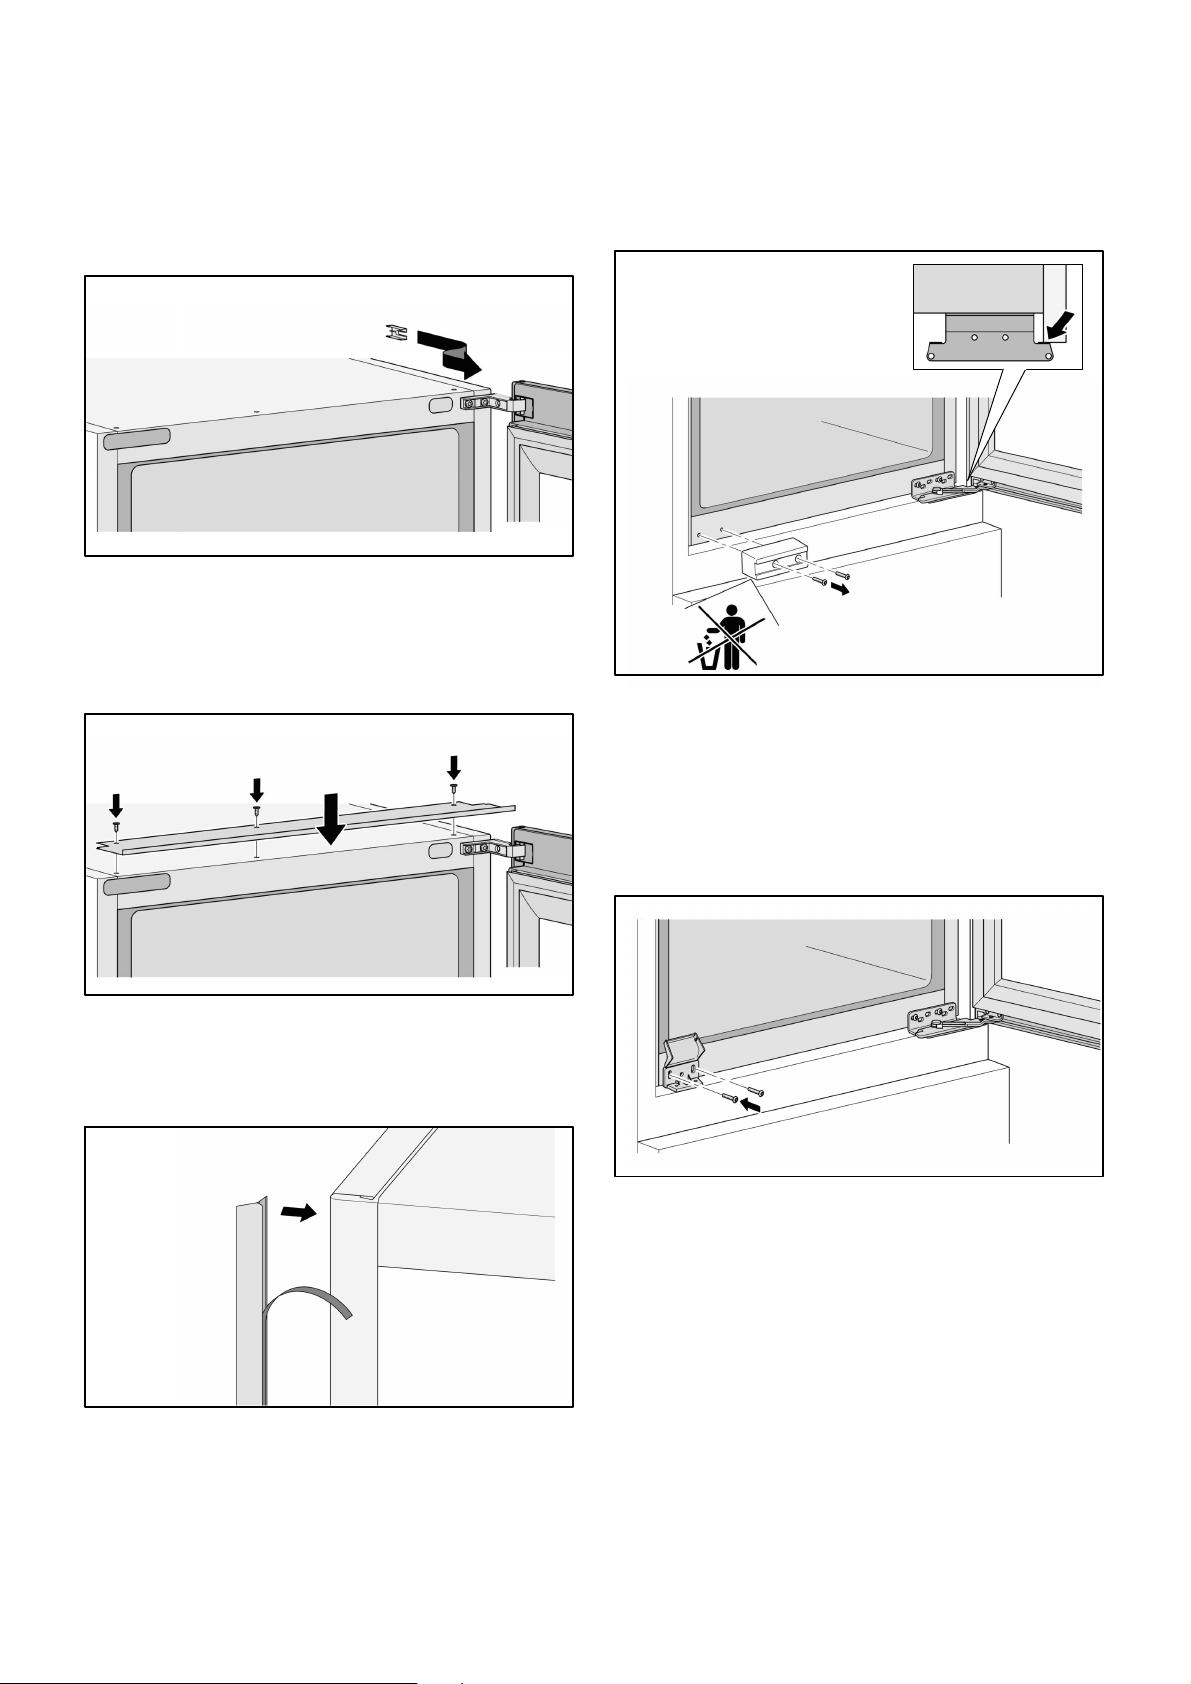
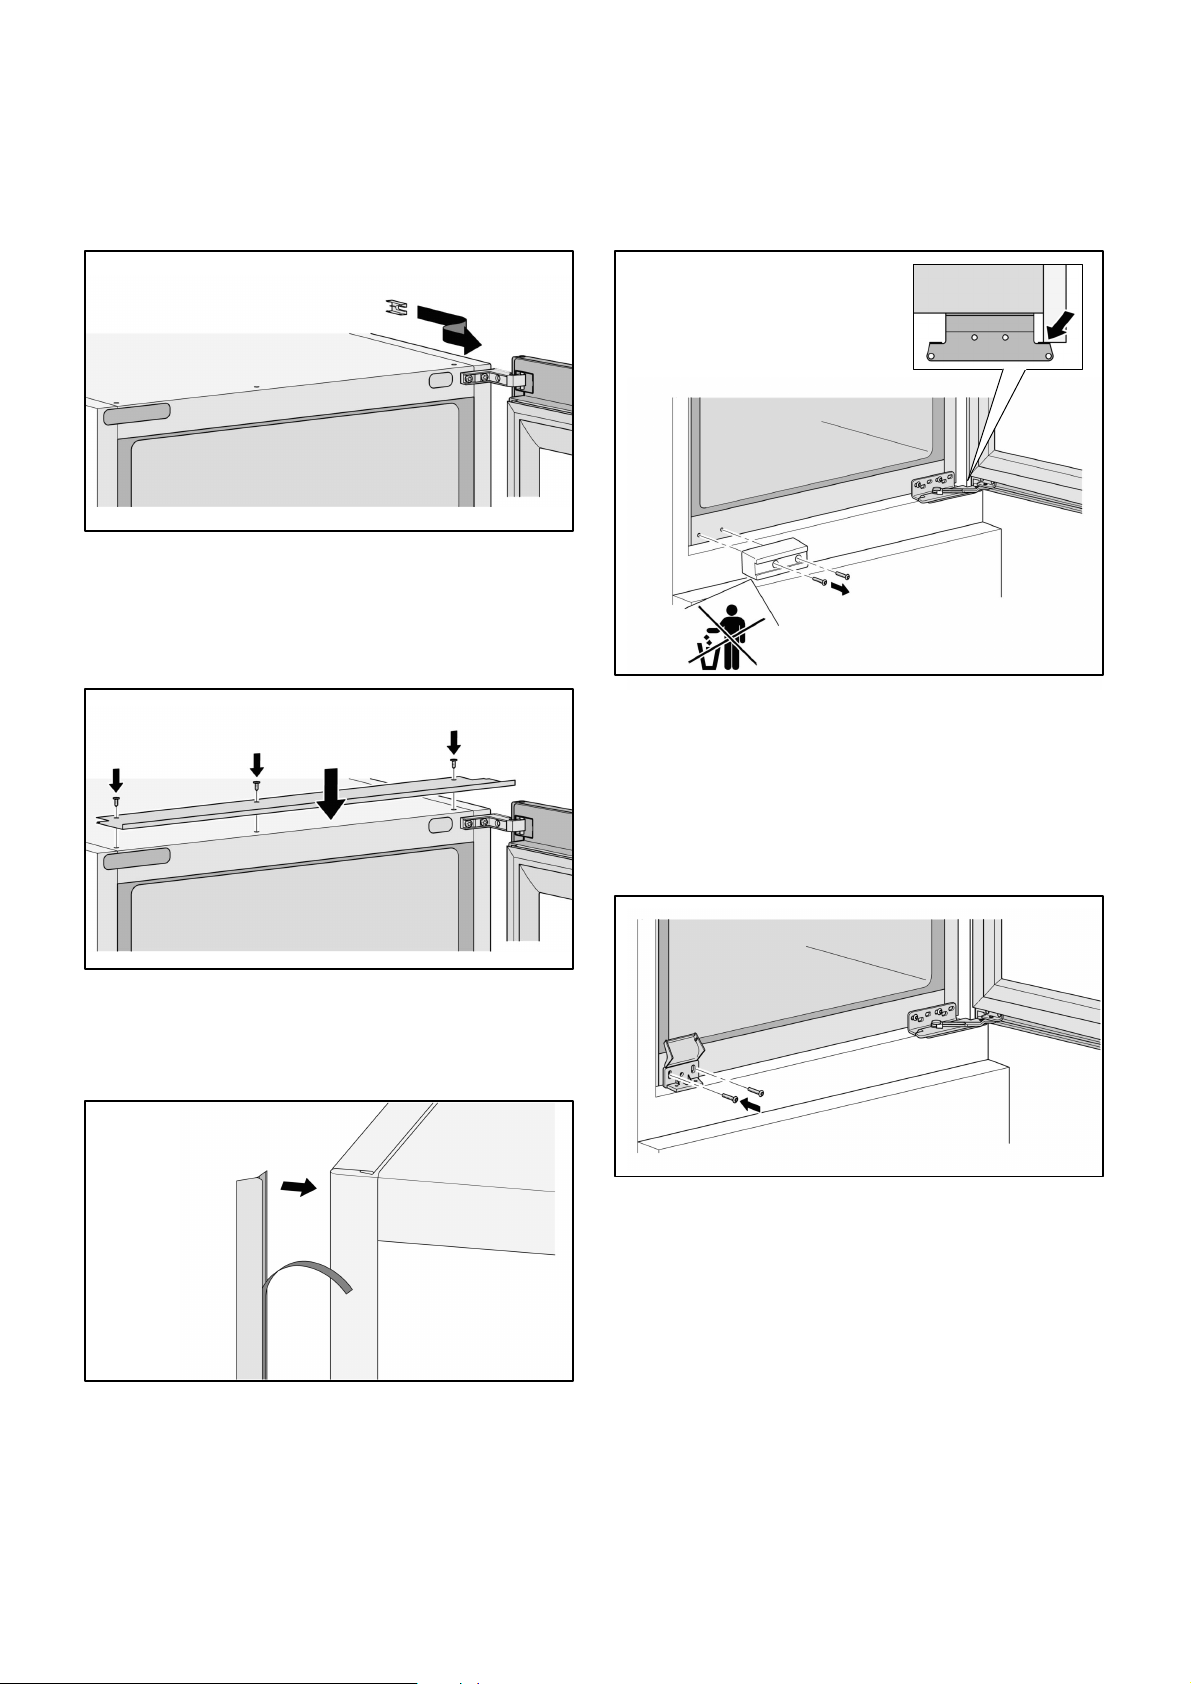
6. Bei 16 mm dicken Möbelwänden:
Das Distanzteil außen auf das obere Scharnier
stecken.
Das Loch nicht verdecken!
7. Die Ausgleichsblende an den vorgebohrten Löchern
auf der Geräteoberseite ansetzen und mit
3 Schrauben (3,5 x 9,5 mm aus Beipack)
befestigen.
9. Das Gerät in die Nische schieben, bis der Anschlag
des unteren Scharniers an der Vorderkante der
Möbelwand anliegt.
10. Die Transportsicherung abschrauben.
Die Transportsicherung für einen erneuten Transport
aufbewahren!
8. Die Abdeckleiste auf die Höhe der Nische kürzen
und auf der Türöffnungsseite an die Seitenwand des
Gerätes kleben.
11. Den Befestigungswinkel mit den zwei Schrauben
der Türtransportsicherung am Gerät festschrauben.
10
Page 11
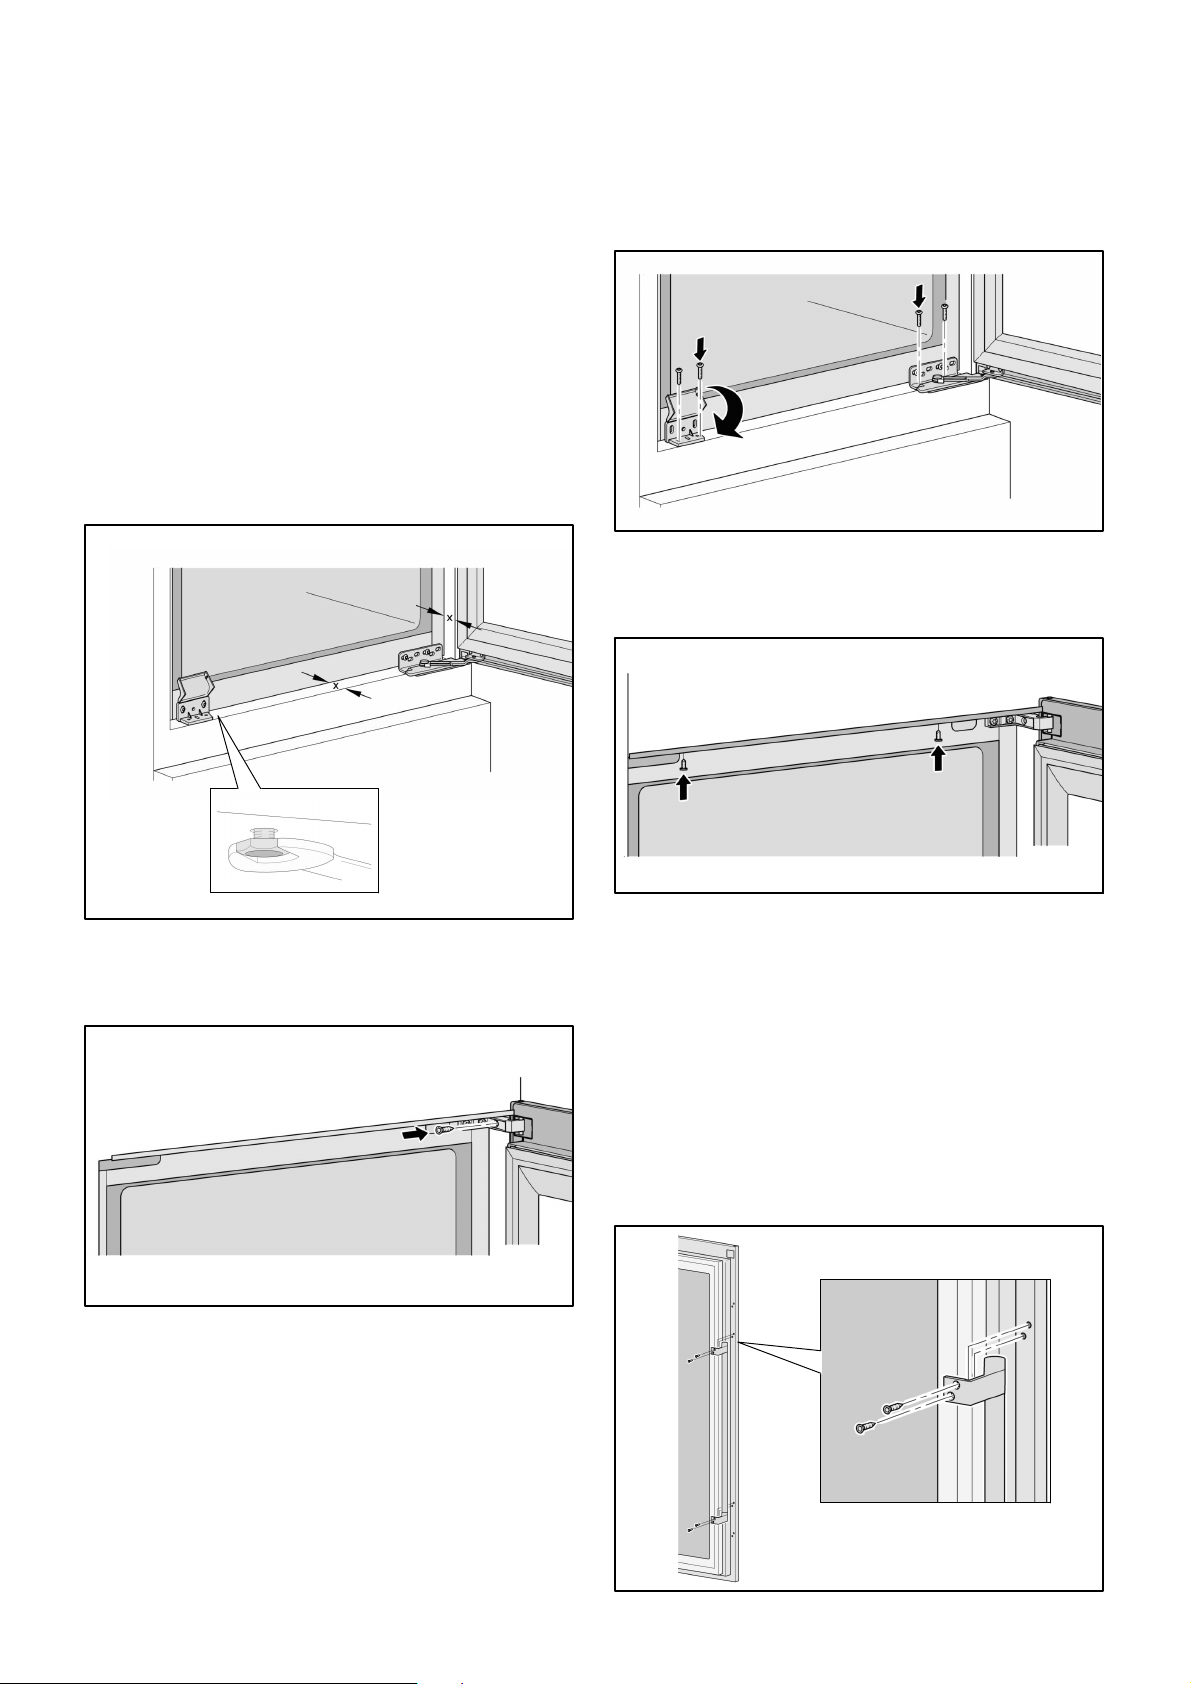
12. Das Gerät mit dem Stellfuß auf der Türöffnungsseite
ausrichten:
Der Befestigungswinkel muss bündig zur
Vorderkante des Möbelbodens sein.
Der Abstand (x) zwischen der Vorderkante der
Möbelwand und der Vorderkante des Gerätes muss
umlaufend gleich groß sein.
Das obere Scharnier muss seitlich an der
Möbelwand anliegen.
Hinweis!
Der Schlüssel zum Ausrichten ist dem Gerät beigelegt.
15. Den Befestigungswinkel mit 2 Schrauben
(4 x 19 mm aus Beipack) am Möbelboden
festschrauben und zuklappen.
16. Die Ausgleichsblende mit 2 Schrauben (4 x 14 mm
aus Beipack) an der Möbeldecke festschrauben.
13. Das obere Scharnier mit 1 Schraube (4 x 29 mm
aus Beipack) an der Möbelwand festschrauben.
14. Das untere Scharnier mit 2 Schrauben (4 x 19 mm
aus Beipack) am Möbelboden festschrauben.
Hinweis!
Vor der Griffmontage die Schutzfolie abziehen.
Die obersten und untersten angekörnten
Markierungen an der Gerätetür sind nicht für die
Griffmontage vorgesehen.
17. Den Griff mit jeweils 2 Schrauben (3,5 x 9,5 mm aus
Beipack) durch die angekörnte Markierung der
Gerätetür festschrauben. Die Schrauben mit mehr
Druck ansetzen, um das Blech zu durchstossen.
11
Page 12

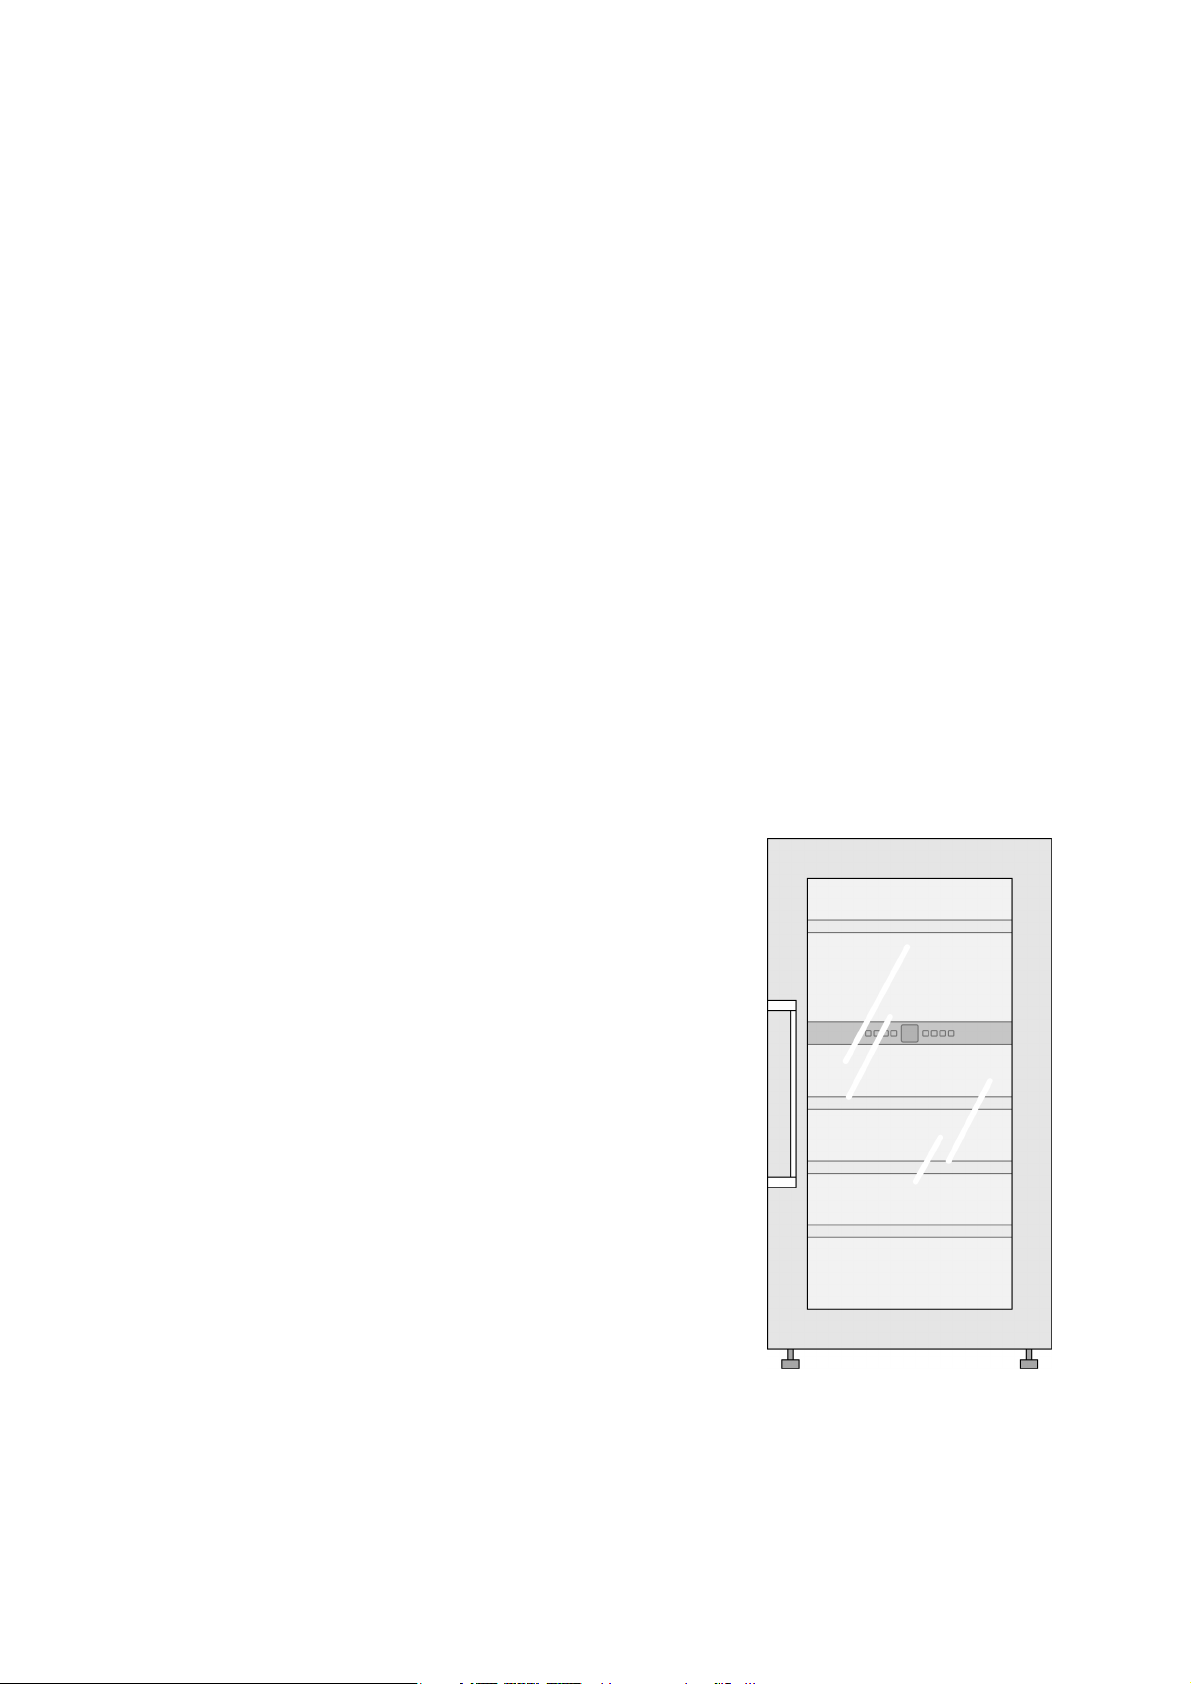
Ihr neues Gerät
4
1
2
3
1. Oberes Fach
2. Griff
3. Unteres Fach
4. Innenbeleuchtung oberes Fach
Bedienblende
5
6
7
8
5. Bedienblende
6. Innenbeleuchtung unteres Fach
7. Flaschenauszüge
8. Stellfüße
1234 5678 9 10
1. Ein/Aus-Taste
2. Ventilator-Taste
3. Taste Innenbeleuchtung
4. Alarm-Aus-Taste
5. Anzeige für eingeschaltete Funktionen
Kindersicherung
6. Temperaturanzeige oberes Fach
7. Temperaturanzeige unteres Fach
8. Auswahl-Taste unteres Fach
9. Plus- und Minus-Tasten zur Temperatureinstellung
10. Auswahl-Taste oberes Fach
12
Ventilator
Page 13
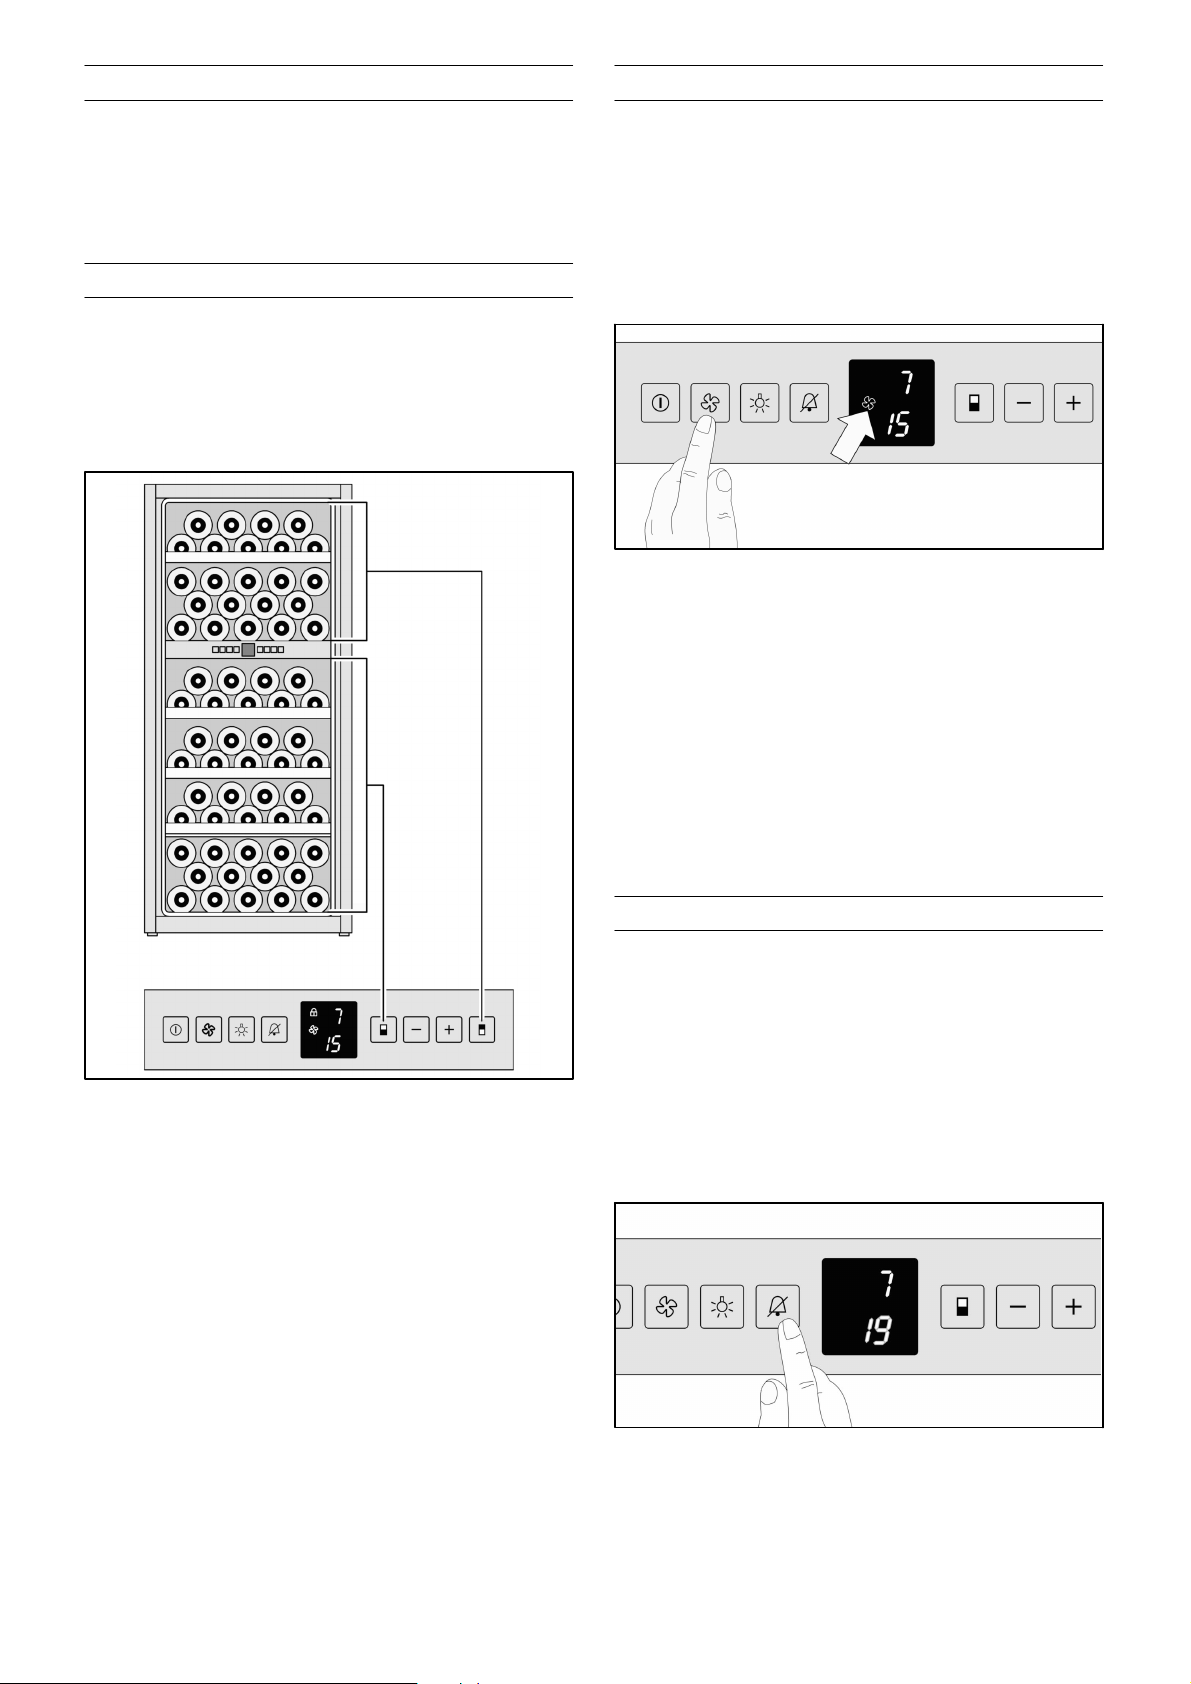
Gerät einschalten
Ventilator
D Ein/Aus-Taste drücken, bis die Temperaturanzeige
leuchtet.
Temperatur einstellen
Die Temperatur kann in beiden Fächern unabhängig
voneinander im Bereich von +5 °C bis +20 °C eingestellt
werden. Wir empfehlen eine Einstellung von +8 °C bis
+12 °C.
Zur langfristigen Lagerung von Wein sollte der Ventilator
eingeschaltet werden.
Der Ventilator erzeugt im Innenraum ein Klima, welches
einem Weinkeller entspricht.
Die dadurch erhöhte Luftfeuchtigkeit verhindert ein
Austrocknen der Korken.
Ventilator einschalten:
D Ventilator-Taste drücken. Im Display erscheint das
Ventilator-Symbol.
Der Ventilator läuft immer.
Ventilator ausschalten:
D Ventilator-Taste drücken. Im Display erlischt das
Ventilator-Symbol.
Der Ventilator läuft nur, wenn das Kälteaggregat
läuft.
D Auswahl-Taste oberes oder unteres Fach drücken.
Die entsprechende Temperaturanzeige blinkt.
D Mit der Plus- oder Minus-Taste die Temperatur
einstellen:
Plus-Taste: Temperatur erhöhen (wärmer)
Minus-Taste: Temperatur absenken (kälter).
Bei jedem Tastendruck verändert sich der Einstellwert in
1 °C−Schritten.
Ca. 5 Sekunden nach dem letzten Tastendruck schaltet
die Temperaturanzeige um und zeigt die tatsächliche
Temperatur an.
Temperatur-Alarm
Der Warnton hilft Ihnen, Ihre Weine vor unzulässigen
Temperaturen zu schützen.
Er ertönt, wenn es im Innenraum zu kalt bzw. zu warm
ist. Gleichzeitig blinkt die Temperaturanzeige.
Er ertönt immer, wenn die Tür länger als 60 Sekunden
geöffnet ist.
Alarm ausschalten:
D Alarm-Aus-Taste drücken.
Die Temperaturanzeige blinkt so lange weiter, bis der
Alarmzustand beendet ist.
13
Page 14
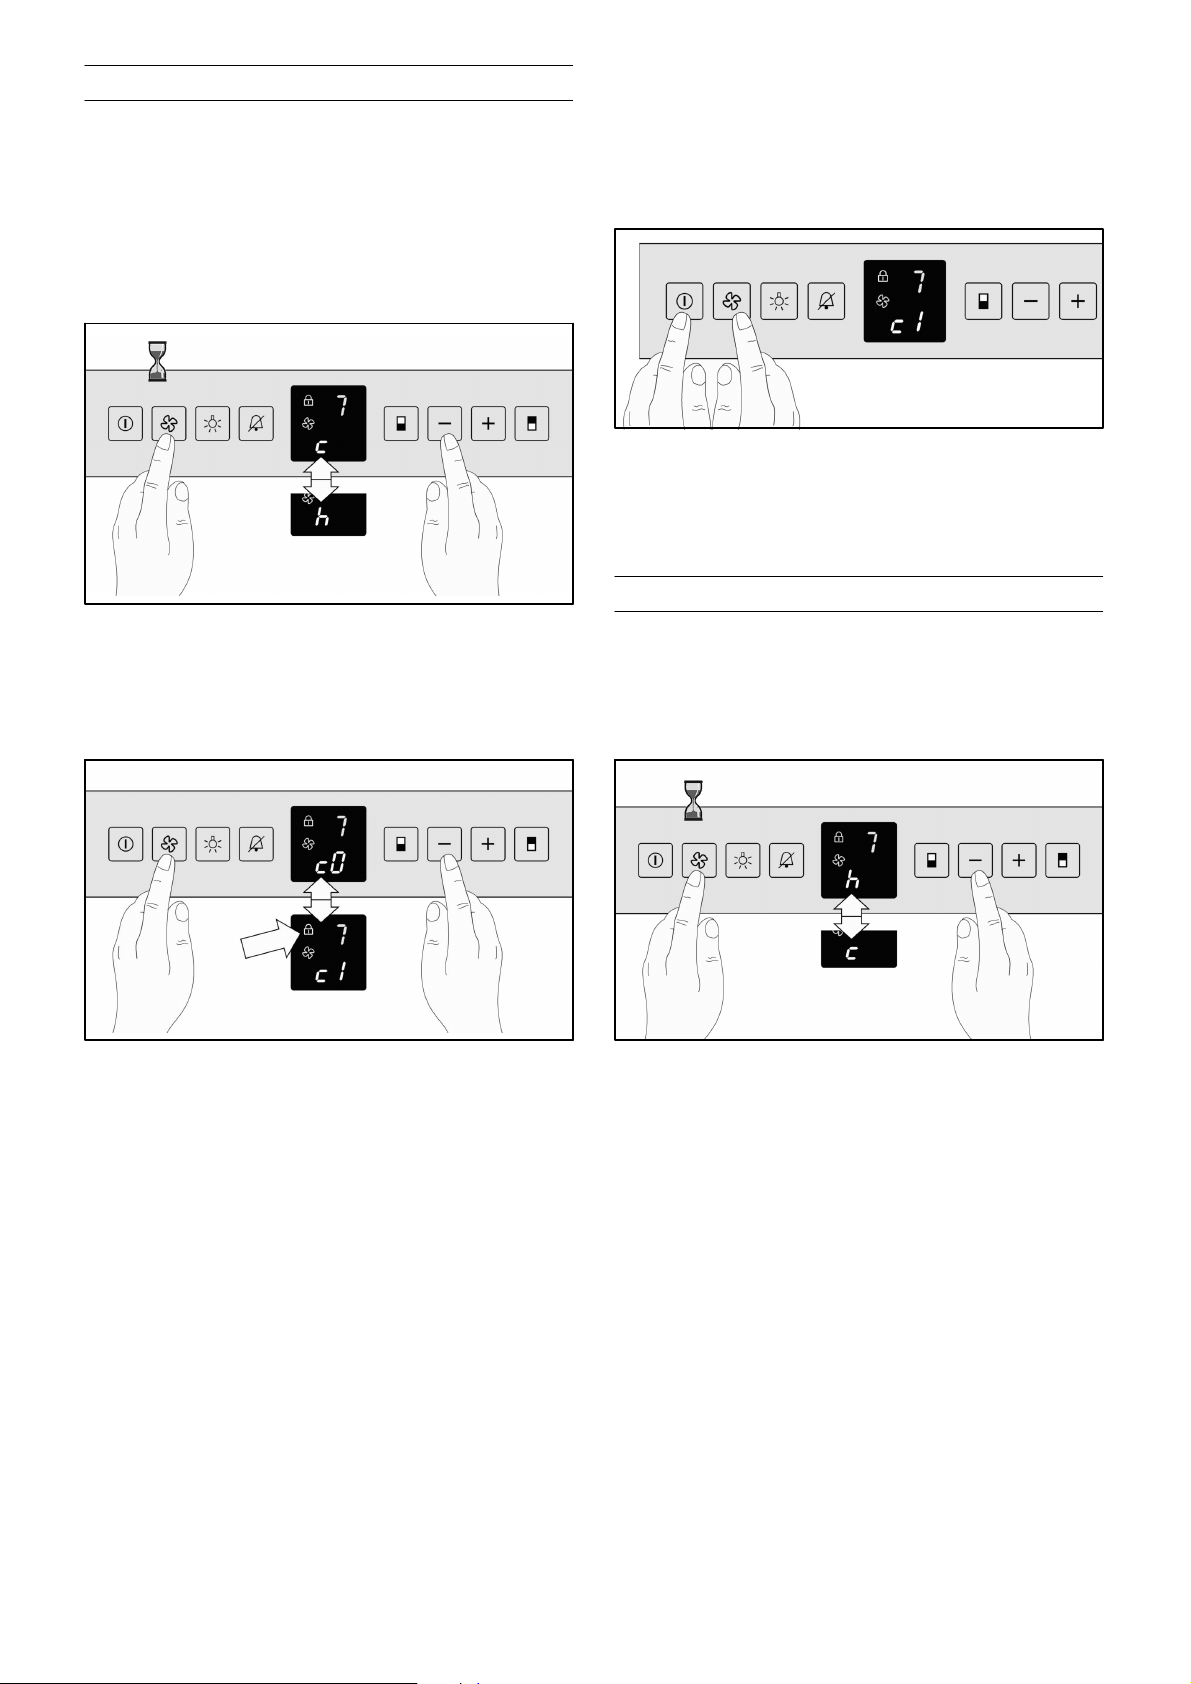
Kindersicherung
Mit der Kindersicherung kann das Gerät vor
ungewolltem Ausschalten gesichert werden.
1. Ventilator-Taste ca. 5 Sekunden drücken. Auf dem
Display blinkt ein c" für Kindersicherung oder ein
h" für die Innenbeleuchtung.
5 s
1. 2.
2. Minus-Taste drücken, bis das Display c" anzeigt.
3. Ventilator-Taste drücken. Auf dem Display blinkt ein
c1" oder ein c0".
5. Ventilator-Taste drücken, um den blinkenden Wert
zu bestätigen.
5.6.
6. Ein/Aus-Taste drücken um den Einstellmodus zu
verlassen.
Leuchtkraft der Anzeige
1. Ventilator-Taste ca. 5 Sekunden drücken. Auf dem
Display blinkt ein h" für die Innenbeleuchtung oder
ein c" für die Kindersicherung.
3. 4.
4. Mit der Plus- oder Minus-Taste die Kindersicherung
ein− oder ausschalten:
c0": Kindersicherung ausgeschaltet
c1": Kindersicherung eingeschaltet.
Bei eingeschalteter Kindersicherung leuchtet das
Schloss-Symbol im Display.
5 s
1. 2.
2. Minus-Taste drücken, bis das Display h" anzeigt.
14
Page 15
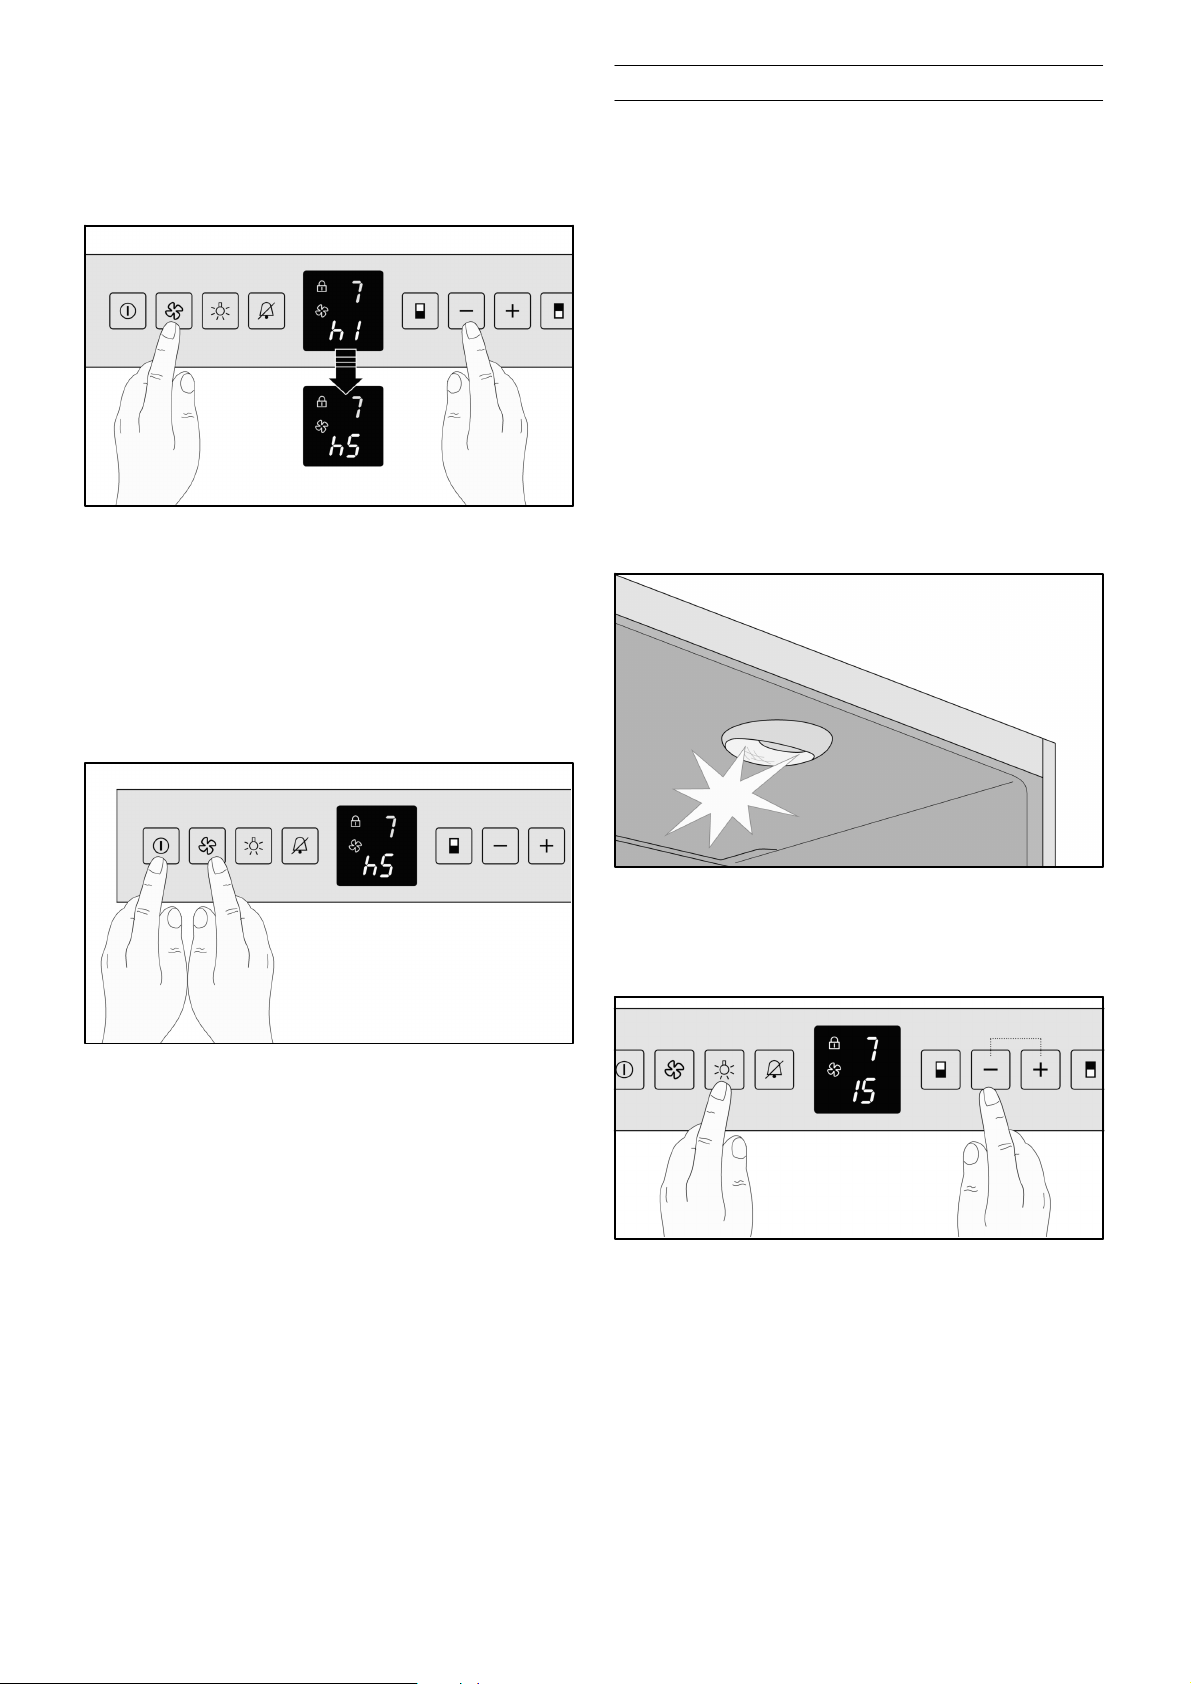
Innenbeleuchtung LED
3. Ventilator-Taste drücken. Auf dem Display blinkt der
aktuelle Wert für die Leuchtkraft.
3. 4.
4. Mit der Plus- und Minus-Taste die Leuchtkraft der
Anzeige einstellen:
h1": minimale Leuchtkraft
bis
h5": maximale Leuchtkraft.
5. Ventilator-Taste drücken, um den blinkenden Wert
zu bestätigen.
Im oberen und unteren Fach ist eine wartungsfreie
LED−Beleuchtung mit Dimm-Effekt integriert.
Beim Öffnen der Tür wird die Helligkeit langsam von 0
auf die individuell einstellbare, maximale Leuchtstärke
erhöht. Beim Schließen der Tür verläuft der Effekt
umgekehrt.
Vorsicht LED−Beleuchtung!
Laserstrahlung der Klasse 1M (Norm IEC 60825).
Nicht mit optischen Instrumenten direkt in die
Strahlung blicken. Gefahr von Augenschäden! Reparaturen an den Lasereinrichtungen dürfen nur
vom Kundendienst oder von autorisierten Fachkräften ausgeführt werden.
5.6.
6. Nach Veränderung der Anzeige bitte den
Einstellmodus durch Drücken der Ein/Aus−Taste
verlassen und die Tür schließen.
Nach ca. 1 Min. wird die Leuchtkraft auf die
eingestellte Helligkeit umgestellt.
Maximale Leuchtstärke individuell einstellen:
1. Taste Innenbeleuchtung drücken.
2. Taste Innenbeleuchtung gedrückt halten und mit der
Plus- und Minus-Taste die maximale Leuchtstärke
einstellen:
Plus-Taste: heller
Minus-Taste: dunkler.
Zu Präsentationszwecken kann die Innenraumbeleuchtung auch dauerhaft eingeschaltet werden:
D Taste Innenbeleuchtung drücken.
D Zum Ausschalten des Dauerlichts Taste
Innenbeleuchtung nochmals drücken.
15
Page 16
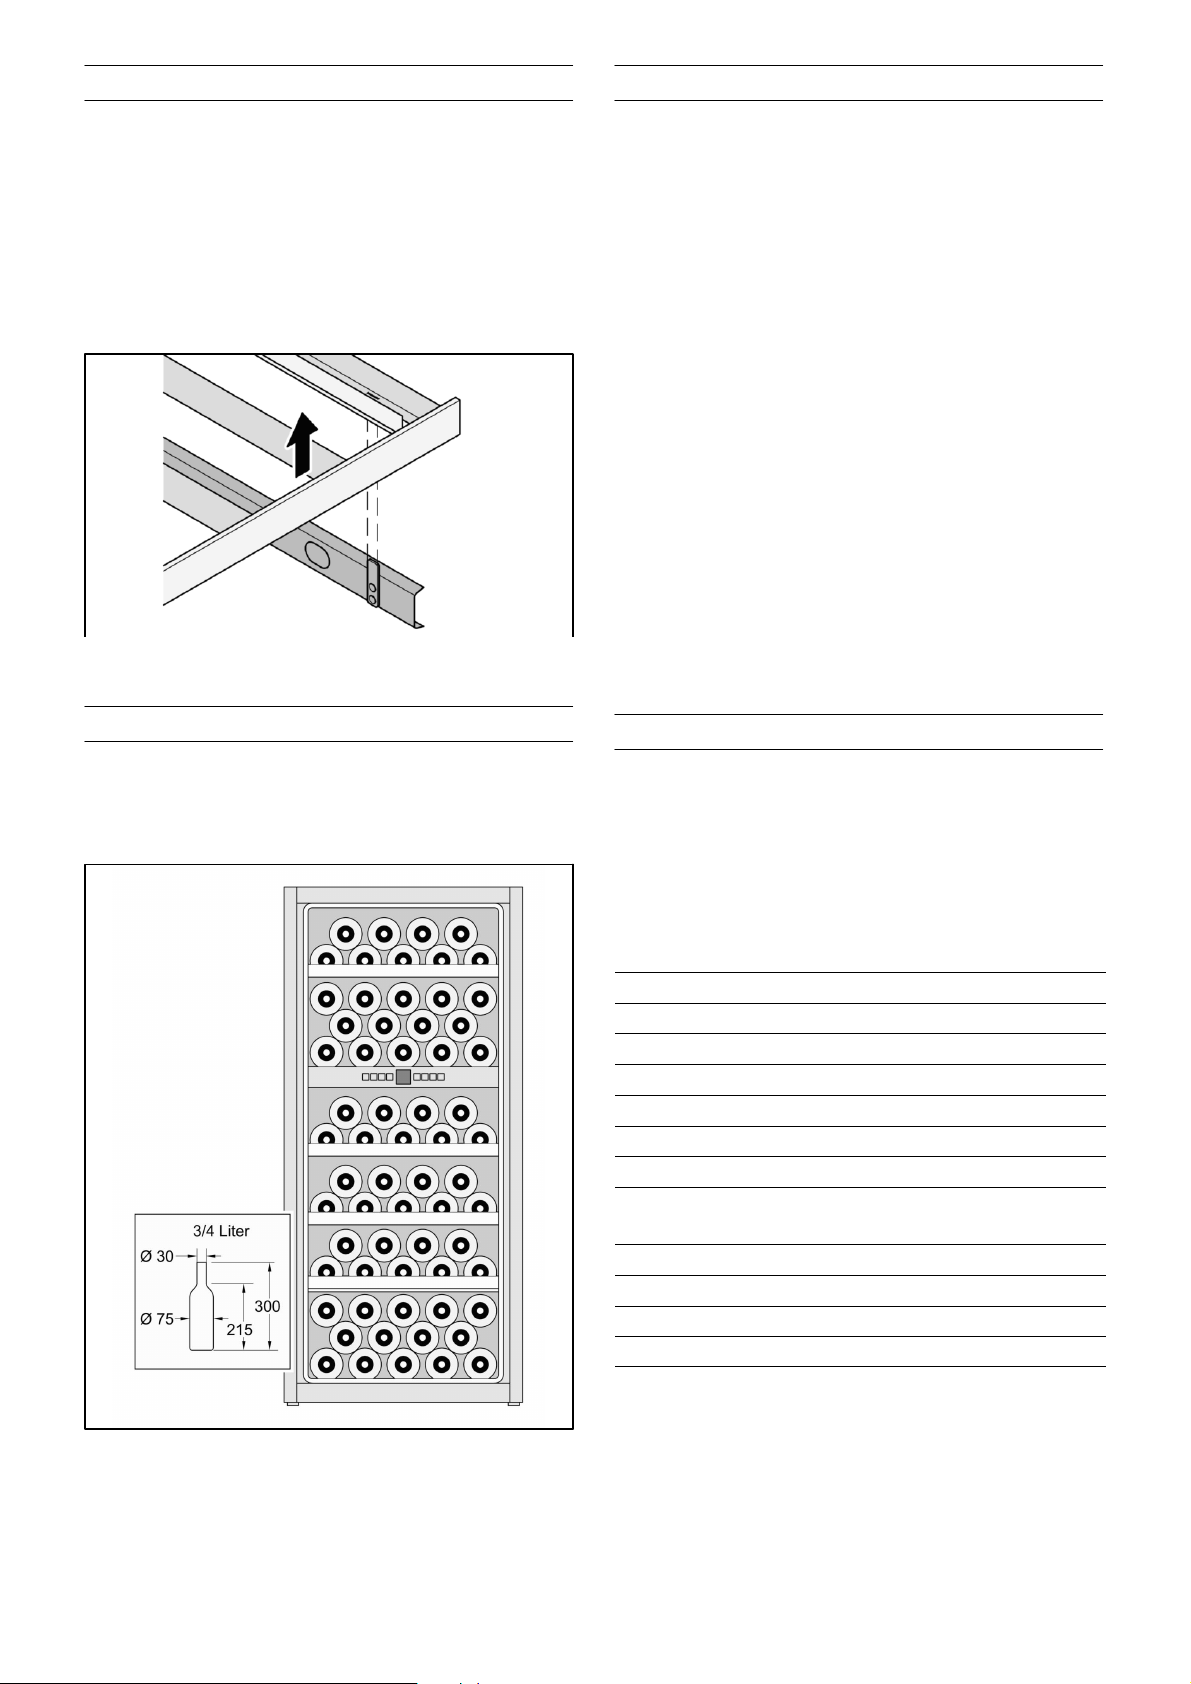
Ausstattung
Praktische Tipps zur Weinlagerung
Flaschenauszüge
Die Flaschenauszüge ermöglichen eine bequeme
Entnahme der Weinflaschen.
Zum Reinigen können die Flaschenauszüge
herausgenommen werden.
Einlagerungsskizze
D Flaschenweine grundsätzlich ausgepackt − nicht in
Kisten oder Kartons − aufbewahren.
D Alte Flaschen müssen so gelegt werden, dass der
Kork stets benetzt ist. Niemals sollte zwischen Wein
und Kork ein Luftzwischenraum bestehen.
D Vor dem Genuss sollte der Wein langsam
angewärmt" (chambriert) werden:
Holen Sie z. B. den Roséwein ca. 2 − 5 Stunden,
den Rotwein ca. 4 − 5 Stunden vorher auf den
Tisch, dann haben sie die richtige Trinktemperatur.
Weißwein dagegen kommt direkt auf den Tisch.
Sekt und Champagner sollten kurz vor dem Genuss
im Kühlschrank gekühlt werden.
D Berücksichtigen Sie, dass Weine immer etwas
niedriger als ihre ideale Serviertemperatur gekühlt
sein sollten, da sie sich beim Einschenken ins Glas
sofort um 1 bis 2 ºC erwärmen!
Trinktemperaturen
Fassungsvermögen: 64 Flaschen
(0,75 l Bordeauxflaschen)
Die richtige Serviertemperatur entscheidet über den
richtigen Geschmack des Weines und damit über Ihren
Trinkgenuss.
Wir empfehlen zum Servieren des Weines folgende
Trinktemperaturen:
Weinart Trinktemperatur
Großer Bordeaux rot 18 ºC
Côtes du Rhône rot/Barolo 17 ºC
Großer Burgunder rot/Bordeaux rot 16 ºC
Portwein 15 ºC
Junge Burgunder rot 14 ºC
Junge Rotweine 12 ºC
Junger Beaujolais/alle Weißweine
mit wenig Restsüße
Alte Weißweine/große Chardonnay 10 ºC
Sherry 9 ºC
Junge Weißweine ab Spätlese 8 ºC
Weißweine Loire/Entre-deux-Mers 7 ºC
11 ºC
16
Page 17

Luftaustausch durch Aktivkohlefilter
Weine entwickeln sich ständig je nach
Umgebungsbedingungen weiter; damit ist die Qualität
der Luft ausschlaggebend für die Konservierung.
Deshalb ist im oberen und unteren Fach in der
Rückwand des Innenraums je ein Aktivkohlefilter
angebracht.
Wir empfehlen die Aktivkohlefilter jährlich zu wechseln.
Die Aktivkohlefilter können über den Kundendienst oder
einen GAGGENAU−Fachhändler bezogen werden.
Gerät ausschalten
3 s
Aktivkohlefilter wechseln:
1. Den Aktivkohlefilter am Griff nehmen und um 90°
nach rechts oder links drehen.
2. Den Aktivkohlefilter herausziehen.
3. Neuen Aktivkohlefilter mit dem Griff in senkrechter
Position einsetzen.
4. Den Aktivkohlefilter am Griff nehmen und um 90°
nach rechts oder links drehen, bis er einrastet.
D Ein/Aus-Taste ca. 3 Sekunden drücken, bis die
Temperaturanzeige verlischt.
Gerät stilllegen
Wenn das Gerät längere Zeit außer Betrieb gesetzt wird:
1. Gerät ausschalten.
2. Netzstecker ziehen oder Sicherung ausschalten.
3. Gerät reinigen.
4. Tür geöffnet lassen, um Geruchsbildung zu
vermeiden.
Gerät reinigen
!
Warnung!
Abtauen
Das Gerät taut automatisch ab. Die anfallende
Feuchtigkeit wird über den Tauwasserablauf nach außen
in die Tauwasserverdunstungsschale geleitet. Dort
verdunstet das Tauwasser durch die Wärme des
Kälteaggregats.
Nie das Gerät mit einem Dampfreinigungsgerät reinigen! Der Dampf kann an spannungsführende Teile des Gerätes gelangen und einen Kurzschluss
oder Stromschlag verursachen. Der Dampf kann
die Kunststoff-Oberflächen beschädigen.
Nie Ablagen und Behälter im Geschirrspüler
reinigen. Die Teile können sich verformen.
Verwenden Sie keine sand−, chlorid− oder
säurehaltigen Putz− und Lösungsmittel.
1. Gerät ausschalten.
2. Netzstecker ziehen oder Sicherung ausschalten.
3. Reinigen Sie das Gerät mit einem weichen Tuch,
lauwarmem Wasser und etwas ph−neutralem
Spülmittel. Das Spülwasser darf nicht in die
Bedienblende oder Beleuchtung gelangen.
17
Page 18

Betriebsgeräusche
4. Glastür mit handelsüblichem Glasreiniger und einem
weichen Putztuch reinigen.
5. Türdichtung nur mit klarem Wasser reinigen und
gründlich trockenreiben.
6. Verschmutzungen an Be− und Entlüftungsöffnungen
mit einem Staubsauger entfernen.
7. Ablagerungen in der Ablauföffnung mit einem
dünnen Hilfsmittel z. B. einem Wattestäbchen
entfernen.
8. Nach dem Reinigen: Netzstecker einstecken bzw.
Sicherung einschalten.
Pflegehinweise für Edelstahlflächen
Zum Pflegen der Edelstahloberflächen das Pflegemittel
Chromol" verwenden.
Das Mittel ist im Handel unter dem Namen Chromol"
oder bei Ihrem Kundendienst unter der
Normale Geräusche
Brummen − Kälteaggregat läuft. Ventilator des
Umluftsystems läuft.
Blubbernde, surrende oder gurgelnde Geräusche −
Kältemittel fließt durch die Rohre.
Klicken − Kälteaggregat (Motor) schaltet ein oder aus.
Geräusche vermeiden
Das Gerät steht uneben
Gerät mit einer Wasserwaage ausrichten (siehe "Einbau
des Gerätes").
Flaschenauszüge wackeln oder klemmen
Prüfen Sie die herausnehmbaren Flaschenauszüge und
setzen Sie diese eventuell neu ein.
Gefäße berühren sich
Ident-Nr. 310359 als 500 ml Sprühflasche und
Ident-Nr. 166787 als 50 ml Probeflasche erhältlich.
Um die Oberflächen nicht zu beschädigen, auf keinen
Fall kratzende Schwämme, Metallbürsten, scharfkantige
Gegenstände oder Scheuermittel benutzen. Auch
chemisch aggressive Reinigungsmittel wie Abtausprays,
Backofensprays, Lösungsmittel oder Fleckenentferner
dürfen Sie nicht verwenden.
Rücken Sie Flaschen oder Gefäße leicht auseinander.
18
Page 19
Kleine Störungen selbst beheben
Bevor Sie den Kundendienst rufen:
Überprüfen Sie, ob Sie die Störung aufgrund der folgenden Hinweise selbst beheben können. Sie müssen die Kosten
für Beratung durch den Kundendienst selbst übernehmen − auch während der Garantiezeit!
Störung
Temperatur weicht stark von
der Einstellung ab.
Gerät hat keine Kühlleistung,
die Innenbeleuchtung und
das Display leuchten nicht.
Das Kälteaggregat schaltet
immer häufiger und länger
ein.
Das Kälteaggregat läuft lang. Das Kälteaggregat schaltet bei
Mögliche Ursachen Abhilfe
Stromausfall; die Sicherung hat
ausgelöst; der Netzstecker sitzt
nicht fest.
Häufiges Öffnen der Gerätetür. Die Gerätetür nicht unnötig öffnen.
Die Be- und Entlüftungsöffnungen
sind verdeckt.
Das Gerät steht zu nah an einer
Wärmequelle oder die
Umgebungstemperatur ist zu
hoch.
geringem Kältebedarf auf eine
niedrige Drehzahl.
In einigen Fällen reicht es, wenn Sie das Gerät
für 5 Minuten ausschalten.
Ist die Temperatur zu warm, prüfen Sie nach
wenigen Stunden, ob eine
Temperaturänderung erfolgt ist.
Ist die Temperatur zu kalt, prüfen Sie am
nächsten Tag die Temperatur erneut.
Prüfen Sie, ob Strom vorhanden ist. Die
Sicherung muss eingeschaltet sein.
Hindernisse und Verschmutzung entfernen.
Siehe Kapitel "Aufstellort".
Obwohl sich dadurch die Laufzeit erhöht, wird
Energie gespart. Das ist bei energiesparenden
Modellen normal.
Schimmel auf den
Weinflaschen.
Die Temperatur ist nicht
ausreichend kalt.
Die Innenbeleuchtung
leuchtet nicht.
Die Temperaturanzeige zeigt
F0 bis F5 an.
Ähnlich wie bei anderen
Lagerformen kann es je nach Art
des Etikettenklebstoffes zu einer
leichten Schimmelbildung
kommen.
Die Be- und Entlüftungsöffnungen
sind verdeckt.
Die Gerätetür ist nicht richtig
geschlossen.
Häufiges Öffnen der Gerätetür. Gerätetür nicht unnötig öffnen.
Das Gerät steht zu nah an einer
Wärmequelle oder die
Umgebungstemperatur ist zu
hoch.
Das Gerät ist ausgeschaltet. Das Gerät einschalten.
Die Innenbeleuchtung ist defekt
oder die Abdeckung ist
beschädigt.
Gerätefehler. Unbedingt den Kundendienst informieren!
Klebstoffreste von den Flaschen sorgfältig
entfernen.
Hindernisse und Verschmutzung entfernen.
Die Gerätetür schließen.
Siehe Kapitel "Aufstellort".
Unbedingt den Kundendienst informieren!
19
Page 20
Kundendienst
Prüfen Sie, ob Sie die Störung aufgrund der Hinweise
im Abschnitt "Kleine Störungen selbst beheben"
beseitigen können. Einen Kundendienst in Ihrer Nähe
finden Sie im Telefonbuch oder im
Kundendienst-Verzeichnis.
Geben Sie bitte dem Kundendienst die
Erzeugnisnummer (E-Nr.) und die Fertigungsnummer
(FD) des Gerätes an.
Bitte helfen Sie durch Nennung der Erzeugnis− und
Fertigungsnummer mit, unnötige Anfahrten zu
vermeiden. Sie sparen die damit verbundenen
Mehrkosten.
Sie finden diese Angaben auf dem Typenschild.
E−Nr. FD−Nr.
20
Page 21

Table of Contents
Congratulations 22 . . . . . . . . . . . . . . . . . . . . . . . . . . .
Safety and warning information 22 . . . . . . . . . . . . .
Before you put the appliance into operation 22 . . . . .
Technical safety 22 . . . . . . . . . . . . . . . . . . . . . . . . . . . .
During use 23 . . . . . . . . . . . . . . . . . . . . . . . . . . . . . . . . .
Children in the household 23 . . . . . . . . . . . . . . . . . . . .
General requirements 23 . . . . . . . . . . . . . . . . . . . . . . . .
Directions for disposal 23 . . . . . . . . . . . . . . . . . . . . .
Disposal of packaging 23 . . . . . . . . . . . . . . . . . . . . . . .
Disposal of old appliances 24 . . . . . . . . . . . . . . . . . . .
Installation notes 24 . . . . . . . . . . . . . . . . . . . . . . . . . .
Installation location 24 . . . . . . . . . . . . . . . . . . . . . . . . . .
Climate classes 24 . . . . . . . . . . . . . . . . . . . . . . . . . . . . .
Recess 24 . . . . . . . . . . . . . . . . . . . . . . . . . . . . . . . . . . . .
Ventilation 25 . . . . . . . . . . . . . . . . . . . . . . . . . . . . . . . . .
Transporting the appliance 25 . . . . . . . . . . . . . . . . . . .
Electrical connection 25 . . . . . . . . . . . . . . . . . . . . . . . .
Installing the appliance 26 . . . . . . . . . . . . . . . . . . . . .
Replace the door hinge if necessary 26 . . . . . . . . . . .
Features 34 . . . . . . . . . . . . . . . . . . . . . . . . . . . . . . . . . .
Pull−out bottle racks 34 . . . . . . . . . . . . . . . . . . . . . . . . .
Storage diagram 34 . . . . . . . . . . . . . . . . . . . . . . . . . . .
Practical tips for storing wine 34 . . . . . . . . . . . . . . .
Drinking temperatures 34 . . . . . . . . . . . . . . . . . . . . .
Air exchange through active carbon filter 35 . . . . .
Defrosting 35 . . . . . . . . . . . . . . . . . . . . . . . . . . . . . . . .
Switching off the appliance 35 . . . . . . . . . . . . . . . . .
Putting the appliance out of service 35 . . . . . . . . .
Cleaning the appliance 35 . . . . . . . . . . . . . . . . . . . . .
Care instructions for stainless steel surfaces 36 . . . .
Operating noises 36 . . . . . . . . . . . . . . . . . . . . . . . . . .
Normal noises 36 . . . . . . . . . . . . . . . . . . . . . . . . . . . . . .
Avoiding noises 36 . . . . . . . . . . . . . . . . . . . . . . . . . . . . .
Rectifying minor faults yourself 37 . . . . . . . . . . . . .
Installation dimensions 27 . . . . . . . . . . . . . . . . . . . . . . .
Fixing and mounting 27 . . . . . . . . . . . . . . . . . . . . . . . .
Your new appliance 30 . . . . . . . . . . . . . . . . . . . . . . . .
Control panel 30 . . . . . . . . . . . . . . . . . . . . . . . . . . . . . .
Switching on the appliance 31 . . . . . . . . . . . . . . . . .
Adjusting the temperature 31 . . . . . . . . . . . . . . . . . .
Fan 31 . . . . . . . . . . . . . . . . . . . . . . . . . . . . . . . . . . . . . . .
Temperature Alarm 31 . . . . . . . . . . . . . . . . . . . . . . . . .
Childproof lock 32 . . . . . . . . . . . . . . . . . . . . . . . . . . . .
Appliance illuminating power 32 . . . . . . . . . . . . . . .
Interior lighting, LED 33 . . . . . . . . . . . . . . . . . . . . . . .
After−sales service 38 . . . . . . . . . . . . . . . . . . . . . . . . .
21
Page 22

Congratulations
Safety and warning information
By purchasing your new wine cooler, you have chosen a
modern, high−quality household appliance.
Only when it is at the right temperature does good wine
allow its aroma and flavour to fully unfold for your
enjoyment. Our wine cooler slowly and steadily brings
your wine to the ideal temperature. There are two
independently controlled temperature zones, allowing
simultaneous storage of both red and white wines at the
optimum drinking temperature.
Your new appliance features economic energy
consumption.
Each appliance that leaves our factory is carefully
checked to ensure that it functions correctly and is in
perfect condition.
If you have any questions, in particular with regard to
setting up and connecting the appliance, our after−sales
service will be happy to help. See the After−sales service
section
You can find further information and a selection of our
products on our website.
Read and follow these instructions as well as the setup
instructions and all included information.
Before you put the appliance into operation
Read the usage and assembly instructions carefully.
They contain important information on setting up, using
and maintaining the appliance.
Retain all documents for later use or for subsequent
owners.
Technical safety
d The appliance contains a small quantity of the
environmentally−friendly, though flammable, refrigerant
R600a. Make sure that the pipes of the refrigerant circuit
are not damaged during transport or installation. If
refrigerant sprays out, it can ignite or cause eye injuries.
In the event of damage
D Keep open flames or sources of ignition away from
the appliance,
D Unplug appliance plugs,
D Ventilate the room well for a few minutes,
D Inform the after−sales service.
The more refrigerant an appliance contains, the larger
the room must be in which it stands. If there is a leak
and the room is too small, a flammable gas−air mixture
may form.
The room must be at least 1 m
refrigerant. The amount of refrigerant in your appliance
is listed on the rating plate inside the appliance.
Power cord changes and other repairs must be
performed only by the after−sales service. Incorrect
installations and repairs can pose significant risk to the
user.
Laser radiation
The appliance is equipped with class 1M lasers for
lighting.
Risk of eye damage
Do not look directly into the laser beam with optical
instruments.
3
in size for each 8 g of
22
Repairs to the laser equipment must only be carried out
by the after−sales service or authorised specialists.
Page 23

During use
General requirements
D Never use electrical appliances inside the appliance
(e.g. heaters, electric ice makers, etc.). Risk of
explosion.
D Never defrost or clean the appliance with a steam
cleaning device. The steam may reach electrical
parts and trigger a short circuit or cause an electric
shock. Risk of electric shock.
D Do not store products with flammable propellant
gases (e.g. spray cans) or explosive substances
inside the appliance. Risk of explosion.
D Do not misuse the base, rails, doors etc. as a step
or support.
D For defrosting and cleaning, unplug the appliance
from the mains or switch off the fuse.
Pull on the mains plug, not on the connecting cable.
D Only store high proof alcohol tightly sealed and in an
upright position.
D Do not contaminate plastic parts or door seals with
oil or grease. Plastic parts and door seals will
otherwise become porous.
This appliance is designed exclusively for the storage of
wine.
This appliance is intended for household use only.
The appliance is interference−suppressed in line with EU
directive 2004/108/EC.
The refrigeration circuit has been checked for leak
tightness.
This appliance corresponds to the relevant safety
requirements for electrical appliances (EN 60335/2/24).
Directions for disposal
x Disposal of packaging
The packaging protects your appliance from damage
during transport. All of the materials used are
environmentally friendly and can be recycled. Please
help by disposing of the packaging in an
environmentally−responsible manner.
D Never cover or block ventilation openings for the
appliance.
D Persons with limited physical, sensory or
psychological capacities or those without sufficient
knowledge must only use this appliance under
supervision or with detailed instructions.
Children in the household
D Do not give packaging or packaging parts to
children. Danger of suffocation from cardboard
boxes and films.
D The appliance is not a child’s toy.
D For appliances with a door lock: Keep the key out of
the reach of children.
You can obtain information about current disposal
routes from your specialist dealer or local council.
23
Page 24
Installation notes
x Disposal of old appliances
Old appliances are not valueless waste.
Valuable raw materials can be recovered by
environmentally−friendly disposal.
This appliance is marked in accordance with
European directive 2002/96/EC regarding old
electric and electronic appliances (waste electrical
and electronic equipment − WEEE). The directive
specifies the framework for EU−wide return and
re−use of old appliances.
d For worn−out appliances:
D Pull out the mains plug.
D Cut through the connecting cable and remove it
together with the mains plug.
D Remove the doors.
D Do not remove shelves and containers, so that it is
harder for children to climb into the appliance.
Installation location
The ideal installation location is a dry, well ventilated
room. The installation location should not be exposed to
direct sunlight or be near a source of heat, such as a
cooker or heater. If installation near a source of heat is
unavoidable, a suitable insulating plate must be fitted or
the following minimum distances from the heat source
must be observed:
− 30 mm from electric cookers,
− 300 mm from oil− or coal−fired cookers.
The floor at the installation site must not sag. Strengthen
the floor if necessary.
Climate classes
The climate class is specified on the rating plate. It
indicates the room temperature range in which the
appliance can be operated.
D Do not allow children to play with worn−out
appliances. Risk of suffocation.
Refrigerators contain refrigerant as well as gases in the
insulation material. Refrigerant and gases must be
disposed of properly. Do not damage the refrigerant
circuit pipes before disposing of them properly.
Climate class Permissible room
temperature
SN +10° °°C to 32 °C
N +16 °C to 32 °C
ST +16 °C to 38 °C
T +16 °C to 43 °C
Recess
The appliance must be installed in a suitable recess.
The recess must be aligned using a spirit level. It must
be securely screwed to the adjacent unit or to the wall.
The recess must have sufficient ventilation openings at
the base of the unit (front) and the unit housing (top).
24
Page 25
Ventilation
Electrical connection
Never cover the ventilation openings at the base of the
unit (front) or in the unit housing (top). Otherwise the
refrigerating unit has to work harder, which increases
power consumption.
The following dimensions must be used:
Depth of the ventilation shaft at the rear wall of the unit:
min. 38 mm
Ventilation cross−sections in the base of the unit and in
the unit housing (top):
min. 200 cm
2
Transporting the appliance
!
Warning!
Risk of injury from shards of glass.
During transport at a height of more than 1500 m,
the glass panels in the door can break. The
fragments of glass have sharp edges and can
cause serious injuries.
The socket for connecting the appliance must be freely
accessible. Connect the appliance to a
220 − 240 V/50 Hz alternating current supply via a
socket which has been correctly installed. The socket
must be fitted with a 10 to 16 A fuse.
Do not use any extension cables or distributors.
In the case of appliances operated outside Europe,
check whether the voltage and type of current
specified on the rating plate conform to the values
of your electricity grid. The rating plate is at the
bottom left inside the appliance. If the power cord
needs to be replaced, this must be carried out only
by an expert.
!
Warning!
The appliance must not be connected to an
electronic energy saving plug (e.g. Ecoboy; Sava
Plug) or an inverter that converts direct current to
230 V alternating current (e.g. solar energy systems,
boat electrical systems).
The appliance should be packed and kept upright for
transport.
Note!
To protect the glass door, only remove the
transportation lock once the appliance is in the
recess.
Fasten the transportation lock each time before the
appliance is transported.
25
Page 26
Installing the appliance
Replace the door hinge if necessary
!
Warning!
Risk of injury due to heavy door.
Replacing glass doors requires two people.
1
1.
2
2.
3.
5
10.
11.
13.
12.
6
15.
12.
17.
14.
16.
3
4.
5.
4
9.
6.
7.
8.
7
19.
18.
8
20.
26
Page 27
Installation dimensions
max. 2100
min. 200 cm
2
1221−
1225
min. 38
560−570
min.
550
min. 38
1218
557
502
58
592
113
49
3
1229
min. 200 cm
Fixing and mounting
1. Remove the connecting cable from the rear of the
appliance.
2. Remove the cable clip (to prevent vibration noises).
3. Using a cord, lay the connecting cable in such a
way that the appliance can be connected easily
after installation.
4. Slide the appliance 2/3 of the way into the recess.
Take care not to trap the connecting cable while
doing so.
450
103
100
2
5. Turn the adjustable feet all the way in.
5
27
Page 28
6. If the kitchen unit walls are 16 mm thick:
Place the spacer on the outside of the upper hinge.
Do not cover the hole.
7. Place the compensating panel over the predrilled
holes on the top of the appliance and fix in place
using 3 screws (3.5 x 9.5 mm from the accessories
kit).
9. Push the appliance into the recess until the lower
hinge stop butts against the front edge of the wall of
the unit.
10. Unscrew the transport lock.
Keep the transport lock for transporting it again in
the future.
8. Shorten the cover strip to the height of the recess
and stick to the side wall of the appliance on the
door opening side.
11. Use the two screws to fasten the mounting angle for
the door transport lock to the appliance.
28
Page 29

12. Align the appliance using the adjustable foot on the
door opening side:
The mounting angle must be flush with the front
edge of the kitchen unit floor.
The distance (x) between the front edge of the
kitchen unit wall and the front edge of the appliance
must be the same all the way around.
The side of the upper hinge must rest against the
wall of the kitchen unit.
Note!
The spanner for making the adjustments is included
with the appliance.
15. Fasten the mounting angle to the floor of the kitchen
unit using 2 screws (4 x 19 mm from the
accessories kit) and close.
16. Fasten the compensating panel to the ceiling of the
kitchen unit using 2 screws (4 x 14 mm from the
accessories kit).
13. Fasten the upper hinge to the wall of the kitchen
unit using 1 screw (4 x 29 mm from the accessories
kit).
14. Fasten the lower hinge to the floor of the kitchen
unit using 2 screws (4 x 19 mm from the
accessories kit).
Note!
Remove the protective film before mounting the
handle.
The top and bottom centre−punched markings on
the appliance door are not for mounting the handle.
17. Fasten the handle by screwing 2 screws
(3.5 x 9.5 mm from the accessories kit) through the
centre−punched markings on the appliance door.
Apply more pressure to the screws in order to pierce
the metal sheet.
29
Page 30

Your new appliance
4
1
2
3
1. Upper compartment
2. Handle
3. Lower compartment
4. Interior lighting, upper compartment
Control panel
5
6
7
8
5. Control panel
6. Interior lighting, lower compartment
7. Pull−out bottle racks
8. Feet
1234 5678 9 10
1. On/off button
2. Fan button
3. Interior lighting button
4. Alarm off button
5. Display showing which functions are on
Childproof lock
6. Temperature display, upper compartment
7. Temperature display, lower compartment
8. Selection button, lower compartment
9. Plus and minus buttons to adjust the temperature
10. Selection button, upper compartment
30
Fan
Page 31

Switching on the appliance
Fan
D Press the on/off button until the temperature display
lights up.
Adjusting the temperature
The temperature in the two compartments can be set
independently of each other, from +5 °C to +20 °C. We
recommend a setting of +8 °C to +12 °C.
For long−term storage of wine, the fan should be
switched on.
The fan creates a climate in the interior of the appliance
which replicates that of a wine cellar.
The increased humidity caused by this prevents the
corks from drying out.
Switching the fan on:
D Press the fan button. The fan symbol appears in the
display.
The fan runs continuously.
Switching the fan off:
D Press the fan button. The fan symbol disappears
from the display.
The fan runs only when the refrigeration unit is
running.
D Press the selection button for the upper or lower
compartment. The corresponding temperature
display flashes.
D Adjust the temperature using the plus or minus
button:
Plus button: Increase the temperature (warmer)
Minus button: Decrease the temperature (colder).
Each time you press a button, the adjustment value
changes by 1 °C.
Approx. 5 seconds after the last button was pressed,
the temperature display switches and indicates the
actual temperature.
Temperature Alarm
The audible warning signal helps you protect your wine
from unfavourable temperatures.
It sounds if the interior of the appliance is too cold or too
warm. The temperature display flashes simultaneously.
It sounds continuously if the door remains open for
longer than 60 seconds.
Switching off the alarm:
D Press the Alarm off button.
The temperature display continues to flash until the
alarm condition has ended.
31
Page 32

Childproof lock
The childproof lock can be used to protect the
appliance from being switched off unintentionally.
1. Press the fan button for approx. 5 seconds. A c"
flashes in the display for the childproof lock or an
h" for the interior lighting.
5 s
1. 2.
2. Press the minus button until "c" appears in the
display.
3. Press the fan button. A c1" or a c0" flashes on the
display.
5. Press the fan button to confirm the flashing value.
5.6.
6. Press the on/off button to exit the adjustment mode.
Appliance illuminating power
1. Press the fan button for approx. 5 seconds. An h"
flashes in the display for the interior lighting or a "c"
for the childproof lock.
5 s
3. 4.
4. Use the plus or minus button to switch the
childproof lock on or off:
c0": Childproof lock switched off
c1": Childproof lock switched on.
When the childproof lock is on, the lock symbol
lights up in the display.
1. 2.
2. Press the minus button until h" appears in the
display.
32
Page 33

Interior lighting, LED
3. Press the fan button. The current value for the
illuminating power flashes in the display.
3. 4.
4. Adjust the illuminating power in the display using the
plus or minus button:
h1": Minimum illumination power
to
h5": Maximum illumination power.
5. Press the fan button to confirm the flashing value.
Both the upper and lower compartments have
integrated, maintenance−free LED lighting with dimmer
effect.
When the door is opened, the brightness slowly
increases from 0 to the individually−controlled maximum
luminosity. Closing the door has the reverse effect.
Caution. LED lighting
Laser radiation, class 1M (standard IEC 60825). Do
not look directly into the laser beam with optical
instruments. Risk of eye damage! Repairs to the
laser equipment must only be carried out by the
after−sales service or authorised specialists.
5.6.
6. After the display changes, press the on/off button to
exit the adjustment mode and close the door.
After approx. 1 minute, the light changes to the
brightness you have set.
Making individual adjustments to the maximum
luminosity.
1. Press the interior lighting button.
2. Press and hold the interior lighting button and adjust
the luminosity using the plus or minus button:
Plus button: brighter
Minus button: darker.
The interior lighting can also be switched on
permanently for presentation purposes:
D Press the interior lighting button.
D To switch off the permanent light, press the interior
lighting button again.
33
Page 34

Features
Practical tips for storing wine
Pull−out bottle racks
The pull−out bottle racks allow easy access to the wine
bottles.
The pull−out bottle racks can be removed for cleaning.
Storage diagram
D Bottled wine must be stored unpacked − not in
boxes or cartons.
D Old bottles must be laid in such a way that the cork
is always wet. There should never be an air gap
between the wine and the cork.
D Before the wine is drunk, it should be "warmed up"
(chambré) slowly:
For example, place rosé wine on the table
approx. 2 − 5 hours before drinking, red wine
approx. 4 − 5 hours before drinking. The wine will
then be at the correct drinking temperature. White
wine, on the other hand, can be placed directly on
the table. Sparkling wine and Champagne should
be cooled in the refrigerator shortly before drinking.
D Please note that wine should always be cooled to a
slightly lower temperature than the ideal serving
temperature as its temperature increases by
1 to 2 ºC as soon as it is poured into a glass.
Capacity: 64 bottles
(0.75 l Bordeaux bottles)
Drinking temperatures
The correct serving temperature is crucial for the proper
taste of the wine and therefore for your drinking
pleasure.
We recommend serving wine at the following drinking
temperatures:
Wine type Drinking
temperature
Large Bordeaux red 18 ºC
Côtes du Rhône red/Barolo 17 ºC
Large Burgundy red/Bordeaux red 16 ºC
Port 15 ºC
Young Burgundy red 14 ºC
Young red wines 12 ºC
Young Beaujolais/all white wines
with little residual sugar
Old white wines/large Chardonnay 10 ºC
Sherry 9 ºC
Young white wines, late vintage
onwards
White wines
Loire/Entre-deux-Mers
11 ºC
8 ºC
7 ºC
34
Page 35

Air exchange through active carbon filter
Wines continue to develop according to their
environmental conditions. This means that the quality of
the air is crucial for their conservation. For this reason,
both the upper and lower compartments are fitted with
an active carbon filter in the interior rear wall.
We recommend that you replace the active carbon filter
every year. The active carbon filters can be obtained via
the after−sales service or from a GAGGENAU specialist
dealer.
Replacing the active carbon filter:
1. Hold the active carbon filter by the handle and turn
90° to the right or left.
2. Pull out the active carbon filter.
Switching off the appliance
3 s
D Press and hold the on/off button for approximately
3 seconds until the temperature display goes out.
Putting the appliance out of service
If the appliance is put out of service for an extended
period of time:
3. Insert a new active carbon filter with the handle in a
vertical position.
4. Hold the active carbon filter by the handle and turn
90° to the right or left, until it engages.
Defrosting
The appliance defrosts automatically. The collected
moisture is directed through the condensation outlet to
the external evaporation pan. The condensation
evaporates under the heat from the refrigeration unit.
1. Switch off the appliance.
2. Unplug the appliance from the mains or switch off
the circuit breaker.
3. Clean the appliance.
4. Leave the door open, to prevent odours from
forming.
Cleaning the appliance
!
Warning!
Never clean the appliance with a steam cleaning
device. The steam may reach live electrical parts in
the appliance and cause a short circuit or cause an
electric shock. The steam may damage the plastic
surfaces.
Never clean the shelves or containers in the
dishwasher. The parts may warp.
Do not use arenaceous or acidic cleaning agents or
solvents or those containing chloride.
1. Switch off the appliance.
2. Unplug the appliance from the mains or switch off
the circuit breaker.
3. Clean the appliance using a soft cloth, lukewarm
water and some pH−neutral cleaning agent. The
water used for cleaning must not penetrate the
control panel or lighting.
35
Page 36

Operating noises
4. Clean the glass door with a commercially available
glass cleaner and a soft cloth.
5. Only clean the door seal with clean water, and rub it
dry thoroughly.
6. Remove dirt on ventilation openings using a vacuum
cleaner.
7. Remove deposits in the drainage opening using a
thin device e.g. a cotton bud.
8. After cleaning: Plug the appliance into the mains or
switch on the fuse.
Care instructions for stainless steel surfaces
Use Chromol" cleaning agent for cleaning stainless
steel surfaces.
This cleaning agent is available on the market under the
name Chromol" or from your after−sales service under
Normal noises
Humming − the refrigeration unit is running. The
circulation fan is running.
Bubbling, whirring or gurgling noises − refrigerant is
flowing through the pipes.
Clicking − refrigeration unit (motor) is switching on or off.
Avoiding noises
The appliance is positioned unevenly
Align the appliance using a spirit level (see "Installing the
appliance").
Pull−out bottle racks are wobbling or sticking
Check the removable pull−out bottle racks and replace
them if necessary.
Containers are touching
ID No. 310359 as 500 ml aerosol can and
ID No. 166787 as 50 ml sample bottle.
To prevent damage to the surfaces, under no
circumstances use abrasive sponges, metal brushes,
sharp−edged implements or scouring agents.
Chemically aggressive cleaning agents such as
defrosting spray, oven spray, solvents or stain removers
must not be used either.
Move bottles or containers apart slightly.
36
Page 37

Rectifying minor faults yourself
Before you call the after−sales service:
Check whether you can rectify the fault yourself by using the notes below. You must bear the costs for consultations
with the after−sales service yourself − even during the warranty period.
Fault
Temperature differs
significantly from the setting.
The appliance has no cooling
capacity, the interior lighting
and the display do not light
up.
The refrigeration unit
switches on increasingly
frequently and for longer
periods.
The refrigeration unit is
running for a long time.
Possible causes Remedy
In many cases, all you need do is switch the
appliance off for 5 minutes.
If the temperature is too warm, check after a
few hours to see if the temperature has
changed.
If the temperature is too cold, check the
temperature again the following day.
Power failure; the fuse has been
tripped; the mains plug is not firmly
inserted.
The appliance door is opened
frequently.
The ventilation openings are
covered.
The appliance is too close to a
heat source or the ambient
temperature is too high.
The refrigeration unit switches to a
low speed when there is low
refrigeration requirement.
Check whether there is power. The fuse must
be switched on.
Do not open the appliance door
unnecessarily.
Remove obstacles and dirt.
See the "Installation site" section.
Although this increases the running time, it
saves energy. This is normal for energy saving
models.
Mould on wine bottles. As in other types of storage, some
mould may form, depending on the
kind of label adhesive used.
The temperature is not cold
enough.
The interior lighting does not
light up.
The temperature display
shows F0 to F5.
The ventilation openings are
covered.
The appliance door is not closed
properly.
The appliance door is opened
frequently.
The appliance is too close to a
heat source or the ambient
temperature is too high.
The appliance is switched off. Switch on the appliance.
The interior lighting is faulty or the
cover is damaged.
Appliance malfunction. Make sure that you inform the after−sales
Carefully remove any adhesive residue from
the bottles.
Remove obstacles and dirt.
Close the appliance door.
Do not open the appliance door
unnecessarily.
See the "Installation location" section.
Make sure that you inform the after−sales
service.
service.
37
Page 38

After−sales service
Check whether you can remedy the fault yourself, using
the instructions in the "Rectifying minor faults yourself"
section. You can find an after−sales service in your area
in the telephone directory or the after−sales service
directory.
When you call the after−sales service, please quote your
product number (E no.) and the production
number (FD no.) of your appliance.
Please help us to avoid unnecessary journeys by
quoting the appliance and production number. In doing
so, you will save related cost overruns.
You will find this information on the rating plate.
E no. FD no.
38
Page 39

Sommaire
Félicitations ! 40 . . . . . . . . . . . . . . . . . . . . . . . . . . . . . .
Consignes de sécurité et avertissements 40 . . . . .
Avant la mise en service de l’appareil 40 . . . . . . . . . .
Sécurité technique 40 . . . . . . . . . . . . . . . . . . . . . . . . . .
Pendant l’utilisation 41 . . . . . . . . . . . . . . . . . . . . . . . . .
Les enfants et l’appareil 41 . . . . . . . . . . . . . . . . . . . . . .
Dispositions générales 41 . . . . . . . . . . . . . . . . . . . . . . .
Conseils pour la mise au rebut 41 . . . . . . . . . . . . . .
Mise au rebut de l’emballage 41 . . . . . . . . . . . . . . . . .
Mise au rebut de l’ancien appareil 42 . . . . . . . . . . . . .
Consignes d’installation 42 . . . . . . . . . . . . . . . . . . . .
Emplacement 42 . . . . . . . . . . . . . . . . . . . . . . . . . . . . . .
Classes climatiques 42 . . . . . . . . . . . . . . . . . . . . . . . . .
Niche 42 . . . . . . . . . . . . . . . . . . . . . . . . . . . . . . . . . . . . .
Aération 43 . . . . . . . . . . . . . . . . . . . . . . . . . . . . . . . . . . .
Transport de l’appareil 43 . . . . . . . . . . . . . . . . . . . . . . .
Équipement 52 . . . . . . . . . . . . . . . . . . . . . . . . . . . . . . .
Plateaux tiroirs coulissants 52 . . . . . . . . . . . . . . . . . . .
Schéma de stockage 52 . . . . . . . . . . . . . . . . . . . . . . .
Conseils pratiques pour stocker votre vin 52 . . . .
Températures de dégustation 52 . . . . . . . . . . . . . . .
Renouvellement de l’air grâce à un filtre
à charbon activé 53 . . . . . . . . . . . . . . . . . . . . . . . . . . .
Dégivrage 53 . . . . . . . . . . . . . . . . . . . . . . . . . . . . . . . . .
Arrêt de l’appareil 53 . . . . . . . . . . . . . . . . . . . . . . . . . .
Mise hors service de l’appareil 53 . . . . . . . . . . . . . .
Nettoyage de l’appareil 53 . . . . . . . . . . . . . . . . . . . . .
Conseils d’entretien des surfaces en acier spécial 54
Bruits de fonctionnement 54 . . . . . . . . . . . . . . . . . . .
Branchement électrique 43 . . . . . . . . . . . . . . . . . . . . .
Installation de l’appareil 44 . . . . . . . . . . . . . . . . . . . .
Changer le sens d’ouverture de la porte, si besoin
est 44 . . . . . . . . . . . . . . . . . . . . . . . . . . . . . . . . . . . . . . .
Cotes d’encastrement 45 . . . . . . . . . . . . . . . . . . . . . . .
Fixation et installation 45 . . . . . . . . . . . . . . . . . . . . . . . .
Votre nouvel appareil 48 . . . . . . . . . . . . . . . . . . . . . . .
Bandeau de commande 48 . . . . . . . . . . . . . . . . . . . .
Mise en marche de l’appareil 49 . . . . . . . . . . . . . . .
Réglage de la température 49 . . . . . . . . . . . . . . . . . .
Ventilateur 49 . . . . . . . . . . . . . . . . . . . . . . . . . . . . . . . .
Alarme de température 49 . . . . . . . . . . . . . . . . . . . . .
Bruits parfaitement normaux 54 . . . . . . . . . . . . . . . . . .
Comment éviter les bruits 54 . . . . . . . . . . . . . . . . . . . .
Remédier soi−même aux petites anomalies
de fonctionnement 55 . . . . . . . . . . . . . . . . . . . . . . . . .
Service après−vente 56 . . . . . . . . . . . . . . . . . . . . . . . .
Sécurité enfants 50 . . . . . . . . . . . . . . . . . . . . . . . . . . .
Luminosité de l’affichage 50 . . . . . . . . . . . . . . . . . . .
LED d’éclairage intérieur 51 . . . . . . . . . . . . . . . . . . .
39
Page 40

Félicitations !
Consignes de sécurité et avertissements
En achetant cette nouvelle cave à vin à température
contrôlée, vous avez fait le choix d’un appareil
électroménager moderne et de haute qualité.
Les bons vins ne révèlent pleinement tout leur arôme et
leur saveur qu’à la bonne température de dégustation.
Votre cave à vin à température contrôlée permet
d’amener vos vins lentement et de façon régulière à la
température de dégustation idéale. Les vins rouges et
vins blancs peuvent être stockés simultanément à leur
température de consommation optimale dans deux
zones de température réglables indépendamment l’une
de l’autre.
Votre nouvel appareil se distingue par une faible
consommation d’énergie.
Le fonctionnement et l’état irréprochable de chaque
appareil est soigneusement contrôlé avant de quitter
l’usine.
Si vous souhaitez davantage de précisions, notamment
sur l’installation et le branchement de l’appareil, notre
service après−vente se tient à votre disposition, cf.
chapitre « Service après−vente ».
Vous trouverez également des informations
supplémentaires ainsi qu’une sélection de nos produits
sur notre site Internet.
Veuillez lire et vous conformer aux notices d’utilisation et
d’installation ainsi qu’à toutes les informations
accompagnant votre appareil.
Avant la mise en service de l’appareil
Veuillez lire attentivement la notice de montage et
d’utilisation.
Elle contient des informations importantes concernant
l’installation, l’utilisation et l’entretien de l’appareil.
Conservez soigneusement ce document. Il pourra vous
être utile plus tard ou servir à un autre utilisateur.
Sécurité technique
d L’appareil contient une faible quantité d’un fluide
frigorigène écologique mais inflammable, le R600a.
Pendant le transport ou l’installation, veillez à ne pas
endommager les éléments du circuit frigorifique. Toute
fuite du fluide frigorigène peut provoquer des lésions
oculaires ou entraîner une inflammation du fluide.
Si l’appareil est endommagé
D éloignez de l’appareil les flammes nues ou les
sources d’étincelle,
D débranchez la fiche mâle,
D aérez bien la pièce pendant plusieurs minutes,
D contactez le service après−vente.
Plus un appareil contient de fluide frigorigène et plus
grande doit être la pièce où l’appareil est installé. Une
fuite dans une pièce dont le volume n’est pas adapté
peut entraîner la formation d’un mélange gaz−air
inflammable.
Prévoyez au minimum 1 m
frigorigène. La quantité de fluide frigorigène contenue
dans votre appareil est indiquée sur la plaque
signalétique à l’intérieur de ce dernier.
Le changement du câble de raccordement au secteur
et les autres réparations doivent être exclusivement
effectués par le service après−vente. Une installation ou
des réparations inexpertes peuvent entraîner des
risques considérables pour l’utilisateur.
Rayonnement laser
L’appareil est doté de lasers de la classe 1M pour
l’éclairage.
Risque de lésions oculaires !
Ne pas fixer directement le rayonnement laser avec des
instruments optiques.
Les dispositifs laser ne doivent être réparés que par le
service après−vente ou des techniciens compétents
autorisés.
3
pour 8 g de fluide
40
Page 41

Pendant l’utilisation
Dispositions générales
D N’utilisez jamais d’appareils électriques à l’intérieur
de l’appareil (par ex. appareils de chauffage,
sorbetières électriques, etc.). Risque d’explosion !
D Ne dégivrez ou ne nettoyez jamais l’appareil à l’aide
d’un nettoyeur à vapeur. La vapeur pourrait
atteindre des éléments électriques et provoquer un
court−circuit ou une électrocution. Risque
d’électrocution !
D Ne stockez aucun produit contenant des gaz
propulseurs inflammables (bombes aérosols par ex.)
ou des substances explosives. Risque
d’explosion !
D Ne vous servez pas des socles, clayettes et portes
comme marchepied ou appui.
D Pour dégivrer et nettoyer l’appareil, débranchez la
fiche mâle ou retirez le fusible.
Débranchez la fiche mâle sans tirer sur le câble de
raccordement.
D Les boissons fortement alcoolisées doivent être
fermées hermétiquement et stockées en position
verticale.
D L’huile et la graisse ne doivent pas entrer en contact
avec les parties en plastique et le joint de porte. Ces
derniers risquent sinon de devenir poreux.
Cet appareil est exclusivement destiné à stocker du vin.
L’appareil est destiné uniquement à un usage
domestique.
L’appareil est conforme à la directive européenne
2004/108/CE.
L’étanchéité du circuit frigorifique a été contrôlée.
Ce produit est conforme aux dispositions de sécurité
applicables aux appareils électriques (EN 60335/2/24).
Conseils pour la mise au rebut
x Mise au rebut de l’emballage
L’emballage protège l’appareil contre les avaries de
transport. Tous les matériaux qui le constituent sont non
polluants et recyclables. Aidez−nous à recycler
l’emballage en respectant l’environnement.
Pour connaître les modes de mise au rebut écologiques,
veuillez vous adresser à votre revendeur spécialisé ou à
votre mairie.
D Veillez à ne jamais recouvrir ni obstruer les orifices
de ventilation de l’appareil.
D Cet appareil ne doit être utilisé par des personnes à
capacités physiques, sensorielles ou intellectuelles
restreintes ou ayant des connaissances insuffisantes
que sous surveillance ou avec une notice détaillée.
Les enfants et l’appareil
D Ne donnez pas l’emballage et ses composantes aux
enfants. Ils risquent de s’étouffer avec les cartons
pliants et les feuilles de plastique !
D Cet appareil n’est pas un jouet pour les enfants.
D Si l’appareil est équipé d’une serrure, rangez la clé
hors de portée des enfants.
41
Page 42

Consignes d’installation
x Mise au rebut de l’ancien appareil
Les appareils usagés ne sont pas des déchets sans
valeur.
Une mise au rebut respectueuse de l’environnement
permet de récupérer de précieuses matières premières.
Cet appareil a été labellisé en conformité avec la
directive communautaire européenne 2002/96/CE
concernant les appareils électriques et
électroniques usagés (waste electrical and
electronic equipment − WEEE). Cette directive sert
de règlement cadre à la reprise et au recyclage des
appareils usagés dans toute l’Europe.
d Appareil usagé :
D Débranchez la fiche mâle.
D Sectionnez le câble de raccordement et enlevez la
fiche mâle.
D Enlevez les portes.
Emplacement
L’appareil doit être installé dans une pièce sèche et
facile à aérer. L’appareil ne doit pas être exposé
directement aux rayons du soleil et doit être éloigné de
toute source de chaleur (cuisinière, radiateurs etc.). Si
l’installation doit se faire à côté d’une source de chaleur,
utiliser une plaque isolante appropriée ou respecter les
distances minimales suivantes par rapport à la source
de chaleur :
− 30 mm des cuisinières électriques,
− 300 mm des poêles à mazout ou au charbon.
Le sol où l’appareil est placé ne doit pas céder,
renforcer éventuellement le sol.
Classes climatiques
La classe climatique figure sur la plaque signalétique.
Elle indique les températures ambiantes auxquelles
l’appareil peut fonctionner.
D Ne retirez pas les clayettes et les compartiments
pour empêcher les enfants de s’introduire dans
l’appareil.
D Ne laissez pas les enfants jouer avec des appareils
usagés. Risque d’étouffement !
Les appareils frigorifiques contiennent un fluide
frigorigène et des gaz isolants. Le fluide frigorigène et
les gaz doivent être éliminés de manière appropriée.
Avant la mise au rebut, vérifiez que les éléments du
circuit du fluide frigorigène sont en bon état.
Classe climatique Température ambiante
admissible
SN +10 °C à 32 °C
N +16 °C à 32 °C
ST +16 °C à 38 °C
T +16 °C à 43 °C
Niche
L’appareil doit être installé dans une niche appropriée.
La position de la niche doit être ajustée à l’aide d’un
niveau à bulle. Elle doit être solidement vissée aux
meubles adjacents ou dans le mur.
La niche doit être dotée de suffisamment d’orifices de
ventilation à l’avant dans le socle du meuble et dans la
partie supérieure du meuble.
42
Page 43

Aération
Branchement électrique
Les orifices de ventilation situés à l’avant dans le socle
du meuble et dans la partie supérieure du meuble ne
doivent en aucun cas être recouverts. Dans le cas
contraire, la machine frigorifique doit générer plus de
puissance, ce qui augmente la consommation
d’électricité.
Respectez impérativement les dimensions suivantes :
Profondeur du puits d’aération au niveau de la paroi
arrière du meuble :
min. 38 mm
Coupes transversales des orifices de ventilation dans le
socle et la partie supérieure du meuble :
min. 200 cm
2
Transport de l’appareil
!
Avertissement !
Risque de blessure par bris de verre !
En cas de transport à une altitude supérieure à
1500 m, les vitres de la porte peuvent se briser. Les
fragments de verre ont des arêtes vives et peuvent
engendrer des blessures.
La prise de courant servant au branchement de
l’appareil doit être facilement accessible. Branchez
l’appareil sur le courant alternatif 220 − 240 V/50 Hz par
l’intermédiaire d’une prise installée dans les normes. La
prise de courant doit être protégée par un fusible de
10 A à 16 A.
N’utilisez pas de rallonge ou de multiprise.
Sur les appareils destinés aux pays non européens,
vérifiez si la tension de branchement et le type de
courant spécifiés sur la plaque signalétique
concordent bien avec ceux fournis par le secteur du
pays concerné. La plaque signalétique se trouve en
bas à gauche de l’appareil. S’il est nécessaire de
changer le câble de raccordement au secteur,
confiez cette opération uniquement à un spécialiste.
!
Avertissement !
L’appareil ne doit en aucun cas être branché sur des
prises électroniques à économie d’énergie (par ex.
Ecoboy ; Sava Plug) ni sur des onduleurs,
convertissant le courant continu en courant
alternatif de 230 V (par exemple installations
solaires, réseaux marins).
Transportez l’appareil emballé et en position verticale.
Remarque !
Afin de protéger la porte vitrée, le dispositif de
protection pour le transport ne doit être retiré
qu’une fois l’appareil placé dans la niche.
Remettez le dispositif de protection avant chaque
nouveau transport.
43
Page 44

Installation de l’appareil
Changer le sens d’ouverture de la porte, si besoin est
!
Avertissement !
Risque de blessure dû à des portes lourdes !
Deux personnes sont nécessaires pour procéder au remplacement des portes vitrées.
1
1.
2
2.
3.
5
10.
11.
13.
12.
6
15.
12.
17.
14.
16.
3
4.
5.
4
9.
6.
7.
8.
7
19.
18.
8
20.
44
Page 45

Cotes d’encastrement
max. 2100
min. 200 cm
2
1221−
1225
min. 38
560−570
min.
550
min. 38
1218
557
502
58
592
113
49
3
1229
min. 200 cm
Fixation et installation
1. Détachez le câble de raccordement de la paroi
arrière de l’appareil.
2. Enlevez également l’attache de câble (pour éviter
des bruits de vibration).
3. Attachez le câble de raccordement à une ficelle
pour pouvoir brancher facilement l’appareil après
l’encastrement.
450
103
100
2
5. Visser entièrement les pieds réglables.
5
4. Introduisez l’appareil jusqu’au 2/3 de la niche. Ce
faisant, veillez à ne pas pincer le câble de
raccordement.
45
Page 46

6. Pour un meuble aux parois de 16 mm d’épaisseur :
Placez la pièce d’écartement à l’extérieur sur la
charnière supérieure.
Ne cachez pas le trou !
7. Positionnez le panneau de compensation sur les
trous percés au préalable sur la partie supérieure de
l’appareil et fixez−le à l’aide de 3 vis (3,5 x 9,5 mm
incluses dans le sachet).
9. Introduisez l’appareil dans la niche jusqu’à ce que la
butée de la charnière inférieure vienne en contact
avec le bord avant de la paroi du meuble.
10. Dévissez le dispositif de sécurité de transport.
Conservez le dispositif de sécurité pour un nouveau
transport éventuel !
8. Raccourcissez la baguette couvre−joint à la hauteur
de la niche et collez−la sur le côté de débattement
de la porte au niveau de la paroi latérale de
l’appareil.
11. Vissez à fond la cornière de fixation à l’aide des
deux vis du dispositif de sécurité de transport sur
l’appareil.
46
Page 47

12. Ajuster l’appareil à l’aide du pied réglable sur le côté
de débattement de la porte :
La cornière de fixation doit affleurer par rapport au
bord avant du fond du meuble.
L’écart (x) entre le bord avant de la paroi du meuble
et le bord avant de l’appareil doit être identique
partout.
La charnière supérieure doit adhérer au niveau
latéral à la paroi du meuble.
Remarque !
La clé de réglage est jointe à l’appareil.
15. Vissez solidement et fermez la cornière de fixation à
l’aide de deux vis (4 x 19 mm incluses dans le
sachet) sur le fond du meuble.
16. Vissez solidement le panneau de compensation à
l’aide de deux vis (4 x 14 mm incluses dans le
sachet) sur le plafond du meuble.
13. Vissez solidement la charnière supérieure à l’aide
d’une vis (4 x 29 mm incluse dans le sachet) sur la
paroi du meuble.
14. Vissez solidement la charnière inférieure à l’aide de
deux vis (4 x 19 mm incluses dans le sachet) sur le
fond du meuble.
Remarque !
Retirez le film de protection avant d’installer la
poignée.
Les repères supérieurs et inférieurs appliqués au
pointeau sur la porte de l’appareil ne sont pas
destinés au montage de la poignée.
17. Visser la poignée au moyen des 2 vis (3,5 x 9,5 mm
en supplément) dans le repère appliqué au pointeau
sur la porte de l’appareil. Appliquer une pression
plus forte sur les vis pour transpercer la tôle.
47
Page 48

Votre nouvel appareil
4
1
2
3
1. Compartiment supérieur
2. Poignée
3. Compartiment inférieur
4. Éclairage intérieur du compartiment supérieur
Bandeau de commande
5
6
7
8
5. Bandeau de commande
6. Éclairage intérieur du compartiment inférieur
7. Plateaux tiroirs coulissants
8. Pieds réglables
1234 5678 9 10
1. Touche Marche / Arrêt
2. Touche du ventilateur
3. Touche de l’éclairage intérieur
4. Touche d’arrêt de l’alarme
5. Affichage des fonctions en marche
Sécurité enfants
6. Affichage de la température du compartiment
supérieur
7. Affichage de la température du compartiment
inférieur
8. Touche de sélection du compartiment inférieur
9. Touches Plus et Moins de réglage de la température
10. Touche de sélection du compartiment supérieur
48
Ventilateur
Page 49

Mise en marche de l’appareil
Ventilateur
D Appuyez sur la touche Marche / Arrêt jusqu’à ce
que l’affichage de la température s’éclaire.
Réglage de la température
La température peut être réglée dans les deux
compartiments indépendamment l’une de l’autre dans
une plage comprise entre +5 °C et +20 °C. Nous
recommandons un réglage compris entre +8 °C et
+12 °C.
Pour stocker votre vin plus longtemps, vous devez
allumer le ventilateur.
Le ventilateur génère un climat à l’intérieur de l’appareil
correspondant à celui d’une cave.
L’humidité accrue qui en résulte empêche le bouchon
de se dessécher.
Allumez le ventilateur :
D Appuyez sur la touche du ventilateur. Le symbole du
ventilateur apparaît sur l’écran.
Le ventilateur fonctionne en permanence.
Éteignez le ventilateur :
D Appuyez sur la touche du ventilateur. Le symbole du
ventilateur s’éteint sur l’écran.
Le ventilateur fonctionne uniquement lorsque le
groupe frigorifique est en marche.
D Appuyez sur la touche de sélection du
compartiment supérieur ou inférieur. L’affichage de
la température correspondante clignote.
D Réglez la température à l’aide des touches Plus ou
Moins :
Touche Plus : Augmentation de la température
(plus chaude)
Touche Moins : Diminution de la température
(plus froide)
Chaque pression sur la touche permet de modifier la
température de 1 °C.
Env. 5 secondes après la dernière pression sur la
touche, l’affichage de la température change et affiche
la température réelle.
Alarme de température
Cette alarme vous permet d’éviter que vos vins ne
soient exposés à des températures excessives.
Elle se déclenche lorsque la température intérieure de
l’appareil est trop élevée ou trop basse. L’affichage de la
température clignote également.
Elle se déclenche toujours lorsque la porte reste ouverte
plus de 60 secondes.
Éteignez l’alarme :
D Appuyez sur la touche d’arrêt de l’alarme.
L’affichage de la température continue de clignoter
jusqu’à ce qu’une température correcte soit atteinte.
49
Page 50

Sécurité enfants
La sécurité enfants permet d’éviter tout arrêt involontaire
de l’appareil.
1. Appuyez env. 5 secondes sur la touche du
ventilateur. Sur l’écran, un « c » clignote pour
signaler la sécurité enfant ou un « h » pour
l’éclairage intérieur.
5 s
1. 2.
2. Appuyez sur la touche Moins jusqu’à ce que l’écran
affiche « c ».
3. Appuyez sur la touche du ventilateur. Un « c1 » ou
un « c0 » clignote sur l’écran.
5. Appuyez sur la touche du ventilateur pour confirmer
la valeur qui clignote.
5.6.
6. Appuyez sur la touche Marche/Arrêt pour quitter le
mode de réglage.
Luminosité de l’affichage
1. Appuyez env. 5 secondes sur la touche du
ventilateur. Sur l’écran, un « h » clignote pour
signaler pour l’éclairage intérieur ou un « c » pour la
sécurité enfant.
3. 4.
4. Activez ou désactivez la sécurité enfant à l’aide de
la touche Plus ou Moins :
« c0 » : Sécurité enfant désactivée
« c1 » : Sécurité enfant activée.
Lorsque la sécurité enfant est activée, le symbole du
cadenas s’allume sur l’écran.
5 s
1. 2.
2. Appuyez sur la touche Moins jusqu’à ce que l’écran
affiche « h ».
50
Page 51

LED d’éclairage intérieur
3. Appuyez sur la touche du ventilateur. La valeur
actuelle pour la luminosité clignote sur l’écran.
3. 4.
4. Réglez la luminosité de l’affichage à l’aide des
touches Plus et Moins :
« h1 » : Luminosité minimale
à
« h5 » : Luminosité maximale.
5. Appuyez sur la touche du ventilateur pour confirmer
la valeur qui clignote.
Un éclairage par LED ne nécessitant aucun entretien et
doté d’un effet de variation d’intensité est intégré dans
le compartiment supérieur et inférieur.
Lors de l’ouverture de la porte, la luminosité s’accroît
lentement pour passer de 0 à l’intensité lumineuse
maximale pouvant être réglée de façon personnalisée.
L’effet inverse se produit lors de la fermeture de la porte.
Attention éclairage par LED !
Rayonnement laser de la classe 1M (norme
IEC 60825). Ne pas fixer directement le
rayonnement laser avec des instruments optiques.
Risque de lésions oculaires ! Les dispositifs laser ne
doivent être réparés que par le service après−vente
ou des techniciens compétents autorisés.
5.6.
6. Une fois l’affichage modifiée, appuyez sur la
touche Marche/Arrêt pour quitter le mode de
réglage et fermez la porte.
Après environ 1 min, la luminosité adopte l’intensité
lumineuse réglée.
Réglez l’intensité lumineuse maximale de façon
personnalisée :
1. Appuyez sur la touche de l’éclairage intérieur.
2. Maintenez la touche de l’éclairage intérieur
enfoncée et réglez l’intensité lumineuse maximale à
l’aide des touches Plus et Moins :
Touche Plus : plus claire
Touche Moins : plus foncée.
À des fins de présentation, l’éclairage intérieur peut
également être allumé de façon durable :
D Appuyez sur la touche de l’éclairage intérieur.
D Appuyez à nouveau sur la touche de l’éclairage
intérieur pour désactiver l’éclairage ininterrompu.
51
Page 52

Équipement
Plateaux tiroirs coulissants
Les plateaux tiroirs coulissants permettent de sortir les
bouteilles de vin de façon pratique.
Les plateaux tiroirs coulissants peuvent être retirés à des
fins de nettoyage.
Conseils pratiques pour stocker votre vin
D Conservez vos bouteilles de vin sans leur
emballage − sans caisses, ni cartons.
D Les bouteilles anciennes doivent être entreposées
de façon à ce que le bouchon soit toujours humide.
Il ne doit jamais y avoir d’air entre le vin et le
bouchon.
D Avant la dégustation, le vin doit être lentement
« réchauffé » (chambré) :
Pour que votre vin soit à la bonne température de
dégustation, sortez votre bouteille au préalable, par
exemple environ 2 à 5 heures pour un rosé et
environ 4 à 5 heures pour un vin rouge. Le vin
blanc, quant à lui, peut être sorti juste au moment
de le déguster. Le mousseux et le Champagne
doivent être consommés frais. Placez−les au
réfrigérateur un peu avant de les déguster.
Schéma de stockage
Capacité de stockage : 64 bouteilles
(bouteilles de Bordeaux de
0,75 l)
D Veillez à ce que les vins soient toujours légèrement
plus frais que leur température de service car ils se
réchauffent immédiatement de 1 à 2 ºC lorsqu’ils
sont versés dans un verre !
Températures de dégustation
La température de service adéquate est décisive pour
obtenir la bonne saveur du vin et par conséquent pour
garantir sa bonne dégustation.
Nous recommandons de servir le vin aux températures
suivantes :
Type de vin Température
de dégustation
Bordeaux rouge grand cru 18 ºC
Côtes du Rhône rouge / Barolo 17 ºC
Grand cru Bourgogne rouge /
Bordeaux rouge
Porto 15 ºC
Bourgogne rouge jeune 14 ºC
Vins rouges jeunes 12 ºC
Beaujolais jeune / tous les vins
blancs avec peu de sucres résiduels
Vins blancs anciens / Chardonnay
grands crus
Xérès 9 ºC
Vins blancs jeunes à partir de
vendanges tardives
Vins blancs de la Loire /
Entre-deux-Mers
16 ºC
11 ºC
10 ºC
8 ºC
7 ºC
52
Page 53

Renouvellement de l’air grâce à un
filtre à charbon activé
Les vins évoluent en permanence en fonction des
conditions ambiantes ; la qualité de l’air est donc
déterminante pour leur conservation. Par conséquent,
un filtre à charbon activé est placé dans chaque
compartiment supérieur et inférieur dans la paroi arrière
de l’appareil.
Nous conseillons de procéder au remplacement du filtre
à charbon activé une fois par an. Les filtres à charbon
activé peuvent être obtenus via le service après−vente
ou auprès d’un revendeur spécialisé GAGGENAU.
Remplacez le filtre à charbon activé :
1. Saisissez le filtre à charbon activé au niveau de la
poignée et tournez de 90° vers la droite ou vers la
gauche.
2. Retirez le filtre à charbon activé.
Arrêt de l’appareil
3 s
D Appuyez env. 3 secondes sur la touche Marche /
Arrêt, jusqu’à ce que l’affichage de la température
s’éteigne.
Mise hors service de l’appareil
Lorsque l’appareil reste hors service pendant une durée
prolongée :
3. Placez le nouveau filtre à charbon activé à l’aide de
la poignée en position verticale.
4. Saisissez le filtre à charbon activé au niveau de la
poignée et tournez de 90° vers la droite ou vers la
gauche jusqu’à ce qu’il s’enclenche.
Dégivrage
L’appareil est équipé d’une fonction de dégivrage
automatique. L’humidité produite est acheminée vers
l’extérieur via le conduit d’évacuation de l’eau de
condensation dans le bac de dégivrage. Là, l’eau de
condensation s’évapore sous l’effet de la chaleur du
groupe frigorifique.
1. Éteignez l’appareil.
2. Débranchez la fiche mâle ou retirez le fusible.
3. Nettoyez l’appareil.
4. Laissez la porte ouverte pour éviter l’apparition
d’odeurs.
Nettoyage de l’appareil
!
Avertissement !
Ne nettoyez jamais l’appareil à l’aide d’un nettoyeur
à vapeur. La vapeur pourrait atteindre des éléments
conducteurs et provoquer un court−circuit ou une
électrocution. La vapeur risque également
d’endommager les surfaces en plastique.
Ne nettoyez jamais les clayettes et les
compartiments dans le lave−vaisselle.
Ces éléments risqueraient de se déformer.
N’utilisez pas de produit de nettoyage ou de solvant
sableux, chloruré ou caustique.
1. Éteignez l’appareil.
2. Débranchez la fiche mâle ou retirez le fusible.
3. Nettoyez l’appareil avec un chiffon doux, à l’eau
tiède et avec un peu de produit vaisselle au ph
neutre. L’eau de rinçage ne doit pas pénétrer
dans le panneau de commande ou l’éclairage.
53
Page 54

Bruits de fonctionnement
4. Nettoyez la porte vitrée avec un produit d’entretien
usuel et un chiffon doux.
5. Nettoyez le joint de porte à l’eau claire uniquement
et séchez−le soigneusement.
6. Nettoyez les orifices de ventilation à l’aide d’un
aspirateur.
7. Retirez les dépôts situés dans l’orifice d’évacuation
à l’aide d’un accessoire fin, comme par ex. un
coton−tige.
8. Après le nettoyage : Branchez la fiche mâle ou
replacez le fusible.
Conseils d’entretien des surfaces en
acier spécial
Pour entretenir les surfaces en acier spécial, utilisez le
produit d’entretien « Chromol ».
Ce produit est disponible dans le commerce sous le
nom de « Chromol » ou auprès de votre service
après−vente sous la
Bruits parfaitement normaux
Bourdonnement − fonctionnement du compresseur. Le
ventilateur du système de ventilation fonctionne.
Bruits d’écoulement − circulation du fluide frigorigène.
Cliquetis − le groupe frigorifique (moteur) s’allume ou
s’éteint.
Comment éviter les bruits
L’appareil n’est pas d’aplomb sur le sol
Ajustez la position de l’appareil à l’aide d’un niveau à
bulle (cf. « Installation de l’appareil »).
Les plateaux tiroirs coulissants ne sont pas stables
ou coincent
Vérifiez les plateaux tiroirs coulissants amovibles et
remettez−les éventuellement à nouveau en place
correctement.
Les récipients bougent
Réf. 310359 sous forme de pulvérisateur de 500 ml et
Réf. 166787 sous forme d’échantillon de 50 ml.
Afin de ne pas endommager les surfaces, n’utilisez en
aucun cas des éponges abrasives, des brosses
métalliques, des objets tranchants ou des produits à
récurer. Vous ne devez pas utiliser non plus de
détergents chimiques agressifs, tels que des bombes
aérosols de dégivrage, des bombes aérosols pour four,
des solvants ou des détachants.
Écartez légèrement les bouteilles ou les récipients.
54
Page 55

Remédier soi−même aux petites
anomalies de fonctionnement
Avant d’appeler le service après−vente :
Vérifiez si vous ne pouvez pas remédier vous−même à l’anomalie constatée à l’aide des indications suivantes. Si vous
faites appel à un technicien par le biais du service après−vente, sa prestation vous sera facturée, même pendant la
période de garantie.
Anomalie
La température diffère
fortement du réglage.
La fonction de
refroidissement de l’appareil
ne fonctionne pas, l’éclairage
intérieur et l’écran ne
s’allument pas.
Le groupe frigorifique se met
en marche de plus en plus
souvent et de plus en plus
longtemps.
Le groupe frigorifique
fonctionne longtemps.
Causes possibles Solution
Dans certains cas, il suffit d’éteindre l’appareil
5 minutes.
Si la température est trop élevée, vérifiez
après quelques heures si un changement de
température s’est produit.
Si la température est trop basse, vérifiez à
nouveau la température le jour suivant.
Coupure de courant ; le fusible a
grillé ; la fiche mâle n’est pas bien
branchée.
Ouverture fréquente de la porte de
l’appareil.
Les orifices de ventilation sont
obstrués.
L’appareil est trop proche d’une
source de chaleur ou la
température ambiante est trop
élevée.
Le groupe frigorifique se règle sur
un régime faible en cas de faible
besoin en froid.
Vérifiez si l’alimentation électrique fonctionne.
Le fusible doit être replacé.
N’ouvrez pas la porte plus souvent que
nécessaire.
Dégagez et nettoyez les orifices de ventilation.
Cf. chapitre « Emplacement ».
Bien que la durée de fonctionnement s’en
trouve allongée, cela permet une économie
d’énergie. Ceci est normal pour les modèles
économes en énergie.
Présence de moisissures sur
les bouteilles de vin.
La température n’est pas
suffisamment basse.
L’éclairage intérieur ne
s’allume pas.
L’affichage de la température
indique F0 à F5.
De même que pour d’autres
formes de stockage, une légère
moisissure peut se former en
fonction du type de colle utilisée
pour les étiquettes.
Les orifices de ventilation sont
obstrués.
La porte de l’appareil est mal
fermée.
Ouverture fréquente de la porte de
l’appareil.
L’appareil est trop proche d’une
source de chaleur ou la
température ambiante est trop
élevée.
L’appareil est éteint. Allumez l’appareil.
L’éclairage intérieur est défectueux
ou l’habillage est endommagé.
Défaut de l’appareil. Contactez impérativement le service
Éliminez soigneusement les résidus de colle
présents sur les bouteilles.
Dégagez et nettoyez les orifices de ventilation.
Fermez la porte de l’appareil.
N’ouvrez pas la porte plus souvent que
nécessaire.
Cf. chapitre « Emplacement».
Contactez impérativement le service
après−vente.
après−vente.
55
Page 56

Service après−vente
Vérifiez si vous pouvez résoudre l’anomalie en vous
basant sur les conseils de la section « Remédier
soi−même aux petites anomalies de fonctionnement ».
Pour connaître le service après−vente situé le plus près
de chez vous, consultez l’annuaire téléphonique ou le
répertoire des services après−vente.
Veuillez indiquer au service après−vente le numéro de
série (E−Nr.) ainsi que le numéro de fabrication (FD−Nr)
de votre appareil.
En indiquant ces références au technicien du service
après−vente, vous lui épargnez des déplacements
inutiles et vous économisez ainsi des frais
supplémentaires.
Vous trouverez ces informations sur la plaque
signalétique.
E-Nr. FD-Nr.
56
Page 57

Indice
Congratulazioni 58 . . . . . . . . . . . . . . . . . . . . . . . . . . . .
Avvertenze di sicurezza e pericolo 58 . . . . . . . . . . .
Prima di mettere in funzione l’apparecchio 58 . . . . . .
Sicurezza tecnica 58 . . . . . . . . . . . . . . . . . . . . . . . . . . .
Durante l’uso 59 . . . . . . . . . . . . . . . . . . . . . . . . . . . . . .
Bambini in casa 59 . . . . . . . . . . . . . . . . . . . . . . . . . . . .
Norme generali 59 . . . . . . . . . . . . . . . . . . . . . . . . . . . . .
Avvertenze per lo smaltimento 59 . . . . . . . . . . . . . .
Smaltimento dell’imballaggio 59 . . . . . . . . . . . . . . . . .
Rottamazione dell’apparecchio dismesso 60 . . . . . . .
Indicazioni per l’installazione 60 . . . . . . . . . . . . . . .
Luogo di installazione 60 . . . . . . . . . . . . . . . . . . . . . . .
Classi di clima 60 . . . . . . . . . . . . . . . . . . . . . . . . . . . . . .
Nicchia 60 . . . . . . . . . . . . . . . . . . . . . . . . . . . . . . . . . . . .
Ventilazione 61 . . . . . . . . . . . . . . . . . . . . . . . . . . . . . . . .
Dotazione 70 . . . . . . . . . . . . . . . . . . . . . . . . . . . . . . . . .
Cassetti estraibili per bottiglie 70 . . . . . . . . . . . . . . . . .
Schema di disposizione delle bottiglie 70 . . . . . . .
Suggerimenti pratici per la conservazione
del vino 70 . . . . . . . . . . . . . . . . . . . . . . . . . . . . . . . . . . .
Temperature di servizio 70 . . . . . . . . . . . . . . . . . . . . .
Ricambio dell’aria mediante il filtro a carbone
attivo 71 . . . . . . . . . . . . . . . . . . . . . . . . . . . . . . . . . . . . .
Sbrinamento 71 . . . . . . . . . . . . . . . . . . . . . . . . . . . . . .
Disattivazione dell’apparecchio 71 . . . . . . . . . . . . .
Sospendere l’uso dell’apparecchio 71 . . . . . . . . . .
Pulizia dell’apparecchio 71 . . . . . . . . . . . . . . . . . . . .
Pulizia delle superfici in acciaio inossidabile 72 . . . . .
Trasporto dell’apparecchio 61 . . . . . . . . . . . . . . . . . . .
Allacciamento elettrico 61 . . . . . . . . . . . . . . . . . . . . . . .
Installazione dell’apparecchio 62 . . . . . . . . . . . . . . .
Se necessario, sostituire l’apertura della porta 62 . . .
Dimensioni di ingombro 63 . . . . . . . . . . . . . . . . . . . . . .
Fissaggio e montaggio 63 . . . . . . . . . . . . . . . . . . . . . . .
Il nuovo apparecchio 66 . . . . . . . . . . . . . . . . . . . . . . .
Pannello di comando 66 . . . . . . . . . . . . . . . . . . . . . .
Attivazione apparecchio 67 . . . . . . . . . . . . . . . . . . . .
Impostazione della temperatura 67 . . . . . . . . . . . . .
Ventilazione 67 . . . . . . . . . . . . . . . . . . . . . . . . . . . . . . .
Allarme temperatura 67 . . . . . . . . . . . . . . . . . . . . . . .
Rumori di funzionamento 72 . . . . . . . . . . . . . . . . . . .
Rumori normali 72 . . . . . . . . . . . . . . . . . . . . . . . . . . . . .
Eliminazione dei rumori 72 . . . . . . . . . . . . . . . . . . . . . .
Eliminazione di piccole anomalie 73 . . . . . . . . . . . .
Servizio di assistenza tecnica 74 . . . . . . . . . . . . . . .
Sicurezza bambino 68 . . . . . . . . . . . . . . . . . . . . . . . .
Luminosità del display 68 . . . . . . . . . . . . . . . . . . . . .
LED illuminazione interna 69 . . . . . . . . . . . . . . . . . . .
57
Page 58

Congratulazioni
Avvertenze di sicurezza e pericolo
Acquistando il nuovo frigorifero cantina per vini avete
scelto un elettrodomestico moderno e di alta qualità.
I vini buoni sprigionano tutto il loro aroma e il loro sapore
solo alla giusta temperatura. Il frigorifero cantina porta i
vini alla temperatura di consumo ideale in modo
progressivo e uniforme. Grazie alle due zone di
temperatura indipendenti è possibile conservare allo
stesso tempo vini rossi e vini bianchi alla temperatura
ottimale.
Il vostro nuovo apparecchio si contraddistingue per un
consumo energetico molto ridotto.
Ogni apparecchio che lascia il nostro stabilimento è
stato accuratamente controllato per verificarne il corretto
funzionamento e le condizioni perfette.
Per qualsiasi domanda, in particolare sull’installazione e
il collegamento dell’apparecchio, il nostro servizio di
assistenza è volentieri a vostra disposizione. Vedere il
capitolo Servizio di assistenza clienti.
Sul nostro sito Internet si possono trovare ulteriori
informazioni e una panoramica dei nostri prodotti.
Leggere e seguire queste istruzioni per l’uso e per
l’installazione e tutte le altre informazioni relative
all’apparecchio.
Prima di mettere in funzione
l’apparecchio
Leggere attentamente le istruzioni per l’uso e il
montaggio!
Contengono informazioni importanti sull’installazione,
l’uso e la manutenzione dell’apparecchio.
Conservare tutti i documenti in caso sia necessario
consultarli in seguito o per trasmetterli a un eventuale
proprietario successivo.
Sicurezza tecnica
d L’apparecchio contiene una piccola quantità di
refrigerante R600a, compatibile con l’ambiente ma
infiammabile. Fare attenzione, durante il trasporto e il
montaggio dell’apparecchio, a non danneggiare i tubi
del circuito del refrigerante. Il refrigerante fuoriuscito a
pressione può danneggiare gli occhi oppure incendiarsi.
In caso di danni
D tenere lontano dall’apparecchio fiamme libere o
sorgenti di accensione,
D estrarre la spina di alimentazione,
D ventilare bene il locale per alcuni minuti,
D rivolgersi al servizio assistenza.
Quanto più refrigerante contiene un apparecchio, tanto
più grande deve essere il locale in cui si trova
l’apparecchio. In locali troppo piccoli, in caso di perdite
si può formare una miscela infiammabile di gas e aria.
Per ogni 8 g di refrigerante, il volume minimo del locale
deve essere pari a 1 m3. La quantità di refrigerante
dell’apparecchio è indicata sulla targhetta di
identificazione all’interno dell’apparecchio.
La sostituzione della linea di allacciamento alla rete e
altre riparazioni possono essere eseguite solo dal
servizio assistenza. L’installazione o eventuali riparazioni
effettuate in modo non corretto possono essere
un’importante fonte di rischio per l’utente.
Raggio laser
L’apparecchio è provvisto di laser classe 1M per
l’illuminazione.
Pericolo di danno agli occhi!
Non guardare direttamente il raggio laser con strumenti
ottici.
58
Gli interventi di riparazione del raggio laser vanno
eseguiti esclusivamente dal servizio di assistenza clienti
o da tecnici specializzati autorizzati.
Page 59

Durante l’uso
Norme generali
D Non usare mai apparecchi elettrici all’interno di
questo apparecchio (ad es. apparecchi per il
riscaldamento o per la produzione di ghiaccio, ecc.).
Pericolo di esplosione!
D Non sbrinare o pulire mai l’apparecchio con una
pulitrice a vapore! Il vapore può raggiungere i
componenti elettrici e provocare un cortocircuito o
una scarica elettrica. Pericolo di scariche
elettriche!
D Non conservare nell’apparecchio prodotti contenenti
gas propellenti infiammabili (ad es. bombolette
spray) o sostanze esplosive. Pericolo di
esplosione!
D Non usare impropriamente lo zoccolo, i cassetti
estraibili, le porte ecc. come pedana d’appoggio
oppure come sostegno.
D Per lo sbrinamento o la pulizia estrarre la spina di
alimentazione o disattivare il dispositivo di sicurezza.
Estrarre direttamente la spina, senza tirare il cavo.
D Conservare alcool ad alta gradazione solo
ermeticamente chiuso e in posizione verticale.
D Non sporcare le parti in materiale plastico e la
guarnizione della porta con olio o grasso:
Potrebbero diventare porose.
Questo apparecchio è destinato esclusivamente alla
conservazione di vino.
L’apparecchio è destinato solo all’uso in ambito privato.
L’apparecchio è schermato contro i radiodisturbi in
conformità alla direttiva EU 2004/108/CE.
L’ermeticità del circuito refrigerante è stata controllata.
Questo prodotto è conforme alle norme di sicurezza
pertinenti per gli apparecchi elettrici (EN 60335/2/24).
Avvertenze per lo smaltimento
x Smaltimento dell’imballaggio
L’imballaggio protegge l’apparecchio da danni durante il
trasporto. Tutti i materiali impiegati sono compatibili con
l’ambiente e riciclabili. Si invita a collaborare: si prega di
smaltire gli imballaggi nel rispetto dell’ambiente.
Il rivenditore o l’amministrazione comunale forniscono
informazioni sulle attuali possibilità di smaltimento.
D Non coprire né ostruire le aperture di aerazione
dell’apparecchio.
D Questo apparecchio può essere utilizzato da
persone con capacità fisiche, sensoriali o psichiche
limitate o cui manchino le necessarie conoscenze,
solo se sorvegliate e debitamente istruite.
Bambini in casa
D Impedire che i bambini giochino con gli imballaggi e
le sue parti. Gli imballaggi in cartone e i fogli
plastificati possono causare soffocamento.
D L’apparecchio non è un giocattolo per bambini!
D In caso di apparecchi con serratura sulla porta:
Conservare la chiave fuori dalla portata dei bambini!
59
Page 60

Indicazioni per l’installazione
x Rottamazione dell’apparecchio
dismesso
Gli apparecchi dismessi non sono rifiuti senza valore!
Con uno smaltimento ecologicamente corretto si
possono recuperare materie prime pregiate.
Questo apparecchio dispone di contrassegno ai
sensi della direttiva europea 2002/96/CE in materia
di apparecchi elettrici ed elettronici dismessi (waste
electrical and electronic equipment - WEEE). Tale
direttiva definisce le norme per la raccolta e il
riciclaggio di apparecchi dismessi valide su tutto il
territorio dell’UE.
d In caso di apparecchi dismessi:
D Staccare la spina di alimentazione.
D Tagliare il cavo di alimentazione ed eliminarlo
insieme alla spina.
D Rimuovere le porte.
D Non rimuovere ripiani e contenitori, si evita così che
i bambini possano entrare nell’apparecchio!
Luogo di installazione
Un locale asciutto e con possibilità di ventilazione è
idoneo come luogo di installazione. Il luogo di
installazione non deve essere soggetto all’irradiazione
solare diretta e non deve essere neanche accanto a una
fonte di calore come fornelli, termosifoni, ecc. Se non
dovesse essere possibile evitare l’installazione in
prossimità di fonti di calore è necessario applicare un
pannello isolante adeguato oppure devono essere
mantenute le seguenti distanze minime dalla fonte di
calore:
− 30 mm dalle cucine elettriche,
− 300 mm dalle cucine a carbone oppure a olio
combustibile.
Evitare che il pavimento del luogo di installazione possa
cedere, se occorre, rinforzarlo.
Classi di clima
La classe di clima è riportata sulla targhetta di
identificazione. Questa indica in quale campo di
temperatura ambiente può essere usato l’apparecchio.
D Impedire che i bambini giochino con l’apparecchio
dismesso. Pericolo di soffocamento!
Gli apparecchi frigoriferi contengono refrigerante e,
nell’isolamento, gas. Il refrigerante e i gas devono essere
smaltiti in modo appropriato. Non danneggiare i tubi del
circuito del refrigerante prima che l’apparecchio sia
stato smaltito in modo appropriato.
Classe di clima Temperatura ambiente
ammessa
SN da +10 °C a 32 °C
N da +16 °C a 32 °C
ST da +16 °C a 38 °C
T da +16 °C a 43 °C
Nicchia
L’apparecchio deve essere incassato in una nicchia
appropriata.
La nicchia deve essere predisposta servendosi di una
livella a bolla d’aria. Inoltre, deve essere fissata in modo
stabile ai mobili attigui o alla parete.
La nicchia deve essere dotata di sufficienti aperture di
aerazione nello zoccolo anteriore e nella parte superiore
del mobile.
60
Page 61

Ventilazione
Allacciamento elettrico
Non coprire per nessun motivo le aperture di aerazione
nello zoccolo anteriore e nella parte superiore del
mobile, altrimenti il motore di raffreddamento dovrebbe
lavorare di più e questo comporterebbe un maggior
consumo energetico.
Rispettare assolutamente le dimensioni seguenti:
Profondità del pozzo di aerazione nel retro del mobile:
min. 38 mm
Sezioni trasversali di aerazione nello zoccolo del mobile
e nella parte superiore del mobile:
min. 200 cm
2
Trasporto dell’apparecchio
!
Avvertenza!
Pericolo di lesioni a causa dei pannelli in vetro!
Se trasportati a un’altezza superiore a 1500 m, i
pannelli in vetro della porta possono infrangersi. I
frammenti sono appuntiti e possono causare lesioni
serie.
Trasportare l’apparecchio provvisto di imballaggio e in
verticale.
La presa per il collegamento dell’apparecchio deve
essere accessibile senza impedimenti. Collegare
l’ apparecchio a corrente alternata a 220 − 240 V/50 Hz
mediante una presa installata a norma. La presa di
corrente deve essere protetta con un interruttore
salvavita 10 A − 16 A.
Non utilizzare alcun cavo di prolunga o ripartitore.
Per gli apparecchi destinati all’uso in paesi
extraeuropei, è necessario verificare sulla targhetta
d’identificazione se la tensione e il tipo di corrente
indicati corrispondono ai valori della rete elettrica
locale. La targhetta d’identificazione si trova in
basso a sinistra nell’apparecchio. L’eventuale
sostituzione del cavo di alimentazione deve essere
eseguita solo da un tecnico specializzato.
!
Avvertenza!
Non collegare in nessun caso l’apparecchio a prese
elettroniche a risparmio energetico (ad es. Ecoboy;
Sava Plug) e a invertitori che convertono la corrente
continua in corrente alternata di 230-V (ad es.
impianti solari, reti elettriche navali).
Indicazione!
Al fine di proteggere la porta in vetro, rimuovere i
fermi di trasporto solo quando l’apparecchio si
trova nella nicchia.
In caso di successivi trasporti, applicare nuovamente i
fermi.
61
Page 62

Installazione dell’apparecchio
Se necessario, sostituire l’apertura della porta
!
Avvertenza!
Pericolo di lesioni a causa di porte pesanti!
Per sostituire le porte in vetro occorrono due persone.
1
1.
2
2.
3.
5
10.
11.
13.
12.
6
15.
12.
17.
14.
16.
3
4.
5.
4
9.
6.
7.
8.
7
19.
18.
8
20.
62
Page 63

Dimensioni di ingombro
max. 2100
min. 200 cm
2
1221−
1225
min. 38
560−570
min.
550
min. 38
1218
557
502
58
592
113
49
3
1229
min. 200 cm
Fissaggio e montaggio
1. Rimuovere il cavo di alimentazione dal lato
posteriore dell’apparecchio.
2. Togliere anche il supporto del cavo (per evitare
rumori dovuti alle vibrazioni).
3. Servendosi di uno spago, spostare il cavo di
alimentazione in modo tale che dopo il montaggio
sia semplice collegare l’apparecchio.
450
103
100
2
5. Avvitare completamente i piedini.
5
4. Inserire l’apparecchio nella nicchia per 2/3 facendo
attenzione che il cavo non rimanga impigliato.
63
Page 64

6. Per pareti di mobili di spessore pari a 16 mm:
Inserire il distanziatore all’esterno della cerniera
superiore.
Non coprire il foro!
7. Applicare la mascherina sui fori predisposti sul lato
superiore dell’apparecchio e fissarla con le 3 viti
(3,5 x 9,5 mm in dotazione aggiuntiva).
9. Inserire l’apparecchio nella nicchia finché la battuta
d’arresto delle cerniere inferiori non si trova a
contatto con il bordo anteriore della parete del
mobile.
8. Accorciare il bordo di rivestimento in base all’altezza
della nicchia e applicarlo nella parete laterale
dell’apparecchio sul lato di apertura.
10. Svitare i fermi di trasporto.
Conservare i fermi di trasporto per riutilizzarli in
futuro!
11. Fissare la squadretta di fissaggio avvitandola
all’apparecchio con le due viti del fermo di trasporto.
64
Page 65

12. Allineare l’apparecchio con i piedini posti sul lato di
apertura della porta:
La squadretta di fissaggio deve trovarsi a livello con
il bordo anteriore del fondo del mobile.
La distanza (x) tra il bordo anteriore della parete del
mobile e il bordo anteriore dell’apparecchio deve
essere sempre la stessa.
La cerniera superiore deve trovarsi di lato alla parete
del mobile.
Indicazione!
La chiave per la regolazione viene fornita in
dotazione con l’apparecchio.
15. Applicare la squadretta di fissaggio al fondo del
mobile con 2 viti (4 x 19 mm in dotazione aggiuntiva)
e ribaltarla.
16. Fissare la mascherina alla copertura del mobile con
2 viti (4 x 14 mm in dotazione aggiuntiva).
13. Fissare la cerniera superiore alla parete del mobile
con 1 vite (4 x 29 mm in dotazione aggiuntiva).
14. Fissare la cerniera inferiore al fondo del mobile con
2 viti (4 x 19 mm in dotazione aggiuntiva).
Indicazione!
Prima di montare la maniglia rimuovere la pellicola
protettiva. Le marcature superiori e inferiori incise
sulla porta dell’apparecchio non sono previste per il
montaggio della maniglia.
17. Fissare la maniglia avvitando le 2 viti (3,5 x 9,5 mm
in dotazione aggiuntiva) nella marcatura incisa sulla
porta dell’apparecchio. Applicare maggiore
pressione sulle viti per spingere la lamiera.
65
Page 66

Il nuovo apparecchio
4
1
2
3
1. Scomparto superiore
2. Maniglia
3. Scomparto inferiore
4. Illuminazione interna scomparto superiore
Pannello di comando
5
6
7
8
5. Pannello di comando
6. Illuminazione interna scomparto inferiore
7. Cassetti estraibili per bottiglie
8. Piedini
1234 5678 9 10
1. Tasto ON/OFF
2. Tasto Ventilazione
3. Tasto illuminazione interna
4. Tasto Alarm OFF
5. Simboli delle funzioni attive
Sicurezza bambino
6. Simbolo temperatura scomparto superiore
7. Simbolo temperatura scomparto inferiore
8. Tasto selezione scomparto inferiore
9. Tasti Più e Meno per la regolazione della
temperatura
10. Tasto selezione scomparto superiore
66
Ventilazione
Page 67

Attivazione apparecchio
Ventilazione
D Premere il tasto ON/OFF fino a quando il display
della temperatura non si illumina.
Impostazione della temperatura
È possibile impostare la temperatura di entrambi gli
scomparti in modo indipendente l’uno dall’altro, entro
un campo compreso tra +5 °C e +20 °C. Si consiglia di
impostare la temperatura su valori compresi tra +8 °C e
+12 °C.
Per la conservare il vino per periodi di tempo prolungati,
occorre attivare la ventilazione.
La ventilazione crea una climatizzazione interna che
corrisponde a quella di una cantina.
L’umidità dell’aria incrementata in questo modo
impedisce la disidratazione dei tappi.
Attivare la ventilazione:
D Premere il tasto Ventilazione. Nel display viene
visualizzato il simbolo corrispondente.
La ventilazione è sempre attiva.
Disattivare la ventilazione:
D Premere il tasto Ventilazione. Il simbolo della
ventilazione nel display si spegne.
La ventilazione si attiva solo quando è in funzione il
compressore.
D Premere il tasto di selezione scomparto superiore o
scomparto inferiore. Il simbolo della temperatura
corrispondente lampeggia.
D Impostare la temperatura servendosi dei tasti Più o
Meno:
Tasto Più: Aumentare la temperatura
(più caldo)
Tasto Meno: Diminuire la temperatura
(più freddo)
A ogni pressione del tasto il valore di impostazione varia
di 1 °C.
Dopo ca. 5 secondi dall’ultima pressione del tasto, si
accende il simbolo della temperatura indicando la
temperatura attuale.
Allarme temperatura
Il segnale acustico aiuta a proteggere i vini da
temperature non idonee.
Viene emesso quando all’interno la temperatura è
troppo bassa o troppo elevata. Contemporaneamente il
display della temperatura lampeggia.
Se si lascia aperta la porta per oltre 60 secondi, il
segnale acustico suona in modo continuo.
Disattivazione dell’allarme:
D Premere il tasto Allarme-OFF.
Il display della temperatura continua a lampeggiare
fino a quando lo stato di allarme non è terminato.
67
Page 68

Sicurezza bambino
La sicurezza bambino permette di impedire che
l’apparecchio venga disattivato inavvertitamente.
1. Premere il tasto Ventilazione per ca. 5 secondi. Nel
display lampeggia una c" a indicare la sicurezza
bambini o una h" per l’illuminazione interna.
5 s
1. 2.
2. Premere il tasto Meno finché il display non visualizza
c".
3. Premere il tasto Ventilazione. Nel display lampeggia
c1" o c0".
5. Premere il tasto Ventilazione per confermare il valore
che lampeggia.
5.6.
6. Premere il tasto ON/OFF per abbandonare la
modalità impostazione.
Luminosità del display
1. Premere il tasto Ventilazione per ca. 5 secondi. Nel
display lampeggia una h" a indicare l’illuminazione
interna o una c" per la sicurezza bambini.
3. 4.
4. Attivare o disattivare la sicurezza bambini servendosi
dei tasti Più o Meno:
c0": Sicurezza bambini disattivata
c1": Sicurezza bambini attivata.
Quando la sicurezza bambini è attivata, sul display
compare il simbolo di un lucchetto.
5 s
1. 2.
2. Premere il tasto Meno finché il display non
visualizza h".
68
Page 69

LED illuminazione interna
3. Premere il tasto Ventilazione. Nel display lampeggia
il valore di luminosità attuale.
3. 4.
4. Regolare la luminosità del display servendosi dei
tasti Più o Meno:
h1": luminosità minima
fino a
h5": luminosità massima.
5. Premere il tasto Ventilazione per confermare il valore
che lampeggia.
Un’illuminazione LED con effetto di oscuramento che
non richiede manutenzione è integrata sia nello
scomparto superiore che in quello inferiore.
Quando si apre la porta, la luminosità viene aumentata
da 0 al valore di intensità massimo impostabile. Alla
chiusura della porta, avviene il processo inverso.
Attenzione, illuminazione LED!
Raggio laser classe 1M (norma IEC 60825). Non
guardare direttamente il raggio laser con strumenti
ottici. Pericolo di danno agli occhi! Gli interventi di
riparazione del raggio laser vanno eseguiti
esclusivamente dal servizio di assistenza clienti o
da tecnici specializzati autorizzati.
5.6.
6. Dopo aver effettuato le modifiche sul display
abbandonare la modalità impostazione premendo il
tasto ON/OFF e chiudere la porta.
Dopo ca. 1 min. viene acquisito il valore impostato
per la luminosità.
Luminosità massima impostabile singolarmente:
1. Premere il tasto dell’illuminazione interna.
2. Tenere premuto il tasto dell’illuminazione interna e
impostare la luminosità massima servendosi dei tasti
Più e Meno:
Tasto Più: più luminoso
Tasto Meno: meno luminoso.
Se si desidera rendere visibile il contenuto del frigorifero
cantina è possibile attivare l’illuminazione interna in
modo permanente:
D Premere il tasto dell’illuminazione interna.
D Per attivare l’illuminazione permanente, premere di
nuovo il tasto dell’illuminazione interna.
69
Page 70

Dotazione
Cassetti estraibili per bottiglie
I cassetti estraibili per bottiglie permettono di prelevare
comodamente le bottiglie di vino.
I cassetti estraibili si possono rimuovere ai fini della
pulizia.
Suggerimenti pratici per la conservazione del vino
D Conservare le bottiglie di vino prive di scatola o carta
di confezionamento.
D Disporre le bottiglie vecchie in modo che il tappo
resti inumidito. Tra il tappo e il vino non deve mai
esservi dell’aria.
D Prima di consumarlo,"scaldare" lentamente il vino
(portarlo alla temperatura ambiente):
Per ottenere una temperatura ideale, prelevare, ad
esempio, un vino rosato ca. 2 − 5 ore prima di
servirlo e un vino rosso ca. 4 − 5 ore prima. I vini
bianchi si possono invece servire direttamente.
Prima di essere serviti, spumanti e champagne
vanno raffreddati brevemente nel frigorifero.
D Tenere presente che i vini andrebbero sempre
conservati a una temperatura leggermente inferiore
a quella ideale di servizio, in quanto una volta versati
nel bicchiere si scaldano subito di 1 o 2 ºC!
Schema di disposizione delle bottiglie
Capacità: 64 bottiglie
(bottiglie di bordeaux da 0,75 l)
Temperature di servizio
Una temperatura di servizio corretta permette di gustare
il sapore autentico di un vino.
Si consiglia di servire il vino alle temperature seguenti:
Tipo di vino Temperatura di
servizio
Bordeaux rosso pregiato 18 ºC
Côtes du Rhône rosso/Barolo 17 ºC
Borgogna rosso/Bordeaux rosso
pregiato
Porto 15 ºC
Borgogna giovane rosso 14 ºC
Vini rossi giovani 12 ºC
Beaujolais giovane/tutti i vini
bianchi con poco zucchero residuo
Vini bianchi
invecchiati/Chardonnay pregiato
Sherry 9 ºC
Vini bianchi giovani di vendemmia
tardiva
Vin bianchi della
Loira/Entre-deux-Mers
16 ºC
11 ºC
10 ºC
8 ºC
7 ºC
70
Page 71

Ricambio dell’aria mediante il filtro a
carbone attivo
I vini si modificano a seconda delle condizioni
ambientali, di conseguenza la qualità dell’aria è
fondamentale ai fini della conservazione. Per questo
motivo, sia lo scomparto superiore che quello inferiore
sono dotati di un filtro a carbone attivo collocato
internamente al pannello posteriore del frigorifero.
Si consiglia di sostituire il filtro una volta all’anno. I filtri a
carbone attivo sono disponibili presso il servizio di
assistenza clienti o i rivenditori GAGGENAU.
Sostituzione del filtro a carbone attivo:
1. Afferrare il filtro a carbone attivo dalla maniglia e
ruotarlo di 90° verso destra o verso sinistra.
Disattivazione dell’apparecchio
3 s
D Premere il tasto ON/OFF per circa 3 secondi finché
il display della temperatura non si spegne.
Sospendere l’uso dell’apparecchio
2. Estrarre il filtro a carbone attivo.
3. Inserire un filtro a carbone attivo nuovo mantenendo
la maniglia in posizione verticale.
4. Afferrare il filtro a carbone attivo dalla maniglia e
ruotarlo di 90° verso destra o verso sinistra fino
all’arresto.
Sbrinamento
Se non si utilizza l’apparecchio per un periodo di tempo
prolungato, procedere come segue:
1. Spegnere l’apparecchio.
2. Estrarre la spina di alimentazione oppure disinserire
il dispositivo di sicurezza!
3. Pulire l’apparecchio.
4. Lasciare la porta aperta per evitare la formazione di
odori.
Pulizia dell’apparecchio
!
Avvertenza!
Non pulire mai l’apparecchio con una pulitrice a
vapore! Il vapore può raggiungere componenti sotto
tensione dell’apparecchio e provocare un
cortocircuito o una scarica elettrica. Il vapore può
inoltre danneggiare le superfici in materiale
sintetico.
L’apparecchio si sbrina automaticamente. L’umidità
accumulatasi viene incanalata verso l’esterno attraverso
lo scarico della condensa fino al recipiente di raccolta.
Qui la condensa evapora grazie al calore del
compressore.
Non lavare mai i cassetti e i ripiani in lavastoviglie in
quanto potrebbero deformarsi.
Non utilizzare detergenti abrasivi, solventi o
contenenti acidi.
1. Spegnere l’apparecchio.
2. Estrarre la spina di alimentazione oppure disinserire
il dispositivo di sicurezza!
3. Pulire l’apparecchio con un panno morbido, acqua
tiepida e un po’ di detersivo con pH neutro. Non
lasciare penetrare l’acqua negli elementi di
comando o di illuminazione.
71
Page 72

Rumori di funzionamento
4. Per la pulizia della porta in vetro, utilizzare un
detergente per vetri e un panno morbido.
5. Lavare la guarnizione della porta solo con acqua
pulita e asciugarla con cura.
6. Rimuovere lo sporco sulle aperture di ventilazione
con un aspirapolvere.
7. Rimuovere i residui presenti nel foro di scarico con
un oggetto sottile, ad esempio un bastoncino
d’ovatta.
8. Dopo la pulizia: inserire la spina o attivare il
dispositivo di sicurezza.
Pulizia delle superfici in acciaio inossidabile
Pulire le superfici in acciaio inossidabile utilizzando il
detergente Chromol".
Questo detergente è reperibile in commercio con il
nome Chromol" o è disponibile presso il servizio di
assistenza clienti con
Codice ID 310359 in confezioni da 500 ml e
Rumori normali
Ronzio − il compressore sta funzionando. Ventola del
sistema di aerazione in funzione.
Rumori simili a un gorgoglio − il refrigerante scorre nei
tubi.
Scatto− Inserimento o disinserimento del compressore
(motore).
Eliminazione dei rumori
L’apparecchio non si trova in pianon
Livellare l’apparecchio servendosi di una livella a bolla
d’aria (vedere "Installazione dell’apparecchio").
I ripiani estraibili vibrano o sono incastrati
Controllare gli elementi estraibili ed eventualmente
riposizionarli.
I contenitori si toccano
Allontanare leggermente le bottiglie o i contenitori l’uno
dall’altro.
Codice ID 166787 in confezioni di prova da 50 ml.
Per evitare di danneggiare le superfici, non utilizzare mai
spugnette abrasive, spazzole in metallo, oggetti
appuntiti e detergenti schiumosi. Evitare anche l’impiego
di detergenti chimici aggressivi come spray per lo
sbrinamento, spray per forni, solventi o antimacchia.
72
Page 73

Eliminazione di piccole anomalie
Prima di rivolgersi al servizio di assistenza tecnica:
Verificare se non è possibile eliminare autonomamente l’anomalia, sulla base delle seguenti indicazioni. I costi del
diritto di chiamata al servizio assistenza sono a carico del cliente − anche durante il periodo di garanzia!
Guasto
Temperatura diversa da
quella impostata.
L’apparecchio non ha
nessuna potenza refrigerante,
l’illuminazione interna e il
display sono spenti.
Il compressore si accende
sempre più spesso e più a
lungo.
Il compressore è in funzione
da molto tempo.
Possibili cause Rimedi
In alcuni casi si ripristina spegnendo
l’apparecchio per 5 minuti.
Se la temperatura è troppo alta, dopo qualche
ora controllare se vi sono variazioni.
Se la temperatura è troppo fredda, controllarla
di nuovo il giorno successivo.
Interruzione di corrente; il
dispositivo di sicurezza è scattato;
la spina di alimentazione non è ben
inserita.
La porta dell’apparecchio viene
aperta molto frequentemente.
Le aperture di aerazione sono
coperte.
L’apparecchio si trova troppo in
prossimità di fonti di calore oppure
la temperatura ambiente è troppo
elevata.
In caso di fabbisogno di freddo
ridotto, il compressore funziona a
basso regime.
Controllare che ci sia la corrente elettrica. Il
dispositivo di sicurezza deve essere attivo.
Non aprire la porta se non è necessario.
Eliminare gli ostacoli e lo sporco.
Vedere il capitolo "Luogo di installazione".
In questo modo, sebbene la durata di
funzionamento aumenti, si risparmia energia.
Questo procedimento è normale nei modelli a
risparmio energetico.
Muffa sulle bottiglie di vino. Come avviene con altri metodi di
conservazione, a seconda del tipo
di adesivo utilizzato per le etichette,
può formarsi uno strato leggero di
muffa.
La temperatura non è
sufficientemente fredda.
L’illuminazione interna non
funziona.
Il display della temperatura
visualizza un valore
compreso tra F0 e F5.
Le aperture di aerazione sono
coperte.
La porta dell’apparecchio non è
chiusa correttamente.
La porta dell’apparecchio viene
aperta molto frequentemente.
L’apparecchio si trova troppo in
prossimità di fonti di calore oppure
la temperatura ambiente è troppo
elevata.
L’apparecchio è spento. Accendere l’apparecchio.
L’illuminazione interna è difettosa
oppure la copertura è danneggiata.
Guasto all’apparecchio. Rivolgersi immediatamente al servizio
Rimuovere con cura l’adesivo dalle bottiglie.
Eliminare gli ostacoli e lo sporco.
Chiudere la porta dell’apparecchio.
Non aprire la porta se non è necessario.
Vedere il capitolo "Luogo di installazione".
Rivolgersi immediatamente al servizio
assistenza!
assistenza!
73
Page 74

Servizio di assistenza tecnica
Controllare la possibilità di risolvere i guasti sulla base
delle procedure descritte nella sezione "Eliminazione di
piccole anomalie". Per trovare il servizio assistenza più
vicino consultare la guida telefonica o il relativo elenco.
Si prega di indicare al servizio di assistenza clienti la
sigla del prodotto (E-N.) e il numero di
fabbricazione (FD-N.) dell’apparecchio.
Si prega di contribuire a evitare interventi inutili,
indicando il codice del prodotto e il numero di
fabbricazione. In questo modo si risparmiano i relativi
costi.
Questi dati sono riportati sulla targhetta.
E−N. FD−N.
74
Page 75

Inhoud
Gefeliciteerd 76 . . . . . . . . . . . . . . . . . . . . . . . . . . . . . .
Veiligheidsbepalingen en waarschuwingen 76 . . .
Voordat u het apparaat in bedrijf neemt 76 . . . . . . . .
Technische veiligheid 76 . . . . . . . . . . . . . . . . . . . . . . . .
Bij gebruik 77 . . . . . . . . . . . . . . . . . . . . . . . . . . . . . . . . .
Kinderen in het gezin 77 . . . . . . . . . . . . . . . . . . . . . . . .
Algemene bepalingen 77 . . . . . . . . . . . . . . . . . . . . . . .
Aanwijzingen over de afvoer 77 . . . . . . . . . . . . . . . .
Afvoeren van de verpakking 77 . . . . . . . . . . . . . . . . . .
Afvoeren van het oude apparaat 78 . . . . . . . . . . . . . .
Plaatsingsinstructies 78 . . . . . . . . . . . . . . . . . . . . . . .
Opstellingsplaats 78 . . . . . . . . . . . . . . . . . . . . . . . . . . .
Klimaatklassen 78 . . . . . . . . . . . . . . . . . . . . . . . . . . . . .
Nis 78 . . . . . . . . . . . . . . . . . . . . . . . . . . . . . . . . . . . . . . .
Beluchting 79 . . . . . . . . . . . . . . . . . . . . . . . . . . . . . . . . .
Uitrusting 88 . . . . . . . . . . . . . . . . . . . . . . . . . . . . . . . . .
Flessenrekken 88 . . . . . . . . . . . . . . . . . . . . . . . . . . . . . .
Indelingstekening 88 . . . . . . . . . . . . . . . . . . . . . . . . . .
Praktische tips voor opslag van wijn 88 . . . . . . . . .
Drinktemperaturen 88 . . . . . . . . . . . . . . . . . . . . . . . . .
Luchtverversing via actiefkool filter 89 . . . . . . . . . .
Ontdooien 89 . . . . . . . . . . . . . . . . . . . . . . . . . . . . . . . .
Apparaat uitschakelen 89 . . . . . . . . . . . . . . . . . . . . .
Apparaat uit bedrijf nemen 89 . . . . . . . . . . . . . . . . .
Apparaat reinigen 89 . . . . . . . . . . . . . . . . . . . . . . . . . .
Onderhoudsinstructies voor roestvaststalen
oppervlakken 90 . . . . . . . . . . . . . . . . . . . . . . . . . . . . . .
Toestel transporteren 79 . . . . . . . . . . . . . . . . . . . . . . . .
Elektrische aansluiting 79 . . . . . . . . . . . . . . . . . . . . . . .
Inbouw van het apparaat 80 . . . . . . . . . . . . . . . . . . .
Deuraanslag indien nodig wisselen 80 . . . . . . . . . . . .
Inbouwmaten 81 . . . . . . . . . . . . . . . . . . . . . . . . . . . . . .
Bevestiging en montage 81 . . . . . . . . . . . . . . . . . . . . .
Uw nieuwe apparaat 84 . . . . . . . . . . . . . . . . . . . . . . .
Bedieningspaneel 84 . . . . . . . . . . . . . . . . . . . . . . . . . .
Apparaat inschakelen 85 . . . . . . . . . . . . . . . . . . . . . .
Temperatuur instellen 85 . . . . . . . . . . . . . . . . . . . . . .
Ventilator 85 . . . . . . . . . . . . . . . . . . . . . . . . . . . . . . . . .
Temperatuuralarm 85 . . . . . . . . . . . . . . . . . . . . . . . . .
Geluid tijdens bedrijf 90 . . . . . . . . . . . . . . . . . . . . . . .
Heel normale geluiden 90 . . . . . . . . . . . . . . . . . . . . . . .
Geluiden voorkomen 90 . . . . . . . . . . . . . . . . . . . . . . . .
Kleine storingen zelf oplossen 91 . . . . . . . . . . . . . .
Servicedienst 92 . . . . . . . . . . . . . . . . . . . . . . . . . . . . . .
Kinderslot 86 . . . . . . . . . . . . . . . . . . . . . . . . . . . . . . . . .
Helderheid van de indicatie 86 . . . . . . . . . . . . . . . . .
Binnenverlichting LED 87 . . . . . . . . . . . . . . . . . . . . . .
75
Page 76

Gefeliciteerd
Veiligheidsbepalingen en waarschuwingen
Met de aankoop van uw nieuwe wijnklimaatkast heeft u
gekozen voor een modern, kwalitatief hoogwaardig
huishoudelijk apparaat.
Pas bij de juiste drinktemperaturen ontvouwen goede
wijnen hun aroma en hun smaak zodat u er optimaal
van kunt genieten. In uw wijnklimaatkast worden wijnen
langzaam en gelijkmatig op de ideale drinktemperatuur
gebracht. In twee onafhankelijk van elkaar instelbare
temperatuurzones kunnen tegelijkertijd rode− en witte
wijnen op de optimale drinktemperatuur worden
opgeslagen.
Uw nieuwe apparaat kenmerkt zich door een zuinig
energieverbruik.
Elk apparaat dat onze fabriek verlaat, wordt zorgvuldig
gecontroleerd op een perfecte toestand.
In geval van vragen − met name over het plaatsen en
aansluiten van het apparaat − staat onze servicedienst
graag tot uw beschikking, zie het hoofdstuk
servicedienst.
Voordat u het apparaat in bedrijf neemt
Lees de gebruiks− en montagehandleiding aandachtig
door!
Hier vindt u belangrijke informatie over het plaatsen, het
gebruik en onderhoud van het apparaat.
Bewaar alle documenten voor later gebruik of volgende
eigenaren.
Technische veiligheid
d Het apparaat bevat in een geringe hoeveelheid het
milieuvriendelijke maar brandbare koelmiddel R600a.
Let er op dat de leidingen van het koelmiddelcircuit bij
het transport of montage niet beschadigd raken.
Koelmiddel dat uit het apparaat spuit kan leiden tot
oogletsel of kan ontsteken.
In geval van beschadiging
D Open vuur of ontstekingsbronnen uit de buurt van
het apparaat houden,
Verdere informatie en een selectie van onze producten
vindt u op onze internetsite.
Lees a.u.b. de gebruiksaanwijzing, het
installatievoorschrift en alle andere meegeleverde
informatie over het apparaat door en handel zoals is
beschreven.
D netstekker uit stopcontact halen,
D ruimte enkele minuten goed luchten,
D contact opnemen met de servicedienst.
Des te meer koelmiddel er in een apparaat aanwezig is,
des te groter moet de ruimte zijn waarin het apparaat
staat. In te kleine ruimten kan bij een lek een brandbaar
gas−lucht−mengsel zich vormen.
Per 8 g koelmiddel moet de ruimte minimaal 1 m
zijn. De hoeveelheid koelmiddel in uw apparaat staat
vermeld op het typeplaatje aan de binnenkant van het
apparaat.
Het vervangen van de netaansluitkabel en andere
reparaties mogen uitsluitend door de servicedienst
worden uitgevoerd. Ondeskundige installaties en
reparaties kunnen een aanzienlijk gevaar opleveren voor
de gebruiker.
Laserstralen
3
groot
76
Het apparaat is uitgerust met een klasse 1M laser voor
de verlichting.
Gevaar voor oogletsel!
Niet met optische instrumenten direct in de laserstraal
kijken.
Reparaties aan de laser mogen uitsluitend door de
servicedienst of door geautoriseerde vakkrachten
worden uitgevoerd.
Page 77

Bij gebruik
Algemene bepalingen
D Nooit elektrische apparaten in het apparaat
gebruiken (bijv. verwarmingsapparaten, elektrische
ijsdispensers etc.). Explosiegevaar!
D Nooit het apparaat met een
stoomreinigingsapparaat ontdooien of reinigen! De
stoom kan bij de elektrische delen komen en leiden
tot een kortsluiting of elektrocutie.
Elektrocutiegevaar!
D Geen producten met brandbare drijfgassen
(bijv. spuitbussen) en geen explosieve stoffen
opslaan. Explosiegevaar!
D Plint, laden, deuren, etc. niet als opstapje of steun
misbruiken.
D Voor het ontdooien en de netstekker uit het
stopcontact trekken of zekering uitschakelen.
Aan de netstekker trekken, niet aan de
aansluitkabel.
D Alcohol van een hoog percentage uitsluitend
gesloten en staand opslaan.
D Kunststofdelen en deurafdichting niet met olie of vet
verontreinigen. Kunststofdelen en deurafdichting
worden anders poreus.
D Be− en ontluchtingsopeningen voor het apparaat
nooit afdekken of dichtmaken.
Dit apparaat is uitsluitend bestemd voor het opslaan van
wijn.
Het apparaat is uitsluitend bedoeld voor gebruik in
huishoudelijke sfeer.
Het apparaat is radio−ontstoord conform de EU-Richtlijn
2004/108/EC.
Het koelmiddelcircuit is op lekdichtheid gecontroleerd.
Dit product voldoet aan de geldende
veiligheidsbepalingen voor elektrische apparaten
(EN 60335/2/24).
Aanwijzingen over de afvoer
x Afvoeren van de verpakking
De verpakking beschermt het apparaat tegen
transportschade. Alle gebruikte materialen zijn
milieuvriendelijk en geschikt voor hergebruik. Werk
a.u.b. mee aan het: milieuvriendelijk afvoeren van het
verpakkingsmateriaal.
Informeer over de actuele afvoermethoden bij uw
vakhandelaar of gemeente.
D Dit toestel mag door personen met beperkte fysieke,
sensorische of psychische capaciteiten of
gebrekkige kennis alleen onder toezicht of na
uitvoerige instructies gebruikt worden.
Kinderen in het gezin
D Verpakking en delen daarvan niet in de buurt van
kinderen laten. Verstikkingsgevaar door karton en
folie!
D Het apparaat is geen speelgoed voor kinderen!
D Bij apparaat met deurslot: Sleutel buiten reikwijdte
van kinderen bewaren!
77
Page 78

Plaatsingsinstructies
x Afvoeren van het oude apparaat
Oude apparaten zijn geen waardeloos afval!
Door milieuvriendelijke afvoer kunnen waardevolle
grondstoffen worden teruggewonnen.
Dit apparaat is overeenkomstig de Europese
Richtlijn 2002/96/EG betreffende afgedankte
elektrische en elektronische apparatuur (waste
electrical and electronic equipment − WEEE)
gemarkeerd. De richtlijn vormt het kader voor een
EU−breed geldende inname en verwerking van
afgedankte apparaten.
d Bij afgedankte apparaten:
D Stekker uit het stopcontact halen.
D Aansluitkabel doorknippen en met de netstekker
verwijderen.
D Deuren demonteren.
D Leggers en lades niet uitnemen, om het voor
kinderen moeilijker te maken er in te klimmen!
Opstellingsplaats
Als opstellingsplaats is een droge, geventileerde ruimte
geschikt. De opstellingsplaats mag niet aan direct
zonlicht blootgesteld zijn en niet naast een warmtebron,
zoals een fornuis, een verwarmingstoestel enz. liggen. Is
een installatie naast een warmtebron niet te vermijden,
dan moet een geschikte isolatieplaat gebruikt worden of
moeten de volgende minimumafstanden tot de
warmtebron in acht genomen worden:
− 30 mm tot elektrische fornuizen,
− 300 mm van olie− of kolenfornuizen.
De vloer van de plaatsingsplek mag niet meeveren.
Vloer eventueel versterken.
Klimaatklassen
De klimaatklasse staat op het typeplaatje. Deze geeft
aan binnen welke ruimtetemperaturen het toestel
gebruikt kan worden.
D Kinderen niet laten spelen met afgedankte
apparaten. Verstikkingsgevaar!
Koel/vriesapparaten bevatten koelmiddel en gassen in
de isolatie. Koelmiddel en gassen moeten deskundig
worden afgevoerd. Leidingen van het koelmiddelcircuit
tot de deskundige afvoer niet beschadigen.
Klimaatklasse Toegestane
ruimtetemperatuur
SN +10 °C tot 32 °C
N +16 °C tot 32 °C
ST +16 °C tot 38 °C
T +16 °C tot 43 °C
Nis
Het apparaat moet in een geschikte nis worden
ingebouwd.
De nis moet zijn gesteld met een waterpas. De nis moet
stabiel zijn gemonteerd met het naastliggende meubel
of de wand.
De nis moet voldoen be− en ontluchtingsopeningen in
de plint voor en de meubelombouw.
78
Page 79

Beluchting
Elektrische aansluiting
In geen geval de be− en ontluchtingsopeningen in de
plint voor en in de meubelombouw afdekken. De
koelmotor moet dan meer presteren en dat leidt tot een
hoger stroomverbruik.
De volgende maten absoluut aanhouden:
Diepte van de ontluchtingsschacht op de achterwand
van het meubel:
min. 38 mm
Be− en ontluchtingsdoorsnede in de plint en ombouw
boven:
min. 200 cm
2
Toestel transporteren
!
Waarschuwing!
Letselgevaar door glasscherven!
Bij transport naar een hoogte van meer dan
1500 m kunnen de glaspanelen van de deur
breken. De scherven zijn scherp en kunnen leiden
tot ernstig letsel.
Het apparaat ingepakt en staand transporteren.
Het stopcontact voor de aansluiting van het toestel
moet vrij toegankelijk zijn. Het toestel via een
reglementair geïnstalleerd stopcontact op
220 −240 V/50 Hz wisselstroom aansluiten. De
contactdoos moet zijn gezekerd met een 10-A- tot
16-A-zekering.
Geen verlengsnoeren of verdeelstekkers gebruiken.
Bij apparaten die in niet Europese landen worden
gebruikt, kan op het typeplaatje worden nagekeken
of de aangegeven spanning en stroomtype
overeenkomen met de waarden van uw stroomnet.
Het typeplaatje bevindt zich in het apparaat
linksonder. Een eventueel noodzakelijke vervanging
van de netaansluitkabel mag uitsluitend door een
vakman worden uitgevoerd.
!
Waarschuwing!
In geen geval mag het apparaat worden aangesloten
op een elektronische energiebesparingsstekker (bijv.
Ecoboy; Sava Plug) en een omvormer, die
gelijkstroom omvormen in 230-V wisselstroom (bijv.
zonne−installaties, boordnetten op schepen).
Aanwijzing!
Ter bescherming van de glasdeur de
transportborging pas verwijderen wanneer het
apparaat in de nis staat.
Voor elk transport de transportborging aanbrengen.
79
Page 80

Inbouw van het apparaat
Deuraanslag indien nodig wisselen
!
Waarschuwing!
Letselgevaar door zware deuren!
Voor het vervangen van de glazen deuren zijn twee personen nodig.
1
1.
2
2.
3.
5
10.
11.
13.
12.
6
15.
12.
17.
14.
16.
3
4.
5.
4
9.
6.
7.
8.
7
19.
18.
8
20.
80
Page 81

Inbouwmaten
max. 2100
min. 200 cm
2
1221−
1225
min. 38
560−570
min.
550
min. 38
1218
557
502
58
592
113
49
3
1229
min. 200 cm
Bevestiging en montage
1. De aansluitkabel van de achterzijde van het
apparaat nemen.
2. De kabelhouder verwijderen (anders ontstaan er
trillingsgeluiden).
3. De aansluitkabel m.b.v. een kabel zo leggen, dat het
apparaat na de inbouw gemakkelijk kan worden
aangesloten.
450
103
100
2
5. De stelvoeten helemaal indraaien.
5
4. Het apparaat naar 2/3 in de nis schuiven. Daarbij de
aansluitkabel niet inklemmen.
81
Page 82

6. Bij 16 mm dikke meubelwanden:
Het afstandsstuk buiten op het bovenste scharnier
plaatsen.
Het gat niet afdekken!
7. De afdekplaat op de voorgeboorde gaten bovenop
het apparaat plaatsen en met de 3 schroeven
(3,5 x 9,5 mm, afzonderlijk meegeleverd) bevestigen.
9. Het apparaat in de nis schuiven, tot de aanslag van
het onderste scharnier tegen de voorrand van de
meubelwand ligt.
10. De transportborging losschroeven.
De transportborging voor een eventueel volgend
transport bewaren!
8. De afdekstrip inkorten op de hoogte van de nis en
op de deuropeningszijde op de zijwand van het
apparaat vastplakken.
11. Het bevestigingsplaatje met de twee schroeven van
de transportborging op het apparaat vastschroeven.
82
Page 83

12. Het apparaat met de stelvoet aan de
deuropeningszijde waterpas stellen:
Het bevestigingsplaatje moet niet uitsteken bij de
voorrand van de onderplaat van het meubel.
De afstand (x) tussen de voorrand van de
meubelwand en de voorkant van het apparaat moet
overal even groot zijn.
Het bovenste scharnier moet aan de zijkant tegen
de meubelwand liggen.
Aanwijzing!
De sleutel voor het horizontaal stellen is
meegeleverd met het apparaat.
15. Het bevestigingsplaatje met 2 schroeven
(4 x 19 mm, afzonderlijk meegeleverd) om de
bodem van het meubel vastschroeven en
dichtklappen.
16. De afdekplaat met 2 schroeven (4 x 14 mm,
afzonderlijk meegeleverd) op het plafond van het
meubel vastschroeven.
13. Het bovenste scharnier met 1 schroef (4 x 29 mm,
afzonderlijk meegeleverd) vastschroeven aan de
meubelwand.
14. Het onderste scharnier met 2 schroeven
(4 x 19 mm, afzonderlijk meegeleverd)
vastschroeven aan de meubelbodem.
Aanwijzing!
Voor de montage van de greep de beschermende
folie verwijderen. De bovenste en onderste
centermarkering op de apparaatdeu is niet voor de
greepmontage.
17. De greep met steeds 2 schroeven (3,5 x 9,5 mm uit
aparte verpakking) door de centermarkering van de
apparaatdeur vastschroeven. De schroeven met
meer druk aanzetten, om door het plaatwerk te
gaan.
83
Page 84

Uw nieuwe apparaat
4
1
2
3
1. Bovenste compartiment
2. Greep
3. Onderste compartiment
4. Binnenverlichting bovenste compartiment
Bedieningspaneel
5
6
7
8
5. Bedieningspaneel
6. Binnenverlichting onderste compartiment
7. Flessenrekken
8. Stelvoeten
1234 5678 9 10
1. Aan/uit-toets
2. Ventilatortoets
3. Toets binnenverlichting
4. Alarm-uit-toets
5. Indicatie voor ingeschakelde functies
Kinderslot
6. Temperatuuraanwijzing bovenste compartiment
7. Temperatuuraanwijzing onderste compartiment
8. Selectietoets onderste compartiment
9. Plus- en mintoetsen voor de temperatuurinstelling
10. Selectietoets bovenste compartiment
84
Ventilator
Page 85

Apparaat inschakelen
Ventilator
D Aan/uit toets indrukken, tot de temperatuurindicatie
aan gaat.
Temperatuur instellen
De temperatuur kan in beide compartimenten
onafhankelijk van elkaar worden ingesteld in het bereik
van +5 °C t/m +20 °C. Wij raden een instelling aan
tussen de +8 °C tot +12 °C.
Voor een langdurige opslag van de wijn moet de
ventilator worden ingeschakeld.
De ventilator creëert een klimaat in het apparaat dat
overeenkomt met het klimaat van een wijnkelder.
De daardoor verhoogde luchtvochtigheid voorkomt het
uitdrogen van de kurken.
Ventilator inschakelen:
D Druk op de ventilator-toets. Op het display verschijnt
het ventilatorsymbool.
De ventilator draait continu.
Ventilator uitschakelen:
D Druk op de ventilator-toets. Op het display dooft het
ventilatorsymbool.
De ventilator draait nu alleen wanneer het
koelaggregaat draait.
D Selectietoets van het bovenste of onderste
compartiment indrukken. De betreffende
temperatuuraanwijzing knippert.
D Met de plus− of mintoets de temperatuur instellen:
Plus-toets: Temperatuur verhogen (warmer)
Min−toets: Temperatuur verlagen (kouder).
Bij elke keer indrukken van de toets verandert de
instelwaarde verandert de instelwaarde met een stap
van 1 °C.
Ca. 5 seconden nadat voor het laatst een toets is
ingedrukt schakelt de temperatuurweergave om en
geeft de actuele temperatuur weer.
Temperatuuralarm
Het waarschuwingssignaal helpt u uw wijnen te
beschermen tegen ontoelaatbare temperaturen.
Het klinkt wanneer het in het apparaat te koud, resp. te
warm is. Tegelijkertijd knippert de temperatuurindicatie.
Het signaal klinkt altijd wanneer de deur langer dan
60 seconden geopend is.
Alarm uitschakelen:
D Op de alarm-uit toets drukken.
De temperatuurindicatie knippert net zo lang totdat
de alarmtoestand is opgeheven.
85
Page 86

Kinderslot
Met het kinderslot kan het apparaat worden beveiligd
tegen ongewenst uitschakelen.
1. Ventilator-toets ca. 5 seconden ingedrukt houden.
Op het display knippert een c" voor het kinderslot
of een h" voor de binnenverlichting.
5 s
1. 2.
2. Op de min−toets drukken totdat op het display een
c" verschijnt.
3. Druk op de ventilator-toets. Op het display knippert
c1" of c0".
5. Druk op de ventilatortoets om de knipperende
waarde te bevestigen.
5.6.
6. Druk op de aan/uit−toets om de instelmodus te
verlaten.
Helderheid van de indicatie
1. Ventilator-toets ca. 5 seconden ingedrukt houden.
Op het display knippert een h" voor de
binnenverlichting of een c" voor het kinderslot.
3. 4.
4. Met de plus− of mintoets het kinderslot in− of
uitschakelen:
c0": Kinderslot uitgeschakeld
c1": Kinderslot ingeschakeld.
Bij ingeschakeld kinderslot gaat het slotsymbool op
het display branden.
5 s
1. 2.
2. Min−toets indrukken, totdat het display h"
weergeeft.
86
Page 87

Binnenverlichting LED
3. Druk op de ventilator-toets. Op het display knippert
de actuele waarde voor de lichtsterkte.
3. 4.
4. Met de plus− en mintoets de lichtsterkte van het
display instellen:
h1": minimale lichtsterkte
tot
h5": maximale lichtsterkte.
5. Druk op de ventilatortoets om de knipperende
waarde te bevestigen.
In het bovenste en onderste compartiment is een
onderhoudsvrije LED−verlichting met dimeffect
geïntegreerd.
Bij het openen van de deur wordt de helderheid
langzaam van 0 tot de individueel instelbare, maximale
lichtsterkte verhoogd. Bij het sluiten van de deur vindt
hetzelfde effect in omgekeerde volgorde plaats.
Voorzichtig LED−verlichting!
Laserstralen van klasse 1M (norm IEC 60825). Niet
met optische instrumenten direct in de straling
kijken. Gevaar voor oogletsel! Reparaties aan de
laser mogen uitsluitend door de servicedienst of
door geautoriseerde vakkrachten worden
uitgevoerd.
5.6.
6. Na het wijzigen van het display a.u.b. de
instelmodus door op de aan/uit knop te drukken
verlaten en de deur sluiten.
Na ca. 1 minuut wordt de helderheid gewijzigd in de
ingestelde waarde.
Maximale lichtsterkte individueel instellen:
1. Druk op de binnenverlichtingtoets.
2. Toets van de binnenverlichting ingedrukt houden en
met de plus− en mintoetsen de maximale lichtsterkte
instellen:
Plustoets: helderder
Mintoets: donkerder.
3. Voor presentatiedoeleinden kan de binnenverlichting
ook continu worden ingeschakeld:
D Druk op de binnenverlichtingtoets.
D Voor het uitschakelen van de continue verlichting
nogmaals op de binnenverlichtingstoets drukken.
87
Page 88

Uitrusting
Praktische tips voor opslag van wijn
Flessenrekken
Door de flessenrekken kunnen wijnflessen gemakkelijk
uit het apparaat worden gehaald.
Voor het reinigen kunnen de flessenrekken uit het
apparaat worden gehaald.
Indelingstekening
D Flessenwijn uitgepakt − niet in kisten of dozen −
bewaren.
D Oude flessen moeten zo worden neergelegd dat de
kurk altijd nat blijft. Er moet nooit een luchtruimte
zijn tussen kurk en wijn.
D Voor het genieten moet de wijn langzaam op
temperatuur komen (chambreren):
Haal bijv. de rosé ca. 2 − 5 uur, de rode wijn
ca. 4 − 5 uur van te voren er uit, dan krijgt u de juiste
drinktemperatuur. Witte wijn daarentegen kan direct
worden geserveerd. Sect en Champagne moeten
kort voor gebruik in de koelkast worden gekoeld.
D Houd er rekening mee dat wijnen altijd iets onder
hun ideale seveertemperatuur gekoeld moeten zijn,
omdat ze bij het inschenken in het glas direct met
1 tot 2 ºC warmer worden!
Drinktemperaturen
Capaciteit: 64 flessen
(0,75 l Bordeauxflessen)
De juiste serveertemperatuur is doorslaggevend voor de
juiste smaak van de wijn en daarmee het drinkplezier.
Wij raden voor het serveren van de wijn de volgende
drinktemperaturen aan:
Wijnsoort Drinktemperatuur
Grote Bordeaux rood 18 ºC
Côtes du Rhône rood/Barolo 17 ºC
Gerenommeerde Burgunder
rood/Bordeaux rood
Port 15 ºC
Jonge Burgunder rood 14 ºC
Jonge rode wijnen 12 ºC
Jonge Beaujolais/alle witte wijnen
met weinig restzoet
Oude witte wijnen /
gerenommerde Chardonnay
Sherry 9 ºC
Jonge witte wijnen vanaf Spätlese 8 ºC
Witte wijnen
Loire/Entre-deux-Mers
16 ºC
11 ºC
10 ºC
7 ºC
88
Page 89

Luchtverversing via actiefkool filter
Wijnen ontwikkelen zich verder afhankelijk van de
omgevingsomstandigheden; daarbij is de kwaliteit van
de lucht doorslaggevend voor de conservering. Daarom
is in het bovenste en onderste compartiment in de
achterwand een actiefkool filter aangebracht.
Apparaat uitschakelen
Wij raden aan het actiefkool filter jaarlijks te vervangen.
De actiefkool filters kunnen via de servicedienst of een
GAGGENAU−dealer worden verkregen.
Actiefkool filter vervangen:
1. Het actiefkool filter aan de greep beetpakken met
90° naar rechts of links draaien.
2. Het actiefkool filter er uit trekken.
3 s
D Aan/uit toets ca. 3 seconden indrukken, tot de
temperatuurindicatie dooft.
Apparaat uit bedrijf nemen
Wanneer het apparaat voor langere tijd uit bedrijf wordt
genomen:
1. Apparaat uitschakelen.
2. Netstekker er uit trekken of zekering uitschakelen.
3. Apparaat reinigen.
4. Deur open laten, om geurvorming te voorkomen.
3. Nieuw actiefkool filter met de greep in verticale
positie plaatsen.
4. Het actiefkool filter bij de greep beetpakken en 90°
naar rechts of links draaien, totdat het filter vastklikt.
Ontdooien
Het apparaat ontdooit automatisch. Het vocht wordt via
de dooiwaterafvoer naar buiten in de
dooiwaterverdampingsschaal geleid. Daar verdampt het
dooiwater door de warmte van het koelaggregaat.
Apparaat reinigen
!
Waarschuwing!
Nooit het apparaat met een
stoomreinigingsapparaat reinigen! De stoom kan bij
stroomvoerende bereiken kortsluiting of elektrocutie
veroorzaken. De stoom kan kunststof oppervlakken
beschadigen.
Nooit rekken en onderdelen in de vaatwasser
reinigen. De delen kunnen daardoor vervormen.
Geen zand−, chloor− of zuurhoudende schoonmaak
en oplosmiddelen gebruiken.
1. Apparaat uitschakelen.
2. Netstekker er uit trekken of zekering uitschakelen.
3. Reinig het apparaat met een zachte doek,
lauwwarm water en een beetje ph−neutraal
afwasmiddel. Het schoonmaaksop mag niet in
het bedieningspaneel of verlichting komen.
89
Page 90

Geluid tijdens bedrijf
4. Glazen deur met gewone glasreiniger en zachte
poetsdoek schoonmaken.
5. Deurafdichting alleen met schoon water reinigen en
grondig droogwrijven.
6. Verontreinigingen aan de be− en
ontluchtingsopeningen met een stofzuiger
verwijderen.
7. Afzettingen in de afvoeropening met een dun
voorwerp, bijv. een wattenstaafje verwijderen.
8. Na het reinigen: Netstekker in het stopcontact
steken resp. zekering inschakelen.
Onderhoudsinstructies voor roestvaststalen oppervlakken
Voor het onderhouden van RVS−oppervlakken het
onderhoudsmiddel Chromol" gebruiken.
Het middel is in de handel verkrijgbaar onder de naam
Chromol" of bij uw servicedienst onder
Ident-nr. 310359 als 500 ml sproeiflacon en
Heel normale geluiden
Zoemen − koelaggregaat draait. Ventilator van het
circulatieluchtsysteem draait.
Borrelende, gonzende of gorgelende geluiden −
koelmiddel stroomt door de leidingen.
Klikken − Koelaggregaat (Motor) schakelt aan of uit.
Geluiden voorkomen
Het apparaat staat niet horizontaal
Apparaat met een waterpas stellen (zie "Inbouw van het
apparaat").
Flessenrekken niet stabiel of klemmen
Controleer de uitneembare flessenrekken en plaats deze
eventueel opnieuw.
Flessen/bakjes komen met elkaar in contact
Haal de flessen of bakjes iets uit elkaar.
Ident-nr. 166787 als 50 ml probeerflesje verkrijgbaar.
Om de oppervlakken niet te beschadigen, in geen geval
krassende sponzen, metalen borstels, scherpe
voorwerpen of schuurmiddelen gebruiken. Ook
chemisch agressieve reinigingsmiddelen zoals
ontdooisprays, ovensprays, oplosmiddelen of
vlekkenverwijderaars mag u niet gebruiken.
90
Page 91

Kleine storingen zelf oplossen
Voordat u contact opneemt met de klantenservice:
Controleer of u de storing op basis van de volgende instructies zelf kunt oplossen. U moet de kosten voor advies
door de klantenservice zelf dragen − ook tijdens de garantieperiode!
Storing
Temperatuur wijkt sterk af
van de instelling.
Het apparaat koelt niet, de
binnenverlichting en het
display gaan niet aan.
Het koelaggregaat schakelt
steeds vaker en langer in.
Mogelijke oorzaken Oplossing
In sommige gevallen is het afdoende wanneer
u het apparaat gedurende 5 minuten
uitschakelt.
Wanneer de temperatuur te hoog is,
controleer dan na enkele uren of een
temperatuurverandering heeft
plaatsgevonden.
Wanneer de temperatuur te laag is, controleer
dan de volgende dag opnieuw de
temperatuur.
Stroomuitval; de zekering is
aangesproken; de netstekker zit
niet goed in het stopcontact.
Frequent openen van de deur van
het apparaat.
De be− en ontluchtingsopeningen
zijn afgedekt.
Het apparaat staat te dicht bij een
warmtebron of de
omgevingstemperatuur is te hoog.
Controleer of er stroom aanwezig is. De
zekering moet geactiveerd zijn.
Deur van het apparaat niet onnodig openen.
Blokkades en verontreinigingen verwijderen.
Zie hoofdstuk "Plaatsingslocatie".
Het koelapparaat draait erg
lang.
Schimmel op de wijnflessen. Net als bij andere
De temperatuur is niet laag
genoeg.
De binnenverlichting gaat niet
aan.
Het koelapparaat schakelt bij een
geringe koudevraag naar een lager
toerental.
opslagmethoden, kan er
afhankelijk van het soort
etikettenlijm een lichte
schimmelvorming optreden.
De be− en ontluchtingsopeningen
zijn afgedekt.
De deur van het apparaat is niet
goed gesloten.
Frequent openen van de deur van
het apparaat.
Het apparaat staat te dicht bij een
warmtebron of de
omgevingstemperatuur is te hoog.
Het apparaat is uitgeschakeld. Het apparaat inschakelen.
De binnenverlichting is defect of de
afdekking is beschadigd.
Hoewel daardoor de draaitijd wordt verlengd,
wordt energie bespaard. Dat is normaal bij
energiebesparende modellen.
Resten lijm zorgvuldig verwijderen van de
flessen.
Blokkades en verontreinigingen verwijderen.
Sluit de deur van het apparaat.
Apparaatdeur niet onnodig openen.
Zie hoofdstuk "Plaatsingslocatie".
Absoluut contact opnemen met de
servicedienst!
De temperatuurindicatie geeft
F0 t/m F5 aan.
Apparaatstoring. Absoluut contact opnemen met de
servicedienst!
91
Page 92

Servicedienst
Controleer of u de storing aan de hand van de
aanwijzingen in het hoofdstuk "Kleine storingen zelf
verhelpen" kunt oplossen. Een servicedienst in uw buurt
kunt u vinden in het telefoonboek of in het overzicht met
de servicediensten.
Geef aan de Servicedienst het typenummer (E-Nr.) en
het fabricagenummer (FD-Nr.) van het apparaat door.
Help door het vermelden van het typenummer en
fabricagenummer mee met het voorkomen van
onnodige ritten. U bespaart de daaraan gerelateerde
extra kosten.
U kunt deze informatie vinden op het typeplaatje.
E−Nr. FD−Nr.
92
Page 93

Gaggenau Hausgeräte GmbH
Carl-Wery-Straße 34
D-81739 München
www.gaggenau.com
7084 544−00
9000 458 418
(9210)
 Loading...