


Gaggenau
en Operating instructions ..................2
fr Notice d’utilisation ......................18
es Instrucciones de uso ..................35
RW 414
RW 464
Wine storage compartment
Conservador de vinos
Cave à vin

en Table of Contents
enOperating instructions
Safety and warning information 3
Instructions on disposal 5
Installing the appliance 5
Ventilation 5
Connecting the appliance 6
Getting to know your appliance 7
Switching the appliance on 9
Set the language 9
Setting the temperature unit 9
Setting the temperature 9
Setting up the brightness of the display 9
Practical tips for storing wine 12
Drinking temperatures 12
Interior fittings 13
Switching off and disconnecting the
appliance 14
Defrosting 14
Cleaning the appliance 14
Odours 14
Light (LED) 15
Saving energy 15
Operating noises 15
Rectifying minor faults yourself 16
Special functions 10
Alarm function 11
Placing bottles in the refrigerator 12
Customer service 17
2

9 Safety and warning information
Safety and warning information. Definition
WARNING:
This indicates that death or serious injury may result due
to non-observance of this warning.
CAUTION:
This indicates that minor or moderately severe
injury may result due to non-observance of this
warning.
Before you switch on the appliance
Please read the instructions for use and installation
carefully. They contain important information on how
to install, use and maintain the appliance.
The manufacturer is not liable if you disregard the
instructions and warnings in the operating
instructions. Retain all documents for later use or for
the subsequent owner.
Technical safety
If the power cord of this appliance is damaged, it must
be replaced by the manufacturer, customer service
or a similarly qualified person. Improper installations
and repairs may put the user at considerable risk.
Repairs may be performed by the manufacturer,
customer service or a similarly qualified person only.
Only original parts supplied by the manufacturer may
be used. The manufacturer guarantees that only these
parts satisfy the safety requirements.
Important information when using
the appliance
▯ Never use electrical appliances inside the
appliance (e.g. heater, electric ice maker, etc.).
Explosion hazard!
▯ Never defrost or clean the appliance with a steam
cleaner! The steam may penetrate electrical parts
and cause a short-circuit. Risk of electric shock!
▯ Do not use pointed or sharp-edged implements to
remove frost or layers of ice. You could damage
the refrigerant tubes. Leaking refrigerant may
cause eye injuries or ignite.
▯ Do not store products which contain flammable
propellants (e.g. spray cans) or explosive
substances in the appliance. Explosion hazard!
▯ Do not stand on or lean heavily against base
of appliance, drawers or doors, etc.
▯ For defrosting and cleaning, pull the power cord
plug out or switch off the fuse. Do not pull out the
power cord plug by tugging on the power cord.
▯ Store high-percentage alcohol tightly closed and
standing up.
▯ Keep plastic parts and the door seal free of oil
and grease. Otherwise, parts and door seal will
become porous.
▯ Never cover or block the ventilation openings for
the appliance.
Do not use multiple outlets, extension leads or
adapters.
The appliance comes with a UL registered 3-wire
power cord.
Never sever or remove the third (earth) conductor
from the power cord.
The appliance requires a 3-pole socket. The socket
may be connected by an electrician only.
Where there is a 2-pole standard wall socket, it is the
personal responsibility of the customer to have this
socket replaced with a correctly grounded 3-pole wall
socket. Do not use any adapter plugs.
3

9 Safety and warning information
▯ Avoiding placing children and vulnerable
people at risk:
At risk are children, people who have limited
physical, mental or sensory abilities, as well as
people who have inadequate knowledge
concerning safe operation of the appliance.
Ensure that children and vulnerable people have
understood the hazards.
A person responsible for safety must supervise or
instruct children and vulnerable people who are
using the appliance.
Only children from 8 years and above may use the
appliance.
Supervise children who are cleaning and
maintaining the appliance.
Never allow children to play with the appliance.
Children in the household
▯ Keep children away from the packaging and its
parts.
Danger of suffocation from collapsible boxes and
foil!
▯ Do not allow children to play with the appliance!
▯ If the appliance features a lock:
keep the key out of the reach of children.
State of California Proposition 65
Warnings
This product can expose you to chemicals including
vinyl chloride, which is known to the State of
California to cause cancer and birth defects or other
reproductive harm. For more information go to
www.P65Warnings.ca.gov
General regulations
This appliance is designed exclusively for the storage
of wine.
This appliance is intended for use in the home
and the home environment.
The refrigeration circuit has been checked for leaks.
This appliance is intended for use at an elevation of
no more than 2000 meters above sea level.
4

Instructions on disposal
Installing the appliance
* Disposal of packaging
The packaging protects your appliance from damage
during transport. All utilized materials are
environmentally safe and recyclable. Please help us by
disposing of the packaging in an environmentally
friendly manner.
Please ask your dealer or inquire at your local
authority about current means of disposal.
* Disposal of your old appliance
Old appliances are not worthless garbage! Valuable
raw materials can be reclaimed by recycling old
appliances.
9 WARNING:
Redundant appliances
1. Pull out the mains plug.
2. Cut off the power cord and discard with the mains
plug.
3. Do not take out the trays and receptacles to
prevent children from climbing in!
4. To prevent children from locking themselves in
the redundant appliance:
Remove appliance doors!
5. Do not allow children to play with the redundant
appliance. Risk of suffocation!
Refrigerators contain refrigerant and gases in the
insulation. Refrigerant and gases must be disposed of
professionally. Ensure that tubing of the refrigerant
circuit is not damaged prior to proper disposal.
Have a technician install and connect the appliance
according to the enclosed installation instructions.
9 WARNING:
Do not install this appliance:
▯ outdoors,
▯ in an environment with dripping water,
▯ in rooms where there is a risk of frost.
Transport
The appliance is heavy. It must be secured during
transport and installation.
9 WARNING:
Due to the appliance's weight and dimensions and to
minimize the risk of injuries or damage to the
appliance, at least two people are needed for safe
installation of the appliance.
Installation location
A dry, well ventilated room is suitable as an
installation location. The installation location should
not be exposed to direct sunlight and not placed near
a heat source, e.g. a cooker, radiator, etc. If
installation near a heat source is unavoidable, use
a suitable insulating plate or observe the following
minimum distances to a heat source:
1
▯ 1
/4" (3 cm) to electric or gas cookers.
▯ 11
The floor of the installation location must not give way;
if required, reinforce floor.
13
/16" (30 cm) to oil or solid-fuel cookers.
Ventilation
The refrigeration unit is ventilated only via
the ventilation grille in the base. Never cover
the ventilation grille or place anything in front of it.
Otherwise the refrigeration unit must work harder,
increasing the power consumption.
5

Connecting the appliance
Have a technician install and connect the appliance
according to the enclosed installation instructions.
Do not remove the transportation protection devices
from the shelves and storage compartments until
the appliance has been installed.
In addition to the statutory national regulations,
observe the connection conditions of the local power
supply companies.
After installing the appliance, wait at least 1 hour until
the appliance starts up. During transportation the oil
in the compressor may have flowed into
the refrigeration system.
Before switching on the appliance for the first time,
clean the interior of the appliance (see chapter
“Cleaning the appliance”).
Electrical connection
9
WARNING:
Risk of electric shock!
Connect the appliance to a grounded, 3-phase outlet
only. Never remove the ground phase. Do not use any
adapters.Do not use any extension leads.
9 WARNING:
Risk of electric shock!
Incorrect connection of the appliance may result in
death, fire or electric shock. Improper connection of
the protective conductor may result in electric shock.
If you are in doubt as to whether the appliance has
been properly grounded, have it tested by a qualified
electrician or Customer Service technician.
9 WARNING:
Risk of electric shock!
If the length of the power cord is inadequate, never
use multiple outlets or extension leads. Instead,
please contact Customer Service for alternatives.
This appliance must be connected to a permanently
installed outlet.
The outlet must be near the appliance and also freely
accessible following installation of the appliance.
The appliance complies with protection class I.
Connect it to a correctly installed outlet. Correct
means: with a protective conductor, 110 V – 120 V/
60 Hz alternating current. The outlet must be
protected by a 10 A – 16 A fuse.
The appliance comes with a UL registered 3-wire
power cord. The appliance requires a 3-pole outlet.
Please observe the following table with regard to this:
Appliance Maximum simultaneous load
Wine refrigerator
Check on the rating plate whether the indicated
voltage and current type match the values of your
power supply. The position of the rating plate can be
found in the chapter entitled Customer Service.
2 A
9 WARNING:
Never connect the appliance to electronic energy
saver plugs.
Our appliances can be used with mains and sinecontrolled inverters. Mains-controlled inverters are
used for photovoltaic systems which are connected
directly to the national grid. Sine-controlled inverters
must be used for isolated applications (e.g. on ships
or in mountain lodges) which are not connected
directly to the national grid.
6
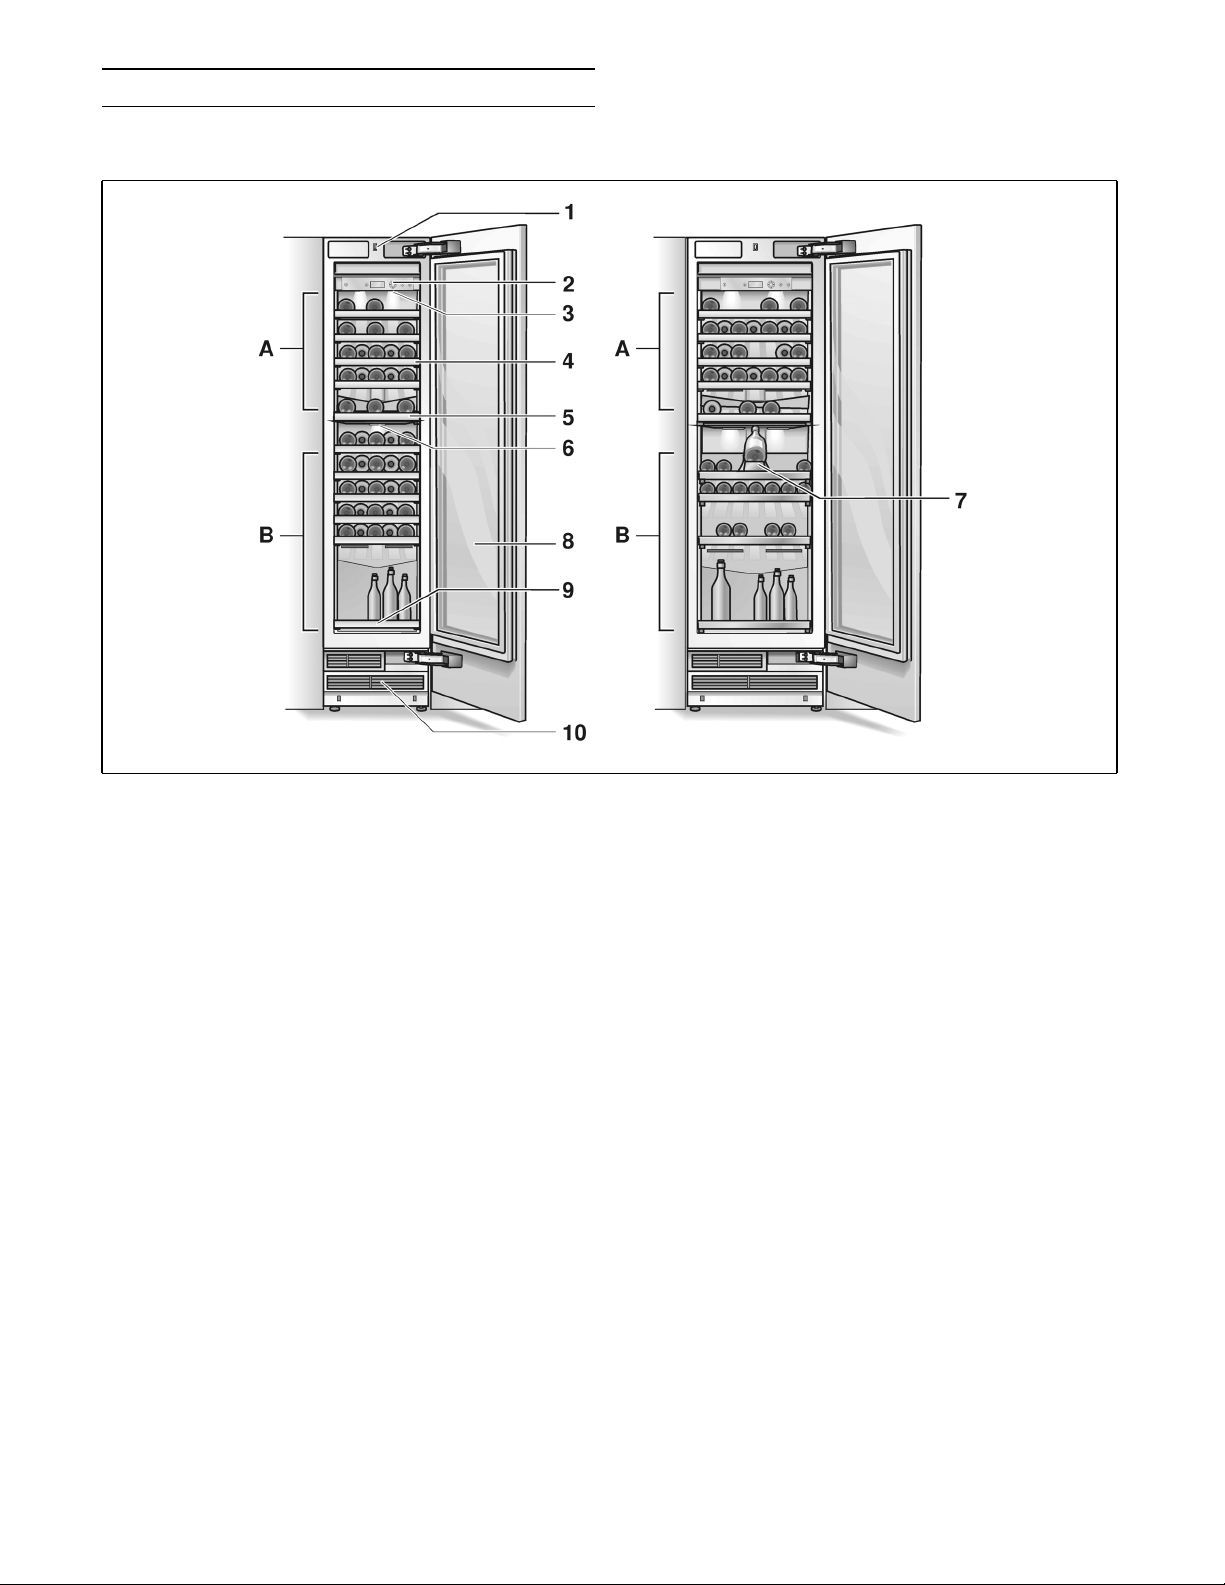
Getting to know your appliance
These operating instructions refer to several models. The diagrams may differ.
* Not all models.
A Upper climatic zone
B Lower climatic zone
1 Light switch
2 Operating controls
3 Light (LED) with switches
for presentation lights
4 Rack for wine bottles
5 Partition
6 Light (presentation light)
7 * Presentation attachment
8 Glass door
9 * Extendable shelf
10 Ventilation
7
Operating controls
A On/Off button ÿ
Serves to switch the whole appliance on and
off.
B Alarm button ±
Used to switch off the warning signal, see
chapter “Alarm function”.
C Display panel
The temperatures in both climatic zones
of the refrigerator compartment are shown
in the display panel. Activated special
functions are shown via “symbol”.
The menus and setting options which are
available are represented on the display panel
in the setup mode, see chapter “Special
functions”.
D Selection buttons ¾ ¿
The temperature setting is activated using
the selection buttons, see chapter “Setting
the temperature”.
For selecting a menu in the setup mode
(see chapter Special functions).
Note:
A sound can be heard every time a button is actuated
if this function is activated in the sound menu during
the setup mode.
Symbols in the display field
Display for the upper climatic zone.
Display for the lower climatic zone
Humidity function is activated (see
chapter “Special functions”, section
“Humidity function”).
Holiday mode is activated, see chapter
Special functions.
For the setting options in the set up
mode, see chapter Special functions.
A warning message is displayed,
see chapter Alarm function.
E Setting buttons +/–
The temperature can be changed using
the setting buttons (see chapter Setting
the temperature).
More settings can be selected in the setup
mode, see chapter Special functions.
F setup button μ
This button starts and ends the setup mode.
If the setup mode is ended using the setup
button, the changes which have been made
are stored.
G Holiday button 
Is used to switch vacation mode on and off
(see chapter Special functions, section
Vacation mode).
8

Switching the appliance on
Setting the temperature
Switch on the appliance with the On/Off button ÿ.
The appliance begins to cool. Light is switched on
when the door is open.
9 CAUTION:
Keep hands and fingers away from front and rear
openings of the refrigerator door when closing. Risk
of injury to hands or fingers.
Never allow children to climb on or play with
the refrigerator door.
Operating tips
When the appliance has been switched on, take
several hours until the set temperature been reached.
Set the language
The display languages can be changed according
to the table in the chapter Special functions, Setup
mode.
In order to change the display language:
The temperatures in both climatic zones can be set
independently of each other from +41 °F to +68 °F.
We recommend a setting of +51 °F.
1. Activate setup mode with the selection button ¿.
2. Select the required climatic zone.
3. Set the required temperature with the @ (warmer)
or A (cooler) setting buttons.
1. Press setup button μ.
2. Press the selection button ¾ or ¿, until the set
language is displayed.
3. Press the setting button @ or A , until the desired
language is displayed.
4. Press the setup button μ, in order to store
the settings. The set temperature is displayed
again in the display panel.
Setting the temperature unit
The temperature can be displayed in degrees Celsius
(°C) or degrees Fahrenheit (°F).
1. Press setup button μ.
The first menu (temperature unit) is displayed.
2. Press the @ or A setting button in order to switch
between degrees Fahrenheit (°F) and degrees
Celsius (°C).
3. Press the setup button μ, in order to store
the settings.
The set temperature is displayed again
in the display panel.
Setting up the brightness of the
display
You can specify how bright the display should appear
when the door is closed.
1. Open the door.
2. Press the light switch 1 and keep it pressed.
3. Use the +/– buttons to adjust the brightness.
4. Release the light switch 1.
5. Close the door.
The display will have the specified brightness.
9

Special functions
Switching off
Press setup button μ.
The following special functions can be selected
or displayed:
Setup mode
In Setup mode you can make your personal settings.
Switching on
Press setup button μ.
The first menu (temperature unit) is displayed
in the display panel.
Making settings
1. Switch on setup mode.
2. Press the selection button ¾ or ¿.
The next menu is displayed and its current setting
(mostly ON or OFF).
All of the changed settings are stored.
Note:
If no button is selected within 20 seconds, the setup
mode ends automatically. All of the changed settings
are stored. The set temperature is displayed again
in the display panel.
Menus in the setup mode
The following settings can be made.
Menu Possible setting
Temperature unit °C (degrees Celsius)
°F (degrees Fahrenheit)
Language Deutsch
English
French
Danish
Finnish
Greek
Dutch
Italian
Polish
Portuguese
Norwegian
Russian
Swedish
Spanish
Turkish
Czech
3. Press the setting button @ or A.
The setting is stored, if the next menu is selected
using ¾ or ¿.
10
Sound On
Humidity (lower climatic
zone)
Humidity (upper climatic
zone)
Off
On
Off
On
Off

Vacation mode
Humidity function
If absent for a prolonged period, you can switch the
appliance to energy-saving vacation mode.
When vacation mode is switched on:
▯ both climatic zones are set to a temperature
of 52 °F,
▯ the humidity function is switched off,
▯ the light is switched off.
Switching on
Press Holiday button ¶.
VACATION is displayed in the display panel.
Switching off
Press Holiday button ¶.
The previous settings and temperature values are
once again activated.
Rest mode
When Rest mode is switched on, the following
settings are switched off:
▯ Acoustic signal
▯ Interior light
▯ Messages on the display panel
▯ The background illumination of the display panel
is reduced
▯ Buttons are locked
The air humidity in both climatic zones can be
increased independently of each other.
Switching on
1. Press setup button μ.
2. Press selection button ¿ until HUMIDITY and
the current setting (ON/OFF) are displayed for
the particular climatic zone.
3. Press the setting button @, in order to change
the setting.
4. Press the setup button μ, in order to store
the setting.
HUMIDITY is displayed in the display panel.
Switching off
1. Press setup button μ.
2. Press selection button ¿ until HUMIDITY and
the current setting (ON/OFF) are displayed for
the particular climatic zone.
3. Press the setting button A, in order to change
the setting.
4. Press the setup button μ, in order to store
the setting.
HUMIDITY goes out on the display panel.
Alarm function
Switching off the warning signal
Press the alarm button ± to switch off the warning
signal.
Switching on
1. Press and hold down the setting button @.
2. Press Holiday button ¶.
3. Press setting button @ and hold down for
a further 3 seconds.
The VACATION symbol flashes on the display
panel and RESTMODE is displayed.
Switching off
Press Holiday button ¶.
The previous settings and temperature values are
once again activated.
Door alarm
The door alarm switches on if an appliance door is left
open for longer than three minutes. Close the door
to switch off the warning signal.
11

Placing bottles in the refrigerator
Storage example
:LQHVWRUDJHFRPSDUWPHQW :LQHVWRUDJHFRPSDUWPHQW
0D[VWRUDJHFDSDFLW\ 0D[VWRUDJHFDSDFLW\
ERWWOHV ERWWOHV
Practical tips for storing wine
▯ Unpack bottles of wine – do not leave in crates
or cardboard boxes – before storing
in the refrigerator compartment.
▯ Place old bottles so that the cork is always wet.
There should never be an air gap between
the wine and the cork.
▯ The open bottle shelves are especially suitable
because they do not interrupt the air circulation.
As a result, the atmospheric humidity which
condenses on the bottles quickly dries again.
▯ Before drinking your wine, let it stand until it
reaches room temperature: For example rosé
takes about two to five hours and red wine four
to five hours before they reach the right drinking
temperature. The wine will then be at the correct
drinking temperature. Sparkling wine and
Champagne should be cooled in the refrigerator
shortly before drinking.
▯ Remember that wine should always be cooled
slightly lower than the ideal serving temperature,
as its temperature increases as soon as it is
poured into a glass!
Drinking temperatures
The correct serving temperature is crucial for
the taste and therefore your enjoyment of the wine.
We recommend serving wine at the following drinking
temperatures:
Type of wine Drinking temperature
Bordeaux red 65 °F
Côtes du Rhône red/
Barolo
Burgundy red/ Bordeaux
red
Port 59 °F
Young Burgundy red 57 °F
Young red wine 54 °F
Young Beaujolais/all
white wines with little
residual sugar
Old white wines/Chardonnay
Sherry 49 °F
Young white wines from
late vintage
White wines Loire/Entre-
deux-Mers
64 °F
61 °F
52 °F
50 °F
46 °F
45 °F
12

Interior fittings
Presentation attachment
* Not all models.
Removing the shelves
You can take out and vary the shelves inside
the appliance.
You can take out or vary the attachment to suit your
requirements.
Door lock
* Not all models.
Extendable shelf
* Not all models.
For the storage of wine bottles standing up:
1. Remove the two lower shelves from the lower
climatic zone.
2. Insert the extendable shelf (optional accessory)
into the bottom rails.
A door lock, available as an accessory, can be used
to lock the wine fridge.
The door lock can be purchased from customer
service (see chapter Customer service) or from
a GAGGENAU dealer.
13
Switching off and disconnecting the
appliance
Switching the appliance off
Press the On/Off button ÿ .
Interior fittings
All variable parts of the appliance can be taken out for
cleaning (see chapter “Interior fittings”).
Odours
Refrigeration unit and light switch off.
Disconnecting the appliance
If you do not use the appliance for a prolonged period:
1. Switch off the appliance.
2. Pull out the mains plug or switch off the fuse.
3. Clean the appliance.
4. Leave the appliance door open.
Defrosting
Defrosting is actuated automatically.
Cleaning the appliance
9
CAUTION:
Do not use abrasive, chloride or acidic cleaning
agents or solvents.
If you experience unpleasant odors:
1. Switch the appliance off.
2. Take all food out of the appliance.
3. Clean interior (see chapter “Cleaning the
appliance”).
4. Clean all packages.
5. Switch the appliance on again.
6. Check whether the formation of odors is still
occuring after 24 hours.
7. Change odor filter (see chapter “Changing
activated-carbon filter”).
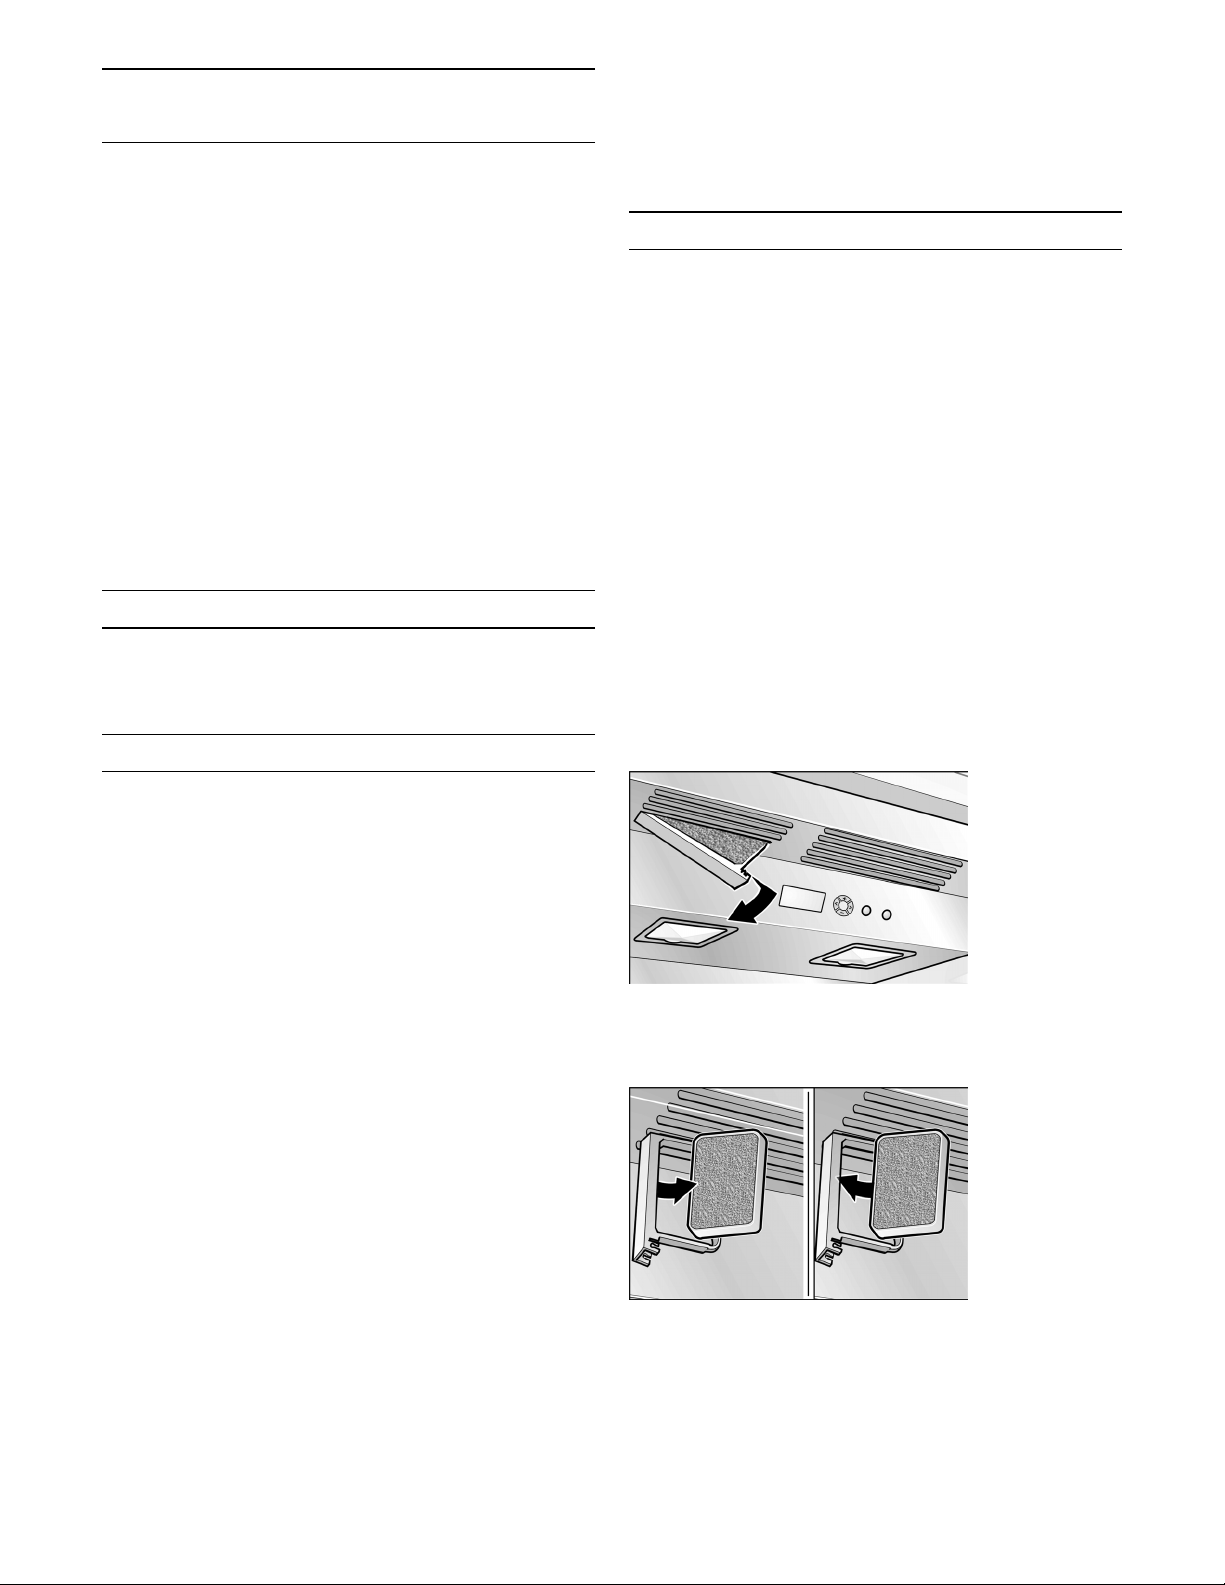
Changing the activated-carbon filter
Spare filters are available from your dealer.
1. Open the filter holder.
9 CAUTION:
Do not use scouring or abrasive sponges.
The metallic surfaces could corrode.
9 CAUTION:
Never clean shelves and containers in the dishwasher.
The parts may become deformed!
Proceed as follows:
1. Before cleaning: Switch the appliance off.
2. Pull out mains plug or switch off fuse.
3. Clean the appliance with a soft cloth, lukewarm
water and a little pH neutral washing-up liquid.
The rinsing water must not run into the light.
4. Wipe the door seal with clear water only and then
wipe dry thoroughly.
5. After cleaning reconnect and switch
the appliance back on.
2. Remove the used filter and replace with a new
one.
14

3. Close the filter holder.
Light (LED)
Your appliance features a maintenance-free LED light.
These lights may be repaired by customer service or
authorized technicians only.
Presentation light
For presentation purposes the interior light can be
switched on separately and permanently for the upper
and lower climatic zones.
Saving energy
▯ Install the appliance in a dry, ventilated room. The
appliance should not be installed in direct
sunlight or in the vicinity of heat sources (e.g.
radiator, cooker).
If required, use an insulating plate.
▯ Do not block the ventilation openings
in the appliance.
▯ Allow warm drinks to cool down before placing in
the appliance.
▯ Open the appliance as briefly as possible.
▯ The arrangement of the fittings does not affect
the energy absorption of the appliance.
Operating noises
Completely normal noises
Droning
Motors are running (e.g. refrigeration units, fan).
If the presentation light is switched on, it also lights
up when the door is closed. This way wine bottles are
presented on the presentation part to full effect
through the glass door.
If the presentation light is switched off, it only lights
up when the door is opened.
Bubbling, humming or gurgling noises
Refrigerant flowing through the pipes.
Clicking
Motor, switches or solenoid valves are switching on/
off.
Preventing noises
The appliance is not level
Please align the appliance with a spirit level. Use the
height-adjustable feet or place packing underneath
them.
The appliance is not free-standing
Please move the appliance away from adjacent units
or appliances.
Containers or storage areas wobble or stick
Check which parts are removable and, if necessary,
re-insert them correctly.
Bottles or receptacles are touching each other
Move the bottles or receptacles slightly away from
each other.
15
Rectifying minor faults yourself
Before you call customer service:
Check whether you can eliminate the fault yourself based on the following information.
Customer service will charge you for advice – even if the appliance is still under guarantee!
Appliance
Fault Possible cause Remedial action
Appliance has no refrigeration
capacity.
The light does not work.
The display does not illuminate.
The refrigeration unit is switching
on more frequently and for longer.
The light (LED) does not work. The LED lamp is defective. Call customer service.
Display indicates “E..”. Electronics have detected a fault. Call customer service.
Display indicates “LOW-
POWER”.
Display indicates “HIGHVOLT”. The mains voltage exceeds
Appliance has been switched off. Press the On/Off button.
Power failure. Check whether the power is on.
The fuse has been switched off. Check the fuse.
The mains plug has not been inserted
properly.
Appliance opened frequently. Do not open the appliance unnecessarily.
The ventilation openings have been cov-
ered.
Light switch is jammed. Check whether it can be moved.
The mains voltage falls below
the permitted limiting value.
the permitted limiting value.
Check whether the mains plug is secure.
Remove obstacles.
When the mains voltage reaches the stipulated
value again, the warning message goes out.
If the warning message lasts for longer, inform
the energy supply company.
When the mains voltage reaches the stipulated
value again, the warning message goes out.
If the warning message lasts for longer, inform
the energy supply company.
16
 Loading...