

Page 1

Electronic
Cooktop
CE 491-610
CE 492-610
Gaggenau Use and Care Manual
Page 2

Page 3

Important Safety Instructions 4
Fire Safety 4
Burn Prevention 4
Child Safety 5
Cleaning Safety 5
Cookware Safety 5
Proper Installation and Maintenance 5
Removable Twist Knob 6
Damage to the Cooktop 6
Operating for the First Time 7
Causes of Damage 7
Pots and Pans 7
Food Spills 7
Scratches on the Glass Ceramic 7
Twist Knob 7
Hard and Pointed Objects 7
Features of Your New Cooktop 8
Cooking Zones 8
Control Panel 9
Special Accessories 9
Operating Principle 10
Main Switch 10
Control Panels 10
Twist Pad with Magnetic Twist Knob 10
Storing the Twist Knob 10
Cooking Zone Extension 10
Residual Heat Display 10
Operation 11
Switching on and off 11
Setting the Cooking Level 11
Changing the Cooking Level 11
Switching off a Cooking Zone 11
Main Switch with Memory Function 12
Residual Heat Display 12
Tips on Saving Energy 12
Cooking Zone Extension 13
Extension of the Dual Size Cooking Zone 13
Extension of the Triple Size Cooking Zone 13
Extension of the Roasting Zone 14
Deactivating Extension 14
Note 14
Settings Table 15
Timer 16
Setting an Automatic Switch-off Time 16
Changing a Time Value 16
Clearing a Time Value 16
Notes 16
Setting the Timer 17
Changing a Time Value 17
Note 17
Automatic Quick Boil Function 18
Switching On the Automatic Quick Boil Function 18
Switching Off the Automatic Quick Boil Function 18
Child Lock 19
Activating the Child Lock 19
Operating the Cooktop 19
Deactivating the Child Lock 19
Single Locking of the Cooktop 19
Unlocking the Cooktop 19
Additional Functions 20
Switching off the Confirmation Tone 20
Holiday Safeguard 20
Memory Cooking 21
Operating Principle 21
Storing the Setting 21
Notes 21
Changing the Setting 22
Calling Up the Memory 22
Displaying the Memory 22
Memory Ends 22
Ending the Memory Prematurely 22
Several Cooking Zones in Memory Operation 22
Cleaning and Care 23
Cleaning the Glass Ceramic 23
Cleaning the Stainless Steel Frame
(only CE 491) 23
Cleaning the Twist Knob 23
Useful Hints 24
Maintenance 24
Troubleshooting 25
Table of Contents
3
Page 4

Fire Safety
Read and save these instructions.
Do not use aluminum foil or protective liners to line
any part of an appliance, especially surface unit
drip bowls or oven bottom. Installation of these
liners may result in a risk of electric shock or fire.
Use this appliance only for its intended use as
described in this manual. For example, never use
the appliance for warming or heating the room.
Never use the appliance for storage.
Do not allow aluminum foil, plastic, paper or cloth to
come in contact with a hot burner or grate. Do not
allow pans to boil dry.
If the cooktop is near a window, forced air vent, or
fan, be certain that flammable materials such as
window coverings do not blow over or near the
burners or elements. They could catch on fire.
Always have a working smoke detector near the
kitchen.
Never leave the cooktop unattended when in use.
Boilovers cause smoking and greasy spillovers may
ignite.
!
WARNING – TO REDUCE THE RISK OF A
GREASE FIRE:
a) Never leave surface units unattended at high
settings. Boilovers cause smoking and greasy
spillovers that may ignite. Heat oils slowly on
low or medium settings.
b) Always turn hood ON when cooking at high
heat or when flambéing food (i.e. Crepes
Suzette, Cherries Jubilee, Peppercorn Beef
Flambé).
c) Clean ventilating fans frequently. Grease
should not be allowed to accumulate on fan or
filter.
d) Use proper pan size. Always use cookware
appropriate for the size of the surface element.
In the event that personal clothing or hair catches
fire, drop and roll immediately to extinguish flames.
Smother flames from food fires other than grease
fires with baking soda. Never use water on cooking
fires.
Have an appropriate fire extinguisher available,
nearby, highly visible and easily accessible near the
oven.
!
WARNING – TO REDUCE THE RISK OF
INJURY TO PERSONS IN THE EVENT OF A
GREASE FIRE, OBSERVE THE FOLLOWING:
a) SMOTHER FLAMES with a close-fitting lid,
cookie sheet, or metal tray, then turn off the
burner. BE CAREFUL TO PREVENT BURNS.
If the flames do not go out immediately,
EVACUATE AND CALL THE FIRE
DEPARTMENT.
b) NEVER PICK UP A FLAMING PAN – You may
be burned.
c) DO NOT USE WATER, including wet dishcloths
or towels – a violent steam explosion will result.
d) Use an extinguisher ONLY if:
1) You know you have a Class ABC
extinguisher, and you already know how to
operate it.
2) The fire is small and contained in the area
where it started.
3) The fire department is being called.
4) You can fight the fire with your back to an
exit. Have an appropriate fire extinguisher
available, nearby, highly visible and easily
accessible near the oven.
Whenever possible, do not operate the ventilation
system during a cooktop fire. However, do not
reach through fire to turn it off.
Burn Prevention
DO NOT TOUCH SURFACE UNITS OR AREAS
NEAR UNITS – Surface units may be hot even
though they are dark in color. Areas near surface
units may become hot enough to cause burns.
During and after use, do not touch, or let clothing,
potholders, or other flammable materials contact
surface units or areas near units until they have had
sufficient time to cool. Among these areas are the
cooktop and areas facing the cooktop.
Do not heat or warm unopened food containers.
Buildup of pressure may cause the container to
burst and cause injury.
Always use dry potholders. Moist or damp
potholders on hot surfaces may result in burns from
steam. Do not let potholder touch hot heating
elements. Do not use a towel or other bulky cloth.
Always turn hood ON when cooking at high heat or
when flambéing food (i.e. Crepes Suzette, Cherries
Jubilee, Peppercorn Beef Flambé).
Important Safety Instructions
4
!
Page 5

Use high heat settings on the cooktop only when
necessary. To avoid bubbling and splattering, heat
oil slowly on no more than a low-medium setting.
Hot oil is capable of causing extreme burns and
injury.
Never move a pan of hot oil, especially a deep fat
fryer. Wait until it is cool.
Child Safety
When children become old enough to use the
appliance, it is the legal responsibility of the
parents or legal guardians to ensure that they are
instructed in safe practices by qualified persons.
Do not allow anyone to climb, stand, lean, sit, or
hang on any part of an appliance, especially a door,
warming drawer, or storage drawer. This can
damage the appliance, and the unit may tip over,
potentially causing severe injury.
Do not allow children to use this appliance unless
closely supervised by an adult. Children and pets
should not be left alone or unattended in the area
where the appliance is in use. They should never be
allowed to play in its vicinity, whether or not the
appliance is in use.
CAUTION – Items of interest to children should not
be stored in an appliance, in cabinets above an
appliance or on the backsplash. Children climbing
on an appliance to reach items could be seriously
injured.
Cleaning Safety
Do not clean the appliance while it is still hot. Some
cleaners produce noxious fumes when applied to a
hot surface. Wet clothes or sponges can cause
burns from steam.
Do not soak removable heating elements – Heating
elements should never be immersed in water.
Cookware Safety
Hold the handle of the pan when stirring or turning
food. This helps prevent spills and movement of the
pan.
Use Proper Pan Size. The use of undersized
cookware will expose a portion of the heating
element or burner to direct contact and may result
in ignition of clothing. Select cookware having flat
bottoms large enough to cover the surface heating
unit. This appliance is equipped with one or more
surface units of different size. Proper relationship
of cookware to heating element or burner will also
improve efficiency.
Cookware not approved for use with ceramic
cooktops may break with sudden temperature
changes. Use only pans that are appropriate for
ceramic cooktops (only certain types of glass,
heatproof glass, ceramic, earthenware, or other
glazed utensils are suitable). See Cookware
Selection Guide for further details.
Always position handles of utensils inward so they
do not extend over adjacent work areas, burners, or
the edge of the cooktop. This reduces the risk of
fires, spills and burns.
Proper Installation and Maintenance
WARNING: When properly cared for, your new
appliance has been designed to be safe and
reliable. Read all instructions carefully before use.
These precautions will reduce the risk of burns,
electric shock, fire, and injury to persons. When
using kitchen appliances, basic safety precautions
must be followed, including those in the following
pages.
Have the installer show you the location of the
circuit breaker or fuse. Mark it for easy reference.
This appliance must be properly installed and
grounded by a qualified technician. Connect only to
properly grounded outlet. Refer to Installation
Instructions for details.
This appliance is intended for normal family
household use only. It is not approved for outdoor
use. See the Warranty. If you have any questions,
contact the manufacturer.
Do not store or use corrosive chemicals, vapors,
flammables or nonfood products in or near this
appliance. It is specifically designed for use when
heating or cooking food. The use of corrosive
chemicals in heating or cleaning will damage the
appliance and could result in injury.
Make sure reflector pans or drip bowls are in place
– Absence of these bowls or pans during cooking
may subject wiring or components underneath to
damage.
Do not operate this appliance if it is not working
properly, or if it has been damaged. Contact an
authorized service center.
Do not cook on a broken cooktop. Cleaning
solutions and spillovers may create a risk of electric
shock.
5
Important Safety Instructions
!
Page 6

Do not repair or replace any part of the appliance
unless specifically recommended in this manual.
Refer all servicing to a factory authorized service
center.
To avoid electrical shock hazard, before servicing
the appliance, switch power off at the service panel
and lock the panel to prevent the power from being
switched on accidentally.
Removable Twist Knob
!
WARNING: FOR PERSONS WHO WEAR
ELECTRONIC IMPLANTS SUCH AS A
PACEMAKER OR INSULIN PUMP.
Implants could be affected by magnetic fields.
Do not carry the twist knob in the pockets of
your clothing. Keep the twist knob at least
4 inches (10 cm) away from a pacemaker.
Damage to the Cooktop
CAUTION, RISK OF BURNS! Switch off the cooking
zone if it heats up but the indicator is not working.
Contact an authorized service center.
CAUTION, RISK OF FIRE! If the cooktop switches
itself off and can no longer be operated, disconnect
it from the electricity supply immediately. The
cooktop could switch itself on later. Switch off the
corresponding household fuse. Contact an
authorized service center.
6
Important Safety Instructions
!
Page 7

7
Remove the packaging from the appliance and
dispose of it according to local regulations.
Be careful to remove all accessories from the
packaging. Keep packaging elements and plastic
bags away from children.
Check the cooktop for transport damage after
unpacking it. Do not connect the cooktop if it has
been damaged.
The cooktop must be installed and connected by an
authorized specialist. No warranty claims can be
lodged for any damage resulting from incorrect
connection. Observe the installation instructions.
Thoroughly clean the appliance before using it for
the first time. This will eliminate any ‘newness’
smells and soiling.
Pots and Pans
Rough pan bases scratch the glass ceramic.
Avoid cooking on the cooktop with an empty pan,
especially with enamel or aluminum pans. This
could cause damage to the pan base and the glass
ceramic.
Do not place hot pots or pans on the control panel,
display area or the frame. This could cause
damage.
Never heat food in aluminum foil or plastic
containers. The material can melt and damage your
cooktop.
Iridescent discoloration can be caused by the
bases of some pans. These do not interfere with the
operation of the glass ceramic cooktop. Remove the
discoloration with glass ceramic cleaner.
Food Spills
Milk, sugar and food with a high sugar content
(e.g. jam) damage the glass ceramic surface.
Remove food spills immediately with the glass
scraper. Caution! The glass scraper has a sharp
blade.
Scratches on the Glass Ceramic
Always keep the cooktop dry and clean. Salt, sugar
and sand cause scratches on the glass ceramic. Do
not use the cooktop as a work surface or storage
space.
Twist Knob
Do not place the twist knob on the cooking zones.
It could be damaged.
Metal parts attached to the underside of the
magnetic twist knob could scratch the glass
ceramic surface. Always keep the twist knob clean.
Hard and Pointed Objects
Damage can occur if hard or pointed objects fall on
the cooktop. Do not store such objects above the
cooktop.
Operating for the First Time Causes of Damage
Page 8
8
CE 491 is supplied with a stainless steel frame.
CE 492 is suitable for flush mounting into stone
worktops. The operation of both types is identical.
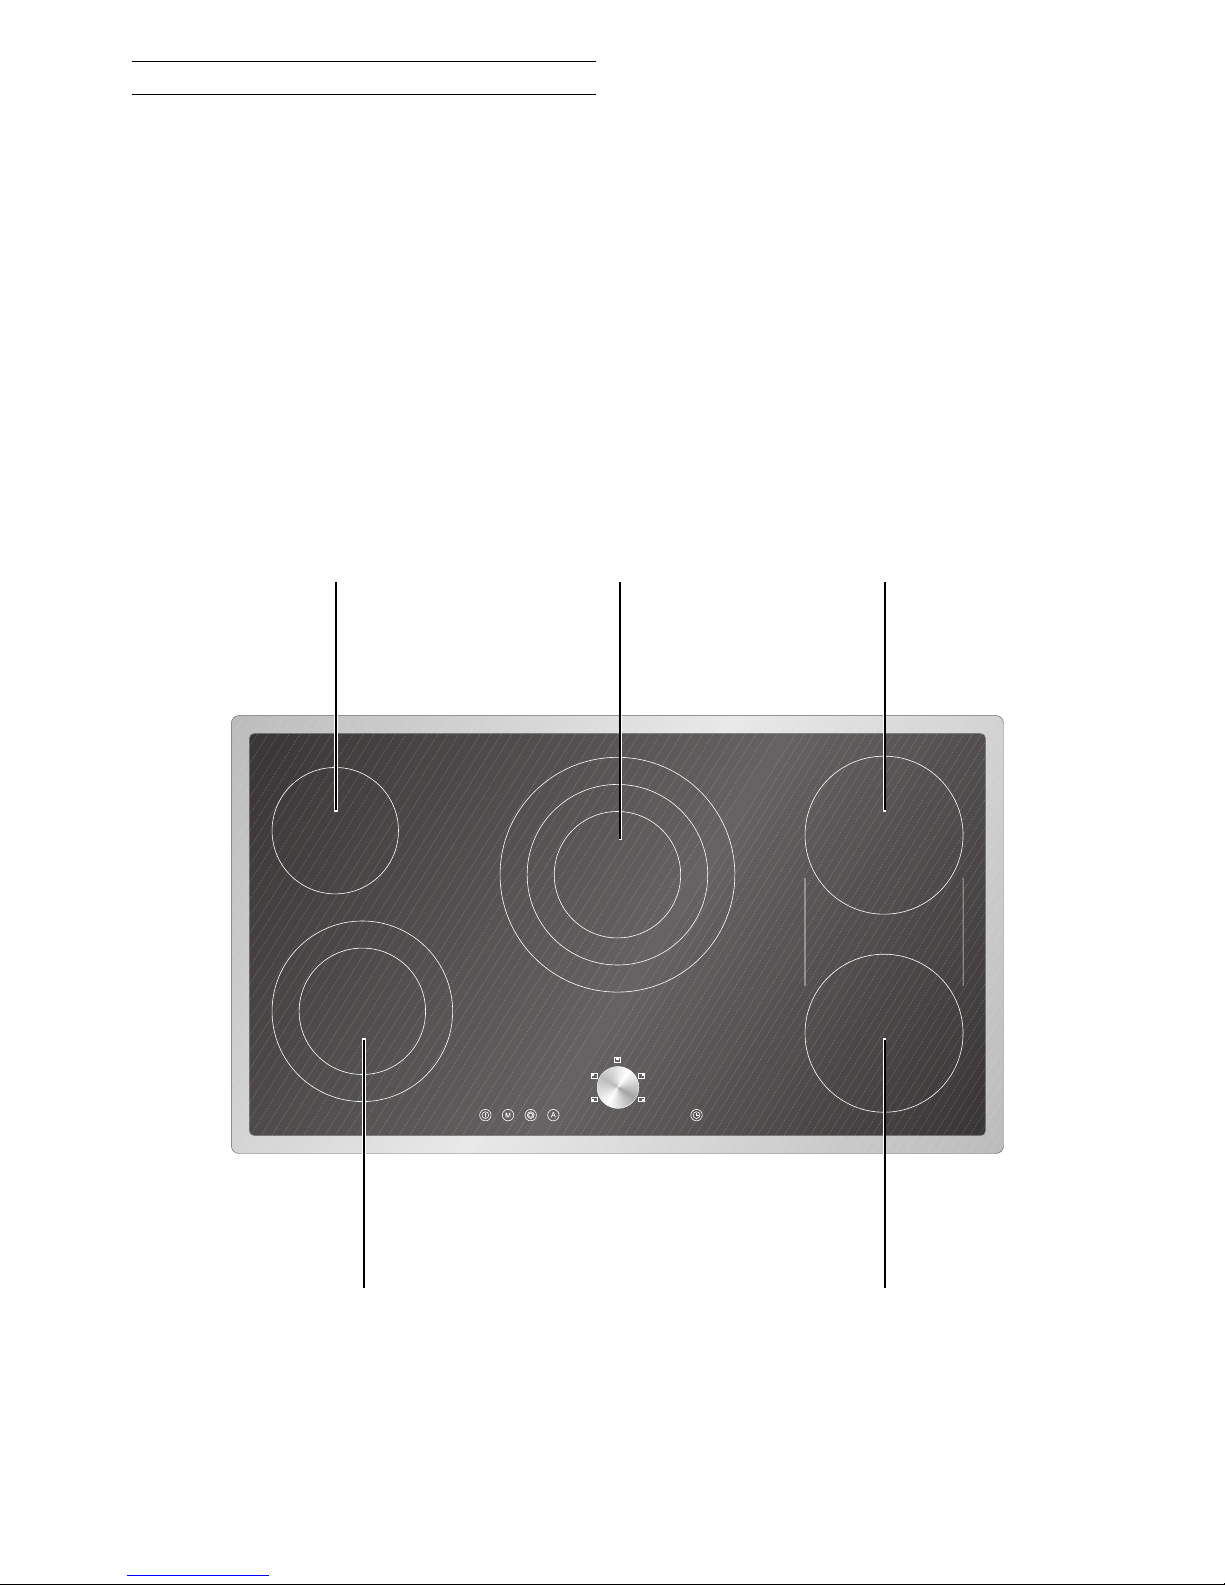
Features of Your New Cooktop
Cooking Zones
ø 511/16" ø 511/16" - 81/4 " - 105/8 "ø 71/16" - 71/16" x 165/16"
(ø 14.5 cm) (ø 14.5 cm / 21 cm / 27 cm) (ø 18 cm / 18 cm x 41.5 cm)
ø 5
11
/16" - 81/4 "ø 7
1
/16" - 71/16" x 165/16"
(ø 14.5 cm / 21 cm) (ø 18 cm / 18 cm x 41.5 cm)
Page 9
9
Special Accessories
You can order the following special accessories:
•
BT 481-000: Cast-iron roaster with lid, nonstick coated, suitable for the roasting zone.
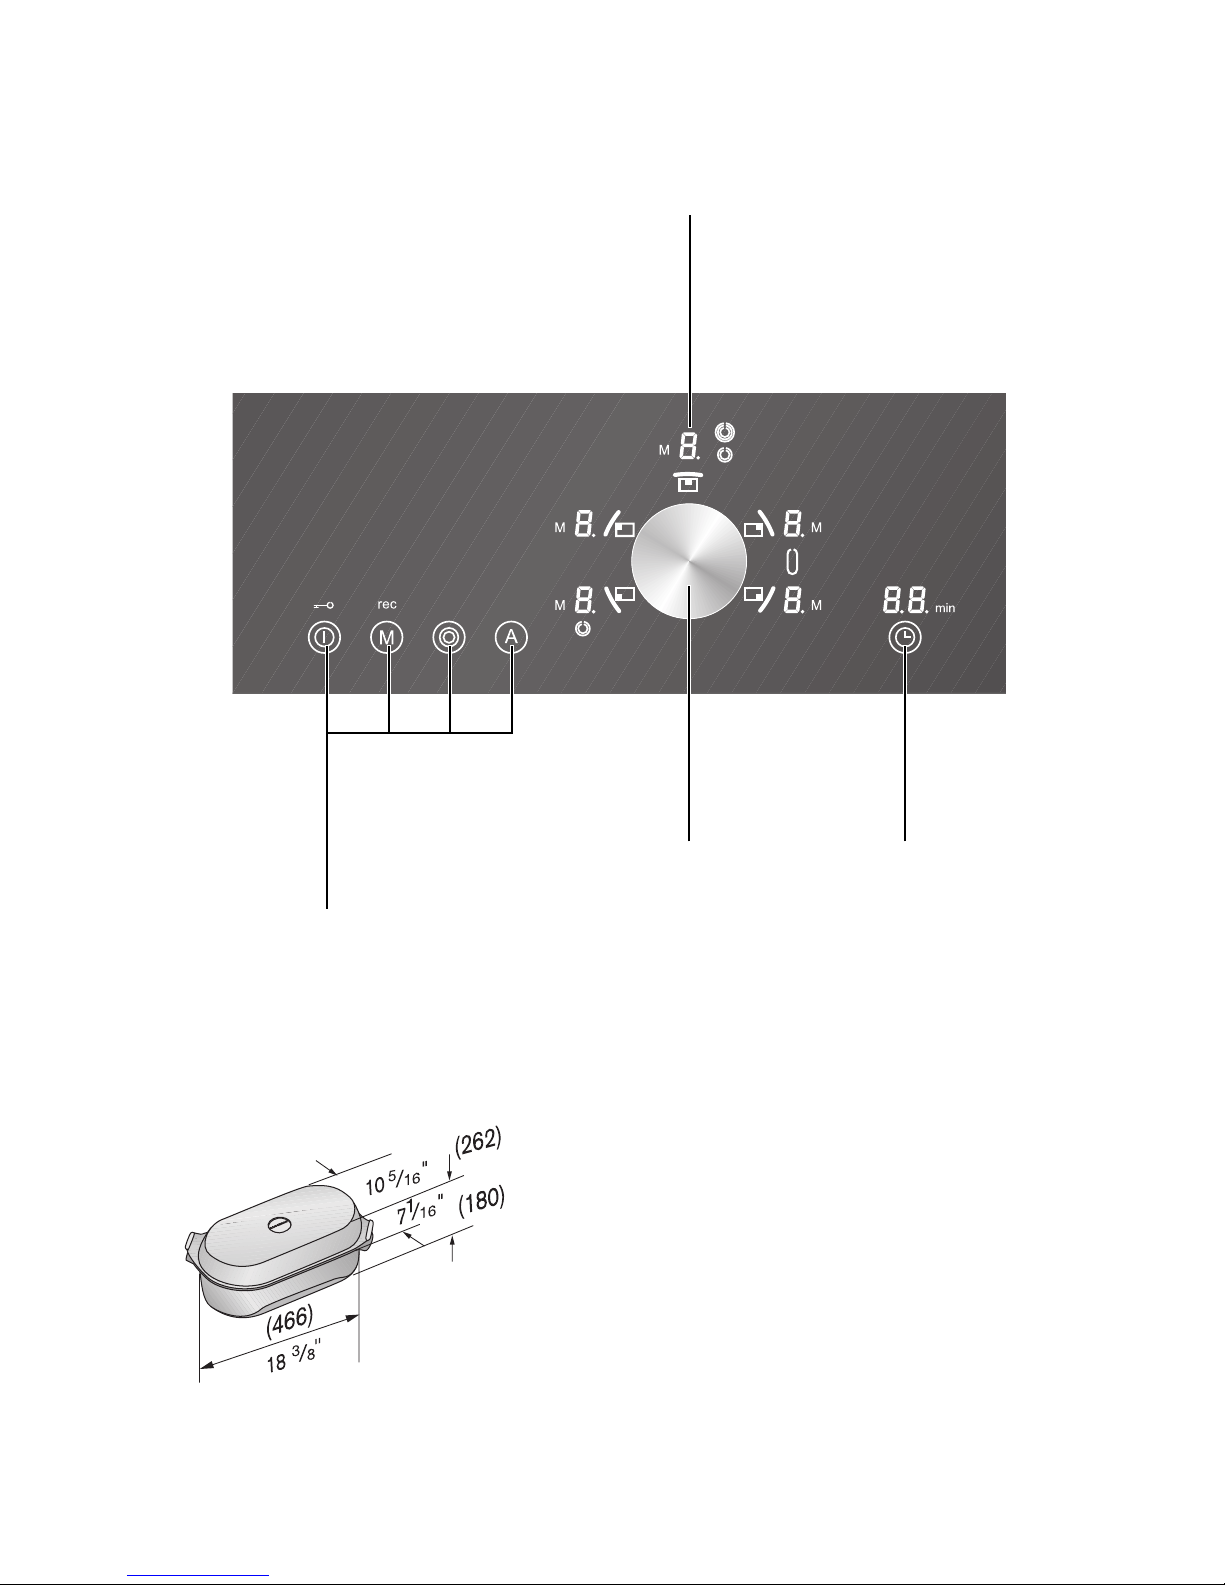
Control Panel
Display for
•
heat setting 1 - 9
•
standby 0
•
residual heat
•
cooking zone extension
•
memory-cooking
Control panel for
•
main switch l
•
memory cooking M
•
extension l
•
automatic quick boil A
Twist pad with
magnetic twist knob
Control panel and
timer display
Page 10

10
Main Switch
The electronics in the control panel are switched on
using the main switch. Touch the l symbol until the
cooking zone displays show 0. Now the cooktop is
ready for use.
Touch the l symbol until the cooking zone displays
go off. All the cooking zones are switched off. The
residual heat indicator remains lit until the cooking
zones have cooled sufficiently.
Note: The cooktop switches off automatically if all
the cooking zones have been switched off for more
than 10 seconds.
Control Panels
When you touch a symbol, the respective function
is activated. Every input is confirmed by an audible
signal.
Note: The settings remain unchanged if several
symbols are touched briefly. You can therefore
easily mop up spills on the control panel.
Note : Always keep the control panels clean and
dry. Moisture and dirt may impair function.
Twist Pad with Magnetic Twist Knob
The twist pad is the area in which you select the
cooking zones with the twist knob and can set heat
settings. The twist knob automatically centers itself
in the twist pad.
The twist knob is magnetic and is placed on the
twist pad. The cooking zone is activated by sliding
the twist knob in the direction of the corresponding
cooking zone symbol. You can set the heat setting
by turning the twist knob.
You can remove the twist knob. This makes
cleaning easier.
If you remove the twist knob when the cooktop is in
operation, all the cooking zones switch off after
3 seconds.
!
Caution! If you place a metal object on the
twist pad within 3 seconds, the cooktop may
continue to heat up. For this reason, always
switch off the cooktop using the main switch.
Storing the Twist Knob
There is a strong magnet in the twist knob. Do not,
therefore, place it near magnetic data carriers, e.g.
video cassettes, disks, credit cards and cards with
magnetic strips. These could be destroyed.
Malfunctions to televisions and monitors may occur.
!
CAUTION! FOR PERSONS WHO WEAR
ELECTRONIC IMPLANTS SUCH AS A
PACEMAKER OR INSULIN PUMP.
Implants could be affected by magnetic fields.
Do not carry the twist knob in the pockets of
your clothing. Keep the twist knob at least 4 ˝
(10 cm) away from a pacemaker.
Cooking Zone Extension
The size of the front left and the middle cooking
zones can be altered by activating the cooking zone
extension.
Both right cooking zones convert together with an
additional zone, to create an oval roasting zone
especially suitable for the Gaggenau cast roaster.
Residual Heat Display
The residual heat display appears on the display of
the relevant cooking zone after switching off. The
moving zero in the display indicates that, after
switching off, a cooking zone has still not cooled
down to such an extent that it can be safely
touched.
!
Caution, risk of burns! Only touch cooking
zones after the residual heat display has gone
off.
!
Caution, risk of burns! The residual heat
display stays off after a power cut. The
cooking zones may still be hot.
Operating Principle
Page 11

11
Switching on and off
Touch the l main switch symbol. A signal is
sounded. The cooking zone displays show 0. Now
the cooktop is ready for use.
The cooktop switches off automatically if no further
inputs are made within approximately 10 seconds.
By touching the main switch symbol at any time the
cooktop can be quickly switched off.
Setting the Cooking Level
The cooktop must be switched on by the main
switch. The switching on and off for all cooking
zones is identical. Each cooking zone has 9 heat
settings with intermediate settings.
1 Select the cooking zone. To do this, slide the
twist knob in the direction of the corresponding
cooking zone symbol. The indicator light comes
on and
0 flashes in the cooking zone display.
2 Move the twist knob back to the center.
3 Within the next 5 seconds, turn the twist knob
until the desired cooking level flashes in the
display. If you select an intermediate setting, a
spot appears next to the cooking level.
The cooking level display lights up permanently
after 5 seconds and the indicator light goes
out.
Changing the Cooking Level
Select the cooking zone. Turn the twist knob to the
desired cooking level.
Switching off a Cooking Zone
Select the cooking zone. Turn the twist knob to 0 .
The cooking zone is switched off, and the residual
heat display appears after approximately 5 seconds.
Operation
Page 12

12
Main Switch with Memory Function
The heating and timer settings remain stored for
5 seconds after the cooktop has been switched off.
If you switch the cooktop on again within 5 seconds
after having switched it off accidentally, the
cooktop will operate using the previously stored
settings.
Residual Heat Display
The residual heat display appears on the display of
the relevant cooking zone after switching off. The
flasing zero in the display indicates that, after
switching off, a cooking zone has still not cooled
down to such an extent that it can be safely
touched.
!
Caution, risk of burns! Only touch cooking
zones after the residual heat display has gone
off.
Tips on Saving Energy
Use good quality saucepans and pots with thick,
even bases.
Select the correct saucepan size for each cooking
zone.The diameter of the bases of the saucepans
and pots should match the size of the cooking zone.
Note: Ovenware manufacturers often give the
diameter of the top of the saucepan. It is usually
larger than the diameter of the base of the
saucepan.
Use a small saucepan for small quantities. A larger,
less full saucepan requires more energy.
Saucepans and pots should always be covered with
a suitable lid to shorten cooking times. Cooking
without a lid requires much more energy.
Cook with small quantities of water. This saves
energy and helps vegetables to retain vitamins and
minerals.
Switch down to a lower heat setting in good time.
For longer cooking times you can switch off the
cooking zone before the end of the cooking time
and then use the residual heat.
Page 13

13
Extension of the Dual Size Cooking
Zone
The size of the front left cooking zone can be
altered.
The cooktop must be switched on by the main
switch.
1 Select the cooking zone. To do this, slide the
twist knob in the direction of the corresponding
cooking zone symbol. The indicator light comes
on and
0 flashes in the cooking zone display.
2 Move the twist knob back to the center.
3 Within 5 seconds, turn the twist knob until the
desired cooking level flashes in the display.
4 Within the next 5 seconds, touch the symbol
l extension.
The cooking level display lights up permanently
after 5 seconds and the indicator light goes
out. The extension symbol lights up under the
cooking zone display.
Extension of the Triple Size Cooking
Zone
The size of the middle cooking zone can be altered.
The cooktop must be switched on by the main
switch.
1 Select the cooking zone. To do this, slide the
twist knob in the direction of the corresponding
cooking zone symbol. The indicator light comes
on and
0 flashes in the cooking zone display.
2 Move the twist knob back to the center.
3 Within 5 seconds, turn the twist knob until the
desired cooking level flashes in the display.
4 Within the next 5 seconds, touch the symbol
l extension. Touch the symbol several times to
chose the required diameter.
The cooking level display lights up permanently
after 5 seconds and the indicator light goes
out. The extension symbol lights up next to the
cooking zone display.
Cooking Zone Extension
Page 14

14
Extension of the Roasting Zone
Both right cooking zones convert together with an
additional zone, to create an oval roasting zone
especially suitable for the Gaggenau cast roaster.
When the extension is activated, both right cooking
zones and the additional zone operate as one single
cooking zone. Each input for one cooking zone will
include both cooking zones and the additional zone.
The cooktop must be switched on by the main
switch.
1 Select either of the right cooking zones. To do
this, slide the twist knob in the direction of the
corresponding cooking zone symbol. The
indicator light comes on and
0 flashes in the
cooking zone display.
2 Move the twist knob back to the center.
3 Within 5 seconds, turn the twist knob until the
desired cooking level flashes in the display.
4 Within the next 5 seconds, touch the symbol
l extension.
The cooking level displays of both cooking
zones light up permanently after 5 seconds and
the indicator lights go out. The extension
symbol lights up between the two cooking zone
displays.
Deactivating Extension
Select the cooking zone. Within the next 5 seconds,
touch the symbol l extension.
The extension symbol goes out.
Note
When a cooking zone is switched on again, the
previously used extension is activated.
Page 15

15
Cooking level Cooking method Examples
9 Boiling Water
Searing Meat
Heating Fat, liquids
Boiling Soup, sauce
Blanching Vegetables
8 - 6 Roasting Meat, fish, potatoes
7 - 6 Browning Flour, onions
Roasting Almonds, breadcrumbs
Baking Pancakes, egg dishes
Boiling in open pot Liquids
6 - 5 Frying Bacon
Reducing Stocks, sauces
5 - 4 Simmering Sweet sauces
Simmering in open pot Dumplings, sausages, soup garnish,
meat stock, poached eggs
4 - 3 Boiling with closed lid Pasta, soup, sauces
Steaming Vegetables, potatoes, fish
Stewing Vegetables, fruit, fish
Braising Goulash, rolled beef steaks, roasts, vegetables
Thawing Frozen foods
3 - 1 Slow cooking Rice, pulses
Reheating / keeping warm Soup, casserole, vegetables in a sauce
Melting Butter, chocolate
Thickening Egg dishes
Each cooking zone has 9 heat settings with intermediate settings. Switch to the highest cooking level in
order to reach the required temperature quickly. Then always switch back to the lower cooking level.
The cooking levels are identical for all cooking zones.
The values given above must be looked upon as recommended values. The heat required depends not only
on the type and condition of the food, but also the size and contents of the pot.
Settings Table
Page 16

16
!
WARNING – NEVER LEAVE THE COOKTOP
UNATTENDED WHEN IN USE. BOILOVERS
CAUSE SMOKING AND GREASY SPILLOVERS MAY IGNITE.
With the timer you can program an automatic
switch-off time between 1 and 90 minutes in
1-minute-steps for a cooking zone (automatic
switch-off). You can set a time value for every
cooking zone.
Setting an Automatic Switch-off Time
The cooktop must be switched on by the main
switch.
1 Select the cooking zone with the twist knob.
2 Touch the W symbol. 00 flashes in the timer
display. Use the twist knob to set the required
duration. The duration flashes for several
seconds and then begins to count down. If you
have set a duration for several cooking zones, it
is always the shortest duration that is
displayed.
If you would like to call up the remaining duration
for a cooking zone: Use the twist knob to select the
cooking zone. The duration is displayed for
5 seconds.
When the duration has elapsed, the cooking zone
switches off. 0 lights up in the cooking zone
display. A signal sounds for three minutes.
00 flashes in the timer display. Touch any control
panel. The displays will go out and the audible
signal will stop.
Changing a Time Value
Select the cooking zone with the twist knob. Touch
the W symbol. Use the twist knob to change the
duration.
Clearing a Time Value
Select the cooking zone with the twist knob. Touch
the W symbol. Use the twist knob to set the duration
to 00. The display goes out after a few seconds.
The cooking zone continues heating at the selected
level.
Timer
Page 17

17
Notes
The automatic switch off (holiday safeguard) can
also be activated while using the timer function.
The timer function is no longer active after a power
cut.
You can use the timer independently from the
cooking zones and without switch-off function.
The timer can also be used when the cooktop
is switched off.
Setting the Timer
No cooking zone should be selected.
1 Touch the W symbol, the min indicator flashes.
00 flashes in the timer display.
2 Use the twist knob to set the required duration.
The duration flashes for several seconds and
then begins to count down.
When the duration has elapsed, the min indicator
flashes. A signal sounds for three minutes.
00 flashes in the timer display. Touch any control
panel. The display will go out and the audible signal
will stop.
Changing a Time Value
Touch the W symbol. Use the twist knob to change
the duration.
Note
The timer is no longer active after a power cut.
Page 18

18
All cooking zones feature an automatic quick boil
function. When the automatic quick boil function is
activated, the set cooking level is boosted for
several minutes. This ensures that the continued
cooking or simmering temperature of the food is
reached faster.
The appliance switches automatically to the set
simmering or cooking level after the quick boil time
has elapsed. The length of the automatic quick boil
function depends on the selected cooking level.
Note: The automatic quick boil function cannot be
activated when using cooking level 9.
Switching On the Automatic Quick
Boil Function
The cooktop must be switched on by the main
switch.
1 Select the cooking zone. To do this, slide the
twist knob in the direction of the corresponding
cooking zone symbol. The indicator light comes
on and
0 flashes in the cooking zone display.
2 Move the twist knob back to the center.
3 Within 5 seconds, turn the twist knob until the
desired cooking level flashes in the display.
4 Within the next 5 seconds, touch the symbol
A automatic quick boil.
The display shows alternatively the chosen
cooking level and “A”. The indicator light goes
off after 5 seconds.
Switching Off the Automatic Quick
Boil Function
It is possible to switch off the automatic quick boil
function prematurely (e.g. because the food is
boiling over).
1 Select the cooking zone. To do this, slide the
twist knob in the direction of the corresponding
cooking zone symbol. The indicator light comes
on and the cooking zone display flashes.
2 Move the twist knob back to the center.
3 Within 5 seconds, touch the symbol
A automatic quick boil.
The cooking level display lights up permanently
after 5 seconds. The cooking zone switches
back to the set cooking level.
Automatic Quick Boil Function
Page 19

19
Child Lock
You can prevent the cooktop from being switched
on unintentionally so that children cannot switch on
the cooking zones. The child lock remains activated
permanently.
Note: The child lock could be activated or
deactivated unintentionally when the appliance is
cleaned using water or as a result of spillages or
objects covering the main switch.
Activating the Child Lock
1 Switch on the cooktop using the main switch.
2 Set all cooking zones to heat setting 2.
3 Switch off the cooking zones one after the
other, beginning with the front right cooking
zone.
4 Touch the l main switch for at least 5 seconds,
after which time a confirmation signal will
sound. The G symbol flashes. The child lock is
activated.
Operating the Cooktop
To switch on, touch the l main switch for more
than 4 seconds. During this time, the G symbol
lights up in the display. As soon as the display goes
off, the cooktop is switched on.
Deactivating the Child Lock
You can deactivate the child lock again. Proceed in
the same manner as for activating the child lock.
Single Locking of the Cooktop
You can lock the cooktop on a single occasion, if
for example, small children are visiting:
The cooktop must be switched off. Touch the l
main switch for more than 4 seconds. The cooking
zone displays go out. The G symbol flashes. The
cooktop is locked.
Unlocking the Cooktop
Touch the l main switch for more than 4 seconds.
The cooktop is switched on. The cooktop is unlocked.
Page 20

20
Switching off the Confirmation Tone
A short buzz confirms that a control panel has been
touched. This buzzer can be switched off
1 Switch on the cooktop using the main switch.
2 Set all cooking zones to heat setting 3.
3 Switch off the cooking zones one after the
other, beginning with the front right cooking
zone.
4 Touch the main switch for at least 5 seconds,
after which time a confirmation signal will
sound.
To switch the entry confirmation on again, proceed
in the same manner as for switching off.
Holiday Safeguard
If a cooking zone is in constant use for a long time
without the setting being changed, it will
automatically switch off. The time after which the
holiday safeguard is activated depends on the heat
setting (1 to 10 hours).
The cooking zone is switched off, an F and an 8
flash alternately in the display.
The indicator goes out when you touch any control
panel. Now you can reset the cooking zone.
Additional Functions
Page 21

21
Operating Principle
Memory cooking is useful if you require several
different heat settings in order to prepare a dish
which you cook particularly often. The conditions
must always be the same, e.g. the same saucepan,
the same quantity and the same initial temperature
of the dish.
You can store one memory event for each cooking
zone with up to five heat and time settings, which
you can recall at any time.
Storing the Setting
The maximum duration that can be recorded is 90
minutes.
The cooktop must be switched on. No cooking zone
should be selected. The cooking zone for which the
settings are to be recorded must be switched off.
1 Touch the M symbol. rec flashes in the display.
2 Select the required cooking zone and set the
heat setting with the twist knob. Recording
begins. The rec indicator lights up and M
flashes next to the cooking zone display.
3 Now prepare the dish as required. The settings
are recorded.
4 When your dish is ready, switch off the cooking
zone. The cooking procedure is stored.
Notes
If you set more than 5 heat settings for your dish,
flashes in the timer display and flashes in the
cooking zone display alternately with the
continuation cooking setting. The subsequent heat
settings are not recorded. The timer indicator goes
out when you touch any control panel. You can
finish cooking the dish as you wish.
If you set more than 90 minutes, 90 flashes in the
timer display and alternates with the ongoing
cooking setting in the cooking zone display.
Subsequent heat settings are not recorded. The
indicators go out when you touch any control panel.
You can finish cooking the dish as you wish.
If you store a memory event for a cooking zone with
extension, the selected extension is stored for the
whole memory event. Select the extension within
30 seconds after touching the M symbol. Later
activation of the cooking zone extension will not be
recorded.
Memory Cooking
==
==
=
=
=
=
Page 22

22
If you store a memory event for the roasting zone,
first select either of the right cooking zones.
Activate the roasting zone extension within
30 seconds after selecting the cooking zone.
The automatic quick boil function cannot be
activated for memory cooking.
The automatic switch off (holiday safeguard) can
also be activated while using memory cooking.
Changing the Setting
If you want to store a different memory event for a
cooking zone, make a new recording. The old
memory is erased.
Calling Up the Memory
If you want to cook a dish again for which the
setting has been recorded, call up the memory.
The cooktop must be switched on.The cooking zone
for which the memory function is to be activated
must be switched off.
1 Select the required cooking zone with the twist
knob.
2 Touch the M symbol to activate the memory.
The stored settings appear in the cooking zone
display in quick succession. The cooking zone does
not heat up yet. The M symbol next to the cooking
zone display lights up. Each individual step appears
in the display for 3 seconds. The respective
cooking times appear in the timer display.
After all the steps have been displayed, the memory
program starts. The cooking zone heats up. The
current setting is displayed in the cooking zone
display. The duration of the whole cooking event
counts down in the timer display.
If you want to call up the memory event for the
roasting zone, first select the cooking zone on the
right that you used to store the memory event. The
remaining right cooking zone must be switched off.
Then touch the M symbol.
Displaying the Memory
You can call up the remaining heat settings and the
respective cooking times while the memory program
is running.
1 Select the cooking zone with the twist knob.
2 Touch the W symbol to display the current heat
setting and duration. You can now call up all
the remaining heat settings and the respective
durations using the W symbol.
Memory Ends
When the memory program has finished, the
cooking zone switches off. A signal sounds for
3 minutes. 00 flashes in the timer display. The
M symbol flashes next to the cooking zone display.
0 lights up in the cooking zone display. Touch any
control panel. The displays disappear and the
signal stops.
Ending the Memory Prematurely
Select the cooking zone with the twist knob. The
cooking zone display flashes. Change the heat
setting. The memory operation is ended. The
cooking zone switches off.
Several Cooking Zones in Memory
Operation
If you want to use the memory function on several
cooking zones at the same time, the shortest
duration of the memory programs is displayed in the
timer display.
If you would like to call up the duration of another
memory program: Select the cooking zone with the
twist knob. The current setting is displayed.
Page 23

23
Cleaning and Care
Do not clean the cooktop using high
pressure cleaners or steam jets.
!
Caution, risk of burns! Before cleaning,
wait until the residual heat display has
gone out.
!
Caution, risk of injury! The blade of the
included glass scraper is very sharp.
Replace damaged blades immediately.
Cleaning the Glass Ceramic
Clean the cooktop after every use. This prevents
food from being burnt into the cooktop surface.
Use the blade scraper to remove food residues and
grease splashes. Only use the blade on the glass
ceramic cooktop. Do not use the blade casing as it
may scratch the glass ceramic.
Use a glass ceramic cleaner and kitchen towel or a
soft, moist cloth to clean the surface when it is
lukewarm.
Wipe the surface with a moist cloth and rub dry
with a soft cloth.
Do not apply the cleaner if the surface is still too
hot. It can become stained.
Water marks can also be removed using lemon juice
or vinegar.
The glass ceramic cleaner will coat the glass
ceramic surface with a gleaming, dirt repellent film.
This will help to preserve the attractive appearance
of your cooktop over a long period of time and make
it easier to clean as well.
Do not use scouring, abrasive or chemically
aggressive cleaners (e.g. oven cleaner).
Do not use cleaners which contain sand or chlorine.
Do not use abrasive sponges or brushes.
Food with a high sugar content (e.g. boiled-over
milk, jam) can damage the surface of your cooktop.
Immediately remove such food using the glass
scraper.
Iridescent discoloration can be caused by the use
of unsuitable cleaning agents or abrasion from the
bases of some pots. These do not interfere with the
operation of the glass ceramic cooktop. Remove the
discoloration with glass ceramic cleaner.
Always keep the control panels clean and dry. Food
residues and spills can impair the function of the
control panels.
Please refer to the enclosed brochure for further
notes on cleaning.
Cleaning the Stainless Steel Frame
(only CE 491)
Use a soft cloth and light soapy liquid or a
commercially available stainless steel cleaner to
clean the cooktop frame. Only wipe in the direction
of the brushed metal.
Do not use any aggressive or abrasive cleaners.
Do not use the blade scraper, as it may scratch the
cooktop frame.
Do not use lemon or vinegar to clean the cooktop
frame. This could result in matt patches.
Cleaning the Twist Knob
Wipe the twist knob using lukewarm soapy water
only. Do not use any aggressive or abrasive
cleaners. The twist knob could be damaged if
cleaned in a dishwasher or immersed in soapy
water.
!
Page 24

24
The temperature of the cooking zones is controlled
by switching the heat on and off, this means that it
is not always possible to see the red, glowing heat.
If you select a low heat setting, the heat will switch
off more often than at higher heat settings. Even at
the highest setting the heat switches on and off.
There may be a gentle buzzing as the cooking zones
heat up.
The heat may show differently on the individual
cooking zones. Depending on the angle of vision,
the heat may appear to spread beyond the marked
boundary of the cooking zone. These are technical
features and do not influence quality or function.
If the appliance does not function correctly, check
the household fuses first.
If the power supply is functioning correctly, but your
appliance still does not work, please contact your
Gaggenau dealer who will provide you with the
address and telephone number of your nearest
manufacturer’s authorized service agent or contact
Gaggenau USA on 877.4GAGGENAU. Specify the
appliance type (see product label).
Please quote the E number (product number) and
the FD number (production number) of your
appliance when contacting the after-sales service.
The quality control slip bearing these numbers is
included with this manual. This quality control slip
should be kept, for guarantee reasons, together
with your operating and assembly instructions.
Repairs may only be carried out by authorized
technicians, in order to guarantee the safety of the
appliance.
!
Caution! Incorrect repairs may result in
serious injury to the user.
All poles of the appliance must be disconnected
from the mains when being repaired (switch off the
household fuse or the circuit breaker in the fuse
box).
Non compliance with these recommendations
results in the warranty coverage becoming invalid.
Useful Hints Maintenance
Page 25

25
Not every malfunction can be ascribed to a defect
of your cooker. If your appliance should not function
properly, search for the fault in the list below. If you
are not successful in correcting the fault with the
aid of the list below, then contact your Gaggenau
after-sales service.
The cooktop does not work
Check that the household fuses for the appliance
are OK. Check if there has been a power cut.
The cooktop functions but does not heat up. A
spot lights constantly in the timer display.
The cooktop is on show room mode after
installation. Disconnect the cooktop from the power
supply for at least 10 seconds. Reconnect the
cooktop and within 3 minutes carry out the following
procedure:
1 Cooktop must be switched of at main switch.
Timer must be off.
2 Touch the symbol extension l and keep the
finger pressed down. Within 3 seconds touch
and release the main switch.
3 Remove your finger from the symbol extension.
A signal will sound. The spot in the timer
display goes off.
The cooktop has switched itself off
The main switch was touched accidentally. Switch
the cooktop back on.
u400 display
The cooktop is connected incorrectly.
Disconnect the appliance from the mains using the
household fuse or the circuit breaker in the fuse
box. Call the installation technician.
E flashes in a cooking zone display
The control panel is very dirty, food has spilt over or
there is an object on the control panel. Wipe the
control panel thoroughly or remove the object.
Touch the appropriate control panel. The flashing
stops.
E flashes in all the cooking zone indicators and a
signal sounds
The main switch was touched continuously for more
than 5 seconds or there is an object on the main
switch. Wipe the control panel thoroughly or
remove the object. Switch the cooktop back on.
Er display and numbers
If an Er and numbers appear in the display, there is
a fault with the electronics. Switch the cooktop off
and on again using the household fuse or the circuit
breaker in the fuse box. Call the after-sales service
if the display appears again.
F2 display
The cooktop is too hot and has switched itself off.
Remove the pans from the cooking zones. F2
disappears from the display when the indicator is
acknowledged (by touching any control panel) and
when the cooking zones have cooled sufficiently.
Wait a few minutes until the cooking zones have
cooled down slightly. If F2 appears again after the
cooking zones are switched back on, the cooktop is
still too hot. Switch off the cooking zones and allow
to cool further.
F4 display
The control panel is too hot and the cooktop has
switched itself off. Check whether there is a hot
pan on the control panel.
Remove the pan from the control panel. Wait a few
minutes until the control panel has cooled down
slightly. If F4 appears again after the cooking zones
are switched back on, call the after-sales service.
F8 display
A cooking zone has been in constant operation for
too long. The holiday safeguard was activated.
Switch off the cooking zone. It can be switched on
again immediately.
Troubleshooting
Page 26

Page 27

Page 28

Gaggenau
780 Dedham Street
Canton, MA 02021
Telephone: 877.4GAGGENAU
USA
www.gaggenau-usa.com
Gaggenau Hausgeräte GmbH
Carl-Wery-Straße 34
81739 München
Germany
www.gaggenau.com
9000159826 EB 8708 enUS
 Loading...