

Page 1
1
BX 280/281-6..
en
fr
Installation Instructions
please keep
Notice de montage
à garder soigneusement
Instrucciones de Montaje
por favor, guardar
es
(724)
(752)
(47)
(min. 550)
(1428)
(547)
(1425)
56"
(1421)
(8)
(5)
28 1/2"
29 5/8"
1 7/8"
min. 21 11/16"
21 9/16"
(min. 200)
min. 8"
5/16"
1/4"
56
1/4"
56 1/8"
1
Page 2
2
3
2
! Important Safety Instructions
READ AND SAVE THESE INSTRUCTIONS
WARNING: If the information in this manual is not
followed exactly, fire or shock may result causing
property damage or personal injury.
WARNING: Do not repair or replace any part of the
appliance unless specifically recommended in the
manuals. Improper installation, service or
maintenance can cause injury or property damage.
Refer to this manual for guidance. All other servicing
should be done by a qualified technician.
! Appliance Handling Safety
Do not lift appliance by door handle.
Unit is heavy and requires at least two people or
proper equipment to move.
Hidden surfaces may have sharp edges. Use caution
when reaching behind or under appliance.
Safety Codes and Standards
This appliance complies with one or more of the
following Standards:
UL 858, The Standard for the Safety of Household
Electric Ranges
UL 923, The Standard for the Safety of Microwave
Cooking Appliances
UL 507, The Standard for the Safety of Electric
Fans
ANSI Z21.1-2000, The American National Standard
for Household Cooking Gas Appliances
CAN/CSA-C22.2 No. 113-M1984 Fans and
Ventilators
CAN/CSA-C22.2 No. 61-M89 Household Cooking
Ranges
It is the responsibility of the owner and the installer
to determine if additional requirements and/or
standards apply to specific installations.
! Electric Safety
Before you plug in an electrical cord, be sure all
controls are in the OFF position.
If required by the National Electrical Code (or
Canadian Electrical Code), this appliance must be
installed on a separate branch circuit.
Installer - show the owner the location of the circuit
breaker or fuse. Mark it for easy reference.
Important - Save these instructions for the local
electrical inspector's use.
Before installing, turn power OFF at the service
panel. Lock service panel to prevent power from
being turned ON accidentally.
Refer to data plate for more information.
en
3
11/16"
(94)
min. 1/4"
(min.
min.90°
5)
Page 3

Be sure your appliance is properly installed and
grounded by a qualified technician. Installation,
electrical connections and grounding must comply
with all applicable codes.
! Related Equipment Safety
Remove all tape and packaging before using the
appliance. Destroy the packaging after unpacking
the appliance. Never allow children to play with
packaging material.
Never modify or alter the construction of the
appliance. For example, do not remove leveling
legs, panels, wire covers or anti-tip
brackets/screws.
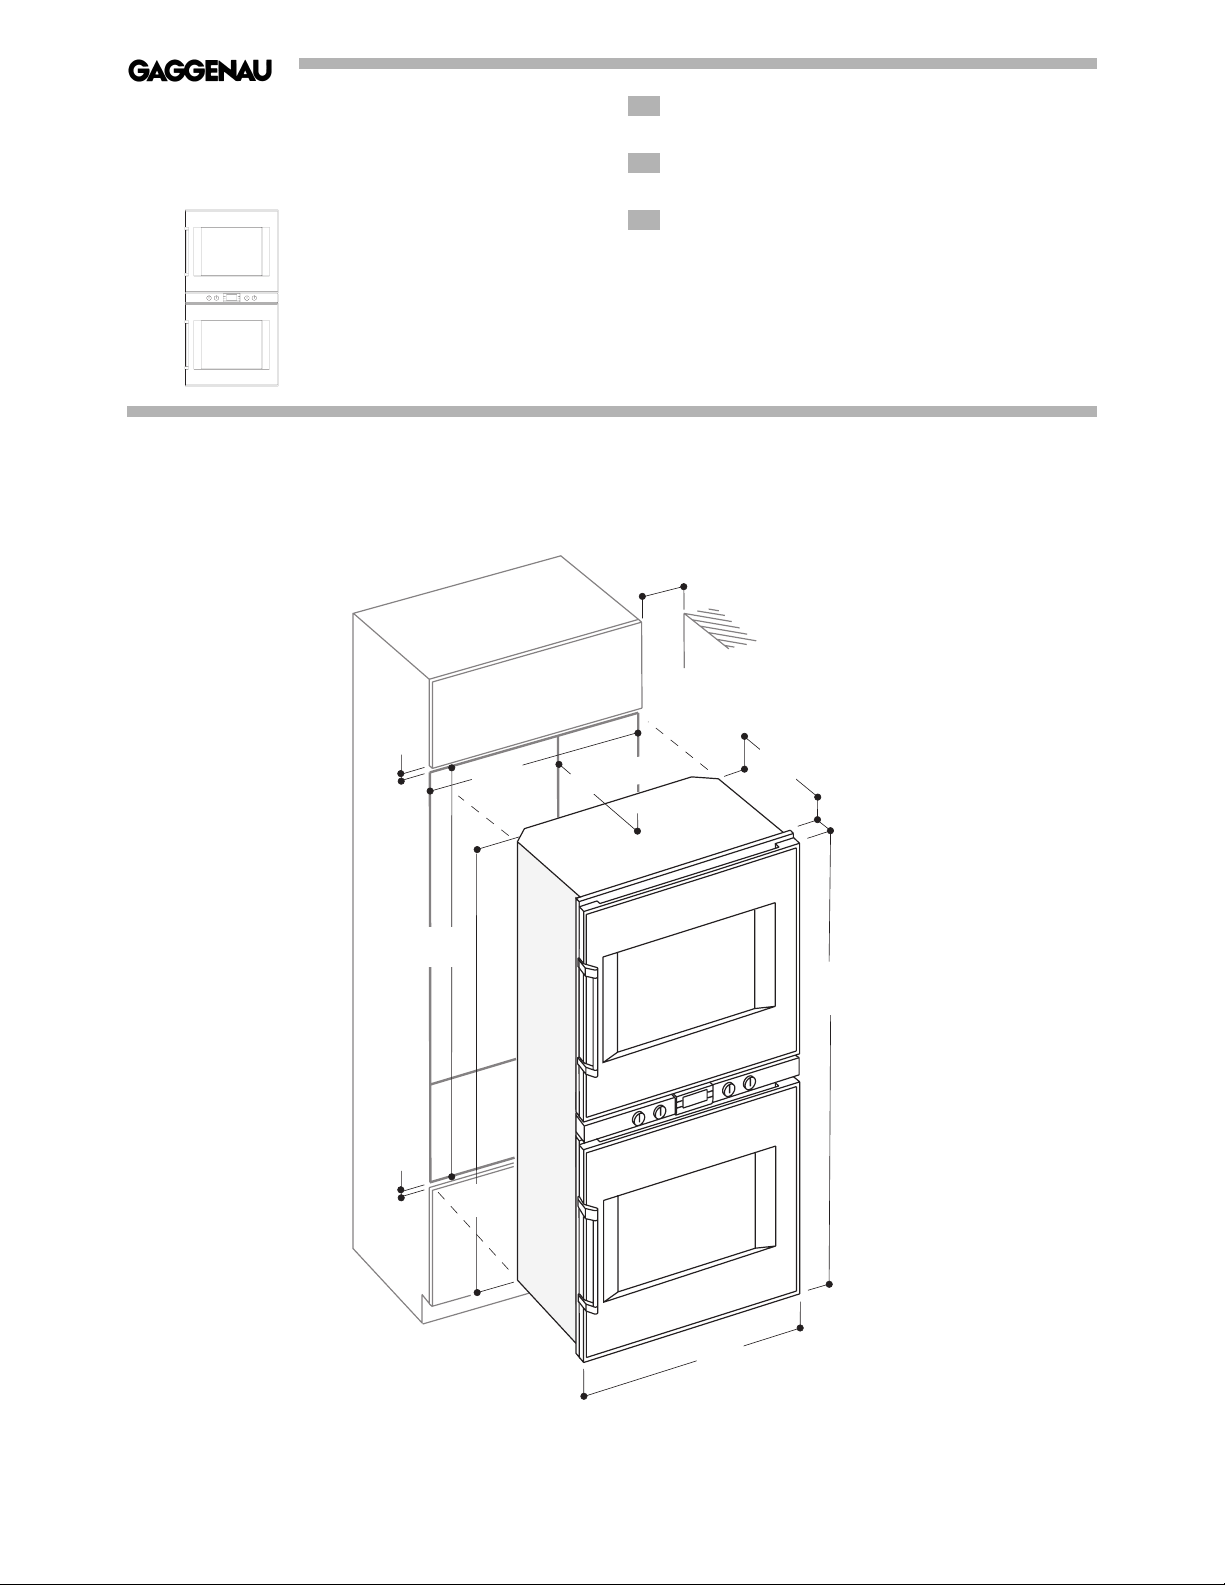
Preparing the Cabinet – Figure 1
Important: Pay attention to the weight of the
double oven (approx. 330 lb / 150 kg with
accessories). The support floor of the cabinet
must be able to withstand this weight.
Fitted units must be heat-resistant up to 200°F,
adjacent unit fronts up to at least 160°F.
Secure furniture which is not fitted to the wall using
a standard fixture.
Install the appliance low enough to allow baking
trays to be easily removed.
Cut out the units before fitting the oven. Remove
shavings as they can affect the function of electrical
components.
Electrical Connection
Observe rating plate data for voltage and total
rating.
Attach flexible conduit to the junction box.
Connect the oven lead wires to the junction box
supply wires in proper phase. Only connect in
accordance with the connection diagram.
1. Connect the red oven wire to the red electrical
supply wire (hot wire).
2. Connect the black oven wire to the black
electrical supply wire (hot wire).
3. Connect the white neutral oven wire to the
white neutral (not bare ground) electrical
supply wire.
4. Connect the bare ground oven wire to the bare
ground electrical supply wire.
To facilitate service, the flex conduit must not be
shortened and should be routed to permit
temporary removal of the oven.
NOTE: If the oven is installed and connected as
specified above, it will be completely grounded in
compliance with the National Electrical Code.
Do not trap the lead during installation and do not
guide it over sharp edges.
An all pin isolating switch with a contact gap of at
least 3 mm must be installed.
Corner Installation – Figure 2
Observe space requirements of door and door
handle when planning drawers beside the
appliance:
measurement cabinet edge – door panel:
1 7/8 ˝ (47 mm)
measurement cabinet edge – door handle edge:
3
11
/16 ˝ (94 mm)
Observe a minimum opening angle of 90° for corner
installation.
Installation – Figure 3
Important: Pay attention to the weight of the
double oven (approx. 330 lb / 150 kg with
accessories). Transport the appliance in an
upright position.
IMPORTANT: Do not lift the appliance by the door,
door handle or lower air vent. Lift the appliance by
the installation handles on both sides.
Insert the appliance in the cabinet and align it
centrally and horizontally.
Leave an air gap of at least
1
/4 ˝ (5 mm) between the
appliance and the front of other cabinets.
Secure the appliance with the screws provided.
If there is no fitted shelf above the oven in the
cabinet, secure the oven against tipping over when
the door is opened. Fit two standard angles
1
/4 ˝
(5 mm) above the appliance at 17 3/4 ˝ (450 mm)
depth inside the cabinet.
Combination with Warming Drawer
WS 2..
Important: Pay attention to the weight of the
double oven (approx. 330 lb / 150 kg with
accessories). A stable intermediate shelf must
be installed above the warming drawer.
Removal
Disconnect the appliance from the power supply.
Loosen the securing screws.
Lift the appliance slightly and pull it out completely.
3
Page 4

! Consignes importantes de
sécurité
LISEZ ET CONSERVEZ CES INSTRUCTIONS
AVERTISSEMENT : tout manquement au respect
strict des instructionsdonnées dans le présent
manuel peut entraîner un incendie ou un choc
électrique pouvant entraîner des dégâts matériels
ou des blessures corporelles.
AVERTISSEMENT : ne procédez à aucune
réparation ou remplacement de pièce sur cet
appareil à moins que cela ne soit spécifiquement
recommandé dans les notices. Une installation
incorrecte, une intervention inadéquate d’entretien
ou de maintenance peuvent provoquer des
blessures ou des dégâts matériels.
Pour tout conseil reportez-vous au présent manuel.
Toute autre opération d’entretien devra être
effectuée par un technicien qualifié.
! Sécurité lors de la manipulation
des appareils
Ne pas soulever l’appareil par la poignée de la
porte.
L’unité est lourde et deux personnes au minimum ou
un équipement appropriés sont nécessaires pour la
déplacer.
Les surfaces cachées peuvent présenter des arêtes
vives. Soyez prudents lorsque vous accédez à la
partie située sous ou derrière l’appareil.
Codes et Normes de sécurité
Cet appareil est conforme à l’une ou plusieurs des
normes suivantes :
UL 858, The Standard for the Safety of Household
Electric Ranges (norme pour la sécurité des
cuisinières électriques domestiques)
UL 923, The Standard for the Safety of Microwave
Cooking Appliances (norme pour la sécurité des
appareils de cuisson à micro-ondes)
UL 507, The Standard for the Safety of Electric
Fans (norme pour la sécurité des ventilateurs
électriques)
ANSI Z21.1-2000, The American National Standard
for Household Cooking Gas Appliances (norme
nationale américaine pour appareils de cuisson à
gaz domestiques)
CAN/CSA-C22.2 No. 113-M1984 Ventilateurs et
hottes
CAN/CSA-C22.2 No. 61-M89 Cuisinières
domestiques
C’est au propriétaire et à l’installateur qu’incombe
la responsabilité de déterminer si des exigences et
(ou) des normes complémentaires sont applicables
à chaque installation spécifique.
! Sécurité électrique
Avant de brancher le cordon électrique, assurezvous que toutes les commandes sont sur la position
« OFF ».
Si la norme américaine (NEC) ou la norme
canadienne (CEC) sur les installations électriques
l’exige, cet appareil doit être monté sur un circuit
terminal séparé.
Installateur – montrez au propriétaire l’endroit où se
trouve le disjoncteur ou le fusible. Identifiez-le pour
faciliter son repérage.
Important – À conserver pour l’inspecteur local en
construction/électricité.
Avant le montage, réglez le bouton du panneau de
commande sur « OFF ». Verrouillez le panneau de
commande pour éviter que le bouton ne soit
accidentellement placé sur « ON ».
Pour plus d’informations, reportez-vous à la plaque
d’identification.
Assurez-vous auprès d’un technicien qualifié que
votre appareil est convenablement installé et mis à
la terre. L’installation, les raccordements
électriques et la mise à la terre doivent être
effectués conformément à tous les codes
applicables.
! Sécurité des équipements
connexes
Retirez tous les rubans adhésifs et emballages
avant d’utiliser l’appareil. Détruisez l’emballage
après avoir déballé l’appareil. Ne laissez JAMAIS
les enfants jouer avec le matériel d’emballage.
N’apportez aucune transformation ou modification à
l’appareil. Ainsi, vous ne devez pas retirer les pieds
de réglage, les panneaux, les protections des fils ni
les vis et (ou) supports anti-basculement.
Préparation du meuble – Figure 1
Important : tenir compte du poids du four
double (330 lb / 150 kg environ avec les
accessoires). Le plateau du meuble sur lequel
repose le four doit être suffisamment solide.
Les unités montées doivent résister à une
température pouvant atteindre 200° F (95° C), les
façades des unités adjacentes au moins 160° F
(70° C).
Fixer les meubles qui ne sont pas accrochés au mur
avec une fixation standard.
4
fr
Page 5

Installer l’appareil suffisamment bas pour permettre
de retirer facilement les plateaux de cuisson.
Découper les unités avant d’équiper le four. Retirer
les copeaux car ils peuvent affecter le
fonctionnement des composants électriques.
Connexion électrique
Respecter les données de la plaque signalétique
pour la tension et les valeurs de raccordement.
Attacher la conduite flexible au boîtier de
connexion.
Connecter les câbles du four aux câbles
d’alimentation du boîtier de connexion dans la
phase appropriée. Connecter uniquement
conformément au schéma des connexions.
1. Branchez le fil rouge du four au fil
d’alimentation électrique rouge (fil chaud).
2. Branchez le fil noir du four au fil d’alimentation
électrique noir (fil chaud).
3. Branchez le fil neutre du four, de couleur
blanche, au fil d’alimentation électrique neutre
de couleur blanche (pas le fil de terre nu).
4. Branchez le fil de terre nu du four au fil de terre
nu de l’alimentation électrique.
Le conduit flexible ne doit pas être raccourci. Pour
faciliter l’entretien et la réparation, il doit être
acheminé de manière à permettre un démontage
temporaire du four.
NOTE : si le four est installé et connecté de la
manière spécifiée ci-dessus, il sera totalement relié
à la terre en conformité avec le Code National
Electrique.
Ne pas attacher le brin pendant l’installation et ne
pas le faire passer sur des arêtes tranchantes.
Il est nécessaire d’installer un commutateur
d’isolation de toutes les broches avec un écart de
contact de 3 mm au moins.
Installation en angle - figure 2
Respecter les obligations de poignée porte à porte
lors de la planification de tiroirs à côté de
l’appareil.
Dimension arête du meuble - panneau de porte :
1
7
/8 ˝ (47 mm)
Dimension arête du meuble – arête de poignée de
porte : 3 11/16 ˝ (94 mm)
Respecter un angle d’ouverture minimum de 90°
pour l’installation en angle.
Installation – figure 3
Important : tenir compte du poids du four
double (330 lb / 150 kg environ avec les
accessoires). Transporter l’appareil seulement
en position verticale.
IMPORTANT : ne pas soulever l’appareil par la
porte, la poignée de la porte ou la ventilation d’air
inférieure. Soulever l’appareil par les poignées
d’installation des deux côtés.
Insérer l’appareil dans le meuble et le centrer et
l’aligner horizontalement.
Laisser un espace d’air d’au moins 5 mm (
1
/4 ˝)
entre l’appareil et la façade des autres meubles.
Fixer l’appareil avec les vis fournies.
S’il n’y a pas d’étagère montée au-dessus du four
dans le meuble, fixer le four pour l’empêcher de
basculer lorsque la porte est ouverte. Monter deux
cornières standard de 5 mm (
1
/4 ˝) au-dessus de
l’appareil à une profondeur de 450 mm (17 3/4 ˝)
dans le meuble.
Combinaison avec le tiroir chauffeplats WS 2..
Important : tenir compte du poids du four
double (330 lb / 150 kg environ avec les
accessoires). Il faut installer au-dessus du tiroir
chauffant un plateau intermédiaire
suffisamment solide.
Démontage
Déconnecter l’appareil de l’alimentation électrique.
Desserrer les vis de fixation.
Soulever légèrement l’appareil et le sortir
complètement.
5
Page 6

! Instrucciones de seguridad
importantes
LEA Y GUARDE ESTAS INSTRUCCIONES
ADVERTENCIA: Si no se sigue estrictamente la
información que contiene este manual, puede
producirse un incendio o una descarga que
provoque daños personales o materiales.
ADVERTENCIA: No repare ni sustituya ninguna
pieza del aparato a menos que se recomiende
específicamente en los manuales. La instalación, el
servicio o el mantenimiento incorrectos pueden
causar daños personales o materiales. Consulte
este manual para saber cómo proceder. Todos los
demás trabajos de servicio deben ser realizados
por un técnico cualificado.
! Seguridad de manipulación de
los aparatos
No levante el aparato cogiéndolo por el asa de la
puerta.
El aparato es muy pesado y para moverlo se
requieren como mínimo dos personas o un equipo
apropiado.
Las superficies ocultas pueden tener bordes
afilados. Tenga precaución al introducir las manos
detrás o debajo del aparato.
Reglamentos y normas de seguridad
Este aparato cumple con una o más de las normas
siguientes:
UL 858, Norma de seguridad para cocinas
eléctricas domésticas
UL 923, Norma de seguridad para aparatos de
cocinado por microondas
UL 507, Norma de seguridad para ventiladores
eléctricos
ANSI Z21.1-2000, Norma nacional de los EE.UU.
para aparatos de cocinado domésticos a gas
CAN/CSA-C22.2 N° 113-M1984 Ventiladores
CAN/CSA-C22.2 N° 61-M89 Cocinas domésticas
Es responsabilidad del propietario y del instalador
determinar si se aplican requisitos y/o normas
adicionales a instalaciones específicas.
! Seguridad eléctrica
Antes de conectar el cable de alimentación,
cerciórese de que todos los mandos se encuentran
apagados.
En caso de exigirlo el Reglamento eléctrico
nacional (o el Reglamento eléctrico canadiense),
este aparato deberá instalarse en un circuito
derivado.
Instalador – muestre al propietario la ubicación del
disyuntor o fusible. Márquelo para facilitar su
localización.
Importante – Guarde estas instrucciones para que
las pueda utilizar el inspector de instalaciones
eléctricas local.
Antes de instalar, desconecte la alimentación
eléctrica en el panel de servicio. Bloquee el panel
de servicio para evitar que la alimentación se active
de nuevo accidentalmente.
Para más información, consulte la placa de datos.
Asegúrese de que su aparato esté instalado y
puesto a tierra correctamente por un técnico
cualificado. La instalación, las conexiones
eléctricas y la puesta a tierra deben cumplir con
todos los códigos aplicables.
! Seguridad relacionada con el
equipo
Retire todas las cintas y material de embalaje antes
de usar el aparato. Destruya el embalaje después
de desempaquetar el aparato. No deje nunca que
los niños jueguen con el material de embalaje.
No modifique ni altere nunca la construcción del
aparato. Por ejemplo, no extraiga las patas de
nivelación, paneles, cubiertas de alambre o
abrazaderas/ tornillos antivuelco.
Preparación del armario – figrua 1
Importante: Observe el peso del horno doble
(aprox. 330 lb / 150 Kg. con accesorio). El suelo
de apoyo del armario de empotrar debe ser lo
suficientemente sólido.
Las unidades empotradas han de resistir hasta
200 °F, y la parte frontal de las unidades
adyacentes ha de resistir hasta 160 °F.
Asegure los muebles que no estén fijados a la
pared con una pieza de fijación estándar.
Instale el aparato a una altura suficientemente baja
para poder extraer las bandejas con facilidad.
Antes de montar el horno haga los cortes en las
unidades. Elimine los recortes, ya que podrían
interferir en el correcto funcionamiento de los
componentes eléctricos.
6
es
Page 7

Conexión eléctrica
Preste atención a la tensión y la potencia indicadas
en la placa de características.
Conecte el conducto flexible a la caja de
conexiones.
Conecte los conductores del horno a la fase
correspondiente de los cables de alimentación de
la caja de conexiones. Realice las conexiones en
estricta conformidad con el esquema de
conexiones.
1. Conecte el hilo rojo del horno al hilo rojo del
suministro eléctrico (hilo caliente).
2. Conecte el hilo negro del horno al hilo negro
del suministro eléctrico (hilo caliente).
3. Conecte el hilo blanco neutro del horno al hilo
blanco neutro del suministro eléctrico.
4. Conecte el hilo de conexión a tierra sin
aislamiento del horno al hilo a tierra sin
aislamiento del suministro eléctrico.
Con el fin de facilitar las reparaciones, el conducto
flexible no se debe acortar y se debe guiar para
permitir el retiro temporal del horno.
NOTA: Si el horno se instala y conecta tal como se
indicó anteriormente, quedará bien conectado a
tierra conforme al reglamento eléctrico nacional.
Durante la instalación preste atención de no
pellizcar los cables ni de pasarlos por encima de
bordes afilados.
Se ha de instalar un conmutador con las clavijas
totalmente aisladas y con una distancia mínima de
3 mm entre contactos.
Instalación en esquina – figura 2
Cuando planifique el montaje de cajones al lado del
aparato, tenga en cuenta el espacio necesario para
la puerta y el asa.
medida borde del armario – panel de la puerta:
1
7
/8 ˝ (47 mm)
medida borde del armario – borde del asa de la
puerta: 3 11/16 ˝ (94 mm)
Cuando realice la instalación en una esquina,
observe un ángulo de apertura mínimo de 90 °.
Instalación – figura 3
Importante: Observe el peso del horno doble
(aprox. 330 lb / 150 Kg. con accesorio).
Transporte el aparato sólo en posición vertical.
IMPORTANTE: No levante el aparato cogiéndolo de
la puerta, el asa o el orificio de ventilación inferior.
Para levantarlo, utilice los asideros de instalación
que hay a ambos lados.
Introduzca el aparato en el armario, céntrelo y
alinéelo horizontalmente.
Deje un mínimo de
1
/4 ˝ (5 mm) de separación entre
el aparato y la parte frontal del resto de armarios.
Asegure el aparato con los tornillos suministrados a
tal efecto.
Si no hay ningún estante por encima del horno una
vez montado en el armario, asegúrelo para que no
vuelque cuando se abra la puerta. Monte dos
ángulos estándar de
1
/4 ˝ (5 mm) encima del
aparato, a una profundidad de 17
3
/4 ˝ (450 mm)
dentro del armario.
Combinación con un cajón
calentador WS 2..
Importante: Observe el peso del horno doble
(aprox. 330 lb / 150 kg con accesorio). Por
encima del cajón térmico deberá montarse un
suelo intermedio suficientemente sólido.
Desmontaje
Desconecte el aparato de la alimentación eléctrica.
Afloje los tornillos de sujeción.
Levante el aparato ligeramente y extráigalo
completamente.
7
Page 8

Gaggenau
780 Dedham Street
Canton, MA 02021
Telephone: 877.4GAGGENAU
USA
www.gaggenau-usa.com
Gaggenau Hausgeräte GmbH
Carl-Wery-Straße 34
81739 München
Germany
www.gaggenau.com
9000203660 EB 8809
 Loading...