


Gaggenau
Gaggenau
Instruction manual
Instrucciones de uso
Instruções de serviço
Οδηγíες χρήσεω
AC 402/462/472/ 482
Ceiling ventilation
Ventilación del techo
Ventilação de teto
Εξαερισμός οροφής

Table of contents
Instructi on manual
Important safety information 3
Environmental protection 6
Saving energy 6
Environmentally-friendly disposal 6
Operating modes 6
Exhaust air mode 6
Air recirculation 6
Operating the appliance 7
Control panel 7
Remote control 7
Setting the fan 7
Intensive setting 7
Run-on function 8
Interval ventilation 8
Saturation display 8
Lighting 8
Safety shut-off 8
Cleaning and maintenance 9
Trouble shooting 12
Replacing the batteries in the remote control 13
Aftersales service 14
Accessory 14
: Additional information on products,
accessories, replacement parts and services can be
found at www.gaggenau.com and in the online shop
www.gaggenau.com/zz/store
2
m Important safety information
Read these instructions carefully. Only then will you be able to operate your appliance safely and correctly. Retain the instruction manual and installation instructions for future use or for subsequent owners.
The appliance can only be used safely if it is correctly installed according to the safety instructions. The installer is responsible for ensuring that the appliance works perfectly at its installation location.
This appliance is intended for domestic use and
the household environment only. The appliance
is not intended for use outside. Do not leave the
appliance unattended during operation. The
manufacturer is not liable for damage which is
caused by improper use or incorrect operation.
This appliance is intended for use up to a maximum height of 2000 metres above sea level.
This appliance may be used by children over the
age of 8 years old and by persons with reduced
physical, sensory or mental capabilities or by
persons with a lack of experience or knowledge
if they are supervised or are instructed by a
person responsible for their safety how to use
the appliance safely and have understood the
associated hazards.
Children must not play with, on, or around the appliance. Children must not clean the appliance or carry out general maintenance unless they are at least 15 years old and are being supervised.
Keep children below the age of 8 years old at a safe distance from the appliance and power cable.
Check the appliance for damage after unpacking it. Do not connect the appliance if it has been damaged in transport.
Always ensure an adequate air supply in the
room if the appliance is being operated in air
extraction mode at the same time as a non-roomsealed heat-producing appliance.
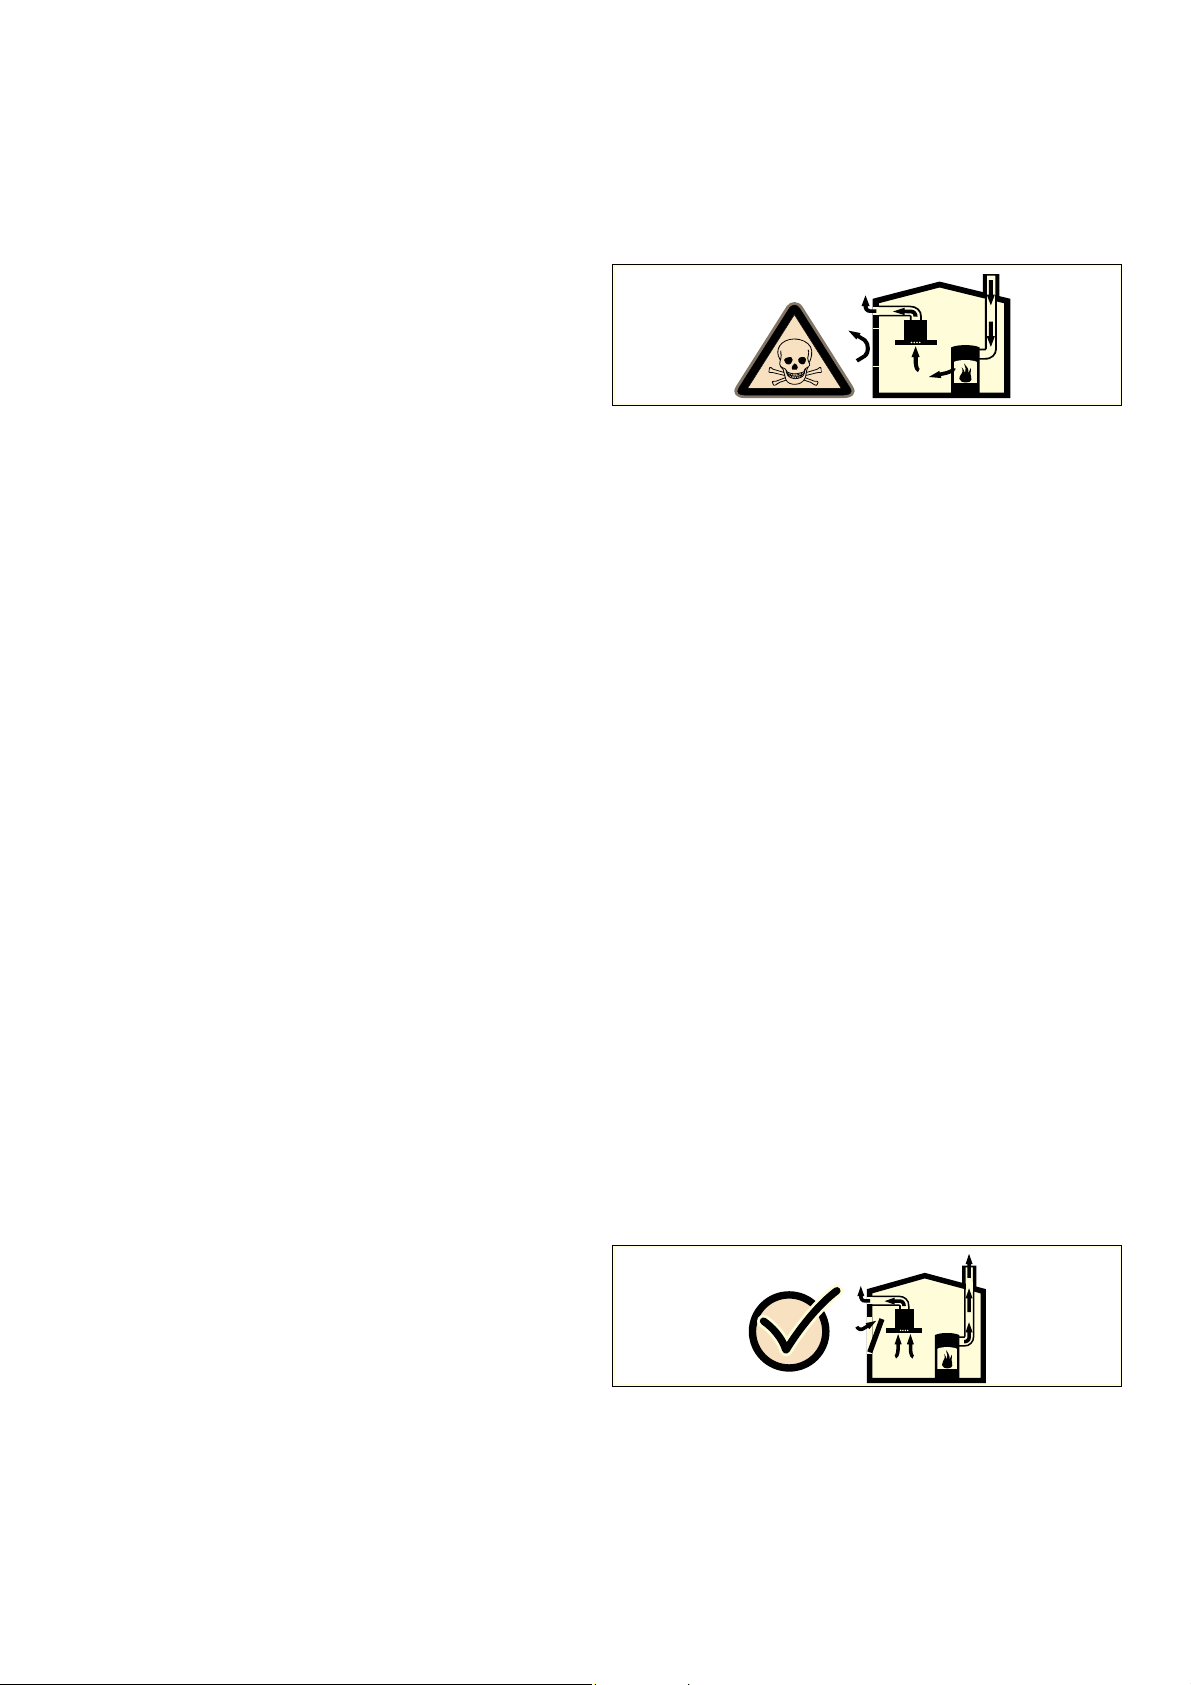
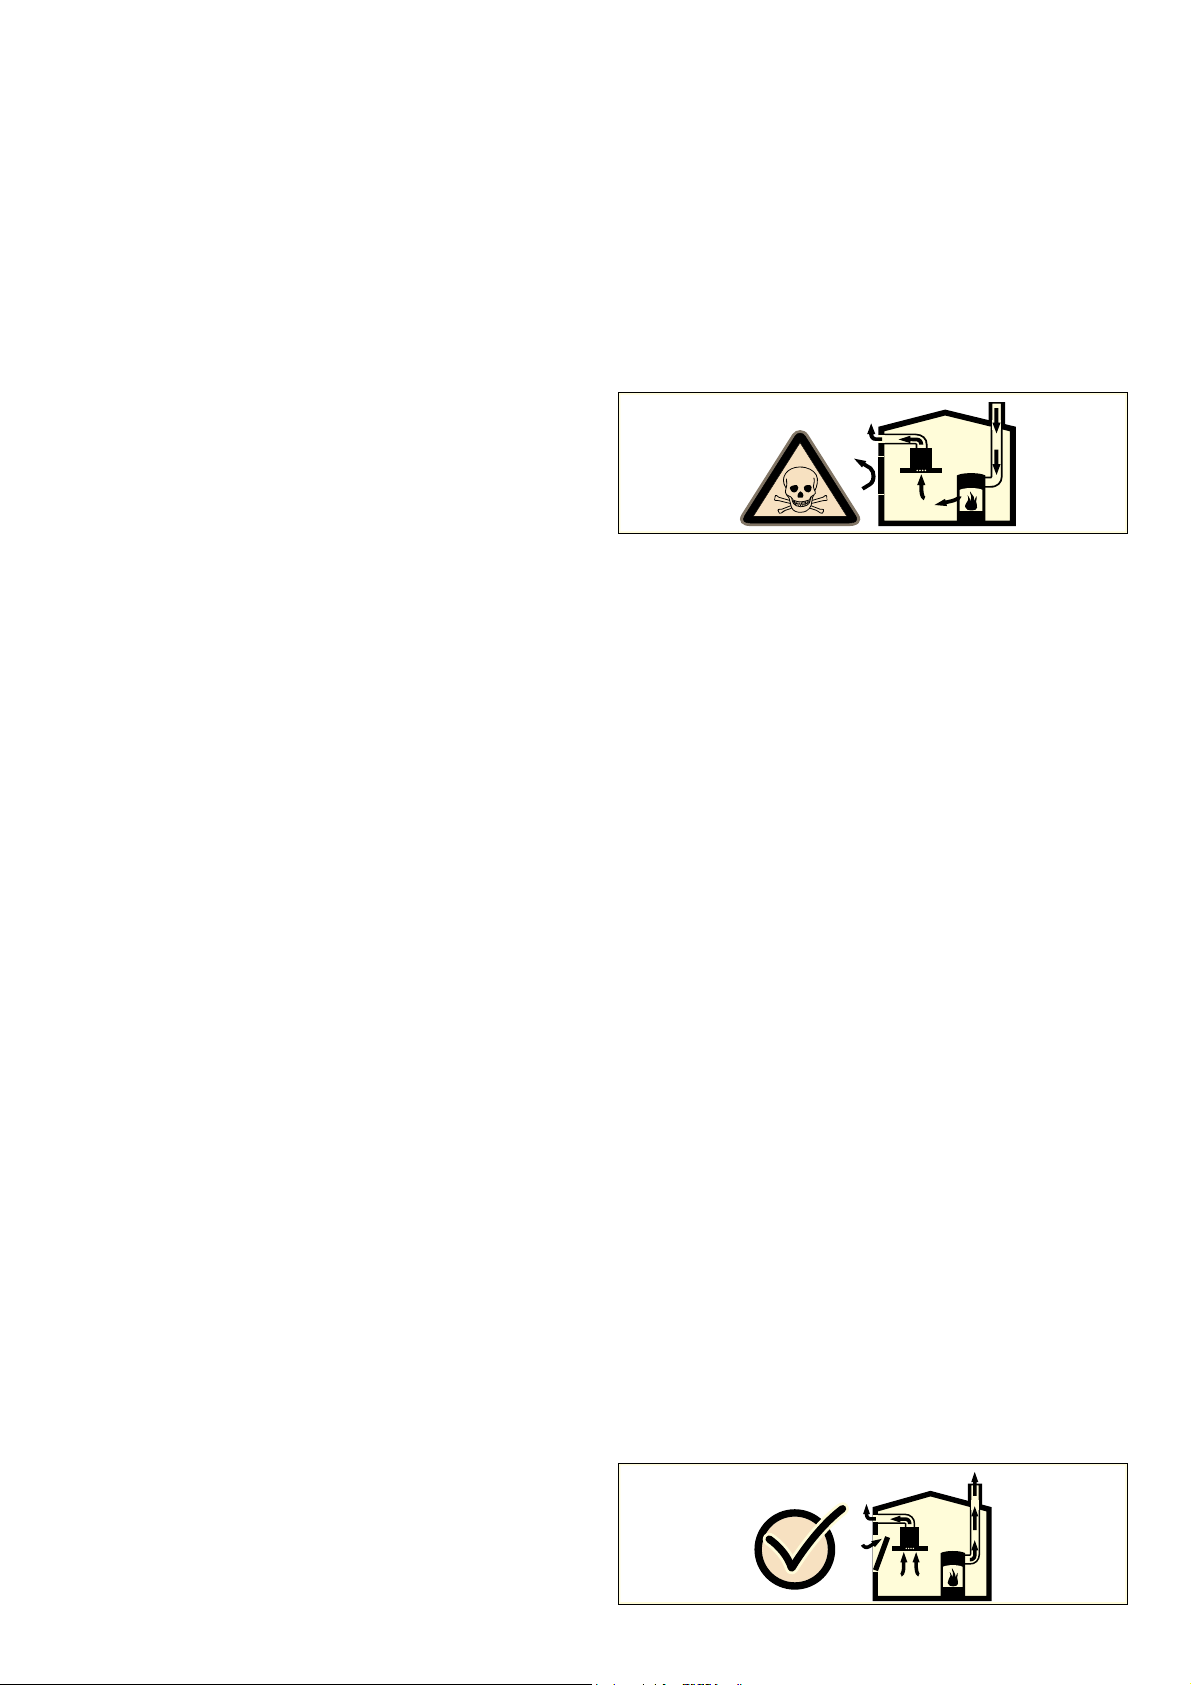
Non-room-sealed heat-producing appliances
(e.g. gas-, oil-, wood- or coal-powered heaters,
continuous flow heaters or water heaters) draw
in combustion air from the room in which they
are installed and discharge the exhaust gases
into the open through an exhaust gas system
(e.g. a chimney).
While the ceiling ventilation is switched on, air is extracted from the kitchen and adjacent rooms – without sufficient supply air, this causes a vacuum. Poisonous gases from the chimney or the extraction shaft are drawn back into the living space.
▯ Therefore, there must always be an
adequate air supply.
▯ A supply-/exhaust-air wall box alone will not
ensure compliance with the limit.
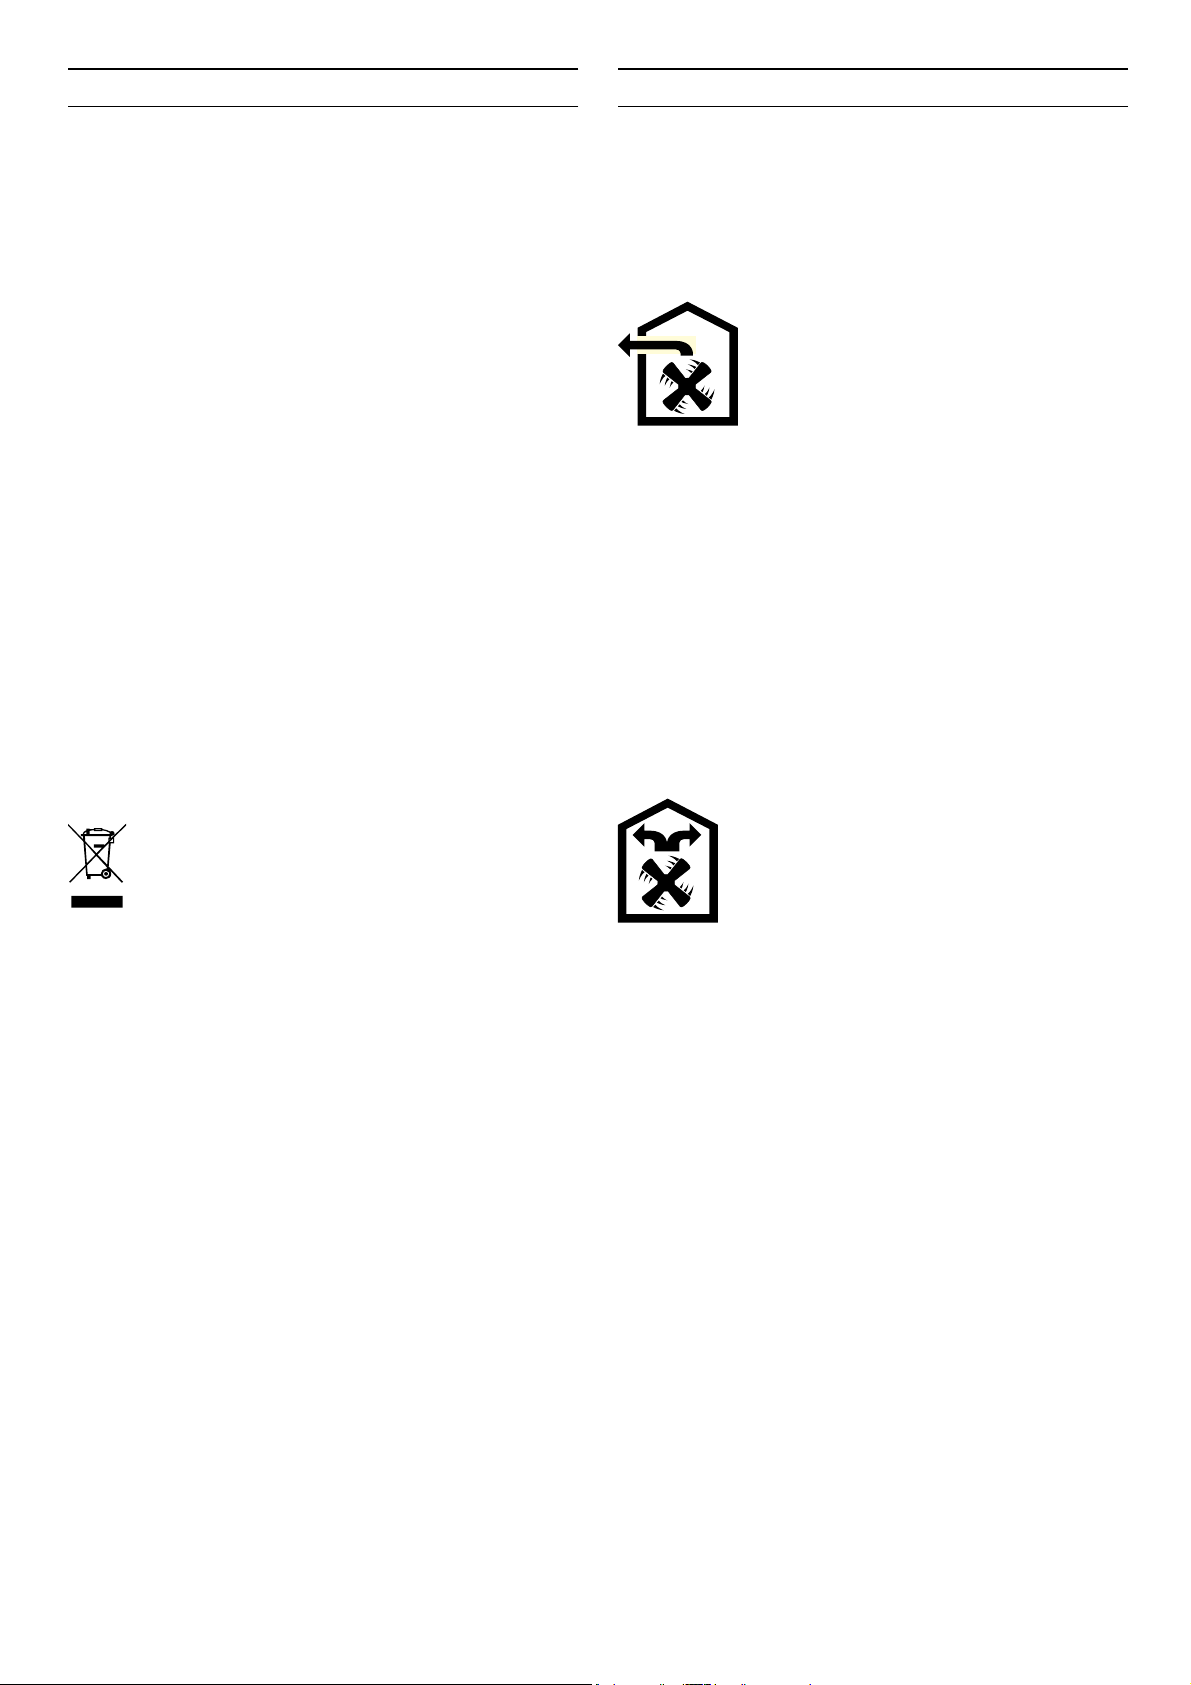
It is therefore only possible to safely operate the
appliance if the vacuum in the installation room
of the heat-producing appliance does not
exceed 4 Pa (0.04 mbar). This can be achieved
when the air needed for combustion is able to
enter through openings that cannot be sealed,
for example through doors, windows, supply-/
exhaust-air wall boxes or by other technical
means.
This appliance is not intended for operation with an external clock timer or a remote control.
Danger of suffocation!
Packaging material is dangerous to children. Never allow children to play with packaging material.
Danger of death!
Risk of poisoning from flue gases that are drawn back in.
In any case, consult a chimney sweep. They are able to assess the house's entire ventilation setup and will suggest the ventilation measures suitable for you.
3

Unrestricted operation is possible if the ceiling ventilation is operated exclusively in recirculation mode.
Risk of fire!
▯ Grease deposits in the grease filter may
catch fire.
Clean the grease filter at least every 2 months.
Never operate the appliance without the grease filter.
Risk of fire!
▯ Grease deposits in the grease filter may
catch fire. Never work with naked flames
close to the appliance (e.g. flambéing). Do
not install the appliance near a heatproducing appliance for solid fuel (e.g. wood
or coal) unless a closed, non-removable
cover is available. There must be no flying
sparks.
Risk of fire!
▯ Hot oil and fat can ignite very quickly. Never
leave hot fat or oil unattended. Never use
water to put out burning oil or fat. Switch off
the hotplate. Extinguish flames carefully
using a lid, fire blanket or something similar.
Risk of fire!
▯ When gas burners are in operation without
any cookware placed on them, they can
build up a lot of heat. A ventilation appliance
installed above the cooker may become
damaged or catch fire. Only operate the gas
burners with cookware on them.
Risk of fire!
▯ Operating several gas burners at the same
time gives rise to a great deal of heat. The
ventilation appliance may become damaged
or catch fire. The ventilation appliance must
only be combined with gas burners that do
not exceed the maximum total output of 18
kW. If the total output exceeds 12 kW, the
local regulations regarding room ventilation,
room size and the combination of ventilation
appliances with recirculation or circulated
air mode must be observed.
Risk of burns!
The accessible parts become very hot when in operation. Never touch hot parts. Keep children at a safe distance.
Risk of injury!
▯ Components inside the appliance may have
sharp edges. Wear protective gloves.
Risk of injury!
▯ Risk of falling when working on the
appliance. Use a stable stepladder. Choose
a suitable stepladder for the working height.
Only use the stepladder when it is fully
opened and on level ground. Ensure that the
spreading lock is locked in place. Always
stand on the stepladder with two feet, do not
climb too high and do not lean over the
sides.
Risk of electric shock!
▯ A defective appliance may cause electric
shock. Never switch on a defective
appliance. Unplug the appliance from the
mains or switch off the circuit breaker in the
fuse box. Contact the after-sales service.
Risk of electric shock!
▯ Incorrect repairs are dangerous. Repairs
may only be carried out and damaged power
cables replaced by one of our trained aftersales technicians. If the appliance is
defective, unplug the appliance from the
mains or switch off the circuit breaker in the
fuse box. Contact the after-sales service.
Risk of electric shock!
▯ Do not use any high-pressure cleaners or
steam cleaners, which can result in an
electric shock.
4

Causes of damage
Caution!
Risk of damage due to corrosion. Always switch on the
appliance while cooking to avoid condensation.
Condensate can produce corrosion damage.
Always replace faulty bulbs to prevent the remaining
bulbs from overloading.
Risk of damage due to ingress of humidity into the
electronic circuitry. Never clean operator controls with a
wet cloth.
Surface damage due to incorrect cleaning. Clean
stainless steel surfaces in the direction of the grain
only. Do not use any stainless steel cleaners for
operator controls.
Surface damage due to strong or abrasive cleaning
agents. Never use strong and abrasive cleaning agents.
Risk of damage from returning condensate. Install the
exhaust duct in such a way that it falls away from the
appliance slightly (1° slope).
5
Environmental protection
Operating modes
Your new appliance is particularly energy-efficient. Here
you can find tips on how to save even more energy when
using the appliance, and how to dispose of your
appliance properly.
Saving energy
▯ Only switch the ventilation on when necessary. You
do not need to switch the ventilation on when
cooking something for a short time that does not
have a strong smell.
▯ Select a fan setting according to what you are
cooking.
▯ Switch the ventilation off again after cooking.
▯ Cleaning the grease filter regularly will increase the
efficiency of the ventilation.
▯ Switch the lighting on the appliance off if you are
not using it.
Environmentally-friendly disposal
This appliance can be used in exhaust-air mode or
circulating-air mode.
Exhaust air mode
The air which is drawn in is cleaned by the
grease filters and conveyed to the exterior
by a pipe system.
Note: The exhaust air must not be conveyed into a
functioning smoke or exhaust gas flue or into a shaft
which is used to ventilate installation rooms which
contain heating appliances.
▯ Before conveying the exhaust air into a non-
functioning smoke or exhaust gas flue, obtain the
consent of the heating engineer responsible.
▯ If the exhaust air is conveyed through the outer wall,
a telescopic wall box should be used.
Dispose of packaging in an environmentally-friendly
manner.
This appliance is labelled in accordance with
European Directive 2012/19/EU concerning
used electrical and electronic appliances
(waste electrical and electronic equipment WEEE). The guideline determines the
framework for the return and recycling of used
appliances as applicable throughout the EU.
Air recirculation
The air which is drawn in is cleaned by
the grease filters and an activated carbon
filter, and is conveyed back into the
kitchen.
Note: To bind odours in air recirculation mode, you
must install an activated carbon filter. The different
options for operating the appliance in air recirculation
mode can be found in the brochure. Alternatively, ask
your dealer. The required accessories are available from
specialist retailers, from customer service or from the
Online Shop.
6
Operating the appliance
Note: Switch on the ceiling ventilation when you start
cooking and switch it off again a few minutes after you
have finished cooking. This is the most effective way of
removing the kitchen fumes.
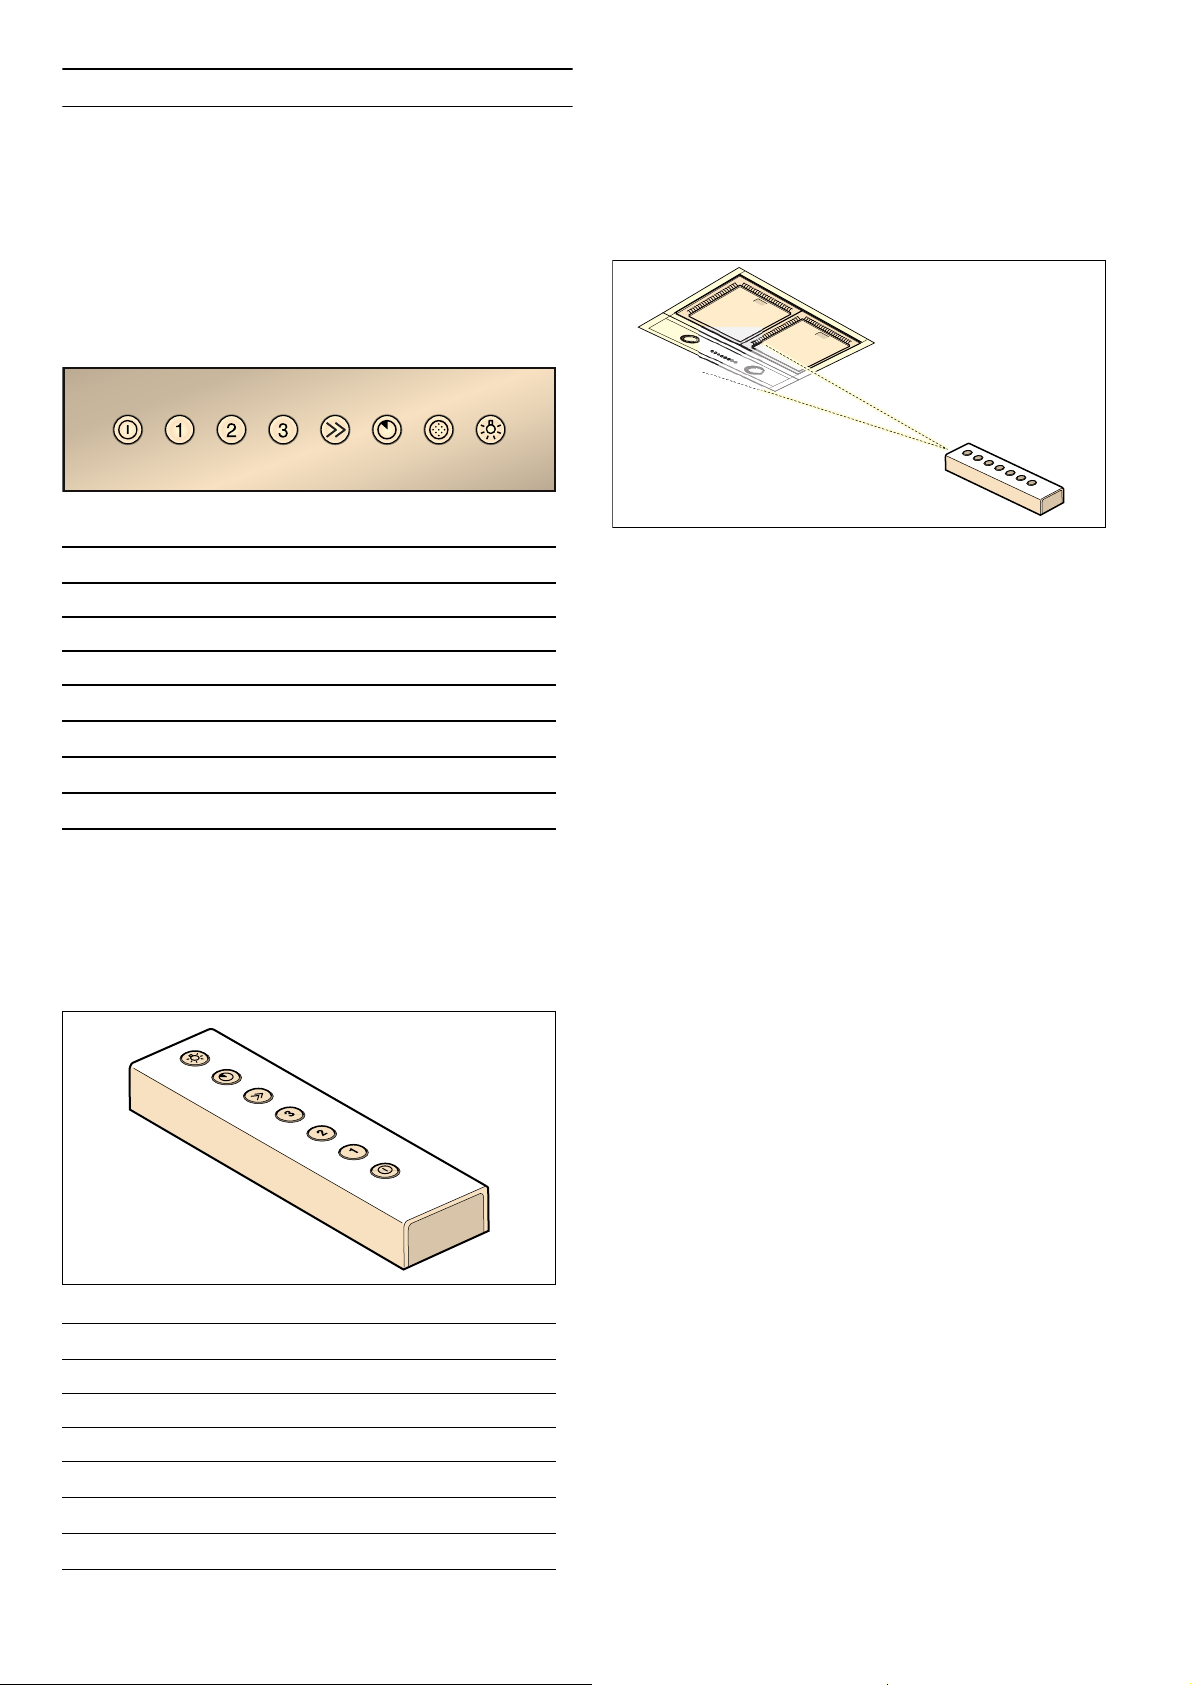
Control panel
Switches the fan on/off
#
Point the remote control at the control panel.
Notes
‒ Ensure that the ceiling ventilation is not obstructed.
‒ If the appliance does not respond even when the
remote control is very close, replace the remote
control batteries.
1 Switches on fan setting 1
2 Switches on fan setting 2
3 Switches on fan setting 3
Switches on intensive mode
Ž
Switches on the fan run-on
ž
Resets the saturation indicator
œ
Switches on the lighting
ž
Remote control
Except for resetting the saturation indicator, you can
operate all appliance functions using the control panel
or remote control.
Setting the fan
Note: Always adjust the fan strength to meet current
conditions. If there is a large build-up of steam or fumes,
select a high fan setting.
Switching on
1 Press the # button.
The fan starts at setting 2.
2 Press the 1, 2, 3 or Ž button to set the
corresponding fan setting.
Note: When using the remote control, you can only
switch the fan on by pressing button 1, 2, 3 or Ž. Press
the # button to switch the fan off.
Switching off
Press the # button.
Intensive setting
Switches off the fan
#
1 Switches on fan setting 1
2 Switches on fan setting 2
3 Switches on fan setting 3
Switches on intensive mode
Ž
Switches on the fan run-on
ž
Switches on the lighting
ž
You can use the intensive setting if there is a large buildup of odours and fumes/vapours.
Switching on
1 Press the # button.
The fan starts at setting 2.
2 Press the Ž button.
Intensive mode is activated.
Note: Intensive mode runs for six minutes. Once
this time has elapsed, the appliance switches back
to the previously selected fan setting.
Note: Using the remote control, you can switch on the
intensive setting directly by pressing the Ž button.
7

Switching off
Lighting
Press the # button or the button for another fan
setting.
Intensive mode is deactivated.
Run-on function
Switching on
The run-on function can be activated for any fan setting.
1 Select fan setting 1, 2, 3 or
2 Press the ž button.
The run-on time for all fan settings is six minutes.
Once this time has elapsed, ventilation switches off
automatically. If the lighting is switched on, it
remains on once the run-on time has elapsed.
Switching off
Press the ž button or the button for another fan
setting.
The run-on function stops before the remaining run-on
time elapses.
Ž.
The lighting can be switched on and off independently
of the ventilation system.
Switching on or off
Press the ž button.
Safety shut-off
For your safety, the appliance has a safety switch-off
function. The lighting switches off after 12 hours and
the fan after 4 hours if the appliance is not operated
during this time. Exception: The fan is not switched off
during the interval ventilation.
Interval ventilation
Switching on
With interval ventilation, the ventilation switches on
automatically for six minutes every hour.
1 Press fan setting 1, 2 or 3. 2 Press the ž button twice.
The ž button and the button for the fan setting
selected flash alternately. The interval ventilation is
switched on.
Switching off
Press the # button.
The interval ventilation is switched off.
Saturation display
If the metal grease filters are saturated, the œ button
flashes.
If you have not yet done so, the metal grease filters
should be cleaned now.
For instructions on how to clean the metal grease filters,
please refer to the Cleaning and maintenance section.
Resetting the saturation indicator
Press the œ button.
8
Cleaning and maintenance
Risk of burns!
m
The appliance becomes hot during operation. Allow the
appliance to cool down before cleaning.
m Risk of electric shock!
Penetrating moisture may result in an electric shock.
Clean the appliance using a damp cloth only. Before
cleaning, pull out the mains plug or switch off the circuit
breaker in the fuse box.
m Risk of electric shock!
Area Cleaning agent
Glass Glass cleaner:
Clean with a soft cloth. Do not use a
glass scraper.
Controls Hot soapy water:
Clean using a damp dish cloth and dry
with a soft cloth/towel.
Risk of electric shock caused by penetrating moisture.
Risk of damage to the electronics from
penetrating moisture. Never clean
operating controls with a wet cloth.
Do not use any stainless steel cleaners.
Do not use any high-pressure cleaners or steam
cleaners, which can result in an electric shock.
m Risk of injury!
Risk of falling when working on the appliance. Use a
stable stepladder.
m Risk of injury!
Components inside the appliance may have sharp
edges. Wear protective gloves.
Cleaning agents
To ensure that the different surfaces are not damaged
by using the wrong cleaning agent, observe the
information in the table. Do not use any of the following:
▯ Harsh or abrasive cleaning agents,
▯ Cleaning agents with a high alcohol content,
▯ Hard scouring pads or cleaning sponges,
▯ High-pressure cleaners or steam cleaners.
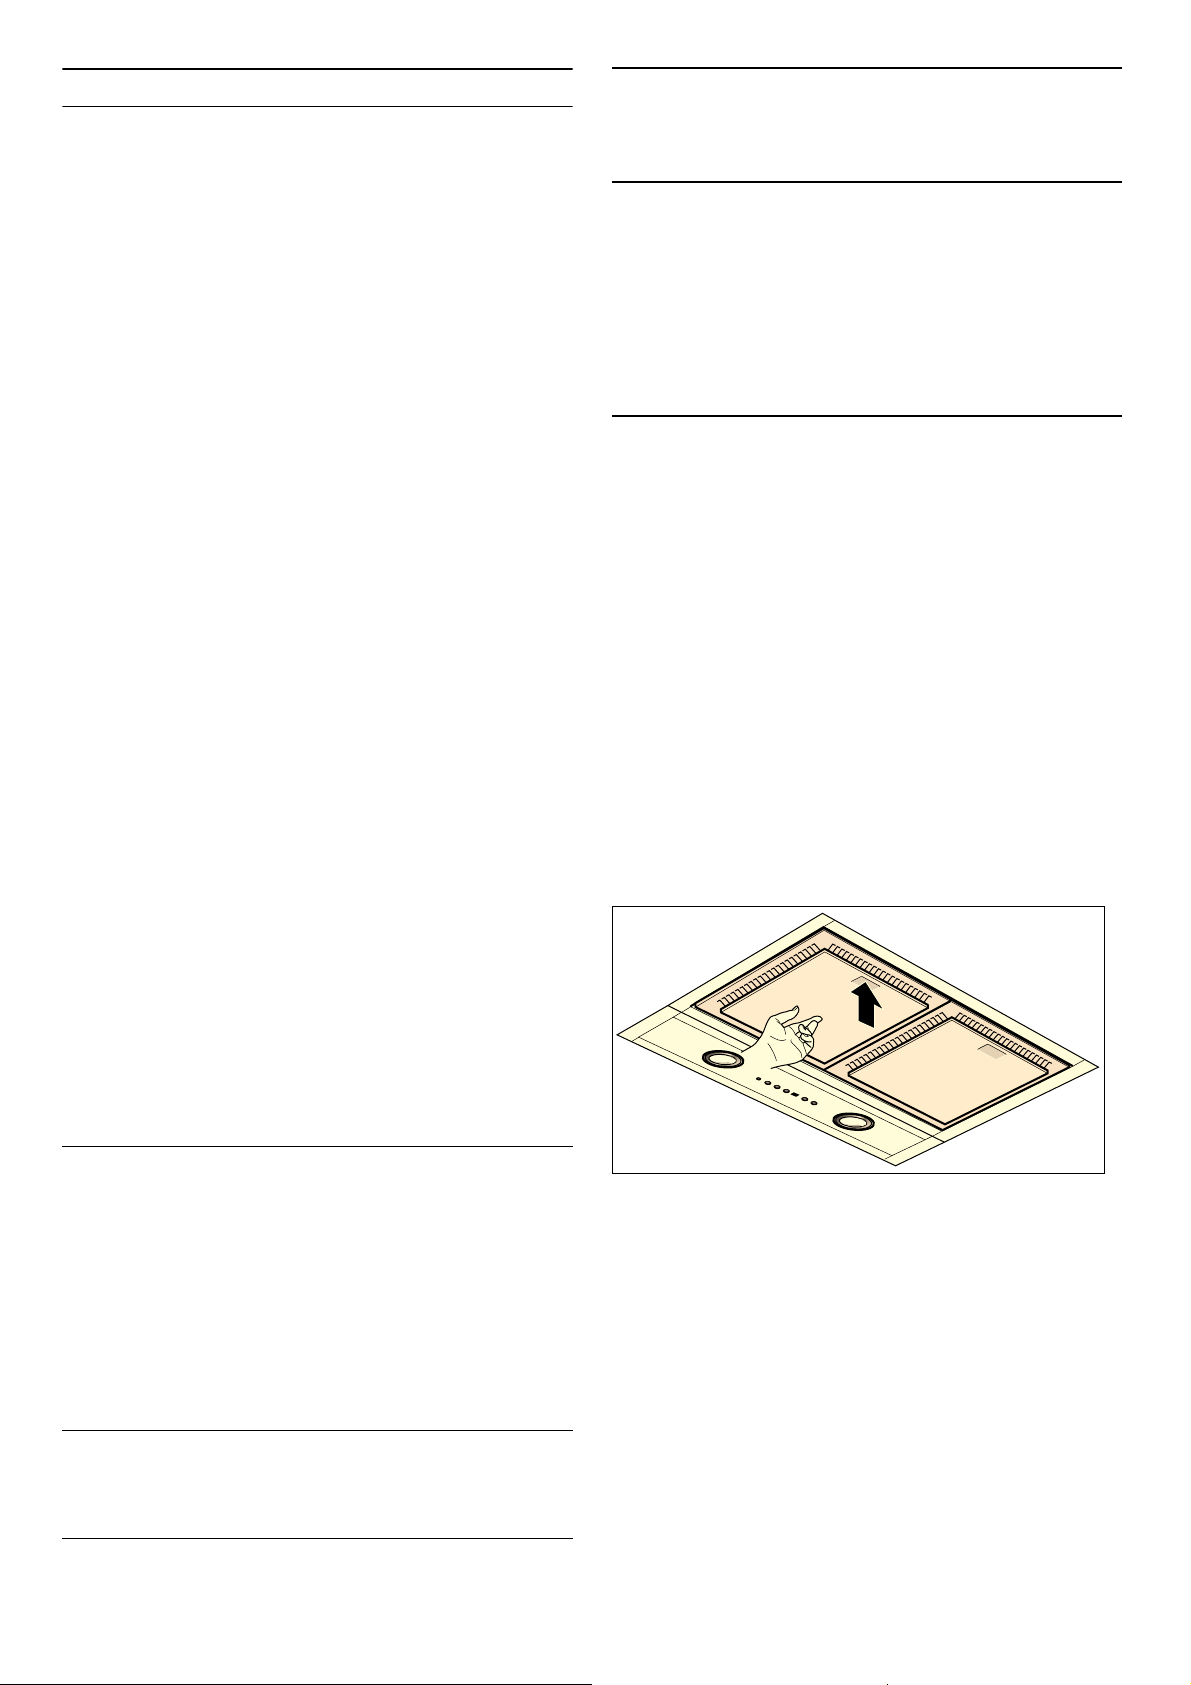
Removing metal grease filter
m
Risk of injury!
Risk of falling when working on the appliance. Use a
stable stepladder.
m Risk of injury!
Components inside the appliance may have sharp
edges. Wear protective gloves.
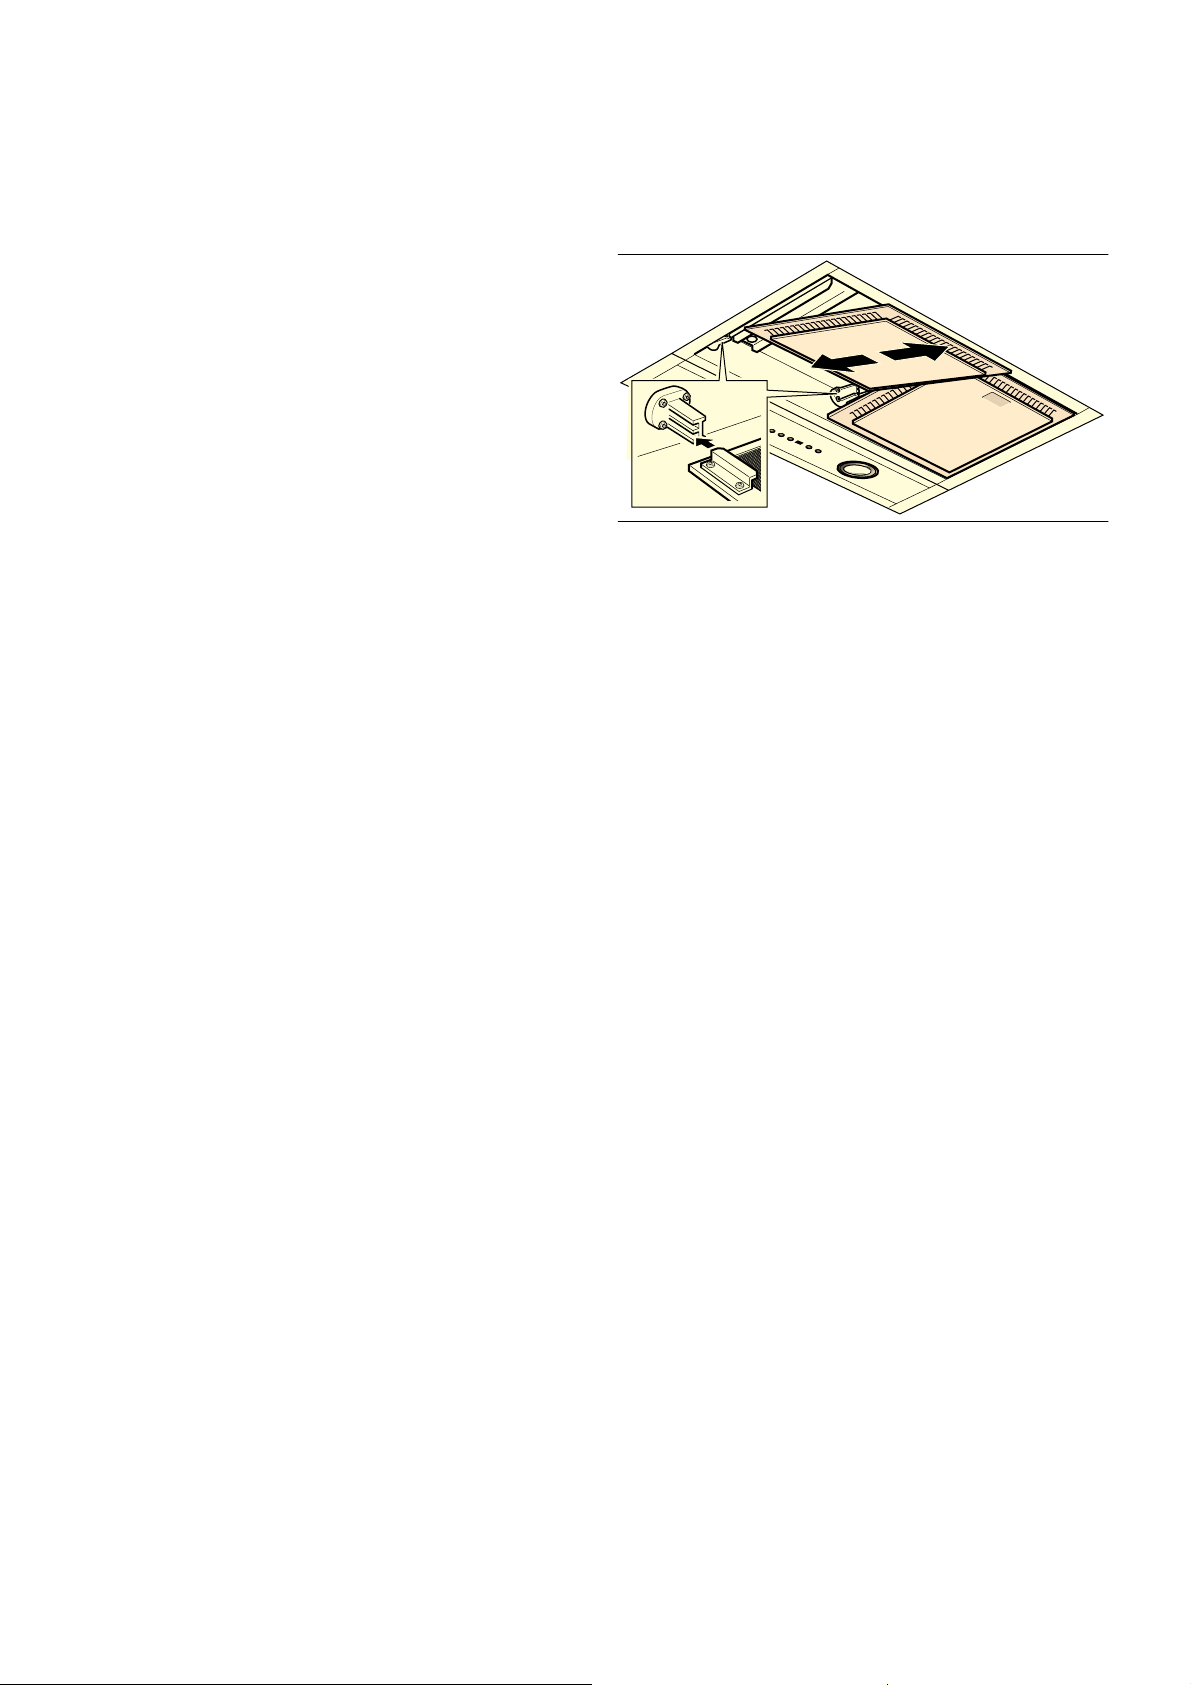
1 Press the marking on the metal grease filter and
remove the metal grease filter from the holder.
While doing this, place your other hand under the
metal grease filter
Note: Grease may accumulate in the bottom of the
metal grease filter. Hold the metal grease filter
level, otherwise grease will drip out.
Wash new sponge cloths thoroughly before use.
Follow all instructions and warnings included with the
cleaning agents.
Area Cleaning agent
Stainless steel Hot soapy water:
Clean with a dish cloth and then dry
with a soft cloth.
Clean stainless steel surfaces in the
grind direction only.
Special stainless steel cleaning products are available from our after-sales
service or from specialist retailers.
Apply a very thin layer of the cleaning
product with a soft cloth.
Painted surfaces Hot soapy water:
Clean using a damp dish cloth and dry
with a soft cloth/towel.
Do not use any stainless steel cleaners.
Aluminium and
plastic
Glass cleaner:
Clean with a soft cloth.
2 Clean the metal grease filter. 3 Clean the appliance from the inside.
9
Cleaning the metal mesh grease
Installing the metal mesh grease filter
filters
m Risk of fire!
Grease deposits in the grease filter may catch fire.
Clean the grease filter at least every 2 months.
Never operate the appliance without the grease filter.
Notes
‒ Do not use any aggressive, acidic or alkaline
cleaning agents.
‒ When cleaning the metal mesh grease filters, also
clean the holder for the metal mesh grease filters in
the appliance using a damp cloth.
‒ The metal mesh grease filters can be cleaned in the
dishwasher or by hand.
In the dishwasher:
Note: Slight discolouration may occur if the metal
grease filters are cleaned in the dishwasher. This has no
effect on the function of the metal grease filters.
▯ Do not clean heavily soiled metal grease filters
together with utensils.
▯ Remove any heavy soiling first by hand.
▯ Place the metal grease filters in the dishwasher
leaving plenty of space around them. The metal
grease filters must not be wedged in.
1 Install the metal grease filter and lock in place.
Note: When installing the metal grease filter,
ensure that it is inserted correctly into the guide on
both sides. Otherwise, the metal grease filter can
fall and damage the cooktop.
2 Press the œ button.
The saturation indicator is reset.
Changing the activated charcoal filter (only in circulating-air mode)
m Risk of injury!
Risk of falling while changing filter. Use a stable
stepladder.
By hand:
▯ Soak the metal grease filters in hot soapy water.
▯ Clean the filters with a brush and then rinse them
thoroughly.
▯ Leave the metal grease filters to drain.
Note: You can use a special degreaser to remove
stubborn dirt. This can be ordered via the online shop
(product no. 00311297). Spray the dirty metal grease
filters with the degreaser and leave it to work for up to
five minutes. Then rinse thoroughly. Observe the
instructions for use supplied with the cleaning product.
In order to ensure adequate odour removal, you must
replace the activated charcoal filter regularly.
With normal levels of use (1 to 2 hours a day), the
activated charcoal filter must be replaced at least every
12 months.
Notes
‒ Activated charcoal filters can be obtained through
specialist retailers, from our after-sales service, or
from the online shop with the order number
AA200110. You need one activated charcoal filter
(AA200110) per filter module.
‒ The activated charcoal filters cannot be cleaned or
reactivated.
‒ Activated charcoal filters do not contain any harmful
substances and can be disposed of with your
normal household waste.
10
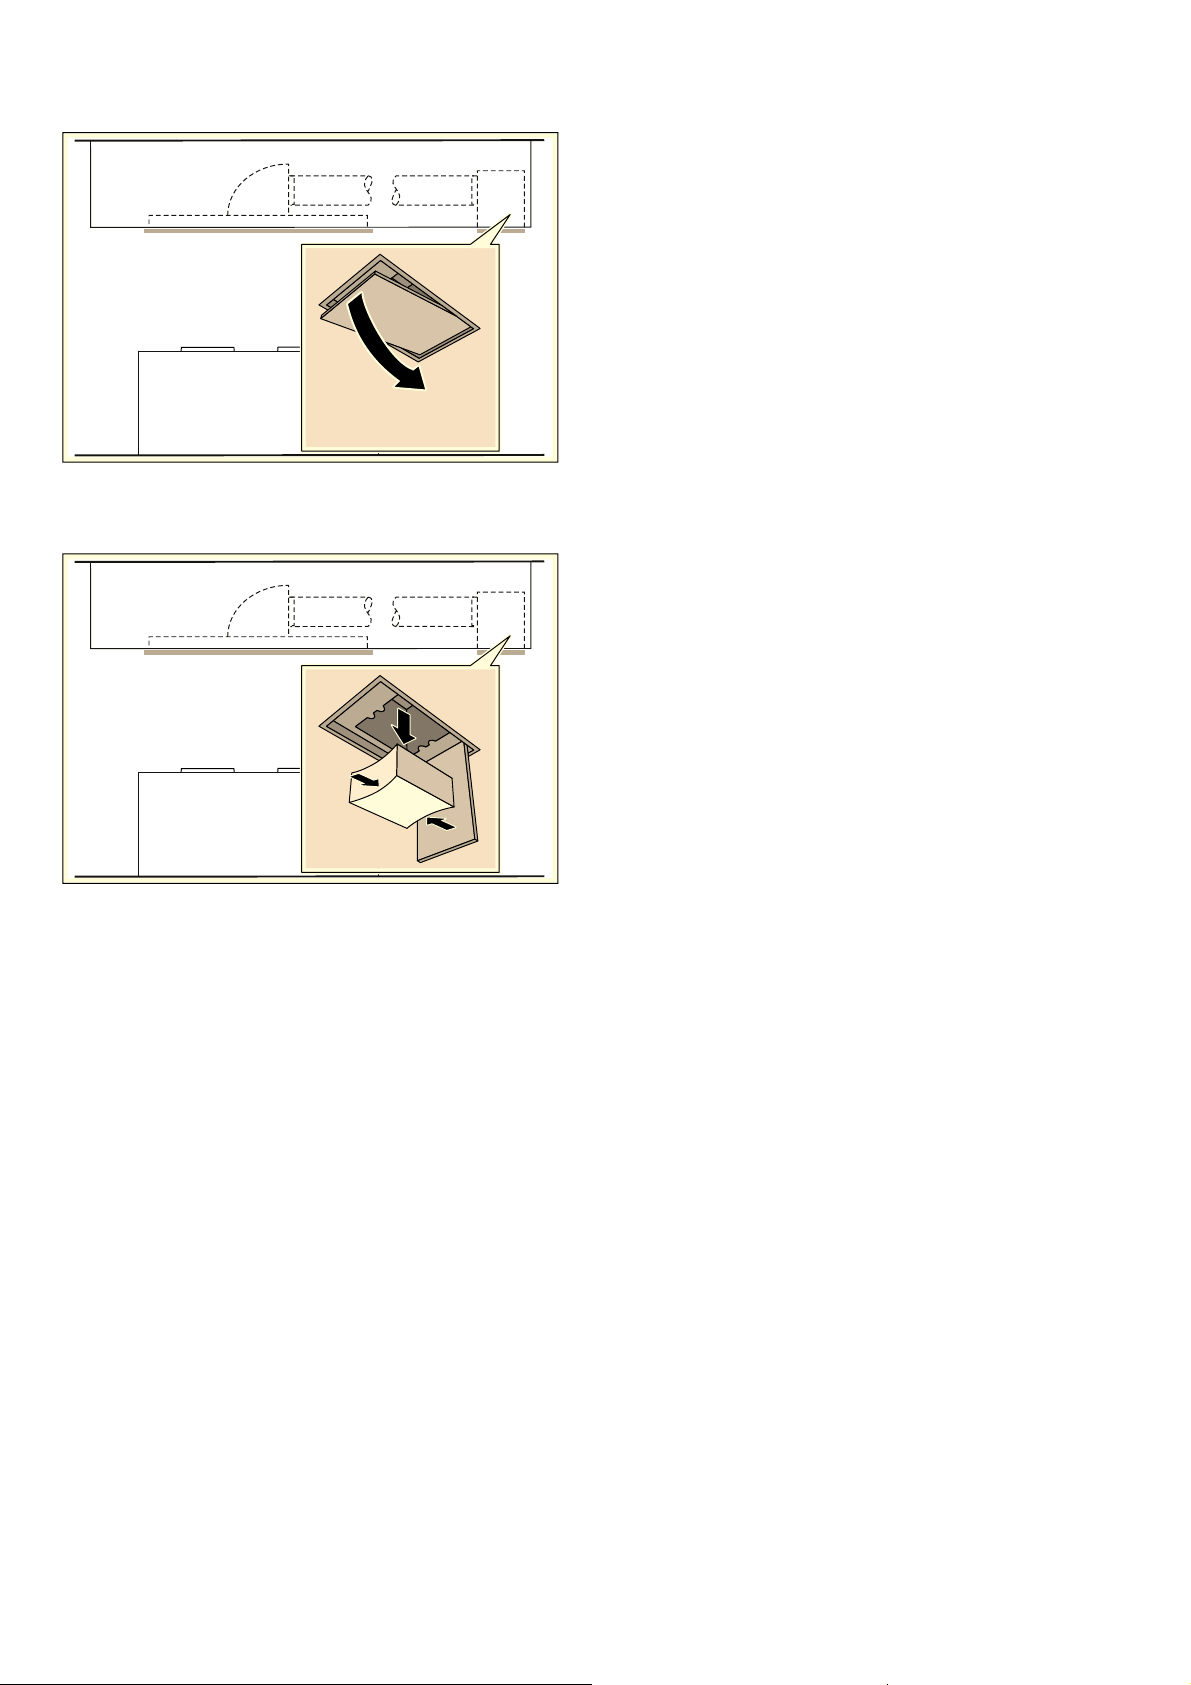
Follow the instructions below: 1 Open the flap.
2 Push the sides of the activated charcoal filter
together and remove it.
3 Push the sides of the new activated charcoal filter
together and insert it.
4 Close the flap.
11

Trouble shooting
Malfunctions often have simple explanations. Please
read the following notes before calling the after-sales
service.
m Risk of electric shock!
Incorrect repairs are dangerous. Repairs may only be
carried out and damaged power cables replaced by one
of our trained after-sales technicians. If the appliance is
defective, unplug the appliance from the mains or switch
off the circuit breaker in the fuse box. Contact the aftersales service.
m Risk of injury!
The light emitted by LED lights is very dazzling, and can
damage the eyes (risk group 1). Do not look directly into
the switched on LED lights for longer than 100 seconds.
LED lights
Defective LED lights must only be replaced by the
manufacturer, their customer service department or a
licensed technician (electrician).
Fault table
Disruption Possible cause Solution
The appliance does not work The plug is not plugged into the mains Connect the appliance to the electricity
supply
Power failure Check whether other kitchen appliances
are working
Faulty fuse Check in the fuse box to make sure that
the fuse for the appliance is OK
The appliance is not working, all the buttons are flashing
The appliance is not working If the appliance is in operation for more
The button illumination does not work The control unit is faulty Call the after-sales service
The lighting is not working The lighting is defective Call the after-sales service
The œ button flashes
The remote control is not working The batteries are flat Replace the batteries; see section
--------
The network-cable plug is not plugged
into the mains
The circuit breaker is faulty Look in the fuse box and check that the
One of the components in the appliance
has broken
than four hours, the safety switch-off
function is activated
The metal filter is saturated Clean the filter, see the Cleaning and
Check that the network cables of all the
appliances are connected
circuit breakers for all the appliances are
in working order
Call the after-sales service
Switch the appliance on again
maintenance
Replacing the remote control batteries
section
12
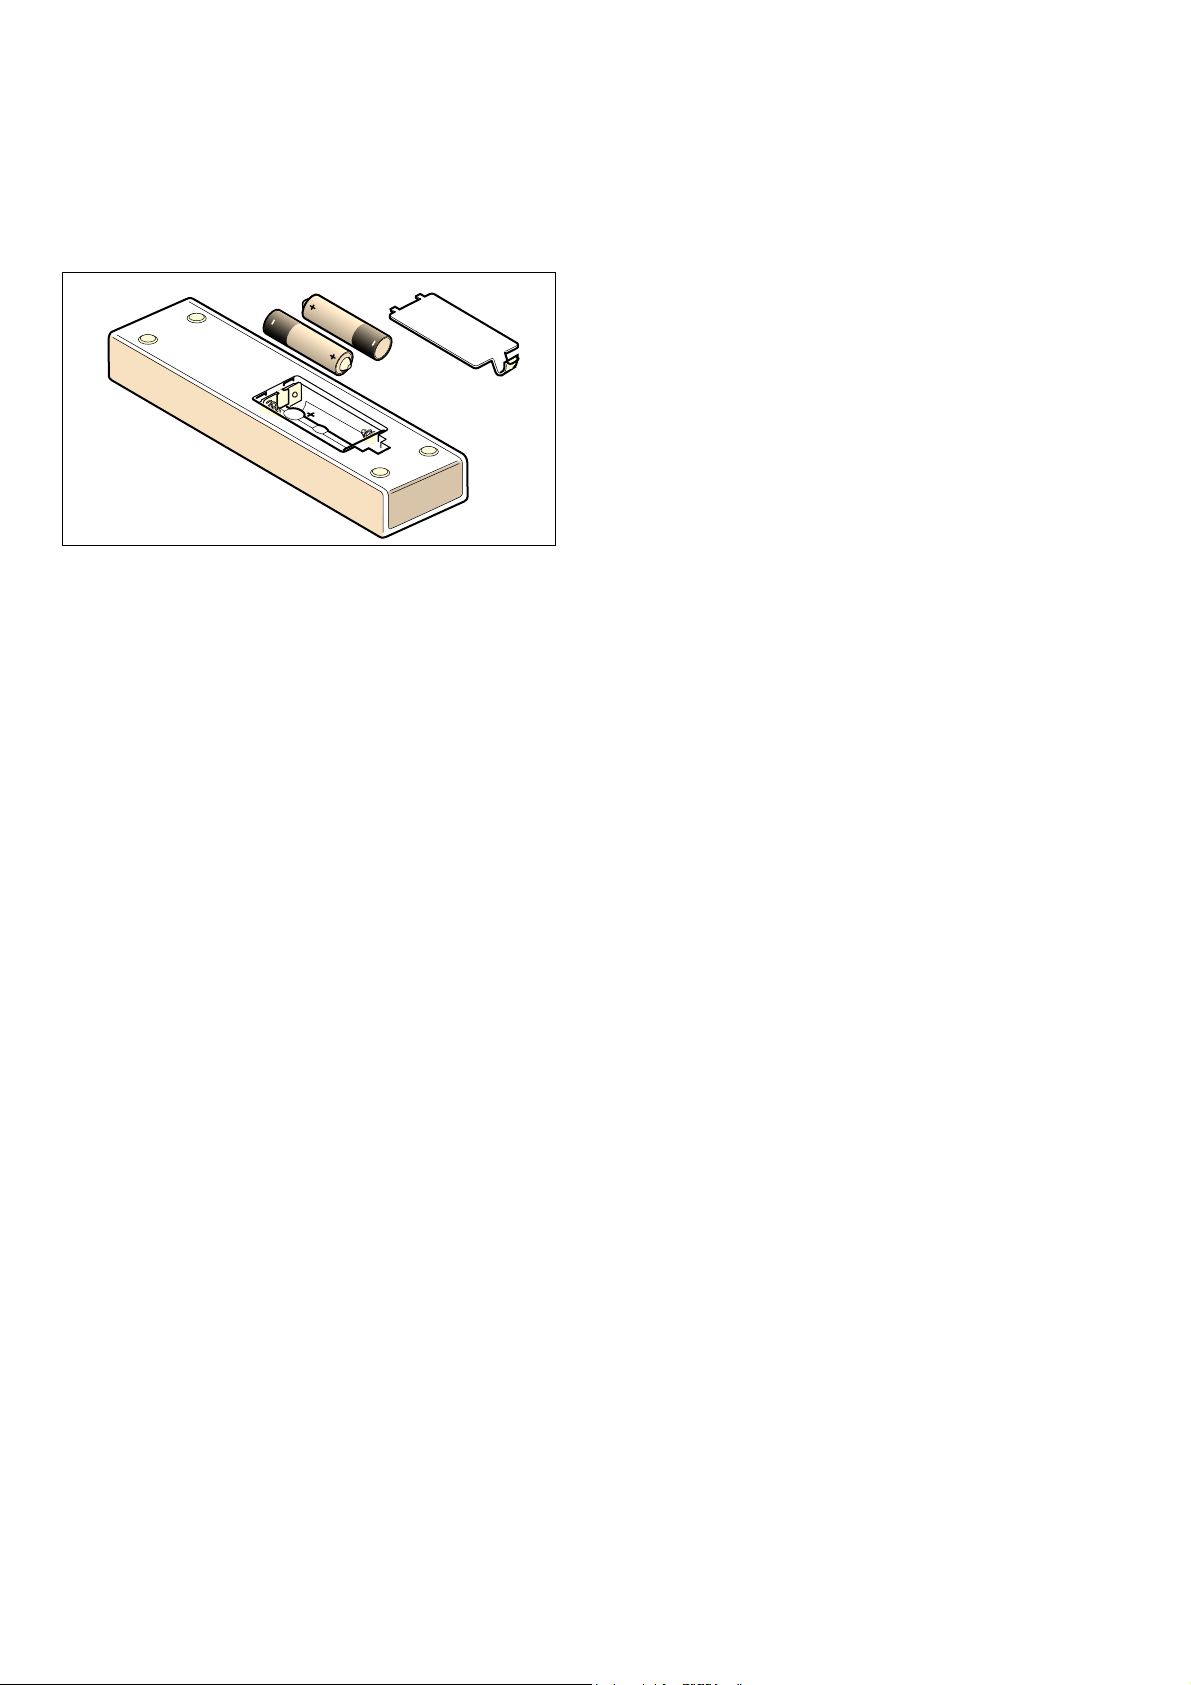
Replacing the batteries in the remote control
1 Press in the catch tappet and remove the cover. 2 Remove the batteries. 3 Correctly insert the new batteries (AAA/LR03/
1.5 V).
4 Dispose of flat or faulty batteries according to local
regulations.
Note: Do not dispose of batteries in general household
waste.
13
Aftersales service
Accessory
Our after-sales service is there for you if your appliance
needs to be repaired. We will always find an appropriate
solution in order to avoid unnecessary visits by
engineers.
When calling us, please give the product number (E no.)
and the production number (FD no.) so that we can
provide you with the correct advice. The rating plate
bearing these numbers can be found on the appliance.
To save time, you can make a note of the number of your
appliance and the telephone number of the after-sales
service in the space below, should it be required.
E no. FD no.
After-sales service
Please note that a visit from an after-sales service
engineer is not free of charge, even during the warranty
period.
Please find the contact data of all countries in the
enclosed customer service list.
O
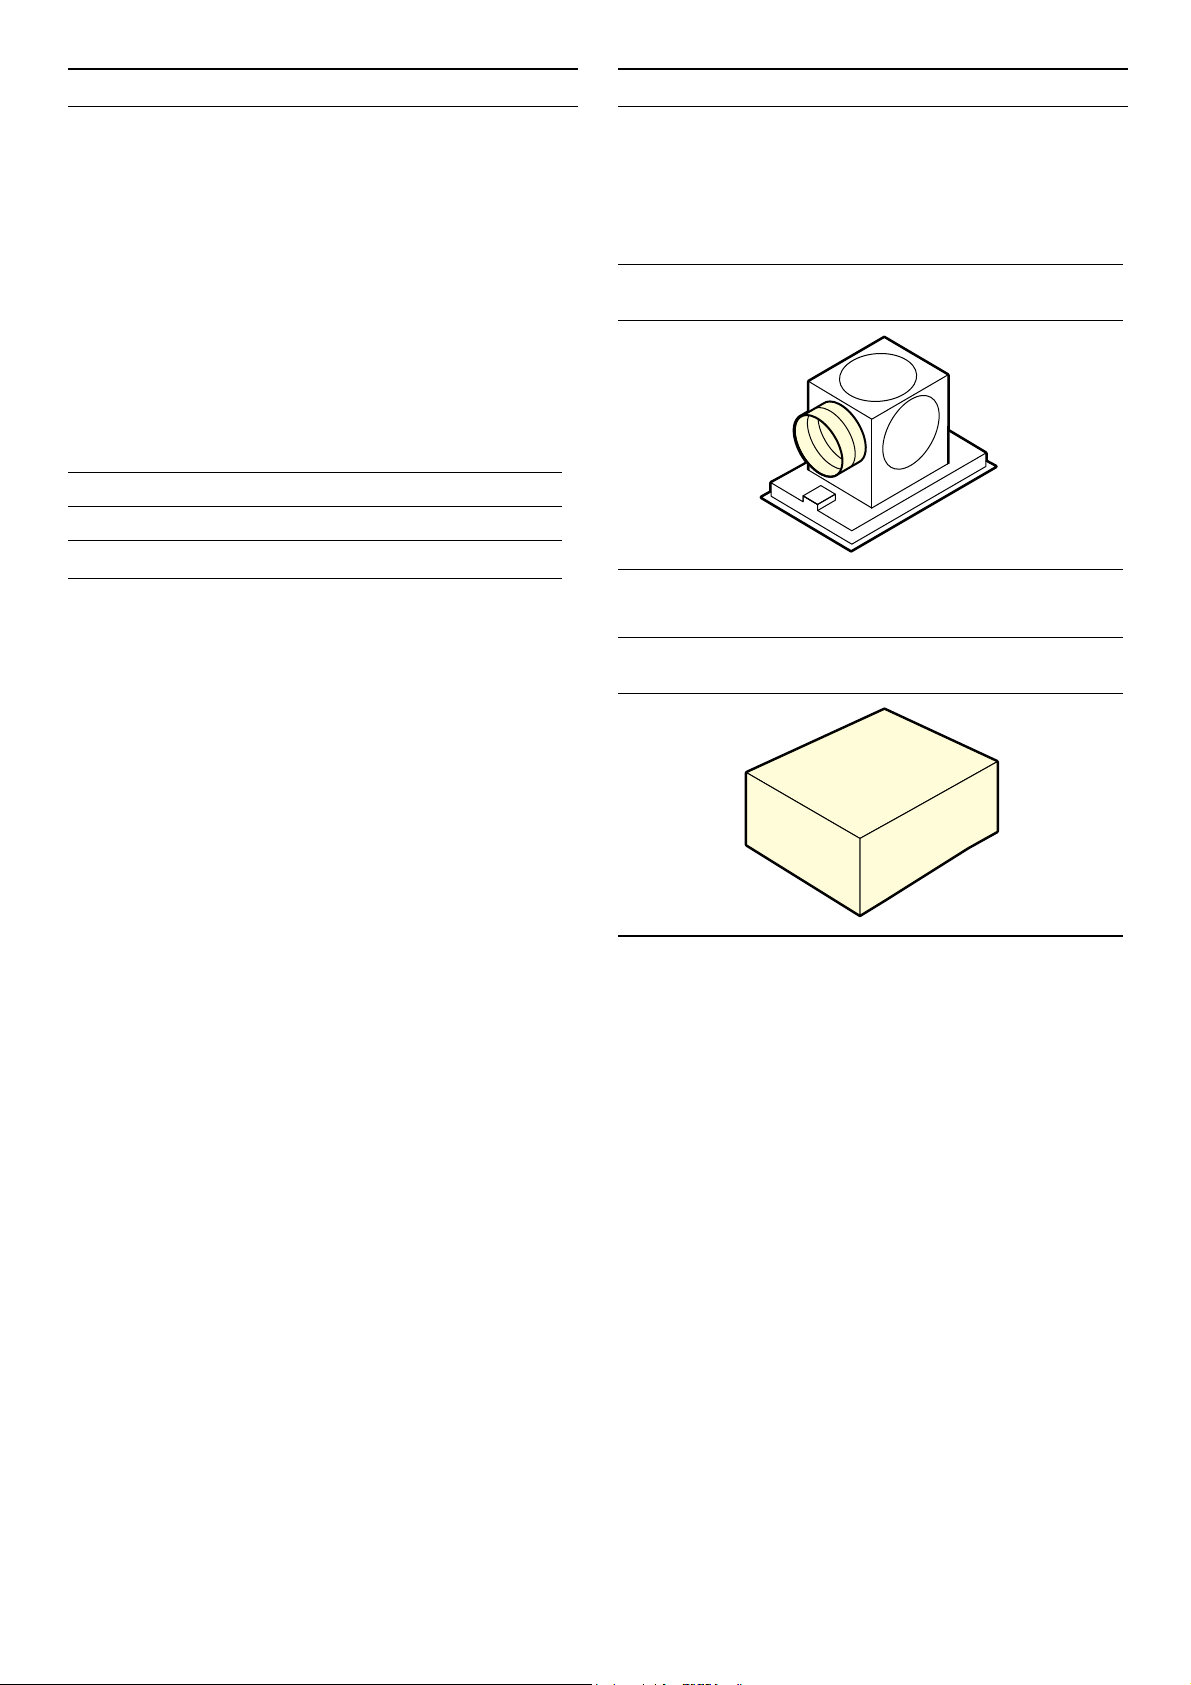
Special accessories
Accessories Order number
Air recirculation module for
AC402/462/472/482
Accessories Order number
Activated charcoal filter for
AC402/462/472/482
AA010810
AA200110
To book an engineer visit and product advice
GB 0344 892 8988
Calls charged at local or mobile rate.
IE 01450 2655
0.03 € per minute at peak.
Off peak 0.0088 € per minute.
AU 1300 368 339
NZ 09 477 0492
Trust the expertise of the manufacturer, and rest
assured that the repair will be carried out by trained
service technicians using original spare parts for your
domestic appliance.
--------
14

Índice
Instrucciones de uso
Indicaciones de seguridad importantes 16
Protección del medio ambiente 19
Ahorro de energía 19
Eliminación de residuos respetuosa con el medio
ambiente 19
Modos de funcionamiento 19
Funcionamiento en salida de aire al exterior 19
Funcionamiento con recirculación de aire 19
Manejar el aparato 20
Panel de mando 20
Mando a distancia 20
Ajustar el ventilador 20
Nivel intensivo 20
Función de marcha en inercia 21
Ventilación a intervalos 21
Indicador de saturación 21
Iluminación 21
Desconexión de seguridad 21
Limpieza y mantenimiento 22
¿Qué hacer en caso de avería? 25
Cambiar las pilas del mando a distancia 26
Servicio de atención al cliente 27
Accesorios 27
: Encontrará más información sobre productos,
accesorios, piezas de repuesto y servicios en internet:
www.gaggenau.com y también en la tienda online:
www.gaggenau.com/zz/store
15
m Indicaciones de seguridad importantes
Leer con atención las siguientes instrucciones. Solo así se puede manejar el aparato de forma correcta y segura. Conservar las instrucciones de uso y montaje para utilizarlas más adelante o para posibles futuros compradores.
Solamente un montaje profesional conforme a las instrucciones de montaje puede garantizar un uso seguro del aparato. El instalador es responsable del funcionamiento perfecto en el lugar de instalación.
Este aparato ha sido diseñado para uso doméstico. Este aparato no puede usarse en exteriores. Vigilarlo mientras está funcionando. El fabricante no asume ninguna responsabilidad en caso de daños derivados de un uso indebido o un manejo incorrecto.
Este aparato está previsto para ser utilizado a una altura máxima de 2.000 metros sobre el nivel del mar.
Este aparato puede ser utilizado por niños a
partir de 8 años y por personas con limitaciones
físicas, sensoriales o psíquicas, o que carezcan
de experiencia y conocimientos, siempre y
cuando sea bajo la supervisión de una persona
responsable de su seguridad o que le haya
instruido en el uso correcto del aparato siendo
consciente de los daños que se pudieran
ocasionar.
No dejar que los niños jueguen con el aparato. La limpieza y el mantenimiento rutinario no deben encomendarse a los niños a menos que sean mayores de 15 años y lo hagan bajo supervisión.
Mantener a los niños menores de 8 años alejados del aparato y del cable de conexión.
Comprobar el aparato al sacarlo de su embalaje. El aparato no debe conectarse en caso de haber sufrido daños durante el transporte.
Este aparato no está previsto para el funcionamiento con un reloj temporizador externo o un mando a distancia.
¡Peligro de muerte!
Los gases de combustión que se vuelven a aspirar pueden ocasionar intoxicaciones.
Garantizar una entrada de aire suficiente si el aparato se emplea en el modo de evacuación del aire al exterior junto con un equipo calefactor dependiente del aire del recinto de instalación.
Los equipos calefactores que dependen del aire
del recinto de instalación (p. ej., calefactores de
gas, aceite, madera o carbón, calentadores de
salida libre, calentadores de agua) adquieren
aire de combustión del recinto de instalación y
evacuan los gases de escape al exterior a través
de un sistema extractor (p. ej., una chimenea).
En combinación con una ventilación de techo
conectada se extrae aire de la cocina y de las
habitaciones próximas; sin una entrada de aire
suficiente se genera una depresión. Los gases
tóxicos procedentes de la chimenea o del hueco
de ventilación se vuelven a aspirar en las
habitaciones.
▯ Por tanto, asegurarse de que siempre haya
una entrada de aire suficiente.
▯ Un pasamuros de entrada/salida de aire no
es garantía por sí solo del cumplimiento del
valor límite.
A fin de garantizar un funcionamiento seguro, la
depresión en el recinto de instalación de los
equipos calefactores no debe superar 4 Pa
(0,04 mbar). Esto se consigue si, mediante
aberturas que no se pueden cerrar, p. ej., en
puertas, ventanas, en combinación con un
pasamuros de entrada/salida de aire o
mediante otras medidas técnicas, se puede
hacer recircular el aire necesario para la
combustión.
¡Peligro de asfixia!
El material de embalaje es peligroso para los niños. No dejar que los niños jueguen con el material de embalaje.
16
 Loading...