

Page 1
Page 2

Page 3
EN
Thank you for purchasing our product.
Before using this unit, please read this manual in order to avoid improper handling and use
ofthedevice.
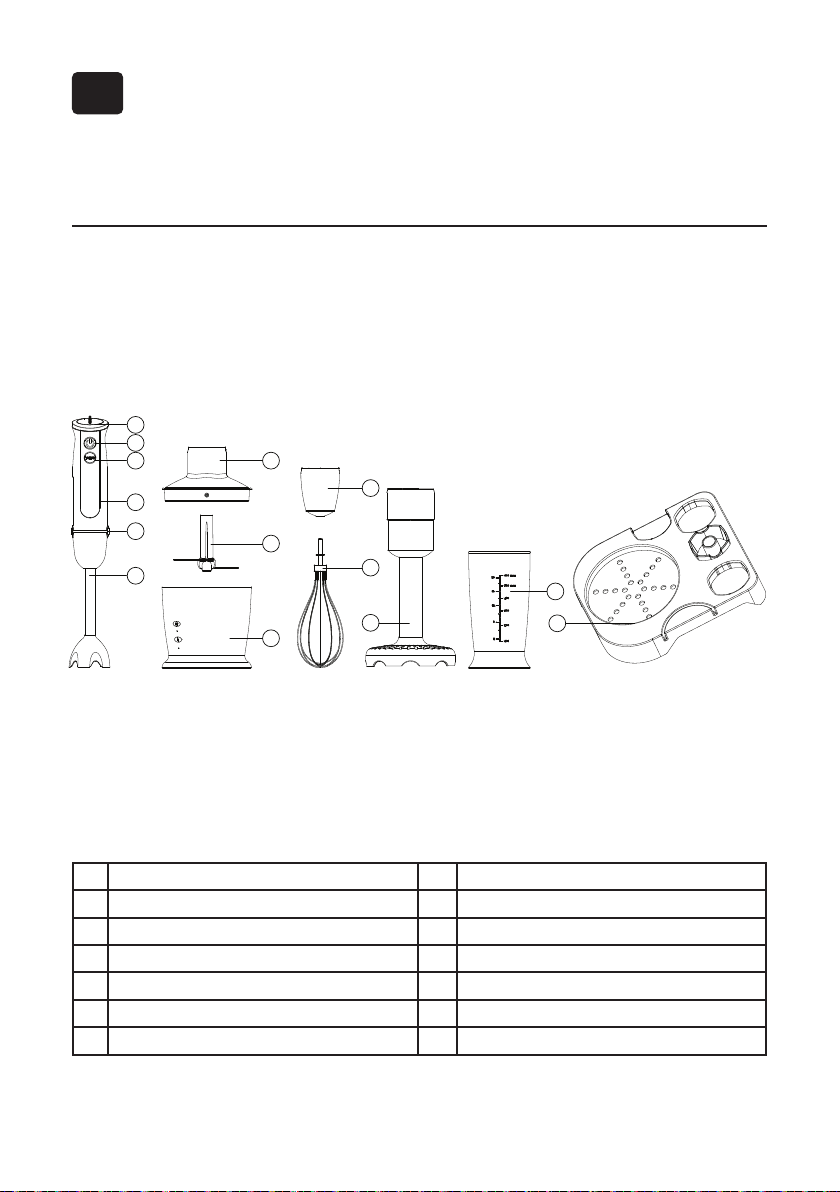
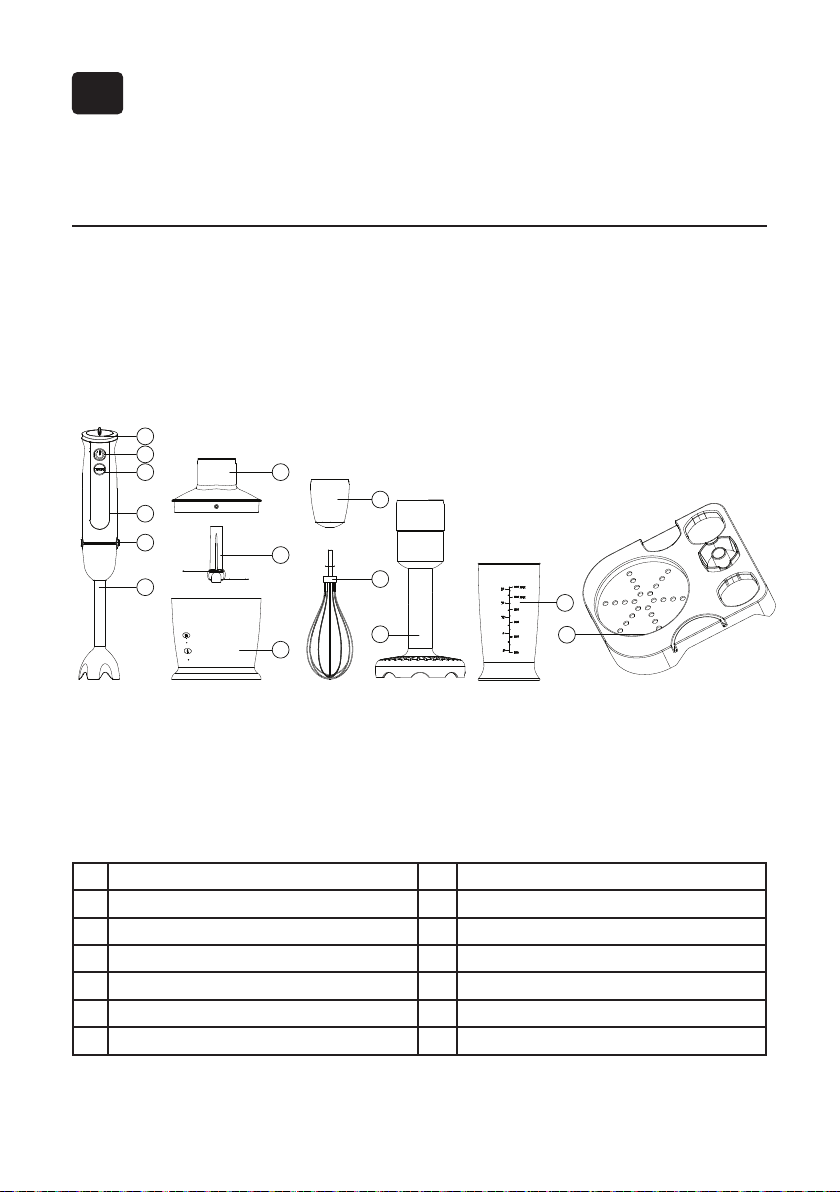
Parts description:
1
2
3
4
5
6
7
10
8
11
M
13
9
12
N
14
1 Inching switch 8 “S”blade
2 Switch I 9 Chopping bowl
3 Switch II 10 Whisk holder
4 Motor unit 11 Whisk
5 Button 12 Potato mashed attachment
6 Blender stick 13 Measuring cup
7 Chopping bowl lid 14 Holder
Page 4

Caution:
Please read the instructions carefully and completely before using the appliance.
1. Always disconnect the appliance from the supply if it is left unattended and before assembling,
disassembling or cleaning.
2. This appliance shall not be used by children. Keep the appliance and its cord out of reach of
children.
3. The appliance cannot be used by persons (including children) with limited physical, sensual or
mental abilities or with lack of experience and knowledge, unless they are supervised by an adult.
4. Do not use the product for purposes other than those for which it is intended. It may cause
injury.
5. Before plugging into a socket, check whether your voltage corresponds to the rating label on
the appliance.
6. Do not plug the appliance into the power supply until it is fully assembled and always unplug the
appliance before disassembling or handling the blade.
7. Do not operate the appliance with a damaged cord or plug or if the appliance malfunctions, or
is dropped or damaged in any manner. Return the appliance to the nearest authorized service for
examination, repair or electrical or mechanical adjustment.
8. Do not let the cord hang over the edge of the worktop or touch hot surfaces.
9. The blades are very sharp! Handle with care!
10. Keep hands and utensils out of bowl while blending to reduce the risk of injury or damage to
the blender. A scraper may be used but must be used only when the blender is not running (does
not apply to an acceptable scraper integral with the appliance.)
11. To protect against risk of electrical shock do not put motor unit, cord, or plug into the water
or other liquid.
12. Do not blend hot liquids.
13. Do not put the appliance parts into the microwave oven.
14. Short - time operating (three times only). Use the appliance to process soft food for no longer
than 1 minute and hard food for no longer than 15 seconds. Operate 3 cycles for one use.
15. To reduce the risk of injury, never place cutting blade on the base before placing bowl properly
in right place.
16. Be certain cover is securely locked in place before operating appliance.
17. Clean the hand blender with dry cloth.
18. The instruction must include details about cleaning surfaces after contact with food, the operating times and speed setting.
19. Be careful during manipulation with sharp knives and during filling or cleaning the appliance.
20. Before replacing accessories, always switch off the appliance.
Page 5
How to use the hand blender
N
M
1
7
8
9
10
12
13
14
11
2
3
4
5
6
N
M
1
7
8
9
10
12
13
14
11
2
3
4
5
6
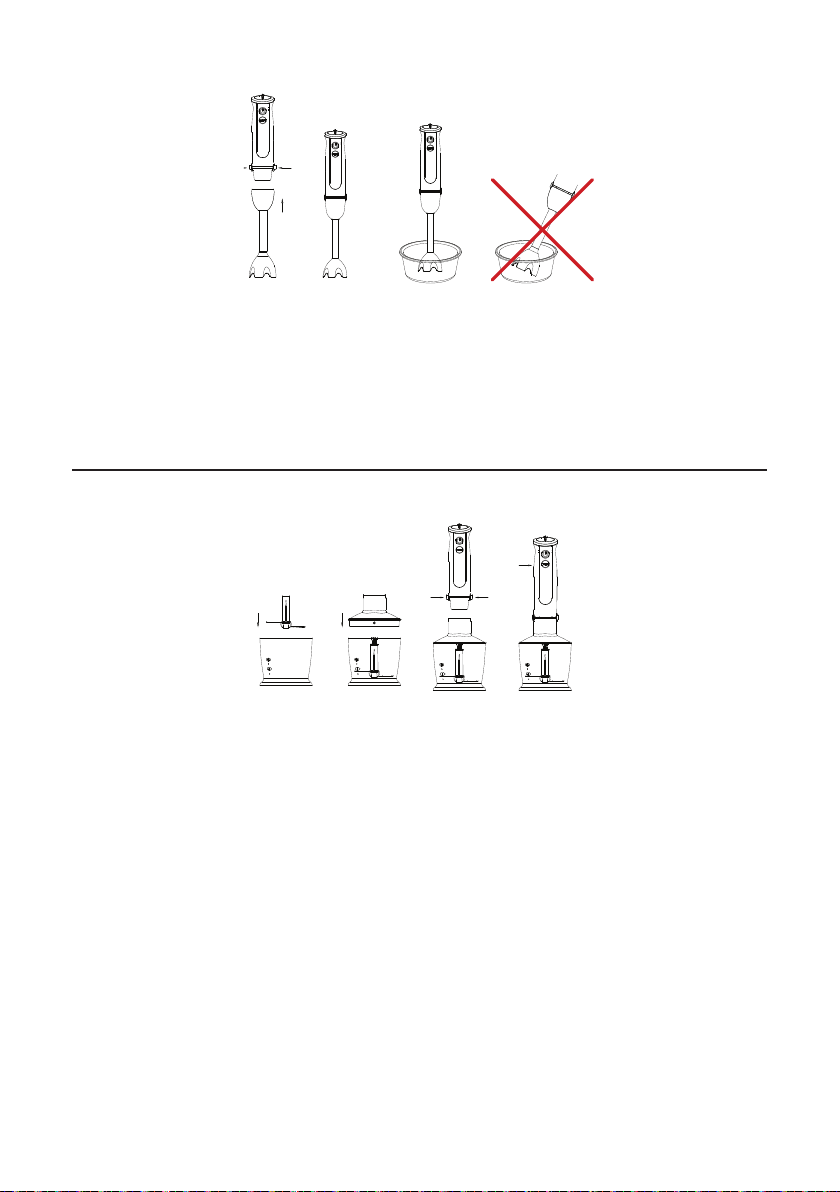
The hand blender is perfectly suited for preparing dips, sauces, soups, mayonnaise and baby food
as well as for mixing.
1. Insert the blender stick onto the motor unit until it locks.
2. Insert the hand blender into the bowl. Then press the switch I or switch II.
3. Unplug the appliance and press the ejection button to remove blender stick after use.
You can use the hand blender in the measuring cup as well as in any other bowl.
How to use your chopper
1. Chopper is perfectly suited for hard food, such as meat, cheese, onion, herbs, garlic, carrot,
walnuts, almonds, prunes etc.
2. Do not chop extremely hard food, such as ice cubes, nutmeg, coffee beans and grains.
Before chopping
1. Carefully remove the plastic cover from the blade. Caution: the blade is very sharp! Always hold
it by the upper plastic part.
2. Place the blade on the center pin of the chopper bowl. Press down the blade and lock bowl.
Always place the chopper bowl on the anti-slip base.
3. Place the food in the chopping bowl.
4. Place the chopping bowl lid on the chopping bowl.
5. Place the motor unit on the chopping bowl lid until it locks.
6. Press switch to operate the chopper. During processing, hold the motor unit with one hand and
the chopping bowl with the other.
7. After use, unplug the appliance and then press the ejection button to remove the motor unit.
8. Remove the chopping bowl lid.
9. Carefully take out the blade.
10. Remove the processed food from the chopping bowl.
Page 6
N
M
1
7
8
9
10
12
13
14
11
2
3
4
5
6
N
M
1
7
8
9
10
12
13
14
11
2
3
4
5
6
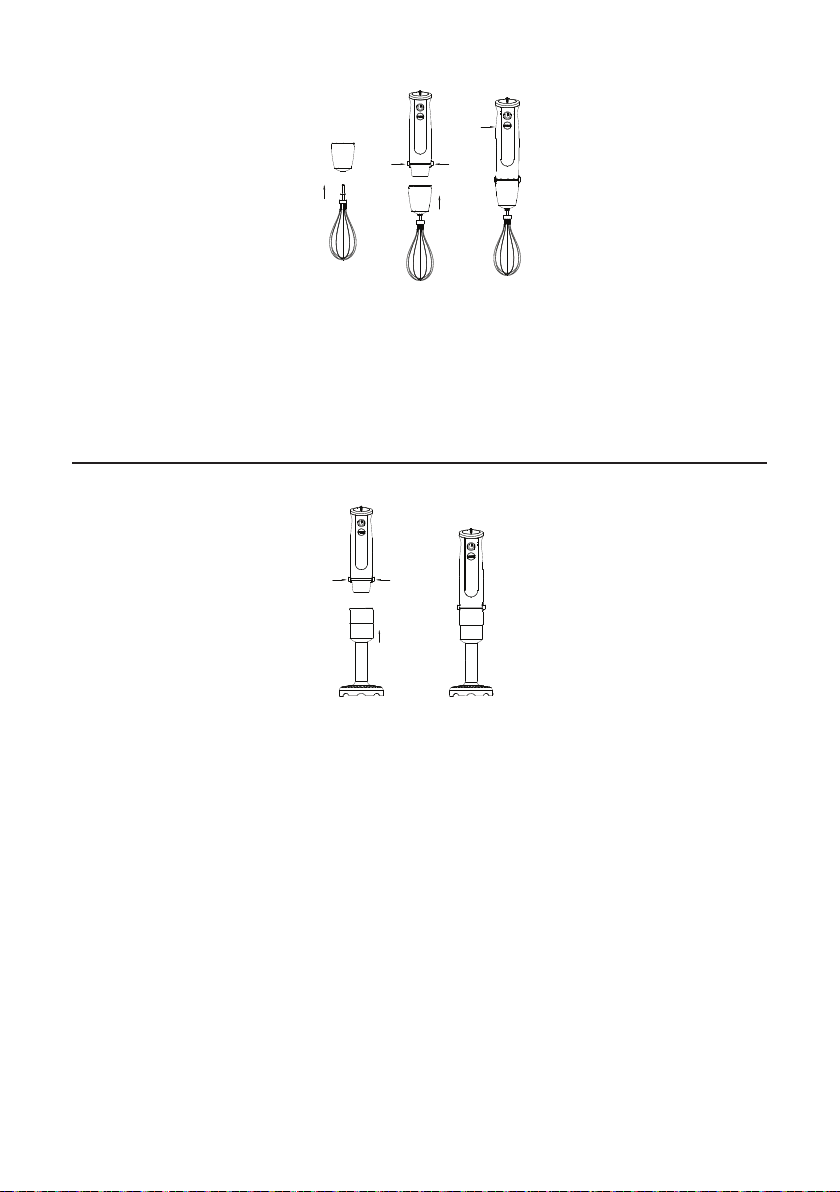
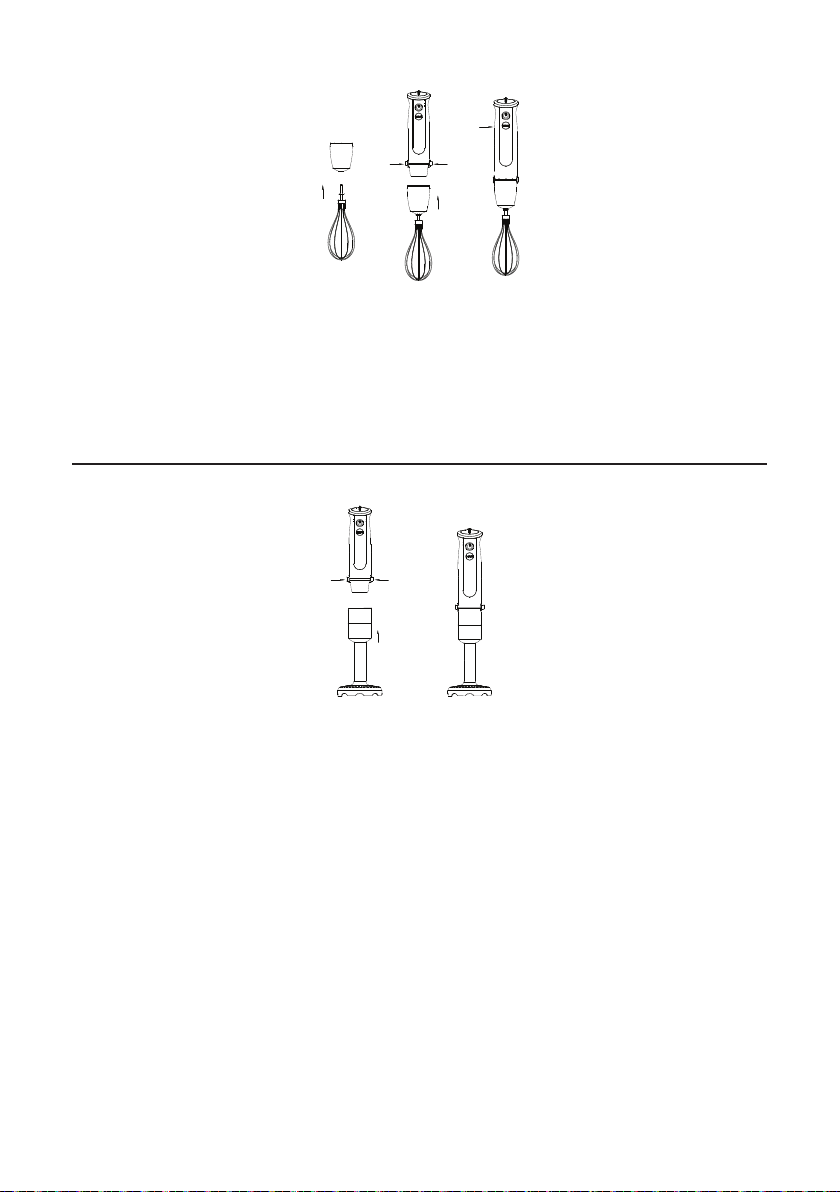
How to use your whisk
Use the whisk only for whipping cream, beating egg whites and so on.
1. Insert the whisk into the whisk holder, and then slot the gear box onto the motor unit until it
locks.
2. Place the whisk in the bowl and then press the switch to turn it on.
3. Unplug the appliance and then press the ejection button to remove the gear box after use and
then pull the whisk out of the gear box.
How to use your potato mashed attachment
Use this attachment for fast cooking of lump-free light potato mash.
• Place the potato mashed attachment on the motor unit until it locks.
• Before you start, place the attachment into the bowl with boiled potatoes. Start operation with
lower speed.
NOTE: In order to obtain light and tasty potato mash add small amount of hot milk and dairy butter
• After preparing puree remove and rinse blades of the attachment. Wipe dry and reinstall.
• To remove blades from the attachment, turn them clockwise. To replace the blades rotate them
counterclockwise.
Page 7

Cleaning
Clean the motor unit and chopper bowl lid only with a damp cloth. Do not immerse the motor unit
in water!
1. All other parts can be cleaned in the dish washer. However, after processing very salty food,
you should rinse the blades right away.
2. Choose carefully cleaning products.
3. When processing colouring foods, the plastic parts of the appliance may become discolored.
Wipe these parts with vegetable oil before placing them in the dishwasher.
4. Unplug the appliance before cleaning.
5. The blades are very sharp, please handle with care.
Processing Guide (for 500ml chopping bowl)
Food Maximum Operation time
meat 250g 15sec
herbs 50g 10sec
nut, almonds 150g 15sec
cheese 100g 10sec
bread 80g 10sec
onions 200g 10sec
biscuits 150g 10sec
soft fruit 200g 10sec
flour 250g
water 165
Yeast dough
cream 2.5
powder 19
sugar 1.5
10sec
Technical specifications:
Voltage
: 220-240 V~
Frequency
Power: 800 W
The English version of the manual is an exact translation of the original manufacturer‘s instructions.
Images used in this manual are for illustrational purposes only and may differ from the actual product.
: 50 Hz-60 Hz
Page 8
DE
Vielen Dank, dass Sie sich für unser Produkt entschieden haben.
Bevor Sie das Gerät benutzen, lesen Sie bitte die Bedienungsanleitung sorgfältig durch, um sich
mit allen Sicherheitshinweisen vertraut zu machen.
Geräteteile:
1
2
3
4
5
6
7
10
8
11
M
13
9
12
N
14
1 Geschwindigkeitsregler 8 Schneidmesser
2 Schalter I 9 Mixbecher
3 Turbo 10 Schneebesenhalter
4 Motorteil 11 Schneebesen
5 Drucktasten zum Lösen der Einsätze 12 Kartoffelstampfer
6 Pürierstab 13 Messbecher
7 Mixbecherdeckel 14 Halter
Page 9

Achtung:
Vor dem ersten Gebrauch des Gerätes lesen Sie bitte alle Sicherheitshinweise aufmerksam
durch.
1. Wenn Sie das Gerät nicht benutzen, es reinigen, zusammen- oder auseinanderbauen, ziehen
Sie immer den Stecker aus der Steckdose.
2. Dieses Gerät ist nicht dafür bestimmt, um von Kindern benutzt zu werden. Das Gerät und seine
Anschlussleitung sind von Kindern fernzuhalten.
3. Dieses Gerät ist nicht dafür bestimmt, durch Personen (einschließlich Kinder) mit eingeschränkten physischen, sensorischen oder geistigen Fähigkeiten oder Mangels Erfahrung benutzt zu werden, es sei denn, sie werden durch eine für ihre Sicherheit zuständige Person beaufsichtigt.
4. Verwenden Sie das Gerät nur für die Zwecke, für die es bestimmt ist. Es besteht Verletzungsgefahr.
5. Schließen Sie das Gerät nur an, wenn die Netzspannung der Steckdose mit der Angabe auf
dem Typenschild übereinstimmt.
6. Schließen Sie das Gerät niemals an eine Steckdose an, wenn es nicht vollständig zusammengebaut ist, wenn Sie es auseinanderbauen oder das Schneidmesser berühren.
7. Betreiben Sie das Gerät nicht, wenn es sichtbare Schäden aufweist oder das Netzkabel bzw.
der Netzstecker defekt ist. In solchem Fall wenden Sie sich an den Kundendienst.
8. Lassen Sie das Netzkabel niemals über Tischkanten frei hängen. Vermeiden Sie den Kontakt
des Netzkabels mit heißen Oberflächen.
9. Die Schneidmesser sind sehr scharf, seien Sie immer vorsichtig im Umgang mit ihnen.
10. Fassen Sie niemals während des Betriebes bewegliche Teile an und legen keine Gegenstände
in den Mixbecher. Dies kann zu Verletzungen oder Schäden am Gerät führen. Verwenden Sie Gummispachtel nur wenn das Gerät ausgeschaltet ist.
11. Tauchen Sie das Gerät oder das Kabel niemals in Wasser oder andere Flüssigkeiten, es besteht
Kurzschlussgefahr.
12. Füllen Sie keine heißen Flüssigkeiten ein.
13. Legen Sie keine Geräteteile in eine Mikrowelle.
14. Kurzer Betrieb (nur dreimal). Betreiben Sie das Gerät nicht weniger als 1 Minute für die Zubereitung von weichen Lebensmitteln und nicht länger als 15 Sekunden für die Zubereitung von festen
Lebensmitteln. Betreiben Sie nur 3 Zyklen für eine Anwendung.
15. Um Verletzungen zu vermeiden, legen Sie nicht die Schneidmesser in den Becher, bevor er fest
an seinem Platz fixiert ist.
16. Stellen Sie sicher, dass der Deckel richtig verriegelt ist, bevor Sie das Gerät in Betrieb nehmen.
17. Das Gerät ist mit einem feuchten Tuch zu reinigen.
18. Anweisungen müssen Einzelheiten enthalten, wie die Geräteoberfläche nach Kontakt mit Lebensmitteln zu reinigen ist, sowie über Betriebszeiten und Geschwindigkeitseinstellung.
19. Seien Sie immer vorsichtig beim Umgang mit scharfen Messern, beim Befüllen des Mixbechers
und während der Reinigung des Gerätes.
20. Wenn Sie Aufsätze wechseln, ziehen Sie immer den Netzstecker.
Page 10

Verwendung vom Pürierstab
N
M
1
7
8
9
10
12
13
14
11
2
3
4
5
6
N
M
1
7
8
9
10
12
13
14
11
2
3
4
5
6
Pürierstab ist bestimmt für die Zubereitung von Dips, Soßen, Suppen, Mayonnaise und Kindergerichten, sowie zum Mixen.
1. Pürierstab auf den Stabmixer setzen und verriegeln.
2. Pürierstab in einem geeigneten Gefäß halten und Schalter I oder II drücken.
3. Netzstecker aus der Steckdose ziehen und Drucktasten zum Lösen des Pürierstabs drücken.
Pürierstab kann nicht nur im Messbecher verwendet werden, sondern in allen Gefäßen.
Verwendung vom Schneidmesser
1. Schneidmesser sind bestimmt zum Zerkleinern von festen Lebensmitteln, wie beispielsweise
Fleisch, Käse, Zwiebeln, Kräuter, Knoblauch, Möhren, Nüsse usw.
2. Füllen Sie niemals sehr harte Lebensmittel, wie Eiswürfel, Muskatnuss, Kaffeebohnen und Getreide ein.
Vor dem Zerkleinern
1. Entfernen Sie vorsichtig die Plastikabdeckung der Messer. Achtung! Die Schneidmesser sind
sehr scharf, fassen Sie die Messer immer am Plastikteil an.
2. Schneidmesser auf die Achse des Mixbechers setzen. Stellen Sie den Mixbecher immer auf
eine rutschfeste Oberfläche.
3. Die gewünschten Zutaten in den Mixbecher einfüllen.
4. Den Mixbecherdeckel auf den Mixbecher setzen.
5. Stabmixer auf den Mixbecherdeckel setzen und einrasten.
6. Das Gerät einschalten. Während des Betriebes halten Sie mit einer Hand den Motorteil und mit
der anderen Hand den Mixbecher.
7. Nach dem Gebrauch ziehen Sie den Netzstecker aus der Steckdose, drücken die Tasten zum
Lösen der Einsätze und entfernen den Motorteil.
8. Danach entfernen Sie den Mixbecherdeckel.
9. Entfernen Sie vorsichtig die Schneidmesser.
10. Entnehmen Sie die verarbeiteten Lebensmittel.
Page 11
N
M
1
7
8
9
10
12
13
14
11
2
3
4
5
6
N
M
1
7
8
9
10
12
13
14
11
2
3
4
5
6
Verwendung vom Schneebesen
Schneebesen verwenden Sie zum Schlagen von Cremes, Eiweiß usw.
1. Den Schneebesen auf den Halter setzen und dann auf den Motorteil und einrasten.
2. Den Schneebesen in einem geeigneten Gefäß halten und das Gerät einschalten.
3. Ziehen Sie den Netzstecker aus der Steckdose, drücken die Tasten zum Lösen der Einsätze
und entfernen zuerst den Halter und dann den Schneebesen.
Verwenden vom Kartoffelstampfer
Dieses Zubehör dient zum schnellen und einfachen Zubereiten von Kartoffelpüree oder Kartoffelstampf.
• Den Kartoffelstampfer auf den Motorteil setzen und einrasten.
• Vor dem Einschalten setzen Sie das Gerät in ein Gefäß mit gekochten Kartoffeln. Schalten Sie
das Gerät auf niedrige Geschwindigkeit.
Hinweis: Um ein leichtes und schmackhaftes Kartoffelpüree zu erhalten, fügen Sie etwas heiße
Milch und zerlassene Butter zu.
• Nach dem Gebrauch entfernen Sie die Messer und spülen diese. Danach trocknen Sie sie und
setzen sie wieder zurück.
• Zum Entfernen der Schneidmesser drehen Sie diese im Uhrzeigersinn. Zum erneuten Einsetzen
drehen Sie diese gegen den Uhrzeigersinn.
Page 12

Reinigung
Reinigen Sie den Motorteil und den Deckel immer nur mit einem feuchten Tuch. Tauchen Sie den
Motorteil niemals in Wasser.
1. Alle anderen Geräteteile sind spülmaschinengeeignet. Nach Verarbeitung von salzigen Lebensmitteln spülen Sie sofort die Schneidmesser.
2. Wählen Sie Reinigungsmittel sorgfältig aus.
3. Um Verfärbungen von Lebensmitteln zu vermeiden, einige Tropfen von Sonnenblumenöl auf ein
Papiertuch geben und die betroffenen Teile damit einreiben. Anschließend in der Spülmaschine
spülen.
4. Vor Reinigung immer den Netzstecker aus der Steckdose ziehen.
5. Die Schneidmesser sind sehr scharf, seien Sie immer vorsichtig im Umgang mit ihnen.
Empfehlung (Für Behälter mit Volumen 500 ml)
Lebensmittel Max Betriebsdauer
Fleisch 250g 15s
Kräuter 50g 10s
Nüsse 150g 15s
Käse 100g 10s
Brot 80g 10s
Zwiebel 200g 10s
Kekse 150g 10s
Weiches Obst 200g 10s
Mehl 250g
Wasser 165
Hefeteig
Sahne 2.5
Backpulver 19
Zucker 1.5
10s
Technische Daten:
Betriebsspannung: 220-240 V~
Frequenz: 50 Hz-60 Hz
Leistung: 800 W
Die deutsche Version der Anleitung ist eine genaue Übersetzung der Anleitung des Herstellers.
Die in diesem Handbuch verwendeten Bilder dienen nur zur Illustration und können nicht genau
das Produkt entsprechen.
Page 13

CZ
Děkujeme za nákup našeho výrobku.
Před použitím přístroje si prosím přečtěte tento návod, vyhnete se tak neodborné manipulaci azacházení s přístrojem.
Popis částí:
1
2
3
4
5
6
7
10
8
11
M
13
9
12
N
14
1 Regulátor výkonu 8 „S“ nůž
2 Spínač I 9 Nádoba na sekání
3 Turbo 10 Držák metly
4 Jednotka motoru 11 Metla
5 Tlačítka aretace nástavců 12 Příslušenství na výrobu bramborové kaše
6 Tyč mixéru 13 Odměrka
7 Víko nádoby na sekání 14 Držák
Page 14

Pozor:
Před prvním použitím přístroje si pečlivě přečtěte instrukce o bezpečném používání přístroje.
1. Pokud přístroj nepoužíváte a před každým montováním, rozebíráním a čištěním přístroj vždy
odpojte z elektrické zásuvky.
2. Tento přístroj není určen na použití dětmi. Přístroj a kabel držte vždy mimo dosah dětí.
3. Tento spotřebič nesmí používat osoby (včetně dětí) se sníženými fyzickými, smyslovými nebo
duševními schopnostmi, nebo s nedostatkem zkušeností a znalostí, pokud nejsou pod dozorem
dospělé osoby.
4. Neužívejte přístroj k jiným účelům, než ke kterým je určen, mohlo by dojít ke zranění.
5. Před zapojením přístroje do elektrické zásuvky zkontrolujte, zda napětí v síti odpovídá napětí
na štítku přístroje.
6. Nezapojujte přístroj do elektrické zásuvky, pokud není plně smontovaný, pokud jej rozebíráte
nebo pokud držíte nože.
7. Přístroj nepoužívejte v případě, že má poničený kabel nebo pokud přístroj jeví jakékoliv jiné
známky poškození. V takovém případě se obraťte na nejbližší servis.
8. Nikdy nenechávejte kabel viset přes kraj pracovní plochy nebo dotýkat se horkých povrchů.
9. Nože jsou velmi ostré, zacházejte s nimi velmi opatrně.
10. Během chodu přístroje nikdy nestrkejte ruce a pracovní náčiní do nádoby. Mohlo by dojít ke
zranění nebo zničení přístroje. Škrabku používejte pouze v případě, že je přístroj vypnutý.
11. Abyste zabránili elektrickému šoku, nikdy nepokládejte motor přístroje a kabel do vody, ani jiné
tekutiny.
12. Nemixujte horké tekutiny.
13. Nedávejte části přístroje do mikrovlnné trouby.
14. Krátký chod (pouze třikrát). Přístroj používejte kratší dobu než 1 min pro zpracování měkkých
potravin a ne déle než 15 s pro zpracování tvrdých surovin. Provozujte pouze 3 cykly na jedno
použití.
15. Abyste zamezili zranění, nikdy nevkládejte nože do nádoby před tím, než je pevně přichycena
na své místo.
16. Ujistěte se, že je víko bezpečně uzamčeno ve správné pozici před spuštěním přístroje.
17. Přístroj čistěte vlhkým hadříkem.
18. Instrukce musí obsahovat detaily, jak čistit povrch přístroje po kontaktu s potravinami, provozní
doby a rychlostní nastavení.
19. Dávejte si pozor během manipulace s ostrými noži, při plnění nádoby a během čištění přístroje.
20. Před výměnou příslušenství přístroj vždy vypněte.
Page 15

Jak používat tyčový mixér
N
M
1
7
8
9
10
12
13
14
11
2
3
4
5
6
N
M
1
7
8
9
10
12
13
14
11
2
3
4
5
6
Tyčový mixér je určen pro výrobu dipů, omáček, polévek, majonéz a jídla pro děti stejně tak jako
pro mixování.
1. Vložte tyč mixéru na jednotku motoru do uzamčené polohy.
2. Tyčový mixér vložte do nádoby a stiskněte spínač I nebo II.
3. Vypojte přístroj z elektrické zásuvky a stiskněte tlačítka aretace nástrojů pro vyjmutí tyče mixéru. Tyčový mixér můžete použít nejen v odměrce, ale také v jakékoliv jiné nádobě.
Jak použít sekáček
1. Sekáček je určen pro sekání tvrdých potravin, jako například maso, sýr, cibule, bylinky, česnek,
mrkev, ořechy a podobně.
2. Nikdy nesekejte hodně tvrdé suroviny, jako například led, muškátový oříšek, kávová zrna a obilí.
Před sekáním
1. Opatrně odstraňte plastové víko z nožů. Pozor! Nože jsou velmi ostré, vždy je držte za horní
plastovou část.
2. Vložte nože na střed nádoby na sekání. Stlačte nože a zamkněte nádobu. Vždy nádobu pokládejte na neklouzavý povrch.
3. Vložte potraviny do nádoby na sekání.
4. Umístěte víko na nádobu na sekání.
5. Jednotku motoru umístěte na víko nádoby na sekání do uzamčené polohy.
6. Zapněte přístroj a uveďte tak sekáček do chodu. Během chodu držte jednotku motoru jednou
rukou a druhou přidržujte nádobu na sekání.
7. Po použití vypojte přístroj z elektrické zásuvky a poté stiskněte tlačítka aretace nástrojů a odstraňte jednotku motoru.
8. Poté odstraňte víko nádoby na sekání.
9. Opatrně vyjměte nože.
10. Vyjměte zpracované potraviny z nádoby.
Page 16

N
M
1
7
8
9
10
12
13
14
11
2
3
4
5
6
N
M
1
7
8
9
10
12
13
14
11
2
3
4
5
6
Jak použít metlu
Metlu používejte pouze na šlehání krému, šlehání bílků a podobně.
1. Vložte metlu na příslušný držák a poté jej vložte na jednotku motoru do uzamčené polohy.
2. Vložte metlu do nádoby a poté stiskněte tlačítko pro spuštění.
3. Odpojte přístroj z elektrické zásuvky a poté stiskněte uvolňovací spínač. Vyjměte držák z jednotky motoru a poté metlu z držáku.
Jak použít příslušenství pro výrobu bramborové kaše
Toto příslušenství používejte pouze pro rychle vaření nebo na výrobu například bramborové kaše.
• Vložte příslušenství pro výrobu bramborové kaše na jednotku motoru do uzamčené polohy.
• Před spuštěním přístroje umístěte příslušenství do nádoby s uvařenými brambory. Spusťte přístroj na nízkou rychlost.
Poznámka: abyste získali lehkou a chutnou bramborovou kaši, přidejte malé množství horkého
mléka a rozpuštěného másla.
• Po použití vyjměte nože a opláchněte je. Utřete je do sucha a znovu je nainstalujte.
• Abyste nože z přístroje vyjmuli, otočte jimi po směru hodinových ručiček. Pokud je budete znovu
na přístroj instalovat, otočte jimi proti směru hodinových ručiček.
Page 17

Čištění
Jednotku motoru a víko nádoby utírejte pouze vlhkým hadříkem. Jednotku motoru nikdy neponořujte do vody.
1. Všechny další části můžete mýt v myčce na nádobí. Pokud zpracováváte velmi slané potraviny,
nože ihned po použití opláchněte.
2. Pečlivě vybírejte přípravky na čištění přístroje.
3. Pokud zpracováváte potraviny, které barví, plastové části přístroje se mohou lehce zbarvit.
Před umístěním do myčky tyto části potřete rostlinným olejem.
4. Před čištěním přístroj vypojte z elektrické zásuvky.
5. Nože přístroje jsou velmi ostré, zacházejte s nimi opatrně.
Průvodce (pro nádobu o objemu 500 ml)
Potraviny Max Doba provozu
Maso 250g 15s
Bylinky 50g 10s
Ořechy 150g 15s
Sýr 100g 10s
Chléb 80g 10s
Cibule 200g 10s
Sušenky 150g 10s
Měkké ovoce 200g 10s
Mouka 250g
Voda 165
Kynuté těsto
Smetana 2.5
Prášek do pečiva 19
Cukr 1.5
10s
Technické parametry:
Napětí: 220-240 V~
Frekvence: 50 Hz-60 Hz
Výkon: 800 W
Česká verze návodu je přesným překladem originálního návodu výrobce.
Fotografie použité v manuálu jsou pouze ilustrační a nemusí se přesně shodovat s výrobkem.
Page 18

SK
Ďakujeme za nákup nášho výrobku.
Pred použitím prístroja si prosím prečítajte tento návod, vyhnete sa tak neodbornej manipulácii
azaobchádzaniu s prístrojom.
Popis častí:
1
2
3
4
5
6
7
10
8
11
M
13
9
12
N
14
1 Regulátor výkonu 8 „S“ nôž
2 Spínač I 9 Nádoba na sekánie
3 Turbo 10 Držiak metly
4 Jednotka motora 11 Metla
5 Tlačidlá aretácie nástavcov 12 Příslušenstvo na výrobu zemiakovej kaše
6 Tyč mixéra 13 Odmerka
7 Veko nádoby na sekanie 14 Držiak
Page 19

Pozor:
Pred prvým použitím prístroja si pozorne prečítajte inštrukcie o bezpečnom používaní prístroja.
1. Pokiaľ prístroj nepoužívate a pred každým montovaním, rozoberaním a čistením prístroj vždy
odpojte z elektrickej zásuvky.
2. Tento prístroj nie je určený na použitie deťmi. Prístroj a kábel držte vždy mimo dosahu detí.
3. Tento spotrebič nesmú používať osoby (vrátane detí) so zníženými fyzickými, zmyslovými alebo
duševnými schopnosťami, alebo s nedostatkom skúseností a znalostí, pokiaľ nie sú pod dozorom
dospelej osoby.
4. Neužívajte prístroj na iné účely, než na ktoré sú určené, mohlo by dôjsť k zraneniu.
5. Pred zapojením prístroja do elektrickej zásuvky skontrolujte, či napätie v sieti zodpovedá napätiu na štítku prístroja.
6. Nezapojte prístroj do elektrickej zásuvky, ak nie je plne zmontovaný, ak ho rozoberáte alebo
ak držíte noža.
7. Prístroj nepoužívajte v prípade, že má poničený kábel alebo ak prístroj javí akékoľvek iné známky poškodenia. V takom prípade sa obráťte na najbližší servis.
8. Nikdy nenechávajte kábel visieť cez kraj pracovnej plochy alebo dotýkať sa horúcich povrchov.
9. Nože sú veľmi ostré, zaobchádzajte s nimi veľmi opatrne.
10. Počas chodu prístroja nikdy nestrkajte ruky a pracovné náčinie do nádoby. Mohlo by dôjsť k
zraneniu alebo zničeniu prístroja. Škrabku používajte len v prípade, že je zariadenie vypnuté.
11. Aby ste zabránili elektrickému šoku, nikdy neklaďte motor prístroja a kábel do vody, ani inej
tekutiny.
12. Nemixujte horúce tekutiny.
13. Nedávajte časti prístroja do mikrovlnnej rúry.
14. Krátky chod (len trikrát). Prístroj používajte kratšiu dobu ako 1 min pre spracovanie mäkkých
potravín a nie dlhšie ako 15 s pre spracovanie tvrdých surovín. Prevádzkujte len 3 cykly na jedno
použitie.
15. Aby ste zamedzili zraneniu, nikdy nevkladajte nože do nádoby pred tým, než je pevne prichytená na svoje miesto.
16. Uistite sa, že je veko bezpečne uzamknuté v správnej pozícii pred spustením prístroja.
17. Prístroj čistite vlhkou handričkou.
18. Inštrukcie musí obsahovať detaily, ako čistiť povrch prístroja po kontakte s potravinami, prevádzkovej doby a rýchlostné nastavenia.
19. Dávajte si pozor počas manipulácie s ostrými nožmi, pri plnení nádoby a počas čistenia prístroja.
20. Pred výmenou príslušenstva prístroj vždy vypnite.
Page 20

Ako používať tyčový mixér
N
M
1
7
8
9
10
12
13
14
11
2
3
4
5
6
N
M
1
7
8
9
10
12
13
14
11
2
3
4
5
6
Tyčový mixér je určený pre výrobu dipov, omáčok, polievok, majonéz a jedlá pre deti rovnako tak
ako pre mixovanie.
1. Vložte tyč mixéra na jednotku motora do uzamknutej polohy.
2. Tyčový mixér vložte do nádoby a stlačte spínač I alebo II.
3. Odpojte prístroj z elektrickej zásuvky a stlačte tlačidlá aretácie nástrojov pre vybratie tyče mixéra.
Tyčový mixér môžete použiť nielen v odmerke, ale aj v akejkoľvek inej nádobe.
Ako použiť sekáčik
1. Sekáč je určený pre sekanie tvrdých potravín, ako napríklad mäso, syr, cibuľa, bylinky, cesnak,
mrkvu, orechy a podobne.
2. Nikdy nekoste veľa tvrdej suroviny, ako napríklad ľad, muškátový oriešok, kávové zrná a obilia.
Pred sekaním
1. Opatrne odstráňte plastové veko z nožov. Pozor! Nože sú veľmi ostré, vždy ich držte za hornú
plastovú časť.
2. Vložte nože na stred nádoby na sekanie. Stlačte nože a zamknite nádobu. Vždy nádobu pokladajte na protišmykový povrch.
3. Vložte potraviny do nádoby na sekanie.
4. Umiestnite veko na nádobu na sekanie.
5. Jednotku motora umiestnite na veko nádoby na sekanie do uzamknutej polohy.
6. Zapnite prístroj a uveďte tak sekáčik do chodu. Počas chodu držte jednotku motora jednou
rukou a druhou pridržujte nádobu na sekanie.
7. Po použití vypojte prístroj z elektrickej zásuvky a potom stlačte tlačidlá aretácie nástrojov a
odstráňte jednotku motora.
8. Potom odstráňte veko nádoby na sekanie.
9. Opatrne vyberte nože.
10. Vyberte spracované potraviny z nádoby.
Page 21

N
M
1
7
8
9
10
12
13
14
11
2
3
4
5
6
N
M
1
7
8
9
10
12
13
14
11
2
3
4
5
6
Ako použiť metlu
Metlu používajte iba na šľahanie krému, šľahanie bielkov a podobne.
1. 1. Vložte metlu na príslušný držiak a potom ho vložte na jednotku motora do uzamknutej polohy.
2. 2. Vložte metlu do nádoby a potom stlačte tlačidlo pre spustenie.
3. 3. Odpojte prístroj z elektrickej zásuvky a potom stlačte uvoľňovacie spínač. Vyberte držiak z
jednotky motora a potom metlu z držiaka.
Ako použiť príslušenstvo na výrobu zemiakovej kaše
Toto príslušenstvo používajte len pre rýchlo varenie alebo na výrobu napríklad zemiakovej kaše.
• Vložte príslušenstvo pre výrobu zemiakovej kaše na jednotku motora do uzamknutej polohy.
• Pred spustením prístroja umiestnite príslušenstvo do nádoby s uvarenými zemiakmi. Spustite
prístroj na nízku rýchlosť.
Poznámka: aby ste získali ľahkú a chutnú zemiakovú kašu, pridajte malé množstvo horúceho
mlieka a rozpusteného masla.
• Po použití vyberte nože a opláchnite ich. Utrite ich do sucha a znovu ich nainštalujte.
• Aby ste nože z prístroja vybrali, otočte nimi v smere hodinových ručičiek. Ak ich budete znovu
na prístroj inštalovať, otočte nimi proti smeru hodinových ručičiek.
Page 22

Čistenie
Jednotku motoru a veko nádoby utierajte iba vlhkou handričkou. Jednotku motora nikdy neponárajte do vody.
1. Všetky ďalšie časti môžete umývať v umývačke riadu. Po spracovaní veľmi slaných potravín
noža ihneď po použití opláchnite.
2. Starostlivo vyberajte prípravky na čistenie prístroja.
3. Ak spracovávate potraviny, ktoré farbia, plastové časti prístroja sa môžu ľahko sfarbiť. Pred
umiestnením do umývačky tieto časti utrite rastlinným olejom.
4. Pred čistením prístroj vypojte z elektrickej zásuvky.
5. Nože prístroje sú veľmi ostré, zaobchádzajte s nimi opatrne.
Sprievodca (pre nádobu s objemom 500 ml))
Potraviny Max Doba prevádzky
Mäso 250g 15s
Bylinky 50g 10s
Orechy 150g 15s
Syr 100g 10s
Chlieb 80g 10s
Cibuľa 200g 10s
Sušienky 150g 10s
Mäkké ovoce 200g 10s
Múka 250g
Voda 165
Kysnuté cesto
Smotana 2.5
Prášok do pečiva 19
Cukor 1.5
10s
Technické parametre:
Napätie: 220-240 V~
Frekvencia: 50 Hz-60 Hz
Výkon: 800 W
Slovenská verzia návodu je presným prekladom originálneho návodu výrobcu.
Fotografie použité v návode sú len ilustračné a nemusia sa presne zhodovat s výrobkom.
Page 23

HU
Köszönjük, hogy megvásárolta termékünket.
Használat előtt kérjük olvassa el a használati útmutatót, így megelőzheti az eszköz helytelen
használatát.
Részek leírása:
1
2
3
4
5
6
7
10
8
11
M
13
9
12
N
14
1 Teljesítmény szabályozó 8 „S“ kés
2 Kapcsoló I 9 Szeletelő edény
3 Turbo 10 Habverő toldalék
4 Motoregység 11 Habverő
5 Toldalék kioldó gomb 12 Burgonyapüré készítő toldalék
6 Bot 13 Mérőedény
7 Edényfedél 14 Fogantyú
Page 24

Vigyázat:
A készülék első használata eőtt figyelmesen olvassa el a használati útmutatót a biztonságos
használat érdekében.
1. Ha nem használja, és mielőtt összeszerelné a készüléket, szétszerelés és tisztítás előtt mindig
húzza ki a konnektorból.
2. Ez a készülék nem alkalmas gyermekek számára. A készülék és a vezeték elzárva tartandó a
gyermekektől.
3. Ezt a készüléket nem használhatják olyan személyek (beleértve a gyermekeket is), akik csökkent fizikai, érzékszervi vagy mentális képességűek, illetve ha nem rendelkeznek tapasztalattal és
ismeretekkel, ha nincsenek felnőtt felügyelet mellett.
4. Ne használja a készüléket más célra, mint amire tervezték, mert sérülést okozhat.
5. Mielőtt a készüléket az elektromos hálózathoz csatlakoztatná, ellenőrizze, hogy a hálózati feszültség megegyezik a feszültséggel a készüléken.
6. Ne csatlakoztassa az elektromos hálózathoz, ha nem teljesen összeszerelt, vagy ha épp szereli
és a kést a kezében tartja.
7. Ne használja a készüléket, ha sérült a kábel vagy ha a készülék mutat más sérülést. Ebben az
esetben forduljon a legközelebbi szervizhez.
8. Ne hagyja a kábelt lógni az asztalról vagy forró felület közelében.
9. A kések nagyon élesek, kezelje különleges figyelemmel.
10. Működés közben soha ne nyúljon a tartályba. Ez sérülést okozhat, vagy megsemmisíti az
eszközt. Csak akkor nyúljon a készülék belsejébe, ha a készülék ki van kapcsolva.
11. Az áramütés elkerülése érdekében ne helyezze a készüléket és a motor kábelt vízbe vagy más
folyadékba.
12. Ne keverjen forró folyadékot.
13. Ne tegye a műszer alkatrészeit a mikrohullámú sütőbe.
14. Rövid üzemmód (csak háromszor). A készüléket ne használja hosszabb ideig mint 1 perc ha
puha ételeket aprít, és hosszabban, mint 15 másodpercig ha kemény élelmiszereket dolgoz fel.
Egyszeri használatra csak három ciklust használja.
15. A sérülések elkerülése érdekében soha ne helyezzen egy kést a tartályba, mielőtt szilárdan a
helyére nem helyezi.
16. Ellenőrizze, hogy a fedél biztosan rögzüljön a helyén, mielőtt a készüléket elindítja.
17. Tisztítsa meg a készüléket egy nedves ruhával.
18. Az utasításoknak tartalmaznia kell a részleteit, hogyan kell tisztítani a felületet a készülék az
élelmiszerrel érintkező, a működési időt és a sebesség-beállításokat.
19. Legyen óvatos a kések kezelése közben éles késsel, a tartály tisztítása során.
20. Mielőtt cserélné a tartozékokat a gépet mindig kapcsolja ki.
Page 25

Hogyan használja a botmixert
N
M
1
7
8
9
10
12
13
14
11
2
3
4
5
6
N
M
1
7
8
9
10
12
13
14
11
2
3
4
5
6
A botmixer segítéségével készíthetőek mártások, szószok, levesek, majonéz és bébiétel, valamint
a keveréshez is alkalmas.
1. Helyezze a botmixertt a motor egységre zárt helyzetbe.
2. Helyezze a botmixert az edénybe, majd kapcsolja az I. vagy II. gombot
3. Húzza ki a készüléket a konnektorból, majd nyomja meg az eszközöket kioldó gombot. A botmixert
A botmixert nem csak a mérőedényben tudja használni, hanem bármilyen más edényben.
Hogyan használja az aprítót
1. Az aprítót kemény élelmiszerek aprításához tervezték, mint a hús, sajt, hagyma, fűszerek,
fokhagyma, sárgarépa, dió és hasonlók.
2. Soha ne vágja túl sok kemény élelmiszert egyszerre, mint a jég, szerecsendió, kávé bab és
szemek.
Aprítás előtt
1. Óvatosan távolítsa el a műanyag fedelet a pengékről. Vigyázat! A kések nagyon élesek, mindig
tartsa őket a felső műanyag résznél.
2. Helyezze a penge közepét a aprítóedénybe. Nyomja a pengét és rögzítse tálba. Kérjük, hogy a
tartályt mindig helyezze csúszásgátló felületre.
3. Helyezze az ételt az aprítóedénybe.
4. Helyezze a fedelet a aprítóedényre.
5. Helyezze a motor egységet a fedelre az aprítóedényre rögzített helyzetben.
6. Kapcsolja be az eszközt, és így üzembe helyezi a készüléket. Működés közben, egyik kézzel
tartsa motoregységet, a másikkal fogja a szeletelő edényt.
7. Használat után húzza ki a készüléket a konnektorból, majd nyomja meg a rögzítő eszközt, és
távolítsa el a motor egységet.
8. Ezután távolítsa el a fedelet a szeletelő edényről.
9. Óvatosan vegye ki a pengét.
10. Vegye ki a feldolgozott élelmiszereket az edényből.
Page 26

N
M
1
7
8
9
10
12
13
14
11
2
3
4
5
6
N
M
1
7
8
9
10
12
13
14
11
2
3
4
5
6
Hogyan használja a habverőt
A habverőt csak tejszínhez, tojásfehérjéhez, és hasonlókhoz használja.
1. Helyezze a habverőt a megfelelő tartóhoz, majd tegye a motoregységet zárt helyzetbe.
2. Helyezze a habverőt egy edénybe, majd nyomja meg a gombot, hogy elindítsa.
3. Húzza ki a készüléket a konnektorból, majd nyomja meg a kioldó kapcsolót. Vegye ki a habverőt az edényből majd a toldalékot a motoregységből.
Hogyan használja a burgonyapüré készítő toldalékot
Ezt a tartozékot csak gyors főzéshez vagy burgonyapüré készítéséhez használja.
• Helyezze a burgonypüré készítéséhez szolgáló toldalékot a motoregységre zárt helyzetbe.
• A készülék bekacsolása előtt helyezze a toldalékot a főtt burgonyát tartalmazó edénybe. Kapcsolja be a készüléket alacsony fokozaton.
Megjegyzés: hogy finom krémes állagú birgonypürét kapjon, adjon hozzá meleg tejet és puha
vajat is a burgonyához.
• Használat után vege ki a késeket, öblítse le, majd tegye őkt vissza újra az edénybe.
• Ahhoz hogy a késeket ki tudja venni a készülékből, fordítsa el őket óramutató jársával megegyező irányba. Ha újra vissza akarja őket helyezni, akkor forgassa el az óramutató járásával ellentétes
irányba.
Page 27

Tisztítás
A motoregységet és a fedelet csak nedves törlőkendővel tisztítsa meg. A motoregységet soha ne
helyezze folyadékba.
1. Minden más részt moshat mosogatógépben. Nagyon sós ételek készítése után azonnal öblítse
le a késeket.
2. Gondos odafigyeléssel válassza ki a tisztító szereket.
3. Ha olyan élelmiszereket használ, amelyek festenek, könnyen elszíneződhetnek a készülék részei. Mosogatás előtt ezeket törölje át növényi olajjal.
4. Tisztítás előtt húzza ki a készüléket a hálózatból.
5. Kések nagyon élesek, bánjon óvatosan velük.
Útmutató (500 ml űrtartalmú edényhez)
Élelmiszer Max Időtartam
Hús 250g 15s
Fűszerek 50g 10s
Dófélék 150g 15s
Sajt 100g 10s
Kenyér 80g 10s
Hagyma 200g 10s
Keksz 150g 10s
Puha gyümölcs 200g 10s
Liszt 250g
Víz 165
Leveles tészta
Tejszín 2.5
Sütőpor 19
Cukor 1.5
10s
Műszaki adatok:
Feszültség: 220-240 V~
Frekvencia: 50 Hz-60 Hz
Teljesítmény: 800 W
A magyar használati utasítás a gyártótól kapott verzió pontos fordítása.
A kézikönyvben használt fényképek csak illusztrációk, nem egyeznek meg pontosan a termékkel.
Page 28

PL
Dziękujemy za zakup naszego produktu.
Przed użyciem prosimy starannie przeczytać tę instrukcję.
Opis części
1
2
3
4
5
6
7
10
8
11
9
12
M
13
N
14
1 Regulator mocy 8 „S“ nóż
2 Włącznik/wyłącznik I 9 Pojemnik do rozdrabniania (miksowania)
3 Turbo 10 Uchwyt rózgi
4 Jednostka napędowa 11 Rózga
5 Przyciski blokowania nadstawek 12 Sprzęt do przygotowania purée z ziemniaków
6 Obudowa blendera 13 Miarka
Pokrywka pojemnika do rozdrabnia-
7
nia (miksowania)
14 Uchwyt
Page 29

Uwaga:
Przed pierwszym użyciem urządzenia należy dokładnie zapoznać się z treścią instrukcji dotyczącej bezpiecznego użytkowania urządzenia.
1. Jeżeli urządzenie nie jest używane i przed każdym składaniem urządzenia dla potrzeb określonej czynności, rozmontowywaniem i czyszczeniem należy urządzenie odłączyć od zasilania.
2. To urządzenie nie jest przeznaczone do użytkowania przez dzieci. Urządzenie i przewód zasilający przechowywać poza zasięgiem dzieci.
3. Odbiornika tego nie mogą użytkować osoby (włącznie z dziećmi) o obniżonych zdolnościach
psychofizycznych i nie posiadające wystarczającej wiedzy i doświadczenia, jeżeli nie pozostają
pod nadzorem bezpośrednim osoby dorosłej.
4. Nie używać urządzenia do celów innych, niż do których jest przeznaczone, grozi wypadkiem.
5. Przed podłączeniem urządzenia do gniazda wtykowego instalacji elektrycznej sprawdzić, czy
napięcie w instalacji jest zgodne z napięciem podanym na tabliczce znamionowej urządzenia.
6. Nie podłączać urządzenia do zasilania, jeżeli nie jest w pełni zmontowane, jeżeli jest rozmontowywane lub jeżeli noże są trzymane w ręce.
7. Nie używać urządzenia, jeżeli przewód zasilający jest uszkodzony lub nosi ślady uszkodzenia.
W takim przypadku należy urządzenie przekazać do zakładu naprawczego.
8. Nigdy nie pozostawiać przewodu zwisającego przez krawędź powierzchni roboczej lub w kontakcie z powierzchniami gorącymi.
9. Noże są bardzo ostre, należy obchodzić się z nimi bardzo ostrożnie.
10. Podczas pracy urządzenia nie wkładać rąk jak również innych przedmiotów do pojemnika.
Zgarniacza używać tylko, jeżeli urządzenie jest wyłączone.
11. Aby uniknąć porażenia prądem elektrycznym nigdy nie należy zanurzać silnika urządzenia, ani
przewodu zasilania w wodzie lub innej cieczy.
12. Nie miksować gorących płynów.
13. Nie wkładać elementów urządzenia do mikrofalówki.
14. Krótka praca (tylko trzykrotnie). Urządzenie używać tylko przez czas poniżej 1 min przy przetwarzaniu miękkich produktów spożywczych i nie dłużej niż przez 15 s przy przetwarzaniu twardych produktów spożywczych. Stosować tylko 3 cykle przy użytku jednorazowym.
15. Aby uniknąć poranienia, nigdy nie należy wkładać noży do pojemnika, przed tym niż pojemnik
jest prawidłowo zamocowany.
16. Należy upewnić się, czy pokrywa jest prawidłowo, we właściwym położeniu zamocowana przed uruchomieniem urządzenia.
17. Urządzenie czyścić używając wilgotnej ścierki.
18. Instrukcja musi zawierać szczegóły dotyczące, jak czyścić powierzchnię urządzenia po kontakcie z produktami spożywczymi, czasu jednorazowego użycia i regulacji prędkości.
19. Należy zachować ostrożność w trakcie manipulowania nożami, przy napełnianiu pojemnika i
podczas czyszczenia urządzenia.
20. Przed wymianą osprzętu zawsze należy urządzenie wyłączyć.
Page 30

Jak używać blender
N
M
1
7
8
9
10
12
13
14
11
2
3
4
5
6
N
M
1
7
8
9
10
12
13
14
11
2
3
4
5
6
Blender jest przeznaczony do przygotowywania dipów, sosów, zup, majonezów i pokarmów dla
dzieci podobnie jak przy miksowaniu.
1. Zamocować blender na jednostce napędowej w pozycji zablokowanej.
2. Blender umieścić w naczyniu i nacisnąć przycisk I lub II.
3. Odłączyć urządzenie od zasilania i nacisnąć przycisk blokady osprzętu w celu wyjęcia blendera. Blendera można używać nie tylko w naczyniu do odmierzania ilości, ale również w dowolnym
innym naczyniu.
Jak użyć malaksera
1. Malakser jest przeznaczony do rozdrabniania twardych produktów spożywczych, jak np. mięso, ser, cebula, zioła, czosnek, marchew, orzechy itp.
2. Nigdy nie próbować rozdrabniać bardzo twardych produktów spożywczych, takich jak np. lód,
gałka muszkatołowa, ziarna kawy lub zbóż.
Przed rozdrabnianiem
1. Ostrożnie zdjąć plastikową osłonę z noży. Uwaga! Noże są bardzo ostre, zawsze należy je
chwytać za plastikową górną część.
2. Noże ustawić na środku pojemnika do siekania. Docisnąć noże i zamknąć pojemnik. Pojemnik
zawsze ustawiać na powierzchni, po której pojemnik nie będzie ślizgać się.
3. Umieścić produkty spożywcze w pojemniku rozdrabniacza.
4. Założyć pokrywę na pojemniku do rozdrabniania.
5. Jednostkę napędową umieścić na pokrywie pojemnika do rozdrabniania w pozycji zablokowanej.
6. Włączyć urządzenie, spowoduje to uruchomienie rozdrabniacza. W trakcie pracy jedną ręką
trzymać jednostkę napędową a drugą pojemnik do rozdrabniania.
7. Po zakończeniu rozdrabniania urządzenie odłączy od zasilania a następnie używając przycisku
zwolnienia blokady zdjąć jednostkę napędową.
8. Następnie zdjąć pokrywę z pojemnika.
9. Ostrożnie wyjąć noże.
10. Wyjąć rozdrobnione produkty spożywcze z pojemnika.
Page 31

N
M
1
7
8
9
10
12
13
14
11
2
3
4
5
6
N
M
1
7
8
9
10
12
13
14
11
2
3
4
5
6
Jak używać rózgę
Rózgi używać tylko do ubijania kremu, ubijania białek itp.
1. Umieścić rózgę we właściwym uchwycie i następnie zamocować do jednostki napędowej w
położeniu zablokowanym.
2. Wstawić rózgę do naczynia z zawartością i następnie nacisnąć przycisk uruchamiający. V
3. Odłączyć urządzenie od zasilania i następnie nacisnąć przycisk zwalniający. Wyjąć uchwyt z
jednostki napędowej a następnie wyjąć rózgę z uchwytu (adaptera).
Jak użyć wyposażenia dla przygotowania purée ziemniaczanego
To wyposażenie używać tylko w celu szybkiego ugotowania lub do przygotowania np. purée z
ziemniaków.
• Zamocować wyposażenie do przygotowania purée ziemniaczanego na jednostce napędowej i
zabezpieczyć w położeniu zamkniętym.
• Przed uruchomieniem blendera umieścić blender w naczyniu z ugotowanymi ziemniakami. Uruchomić urządzenie pracując z niską prędkością obrotową.
Uwaga: w celu uzyskania puszystego i smacznego purée ziemniaczanego, dodać niewielka ilość
gorącego mleka i rozpuszczonego masła.
• Po zakończeniu pracy wyjąć noże i opłukać je. Wytrzeć do sucha i ponownie je zainstalować.
• W celu wyjęcia noży z urządzenia należy obrócić je w kierunku zgodnym z ruchem wskazówek
zegara. Przy ponownej instalacji należy obracać je w kierunku przeciwnym do ruchu wskazówek
zegara.
Page 32

Czyszczenie
Obudowę silnika i pokrywę pojemnika czyścić tylko wilgotną ścierką. Jednostkę napędową nigdy
nie zanurzać w wodzie.
1. Wszystkie pozostałe części można myć w zmywarce do naczyń. Po przetworzeniu bardzo słonych produktów spożywczych należy natychmiast opłukać noże.
2. Starannie dobierać środki do czyszczenia urządzenia.
3. W przypadku przetwarzania produktów spożywczych, które barwią, plastikowe części urządzenia mogą się lekko zabarwić. Przed włożeniem do zmywarki należy części te przetrzeć olejem
roślinnym.
4. Przed przystąpieniem do czyszczenia należy urządzenie odłączyć od zasilania.
5. Noże urządzenia są bardzo ostre, należy obchodzić się z nimi bardzo ostrożnie.
Przewodnik (dla pojemnika o pojemności 500 ml)
Produkty spożywcze Maks Czas pracy
Mięso 250g 15s
Zioła 50g 10s
Orzechy 150g 15s
Ser 100g 10s
Chleb 80g 10s
Cebula 200g 10s
Herbatniki 150g 10s
Owoce miękkie 200g 10s
Mąka 250g
Ciasto
drożdżowe
Woda 165
Śmietana 2.5
Proszek do ciasta 19
Cukier 1.5
10s
Parametry techniczne:
Napięcie: 220-240 V~
Częstotliwość: 50 Hz-60 Hz
Moc: 800 W
Polska wersja językowa instrukcji jest dokładnym tłumaczeniem oryginalnej instrukcji producenta.
Zdjęcia wykorzystane w tym podręczniku są jedynie ilustracją i nie może dokładnie dopasować produkt.
Page 33

Page 34

Page 35

Page 36

powerful blenders “Smoothie”Food processor “Promesso“
vertical juicers “Juicer” horizontal juicers “Chamber” and “Gourmet”
food dehydrators “Harmony”
more products G21
 Loading...