


1
120V LITHIUM-ION CORDLESS
CHAINSAW—Model: EA216/EA218
Operator’s Manual and Part List
Before use please read & understand this manual, paying particular attention to the
safety instructions.
Retain these instructions for future reference.

!!!!!!!!!!!!!!!!!!!!!!!!!!!!!!!!!!!!!!!!!!!!
!!!!!!!!!!!!!!!!!!!!!!!!!!!!!!!!!!!!!!!!!
2!
Contents
Symbols used in this manual .... Sym
Sym Error! Reference source not found.
Error! Reference source not found. Error! Reference source not found.
Error! Reference source not found. Error! Reference source not found.
Technical specifications Technical specifications
Overview ............................... Overview
Instructions for use Instructions for use
Basic working technique Basic working technique
Maintenance and care .................... 24
Disposal information ....................... 25
Symbols used in this manual
WARNING!
Denotes impending danger. Non-observance of this warning may result in death or extremely
severe injuries.
CAUTION!
Denotes a potentially dangerous situation. Non-observance of this warning may result in
injury or damage to property.
NOTE
Denotes application tips and important information.
Symbols on the power tool
General safety warning!

3
Before switching on the power tool, read the operating
manual!
Wear safety goggles.
Wear ear protection.
Protect the device from rain and do not leave it
outdoors in the rain!
Disposal information
Tip contact may cause the guide bar to
move suddenly upward and backwards,
which may cause serious injury to user.
Do not use one hand when operating the chainsaw.
Always use two hands when operating.
For your safety
WARNING!
Before using the garden tool, read and follow:
these operating instructions,
the user instructions of associated/supplied accessories (charger, battery),
the currently valid site rules and the regulations for the prevention of accidents.
User
This garden tool is not intended for use by persons (including children) with reduced physical,
sensory or mental capabilities, or lack of experience and know-ledge, unless they have been
given supervision or instruction concerning use of the machine by a person responsible for
their safety.
Never allow children or people unfamiliar with these instructions to use the garden tool.

!!!!!!!!!!!!!!!!!!!!!!!!!!!!!!!!!!!!!!!!!!!!
!!!!!!!!!!!!!!!!!!!!!!!!!!!!!!!!!!!!!!!!!
4!
Supervise children. This will ensure that children do not play with the unit.
Intended use
This garden tool is intended for sawing wood and felling trees in the private sector exclusively,
not suitable for sawing plastic, masonry or building materials which are not made of wood,
to use according to the descriptions and safety instructions indicated in manual.
Any other use is not as intended. Improper use is not covered by the warranty and the
manufacturer will reject any liability. The user is liable for all injuries to third parties and damage to
their property.
Operate the unit only in the technical condition as stipulated and delivered by the manufacturer.
Arbitrary changes to the unit will exclude the manufacturer from any liability for resulting injury
and/or damage.
General Power Tool Safety Warnings
WARNING!
Read all safety warnings and all instructions. Failure to follow the warnings and
instructions may result in electric shock, fire and/or serious injury. Save all warnings and
instructions for future reference.
The term “power tool” in all of the warnings refers to your mains-operated (corded) power
tool or battery-operated (cordless) power tool.
Work area safety
Keep work area clean and well lit. Cluttered and dark areas invite accidents.
Do not operate power tools in explosive atmospheres, such as in the presence of
flammable
liquids, gases or dust. Power tools create sparks which may ignite the dust or fumes.
Keep children and bystanders away while operating a power tool. Distractions can
cause you to
lose control.
Electrical safety
Power tool plugs must match the outlet. Never modify the plug in any way. Do not
use any
adapter plugs with earthed (grounded) power tools. Unmodified plugs and matching
outlets will
reduce risk of electric shock.
Avoid body contact with earthed or grounded surfaces, such as pipes, radiators,
ranges and
refrigerators. There is an increased risk of electric shock if your body is earthed or grounded.
Do not expose power tools to rain or wet conditions. Water entering a power tool will
increase the

5
risk of electric shock.
Do not abuse the cord. Never use the cord for carrying, pulling or unplugging the
power tool.
Keep cord away from heat, oil, sharp edges and moving parts. Damaged or entangled
cords
increase the risk of electric shock.
When operating a power tool outdoors, use an extension cord suitable for outdoor
use. Use of a
cord suitable for outdoor use reduces the risk of electric shock.
If operating a power tool in a damp location is unavoidable, use a residual current
device (RCD)
protected supply. Use of an RCD reduces the risk of electric shock.
Personal safety
Stay alert, watch what you are doing and use common sense when operating a
power tool. Do
not use a power tool while you are tired or under the influence of drugs, alcohol or
medication. A
moment of inattention while operating power tools may result in serious personal injury.
Use personal protective equipment. Always wear eye protection. Protective equipment
such as
dust mask, non-skid safety shoes, hard hat, or hearing protection used for appropriate conditions
will reduce personal injuries.
Prevent unintentional starting. Ensure the switch is in the off-position before
connecting to power
source and/or battery pack, picking up or carrying the tool. Carrying power tools with
your finger
on the switch or energising power tools that have the switch on invites accidents.
Remove any adjusting key or wrench before turning the power tool on. A wrench or a
key left
attached to a rotating part of the power tool may result in personal injury.
Do not overreach. Keep proper footing and balance at all times. This enables better
control of the
power tool in unexpected situations.
Dress properly. Do not wear loose clothing or jewellery. Keep your hair, clothing
and gloves away
from moving parts. Loose clothes, jewellery or long hair can be caught in moving parts.
If devices are provided for the connection of dust extraction and collection facilities,
ensure these
are connected and properly used. Use of dust collection can reduce dust-related hazards.

!!!!!!!!!!!!!!!!!!!!!!!!!!!!!!!!!!!!!!!!!!!!
!!!!!!!!!!!!!!!!!!!!!!!!!!!!!!!!!!!!!!!!!
6!
Power tool use and care
Do not force the power tool. Use the correct power tool for your application. The
correct power tool
will do the job better and safer at the rate for which it was designed.
Do not use the power tool if the switch does not turn it on and off. Any power tool that
cannot be
controlled with the switch is dangerous and must be repaired.
Disconnect the plug from the power source and/or the battery pack from the power
tool before
making any adjustments, changing accessories, or storing power tools. Such
preventive safety
measures reduce the risk of starting the power tool accidentally.
Store idle power tools out of the reach of children and do not allow persons
unfamiliar with the
power tool or these instructions to operate the power tool. Power tools are dangerous in
the hands
of untrained users.
Maintain power tools. Check for misalignment or binding of moving parts, breakage of parts and
any other condition that may affect the power tool’s operation. If damaged, have the power tool
repaired before use. Many accidents are caused by poorly maintained power tools.
Keep cutting tools sharp and clean. Properly maintained cutting tools with sharp cutting edges are
less likely to bind and are easier to control.
Use the power tool, accessories and tool bits etc. in accordance with these
instructions, taking into
account the working conditions and the work to be performed.
Use of the power tool for
operations
different from those intended could result in a hazardous situation.
Battery tool use and care
a) Recharge only with the charger specified by the manufacturer. A charger that is suitable
for one type of battery pack may create a risk of fire when used with another battery pack.
b) Use power tools only with specifically designated battery packs. Use of any other
battery packs may create a risk of injury and fire.
c) When battery pack is not in use, keep it away from other metal objects, like paper
clips, coins, keys, nails, screws or other small metal objects, that can make a connection
from one terminal to another. Shorting the battery terminals together may cause burns or a
fire.
d) Under abusive conditions, liquid may be ejected from the battery; avoid contact. If
contact accidentally occurs, flush with water. If liquid contacts eyes, additionally seek
medical help. Liquid ejected from the battery may cause irritation or burns.

7
Service
Have your power tool serviced by a qualified repair person using only identical
replacement parts.
This will ensure that the safety of the power tool is maintained.
Safety instructions for chain saws
When the saw is running, keep all body parts away from the saw chain. Before
starting the saw,
ensure that the saw chain touches nothing. When working with a chain saw, a moment of
inattention may result in clothing or body parts being caught by the chain saw.
Always hold the chain saw with your right hand on the rear handle and your left
hand on the front
handle. Holding the chain saw in reverse working position increases the risk of injuries and must
be avoided.
Hold the electric power tool by the insulated handle surfaces, as the saw chain may
may contact
hidden wiring. .
Wear goggles and hearing protection. Additional protective equipment for head,
hands, legs and
feet is recommended. Suitable protective clothing reduces the risk of injury from flying
splinters
and of accidentally touching the saw chain.
Do not work with the chain saw in a tree.
Always ensure you have a firm footing and use the chain saw only when you are
standing on
solid, safe and level ground. Slippery ground or unsteady footing, such as on a ladder, may
cause
you to lose your balance or lose control of the chain saw.
When cutting a branch which is under tension, expect it to spring back. When the
tension in the
Wood is released, the branch under tension may strike the operator and/or cause him to lose
control of the chain saw.
Be particularly careful when cutting undergrowth and young trees. Thin material may
become
caught in the saw chain and strike you or cause you to lose your balance.
Carry the chain saw, switched off, by the front handle, ensuring that the chain saw
is turned away
from your body. When transporting or storing the chain saw, always pull on the
protective cover.
Handle the chain saw carefully to reduce the likelihood of inadvertently touching the running saw
chain.

!!!!!!!!!!!!!!!!!!!!!!!!!!!!!!!!!!!!!!!!!!!!
!!!!!!!!!!!!!!!!!!!!!!!!!!!!!!!!!!!!!!!!!
8!
Follow the instructions for lubrication, tensioning the chain and changing the
accessories. An
improperly tensioned or lubricated chain may either snap or increase the risk of a kickback.
Keep the handles dry, clean and free of oil and grease. Greasy and oily handles are
slippery and
will cause loss of control.
Saw wood only. Do not use the chain saw for work for which it is not designed.
Example: Do not
use the chain saw for sawing plastic, masonry or building materials which are not made of wood.
If the chain saw is not used as intended, this may result in hazardous situations.
Causes of and avoiding a kickback
A kickback can occur when the tip of the guide rail touches an object or when the wood bends
and the saw chain becomes jammed in the cut. If the rail tip touches an object, this may
occasionally cause an unexpected reaction directed backwards, throwing the guide rail upwards
and in the direction of the operator.
If the saw chain jams on the upper edge of the guide rail, the rail may quickly recoil in the direction
of the operator.
A kickback occurs when the electric power tool is used incorrectly or erroneously.
A kickback can be prevented by taking appropriate precautions, as described below:
Hold the saw firmly with both hands, ensuring that your thumbs and fingers clasp
the handles on
the chain saw. Move your body and arms into a position in which they can withstand
the kickback
forces. If appropriate measures are taken, the operator can control the kickback forces. Never
release the chain saw.
Avoid an abnormal body posture and do not saw above shoulder height. This will
prevent you
from unintentionally touching the rail tip and will enable better control of the chain saw in
unexpected situations.
Use only replacement rails and saw chains stipulated by the manufacturer. Incorrect
replacement
rails and saw chains may cause the chain to snap and/or a kickback.
Follow the instructions of the manufacturer for sharpening and servicing the saw
chain. If the
depth limiter is too low, there will be a greater tendency of a kickback occurring.
Technical specifications
Chain saw

9
Type
EA216
EA218
Nominal voltage V 120
Battery type
Charger
EA20
EA30
EC130
EC440
Ah
Ah
A
A
2.0
3.0
1.0
3.5
Chain speed (no load)
m/s
12
Saw rail length
Mm
inch
410
16
460
18
Oil tank volume
ml
160
Weight (without battery)
Kg
lbs
5
11
A-weighted*sound*pressure*level*according*to* * ISO*22868,*EN*3744:!
Sound!pressure!level!LpA!
dB(A)
89
Sound!power!level!LwA!
dB(A)
103
Uncertainty!K!
dB
3
Total*vibration*value*according*to*ISO*22867:!
Emission!value!ah! !
m/s²
3.5
Uncertainty!K!
m/s²
1.5

!!!!!!!!!!!!!!!!!!!!!!!!!!!!!!!!!!!!!!!!!!!!
!!!!!!!!!!!!!!!!!!!!!!!!!!!!!!!!!!!!!!!!!
1
Overview
Different chain saws are described in these instructions. The illustrated chain saw may differ
in detail from the one which you purchased.
!
1.Rear handle 2.On/Off button 3.Switch interlock 4.Insertion slot for
battery
5.Protection hood 6.Saw chain 7.Saw rail 8.Spiked bumper
9.Hand guard/chain brake 10.Handlebar 11.Chain tension
wheel
12.Chain cover 13 .Hand wheel 14.Oil tank cover
15.Oil tank with oil level indicator 16.Housing 17.Ventilation
openings
18.Battery !EA20 (2,0 Ah), EA30 (3,0 Ah) 19.Release button for battery
20.LED state of charge indicator 21.Battery charger !
!
! Optional.!Depending!on!delivery!scope.!

11
Instructions for use
WARNING!
Switch the unit off and remove the battery under the following conditions:
if the unit is left unattended;
before checking, cleaning or performing other work on the unit;
if the unit starts vibrating excessively.
Before initial operation
Unpack the garden tool and accessories and check that no parts are missing or damaged.
The batteries (optional; depending on delivery scope) are not fully charged on delivery. Prior
to initial operation, charge the batteries fully. See user manual of the battery charger.
Assembling
Attaching saw rail and saw chain
WARNING!
The teeth on the saw chain are very sharp! Wear protective gloves when per-forming any
work on the chain.
Risk of injury!
An incorrectly attached saw chain will cause the power tool to cut in an uncontrolled manner!
When attaching the chain, observe the specified running direction!
Place the chain saw on any suitable flat surface.
Detach the hand wheel (1.) and remove the chain cover (2.).
Turn the chain tension wheel clockwise to push the saw rail as far as possible onto the chain
Wheel.

!!!!!!!!!!!!!!!!!!!!!!!!!!!!!!!!!!!!!!!!!!!!
!!!!!!!!!!!!!!!!!!!!!!!!!!!!!!!!!!!!!!!!!
1
Place saw chain around the saw rail starting on the upper part of the rail. Slide the chain in
the slot around the saw rail.
When attaching the chain, ensure that it is in the correct running direction.
Place elongated hole of the saw rail on the stud bolt a and the guide bolt b on the chain saw.
Place the saw chain around the chain wheel.
Tighten the chain tension wheel anti-clockwise to tension the chain.
The saw chain must not sag, but it should be possible to pull it 2-4 millimetres off the saw rail
in the middle of the saw rail.
Turn the saw chain by hand to check that it runs perfectly. It must slide freely in the rail.
Attach the chain guard. Tighten the hand wheel to attach the rail and the cover.
NOTE
Check and re-adjust the tension of a new chain after working for a few minutes. Switch the
motor off, remove the battery and actuate the chain brake.
13
Pour in chain oil
CAUTION!
Fill the unit only with an environmentally compatible quality chain and bar lubricant
(according to RAL-UZ48).
Do not use waste oil. Renewed contact with waste oil can cause skin cancer. Waste oil is
environmentally harmful. Waste oil does not have the necessary lubricating properties and
is unsuitable for chain lubrication.
An oil other than the one recommended may damage the rail, the chain and the lubricating
system.
Ensure that dirt does not get into the oil tank.
Avoid spilling oil. Always wipe up any spilled oil.
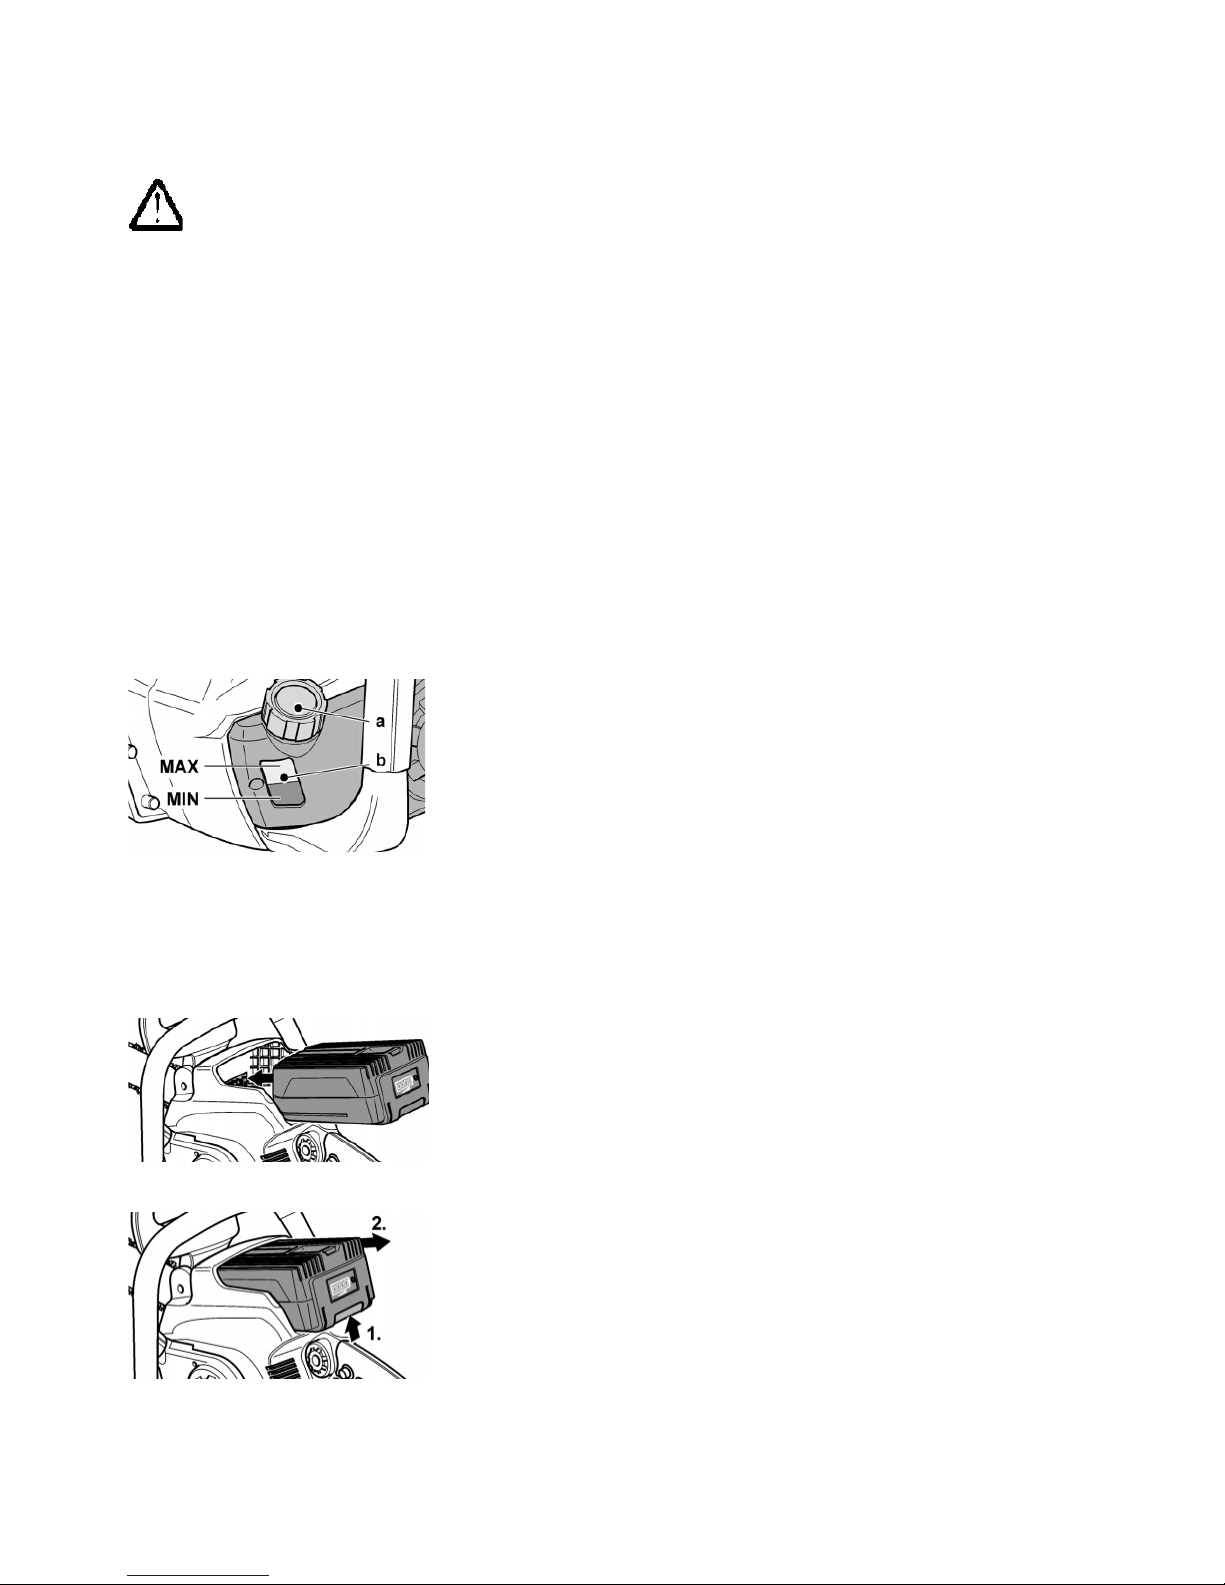
Unscrew the oil tank cap (a).
Carefully pour in the chain lubricating oil until it reaches the upper mark on the oil level
indicator (b).
Tank volume: max. 160 ml
Tighten the oil tank cap (a) by hand.
Inserting/replacing the battery
Charging the battery as described in the user manual of the charger.
Press the charged battery into the power tool until it clicks into place.
To remove, press the release button (1.) and pull out the battery (2.).

!!!!!!!!!!!!!!!!!!!!!!!!!!!!!!!!!!!!!!!!!!!!
!!!!!!!!!!!!!!!!!!!!!!!!!!!!!!!!!!!!!!!!!
1
CAUTION!
Protect the battery contacts when the battery is not being used. Loose metal parts may
short-circuit the contacts –
Explosion and fire hazard!
Chain brake
WARNING!
Before using the chain saw, always check that the chain brake is in perfect working order.
Otherwise, do not use the chain saw and have it repaired by a qualified technician or a
service centre.
The chain saw features a safety chain brake which stops the chain within a fraction of
a second in the event of a kickback.
If a kickback occurs, the chain brake is automatically actuated by touching the hand guard
with your left hand.
Therefore always hold the chain saw firmly with both hands.
Manually activating the chain brake
Tilt the hand guard a towards the saw rail tip
Loosening the chain brake
Pull the hand guard towards the handlebar.
Checking the chain brake
Place the chain saw on a secure surface.
Loosen the chain brake.
Hold the chain saw with both hands.
Switch the chain saw on. The saw chain runs.
Tilt the hand guard a towards the saw rail tip.
Otherwise, do not use the chain saw and have it repaired by a qualified technician or a
service centre.
After work, regularly remove sawdust and saw waste from the visible mechanisms of the
chain brake.
Lubricating the chain
CAUTION!
The unit may be operated with adequate chain lubricating oil only. Inadequate lubrication will
reduce the service life of the power tool.
Check the amount of oil on the oil level indicator.

15
Topping up the chain oil
CAUTION!
Fill the unit only with an environmentally compatible quality chain and bar lubricant
(according to RAL-UZ48).
Do not use waste oil. Renewed contact with waste oil can cause skin cancer. Waste oil is
environmentally harmful. Waste oil does not have the necessary lubricating properties and is
unsuitable for chain lubrication.
An oil other than the one recommended may damage the rail, the chain and the lubricating
system.
Ensure that dirt does not get into the oil tank.Avoid spilling oil. Always wipe up any spilled oil.
Check on the transparent oil level indicator (b) whether there is still adequate chain oil for
lubrication.
Unscrew the oil tank cap (a).Before opening, clean tank cap and inlet nozzle if required.
Carefully pour in the chain lubricating oil until it reaches the upper mark on the oil level
indicator (b ). Tighten the oil tank cap (a) by hand.
Check the chain oil level even during operation and top up with chain oil if required.
Checking the chain lubrication
Start the unit (see section “Switching on/off the power tool”).
Hold running saw chain for some time approx. 15 cm above a suitable surface. If there is
adequate chain lubrication, the oil which is ejected by the saw chain will form a light trail.
Switching on/off the power tool
Switching on
WARNING!
Make certain that the saw chain has not yet been positioned for cutting and is not touching
any other objects. Risk of injury!
Hold the chain saw firmly with both hands and ensure that there are no people (particularly
children) or animals in the immediate vicinity.
Ensure that the chain brake is released before starting the chain saw. To do this, pull the
hand guard back towards the handlebar.

!!!!!!!!!!!!!!!!!!!!!!!!!!!!!!!!!!!!!!!!!!!!
!!!!!!!!!!!!!!!!!!!!!!!!!!!!!!!!!!!!!!!!!
1
Press the release button and hold down (1.).
Press the rear On/Off switch (2.).The saw chain runs.
Switching off
Release the On/Off switch.
Battery state of charge
Press the button on the battery to check the state of charge at the state of charge indicator
LED.
The indicator goes out after 5 seconds.
If one of the LED flashes, the battery must be recharged. If none of the LED light up after the
button is pressed, the battery is faulty and must be replaced.
Using the device
WARNING!
Before using the power tool, familiarise yourself thoroughly with the sawing
technique of chain saws (see section “
Basic working technique
”). Risk of
injury!
Never allow children to operate the chain saw. Allow no person to use this chain
saw who has not read this user m anual or received adequate instructions for the
safe and proper use of this chain saw.
We recommend attending suitable training courses. The information listed here is only
additional!

17
Before each use
Check that all parts of the power tool are present, firmly attached and undamaged.
Check that the chain tension is correct.
Check that the chain brake functions.
Check the chain lubrication.
Check that there are no leaks.
Correct posture
Risk of injury!
Never work on unstable ground! Never work above shoulder height!
Never work while standing on a ladder!
Do not bend too far forwards when working!
Use the power tool only when the weather conditions and terrain are favourable!
Stand with both legs firmly on the ground.
Beware of obstructions in the working area.
When working, always hold the power tool with both hands!
Hold the power tool: with the left hand on the hand grip.with the right hand on the handle.
in a balanced position with your feet firmly on the ground.
This is how to use the saw correctly!
Look over the working area and remove any obstructions.
Before starting work, check the safety of the power tool (see “Before each use”).
Pick up the power tool in both hands as specified.
Switch the chain saw on before starting the cut.
Apply a uniform pressure to the unit, however not excessive force.
If possible, place the unit's tree claw on the branch which is to be sawn.
After use
Risk of injury!
Always switch the motor off before you put the power tool down! When the On/Off switch is
released, the saw chain continue running briefly.

!!!!!!!!!!!!!!!!!!!!!!!!!!!!!!!!!!!!!!!!!!!!
!!!!!!!!!!!!!!!!!!!!!!!!!!!!!!!!!!!!!!!!!
1
Stop the engine.
Wait until all rotating parts have come to a standstill.
Remove the battery.
Place sheath on cutting mechanism.
Activate chain brake.
Leave power tool to cool down.
Basic working technique
Risk of injury!
This section deals with the basic working technique when handling the power tool.
The information given here does not replace the extensive training and experience of a
specialist.
Avoid any work for which you are not adequately qualified! Imprudent handling of the power
tool may result in extremely serious to fatal injuries!
Sawing technique
Pull stroke sawing
With!this! t ec hn i que ! th e! u nd er si d e! of ! t he ! sa w! r ai l ! sa ws ! fr om! t op ! t o! bo tt o m. !
! !
The saw chain pushes the power tool forwards away from the user. The front edge of the power
tool forms a support which absorbs the forces which occur when sawing on the tree trunk.
In pull stroke sawing the user has much more control over the power tool and can better avoid
kickbacks. Therefore this sawing technique should be used preferably.
Push stroke sawing
With!this! t ec hn i que ! th e! u pp er ! si d e! of ! t he ! sa w! r ai l ! sa ws !f r om! b ot t om! t o! t op .! ! !
!
The saw chain pushes the power tool backwards towards the user.
WARNING!
If the saw rail jams, the power tool may be thrown back towards the user with great force. If
the user does not use his physical strength to compensate for the force of the saw chain

19
pushing backwards, there is a risk that only the tip of the saw rail will make contact with the
wood and cause a kickback. Risk of death or extremely severe injuries!
Felling a tree
Risk of injury!
Felling and limbing work may be performed by trained persons only! There is a risk of
life-threatening injuries!
Before starting felling work, ensure that:
there are no unauthorised persons and no animals within the fall area (A) of the tree;
there is an obstacle-free escape route for all those involved. People withdraw (B) at an angle
opposite the direction of fall;
the area around the trunk is free of obstacles (risk of tripping!);
the next workplace is at least two and a half tree lengths away. Before felling the tree, check
the direction in which the tree will fall and ensure that there are neither objects nor persons
or animals within a distance of 2½ tree lengths.
!
A tree is felled in two stages:
Notch the trunk by approx. one third of its diameter on the side of the direction of fall (1.).
On the opposite side make the felling cut (2. ) which must be slightly higher than the notch
(approx. 3–5 cm).
!

!!!!!!!!!!!!!!!!!!!!!!!!!!!!!!!!!!!!!!!!!!!!
!!!!!!!!!!!!!!!!!!!!!!!!!!!!!!!!!!!!!!!!!
2
Risk of injury!
Never saw the tree trunk all the way through. The area (C) is used as a “hinge” and provides
a defined direction of fall. When felling, stand only at the side of the tree to be felled! There is
a risk of life-threatening injuries!
Trunks lying flat on the ground
Cut halfway into the trunk, then turn around and saw through from the opposite side.
!
Damage to power tool!
When sawing through the trunk, ensure that the saw rail does not touch the ground!
Supported trunks
We recommend supporting trunks, which are to be sawn through, on sawhorses. If this is not
possible, the trunk should be raised and supported with the aid of the supporting branches or
via support blocks.
In area A first cut approx. one third of the trunk diameter from top to bottom, then complete
the cut from bottom to top.
In area B first cut approx. one third of the trunk diameter from bottom to top, then cut through
from the top.
!
Risk of injury!
Do not saw trunks which are under tension! Splintering wood or a jammed saw rail may result
in extremely serious injuries!
Removing branches
Always work on the side opposite the branch in question.
Start at the bottom of the trunk and work upwards.

21
10–15 cm from the base of the branch saw upwards into the branch 1/3 of the branch
diameter (1).
A little further up the branch saw through the branch from top to bottom (2).
Make a cut close to the trunk (3). Make the cut from top to bottom.
!
When limbing trunks lying flat on the ground, first always saw off the branches pointing
upwards. Do not cut through supporting branches until the trunk has been sawn into lengths.
Risk of injury!
Branches which are supported or under tension may wedge the saw chain in the wood!
Maintenance and care
WARNING!
Before performing any work on the garden tool, remove the battery.
Risk of injury by the sharp cutters! Wear protective gloves.
In the interest of your own safety!
Perform only the maintenance work described here yourself. All other work, in particular
motor maintenance and repairs, must be performed by a trained specialist. Improper work
may damage the power tool and also result in injuries. Have power tool inspected once a
year at a service centre.
Overview of cleaning and maintenance
After using the power tool
Clean the unit.
Regularly, depending on the application conditions
Tension the saw chain. Clean oil guide groove in the saw rail.
Regrind saw chain. Check saw chain oil level, top up if required.

!!!!!!!!!!!!!!!!!!!!!!!!!!!!!!!!!!!!!!!!!!!!
!!!!!!!!!!!!!!!!!!!!!!!!!!!!!!!!!!!!!!!!!
2
Cleaning
WARNING!
Do not use water or liquid detergents.
CAUTION!
Clean the unit after every use. Failure to clean the unit can damage the materials and cause
malfunctions.
Clean the unit with a damp cloth and a soft brush.
Remove the chain cover, and then use a soft brush to remove debris from the saw rail, saw
chain, chain wheel and chain cover.
Keep the ventilation slits clean and dust-free.
Servicing
Tension the saw chain
The saw chain must not sag, but it should be possible to pull it 2-4 millimetres off the saw rail
in the middle of the saw rail.
Unscrew the hand wheel anti-clockwise until the saw rail can be moved by hand.
Turn the chain tension wheel on anti-clockwise to tension the chain.
Turn the saw chain by hand to check that it runs perfectly. It must slide freely in the rail.
Tighten the hand wheel to attach the rail and the cover .
NOTE: Check and re-adjust the tension of a new chain after working for a few minutes.
Switch the motor off, remove the battery and actuate the chain brake.
Cleaning oil guide groove in the saw rail
Remove saw rail. Remove dirt from the oil guide groove using a suitable tool. Use a plastic
spatula, not a steel tool! Re-attach saw rail.
Regrinding saw chain
Special tools are required to sharpen the saw chain and guarantee that the blades of the
chain are sharpened at the correct angle and to the correct depth. We recommend having the
saw chain reground by specialist.
Storage
Store the unit in a dry and frost-free place (10-25 °C).
Store the battery and the unit separately.
Charge the battery before storing the unit in winter.
For a prolonged period of non-use always drain the chain lubricating oil out the power tool.

23
Place sheath on cutting mechanism.
Repairs
Check the unit for damage. Repairs may be carried out by an authorised customer service
centre only.
Disposal information
WARNING!
Render redundant garden tools unusable: mains operated tool ,by removing the power cord,
battery operated tool by removing the battery.
Recycling raw materials instead of waste disposal.
Device, accessories and packaging should be recycled in an environmentally friendly manner.
Plastic parts are identified for recycling according to material type.
 Loading...