

Page 1

COLOR LCD SOUNDER
MODEL
FCV-582L
Page 2

A
(
C
9-52, Ashihara-cho,
Nishinomiya, Japan
Telephone: 0798-65-2111
Telefax: 0798-65-4200
ll rights reserved.
Printed in Japan
Your Local Agent/Dealer
FIRST EDITION : APR. 1998
H : MAR. 13, 2001
PUB. No. OME-23590
YOSH)
FCV-582L
Page 3
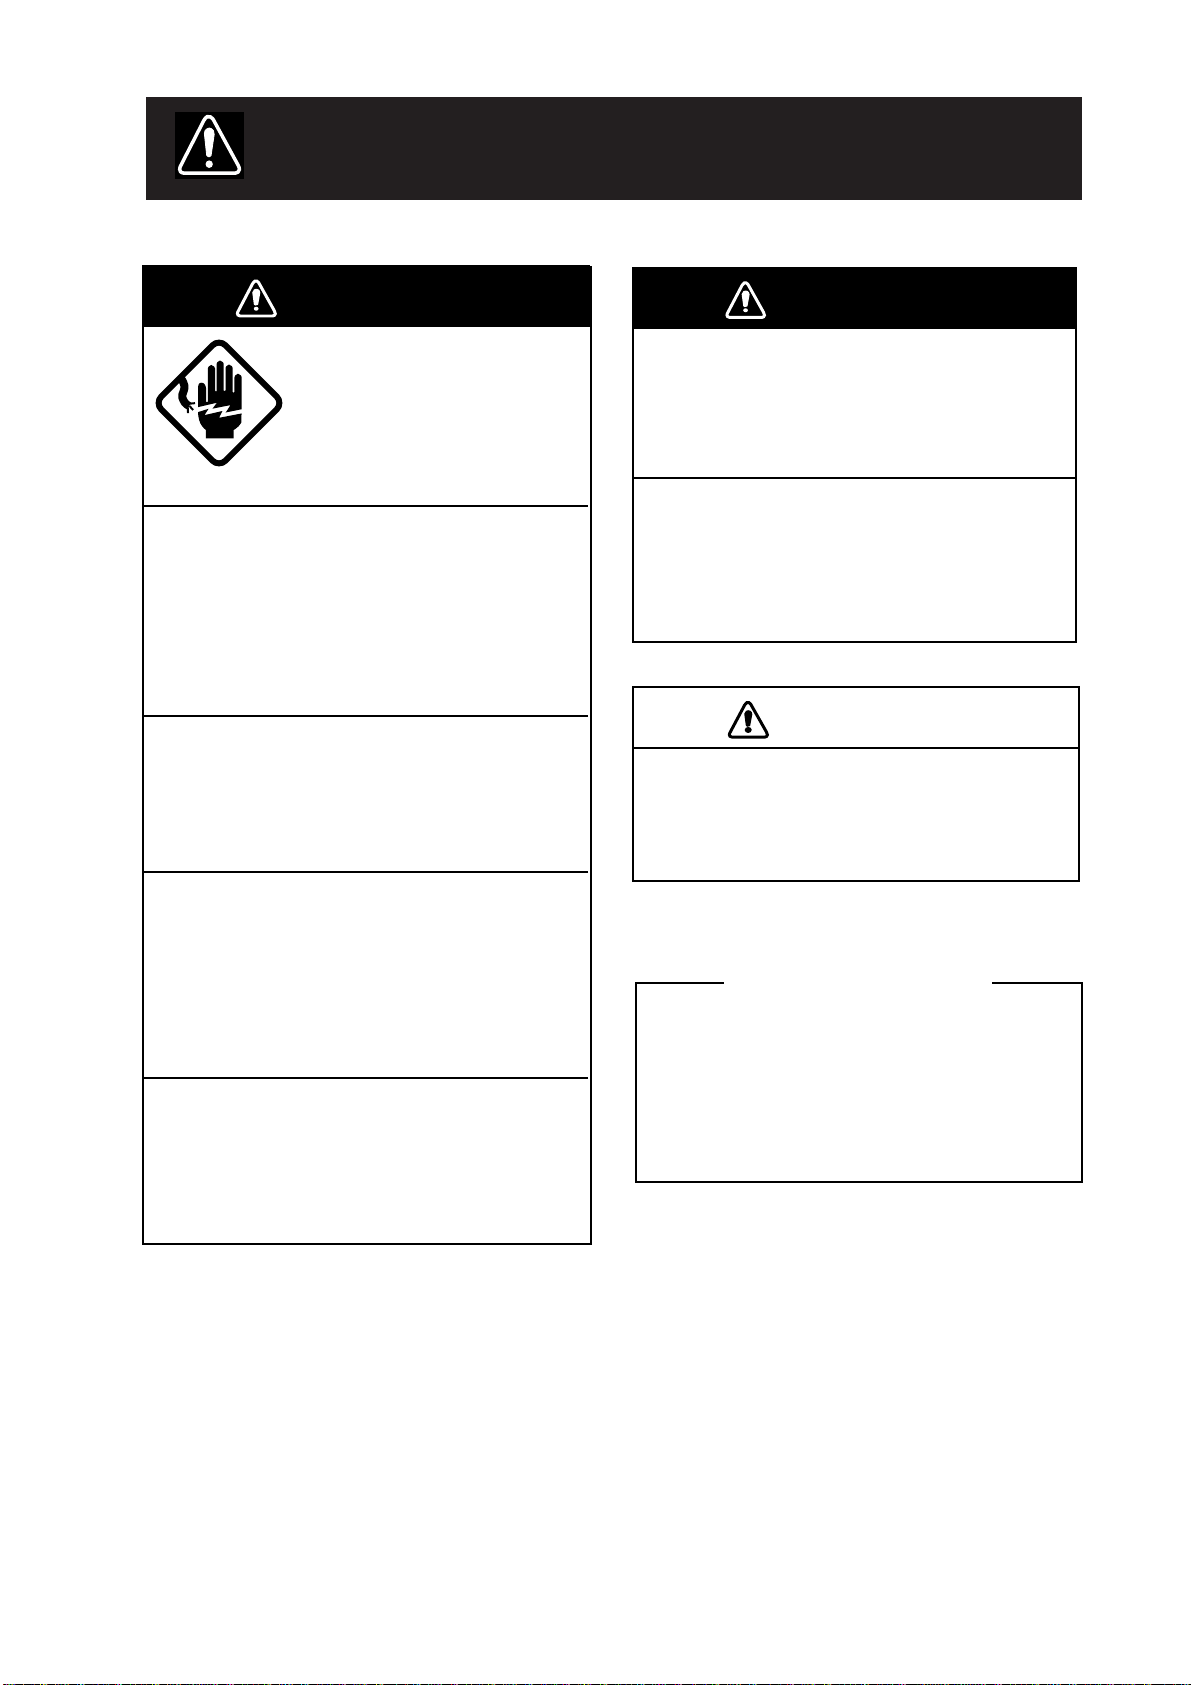
SAFETY INSTRUCTIONS
WARNING
Keep heater away from equipment.
A heater can melt the equipment’s power
cord, which can cause fire or electrical
shock.
Use the proper fuse.
Use only a 3A fuse. Use of a wrong fuse
can result in equipment damage and void
the warranty.
The TFT LCD is constructed using the
latest LCD techniques, and displays
99.99% of its pixels. The remaining 0.01%
of the pixels may drop out or blink, however this is not an indication of malfunction.
About the TFT LCD
CAUTION
A warning label is attached to the
equipment. Do not remove the label.
If the label is peeling off or is illegible,
contact a FURUNO agent or dealer.
WARNING
ELECTRICAL SHOCK HAZARD
Do not open the equipment.
Only qualified personnel
should work inside the
equipment.
Immediately turn off the power at the
switchboard if water leaks into the
equipment.
Continued use of the equipment can cause
fire or electrical shock. Contact a FURUNO
agent for service.
Do not disassemble or modify the
equipment.
Fire, electrical shock or serious injury can
result.
Immediately turn off the power at the
switchboard if the equipment is emitting
smoke or fire.
Continued use of the equipment can cause
fire or electrical shock. Contact a FURUNO
agent for service.
Make sure no rain or water splash leaks
into the equipment.
Fire or electrical shock can result if water
leaks in the equipment.
iiiiiiiiiiiii
i
Page 4

TABLE OF CONTENTS
FOREWORD.......................................iii
MENU TREE ....................................... iv
SYSTEM CONFIGURATION....... v
PRINCIPLE OF OPERATION.... vi
OPERATIONAL OVERVIEW
1.1 Control Description ............................... 1
1.2 Indications, Markers .............................. 2
1.3 Turning On/Off the Power ..................... 3
1.4 Adjusting Tone and Brilliance ............... 3
1.5 Selecting a Display ................................ 3
1.6 Selecting Display Range........................ 7
1.7 Adjusting the Gain................................. 7
1.8 Automatic Operation.............................. 8
1.9 Selecting Picture Advance
Speed ..................................................... 8
1.10 Erasing Weak Echoes .......................... 9
1.11 Measuring Depth ................................. 9
1.12 A-scope Display................................. 10
1.13 User Menu ......................................... 10
1.14 Suppressing Interference ................... 11
1.15 Suppressing Low Level Noise........... 11
1.16 Selecting Background and
Echo Colors ....................................... 11
1.17 Alarms................................................ 12
1.18 White Marker..................................... 13
1.19 Fine Adjustment of Gain in
Dual-Frequency Operation ................ 13
INTERPRETING THE DISPLAY
3.1 Zero Line ............................................. 19
3.2 Fish School Echoes.............................. 19
3.3 Bottom Echo ........................................ 19
3.4 Surface Noise/Aeration........................ 20
MAINTENANCE &
TROUBLESHOOTING
4.1 Checking.............................................. 21
4.2 Cleaning the Display Unit ................... 21
4.3 Transducer Maintenance...................... 21
4.4 Replacing the Fuse............................... 21
4.5 Troubleshooting................................... 22
4.6 T est....................................................... 23
4.7 T est Pattern .......................................... 23
4.8 Clearing the Memory........................... 24
SPECIFICATIONS....................... SP-1
INDEX ............................................Index-1
OPTIONAL MODE
2.1 Displaying the Optional Mode Menu .. 15
2.2 System Menu ....................................... 15
2.3 Demonstration Display ........................ 17
2.4 Bottom Level ....................................... 17
2.5 TVG Level........................................... 18
2.6 Echo Offset .......................................... 18
ii
Page 5

FOREWORD
A Word to FCV-582L Owners
Congratulations on your choice of the
FURUNO FCV-582L Color LCD Sounder.
We are confident you will see why the
FURUNO name has become synonymous
with quality and reliability.
For over 50 years FURUNO Electric Company has enjoyed an enviable reputation for
innovative and dependable marine electronics equipment. This dedication to excellence
is furthered by our extensive global network
of agents and dealers.
This equipment is designed and constructed
to meet the rigorous demands of the marine
environment. However, no machine can perform its intended function unless operated and
maintained properly. Please carefully read and
follow the recommended procedures for operation and maintenance.
We would appreciate hearing from you, the
end-user, about whether we are achieving our
purposes.
Thank you for considering and purchasing
FURUNO equipment.
Features
The FURUNO FCV -582L is a dual-frequency
(50 kHz and 200 kHz) color LCD sounder.
Comprised of a display unit and a transducer,
the FCV -582L displays underwater conditions
in 16 colors (including background) on a
bright 6.5-inch color TFT (Thin Film Transistor) LCD.
The main features of the FCV-582L are
• Compact design permits installation where
space is limited.
• Bright 6.5-inch color LCD with temperature compensated tone and brilliance control.
• Wide variety of display modes: bottom
lock, dual frequency, marker zoom, bottom
zoom, nav data and graphic display.
• Automatic function permits unattended
adjustment of range and gain. The range
scale and gain automatically change to display the bottom in reddish-brown on the
lower half of the screen.
• Navigation data display (requires navigation data input from external navigator)
provides position, course, speed, depth,
temperature and waypoint data indications.
• Alarms: Bottom, Fish (bottom-lock, normal), T emperature (within, over range set).
• A-scope display discriminates bottom fish,
vital for bottom trawler and trap users.
• Universal 10.2–31.2 VDC power supply
consuming less than 20 W power.
iii
Page 6
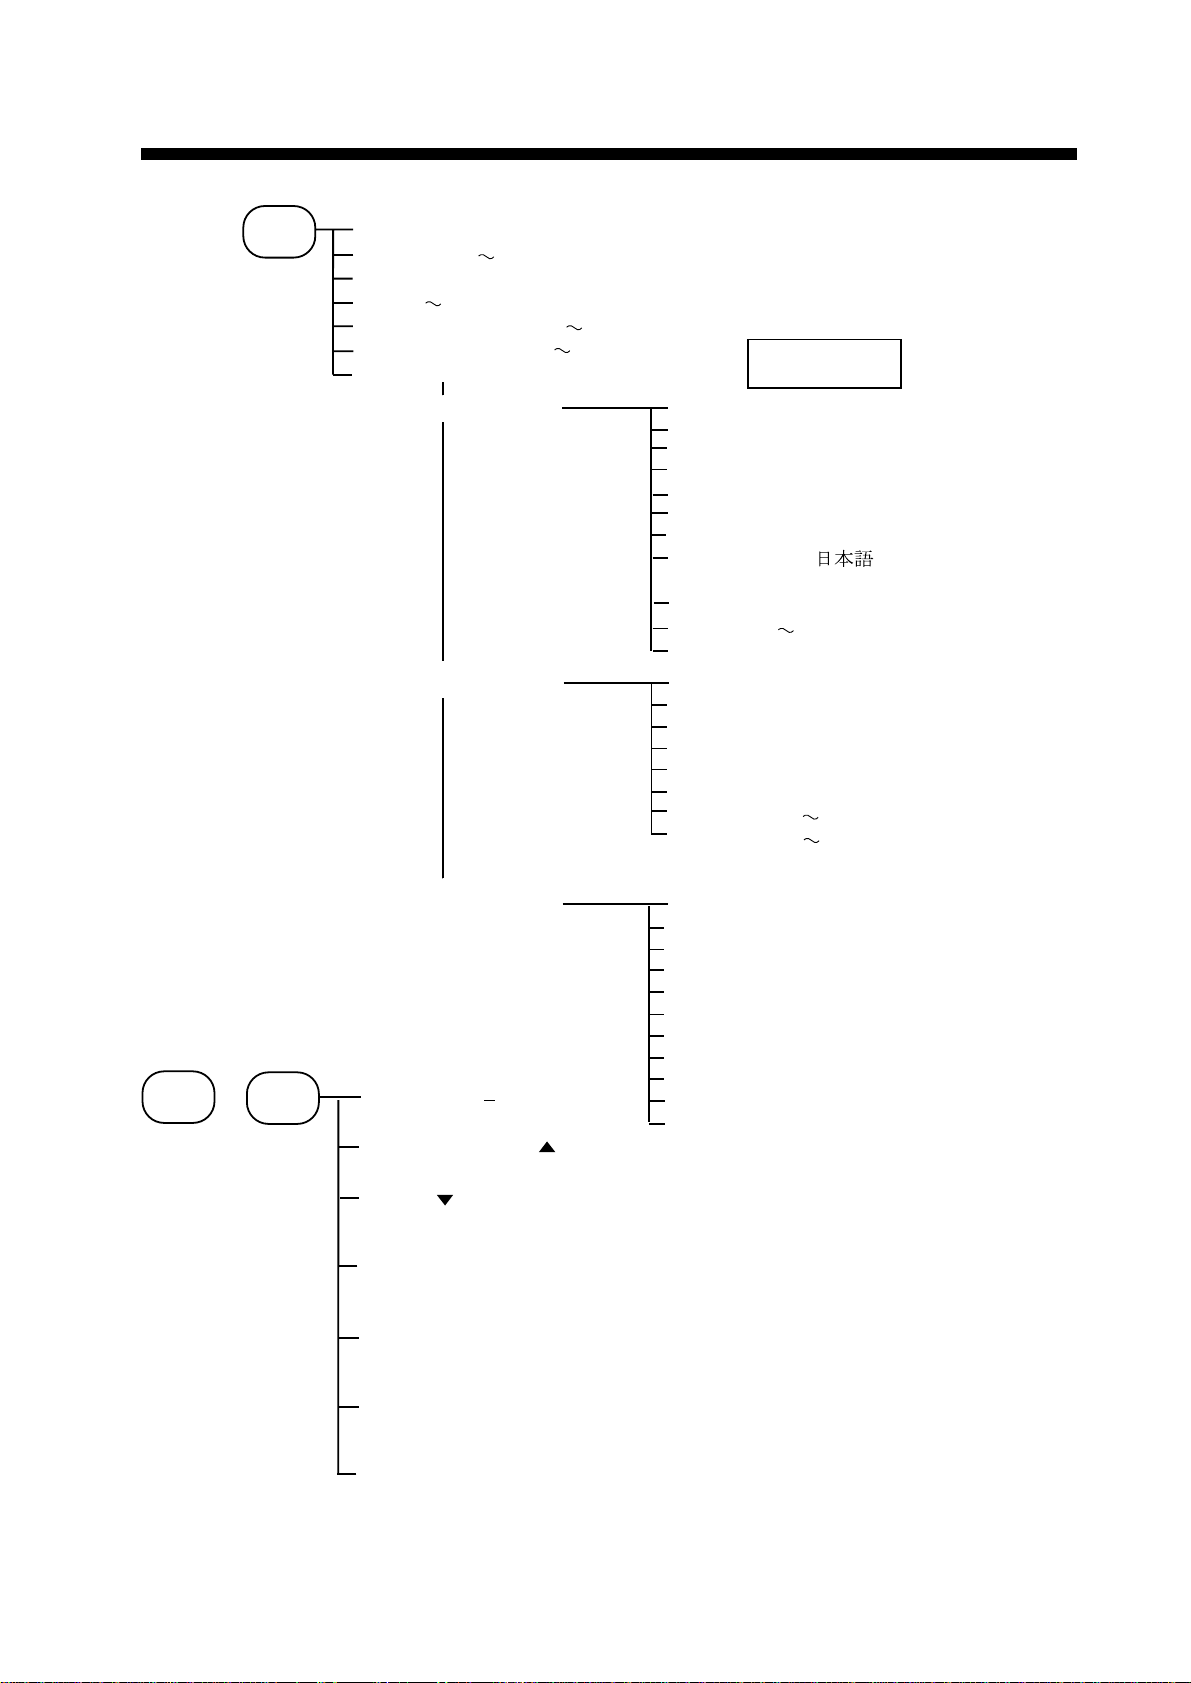
MENU TREE
MENU
ESC
USER
MENU
NOISE LIMITER (OFF, NL1, NL2, NL3)
CLUTTER (0 16) Default: 9
MARKER(VRM,WHITE,MARKER)
HUE (1
GAIN ADJ 200kHz (-20
GAIN ADJ 50kHz (-20
GO TO SYSTEM MENU (+)
9) Default: 1
SYSTEM MENU 1
SYSTEM MENU 2
+20) Default: 0
+20) Default: 0
MENU (1, 2, 3)
DEPTH UNIT (m, ft, fa, pb)
SPEED UNIT (kt, MPH, km/h)
TEMP UNIT (°C, °F)
ZOOM MARK (OFF, ON)
F/A LEVEL (WEAK, MED, STRG)
TEMP GRAPH (OFF, ON)
LANG (English, , French,
Spanish, German, Italian)
DISP SEL (GRA1,GRA2,DATA)
DRAFT(-20 +20) Default: 0
TX OUTPUT (MIN, MAX)
MENU (1, 2, 3)
NAV DSP (OFF, L/L, R/B, CSE)
NMEA (Ver1.5, Ver2.0)
BEARING (TRUE, MAG)
SPD SEL (OFF, OWN, NMEA)
TMP SEL (OFF, OWN, NMEA)
SPD ADJ (-50 +50) Default: 0
TMP ADJ (-20 +20) Default: 0.0
Default settings
shown in bold.
Any
key
OPTIONAL MODE
+
POWER
SYSTEM MENU 3
SELF TEST ( )
CLEAR MEMORY ( )
DEMO ( )
ECHO OFFSET (SIG LEV key 3 times)
TVG SELECT (ZOOM key 3 times)
BOTTOM LEVEL (ALARM key 3 times)
TEST PATTERN (BRILL key 3 times)
MENU (1, 2, 3)
BASIC RANGE1 (15)
BASIC RANGE2 (30)
BASIC RANGE3 (60)
BASIC RANGE4 (120)
BASIC RANGE5 (200)
BASIC RANGE6 (400)
BASIC RANGE7 (1000)
BASIC RANGE8 (2500)
ZOOM RANGE (range: 7-2500, 30) (feet)
B/L RANGE (10, 20) (feet)
All basic ranges
in feet.
iv
Page 7
SYSTEM CONFIGURATION
DISPLAY
UNIT
Speed, temperature
sensor (option)
TRANSDUCER
FCV-582L system configuration
Ship's mains
12–24 VDC
External equipment
(GPS navigator, etc.)
v
Page 8
PRINCIPLE OF OPERATION
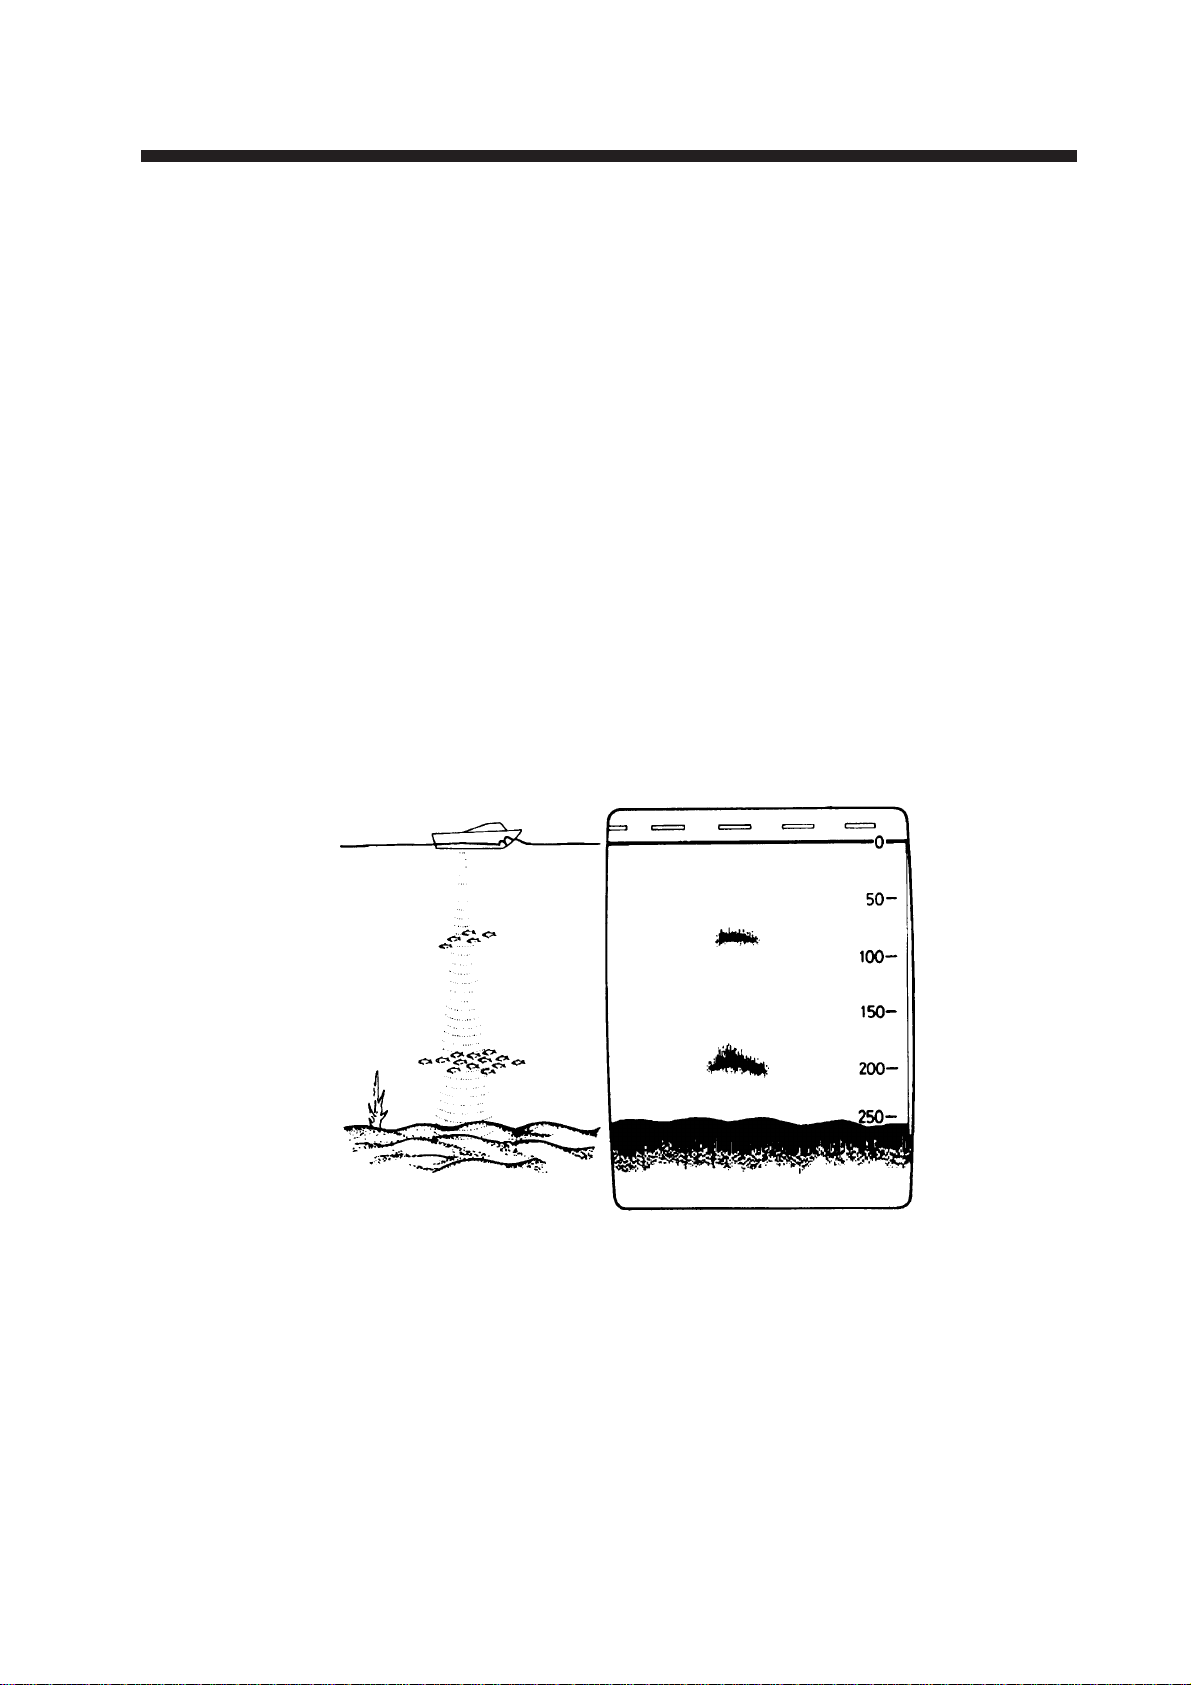
The FCV-582L determines the distance between its transducer and underwater objects
such as fish, lake bottom or seabed and displays the results on its screen. It does this by
utilizing the fact that an ultrasonic wave transmitted through water travels at a nearly constant speed of 4800 feet (1500 meters) per
second. When a sound wave strikes an underwater object such as fish or sea bottom,
part of the sound wave is reflected back toward the source. Thus by calculating the time
difference between the transmission of a
sound wave and the reception of the reflected
sound wave, the depth to the object can be
determined.
The entire process begins in the display unit.
Transmitter power is sent to the transducer as
a short pulse of electrical energy. The electrical signal produced by the transmitter is converted into an ultrasonic signal by the
transducer and transmitted into the water. Any
returning signals from intervening objects
(such as a fish school) are received by the
transducer and converted into an electrical signal. The signals are then amplified in the amplifier section, and finally, displayed on the
screen.
The picture displayed is made up of a series
of vertical scan lines, one for each transmission. Each line represents a snapshot of what
has occurred beneath the boat. Series of snapshots are accumulated side by side across the
screen, and the resulting contours of the bottom and fish between the bottom and surface
are displayed.
Underwater conditions and video sounder display
vi
Page 9
OPERATIONAL OVERVIEW
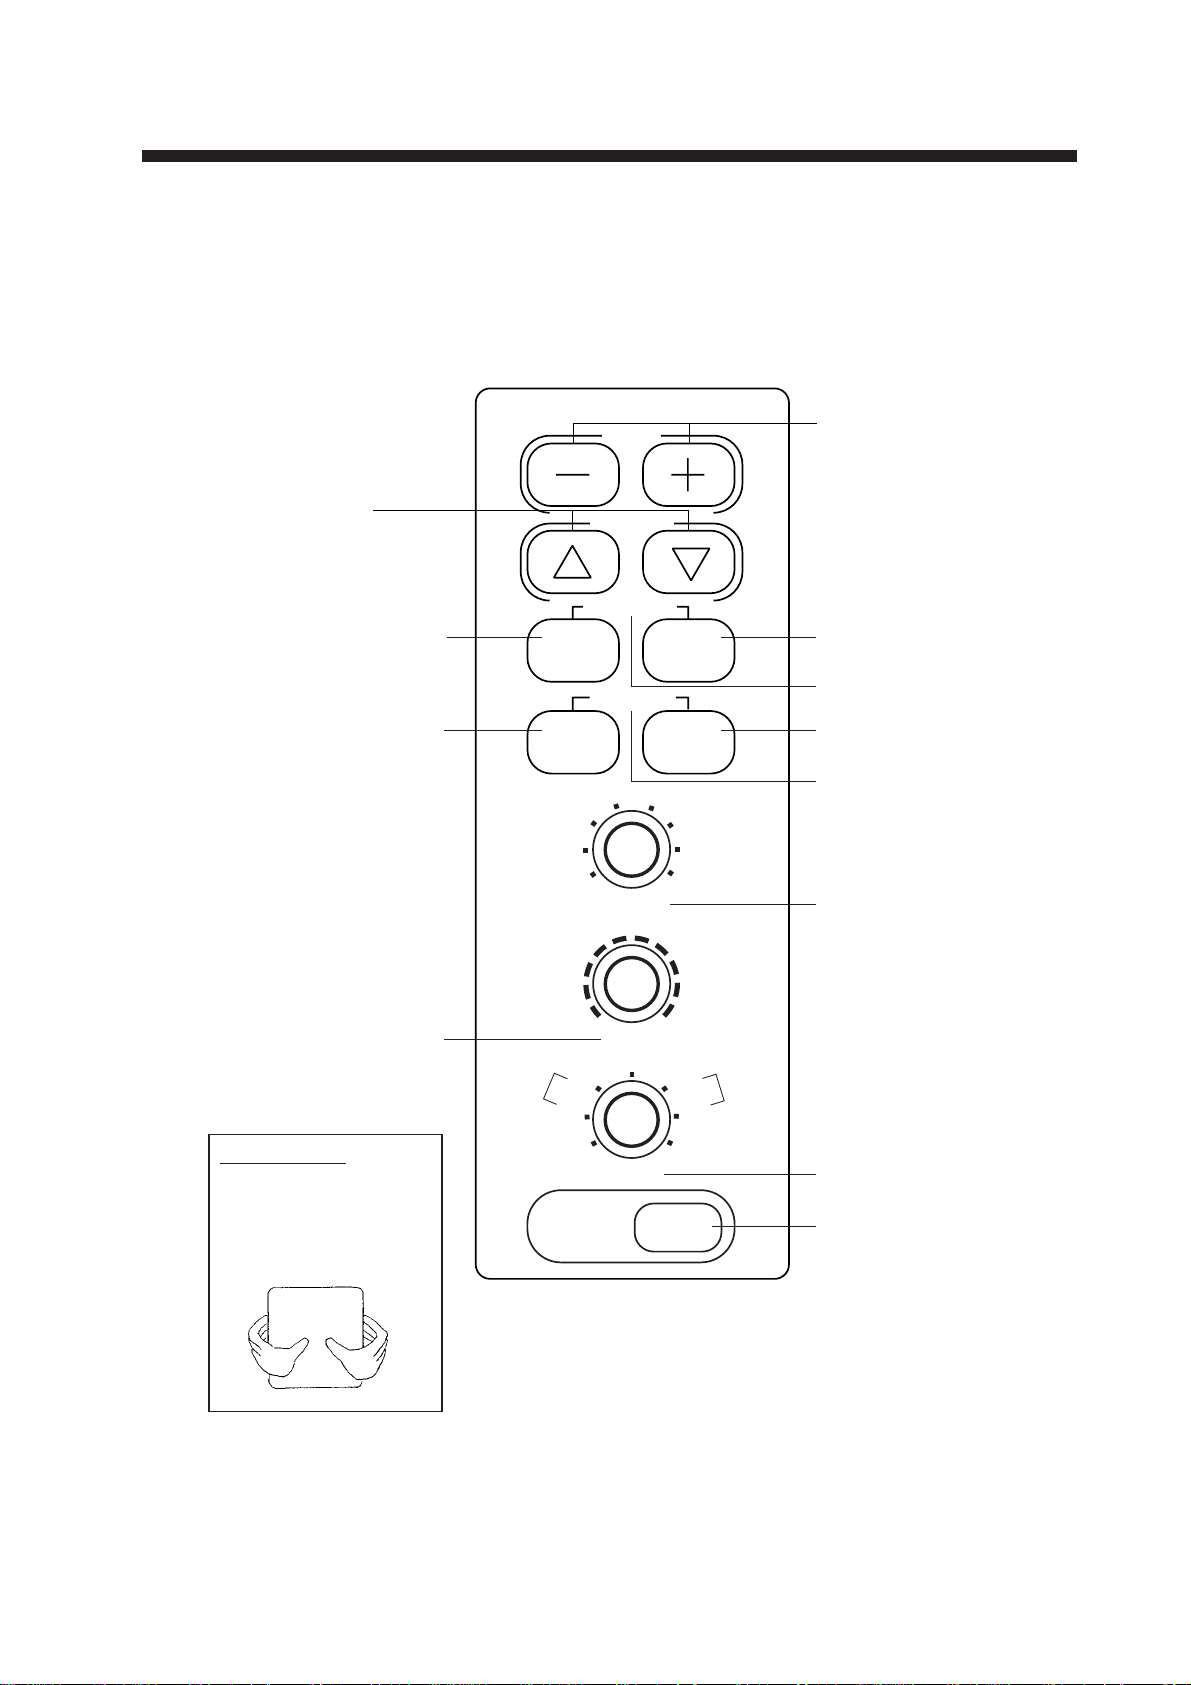
1.1 Control Description
All operations of the FCV-582L are carried out with the controls on the front panel of the
display unit. All controls respond immediately to your command and the unit emits a beep to
signify correct key sequence. (Invalid key input emits several beeps.)
• Shift VRM. (p. 9)
• Select menu items. (p. 10)
Selects zoom mode. (p. 3)
Adjusts display brilliance
and tone. (p. 3)
SHIFT
MARKER
ADVANCE
ZOOM SIG LEV
A-SCOPE
BRILL ALARM
4
5
3
2
1
RANGE
4
2
6
7
8
6
8
• Shift display range.
(p. 7)
• Select menu options.
(p. 10)
Removes weak echoes.
(p. 9)
Selects picture advance
speed. (p. 8)
Sets alarms. (p. 12)
Turns A-scope
display on/off. (p. 10)
Selects range. (p. 7)
PUSH
AUTO
• Rotate to adjust gain. (p. 7)
• Push to turn automatic
operation on/off. (p. 7)
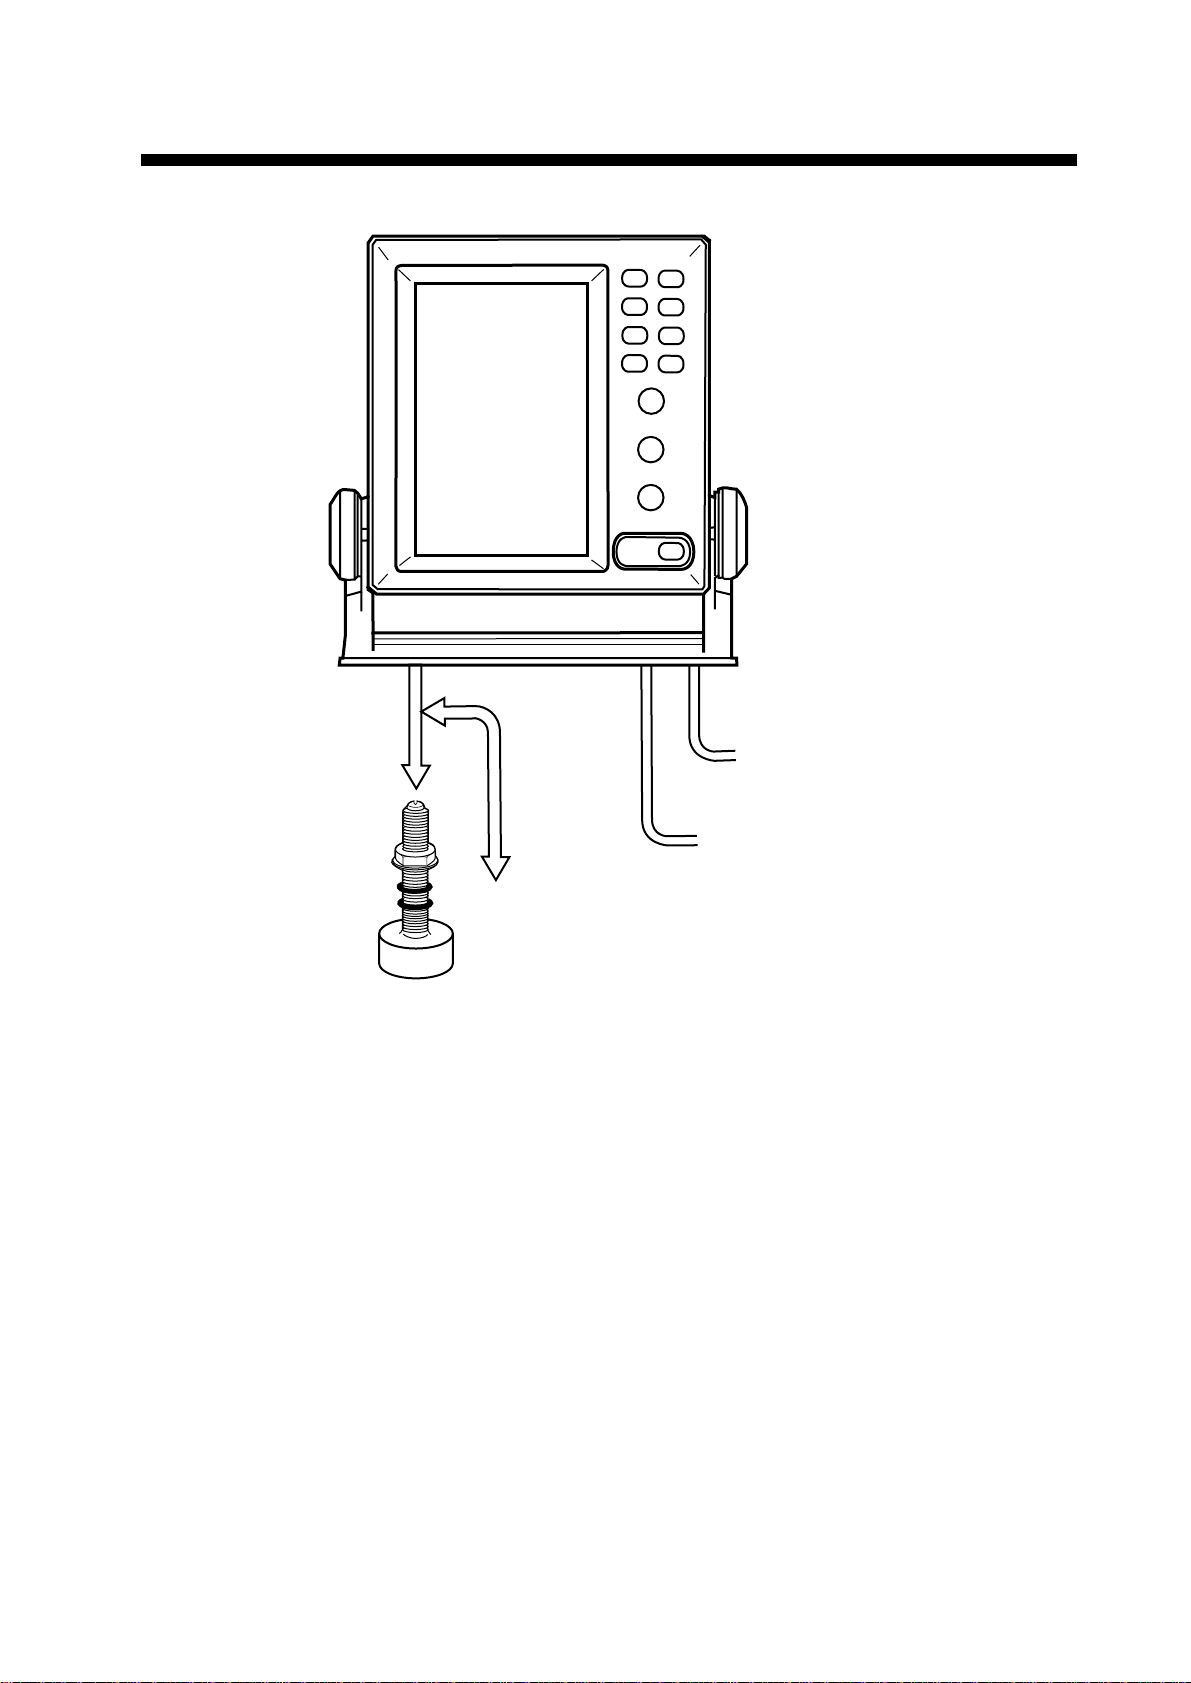
Removing cover
While pressing the center
of the cover with your
thumbs as illustrated, pull
the cover towards you to
remove it.
ZOOM
NAV
LF
0
GAIN
DUAL
MODE
10
HF
ZOOM
MENU
POWER
Figure 1-1 Controls
Selects display mode.
(p. 3)
Turns power on/off.
(p. 3)
1
Page 10
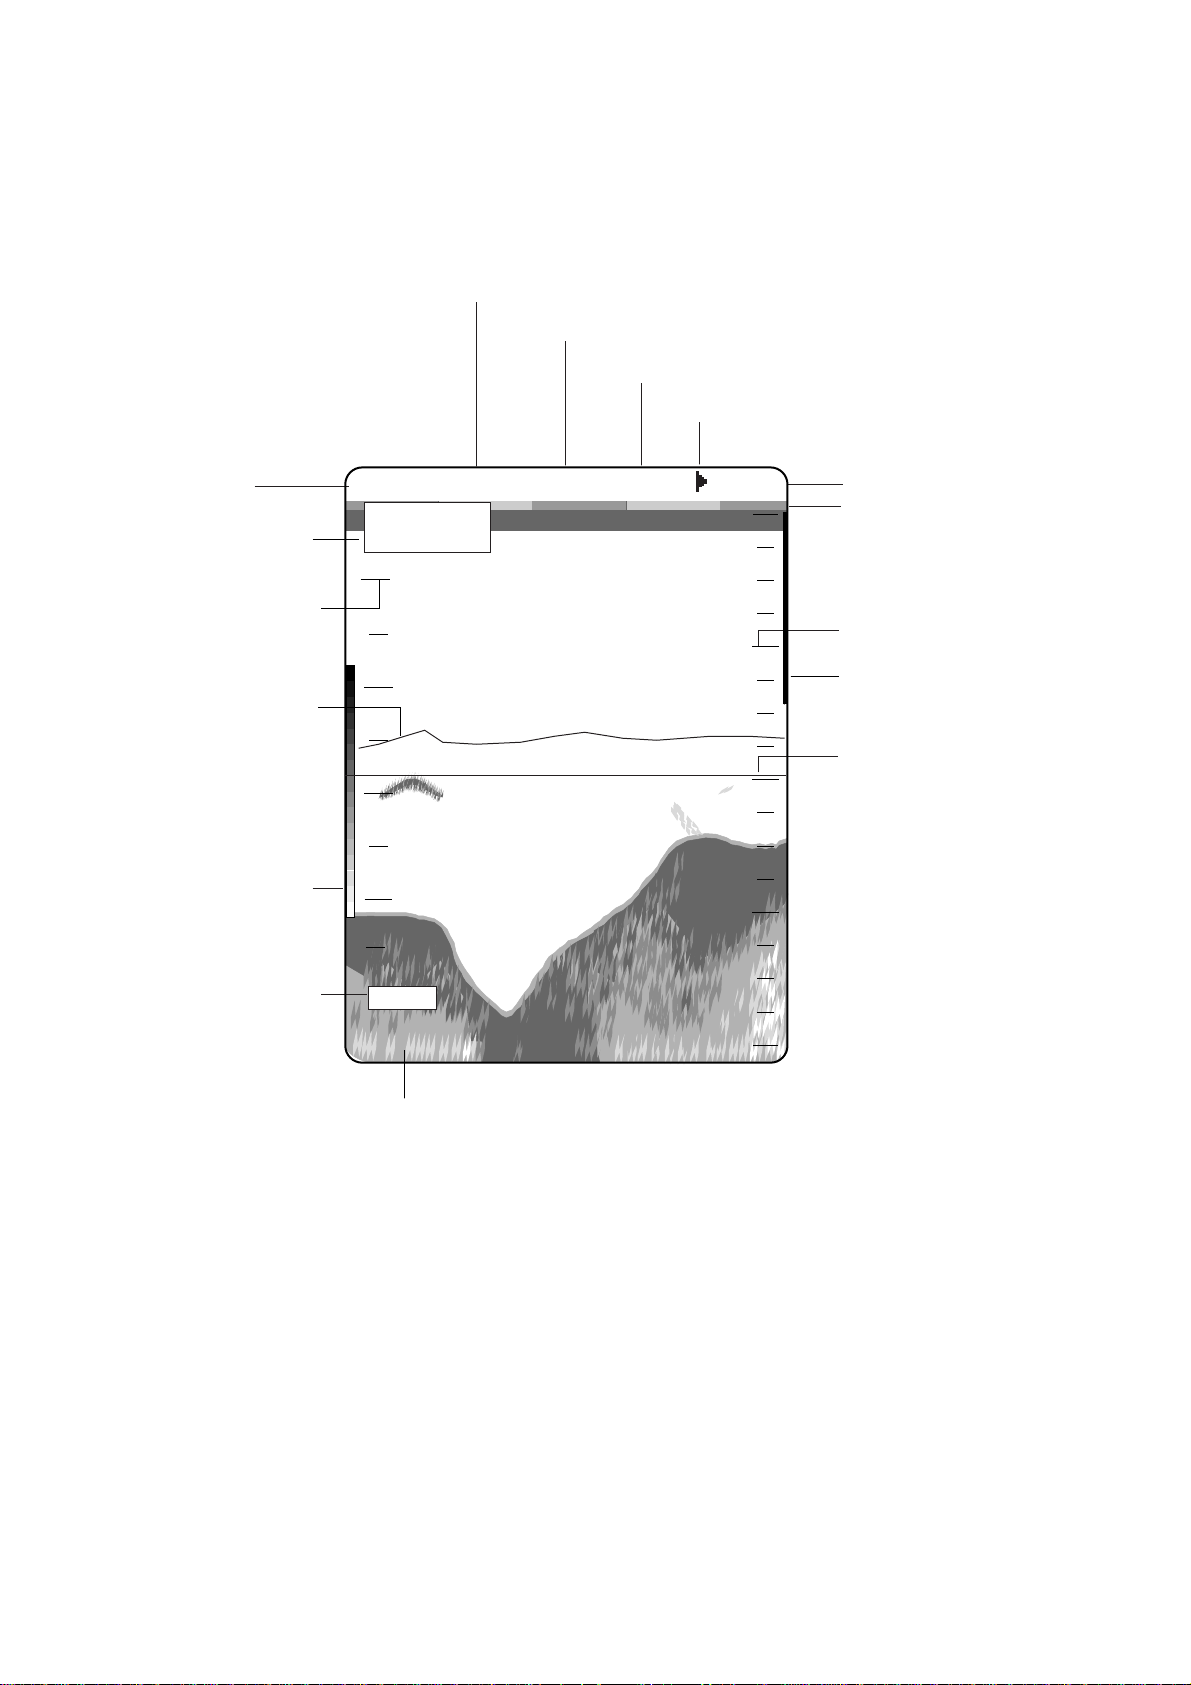
1.2 Indications, Markers
d
The figure below shows all indications and markers which may appear in the normal display.
The combination displays (normal display plus marker or zoom display) may additionally display the zoom marker.
Speed*
Noise Limiter
Transducer frequency
Alarm icon
Water
temperature*
Nav data*
Water temperature
scale*
Water temperature
marker (orange)*
Color
bar
Demonstration
mode
22.6°C 12kt NL1 200k F/NM
35°15.000’ N
135°07.500’ E
0
30
20
20
39.8
10
40
0
60
(DEMO)
49.6
80
Active alarm
Minute marker
(yellow, blue,
30 sec. each)
Range scale
Alarm zone
marker
Variable range
marker (green)
w/depth readout
All indications and
markers are displaye
in white unless
noted otherwise.
Depth
* Requires appropriate sensor.
Figure 1-2 Indications
2
Page 11
1.3 Turning On/Off the Power
Press the POWER key to turn the power on/
off. When the unit is turned on it proceeds in
the sequence shown below.
ROM: OK
RAM: OK
ROM and RAM
check; displayed for
several seconds.
Note 1: Location of arrow keys on the brilliance setting is opposite of same controls on
the control panel.
Note 2: Tone or brilliance must be adjusted
within about 10 seconds after pressing the
BRILL key or the tone and brilliance display
will be erased.
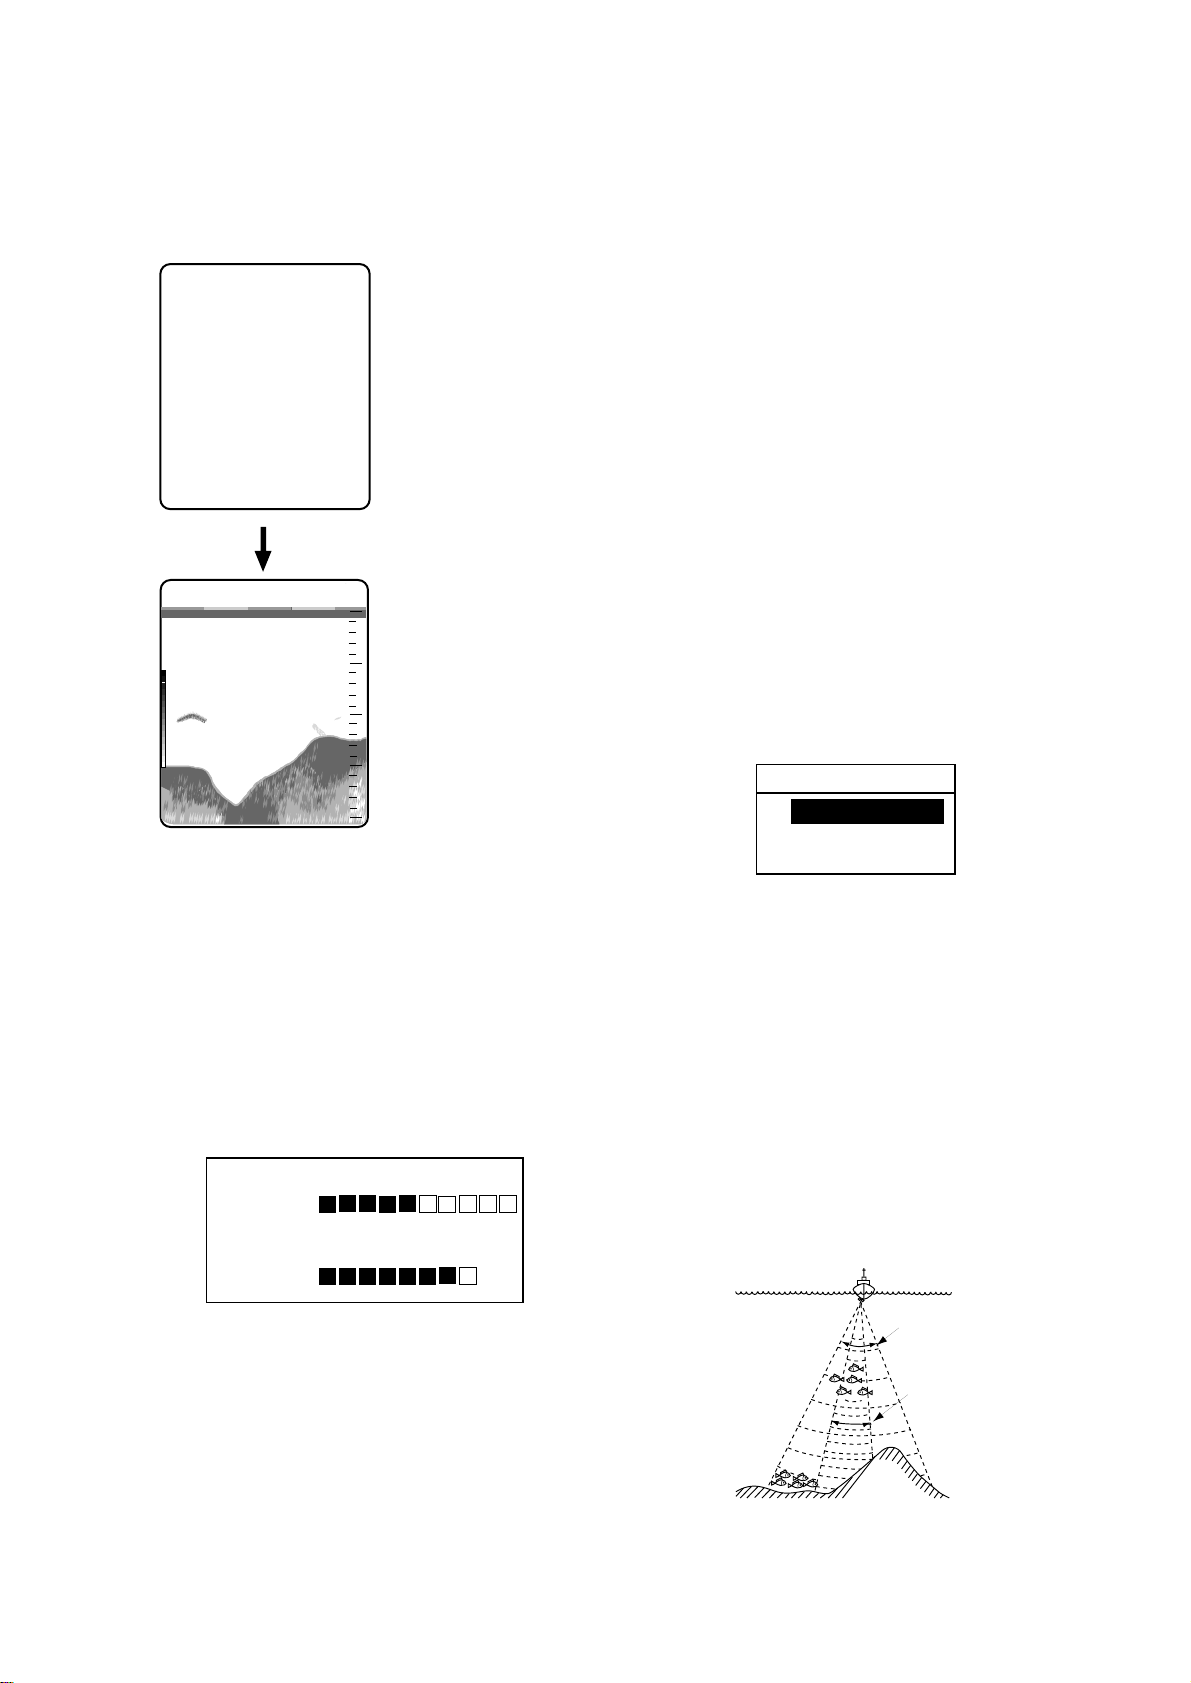
1.5 Selecting a Display
PROGRAM No: 02522790**
You may press any key to show
the sounder display immediately.
200k
0.0
49.6
** Program version
no.
Sounder
0
display
20
40
60
80
Figure 1-3 Start-up sequence
Note: Wait at least five sec. before reapplying the power.
Six basic displays are available: nav (data or
graphic mode selectable on the system menu),
low frequency, dual frequency, high frequency, zoom (marker zoom, bottom zoom,
bottom lock), and menu. (An A-scope display
is also available with the BRILL and ALARM
keys.)
1. Operate the MODE control to select a dis-
play mode.
2. For zoom mode, press the ZOOM key.
ZOOM MODE
▲
BOTTOM LOCK
BOTTOM ZOOM
▼
MARKER ZOOM
Figure 1-5 Zoom mode selection display
Normal display
1.4 Adjusting Tone and Brilliance
1. Press the BRILL key. The tone and brilliance setting display appears.
LOW– +HIGH
TONE : 5
LOW
▼ ▲HIGH
BRILL : 7
Figure 1-4 Tone and brilliance
setting display
2. Press the [+] or [–] key to adjust display
tone.
3. Press the [ ▲] or [▼] key to adjust dis-
play brilliance.
Low frequency (50 kHz) display
The sounder uses ultrasonic pulses to detect
bottom conditions. The lower the frequency
of the pulse, the wider the detection area.
Therefore, the 50 kHz frequency is useful for
general detection and judging bottom condition.
50 kHz
200 kHz
Figure 1-6 Comparison of detection ranges
of 50 kHz and 200 kHz transducers
3
Page 12

50k
0.0
Fish
school
Bottom
49.6
0
20
40
60
80
Figure 1-7 Typical 50 kHz display
High frequency (200 kHz) display
The higher the frequency of the ultrasonic
pulse the better the resolution. Therefore, the
200 kHz frequency is ideal for detailed observation of fish schools.
Marker-zoom display
This mode expands selected area of the normal picture to full vertical size of the screen
on the left-half window. Y ou may specify the
portion to expand by operating the VRM
(V ariable Range Marker), which you can shift
with the [▲] or [▼] key. The area between
the VRM and zoom range marker is expanded.
The length of the segment is equal to one division of the depth scale.
0
15
20
Zoomed fish
school
14.7
Fish
school
10
20
30
Normal
display
Variable range
marker (green)
This section
is zoomed
Dual-frequency display
The 50 kHz picture appears on the left; the
200 kHz picture on the right. This display is
useful for comparing the same picture with
two different transmitting frequencies.
0
50 kHz 200 kHz
picture picture
20
40
60
50/200
0.0
49.6
0
20
40
80
25
28.2
Marker-zoom
display
Figure 1-9 Marker-zoom display
plus normal display
Note : The zoom marker looks like white
when the background is blue.
Zoom marker
(yellow)
Figure 1-8 Dual-frequency display
4
Page 13

Bottom-zoom display
Zoom marker (yellow)
This mode expands bottom and bottom fish
echoes two to five times to vertical size of the
screen, and is useful for determining bottom
hardness. A bottom displayed with a short
echo tail usually means it is a soft, sandy bottom. A long echo tail means a hard bottom.
Bottom-zoom display
0
15
10
20
25
36.4
Bottom
20
30
40
Normal
display
Zoom
marker
(yellow)
0
10
20
30
40
Bottom-
lock
display
Zoomed
fish
20.7
5
4
3
2
1
0
This section
is zoomed
9.6
Fish
Normal
display
Figure 1-11 Bottom-lock display plus
normal display
Note: The zoom marker is not displayed in
the default setting. It may be turned on in System menu 1. For further details see page 15.
Data display
Figure 1-10 Bottom-zoom display plus
normal display
Bottom-lock display
The bottom-lock display provides a compressed normal picture on the right half of the
screen and a 5 or 10 meter (10 or 20 feet) wide
layer in contact with the bottom is expanded
onto the left half of the screen. This mode is
useful for bottom discrimination.
This display provides navigation data in digital form. Date, time, position, course, speed,
depth, water temperature and waypoint data
can be shown. Requires nav data input and
appropriate sensors.
0
20
40
60
80
Position
Course, speed
Depth,
temperature
Waypoint
Range to waypoint
Bearing to waypoint
Cross-track error
POS
30°00. 065’N
130
°
00. 574’E
CSE SPD
143
DEP TMP
69. 4
WP ABC
RNG 12nm
BRG 123. 4°
XTE 1. 23nm
°
15. 6kt
m 9. 3°C
Figure 1-12 Data display
5
Page 14

Enlarging a nav data indication
You can enlarge and display one of the data
indications as follows:
1. Press the [▲] or [▼] key to select the in-
dication you want to display. A blue cursor circumscribes your selection. For
example, select the waypoint data window.
2. Press the [+] key to enlarge the data.
WP
ABC
RNG
12.0
nm
0
20
Bearing to waypoint
N
Bearing
Course
Waypoint
Range to
waypoint
Depth
W
1nm 1nm
WP
ABC
RNG
12.0
DEP
69.4
nm
m
BRG
CSE
248
°
323
°
SPD
16.8
TRIP
76.8
TMP
18. 1
Temperature
Figure 1-14 a Graphic display 1
kt
nm
°C
0
Course
20
40
60
80
indicator
XTE
scale
Speed
Trip
distance
E
BRG
123. 4
XTE
1. 23
°
nm
40
60
80
Figure 1-13 WP data window enlarged
3. To return to the full data display , press the
[–] key.
Graphic display
There are two types of graphic displays:
graphic display 1 and graphic display 2 , and
you can select which one to display on the
SYSTEM MENU1.
The graphic display 1 provides analog and
digital displays of cross-track error (XTE),
course and bearing. It is useful for monitoring progress toward a waypoint. The XTE
scale in the center of the display , graduated in
increments of 0.1 nm, shows cross-track error, the dird/Xion and distance the boat is off
course. In the example below the XTE marker
(red) shows the boat is off course by 0.2 nm
starboard. Therefore you would steer left by
the same distance to return to course.
Resetting trip distance indication on graphic
displays
The trip distance indication displays the distance the boat has traveled. To reset the indication to zero, press both the [▲] and [▼] keys
together until the indication reads zero. (The
indication can also be reset by pressing one
of the arrow keys, in which case it takes about
five seconds.) Note that the trip indication is
reset to zero whenever the power is turned
off.
The graphic display 2 mainly provides analog speed meter and cross-track error indication.
Trip
distance
Temperature
Ship's
position
Range to
waypoint
Depth
Waypoint
Ship's
heading
Bearing to
Waypoint
Bearing to
Waypoint relative
to ship's heading
Speed
Cross track error
Figure 1-14 b Graphic display 2
6
Page 15

Selecting data or graphic display
Set the MODE control in the NAV position to
show the data display or the graphic display.
You can select which display to show on the
System menu 1, and the default setting is the
graphic display 1. For how to preselect the
display to show see page 15.
Operate the RANGE control to select a basic
range. Current selection is shown in the range
display window.
RANGE 5m
Figure 1-16 Range display
Range shifting
1.6 Selecting Display Range
The basic range and range shifting functions
used together give you the means to select the
depth you can see on the screen. The basic
range can be thought of as providing a “window” into the water column and range shifting as moving the “window” to the desired
depth. Note that the RANGE control is inoperative in automatic operation. (See the next
page for details.)
Shift
Display
Figure 1-15 Range and display shift concept
The basic range may be shifted with the [+]
and [–] keys. The shift display window , which
appears when the [+] or [–] key is operated,
shows current shift amount. Note that the
SHIFT keys and RANGE control are inoperative in automatic operation.
SHIFT 0m
Figure 1-17 Shift display
Note: The maximum shift range is 2500 feet
(500 m). However, the actual range will depend on underwater conditions. In the worst
case echoes will not appear.
1.7 Adjusting the Gain
The GAIN control adjusts the sensitivity of
the receiver . Adjust the control so that a slight
amount of noise remains on the screen. Generally, use a higher gain setting for greater
depths and a lower setting for shallower waters. Note that the GAIN control is inoperative in automatic operation.
Basic range selection
The basic range may be selected by the
RANGE control from the eight ranges shown
in the table below.
Table 1-1 Basic ranges (default settings)
inUt
123456 7 8
sreteM501020408051300008
teeF51030602100200401000052
smohtaF3501020408
azarB/issaP35010305001002005
egnaRyalpsiD
105
004
Gain too high Gain proper Gain too low
Figure 1-18 Examples of proper and
improper gain
7
Page 16

1.8 Automatic Operation
1.9 Selecting Picture Advance
Automatic operation is useful when you are
preoccupied with other tasks and do not have
time to adjust the display.
How it works
The automatic function automatically selects
the proper gain and range scale according to
depth. It works as follows:
• The range changes automatically to locate
the bottom on the lower half of the screen.
It jumps to one step shallower range when
bottom echoes reach a halfway point of the
full scale from top and to one step deeper
range when they come to the lower edge
of the scale.
• The gain is automatically adjusted to dis-
play the bottom echo in reddish-brown (default color arrangement).
• Clutter level (on the User menu), which
suppresses low level noise, is automatically
adjusted.
Two types of automatic modes
Two types of automatic modes are available:
cruising and fishing. Cruising is for tracking
the bottom; fishing is for searching fish
schools. Since cruising uses a higher clutter
rejection setting than fishing, it is not recommended for fish detection – weak fish echoes
may be deleted by clutter rejection.
Speed
The picture advance speed determines how
quickly the vertical scan lines run across the
screen. When selecting a picture advance
speed, keep in mind that a fast advance speed
will expand the size of the fish school horizontally on the screen and a slow advance
speed will contract it.
1. Press the ZOOM and SIG LEV keys together. The following display appears.
ADVANCE
▲
STOP
1/16
1/8
1/4
1/2
1/1
2/1
▼
Figure 1-20 Picture advance
speed selection display
The fractions in the menu denote number
of scan lines produced per transmission.
For example, 1/8 means one scan line is
produced every 8 transmissions. STOP
freezes the display and it is convenient for
observing an echo.
2. Press the [▲] or [▼] key to select speed
desired.
How to enable automatic operation
1. Push the GAIN control. The auto mode
display appears.
AUTO MODE
▲
OFF
CRUISING
▼
FISHING
Figure 1-19 Auto mode display
2. Push the GAIN control again to select
Cruising or Fishing.
8
Page 17

1.10 Erasing Weak Echoes
1.11 Measuring Depth
Dirty water or reflections from plankton may
be painted on the display in green or lightblue. These weak echoes may be erased as
follows:
1. Press the SIG LEV key. The following
display appears.
SIGNAL LEVEL
▲
OFF
SL1
SL2
SL3
SL4
SL5
▼
SL6
(At 16-color display)
SIGNAL LEVEL
▲
OFF
SL1
SL2
▼
SL3
(At 8-color display)
Figure 1-21 Signal level display
2. Press the SIG LEV key again to select signal level (echo color) to erase. The color
deleted disappears from the color bar and
is replaced with dark-blue color. SL1
erases the weakest echo; SL6 the lightblue echo.
The VRM (V ariable Range Marker) functions
to measure the depth to fish schools, etc.
1. Press the [▲] or [▼] key to place the
VRM on an echo.
2. Read the VRM range just above the VRM.
200k
0.0
VRM (green)
39.8
49.6
0
20
40
60
80
Figure 1-23 How to measure depth
with the VRM
Weak
echoes
Signal level
adjusted
Figure 1-22 How SIG LEV works
9
Page 18

1.12 A-scope Display
1.13 User Menu
This display shows echoes at each transmission with amplitudes and tone proportional to
their intensities, on the right 1/3 of the screen.
It is useful for estimating the kind of fish
school and bottom composition.
200k
Normal
display
32.3
0
10
20
30
40
0.0
A-scope
display
Figure 1-24 A-scope display
1. Press the BRILL and ALARM keys together. The A-SCOPE selection display
appears.
A-SCOPE
▲
OFF
▼
ON
The User menu has several functions which
require adjustment according to operating
conditions.
1. Select MENU with the MODE control.
NOISE LIMITER
OFF NL1 NL2 NL3
CLUTTER
AUTO 0 16
M ARKER
VRM WHITE MARKER
HUE
1 1 9
GAIN ADJ 200kHz
0 -20 +20
GAIN ADJ 50kHz
0 -20 +20
▲▼ : To select item
- +: To set condition
1/2
Figure 1-26 User menu
2. Press the [▲] or [▼] key to select menu
item. As you operate the [▲] or [▼] key ,
the selected item and its current setting
appear in reverse video.
3. Press the [+] or [–] key to set condition.
4. Set the MODE control in another position to close the menu.
Figure 1-25 A-scope selection display
2. Press the [▲] or [▼] key to select OFF or
ON.
10
Page 19

1.14 Suppressing Interference
Interference from other acoustic equipment
operating nearby or other electronic equipment on your boat may show itself on the display as shown in Figure 1-27.
To suppress interference, do the following:
1. Select MENU with the MODE control.
2. Select NOISE LIMITER.
3. Press the [+] or [–] key to select degree of
suppression desired; OFF, NL1, NL2 or
NL3. The higher the number the greater
the degree of suppression.
3. Press the [+] or [–] key to select clutter
rejection level desired. The higher the
number the higher the degree of suppression. Note that weak echoes may not be
displayed when the clutter circuit is on.
Figure 1-28 Clutter appearance
1.16 Selecting Background and
Echo Colors
Interference from Electrical inteference
other sounder
Figure 1-27 Interference
Turn the noise limiter circuit off when no interference exists, otherwise weak echoes may
be missed.
1.15 Suppressing Low Level Noise
Light-blue dots may appear over most of
screen. This is mainly due to dirty water or
noise. This noise can be suppressed by adjusting CLUTTER on the User menu.
When the automatic mode is on, the clutter
suppression setting is fixed at AUTO. T o suppress low level noise in manual sounder operation do the following:
1. Select MENU with the MODE control.
2. Select HUE.
3. Press the [+] or [–] key to select hue number . (You can see the result of your selection on the display.)
Table 1-2 Background and echo colors
euH
.oN
1roloc61eulb-muideM
2roloc8eulb-muideM
3roloc61eulb-kraD
4roloc8eulb-kraD
5roloc61etihW
6roloc8etihW
7roloc61kcalB
8roloc8kcalB
9seitisnetni8,emorhconoM
roloCohcEroloCdnuorgkcaB
1. Select MENU with the MODE control.
2. Select CLUTTER.
11
Page 20

1.17 Alarms
Table 1-3 Alarm width data
Bottom alarm
The bottom alarm sounds when the bottom is
within the alarm range set. To activate the
bottom alarm the depth must be displayed.
Fish alarm
There are two types of fish alarms: bottomlock and normal. The bottom-lock fish alarm
sounds when fish are within a certain distance
from the bottom. The normal fish alarm
sounds when fish are within the preset alarm
range.
Water temperature alarm
There are two types of water temperature
alarms: IN and OUT. The IN alarm sounds
when the water temperature is within the range
set; the OUT alarm sounds when the water
temperature is higher than the range set. This
alarm requires water temperature data.
mralA
mralA
)m(htdiW
mottoB99-15
lamroN-hsiF99-15
L/B-hsiFeulavL/B-11
NIpmeT99-15
TUOpmeT99-15
2. Press the [+] key to select on .
F/NM
Alarm
zone
tluafeD
)m(gnitteS
Alarm
zone
marker
(Fish,
bottom
alarms
only)
Activating/deactivating an alarm
1. Press the ALARM key to display the
alarm settings display and select alarm
desired.
BOTTOM OFF ON
ALARM ZONE 0 5
RANGE 5
FISH (NORMAL) OFF ON
ALARM ZONE 0 5
RANGE 5
FISH (B/L) OFF ON
ALARM ZONE 22 21
RANGE 1
TEMP OFF IN OUT
ALARM ZONE 32 37
RANGE 5
▲▼ : To select item
- + : To set condition
Figure 1-29 Alarm mode display
Figure 1-30 Alarm zone
3. Press the [▼] key to set ALARM ZONE
4. Press the [+] or [-] key to change alarm
zone.
5. Press the [▼] key to set RANGE.
6. Press the [+] or [-] key to change range.
7. T o deactivate an alarm, select OFF on the
ALARM MODE display.
Note: For fish alarm set “F/A LEVEL.”
See page 15.
Silencing the buzzer
The buzzer sounds whenever an alarm is violated. You can temporarily silence the buzzer
by pressing any key. However , the buzzer will
sound whenever the alarm setting is violated.
12
Page 21

1.18 White Marker
1.19 Fine Adjustment of Gain in
The white marker functions to display a particular echo color in white. For example, you
may want to display the bottom echo (reddish-brown) in white to discriminate fish echoes near the bottom. Note that the bottom must
be displayed in reddish-brown for the white
marker to function.
1. Press the [▲] and [▼] keys together until
the display shown below appears.
WHITE MARKER
▲: UP
▼: DOWN
Figure 1-31 White marker display
2. Press the [ ▲] or [▼] key to select color
to display in white. As you press the [▲]
or [▼] key, the arrow next to the color
bar shifts and selected echo color is displayed in white.
Dual-Frequency Operation
The gain of the 50 kHz and 200 kHz transducers can be adjusted individually on the
User menu as follows:
1. Select MENU with the MODE control.
2. Select GAIN ADJ 200kHz or GAIN ADJ
50kHz.
3. Press the [+] or [–] key to adjust gain.
←
Arrow points to
color currently
displayed in white.
Figure 1-32 Color bar when white
marker display is on
To turn the white marker function off, set the
arrow below the weakest color in the color
bar in step 2 of the above procedure.
13
Page 22

SYSTEM MENU 2
▲▼
: To select item
- +: To set condition
SIG LEV: ESCAPE
(ADJUSTABLE OWN SENSOR ONLY)
OWN SENSOR
SPEED
— —. — kt — —. — °F
OWN SENSOR
TEMPERATURE
SYSTEM MENU 3
▲▼
: To select item
- +: To set condition
SIG LEV: ESCAPE
Press [+] at MENU 1.
Press [—]
at MENU 3.
Press [+] at MENU 2.
SYSTEM MENU 1
▲▼
: To select item
- +: To set condition
SIG LEV: ESCAPE
MENU
DEPTH UNIT
SPEED UNIT
TEMP UNIT
ZOOM MARK
F/A LEVEL
TEMP GRAPH
LANG
DISP SEL
DRAFT
TX OUTPUT
MENU
NAV DSP
NMEA
BEARING
SPD SEL
TMP SEL
SPD ADJ
TMP ADJ
1 2 3
OFF L/L R/B CSE
Ver1.5 Ver2.0
TRUE MAG
OFF OWN NMEA
OFF OWN NMEA
0 % [-50 +50]
0.0 °F [-20 +20]
MENU
BASIC RANGE1
RANGE2
RANGE3
RANGE4
RANGE5
RANGE6
RANGE7
RANGE8
ZOOM RANGE
B/L RANGE
1 2 3
15 ( 7 2500)
30 ft
60
120
200
400
1000
2500
30
10 20
1 2 3
m ft fa pb
kt MPH km/h
° C ° F
OFF ON
WEAK MED STRG
OFF ON
English
GRA1 GRA2 DATA
0.0 [-20 +20]
MIN MAX
OPTIONAL MODE
2.1 Displaying the Optional
Mode
Menu
The Optional mode mainly contains less-often used functions which once preset do not
require frequent adjustment. You can access
the Optional mode menu as follows:
1. Turn off the equipment.
2. Press the POWER key while pressing any
key. The following display appears.
Figure 2-1 Optional mode selection display
3. Operate [▲], [▼] or [–] to select item.
Note: SELF TEST and CLEAR
MEMORY are explained in the chapter
on maintenance.
OPTIONAL MODE
–: SELF TEST
▲: CLEAR MEMORY
▼: DEMO
SELECT MODE
4. To escape from the Optional mode, turn
off the power.
Note: Wait at least five sec. Before reapplying the power.
2.2 System Menu
There are three system menus: system menu
1, system menu 2, and system menu 3.
1. Select MENU by operating the MODE
control.
2. Press [▼] to select GO TO SYSTEM
MENU.
3. Press [+] at GO TO SYSTEM MENU.
The system menu 1 appears.
4. With the cursor selecting MENU, operate the [+] or [-] key to select system menu
desired.
Figure 2-2 System menus
15
Page 23

System menu 1 description
System menu 2 description
MENU: Selects system menu desired.
DEPTH UNIT: Selects unit of depth mea-
surement among meters, feet, fathoms, or
passi/braza. Default setting is feet.
SPEED UNIT : Selects unit of speed measurement among knots, miles per hour, or kilometers per hour. Default setting is knots.
Requires speed data.
TEMP UNIT: Selects unit of temperature
measurement; Celsius or Fahrenheit. Default
setting is Fahrenheit. Requires temperature
data.
ZOOM MARK: The zoom marker appears
in the normal, bottom marker and bottom
zoom displays and marks the area which is
expanded in the bottom marker and bottom
zoom pictures. Y ou can turn on/off the marker
as desired. The default setting is off.
MENU: Selects system menu desired.
NAV DSP: Selects nav data to display on the
video sounder displays; position (L/L), range
and bearing (R/B), or course (CSE). (For the
location of the nav data indication, see the illustration on page 2.) Default setting is off.
Requires nav data input.
NMEA: Selects NMEA data input format;
V er . 1.5 or V er . 2.0. Default setting is Ver . 2.0.
BEARING: Ship’s course and bearing to a
waypoint may be displayed in true or magnetic bearing, on the graphic display. Magnetic bearing is true bearing plus (or minus)
earth’s magnetic deviation. Default setting is
magnetic. Requires bearing data.
SPD SEL: Selects source of speed input; OFF ,
OWN (speed sensor), or NMEA (external).
Default setting is OWN. Requires speed data.
F/A (Fish Alarm) LEVEL: Selects minimum
echo strength level which triggers fish alarm;
weak, medium, or strong. Default setting is
medium.
TEMP GRAPH: Displays current water temperature in line graph form. (See illustration
on page 2.) Default setting is off. Requires
water temperature data.
LANG: Selects menu language; Japanese,
English or etc. Default setting is English.
DISP SEL: Selects navigation displays:
GRA1, steering display; GRA2, speed meter
display; DATA, date display. Default setting
is GRA1.
DRAFT: The zero line (sometimes referred
to as the transmission line) represents the
transducer’s position, and moves off the
screen when a deep phased range is used.
TMP SEL: Selects source of water temperature input; OFF, OWN (water temperature
sensor), or NMEA (external). Default setting
is OWN. Requires water temperature data.
SPD ADJ: If the speed sensor-generated
speed indication is wrong, you can correct it
here. (NMEA format speed data cannot be adjusted.) For example, if the speed indication
is 10% higher than actual speed, enter +10.
Default setting is zero.
TEMP ADJ: If the water temperature sensor-generated water temperature indication is
wrong, you can correct it here. (NMEA format water temperature data cannot be adjusted.) For example, if the water temperature
indication is 2° higher than actual water temperature, enter -2. Default setting is zero.
System menu 3 description
TX OUTPUT: Selects transmitter output
level; maximum or minimum.
16
MENU: Selects system menu desired.
BASIC RANGE 1–BASIC RANGE 8: Set
range of each of the eight basic ranges. Default basic ranges are 15, 30, 60, 120, 200,
400, 1000, and 2500 (feet).
Page 24

Note 1: All default basic ranges are restored
BOTTOM LEVEL
▲▼ : 50kHz
50kHz= 80(20 200)
200kHz= 80(20 200)
- + : 200kHz
whenever the depth unit is changed. Therefore, change the depth unit before changing the basic ranges.
Note 2: Ranges must be set in numerical
order. For example, if basic range 3 is 60
feet and basic range 5 is 200 feet, the basic
range which can be set for basic range 4 is
between 60 and 200 feet.
ZOOM RANGE: Select the range to zoom
in the marker and bottom zoom modes. You
may select a range between 7 and 2500 feet.
Default setting is 30 feet.
B/L RANGE: The expansion width for the
bottom-lock display can be selected to 10 feet
or 20 feet. Default setting is 20 feet.
2.3 Demonstration Display
2.4 Bottom Level
If the depth indication is unstable in automatic
operation or the bottom echo cannot be displayed in reddish-brown by adjusting the gain
controls in manual operation, you may adjust
the bottom echo level detection circuit, for
both 50 kHz and 200 kHz, to stabilize the indication. Note that if the level is set too low
weak echoes may be missed and if set too high
the depth indication will not be displayed.
1. Turn on the power while pressing any key .
2. Press the ALARM key three times. The
start-up screen appears and shortly thereafter the BOTTOM LEVEL display appears.
The demonstration display lets you get acquainted with the features of the FCV-582L
without connecting the transducer. You can
activate it as follows:
1. Turn on the power while pressing any key.
2. Press the [▼] key. The following display
appears:
DEMO MODE
OFF ON
- +: To set condition
▼: OPTIONAL MODE
Figure 2-3 Demo mode display
3. Press the [+] key to select ON.
4. Reset the power. “DEMO” appears above
the depth indication on the video sounder
displays and at the top right-hand corner
on the data and graphic displays.
Figure 2-4 Bottom level display
3. Operate appropriate key among [▲], [▼],
[+] or [–] to set level.
4. Press the POWER key to escape.
To return to normal operation, turn off the
demonstration display at step 3 in the above
procedure.
17
Page 25

2.5 TVG Level
ECHO OFFSET
▲▼: 50kHz
50kHz= 0(-99 +99)
200kHz= 0(-99 +99)
- + : 200kHz
2.6 Echo Offset
TVG (Time Varied Gain) compensates for
propagation attenuation of the ultrasonic
waves. It does this by equalizing echo presentation so that fish schools of the same size
appear in the same density in both shallow
and deep waters. In addition, it reduces surface noise. Note that if the TVG level is set
too high short range echoes may not be displayed.
1. Turn on the power while pressing any key.
2. Press the ZOOM key three times. The
start-up screen appears and shortly thereafter the TVG SELECT display appears.
TVG SELECT
50kHz= 5(0 9)
200kHz= 5(0 9)
▲▼ : 50kHz
- + : 200kHz
Figure 2-5 TVG select display
3. Operate appropriate key among [▲], [▼],
[+] or [–] to set level.
The echo offset feature functions to compensate for too weak or too strong echo level. If
the on-screen echo level appears to be too
weak or too strong and the level cannot be
adjusted satisfactorily with the GAIN control,
do the following to adjust echo level:
1. Turn on the power while pressing any key .
2. Press the SIG LEV key three times. The
start-up screen appears and shortly thereafter the ECHO OFFSET display appears.
Figure 2-6 Echo offset display
3. Operate appropriate key among [▲], [▼],
[+] or [–] to set level.
4. Press the POWER key to escape.
4. Press the POWER key to escape.
18
Page 26

INTERPRETING THE DISPLAY
3.1 Zero Line
The zero line (sometimes referred to as the
transmission line) represents the transducer’s
position, and moves off the screen when a
deep phased range is used.
Zero
line
Shift
Figure 3-1 Zero line
3.2 Fish School Echoes
Fish school echoes will generally be plotted
between the zero line and the bottom. Usually the fish school/fish echo is weaker than
the bottom echo because its reflection property is much smaller compared to the bottom.
The size of the fish school can be ascertained
from the density of the display.
3.3 Bottom Echo
Echoes from the bottom are normally the
strongest and are displayed in reddish-brown
color (in default color arrangement) but the
color and width will vary with bottom composition, water depth, frequency, sensitivity,
etc.
In a comparatively shallow depth, a high gain
setting will cause a second or sometimes a
third or a fourth echo to be displayed at the
same interval between them below the first
echo trace. This is because the echo travels
between the bottom and the surface twice or
more in shallow depths.
The color of the bottom echo can be used to
help determine the density of the bottom materials (soft or hard). The harder the bottom,
the wider the trace. If the gain is set to show
only a single bottom echo on mud, a rocky
bottom will show a second or third bottom return. The range should be chosen so the first
and second bottom echoes are displayed when
bottom hardness is being determined.
Intensity
difference in
water depth
Large
school
Size of
fish school
Small
school
Figure 3-2 Fish school echoes
Second bottom
echo
Rock base
Mud
and sand
Figure 3-3 Bottom echoes
19
Page 27

3.4 Surface Noise/Aeration
Surface noise
When the waters are rough or the boat passes
over a wake, surface noise may appear near
the zero line. As surface turbulence is acoustically equivalent to running into a brick wall,
the bottom echo will be displayed intermittently . Similar noise sometimes appears when
a water temperature difference (thermocline)
exists. Different species of fish tend to prefer
different temperature zones, so the thermocline may be useful to help identify target
fish. 200 kHz tends to show shallow thermoclines better than 50 kHz.
In rough waters the display is occasionally interrupted due to below-the-ship air bubbles
obstructing the sound path. This also occurs
when the boat makes a quick turn or reverses
movement. Lowering the picture advance
speed may reduce the interruption. However,
reconsideration of the transducer installation
may be necessary if the interruption occurs
frequently.
Caused by
aerated water
Thermocline
Figure 3-4 Surface noise/aeration
20
Page 28

MAINTENANCE & TROUBLESHOOTING
4.2 Cleaning the Display Unit
WARNING
Do not open the cover.
There are no user-serviceable parts inside.
Refer any repair work to a qualified
technician.
4.1 Checking
Regular maintenance is essential for good performance. Checking the items listed in the
table below on a regular basis will keep the
equipment in good shape for years to come.
Table 4-1 Checking
Dust or dirt on the display unit can be removed
with a soft cloth. If desired a water-moistened
cloth may be used. Do not use chemical cleaners to clean the display unit; they can remove
paint and markings.
4.3 Transducer Maintenance
Marine life on the transducer face will result
in a gradual decrease in sensitivity . Check the
transducer face for cleanliness each time the
boat is dry-docked. Carefully remove any
marine life with a piece of wood or fine-grade
sandpaper.
metInoitcA
nurelbaCerasrotcudnocfI
ecalper,desopxe
.elbac
,elbacrewoP
gulpelbacrecudsnart
dnuorgtinuyalpsiD.naelc,dedorrocfI
niams'pihSs
egatlov
,denesoolfI
.nethgit
,gnitarfotuofI
melborptcerroc.
4.4 Replacing the Fuse
The fuse on the power cable protects the system from reverse polarity of the ship’ s mains
and equipment fault. If the fuse blows, find
the cause before replacing it. Use only a 3A
fuse. Using the wrong fuse will damage the
unit and void the warranty.
Use only a 3A fuse.
Use of a wrong fuse can result in equipment
damage and void the warranty.
WARNING
21
Page 29

4.5 Troubleshooting
The table below provides simple troubleshooting procedures which you may follow to restore
normal operation. If you cannot restore normal operation, contact your dealer.
Table 4-2 Troubleshooting
...fI...kcehcnehT
elacsegnardexifronohcerehtien
sraeppa
egnardexiftubsraeppaohceon
sraeppaelacs
enilorezontubsraeppaohcetessignitfihsegnarfi•ot.0
wolsiytivitisnes.gnittesniag•
roecnerefretniemertxesiereht
esion
citsilaernuroonsiereht
tuodaererutarepmet/deeps
s'pihscitsilaernuroonsiereht
tuodaernoitisop
.esuf•
eragniebtarepode.ybraen
.egatlovyrettab•
.ylppusrewop•
.elbacrewop•
sideepsecnavdayalpsidfi•.POTSottes
.gulprecudsnart•
otkcutssiefileniramrotneserperaselbbubriafi•
.recudsnarteht
.ytridsiretawfi•
.ohcenanruterottfosootsimottobfi•
.enigneotesolcsielbacrorecudsnartfi•
.dednuorgylreporpsitinufi•
nwosaycneuqerfemasehtfosrednuosohcerehtofi•
.gulprosnes•
.rotagivandnarednuosneewtebnoitcennoc•
.flestirotagivan•
22
Page 30

4.6 Test
GRAY
WHITE
BLACK
WHITE
B
L
A
C
K
R
E
D
G
R
E
E
N
B
L
U
E
Y
E
L
L
O
W
P
U
R
P
L
E
A
Q
U
A
W
H
I
T
E
4.7 Test Pattern
The test checks the ROM, RAM, color bar
and keyboard for proper operation. You may
start the test as follows:
1. Turn on the power while pressing any key.
2. Press the [–] key. The following display
appears.
ROM:
RAM:
PROGRAM No: 02522790**
** = Version no.
OK
OK
RANGE: 2
GAIN : 86
MODE : 4
This feature tests for proper display of colors.
1. Turn on the power while pressing any key .
2. Press the BRILL key three times. Press
the BRILL key again to change the test
pattern as below.
Figure 4-1 Test display
3. The ROM and RAM are checked and the
results are displayed as OK or NG (No
Good).
4. Press and release each key (except the
POWER key) one by one. If the key is
normal, its on-screen location lights in
black and the buzzer sounds while the key
is pressed.
5. Operate the controls. The control setting
indication should be the same as actual
control setting.
Figure 4-2 Test patterns
3. Press the POWER key to escape.
23
Page 31

4.8 Clearing the Memory
The memory (all menu settings) can be cleared
to start afresh. All default menu settings are
restored when the memory is cleared. For your
reference all default settings are shown in the
menu tree at the beginning of this manual.
1. Turn on the power while pressing any key.
2. Press the [▲] key. The following display
appears.
Restore factory settings.
+: YES
–: NO
Figure 4-3 Clear memory display
3. Press the [+] key to clear the memory. The
following display appears while data is
being cleared:
Set data to default.
Figure 4-4 Display while memory
is being cleared
4. The Optional mode menu appears.
24
Page 32

SPECIFICATIONS OF COLOR LCD SOUNDER
FCV-582L
This equipment is a dual-frequency (50/200 kHz) color LCD video sounder which has a large variety of
functions, all contained in a splash-proof rugged diecasting aluminum case that is compact to fit small
boats.
1. GENERAL
(1) Transmit Frequency 50 kHz/200 kHz
(2) Output Power 600 Wrms
(3) Tx Rate 1500 pulse/min max.
(4) Pulselength 0.13 to 3.6 ms
(5) Transducer Dual-frequency one-mold type
2. DISPLAY UNIT
(1) Indication System 6.5-inch color TFT LCD
(2) Echo Colors 8 or 16 colors depending on echo intensity.
Monochrome presentation is also available.
(3) Display Mode Normal (high/low), Combination display, Marker zoom, Bottom zoom,
Bottom-lock expansion
(4) Alphanumeric Data Digital display of water depth, *Water temperature,
*Ship’s speed/position data
*: Speed/temperature sensor is required.
(5) Basic Display Range
Unit
Meters 5 10 20 40 80 150 300 800 2 to 800
Feet 15 30 60 120 200 400 1000 2500 7 to 2500
Fathoms 3 5 10 20 40 80 150 400 1 to 400
Passi/Braza 3 5 10 30 50 100 200 500 1 to 500
(6) Range Shift 0 to 800 m, 0 to 2500 ft, 0 to 400 fa or 0 to 450 p/b
(7) Expansion Range Bottom lock expansion: 5/10m
Target lock expansion: 2 m to 800 m
Range
1 2 3 4 5 6 7 8
Range Setting
(8) Picture Advance Speed 7 steps (Lines/Tx: freeze,1/16,1/8,1/4,1/2,1/1,2/1)
(9) User Setting Interference rejecter, Clutter, Alarm, Sensitivity, Hue level, Sensitivity
SP - 1
Page 33

3. I/O DATA
(1) Input Data NMEA0183(Ver.1.5/2.0), current loop
RMA: L/L, ground track speed, advance course
RMB: Waypoint bearing/distance, cross track error
RMC: L/L(GPS), ground track speed, advance course
BWC: Waypoint bearing/distance
BWR: Waypoint bearing/distance
GLL: L/L
VTG: Ground track speed, advance course
VHW: Water track speed, advance course
MTW: Water temperature
XTE: Cross track error
(2) Output Data NMEA0183(Ver.1.5/2.0), RS-422, output period: 2 sec.
SDDBT(Ver1.5): Depth (ft, m, fa)
SDDPT(Ver2.0): Depth (m)
YCMTW*: Water temperature
VWVHW*: Water track speed
*: Speed/temperature sensor is required.
4. POWER SUPPLY
(1) Voltage and Current 12 - 24 VDC: 1.5 - 0.5 A
5. DIMENSIONS AND MASS
See Outline Drawing
6. ENVIRONMENTAL CONDITI ON
(1) Temperature -15 °C to +55 °C
(2) Relative Humidity 95% or less at 40 °C
(3) Waterproofing IEC IPX5
(4) Category of Equipment Units
Display Unit: To be installed in a protected area
7. COATING COLOR
(1) Display Unit Panel: N3.0 Newtone No.5
Chassis: 2.5GY5/1.5
SP - 2
Page 34

INDEX
A
A-scope display 10
ALARM key 12
Alarm zone width 12
Automatic operation 8
B
Basic range setting 16
Bearing reference 16
Bottom alarm 12
Bottom echo 19
Bottom level 17
Bottom-lock display 5
Bottom-lock range 17
Bottom-zoom display 5
BRILL key 3
Brilliance 3
C
Cleaning 21
Clutter 11
Colors 11
Control description 1
D
Data display 6
Demonstration display 17
Depth unit 16
Dual-frequency display 4
E
Echo offset 18
F
Fish alarm 12
Fish alarm level 16
Fish school echoes 19
Fuse replacement 21
G
GAIN control 7, 8
Graphic display 6
I
Indications 2
Input format 16
M
Marker-zoom display 4
Menu tree iv
MODE control 3
N
Nav data enlargement 6
Nav display selection 16
Noise limiter 11
O
Optional mode 15
P
Picture advance speed 8
POWER key 3
Power on/off 3
R
RANGE control 7
S
SHIFT keys 7
SIG LEV key 8, 9
Specifications 25
Speed indication offset 16
Speed input 16
Speed unit 16
Surface noise/aeration 20
System configuration v
System menu 15
T
Test 23
Test pattern 23
Tone 3
Transducer maintenance 21
Trip distance resetting 6
Troubleshooting 22
TVG level 18
Tx output 16
U
User menu 10
V
VRM 9
Index-1
Page 35

W
Water temperature alarm 12
Temperature graph 16
Temperature indication offset 16
Temperature input 16
Water temperature unit 16
White marker 13
Z
Zero line 19
ZOOM key 3, 8
Zoom marker 16
Zoom range 17
Index-2
 Loading...