

Page 1
INSTALLATION INSTRUCTIONS
compression
nut
Threaded-Stem Stuffing Tube
Bronze or Stainless Steel
IMPORTANT: Please read the instructions completely
before proceeding with the installation. These
instructions supersede any other instructions in your
instrument manual if they differ.
17-423-01 rev. 03 05/19/10
Applications
A stuffing tube seals the hull forming a water-tight conduit for the
cable.
CAUTION: The stuffing tube must be compatible with the hull
material (see table below).
• Metal hull—Use a stainless-steel stuffing tube.
Never install a bronze stuffing tube in an aluminum hull
because electrolytic corrosion will occur.
• Fiberglass hull—The stuffing tube must be installed in solid
fiberglass, not in coring.
Hull Material
fiberglass
wood
fiberglass
wood
aluminum
steel
Stuffing Tube
Material
bronze
stainless steel
stainless steel
Cable Diameter
up to 12mm
(0.47”)
up to 12mm
(0.47”)
up to 12mm
(0.47”)
Tools & Materials
Safety goggles
Dust mask
Electric drill with 10mm (3/8") or larger chuck capacity
Drill bit: 3mm or 1/8"
Hole saw (see table above)
Sandpaper
Mild household detergent or weak solvent (such as alcohol)
File (installation in a metal hull)
Marine sealant (suitable for below waterline)
Slip-joint pliers
Hull
Hole Diameter
44mm (1-3/4") 33-511-01
44mm (1-3/4") 33-541-01
50mm (2") 33-541-01
Airmar
Part No.
plastic
washers
hull nut
rubbery
washer
Installing the Stuffing Tube
WARNING: Always wear safety goggles and a dust mask.
WARNING: Metal hull—The stainless-steel stuffing tube must be
isolated from the metal hull to prevent electrolytic corrosion.
WARNING: Metal hull—The rubbery washer must lay flat against
the hull for the stuffing tube to be firmly installed.
1. At the selected mounting location, inspect the hull interior to
ensure there is adequate clearance for the stuffing tube and any
bolts used to install the transducer. Be sure no cables, ribs, or
struts will interfere. Mark the site for the stuffing tube.
2. From inside the hull, drill a 3mm or 1/8" diameter pilot hole
perpendicular to the hull. If there is a hull irregularity near the
selected mounting location, drill from the outside.
3. Using the appropriate size hole saw, cut a hole from outside the
hull perpendicular to the hull surface (see table).
4. Sand and clean the area around the hole, inside and outside, to
ensure that the marine sealant will adhere properly to the hull. If
there is any petroleum residue inside the hull, remove it with
either a mild household detergent or a weak solvent (alcohol).
Metal hull—Remove all burrs with a file and sandpaper.
5. Remove the compression nut and hull nut from the stuffing tube.
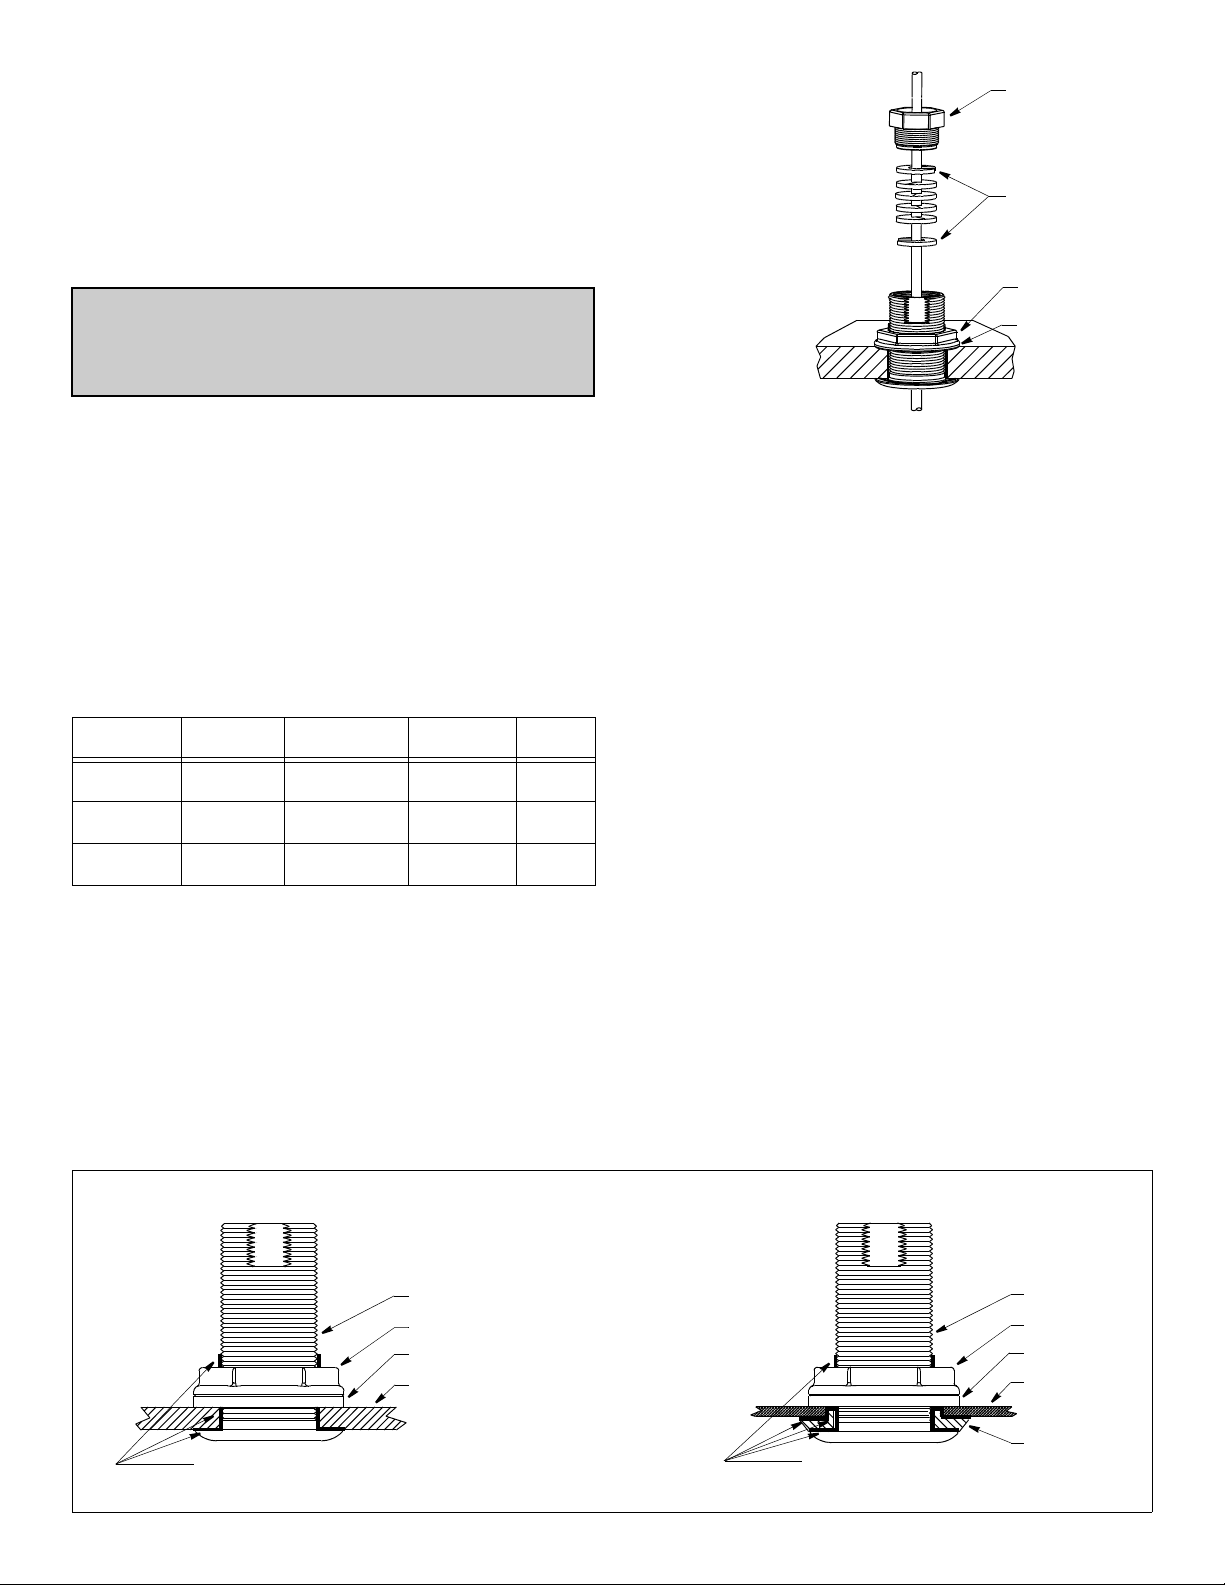
6. Use marine sealant to seal the hull and hold the hull nut. Apply
a 2mm (1/16") thick layer of marine sealant around the flange of
the stuffing tube that contacts the hull and up the sidewall of the
tube (see Figure 1). The sealant must extend 6mm (1/4") higher
than the combined thickness of the hull, rubbery washer, and
the hull nut.
Metal hull—To isolate the stainless-steel stuffing tube from the
fiberglass or wood hull
marine sealant on flange
and sidewall of stuffing tube
stuffing tube
hull nut
rubbery washer
hull
Figure 1. Installing the stuffing tube
Copyright © 2006 - 2010 Airmar Tech nology Corp.
metal hull with stainless-steel stuffing tube
stuffing tube
hull nut
rubbery washer
hull
isolation
marine sealant on flange
and sidewall of stuffing tube, and
isolation bushing where it contacts the hull
bushing
Page 2
metal hull, slide the isolation bushing onto the stuffing tube.
Apply additional marine sealant to the surfaces of the isolation
bushing that will contact the hull, filling any cavities in and
around the bushing.
7. From outside the hull, push the stem of the stuffing tube
through the mounting hole using a twisting motion to squeeze
out excess sealant.
8. From inside the hull, slide the rubbery washer onto the stuffing
tube.
Metal hull—The rubbery washer must contact the hull. Do not
tighten the hull nut with the rubbery washer against the isolation
bushing. The stuffing tube will not be firmly installed. If
necessary, sand the isolation bushing until the rubbery washer
rests against the hull.
9. Screw the hull nut in place. Tighten it with slip-joint pliers.
Wood hull—Allow the wood to swell. After the hull has
expanded, tighten the hull nut securely.
Installing the Transducer & Fairing
Follow the instructions that came with the transducer and fairing.
After they are installed, follow the instructions below to seal the
cable inside the stuffing tube.
Sealing the Cable in the Stuffing Tube
WARNING: To form a watertight seal inside the stuffing tube,
stagger the splits in the compliant bushings.
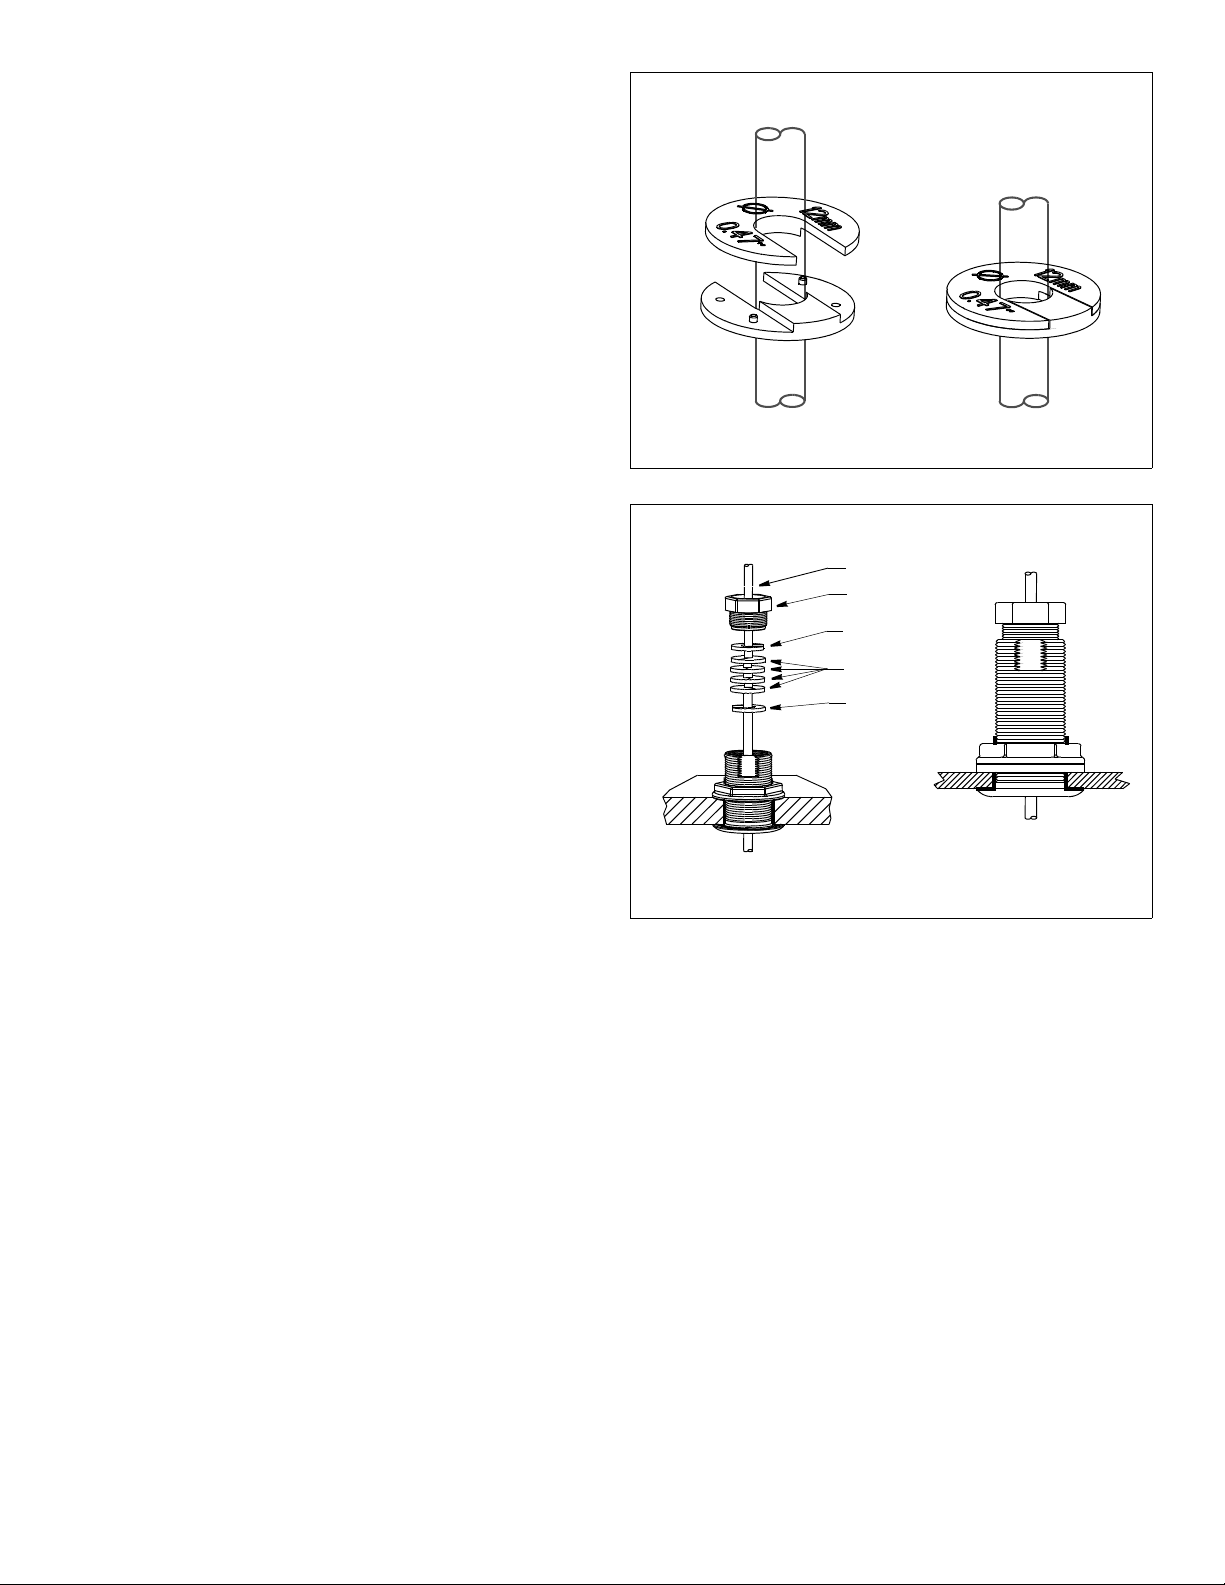
1. The stuffing tube kit contains two sets of plastic washers. Four
are marked 8mm (0.33") diameter and four are marked 12mm
(0.47") diameter. Choose the set of plastic washers with the
smallest diameter that will fit around your cable. (Discard the
other set; it is not needed.) Put two of the plastic-washer pieces
around the cable and press the halves together to form a closed
ring (see Figure 2).
2. The kit also contains four sets of compliant bushings with four
bushings in each set. Choose the set of compliant bushings with
the smallest diameter that will fit around your cable. (Discard the
other sets; they are not needed.) Place the four compliant
bushings around the cable above the plastic washer (see Figure
3). Arrange the bushings so that the splits are staggered—not
aligned. At the top of the stack, press the second pair of plastic
washers together to form a closed ring. Be sure the plastic
washers and compliant bushings are stacked as shown in
Figure 3.
3. To seal the cable inside the stuffing tube, push the plastic
washers and compliant bushings into the stuffing tube forming a
tight stack. Be sure the stack of plastic washers and compliant
bushings is seated securely inside the stuffing tube.
4. Screw the compression nut into the stuffing tube until it is snug.
Using slip-joint pliers, tighten the compression nut 2-1/2 turns.
This will compress the compliant bushings slightly to form a
watertight seal. Do not over-tighten.
Checking for Leaks
WARNING: Do not leave the boat in the water unchecked for
several days.
When the boat is placed in the water, immediately check around
the stuffing tube for leaks. Note that very small leaks may not be
exploded view
Figure 2. Plastic washers—12mm (0.47”) diameter shown
Copyright © 2004 Airmar Technolog y Corp.
installedexploded view
cable
compression
nut
plastic
washer
compliant
bushings
plastic
washer
NOTE: stagger the
splits in the
compliant bushings
Figure 3. Sealing the cable in the stuffing tube
Copyright © 2006 2010 Airmar Technology Corp.
readily observed. Do not leave the boat in the water unattended
for more than 3 hours before checking it again. If there is a small
leak, there may be considerable bilge water accumulation after 24
hours.If a leak is observed around the stuffing tube, tighten the
compression nut another quarter turn and see if the leakage
stops. If the stuffing tube continues to leak, repeat the installation
and sealing procedures immediately.
Parts
Bronze Stuffing Tube (B165) 33-511-01
Stainless-steel Stuffing Tube (SS571) 33-541-01
Plastic Washers 20-457-01
Compliant Bushings 20-488-01
Obtain parts from your sensor manufacturer or marine dealer.
Gemeco Tel: 843.210.7000
(USA) Fax: 843.210.7170
email: sales@gemeco.com
Airmar EMEA Tel: +33.(0)2.23.52.06.48
(Europe, Middle East, Africa) Fax: +33.(0)2.23.52.06.49
email: sales@airmar-emea.com
®
AIRMAR
TECHNOLOGY CORPORATION
2
35 Meadowbrook Drive, Milford, New Hampshire 03055-4613, USA
•
Copyright © 2005-2010 Airmar Technology Corp. All rights reserved.
www.airmar.com
 Loading...