

Page 1
REFERENCE MANUAL
AUTOPILOT NAVPILOT-500/511/520
WIND MODE
1. OPERATION...................................................................................................... 1
WIND Mode..........................................................................................................................1
1.1.1 Using the WIND mo de........................................................................................1
1.1.2 Displays.............................................................................................................2
1.1.3 Selecting the wind an gl e mode...........................................................................2
1.2 TACK Mode..................................................................................................................3
1.2.1 Tacking/Gybing in AUTO mode (FIXED TRACK)................................................3
1.2.2 Tacking in WIND mode (WIND TACK)................................................................6
1.2.3 Setting the tack timer..........................................................................................9
1.3 DODGE Mode.............................................................................................................10
1.4 Alarms........................................................................................................................10
1.4.1 Setting the heading change alarm.................................................................... 10
1.4.2 Setting the wind shift alarm............................................................................... 11
1.4.3 Setting the true wind speed alarm....................................................................12
1.4.4 Setting the apparent speed alarm.....................................................................12
1.5 Error Messages .......................................................................................................... 13
2. SETTING OF FI-30..........................................................................................14
1
Page 2
SAFETY INSTRUCTIONS
WARNINGWARNING
Do not use the WIND mode under strong
or unstable wind.
The boat may capsize.
When gybing, watch for moving boom.
The boom may strike a person, possibly
causing serious injury.
FOREWORD
CAUTION
Trim the sail to the wind always optimally.
Wrong sail position may cause the autopilot's
control error.
Monitor the wind direction when using the
NAV mode.
The wind direction on the display may change
because the heading moves according to
route.
Try the TACK mode in good wheather to
confirm how it works.
Feature
The wind m ode is designed specially for use on sailboats t o k eep the direction
same as receiving wind directi on. This ref er enc e m anual provid es the operating
for the wind mode of Navpilot-500/511/520.
For other i nf or m ation, see t he appropriate operator’s manual and installation
manual.
• Auto tac k ing (gybi ng) function
• Wind direction/speed alarm
• Tack Timer Function
Page 3
1. OPERATION
1.1 WIND Mode
The wind m ode k eeps the direc tion same as receivi ng wind dir ec t ion.
Note: The WIND mode r equires w ind sensor data as below.
Mode Required data Update ra te of wind data
A WA Apparent wind angle and speed 2 Hz or more
TWA
For setting of the FI - 30, see page 14.
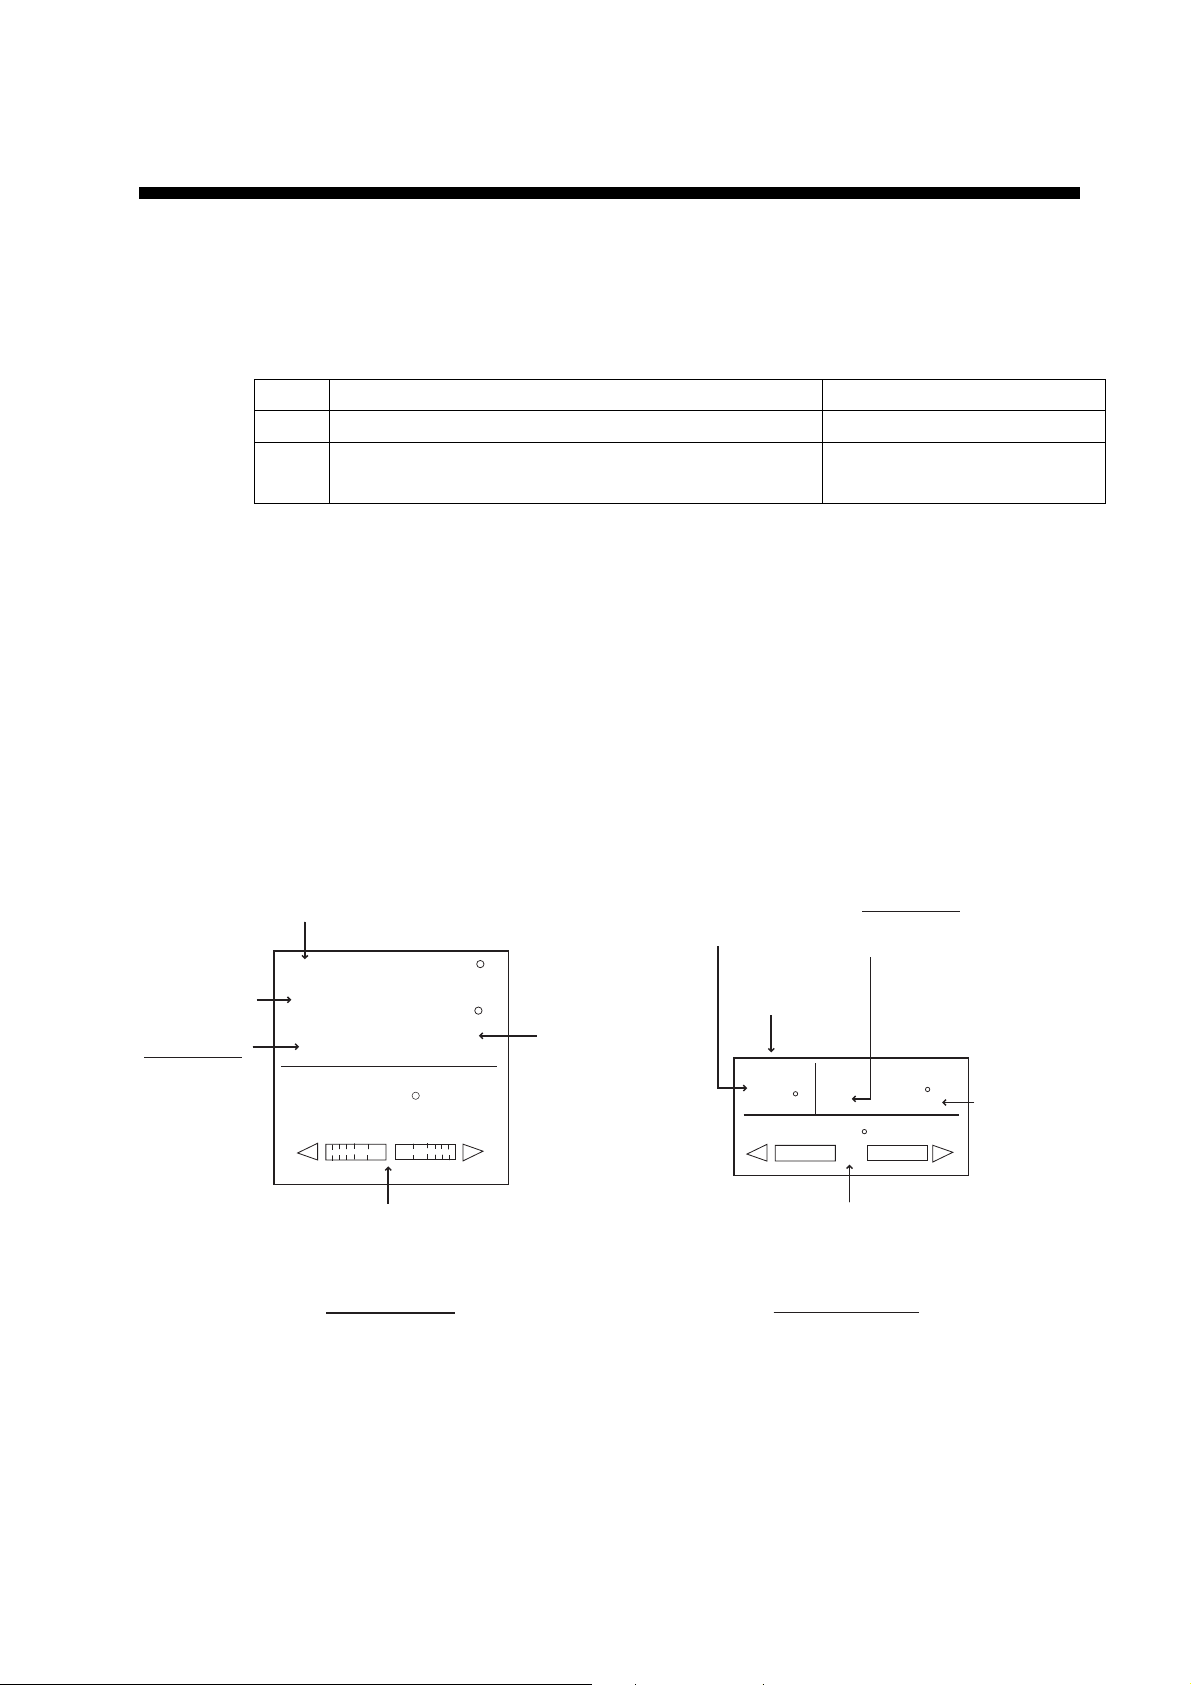
1.1.1 Using the WIND mode
1. Direct the heading to the desired directi on and trim the sail to keep the wind
2. Press the [AUTO] key while holding t he [STBY] key dow n to go to WIND
3. To change/r e- adjust t he wind angle, simply rotate the course control knob.
4. To escape from the WIND mode, pr es s the [STBY] key.
WIND mode
Direction mode
Heading mode
M: Magnetic
T: True
True wind angle and speed or
Apparent wind angle, speed and own boat’s speed
direction.
mode.
You can change the wind direction in 5, 10 or 20° step. For detail, ask your
dealer.
WIND
AWA
HDG
M
RUDDER
359
359.9
Heading from
heading sensor
0
20
40
10
40
10
20
Direction mode
WIND mode
WIND
AWA
359
RUDDER
20
40
10 5
2 Hz or more
Heading mode
M: Magnetic
T: True
HDG
M
359.9
0
40
5 10
20
Heading from
heading sensor
Rudder angle (XTE or Deviation)
Navpilot-500
Rudder angle (XTE or Deviation)
Navpilot-511/520
WIND mode dis play
1
Page 4
1. OPERATION
1.1.2 Displays
(Navpilot-500)
There are f our t ypes of di s plays; Normal display, Nor m al displ ay 2, Data di s play
and Graphi c display.
(Navpilot-511/520)
There are t hr ee t ypes of di s plays; Normal display 1, Norm al displ ay 2 and Data
display.
To choose a display mode, pr es s the [AUTO] key.
1.1.3 Selecting the win d an gl e mo de
The wind m ode has t wo wind angle modes, AW A (Apparent Wind Angle) and
TWA (Tr ue Wind Angle).
AWA: The direction (in relation to shi p’s bow ) of the wi nd as it appears to that on
board, detec ted by the wind sensor. AWA mode requires wind angle and speed
data. Use this mode when wind i s stable.
TWA: The actual wi nd direction; combination of the AWS (Apparent Wind Speed)
and own boat’s speed. This m ode r equires apparent w ind angle, apparent wind
speed, ow n boat’s speed and ow n boat’s heading. Use this mode when there is
a downwi nd uns table.
True wind angle (TWA)
N
Own boat's
Speed
True wind speed
(TWS)
Own boat's
Heading
Apparent wind angle (AWA)
Apparent/Tr ue wind angle
Apparent wind speed
(AWS)
NOTE
When running on engine, use the TWA (or AUTO) mode.
The autopilot cannnot control your boat when the boat's
speed exceeds the true wind speed in AWA mode.
2
Page 5
1. In the WIND mode, press the [MENU] key to s how the WIND mod e m enu.
For Navpilot-511/520, press the [TURN/MENU] key twice to show the menu.
2. Rotate the course control knob to select “SAILBOAT PARAMETERS” , and
then push the c our se control knob to show the sailboat parameters menu.
3. Rotate the course control knob to select “MO DE TYPE”, and then push the
course cont r ol knob to show the mode type options window.
4. Rotate the cours e c ont r ol knob to select AWA or TWA as appropriate.
5. Press the course contr ol knob, and then press t he [MENU] key
([MENU/TURN] key for Navpilot-511/520) twice to close the menu.
1.2 TACK Mode
AWA
TWA
Mode type opt ions window
1. OPERATION
In the AUTO and WIND modes , the [TURN] key provides various tacking and
gybing motions.
1.2.1 Tacking/Gybing in AUTO mode (FIXED TACK)
This func tion changes the current course by the degrees (set on menu) to port or
starboard direction. There are two types of speed, SLOW (for gybing) and FA S T
(for t ac k ing) in this mode. This TACK mode can be used when your boat does
not have a w ind sensor.
To start tacking/gybing, do the followi ng.
1. Press the [AUTO] key to go to the AUTO mode.
2. Press the [TURN] k ey to show the TACK m enu.
For Navpilot-511/520, press the [TURN/MENU] key.
SLOW
FAST
SLOW
FAST
TRACK ANGLE: 100
TACK menu (AUT O mode)
3. Rotate the cours e c ont r ol knob to select a mode.
The arrow next to the mode name shows the direction to turn.
SLOW: Used when gybing. The boat slowly changes the heading the value set.
FAST: Used when tacking. The boat rapidly changes the heading angle.
3
Page 6

1. OPERATION
Wind direction
Wind direction
Degrees set on
RATE OF SLOW TACK
Degrees set on RATE OF FAST TACK
FAST mode (Starboard)
4. Press the course contr ol knob to execute.
The TACK mode display appears.
Heading from
TACK mode
heading sensor
TACK
359
359.9
Heading mode
M: Magnetic
T: True
FIXED
HDG
M
RUDDER
0
20
40
10
Rudder angle (XTE or Deviation)
Navpilot-500
40
10
20
SLOW mode (Starboard)
Heading mode
M: Magnetic
T: True
TACK mode
TACK
FIXED
359
RUDDER
Rudder angle (XTE or Deviation)
HDG
M
359.9
0
20
40
10 5
5 10
40
20
Navpilot-511/520
Heading from
heading sensor
TACK mode display
When the turning starts, a beep sounds three tim es.
Note: You can set the timing between pressing the course control knob and
start ing tacking. For det ails, see “1.2.3 Setting the tac k timer”.
5. Your boat starts turning to the direction selec ted at step 3.
The tacking angle can be set on the menu. For details, see page 9.
6. When the turning is completed, a beep sounds three times to notify you. Also,
the message “ TURN COMPLETE D” appear s on the display.
4
Page 7

1. OPERATION
Setting t h e rat e of turn for FAST/SLOW tacking
The rate of turn is preset as 3º for SLOW and 20º f or FAST. If you need to
change the val ue, do the following:
1. Press the [MENU] ke y to show the menu.
For Navpilot-511/520, press the [TURN/MENU] key to show the main menu.
2. Rotate the cours e c ontrol knob to select “SA IL BOAT PARAMETERS”, and
then press the course control knob to show the sailboat param eters menu.
3. Rotate the cours e c ontrol knob to select “RATE OF SLOW TACK”, and then
press the course control knob to ci r c um s c ribe the current value with the
double rectangle.
4. Rotate the cours e c ont r ol knob to set value, and then press the course
control knob.
5. Rotate the cours e c ontrol knob to select “RATE OF FAST TACK”, and then
press the course control knob to ci r c um s c ribe the current value with the
double rectangle.
6. Rotate the cours e c ont r ol knob to set value, and then press the course
control knob.
7. Press the [MENU] ( [TURN/MENU] for Navpil ot-511/520) key to close the
menu.
5
Page 8

1. OPERATION
Setting the fixed tack angle
The fixed tacking mode requires the s etting of tacki ng angle. You can set the
angle on the me nu.
1. Rotate the cours e c ontrol knob to select “FIXED TACK ANGLE ” , and then
press the course control knob to ci r c um s c ribe the current value with the
double-rectangle.
2. Rotate the cours e c ontrol knob to set values (Setting range: 1º to 180 º).
3. Press the course contr ol knob.
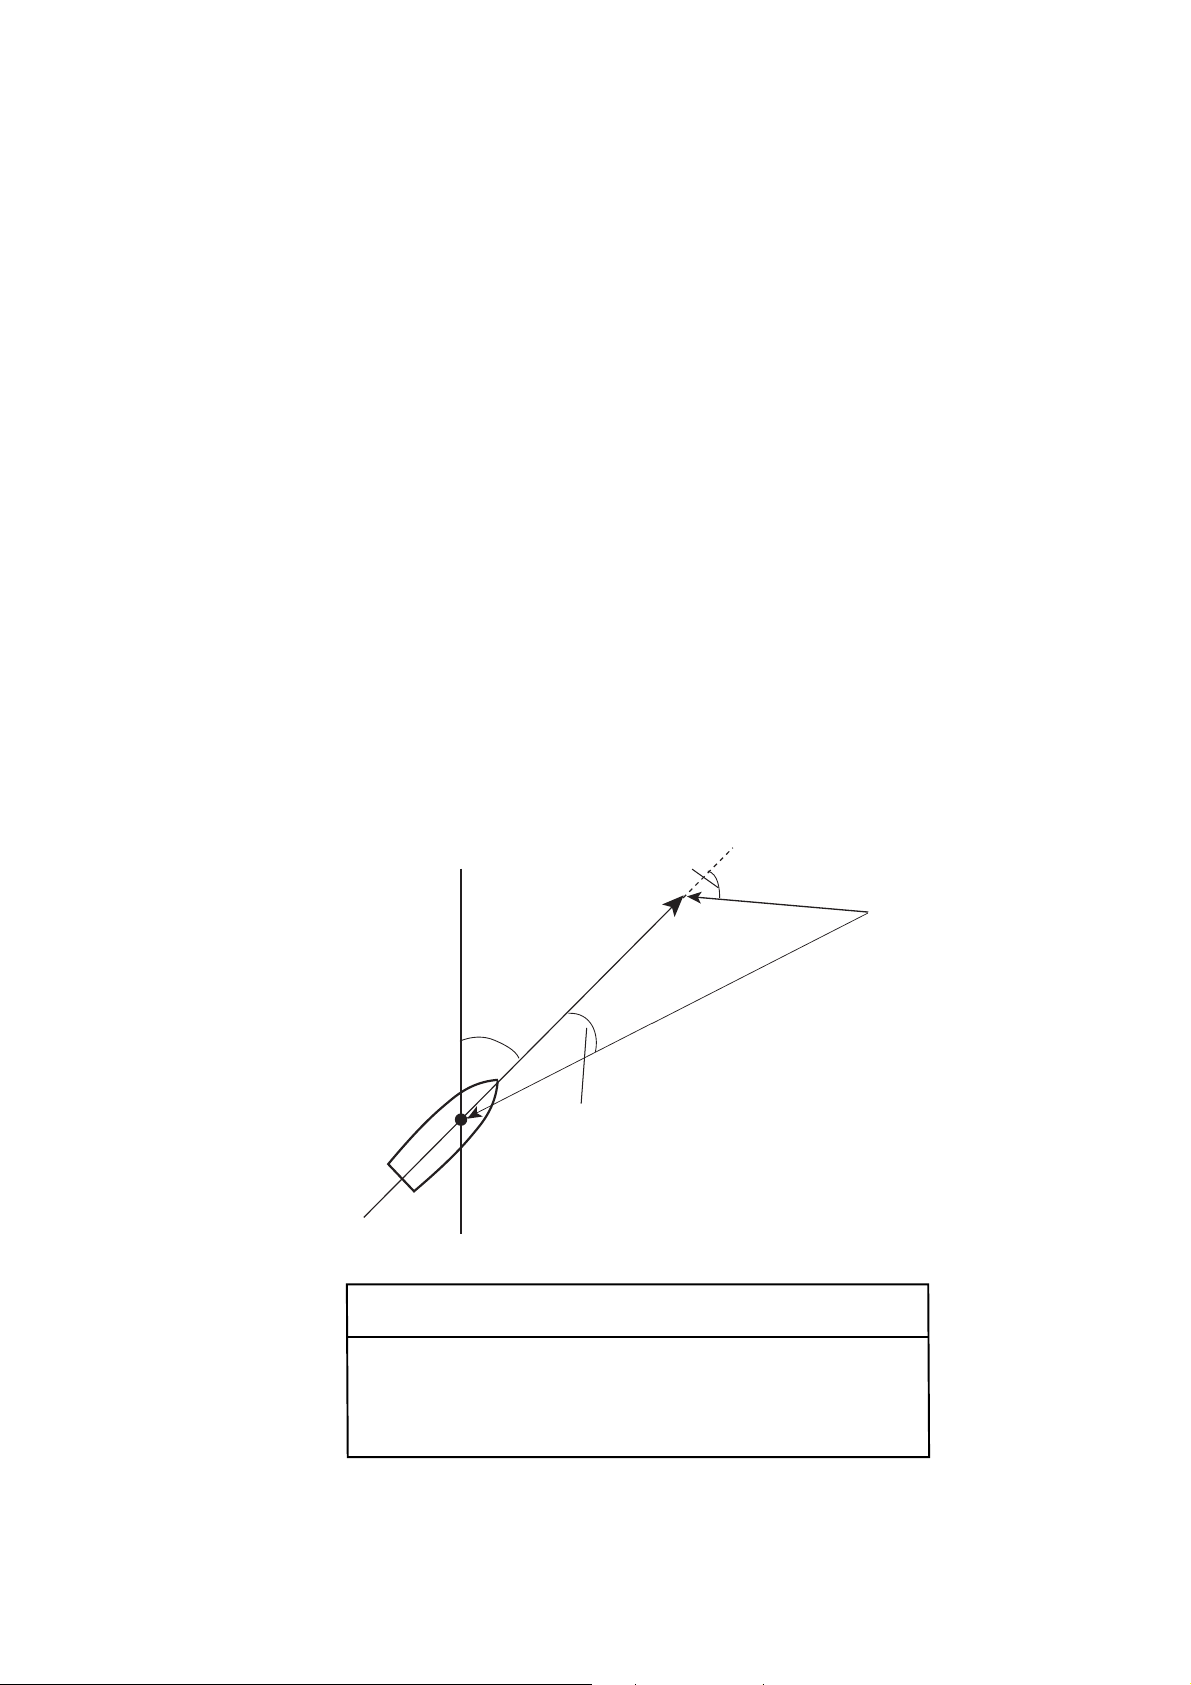
1.2.2 Tacking in WIND mode (WIND TACK)
When using the WIND mode, the degree and direction of tacking are
automatic ally set so that the boat receives the apparent wind on its opposite s ide
with same angle.
Wind direction
"
"
Tacking maneuver in WIND mode
To start turning, do t he following:
1. In the WIND mode, press t he [TURN] key to show the tacking menu.
For Navpilot-511/520, press the [TURN/MENU] key.
PORT
TACK ANGLE: 0
Tacking menu (WIND mode)
STBD
6
Page 9

1. OPERATION
The turning direction is determined according to the heading at the time the
[TURN] ([TURN/MENU] for Navpilot 511/520) key is pressed, a s shown below.
Wind direction
STBD
15
10
PORT
15
15
When the boat is in this area,
it may be turned in either direction.
PORT
When the boat is in this area,
it cannot be turned in either direction..
STBD
: Direction available to turn
Relations of boat heading on start ing the TACK mode and turning direction
2. Rotate the cours e c ont r ol knob to select the dir ec tion to turn.
Note that the message “WIND DIRECTION IS UNFIT FOR YOUR CHOICE.”
appears if you select an unavailable direction, and the selection is refused.
3. Press the course contr ol knob to execute.
The boat starts turning toward the selected direction until the heading is twice at
the time the course control knob is pressed. When the course control knob is
pressed, for example, at the P (port) 50º, th e bo at tur ns un ti l the he ading
becomes S (starboard) 50º.
7
Page 10

1. OPERATION
50
Wind direction
(apparent)
50
Tacking maneuver when heading is 50º
You can set the interval between pressing the course control knob and starting
turning. For details, see the next section.
4. When the turning is complet ed, a beep sounds three times to notify you.
Setting the maximum rudder angle for WIND T ACKING
The tack ing in the WIND mode requires the setting of maximum r udder angle.
This angl e is calculated automatic ally when the Navpilot is installed. If you need
to change the v alue, do the following:
1. Rotate the cours e c ontrol knob to select “WIND TACK RUD ANGLE”, and
then press the course control knob to circumscribe the curre nt value with a
double-rectangle.
2. Rotate the cours e c ontrol knob to set values (Setting range: 1 to 45º).
3. Press the course contr ol knob.
Setting the damping interval of wind data
You can set the damping interval of data from the wi nd s ens or as below.
1. Rotate the cours e c ontrol knob to select “ WIN D DA MPING” and then press
the course co ntrol knob to circumscribe the current value w ith the double
rectangle.
2. Rotate the cours e c ontrol knob to set value (Setting range: 0.5 to 99.9
seconds)
3. Press the course contr ol knob.
8
Page 11

1.2.3 Setting the tack timer
You can set the timing betw een pr es s ing the course control knob and starting
actual tur ning.
1. On the STBY, AUTO or WIND mode, press the [MENU] key to show the main
menu.
For Navpilot-511/520, press the [TURN/MENU] key twice.
2. Rotate the cours e c ontrol knob to select “SAILBOAT PARAMETERS”, and
then press the course control knob to show the sailboat param eters menu.
For STBY mode, the parameter setup menu should be opened before selecting
“SAILBO AT PARAMETERS” .
MODE TYPE: AWA
WIND TACK RUD ANGLE: 35
WIND DAMPING: 1.3 SEC
FIXED TACK ANGLE:100
RATE OF SLOW TACK: 3 /s
RATE OF FAST TACK: 3 /s
TACK TIMER: ON 10 SEC
1. OPERATION
PUSH MENU KEY TO RETURN
TO PREVIOUS MENU.*
*: Not appeared on Navpilot-511/520
Sailboat p ar ameters menu
3. Rotate the cours e c ontrol knob to select “TACK TIMER” , and t hen pres s the
course cont r ol knob to show the track timer options window.
OFF
ON
Tack timer options window
4. Rotate the cours e c ontrol knob to select “ON” , and then press the course
control knob.
5. Rotate the cours e c ontrol knob to select the cur rent timer value next t o “ ON”,
and then press the course control knob.
6. Rotate the cours e c ont r ol knob to select the timer setting, and then press the
course cont r ol knob. (Setting range: 1 t o 99 s econds)
7. Press the [MENU] ( [TURN/MENU] for Navpilot 511/520) k ey several times t o
close the menu.
9
Page 12

1. OPERATION
1.3 DODGE Mode
The DODG E m ode is useful in situations where you need to quickly t ak e c ont r ol
of the helm to avoid an obs truction.
1. Press the [PORT ] or [STBD] key down to c hange the course until boat
finis hes to avoid the obstruction. T he equipment goes into the DO DGE mode
and the audible alarm sounds w hen one of the above key is operated, to
alert you to dodge operation. Note also that “DODGE” appears on the
display.
2. Release the [PORT] or [STBD] key to leave f r om the DODGE mode.
Note: You can change the wind direction in 5, 10 or 20° st eps by using the
dodge keys . This function i s set on installation. For detail, ask your dealer.
1.4 Alarms
The WIND al ar m, which is an alarm exclusively for sailboats, has four condi tions
which generate both audio and visual alarms: heading change, wind shift, t r ue
wind speed and APP. wind speed alarm. To access the WIND alar m m enu, do
the following:
1. Press the [MENU] ke y to show the mode menu.
For Navpilot-511/520, press the [TURN/MENU] key twice.
2. Rotate the course control knob to select “WIND ALARMS”, and then press
the course co ntrol knob to show the WIND alarm menu.
HEADING CHANGE ALARM: OFF
WIND SHIFT ALARM: 15
TRUE SHIFT ALARM: OFF
APP. WIND SPD ALARM: OFF
PUSH MENU KEY TO RETURN
TO PREVIOUS MENU.*
*: Not appeared on Navpilot-511/520.
Wind alarm menu
1.4.1 Setting the heading change alarm
The heading c hange alarm sounds w hen own boat’s heading cha nges
remarkably by the effect s of true wind angle.
Set the heading valu e and alarm range as shown on t he nex t page.
10
Page 13

N
Heading value set
(HDG)
Available range set
(BND)
Range where the alarm occurs
Heading change alarm maneuver
3. STEERING MODE
1. Rotate the cours e c ontrol knob to select “HEA DING CHANGE ALARM”, and
the press the course control knob to show the option window.
OFF
ON
Heading change alarm window
2. Rotate the cours e c ontrol knob to select “ON” , and then press the course
control knob.
An area appears below “HEADING CHANG E ALARM”.
3. Rotate the cours e c ontrol knob to select “HDG” , and then press the course
control knob to circumscribe the curr ent value with t he double rectangle.
4. Rotate the cours e c ontrol knob to set the value (Setting range: 0º to 359º).
5. Press the course contr ol knob.
6. Rotate the cours e c ontrol knob to select “BND” and then press the cours e
control knob to circumscribe the curr ent value with t he double rectangle.
7. Rotate the cours e c ontrol knob to set value (Setting range: 1 to 180º) .
8. Press the course contr ol knob.
1.4.2 Setting the wind shift alarm
The wind s hift alarm sounds when the c ur r ent wind angle is greater than the
wind angl e limit set.
1. Rotate the cours e c ontrol knob to select “ WIN D S HIFT A LA RM”, and then
press the course control knob to ci r c um s c ribe the current value with a double
rectangle.
2. Rotate the cours e c ontrol knob to set the value (Setting range: 0 to 180 º).
3. Press the course contr ol knob.
11
Page 14

1. OPERATION
1.4.3 Setting the true wind speed alarm
The true wind speed alarm warns you when the true wind speed is over or under
the wind s peed alarm setting.
1. Rotate the course control knob to select “TRUE WI ND SPEED ALARM”, and
then press the course control knob to show the option window.
OFF
ON
True wind speed alarm window
2. Rotate the cours e c ontrol knob to choose “ON”, and then press the course
control knob.
The range setting area appears.
3. Rotate the cours e c ont r ol knob to select the current value and then press t he
course cont r ol knob.
4. Use the course control k nob to set the upper and lower limits.
5. Press the course contr ol knob.
1.4.4 Setting the apparent wind speed alarm
The appar ent wind speed alarm warns you when the true wind s peed is over or
under the w ind speed alarm setting.
1. Rotate the course control knob to select “APP. WIND SPEED ALARM”, and
then press the course control knob to show the option window.
OFF
ON
Apparent wind speed alarm wind
2. Rotate the cours e c ontrol knob to choose “ON”, and then press the course
control knob.
The range setting area appears.
3. Rotate the cours e c ont r ol knob to select the current value and then press t he
course cont r ol knob.
4. Use the course control k nob to set the upper and lower limits.
5. Press the course contr ol knob.
12
Page 15

1.5 Error Messages
Your equipment displays error messages to alert you to potential equipment
trouble.
Error message Meaning Remedy
ABNORMAL
WIND DATA
NO WIND DATA Wind data i s not input.
Wind angle ex c eeds 90%/s, or
wind speed exc eeds 20 kt/s.
Check the wind sensor and its
connection.
Press the [STBY] key to go to
STBY mode, and then check the
appropriate sensor.
3. STEERING MODE
13
Page 16

2. SETTING OF FI-30
When connect ing with FI-30 server to input wind data, s et it as below.
FI-30 NM E A output setting: update rate of AWA/TWA = 2Hz
Position Setting
C77 MWV
C78 Other
C79 MWV
C80 Other
C81 MWV
C82 Other
C83 MWV
C84 Other
C85 MWV
C86 Other
C87 MWV
C88 Other
C89 MWV
C90 Other
C91 MWV
C92 Other
PUB.NO.E72-00401-A
(0506,HIMA) NAVPILOT-500/511/520
14
 Loading...