

Page 1
MODEL 1824C/1834C/1934C/
1944C/1954C-BB GD-1920C-BB
Operator’s Guide
The purpose of this Operator's Guide is to provide basic operating procedures for this
equipment. For more detailed information see the Operator's Manual.
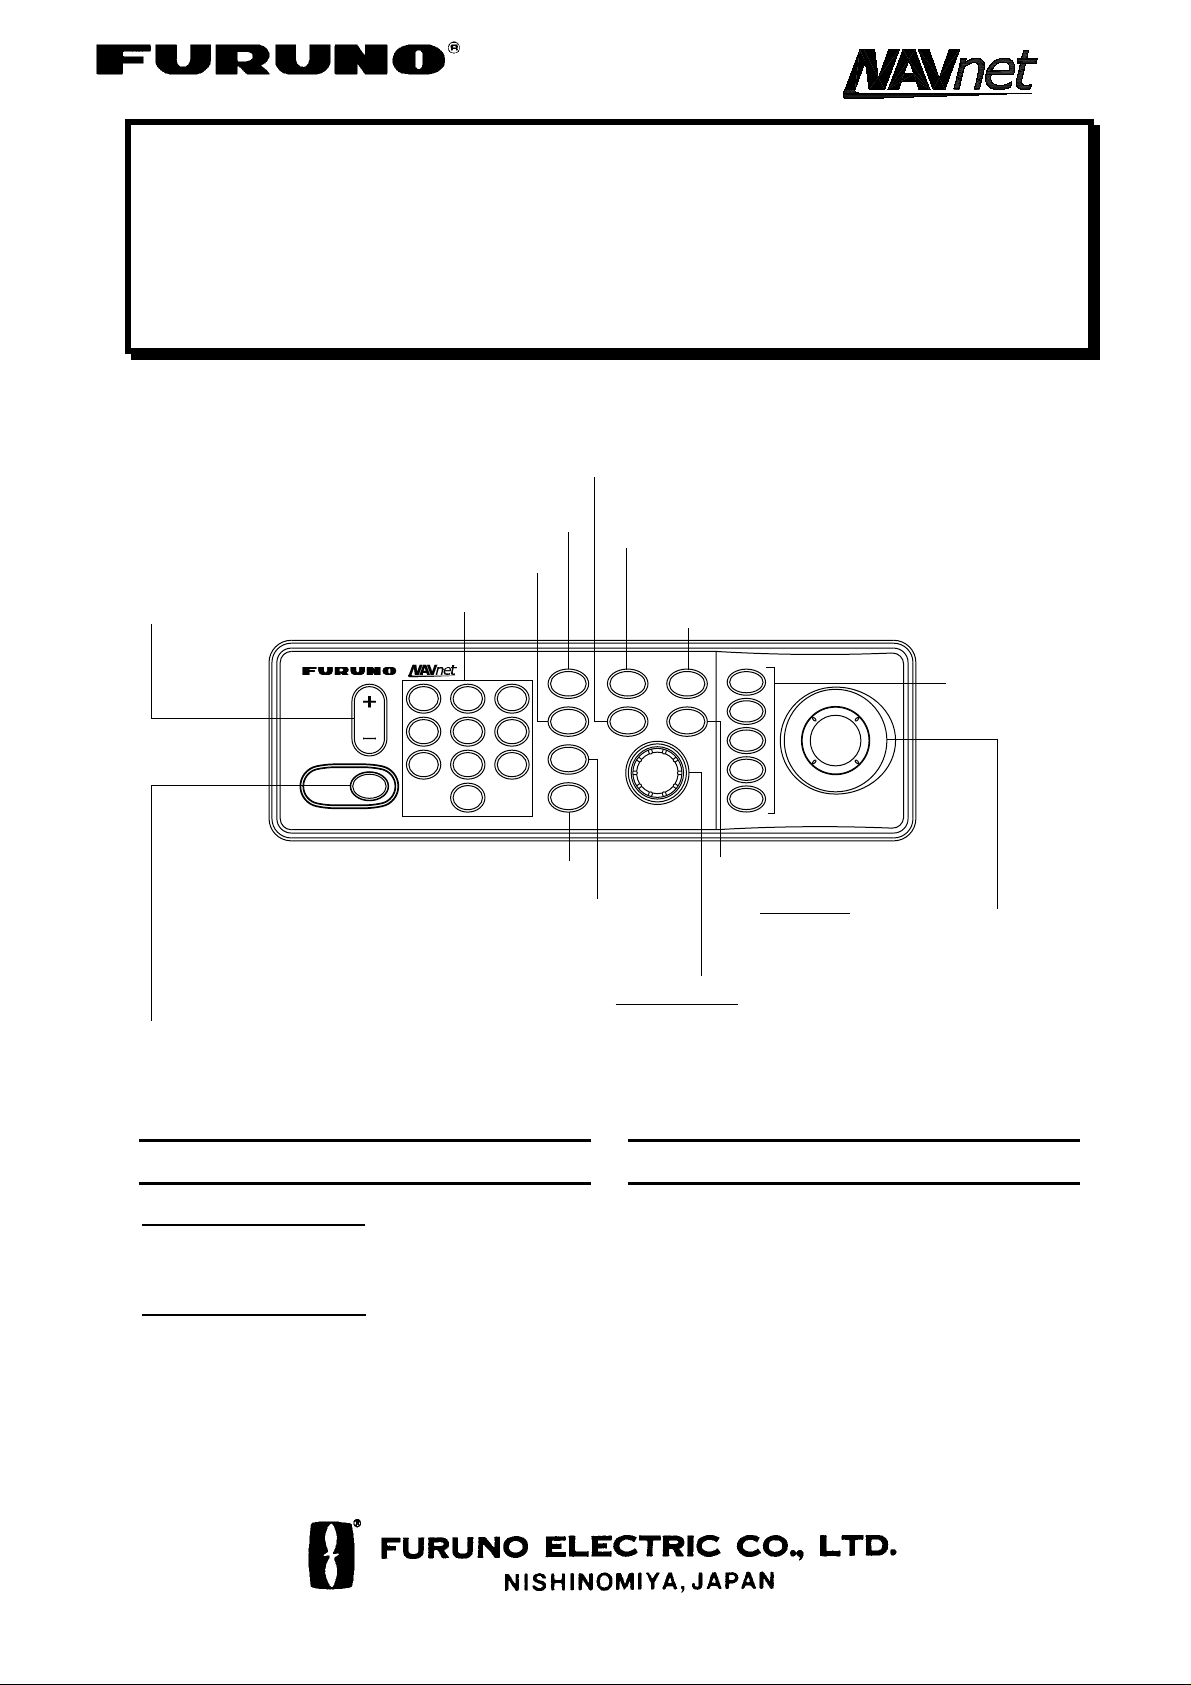
Displays the mode selection window.
Selects a range.
Clears data; erases selected mark.
Opens/closes the alarm menu.
Enter alphanumeric
data.
Momentary press:
Registers own ship's position as a waypoint.
Press three seconds:
Marks man overboard position.
Shows or hides the soft
keys, function keys,
nav data.
VX2
DEFDEF
RANGERANGE
POWERPOWER
TXTX
ABCABC
JKLJKL
44
STUSTU
77
MNOMNO
VWXVWX
_'#_'#
GHIGHI
33
2211
PQRPQR
66
55
YZ&YZ&
99
88
00
Displays soft keys for EBL/VRM.
Radar: Displays the soft keys
for adjustment of gain, A/C SEA,
A/C RAIN.
Sounder: Adjusts gain.
Press three seconds: Turns power off.
Momentary press: Turns the power on, and
shows D: RADAR STBY/TX soft key.
Turning the Power On/Off
Turning on the power
Press the POWER/TX key momentary.
Turning off the power
Press and hold down the POWER/TX key
until the screen goes off (approx. 3 sec.)
SAVESAVE
CLEARCLEAR
ALARMALARM
GAINGAIN
EBLEBL
VRMVRM
DISPDISP
MOBMOB
PUSH TO ENTERPUSH TO ENTER
HIDEHIDE
SHOWSHOW
MENUMENU
AA
BB
CC
DD
EE
Opens/closes the main menu.
Trackball
Shifts EBL/VRM and cursor;
selects menu items and options.
ENTER knob
Push: Registers setting.
Rotate: Adjusts gain, VRM, EBL, etc.;
selects menu items and options. May also
be used to enter alphanumeric data.
Selecting a Display
1. Press the DISP key to show the display
selection window.
2. Rotate the ENTER knob to select a basic
display screen, and then push it.
3. Rotate the ENTER knob to select a
combination display.
4. Push the ENTER k nob.
Soft keys
Page 2
<RADAR Operation>
Transmitting, Stand-by
1. Press the POWER/TX key momentarily
to sow soft keys.
2. Press the D:RADAR STBY soft key to
highlight TX on its label.
3. Press the E: RETURN soft key.
To return to Stand-by mode, press the D:
RADAR TX soft key to highlight STBY on its
label.
Selecting the Range Scale
Press the RANGE (+ or -) key to change the
range scale.
Adjusting the Gain
1. Press the GAIN key.
2. Press the A: GAIN soft key to show the
gain sensitivity setting window.
GAIN SENSITIVITY
AUTO ROUGH
¤
¡
AUTO MODERATE
¡
AUTO CALM
¡
MAN
0
3. Use the trackball to select AUTO
ROUGH, AUTO MODERA TE, AUTO
CALM or MAN (manual) as appropriate.
For manual adjustment, rotate the
ENTER knob to adjust, while observing
the radar echo.
4. Press the GAIN key or the E: RETURN
soft key to finish.
Adjusting the A/C SEA, RAIN
1. Press the GAIN key followed by B: A/C
SEA or C: A/C RAIN soft key to show the
appropriate setting window.
A/C SEA
AUTO ROUGH
AUTO MODERATE
AUTO CALM
MAN
A/C SEA window A/C RAIN window
0
A/C RAIN
0
2. For A/C SEA, rotate the ENTER knob to
select the appropriate setting. When
selecting MAN, rotate the ENTER knob
to adjust.
3. For A/C RAIN, rotate the ENTER knob to
adjust.
4. Press the GAIN key or E: RETURN soft
key to finish.
Measuring Range by VRM
1. Press the EBL/VRM key followed by B:
VRM1 ON (dotted ring) or E: VRM2 ON
(dashed ring) soft key to show
appropriate VRM.
2. Rotate the ENTER knob to place the
VRM on the inside edge of a radar target,
and read the VRM indication to find
range.
To erase a VRM, press appropriate VRM soft
key (B or E) followed by the CLEAR key.
Measuring the Bearing
1. Press the EBL/VRM key followed by A:
EBL 1 ON (dotted line) or D: EBL 2 ON
(dashed line) soft key to show the
appropriate EBL.
2. Rotate the ENTER knob to bisect the
radar target with the EBL, and read the
EBL indication to find bearing.
To erase an EBL, press appropriate EBL soft
key (A or D) followed by the CLEAR key.
EBL1
(Dotted)
VRM2
(Dashed)
VRM1
(Dotted)
EBL2
(Dashed)
EBL1 bearing/
VRM1 range
3nm
12/
LP
H-UP
EBL1
330.1°R
VRM1
3.123nm
EBL2
234.1°R
VRM2
9.343nm
Active marker is highlighted.
EBL2 bearing/
VRM2 range
319. 9
°
M
EBL
VRM
EBL1
A
ON
VRM1
B
ON
C
OFFSET
EBL2
D
ON
VRM2
E
ON
359.9 ˚R
+
nm
11.70
2
Page 3

ARRIVAL ALARM
▲
¡
ON 0.010nm
¤
OFF
▼
<PLOTTER Operation>
Changing Chart Scale
Press the RANGE - key (shrinks the scale,
and expands image) or RANGE + key
(expands the scale, and shrinks image).
Entering a Mark
1. Place the cursor where you want a mark
appear.
2. Press the A: MARK ENTRY soft key.
Entering a Waypoint at Own
Ship Position
Press the SAVE/MOB key momentarily to
store your position as a waypoint.
NEW
ROUTE NAME
0 0 1
COMMENT
ROUTE
A
PLOT
LOCAL
B
LIST
ALPHA
C
LIST
D
CONECT
E
CANCEL
3. Press the B: LOCAL LIST or C: ALPHA
LIST soft key to open the waypoint list.
4. Use the trackball to select a waypoint,
then press the A: ADD WPT soft key .
5. Repeat step 4 to complete the route.
6. Press the D: SAVE soft key to register
the route, and then press the MENU ke y.
Navigating to Waypoints
Entering a Waypoint with
Cursor
1. Press the MENU key, C:
WA YPOINTS/ROUTES, A: WAYPOINTS
and C: WAYPOINT BY CURSOR soft
keys in order to show the plotter display.
2. Operate the trackball to place the cursor
where you want to enter a waypoint.
3. Press the D: NEW WAYPOINT soft key.
NEW
MARK
NAME
▲
001WPT
34°44.000'N
135°21.000'W
COMMENT
02:36 01JAN01
LAT
34° 12. 134'N
LON
134° 12. 345'W
PROXIMITY ALARM RADIUS
002WPT
00:00 01JAN00
34°44.000'N
135°21.000'W
003WPT
00:00 01JAN00
34°44.000'N
135°21.000'W
359.9°
0.00nm
359.9°
0.00nm
359.9°
0.00nm
0. 00nm
4. Press the D: SAVE soft key.
WPT
SELECT
A
MARK
COORD
B
TYPE
N< - - >S
C
E< - - >W
D
SAVE
E
RETURN
1. Operate the trackball to select a
waypoint on the plotter display.
2. Press the D: GO TO WPT soft key.
Setting A rrival A larm
1. Press the ALARM key.
2. Select ARRIV AL ALARM.
3. Press the A: EDIT soft key to show the
arrival alarm window.
4. Use the trackball to select ON.
5. Enter alarm range, and then press the C:
ENTER soft key or ENTER knob to
register setting.
6. Press the ALARM key to finish.
Creating a Route
1. Press the MENU key, C:
2. Press the B: NEW ROUTE soft key to
WAYPOINTS/ROUTES, B: ROUTES soft
keys in order to show the ROUTE menu.
open the new route entry screen.
3
Page 4

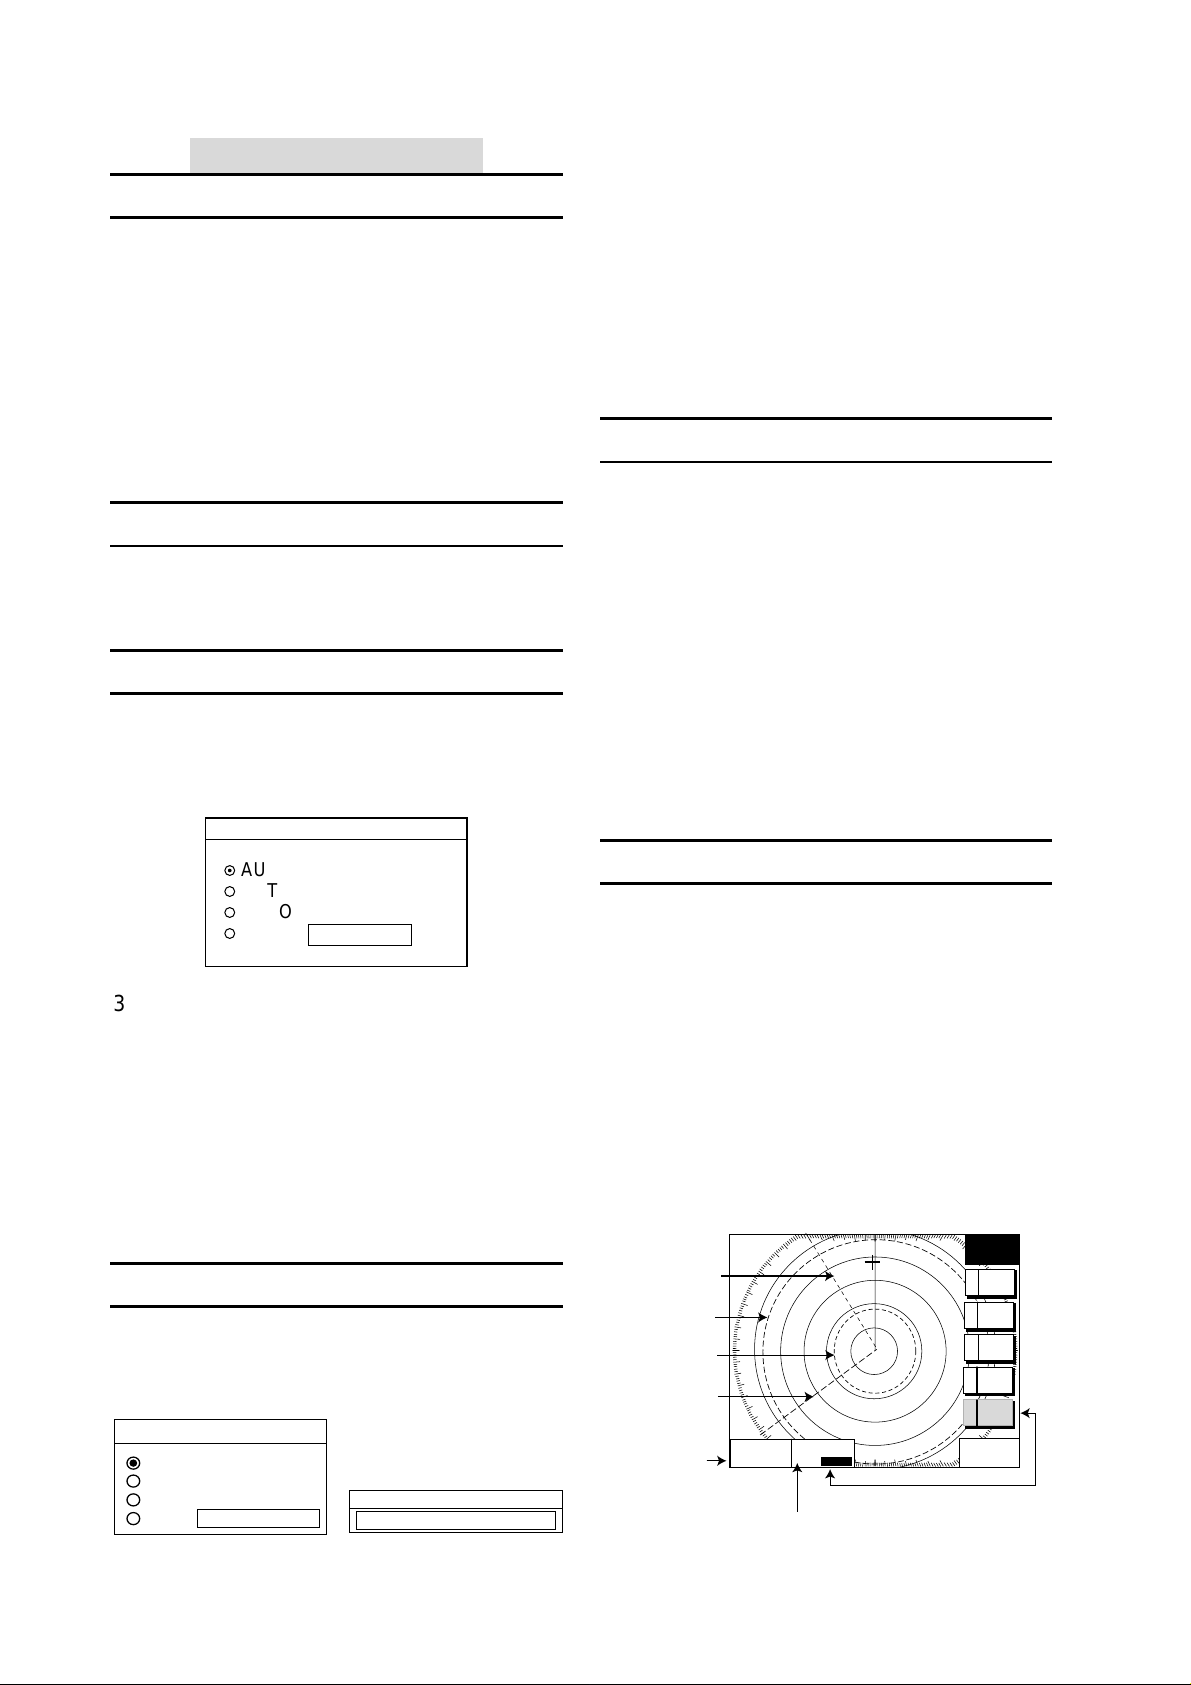
<SOUNDER Operation>
Variable Range Marker
Zero line
Icons
(alarm,
battery,
simulation)
Color bar
Temp.
scale
Water
temp.
graph
Water
temp.
display
50
40
30
Depth
°
F
120
LF
Minute marker
S
I
M
Tx frequency
(White)
Fish
echo
Depth scale
Time
0'30"
0
50.0
50
Cross-hair
cursor
100
150
200
Bottom echo
Selecting a sounder mode
1. Press the D: DISPLAY MODE soft key to
show the display mode window.
2. Use the trackball or ENTER knob to
select a display.
3. Press the E: RETURN soft key to close
the window.
Automatic Sounder Operation
1. Press the B: AUT O /D.BOX soft key.
2. Use the trackball or ENTER knob to
select CRUISING or FISHING.
3. Press the E: RETURN soft key.
Manual Sounder Operat ion
1. Press the B: AUT O /D.BOX soft key.
2. Select OFF (MANUAL), and then press
the E: RETURN soft key.
Adjusting the gain
Press the GAIN key, and then adjust the
ENTER knob or trackball.
Shifting the basic range
Press the A: SHIFT soft key, and then adjust
the ENTER knob.
(0502,HIMA) MODEL 1824C-BB SERIES
PUB.NO.OSE-35490-A
Reducing Low Level Noise
1. Press the MENU key, and then press the
A: SOUNDER MENU soft key.
2. Select CLUTTER, then press the A: EDIT
soft key to show the clutter window.
3. Adjust the trackball upward or
downward.
4. Press the E: RETURN soft key followed
by the MENU key to close the menu.
Picture A dvan ce Speed
1. Press the MENU key and A: SOUNDER
MENU soft key in order.
2. Select PICTURE ADVANCE, and then
press the A: EDIT soft key to open the
picture advance window.
3. Use the trackball to select speed
desired.
4. Press the E: RETURN soft key followed
by the MENU key to close the menu.
Activating Sounder Alarms
1. Press the ALARM key to show the
ALARM menu.
2. Use the trackball to select the alarm
among BOTTOM, TEMPERATURE,
FISH and FISH (B/L).
3. Press the A: EDIT soft key.
4. Select ON (for TEMPERATURE, WITHIN
RANGE or OUT OF RANGE), and then
key in the alarm range.
5. Press the C: ENTER soft key (or ENTER
key) followed by the ALARM key to close
the menu.
This manual is printed with
soy ink.
4
 Loading...