

Page 1
–
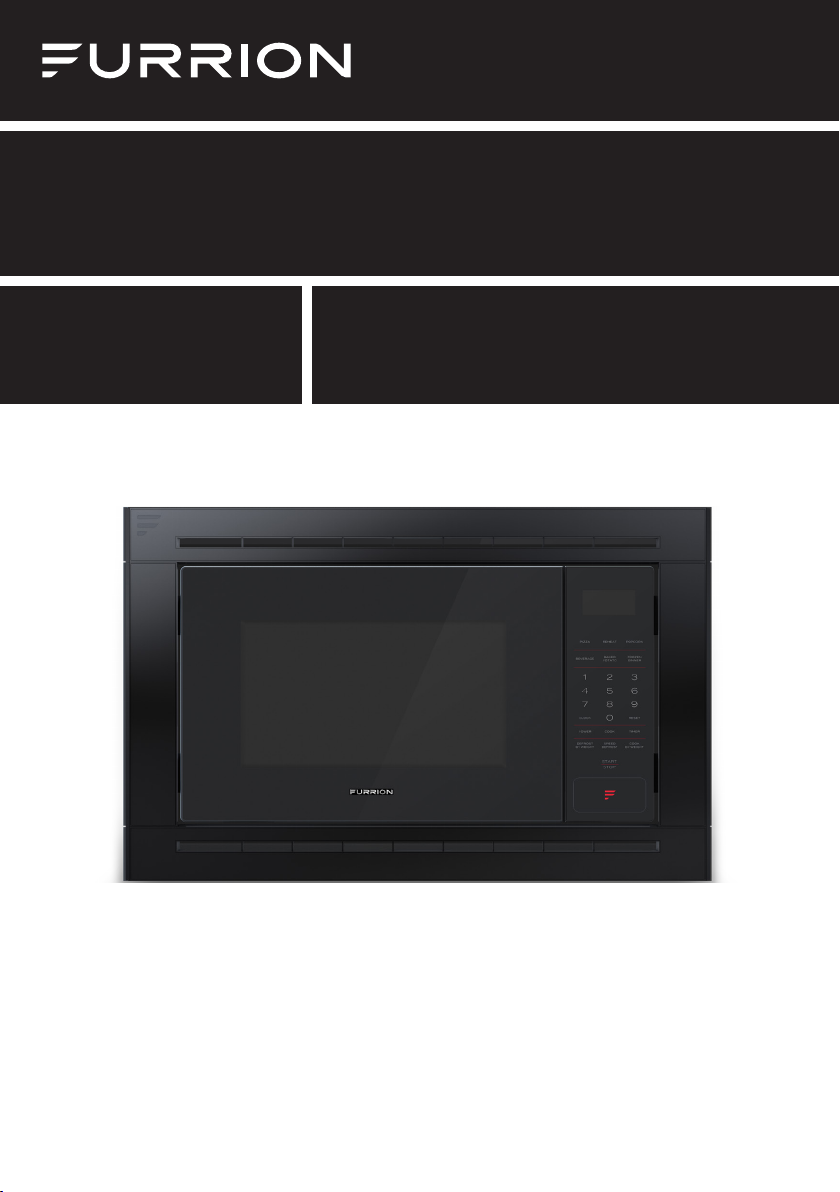
0.9 cu.ft. Countertop Microwave Oven
Four à micro-ondes de comptoir de 0,9pi.cu.
Horno microondas de encimera de 0.9pies cúbicos
User Manual
Manuel d’utilisation
Manual del usuario
Model/ Modèle/ Modelo:
FMSN09-BL/FMSM09-BL
FMSN09-MG/FMSM09-MG
* Picture shown here is for reference only.
* The trim kit is sold separately.
* L’image montrée ici est pour référence seulement.
* Le kit de finition est vendu séparément.
* La imagen que se muestra aquí es sólo para referencia.
* El marco para empotrar se vende por separado.
Page 2

Welcome
Thank you for purchasing this Furrion® 0.9 cu. ft. Microwave Oven. Before operating
your new product, please read these instructions carefully. This instruction manual
contains information for safe use, installation and maintenance of the product.
English
Please keep this instruction manual in a safe place for future reference. This will ensure
safe use and reduce the risk of injury. Be sure to pass on this manual to new owners of
this product.
The manufacturer does not accept responsibility for any damages due to not
observing these instructions.
1
Page 3

Table of Contents
Welcome .........................................................................................1
Table of Contents ...........................................................................2
Important Safety Instructions ......................................................3
General Safety Instructions ...............................................................................3
Grounding Instructions ......................................................................................5
California Residents Only ..................................................................................6
Product Features ...........................................................................7
Function Overview .........................................................................8
Control Panel .......................................................................................................8
Installation ......................................................................................9
What’s in the Box ................................................................................................. 9
Before Installation ...............................................................................................9
Microwave Oven Installation .............................................................................9
Electrical Connection ......................................................................................... 11
Installation ......................................................................................11
Quick Cook Settings ......................................................................12
Operation ........................................................................................13
Cooking Techniques ......................................................................16
Utensils Guide ...................................................................................................... 16
Cleaning and Care ..........................................................................18
Troubleshooting .............................................................................19
Technical Specification .................................................................20
English
2
Page 4

Important Safety Instructions
PRECAUTIONS TO AVOID POSSIBLE
EXPOSURE TO EXCESSIVE
MICROWAVE ENERGY
English
1. Do not attempt to operate this oven
with the door-open since open-
door operation can result in harmful
exposure to microwave energy. It is
important not to defeat or tamper
with the safety interlocks.
2. Do not place any object between the
oven front face and the door or allow
dirt or cleaner residue to accumulate
on sealing surfaces.
3. Do not operate the oven if it is
damaged. It is particularly important
that the oven door close properly and
that there is no damage to the:
a. Door (bent),
b. Hinges and latches (broken or
loosened),
c. Door seals and sealing surfaces.
4. The oven should not be adjusted or
repaired by anyone except properly
qualified service personnel.
General Safety
Instructions
When using electrical appliances, basic
safety precautions should be followed,
including the following:
WARNING - To reduce the risk of burns,
electric shock, fire, injury to persons
or exposure to excessive microwave
energy:
1. Read all instructions before using the
appliance.
2. Read and follow the specific
“PRECAUTIONS TO AVOID
POSSIBLE EXPOSURE TO
EXCESSIVE MICROWAVE ENERGY”
on page 3.
3
3. This appliance must be grounded.
Connect only to properly grounded
outlet. See “GROUNDING
INSTRUCTIONS” section.
4. Install or locate this appliance only
in accordance with the provided
installation instructions.
5. Do not operate the oven when empty.
6. Some products such as whole eggs
and sealed containers - for example,
closed glass jars - are able to explode
and should not be heated in this oven.
7. Use this appliance only for its
intended use as described in this
manual. Do not use corrosive
chemicals or vapors in this appliance.
This type of oven is specifically
designed to heat, cook, or dry food.
It is not designed for industrial or
laboratory use.
8. As with any appliance, close
supervision is necessary when used
by children.
9. To reduce the risk of fire in the oven
cavity:
a. Do not overcook food. Carefully
attend appliance when paper,
plastic, or other combustible
materials are placed inside the
oven to facilitate cooking.
b. Remove wire twist-ties from paper
or plastic bags before placing bag
in oven.
c. If materials inside the oven should
ignite, keep oven door closed,
turn oven off, and disconnect the
power cord or shut off power at
the fuse or circuit breaker panel.
d. Do not use the cavity for storage
purposes. Do not leave paper
products, cooking utensils or food
in the cavity when not in use.
Page 5

Important Safety Instructions
10. Liquids, such as water, coffee, or tea
are able to be overheated beyond
the boiling point without appearing to
be boiling due to surface tension of
the liquid. Visible bubbling or boiling
when the container is removed from
the microwave oven is not always
present. THIS COULD RESULT IN
VERY HOT LIQUIDS SUDDENLY
BOILING OVER WHEN A SPOON OR
OTHER UTENSIL IS INSERTED INTO
THE LIQUID. To reduce the risk of
injury to person:
a. Do not overheat the liquid.
b. Stir the liquid both before and
halfway through heating it.
c. Do not use straight-sided
containers with narrow necks.
d. After heating, allow the container
to stand in the microwave oven for
a short time before removing the
container.
e. Use extreme care when inserting
a spoon or other utensil into the
container.
11. Do not heat oil or fat for deep-frying. It
is difficult to control the temperature
of oil in microwave oven.
12. Pierce foods with heavy skins such as
potatoes, whole squash, apples and
chestnuts before cooking.
13. The contents of feeding bottles and
baby jars should be stirred or shaken
and the temperature should be
checked before serving in order to
avoid burns.
14. Cooking utensils may become hot
because of heat transferred from
the heated food. Potholders may be
needed to handle the utensil.
15. Do not cover or block any openings
on the appliance.
16. Do not store or use this appliance
outdoors. Do not use this product
near water, for example, near a
kitchen sink, in a wet basement, near
a swimming pool, or similar locations.
17. Do not operate this appliance if it
has a damaged cord or a plug, if it is
not working properly or if it has been
damaged or dropped.
18. Do not immerse cord or plug in water.
Keep cord away from heated surface.
Do not let cord hang over edge of
table or counter.
19. Use only thermometers, which are
specifically designed for use in
microwave ovens.
20. Do not operate any heating or
cooking appliance beneath this
appliance.
21. Be certain the glass tray and roller
rings are in place when you operate
the oven.
22. This appliance should be serviced
only by qualified service personnel,
contact nearest authorized service
facility for examination, repair, or
adjustment.
23. When cleaning surfaces of door and
oven that comes together on closing
the door, use only mild, nonabrasive
soaps, or detergents applied with a
sponge or soft cloth.
English
4
Page 6

Important Safety Instructions
24. This equipment generates, uses
and can radiate radio frequency
energy and, if not installed and used
English
in accordance with the instructions,
may cause harmful interference
to radio communications.
However, there is no guarantee
that interference will not occur
in a particular installation. If this
equipment does cause harmful
interference to radio or television
reception, which can be determined
by turning the equipment off and
on, the user is encouraged to try to
correct the interference by one or
more of the following measures:
- Reorient or relocate the receiving
antenna.
- Increase the separation between
the equipment and receiver.
- Connect the equipment into an
outlet on a circuit different from
that to which the receiver is
connected.
- Consult the dealer or an
experienced radio/TV technician
for help.
CAUTION
● NOTICE: PACEMAKERS
Most pacemakers are shielded
from interference from electronic
products, including microwaves.
However, patients with pacemakers
may wish to consult their physicians
if they have concerns.
● Changes or modifications not
expressly approved by the party
responsible for compliance could
void the user's authority to operate
the product.
Grounding Instructions
This appliance must be grounded. In
the event of an electrical short circuit,
grounding reduces risk of electric shock
by providing an escape wire for the
electric current.
WARNING - Improper use of the
grounding plug can result in a risk of
electric shock.
Consult a qualified electrician or
serviceman if the grounding instructions
are not completely understood, or if
doubt exists as to whether the appliance
is properly grounded, and either:
1) If it is necessary to use an extension
cord, use only a 3-wire extension
cord that has a 3-blade grounding
plug and a 3-slot receptacle that will
accept the plug on the appliance. The
marked rating of the extension cord
shall be equal to or greater than the
electrical rating of the appliance, or
2) Do not use an extension cord. If the
power supply cord is too short, have
a qualified electrician or serviceman
install an outlet near the appliance.
Electrical Requirements
The electrical requirements are a 120
volt, 60 Hz, AC only, 15 amp or 20 amp
dedicated circuit. It is recommended
that a separate circuit serving only the
oven be provided. The oven is equipped
with a 3-prong grounding plug. It must
be plugged into a wall receptacle that is
properly installed and grounded.
5
Page 7
Important Safety Instructions
Power Supply Cord
1. A short power supply cord is provided
to reduce the risks resulting from
becoming entangled in or tripping
over a longer cord.
2. Longer cord sets or extension cords
are available and may be used if care
is exercised in their use.
3. If long cord or extension cord is used:
a) The marked electrical rating of
the cord set or extension cord
should be at least as great as the
electrical rating of the appliance.
b) Th e ex tension cord must be a
grounding-type 3-wire cord, and the
longer cord should be arranged so
that it will not drape over the counter
top or table top where it can be
pulled on by children or tripped over
unintentionally.
NOTES:
If you have any questions about the
grounding or electrical instructions,
consult a qualified electrician or
service person.
Neither manufacturer nor the dealer
can accept any liability for damage to
the oven or personal injury resulting
from failure to observe the electrical
connection procedures.
Radio or TV Interference
Should there be any interference caused
by the microwave oven to your radio or
TV, check that the microwave oven is on
a different circuit, relocate the radio or
TV as far away from the oven as feasible
or check position and signal of receiving
antenna.
California Residents Only
CAUTION
Cancer and Reproductive
Harm – www.P65Warnings.ca.gov
SAVE THESE INSTRUCTIONS
English
6
Page 8
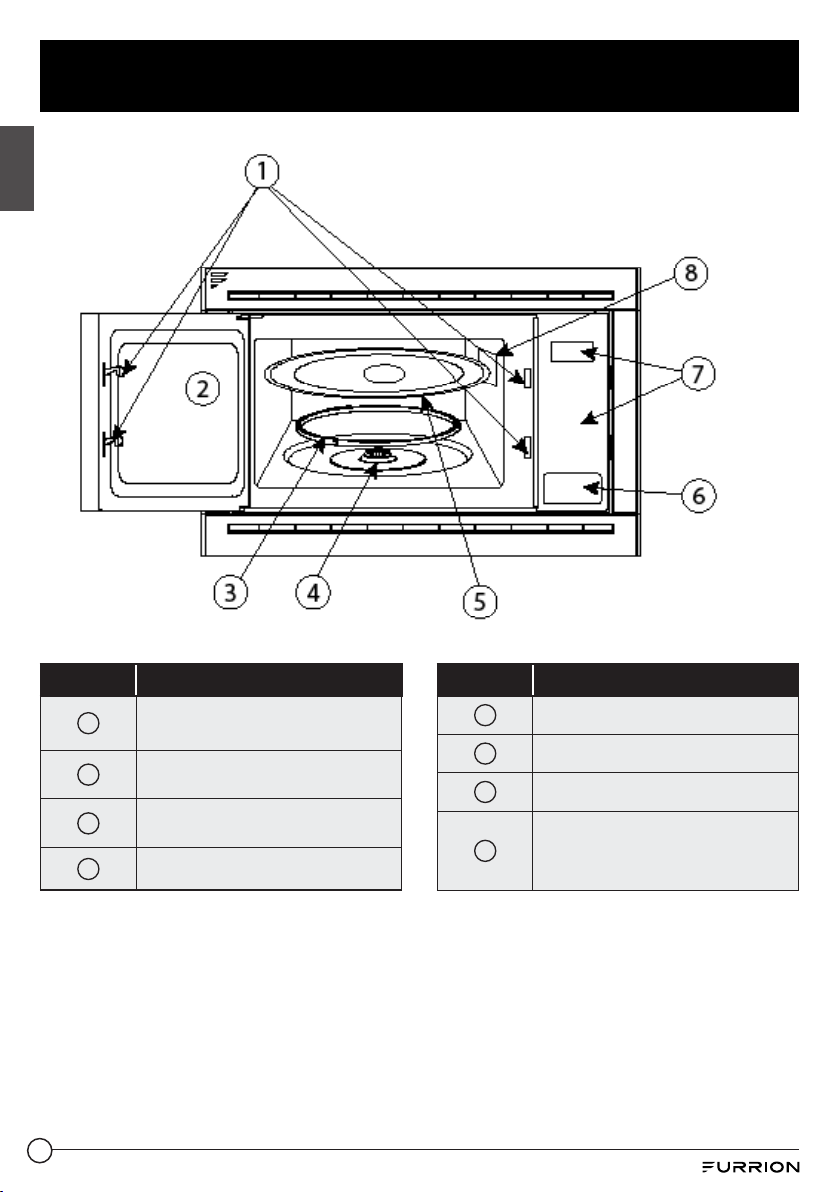
Product Features
English
Item Description
1
Door Safety Lock System
2
Oven Window
3
Roller Ring
4
Shaft
7
Item Description
5
Glass Tray
6
Door Release Button
7
Control Panel
Wave Guide (Please do
8
not remove the mica plate
covering the wave guide)
Page 9
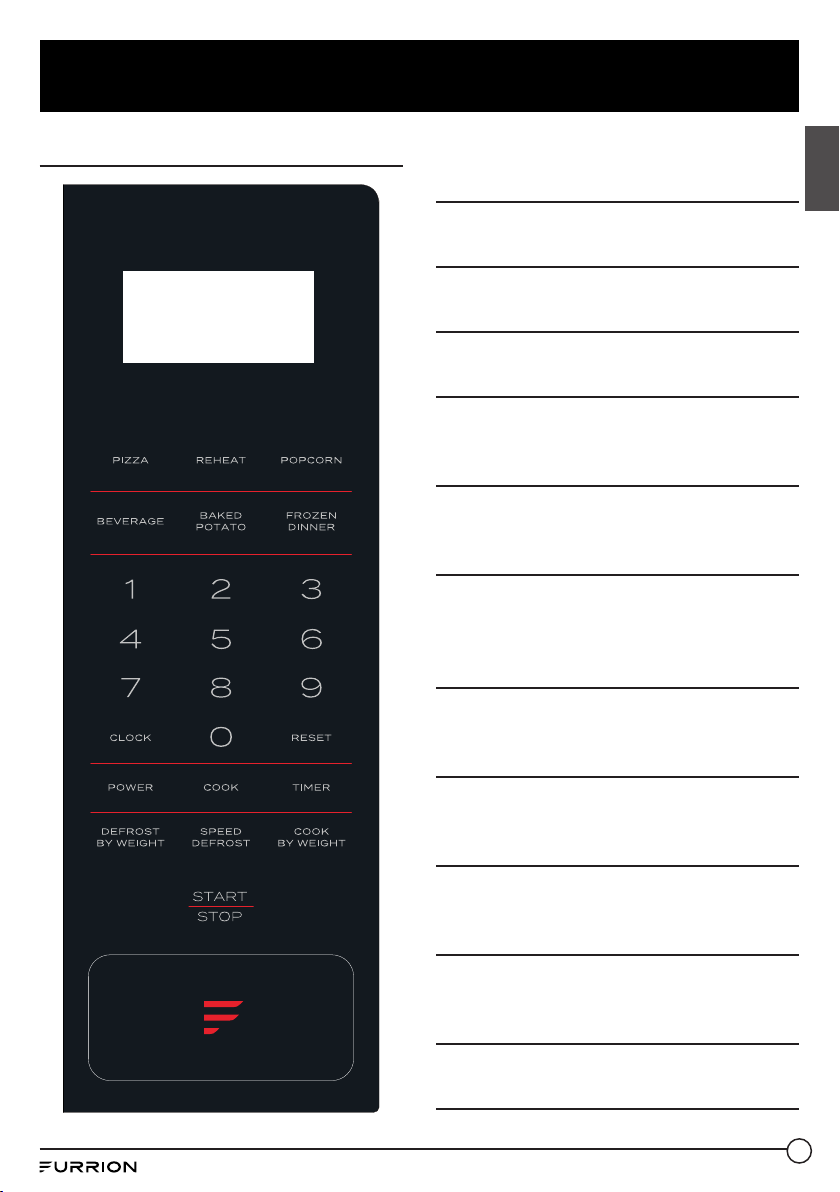
Function Overview
Control Panel
DISPLAY
Cooking time, power, indicators and
present time are displayed.
QUICK COOK BUTTONS
Instant settings to cook popular foods
NUMBER PADS (0-9)
Touch to set time or weight
CLOCK
Use to set the time of day.
RESET
Use to clear all previous settings or set
the child lock.
POWER
Use to set power level or to check power
level during cooking.
COOK
Use for multi-stage cooking. It enables
cooking at multiple power and time
settings automatically.
English
TIMER
Timer functions independently, even
while a cooking program is in process.
DEFROST BY WEIGHT
Programmed defrosting based on the
weight of the foods to be defrosted.
SPEED DEFROST
SPEED DEFROST based on the time
you entered.
COOK BY WEIGHT
Programmed cooking based on the
weight of the foods to be cooked.
START/STOP
Touch to start or stop cooking.
8
Page 10

Installation
What’s in the Box
Make sure all the following items are
English
included in the packaging. If any item
is damaged or missing, contact your
dealer.
● Microwave Oven Body
● Glass Tray x 1
● Glass Tray Roller Ring x 2
● Instruction Manual
● Warranty Leaflet
● Trim Kit
– Long Strip x 2
– Short Strip x 2
– Mounting Screws x 8:
- PMA screws M4x12mm x 4
- KA screws M4x20mm x 4
– Metal Bracket x 2
* Fo r model FMSM09-BL & FMSM09MG only.
Before Installation
1. Make sure that all the packing
materials are removed from the inside
of the door.
2. Check the oven for any damage, such
as misaligned or bent door, damaged
door seals and sealing surface,
broken or loose door hinges and
latches and dents inside the cavity or
on the door. If there is any damage,
do not operate the oven but contact
qualified service personnel.
3. This microwave oven must be placed
on a flat, stable surface to hold its
weight and the heaviest food likely to
be cooked in the oven.
4. Do not place the oven where heat,
moisture, or high humidity are
generated, or near combustible
materials.
5. For correct operation, the oven
must have sufficient airflow. Do not
cover or block any openings on the
appliance. Do not remove feet on
which oven stands.
6. Do not operate the oven without
glass tray, roller support, and shaft in
their proper positions.
7. Make sure that the power supply cord
is undamaged and does not run under
the oven or over any hot or sharp
surface.
8. The socket must be accessible so
that it can be easily unplugged in an
emergency.
Microwave Oven
Installation
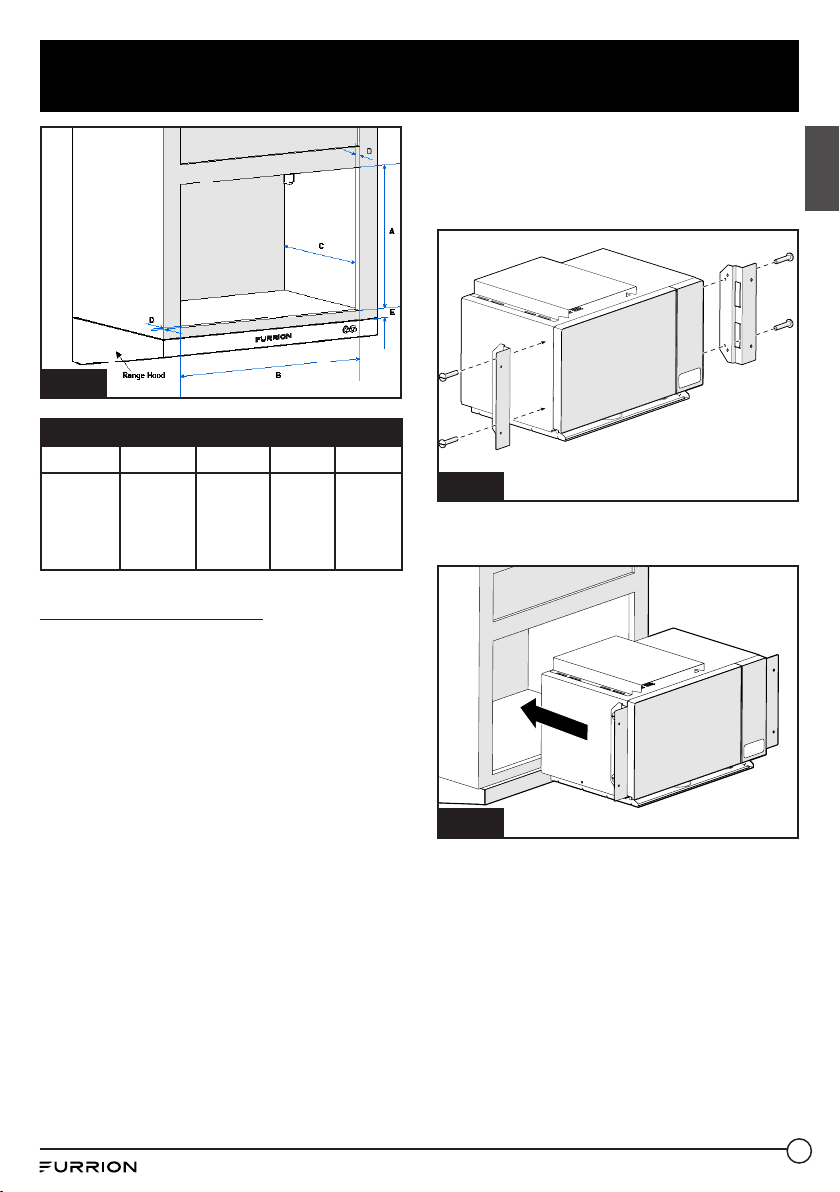
Cabinet Preparation
1. Select a suitable place that is not
susceptible to moisture.
2. Mark and cutout an opening in the
cabinet according to the dimensions
outlined in the table. (Fig. 1)
NOTE: If a range oven is installed
under the microwave oven, 1 inch
minimum clearance must be reserved
from the bottom of the microwave
oven to the top of the range oven,
refer to E dimension.
9
Page 11
Installation
Fig. 1
Dimensions
A B C D E
13⅜”
(339.7mm)
Min. to 13⅞”
(352.4mm)
Max.
19⁄”
(506.4mm)
Min. to
20¼”
(514.3mm)
Max.
13⅞”
(352.4mm)
Min.
½”
(12.7mm)
Min.
1”
(25.4mm)
Min.
Trim Kit Installation
NOTE: The Trim Kit is only included in
FMSM09-BL & FMSM09-MG models.
Please contact Furrion authorized dealer
to purchase it in case of need. (Trim Kit
part# is FMSM09-SS-TK or FMSM09BL-TK)
1. Take out the microwave oven and the
component(s) from box and put on a
flat surface.
2. Attach the left and right metal
brackets to the microwave oven
and fix with 4pcs of PMA screws
M4x12mm provided. (Fig. 2)
Fig. 2
3. Slide the microwave oven into the
cabinet opening. (Fig. 3)
Fig. 3
English
10
Page 12
Installation
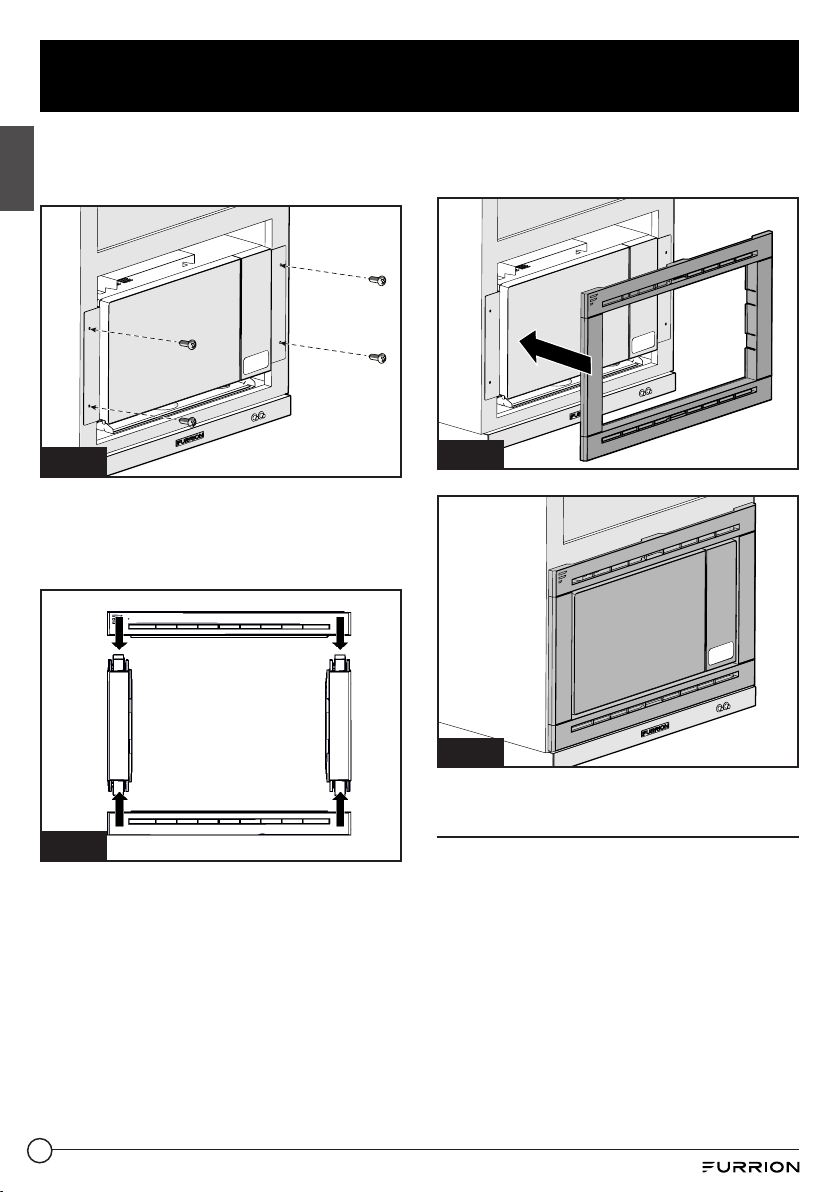
4. Fix the microwave into the cabinet
with 4pcs of KA screws M4x20mm
provided. (Fig. 4)
English
Fig. 4
5. Assemble the trim kit as shown in
(Fig. 5).
NOTE: DO NOT assemble reversed.
6. Install the assembled trim kit over the
microwave oven and push to lock into
place. (Fig. 6 and Fig. 7)
Fig. 6
Fig. 5
11
Fig. 7
Electrical Connection
Connect the microwave oven to a 120
volt, 60 Hz, AC only, 15 amp or 20 amp
dedicated circuit. It is recommended that
a separate circuit serving only the oven
be provided.
Page 13
Quick Cook Settings
The QUICK COOK settings allow you
to cook or reheat food automatically
without entering power level or time.
For smaller portions, simply touch the
applicable pad and START/STOP. For
larger portions, push the pad twice.
FROZEN DINNER, BAKED POTATO and
BEVERAGE allow you to cook multiple
amounts of the same food. Simply touch
pad once, and ENTER AMT appears in
the display. Enter the amount of servings
and start.
POPCORN
For a 3.5 oz. bag of microwave
popcorn:
1. Touch POPCORN once.
2. Touch START/STOP.
To change the preset POPCORN time:
1. Touch POPCORN twice. ENTER
TIME appears in display.
2. Touch number pads to enter desired
cooking time. Touch START/STOP.
NOTE: The longest time you can enter
is 99 minutes and 99 seconds. This new
setting will be set as the default one until
you reset it or next power on.
BAKED POTATO
For potatoes (4 ~6 oz. per entries):
1. Touch BAKED POTATO once.
2. Enter number of potatoes by
touching number pads from 1 to 4.
3. Touch START/STOP.
For the big potatoes (8~10oz. per
entries):
1. Touch BAKED POTATO twice.
2. Enter number of potatoes by
touching number pads from 1 to 4.
3. Touch START/STOP.
PIZZA
Reheating a slice of pizza:
1. Touch PIZZA once.
2. Touch START/STOP.
Heating a whole frozen pizza:
1. Touch PIZZA twice.
2. Touch START/STOP.
BEVERAGE
For cups (5 ~ 7 oz. one cup)
1. Touch BEVERAGE once.
2. Enter number of cups by touching
number pads from 1 to 4.
3. Touch START/STOP.
For more coffee (9~11 oz. one cup):
1. Touch BEVERAGE twice.
2. Enter number of mugs by touching
number pads from 1 to 4.
3. Touch START/STOP.
FROZEN DINNER
For one or two small (7~ 9 oz. per
share) frozen dinners:
1. Touch FROZEN DINNER once.
2. For 1 entree, touch the number pad
“1”. For 2 entrees, touch the number
pad “2”.
3. Touch START/STOP pad.
Microwaving bigger (10 ~ 12 oz. per
share) frozen dinner:
1. Touch FROZEN DINNER twice.
2. For 1 entree, touch the number pad
“1”. For 2 entrees, touch the number
pad “2”.
3. Touch START/STOP.
REHEAT
1. Touch REHEAT pad.
2. Touch START/STOP.
NOTE:
of chilled leftovers with good results.
This setting lets you reheat a plate
English
12
Page 14
Operation
SIGNALS DURING OVEN SETTINGS
ONE SIGNAL: Oven accepts the entry.
TWO SIGNALS: Oven does not accept
English
the entry, please check and try again.
After a cooking program has finished,
the oven will sound beeps with END
showing on screen, press any pad
or open oven door to clear it before
setting another function.
During cooking, if press START/STOP
pad once, the program will be paused,
press, and then press RESET pad, the
program will be canceled.
SETTING THE CLOCK
1. Touch CLOCK pad.
2. Use the number pads to enter the
correct time.
3. Touch CLOCK pad again.
NOTE: This is a 12 hour clock. When the
oven is first plugged in or power resumes,
the display will show ENTER CLOCK
TIME. If you prefer not to have the clock
displayed, touch RESET.
SETTING THE OVEN TIMER
1. Touch TIMER.
2. Enter the amount of time by touching
the number pads.
3. Touch START/STOP.
NOTE: The maximum countdown
time you can set is 99 minutes and 99
seconds.
● Time countdown can be seen in
display for 5 seconds before clock or
cooking time is returned to display.
● After the countdown time elapsed,
the buzzer will sound one beep.
● Touch TIMER and then touch RESET
to cancel TIMER during timing
process.
SETTING A COOKING
PROGRAM
A. One-stage cooking
1. Use the number pads to set a cooking
time. You can set a cooking time from
one second to 99 minutes and 99
seconds.
2. If you want to set a power level other
than 100%, touch POWER, and then
use the number pads to enter the
power level. During cooking you can
check the power level by touching
POWER pad.
3. Touch START/STOP to start cooking.
Use digit to set a cooking power level:
Number Pad Cooking Power
1,0 100%
9 90%
8 80%
7 70 %
6 60%
5 50%
4 40%
3 30%
2 20%
1 10%
0 0%
B. Two-stage cooking
Some cooking requires different stages
of cooking at different temperatures.
1. SET STAGE 1: Follow steps 1 and 2 in
“One-stage cooking”. Do not touch
START/STOP.
2. SET STAGE 2: Touch COOK then
enter proper cooking time and (lower)
power level. (Most 2-stage recipes
13
Page 15
Operation
use lower power for second stage.)
3. Touch START/STOP.
SPEED DEFROST
1. Touch SPEED DEFROST.
2. Enter desired defrosting time by
touching number pads. The longest
defrosting time is 99minutes and 99
seconds.
3. Touch START/STOP.
NOTES:
Half of defrosting, the system will
suspend and sound to remind users
to turn food over, after that, press
START/STOP to resubmit.
After setting SPEED DEFROST, oven
can be programmed to automatically
switch to one or two-stage cooking.
For speed defrost and one stage
cooking, follow steps above. Before
touching START/STOP, touch COOK,
enter time and power level and then
touch START/STOP.
For speed defrost and two stage
cooking, follow steps above. Before
touching START/STOP, touch COOK,
enter two-stage cooking programs
and then touch START/STOP to start.
COOK BY WEIGHT
1. Touch COOK BY WEIGHT.
2. Enter 1-3 single digital pad to select
food code.
3. Enter food weight.
4. Touch START/STOP.
Cook By Weight Code Description
NOTES:
● Meat must be defrosted at
refrigerated temperature.
● Weight must be in pounds and ounces.
● Ounce weights less than 10 must be
preceded by a 0. If label gives weight
in pounds only, change the fraction of
a pound to ounces using the following
chart.
Converting Fractions of a Pound to Ounces
Fractions of a
pound
Less than .03 0
.03 to .09 1
.10 to .15 2
.16 to .21 3
.22 to .27 4
.28 to .34 5
.35 to .40 6
.41 to .46 7
.47 to .53 8
.54 to 59 9
.60 to .65 10
.66 to .71 11
.72 to .78 12
.79 to .84 13
.85 to .90 14
.91 to .97 15
above .97 go to next even
Ounces
English
CODE TYPE MA X
WEIGHT
1 Beef 5 lb. 16 oz
2 Mutton 5 lb. 16 oz
3 Pork 4 lb. 0 oz
● During cooking, the system will
pause automatically and sound to
remind users to turn food over, after
that touch START/STOP to resume
cooking.
14
Page 16

Operation
DEFROST BY WEIGHT
1. Touch DEFROST BY WEIGHT pad.
English
2. Enter food weight by touching the
number pads.
3. Touch START/STOP pad.
NOTES:
● The maximum weight is 5lb.16oz.
● Weight must be in pounds and
ounces. Ounce weights less than 10
must be preceded by a 0. If label gives
weight in pounds only, change the
fraction of a pound to ounces using
the chart given above.
● During defrosting, the system will
sound to remind users to turn
meat over.
SETTING CHILD LOCK
The child lock prevents unsupervised
operation by children. Set the function in
standby mode.
To set: In standby mode, press and hold
RESET for 3 seconds. LOCK is indicated
on the display.
To cancel: press and hold RESET for 3
seconds. LOCK indication disappears.
KEY ADHESION PROTECTION
In any mode, if the membrane switch
closed for 60 seconds, the system will
stop to cook immediately, the oven will
return to waiting mode. Beep will sound
and ”FAIL” will display in the screen. The
beep will sound every one minute until
trouble shooting, press RESET pad to
return waiting mode.
15
Page 17

Cooking Techniques
Your microwave makes cooking easier
than conventional cooking, provided you
keep these considerations in mind:
STIRRING
Stir foods such as casseroles and
vegetables while cooking to distribute
heat evenly. Food at the outside of the
dish absorbs more energy and heats
more quickly, so stir from the outside to
the center. The oven will turn off when
you open the door to stir your food.
ARRANGEMENT
Arrange unevenly shaped foods, such
as chicken pieces or chops, with the
thicker, meatier parts toward the outside
of the turntable where they receive
more microwave energy. To prevent
overcooking, place delicate areas, such
as asparagus tips, toward the center of
the turntable.
SHIELDING
STANDING
Foods cooked in the microwave build
up internal heat and continue to cook
for a few minutes after heating stops.
Let foods stand to complete cooking,
especially foods such as cakes and
whole vegetables. Roasts need this
time to complete cooking in the center
without overcooking the outer areas. All
liquids, such as soup or hot chocolate,
should be shaken or stirred when
cooking is complete. Let liquids stand a
moment before serving. When heating
baby food, stir well at removal and test
the temperature before serving.
ADDING MOISTURE
Microwave energy is attracted to
water molecules. Food that is uneven
in moisture content should be covered
or allowed to stand so that the heat
disperses evenly. Add a small amount of
water to dry food to help it cook.
English
Shield food with narrow strips of
aluminum foil to prevent overcooking.
Areas that need shielding include poultry
wing tips, the ends of poultry legs, and
corners of square baking dishes. Use
only small amounts of aluminum foil.
Larger amounts can damage your oven.
TURNING
Turn foods over midway through cooking
to expose all parts to microwave energy.
This is especially important with large
foods such as roasts.
Utensils Guide
This section lists which utensils can
be used in the microwave, which ones
have limited use for short periods, and
which ones should not be used in the
microwave.
16
Page 18

Cooking Techniques
RECOMMENDED
Microwave browning dish — Use to
English
brown the exterior of small items such as
steaks, chops, or pancakes. Follow the
directions provided with your browning
dish.
Microwaveable plastic wrap — Use to
retain steam. Leave a small opening for
some steam to escape and avoid placing
it directly on the food.
Paper towels and napkins — Use for
short-term heating and covering; these
absorb excess moisture and prevent
spattering. Do not use recycled paper
towels, which may contain metal and
could ignite.
Glass and glass-ceramic bowls and
dishes — Use for heating or cooking.
Paper plates and cups — Use for shortterm heating at low temperatures. Do not
use recycled paper, which may contain
metal and could ignite.
Wax paper — Use as a cover to prevent
spattering.
Thermometers — Use only those
labeled “Microwave Safe” and follow all
directions. Check the food in several
places. Conventional thermometers may
be used on microwave food once the
food has been removed from the oven.
LIMITED USE
Aluminum foil — Use narrow strips of
foil to prevent overcooking of exposed
areas. Using too much foil can damage
your oven, so be careful. You should keep
distance of 1 inch (25.4mm) between
aluminum foil and cavity.
Ceramic, porcelain, and stoneware —
Use these if they are labeled “Microwave
Safe”. If they are not labeled, test them to
make sure they can be used safely.
Plastic — Use only if labeled “Microwave
Safe”. Other plastics can melt.
Not Recommended
Glass jars and bottles — Regular glass is too
thin to be used in a microwave. It can shatter and
cause damage and injury.
Paper bags — These are a fire hazard,
except for popcorn bags that are
designed for microwave use.
Styrofoam plates and cups — These can
melt and leave an unhealthy residue on
food.
Plastic storage and food containers
— Containers such as margarine tubs
can melt in the microwave.
Metal utensils — These can damage
your oven. Remove all metal before
cooking.
NOTE: Should you wish to check if a dish
is safe for microwaving, place the empty
dish in the oven and microwave on HIGH
for 30 seconds. A dish which becomes
very hot should not be used.
17
Page 19

Cleaning and Care
1. Turn off the oven and remove the
power plug from the wall socket
before cleaning.
2. Keep the inside of the oven clean.
When food splatters or spilled liquids
adhere to oven walls, wipe with a
damp cloth. Mild detergent may be
used if the oven gets very dirty. Avoid
the use of spray and other harsh
cleaners as they may stain, streak or
dull the door surface.
3. The outside surfaces should be
cleaned with a damp cloth. To prevent
damage to the operating parts inside
the oven, water should not be allowed
to seep into the ventilation openings.
4. Wipe the window on both sides with
a damp cloth to remove any spills
or spatters.
5. Do not allow the control panel to
become wet. Clean with a soft,
damp cloth. When cleaning the
control panel, leave oven door open
to prevent oven from accidentally
turning on.
6. If steam accumulates inside or
around the outside of the oven door,
wipe with a soft cloth. This may occur
when the microwave oven is operated
under high humidity conditions. In
such case, it is normal.
7. It is occasionally necessary to
remove the glass tray for cleaning.
Wash the tray in warm sudsy water or
in a dishwasher.
8. The roller ring and oven floor should
be cleaned regularly to avoid
excessive noise. Simply wipe the
bottom surface of the oven with
mild detergent. The roller ring may
be washed in mild sudsy water or
dishwasher. When removing the roller
ring from cavity floor for cleaning, be
sure to replace in the proper position.
9. Remove odors from your oven by
combining a cup of water with the
juice and skin of one lemon in a deep
microwaveable bowl, microwave for
5 minutes. Wipe thoroughly and dry
with a soft cloth.
10. When it becomes necessary to
replace the oven light, please consult
a dealer to have it replaced.
11. The oven should be cleaned regularly
and any food deposits removed.
Failure to maintain the oven in a clean
condition could lead to deterioration
of the surface that could adversely
affect the life of the appliance and
possibly result in
a hazardous situation.
12. Please do not dispose this appliance
into the domestic rubbish bin;
it should be disposed to the particular
disposal center provided by the
municipalities.
English
18
Page 20

Troubleshooting
IF THE OVEN FAILS TO OPERATE:
1. Check to ensure that the oven is plugged in securely. If it is not, remove the plug
from the outlet, wait 10 seconds, and plug it in again securely.
English
2. Check for a blown circuit fuse or a tripped main circuit breaker. If these seem to be
operating properly, test the outlet with another appliance.
3. Check to ensure that the control panel is programmed correctly and the timer is
set.
4. Check to ensure that the door is securely closed engaging the door safety lock
system. Otherwise, the microwave energy will not flow into the oven.
IF NONE OF THE ABOVE RECTIFIES THE SITUATION, THEN CONTACT A
QUALIFIED TECHNICIAN. DO NOT TRY TO ADJUST OR REPAIR THE OVEN
YOURSELF.
19
Page 21

Technical Specification
Technical Specification
English
Power Consumption:
Output:
Operation Frequency:
Outside Dimensions (W×H×D):
Oven Cavity Dimensions (W×H×D):
Oven Capacity:
Cooking Uniformity:
Net Weight:
120V/60Hz, 1350W (MICROWAVE)
900 W
2450 MHz
19⁄ x13⅝ x14⁄ inches
13⅜ × 8⁄ × 12⅝ inches
0.9 cu. ft.
Turntable System
Approx. 31.5 lbs.
20
Page 22

Bienvenue
Merci d'avoir acheté ce Furrion® 0,9 pi3 FOUR À MICRO-ONDES SOLO. Avant utiliser
votre nouvel appareil, veuillez lire ces consignes attentivement. Le présent guide
d’utilisation contient des informations permettant l’utilisation, l’installation et l’entretien
en toute sécurité de l’appareil.
Veuillez conserver le présent guide d’utilisation en lieu sûr pour vous y référer
ultérieurement, afin d’assurer votre sécurité et de réduire les risques de blessure.
Veuillez aussi remettre le présent manuel à tout nouveau propriétaire de cet appareil.
Français
Le fabricant décline toute responsabilité en cas de dommages dus au non-respect des
présentes consignes.
21
Page 23

Contenu
Bienvenue .......................................................................................21
Contenu ...........................................................................................22
Consignes de sécurité importantes .............................................23
Consignes générales de sécurité .....................................................................23
Instructions de mise à la terre ........................................................................... 25
Résidents de la Californie seulement ..............................................................26
Caractéristiques du produit ..........................................................27
Aperçu du fonctionnement ...........................................................28
Panneau de commande ...................................................................................... 28
Installation ......................................................................................29
Contenu de la boîte ............................................................................................. 29
Avant l’installation ............................................................................................... 29
Installation du four à micro-ondes ....................................................................29
Connexion électrique .........................................................................................31
Réglages de cuisson rapide ..........................................................32
Fonctionnement .............................................................................34
Techniques de cuisson ..................................................................38
Guide des ustensiles ........................................................................................... 38
Techniques de cuisson ..................................................................39
Nettoyage et entretien...................................................................40
Dépannage ......................................................................................41
Spécifications techniques ............................................................41
Français
22
Page 24

Consignes de sécurité importantes
PRÉCAUTIONS À PRENDRE POUR
ÉVITER UNE POSSIBLE EXPOSITION
EXCESSIVE À L’ÉNERGIE DES
MICRO-ONDES.
1. Ne tentez pas de faire fonctionner
ce four avec la porte ouverte, car
cela peut entraîner une exposition
Français
nocive à l’énergie des micro-ondes.
Il est important de ne pas déjouer ou
altérer les verrouillages de sécurité.
2. Ne placez aucun objet entre la face
avant du four et la porte et ne laissez
aucune saleté ou résidu de produit
de nettoyage s’accumuler sur les
surfaces d’étanchéité.
3. N’utilisez pas le four s’il est
endommagé. Il est particulièrement
important que la porte du four se
ferme correctement et qu’il n’y ait
aucun dommage à ces éléments: a.
Porte (pliée), b. Charnières et loquets
(brisés ou desserrés), c. Joints de
porte et surfaces d’étanchéité.
4. Le four ne doit pas être réglé ou
réparé par quelqu’un d’autre qu’un
personnel d’entretien qualifié.
Consignes générales
de sécurité
Lors de l’utilisation d’appareils
électriques, des précautions de sécurité
élémentaires doivent être respectées,
notamment:
AVERTISSEMENT - Pour réduire
le risque de brûlure, d’électrocution,
d’incendie, de blessure ou d’exposition
excessive à l’énergie des micro-ondes:
1. Lisez toutes les instructions avant
d’utiliser l’appareil.
2. Lisez et suivez les «PRÉCAUTIONS
À PRENDRE POUR ÉVITER
UNE POSSIBLE EXPOSITION
EXCESSIVE À L’ÉNERGIE DES
MICRO-ONDES» à la page23.
3. Cet appareil doit être mis à la terre.
Connectez-le uniquement à une prise
correctement mise à la terre. Voir la
section «INSTRUCTIONS DE MISE À
LA TERRE».
4. Installez ou placez ce four
uniquement en conformité aux
instructions d’installation fournies.
5. Ne pas faire fonctionner le four
lorsqu’il est vide.
6. Certains produits comme les œufs
entiers et les contenants scellés - par
exemple des bocaux de verre fermés
- peuvent exploser et ne devraient
pas être chauffés dans le four.
7. Utilisez cet appareil uniquement pour
l’utilisation prévue, comme décrite
dans ce manuel. N’utilisez pas de
produits chimiques (ou de vapeurs)
corrosifs dans cet appareil. Ce type
de four est spécialement conçu pour
chauffer, cuire ou sécher les aliments.
Il n’est pas conçu pour un usage
industriel ou de laboratoire.
8. Comme avec n’importe quel
électroménager, une surveillance
étroite est nécessaire lorsqu’il est
utilisé par des enfants.
9. Pour réduire le risque d’incendie dans
la cavité du four:
a. Ne pas trop cuire les aliments.
Surveillez attentivement l’appareil
lorsque du papier, du plastique ou
d’autres matériaux combustibles
sont placés à l’intérieur du four
pour faciliter la cuisson.
23
Page 25

Consignes de sécurité importantes
b. Retirez les attaches en fil
métallique des sacs en papier ou
en plastique avant de placer le sac
dans le four.
c. Si les aliments à l’intérieur du
four s’enflamment, maintenez la
porte du four fermée, éteignez
le four et débranchez le cordon
d’alimentation, ou coupez
l’alimentation au fusible ou au
panneau du disjoncteur.
d. N’utilisez pas la cavité du four
à des fins de rangement. Ne
laissez pas de produits de papier,
d’ustensiles de cuisine ou de
nourriture dans la cavité lorsque
vous n’utilisez pas le four.
10. Les liquides tels que l’eau, le café
ou le thé peuvent être surchauffés
au-delà du point d’ébullition sans
avoir l’air de bouillir en raison de la
tension de surface du liquide. Le
bouillonnement ou l’ébullition visible
lorsque le récipient est retiré du four
à micro-ondes n’est pas toujours
présent. CELA PEUT RÉSULTER EN
DES LIQUIDES TRÈS CHAUDS QUI
PEUVENT SE METTRE À BOUILLIR
ET À DÉBORDER SOUDAINEMENT
LORSQU’UNE CUILLÈRE OU UN
AUTRE USTENSILE EST INSÉRÉ
DANS LE LIQUIDE. Pour réduire le
risque de blessure à la personne:
a. Ne pas surchauffer le liquide.
b. Mélanger le liquide avant et à mi-
temps pendant le chauffage.
c. N’utilisez pas de contenants à
côtés droits avec un col étroit.
d. Après le chauffage, laisser reposer
le contenant dans le four à microondes pendant une courte période
avant de le retirer.
e. Soyez extrêmement prudent
lorsque vous insérez une cuillère
ou un autre ustensile dans
le contenant.
11. Ne chauffez pas l’huile ou la graisse
pour la friture. Il est difficile de
contrôler la température de l’huile
dans le four à micro-ondes.
12. Percez les aliments avec des pelures
épaisses comme les pommes de
terre, les courges entières, les
pommes et les châtaignes avant de
les faire cuire.
13. Le contenu des biberons et des
bocaux doit être agité ou secoué et
la température doit être vérifiée avant
de servir afin d’éviter les brûlures.
14. Les ustensiles de cuisine peuvent
devenir chauds à cause de la
chaleur transmise par les aliments
chauffés. Des maniques peuvent
être nécessaires pour manipuler
l’ustensile.
15. Ne pas couvrir ou bloquer les
ouvertures de l’appareil.
16. N’entreposez pas et n’utilisez pas cet
appareil à l’extérieur. N’utilisez pas
ce produit près de l’eau, par exemple
près d’un évier de cuisine, dans un
sous-sol humide, près d’une piscine
ou dans des endroits similaires.
17. N’utilisez pas cet appareil si la fiche
ou le cordon est endommagé, s’il ne
fonctionne pas correctement, ou s’il a
été endommagé ou est tombé.
18. Ne plongez pas le cordon ou la fiche
dans l’eau. Gardez le cordon loin de
la surface chauffée. Ne laissez pas le
cordon pendre par-dessus le bord de
la table ou du comptoir.
Français
24
Page 26

Consignes de sécurité importantes
19. Utilisez uniquement des
thermomètres spécialement conçus
pour les fours à micro-ondes.
20. N’utilisez aucun appareil de
chauffage ou de cuisson sous cet
appareil.
21. Assurez-vous que le plateau en verre
Français
et l’anneau à rouleaux sont en place
lorsque vous utilisez le four.
22. Cet appareil doit être réparé
uniquement par un technicien qualifié,
contactez le service après-vente
agréé le plus proche pour un examen,
une réparation ou un réglage.
23. Lorsque vous nettoyez les surfaces
de la porte et du four qui se touchent
lorsque vous fermez la porte, utilisez
uniquement des savons doux et non
abrasifs ou des détergents appliqués
avec une éponge ou un chiffon doux.
24. Cet équipement génère, utilise
et peut émettre de l’énergie
radiofréquence et, s’il n’est pas
installé et utilisé conformément
aux instructions, peut causer
des interférences nuisibles aux
communications radio. Cependant,
il n’y a aucune garantie que des
interférences ne se produiront pas
dans une installation particulière.
Si cet équipement cause des
interférences nuisibles à la réception
radio ou télévision, ce qui peut
être déterminé en éteignant et en
rallumant l’équipement, l’utilisateur
est encouragé à essayer de corriger
l’interférence par une ou plusieurs
des mesures suivantes:
- Réorienter ou déplacer l’antenne de
réception.
- Augmentez la distance entre
l’équipement et le récepteur.
25
- Connectez l’équipement dans une
prise sur un circuit différent de celui
auquel le récepteur est connecté.
- Consulter le revendeur ou un
technicien radio / TV expérimenté
pour obtenir de l’aide.
MISE EN GARDE
● REMARQUE: STIMULATEURS
CARDIAQUES
La plupart des stimulateurs
cardiaques sont protégés contre
les interférences provenant de
produits électroniques, y compris
les micro-ondes. Toutefois, les
patients porteurs d’un stimulateur
cardiaque sont invités à consulter
leur médecin en cas d’inquiétudes.
● Tout changement ou toute
modification non expressément
approuvé(e) par la partie
responsable de la conformité
est susceptible d’engendrer une
annulation du droit d’utilisation du
produit par l’utilisateur.
Instructions de mise à la
terre
Cet appareil doit être mis à la terre.
En cas de court-circuit électrique,
la mise à la terre réduit le risque de
décharge électrique en fournissant
un fil d’échappement pour le courant
électrique.
AVERTISSEMENT - Une mauvaise
utilisation de la fiche de mise à la terre
peut entraîner un risque de
décharge électrique.
1) S’il est nécessaire d’utiliser une
Page 27

Consignes de sécurité importantes
rallonge, utilisez uniquement une
rallonge à trois fils munie d’une fiche
à trois broches avec mise à la terre et
une prise à trois fentes acceptant la
fiche de l’appareil. La cote marquée
de la rallonge doit être égale ou
supérieure à la capacité électrique
nominale de l’appareil, ou
2) N’utilisez pas de rallonge. Si le
cordon d’alimentation est trop court,
demandez à un électricien ou à un
technicien qualifié d’installer une prise
près de l’appareil.
Exigences électriques
Les exigences électriques sont un
circuit dédié de 120volts, 60 Hz, ca
seulement, 15ampères ou 20ampères.
Il est recommandé de prévoir un circuit
séparé desservant uniquement le four.
Le four est équipé d’une prise de terre à
3broches. Elle doit être branchée dans
une prise correctement installée et mise
à la terre.
Cordon d’alimentation
1. Un cordon d’alimentation court
est fourni pour réduire les risques
résultant d’un enchevêtrement ou
d’un trébuchement sur un cordon
plus long.
2. Des cordons plus longs ou des
rallonges sont disponibles et peuvent
être utilisés si des précautions sont
prises lors de leur utilisation.
3. Si un long cordon ou une rallonge
est utilisé:
a) La cote électrique marquée du
cordon ou de la rallonge doit
être au moins aussi élevée que la
capacité électrique nominale
de l’appareil.
b) La rallonge doit être un cordon à
trois fils de type mise à la terre. Le
cordon le plus long doit être placé
de manière à ne pas s’étendre sur
le comptoir ou sur la table où des
enfants pourraient tirer dessus ou
trébucher involontairement.
REMARQUES:
Si vous avez des questions
concernant la mise à la terre ou les
instructions électriques, consultez un
électricien qualifié ou un technicien
qualifié.
Ni le fabricant ni le revendeur ne
peuvent être tenus responsables des
dommages au four ou des blessures
résultant du non-respect des
procédures de connexion électrique.
Interférence radio ou TV
En cas d’interférence du four microondes avec votre radio ou téléviseur,
vérifiez que le four à micro-ondes est
sur un circuit différent; déplacez la radio
ou le téléviseur le plus loin possible du
four ou vérifiez la position et le signal de
l’antenne réceptrice.
Résidents de la Californie
seulement
MISE EN GARDE
Cancer et effets nocifs sur la
reproduction - www.P65Warnings.ca.gov
CONSERVEZ CES
INSTRUCTIONS
Français
26
Page 28

Caractéristiques du produit
Français
Article Description
Système de verrouillage de
1
sécurité de la porte
2
Fenêtre du four
3
Anneau à rouleaux
4
Axe
5
Plateau en verre
27
Article Description
Bouton d’ouverture de
6
la porte
7
Panneau de commande
Guide d’ondes (veuillez ne
8
pas retirer la plaque de mica
couvrant le guide d’ondes)
Page 29

Aperçu du fonctionnement
Panneau de commande
PAVÉ NUMÉRIQUE (0-9)
Touchez pour régler l’heure ou le poids
HORLOGE
Utilisez pour régler l’heure du jour.
RÉINITIALISER
Permet d’effacer tous les réglages
précédents ou de définir le verrouillage
parental.
PUISSANCE
Permet de régler le niveau de puissance
ou de vérifier le niveau de puissance
pendant la cuisson.
CUISINER
Utilisez pour la cuisson en plusieurs
étapes. Cette fonction permet la cuisson
à plusieurs réglages de puissance et de
temps automatiquement.
MINUTERIE
La minuterie fonctionne
indépendamment, même pendant qu’un
programme de cuisson est en cours..
Français
AFFICHAGE
Le temps de cuisson, la puissance, les indicateurs
et l’heure actuelle sont achés.
BOUTONS DE CUISSON RAPIDE
Réglages instantanés pour cuire des
aliments populaires
DÉCONGÉLATION PAR POIDS
Décongélation programmée en fonction
du poids des aliments à décongeler.
DÉCONGÉLATION RAPIDE
DÉCONGÉLATION RAPIDE en fonction
du temps que vous entrez.
CUIRE AU POIDS
Cuisson programmée en fonction du
poids des aliments à cuire.
DÉMARRER/ARRÊTER
Touchez pour démarrer ou arrêter
la cuisson.
28
Page 30

Installation
Contenu de la boîte
Assurez-vous que tous les articles
suivants sont inclus dans l’emballage. Si
un article est endommagé ou manquant,
contactez votre revendeur.
Français
● Corps du four à micro-ondes
● Plateau en verre x1
● Anneau de roulement pour plateau en
verre x2
● Manuel d’instructions
● Dépliant de garantie
● Trousse de finition *
– Bande longue x 2
– Bande courte x 2
– Vis de montage x 8
- Vis PMA M4x12mm x4
- Vis KA M4x20mm x4
– Support métallique x 2
* Pour les modèles FMSM09-BL et
FMSM09-MG uniquement.
Avant l’installation
1. Assurez-vous que tous les matériaux
d’emballage sont retirés de l’intérieur
de la porte.
2. Vérifiez le four pour tout dommage,
tel qu’une porte mal alignée ou pliée,
des joints de porte et une surface
d’étanchéité endommagés, des
charnières et des loquets de porte
cassés ou desserrés et des bosses
dans la cavité ou sur la porte. En cas
de dommage, n’utilisez pas le four et
contactez un technicien qualifié.
3. Ce four à micro-ondes doit être placé
sur une surface plane et stable pour
supporter son poids et les aliments
les plus lourds susceptibles d’être
29
cuits dans le four.
4. Ne placez pas le four dans un endroit
où de la chaleur ou de l’humidité
excessive sont générés, ou à
proximité de matériaux combustibles.
5. Pour un fonctionnement adéquat,
le four doit bénéficier d’un débit d’air
suffisant. Ne pas couvrir ou bloquer
les ouvertures de l’appareil. Ne pas
retirer les pieds sur lesquels se trouve
le four.
6. Ne faites pas fonctionner le four sans
le plateau en verre, le support
à rouleaux et l’axe dans leur
position appropriée.
7. Assurez-vous que le cordon
d’alimentation n’est pas endommagé
et qu’il ne passe pas sous le four
ou sur une surface chaude ou
tranchante.
8. La prise doit être facilement
accessible pour pouvoir facilement
débrancher la fiche en cas d’urgence.
Installation du four
à micro-ondes
Préparation de l’armoire
1. 1Choisissez un endroit approprié qui
n’est pas exposé à l’humidité.
2. Marquez et découpez une ouverture
dans l’armoire selon les dimensions
indiquées dans le tableau. (Fig. 1)
REMARQUE: Si une hotte de cuisine
est installée sous le four à microondes, un dégagement minimum
de 1 pouce doit être réservé du bas
du four à micro-ondes au-dessus
de la hotte de cuisine, se référer à la
dimension E.
Page 31

Installation
Français
Fig. 1
Hotte
Dimensions
A B C D E
13⅜”
(339.7mm)
Min. to
13⅞”
(352.4mm)
Max.
19⁄”
(506.4mm)
Min. to
20¼”
(514.3mm)
Max.
13⅞”
(352.4mm)
Min.
½”
(12.7mm)
Min.
1”
(25.4mm)
Min.
Installation de la trousse de finition
REMARQUE: La trousse de finition est
uniquement incluse dans les modèles
FMSM09-BL et FMSM09-MG. Veuillez
contacter le revendeur agréé Furrion
pour l’acheter en cas de besoin. (Le
numéro de pièce de la trousse de finition
est FMSM09-SS-TK ou FMSM09-BLTK).
1. Sortez le four à micro-ondes et les
composants de la boîte et posez-les
sur une surface plane.
2. Fixez les supports métalliques
gauche et droit sur le micro-ondes
à l’aide des 4vis PMA M4x12mm
fournies avec le four. (Fig.2)
Fig. 2
3. Faites glisser le four à micro-ondes
dans l’ouverture de l’armoire. (Fig. 3)
Fig. 3
4. Fixez le micro-ondes dans le meuble
de rangement à l’aide des 4vis KA
M4x20mm fournies avec le four.
(Fig.4)
Fig. 4
30
Page 32

Installation
5. Assemblez la trousse de finition
comme indiqué dans (Fig. 5).
REMARQUE: NE PAS assembler de
manière inversée.
Français
Fig. 7
Connexion électrique
Fig. 5
6. Installez la trousse de garniture
montée sur le four à micro-ondes et
pressez pour la verrouiller en place.
(Fig. 6 et Fig. 7)
Fig. 6
Connectez le four à micro-ondes à un
circuit dédié de 120volts, 60 Hz, CA
seulement, 15ampères ou 20ampères.
Il est recommandé de prévoir un circuit
séparé desservant uniquement le four.
31
Page 33

Réglages de cuisson rapide
Les réglages de CUISSON RAPIDE vous
permettent de cuire ou de réchauffer des
aliments automatiquement sans entrer le
niveau de puissance ou l’heure. Pour les
portions plus petites, il suffit de toucher
la touche correspondante et START/
STOP (DÉMARRER/ARRÊTER). Pour les
portions plus grandes, appuyez deux fois
sur la touche. FROZEN DINNER (REPAS
CONGELÉ), BAKED POTATO (POMME
DE TERRE AU FOUR) et BEVERAGE
(BOISSON) vous permettent de faire
cuire plusieurs quantités de la même
nourriture. Appuyez simplement une fois
sur la touche et ENTER AMT (ENTRER
QUANTITÉ) apparaît sur l’affichage.
Entrez la quantité de portions et
démarrez.
MAÏS SOUFFLÉ
Pour un sac de 3,5 oz de maïs soufflé
au micro-ondes:
1. Touchez POPCORN (MAÏS
SOUFFLÉ) une fois.
2. Appuyez sur START/STOP
(DÉMARRER/ARRÊTER).
Pour changer le temps POPCORN
préréglé:
1. Touchez POPCORN (MAÏS
SOUFFLÉ) deux fois. ENTER TIME
(ENTRER TEMPS) apparaît sur
l’affichage.
2. Appuyez sur les touches numériques
pour entrer le temps de cuisson
désiré. Appuyez sur START/STOP
(DÉMARRER/ARRÊTER).
REMARQUE: Le temps le plus long que
vous pouvez entrer est de 99minutes et
99secondes. Ce nouveau réglage sera
défini par défaut jusqu’à ce que vous le
réinitialisiez ou jusqu’à la nouvelle mise
en fonction.
POMME DE TERRE AU FOUR
Pour les pommes de terre (4 ~ 6onces
par entrée):
1. Appuyez sur BAKED POTATO
(POMME DE TERRE AU FOUR) une
fois.
2. Entrez le nombre de pommes de
terre en appuyant sur les touches
numériques de 1 à 4.
3. Appuyez sur START/STOP
(DÉMARRER/ARRÊTER).
Pour les grosses pommes de terre
(8 ~ 10 oz par entrée):
1. Touchez BAKED POTATO (POMME
DE TERRE AU FOUR) deux fois.
2. Entrez le nombre de pommes de
terre en appuyant sur les touches
numériques de 1 à 4.
3. Appuyez sur START/STOP
(DÉMARRER/ARRÊTER).
PIZZA
Réchauffer une pointe de pizza:
1. Touchez PIZZA une fois.
2. Appuyez sur START/STOP
(DÉMARRER/ARRÊTER).
Chauffer une pizza congelée entière:
1. Touchez PIZZA deux fois.
2. Appuyez sur START/STOP
(DÉMARRER/ARRÊTER).
Français
32
Page 34

Réglages de cuisson rapide
BOISSON
Pour les tasses (tasse de 5 ~ 7 oz)
1. Touchez BEVERAGE (BOISSON)
une fois.
2. Entrez le nombre de tasses en
appuyant sur les touches numériques
Français
de 1 à 4.
3. Appuyez sur START/STOP
(DÉMARRER/ARRÊTER).
Pour plus de café (tasse de 9 ~
11onces):
1. Touchez BEVERAGE (BOISSON)
deux fois.
2. Entrez le nombre de grosses tasses
en touchant les touches numériques
de 1 à 4.
3. Appuyez sur START/STOP
(DÉMARRER/ARRÊTER).
REPAS CONGELÉ
Pour un ou deux petits repas
congelés (7 ~ 9 oz par portion):
1. Appuyez une fois sur FROZEN
DINNER (REPAS CONGELÉ).
2. Pour 1 entrée, appuyez sur la touche
numérique «1». “1”. Pour 2 entrées,
appuyez sur la touche numérique
«2».
3. Appuyez sur la touche START/STOP
(DÉMARRER/ARRÊTER).
Cuisson au micro-ondes d’un repas congelé
plus gros (10 ~ 12 oz par portion):
1. Appuyez deux fois sur FROZEN
DINNER (REPAS CONGELÉ).
2. Pour 1 entrée, appuyez sur la touche
numérique «1». “1”. Pour 2 entrées,
appuyez sur la touche numérique
«2».
3. Appuyez sur START/STO P
(DÉMARRER/ARRÊTER).
RÉCHAUFFER
1. Appuyez sur la touche REHEAT
(RÉCHAUFFER).
2. Appuyez sur START/STOP
(DÉMARRER/ARRÊTER).
REMARQUE: Ce réglage vous permet
de réchauffer une assiette de restes
réfrigérés avec de bons résultats.
33
Page 35

Fonctionnement
SIGNAUX PENDANT LES RÉGLAGES
DU FOUR
UN SIGNAL: Le four accepte l’entrée.
DEUX SIGNAUX: Le four n’accepte pas
l’entrée. Veuillez vérifier et réessayer.
● Une fois le programme de cuisson
terminé, le four émet un signal sonore
et END (FIN) s’affiche; appuyez sur
n’importe quelle touche ou ouvrez la
porte du four pour quitter le réglage
avant de régler une autre fonction.
● Pendant la cuisson, si vous appuyez
une fois sur la touche START/STOP
(DÉMARRER/ARRÊTER),
le programme sera mis en pause,
appuyez, puis appuyez sur la touche
RESET (RÉINITIALISER) et le
programme sera annulé.
RÉGLAGE DE L’HORLOGE
1. Appuyez sur la touche CLOCK
(HORLOGE).
2. Utilisez les touches numériques pour
entrer la bonne heure.
3. Appuyez de nouveau sur la touche
CLOCK.
REMARQUE: Il s’agit d’une horloge de
12heures. Lorsque le four est branché
pour la première fois ou que le courant
est rétabli, l’afficheur indique ENTER
CLOCK TIME (ENTRER L’HEURE). Si
vous préférez ne pas afficher l’horloge,
appuyez sur RESET (RÉINITIALISER).
RÉGLAGE DE LA MINUTERIE
DU FOUR
1. Appuyez sur TIMER (MINUTERIE).
2. Entrez la durée en appuyant sur les
touches numériques.
3. Appuyez sur START/STOP
(DÉMARRER/ARRÊTER).
REMARQUE: Le compte à rebours
maximal que vous pouvez définir est de
99minutes et 99secondes.
● Le compte à rebours peut être
visualisé pendant 5secondes avant
que l’heure ou le temps de cuisson ne
revienne à l’affichage.
● Une fois le compte à rebours écoulé,
l’avertisseur sonore émet un bip.
● Appuyez sur TIMER (MINUTERIE),
puis sur RESET (RÉINITIALISER)
pour annuler la minuterie pendant le
processus de
RÉGLAGE D’UN PROGRAMME
DE CUISSON
A. Cuisson en une étape
1. Utilisez les touches numériques pour
définir un temps de cuisson. Vous
pouvez régler un temps de cuisson
d’une seconde à 99minutes et
99secondes.
2. Si vous souhaitez définir un niveau de
puissance autre que 100 %, appuyez
sur POWER (PUISSANCE), puis utilisez
les touches numériques pour entrer
le niveau de puissance. Pendant la
cuisson, vous pouvez vérifier le niveau
de puissance en touchant la touche
POWER.
3. Appuyer sur START/STOP
(DÉMARRER/ARRÊTER) pour
commencer la cuisson. Utilisez les
chiffres pour définir un niveau de
puissance de cuisson:
Utilisez digit pour définir un niveau de
puissance de cuisson:
Français
34
Page 36

Fonctionnement
Touche
numérique
1,0 100%
9 90%
8 80%
Français
B. Cuisson en deux étapes
Certaines cuissons nécessitent
différentes étapes de cuisson à
différentes températures.
1. DÉFINIR L’ÉTAPE1: Suivez les
2. DÉFINIR L’ÉTAPE2: Appuyez sur
3. Appuyez sur START/STOP
7 70 %
6 60%
5 50%
4 40%
3 30%
2 20%
1 10%
0 0%
étapes1 et 2 de «Cuisson en une
étape». Ne touchez pas START/
STOP (DÉMARRER/ARRÊTER).
COOK (CUISSON) puis entrez le
temps de cuisson approprié et le
niveau de puissance (inférieur). (La
plupart des recettes en 2étapes
utilisent moins de puissance pour la
deuxième étape.)
(DÉMARRER/ARRÊTER).
Puissance de
cuisson
DÉCONGÉLATION RAPIDE
1. Appuyez sur SPEED DEFROST
(DÉCONGÉLATION RAPIDE).
2. Entrez le temps de décongélation
souhaité en touchant les touches
numériques. Le temps de
décongélation le plus long est de
99minutes et 99secondes.
3. Appuyez sur START/STOP
(DÉMARRER/ARRÊTER).
REMARQUES:
● À la mi-temps de la décongélation,
le système suspend le processus et
émet un signal sonore pour rappeler à
l’utilisateur de retourner la nourriture,
après quoi, appuyez sur START/
STOP (DÉMARRER/ARRÊTER) pour
reprendre le processus.
● Après le réglage de la fonction SPEED
DEFROST (DÉCONGÉLATION RAPIDE),
le four peut être programmé pour passer
automatiquement à la cuisson en une ou
deux étapes.
● Pour la décongélation rapide et la
cuisson en une étape, suivez les
étapes ci-dessus. Avant de toucher
START/STOP (DÉMARRER/
ARRÊTER), appuyez sur COOK
(CUISSON), entrez le temps et le
niveau de puissance, puis appuyez
sur START/STOP (DÉMARRER/
ARRÊTER).
● Pour la décongélation rapide
et la cuisson en deux étapes,
suivez les étapes ci-dessus.
Avant de toucher START/STOP
(DÉMARRER/ARRÊTER), touchez
COOK (CUISSON), entrez dans les
programmes de cuisson en deux
étapes, puis appuyez sur START/
STOP (DÉMARRER/ARRÊTER) pour
démarrer.
35
Page 37

Fonctionnement
CUIRE AU POIDS
1. Appuyez sur COOK BY WEIGHT
(CUIRE AU POIDS)
2. Entrez une des touches numériques
1 à 3 pour sélectionner le code de la
nourriture.
3. Entrez le poids de la nourriture.
4. Appuyez sur START/STOP
(DÉMARRER/ARRÊTER).
Description des codes de cuisson au
poids
CODE
1 Bœuf 5 lb. 16 oz
2
3 Porc 4 lb. 0 oz
REMARQUES:
● La viande doit être décongelée à
température réfrigérée.
● Le poids doit être en livres et en onces.
● Les poids en onces inférieurs à 10
doivent être précédés d’un 0. Si
l’étiquette indique le poids en livres
seulement, changez la fraction d’une
livre en onces en utilisant le tableau
suivant.
TYPE POIDS MAXIMUM
Viande
de
mouton
5 lb. 16 oz
Conversion des fractions d’une livre
en onces
Fractions d’une
livre
Moins de 0,03 0
.03 to .09 1
.10 to .15 2
.16 to .21 3
.22 to .27 4
.28 to .34 5
.35 to .40 6
.41 to .46 7
.47 to .53 8
.54 to 59 9
.60 to .65 10
.66 to .71 11
.72 to .78 12
.79 to .84 13
.85 to .90 14
.91 to .97 15
ci-dessus. 97
● Pendant la cuisson, le système se
met automatiquement en pause et
émet un signal sonore pour rappelez à
l’utilisateur de retourner les aliments,
puis d’appuyer sur START/STOP
(DÉMARRER/ARRÊTER) pour
reprendre la cuisson.
Onces
aller au prochain
chiffre rond
Français
36
Page 38

Fonctionnement
DÉCONGÉLATION PAR POIDS
1. Appuyez sur la touche DEFROST BY
WEIGHT (DÉCONGÉLATION PAR
POIDS).
2. Entrez le poids de la nourriture
en appuyant sur les touches
Français
numériques.
3. Appuyez sur la touche START/STOP
(DÉMARRER/ARRÊTER).
REMARQUES:
● Le poids maximum est de 5lb et 16oz.
● Le poids doit être en livres et en
onces. Les poids en onces inférieurs
à 10 doivent être précédés d’un 0. Si
l’étiquette donne le poids en livres
seulement, changez la fraction d’une
livre en onces en utilisant le tableau
ci-dessus.
● Pendant la décongélation, le système
émet un signal sonore pour rappeler à
l’utilisateur de retourner la viande.
RÉGLAGE DU VERROUILLAGE
PARENTAL
PROTECTION CONTRE
L’ADHÉRENCE DES TOUCHES
Dans n’importe quel mode, si
l’interrupteur à membrane est fermé
pendant 60secondes, le système
arrêtera immédiatement la cuisson et
le four retournera en mode attente. Un
bip retentira et «FAIL» (DÉFAILLANCE)
s’affichera à l’écran. Le bip retentira
toutes les minutes jusqu’à la résolution
du problème; appuyez sur la touche
RESET (RÉINITIALISER) pour revenir au
mode attente.
Le verrouillage parental empêche
l’utilisation non supervisée par des
enfants. Réglez la fonction en mode
veille.
Pour régler: En mode veille, maintenez
la touche RESET (RÉINITIALISATION)
enfoncée pendant 3secondes. LOCK
(VERROUILLAGE) apparaît sur
l’affichage.
Pour annuler: Maintenez la touche RESET
enfoncée pendant 3secondes. L’indication
LOCK (VERROUILLAGE) disparaît.
37
Page 39

Techniques de cuisson
Votre micro-ondes facilite la cuisson par
rapport à la cuisson conventionnelle, à
condition de garder ces considérations à
l’esprit:
MÉLANGER
Mélanger les aliments comme les
casseroles et les légumes pendant
la cuisson pour répartir la chaleur
uniformément. La nourriture sur
l’extérieur du plat absorbe plus d’énergie
et chauffe plus rapidement, alors remuez
de l’extérieur au centre. Le four s’éteint
lorsque vous ouvrez la porte pour remuer
votre nourriture.
DISPOSITION
Disposez les aliments de forme inégale,
comme les morceaux de poulet ou le
saumon, avec les parties plus épaisses
ou plus charnues vers l’extérieur de la
plaque tournante où ils reçoivent plus
d’énergie micro-ondes. Pour éviter la
surcuisson, placez les zones délicates,
comme les pointes d’asperges, vers le
centre de la plaque tournante.
PROTECTION
Protéger les aliments avec des bandes
étroites de papier d’aluminium pour éviter
une cuisson excessive. Les zones qui
ont besoin de protection comprennent
les extrémités des ailes de volaille, les
extrémités des pattes de volaille et
les coins des plats de cuisson carrés.
Utilisez seulement de petites quantités
de papier d’aluminium. Des quantités plus
importantes peuvent endommager votre
four.
RETOURNER
Retournez les aliments à la mi-cuisson
pour exposer toutes les pièces à l’énergie
micro-ondes. Cela est particulièrement
important pour les gros aliments tels que
les rôtis.
REPOS
Les aliments cuits au micro-ondes
accumulent la chaleur interne et
continuent de cuire quelques minutes
après l’arrêt du chauffage. Laisser les
aliments reposer jusqu’à la fin de la
cuisson, en particulier les aliments tels
que les gâteaux et les légumes entiers.
Les rôtis ont besoin de ce temps pour
terminer la cuisson au centre
sans que les zones extérieures soient
trop cuites. Tous les liquides, tels que la
soupe ou le chocolat chaud, doivent être
brassés ou mélangés lorsque la cuisson
est terminée. Laisser reposer les liquides
un moment avant de servir. Lorsque vous
faites chauffer des aliments pour bébés,
mélangez-les bien après les avoir retirés
et vérifiez la température avant de servir.
AJOUT D’HUMIDITÉ
L’énergie micro-ondes est attirée par
les molécules d’eau. Les aliments dont
la teneur en eau est inégale doivent être
couverts ou laissés au repos afin que
la chaleur se disperse uniformément.
Ajouter une petite quantité d’eau aux
aliments secs pour les aider à cuire.
Guide des ustensiles
Cette section énumère les ustensiles
qui peuvent être utilisés dans le microondes, ceux qui ont une utilisation limitée
pendant de courtes périodes,
et ceux qui ne devraient pas être utilisés
dans le micro-ondes.
RECOMMANDÉS
Plat à dorer au micro-ondes —
Ut il is ez- le po ur do rer l’extérieur de petits
articles tels que des steaks, des côtelettes ou
Français
38
Page 40

Techniques de cuisson
des crêpes. Suivez les instructions fournies
avec votre plat à dorer.
Enveloppe de plastique pour microondes — Utilisez-la pour
retenir la vapeur. Laissez une petite
ouverture pour que de la vapeur
s’échappe et évitez de la placer
Français
directement sur la nourriture.
Essuie-tout et serviettes en
papier — Utilisez-les pour chauffer
et couvrir à court terme; ils absorbent
l’excès d’humidité et empêchent
les éclaboussures. N’utilisez pas
de serviettes en papier recyclé, qui
peuvent contenir du métal et pourraient
s’enflammer.
Bols et plats en verre et en
vitrocéramique — Utilisez-les pour
chauffer ou cuire.
Assiettes et gobelets en papier — À
utiliser pour le chauffage à court terme
à basse température. N’utilisez pas de
papier recyclé, qui pourrait contenir du
métal et pourrait s’enflammer.
Papier ciré — Utiliser-le comme
couvercle pour éviter les éclaboussures.
Thermomètres — Utilisez uniquement
ceux étiquetés «Va au micro-ondes»
(ou «Microwave Safe») et suivez toutes
les instructions. Vérifiez la nourriture à
plusieurs endroits. Les thermomètres
conventionnels peuvent être utilisés sur
les aliments au micro-ondes une fois que
les aliments ont été retirés du four.
UTILISATION LIMITÉE
Feuille d’aluminium — Utilisez des
bandes étroites de papier d’aluminium
pour éviter la surchauffe des zones
exposées. Utiliser trop de papier
d’aluminium peut endommager votre four,
alors faites attention. Vous devriez garder
une distance de 1 pouce (25,4 mm) entre
la feuille d’aluminium et la cavité.
Céramique, porcelaine et grès —
Utilisez-les s’ils sont étiquetés «Va au
micro-ondes» (ou «Microwave Safe»).
S’ils ne sont pas étiquetés, testez-les
pour vous assurer qu’ils peuvent être
utilisés en toute sécurité. Plastique
— Utilisez le plastique seulement s’il
est étiqueté «Va au micro-ondes» (ou
«Microwave
Save»). D’autres plastiques peuvent
fondre.
Non recommandés
Bocaux en verre et bouteilles — Le
verre ordinaire est trop mince pour être
utilisé dans un micro-ondes. Il peut se
briser et causer des dommages et des
blessures.
Sacs en papier — Ils représentent un
risque d’incendie, à l’exception des sacs
de maïs soufflé conçus pour être utilisés
au micro-ondes. Assiettes et tasses en
polystyrène — Elles peuvent fondre et
laisser un résidu malsain sur la nourriture.
Contenants en plastique et
contenants alimentaires — Les
contenants tels que les pots de
margarine peuvent fondre dans le microondes.
Ustensiles en métal — Il peuvent
endommager votre four. Enlever tout
article en métal avant la cuisson.
REMARQUE: Si vous souhaitez vérifier
si un plat est sûr pour le micro-ondes,
placez le plat vide dans le four et microondes sur HIGH (puissance élevée)
pendant 30secondes. Un plat qui devient
très chaud ne doit pas être utilisé.
39
Page 41

Nettoyage et entretien
1. Éteignez le four et débranchez le
cordon d’alimentation de la prise
murale avant le nettoyage.
2. Gardez l’intérieur du four propre.
Lorsque des éclaboussures de
nourriture ou de liquides renversés
adhèrent aux parois du four,
essuyez-les avec un linge humide. Un
détergent doux peut être utilisé si le
four est très sale. Évitez l’utilisation de
vaporisateur et d’autres nettoyants
agressifs, car ils peuvent tacher, strier
ou émousser la surface de
la porte.
3. Les surfaces extérieures doivent être
nettoyées avec un chiffon humide.
Pour éviter d’endommager les pièces
de fonctionnement à l’intérieur du
four, l’eau ne doit pas s’infiltrer dans
les ouvertures de ventilation.
4. Essuyez la fenêtre des deux côtés
avec un chiffon humide pour
enlever les déversements ou les
éclaboussures.
5. Ne laissez pas le panneau de
commande devenir trempé. Nettoyez
avec un chiffon humide doux.
Lorsque vous nettoyez le panneau de
commande, laissez la porte du four
ouverte pour empêcher le four de
s’allumer accidentellement.
6. Si de la vapeur s’accumule à
l’intérieur ou autour de l’extérieur de
la porte du four, essuyez-la avec un
chiffon doux. Cela peut se produire
lorsque le four à micro-ondes est
utilisé dans des conditions d’humidité
élevée. Dans ce cas, c’est normal.
7. Il est parfois nécessaire de retirer
le plateau en verre pour le nettoyer.
Lavez le plateau tournant dans de
l’eau chaude savonneuse ou dans un
lave-vaisselle.
8. L’anneau à rouleaux et le fond du
four doivent être nettoyés régulièrement
pour éviter les bruits excessifs. Essuyez
simplement la surface inférieure du four avec
un détergent doux. L’anneau à rouleaux peut
être lavé dans de l’eau savonneuse douce
ou au lave-vaiss elle. Lorsque vous retirez
l’anneau à rouleaux du fond de la cavité pour
le nettoyer, assurez-vous de le replacer dans
la bonne position.
9. Enlever les odeurs de votre four en
combinant une tasse d’eau avec le
jus et la pelure d’un citron dans un
bol profond allant au micro-ondes
et mettez le four en marche pendant
5minutes. Essuyez à fond et séchez
avec un chiffon doux.
10. Lorsqu’il devient nécessaire de
remplacer la lumière du four,
veuillez consulter un revendeur
pour la faire remplacer.
11. Le four doit être nettoyé
régulièrement et tous les dépôts de
nourriture doivent être éliminés. Le
fait de ne pas maintenir le four propre
pourrait entraîner une détérioration
de la surface qui pourrait nuire à la
durée de vie de l’appareil et entraîner
une situation dangereuse.
12. Veuillez ne pas jeter cet appareil dans
une poubelle domestique. il doit être
acheminé au centre d’élimination
propre à chaque municipalité.
Français
40
Page 42

Dépannage
SI LE FOUR NE FONCTIONNE PAS:
1. Vérifiez que le four est bien branché. Si ce n’est pas le cas, retirez la fiche de la
prise, attendez 10secondes et rebranchez-la fermement.
2. Vérifiez s’il n’y a pas de fusible de circuit grillé ou un disjoncteur principal
déclenché. Si ces derniers semblent fonctionner correctement, testez la prise avec
un autre appareil.
Français
3. Vérifiez que le panneau de commande est correctement programmé et que la
minuterie est réglée.
4. Assurez-vous que la porte est bien fermée en engageant le système de verrouillage
de sécurité de la porte. Sinon, l’énergie micro-ondes ne circulera pas dans le four.
SI AUCUNE DES VÉRIFICATIONS CI-DESSUS NE PERMET DE CORRIGER
LA SITUATION, CONTACTEZ UN TECHNICIEN QUALIFIÉ. N’ESSAYEZ PAS
D’AJUSTER OU DE RÉPARER LE FOUR VOUS-MÊME.
Spécifications techniques
Spécifications techniques
Consommation d’énergie:
Puissance:
Fréquence de fonctionnement:
Dimensions extérieures (L × H × P):
Dimensions de la cavité du four
(L × H × P):
Capacité du four:
Uniformité de cuisson:
Poids net:
41
120V/60Hz, 1350W (MICRO-ONDES)
900 W
2450 MHz
19⁄ x13⅝ x14⁄ inches
13⅜ × 8⁄ × 12⅝ inches
0,9 pi3
Système de plaque tournante
Environ. 31,5 lb (14,3kg)
Page 43

Bienvenido
Gracias por comprar este Furrion® de 0.9 pies cúbicos SOLO HORNO MICROONDAS.
Antes de operar su nuevo dispositivo, lea estas instrucciones cuidadosamente.
Este manual de instrucciones contiene información para el uso, la instalación y el
mantenimiento seguros del dispositivo.
Conserve este manual de instrucciones en un lugar seguro para futuras referencias.
Esto le garantizará un uso seguro y reducirá el riesgo de lesiones. Asegúrese de
proporcionar este manual a los nuevos propietarios de este dispositivo.
El fabricante no asume responsabilidad alguna por los daños producidos como
consecuencia de no haber respetado estas instrucciones.
Français
42
Page 44

Contenido
Bienvenido ......................................................................................42
Contenido .......................................................................................43
Instrucciones importantes de seguridad ....................................44
Instrucciones generales de seguridad .............................................................44
Instrucciones de conexión a tierra ...................................................................46
Residentes de California solamente ................................................................47
Características del producto ........................................................48
Descripción de la función ..............................................................49
Panel de control ...................................................................................................49
Español
Instalación ......................................................................................50
Qué hay en la caja ................................................................................................ 50
Antes de la instalación........................................................................................50
Instalación del horno de microondas ............................................................... 50
Conexión eléctrica .............................................................................................. 52
Configuración de cocción rápida .................................................53
Operación .......................................................................................55
Técnicas de cocina .........................................................................59
Guía de utensilios ................................................................................................ 60
Técnicas de cocina .........................................................................60
Limpieza y cuidado ........................................................................61
Solución de problemas ..................................................................62
Especificación técnica ..................................................................62
43
Page 45

Instrucciones importantes de seguridad
PRECAUCIONES PARA EVITAR LA
POSIBLE EXPOSICIÓN AL EXCESO
DE ENERGÍA DE MICROONDAS.
1. No intente operar este horno
con la puerta abierta ya que esto
puede ocasionar una exposición
dañina a la energía de microondas.
Es importante no alterar los
enclavamientos de seguridad.
2. No coloque ningún objeto entre la
parte frontal del horno y la puerta,
ni permita que se acumule suciedad
o residuos de limpiador en las
superficies de sellado.
3. No opere el horno si está dañado.
Es muy importante que la puerta del
horno se cierre correctamente y no
dañar:
a. Puerta (doblada),
b.
Bisagras y pestillos (rotos o aflojados),
c. Sellos de la puerta y superficies
de sellado.
4. Nadie debe debe regular ni reparar
el horno, excepto el personal de
servicio debidamente calificado.
Instrucciones generales
de seguridad
Al utilizar electrodomésticos, se deben
seguir precauciones de seguridad
básicas, que incluyen las siguientes:
ADVERTENCIA - Para reducir el riesgo
de quemaduras, descargas eléctricas,
incendios, lesiones a personas o
exposición a energía excesiva de
microondas:
1. Lea todas las instrucciones antes de
usar el electrodoméstico.
2. Lea y siga las “PRECAUCIONES
PARA EVITAR POSIBLE”
EXPOSICIÓN A ENERGÍA EXCESIVA
DE MICROONDAS “en la página 44.
3. Este electrodoméstico debe estar
conectado a tierra. Conéctelo
solo a una toma de corriente con
conexión a tierra. Vea la sección
“INSTRUCCIONES DE PUESTA A
TIERRA”.
4. Instale o ubique este
electrodoméstico solo de acuerdo
con las instrucciones de instalación
proporcionadas.
5. No encienda el horno si está vacío.
6. Algunos productos, como huevos
enteros y recipientes sellados como
por ejemplo frascos de de vidrio
cerrados, pueden explotar y no
deben calentarse en este horno.
7. Use este electrodoméstico solo
para los usos previstos tal como
se describe en este manual.
No use productos químicos
o vapores corrosivos en este
electrodoméstico. Este tipo de horno
está específicamente diseñado para
calentar, cocinar o secar alimentos.
No está diseñado para uso industrial
o de laboratorio.
8. Al igual que con cualquier
electrodoméstico, se requiere de
una estrecha supervisión cuando lo
utilizan los niños
9. Para reducir el riesgo de incendio en
la cavidad del horno:
a. No cocine la comida en
exceso. Supervise de cerca el
electrodoméstico cuando el papel,
el plástico u otros materiales
combustibles se colocan dentro
del horno para facilitar la cocción.
Español
44
Page 46

Instrucciones importantes de seguridad
b. Retire las ataduras de alambre del papel
o las bolsas de plástico antes de colocar
la bolsa en el horno.
c. Si los materiales dentro del horno
se encienden, mantenga la puerta
del horno cerrada, apague el
horno y desconecte el cable de
alimentación o desconecte la
energía en el fusible o en el panel
Español
45
del interruptor de circuito.
d. No use la cavidad del horno como
lugar de almacenamiento. No deje
productos de papel utensilios de
cocina o alimentos en la cavidad
del horno cuando no los utilice.
10. Los líquidos, como el agua, el café o
el té, pueden sobrecalentarse más
allá del punto de ebullición sin que
parezca que estén hirviendo debido a
la tensión de la superficie del líquido.
El burbujeo visible o la ebullición
cuando el recipiente se retira del
horno de microondas no siempre
está presente. ESTO PODRÍA
OCASIONAR QUE LOS LÍQUIDOS
MUY CALIENTES HIERVAN
REPENTINAMENTE CUANDO
SE COLOCA UNA CUCHARA O
CUALQUIER OTRO CUBIERTO EN
EL LÍQUIDO. Para reducir el riesgo de
lesiones a la persona:
a. No sobrecaliente el líquido.
b. Revuelva el líquido antes y hasta la
mitad de su calentamiento.
c. No use recipientes de lados rectos
con cuellos estrechos.
d. Después de calentar, deje que el
recipiente permanezca en el horno
microondas por un periodo corto
tiempo antes de retirar el recipiente.
e. Tenga mucho cuidado al colocar
una cuchara u otro cubierto en
el recipiente.
11. No caliente aceite o grasa para freír.
Es difícil controlar la temperatura del
aceite en el horno de microondas.
12. Haga agujeros en los alimentos con
cáscaras pesadas, como papas,
calabaza entera, manzanas y
castañas antes de cocinarlos.
13. El contenido de los biberones y
frascos para bebés debe agitarse
o agitarse y la temperatura debe
verificarse antes de servir para
evitar quemaduras.
14. Los utensilios de cocina pueden
calentarse debido al calor transferido
de la comida calentada. Es posible
que se necesiten agarradores para
manipular el utensilio.
15. No cubra ni bloquee ninguna abertura
en el horno.
16. No almacene ni use este
electrodoméstico al aire libre. No use
este producto cerca del agua, por
ejemplo, cerca del fregadero de la
cocina, en un sótano húmedo, cerca
de una piscina o en lugares similares.
17. No opere este electrodoméstico si
tiene un cable o enchufe dañado,
si no funciona correctamente o si
está dañado o caído.
18. No sumerja el cable ni el enchufe en
el agua. Mantenga el cable alejado de
la superficie caliente. No permita que
el cable cuelgue del borde de la mesa
o mostrador.
19. Use solo termómetros, que están
diseñados específicamente para su
uso en hornos de microondas.
20. No haga funcionar ningún artículo de
calefacción ni de cocción debajo del
electrodoméstico.
Page 47

Instrucciones importantes de seguridad
21. Asegúrese de que la bandeja de
vidrio y los anillos del rodillo estén en
su lugar cuando opera el horno.
22. Este electrodoméstico debe ser
reparado solo por personal de
servicio calificado, comuníquese con
la instalación de servicio autorizada
más cercana para su examen,
reparación o ajuste.
23. Al limpiar las
y el horno que se juntan al cerrar la
puerta, use únicamente jabones o
detergentes suaves no abrasivos
aplicados con una esponja o un paño
suave.
24. Este equipo genera, utiliza y puede
irradiar energía de radiofrecuencia
y, si no se instala y utiliza de acuerdo
con las instrucciones, puede
causar interferencia perjudicial
a comunicaciones de radio. Sin
embargo, no hay garantía de que
la interferencia no ocurra en una
instalación en particular. Si este
equipo causa interferencia dañina
a la recepción de radio o televisión, lo
que puede determinarse apagando
y encendiendo el equipo, se
recomienda al usuario que intente
corregir la interferencia mediante una
o más de las siguientes medidas:
- Reoriente o reubique la antena
receptora.
- Aumente la separación entre el
equipo y el receptor.
- Conecte el equipo a una toma de
corriente en un circuito diferente
de aquel al que el receptor está
conectado.
- Consulte al distribuidor o a un
técnico experimentado en
radio/TV para obtener ayuda.
superficies de la puerta
● ATENCIÓN: MARCAPASOS
● Los cambios o alteraciones no
Instrucciones de conexión
a tierra
Este electrodoméstico debe estar
conectado a tierra. En el caso de un
cortocircuito eléctrico, la conexión a
tierra reduce el riesgo de descarga
eléctrica al proporcionar un cable de
escape para la corriente eléctrica.
ADVERTENCIA - El uso incorrecto del
enchufe de conexión a tierra puede
ocasionar un riesgo de descarga
eléctrica.
Consulte a un electricista o
técnico calificado si no comprende
completamente las instrucciones de
conexión o si existe una duda sobre si el
electrodoméstico está correctamente
conectado a tierra y:
1) Si es necesario utilizar un cable de
PRECAUCIÓN
La mayoría de los marcapasos
están blindados contra interferencia
de productos electrónicos,
incluidos los microondas. Sin
embargo, los pacientes con
marcapasos podrían tener que
consultar con sus médicos si tienen
dudas.
aprobados expresamente por el
responsable del cumplimiento
normativo podría anular la
autoridad del usuario de operar el
producto.
extensión, use uno extensión de 3
conectores que tenga un enchufe de
3 clavijas con conexión a tierra y un
Español
46
Page 48

Instrucciones importantes de seguridad
receptáculo de 3 ranuras que acepte
el enchufe del electrodoméstico. La
clasificación marcada del cable de
extensión debe ser igual o mayor
que la clasificación eléctrica del
electrodoméstico o
2) No use un cable de extensión.
Si el cable de suministro de energía
es demasiado corto, solicite a un
electricista o técnico calificado que
Español
instale una toma de corriente cerca
del electrodoméstico.
Requisitos eléctricos
Los requisitos eléctricos son un circuito
dedicado de 120 voltios, 60 Hz, solo CA,
15 amp o 20 amp. Se recomienda que
se proporcione un circuito separado
que sirva solo al horno. El horno está
equipado con un enchufe de tres patas
con conexión a tierra. El enchufe debe
estar conectado a un tomacorriente de
pared que esté instalado y conectado a
tierra correctamente.
Cable de alimentación eléctrica
1. Se proporciona un cable corto de
suministro de energía para reducir los
riesgos que resultan al enredarse o
tropezarse con un cable más largo.
2. Se encuentran disponibles juegos de
cables o alargadores más largos que
pueden usarse si se tiene cuidado en
su uso.
3. Si se usa un cable largo o extensión:
a) La clasificación eléctrica marcada
del juego de cables o cable de
extensión debe ser al menos
tan buena como la clasificación
eléctrica del electrodomésticos.
b) El cable de extensión debe ser
un cable de 3 hilos con conexión
a tierra, y el cable más largo
debe colocarse de modo que no
cuelgue sobre el mostrador o la
parte superior de la mesa, donde
los niños puedan tirar de él o
tropezarse involuntariamente.
NOTAS:
● Si tiene alguna pregunta sobre la
conexión a tierra o las instrucciones
eléctricas, consulte a un electricista o
persona de servicio calificada.
● Ni el fabricante ni el distribuidor
pueden aceptar ninguna
responsabilidad por daños al horno o
lesiones personales que resulten del
incumplimiento de los procedimientos
de conexión eléctrica.
Interferencia de Radio o TV
En caso de producirse alguna interferencia
causada por el horno de microondas a su radio
o televisor, verifique que el horno esté en un
circuito diferente, reubique la radio o TV lo más
lejos posible del horno o verifique la posición y
la señal de la antena receptora.
Residentes de California
solamente
PRECAUCIÓN
Cáncer y Reproductivo
Daño - www.P65Warnings.ca.gov
GUARDE ESTAS
INSTRUCCIONES
47
Page 49

Características del producto
Español
Artículo Descripción
1
2
3
4
5
Sistema de bloqueo de
seguridad de la puerta
Ventana del horno
Anillo de rodillo
Eje
Bandeja de vidrio
Artículo Descripción
6
7
Botón de liberación de
la puerta
Panel de control
Guía de ondas (no retire la
8
placa de mica que cubre
la guía de ondas)
48
Page 50

Descripción de la función
Panel de control
Español
TECLADO NUMÉRICO (0-9)
Toca para configurar la hora o el peso
RELOJ
Use para configurar la hora del día.
REINICIAR
Use para borrar todas las
configuraciones anteriores o configurar
el bloqueo para niños.
ENCENDIDO
Úselo para establecer el nivel de
potencia o para verificar el nivel de
potencia durante la cocción.
COCINAR
Use para cocinar en varias etapas.
Permite cocinar en múltiples
configuraciones de energía y tiempo
automáticamente.
TEMPORIZADOR
El temporizador funciona de forma
independiente, incluso mientras un
programa de cocina está en proceso.
PANTALLA
Se muestra el tiempo de cocción, la
potencia, los indicadores y el tiempo
presente.
BOTONES DE COCCIÓN RÁPIDA
Configuraciones instantáneas para
cocinar comidas populares
49
DESCONGELAR POR PESO
El descongelamiento se basa en el
peso de los alimentos que se van a
descongelar.
DESCONGELAMIENTO RÁPIDO
La DESCONGELAMIENTO RÁPIDO se
basa en la hora que ingresó.
COCINAR POR PESO
Cocción programada basada en el peso
de los alimentos a cocinar.
INICIO / DETENER
Toca para iniciar o detener la cocción.
Page 51

Instalación
Qué hay en la caja
Asegúrese de que los siguientes
artículos estén incluidos en el embalaje.
Si algún artículo está dañado o falta,
contacte a su distribuidor.
● Cuerpo del horno microondas
● Bandeja de vidrio x1
● Anillo de rodillo para bandeja de vidrio
x2
● Manual de instrucciones
● Folleto de garantía
● Kit de corte *
– Tira larga x 2
– Short Strip x 2
– Tornillos de montaje x 8
- Tornillos PMA M4x12mm x4
- Tornillos KA M4x20mm x4
– Soporte de metal x 2
* Solo para el modelo FMSM09-BL
y FMSM09-MG.
Antes de la instalación
1. Asegúrese de que todos los
materiales de embalaje se eliminen
del interior de la puerta.
2. Verifique que el horno no tenga
daños, como una puerta desalineada
o doblada, sellos de puerta y
superficie de sellado dañados,
bisagras de puerta rotas o sueltas,
pestillos y abolladuras dentro de
la cavidad o en la puerta. Si hay
algún daño, no opere el horno, pero
comuníquese con el personal de
servicio calificado.
3. Este horno de microondas debe
colocarse sobre una superficie plana
y estable para mantener su peso y los
alimentos más pesados que puedan
cocinarse en el horno.
4. No coloque el horno donde haya
calor, humedad o mucha humedad
generada, o cerca de materiales
combustibles.
5. Para un funcionamiento correcto,
el horno debe tener suficiente flujo
de aire. No cubra ni bloquee ninguna
abertura en el electrodoméstico.
No quite los pies sobre los cuales se
apoya el horno.
6. No opere el horno sin la bandeja de
vidrio, el soporte del rodillo y el eje en
sus posiciones correctas.
7. Asegúrese de que el cable de
suministro de energía no esté dañado
y no corra debajo del horno ni sobre
ninguna superficie caliente o afilada.
8. El enchufe debe ser fácilmente
accesible para que pueda
desenchufarse fácilmente en caso
de emergencia.
Instalación del horno de
microondas
Preparación del gabinete
1. Seleccione un lugar adecuado que no
sea susceptible a la humedad.
2. Marque y recorte una abertura
en el gabinete de acuerdo con las
dimensiones descritas en la tabla.
(Fig. 1)
NOTA: Si se instala un horno de rango
debajo del horno de microondas,
1 pulgada de separación mínima se
debe reservar desde la parte inferior
del horno de microondas en la parte
superior del horno de rango, consulte
la dimensión E.
Español
50
Page 52

Instalación
Español
Fig. 1
Campana
Dimensiones
A B C D E
13⅜”
(339.7mm)
Min. to
13⅞”
(352.4mm)
Max.
19⁄”
(506.4mm)
Min. to
20¼”
(514.3mm)
Max.
13⅞”
(352.4mm)
Min.
½”
(12.7mm)
Min.
(25.4mm)
Instalación del kit de ajuste
NOTA: El kit de corte solo se incluye en
los modelos FMSM09-BL y FMSM09MG. Comuníquese con el distribuidor
autorizado de Furrion para comprarlo en
caso de necesidad. (El número de pieza
del kit de ajuste es FMSM09-SS-TK o
FMSM09-BLTK)
1. Saque el horno de microondas y los
componentes de la caja y colóquelos
en una superficie plana.
2. Coloque los soportes metálicos
izquierdo y derecho contra el
microondas y fíjelos con 4tornillos
PMA M4x12mm provistos. (Fig. 2)
Fig. 2
3. Deslice el horno microondas en la
abertura del gabinete. (Fig. 3)
1”
Min.
Fig. 3
4. Fije el microondas dentro del
gabinete con 4tornillos KA
M4x20mm provistos. (Fig. 4)
Fig. 4
51
Page 53

Instalación
5. Ensamble el kit de moldura como se
muestra en la (Fig. 5).
NOTA : NO ensamblar invertido.
Español
Fig. 7
Fig. 5
6. Instale el kit de molduras montado
sobre el horno de microondas y
presione para asegurarlo en su lugar.
(Fig. 6 y Fig. 7)
Fig. 6
Conexión eléctrica
Conecte el horno de microondas a un
ci rc uit o ded ic ado de 120 voltios, 60 Hz, solo
CA, 15 amp o 20 amp. Se recomienda que se
proporcione un circuito separado que sirva solo
al horno.
52
Page 54

Configuración de cocción rápida
La configuración de COCCIÓN RÁPIDA
le permite cocinar o recalentar alimentos
automáticamente sin ingresar el nivel
de potencia o el tiempo. Para porciones
más pequeñas, simplemente toque el
botón correspondiente e START / STOP
(INICIO / DETENER). por
porciones más grandes, empuje la
almohadilla dos veces. FROZEN DINNER
(CENA CONGELADA), BAKED POTATO
Español
(PATATA AL HORNO) y BEVERAGE
(BEBIDA) le permiten cocinar múltiples
cantidades de la misma comida.
Simplemente toque el botón una vez,
y ENTER AMT aparecerá en la pantalla.
Ingrese la cantidad de porciones y
comience.
PALOMITAS DE MAÍZ
Para un 3.5 oz bolsa de palomitas de
microondas:
1. Toque POPCORN (PALOMITAS DE
MAÍZ) una vez.
2. Presione el botón START/STOP
(INICIO/DETENER).
Para cambiar el tiempo
preestablecida para PALOMITAS DE
MAÍZ:
1. Toque POPCORN (PALOMITAS
DE MAÍZ) dos veces. ENTER TIME
aparece en la pantalla.
2. Toque los botones numéricos
para ingresar el tiempo de cocción
deseado. Presione el botón START/
STOP (INICIO/DETENER).
NOTA : El tiempo más largo que
puede ingresar es de 99 minutos y 99
segundos. Esta nueva configuración se
establecerá como la predeterminada
hasta que la restablezca o la próxima vez
que encienda.
PAPA HORNEADA
Para papas (4 ~ 6 onzas por entrada):
1. Toque BAKED POTATO (PAPA
HORNEADA) una vez.
2. Ingrese el número de papas tocando
el teclado numérico del 1 al 4.
3. Presione el botón START/STOP
(INICIO/DETENER).
Para las patatas grandes (8 ~ 10 oz
por entradas):
1. Toque BAKED POTATO (PAPA
HORNEADA) dos veces.
2. Ingrese el número de papas tocando
el teclado numérico del 1 al 4.
3. Presione el botón START/STOP
(INICIO/DETENER).
PIZZA
Recalentamiento de una rebanada de
pizza:
1. Toca PIZZA una vez.
2. Presione el botón START/STOP
(INICIO/DETENER).
Calentar una pizza entera congelada:
1. Toca PIZZA dos veces.
2. Presione el botón START/STOP
(INICIO/DETENER).
53
Page 55

Configuración de cocción rápida
BEBIDAS
Para tazas (5 ~ 7 oz. Una taza)
1. Toca BEVERAGE (BEBIDA) una vez.
2. Ingrese el número de tazas tocando
el teclado numérico del 1 al 4.
3. Presione el botón START/STOP
(INICIO/DETENER).
Para obtener más café (9 ~ 11 onzas
por taza):
1. Toque BEBIDAS (BOISSON) dos
veces.
2. Ingrese el número de tazas tocando
el teclado numérico del 1 al 4.
3. Presione el botón START/STOP
(INICIO/DETENER).
CENA CONGELADA
Para una o dos cenas congeladas
pequeñas (7 ~ 9 onzas por acción):
1. Toca FROZEN DINNER (CENA
CONGELADA) una vez.
2. Para 1 entrada, toque el teclado
numérico “1”. Para 2 entradas, toque
el teclado numérico “2”.
3. Presione el botón START/STOP
(INICIO/DETENER).
Microondas con una cena congelada
más grande (10 ~ 12 onzas por
acción):
1. Toca FROZEN DINNER (CENA
CONGELADA) dos veces.
2. Para 1 entrada, toque el teclado
numérico “1”. Para 2 entradas, toque
el teclado numérico “2”.
3. Presione el botón START/STOP
(INICIO/DETENER).
RECALENTAR
1. Toque el botón REHEAT
(RECALENTAR).
2. Presione el botón START/STOP
(INICIO/DETENER).
NOTA: Esta configuración le permite
recalentar un plato de restos fríos con
buenos resultados
Español
54
Page 56

Operación
SEÑALES DURANTE LA
CONFIGURACIÓN DEL HORNO
UNA SEÑAL: El horno acepta la entrada.
DOS SEÑALES: El horno no acepta la
entrada, verifíquelo y vuelva a intentarlo.
● Después de que un programa de
cocción haya finalizado, el horno
emitirá un pitido con la indicación
END en la pantalla, presione cualquier
tecla o abra la puerta del horno para
Español
despejarla antes de configurar otra
función.
● Durante la cocción, si presiona
el botón START/STOP (INICIO/
DETENER) una vez, el programa se
pausará, presione, y luego presione
el botón RESET (RESTABLECER), el
programa se cancelará.
AJUSTE DEL RELOJ
1. Toque el CLOCK (RELOJ).
2. Use los botones numéricos para
ingresar la hora correcta.
3. Presione el botón del CLOCK
(RELOJ) de nuevo.
NOTA : Este es un reloj de 12 horas.
Cuando el horno se enchufa por primera
vez o se reanuda la alimentación, la
pantalla mostrará ENTER CLOCK TIME
(INGRESE LA HORA). Si prefiere que
no se muestre el reloj, toque RESET
(RESTABLECER).
AJUSTE DEL TEMPORIZADOR
DEL HORNO
1. Tocar TIMER (TEMPORIZADOR).
2. ngrese la cantidad de tiempo
tocando los botones numéricos.
3. Presione el botón START/STOP
(INICIO/DETENER).
NOTA : El tiempo máximo de cuenta atrás
que puede establecer es 99 minutos
y 99 segundos.
● La cuenta regresiva de tiempo se
puede ver en la pantalla durante
5 segundos antes de que vuelva
a mostrarse el reloj o el tiempo
de cocción.
● Después de transcurrido el tiempo
de cuenta atrás, el zumbador emitirá
un pitido.
● Toque TIMER (TEMPORIZADOR)
y luego toque RESET
(RESTABLECER) para cancelar
TIMER (TEMPORIZADOR) durante el
proceso del periodo de tiempo.
CONFIGURAR UN PROGRAMA
DE COCCIÓN
A. Cocina de una etapa
1. Use los botones numéricos para
establecer un tiempo de cocción.
Puede establecer un tiempo de
cocción de un segundo a 99 minutos
y 99 segundos.
2. Si desea establecer un nivel de
potencia distinto al 100%, toque
POWER (ENCENDIDO), y luego use
los botones numéricos para ingresar
el nivel de potencia. Durante la
cocción, puede verificar el nivel de
energía tocando la tecla POWER.
3. Presione START/STOP (INICIO/
DETENER) para comenzar a cocinar.
Utilice el dígito para establecer un
nivel de potencia de cocción:
55
Page 57

Operación
Teclado
numérico
1,0 100%
9 90%
8 80%
7 70 %
6 60%
5 50%
4 40%
3 30%
2 20%
1 10%
0 0%
B. Cocina en dos etapas
Algunas cocciones requieren diferentes
etapas de cocción a diferentes
temperaturas.
1. CONFIGURACIÓN DE LA ETAPA 1:
Siga los pasos 1 y 2 en “Cocción en
una etapa”. No toque START/STOP
(INICIO/DETENER).
2. CO NF IG URACIÓN DE LA ETAPA 2:
Toque COOK (COCINAR) luego ingrese
el tiempo de cocción correcto y el nivel de
potencia (inferior). (La mayoría de las recetas
de dos etapas usan menos potencia para la
segunda etapa).
3. Presione el botón START/STOP
(INICIO/DETENER).
Potencia de
cocción
DESCONGELAMIENTO
RÁPIDO
1. Toque SPEED DEFROST
(DESCONGELAMIENTO RÁPIDO).
2. Ingrese el tiempo de
descongelación deseado tocando
el teclado numérico. El tiempo de
descongelación más largo es de 99
minutos y 99 segundos.
3. Presione el botón START/STOP
(INICIO/DETENER).
NOTAS:
● La mitad de la descongelación, el
sistema se suspenderá y emitirá un
sonido para recordar a los usuarios
que den vuelta los alimentos, después
de eso, presione START/STOP
(INICIO/DETENER) para volver a
enviarlos.
● Después de SPEED DEFROST
(DESCONGELAMIENTO RÁPIDO),
el horno puede programarse para
cambiar automáticamente a una o
dos etapas de cocción.
● Para descongelar rápidamente y
cocinar en una etapa, siga los pasos
anteriores. Antes de tocar START/
STOP (INICIO/DETENER), presione
COOK (COCINAR), ingrese la hora y
el nivel de potencia y luego presione
START/STOP (INICIO/DETENER).
● Para el descongelamiento rápido y
la cocción en dos etapas, siga los
pasos anteriores. Antes de presionar
START/STOP (INICIO/DETENER),
toque COOK (COCINAR), ingrese
a los programas de cocción de dos
etapas y luego toque START/STOP
(INICIO/DETENER) para comenzar.
Español
56
Page 58

Operación
COCINAR POR PESO
1. Toque COOK BY WEIGHT
English
(COCINAR POR PESO).
2. Ingrese el teclado numérico 1 a 3 para
seleccionar el código de comida.
3. Ingrese el peso de los alimentos.
4. Presione el botón START/STOP
(INICIO/DETENER).
Descripción de código de cocinar
por peso
CÓDIGO TIPO
1
2
3 Cerdo 4 lb. 0 oz
NOTAS:
● La carne debe descongelarse a
temperatura refrigerada.
● El peso debe estar en libras y onzas.
● Los pesos en onzas menores que
10 deben estar precedidos por un
0. Si la etiqueta da el peso en libras
solamente, cambie la fracción de libra
a onzas usando la siguiente tabla.
Carne de
res
Carne de
cordero
PESO
MÁXIMO
5 lb. 16 oz
5 lb. 16 oz
Conversión de fracciones de libra
a onzas
Fracciones de
una libra
Menos de .03 0
.03 to .09 1
.10 to .15 2
.16 to .21 3
.22 to .27 4
.28 to .34 5
.35 to .40 6
.41 to .46 7
.47 to .53 8
.54 to 59 9
.60 to .65 10
.66 to .71 11
.72 to .78 12
.79 to .84 13
.85 to .90 14
.91 to .97 15
Above .97
● Durante la cocción, el sistema
pausará automáticamente y sonará
Recuerde a los usuarios que den la
vuelta a los alimentos, luego toque
START/STOP (INICIO/DETENER)
para reanudar la cocción.
Onzas
Ir a siguiente
incluso
57
Page 59

Operación
DESCONGELAR POR PESO
1. Presione el botón DEFROST BY
WEIGHT (DESCONGELAR POR
PESO).
2. Ingrese el peso de los alimentos
tocando el teclado numérico.
3. Presione el botón START/STOP
(INICIO/DETENER).
NOTAS:
● El peso máximo es de 5lb. 16oz.
● El peso debe estar en libras y onzas.
Peso en onzas menos que 10 debe ir
precedido de un 0. Si la etiqueta da
peso solo en libras, cambie la fracción
de libra a onzas usando el cuadro que
se muestra arriba.
● Durante la descongelación, el sistema
sonará para recordarle a los usuarios
que deben voltear la carne.
AJUSTE DEL BLOQUEO
INFANTIL
El bloqueo para niños evita el
funcionamiento sin supervisión de los
niños. Configure la función en el modo de
espera.
Para configurar: En el modo de
espera, mantenga presionado RESET
(RESTABLECER) durante 3 segundos.
LOCK (BLOQUEO) se indica en la
pantalla.
Cancelar: Presione y sostenga RESET
(RESTABLECER) por 3 segundos.
La indicación de LOCK (BLOQUEO)
desaparece.
PROTECCIÓN DE ADHESIÓN
CLAVE
En cualquier modo, si el interruptor
de membrana se cierra durante 60
segundos, el sistema se detendrá para
cocinar inmediatamente, el horno volverá
al modo de espera. Se escuchará un
pitido y se mostrará “FAIL” (FALLA) en
la pantalla. El pitido sonará cada minuto
hasta la solución de problemas, presione
el botón RESET (RESTABLECER) para
regresar al modo de espera.
English
58
Page 60

Técnicas de cocina
Su horno de microondas hace que
cocinar sea más fácil que la cocina
convencional, siempre que tenga estas
consideraciones en mente:
PARA MEZCLAR
Revuelva alimentos como guisos y
verduras mientras cocina para distribuir
el calor de manera uniforme. La comida
en el exterior del plato absorbe más
Español
energía y se calienta más rápidamente,
por lo que debe moverse desde el
exterior hacia el centro. El horno se
apagará cuando abras la puerta para
remover la comida.
ARREGLO
Disponga alimentos de forma irregular,
como trozos de pollo o chuletas, con
las partes más gruesas o con más
carne hacia el exterior de la bandeja
giratoria donde reciben más energía de
microondas. Para evitar la sobrecocción,
coloque las áreas delicadas, como las
puntas de los espárragos, hacia el centro
de la plataforma giratoria.
ESCUDO
PARA GIRAR
Dé vuelta a los alimentos a la mitad de la
cocción para exponer todas las piezas
a la energía de microondas. Esto es
especialmente importante con alimentos
grandes como asados.
EN PIE
Los alimentos cocinados en el
microondas acumulan calor interno
y continúan cocinando durante unos
minutos después de que se detiene
el calentamiento. Deje reposar los
alimentos para completar la cocción,
especialmente alimentos como tortas y
verduras enteras. Los asados necesitan
este tiempo para completar la cocción en
el centro
Sin sobrecocinar las áreas exteriores.
Todos los líquidos, como la sopa o el
chocolate caliente, deben agitarse
o agitarse cuando se complete la
cocción. Deje que los líquidos reposen
un momento antes de servir. Cuando
caliente alimentos para bebés, mezcle
bien al momento de retirarlos y pruebe la
temperatura antes de servirlos.
Proteja los alimentos con tiras angostas
de papel de aluminio para evitar que
se cocinen demasiado. Las áreas que
necesitan protección incluyen puntas
de alas de aves de corral, los extremos
de las patas de las aves de corral y las
esquinas de los platos cuadrados para
hornear. Utilice
solo pequeñas cantidades de papel
de aluminio. Las cantidades mayores
pueden dañar su horno.
59
AÑADIR HUMEDAD
La energía de microondas es atraída por
las moléculas de agua. Los alimentos
que tienen un contenido de humedad
desigual deben cubrirse o dejarse
reposar para que el calor se disperse
uniformemente. Agregue una pequeña
cantidad de agua para secar los
alimentos y ayudarlos a cocinar.
Page 61

Técnicas de cocina
Guía de utensilios
Esta sección enumera qué utensilios se
pueden usar en el microondas, cuáles
tienen un uso limitado por períodos
cortos y cuáles no se deben usar en
el microondas.
RECOMENDADO
Plato de microondas para dorar
— Utilícelo para dorar el exterior de
los artículos pequeños como filetes,
chuletas o panqueques. Siga las
instrucciones provistas con su plato para
dorar.
Envoltura de plástico microondas
— Usar para retener el vapor Deje una
pequeña abertura para que escape algo
de vapor y evite colocarla directamente
sobre la comida.
Toallas y servilletas de papel — Usar
para calentar y cubrir a corto plazo; estos
absorben el exceso de humedad y evitan
las salpicaduras. No use toallas de papel
recicladas, que pueden contener metal y
podrían encenderse.
Cuencos y platos de cristal y vidrio —
Use para calentar o cocinar.
Platos y tazas de papel: se usa
para calentar a corto plazo a bajas
temperaturas. No use papel reciclado,
que puede contener metal y podría
encenderse.
Papel encerado — Utilizar como una
cubierta para evitar salpicaduras.
Termómetros — Use as a cover to
prevent spattering.
Thermometers — Use solo aquellos
etiquetados como “Microwave Safe” y
siga todas las instrucciones. Verifique
la comida en varios lugares. Los
termómetros convencionales se pueden
utilizar en los alimentos de microondas
una vez que los alimentos se han
eliminado del horno.
USO LIMITADO
Papel de aluminio — Use tiras
estrechas de papel de aluminio para
evitar la sobrecocción de las áreas
expuestas. Usar demasiada lámina
puede dañar el horno, así que ten
cuidado. Debe mantener una distancia
de 1 pulgada (25,4 mm) entre
Papel de aluminio y cavidad.
Cerámica, porcelana y gres — Úselos
si están etiquetados como “Microwave
Safe” (apto para microondas). Si no están
etiquetados, pruébelos para asegurarse
de que se puedan usar de forma segura.
Plástico — Úselo solo si tiene la etiqueta
“Microwave
Safe” (apto para microondas). Otros
plásticos pueden derretirse.
No recomendado
Frascos y botellas de vidrio — El
vidrio regular es demasiado delgado
para ser utilizado en un microondas. Se
puede romper y causar daños y lesiones.
Bolsas de papel — Estos son un peligro
de incendio, a excepción de las bolsas
de palomitas que están diseñadas para
el uso de microondas. Platos y tazas de
espuma de poliestireno: estos pueden
derretirse y dejar residuos no saludables
en los alimentos.
Español
60
Page 62

Limpieza y cuidado
Contenedores de plástico y
contenedores de alimentos — Los
recipientes como las tinas de margarina
pueden derretirse en el microondas.
Utensilios de metal — Pueden dañar
tu horno. Retire todo el metal antes
de cocinar.
NOTA : Si desea comprobar si un plato
es seguro para el microondas, coloque el
plato vacío en el horno y el microondas
Español
en HIGH (ALTO) durante 30 segundos.
Un plato que se calienta mucho no
debe usarse.
1. Apague el horno y quite el enchufe de la
toma de corriente Antes de limpiar.
2. Mantenga el interior del horno
limpio. Cuando las salpicaduras de
comida o los líquidos derramados
se adhieren a las paredes del horno,
limpie con un paño húmedo. Se
puede usar un detergente suave si
el horno se ensucia mucho. Evite el
uso de aerosoles y otros productos
de limpieza agresivos, ya que pueden
manchar, rayar u opaca la superficie
de la puerta.
3. Las superficies externas deben
limpiarse con un paño húmedo.
Para evitar daños en las piezas de
operación dentro del horno, no se
debe permitir que el agua se filtre en
las aberturas de ventilación.
4. Limpie la ventana a ambos lados
con un paño húmedo para eliminar
cualquier derrame o salpicadura.
5. No permita que el panel de control se
moje. Limpiar con un paño suave y
húmedo. Cuando limpie el panel de control,
deje la puerta del horno abierta pa ra
evitar que el horno se encienda
accidentalmente.
6. Si se acumula vapor dentro o fuera
de la puerta del horno, limpie con
un paño suave. Esto puede ocurrir
cuando el horno de microondas
funciona bajo condiciones de alta
humedad. En tal caso, es normal.
7. En ocasiones es necesario quitar la
bandeja de cristal para limpiarla. Lave
la bandeja con agua jabonosa tibia o
en un lavavajillas.
8. El anillo del rodillo y el piso del horno
deben limpiarse regularmente para
evitar ruidos excesivos. Simplemente
limpie la superficie inferior del horno
con un detergente suave. El anillo
del rodillo se puede lavar con agua
jabonosa suave o lavaplatos. Cuando
retire el anillo del rodillo del piso de
la cavidad para limpiarlo, asegúrese
de volver a colocarlo en la posición
correcta.
9. Elimine los olores de su horno
combinando una taza de agua
con el jugo y la piel de un limón
en un recipiente hondo apto para
microondas, y caliéntelo en el
microondas durante 5 minutos.
Seque y pula con un paño suave.
10. Cuando sea necesario reemplazar la luz
del horno, consulte a un distribuidor para
que se la reemplace.
11. El horno debe limpiarse regularmente
y se deben eliminar los depósitos de
alimentos. Si no se mantiene el horno
en condiciones de limpieza, se podría
deteriorar la superficie, lo que podría
afectar negativamente la vida útil del
electrodoméstico y provocar una
situación peligrosa.
12. No arroje este artefacto a la basura
doméstica; debe ser dispuesto en
el centro de eliminación particular
provisto por los municipios.
61
Page 63

Solución de problemas
SI EL HORNO NO FUNCIONA:
1. Verifique que el horno esté enchufado de forma segura. Si no es así, retire el
enchufe de la toma de corriente, espere 10 segundos y vuelva a enchufarlo de
forma segura.
2. Compruebe si hay un fusible de circuito fundido o un disyuntor principal disparado.
Si parece que estas funcionan correctamente, pruebe la toma de corriente con
otro aparato.
3. Verifique que el panel de control esté programado correctamente y que el
temporizador esté configurado.
4. Verifique para asegurarse de que la puerta esté cerrada de forma segura y active
el sistema de bloqueo de seguridad de la puerta. De lo contrario, la energía de
microondas no fluirá al horno.
SI NINGUNO DE LO ANTERIOR RECTIFICA LA SITUACIÓN, ENTONCES
PÓNGASE EN CONTACTO CON UN TÉCNICO CALIFICADO. NO TRATE DE
AJUSTAR O REPARAR EL HORNO USTED MISMO.
Especificación técnica
Español
Especificación técnica
Consumo de energía:
Salida:
Frecuencia de operación:
Dimensiones exteriores
(Ancho×Alto×Profundidad):
Dimensiones de la cavidad del
horno (Ancho×Alto×Profundidad):
Capacidad del horno:
Uniformidad de cocina:
Peso neto:
120V/60Hz, 1350W (MICROONDAS)
900 W
2450 MHz
19⁄ x13⅝ x14⁄ inches
13⅜ × 8⁄ × 12⅝ inches
0.9 pies cúbicos
Sistema de placa giratoria
Aprox. 31.5 lbs.
62
Page 64

Furrion Innovation Center & Institute of Technology
● 52567 Independence Ct., Elkhart, IN 46514, USA ● Toll free:1-800-789-3341
©2007-2020 Furrion Ltd. Furrion® and the Furrion logo are trademarks licensed for use by
Furrion Ltd. and registered in the U.S. and other countries.
©2007-2020 Furrion Ltd. Furrion® et le logo Furrion sont des marques déposées par Furrion Ltd. et
©2007-2020 Furrion Ltd. Furrion® y el logotipo de Furrion y son marcas comerciales con
licencia de uso de Furrion Ltd. y están registradas en los Estados Unidos y en otros países.
Patents pending / Brevets en instance pour / Patentes pendientes para
● Email: support@furrion.com
enregistrées aux Etats-Unis et ailleurs.
(SKU FMSN09-BL / FMSN09-MG)
FURRION.COM
IM-FHA00022 V11.0
 Loading...