

Page 1
Induction Cooktop
Operating and Installation Instructions
This manual is for use with
Furrion FIH1ZEA-BG
Induction Cooktop
1
Page 2

Welcome
Furrion FIH1ZEA-BG Induction Cooktop
Thank you for purchasing a Furrion FIH1ZEA-BG Induction Cooktop.
Before installation and use, please read all instructions carefully. This will ensure
safe use and reduce the risk of injury to persons.
Contents
IMPORTANT SAFETY INSTRUCTIONS .............................................
Introduction to Induction Cooking..................................................
Product Specifications.......................................................................
Operation ...........................................................................................
Selecting the Proper Cookware .......................................................
Cleaning and Maintenance ..............................................................
Trouble Shooting ..............................................................................
Installation .........................................................................................
Overall Dimensions ...........................................................................
Special Declaration ...........................................................................
Short Cord Instruction ......................................................................
3-4
5
6
7-9
10
11
12-13
14
15
15
15
2
Page 3

IMPORTANT SAFETY INSTRUCTION
When using electrical appliances, basic safety precautions should always be
followed including the following:
1. Read all instructions before operating the induction cooktop.
2. Do not touch hot surfaces. Do not
move the cooktop while in use. Use
handles or knobs.
3. To prevent electrical shock, the
cooktop should always be placed
on a flat, hard and dry surface.
4. Close supervision is necessary when
any appliance is used by or near
children.
5. Unplug the cooktop from the
electrical outlet when not in use
and before cleaning. Allow the unit
to cool before putting on or taking
off parts.
6. Do not operate any appliance with
a damaged electrical cord or plug,
or if the appliance malfunctions or
has been damaged in any manner.
Return the appliance to the nearest
authorized service facility for examination, repair or adjustment.
7. The use of accessory attachments
not recommended by the appliance
manufacturer may cause injuries.
8. The cooktop is for indoor household
use only. Do not use outdoors.
9. Do not let the electrical cord hang
over edge of table or counter, or
touch hot surfaces.
10. Do not place the cooktop on or
near a hot gas or electric burner.
11. Use extreme caution when moving
an appliance containing hot oil or
other hot liquids.
12. Do not use this appliance for other
than its intended use.
13. WARNING! To prevent electric shock,
unplug before cleaning.
14. This appliance has a polarized
plug (one blade is wider than the
other). To reduce the risk of electric
shock, this plug is intended to fit
into a polarized outlet. If the plug
does not fit fully into the outlet,
reverse the plug. If it still does not
fit, contact a licensed electrician.
Do not attempt to modify the plug
in any way.
15. Do not cook on a broken cooktop. If the cooktop should break,
cleaning solution and spillovers
may penetrate the surface of the
broken cooktop and create a risk of
electric shock.
16. Clean the cooktop with caution.
If a wet sponge or cloth is used to
wipe off spills on a hot cooking
area, be careful to avoid steam
burns. Also, some cleaners can
produce noxious fumes if applied
to a hot surface.
17. Any other servicing should be performed by an authorized services
representative.
18. Do not place metallic objects such
as knives, forks, spoons and lids on
the Table Stove since they can get
hot.
SAVE THESE INSTRUCTIONS
3
Page 4

IMPORTANT SAFETY INSTRUCTIONS
19. This appliance is not intended for
use by persons (including children)
with limited physical, sensory
or mental capabilities, or lack of
experience or knowledge, unless
they have been given supervision
or instruction concerning use of the
appliance by a person responsible
for their safety.
20. The induction cooktop should be
placed on a level surface, and used
in a well ventilated environment.
Do not block or obstruct the area
around the unit’s base in order to
allow proper ventilation and fan
operation. A minimum of 4 inches
clearance is recommended. Do not
place any material under the cooktop other than the counter surface.
21. Please use only cookware designed
for induction cooktops. Do not
place any metal utensil, object or
non ferrous cookware on top of
the stove when operating. The
unit is designed to automatically
shut down ten (10) seconds after
detecting inappropriate metals on
its surface. Objects made of ferrous
materials will heat rapidly and can
cause severe burns if not properly
handled.
22. In order to avoid accidental fire,
particularly when frying or using
cooking oil, do not leave the cooktop unattended.
23. Do not handle the electric plug with
wet hands.
24. Do not use the cooktop on any
surface containing iron or steel.
25. Do not attempt to heat hermetically sealed food containers such
as unopened cans, otherwise the
can may explode, as any air in the
can will become superheated.
26. Do not touch the designated
heating coil area of the stovetop
until it has cooled down.
27. Do not use aluminum foil, cloth,
paper or other combustible goods
on the cooktop.
28. Do not use the cooktop to parch
ingredients.
29. Do not place the cooktop near an
open flame.
30. Use the induction cooktop with a
properly rated electrical outlet. It
is recommended that the cooktop
not share an outlet with another
electrical device or appliance.
31. When the cooktop is in use, do
not place a credit card, magnetic
sheet, wristwatch, small radio or
any other electric appliance near
the cooktop in order to avoid
interference with the cooktop’s
magnetic field; also, doing so may
produce excessive noise.
32. When not in use, please remove
the electric plug from the wall
outlet.
33. To disconnect the cooktop, turn
any control to “off”, then remove
the electric plug from wall outlet.
34. To protect against electrical shock
do not immerse cord, plugs, or
the whole unit in water or other
liquid.
SAVE THESE INSTRUCTIONS
4
Page 5
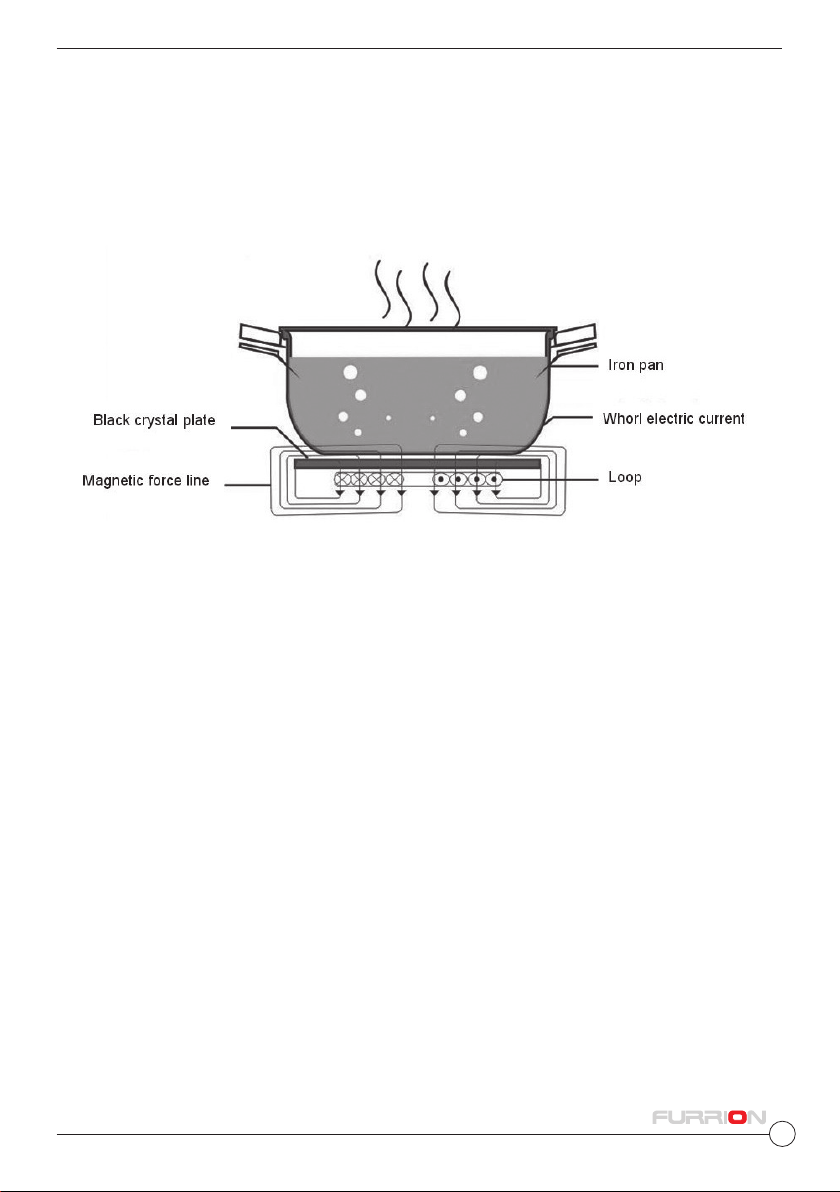
Introduction to Induction Cooking
How does this Induction cooktop work?
An induction cooktop consists of a series of burners called Induction Coils,
that operate based on magnetic principles. These coils will heat the cookware
itself, and not the cooktop surface, by generating magnetic fields that induct a
warming reaction in steel and iron-based pots and pans.
How is an induction cooktop dierent?
High Eciency: Induction cooking utilizes 90% of the energy produced, which
is far more energy efficient than a gas or electric cooktop. The induction coils
recognize the base of the cookware and will only heat the diameter of the pot,
reducing the amount of wasted energy.
Safety and Environmental-friendly: More than ten safe protection mechanisms
are designed to keep you safe, such as a mechanism to avoid magnetic field
leakage, the use of a pan without liquids, excessive voltage (145V±5V) or
insufficient voltage (80V±5V), overheating, small object detection, and a “no
pan” automatic shutoff. There is no smoke or fire generated during the cooking
process, making cooking clean and easy, beneficial to your home environment
and to the health of your family members.
Heat Distribution: Induction cooktops directly heat the cookware and not the
surface of the cooktop, allowing the heat to distribute uniformly around the
cookware. Heating adjustments are nearly instantaneous, reducing the cooking
time to about half that of gas and electric.
Intelligent: All functions are controlled by a microcomputer.
5
Page 6

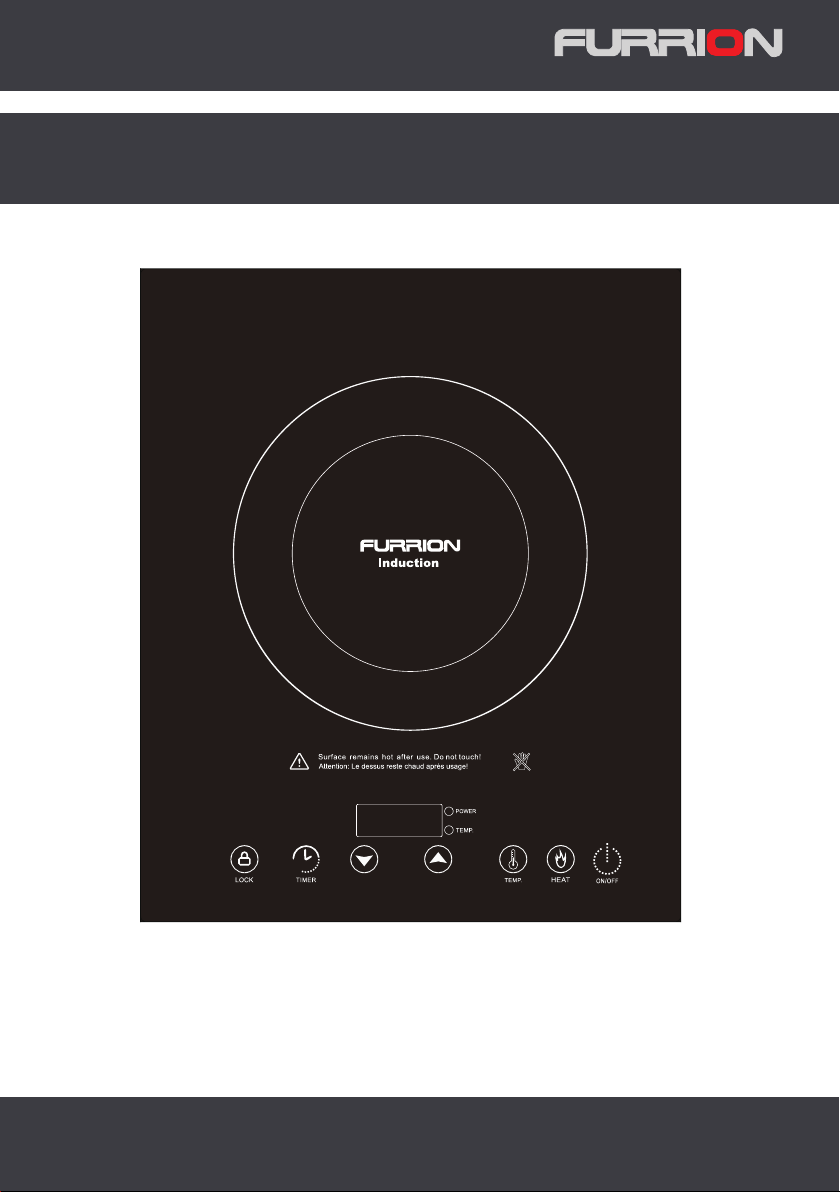
Product Specifications
Vent
Black crystal
plate
Air entry
Supply cord
Part name
Vent
Black crystal
plate
Control panel
Control Panel
Lock Timer
Air entry
Adjust Power
or Temp. or Time
Supply cord
Temp. Heat ON/OFF
Specification list
Model Applied voltage/frequency Rated power Cut-out(W x D)
FIH1ZEA-BG 120V~/60Hz 1500W 11
6
5/8
“x14
5/16
“
Page 7

Operation
1. Standby Mode:
Upon inserting the power plug into an electric socket, the induction cooktop
will make a “beep” sound once, and all the digital lights on the cooktop will
blink once, indicating the unit enters into the Standby Mode.
2. Lock Mode:
In the Standby mode or Working status, press “Lock” key to activate the
function. The unit will make a “beep” sound and the Lock LED will be lit up.
The controls are now locked.
A. Manual Lock: Press the Lock key to activate the function during the
cooktop use. Controls Lock prevents activation of any sensor key, except for
the ON/OFF, and Lock key.
B. Automatic Lock: The induction cooktop will automatically enter into Lock
mode if the unit is turned off for 5 minutes. Controls Lock prevents activation
of any sensor key, except for the Lock key pad, so you must deactivate the
control lock firstly, then touch the “ON/OFF” key to turn on the cooktop.
Switching o the lock
In the Standby Mode, press the Lock key to deactivate the function. The Lock
LED will turn off.
In the Working Status, press the Lock key for one second to deactivate the
function. The Lock LED will turn off.
3. Readiness Mode:
While in the Standby Mode, press the “ON/OFF” key, it will make a “beep”
sound once, indicating that the induction cooktop functions are ready to use.
The unit will automatically return to standby mode if Heat or Temp functions
are not chosen within 60 seconds.
4. Place cookware on the cooktop. Please select from either Heat Setting or
Temp. Setting to begin cooking.
• Heat Setting Mode: This function cooks at power (wattage) settings. When
the unit is in the Readiness mode, or in the Temp. mode, press the “Heat”
key to enter power setting mode, Heat LED is lit up, and the digital display
will show “900” watts. If the user wants to adjust the power level, please
press the “+” or “-” key. To stop cooking, please press the “ON/OFF” key. If the
user wants to set the timer for the unit to shut off automatically, please refer
to the Set Timer Mode. Power levels (in watts): 1500W, 1300W, 1100W, 900W,
700W, 500W, 300W.
Attention: This function is equipped with safeguards against the parched protection.
The unit will might shut off automatically when this function is used for
frying, stir-frying, grilling and other high temperature cooking formats.
7
Page 8

Operation
• Temp. Setting Mode: This function cooks at temperature settings. When the
unit is in the Readiness mode, or in the Heat mode, press the “Temp.” key
to enter the temperature setting mode, Temp LED is lit up, and the digital
display will show “260” F. If the user wants to adjust the temperature level,
please press the “+” or “-” key. To stop cooking, please press the “ON/OFF”
key. If the user wants to set the timer for the unit to shut off automatically,
please refer to the Set Timer Mode. Temperature levels: 120°F, 150°F, 180°F,
210°F, 260°F, 300°F, 360°F, 420°F, 465°F.
5. Set Timer Mode:
Use “+” or “-” key to adjust and set the desired time. A short key press adjusts
the time by 1 minute and a long key press by 10 minutes. The timer is
adjustable to a maximum of 1 minute to 2 hours and 59 minutes. (Note: there
is no “seconds” display, only hours and minutes.)
When the unit is in the “Power” or “Temp.” mode, press “Timer” key, the Timer
LED is lit up, indicating the cooktop has entered Set Timer Mode, the digital
display reads “0:00” and minute number will be blinking; Press “+” or “-” key
to set the desired minute number, then press the “Timer” key again, hour
number will be blinking, press “+” or “-” key to set the desired hour number,
then press “Timer” key thirdly to complete setting. ( Setting would be also
completed after 10 seconds if the "+" or "-" key is not pressed.) Once activated,
“Timer” or “Time” indicator light will turn long lit, the digital display will
alternate between showing the remaining cooking time and power or temp.
level. When the countdown is complete, the cooktop will sound “beep” and
shut off automatically.
6. To Turn O:
When use of the cooktop is complete, please press the “ON/OFF” key. “ON/
OFF” light will turn off, it will make a “beep” sound once, and all the displays
will turn off, indicating the unit is now on the standby mode. Digital display
will show “H” if the temperature of the cooking zone is above 140°F. (Hot
surface indicator) Wait until the “H” is no longer displayed to clean the unit.
You may turn back on even if the “H” is displayed.
Note: Please do not pull the power plug until the cooling fan has stopped.
8
Page 9

Operation
7. Special explanations:
a. When the induction cooktop is turned off, the cooling fan will automatically
continue working for one (1) minute to eliminate heat built up.
b. If unsuitable cookware is used, or if the cookware is removed from the
cooktop prior to completion of the cooking cycle, the heating function
will stop, the digital display will show error message U, and every two (2)
seconds, the unit will sound an alert. After ten (10) seconds, the unit will
shut down completely unless suitable cookware is placed back on the
stovetop.
c. For best results, use cookware designed for induction cooking.
d. If the induction cooktop is subjected to high or low voltage fluctuations
while in operation, the unit will stop heating, and display error message E3
(or E2). If the voltage does not return to normal within one (1) minute, the
cooktop will shut off automatically.
If voltage fluctuations occur while the unit is in standby mode, the unit will
display error messages E3 (or E2) together with a warning signal. Please
remove the induction cooktop from its power source immediately.
e. When using the cooktop, please keep the black crystal top clean. Otherwise,
some staining or dark discoloration may appear over time. Such stains or
discoloration will affect only the physical appearance of the unit, not its
actual performance.
Any other servicing should be performed by an authorized service representative.
9
Page 10

Selecting the Proper Cookware
Enamel stainless steel kettle Enamel cooking top Iron plate
Suitable Cookware
You have to select a cookware that is made from iron, cast iron, stainless steel or
enamels that has a smooth base and a diameter of no less than 4.7 inches, and
no more than 10.2 inches. Induction cooktop requires cookware composed of
ferrous materials in order to properly heat.
Iron frying pan
1. Please take ensure that your cookware meets the following conditions:
• Materials requirement: Containing magnetic (ferrous) conducting materials;
• Shape requirement: Flat bottom, with the diameter within the range of 4.7
inches – 10.2 inches.
2. After first use, some white spots would appear at the bottom of the pot, this
is normal. Please pour some vinegar into the pot, heat it at about 140-180*F,
then wipe the spots away with brush.
3. The induction cooktop sensor array can identify most cookware except for
ones made with non-magnetic steels.
4. If the cooktop is operating, and there is no cookware upon it, or if unsuitable
cookware is utilized, a warning buzzer will sound for about 10 seconds, and
then the unit will turn off automatically.
Stainless steel pot Iron pan Iron kettle
Unsuitable Cookware
Cookware that is made from ceramic, glass, copper, bronze, or has an aluminum
bottom. Any cookware that has a diameter of less than 4.7 inches is also unsuitable.
10
Page 11

Cleaning and Maintenance
Please remove the electric power plug from its socket and wait for the unit to
cool before cleaning or performing maintenance.
1. Black crystal plate and control panel
Slight stain: Please wipe off the plate with soft moistened cloth.
Tough stain: Please clean with a soft moistened cloth dipped in a bit of
toothpaste or neutral liquid cleaner until no residue remains.
Never clean the cooktop surface with a rigid brush.
2. The induction cooktop body can be cleaned lightly with soft dry cloth. Any
dust around the air entry and air outlet can be cleaned with a flexible brush
or a damp cloth.
3. To avoid damaging the casing or any plastic parts of the unit, do not use any
oil based cleaning products.
4. To maintain its appearance, try to avoid scraping the cooktop with the bottom
of your cookware. Scratches will not impair the operation of the induction
cooktop.
5. For longer term storage, the cooktop should be clean and air dried, then
packed in a bag and stored in a dry place. To maintain efficiency, the unit
should be plugged into an electric outlet for half hour at least every three
months.
11
Page 12

Trouble Shooting
1. For power cord replacement if the power cord is damaged; please contact an
appropriate, licensed electrical repair shop.. For safety purposes, please never
replace the cord by oneself.
2. Error Code Quick Guide:
Problem Possible Cause Solutions
Cooktop does not
work
Cooktop does not
heat
Cooktop turns o
while cooking
The fan keep running
for one minute after
the unit has been
switched o
“U” appears in the
digital display
“E0” appears in the
digital display
“E2” appears in the
digital display
• Cooktop controls are locked
• Power outage
• No cookware or improper
cookware placement on the
cooking zone
• Incorrect cookware size for
the selected cooking zone
• Cookware is not properly
res ting on the cooking zone
• No power to cooktop
• Cooktop internal heat
sensor has detected the
high temperature inside
the cooktop, activating
automatic shut o
• Liquid or object on the
controls area
• The electronics are cooling
down
• No cookware found or
improper placement of
cookware over 10 seconds
on the cooking zone
• IGBT overheating • Turn o unit to allow IGBT to cool. Restart unit
• Supplied voltage to
cooktop is too low
• Turn o the child lock
• Check house lights to conrm power outage
• Contact the dealer
• Make sure that the cookware is centered on the
cooking zone, and that cookware is of the proper
type for induction cooking.
• The bottom of the cookware must be large
enough to cover Cooking Zone completely.
• Cookware bottoms must be at and centered on
the Cooking Zone.
• See “Cooktop does not work” above
• Make sure the cooktop vents are not blocked
• The cooktop features an automatic shuto feature
that turns the entire cooktop o if any Cooking
Zone has been on continuously for 2 hours.
• The cooktop control may register liquids or objects
obstructing the panel, which can cause the
cooktop to shut o. Clean up spills or remove
objects and restart the unit.
• This is a normal occurrence
• Make sure that the cookware is centered on
the cooking zone, and that it is also induction
compatible
• If the voltage of the power supplied to the cooktop
is too low, it cannot operate properly and will show
this error code. This may be caused by reduced
voltage being supplied to the house circuit. If
connections are correct and the supplied voltage
returns to normal, the code will disappear.
12
Page 13

Trouble Shooting
Problem Possible Cause Solutions
• If the voltage of the power supplied to the
cooktop is too high, it cannot operate properly and
“E3” appears in the
digital display
“E7” appears in the
digital display
“E8” appears in the
digital display
“E9” appears in the
digital display
“EE” appears in the
digital display
Noise
• Supplied voltage to
cooktop is too high
• NTC1 Break o
• NTC1 Short circuit
• NTC2 Break o
• NTC2 Short circuit
• Noise like humming,
crackling and buzzing
E0, E6 = Overheat Protection
If this appears on the screen, there is no more content in the pan. To remedy,
add ingredients or remove the pan from the cooktop.
will show this error code. This may be caused
by increased voltage being supplied to the
house circuit. If connections are correct and the
supplied voltage returns to normal, the code will
disappear.
• Turn the cooktop OFF; then pull plug out for about
30 seconds. Then re-insert the plug and turn the
cooktop on using the ON/OFF pad. If the error
message is still displayed, call for service.
• This is a normal occurrence, What can sometimes
produce sound with induction cooking is not the
induction equipment but the cookware itself.
U = Cookware Sensor Detection
If this appears on the screen, proper cookware is not detected. To remedy, place
correct cookware on the induction cooktop.
E2 and E3 = Incorrect Voltage Sensor
To remedy, use the correct voltage specified.
E7, E9 = If this message appears, contact your electrician. This error message is
unlikely to appear as voltage is regulated by the government.
E8, EE = If this message appears, contact your electrician. This error message is
unlikely to appear as voltage is regulated by government.
13
Page 14

Installation
Minimum distance from
cook-top to any object above
must be at least 30”
Minimum distance from
cook-top to any surface below
must be at least 3
1/2 ”
Cut-out Depth: 14 5/16"
Cut-out Width: 11
5/8"
There must be at least 2 1/2”
from Edge of Cutout to Front
8
8
Edge of Countertop.
*If installing in a RV, Boat or Manufactured Home, please
refer to relevant safety standards and guide lines.
Minimum height when tted with range hood is 19’’.
14
Page 15

Overall Dimensions
FIH1ZEA-BG INDUCTION COOKTOP
QUICK INSTALLATION GUIDE
OVERALL WIDTH
Overall Dimensions
Cut-out Depth: 14 5/16"
Cut-out Width: 11
Minimum distance from
cook-top to any object above
must be at least 30”
Minimum distance from
cook-top to any surface below
must be at least 3
Installation
15"
OVERALL
DEPTH
Special Declaration
All of the contents and material in this manual have been subjected to careful
review. The manufacturer reserves the right of interpretation of any mistakes
and omissions in printing or misunderstanding of the contents.
12 7/16"
Addition: Any technical improvements will be placed in a revised manual
without notice; for any changes in the appearance and color, those of the actual
product shall prevail.
Short cord instruction
1. A short power-supply cord is provided so as to reduce the risk of tripping.
2. Extension cords are available and may be used if caution is exercised.
3. If an extension cord is used:
a. The marked electrical rating of the extension cord needs to match or exceed
the electrical rating of the cooktop appliance.
b. The extension cord should be arranged so that it will not drape over the
countertop or tabletop, to reduce handling by children or the possibility of
tripping over the cord.
15
Page 16

Furrion reserve the right to alter the information in this document without prior notice.
Furrion shall not be liable for technical or editorial errors or omissions contained herein.
FURRION.COM
16
IM- FIH1ZEA-BG REV.0
 Loading...