

Page 1

US RV Grill (with/without lid)
5014612
Barbecue pour véhicule récréatif (avec ou
sans couvercle)
Parrilla para casa rodante (con/sin tapa)
Instruction Manual
Model/Modèle/Modelo:
Manuel d’instructions
FGL200A-SS / FGL202A-SS
Manual de instrucciones
FGL200A-SS
FGL202A-SS
Conforms to ANSI STD Z21.58-2018 Certified to CSA STD 1.6-2018 Outdoor Cooking Gas Appliances
Conforme à: ANSI STD Z21.58-2018 Certifié à: CSA STD 1.6-2018 Appareil de cuisson à gaz pour l’extérieur
Cumple con: ANSI STD Z21.58-2018 Certificado para: CSA STD 1.6-2018 Cocina de gas para exteriores
Page 2

Thank you for purchasing this Furrion® product. Before operating your new appliance, please read these instructions carefully.
This instruction manual contains information for safe use, installation and maintenance of the appliance.
Please keep this instruction manual in a safe place for future reference. This will ensure safe use and reduce the risk of injury.
Be sure to pass on this manual to new owners of this appliance.
The manufacturer does not accept responsibility for any damages due to not observing these instructions.
DANGER
If you smell gas:
English
1. Shut off gas to the appliance.
2. Extinguish any open flame.
3. Open lid.
4. If odor continues, keep away from the appliance and immediately call your gas supplier or
your fire department.
WARNING
1. Do not store or use gasoline or other flammable liquids or vapors in the vicinity of this or any
other appliance.
2. An LP cylinder not connected for use shall not be stored in the vicinity of this or any other
appliance.
Table of Contents
Table of Contents ....................................................................................................................................... 1
Explanation of Symbols ............................................................................................................................2
Important Safety Instructions ..................................................................................................................2
General Safety Instructions ................................................................................................................................................................................................ 2
Important Instructions for Cleaning Your Grill ............................................................................................................................................................ 3
Product Overview ......................................................................................................................................3
Installation ..................................................................................................................................................4
What’s in the Box ...................................................................................................................................................................................................................... 4
Cut Out Dimensions & Clearance ..................................................................................................................................................................................... 4
Install the Grill ............................................................................................................................................................................................................................ 5
Gas Connection ....................................................................................................................................................................................................................... 7
Checking for Leaks ................................................................................................................................................................................................................. 7
Close the Drawer After Use ................................................................................................................................................................................................ 7
Ventilation Requirements ..................................................................................................................................................................................................... 8
Operation.....................................................................................................................................................8
Lighting Instructions ............................................................................................................................................................................................................... 8
The Burner Flame .................................................................................................................................................................................................................... 9
Grilling Tips ................................................................................................................................................. 9
Maintenance ...............................................................................................................................................9
General Cleaning Guide ....................................................................................................................................................................................................... 10
1
Page 3

Explanation of Symbols
This manual has safety information and instructions to help
you eliminate or reduce the risk of accidents and injuries.
Always respect all safety warnings identified with these
symbols. A signal word will identify safety messages and
property damage messages, and will indicate the degree or
level of hazard seriousness.
DANGER
Indicates an imminently hazardous situation which, if not
avoided, will result in death or serious injury.
Important Safety Instructions
Warning and important safety instructions appearing in this
guide are not meant to cover all possible conditions and
situations that may occur. Common sense, caution, and care
must be exercised when installing, maintaining, or operating
the appliance.
Always contact the manufacturer about problems or
conditions you do not understand.
Read and follow all instructions before using this appliance
to prevent the potential risk of fire, electric shock, personal
injury or damage to the appliance as a result of improper
usage of the appliance. Use appliance only for its intended
purpose as described in this guide.
If an external electrical source is utilized, the appliance must
be electrically grounded in accordance with state or other
codes or, in the absence of such codes, with the National
Electrical Code, ANSI/NFPA 70. Do not attempt to adjust,
repair, service or replace any part of your appliance unless it
is specifically recommended in this guide. All other servicing
should be referred to a qualified service technician.
WARNING
Indicates a potentially hazardous situation which, if not
avoided, could result in death or serious injury.
CAUTION
Indicates a potentially hazardous situation which, if not
avoided, may result in minor or moderate personal injury, or
property damage.
WARNING
For outdoor use only.
Do not install this grill in an enclosed cabinet.
WARNING
NEVER use this appliance as a space heater to heat or
warm the room. Doing so may result in carbon monoxide
poisoning and overheating of the appliance.
WARNING
● Do not close drawer for 30 minutes after grill is turned
off to allow unit to cool.
● Remove and clean the drip pan underneath of the grill
after each use.
● Disconnect the gas supply line and then close the
drawer once the grill has adequately cooled.
English
General Safety Instructions
● Remove all tape and packaging before using the
appliance. Recycle/dispose of the carton and plastic bags
after unpacking the appliance. Never allow children to
play with packaging material.
● Be sure your appliance is properly installed by a qualified
technician in accordance with state or other codes. Install
only per installation instructions provided in the literature
package for this appliance.
Ask your dealer to recommend a qualified technician and an
authorized repair service.
● Do not repair or replace any part of the appliance
unless specifically recommended in the manuals.
All other servicing should be done only by a qualified
technician. This may reduce the risk of personal injury and
damage to the appliance.
● Never modify or alter the construction of a appliance
by removing leveling legs, panels, anti-tip brackets/
screws, or any other part of the product.
WARNING
FIRE, EXPLOSION, BURN INJURY CARBON MONOXIDE
POISONING
● The cooking appliance must be completely separated
and/or sealed from other air moving or air consuming
devices such as, but not limited to furnaces, microwave
ovens clothes dryers, cooling fans and doors or drawers
in common cabinets. Failure to do so will affect the
appliance(s) combustion air supply by creating either a
negative or positive draft.
● NEGATIVE DRAFT caused by air moving appliances may
draw the burner flame down into or toward the grill resulting
in grill damage, burn hazard, explosion possibility and/or
carbon monoxide buildup.
● POSITIVE DRAFT may blow out the burner flame during use
resulting in an explosion and/or fire hazard and/or injury to
the occupants of the vehicle.
● DO NOT operate the appliance in excessive windy
conditions as this may cause a negative or positive draft.
Directions that direct current electrical supply conductors
2
Page 4

must be provided with strain relief at the appliance.
● The appliance must be isolated from the gas supply piping
system by closing its isolation valve during any pressure
testing with a pressure 11 to 13.8 water columns.
● Storage on appliance - Flammable materials should
not be stored near surface burners and/or cabinet
areas around the appliance. This includes paper,
plastic and cloth items, such as cookbooks, plasticware
and towels, as well as flammable liquids. Do not store
English
explosives, such as aerosol cans, on or near the
appliance. Flammable materials may explode and result in
fire or property damage.
● Children should not be left alone or unattended in the
area where the appliance is in use.
WARNING
DO NOT TOUCH THE GRILL RACKS, LID or ANY
SURROUNDING AREAS AROUND THE GRILL WHILE
GRILLING. These may become HOT and could cause
burns to the skin.
● Wear proper apparel - Loose fitting or hanging
garments should never be worn while using the
appliance. Do not let clothing or other flammable
materials contact hot surfaces.
● Do not use water or flour on grease fires - Smother
the fire with a pan lid, or use baking soda, a dry
chemical or foam-type extinguisher.
● When heating fat or grease, watch it closely. Fat or
grease may catch fire if allowed to become too hot.
WARNING
Gas leaks may occur in your system and result in a
dangerous situation. Gas leaks may not be detected by
smell alone. Gas suppliers recommend you purchase
and install a UL approved gas detector. Install and use in
accordance with the manufacturer’s instructions.
WARNING
In case of fire or gas leak, be sure to turn off the main gas
shutoff valve.
WARNING
NEVER LEAVE THE GRILL UNATTENDED WHILE
COOKING.
● DO NOT TOUCH GRATE OR AREAS NEAR GRATE.
The grate may be hot even though flames are not visible.
Areas near grate may become hot enough to cause burns.
During and after use, do not touch, or let clothing or other
flammable materials touch these areas until they have
had sufficient time to cool. Among these areas are the
lid and firebox, surfaces facing the grate, the firebox vent
openings and surfaces near these openings, warming
rack and lid.
Product Overview
FGL202A-SS (with lid)
Lid
Warming
Rack
Splash
Guards
Flame
Diffuser
● Use only dry potholders - Moist or damp potholders
on hot surfaces may result in burns from steam. D o
not let potholders touch hot heating burners. Do not use a
towel or other bulky cloth instead of a potholder.
● Do not heat unopened food containers - Buildup of
pressure may cause container to burst and result in
injury.
Important Instructions for Cleaning
Your Grill
● Clean the appliance regularly to keep all parts free of
grease that could catch fire.
FGL200A-SS (without lid)
Grate
Flame
Firebox
Diffuser
Grate
Firebox
Heat
Shield
3
Knob
Drip Tray Gas Connector
Heat
Shield
Knob
Drip Tray Gas Connector
Page 5

Cooking Functions and Features
The product is a grill, with adjustable burner strength.
The usable grill surface is: 155 inch2 (99990 mm2)
The flame diffuser, in combination with the adjustable burner
strength allows for good heat management.
Product Main Performance
Grill Specification:
● Minimum 8500 BTU, Maximum 10.000 BTU
● Gas pressure: LPG 11” W.C.
● Piezo ignite system
● The maximum open angle is 70o.
Installation
WARNING
If this appliance is used under an extended overhang,
leave min. 30” (762mm) distance from drawer counter top
surface to the overhang above. See overhang material
requirements below. Failure to comply could result in a fire
or personal injury.
The installation must conform with local codes or, in the
absence of local codes, with either the National Fuel
Gas Code, ANSI Z223.1/NFPA 54, or the Standard for
Recreational Vehicles, ANSI A119.2/NFPA 1192, and CSA
Z240 RV Series, Recreational Vehicle Code, as applicable.
o
70
English
F
E
G
D
What’s in the Box
FGL202A-SS
● Lid
● Warming Rack
● Grate
● Firebox
● Drip Tray
● ⅝”-18UNF Quick Connector
● User Manual
● Warranty Manual
FGL200A-SS
● Grate
● Firebox
● Drip Tray
● ⅝”-18UNF Quick Connector
● User Manual
● Warranty Manual
Cut Out Dimensions & Clearance
Drawer material requirements: The grill can be installed
in a noncombustible drawer with minimum clearance to the
surfaces around or if using a combustible material to use a
material rated for a minimum of 266oF (130oC).
Outdoor overhang material requirements: Overhang
material can be a noncombustible type material or a
combustible material with a temperature rating of 149
(65oC) at a minimum distance of 30”.
o
F
A
B
C
Side Facing Installation
H
H
I
K
H
H
J
4
Page 6
Front Facing Installation
English
H
H
J
from all combustibles.
The grill must only be installed in a pull-out drawer.
Combustible wall and overhead clearances must be
maintained.
A safety shut off valve must be installed for easy accessibility
to turn off the gas to the grill.
WARNING
After the installation is completed, the grill and gas
H
H
I
L
connection must be checked for any leaks.
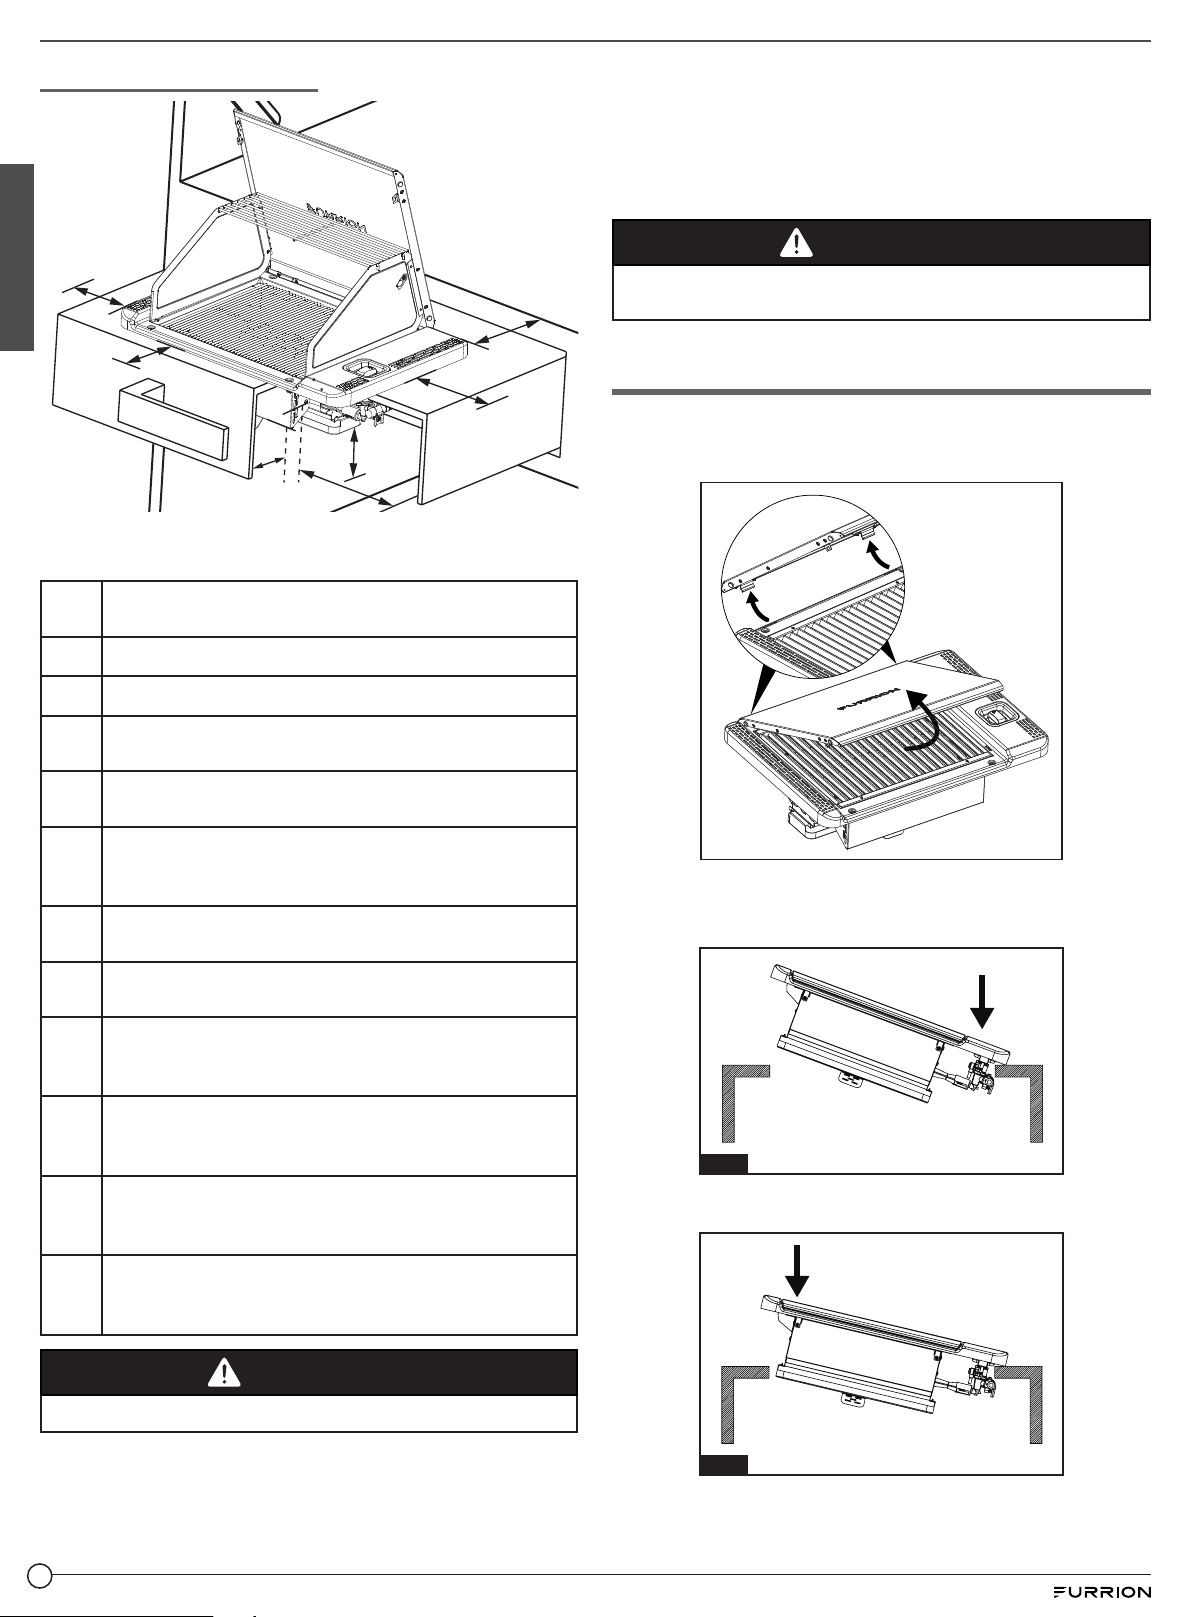
Install the Grill
1. Lift up the front of the lid (a), hold both sides of the lid and
push it a little to make the lid hinges separate from the grill
base (b), then take the lid off (only for model FGL202A-SS).
NOTE: All dimensions in the Side Facing and the Front
Facing illustrations apply for any grill installation.
Min. 6½” (165.1mm) thickness of the drawer for grill
A
install
B The depth of cut out size: 13” (330.2mm)
C The width of cut out size: 19” (482.6mm)
Min. 2” (50.8mm) from the drawer counter surface to
D
the top of the drawer opening
Min. 2” (50.8mm) distance to the front and rear sides
E
of the cut out to support the grill
Min. 30” (1016mm) distance from drawer counter top
F
surface to the overhang material above. Temperature
requirement minimum is 149
Min. 3½” (88.9mm) distance to the left and right
G
sides of the cut out to support the grill
Min. 3” (76.2mm) clearance around the grill to the
H
combustible material above the counter top surface
o
F (65oC)
Min. 12” (305mm) clearance from bottom of the grill
I
to any combustible material below the drawer (if you
install something below the drawer)
Min. 2” (50.8mm) distance from the front and rear
J
heat shield surfaces to the combustible material on
the inner front and rear surfaces of the drawer
Min. 5” (127.0mm) distance from the left side heat
K
shield surface to the combustible material on the
inner left side surface of the drawer
Min. 6½” (165.1mm) distance from the right side heat
L
shield surface to the combustible material on the
inner right side surface of the drawer
b
a
2. Place the grill into the cutout at a 30 degree angle as
shown in illustration Fig. A, Fig. B, and Fig. C.
a. Place the grill knob side into the cabinet (Fig. A).
Fig. A
b. Push down on the left side to seat the grill into the
cutout (Fig. B).
WARNING
For outdoor use only.
You grill is designed to be installed into an exterior counter
top and a pull-out drawer that extends away from the RV. It is
not designed to be installed in an enclosed cabinet.
When in use, the bottom of the grill must be free and clear
5
Fig. B
c. Pull back the grill to the left until the limit bracket hits
the cabinet cutout (Fig. C).
Page 7

Limit bracket
Limit bracket
Fig. C
3. Mount the grill with 4 screws (not included) on the drawer.
Recommend using a #8 type stainless screw that is
designed for adhering to the counter top material.
English
6. Attach the warming rack in the appropriate slots on the
splash guards.
4. Re-attach the lid to the grill by inserting the 2 angled tabs
on the bottom of the lid down into the slot openings in the
grill.
5. Rotate the splash guard holder first, then release the
splash guards and rotate them to the appropriate position,
push down the front corners into the slots.
7. Attach the drip tray to the bottom of the grill body. Ensure
the grease tray is attached correctly as detailed below.
Gas Connection
1. This product is for LP gas use only. Connect the gas
supply hose with a ⅜” female flare fitting with a ⅝”-18UNF
thread connection to the grill. Tighten the gas supply hose
to the grills gas connection using 2 wrenches.
2. Attach the gas supply hose onto the drawer to prevent it
from loosening from the fixing point when the drawer is
pulled out. (The gas supply hose holder is not included.)
NOTE: The ⅝”-18UNF quick connector provided can be
threaded on to the grill gas pipe prior to connecting the gas
supply line from the RV.
6
Page 8

the splash guard holder to secure them together.
English
Checking for Leaks
WARNING
When checking for or repairing leaks or if you smell gas,
extinguish all flames and do not turn on any device that
could cause a spark such as lights, power tools, cooking
appliances or this grill. If you cannot repair the leak, turn
the gas off and call a qualified service technician to repair
the leak.
WARNING
Never use a flame to check for leaks. Doing so may cause
serious injury, property damage or death.
WARNING
If this product maybe damaged using ½ psig or more during
test it must be disconnected.
After installing the grill or after any service or repair you must
check all gas connections for leaks.
Spray or brush a solution of 50% water and 50% liquid soap on
to all gas connections and the valve. Make sure the gas is turned
on and wait up to five minutes. If bubbles appear there is a leak.
To repair the leak, tighten the connection. If the leak persists,
shut off the gas and get a qualified service technician to
repair the leak. Liquefied Petroleum (LP) has an odorant
added to the gas. If you smell an odor, you may have a gas
leak. Follow the leak check instructions above.
a
b
3. Position the warming rack as shown below on the grate (it
should sit flat on top of the grate), close the lid according to
the arrow direction to close it. Ensure the lid locks into the 2
front slots by firmly pressing down on the lid.
4. Always remove and clean the drip tray after each use (See
page 10).
5. Disconnect the gas supply line and then close the drawer
once the grill has adequately cooled.
Close the Drawer After Use
WARNING
Allow grill to cool to touch before moving or storing. Failure
to do so could result in fire resulting in property damage,
personal injury or death.
1. Remove the warming rack after the grill has cooled for at
least 30 minutes, put it beside the grill.
2. Lift up the splash guards a little, rotate the right splash
guard (a) to the lid first, then rotate the other one (b), use
7
Ventilation Requirements
CAUTION
Your grill requires proper ventilation.
Page 9

CAUTION
The grill is designed for recreational vehicle outdoor use,
and not designed for indoor use and can not be installed in
an enclosed cabinet.
Operation
WARNING
The appliance should not be installed with a ventilation
system that blows air downward toward the grill since
this type of the ventilation system may cause ignition and
combustion problems with the gas cooking appliance
resulting in personal injury or unintended operation.
English
WARNING
NEVER LEAVE THE GRILL UNATTENDED WHILE
COOKING.
The product will have 1 rotary knobs to control the gas valve,
and piezo ignition.
● Piezo ignition, creating a spark by pushing the knob down
and rotate counterclockwise.
● OFF – HI – LO control
− OFF–The grill is shut off when the knob is in this position.
− HI–Push and Turn the knob to this position, the grill is in
maximum flame.
− LO–Turn the knob to this position for the minimum flame.
OFF position HI position LO position
NOTE: Please be sure to shut off the gas valve after you turn
off the grill.
WARNING
Immediately after turning the grill on, all surfaces of the grill
become extremely hot. Do not touch any part of the grill
except for the knob to adjust the cooking temperature or to
turn the grill off.
WARNING
● Do not close drawer for 30 minutes after grill is turned
off to allow unit to cool.
● Remove and clean the drip pan underneath of the grill
after each use.
WARNING
Do not cover the grate area exceeding 75% when using foil,
grilling cooking sheets, pots or pans or any other cooking
utensils. Exceeding this could possibly cause damage to
the drawer materials.
Lighting Instructions
WARNING
Keep your arms and face away from being
directly above the cooking area.
Open the lid and secure the splash guards
before lighting the burner. Do not close the lid
during cooking.
If ignition does not occur in 5 seconds, turn
the burner control off, wait 5 minutes, and
repeat the lighting procedure.
1. Inspect the grill regulator/gas supply hose before each
use for any leaks, cuts, abrasions, or excessive wear.
Replace any damaged components before using. Call
your dealer for replacement parts for this grill.
2. Ensure the grease drip tray is secured under the grill (see
page 10 for how to attach the grease drip tray).
3. Open the lid and secure the side panels in the appropriate
slots.
4. Place warming rack into position (if used).
5. Push down on the gas knob and turn to anti-clockwise
until you hear a clicking sound.
NOTE: If the burner does not light, repeat by turning the
gas knob back to OFF and repeat step 5.
6. Adjust knob position for desired setting.
Ensure the grill and grate have cooled prior to removing the
grate.
WARNING
Never use rocks, coal, charcoal, or anything else on or below
the grate.
8
Page 10

The Burner Flame
Flames should appear similar to the good flame shown in
diagram below.
Good
English
Bad
Yellow
Blue
A good flame should be blue with a yellow tip.
Some yellow tips on flames up to 1” (25.4mm) in length are
acceptable as long as no carbon or soot deposits appear.
If flames are excessively yellow and irregular, the oil residue
may not be completely burned off, or the venturi may be
clogged or may not be properly positioned over the orifices.
Yellow
Blue
Holes in Burner
Grilling Tips
WARNING
Food Poisoning Hazard
● Do not let food sit more than one hour before or after
cooking.
● Doing so can result in food poisoning sickness.
Before Grilling
● Thaw food before grilling.
● Turn on burner on HIGH for 10 minutes to preheat your grill,
which can provide high heat enough to brown and seal the
juices of the food.
● Brush a little oil on the grates or food when grilling low-fat
foods of meat, poultry, fish, shrimp or vegetables, which will
prevent the foods being burned or stuck on the grate.
● Trim excess fat from food prior to cooking to reduce flare-ups.
During Grilling
● Turn foods only once. Turning foods multiple times may
cause the food to become dry.
● Turn foods over when juices just begin to appear on the
surface.
● Add barbecue sauce only during the last 10 minutes of
cooking to avoid burning the sauce.
● Cooking times will vary and could take longer in
comparison to your home grill.
Maintenance
Your grill requires occasional cleaning. Always apply a Stainless.
Shine Cleaner to all external parts of your grill after cleaning, this
will keep the finish of your grill like new for many years. Keeping
the grill clean will also prevent fires and flair ups. Always follow
the manufacturers’ directions & warnings when using cleaners
& degreasers. The cooking grate should be cleaned after each
use. When needed, it should be cleaned with soap & water.
There is a grease drip pan underneath of the grill that should be
cleaned after each use.
● Keeping outdoor cooking gas appliance area clear and
free from combustible materials, gasoline and other
flammable vapors and liquids.
● Do not obstruct the flow of combustion and ventilation air.
● Keeping the ventilation opening(s) of the cylinder
enclosure free and clear from debris.
● Visually checking burner flames including pilot burner
flame, refer to “The Burner Flame” section.
● Cleaning outdoor cooking gas appliance, including
special surfaces with non-abrasive cleaners or
degreasers.
9
● Checking and cleaning burner/venturi tubes for insects
and insect nests. A clogged tube can lead to a fire
beneath the grill.
General Cleaning Guide
CAUTION
Before cleaning, ensure the grill is turned off and completely
cooled prior to removing any components and/or cleaning.
Types of Cleaners
Consider the possibility of scratching and the potential for
post-cleaning corrosion caused by incompletely removed
cleaners. Avoid using abrasive cleaners unless absolutely
necessary.
Page 11

General Cleaning
Burner Cleaning Advice
A soft cloth and clean warm water should always be the first
choice for mild stains and loose dirt and soils. A final rinse
with clean water and a dry wipe will complete the process
and eliminate the possibility of water stains.
Stainless Steel Care and Cleaning Advice
In order to maintain the good looks and lifespan of your grill,
follow these summary tips on the care of stainless steel:
When new or when cleaned and dried, we recommend the
owner apply a thin coat of olive oil to stainless steel surfaces
which should then be polished in.
Cleaning method:
● Use clean, soft cloths or sponges to clean your grill.
● Carbon steel brushes or steel wool should never be used.
● After cleaning, rinse thoroughly with water and wipe dry.
● Cleaning with chloride-containing detergents must be avoided.
● On polished finishes, rubbing or wiping should be done in
the direction of the polish lines, NOT across them.
● Care must be taken when cleaning the fascia. Printed
information may be erased with heavy cleaning.
Grate and Drip Tray Cleaning Advice
Cleaning method:
● The drip tray and cooking grate can be put into the
dishwasher to clean.
● Use only non-abrasive cleaners or degreasers designed
for use on Stainless Steel.
● Suggest to use a non scratch scrub sponge with soap and
water to clean the grate before each use.
1. Lift to remove the grate from the grill.
2. Remove the flame diffuser by unscrewing the 4 screws.
3. Wire-brush loose corrosion from the burner exterior.
Clean clogged gas port holes with an opened paper clip.
4. Replace the flame diffuser and attach with the 4 screws.
NOTE: Make sure the curved edge is facing left while
replacing the flame diffuser.
Curved edge
English
10
Page 12

Merci d’avoir acheté ce produit Furrion®. Avant d’utiliser votre nouvel appareil, veuillez lire attentivement les présentes
consignes. Le présent manuel d’instructions contient des consignes permettant une utilisation, une installation et un entretien
de l’appareil en toute sécurité.
Veuillez conserver le présent manuel d’instructions en lieu sûr afin de pouvoir vous y référer ultérieurement. Cela garantit
une utilisation en toute sécurité et réduit tout risque de blessures. Veillez à transmettre le présent manuel à tout nouveau
propriétaire de cet appareil.
Le fabricant décline toute responsabilité pour tous dommages résultant du non-respect des présentes consignes.
DANGER
Si vous sentez une odeur de gaz:
1. Coupez l'alimentation en gaz de l'appareil.
2. Éteignez toute flamme nue.
3. Ouvrez le couvercle.
4. Si l'odeur persiste, éloignez-vous de l'appareil et appelez immédiatement votre fournisseur
Français
de gaz ou votre service d'incendie.
AVERTISSEMENT
1. N'entreposez ni n'utilisez pas d'essence ou d'autres liquides ou vapeurs inflammables à
proximité de cet appareil ou de tout autre appareil.
2. Une bouteille de GPL non raccordée pour utilisation ne doit pas être entreposée à proximité
de cet appareil ou de tout autre appareil.
Table des matières
Table des matières ..................................................................................................................................... 11
Explication des symboles ......................................................................................................................... 12
Consignes de sécurité importantes ........................................................................................................ 12
Consignes générales de sécurité ..................................................................................................................................................................................... 12
Instructions importantes pour le nettoyage du barbecue ..................................................................................................................................... 13
Présentation du produit ............................................................................................................................13
Installation ..................................................................................................................................................14
Contenu de l’emballage ........................................................................................................................................................................................................ 14
Dimensions et dégagement des découpes ................................................................................................................................................................. 14
Installer le barbecue ............................................................................................................................................................................................................... 16
Raccordement au gaz ........................................................................................................................................................................................................... 17
Vérification des fuites ............................................................................................................................................................................................................ 17
Fermez le tiroir après utilisation ........................................................................................................................................................................................ 18
Exigences en matière de ventilation ............................................................................................................................................................................... 18
Utilisation ....................................................................................................................................................19
Instructions d’allumage ......................................................................................................................................................................................................... 19
La flamme du brûleur ............................................................................................................................................................................................................. 19
Conseils de cuisson ................................................................................................................................... 20
Entretien ...................................................................................................................................................... 20
Guide général de nettoyage................................................................................................................................................................................................ 20
11
Page 13

Explication des symboles
Le présent manuel contient des consignes de sécurité et des
instructions visant à vous aider à éliminer ou à réduire tout
risque d’accidents et de blessures. Respectez toujours tous les
avertissements de sécurité indiqués par les symboles ci-après.
Un terme de mise en garde indique des messages de sécurité
ainsi que des messages signalant des risques de dommages
matériels, et indique le degré ou le niveau de gravité du danger.
DANGER
Indique une situation de danger immédiat qui, si elle n’est
pas évitée, provoque des blessures graves, voire la mort.
Indique une situation de danger potentiel qui, si elle n’est pas
évitée, peut provoquer des blessures graves, voire la mort.
Indique une situation de danger potentiel qui, si elle n’est
pas évitée, peut provoquer des blessures corporelles
mineures ou modérées ou des dommages matériels.
Consignes de sécurité importantes
Les avertissements et les consignes de sécurité importantes
figurant dans le présent guide n’ont pas vocation à couvrir
toutes les conditions et situations possibles. Il convient de faire
preuve de bon sens, de prudence et user de circonspection
lors de l’installation, de l’entretien ou de l’utilisation de l’appareil.
Contactez toujours le fabricant en cas de dysfonctionnement
de l’appareil.
Veuillez lire et respecter toutes les consignes avant d’utiliser
cet appareil, afin de prévenir tout risque potentiel d’incendie,
d’électrocution, de blessures corporelles ou d’endommagement
de l’appareil du fait d’une utilisation incorrecte de celui-ci.
Utilisez cet appareil uniquement aux fins pour lesquelles il a été
conçu, tel que décrit dans le présent guide.
En cas d’utilisation d’une source d’alimentation externe,
l’appareil doit être mis à la terre conformément aux codes
de l’État ou à tout autre code ou, en l’absence de tels codes,
au code national d’électricité américain (NEC), ANSI/NFPA
70. Ne tentez pas de régler, de réparer, de réviser ou de
remplacer une pièce de votre appareil, sauf recommandation
expresse dans le présent guide. Tout autre entretien doit être
confié à un technicien qualifié.
Consignes générales de sécurité
● Retirez tout le ruban adhésif et l’emballage avant d’utiliser
l’appareil. Recyclez ou jetez le carton et les sacs en
plastique après avoir déballé l’appareil. Ne permettez
jamais aux enfants de jouer avec le matériel d’emballage.
● Assurez-vous que votre appareil est correctement installé
par un technicien qualifié, conformément aux normes
en vigueur ou autres. N’installez l’appareil que selon les
instructions d’installation fournies dans la documentation
accompagnant le présent appareil.
Demandez à votre revendeur de vous recommander un
technicien qualifié et un service de réparation agréé.
● Ne réparez ou ne remplacez aucune pièce de
l’appareil à moins que cela ne soit spécifiquement
recommandé dans les manuels. Tous les autres travaux
d’entretien ne doivent être effectués que par un technicien
qualifié. Cela peut réduire le risque de blessures
corporelles et d’endommagement de l’appareil.
● Ne modifiez ou ne transformez jamais la construction
d’un appareil en enlevant les pieds de mise à niveau,
les panneaux, les supports anti-basculement, les vis
ou toute autre partie du produit.
Pour usage extérieur uniquement.
N'installez pas ce barbecue dans une armoire fermée.
N'utilisez JAMAIS cet appareil comme appareil de
chauffage d'appoint pour chauffer ou réchauffer la pièce.
Vous risqueriez de provoquer un empoisonnement au
monoxyde de carbone et une surchauffe de l'appareil.
● Ne fermez pas le tiroir pendant 30minutes après avoir
● Retirez et nettoyez le bac d'égouttage situé sous le
● Débranchez la conduite d'alimentation en gaz et fermez
AVERTISSEMENT
ATTENTION
Français
AVERTISSEMENT
AVERTISSEMENT
AVERTISSEMENT
éteint le barbecue pour permettre à l'appareil de refroidir.
barbecue après chaque utilisation.
le tiroir une fois que le barbecue est suffisamment refroidi.
12
Page 14

AVERTISSEMENT
INCENDIE, EXPLOSION, BLESSURE PAR BRÛLURE,
INTOXICATION AU MONOXYDE DE CARBONE
● L'appareil de cuisson doit être complètement séparé
et isolé des autres dispositifs de circulation d'air ou de
consommation d'air tels que, mais sans s'y limiter, les
fournaises, les fours à micro-ondes, les sécheuses, les
ventilateurs de refroidissement et les portes ou tiroirs des
caissons communs. Le non-respect de cette consigne
affectera l'alimentation en air de combustion de l'appareil ou
des appareils en créant un courant d'air négatif ou positif.
● Le TIRAGE NÉGATIF provoqué par les appareils qui
déplacent l'air peut entraîner la flamme du brûleur vers le
bas ou vers le barbecue et causer des dommages à celui-ci,
un risque de brûlure, une explosion et/ou une accumulation
Français
de monoxyde de carbone.
● Le TIRAGE POSITIF peut éteindre la flamme du brûleur
pendant l'utilisation, ce qui peut entraîner un risque
d'explosion et/ou d'incendie et/ou de blessures pour les
occupants du véhicule.
● N’utilisez PAS l'appareil par vent excessif, car cela pourrait
causer un tirage négatif ou positif.
Les conducteurs d’alimentation en courant continu doivent
être munis d’un réducteur de tension sur l’appareil.
● L’appareil doit être isolé de la tuyauterie d’alimentation en
gaz en fermant sa vanne d’isolement lors de tout essai de
pression avec une pression de 11 à 13,8colonnes d’eau.
● Entreposage sur l’appareil - Les matériaux
inflammables ne doivent pas être entreposés
près des brûleurs de surface et/ou des armoires à
proximité de l’appareil. Cela comprend les articles
en papier, en plastique et en tissu, tels que les livres de
cuisine, les articles en plastique et les serviettes, ainsi que
les liquides inflammables. N’entreposez pas de matières
explosives, telles que des aérosols, sur l’appareil ou à
proximité. Les matières inflammables peuvent exploser et
causer un incendie ou des dommages matériels.
● Les enfants ne doivent pas être laissés seuls ou sans
surveillance dans la zone où l’appareil est utilisé.
AVERTISSEMENT
NE TOUCHEZ PAS AUX GRILLES DU BARBECUE,
À SON COUVERCLE ou À TOUT AUTRE ENDROIT
AUTOUR DU BARBECUE LORSQUE VOUS CUISINEZ.
Ceux-ci peuvent devenir CHAUDS et provoquer des
brûlures à la peau.
même si les flammes ne sont pas visibles. Les endroits
près de la grille peuvent devenir assez chauds pour
causer des brûlures. Pendant et après l’utilisation, ne
touchez pas ou ne laissez pas les vêtements ou autres
matériaux inflammables toucher ces zones jusqu’à ce
qu’ils aient eu suffisamment de temps pour refroidir.
Entre autres, il s’agit du couvercle et de la chambre de
combustion, des surfaces faisant face à la grille, des
ouvertures de ventilation de la chambre de combustion et
des surfaces situées près de ces ouvertures, du support
chauffant et du couvercle.
● Portez des vêtements appropriés - Ne portez jamais
de vêtements amples ou tombants lorsque vous
utilisez l’appareil. Assurez-vous de ne pas laisser les
vêtements ou autres matériaux inflammables entrer en
contact avec des surfaces chaudes.
● N’utilisez pas d’eau ou de farine sur les feux de
graisse - Étouffez le feu avec un couvercle de
casserole, ou utilisez du bicarbonate de soude, un
extincteur à poudre chimique ou à mousse.
● Lorsque vous chauffez de la graisse ou des matières
grasses, surveillez-les de près. La graisse ou les
matières grasses peuvent s’enflammer si on les laisse
devenir trop chaudes.
AVERTISSEMENT
Des fuites de gaz peuvent se produire dans votre système
et entraîner une situation dangereuse. Il est possible que
les fuites de gaz ne soient pas détectées uniquement
par l'odeur. Les fournisseurs de gaz vous recommandent
d'acheter et d'installer un détecteur de gaz approuvé
UL. Installez et utilisez conformément aux directives du
fabricant.
AVERTISSEMENT
En cas d'incendie ou de fuite de gaz, assurez-vous de
fermer le robinet d'arrêt principal du gaz.
● Utilisez uniquement des poignées sèches - Des
poignées humides ou mouillées sur des surfaces
chaudes peuvent causer des brûlures par la vapeur.
Ne laissez pas les poignées toucher les brûleurs
chauffants. N’utilisez pas de serviette ou d’autre tissu
épais au lieu d’une poignée.
● Ne chauffez pas les contenants d’aliments non
ouverts - L’accumulation de pression peut faire
éclater le contenant et causer des blessures.
AVERTISSEMENT
NE LAISSEZ JAMAIS LE BARBECUE SANS
SURVEILLANCE PENDANT LA CUISSON.
● NE TOUCHEZ PAS LA GRILLE OU LES ZONES
PROCHES DE LA GRILLE. La grille peut être chaude
Présentation du produit
FGL202A-SS (avec couvercle)
13
Instructions importantes pour le
nettoyage du barbecue
● Nettoyez régulièrement l’appareil afin d’éliminer
toute trace de graisse susceptible de s’enflammer.
Page 15

Couvercle
Support
chauffant
Protections
contre les
éclaboussures
Grille
Chambre à
combustion
Bouclier
thermique
Diffuseur
de flamme
Bouton
Plateau d’égouttage Raccordement au gaz
Fonctions et caractéristiques de cuisson
Le produit est un barbecue avec une puissance de brûleur
réglable.
La surface utilisable du barbecue est: 155po2 (99990mm2)
Le diffuseur de flamme, en combinaison avec la puissance
réglable du brûleur, permet une bonne gestion de la chaleur.
Performances principales du produit
Caractéristiques du barbecue:
● Minimum 8500BTU, Maximum 10000BTU
● Pression du gaz: GPL 11po W.C.
● Système d’allumage piézoélectrique
● L’angle d’ouverture maximale est de 70o.
Français
FGL200A-SS (sans couvercle)
Grille
Diffuseur
Chambre à
combustion
Bouclier
thermique
Plateau d’égouttage Raccordement au gaz
de flamme
Bouton
Installation
AVERTISSEMENT
Si cet appareil est utilisé sous un porte-à-faux prolongé,
prévoyez une distance minimale de 30po (762mm) entre
la surface du comptoir du tiroir et le porte-à-faux audessus. Consultez les exigences relatives aux matériaux
en surplomb ci-dessous. Le non-respect de cette consigne
peut entraîner un incendie ou des blessures corporelles.
L’installation doit être conforme aux normes locales ou, en
l’absence de normes locales, au National Fuel Gas Code,
ANSI Z223.1/NFPA 54 ou à la norme ANSI A119.2/NFPA 1192
pour les véhicules récréatifs et à la norme CSA Z240 RV
Series, Recreational Vehicle Code, selon le cas.
o
70
● Manuel d’utilisation
● Livret de garantie
FGL200A-SS
● Grille
● Chambre à combustion
● Plateau d’égouttage
● Connecteur rapide ⅝po-18UNF
● Manuel d’utilisation
● Livret de garantie
Dimensions et dégagement des
découpes
Contenu de l’emballage
FGL202A-SS (avec couvercle)
● Couvercle
● Support chauffant
● Grille
● Chambre à combustion
● Connecteur rapide ⅝po-18UNF
Exigences relatives aux matériaux des tiroirs: Le
barbecue peut être installé dans un tiroir incombustible
avec un dégagement minimal par rapport aux surfaces
environnantes ou, si l’on utilise un matériau combustible, avec
un matériau d’une température minimale de 266oF (130oC).
Exigences relatives aux matériaux en porte-à-faux
à l’extérieur: Le matériau en porte-à-faux peut être un
matériau incombustible ou un matériau combustible ayant
une température nominale de 149
o
F (65oC) à une distance
14
Page 16

minimale de 30po.
F
E
G
H
H
H
H
D
A
B
C
Français
Installation en façade latérale
H
H
I
K
J
Installation en façade frontale
J
I
L
REMARQUE: Toutes les dimensions indiquées dans les
illustrations d’installation en façade latérale et en façade
frontale s’appliquent à toute installation du barbecue.
Épaisseur minimale du tiroir de 6½po (165,1mm)
A
pour l'installation du barbecue
B La profondeur de la découpe: 13po (330,2mm)
C La largeur de la découpe: 19po (482,6mm)
Minimum 2po (50,8mm) de la surface du comptoir
D
du tiroir jusqu'en haut de l'ouverture du tiroir
Distance minimale de 2po (50,8mm) à l'avant et à
E
l'arrière de la découpe pour supporter le barbecue
H
H
Distance minimale de 30po (1016mm) entre la
surface du comptoir du tiroir et le matériau du porte-
F
à-faux au-dessus. La température minimale requise
est de 149
Distance minimale de 3½po (88,9mm) à gauche et
G
à droite de la découpe pour supporter le barbecue
o
F (65oC)
Dégagement minimal de 3po (76,2mm) autour du
H
barbecue par rapport au matériau combustible audessus de la surface supérieure du comptoir
Dégagement minimal de 12po (305mm) entre le
I
bas du barbecue et tout matériau combustible sous
le tiroir (si vous installez quelque chose sous le tiroir)
Distance minimale de 2po (50,8mm) entre les
surfaces avant et arrière de l'écran thermique et
J
le matériau combustible sur les surfaces avant et
arrière intérieures du tiroir
Distance minimale de 5po (127,0mm) entre la
surface du bouclier thermique du côté gauche et
K
le matériau combustible sur la surface intérieure
gauche du tiroir
Distance minimale de 6½po (165,1mm) entre la
surface du bouclier thermique du côté droit et le
L
matériau combustible sur la surface intérieure droite
du tiroir
AVERTISSEMENT
Pour usage extérieur uniquement.
15
Page 17

Le barbecue est conçu pour être installé dans un comptoir
extérieur et dans un tiroir coulissant qui s’éloigne du véhicule
récréatif. Il n’est pas conçu pour être installé dans une
armoire fermée.
Lors de l’utilisation, le fond du barbecue doit être libre et
dégagé de tout combustible.
Le barbecue ne doit être installé que dans un tiroir coulissant.
Les dégagements pour les murs et les plafonds combustibles
doivent être maintenus.
Un robinet d’arrêt de sécurité doit être installé pour faciliter
l’accès afin de couper l’alimentation en gaz du barbecue.
AVERTISSEMENT
Une fois l'installation terminée, vérifiez l'absence de fuites
dans le barbecue et le raccordement au gaz.
Installer le barbecue
1. Soulevez l’avant du couvercle (a), tenez les deux côtés
du couvercle et poussez-le légèrement pour séparer
les charnières du couvercle de la base du barbecue (b),
puis retirez le couvercle (uniquement pour le modèle
FGL202A-SS).
Fig. B
c. Tirez la grille vers la gauche jusqu’à ce que le support de
limite touche la découpe de l’armoire (Fig.C).
Français
Support de limite
b
a
2. Placez la grille dans l’ouverture à un angle de 30degrés
comme indiqué sur l’illustration Fig.A, Fig.B et Fig.C.
a. Placez le côté du bouton du gril dans l’armoire (Fig.A).
Support de limite
Fig. C
3. Fixez le barbecue à l’aide de 4vis (non fournies) sur
le tiroir. Il est recommandé d’utiliser une vis en acier
inoxydable de type #8 qui est conçue pour adhérer au
matériau du comptoir.
Fig. A
b. Poussez vers le bas sur le côté gauche pour placer la
grille dans la découpe (Fig.B).
4. Fixez de nouveau le couvercle au barbecue en insérant les
2languettes coudées au bas du couvercle dans les fentes
du barbecue.
16
Page 18

5. Tournez d’abord le support de protection contre les
éclaboussures, puis relâchez les protections et faites-les
pivoter dans la position appropriée, poussez les coins
avant vers le bas dans les fentes.
Français
6. Attachez le support chauffant dans les fentes appropriées
sur les supports de protection contre les éclaboussures.
Raccordement au gaz
1. Ce produit est réservé à l’usage du gaz de pétrole
liquéfié (GPL). Raccordez le tuyau d’alimentation en gaz
à la grille à l’aide d’un raccord évasé femelle de ⅜po
avec un raccord fileté de ⅝po-18UNF. Serrez le tuyau
d’alimentation en gaz au raccord de gaz de la grille à l’aide
de deuxclés.
2. Fixez le tuyau d’alimentation en gaz sur le tiroir pour éviter
qu’il ne se détache du point de fixation lorsque le tiroir est
rétracté. (Le support de tuyau d’alimentation en gaz n’est
pas inclus.)
REMARQUE: Le raccord rapide ⅝po-18UNF fourni
peut être vissé sur la conduite de gaz de la grille avant de
raccorder le tuyau d’alimentation en gaz du VR.
7. Fixez le plateau d’égouttage au fond du corps du
barbecue. Assurez-vous que le bac à graisse est
correctement fixé comme indiqué ci-dessous.
17
Vérification des fuites
AVERTISSEMENT
Lorsque vous vérifiez ou réparez des fuites ou si vous
sentez une odeur de gaz, éteignez toutes les flammes et
n'allumez aucun appareil qui pourrait causer une étincelle
comme les lumières, les outils électriques, les appareils de
cuisson ou ce barbecue. Si vous ne pouvez pas réparer la
fuite, éteignez le gaz et appelez un technicien qualifié pour
réparer la fuite.
Page 19

AVERTISSEMENT
Ne vérifiez jamais l'absence de fuites à l'aide d'une flamme.
Vous risqueriez de provoquer des blessures graves, des
dommages matériels ou la mort.
AVERTISSEMENT
Si ce produit peut être endommagé en utilisant ½psig ou
plus pendant le test, il doit être débranché.
Après l’installation du barbecue ou après tout entretien
ou réparation, vous devez vérifier l’étanchéité de tous les
raccords de gaz.
Pulvérisez ou brossez une solution de 50% d’eau et 50%
de savon liquide sur tous les raccords de gaz et sur la vanne.
Assurez-vous que le gaz est bien ouvert et attendez jusqu’à
cinq minutes. Si des bulles apparaissent, il y a une fuite.
Afin de réparer la fuite, resserrez le raccord. Si la fuite
persiste, fermez le gaz et faites réparer la fuite par un
technicien qualifié. Le gaz de pétrole liquéfié (GPL) a une
odeur ajoutée au gaz. Si vous sentez une odeur, il est possible
que le gaz s’échappe. Suivez les instructions de vérification
des fuites ci-dessus.
2fentes avant en appuyant fermement sur le couvercle.
Français
4. Retirez et nettoyez toujours le plateau d’égouttage après
chaque utilisation (voir page 10).
5. Débranchez la conduite d’alimentation en gaz et fermez le
tiroir une fois que le barbecue est suffisamment refroidi.
Fermez le tiroir après utilisation
AVERTISSEMENT
Laissez le barbecue refroidir au toucher avant de le
déplacer ou de le ranger. Le non-respect de cette consigne
peut entraîner un incendie et causer des dommages
matériels, des blessures corporelles ou la mort.
1. Retirez le support chauffant une fois que le barbecue a
refroidi pendant au moins 30minutes, placez-le à côté du
barbecue.
2. Soulevez légèrement les protections contre les
éclaboussures, tournez d’abord la protection droite
(a) vers le couvercle, puis tournez l’autre (b), utilisez le
support de protection contre les éclaboussures pour les
attacher ensemble.
a
b
Exigences en matière de ventilation
ATTENTION
Le barbecue nécessite une ventilation adéquate.
ATTENTION
Le barbecue est conçu pour être utilisé à l'extérieur, par
les véhicules récréatifs, et non à l'intérieur, et ne peut être
installé dans une armoire fermée.
AVERTISSEMENT
L'appareil ne doit pas être installé avec un système de
ventilation qui souffle l'air vers le bas en direction du
barbecue, car ce type de système de ventilation peut
causer des problèmes d'inflammation et de combustion
de l'appareil de cuisson au gaz, causant des blessures
corporelles ou un fonctionnement non intentionnel.
3. Placez le support chauffant comme indiqué ci-dessous
sur la grille (il doit reposer à plat sur le dessus de la grille),
fermez le couvercle en suivant la direction de la flèche.
Assurez-vous que le couvercle se verrouille dans les
18
Page 20

Utilisation
AVERTISSEMENT
NE LAISSEZ JAMAIS LE BARBECUE SANS
SURVEILLANCE PENDANT LA CUISSON.
Le produit aura 1bouton rotatif pour contrôler la valve de gaz
et l’allumage piézoélectrique.
● Allumage piézoélectrique, qui produit une étincelle en
poussant le bouton vers le bas et en le tournant dans le
sens anti-horaire.
● Commande OFF – HI – LO (Arrêt – Haut – Bas)
− OFF (Arrêt)–le barbecue est éteint lorsque le bouton est
Français
dans cette position.
− HI (Haut)–Poussez et tournez le bouton sur cette
position, le barbecue produit une flamme maximale.
− LO (Bas)–Tournez le bouton sur cette position pour
obtenir une flamme minimale.
Position OFF (Arrêt) Position HI (Haut) Position LO (Bas)
REMARQUE: Assurez-vous de fermer la valve de gaz après
avoir éteint le barbecue.
AVERTISSEMENT
Aussitôt après avoir allumé le barbecue, toutes les
surfaces du barbecue deviennent extrêmement chaudes.
Ne touchez à aucune partie du barbecue, à l'exception du
bouton qui permet de régler la température de cuisson ou
de l'éteindre.
AVERTISSEMENT
● Ne fermez pas le tiroir pendant 30minutes après avoir
éteint le barbecue pour permettre à l'appareil de refroidir.
● Retirez et nettoyez le bac d'égouttage situé sous le
barbecue après chaque utilisation.
Instructions d’allumage
AVERTISSEMENT
Ne placez pas vos bras et votre visage
directement au-dessus de la zone de cuisson.
Ouvrez le couvercle et fixez les protections contre
les éclaboussures avant d'allumer le brûleur. Ne
fermez pas le couvercle pendant la cuisson.
Si l'allumage ne se produit pas dans les
5secondes, éteignez la commande du brûleur,
attendez 5minutes, et répétez la procédure
d'allumage.
1. Inspectez le régulateur du barbecue/tuyau d’alimentation
en gaz avant chaque utilisation pour déceler toute fuite,
coupure, abrasion ou usure excessive. Remplacez tout
composant endommagé avant de l’utiliser. Appelez votre
détaillant pour obtenir des pièces de rechange pour ce
barbecue.
2. Assurez-vous que le plateau d’égouttage de graisse est
fixé sous le barbecue (voir page 10 pour la façon de fixer
le plateau d’égouttage de graisse).
3. Ouvrez le couvercle et fixez les panneaux latéraux dans
les fentes appropriées.
4. Placez le support chauffant en position (si utilisé).
5. Appuyez sur le bouton du gaz et tournez-le dans le sens
anti-horaire jusqu’à ce que vous entendiez un déclic.
REMARQUE: Si le brûleur ne s’allume pas, répétez
l’opération en tournant le bouton du gaz en position OFF
(Arrêt) et répétez l’étape 5.
6. Ajustez la position du bouton pour le réglage désiré.
Assurez-vous que le barbecue et la grille ont refroidi avant de
retirer la grille.
La flamme du brûleur
Les flammes doivent ressembler à la flamme correcte
montrée dans le diagramme ci-dessous.
AVERTISSEMENT
N'utilisez jamais de roches, de charbon, de charbon de bois
ou autre chose sur ou sous la grille.
AVERTISSEMENT
Ne recouvrez pas la surface de la grille de plus de 75%
lorsque vous utilisez du papier d'aluminium, des plaques de
cuisson, des casseroles, des poêles ou tout autre matériel
de cuisine pour cuisiner. Le dépassement de cette valeur
peut endommager les matériaux du tiroir.
19
Jaune
Correct
Bleu
Incorrect
Jaune
Orifices du brûleur
Bleu
Page 21

Une flamme correcte doit être bleue avec une pointe jaune.
Certaines pointes jaunes sur des flammes allant jusqu’à 1po
(25,4mm) de longueur sont acceptables tant qu’aucun dépôt
de carbone ou de suie n’apparaît.
Conseils de cuisson
Si les flammes sont excessivement jaunes et irrégulières, il
se peut que les résidus d’huile ne soient pas complètement
brûlés, que le venturi soit bouché ou qu’il ne soit pas
correctement positionné sur les orifices.
AVERTISSEMENT
Risque d’intoxication alimentaire
● Ne laissez pas les aliments reposer plus d'une heure
avant ou après la cuisson.
● Cela peut entraîner une intoxication alimentaire.
Avant de cuisiner
● Décongelez les aliments avant de les cuisiner.
● Allumez le brûleur en position HI (Haut) pendant 10minutes
pour préchauffer le barbecue, qui peut fournir suffisamment
de chaleur pour dorer et sceller les jus des aliments.
● Badigeonnez un peu d’huile sur les grilles ou les aliments
lorsque vous cuisinez de la viande, de la volaille, du poisson,
Entretien
Le barbecue nécessite un nettoyage occasionnel. Après le
nettoyage, appliquez toujours un nettoyant lustrant inoxydable
sur toutes les parties extérieures du barbecue, afin de conserver
son fini comme neuf pour de nombreuses années. En gardant
le barbecue propre, vous éviterez également les incendies
et les brûlures. Respectez toujours les consignes et les
avertissements du fabricant lorsque vous utilisez des nettoyants
et des dégraissants. La grille de cuisson doit être nettoyée
après chaque utilisation. Au besoin, il faut la nettoyer à l’eau
et au savon. Un bac d’égouttage de graisse se trouve sous le
barbecue et doit être nettoyé après chaque utilisation.
● Gardez l’espace extérieur de l’appareil de cuisson au gaz
dégagé et exempt de matières combustibles, d’essence et
d’autres vapeurs et liquides inflammables.
● N’obstruez pas le flux d’air de combustion et de
ventilation.
● Gardez l’ouverture ou les ouvertures de ventilation de
l’enceinte du cylindre libre(s) et dégagée(s) de débris.
● Vérifiez visuellement les flammes du brûleur, y compris
la flamme de la veilleuse, voir la section «La flamme du
brûleur».
● Nettoyez les appareils à gaz de cuisson extérieurs, y
compris les surfaces spéciales avec des nettoyants ou
dégraissants non abrasifs.
● Vérifiez et nettoyez les tubes des brûleurs/de ventilation
pour détecter la présence d’insectes et de nids d’insectes.
Un tube bouché peut provoquer un incendie sous le
barbecue.
des crevettes ou des légumes faibles en gras, afin d’éviter
que les aliments soient brûlés ou collés sur la grille.
● Enlevez l’excès de gras des aliments avant la cuisson pour
réduire les flambées.
Français
Pendant la cuisson
● Ne tournez les aliments qu’une seule fois. Le fait de
tourner les aliments plusieurs fois peut les dessécher.
● Tournez les aliments lorsque les jus commencent tout
juste à apparaître sur la surface.
● N’ajoutez la sauce barbecue que pendant les 10 dernières
minutes de cuisson pour éviter de brûler la sauce.
● Le temps de cuisson varie et peut prendre plus de temps
que celui du barbecue domestique.
Guide général de nettoyage
ATTENTION
Assurez-vous que le barbecue est éteint et complètement
refroidi avant d'enlever tout composant et/ou de le nettoyer.
Types de nettoyeurs
Envisagez la possibilité d’égratignures et le risque de
corrosion après le nettoyage causé par des nettoyants
enlevés de façon incomplète. Évitez d’utiliser des nettoyants
abrasifs, sauf en cas d’absolue nécessité.
Nettoyage général
Un chiffon doux et de l’eau chaude propre devraient
toujours être le premier choix pour les taches légères et la
saleté. Un rinçage final à l’eau propre et un essuyage à sec
complèteront le processus et élimineront la possibilité de
taches d’eau.
Conseils d’entretien et de nettoyage de l’acier
inoxydable
Afin de préserver l’apparence et la durée de vie du barbecue,
suivez ces conseils sur l’entretien de l’acier inoxydable: À
l’état neuf ou nettoyé et séché, nous recommandons au
propriétaire d’appliquer une fine couche d’huile d’olive sur les
surfaces en acier inoxydable qui doivent ensuite être polies.
Méthode de nettoyage:
● Utilisez des chiffons ou des éponges propres et doux pour
nettoyer le barbecue.
20
Page 22

● N’utilisez jamais de brosses en acier au carbone ou de la
laine d’acier.
● Après le nettoyage, rincez abondamment à l’eau et
essuyez.
● Le nettoyage avec des détergents contenant du chlorure
doit être évité.
● Sur les finitions polies, frottez ou essuyez dans le sens des
lignes de polissage, et NON à travers elles.
● Il faut être prudent lors du nettoyage de la façade. Les
informations imprimées peuvent être effacées lors d’un
nettoyage intensif.
Conseils de nettoyage du brûleur
1. Soulevez pour retirer le grillage de la grille.
2. Enlevez le diffuseur de flamme en dévissant les quatrevis.
3. La corrosion de l’extérieur du brûleur peut être enlevée
à l’aide d’une brosse métallique. Nettoyez les orifices
d’admission de gaz obstrués avec un trombone ouvert.
4. Replacez le diffuseur de flamme et fixez-le avec les quatre
vis.
REMARQUE: Assurez-vous que le bord courbé est tourné
vers la gauche lors du remplacement du diffuseur de flamme.
Conseils de nettoyage de la grille et du plateau
d’égouttage
Méthode de nettoyage:
Français
● Le plateau d’égouttage et la grille de cuisson peuvent être
nettoyés dans le lave-vaisselle.
● N’utilisez que des nettoyants ou dégraissants non abrasifs
conçus pour l’acier inoxydable.
● Il est suggéré d’utiliser une éponge à récurer non abrasive
avec de l’eau et du savon pour nettoyer la grille avant
chaque utilisation.
Bord courbé
21
Page 23

Gracias por comprar este producto de Furrion®. Antes de usar su nuevo electrodoméstico, lea atentamente estas
instrucciones. Este manual de instrucciones contiene información relativa al uso seguro, a la instalación y al mantenimiento
del electrodoméstico.
Guarde este manual de instrucciones en un lugar seguro para usarlo como referencia a futuro. Esto garantizará un uso seguro
y reducirá el riesgo de lesiones. Asegúrese de entregar este manual a los nuevos propietarios del electrodoméstico.
El fabricante no acepta responsabilidad por daños provocados por no seguir estas instrucciones.
PELIGRO
Si siente olor a gas:
1. Cierre el pase de gas hacia el electrodoméstico.
2. Apague todas las llamas abiertas.
3. Abra la tapa.
4. Si el olor continúa, manténgase alejado del electrodoméstico y llame de inmediato a su
proveedor de gas o al destacamento de bomberos.
ADVERTENCIA
1. No almacene ni utilice gasolina u otros líquidos o vapores inflamables cerca de este o
cualquier otro electrodoméstico.
2. No se debe almacenar cilindros de gas que no estén conectados para su uso cerca de este o
cualquier otro electrodoméstico.
Español
Índice
Índice ...........................................................................................................................................................22
Explicación de los símbolos ..................................................................................................................... 23
Instrucciones de seguridad importantes ............................................................................................... 23
Instrucciones generales de seguridad ........................................................................................................................................................................... 23
Instrucciones importantes para limpiar su parrilla.................................................................................................................................................... 24
Resumen del producto .............................................................................................................................. 25
Instalación ...................................................................................................................................................25
Contenido .................................................................................................................................................................................................................................... 25
Dimensiones del corte y distancias de separación .................................................................................................................................................. 26
Instalación de la parrilla ........................................................................................................................................................................................................ 27
Conexión de gas ...................................................................................................................................................................................................................... 28
Verificación de fugas ..............................................................................................................................................................................................................28
Cierre el cajón después de usarla .................................................................................................................................................................................... 29
Requisitos de ventilación ..................................................................................................................................................................................................... 29
Funcionamiento .........................................................................................................................................30
Instrucciones de encendido ............................................................................................................................................................................................... 30
La llama del quemador .......................................................................................................................................................................................................... 30
Consejos útiles para cocinar a la parrilla ...............................................................................................31
Mantenimiento ............................................................................................................................................31
Guía de limpieza general ...................................................................................................................................................................................................... 31
22
Page 24

Explicación de los símbolos
Este manual tiene información de seguridad e instrucciones
para ayudarle a eliminar o reducir el riesgo de accidentes
y lesiones. Respete siempre todas las advertencias de
seguridad identificadas con estos símbolos. Una palabra de
aviso identificará los mensajes de seguridad y de daños a la
propiedad, e indicará el grado o nivel de gravedad del peligro.
PELIGRO
Indica una situación peligrosa que, de no evitarse,
provocará la muerte o lesiones graves.
Indica una situación potencialmente peligrosa que, de no
evitarse, podría provocar la muerte o lesiones graves.
Indica una situación potencialmente peligrosa que, de no
evitarse, podría provocar lesiones personales menores o
moderadas, o bien daño a la propiedad.
Instrucciones de seguridad importantes
Las advertencias e instrucciones de seguridad importantes
que aparecen en esta guía no están hechas para cubrir
todas las posibles condiciones situaciones que puedan
ocurrir. Se debe usar el sentido común, la precaución y el
Español
cuidado en todo momento al instalar, mantener y usar el
electrodoméstico.
Contacte siempre al fabricante en torno a problemas o
condiciones que no comprenda.
Lea y siga todas las instrucciones antes de usar este
electrodoméstico para prevenir el riesgo potencial de
incendio, descarga eléctrica, lesiones personales o daños al
electrodoméstico como resultado de un uso inadecuado del
mismo. Utilice el electrodoméstico únicamente para el uso
previsto, tal y como se describe en esta guía.
Si se utiliza una fuente eléctrica externa, el electrodoméstico
debe estar conectado a tierra de acuerdo con las normas
del estado u otros códigos o, en ausencia de dichas normas,
con el Código Eléctrico Nacional, ANSI/NFPA70. No intente
ajustar, reparar, realizar el mantenimiento o reemplazar
ninguna pieza de su electrodoméstico a menos que se
recomiende específicamente en esta guía. Todas las demás
reparaciones deben ser realizadas por un técnico de servicio
cualificado.
Instrucciones generales de seguridad
● Retire todas las cintas y material de embalaje antes de
utilizar el electrodoméstico. Recicle/deseche el cartón
y las bolsas de plástico después de desempaquetar el
electrodoméstico. Nunca permita que los niños jueguen
con el material del empaque.
● Asegúrese de que su electrodoméstico sea instalado
correctamente por un técnico cualificado de acuerdo con
las normas estatales o de otro tipo. Realice la instalación
únicamente según las instrucciones de instalación
proporcionadas en el paquete de documentación de este
electrodoméstico.
Pida a su distribuidor que le recomiende un técnico
cualificado y un servicio de reparación autorizado.
● No repare ni reemplace ninguna pieza del
electrodoméstico a menos que se recomiende
específicamente en los manuales. Todas las demás
operaciones de mantenimiento deben ser realizadas
únicamente por un técnico cualificado. Esto puede
reducir el riesgo de sufrir lesiones personales y daños al
electrodoméstico.
● Nunca modifique o altere la construcción de un
electrodoméstico quitando las patas niveladoras, los
paneles, los tornillos/soportes antivuelco o cualquier
otra pieza del producto.
Únicamente para uso en exteriores.
No instale esta parrilla en un gabinete cerrado.
NUNCA utilice este electrodoméstico como un aparato de
calefacción para calentar la habitación. Si lo hace, puede
provocar envenenamiento por monóxido de carbono y
sobrecalentamiento del electrodoméstico.
● No cierre el cajón durante los 30minutos posteriores
al apagado de la parrilla para permitir que la unidad se
enfríe.
● Retire y limpie la bandeja de goteo debajo de la parrilla
después de cada uso.
● Desconecte la manguera de suministro de gas y
cierre el cajón una vez que la parrilla se haya enfriado
adecuadamente.
ADVERTENCIA
PRECAUCIÓN
ADVERTENCIA
ADVERTENCIA
ADVERTENCIA
23
Page 25

ADVERTENCIA
INCENDIO, EXPLOSIÓN, LESIÓN POR QUEMADURAS,
INTOXICACIÓN POR MONÓXIDO DE CARBONO
● El electrodoméstico de cocina debe estar completamente
separado y/o aislado de otros dispositivos que muevan
o consuman aire, tales como, aunque no exclusivamente,
calderas, hornos de microondas, secadoras de ropa,
ventiladores de enfriamiento y puertas o cajones en
armarios comunes. Si no lo hace, el suministro de aire de
combustión del electrodoméstico se verá afectado por la
creación de una corriente de aire negativa o positiva.
● La CORRIENTE DE AIRE NEGATIVA causada por
electrodomésticos que mueven aire puede hacer que
la llama del quemador descienda hacia o dentro de la
parrilla y que provoque daños en la parrilla, peligro de sufrir
quemaduras, posibilidad de explosión y/o acumulación de
monóxido de carbono.
● La CORRIENTE DE AIRE POSITIVA puede apagar la llama
del quemador durante el uso y provocar una explosión
y/o peligro de incendio y/o lesiones a los ocupantes del
vehículo.
● NO opere el electrodoméstico en condiciones de viento
excesivo, ya que esto puede causar una corriente de aire
negativa o positiva.
Instrucciones para que los conductores de suministro
eléctrico de corriente continua estén provistos de protección
contra tirones en el electrodoméstico.
● El electrodoméstico debe aislarse del sistema de tuberías
de suministro de gas cerrando su válvula de aislamiento
durante cualquier prueba de presión con una presión de 11
a 13.8columnas de agua.
● Almacenamiento en el electrodoméstico: los
materiales inflamables no deben almacenarse cerca
de quemadores de superficie y/o áreas del gabinete
alrededor del electrodoméstico. Esto incluye artículos
de papel, plástico y tela, como libros de cocina, utensilios
de plástico y toallas, así como líquidos inflamables. No
almacene explosivos, como latas de aerosol, sobre o
cerca del electrodoméstico. Los materiales inflamables
pueden explotar y provocar incendios o daños a la
propiedad.
● No se debe dejar a los niños solos o desatendidos en
el área donde se usa el electrodoméstico.
ADVERTENCIA
NO TOQUE LAS REJILLAS, LA TAPA ni NINGUNA
ZONA ALREDEDOR DE LA PARRILLA MIENTRAS
COCINA. Pueden calentarse y causar quemaduras en
la piel.
ADVERTENCIA
NUNCA DEJE LA PARRILLA DESATENDIDA MIENTRAS
COCINA.
● NO TOQUE LA REJILLA NI LAS ÁREAS CERCANAS
A LA REJILLA. La rejilla puede estar caliente aunque
las llamas no sean visibles. Las áreas cercanas a la rejilla
pueden calentarse lo suficiente como para provocar
quemaduras. Durante y después del uso, no toque ni
permita que la ropa u otros materiales inflamables entren
en contacto con estas áreas hasta que hayan tenido
suficiente tiempo para enfriarse. Entre estas áreas
se encuentran la tapa y la cámara de combustión, las
superficies orientadas hacia la rejilla, las aberturas de
ventilación de la cámara de combustión y las superficies
cercanas a estas aberturas, la rejilla de calentamiento y la
tapa.
● Utilice ropa adecuada. Nunca debe usar ropa
suelta ni accesorios colgantes mientras utilice el
electrodoméstico. No permita que la ropa u otros
materiales inflamables entren en contacto con superficies
calientes.
● No use agua ni harina en incendios provocados por
la grasa. Ahogue el fuego con la tapa de una olla,
utilice bicarbonato de sodio o un extintor de espuma
o polvo químico seco.
● Cuando caliente grasa o aceite, vigílelo con atención.
La grasa o el aceite pueden incendiarse si se dejan que se
calienten demasiado.
ADVERTENCIA
Se pueden producir fugas de gas en su sistema y generar
una situación peligrosa. Las fugas de gas pueden no
ser detectadas solo por el olor. Los proveedores de gas
recomiendan que compre e instale un detector de gas
aprobado por UL. Instale y utilice el producto según las
instrucciones del fabricante.
ADVERTENCIA
En caso de incendio o fuga de gas, asegúrese de cerrar la
válvula principal de suministro de gas.
● Use manoplas o agarradores de ollas que estén
secos para sostener las ollas. Si están húmedos
o mojados, pueden provocar quemaduras al tocar
superficies calientes debido al vapor. No permita
que las manoplas o agarradores de ollas toquen los
quemadores calientes. No utilice una toalla u otro paño
voluminoso en lugar de un agarrador de ollas.
● No caliente recipientes de alimentos sin abrir.
La acumulación de presión puede hacer que el
recipiente explote y provoque lesiones.
Instrucciones importantes para limpiar
su parrilla
● Limpie el electrodoméstico periódicamente para
mantener sin grasa todas las piezas que pudieran
incendiarse.
Español
24
Page 26

Resumen del producto
FGL202A-SS (con tapa)
Ta p a
Rejilla de
calentamiento
Protectores de
salpicaduras
Rejilla
Cámara de
combustión
Protección
para el calor
Español
FGL200A-SS (sin tapa)
Rejilla
Difusor
de llama
Perilla
Bandeja de goteo Conector de gas
Características y funciones de cocción
El producto es una parrilla, con intensidad ajustable del
quemador.
La superficie utilizable de la parrilla es: 155pulgadas2
(99990mm2)
El difusor de llama, en combinación con la intensidad
ajustable del quemador, permite una buena gestión del calor.
Desempeño principal del producto
Especificación de la parrilla:
● Mínimo 8500BTU, Máximo 10000BTU
● Presión del gas: LPG 11” W.C.
● Sistema de encendido piezoeléctrico
● El ángulo de apertura máximo es 70o.
o
70
Difusor
Cámara de
combustión
Protección
para el calor
Bandeja de goteo Conector de gas
de llama
Instalación
ADVERTENCIA
Si este electrodoméstico se utiliza bajo un voladizo
prolongado, deje como mínimo 30” (762mm) de distancia
desde la superficie de la encimera del cajón hasta el
voladizo de arriba. Consulte a continuación los requisitos
de material para el voladizo. El incumplimiento de esta
advertencia podría provocar un incendio o lesiones
personales.
La instalación debe cumplir con las normas locales o, ante
la ausencia de normas locales, con el Código Nacional de
Gas Combustible, ANSI Z223.1/NFPA 54, o la Norma para
Vehículos Recreativos, ANSI A119.2/NFPA 1192, y la Serie
CSA Z240 RV, Código de Vehículos Recreativos, según
corresponda.
25
Perilla
Contenido
FGL202A-SS (con tapa)
● Ta p a
● Rejilla de calentamiento
● Rejilla
● Cámara de combustión
● Bandeja de goteo
● Conector rápido de ⅝”-18UNF
● Manual del usuario
● Manual de garantía
FGL200A-SS
● Rejilla
● Cámara de combustión
● Bandeja de goteo
● Conector rápido de ⅝”-18UNF
Page 27

● Manual del usuario
● Manual de garantía
Dimensiones del corte y distancias de
separación
Requisitos del material del cajón: La parrilla se puede
instalar en un cajón no combustible con una separación
mínima de las superficies que la rodean o si se utiliza un
material combustible, se debe utilizar un material clasificado
para 266oF (130oC).
Requisitos para el material voladizo exterior: El material
voladizo puede ser un tipo de material incombustible o un
material combustible con una clasificación de temperatura
de 149
o
F (65oC) y debe estar a una distancia mínima de 30”.
F
E
G
D
Instalación con orientación frontal
H
H
H
H
J
NOTA: Todas las dimensiones en las ilustraciones de
orientación lateral y orientación frontal son válidas para
cualquier instalación de la parrilla.
Mín. 6½” (165.1mm) de espesor del cajón para
A
instalación de la parrilla
B La profundidad del tamaño del corte: 13” (330.2mm)
C El ancho del tamaño del corte: 19” (482.6mm)
I
L
Español
A
B
C
Instalación con orientación lateral
H
H
I
K
J
Mín. 2" (50.8mm) desde la superficie de la encimera
D
del cajón hasta la parte superior de la abertura del
cajón
Mín. 2" (50.8mm) de distancia a la parte delantera y
E
trasera del corte para sostener la parrilla
Mín. 30” (1016mm) de distancia desde la superficie
de la encimera del cajón hasta el material
F
del voladizo de arriba. El requisito mínimo de
temperatura es 149
Mín. 3½” (88.9mm) de distancia a los laterales
G
izquierdo y derecho del corte para sostener la parrilla
o
F (65oC)
Mín. 3" (76.2mm) de separación alrededor de la
H
parrilla hacia el material combustible por encima de
la superficie de la encimera
Mín. 12" (305mm) de separación desde la parte
inferior de la parrilla hasta cualquier material
H
I
combustible debajo del cajón (si se instala algo
debajo del cajón)
H
Mín. 2" (50.8mm) de distancia desde las superficies
delantera y trasera de la protección de calor hasta
J
el material combustible en las superficies interiores
delantera y trasera del cajón
Mín. 5" (127mm) de distancia desde la superficie
lateral izquierda de la protección de calor hasta
K
el material combustible en la superficie interior
izquierda del cajón
Mín. 6½” (165.1mm) de distancia desde la superficie
lateral derecha de la protección de calor hasta
L
el material combustible en la superficie interior
derecha del cajón
26
Page 28

ADVERTENCIA
Únicamente para uso en exteriores.
Su parrilla está diseñada para instalarse en una encimera
exterior y en un cajón extraíble que se extienda hacia fuera
de la casa rodante. No está diseñado para instalarse en un
gabinete cerrado.
Cuando se utilice, la parte inferior de la parrilla debe estar
libre y despejado de cualquier material combustible.
La parrilla debe instalarse únicamente en un cajón extraíble.
Se deben mantener las separaciones correspondientes de
materiales combustibles en la pared y por encima.
Se debe instalar una válvula de cierre de seguridad para
facilitar el acceso y cerrar el paso de gas hacia la parrilla.
ADVERTENCIA
Una vez finalizada la instalación, se debe comprobar si hay
fugas en la parrilla y en la conexión de gas.
Fig. B
C. Retire la parrilla a la izquierda hasta que el soporte
límite toque el corte del armario (Fig. C).
Instalación de la parrilla
1. Levante la parte delantera de la tapa (a), sostenga ambos
Español
lados de la tapa y empújela un poco para separar las
bisagras de la tapa de la base de la parrilla (b), luego retire
la tapa (sólo para el modelo FGL202A-SS).
b
a
2. Coloque la parrilla en el corte en un ángulo de 30grados
como se muestra en Fig. A, Fig. B, y Fig. C.
a. Coloque la perilla de la parrilla en el armario (Fig. A).
Soporte límite
Soporte límite
Fig. C
3. Sujete la parrilla al cajón con 4tornillos (no incluidos).
Recomendamos usar tornillos de acero inoxidable tipo
#8 que están diseñados para adherirse al material de las
encimeras.
Fig. A
b. Empuje hacia abajo en el lado izquierdo para colocar la
parrilla en el corte (Fig. B).
27
4. Vuelva a colocar la tapa en la parrilla insertando las dos
pestañas en ángulo en la parte inferior de la tapa en las
ranuras de la parrilla.
Page 29

5. Gire primero el soporte del protector de salpicaduras,
luego suelte los protectores de salpicaduras y gírelos a
la posición apropiada, empuje hacia abajo las esquinas
delanteras en las ranuras.
6. Coloque la rejilla de calentamiento en las ranuras
apropiadas de los protectores de salpicaduras.
Conexión de gas
1. Este producto es apto solo para gas licuado de petróleo.
Conecte la manguera de suministro de gas con una
boquilla hembra de 3/8” con una conexión roscada de
5/8”-18UNF a la parrilla. Ajuste la manguera de suministro
de gas a la conexión de gas de la parrilla usando 2llaves.
2. Sujete la manguera de suministro de gas al cajón para
evitar que se afloje del punto de fijación al extraer el cajón.
(El soporte de manguera de suministro de gas no está
incluido.)
NOTA: El conector rápido de ⅝”-18UNF provisto se puede
instalar en la tubería de gas de la parrilla antes de conectar la
manguera de alimentación de gas desde la casa rodante.
Español
7. Coloque la bandeja de goteo en la parte inferior del
armazón de la parrilla. Asegúrese de que la bandeja
para la grasa esté bien colocada como se detalla a
continuación.
Verificación de fugas
ADVERTENCIA
Cuando revise o repare fugas o si huele a gas, apague
todas las llamas y no encienda ningún dispositivo que
pueda causar una chispa, como luces, herramientas
eléctricas, artefactos de cocina o esta parrilla. Si no puede
reparar la fuga, cierre el pase del gas y llame a un técnico
de servicio cualificado para que repare la fuga.
28
Page 30

ADVERTENCIA
Nunca use una llama para comprobar si hay fugas. Si
lo hace puede provocar lesiones graves, daños a la
propiedad o la muerte.
ADVERTENCIA
Si este producto se daña utilizando ½psig o más durante la
prueba, debe ser desconectado.
Después de la instalación de la parrilla o después de cualquier
mantenimiento o reparación, debe verificar todas las
conexiones de gas para asegurarse de que no haya fugas.
Rocíe o coloque con un cepillo una solución de 50% de agua
y 50% de jabón líquido en todas las conexiones de gas y en la
válvula. Asegúrese de que el pase gas esté abierto y espere
hasta cinco minutos. Si aparecen burbujas, hay una fuga.
Para reparar la fuga, apriete la conexión. Si la fuga persiste,
cierre el pase del gas y solicite a un técnico de servicio
cualificado que repare la fuga. El gas de petróleo licuado
(LP) tiene un agente odorante que se agrega para detectar
las fugas. Si percibe olor a gas, puede tener una fuga de
gas. Siga las instrucciones de detección de fugas indicadas
anteriormente.
Español
ranuras delanteras presionando firmemente la tapa hacia
abajo.
4. Siempre retire y limpie la bandeja de goteo después de
cada uso (consulte la página 10).
5. Desconecte la manguera de suministro de gas y
cierre el cajón una vez que la parrilla se haya enfriado
adecuadamente.
Cierre el cajón después de usarla
ADVERTENCIA
Deje que se enfríe la parrilla al tacto antes de moverla o
guardarla. De lo contrario, podría producirse un incendio
que provoque daños a la propiedad, lesiones personales o
la muerte.
1. Retire la rejilla de calentamiento después de que la parrilla
se haya enfriado por lo menos 30 minutos, colóquela al
lado de la parrilla.
2. Levante un poco los protectores de salpicaduras, gire
primero el protector derecho de salpicaduras (a) hacia
la tapa, luego gire el otro protector (b), use el soporte del
protector de salpicaduras para sujetarlos entre sí.
a
b
Requisitos de ventilación
PRECAUCIÓN
Su parrilla requiere una ventilación adecuada.
PRECAUCIÓN
La parrilla está diseñada para el uso de casas rodantes al
aire libre, y no está diseñada para uso en interiores y no se
puede instalar en un gabinete cerrado.
ADVERTENCIA
El electrodoméstico no debe instalarse con un sistema
de ventilación que sople aire hacia abajo de la parrilla,
dado que este tipo de sistema de ventilación puede
causar problemas de encendido y combustión con el
electrodoméstico de cocción a gas, que pueden provocar
lesiones personales o un funcionamiento no intencionado.
3. Coloque la rejilla de calentamiento como se muestra
abajo sobre la rejilla (debe estar plana encima de la rejilla),
cierre la tapa de acuerdo con la dirección de la flecha para
cerrarla. Asegúrese de que la tapa se trabe en las dos
29
Page 31

Funcionamiento
ADVERTENCIA
NUNCA DEJE LA PARRILLA DESATENDIDA MIENTRAS
COCINA.
El producto tendrá 1perilla giratoria para controlar la válvula
de gas y el encendido piezoeléctrico.
● Encendido piezoeléctrico, que crea una chispa al
presionar la perilla y girarla en sentido contrario a las
agujas del reloj.
● Control OFF – HI – LO (apagado - alta - baja)
− OFF (apagado): la parrilla está apagada cuando la perilla
está en esta posición.
− HI (alta): presione y gire la perilla hasta esta posición para
utilizar la parrilla con la llama más alta.
− LO (baja): gire la perilla hasta esta posición para utilizar la
parrilla con la llama más baja.
Posición OFF (apagado)
NOTA: asegúrese de cerrar la válvula de gas después de
apagar la parrilla.
Posición HI (alta) Posición LO (baja)
ADVERTENCIA
Inmediatamente después de encender la parrilla, todas las
superficies de la parrilla se calientan extremadamente. No
toque ninguna parte de la parrilla excepto la perilla para
ajustar la temperatura de cocción o para apagar la parrilla.
ADVERTENCIA
● No cierre el cajón durante los 30minutos posteriores
al apagado de la parrilla para permitir que la unidad se
enfríe.
● Retire y limpie la bandeja de goteo debajo de la parrilla
después de cada uso.
Instrucciones de encendido
ADVERTENCIA
Mantenga los brazos y la cara alejados de la
parte directamente encima del área de cocción.
Abra la tapa y asegure los protectores de
salpicaduras antes de encender el quemador.
No cierre la tapa durante la cocción.
Si la llama no se enciende en 5segundos,
cierre la perilla de control del quemador, espere
5minutos y repita el proceso de encendido.
1. Inspeccione la manguera de suministro de gas/regulador
de la parrilla antes de cada uso para detectar fugas, cortes,
abrasiones o desgaste excesivo. Reemplace cualquier
componente dañado antes de usarla. Llame a su distribuidor
para obtener piezas de repuesto para esta parrilla.
2. Asegúrese de que la bandeja de goteo de grasa esté
sujetada debajo de la parrilla (consulte la página 10 para
saber cómo colocar la bandeja de goteo de grasa).
3. Abra la tapa y asegure los paneles laterales en las ranuras
correspondientes.
4. Coloque la rejilla de calentamiento en su lugar (si se utiliza).
5. Presione la perilla de gas y gírela en sentido contrario a las
agujas del reloj hasta que oiga un chasquido.
NOTA: si el quemador no se enciende, repita girando la
perilla de gas a la posición OFF (apagado) y repita el paso 5.
6. Ajuste la posición de la perilla para lograr la intensidad
deseada.
Asegúrese de que la parrilla y la rejilla se hayan enfriado
antes de retirar la rejilla.
La llama del quemador
Las llamas deben verse similares al ejemplo de llama
correcta que se muestra en el diagrama a continuación.
Bien
Mal
Azul
Español
ADVERTENCIA
Nunca utilice piedras, carbón, carboncillo o cualquier otra
cosa sobre o debajo de la rejilla.
ADVERTENCIA
No cubra el área de la parrilla que exceda el 75% cuando
utilice papel de aluminio para parrilla, ollas o sartenes
o cualquier otro utensilio de cocina. De lo contrario, es
posible que se dañen los materiales del cajón.
Amarillo
Amarillo
Una llama correcta debería ser azul con una punta amarilla.
Algunas puntas amarillas en llamas de hasta 1” (25.4mm)
Azul
Orificios en quemador
30
Page 32

de longitud son aceptables siempre y cuando no aparezcan
depósitos de carbón u hollín.
Si las llamas son excesivamente amarillas e irregulares, es
posible que el residuo de aceite no se queme por completo, o
que el tubo de venturi esté obstruido o que no esté colocado
correctamente sobre los orificios.
Consejos útiles para cocinar a la parrilla
ADVERTENCIA
Peligro de intoxicación por alimentos
● No deje los alimentos más de una hora antes o después
de cocinarlos.
● Hacerlo podría causar intoxicación alimentaria.
Antes de cocinar en la parrilla
● Descongele la comida antes de cocinarla en la parrilla.
● Encienda el quemador a temperatura alta HI durante
10minutos para precalentar la parrilla, lo que puede
proporcionar suficiente calor para dorar y sellar los jugos de
los alimentos.
● Unte un poco de aceite en las rejillas o en los alimentos
Español
Mantenimiento
La parrilla requiere una limpieza ocasional. Aplique siempre un
limpiador de acero inoxidable para todas las partes externas de
su parrilla después de la limpieza, esto mantendrá el acabado
de la parrilla como nuevo por muchos años. Mantener la parrilla
limpia también evitará incendios y llamaradas. Siga siempre
las instrucciones y advertencias del fabricante cuando utilice
limpiadores y desengrasantes. La rejilla de cocción debe
limpiarse después de cada uso. Cuando sea necesario, debe
limpiarse con agua y jabón. Debajo de la parrilla hay una bandeja
de goteo de grasa que se debe limpiar después de cada uso.
● Mantenga el área de los electrodomésticos a gas para
cocinar al aire libre despejada de materiales combustibles,
gasolina y otros vapores y líquidos inflamables.
● No obstruya el flujo de aire de combustión y ventilación.
● Mantenga despejadas las aberturas de ventilación de la
carcasa del cilindro y libre de residuos.
● Realice una verificación visual de las llamas del
quemador, incluida la llama del quemador piloto, y
consulte la sección “La llama del quemador”.
● Limpie el electrodoméstico de gas para cocinar al aire
libre, incluidas las superficies especiales con limpiadores
o desengrasantes no abrasivos.
● Revise y limpie los tubos del quemador/venturi para
verificar que no haya insectos y nidos de insectos. Un tubo
obstruido puede provocar un incendio debajo de la parrilla.
Guía de limpieza general
PRECAUCIÓN
Antes de la limpieza, asegúrese de que la parrilla esté
apagada y se haya enfriado completamente antes de retirar
cualquier componente y/o limpiar.
cuando cocine alimentos bajos en grasa como carne, aves,
pescado, camarones o vegetales, lo cual evitará que los
alimentos se quemen o se peguen a la rejilla.
● Recorte el exceso de grasa de los alimentos antes de
cocinarlos para reducir la posibilidad de llamaradas.
Durante la cocción en la parrilla
● Voltee los alimentos sólo una vez. Si los voltea varias
veces puede causar que los alimentos se sequen.
● Voltee los alimentos cuando los jugos empiecen a
aparecer en la superficie.
● Agregue salsa de barbacoa únicamente durante los
últimos 10minutos de cocción para evitar quemar la salsa.
● El tiempo de cocción puede variar y puede tardar más en
comparación con la parrilla de su casa.
Tipos de limpiadores
Tenga en cuenta la posibilidad de rayar y la posibilidad de
corrosión posterior a la limpieza causada por limpiadores
que no se han eliminado completamente. Evite el uso de
limpiadores abrasivos a menos que sea absolutamente
necesario.
Limpieza general
Un paño suave y agua tibia limpia debe ser siempre la
primera opción para remover manchas suaves y suciedad.
Un enjuague final con agua limpia y un trapo seco completará
el proceso y eliminará la posibilidad de manchas de agua.
Cuidado del acero inoxidable y consejos de
limpieza
Para mantener el buen aspecto y la vida útil de tu parrilla,
siga estos consejos resumidos sobre el cuidado del acero
inoxidable: Cuando es nuevo o cuando se limpia y seca, se
recomienda al propietario aplicar una fina capa de aceite
de oliva a las superficies de acero inoxidable que luego se
deben pulir.
Método de limpieza:
● Utilice esponjas o paños suaves y limpios para limpiar su
parrilla.
● Nunca se deben utilizar cepillos de acero al carbón o lana
de acero.
● Después de la limpieza, enjuague bien con agua y seque
con un paño.
● Debe evitarse la limpieza con detergentes que contengan
cloruro.
● En los acabados pulidos, el frotado o la limpieza deben
31
Page 33

hacerse en dirección paralela a las líneas de pulido, NO en
sentido transversal.
● Se debe tener cuidado al limpiar la carcasa. La
información impresa puede borrarse con una limpieza
muy fuerte.
Consejos de limpieza para la rejilla y la bandeja
de goteo
Método de limpieza:
● La bandeja de goteo y la rejilla de cocción se pueden lavar
en el lavavajillas.
● Utilice únicamente limpiadores no abrasivos o
desengrasantes diseñados para su uso en acero
inoxidable.
● Se sugiere utilizar una esponja para fregar antirayas con
agua y jabón para limpiar la parrilla antes de cada uso.
Consejos de limpieza para el quemador
1. Levante para retirar la rejilla de la parrilla.
2. Retire el difusor de llama desatornillando los 4tornillos.
3. Afloje la corrosión del exterior del quemador con un
cepillo de alambre. Limpie los orificios obstruidos de las
conexiones de gas con un sujetapapeles abierto.
4. Reemplace el difusor de llama y fíjelo con los 4tornillos.
NOTA: Asegúrese de que el borde curvo esté orientado a la
izquierda mientras se reemplaza el difusor de llama.
Borde curvo
Español
32
Page 34

Furrion Innovation Center & Institute of Technology
● 52567 Independence Ct., Elkhart, IN 46514, USA ● Toll free: 1-800-789-3341
● Email: support@furrion.com
©2007-2020 Furrion Ltd. Furrion® and the Furrion logo are trademarks licensed for use by Furrion Ltd.
and registered in the U.S. and other countries.
©2007-2020 Furrion Ltd. Furrion® et le logo Furrion sont des marques déposées par Furrion Ltd.
et enregistrées aux Etats-Unis et ailleurs.
©2007-2020 Furrion Ltd. Furrion® y el logotipo de Furrion y son marcas comerciales con licencia de uso
de Furrion Ltd. y están registradas en los Estados Unidos y en otros países.
IM-FHA00063 V3.0
 Loading...